1
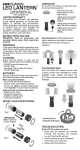
Charging Indicator Light
Solid green: 100% - 65% charge
Flashing green: 65% - 35% charge
Flashing red: 35% - 5% charge
Solid red: below 5% charge
Industrial Revolution, Inc.
Seattle, WA | (888) 297-6062
www.ucogear.com
OPERATION
LIMITED WARRANTY
This product has a limited 1 year warranty,
to the original purchaser, to be free from
defects in materials and workmanship.
Follow all product instructions and warnings
as warranty does not cover damage due
to misuse, improper care, accidents, or
alterations. See www.ucogear.com for further
details, limitations, and restrictions.
INSTRUCTIONS FOR USE
IMPORTANT: Read all instructions and
warnings before using. Adult supervision
required.
To turn the Arka on (and off ), press the
center dimming switch.
• Press switch again and
the Arka will turn on at
the brightest setting.
• Hold down the switch to
dim or brighten.
• The light will flash when
the lowest light output
setting is reached and
begin to brighten.
• The light will flash at the
brightest light output
and begin to dim.
Dimming Switch Controls lighting from
bright light to low light to conserve batteries.
WARNINGS
To be used under the direct supervision of
an adult. Misuse could result in injury to the
user or damage to the Arka. Damage due to
misuse is not covered under warranty.
Low
High
Lumens
Burn Time
6-8
180
Hours
Using Night, Strobe and S.O.S. modes
Starting in off mode, hold down dimming
switch for two seconds. Once red LEDs light
for night vision mode, click once for strobe,
and once more for emergency S.O.S. mode.
100
15
S.O.S.
S.O.S.
Hours
CHARGING THE ARKA
Plug the USB Mini end of the charging cord
into the base of the Arka. Plug the USB end
into the wall socket adaptor, then plug
adaptor into a standard wall socket (100 240V).
Using Flashlight Mode
The Arka can be used as both a lantern
and a flashlight. To enable flashlight mode,
collapse the globe. The Arka can now be
used as a hand-held flashlight.
To hang the Arka, use
either one hook or
both together to form a
closed loop.
CHARGING USB DEVICES
For USB devices such as phones, cameras,
GPS units, etc. that charge with a USB Mini
cord you may use the charging cord provided
by inserting the USB end into the base of the
Arka and the USB Mini end into the device.
For all other devices, use the approved USB
cord for your device and have the USB end
inserted into the base of the Arka and the
other end into the device.
USB
Mini USB
GPS
MP3
Extend feet for added stability.
CLEANING
Ensure that the lantern is clean and dry
before and after each use and before
storage.
• DO NOT store the lantern wet.
• DO NOT heat.
• Use damp cloth to clean the lantern.
DO NOT submerge.
TROUBLESHOOTING
If the Arka does not work properly:
• Ensure USB charging cord is plugged into
corresponding port and connected.
• Follow directions carefully to activate
different lighting modes.
Témoin de charge
Vert : Charge de 100 % à 65 %
Vert clignotant : Charge de 65 % à 35 %
Rouge clignotant : Charge de 35 % à 5 %
Rouge : Charge inférieure à 5 %
Industrial Revolution, Inc.
Seattle, WA | (888) 297-6062
www.ucogear.com
FONCTIONNEMENT
GARANTIE LIMITÉE
Ce produit est doté d‘une garantie limitée
d’une année auprès de l’acheteur original
contre les vices de matériaux et de
fabrication. Veuillez suivre les instructions
ou les mises en garde, car la garantie ne
couvre pas les dommages causés par une
utilisation erronée, un entretien inadéquat,
les accidents ou les modifications. Pour en
savoir plus et connaître les limitations et les
restrictions, voir www.ucogear.com.
MODE D’EMPLOI
IMPORTANT : Lisez toutes les instructions
et les mises en garde avant l’utilisation. La
surveillance d’un adulte est nécessaire.
Pour allumer (et fermer) l’Arka, appuyez sur
le variateur d’intensité au centre.
• Press switch again and
the Arka will turn on at
the brightest setting.
• Pour augmenter ou
réduire l’intensité,
maintenez le variateur
enfoncé.
• Lorsqu’elle atteint
l’intensité la plus faible, la
lumière clignote et commence à s’intensifier.
• Lorsqu’elle atteint
l’intensité la plus forte,
la lumière clignote et
commence à faiblir.
Variateur d’intensité Règle le niveau
d’éclairage, d’intense à faible, pour préserver
les piles.
MISES EN GARDE
À utiliser sous la surveillance directe d’un
adulte. Un usage impropre peut blesser
l’utilisateur ou endommager l’Arka. Les
dommages causés par un tel usage ne sont
pas couverts par la garantie.
Lumens
Durée de
combustion
Fort
6-8
180
heures
Modes nocturne, stroboscopique et S.O.S.
À partir du mode arrêt, enfoncer la touche
du gradateur d’intensité pendant deux
secondes. Lorsque les DEL rouges s’allument
en mode de vision nocturne, cliquez une fois
pour obtenir le mode stroboscopique et une
autre fois pour le mode d’urgence S.O.S.
Faible
100
15
S.O.S.
S.O.S.
heures
CHARGER L’ARKA
Branchez l’extrémité mini USB du câble de
chargement à la base de l’Arka. Branchez
l’extrémité USB dans le support d’adaptateur
mural et branchez l’adaptateur dans une prise
de courant murale standard (100-240 v).
CHARGER DES APPAREILS USB
Avec les appareils USB qui se chargent à
l’aide d’un câble doté d’un port mini USB
(téléphones, appareils photo, GPS, etc.),
utilisez le câble de chargement fourni en
insérant l’extrémité USB dans la base de
l’Arka et l’extrémité mini USB dans l’appareil.
Avec les autres appareils, utilisez le câble
USB approuvé. Insérez l’extrémité USB dans
la base de l’Arka et l’autre extrémité dans
l’appareil.
Mode lampe de poche
L’Arka sert à la fois de lanterne et de lampe
de poche. Pour activer le mode lampe de
poche, faites coulisser le globe vers le bas.
Vous pouvez désormais utiliser l’Arka comme
lampe de poche.
Pour accrocher l’Arka,
utilisez l’un des crochets
ou les deux pour former
une boucle.
Extend feet for added stability.
NETTOYAGE
USB
Mini USB
GPS
MP3
Avant et après chaque utilisation, ainsi
qu’avant de la ranger, assurez-vous que la
lanterne est propre et sèche.
• NE RANGEZ PAS la lanterne si elle est
mouillée.
• NE CHAUFFEZ PAS la lanterne.
• Pour nettoyer la lanterne, utilisez un
chiffon humide. NE LA SUBMERGEZ PAS.
DÉPANNAGE
En cas de mauvais fonctionnement :
• Vérifiez si le câble de chargement USB est
branché dans le port correspondant et
bien inséré.
• Pour activer les différents modes d’éclairage,
suivez les instructions attentivement.