1
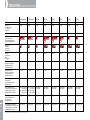
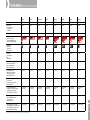
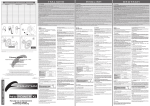
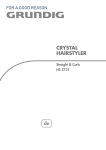
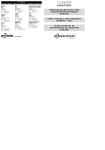
DT Swiss AG
Solothurnstrasse 1
CH - 2504 Biel/Bienne
Phone +41 (0)32 344 79 30
Fax +41 (0)32 341 91 52
E-mail: [email protected]
DT Swiss, Inc.
2493 Industrial Blvd.
USA - Grand Junction, CO 81505
Phone +1 (970) 242 92 32
Fax +1 (970) 244 89 18
E-mail: [email protected]
DT Swiss (Asia) Ltd.
No. 26, 21st Road Industrial Park
Taichung City
Taiwan R.O.C
Phone +886 (423) 585256
Fax +886 (423) 598290
E-mail: [email protected]
DT Swiss (France) S.A.S.
Parc d‘Activites de la SARREE
Route de Gourdon
F - 06620 Le Bar sur Loup
Phone +33 (4) 926 09 058
Fax +33 (4) 934 00 875
E-Mail: [email protected]
GUARANTEE CONDITIONS / LIMITS TO LIABILITY (EUROPE & USA) IN ENGLISH
EUROPA: The purchaser has the right to claims under the guarantee as covered by general law, against the sales contract partner (retailer). In addition to
the general guarantee required by law, DT Swiss AG with Head Office in Biel/Switzerland, guarantees the DT Swiss wheel for two years (24 months) from
the date of purchase.
CAUTION! There shall be no claim under the guarantee for:
- normal wear of parts, subject to wear (bearings, seals, sliding surfaces, brake surfaces, stickers etc.)
- incorrect assembly or in combination with products that do not fit
- incorrect maintenance, incorrect repair or alteration
- correct use, bad treatment, misuse, negligence, carelessness during installation, maintenance or use, commercial use or use in cycling competitions
- delivery and transport damage
DT Swiss LTD shall reject any liability for both indirect damage caused by accidents and consequential damage. In case of warranty repair/replacement please
contact the dealer where you bought the product. Wheels which have to be checked, can be sent postage paid to a DT Swiss Service Centre. Legal venue
and place of performance is Biel (Switzerland). Swiss law shall apply. Subject to technical changes. Please keep the user manual and warranty for future use.
Have a lot of fun with your DT Swiss wheels!
USA: DT Swiss LTD makes every effort to assure that its product meets high quality and durability standards and warrants to the original retail consumer/
purchaser of our product that each product is free from defects in materials and workmanship as follows: 2 YEAR LIMITED WARRANTY ON THIS DT Swiss w/h/
e/e/l/ PRODUCT. This warranty does not apply to defects due directly or indirectly to misuse, abuse, negligence or accidents, repairs or alterations outside our
facilities or to a lack of maintenance. DT SWISS LTD LIMITS ALL IMPLIED WARRANTIES TO THE PERIOD OF TWO YEARS FROM THE DATE OF INITIAL PURCHASE
AT RETAIL. EXCEPT AS STATED HEREIN, ANY IMPLIED WARRANTIES OF MERCHANTABILITY AND FITNESS ARE EXCLUDED. SOME STATES MAY NOT ALLOW
LIMITATIONS ON HOW LONG THE IMPLIED WARRANTY LASTS, SO THE ABOVE LIMITATION MAY NOT APPLY TO YOU. DT SWISS LTD SHALL IN NO EVENT BE
LIABLE FOR DEATH, INJURIES TO PERSONS OR PROPERTY OR FOR INCIDENTAL, CONTINGENT, SPECIAL OR CONSEQUENTIAL DAMAGES ARISING FROM THE
USE OF OUR PRODUCTS. SOME STATES MAY NOT ALLOW THE EXCLUSION OR LIMITATION OF INCIDENTAL OR CONSEQUENTIAL DAMAGES, SO THE ABOVE
LIMITATION OR EXCLUSION MAY NOT APPLY TO YOU. CAUTION! To take advantage of this warranty, the product or part must be returned for examination,
postage prepaid, to the dealer where you bought the product or to a DT Swiss Service Centre. Proof of purchase date and an explanation of the complaint
must accompany the product. If our inspection discloses a defect, DT Swiss will either repair or replace the product or refund the purchase price, if we cannot
readily and quickly provide a repair or replacement. DT Swiss will return repaired product or replacement at DT Swiss expense, but if it is determined there is
no defect, or that the defect resulted from causes not within the scope of this warranty, then the user must bear the cost of shipping. This warranty gives you
specific legal rights, and you may also have other rights which vary from state to state. Legal venue and place of performance is Biel (Switzerland). Swiss law
shall apply. Subject to technical changes. Please keep the user manual and warranty for future use. Have a lot of fun with your DT Swiss wheels!
GARANTIEBESTIMMUNGEN / HAFTUNGSBEGRENZUNGEN (EUROPA) IN DEUTSCH
XR / X
Ihnen stehen die gesetzlichen Gewährleistungsansprüche wegen eines Produktmangels gegenüber Ihrem Vertragspartner (Händler) zu. Über diese Gewährleistungsansprüche hinaus gewährt DT Swiss AG mit Sitz in Biel/Schweiz für das DT Swiss Laufrad ab Kaufdatum 2 Jahre (24 Monate) Garantie.
ACHTUNG! Kein Anspruch auf Garantieleistung besteht bei:
- normaler Abnutzung oder starker Alterung von Verschleissteilen (Lager, Dichtungen, Laufflächen, Bremsflächen, Aufkleber usw.)
- unsachgemässer Montage oder in Verbindung mit nicht passenden Produkten
- unsachgemässe Instandhaltung, unsachgemässer Reparatur oder Veränderungen
- unsachgemässem Gebrauch, unsorgfältiger Behandlung, Missbrauch, Nachlässigkeit, leichter und grober Fahrlässigkeit bei Montage, Wartung und
Benutzung, kommerzieller Gebrauch oder Einsatz in Wettkämpfen
- Lieferungs- und Transportschäden
DT Swiss wheels for cross country
DT Swiss AG haftet aus dieser Garantie nicht auf Schadensersatz, insbesondere nicht für indirekte Schäden, mittelbare Schäden und Folgeschäden. Zwingende gesetzliche Haftungsregelungen bleiben von dieser Garantie unberührt. Sollten Arbeiten unter dieser Garantie nötig werden, wenden Sie sich an das
Geschäft, in dem das DT Swiss Laufrad erworben wurde. DT Swiss Laufräder, die zur Überprüfung eingeschickt werden, sind an ein DT Swiss Servicecenter
zu schicken. Gerichtsstand und Erfüllungsort ist Biel (Schweiz). Es gilt schweizerisches Recht. Technische Änderungen vorbehalten. Bitte bewahren Sie diese
Bedienungsanleitung und Garantiebestimmungen für künftige Verwendungen auf. Wir wünschen Ihnen viel Spass mit Ihrem DT Swiss Laufrad!
USER‘S MANUAL AND WARRANTY
(EUROPE / USA)
CONDITIONS DE GARANTIE / RESTRICTIONS DE RESPONSABILITÉ (EUROPE) EN FRANCAIS
Pouvez faire valoir vos droits à garantie légale pour vice de produit vis-à-vis de votre concessionnaire (commerçant). Au-delà de ces droits à garantie, la société
DT Swiss AG dont le siège est à Bienne/Suisse, accorde une garantie de 2 ans (24 mois) à partir de la date d‘achat sur la roue DT Swiss.
ATTENTION! Aucune garantie ne sera reconnue dans les cas suivants:
- Usure ordinaire des pièces. Les paliers, joints, surfaces de frottement, surfaces de frein ainsi que les autocollants de la roue sont exclus de la
garantie par une usure de fonctionnement ou par un fort vieillissement
- Montage non conforme ou assemblage avec des produits inadéquats
- Entretien, réparation ou modification non conforme
- Emploi non conforme, mauvais traitement, abus, négligence, imprudence, usage à but commercial ou emploi lors de compétition
- Dommage de livraison et de transport
BEDIENUNGSANLEITUNG UND GARANTIEBESTIMMUNGEN
(EUROPA)
DT Swiss SA décline toute responsabilité en cas de dommages indirects ou résultant d‘un accident. En tout cas la responsabilité de la réglementation légale
de cette garantie rest inchangée. Si des travaux devaient être nécessaires sous cette garantie, nous vous prions de bien vouloir contacter le marchand chez
lequel vous avez acheté la roue. Les produits qui doivent être envoyés pour être révisés peuvent être livrés franc de port au centre de service DT Swiss. Tribunal
compétent et for juridique: Bienne (Suisse). Le droit suisse est applicable. Sous réserve des changements techniques. Veuillez conserver le mode d‘emploi et
les dispositions de garantie pour des utilisations futures. Nous vous souhaitons beaucoup de plaisir avec votre roue DT Swiss!
MODE D‘EMPLOI ET DISPOSITIONS DE GARANTIE
(EUROPE)
www.dtswiss.com
MODE D‘EMPLOI EN FRANCAIS
Nous vous félicitons pour l‘achat de votre nouvelle roue DT Swiss XR/X! Vous avez décidé d‘acheter un produit de qualité Suisse leader dans la technologie des roues.
IMPORTANT:
IMPORTANT 1:
IMPORTANT 2:
IMPORTANT 3:
STOP:
STOP 1:
STOP 2:
STOP 3:
Avant utilisation, lire attentivement et personnellement tous les instructions de la roue. Le mode d‘emploi doit également être remis à chaque tierce personne avant l‘utilisation.
L‘observation des dispositions suivante concernant le montage, la maintenance & l‘entretien de la roue sont supposés garantir un fonctionnement irréprochable ainsi que d‘éviter tout accident. La non-observation de ces dispositions
peut conduire à des accidents pouvant provoquer des blessures graves. De plus, cela aura pour effet d‘annuler la garantie du fabricant.
Les roues DT Swiss XR/X conviennent exclusivement aux VTT utilisés en cross country. L‘utilisation de cette roue ou de ses parties dans d‘autres domaines d‘application (par exemple le downhill, le tandem etc. ) ou en tant
qu‘outil ou jouet et toute manipulation divergente au présent mode d‘emploi ne sont pas autorisés. Le cas échéant néanmoins, l‘utilisateur en assume la pleine responsabilité.
Vérifiez que la roue est compatible avec votre bicyclette (empattement, cadre et fourche) et toutes ses parties, notamment le type de frein, de cassette de pignons, les pneus, le type de chambre à air, de soupape et de fond de
jantes. Pour les roues dont les surfaces de freinage sur la jante ont un revêtement céramique, il faut utiliser des sabots de freins spéciaux.
Le montage non conforme ainsi qu‘un mauvais entretien de la roue est dangereux et peut causer des accidents pouvant provoquer des blessures graves. Nous vous recommandons vivement de faire monter votre roue par un spécialiste
qualifé.
En cas de problème ou de manque de qualifications adressez-vous au centre de service DT Swiss et faîtes faire exécuter le montage et l‘entretien par un spécialiste qualifié.
MONTAGE
L‘observation des dispositions énumérées concernant le montage de la roue sont supposer garantir un fonctionnement irréprochable ainsi que d‘éviter tout accident. La non-observation de ces dispositions peut conduire à des accidents pouvant
provoquer des blessures graves. De plus, cela aura pour effet d‘annuler la garantie du fabricant.
Utilisez exclusivement des fond de jantes, des chambres à air et des pneus dont les dimensions sont conformes aux normes ETRTO pour la roue.
N‘utilisez pas de démonte-pneus en métal. Ceux-ci pourraient endommager la surface de jante, le pneu ou la chambre à air.
Utilisez exclusivement les valves Presta.
Pression d‘air: Conformez-vous aux indications des fabricants de pneus.
Montez la cassette conformément aux instructions du fabricant.
Freins:
a)
Vérifiez la compatibilité du frein avec les montages sur le cadre, sur la fourche et sur la roue. Montez le frein et ses composants conformément aux instructions du fabricant.
b)
Réglage du frein sur jante (voir au verso la fig. 1)
c)
Montage du disque Centerlock (voir au verso la fig. 2)
d)
Montage de l‘adaptateur Centerlock DT Swiss pour la norme internationale à 6 trous (voir au verso la fig. 3). Couple Couple de démarrage 40 Nm.
Serrage rapide:
IMPORTANT:
A.
B.
C.
D.
E.
F.
G.
IMPORTANT:
Si vous n‘êtes pas habitué au maniement de serrages rapides, adressez-vous à un professionnel expérimenté.
STOP:
N‘utilisez en aucun cas le serrage rapide comme un écrou à ailettes (voir au verso la fig. 4).
a)
b)
c)
d)
e)
f)
H.
Graissez l‘axe du serrage rapide à l‘aide d‘une graisse à usage multiple appropriée. Ensuite, insérez le serrage rapide dans le moyeu (voir au verso la fig. 5).
Placez le levier du serrage rapide dans la position „open“ (ouvert).
Veillez à ce que la roue soit correctement positionnée dans le cadre resp. dans la fourche (voir au verso la fig. 6).
Amenez le levier du serrage rapide dans la position „closed“ (fermé) (voir au verso la fig. 7).
- Si le levier se laisse rabattre trop facilement, le serrage est insuffisant. Si c‘est le cas, rouvrez le serrage rapide et resserrez un peu plus le contre-écrou du serrage rapide.
- Refermez le serrage rapide (position „closed“).
- Répétez les étapes ci-dessus jusqu‘à ce que la force de serrage est telle que la fermeture du serrage rapide sans aucun outil est tout juste possible.
Il faut que le levier du serrage rapide puisse être complètement rabattu. Il faut en outre veiller à ce qu‘il ne touche pas le cadre, la fourche ou aucun élément de ces parties.
Vérifiez l‘ajustement fixe de la roue.
Le système RWS „ Ratchet Wheel Mounting System“ par DT Swiss: Pour serrer le mecanisme, tourner le levier dans le sens des aiguilles d‘une montre en même temps que vous maintenez le contre écrou d‘ajustement (situe à l‘oppose de l‘axe). La force manuelle minimum requise est de 15 NM. Selon le type de
fourche ou de cadre, il peut-être necessaire d‘ajuster le levier en plusieurs fois (fig.7). Pour ouvrir le système, tourner dans le sens oppose des aiguilles d‘une montre, en tenant en meme temps le contre écrou d‘ajustement. Verifier toujours votre RWS avant d‘utiliser votre vélo, afin d‘être sur que les roues soient bien
fixées au cadre et à la fourche. Ceci est très important après avoir laisse votre vélo dans un endroit public. Pour un contrôle rapide, levez votre roue avant et en tapant dessus verticalement celle ci ne doit pas tomber. Toutefois ce contrôle ne garantit pas que le couple de serrage minimum de 15 NM soit respecte. En
cas de doute, veuillez vous adresser directement à votre revendeur DT Swiss.
IMPORTANT:
I
Avant l‘utilisation, lire attentivement ces instructions d‘entretien du RWS. Pour toutes questions, s‘adresser au revendeur. Une installation incorrecte peut entrainer de graves blessures corporelles.
Kit tubeless DT Swiss: A noter que le kit tubeless DT Swiss (voir au verso la fig. 9) vous permet de transformer vos roues DT Swiss XR/X en systèmes de roues tubeless! Pour d‘autres détails sur les produits DT Swiss, consultez directement www.dtswiss.com.
MAINTENANCE & ENTRETIEN
IMPORTANT:
IMPORTANT 1:
IMPORTANT 2:
STOP:
STOP 1:
STOP 2:
STOP 3:
A.
B.
C.
D.
L‘observation des dispositions énumérées concernant la maintenance & l‘entretien de la roue sont supposer garantir un fonctionnement irréprochable ainsi que d‘éviter tout accident. La non-observation de ces dispositions peut conduire
à des accidents pouvant provoquer des blessures graves. De plus, cela aura pour effet d‘annuler la garantie du fabricant.
Pour tous les travaux de centrage, adressez-vous impérativement à un spécialiste qualifié. Contrôlez régulièrement la tension des rayons et le centrage de la roue. Les tensions de rayons trop élevées ou trop basses causent des
charges excessives sur les composants de la roue et peuvent entraîner leur défaillance prématurée par fatigue des matériaux. La répartition de tension des rayons sur chaque face de la roue doit être aussi homogène que possible.
En cas d‘incertitude ou de difficultés, adressez-vous à un centre de service DT Swiss et faites effectuer la maintenance par un professionnel expérimenté.
Vérifiez régulièrement la roue à d‘éventuels dégâts. Ne roulez en aucun cas si vous constatez des fissures dans la jante, des rayons cassés ou du jeu dans un roulement. Dans ce cas, contactez un centre de service DT Swiss ou un
spécialiste qualifié pour faire réparer le dégât.
Après une chute ou un accident, faites impérativement contrôler votre roue par un spécialiste qualifié pour déceler tout dégât éventuel.
Nettoyage: Les roues doivent être nettoyées régulièrement à l‘aide d‘une éponge douce et d‘un produit nettoyant adapté. Ne jamais utiliser des détergents et du Tenside pour le nettoyage.
Serrage rapide: Avant tout utilisation, assurez-vous que le serrage rapide soit correctement monté et bien serré. En cas de doute, adressez-vous sans hésiter à un centre de service DT Swiss ou à un spécialiste qualifié.
Moyeu: L‘entretien des moyeux avant et arrière doit être effectué au moins une fois par an. Si la bicyclette est utilisée régulièrement dans des conditions extrêmes (forte pluie, boue, transport sous la pluie), le mécanisme de roue libre doit être entretenu plus souvent.
Une maintenance régulière du moyeu assure une durée de vie plus longue et des performances optimales pendant de nombreuses années. Le nettoyage excessif avec de l‘eau sous haute pression (p.ex. hypromate) peut provoquer l‘infiltration d‘eau dans le moyeu. Ne
jamais utiliser des détergents et du Tenside pour le nettoyage. Ceci peut endommager le moyeu. Pour tout autre renseignement, adressez-vous à un centre de service DT Swiss ou consultez directement www.dtswiss.com.
Jante :
a)
Eliminez avant chaque utilisation tout encrassement éventuel sur les surfaces de freinage de la jante, en particulier toute trace d‘huile ou de graisse.
b)
Examinez avant chaque utilisation l‘usure des gommes de freins. Retirez régulièrement les corps étrangers (cailloux, copeaux métalliques etc. ) provenant de la route. Ne roulez jamais avec des patins de freins usés!
c)
Si les surfaces de freinage de votre roue portent un revêtement céramique, il faut impérativement utiliser des gommes de freins spéciaux, adaptés à ces jantes.
d)
Si votre bicyclette est équipée de freins sur jantes, vérifiez l‘usure des surfaces de freinage avant chaque utilisation. Avec le système DT Swiss wear control vous pouvez facilement contrôler: Si les petits renfoncements ponctuels dans les surfaces de freinage sont
encore tous visibles, l‘épaisseur du flanc de la jante est encore suffisante. Si un ou plusieurs renfoncements ne sont plus visibles, la jante doit être remplacée de suite. Ne roulez jamais avec des surfaces de freinage usées (fig. 10)
Pat. pend.
1
2
3
4
5
6
7
8
9
10
USER‘S MANUAL IN ENGLISH
Thank you for choosing DT Swiss XR/X wheels. You have bought a wheelset of best Swiss quality and innovative technology.
IMPORTANT:
STOP:
IMPORTANT 1: Please read the complete user‘s manual attentively before installing or using the wheels! The manual has to be given to every rider using the unit.
IMPORTANT 2: Compliance with the following instructions concerning assembly and maintenance & care of the wheels is imperative for proper and accident-free operation. Disregarding these instructions can cause accidents with serious injuries,
and consequently void the product-warranty of the manufacturer.
IMPORTANT 3: DT Swiss XR/X wheels are recommended only for use on mountain bikes for cross-country riding. The wheels or its components cannot be used for other applications (for example downhill or tandem bicycles), or as
a tool or toy, or for anything else than described in the user‘s manual. Otherwise it is at the user‘s own risk.
STOP 1:
STOP 2:
STOP 3:
Ensure that the wheel is compatible with your bicycle (built-in dimensions of the frame and fork) and all other parts such as type of brake, cassette, tire, inner tube, valve and rim tape. For ceramic-coated rims use only special ceramic
brake pads.
If the wheel is not assembled correctly or is improperly maintained it is dangerous and may cause accidents with serious injuries. We strongly recommend having the wheels assembled and maintained by an experienced specialist.
If you encounter uncertainties or difficulties, please contact a national DT Swiss service center for assembly and maintainance of the wheels by an experienced specialist.
ASSEMBLY
IMPORTANT:
A.
B.
C.
D.
E.
F.
G.
Compliance with the following instructions concerning assembly of the wheels is imperative for proper and accident-free operation. Disregarding these instructions can cause accidents with serious injuries, and consequently void the product-warranty of
the manufacturer.
Use rim tapes, inner tubes and tires only if they are stated to the ETRTO dimension.
Do not use metal tire levers when mounting or removing the tires. Metal tools can damage the rim surface, the inner tube and also the tire.
The exclusive use of PRESTA valves is recommended.
Air pressure: Please follow the tire manufacturer‘s instruction.
Mount the cassette corresponding to the manufacturer‘s recommendations.
Brakes:
a)
Check the compatibility of the brakes, especially the brake interface of the frame, fork and wheel. Mount the brakes and their components corresponding to the manufacturer‘s recommendations.
b)
Adjust disc brake (fig. 1)
c)
Assembly of center lock disc (fig. 2)
d)
Assembly of DT Swiss centerlock adaptor for the international standard / 6 hole (fig. 3) with a torque of 40 Nm.
Quick release:
IMPORTANT:
If you are not familiar with the handling of a quick release, you should absolutely contact an experienced specialist.
STOP:
Never use quick release like a wink nut (fig. 4).
a)
b)
c)
d)
H.
Grease the axle of the quick release with suitable general-purpose grease and install the quick release into the hub (fig. 5).
Place the lever of the quick release in the „open“ position.
Make sure that the positioning of the wheel into the frame, in respect to the fork is correct (fig. 6).
Place the lever of the quick release in the „closed“ position (fig. 7).
- If the lever can be moved easily, the quick release is not tight enough. In this case, open the quick release again and tighten the locking nut of the quick release more firmly.
- Place the quick release lever again into the „closed“ position.
- Repeat above steps until the closing force is high enough that the lever is tight without using a tool
e)
The lever of the quick release must be closed completely. Ensure that the lever does not knock against the frame, respectively fork or parts of it.
f)
Check the firm tightness and the correct position of the wheel.
DT Swiss RWS (ratchet wheel mounting system): To tighten up the system turn the lever clockwise while holding the adjusting nut (located on the opposite side of the hub). The required minimium handforce is 15 Nm. Depending on the frame or fork construction it may be necessary to throw the lever several times
(fig. 8). To open the system turn the lever counterclockwise while holding the adjusting nut. Always check your RWS system before riding to make sure that the wheels are correctly installed on the bicycle frame or fork. This is especially important after you park your bicycle in a public place. Make sure that the
tightening force of the RWS lever is minimum 15 Nm. For a quick check lift up the bicycle so that the front or back wheel is off the ground, and give the top of the tire a few sharp downward hits. The wheel should not be loose or falling off. This check does not guarantee that the RWS lever has received adequate
tightening torque (minimum 15 Nm handforce). If you are uncertain if the RWS is mounted correctly please ask your dealer.
IMPORTANT:
I.
Before use, carefully read the RWS manual. If you have any questions, ask your dealer. Improper installation of the RWS system can result in serious body injury.
DT Swiss tubeless kit: By the way, with the DT Swiss tubelesskit (fig. 9) you can convert your DT Swiss wheel set into a tubeless system! More information about all DT Swiss products under www.dtswiss.com.
MAINTENANCE & CARE
IMPORTANT:
IMPORTANT 1: Compliance with the following instructions concerning maintenance & care of the wheels is imperative for proper and accident-free operation. Disregarding these instructions can cause accidents with serious injuries, and
consequently void the product-warranty of the manufacturer.
IMPORTANT 2: Contact an experienced specialist for all truing matters. Frequently check the spoke tension and the even rotation of the wheels. Too high or too low spoke tension can cause high operating loads of the wheel components and could
lead to an earlier failure by material fatigue. The spoke tension should as be as even as possible.
STOP:
STOP 1:
STOP 2:
STOP 3:
A.
B.
C.
D.
If you encounter uncertainties or difficulties, please contact a national DT Swiss service center for proper maintenance.
Check the wheels frequently for possible damage. Do not ride in case of damages such as cracks in the rim, broken spokes or bearing play. Contact a national DT Swiss service center or an experienced specialist to solve problems of the
kind preciously mentioned.
You must check your wheels after an accident for possible damages at a national DT Swiss service center or by an experienced specialist.
Cleaning: Wheels must be cleaned frequently with a dry rag and a suitable cleaner. Do not use solvents or other harmful chemicals.
Quick release: Check before each ride to make sure the quick release is correctly closed. If you encounter uncertainties you must contact a national DT Swiss service center or an experienced specialist.
Hub: The required maintenance of the front and rear hubs must be adhered to at least once annually. With regular use under extreme conditions (strong rain, mud, transport in rain, etc) the free wheel should be maintained more often. Frequent maintenance of the
hubs guarantees a longer life span and optimal performance over time. Using excessive water pressure (i.e. high pressure cleaner) can allow water to get inside the hub. Do not use solvents or other harmful chemicals, as these can cause damages. For more information
about proper maintenance please contact the national DT Swiss service center or check under www.dtswiss.com.
Rim:
a)
Clean the braking surface of the rims before each ride.
b)
Before each ride check the wear of the brake pads. Always remove dirt or metal pieces. Never ride with worn out brake pads!
c)
If you use ceramic-coated rims you must use special brake pads.
d)
Check the rim brakes before every ride as well as the wear of the rims. It is easy to determine the wear on your DT Swiss rims by observing the built-in wear indicators. If the marks on the braking surface are still visible, the thickness of the rim sidewalls is still
sufficient. If they are no longer visible the rim must be replaced immediately. Never ride with worn brake surfaces (fig. 10)!
BEDIENUNGSANLEITUNG IN DEUTSCH
Wir gratulieren Ihnen zum Kauf Ihres neuen DT Swiss XR/X Laufrads! Sie haben sich für ein Schweizer Qualitätsprodukt führender Laufradtechnologie entschieden.
WICHTIG:
WICHTIG 1:
WICHTIG 2:
WICHTIG 3:
STOPP:
STOPP 1:
STOPP 2:
STOPP 3:
Lesen Sie die gesamte Bedienungsanleitung vor der Inbetriebnahme des Laufrads aufmerksam durch! Die Bedienungsanleitung muss auch an Drittpersonen vor der Fahrt ausgehändigt werden.
Die Einhaltung der nachstehenden Bestimmungen betreffend Montage und Wartung & Pflege des Laufrads ist Voraussetzung für ein einwandfreies Funktionieren und einen unfallfreien Einsatz. Die Nichtbeachtung der Bestimmungen
kann zu Unfällen mit unter Umständen schwerwiegenden Verletzungen führen. Ausserdem fällt in diesem Fall die Produktgarantie der Herstellerfirma dahin.
DT Swiss XR/X Laufräder sind ausschliesslich als Laufräder für Mountainbikes im Cross Country Bereich zu gebrauchen. Die Verwendung des Laufrads oder dessen Teile für andere Anwendungsbereiche (z.B. Downhill, Tandem
usw.) oder als Werkzeug oder Spielzeug sowie eine von der Bedienungsanleitung abweichende Handhabung ist nicht zulässig. Andernfalls übernimmt der Anwender die Verantwortung.
Stellen Sie sicher, dass das Laufrad mit Ihrem Fahrrad (Einbaumasse, Rahmen und Gabel) und allen Teilen, wie Bremsentyp, Kassettentyp, Reifen, Schlauch, Ventiltyp sowie Felgenband kompatibel ist. Bei Laufrädern mit
Keramikbeschichteten Felgenbremsflächen müssen spezielle Bremsklötze verwendet werden.
Ein unsachgemäss eingebautes oder schlecht gewartetes Laufrad ist gefährlich und kann Unfälle mit unter Umständen schwerwiegenden Verletzungen verursachen. Wir empfehlen Ihnen dringend, Ihr Laufrad durch einen erfahrenen
Fachmann montieren und warten zu lassen.
Bei Unklarheiten oder Schwierigkeiten wenden Sie sich an ein DT Swiss Servicecenter und lassen Sie die Montage und Wartung von einem erfahrenen Fachmann durchführen.
MONTAGE
Die Einhaltung der hier aufgeführten Bestimmungen betreffend Montage des Laufrads ist Voraussetzung für ein einwandfreies Funktionieren und einen unfallfreien Einsatz. Die Nichtbeachtung der Bestimmungen kann zu Unfällen mit unter Umständen
schwerwiegenden Verletzungen führen. Ausserdem fällt in diesem Fall die Produktgarantie der Herstellerfirma dahin.
Verwenden Sie ausschliesslich Felgenbänder, Schläuche und Reifen, welche die dem Laufrad entsprechende ETRTO Dimension aufweisen.
Verwenden Sie keine Reifenheber aus Metall. Diese können die Oberfläche der Felge, den Reifen oder den Schlauch beschädigen.
Verwenden Sie ausschliesslich Presta Ventile.
Luftdruck: Befolgen Sie die Angaben des Reifenherstellers.
Montieren Sie die Kassette gemäss Herstellerangaben.
Bremsen:
a)
Überprüfen Sie die Kompatibilität der Bremse mit den Aufnahmen am Rahmen/an der Gabel und am Laufrad. Montieren Sie Bremse und deren Komponenten gemäss Herstellerangaben.
b)
Einstellung Felgenbremse (Abb. 1)
c)
Montage Centerlock Scheibe (Abb. 2)
d)
Montage DT Swiss Centerlock Adapter für internationalen Standard/6 Loch (Abb. 3). Anzugsmoment 40 Nm.
Schnellspanner:
WICHTIG:
A.
B.
C.
D.
E.
F.
G.
WICHTIG:
Wenn Ihnen der Umgang mit Schnellspannern nicht vertraut ist, sollten Sie sich unbedingt an einen erfahrenen Fachmann wenden.
STOPP:
Verwenden Sie den Schnellspanner auf keinen Fall wie eine Flügelmutter (Abb. 4).
a)
b)
c)
d)
e)
f)
Fetten Sie die Achse des Schnellspanners mit einem geeigneten Mehrzweckfett. Montieren Sie den Schnellspanner anschliessend in die Nabe (Abb. 5).
Bringen Sie den Hebel des Schnellspanners in die Position „open“
Stellen Sie sicher, dass das Laufrad richtig im Rahmen resp. in der Gabel positioniert ist (Abb. 6).
Legen Sie den Hebel des Schnellspanners in die Position „closed“ um (Abb. 7).
- Lässt sich der Hebel zu leicht umlegen, ist die Schliesskraft zu gering. Ist dies der Fall, dann öffnen Sie den Schnellspanner erneut und ziehen die Kontermutter des Schnellspanners fester an.
- Schliessen Sie den Schnellspanner wieder (Position „closed“).
- Wiederholen Sie die oben genannten Schritte bis die Schliesskraft so gross ist, dass ein Schliessen des Schnellspanners ohne Hilfsmittel gerade noch möglich ist.
Der Hebel des Schnellspanners muss vollständig geschlossen werden können. Es ist darauf zu achten (Umlegen), dass er nicht am Rahmen resp. Gabel oder Teilen davon anstösst.
Überprüfen Sie den festen Sitz des Laufrads.
H.
DT Swiss RWS (ratchet wheel mounting system): Den Spanner durch Drehen am Hebel im Uhrzeigersinn so fest wie möglich von Hand festziehen (min. 15 Nm Handkraft), während die Mutter auf der Gegenseite festgehalten wird. Je nach Rahmen- oder Gabelkonstruktion kann das auch durch mehrmaliges Umlegen
des Hebels geschehen. Dann den Hebel anheben und in die gewünschte Position drehen (Abb. 7). Zum Öffnen des Systems, den Hebel gegen den Uhrzeigersinn drehen, während die Mutter festgehalten wird. Vor der Fahrt muss jeweils sichergestellt werden, dass das Laufrad korrekt im Rahmen oder an der
Gabel montiert ist. Dies ist besonders wichtig, nachdem das Fahrrad an öffentlichen Plätzen abgestellt wurde. Die Anziehkraft des RWS Laufradbefestigungsystems muss mindestens 15 Nm (Handkraft) betragen. Für eine kurze Kontrolle, heben Sie den Hinter- und Vorderteil des Fahrrads vom Boden und schlagen
Sie oben kräftig auf den Reifen. Das Rad sollte sich dabei nicht lockern, lösen oder seitlich bewegen. Wenn Sie sich nicht sicher sind, wiederholen Sie das Anziehen des Schnellspanners wie in Schritt a - f.
I.
DT Swiss Tubelesskit: Übrigens, mit dem DT Swiss Tubelesskit (Abb. 9) verwandeln Sie Ihre DT Swiss Laufräder in ein schlauchloses System! Weitere Angaben zu allen DT Swiss Produkten finden Sie unter www.dtswiss.com.
WICHTIG:
Lesen Sie vor der Benutzung die Gebrauchsanweisung für den RWS aufmerksam durch. Falls Sie irgendwelche Fragen haben, wenden Sie sich bitte an Ihren Fachhändler. Unsachgemässer Einbau des RWS Systems kann zu schweren Körperverletzungen fürhren.
WARTUNG & PFLEGE
WICHTIG:
WICHTIG 1:
WICHTIG 2:
STOPP:
STOPP 1:
STOPP 2:
STOPP 3:
A.
B.
C.
D.
Die Einhaltung der hier aufgeführten Bestimmungen betreffend Wartung & Pflege des Laufrads ist Voraussetzung für ein einwandfreies Funktionieren und einen unfallfreien Einsatz. Die Nichtbeachtung der Bestimmungen kann zu
Unfällen mit unter Umständen schwerwiegenden Verletzungen führen. Ausserdem fällt in diesem Fall die Produktgarantie der Herstellerfirma dahin.
Wenden Sie sich für Zentrierarbeiten unbedingt an einen erfahrenen Fachmann. Überprüfen Sie regelmässig die Speichenspannung und Rundlauf des Laufrads. Zu hohe oder zu tiefe Speichenspannungen führen zu übermassigen
Betriebslasten der Laufradkomponenten und können zu einem früheren Versagen durch Materialermüdung führen. Die Speichenspannungsverteilung pro Laufradseite muss so homogen wie möglich sein.
Bei Unklarheiten oder Schwierigkeiten wenden Sie sich an ein DT Swiss Servicecenter und lassen Sie die Wartung von einem erfahrenen Fachmann durchführen.
Überprüfen Sie das Laufrad regelmässig auf allfällige Beschädigungen. Fahren Sie auf keinem Fall, wenn Sie Risse in der Felge, gebrochene Speichen oder Lagerspiel feststellen. Kontaktieren Sie in diesem Fall ein DT Swiss Servicecenter
oder einen erfahrenen Fachmann zur Behebung des Mangels.
Lassen Sie Ihr Laufrad nach einem Sturz oder einem Unfall unbedingt durch einen erfahrenen Fachmann auf allfällige Beschädigungen prüfen.
Reinigung: Laufräder müssen regelmässig mit einem weichen Schwamm und einem geeigneten Reinigungsmittel gereinigt werden. Verwenden Sie keine Lösungsmittel und Tenside.
Schnellspanner: Überprüfen Sie vor jeder Fahrt, dass der Schnellspanner korrekt und fest montiert ist. Bei Unklarheiten melden Sie sich unbedingt bei einem DT Swiss Servicecenter oder einem erfahrenen Fachmann.
Nabe: Die Wartung der Hinter- und Vorderradnabe muss mindestens einmal jährlich durchgeführt werden. Bei regelmässigem Gebrauch unter extremen Bedingungen (starker Regen, Schlamm, Transport im Regen) muss der Freilauf öfter gewartet werden. Regelmässige
Wartung der Nabe verhilft zu einer längeren Lebensdauer und zu optimalen Fahrleistungen während Jahren. Durch übermässigen Wasserdruck (z.B. Hochdruckreiniger) kann Wasser in die Nabe eindringen. Verwenden Sie keine Lösungsmittel und Tenside. Diese können
die Nabe beschädigen. Weitere Informationen erhalten Sie beim DT Swiss Servicecenter oder unter www.dtswiss.com
Felge:
a)
Entfernen Sie vor jeder Fahrt allfällige Verschmutzungen (im Speziellen Öl- und Fettspuren) auf den Bremsflächen.
b)
Überprüfen Sie vor jeder Fahrt den Verschleissgrad der Bremsbeläge. Entfernen Sie regelmässig eingefahrene Fremdkörper (Splitt, Metallspäne usw.) Fahren Sie nie mit abgenutzten Bremsbelägen!
c)
Falls die Bremsflächen Ihres Laufrads eine Keramikbeschichtung aufweisen, sind unbedingt dafür geeignete Spezialbremsbeläge zu verwenden.
d)
Überprüfen Sie bei Felgenbremsen vor jeder Fahrt den Verschleissgrad der Bremsflächen der Felgen. Anhand der DT Swiss wear control lässt sich dieser leicht feststellen: Sind die punktförmigen Vertiefungen in den Bremsflächen noch alle sichtbar, so ist die
Wandstärke der Felgenflanke noch ausreichend. Ist eine oder mehrere Vertiefungen nicht mehr sichtbar, muss die Felge umgehend ersetzt werden. Fahren Sie nie mit abgenutzten Bremsflächen (Abb. 10).
WXWXR0000WRXXS / 0705-def
TECH SPECS wheels mountainbike
XM 1550 TRICON®
M 1700 TRICON®
XRC 1250
XRC 1350
XR 1450
X 1600
X 1800
X 1900
ETRTO
559 x 19.5
559 x 19.5
559 x 17
559 x 17
559 x 18
559 x 18
559 x 17
559 x 17
Valve hole ø
Percage de valve ø
Foro valvola ø
Ventilloch ø
6.5 mm
6.5 mm
6.5 mm
6.5 mm
6.5 mm
6.5 mm
6.5 mm
6.5 mm
Tubelesskit
—
—
no
no
yes
yes
yes
yes
Wheel mounting option
Option de montage
Opzione montaggio ruota
Optionale Radbefestigung
Lefty
Intended use
Utilisation
Uso previsto
Einsatzbereich
TECH SPECS
98
Rim tape
Fonds de jante
Flap
Felgenband
559 x 22
559 x 22
559 x 22
559 x 22
559 x 22
559 x 22
559 x 22
559 x 22
Tire dimension min.
Dimension du pneu min.
Dim. min. pneumatico
Reifendimension min.
26”x 1.7”
26”x 1.7”
26“ x 1.5“
26“ x 1.5“
26“ x 1.5“
26“ x 1.5“
26“ x 1.5“
26“ x 1.5“
Tire dimension max.
Dimension de pneu max.
Dim. max. pneumatico
Reifendimension max.
26“ x 2.4“
26“ x 2.4“
26“ x 2.1“
26“ x 2.1”
26“ x 2.25“
26“ x 2.25“
26“ x 2.25“
26“ x 2.25“
Maximum tire pressure*
Pression max.*
Pressione max pneumatico*
Reifendruck max.*
4 bar
4 bar
3 bar
3 bar
4 bar
4 bar
4 bar
4 bar
Spoke lengths front / rear
Longueur de rayon avant / arrière
Lunghezze raggio ant./post.
Speichenlänge vorne / hinten
front: 247, 256 mm
248, 258 mm
rear: 248, 257 mm
243, 255 mm
front: 247, 256 mm
249, 258 mm
rear: 249, 257 mm
244, 255 mm
262, 265 mm /
263, 260 mm
267, 268 mm /
268, 266 mm
268, 270 mm /
270, 268 mm
268, 269 mm /
269, 268 mm
266, 268 mm/
267, 266 mm
266, 268 mm /
267, 266 mm
Rider s weight max.
Poids de l’utilisateur max.
Peso max. rider
Fahrergewicht max.
100 kg
100 kg
90 kg
90 kg
90 kg
90 kg
90 kg
90 kg
Axle clamping force (min./ max.)
Couple de serrage sur l’axe (min./ max.)
Forza di chiusura perno (min./ max.)
Achsenklemmkraft (min./ max.
4000 N / 8000 N
4000 N / 8000 N
4000 N / 8000 N
4000 N / 8000 N
4000 N / 8000 N
4000 N / 8000 N
4000 N / 8000 N
4000 N / 8000 N
* or like posted on the tire / 1 inch = 25.4 mm / 1 bar = 14.2 psi / 1 kg = 2.2 lbs
TECH SPECS wheels mountainbike
M 1600
M 1800
M 1800 29er
M 1900
EXC 1550
EX 1750
E 2000
FR 2050
ETRTO
559 x 19.5
559 x 19.5
622 x 19.5
559 x 19.5
559 x 21
559 x 21
559 x 21
559 x 25
Valve hole ø
Percage de valve ø
Foro valvola ø
Ventilloch ø
6.5 mm
6.5 mm
6.5 mm
6.5 mm
6.5 mm
6.5 mm
6.5 mm
8.5 mm
Tubelesskit
yes
yes
yes
yes
no
yes
yes
no
Rim tape
Fonds de jante
Flap
Felgenband
559 x 22
559 x 22
622 x 22
559 x 22
559 x 25
559 x 25
559 x 25
559 x 25
Tire dimension min.
Dimension du pneu min.
Dim. min. pneumatico
Reifendimension min.
26“ x 1.7“
26“ x 1.7“
28“ x 1.7“
26“ x 1.7“
26“ x 1.9“
26“ x 1.9“
26“ x 1.9“
26“ x 2.1“
Tire dimension max.
Dimension de pneu max.
Dim. max. pneumatico
Reifendimension max.
26“ x 2.4“
26“ x 2.4“
28“ x 2.4“
26“ x 2.4“
26“ x 2.5“
26“ x 2.5“
26“ x 2.5“
26“ x 3“
Maximum tire pressure*
Pression max.*
Pressione max pneumatico*
Reifendruck max.*
4 bar
4 bar
4 bar
4 bar
3 bar
3 bar
3 bar
3 bar
Spoke lengths front / rear
Longueur de rayon avant / arrière
Lunghezze raggio ant./post.
Speichenlänge vorne / hinten
266, 267 mm /
267, 265 mm
260, 262 mm /
261, 260 mm
291, 294 mm /
293, 292 mm
261, 263 mm /
262, 261 mm
259, 260 mm /
260 mm
260, 262 mm /
261 mm
259, 261 mm /
260, 259 mm
259, 261 mm /
260 mm
Rider s weight max.
Poids de l’utilisateur max.
Peso max. rider
Fahrergewicht max.
100 kg
100 kg
100 kg
100 kg
110 kg
110 kg
110 kg
130 kg
Axle clamping force (min./ max.)
Couple de serrage sur l’axe (min./ max.)
Forza di chiusura perno (min./ max.)
Achsenklemmkraft (min./ max.
4000 N / 8000 N
Wheel mounting option
Option de montage
Opzione montaggio ruota
Optionale Radbefestigung
Intended use
Utilisation
Uso previsto
Einsatzbereich
4000 N / 8000 N
* or like posted on the tire / 1 inch = 25.4 mm / 1 bar = 14.2 psi / 1 kg = 2.2 lbs
4000 N / 8000 N
4000 N / 8000 N
4000 N / 8000 N
4000 N / 8000 N
4000 N / 8000 N
4000 N / 8000 N
TECH SPECS
99