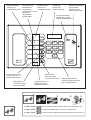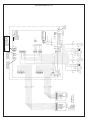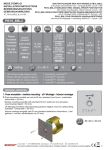
1
®
SICHERHEIT
UND PRÄZISION
Türcode-Anlagen
D 00080
BEDIENUNGS-ANLEITUNG
d e u t s c h
Türcode-Anlage
441-10 / 451-10
OPERATING INSTRUCTIONS
e n g l i s h
Door coding system
441-10 / 451-10
MODE D'EMPLOI
f r a n ç a i s
Centrale à clavier
441-10 / 451-10
Eingabe löschen
Eingabe bestätigen
Programmierung
Delete input
Confirm input
Zusatzfunktion
Annulation de l'entrée
Confirmation de l'entrée Programming
supplementary function
Fonction de
programmation
supplémentaire
Anzeigefeld
Display field
Fenêtre d'affichage
Geräteschlüsselschalter
Key-operated
appliance switch
Clé de programmation
Programmierstellung
Programming position
Position de programmation
ENG
7
8
9
ENT
4
5
6
1
2
3
EIN/ON
~
CE
0
AUS/OFF
441-10
451-10
Programmierung Tür 2
Programming door 2
Programmation Porte 2
Normalbetrieb
Normal operation
Fonctionnement normal
Steuergerät Typ
Control device type
Type de la centrale
Programmierung Tür 1
Programming door 1
Programmation Porte 1
®
®
®
Ziffernprogrammierfeld
Numerical programming pad
Bloc de programmation
®
®
Fafix
®
® effeff, FAFIX,
sind eingetragene Warenzeichen der Fritz Fuss GmbH & Co.
® effeff, FAFIX,
are registered trademarks of Fritz Fuss GmbH & Co.
® effeff, FAFIX,
sont des marques déposées de l'entreprise Fritz Fuss GmbH & Co.
d e u t s c h
Contents
Inhaltsverzeichnis
Zusatzfunktionen
Befehlsnummern
Page
General description
Keypads
Door openers
11
11
11
Description générale
Les claviers
Les gâches
18
18
18
5
Programming
Code number
11
Door unlocked period 12
Function of keypadcontrolled continuously
unlocked door
12
Programmation
Code
18
Durée de libération
de la gâche
19
Libération permanente
de la porte
19
5
5
Additional functions
Command numbers
Fonctions supplémentaires 19
Ordres
19
4
5
Programming
Alarm Code
12
command 01
Erroneous code message
13
command 02
Door monitioring
13
command 03
Lock-doors function
14
command 04
Central keypad
14
command 05
Time and weekday
14
command 10
Summertime/
standard time
15
command 11
Continuously unlocked
periods
15
command 15
Continuously locked
periods
16
command 16
Night code
17
command 17
Programmation
Code agression
Ordre 01
Tentative d'accès
frauduleuse
Ordre 02
Surveillance du temps
d'ouverture de porte
Ordre 03
Fonction "sas"
Ordre 04
Clavier central
Ordre 05
Jour et heure
Ordre 10
Horaires Eté / Hiver
Ordre 11
Libération permanente
de la porte
Ordre 15
Verrouillage permanent
de la porte
Ordre 16
Code de nuit
Ordre 17
19
20
21
21
21
22
451-10
Programmierung
Alarmcode
5
Befehl 01
Falschcodemeldung
6
Befehl 02
Türüberwachung
7
Befehl 03
Schleusenfunktion
7
Befehl 04
Zentraltastatur
7
Befehl 05
Uhrzeit und Wochentag 8
Befehl 10
Sommer-/Normalzeit
8
Befehl 11
Dauerentriegelungszeit 8
Befehl 15
Dauerverriegelungszeit 9
Befehl 16
Nachtcode
10
Befehl 17
12
12
441-10
Programmierung
Codezahl
Türentriegelungszeit
Funktion
tastaturgesteuerte Tür
Dauerentriegelung
4
4
4
Sommaire
Page
Seite
Allgemeine Beschreibung
Die Tastaturen
Die Türöffner
f r a n ç a i s
e n g l i s h
22
22
23
24
Anschlußplatine
Hauptplatine
25
26
Connection board
Mains board
25
26
Platine de raccordement
Platine de base
25
26
Anschlußschaltbild
Modell 441-10
Modell 451-10
27
28
Connection diagram
Model 441-10
Model 451-10
29
30
Schéma de câblage
Modèle 441-10
Modèle 451-10
31
32
3
d e u t s c h
Türcode-Steuergeräte
441-10/451-10
Allgemeine Beschreibung
Das vollelektronische / mikroprozessorgesteuerte Türcodesystem Modell 441-10 /451-10 in Zwei-KanalAusführung bietet Anschlußmöglichkeiten für 2 Türen und 2 Tastaturen.
Die Programmier-Berechtigung der
Türcodeanlage kann nur durch die
Schlüsselschalter-Betätigung erlangt
werden. Hier muß der Geräteschlüssel in Programmier -Stellung gedreht
werden. Über eine bedienerfreundliche Folientastatur und eine 7-Segment-Anzeige wird das Gerät frei
programmiert. Das heißt, es können
2 Türen (2 Kanäle) getrennt codiert
werden, wobei jeweils eine max. 6stellige Codeziffer programmiert
werden kann.
Alle Daten und Codes können nur
von programmierberechtigten Personen über den Geräteschlüsselschalter gelesen oder geändert werden.
Die programmierten Daten bleiben
auch nach völligem Spannungsausfall erhalten, da die Daten nach jedem Programmiervorgang abgespeichert werden.
Das Steuergerät ist in einem stabilen Stahlblechgehäuse für AufputzMontage untergebracht.
Eine integrierte Notstromversorgung
kann das Funktionieren der Anlage
bei Stromausfall für mehrere Stunden sichern. Hierzu muß das Steuergerät mit einem Akku Modell 18 004
(5,7 Ah), – nicht im Bestellumfang
der Steuergeräte enthalten – bestückt werden. Damit beim Türcodemodell 451-10 die integrierte Uhr
trotz Stromausfall korrekt weiterläuft,
ist der vorgenannte Akku notwendig.
Technische Daten:
Netzanschluß:
220 V +/- 10 %, 50/60 Hz
Umgebungstemperatur:
+5 °C bis +40 °C
Gehäuse:
Stahlblechgehäuse mit
Folienfrontfeldtastatur und
integriertem Schlüsselschalter.
4
Gehäuseabmessungen:
300 x 185 x 130 mm
(B x H x T)
Netzteil:
12 V/1,2 A
Notstromversorgung:
12 V/5,7 Ah
(Modell 18 004)
nur bei Erweiterung durch
einen Akku)
Anschlußmöglichkeiten:
2 Tastgeräte,
2 Türöffner
(bzw. 2 Türöffner mit
Rückmeldung)
Die Türöffner
Die mit der Türcodeanlage einzusetzenden Standard-Türöffner sind
die Modelle 1405 (Arbeitsstromfunktion) und 3405 (Ruhestromfunktion). Es wird grundsätzlich empfohlen, Türöffner mit Rückmeldekontakten (Bestellzusatz RR) zu verwenden.
Die Tastaturen
Es stehen vier verschiedene Tastgeräte zur Auswahl. Ihnen ist allen
gemeinsam, daß sie eine 12er Matrixtastatur besitzen.
Technische Daten:
1405 RR:
Nennspannung 12 VStromaufnahme 200 mA,
100 % ED
3405 RR:
Nennspannung 12 VStromaufnahme 200 mA
14105 RR:
Nennspannung 12 VStromaufnahme 400 mA,
100 % ED
34105 RR:
Nennspannung 12 VStromaufnahme 470 mA
Tastaturen werden stets im Handbereich der Türen montiert. Durch
das Abschrauben und Abnehmen
der Frontplatte kann das Tastaturgehäuse bequem installiert werden.
Nach dem Einführen und Anschließen des 7-adrigen, abgeschirmten
Steuerkabels (siehe Anschlußschaltbild), wird die Frontplatte wieder auf
das Tastaturgehäuse geschraubt.
Bei wassergeschützten Tastaturen
muß darauf geachtet werden, daß
die Frontplattendichtung nicht beschädigt wird.
Als Tastaturkabel muß ein 7-adriges abgeschirmtes Kabel verwendet werden. Eine Leitungslänge (zwischen Tastatur und Steuergerät) von
200 m darf nicht überschritten werden.
Sämtliche Steuerkabel müssen von
der Türcode-Anlage aus separat und
sternförmig verlegt werden.
Achtung!
Bitte beachten Sie, daß nur abgeschirmte Kabel verwendet werden
dürfen, und alle Schirme auf die zentrale Erdanschlußklemme im Gehäuse zu legen sind.
Im Einzelnen sind folgende
Tastaturen lieferbar:
412-12 (412-10)
(Standard – Aufputzausführung)
413-10 (413-12)
(Standard – Aufputz,
wassergeschützt)
414-10 (414-12)
(Standard – Unterputzausführung)
415-10 (415-12)
(Standard – Unterputz,
wassergeschützt)
Bei erhöhten Sicherheitsanforderungen empfiehlt sich der Einbau
der Sicherheits-Türöffner- Modelle
14105 RR (Arbeitsstrom) oder
34105 RR (Ruhestrom).
Achtung!
Werden Türöffner ohne Rückmeldekontakte installiert, müssen die
Schiebeschalter S 4 und S 5 auf der
Anschlußplatine in Schalterstellung
EIN
gebracht werden (Siehe
Anschlußschaltplan).
Für das Türcode-Steuergerät 451-10
müssen Türöffner mit Rückmeldekontakten vorgesehen werden!
Programmierung:
Codezahl
Programmierablauf:
Einstellung der Codezahl
Kanal 1 = Tür 1
Kanal 2 = Tür 2
--- Schlüsselschalter in
Programmierstellung drehen
--- Programmierschalter >>> S 1
und S 2 in Stellung EIN
schieben.
Hierzu muß das Gerät geöffnet
werden; die Programmierschalter S1 und S 2 befinden
sich auf der Hauptplatine.
--- Kanal anwählen >>> Taste Tür 1
oder Tür 2 betätigen.
Im Anzeigefeld erscheint die
gespeicherte Codezahl.
--- Codezahl löschen >>>
Taste CE drücken.
Im Anzeigefeld sind 6 freieStellen durch Punkte markiert.
--- Gewünschte Codezahl über
das Ziffernprogrammierfeld
der Türcodeanlage eingeben.
Zur Auswahl steht eine beliebige
Codezahl bis max. 6 Codeziffern.
--- Soll eine vorhandene, eingespeicherte Codezahl beibehalten werden, oder wird der Programmiervorgang beendet, so muß als
Abschluß in beiden Fällen die
>>> Taste • (Normalbetrieb)
gedrückt werden.
--- Programmierschalter >>> S 1
und S 2 in die gewünschte
Schalterstellung bringen.
-*- Programmierschalterstellung:
S 1 und S 2 EIN Grundfunktion Kurzzeitentriegelung
-*- Programmierschalterstellung:
S 1 EIN und S 2 AUS Grundfunktion Kurzzeitentriegelung mit
Dauerentriegelungsmöglichkeit
über Tastatur (Näheres S. 5).
--- Gerätedeckel schließen
--- Schlüsselschalter in Betriebsstellung bringen
Zeichenerklärung:
--- Vorzunehmende Programmierschritte
-*- Hinweise
>>> Betätigung der nachstehenden Taste
Programmierung:
Türentriegelungszeit
-*- Werkseitig ist eine Türentriegelungszeit von 07 sec. für Tür 1
und Tür 2 programmiert.
Programmierungsablauf:
Einstellung der Türentriegelungszeit
Kanal 1 = Tür 1
Kanal 2 = Tür 2
--- Schlüsselschalter in Programmierstellung drehen.
--- Programmierschalter >>> S 1
und S 2 in Stellung AUS
schieben.
Hierzu muß das Gerät geöffnet
werden; die Programmierschalter S 1 und S 2 befinden
sich auf der Hauptplatine.
--- Kanal anwählen >>> Taste Tür 1
oder Tür 2 betätigen.
Im Anzeigefeld erscheint die gespeicherte Türentriegelungszeit.
--- Wird eine andere Türentriegelungszeit gewünscht, muß eine
2-stellige Zahl zwischen 01 und
99 sec. über das Ziffernprogrammierfeld eingegeben werden.
(Überschreiben der gespeicher-
ten Türentriegelungszeit).
--- Soll eine vorhandene, gespeicherte Türentriegelungszeit bestätigt, oder der Programmiervorgang beendet werden, muß als
Abschluß in beiden Fällen die
>>> Taste • (Normalbetrieb)
gedrückt werden.
--- Programmierschalter >>> S 1
und S 2 in die gewünschte
Schalterstellung bringen.
-*- Programmierschalterstellung:
S 1 und S 2 EIN Grundfunktion
Kurzzeitentriegelung.
-*- Programmierschalterstellung:
S 1 EIN und S 2 AUS Grundfunktion Kurzzeitentriegelung mit
Dauerentriegelungsmöglichkeit
über Tastatur. (Näheres S. 5)
--- Gerätedeckel schließen
--- Schlüsselschalter in Betriebsstellung bringen
Programmierung:
Funktion
Tastaturengesteuerte
Tür-Dauerentriegelung
Durch das Betätigen der Plus-Tasten und anschließendes Eingeben
der Codezahl an den Tastaturen,
können die Türen dauerentriegelt
werden. Somit besteht die Möglichkeit, diese Türen beliebig oft zu begehen. Zur Rückstellung dieser freien Begehbarkeit der Türen, muß an
den Tastaturen zunächst die MinusTaste gedrückt und dann die Codezahl eingegeben werden.
Wird die Plus-Taste an den Tastaturen nicht betätigt, ist bei Eingabe der
korrekten Codeziffer die Grundfunktion (Kurzzeitentriegelung) wirksam.
-*- Werkseitig ist die Grundfunktion
(Kurzzeitentriegelung) für Tür 1
und Tür 2 eingestellt. (S 1 und
S 2 EIN )
Programmierablauf:
Einstellen der Tür-Dauerentriegelungsmöglichkeit; (diese Funktion ist
generell für beide Kanäle bzw. Türen wirksam).
--- Schlüsselschalter in Programmierstellung drehen, und Türcodegerät öffnen.
--- Programmierschalter >>> S 1
in Stellung EIN und S 2 in Stellung AUS schieben.
-*- Die Programmierschalter S 1 und
S 2 befinden sich auf der Hauptplatine.
--- Gerätedeckel schließen
--- Schlüsselschalter in Betriebsstellung bringen
Zusatzfunktionen
Folgende Zusatzfunktionen sind nur
beim Türcode-Steuergerät Modell
451-10 enthalten. Ferner muß das
Steuergerät mit einem Akku 12 V /
5,7 Ah (Nr.18 004) bestückt werden.
Befehlsnummern
Nr. Funktion
Seite
01 Alarmcode
5–6
02 Falschcode
6
03 Türüberwachung
7
04 Schleusenfunktion
7
05 Zentraltastatur
7–8
10 Uhr- und Wochen8
tageinstellung
11 Sommer-/Normalzeit 8
15 Dauerentriegelungs- 8 – 9
zeiten
16 Dauerverriegelungs- 9 – 10
zeiten
17 Nachtcode
10
Die Befehlsnummern
06 – 09 und 12 – 14 sind nicht belegt.
Achtung!
Bei Programmiervorgängen der Zusatzfunktionen müssen sich Schiebeschalter >>> S 1 und S 2 in
Stellung EIN (Grundfunktion) oder
>>> S 1 in Stellung EIN und S 2
in Stellung AUS
(Grundfunktion
mit Dauerentriegelungsmöglichkeit)
befinden!
Programmierung:
Alarmcode
(Befehl 01)
Mit dem Alarmcode wird die Tür
ebenfalls entriegelt und gleichzeitig
in der Zentrale Alarm (stiller Alarm)
ausgelöst. Dadurch kann z.B. bei
einem erzwungenen Zutritt unbemerkt die Zentrale alarmiert werden.
Der Alarmcode ist bis auf die letzte
Stelle mit dem jeweiligen Türcode
identisch. Wird diese letzte Stelle
um 2 erhöht, so wird eine Alarmmeldung ausgelöst. Der Übertrag bei
einer Zehner-Überschreitung entfällt
dabei.
Programmierablauf:
Einstellung des Alarmcodes
Kanal 1 = Tür 1
Kanal 2 = Tür 2
--- Schlüsselschalter in Programmierstellung drehen. Im Anzeigefeld erscheint die Uhrzeit.
--- Kanal anwählen >>>Taste
Tür 1 oder Tür 2 betätigen.
Im Anzeigefeld erscheint die
gespeicherte Codezahl.
5
--- Zusatzfunktionstaste >>>
ENG drücken.
Im Anzeigefeld sind 2 freie
Stellen durch Punkte markiert.
--- Befehlsnummer >>> 01 (Befehl
Alarmcode) eingeben.
--- Eingabe durch Drücken der
>>> Taste ENT bestätigen.
Im Anzeigefeld erscheint die Information AC 0 für Alarmcode
nicht aktiviert bzw. AC 1 für
Alarmcode aktiviert.
--- Gewünschten Aktivierungszustand >>> 0 oder 1 über das
Ziffernprogrammierfeld der Türcode-Anlagen eingeben.
--- Wird die Ziffer >>> 0 eingegeben (Alarmcode nicht aktiviert),
und durch >>> Taste ENT
bestätigt, so erscheinen im
Anzeigefeld 2 freie Stellen,
die durch die Eingabe einer
neuen Befehlsnummer belegt
werden können.
------- Befehlsnummern
(siehe Seite 5) --------------- Wird keine neue Befehlsnummer eingegeben, so kann die
Programmierung durch das Bestätigen der >>> Tasten ENG
und anschließend der >>>
Taste • (Normalbetrieb)
beendet werden.
--- Wird der Aktivierungszustand
>>> 1 eingegeben (Alarmcode
aktiv), so muß die Programmierung wie nachstehend beschrieben, weitergeführt werden.
--- Eingabe durch Drücken der >>>
Taste ENT bestätigen. Im Anzeigefeld erscheint die gespeicherte Alarmmeldezeit, (AlarmRelais-Anzugszeit), die werkseitig auf 30 sec. programmiert ist.
-*- Wird eine andere Alarmmeldezeit gewünscht, so muß eine
2-stellige Zahl zwischen 01 sec.
und 99 sec. am Ziffernprogrammierfeld eingegeben werden.
(Überschreiben der gespeicherten Alarmmeldezeit).
--- Eingabe durch Drücken der
>>> Taste ENT bestätigen.
-*- Im Anzeigefeld erscheinen 2
freie Stellen, die durch die Eingabe einer neuen Befehlsnummer belegt werden können.
------- Befehlsnummern
(siehe Seite 5) --------------- Wird keine neue Befehlsnummer eingegeben, so kann
die Programmierung durch das
Bestätigen der >>> Tasten
ENG und anschließend der
>>> Taste • (Normalbetrieb)
beendet werden.
--- Schlüsselschalter in Betriebsstellung bringen.
6
Programmierung: Falschcodemeldung
(Befehl 02)
Die Falschcodemeldung (Ansprechen des Falschcoderelais), wird
ausgelöst, wenn eine programmierte Anzahl falscher Codezahlen an
den Tastgeräten eingegeben wird.
Während der Falschcodemeldezeit
(zwischen 01 und 99 sec.), sperrt
das Türcode-Steuergerät die betreffende Tastatur bzw. den betreffenden Kanal.
Programmierablauf:
Einstellung des Falschcodes
Kanal 1 = Tür 1
Kanal 2 = Tür 2
--- Schlüsselschalter in Programmierstellung drehen.
Im Anzeigefeld erscheint die
Uhrzeit.
--- Kanal anwählen >>> Taste
Tür 1 oder Tür 2 betätigen.
Im Anzeigefeld erscheint die
gespeicherte Codezahl.
--- Zusatzfunktionstaste >>>
ENG drücken.
Im Anzeigefeld sind 2 freie
Stellen durch Punkte markiert.
--- Befehlsnummer >>> 02 (Befehl
Falschcodemeldung) eingeben.
--- Eingabe durch Drücken der
>>> Taste ENT bestätigen.
Im Anzeigefeld erscheint die
Information FC 0 für Falschcodemeldung nicht aktiviert bzw.
FC 1 für Falschcodemeldung
aktiviert.
--- Gewünschten Aktivierungszustand >>> 0 oder 1 über das
Ziffernprogrammierfeld der Türcode-Anlage eingeben.
--- Wird die Ziffer >>> 0 eingegeben (Falschcodemeldung nicht
aktiviert), und durch >>> Taste
ENT bestätigt, so erscheinen
im Anzeigefeld 2 freie Stellen,
die durch die Eingabe einer
neuen Befehlsnummer belegt
werden können.
------- Befehlsnummern
(siehe Seite 5) --------------- Wird keine neue Befehlsnummer eingegeben, so kann
die Programmierung durch das
Bestätigen der >>> ENG und
anschließend der >>> Taste •
(Normalbetrieb) beendet werden.
--- Wird der Aktivierungszustand
>>> 1 eingegeben (Falschcodemeldung aktiv) so kann die
Programmierung, wie nachstehend beschrieben, weitergeführt werden.
--- Eingabe durch Drücken der
Taste >>> ENT bestätigen.
Im Anzeigefeld erscheint die
gespeicherte Falschcodemeldezeit (Falschcode-Relais-Anzugszeit), die werkseitig auf 30
sec. programmiert ist.
Anzeige:
Falschcode-Relais-Anzugszeit
z.B. FC 30
Während der Falschcodemeldezeit wird der entsprechende
Kanal für die Neueingabe der
Codezahl gesperrt.
--- Wird eine andere Falschcodemeldezeit gewünscht, so muß
eine 2-stellige Zahl zwischen
01 sec. und 99 sec. am Ziffernprogrammierfeld eingegeben
werden (Überschreiben der gespeicherten Falschcodemeldezeit).
--- Eingabe durch Drücken der
>>> Taste ENT bestätigen.
-*- Im Anzeigefeld erscheint die
Anzahl der möglichen Falschcodeangaben.
Werkseitig sind 03 Wiederholungsmöglichkeiten programmiert. Ist z.B. eine 4-stellige Codeziffer eingestellt, dann spricht
das Falschcoderelais bei der
dreizehnten falschen Tastenbetätigung an. (4-stellige Codeziffer x 3 mögliche Falschcodeeingaben = 12 zulässige
Tastenbetätigungen).
-*- Wird eine andere Anzahl der
Falschcode-Eingabemöglichkeiten gewünscht, so kann eine
2-stellige Zahl zwischen 01 und
05 am Ziffernprogrammierfeld
eingegeben werden. (Überschreiben der gespeicherten
Zahl).
--- Eingabe durch Drücken der
>>> Taste ENT bestätigen.
-*- Im Anzeigefeld erscheinen 2
freie Stellen, die durch die
Eingabe einer neuen Befehlsnummer belegt werden können.
------- Befehlsnummern
(siehe Seite 5) --------------- Wird keine neue Befehlsnummer eingegeben, so kann
die Programmierung durch das
Bestätigen der >>> Tasten
ENG und anschließend der
>>> Taste • (Normalbetrieb)
beendet werden.
--- Schlüsselschalter in Betriebsstellung bringen.
Programmierung:
Türüberwachung
(Befehl 03)
Das Steuergerät löst eine Meldung
aus, wenn eine Tür über die programmierte Türüberwachungszeit
hinaus offensteht.
Programmierablauf:
Einstellung der Zusatzfunktion
Türüberwachung
Kanal 1 = Tür 1
Kanal 2 = Tür 2
--- Schlüsselschalter in Programmierstellung drehen.
Im Anzeigefeld erscheint die
Uhrzeit.
--- Kanal anwählen >>> Taste
Tür 1 oder Tür 2 betätigen.
Im Anzeigefeld erscheint die
Codezahl.
--- Zusatzfunktionstaste >>> ENG
drücken.
Im Anzeigefeld sind 2 freie
Stellen durch Punkte markiert.
--- Befehlsnummer >>> 03 (Befehl
Türüberwachung) eingeben.
--- Eingabe durch Drücken der
>>> Taste ENT bestätigen.
Im Anzeigefeld erscheint die Information tu 0 für Türüberwachungsfunktion nicht aktiviert bzw. tu 1 für Türüberwachungsfunktion aktiviert.
--- Gewünschten Aktivierungszustand >>> 0 oder 1 über das
Ziffernprogrammierfeld der Türcodeanlage eingeben.
--- Wird die Ziffer >>> 0 eingegeben (Türüberwachungsfunktion
nicht aktiviert), und durch >>>
Taste ENT bestätigt, so erscheinen im Anzeigefeld 2 freie
Stellen, die durch die Eingabe
einer neuen Befehlsnummer
belegt werden können.
------- Befehlsnummern
(siehe Seite 5) --------------- Wird keine neue Befehlsnummer eingegeben, so kann
die Programmierung durch das
Bestätigen der >>> Tasten
ENG und anschließend der
>>> Taste • (Normalbetrieb)
beendet werden.
--- Wird der Aktivierungszustand
>>> 1 eingegeben (Türüberwachungsfunktion aktiv), so
kann die Programmierung wie
nachstehend beschrieben, weitergeführt werden.
--- Eingabe durch Drücken der
>>> Taste ENT bestätigen.
---
---*-
---
---
Im Anzeigefeld erscheint die
Information Türüberwachungszeit z.B. tu 99
Nach dieser Überwachungszeit
wird das Falschcoderelais angesteuert (Meldung: Tür zulange offen).
Werkseitig sind 99 sec. programmiert.
Wird eine andere Türüberwachungszeit gewünscht, so
muß eine 2-stellige Zahl zwischen 01 sec. und 99 sec. am
Ziffernprogrammierfeld eingegeben werden (Überschreiben
der gespeicherten Türüberwachungszeit).
Eingabe durch Drücken der
>>> Taste ENT bestätigen.
Im Anzeigefeld erscheinen 2
freie Stellen, die durch die Eingabe einer neuen Befehlsnummer belegt werden können.
------- Befehlsnummern
(siehe Seite 5) ------------Wird keine neue Befehlsnummer eingegeben, so kann
die Programmierung durch das
Bestätigen der >>> Tasten
ENG und anschließend der
>>> Taste • (Normalbetrieb)
beendet werden.
Schlüsselschalter in Betriebsstellung bringen.
-----
---
---
---
---
drücken. Im Anzeigefeld sind
2 freie Stellen durch Punkte
markiert.
Befehlsnummer >>> 04 (Befehl
Schleusenfunktion) eingeben.
Eingabe durch Drücken der
>>> Taste ENT bestätigen.
Im Anzeigefeld erscheint die Information SF 0 für Schleusenfunktion nicht aktiviert bzw.
SF 1 für Schleusenfunktion
aktiviert.
Gewünschten Aktivierungszustand >>> 0 oder 1 über das
Ziffernprogrammierfeld der Türcode-Anlagen eingeben.
Wird die Ziffer >>> 0 oder 1
eingegeben und durch >>>
Taste ENT bestätigt, so erscheinen im Anzeigefeld 2 freie
Stellen, die durch die Eingabe
einer neuen Befehlsnummer
belegt werden können.
------- Befehlsnummern
(siehe Seite 5) ------------Wird keine neue Befehlsnummer eingegeben, so kann die
Programmierung durch das Bestätigen der >>> Tasten ENG
und anschließend der
>>> Taste • (Normalbetrieb)
beendet werden.
Schlüsselschalter in Betriebsstellung bringen.
Programmierung:
Schleusenfunktion
(Befehl 04)
Programmierung:
Zentraltastatur
(Befehl 05)
Wie der Begriff schon definiert, kann
immer nur eine von zwei Türen über
die Codezahl oder durch einen
Türöffnertaster geöffnet werden. Solange eine Tür geöffnet bleibt, ist die
Tastatur der Gegentür gesperrt.
Bei aktivierter Zusatzfunktion Zentraltastatur werden beide Kanäle von
der Tastatur 1 gesteuert. An der Tastatur 2 ist keine Eingabe möglich.
Programmierablauf:
Einstellung der Zusatzfunktion
Schleusenbetrieb
(Die Programmierung der Zusatzfunktion Schleusenbetrieb kann im
Kanal 1 oder Kanal 2 erfolgen, die
Eingabe gilt jedoch immer für beide
Kanäle).
--- Schlüsselschalter in Programmierstellung drehen.
Im Anzeigefeld erscheint die
Uhrzeit.
--- Kanal anwählen >>> Taste
Tür 1 oder Tür 2 betätigen.
Im Anzeigefeld erscheint die
gespeicherte Codezahl.
--- Zusatzfunktionstaste >>> ENG
Programmierablauf:
Einstellung der Zusatzfunktion
Zentraltastatur
(Die Programmierung der Zusatzfunktion Zentraltastatur kann in Kanal 1 oder Kanal 2 erfolgen, die Eingabe gilt jedoch immer für beide
Kanäle).
--- Schlüsselschalter in Programmierstellung drehen. Im Anzeigefeld erscheint die Uhrzeit.
--- Kanal anwählen >>> Taste
Tür 1 oder Tür 2 betätigen.
Im Anzeigefeld erscheint die
gespeicherte Codezahl.
--- Zusatzfunktionstaste >>>
ENG drücken.
Im Anzeigefeld sind 2 freie
Stellen durch Punkte markiert.
7
--- Befehlsnummer >>> 05 (Befehl
Zentraltastatur) eingeben.
--- Eingabe durch Drücken der >>>
Taste ENT bestätigen. Im Anzeigefeld erscheint die Information Zt 0 für Zentraltastatur nicht
aktiviert bzw. Zt 1 für Zentraltastatur aktiviert.
--- Gewünschten Aktivierungszustand >>> 0 oder 1 über das
Ziffernprogrammierfeld der Türcode-Anlagen eingeben.
--- Wird die Ziffer >>> 0 oder 1 eingegeben und durch >>> Taste
ENT bestätigt, so erscheinen
im Anzeigefeld 2 freie Stellen, die
durch die Eingabe einer neuen
Befehlsnummer belegt werden
können.
------- Befehlsnummern
(siehe Seite 5) --------------- Wird keine neue Befehlsnummer
eingegeben, so kann die Programmierung durch das Bestätigen der >>> Tasten ENG und
anschließend der >>> Taste •
(Normalbetrieb) beendet werden.
--- Schlüsselschalter in Betriebsstellung bringen.
Programmierung:
Uhr und Wochentag
(Befehl 10)
Programmierablauf:
Einstellung der aktuellen Uhrzeit und
des aktuellen Wochentages.
(Die Uhrzeit und der Wochentag kann
im Kanal 1 oder Kanal 2 programmiert werden, die Eingabe gilt jedoch immer für beide Kanäle).
--- Schlüsselschalter in Programmierstellung drehen.
Im Anzeigefeld erscheint die Uhrzeit.
--- Kanal anwählen >>> Taste
Tür 1 oder Tür 2 betätigen.
Im Anzeigefeld erscheint die gespeicherte Codezahl.
--- Zusatzfunktionstaste >>> ENG
drücken.
Im Anzeigefeld sind 2 freie Stellen durch Punkte markiert.
--- Befehlsnummer >>> 10 (Befehl
Uhr stellen) eingeben.
--- Eingabe durch Drücken der >>>
Taste ENT bestätigen.
Im Anzeigefeld erscheint eine
Wochentagsangabe.
Ziffer 1 ≈ Montag;
Ziffer 2 ≈ Dienstag; ...
Ziffer 7 ≈ Sonntag
--- Gewünschte Wochentagsziffer
8
---
---
-----
---
---
über das Ziffernprogrammierfeld
eingeben. (Überschreiben des
angezeigten Wochentages)
Eingabe durch Drücken der >>>
Taste ENT bestätigen.
Im Anzeigefeld erscheint die
Uhrzeit.
Aktuelle Uhrzeit (in Stunden, Minuten und Sekunden) über das
Ziffernprogrammierfeld eingeben. (Überschreiben der angezeigten Zeit).
Eingabe (Start der Uhr) mit der
>>> Taste ENT bestätigen.
Im Anzeigefeld erscheinen 2 freie
Stellen, die durch die Eingabe
einer neuen Befehlsnummer belegt werden können.
------- Befehlsnummern
(siehe Seite 5) -------------Wird keine neue Befehlsnummer
eingegeben, so kann die Programmierung durch das Bestätigen der >>> Tasten ENG
und anschließend der Taste •
(Normalbetrieb) beendet werden.
Schlüsselschalter in Betriebsstellung bringen.
Programmierung:
Sommer- / Normalzeit
(Befehl 11)
Programmierablauf:
Einstellung der Sommer- bzw. Normalzeit
(Die Programmierung der Sommerbzw. Normalzeit kann im Kanal 1
oder 2 erfolgen, die Eingabe gilt jedoch immer für beide Kanäle).
--- Schlüsselschalter in Programmierstellung drehen.
Im Anzeigefeld erscheint die
Uhrzeit.
--- Kanal anwählen >>> Taste
Tür 1 oder Tür 2 betätigen.
Im Anzeigefeld erscheint die
gespeicherte Codezahl.
--- Zusatzfunktionstaste >>> ENG
drücken.
Im Anzeigefeld sind 2 freie
Stellen durch Punkte markiert.
--- Befehlsnummer >>> 11 (Befehl
Sommer-/ Normalzeit) eingeben.
--- Eingabe durch Drücken der
>>> Taste ENT bestätigen.
Im Anzeigefeld erscheint die Information SZ 0 für Normalzeit
bzw. SZ 1 für Sommerzeit.
--- Gewünschten Aktivierungszustand >>> 0 oder 1 über
das Ziffernprogrammierfeld der
Türcode-Anlagen eingeben.
--- Wird die Ziffer >>> 0 oder 1
eingegeben und durch >>>
Taste ENT bestätigt, so erscheinen im Anzeigefeld 2 freie
Stellen, die durch die Eingabe
einer neuen Befehlsnummer
belegt werden können.
------- Befehlsnummern
(siehe Seite 5) --------------- Wird keine neue Befehlsnummer
eingegeben, so kann die Programmierung durch das Bestätigen der >>> Tasten ENG
und anschließend der >>>
Taste • (Normalbetrieb)
beendet werden.
--- Schlüsselschalter in Betriebsstellung bringen.
Programmierung:
Dauerentriegelungszeiten
(Befehl 15)
Die Tür-Dauerentriegelung ermöglicht, daß die entsprechende Tür,
zeitabhängig ohne Codeziffereingabe, frei zu begehen ist. Die Gültigkeitsdauer muß jeweils auch unter
Bezug des Wochentages programmiert werden. Für diese Zusatzfunktion stehen je Kanal (Tür) 10
Dauerentriegelungszeiten zur Verfügung.
Programmierablauf:
Einstellung der
Dauerentriegelungszeiten
Kanal 1 = Tür 1
Kanal 2 = Tür 2
--- Schlüsselschalter in Programmierstellung drehen.
Im Anzeigefeld erscheint die
Uhrzeit.
--- Kanal anwählen >>> Taste
Tür 1 oder Tür 2 betätigen.
Im Anzeigefeld erscheint die
gespeicherte Codezahl.
--- Zusatzfunktionstaste >>> ENG
drücken.
Im Anzeigefeld sind 2 freie
Stellen durch Punkte markiert.
--- Befehlsnummer >>> 15
(Befehl Dauerentriegelung)
eingeben.
--- Eingabe durch Drücken der
>>> Taste ENT bestätigen.
Im Anzeigefeld erscheint die Information dE 0 für Dauerentriegelung nicht aktiviert bzw.
dE 1 für Dauerentriegelung
aktiviert.
--- Gewünschten Aktivierungszustand >>> 0 oder 1 über das
Ziffernprogrammierfeld der Türcode-Anlagen eingeben.
--- Wird die Ziffer >>> 0 eingegeben, (Dauerentriegelung nicht aktiviert) und durch >>> Taste ENT
bestätigt, so erscheinen im Anzeigefeld 2 freie Stellen, die
durch die Eingabe einer neuen
Befehlsnummer belegt werden
können.
------- Befehlsnummern
(siehe Seite 5) ---------------- Wird keine neue Befehlsnummer
eingegeben, so kann die Programmierung durch das Bestätigen der >>> Tasten ENG und
anschließend der >>>
Taste • (Normalbetrieb)
beendet werden.
--- Wird der Aktivierungszustand >>>
1 eingegeben (Dauerentriegelung aktiv), so kann die Programmierung, wie nachstehend
beschrieben, weitergeführt
werden.
-*- Für die Tür-Dauerentriegelung
stehen 10 Speicherplätze zur Verfügung. Hierbei kann die Anfangsbzw. Endzeit der Dauerentriegelung unter Bezug des Wochentages programmiert werden. Bei
der Programmierung einer Dauerentriegelung müssen alle 10
Speicherplätze durchgetastet
werden.
Angaben können überschrieben
oder mit der >>> Taste CE auf
0000 gesetzt werden.Werkseitig
sind alle Anfangs- und Endzeiten,
sowie der Wochentag auf 0 eingestellt. Sämtliche Eingaben oder
Betätigungen sind mit der >>>
Taste ENT zu bestätigen.
--- Eingabe durch Drücken der >>>
Taste ENT bestätigen. Im Anzeigefeld erscheint die Information A (Zeit) für die Anfangszeit
der ersten Dauerentriegelung.
>1< Gewünschte Anfangszeit
4-stellig in Stunden und Minuten
über das Ziffernprogrammierfeld
eingeben (evtl. Überschreiben
der angezeigten Zeit)
--- Eingabe durch Drücken der >>>
Taste ENT bestätigen.
Im Anzeigefeld erscheint die Information E (Zeit) für die Endzeit
der ersten Dauerentriegelung.
--- Gewünschte Endzeit 4-stellig in
Stunden und Minuten über das
Ziffernprogrammierfeld eingeben
(evtl. Überschreiben der angezeigten Zeit)
--- Eingabe durch Drücken der >>>
Taste ENT bestätigen.
---
---*-
-*-
---
---
Im Anzeigefeld erscheint der
Wochentag, z.B. t = 0 an dem
die zuvor programmierte Dauerentriegelungszeit gültig sein soll.
t = 0 bedeutet an allen Tagen
t = 1 bedeutet nur am Montag
t = 2 bedeutet nur am Dienstag
.
.
.
t = 7 bedeutet nur am Sonntag
Gewünschte Wochentagsziffer
über das Ziffernprogrammierfeld
eingeben. (Überschreiben des
angezeigten Wochentages)
Eingabe durch Drücken der >>>
Taste ENT bestätigt.
Im Anzeigefeld erscheint die Information A (Zeit) für die Anfangszeit der zweiten Dauerentriegelung.
Der Programmierablauf wiederholt sich nun vom oben gekennzeichneten Programmierschritt
(>1<) ab, bis alle 10 Dauerentriegelungsspeicher programmiert
sind.
Nachdem die Wochentagsziffer
der 10ten Dauerentriegelungszeit
durch die >>> Taste ENT bestätigt worden ist, erscheinen im Anzeigefeld 2 freie Stellen, die durch
die Eingabe einer neuen Befehlsnummer belegt werden können.
------- Befehlsnummern
(siehe Seite 5) -------------wird keine neue Befehlsnummer
eingegeben, so kann die Programmierung durch das Bestätigen der >>> Tasten ENG
und anschließend der >>> Taste
• (Normalbetrieb) beendet
werden.
Schlüsselschalter in Betriebsstellung bringen.
Programmierung:
Dauerverriegelungszeiten
(Befehl 16)
Die Tür-Dauerverriegelung ermöglicht ein zeitabhängiges Sperren der
entsprechenden Türcodekanäle. Je
Kanal stehen 10 Dauerverriegelungszeiten zur Verfügung.
Jede Verriegelungszeit kann auf einen bestimmten Wochentag programmiert werden. Wird bei der Wochenprogrammierung Tag 0 eingegeben, ist die Dauerverriegelung an
allen Tagen gültig (Blockbildung
möglich). Überschneidet sich eine
Dauerentriegelungszeit mit einer
Dauerverriegelungszeit, so hat die
Verriegelung Vorrang.
Programmierablauf:
Einstellung der Dauerverriegelungszeiten
Kanal 1 = Tür 1
Kanal 2 = Tür 2
--- Schlüsselschalter in Programmierstellung drehen.Im Anzeigefeld erscheint die Uhrzeit.
--- Kanal anwählen >>> Taste
Tür 1 oder Tür 2 betätigen.
Im Anzeigefeld erscheint die
gespeicherte Codezahl.
--- Zusatzfunktionstaste >>> ENG
drücken. Im Anzeigefeld sind 2
freie Stellen durch Punkte markiert.
--- Befehlsnummer >>> 16 (Befehl
Dauerverriegelung) eingeben.
--- Eingabe durch Drücken der >>>
Taste ENT bestätigen. Im
Anzeigefeld erscheint die Information dV 0 für Dauerverriegelung nicht aktiviert bzw. dV 1
für Dauerverriegelung aktiviert.
--- Gewünschten Aktivierungszustand >>> 0 oder 1 über das
Ziffernprogrammierfeld der Türcode-Anlagen eingeben.
--- Wird die Ziffer >>> 0 eingegeben, (Dauerverriegelung nicht
aktiviert) und durch >>> Taste
ENT bestätigt, so erscheinen
im Anzeigefeld 2 freie Stellen,
die durch die Eingabe einer neuen Befehlsnummer belegt werden können.
------- Befehlsnummern
(siehe Seite 5) ---------------- Wird keine neue Befehlsnummer
eingegeben, so kann die Programmierung durch das Bestätigen der >>> Tasten ENG und
anschließend der >>> Taste •
(Normalbetrieb) beendet
werden.
--- Wird der Aktivierungszustand
>>> 1 eingegeben (Dauerverriegelung aktiv),so kann die Programmierung wie nachstehend
beschrieben, weitergeführt werden.
-*- Für die Tür-Dauerverriegelung
stehen 10 Speicherplätze zur
Verfügung (-1- erster Speicherplatz). Hierbei kann die Anfangsbzw. Endzeit der Dauerverriegelung unter Bezug des Wochentages programmiert werden. Bei
der Programmierung einer Dauerverriegelung müssen alle 10
Speicherplätze durchgetastet
werden.
Angaben können überschrieben
oder mit der >>> Taste CE
9
auf 0000 gesetzt werden.
Werkseitig sind alle Anfangs- und
Endzeiten, sowie der Wochentag auf 0 eingestellt. Sämtliche
Eingaben oder Betätigungen
sind mit der >>>
Taste ENT zu bestätigen.
--- Eingabe durch Drücken der
>>> Taste ENT bestätigen.
Im Anzeigefeld erscheint die Information A (Zeit) für die Anfangszeit der ersten Dauerverriegelung.
>1< Gewünschte Anfangszeit
4-stellig in Stunden und Minuten eingeben (evtl. Überschreiben der angezeigten Zeit)
--- Eingabe durch Drücken der
>>> Taste ENT bestätigen.
Im Anzeigefeld erscheint die Information E(Zeit) für die Endzeit
der ersten Dauerverriegelung.
--- Gewünschte Endzeit 4-stellig in
Stunden und Minuten über das
Ziffernprogrammierfeld eingeben (evtl. Überschreiben der
angezeigten Zeit)
--- Eingabe durch Drücken der
>>> Taste ENT bestätigen.
Im Anzeigefeld erscheint der
Wochentag, z.B. t = 0 an dem
die zuvor programmierte Dauerverriegelungszeit gültig sein
soll.
t = 0 bedeutet an allen Tagen
t = 1 bedeutet nur am Montag
t = 2 bedeutet nur am Dienstag
.
.
t = 7 bedeutet nur am Sonntag
--- Gewünschte Wochentagsziffer
über das Ziffernprogrammierfeld eingeben. (Überschreiben
des angezeigten Wochentages)
--- Eingabe durch Drücken der
>>> Taste ENT bestätigt.
-*- Im Anzeigefeld erscheint die Information A (Zeit) für die Anfangszeit der zweiten Dauerverriegelung.
-*- Der Programmierablauf wiederholt sich nun vom oben gekennzeichneten Programmierschritt
(>1<) ab, bis alle 10 Dauerverriegelungsspeicher programmiert sind.
Nach dem die Wochentagsziffer
der 10ten Dauerverriegelungszeit durch die >>> Taste ENT
bestätigt worden ist, erscheinen
im Anzeigefeld 2 freie Stellen,
die durch die Eingabe einer
neuen Befehlsnummer belegt
werden können.
------- Befehlsnummern
(siehe Seite 5) ------------10
--- wird keine neue Befehlsnummer eingegeben, so kann die
Programmierung durch das
Bestätigen der >>> Tasten ENG
und anschließend der >>> Taste
• (Normalbetrieb) beendet
werden.
--- Schlüsselschalter in Betriebsstellung bringen.
Programmierung:
Nachtcode
(Befehl 17)
Jeder Tür kann eine zweite Codezahl zugeordnet werden. Die Gültigkeitsdauer (Anfangszeit z.B. 20.00
Uhr und Endzeit z.B. 06.00 Uhr) muß
über das Ziffernprogrammierfeld eingegeben werden.
Programmierablauf:
Einstellung des Nachtcodes
Kanal 1 = Tür 1
Kanal 2 = Tür 2
--- Schlüsselschalter in Programmierstellung drehen.Im Anzeigefeld erscheint die Uhrzeit.
--- Kanal anwählen >>> Taste
Tür 1 oder Tür 2 betätigen.
Im Anzeigefeld erscheint die
gespeicherte Codezahl.
--- Zusatzfunktionstaste >>> ENG
drücken. Im Anzeigefeld sind
2 freie Stellen durch Punkte
markiert.
--- Befehlsnummer >>> 17 (Befehl
Nachtcode) eingeben.
--- Eingabe durch Drücken der >>>
Taste ENT bestätigen.
Im Anzeigefeld erscheint die
Information nc 0 für Nachtcode
nicht aktiviert bzw. nc 1 für
Nachtcode aktiviert.
--- Gewünschten Aktivierungszustand >>> 0 oder 1 über das
Ziffernprogrammierfeld der Türcode-Anlagen eingeben.
--- Wird die Ziffer >>> 0 eingegeben, (Nachtcode nicht aktiviert)
und durch >>> Taste ENT bestätigt, so erscheinen im Anzeigefeld 2 freie Stellen, die durch
Eingabe einer neuen Befehlsnummer belegt werden können.
------- Befehlsnummern
(siehe Seite 5) ---------------- Wird keine neue Befehlsnummer
eingegeben, so kann die Programmierung durch das Bestätigen der >>> Tasten ENG
und anschließend der >>> Taste
• (Normalbetrieb) beendet
werden.
--- Wird der Aktivierungszustand >>>
1 eingegeben (Nachtcode aktiv), so kann die Programmierung,
wie nachstehend beschrieben,
weitergeführt werden.
--- Eingabe durch Drücken der >>>
Taste ENT bestätigen.
Im Anzeigefeld erscheint die gespeicherte Nachtcodezahl.
--- Nachtcodezahl löschen >>>
Taste CE drücken.
Im Anzeigefeld sind 6 freie
Stellen durch Punkte markiert
(werkseitige Einstellung)
--- Gewünschte Nachtcodezahl
über das Ziffernprogrammierfeld der Türcode-Anlage
eingeben.
Zur Auswahl steht eine beliebige
Nachtcodezahl bis max. 6
Codeziffern.
--- Eingabe durch Drücken der
>>> Taste ENT bestätigen.
Im Anzeigefeld erscheint die Information A (Zeit) für die Anfangszeit des Nachtcodes.
--- Gewünschte Anfangszeit
4-stellig in Stunden und Minuten eingeben (evtl. Überschreiben der angezeigten Zeit)
--- Eingabe durch Drücken der
>>> Taste ENT bestätigen.
Im Anzeigefeld erscheint die Information E (Zeit) für die
Endzeit des Nachtcodes.
--- Gewünschte Endzeit 4-stellig in
Stunden und Minuten eingeben
(evtl. Überschreiben der angezeigten Zeit)
--- Eingabe durch Drücken der
>>> Taste ENT bestätigen.
Im Anzeigefeld erscheinen 2
freie Stellen, die durch die Eingabe einer neuen Befehlsnummer belegt werden können.
------- Befehlsnummern
(siehe Seite 5) ---------------- Wird keine neue Befehlsnummer eingegeben, so kann
die Programmierung durch das
Betätigen der >>> Tasten
ENG und anschließend der
>>> Taste • (Normalbetrieb)
beendet werden.
--- Schlüsselschalter in Betriebsstellung bringen.
e n g l i s h
Door coding control devices
441-10 /451-10
General description
The fully electronic/microprocessorcontrolled door coding system model
441-10 /451-10 in the two channel
version provides facilities for the connection of 2 doors and 2 keypads.
Programming of the door coding system can only be given entitlement
by actuation of the key-operated
switch. The latter's key has to be
turned to the programming position.
The system is freely programmable
via the keypad and a 7 segment
display.
This means that 2 doors (2 channels)
can be separately coded, a maximum
of 6 digits per door.
All data and codes can be read
amended by programming-entitled
personnel via the key-operated
switch.
Programmed data if retained even
after a complete power failure as the
data are stored after each programming procedure.
For operation to continue in the event
of power (mains) failure it is advisable
that a battery model 18004 (5,7 Ah)
be used. When using model 451-10
necessary to use the battery to
backup the clock.
Technical data:
Mains connection:
220 V +/- 10 %, 50/60 Hz
Ambient temperature:
+5° C to + 40° C
Enclosure:
sheet steel enclosure
with front panel membrane
keypad and integrated
key-operated switch.
Enclosure dimensions:
300 x 185 x 130 mm
(b x h x d)
Mains unit:
12 V/ 1,2 A
Emergency power suply:
12 V/ 5,7 Ah
(model 18 004)
only in the case of expansion
in the form of an accumulator
Connection facilities:
2 pushbutton devices,
2 door openers
(or 2 door openers with
acknowledgement message
Keypads
A choice of four different keypad
units is available. Common to all is
that they have a 12-key matrix keypad. Keypads are always mounted
within hand reach of doors. The keypad enclosure can be conveniently
fitted by unscrewing and removing
the front panel. After having introduced and connected the 7-conductor screened control cable (see
connection diagram) the front panel
is screwed back onto the keypad
enclosure. In the case of keypads
protected against water, care must
be taken that the front panel seal is
not damaged.
Screened cable with a minimum of 7
conductors has to be used for the
keypad control cable. A lead length
(between keypad and control device)
of 200 m may not be ecxeeded.
Outgoing from the door coding system all control cables must be laid
separately and star-shaped.
Caution!
Take heed that only screened cable
may be used and that all screening
has to be connected to the central
earth terminal inside the enclosure.
In detail the following keypads
are available:
412 - 10 (412 -12) (standard – surface
mounted version)
413 -10 (413 -12) (standard – surface
mounted, protected against water)
414 -10 (414 -12) (standard – concealed mounting)
415 -10 (415 -12) (standard – concealed mounting, protected against
water)
Door openers
The door openers to be utilized together with the door coding system are
the models 1405 (energized mode)
and 3405 (nonenergized mode). It is
recommended fundamentally that
the door opener be used together
with acknowledgement message
contacts (ordering suffix RR).
In the case of enhanced security
requirements it is recommended
that security door opener model
14105 RR (energized mode) or
34105 RR (nonenergized mode)
be fitted.
Technical data:
1405 RR:
voltage rating 12 Vpower consumption 200 mA
continuous duty
3405 RR:
voltage rating 12 Vpower consumption 200 mA
14105 RR:
voltage rating 12 Vpower consumption 400 mA
continuous duty
34105 RR:
voltage rating 12 Vpower consumption 470 mA
Caution!
If door openers without acknowledgement message contacts are fitted,
the slide switches S 4 and S 5 on the
connection board have to be placed
in the ON
switch position (see
connection diagram).
Door openers with acknowledgement
message contacts have to be provided for door coding control device
451 - 10!
Programming:
Code number
Programming procedure:
setting of code number
channel 1 = door 1
channel 2 = door 2
--- Turn key-operated switch to
programing position.
--- Slide programming switch >>>
S 1 and S 2 to ON Position.
For this purpose the appliance
must be opened. The programming switches S1 and S2 are
located on the main board.
--- Select channel, actuate >>> key
Door 1 or Door 2 .
The stored code number appears
in the display box.
--- Delete code number >>>
Press key CE .
6 free digits are marked by
points in the display box.
--- Enter the desired code number
via the door coding system's
numeric programming pad.
A random code number of up to
a maximum of 6 code digits is
available for selection.
--- If an existing stored code number
is to be retained or, the programming procedure is being
terminated, in both cases the
>>> key • (normal operating
mode) has to be pressed to
conclude.
--- Place programming switch >>>
S 1 and S 2 in desired switch
position.
11
-*-Programming switch position:
S1 and S2 ON basic function
short unlocked period
-*- Programming switch positions:
S 1 ON and S 2 OFF basic
function short unlocked period
with continuous unlocked period
via keypad (for further details
see page 12).
--- Close appliance cover
--- Turn key-operated switch to
operating position
Key to symbols:
--- Programming steps to be carried out
-*- Instructions
>>> Actuation of following key
Programming:
Door unlocked period
-*- A door unlocking period of 07
secs. is programmed ex-factory
for door 1 and door 2.
Programming procedure:
setting of door unlocked period
channel 1 = door 1
channel 2 = door 2
--- Turn key-operated switch to
programming position.
--- Slide porgramming switch
>>> S 1 and S 2 to position
OFF . The appliance has to be
opened for this purpose;
The programming switches S 1
and S 2 are located on the main
board.
--- Select channel, actuate
>>> key Door 1 or Door 2 .
The stored door unlocked period
appears in the display box.
--- If another door unlocked period
is desired, a two digit number
between 01 and 99 secs. has to
be entered via the numeric
programming pad (overwriting the
stored door unlocked period).
--- If an existing, stored door
unlocking period is to be
confirmed or the programming
procedure terminated, to
conclude the >>> key •
(normal operating mode) has to
be pressed in both cases.
--- Place the programming switch
>>> S 1 and S 2 in the
desired switching position.
-*- Programming switch position:
S 1 and S 2 ON basic function
short unlocked period
-*- Programming switch position:
S 1 ON and S 2 OFF
basic function short period
release with continuous
12
unlocked period via keypad
(for further details see page 12).
--- Close appliance cover
--- Put key-operated switch in
operating position
Programming:
Function
Keypad-controlled
continuously
unlocked door
The doors can be continuously unlocked by actuating the plus keys
and subsequent entry of the code
number via the keypads. The possibility thus exists of accessing these
doors as often as desired. In order to
reset the free accessibility of the
doors, first of all the minus key and
then the code number has to be
entered via the keypads.
If the plus key is not confirmed via
the keypads the basic function (short
unlocked period) is effective upon
entry of the correct code number.
-*- Ex-factory the basic function
(short unlocked period) is preset
for door 1 and door 2.
(S 1 and S 2 ON )
Programming procedure:
setting of the continuously unlocked
door period; this function is effective
generally for both channels or doors.
--- Turn key-operated switch to
programming position and open
door coding device.
--- Slide pogramming switch >>>
S 1 to ON position and S 2
to OFF position.
-*- The programming switches S 1
and S 2 are located on the main
board.
--- Close appliance cover
--- Put key-operated switch in
operating position
Additional functions
The following additional functions are
only included in the case of the door
coding control device model 451-10.
Furthermore, the control device has
to be fitted with a 12 V/5,7 Ah accumulator (no. 18 004).
Command numbers
No. Function
01 Alarm code
02 Erroneous code
03 Door monitoring
04 Lock-doors function
05 Central keypad
10 Time and weekday
setting
Page
12 – 13
13
13 – 14
14
14
14 – 15
11
Summertime/
15
standard time
15 Continuously
15 – 16
unlocked periods
16 Continuously
16 – 17
locked periods
17 Night code
17
The command codes 06 – 09 and
12 – 14 are not assigned.
Caution!
During programming procedures for
additional functions the sliding
switches >>> S1 and S2 must be
located in the ON position (basic
function) or >>> S 1 in the ON
position and S 2 in the OFF position (basic function with continuously
unlocked facility)!
Programming:
Alarm code
(command 01)
By means of the alarm code the door
is both unlocked and simultaneously
an alarm is triggered at the central
control unit (silent alarm). By this
means the central unit is alarmable
unnoticed, e.g. in the event of forced
access.
The alarm code is identical with the
respectively valid door code, with
the exception of the last digit. If alarm
is required to be activated, the last
figure is raised by 2.
I.e. if the last digit is 7,
the alarm digit is 9.
If the last digit is 9,
the alarm digit is 1.
Programming procedure:
setting of the alarm code
channel 1 = door 1
channel 2 = door 2
--- Turn key-operated switch to
programming position. The time
appears in the display box.
--- Select the channel, actuate
>>> key Door 1 or Door 2 .
The stored code number
appears in the display box.
--- Press additional function key
>>> ENG .
2 free digits are marked by
points in the display box.
--- Enter command number >>> 01
(command alarm code).
--- Confirm entry by pressing the
>>> key ENT .
The information AC 0 appears
in the display box, standing for
alarm code not activated or
AC 1 , standing for alarm code
activated.
--- Enter desired activation status
>>> 0 or 1 via the numeric
programming pad of the door
coding systems.
--- If the number >>> 0 is entered
(alarm code not activated) and
confirmed by >>> key ENT ,
2 free digits appear in the display
box which are occupiable by the
entry of a new command number.
------ Command numbers
(see page 12) --------------- If no new command number is
entered programming can be
terminated by actuating the >>>
key ENG and subsequently
the >>> key •
(normal operating mode).
--- If the activation status >>> 1 is
entered (alarm code active)
programming must be continued
as described in the following.
--- Confirm entry by pressing the >>>
key ENT . The stored alarm
message period (alarm relay
pick-up period) appears in the
display box, being programmed
ex-factory to 30 secs.
-*- If a different alarm period is
desired, a two digit number of
between 01 and 99 secs. has to
be entered via the numeric programming pad (overwriting the
stored alarm message period).
--- Confirm entry by pressing the >>>
key ENT .
-*- 2 free digits appear in the display
box which are occupiable by the
input of a new command number.
------ Command numbers
(see page 12) --------------- If no new command number is
entered, programming can be
terminated by confirmation of
the key >>> ENG and
subsequently the >>> key •
(normal operating mode).
--- Turn key-operated switch to
operating position.
Programming:
Erroneous code message
(command 02)
The erroneous code message (reaction of the erroneous code relay is
triggered when a programmed number of erroneous code numbers has
been entered via the keypad units.
During the erroneous code message
period (between 01 and 99 secs.)
the door coding control device locks
the keypad or channel concerned.
Programming procedure:
setting of erroneous code
channel 1 = door 1
channel 2 = door 2
--- Turn key-operated switch to
programming position. The time
appears in the display box.
--- Select channel, actuate
>>> key Door 1 or Door 2 .
The stored code number
appears in the display box.
--- Press additional function key
ENG . 2 free digits are marked
by points in the display box.
--- Enter command number >>>02
(command erroneous code
message).
--- Confirm input by pressing the >>>
key ENT .
The information FC 0 appears
in the display box, standing for
erroneous code message not
activated or FC 1 , standing
for erroneous code message
activated .
--- Enter desired activation status
>>> 0 or 1 via the numeric
programming pad of the door
coding systems.
--- If the number >>> 0 is entered
(erroneous code message not
activated), and confirmed by
>>> key ENT , 2 free digits
appear in the display box,
which can be allocated for entry
of a new command number.
------ Command numbers
(see page 12) --------------- If no new command number is
entered, programming can be
terminated by confirmation of
the >>> key ENG and
subsequently the >>> key •
(normal operating mode).
--- If the activation status >>> 1
is entered (erroneous code
message active), programming
can be continued as described
in the following.
--- Confirm entry by pressing the
>>> key ENT .
The stored erroneous code
message period (erroneous code
relay reaction period) appears in
the display box, this being programmed ex-factory to 30 secs.
Display: erroneous code relay
reaction period e.g. FC 30 .
The corresponding channel is
inhibited for re-entry of the code
number during the erroneous
code message period.
--- If a different erroneous code
message period is desired,
a two digit number between 01
---*-
-*-
---*-
---
---
and 99 secs. must be entered
via the numeric programming
pad (overwriting the erroneous
code message period).
Confirm entry by pressing the
>>> key ENT .
The number of possible
erroneous code entries appears
in the display box. 03 possible
repetitions are programmed exfactory. E.g.: if a 4-digit code
number is preset, the erroneous
code relay then reacts upon the
thirteenth erroneous key actuation. (4 digit code number x 3
possible erroneous code entries
= 12 permitted key actuations).
If a different number of erroneous
code entry possibilities is desired,
a two digit number between 01
and 05 can be entered via the
numeric programming pad.
(Overwriting the stored number).
Confirm entry by pressing the
>>> key ENT .
2 free digits appear in the
display box, which are occupiable
by the entry of a new command
number.
------ Command numbers
(see page 12) ------------If no new command number is
entered, programming can be
terminated by confirmation of
the >>> key ENG and
subsequently the >>> key •
(normal operating mode).
Turn key-operated switch to
operating position.
Programming:
Door monitoring
(command 03)
The control device triggers a message, if a door stays open beyond
the programmed door monitoring
period.
Programming procedure:
setting of additional function
door monitoring
channel 1 = door 1
channel 2 = door 2
--- Turn key-operated switch to
programming position. The time
appears in the display box.
--- Select channel, actuate >>> key
Door 1 or Door 2 .
The stored code number appears
in the display box.
--- Press additional function key >>>
ENG . 2 free digits are marked
by points in the display box.
13
--- Enter command number >>> 03
(command door monitoring).
--- Confirm entry by pressing the
>>> key ENT .
The information tu 0 appears in
the display box, standing for door
monitoring function not activated
or tu 1 , standing for door
monitoring function activated.
--- Enter desired activation status
>>> 0 or 1 via the numeric
programming pad of the door
coding systems.
--- If the number >>> 0 is entered
(door monitoring function not
activated) and confirmed by
>>> key ENT , 2 free digits
then appear in the display box
which are occupiable by the
entry of a new command
number.
------ Command numbers
(see page 12) -------------- If no new comand numbers are
entered, programming can be
terminated by confirmation of
the >>> keys ENG and
subsequently the >>> key •
(normal operating mode).
--- If activation status >>> 1 is
entered (door monitoring function
active) programming can be
continued as described in the
following.
--- Confirm entry by pressing the
>>> key ENT .
The information door monitoring
period appears in the display
box, e.g. tu 99 . After this
monitoring period the erroneous
code relay is triggered (message:
door open too long). 99 secs. are
programmed ex-factory.
--- If a different door monitoring
period is desired, a two digit number has to be entered between
01 and 99 secs. via the numeric
programming pad (overwriting the
stored door monitoring period).
--- Confirm entry by pressing the
>>> key ENT .
-*- 2 free digits appear in the display
box, which are occupiable by the
entry of a new command number.
------ Command numbers
(see page 12) --------------- If no new command number is
entered, programming can be
terminated by confirmation of
the >>> key ENG and
subsequently of the key •
(normal operating mode).
--- Turn key-operated switch to
operating position.
14
Programming:
Lock-doors function
(command 04)
As the term already defines only one
of two doors can be opened at any
one time via the code number or by
means of a door opening pushbutton.
As long as a door remains open, the
door's counterpart remains locked.
Programming procedure:
setting of the additional functions
lock-doors operating mode
(programming of the additional function lock-doors operating mode can
be effected on channel 1 or channel
2, entry applies, however, at all times
to both channels).
--- Turn key-operated switch to
programming position. The time
appears in the display box.
--- Select channel, actuate
>>> key Door 1 or Door 2 .
The stored code number
appears in the display box.
--- Press the additional function key
>>> ENG . 2 free digits are marked by points in the display box.
--- Enter command number >>> 04
(command lock-doors function).
--- Confirm entry by pressing the
>>> key ENT . The information
SF 0 appears in the display
box, standing for lock-doors
functions not activated or SF 1
for lock-doors functions activated.
--- Enter desired activation status
>>> 0 or 1 via the numeric
programming box of the door
coding systems.
--- If the number >>> 0 or 1 is
entered and confirmed by >>>
key ENT , 2 free digits appear
in the display box, which can be
occupied by a new command
number.
------ Command numbers
(see page 12) --------------- If no new command number is
entered, programming can be
terminated by confirmation of
the >>> key ENG and
subsequently of the >>> key •
(normal operating mode).
--- Turn key-operated switch to
operating position.
Programming:
Central keypad
(command 05)
When the additional function central
keypad is activated both channels
are controlled by keypad 1. No entry
is possible via keypad 2.
Programming procedure:
setting of additional function central
keypad
(programming of the additional function central keypad can be effected
on channel 1 or channel 2, but entry
always applies to both channels).
--- Turn key-operated switch to
programming position. The time
appears in the display box.
--- Select channel, actuate >>> key
Door 1 or Door 2 .
The stored code number appears
in the display box.
--- Press additional function key >>>
ENG . 2 free digits are marked
by points in the display box.
--- Enter command number >>> 05
(command central keypad).
--- Confirm entry by pressing the
>>> key ENT . The information
Zt 0 appears in the display box,
standing for central keypad not
activated or Zt 1 , standing for
central keypad activated.
--- Enter desired activation status
>>> 0 or 1 via the numeric
programming box of the door
coding systems.
--- If the number >>> 0 or 1 is entered and confirmed by >>> key
ENT , 2 free digits appear in the
display box, which are occupiable
by a new command number.
------ Command numbers
(see page 12) --------------- If no new command number is
entered, programming can be
terminated by confirmation of the
>>> key ENG and
subsequently of the >>> key •
(normal operating mode).
--- Turn key-operated switch to
operating position.
Programming:
Time and weekday
(command 10)
Programming procedure:
setting of current time and the current
weekday
(The time and weekday are programmable on channel 1 or channel
2, however, entry is valid at all times
for both channels).
--- Turn key-operated switch to
programming position. The time
appears in the display box.
--- Select channel, actuate >>> key
Door 1 or Door 2 .
The stored code number appears
in the display box.
--- Press additional function key >>>
ENG .
2 free points are marked by points
in the display box.
--- Enter command >>> 10
(set clock).
--- Confirm entry by pressing >>>
key ENT . A weekday specification appears in the display box.
Number 1 ≈ Monday;
Number 2 ≈ Tuesday;...
Number 7 ≈ Sunday
--- Enter desired weekday number
via the numeric programming pad
(overwriting displayed weekday).
--- Confirm entry by pressing
>>> key ENT . The time
appears in the display box.
--- Enter current time (in hours,
minutes and seconds) via the
numeric programming pad
(overwriting displayed weekday).
--- Confirm entry (clock start) by
means of >>> key ENT .
--- 2 free digits appear in the display
box, which are occupiable by the
entry of a new command number.
------ Command numbers
(see page 12) --------------- If no new command number is
entered, programming can be
terminated by confirming the
>>> key ENG and
subsequently the >>> key •
(normal operating mode).
--- turn key-operated switch to
operating position.
Programming:
Summertime/standard time
(command 11)
Programming procedure:
setting of sumertime or standard time
(programming of summertime/standard time is effectable on channels 1
or 2, however, entry is valid at all
times for both channels).
--- Turn key-operated switch to
programming position. The time
appears in the display box.
--- Select channel, actuate >>> key
Door 1 or Door 2 .
The stored code number appears
in the display box.
--- Press additional function key >>>
ENG .
2 free points are marked by points
in the display box.
--- Enter command >>> 11
(command summer/standard).
--- Confirm entry by pressing
>>> key ENT .
---
---
---
---
The information SZ 0 , standing for standard time or, SZ 1 ,
standing for summertime,
appears in the display box.
Enter desired activation status
>>> 0 or 1 via the numeric
programming pad of the door
coding systems.
If the number >>> 0 or 1 is
entered and confirmed by >>>
key ENT , 2 free digits appear
in the display box, which are
occupiable by the entry of a new
command number.
------ Command numbers
(see page 12) ------------If no new command number is
entered, programming can be
terminated by confirming the
>>> key ENG and
subsequently the >>> key •
(normal operating mode).
Turn key-operated switch to
operating position.
Programming:
Continuously
unlocked periods
(command 15)
Continuously unlocked door periods
makes it possible that the corresponding door is freely accessible,
dependent on time, without any code
number entry. The duration of validity
must be programmed each time with
reference to the weekday. 10 continuously unlocked periods are available per channel (door) for this additional function.
Programming procedure:
setting of continuously unlocked
periods
channel 1 = door 1
channel 2 = door 2
--- Turn key-operated switch to
programming position. The time
appears in the display box.
--- Select channel, actuate >>> key
Door 1 or Door 2 .
The stored code number appears
in the display box.
--- Press additional function key >>>
ENG . 2 free digits are marked
by points in the display box.
--- Enter command >>> 15
(command continuously
unlocked period).
--- Confirm entry by pressing
>>> key ENT . The information
dE 0 , standing for continuously
unlocked period not activated or,
dE 1 , standing for continuously
unlocked period activated,
appears in the display box.
--- Enter desired activation status
>>> 0 or 1 via the numeric
programming pad of the door
coding systems.
--- If the number >>> 0 is entered
(continuously unlocked period not
activated) and confirmed by
>>> key ENT , 2 free digits
appear in the display box, which
are occupiable by the entry of a
new command number.
------ Command numbers
(see page 12) --------------- If no new command number is
entered, programming can be
terminated by confirmation of the
>>> key ENG and
subsequently the >>> key •
(normal operating mode).
--- If activation status >>> 1 is
entered (continuously unlocked
period active), programming can
be continued as described in the
following.
-*- 10 storage locations are available
for the continuously unlocked
door period. The starting and
finishing times of the continuously
unlocked period is hereby
programmable with reference to
the weekday. When programming
a contiuously unlocked period
all 10 storage locations have to
keyed through.
All data can be overwritten or
reset to 0000 by means of the
>>> key CE (all starting, finishing times and the weekday are
preset to 0 ex-factory. All entries
or confirmations have to be
confirmed by means of >>> key
ENT .
--- Confirm entry by pressing >>>
key ENT .
The information A (time) appears
in the display box for the starting
time of the first continuously
unlocked period.
>1< Enter desired starting time,
4 digits in hours and minutes, via
the numeric programming pad
(possibly overwriting displayed
time).
--- Confirm entry by pressing the
>>> key ENT .
The information E (time)
appears in the display box,
standing for the finishing time of
the first continuously unlocked
period.
--- Enter desired finishing time,
4 digits in hours and minutes, via
the numeric programming pad
15
---
---
---*-
-*-
---
---
(possibly overwriting displayed
time).
Confirm entry by pressing the
>>> key ENT .
The weekday appears in the
display box, e.g. t = 0 on
which the previously programmed
continuously unlocked period is
to be valid.
t = 0 signifies on all days
t = 1 signifies only on Monday
t = 2 signifies only on Tuesday
.
.
t = 7 signifies only on Sunday
Enter desired weekday number
via the numeric programming pad
(possibly overwriting displayed
weekday).
Confirm entry by pressing the
>>> key ENT .
The information A (time) appears
in the display box, standing for
the starting time of the second
continuously unlocked period.
The programming procedure now
repeats itself starting from the
above designated programming
step (>1<), until all 10 continuously
unlocked period storage locations
have been programmed.
Once the weekday number of the
10th continuously unlocked period
has been confirmed by means
of the >>> key ENT , 2 free
digits appear in the display box,
which are occupiable by the entry
of a new command number.
------ Command numbers
(see page 12) ------------If no new command number is
entered, programming can be
terminated by confirmation of the
>>> key ENG and
subsequently the >>> key •
(normal operating mode).
Turn key-operated switch to
operating position.
Programming:
Continuously locked periods
(command 16)
The continuously locked door facility
makes possible the time-dependent
locking of the corresponding door
code channels.
10 continuously locked periods are
available per channel. Each locked
period is programmable for a certain
weekday. If day 0 is entered when
programming the week, continuous
locking is valid on all days (block
formation possible).
If a continuously unlocked period
overlaps a continuously locked
16
period, the locked period has precedence.
Programming procedure:
setting of continuously locked periods
channel 1 = door 1
channel 2 = door 2
--- Turn key-operated switch to
programming position. The time
appears in the display box.
--- Select channel, actuate >>> key
Door 1 or Door 2 .
The stored code number appears
in the display box.
--- Press additional function key
>>> ENG .
2 free digits are marked by points
in the display box.
--- Enter command >>> 16
(command continuously unlocked
period).
--- Confirm entry by pressing
>>> key ENT . The information
dV 0 , standing for continuously
locked period not activated or,
dV 1 , standing for continuously
locked period activated, appears
in the display box.
--- Enter desired activation status
>>> 0 or 1 via the numeric
programming pad of the door
coding systems.
--- If the number >>> 0 is entered
(continuously locked period not
activated) and confirmed by
>>> key ENT , 2 free digits
appear in the display box, which
are occupiable by entry of a new
command number.
------ Command numbers
(see page 12) --------------- If no new command number is
entered, programming can be
terminated by confirmation of the
>>> keys ENG and
subsequently the >>> key •
(normal operating mode).
--- If activation status >>> 1 is
entred (continuously locked
period active), programming can
be continued as described in the
following.
-*- 10 storage locations are available
for the continuously locked door
period (-1- first storage location).
The starting and finishing time of
the continuously locked period is
hereby programmable relative to
the weekday. When programming
a continuously locked period
all 10 storage locations have to
keyed through.
All data can be overwritten or
reset to 0000 by means of the
>>> key CE . All entries or
confirmations are to be confirmed
by means of >>> key ENT .
--- Confirm entry by pressing the
>>> key ENT .
The information A (time)
appears in the display box,
standing for the starting time of
the first continuously locked
period.
>1< Enter desired starting time,
4 digits in hours and minutes,
(possibly overwriting displayed
time).
--- Confirm entry by pressing the
>>> key ENT .
The information E (time)
appears in the display box, standing for the finishing time of the
first continuously locked period.
--- Enter desired finishing time,
4 digits in hours and minutes, via
the numeric programming pad
(possibly overwriting displayed
time).
--- Confirm entry by pressing the
>>> key ENT .
The weekday appears in the
display box, e.g. t = 0 on
which the previously programmed
continuously locked period is to
be valid.
t = 0 signifies on all days
t = 1 signifies only on Monday
t = 2 signifies only on Tuesday
.
.
t = 7 signifies only on Sunday
--- Enter desired weekday number
via the numeric programming pad
(possibly overwriting displayed
weekday).
--- Confirm entry by pressing the
>>> key ENT .
-*- The information A (time) appears
in the display box,standing for
the starting time of the second
continuously locked period.
-*- The programming procedure now
repeats itself commencing from
the above designated programming step (>1<), until all 10 continuously locked period storage
locations are programmed.
Once the weekday number of the
10th continuously locked period
has been confirmed by means of
the >>> key ENT , 2 free digits
appear in the display box, which
are occupiable by the entry of a
new command number.
------ Command numbers
(see page 12) --------------- If no new command number is
entered, programming can be
terminated by confirmation of the
>>>key ENG and subsequently
the >>> key •
(normal operating mode).
--- Turn key-operated switch to
operating position.
---
Programming:
Night code
(command 17)
---
A second code number is assignable
to each door. The validity period
(starting time, e.g. 20.00 hours and
finishing time, e.g. 06.00 hours) has
to be entered via the numeric programming pad.
---
Programming procedure:
setting of night code
channel 1 = door 1
channel 2 = door 2
---
--- Turn key-operated switch to
programming position. The time
appears in the display box.
--- Select channel, actuate >>> key
Door 1 or Door 2 .
The stored code number appears
in the display box.
--- Press additional function key
>>> ENG .
2 free digits are marked by points
in the display box.
--- Enter command >>> 17
(command night code).
--- Confirm entry by pressing >>>
key ENT .
The information nc 0 , standing
for night code not activated
or, nc 1 , standing for night
code activated, appears in the
display box.
--- Enter desired activation status
>>> 0 or 1 via the numeric
programming pad of the door
coding systems.
--- If the number >>> 0 is entered
(night code not activated) and
confirmed by >>> key ENT ,
2 free digits appear in the display
box, which are occupiable by the
entry of a new command number.
------ Command numbers
(see page 12) --------------- If no new command number is
entered, programming can be
terminated by confirmation of the
>>> key ENG and
subsequently the >>> key •
(normal operating mode).
--- If activation status >>> 1 is
entered (night code active),
programming can be continued
as described in the following.
--- Confirm entry by pressing the
key ENT .
---
---
---
---
---
The stored night code number
appears in the display box.
Delete night code number, press
>>> key CE . 6 free digits are
marked by points in the display
box (preset ex-factory).
Enter desired night code number
via the numeric programming pad
of the door coding system.
A random night code number of
up to a maximum of 6 digits is
available for selection.
Confirm entry by pressing the
>>> key ENT .
The information A (time)
appears in the display box,
standing for the starting time of
the night code.
Enter desired starting time,
4 digits in hours and minutes,
(possibly overwriting displayed
time).
Confirm entry by pressing the
>>> key ENT .
The information E (time)
appears in the display box,
standing for the finishing time of
the night code.
Enter desired finishing time,
4 digits in hours and minutes
(possibly overwriting displayed
time).
Confirm entry by pressing the >>>
key ENT .
2 free digits appear in the display
box, which are occupiable by the
entry of a new command number.
------ Command numbers
(see page 12) ------------If no new command number is
entered, programming can be
terminated by confirmation of the
>>> key ENG and
subsequently the >>> key •
(normal operating mode).
Turn key-operated switch to
operating position.
17
f r a n ç a i s
Centrales à clavier
441-10 / 451-10
Description générale
Entièrement électronique et
commandée par un microprocesseur, la centrale 441-10/451-10
permet de raccorder deux portes et
deux claviers.
Seule, la personne qui détient la clé
de programmation peut accéder aux
fonctions de programmation. Cette
personne, le responsable de la
centrale, tourne la clé sur la position
de programmation et peut alors
programmer la centrale et définir tous
les paramètres par l’intermédiaire
du bloc de touches numériques. Ses
interventions sont visualisées dans
une fenêtre d’affichage placée juste
au-dessus. Il peut programmer
séparément deux portes (deux
claviers); autrement dit il peut affecter
à chaque porte un code d’accès de 6
chiffres au maximum.
Dès que la programmation est
terminée, les données introduites
sont mémorisées et de ce fait,
entièrement conservées en cas de
coupure de courant.
La centrale se présente sous la forme d’un boîtier métallique robuste
prévu pour être fixé en saillie sur un
mur.
Une alimentation de secours est
intégrée qui permet de prolonger
son fonctionnement pendant
quelques heures après la coupure
de courant. Dans ce but, il convient
d’équiper la centrale avec un accu
de 5,7 Ah (référence : 18 004), qui ne
fait pas partie de l’équipement de
base de la centrale. Cet accu est
impératif pour le modèle 451-10, afin
que l’horloge intégrée puisse
continuer à fonctionner correctement
en cas de coupure de courant.
Spécifications techniques :
Tension :
220 V +/- 10%, 50/60 Hz
Températures de fonctionnement :
+ 5° C à + 40° C
Boîtier :
en acier, avec touches
tactiles encastrées et clé
de programmation
Dimensions du boîtier :
(L x H x P)
300 x 185 x 130 mm
18
Boîte d’alimentation :
12 V / 1,2 A
Alimentation de secours (option) :
12 V / 5,7 Ah (réf. 18 004)
Raccordements possibles :
2 claviers de touches
2 gâches (à contact de fond
de pêne)
Les claviers
Il existe quatre différents claviers au
choix. Ils se présentent tous sous la
forme d’un bloc de 3 x 4 touches.
Chaque clavier est à installer à
proximité de la porte dont il doit gérer
l’accès et à portée de la main. La
partie frontale se dévisse et s’enlève
facilement pour permettre la fixation
de l’ensemble et le raccordement du
câble à 7 brins avec écran (voir plan
de câblage). Elle se laisse remonter
sans difficulté. Dans le cas d’un
clavier en version étanche, s’assurer
que le joint est bien en place et n’est
pas détérioré.
La longueur de câblage entre le
clavier et la centrale ne doit pas
excéder 200 m.
Tous les raccordements à la centrale
doivent être posés séparément et
sous forme étoilée.
Attention !
N’utiliser que des câbles avec écran
et raccorder les écrans à la borne
centrale de mise à terre dans le
boîtier.
Claviers à disposition :
412-12 (412-10)
Version standard, en saillie
413-10 (413-12)
Version standard étanche, en saillie
414-10(414-12)
Version standard, encastrable
415-10 (415-12)
Version standard étanche, encastrable
Les gâches
Les gâches standard recommandées
pour les centrales à clavier sont les
modèles 1405 (fonction courant
travail) et 3405 (fonction courant
repos). D’une manière générale, il
est recommandé d’utiliser des
gâches avec un contact de retour de
fond de pêne (index de référence
RR).
Pour faire face aux exigences
croissantes en matière de sécurité, il
est toutefois préconisé d’installer des
gâches de sécurité, en l’occurrence
les modèles 14105 RR (courant
travail) ou 34105 RR (courant repos).
Spécifications techniques :
1405 RR :
Tension nominale 12VConsommation 200 mA,
alimentation permanente
3405 RR :
Tension nominale 12VConsommation 200 mA
14105 RR :
Tension nominale 12VConsommation 400 mA,
alimentation permanente
34105 RR :
Tension nominale 12VConsommation 470 mA
Attention !
En présence d’une gâche sans
contact de fond de pêne, il convient
de placer les sélecteurs S4 et S5 qui
figurent sur la platine de
raccordement, sur la position
EIN
(voir le plan de câblage).
Pour la centrale 451-10, prévoir
impérativement des gâches avec
contact de fond de pêne !
Programmation :
Code d’accès
Procédure de programmation :
Réglage du code d’accès
Porte 1
Porte 2
--- Tourner la clé de programmation
sur la position de programmation
--- Faire glisser les sélecteurs de
programmation >>> S1 et S2
sur la position EIN .Pour ce,
ouvrir la centrale; les sélecteurs
sont placés sur la platine de base.
--- Choisir la porte >>> en pressant
la touche Tür 1 (porte 1) ou
Tür 2 (porte 2).
Le code actuellement en vigueur
apparaît dans la fenêtre
d’affichage.
--- Effacer ce code >>> en pressant
la touche CE . Les six chiffres
dans la fenêtre d’affichage sont
remplacés par des points.
--- Composer le nouveau code sur
le bloc de touches numériques,
au choix une combinaison de 6
chiffres au maximum.
--- Pour conserver un code déjà en
mémoire, >>> presser la touche
(fonctionnement normal) ,
touche à presser également après
avoir composé un nouveau code.
--- >>> Faire glisser les sélecteurs
de programmation S1 et S2 sur
la position recherchée.
-*- S1 et S2 sur position EIN
:
Fonction de base „Libération
courte durée de la gâche“
-*- S1 sur position EIN et S2 sur
position AUS : Fonction de
base „Libération courte durée de
la gâche avec possibilité d’en
demander la libération
permanente sur le clavier“ (voir
plus loin).
--- Refermer le boîtier
--- Ramener la clé en position normale.
-*- S1 et S2 sur position EIN :
Fonction de base „ Libération
courte durée de la gâche “
-*- S1 sur position EIN et S2 sur
position AUS :
Fonction de base „ Libération
courte durée de la gâche avec
possibilité d’en demander la
libération permanente sur le
clavier“ (voir plus loin).
--- Refermer le boîtier
--- Ramener la clé en position normale.
Signification des symboles et abréviations :
--Pas dans la procédure
-*Observations
>>>
Touche à presser
AUS HS
EIN
ES
Programmation :
Fonction
Libération permanente
demandée sur clavier
Programmation :
Durée de libération de la
gâche
-*- Programmation faite à l’usine :
7 secondes pour porte 1 et
porte 2
Procédure de programmation :
Réglage de la durée de libération de
la gâche
Porte 1
Porte 2
--- Tourner la clé de programmation
sur la position de programmation
--- Faire glisser les sélecteurs de
programmation S1 et S2 >>>
sur la position AUS . Pour
ce, ouvrir la centrale;
les sélecteurs sont placés sur la
platine de base.
--- Choisir la porte >>> en pressant
la touche Tür 1 (porte 1) ou
Tür 2 (porte 2).
La durée actuellement en vigueur
apparaît dans la fenêtre
d’affichage.
--- Si la durée affichée doit être
changée, composer la nouvelle
durée ( 2 chiffres entre 01 et 99
secondes ) sur le bloc de touches
numériques) qui écrase la valeur
en place.
--- Pour conserver une durée déjà
en mémoire, >>> presser la
touche
(fonctionnement normal), touche à presser également
après avoir composé une
nouvelle durée.
--- >>> Faire glisser les sélecteurs
de programmation S1 et S2 sur
la position recherchée.
Il est possible de demander sur le
clavier la libération permanente de
la porte en pressant la touche +
avant de composer le code. C’est
une façon d’autoriser l’accès sans
restriction. Pour restaurer la libération
courte durée, il suffit de presser la
touche - avant de composer le code.
Composer le code sans avoir
auparavant presser la touche +, libère
la gâche uniquement pour la durée
programmée (fonction de base
„libération courte durée“).
-*- Programmation faite à l’usine :
Fonction de base „ libération
courte durée “ pour porte 1 et
porte 2 (S1 et S2 sur EIN ).
Procédure de programmation :
Mise en place de la possibilité de
demander la fonction „libération permanente d’une porte“; dès qu’elle
est activée sur une porte, cette
fonction l’est aussi sur l’autre).
--- Tourner la clé de programmation
sur la position de programmation
et ouvrir le boîtier.
--- >>> Faire glisser les sélecteurs
de programmation S1 sur
position EIN et S2 sur
position AUS
-*- Les sélecteurs sont placés sur la
platine de base.
--- Refermer le boîtier
--- Ramener la clé en position normale.
Fonctions supplémentaires
La centrale 451-10 dispose des
fonctions supplémentaires suivantes
pour laquelle il est indispensable de
compléter l’équipement par un accu
12 V / 5,7 Ah (Référence 18 004).
Ordres
N° Fonction
01 Code agression
02 Tentative d’accès
frauduleuse
03 Surveillance du temps
d’ouverture de porte
04 Fonction „sas“
05 Clavier central
10 Jour et heure
11 Horaires Eté/Hiver
15 Libération permanente
de la porte
16 Verrouillage permanent
de la porte
17 Code de nuit
Page
19
20
21
21
21
22
22
22
23
24
Attention !
Pour la programmation des fonctions
supplémentaires, >>> faire glisser
les sélecteurs S1 et S2 sur la
position EIN
(fonction de base)
ou bien >>> faire glisser S1 sur
EIN et S2 sur AUS (fonction
de base avec possibilité de libération
permanente)!
Programmation :
Code agression
(Ordre 01)
Le code agression libère la gâche,
mais déclenche parallèlement une
alarme silencieuse pour alerter le
poste de contrôle, quand la libération
de la gâche est faite sous la menace.
Ce code est identique au code
d’accès jusqu’au dernier chiffre : si
ce dernier chiffre est supérieur de 2
au dernier chiffre du code d’accès,
l’alarme est déclenchée.
Procédure de programmation :
Réglage du code agression
Porte 1
Porte 2
--- Tourner la clé de programmation
sur la position de programmation.
L’heure est alors lisible dans la
fenêtre d’affichage.
--- Choisir la porte >>> en pressant
la touche Tür 1 ( porte 1 ) ou
Tür 2 ( porte 2 ).
Le code actuellement en vigueur
apparaît dans la fenêtre
d’affichage.
--- >>> Presser la touche de fonction
supplémentaire ENG .
Dans la fenêtre d’affichage, deux
points apparaissent en lieu et
place de deux chiffres.
--- >>> Composer l’ordre 01 sur le
bloc de touches numériques.
19
--- Confirmer l’introduction >>> en
pressant la touche ENT . Dans
la fenêtre d’affichage, on peut lire
AC 0 quand la fonction n’est pas
activée et AC 1 quand elle l’est.
--- Choisir l’état activé ou désactivé
la fonction >>> en pressant la
touche 0 ou 1 sur le bloc de
touches numériques de la
centrale.
--- Quand on choisit 0 ( fonction
code agression désactivée ),
confirmée >>> en pressant
ENT , on voit apparaître dans la
fenêtre d’affichage deux points
en lieu et place de deux chiffres.
On peut alors introduire un nouvel
ordre.
------------ Ordres
( page 19 ) ----------------- On peut aussi mettre fin à la
programmation >>> en pressant
successivement les touches
ENG et
(fonctionnement
normal).
--- Quand on choisit 1 (fonction
code agression activée ) , il
convient alors de poursuivre la
programmation comme suit.
--- Confirmer ce choix >>> en
pressant ENT . Dans la fenêtre
d’affichage, on peut alors lire la
durée de l’alarme actuellement
en mémoire ( durée d’excitation
du relais alarme); la durée réglée
à l’usine est de 30 secondes.
-*- Pour modifier cette durée, il suffit
de composer sur le bloc de
touches numériques un nombre
à deux chiffres entre 01 et 99
secondes, qui écrasera la valeur
en place.
--- Confirmer l’introduction >>> en
pressant la touche ENT .
-*- On voit apparaître dans la fenêtre
d’affichage deux points en lieu et
place de deux chiffres. On peut
alors introduire un nouvel ordre.
------------ Ordres
(page 19) ------------------ On peut aussi mettre fin à la
programmation >>> en pressant
successivement les touches
ENG et
(fonctionnement
normal).
--- Ramener la clé en position normale.
20
Programmation :
Tentatived’accès frauduleuse
(Ordre 02)
Lorsqu’une personne tente d’ouvrir
la porte en composant plusieurs fois
de suite une suite de chiffres sur le
clavier, qui ne correspondent pas au
code d’accès programmé, une
alarme est déclenchée. On a la
possibilité de définir le nombre de
tentatives admises avant le déclenchement du relais d’alarme, ainsi
que la durée d’excitation de ce relais
d’alarme (entre 01 et 99 secondes).
Pendant cette durée la centrale
bloque le clavier d’accès et garde la
porte fermée.
Procédure de programmation
Réglage de la fonction d’alarme en
cas de tentatives d’accès frauduleuses
Porte 1
Porte 2
--- Tourner la clé de programmation
sur la position de programmation.
L’heure est alors lisible dans la
fenêtre d’affichage.
--- Choisir la porte >>> en pressant
la touche Tür 1 ( porte 1 ) ou
Tür 2 ( porte 2 ).
Le code d’accès actuellement en
vigueur apparaît dans la fenêtre
d’affichage.
--- >>> Presser la touche de fonction
supplémentaire ENG .
Dans la fenêtre d’affichage, deux
points apparaissent en lieu et
place de deux chiffres.
--- >>> Composer l’ordre 02 sur le
bloc de touches numériques.
--- Confirmer l’introduction >>> en
pressant la touche ENT . Dans
la fenêtre d’affichage, on peut lire
FC 0 quand la fonction n’est pas
activée et FC 1 quand elle l’est.
--- Choisir l’état activé ou désactivé
de la fonction >>> en pressant la
touche 0 ou 1 sur le bloc de
touches numériques de la
centrale.
--- Quand on choisit 0 ( fonction
désactivée ), confirmée >>> en
pressant ENT , on voit apparaître
dans la fenêtre d’affichage deux
points en lieu et place de deux
chiffres. On peut alors introduire
un nouvel ordre.
------------ Ordres
(page 19) ------------------ On peut aussi mettre fin à la
programmation >>> en pressant
successivement les touches
ENG et
(fonctionnement
normal).
--- Quand on choisit 1 ( fonction
activée ), il convient alors de
poursuivre la programmation
comme suit.
--- Confirmer ce choix >>> en
pressant ENT . Dans la fenêtre
d’affichage, on peut alors lire la
durée de l’alarme actuellement
en mémoire (durée d’excitation
du relais alarme); la durée réglée
à l’usine est de 30 secondes.
Affichage :
Durée d’excitation du relais
d’alarme faux code,
par ex. FC 30
Pendant la durée de l’alarme, il
est impossible d’utiliser le clavier
qui est bloqué.
--- Pour modifier cette durée, il suffit
de composer sur le bloc de
touches numériques un nombre
à deux chiffres entre 01 et 99
secondes, qui écrasera la valeur
en place.
--- Confirmer l’introduction >>> en
pressant la touche ENT .
-*- On voit apparaître dans la fenêtre
d’affichage le nombre de faux
codes autorisé.
Le réglage à l’usine en a prévu
03 , autrement dit la centrale
accepte trois faux codes
consécutifs, autrement dit trois
tentatives frauduleuses d’accès,
avant de déclencher l’alarme.
Supposons un code d’accès à 4
chiffres; le relais d’alarme faux
code réagira dès la 13ème touche
incorrecte : nombre à 4 chiffres
x 3 possibilités = il est possible
d’actionner 12 touches sans
déclencher l’alarme.
-*- Pour modifier ce nombre de
tentatives admises, il suffit de
composer sur le bloc de touches
numériques un nombre à deux
chiffres entre 01 et 05, qui
écrasera la valeur en place.
--- Confirmer l’introduction >>> en
pressant la touche ENT .
-*- Dans la fenêtre d’affichage, on
voit apparaître deux points en
lieu et place de deux chiffres. On
peut alors introduire un nouvel
ordre.
------------ Ordres
(page 19) ------------------ On peut aussi mettre fin à la
programmation >>> en pressant
successivement les touches
ENG et
(fonctionnement
normal).
--- Ramener la clé en position normale.
Programmation :
Surveillance du temps
d’ouverture de porte
(Ordre 03)
La centrale déclenche une alarme
dès qu’une porte reste ouverte audelà de la durée admise.
--Procédure de programmation :
Mise en place de la fonction
supplémentaire
Surveillance du temps d’ouverture
de porte
Porte 1
Porte 2
---*-
--- Tourner la clé de programmation
sur la position de programmation.
L’heure est alors lisible dans la
fenêtre d’affichage.
--- Choisir la porte >>> en pressant
la touche Tür 1 ( porte 1 ) ou
Tür 2 ( porte 2 ).
Le code d’accès actuellement en
vigueur apparaît dans la fenêtre
d’affichage.
--- >>> Presser la touche de fonction
supplémentaire ENG .
Dans la fenêtre d’affichage, deux
points apparaissent en lieu et
place de deux chiffres.
--- >>> Composer l’ordre 03 sur le
bloc de touches numériques.
--- Confirmer l’introduction >>> en
pressant la touche ENT . Dans
la fenêtre d’affichage, on peut lire
tu 0 quand la fonction de
surveillance n’est pas activée et
tu 1 quand elle l’est.
--- Choisir l’état activé ou désactivé
de la fonction de surveillance >>>
en pressant la touche 0 ou 1 sur
le bloc de touches numériques
de la centrale.
--- Quand on choisit 0 ( fonction
désactivée ), confirmée >>> en
pressant ENT , on voit apparaître
dans la fenêtre d’affichage deux
points en lieu et place de deux
chiffres. On peut alors introduire
un nouvel ordre.
------------ Ordres
(page 19) ------------------ On peut aussi mettre fin à la
programmation >>> en pressant
successivement les touches
ENG et
(fonctionnement
normal).
--- Quand on choisit 1 ( fonction
activée ), il convient alors de
poursuivre la programmation
comme suit.
--- Confirmer ce choix >>> en
pressant ENT . Dans la fenêtre
---
---
d’affichage, on peut alors lire la
durée de surveillance de la porte,
par exemple tu 99 . Cela signifie
que lorsque la porte n’a pas été
refermée au bout de 99 secondes,
il y a excitation du relais alarme);
la durée réglée à l’usine est de 99
secondes.
Si la durée affichée doit être
changée, composer la nouvelle
durée ( 2 chiffres entre 01 et 99
secondes) sur le bloc de touches
numériques) qui écrase la valeur
en place.
Confirmer la valeur choisie >>>
en pressant la touche ENT .
Dans la fenêtre d’affichage, on
voit apparaître deux points en
lieu et place de deux chiffres. On
peut alors introduire un nouvel
ordre.
------------ Ordres
(page 19) ---------------On peut aussi mettre fin à la
programmation >>> en pressant
successivement les touches
ENG et
( fonctionnement
normal).
Ramener la clé en position normale.
Programmation :
Fonction „sas“
(Ordre 04)
Quand cette fonction est activée, il
n’est pas possible d’ouvrir une porte
(avec le code ou un bouton poussoir)
avant que l’autre ne soit refermée.
Procédure de programmation :
Mise en place de la fonction
supplémentaire
Fonction „sas“
(Qu’elle soit faite pour la porte 1 ou
pour la porte 2, la programmation de
cette fonction touche les deux portes
à la fois).
--- Tourner la clé de programmation
sur la position de programmation.
L’heure est alors lisible dans la
fenêtre d’affichage.
--- Choisir la porte >>> en pressant
la touche Tür 1 ( porte 1 ) ou
Tür 2 ( porte 2 ).
Le code d’accès actuellement en
vigueur apparaît dans la fenêtre
d’affichage.
--- >>> Presser la touche de fonction
supplémentaire ENG .
Dans la fenêtre d’affichage, deux
points apparaissent en lieu et
place de deux chiffres.
--- >>> Composer l’ordre 04 sur le
bloc de touches numériques.
--- Confirmer l’introduction >>> en
pressant la touche ENT . Dans
la fenêtre d’affichage, on peut lire
SF 0 quand la fonction „ sas “
n’est pas activée et SF 1 quand
elle l’est.
--- Choisir l’état activé ou désactivé
de la fonction >>> en pressant la
touche 0 ou 1 sur le bloc de
touches numériques de la
centrale.
--- Quand on a choisi 0 ou 1 et
confirmé ce choix >>> en pressant
ENT , on voit apparaître dans la
fenêtre d’affichage deux points
en lieu et place de deux chiffres.
On peut alors introduire un nouvel
ordre.
------------ Ordres
(page 19) ------------------ On peut aussi mettre fin à la
programmation >>> en pressant
successivement les touches
ENG et
(fonctionnement
normal).
--- Ramener la clé en position normale.
Programmation :
Clavier central
(Ordre 05)
Quand la fonction „Clavier central“
est activée, la programmation se fait
uniquement sur le clavier déclaré
n° 1, le second clavier étant asservi
au premier.
Procédure de programmation :
Mise en place de la fonction
supplémentaire
Clavier central
(On peut nommer Clavier central
indifféremment le clavier de la porte
1 ou de la porte 2).
--- Tourner la clé de programmation
sur la position de programmation.
L’heure est alors lisible dans la
fenêtre d’affichage.
--- Choisir la porte >>> en pressant
la touche Tür 1 ( porte 1 ) ou
Tür 2 ( porte 2 ).
Le code d’accès actuellement en
vigueur apparaît dans la fenêtre
d’affichage.
--- >>> Presser la touche de fonction
supplémentaire ENG .
Dans la fenêtre d’affichage, deux
points apparaissent en lieu et
place de deux chiffres.
21
--- >>> Composer l’ordre 05 sur le
bloc de touches numériques.
--- Confirmer l’introduction >>> en
pressant la touche ENT . Dans
la fenêtre d’affichage, on peut lire
Zt 0 quand la fonction n’est pas
activée et Zt 1 quand elle l’est.
--- Choisir l’état activé ou désactivé
de la fonction >>> en pressant la
touche 0 ou 1 sur le bloc de
touches numériques de la
centrale, puis confirmer ce choix
>>> en pressant ENT , on voit
apparaître dans la fenêtre
d’affichage deux points en lieu et
place de deux chiffres. On peut
alors introduire un nouvel ordre.
------------ Ordres
(page 19) ------------------ On peut aussi mettre fin à la
programmation >>> en pressant
successivement les touches
ENG et
(fonctionnement
normal).
--- Ramener la clé en position normale.
---
---
---
---
---
numériques le chiffre qui
correspond au jour choisi, ce
choix écrase le jour qui était en
place.
Confirmer ce choix >>> en
pressant ENT , on voit
apparaître dans la fenêtre
d’affichage l’heure.
Composer sur le bloc de touches
numériques l’heure actuelle
( heures, minutes, secondes ) ;
cette introduction écrase l’heure
qui était en place.
Confirmer ce choix et mettre
l’horloge en marche >>> en
pressant ENT .
Dans la fenêtre d’affichage, on
voit apparaître deux points en
lieu et place de deux chiffres. On
peut alors introduire un nouvel
ordre.
------------ Ordres
(page 19) ---------------On peut aussi mettre fin à la
programmation >>> en pressant
successivement les touches
ENG et
(fonctionnement
normal).
Ramener la clé en position normale.
Programmation
Jour et Heure
(Ordre 10)
---
Procédure de programmation :
Cet ordre permet d’actualiser le jour
et l’heure. Cette intervention peut se
faire indifféremment sur le clavier de
la porte 1 ou de la porte 2; elle touche
automatiquement l’autre porte.
Programmation
Horaires Eté/Hiver
(Ordre 11)
--- Tourner la clé de programmation
sur la position de programmation.
L’heure est alors lisible dans la
fenêtre d’affichage.
--- Choisir la porte >>> en pressant
la touche Tür 1 ( porte 1 ) ou
Tür 2 ( porte 2 ).
Le code d’accès actuellement en
vigueur apparaît dans la fenêtre
d’affichage.
--- >>> Presser la touche de fonction
supplémentaire ENG .
Dans la fenêtre d’affichage, deux
points apparaissent en lieu et
place de deux chiffres.
--- >>> Composer l’ordre 10 sur le
bloc de touches numériques.
--- Confirmer l’introduction >>> en
pressant la touche ENT . Dans
la fenêtre d’affichage, on peut lire
une représentation des jours de
la semaines :
Chiffre 1 : Lundi;
Chiffre 2 : Mardi; ...
Chiffre 7 : Dimanche
--- Composer sur le bloc de touches
22
Procédure de programmation :
Cet ordre permet d’actualiser les
horaires lors du passage en été ou
en hiver. Cette intervention peut se
faire indifféremment sur le clavier de
la porte 1 ou de la porte 2; elle touche
automatiquement l’autre porte.
--- Tourner la clé de programmation
sur la position de programmation.
L’heure est alors lisible dans la
fenêtre d’affichage.
--- Choisir la porte >>> en pressant
la touche Tür 1 ( porte 1 ) ou
Tür 2 ( porte 2 ).
Le code d’accès actuellement en
vigueur apparaît dans la fenêtre
d’affichage.
--- >>> Presser la touche de fonction
supplémentaire ENG .
Dans la fenêtre d’affichage, deux
points apparaissent en lieu et
place de deux chiffres.
--- >>> Composer l’ordre 11 sur le
bloc de touches numériques.
--- Confirmer l’introduction >>> en
pressant la touche ENT . Dans
la fenêtre d’affichage, on peut lire
SZ 0 pour les horaires normaux
---
---
---
---
(hiver) et SZ 1 pour les horaires
d’été.
Composer sur le bloc de touches
numériques le chiffre qui
correspond au jour choisi, ce
choix écrase le choix qui était en
place.
Confirmer ce choix >>> en
pressant ENT , on voit apparaître
dans la fenêtre d’affichage deux
points en lieu et place de deux
chiffres. On peut alors introduire
un nouvel ordre.
------------ Ordres
(page 19) ---------------On peut aussi mettre fin à la
programmation >>> en pressant
successivement les touches
ENG et
(fonctionnement
normal).
Ramener la clé en position normale.
Programmation
Libération permanente de la
porte
(Ordre 15)
Cet ordre permet de libérer une porte
pendant une période de temps bien
définie, sans qu’il soit nécessaire
d’intervenir sur le clavier. La
programmation renferme une information en jours et en heures. Dans
ce but, la centrale permet de
mémoriser 10 périodes de temps
pour chaque porte.
Procédure de programmation :
Mise en place de la fonction
supplémentaire
Périodes de libération de la porte
Porte 1
Porte 2
--- Tourner la clé de programmation
sur la position de programmation.
L’heure est alors lisible dans la
fenêtre d’affichage.
--- Choisir la porte >>> en pressant
la touche Tür 1 ( porte 1 ) ou
Tür 2 ( porte 2 ).
Le code d’accès actuellement en
vigueur apparaît dans la fenêtre
d’affichage.
--- >>> Presser la touche de fonction
supplémentaire ENG .
Dans la fenêtre d’affichage, deux
points apparaissent en lieu et
place de deux chiffres.
--- >>> Composer l’ordre 15 sur le
bloc de touches numériques.
--- Confirmer l’introduction >>> en
voit ensuite apparaître le jour de
la semaine, par exemple t = 0 :
le(s) jour(s) de validation de la
période de déverrouillage définie
précédemment.
t = 0 signifie tous les jours de la semaine
t = 1 signifie Lundi uniquement
t = 2 signifie Mardi uniquement
.........
pressant la touche ENT . Dans
la fenêtre d’affichage, on peut lire
dE 0 quand la fonction est
désactivée et dE 1 quand elle
est activée.
--- Choisir l’état activé ou désactivé
de la fonction >>> en pressant la
touche 0 ou 1 sur le bloc de
touches numériques de la
centrale.
--- Quand on choisit 0 ( fonction
désactivée ), confirmée >>> en
pressant ENT , on voit apparaître
dans la fenêtre d’affichage deux
points en lieu et place de deux
chiffres. On peut alors introduire
un nouvel ordre.
------------ Ordres
(page 19) ------------------ On peut aussi mettre fin à la
programmation >>> en pressant
successivement les touches
ENG et
(fonctionnement
normal).
--- Quand on choisit 1 ( fonction
activée ), il convient alors de
poursuivre la programmation
comme suit.
-*- Dans la mémoire de la centrale,
10 registres sont préparés pour
la programmation des périodes
de temps dont il convient de définir
le début et la fin, ainsi que le jour
de la semaine. Lors de la
programmation, on est obligé
de passer par tous les 10
registres.
Les données éventuellement déjà
en mémoire peuvent être
remplacées par d’autres valeurs
ou ramenées à 0000 avec la
touche CE .
Réglage à l’usine : jour de la
semaine, heure de début et heure
de fin sont mis à 0.
--- Chaque nouvelle introduction,
chaque choix est à valider >>> en
pressant ENT .
-*- Dans la fenêtre d’affichage, on
voit apparaître A (Zeit) : demande
de l’heure de début de la première
période de temps à programmer.
>1< Composer sur le bloc de touches
numériques l’heure à 4 chiffres
en heures et minutes.
--- Confirmer l’introduction >>> en
pressant la touche ENT .
-*- Dans la fenêtre d’affichage, on
voit apparaître E (Zeit) : demande
de l’heure de fin de la première
période de temps à programmer.
--- Composer sur le bloc de touches
numériques l’heure à 4 chiffres
en heures et minutes.
-*- Dans la fenêtre d’affichage, on
t = 7 signifie Dimanche uniquement
--- Sur le bloc de touches
numériques, composer le chiffre
qui correspond au choix qui a été
fait.
--- Confirmer l’introduction >>> en
pressant la touche ENT .
-*- Dans la fenêtre d’affichage, on
voit apparaître A (Zeit) : demande
de l’heure de début de la seconde
période de temps à programmer.
-*- La procédure de programmation
est à répéter de manière
semblable pour la seconde
période de temps depuis le pas
>1< et ce, jusqu’à la 10ème
période de temps.
Après confirmation >>> avec la
touche ENT , des jours de validité
de cette 10ème période de temps,
on voit apparaître dans la fenêtre
d’affichage deux points en lieu et
place de deux chiffres. On peut
alors introduire un nouvel ordre.
------------ Ordres
(page 19) ------------------ On peut aussi mettre fin à la
programmation >>> en pressant
successivement les touches
ENG et
(fonctionnement
normal).
--- Ramener la clé en position normale.
Programmation :
Verrouillage permanent de
la porte
(Ordre 16)
Cet ordre permet de maintenir une
porte verrouillée pendant une période
de temps bien définie. Il est possible
de définir 10 périodes de temps pour
chaque porte et de préciser pour
chacune d’elle le jour de validité,
comme c’est le cas dans l’ordre 15
pour les périodes de libération de la
porte. Il faut savoir que s’il y a eu, au
niveau de la programmation, une
interférence entre une période de
libération de porte et une période de
verrouillage de cette même porte,
c’est cette dernière qui est prioritaire.
Procédure de programmation :
Périodes de verrouillage de la porte
Porte 1
Porte 2
--- Tourner la clé de programmation
sur la position de programmation.
L’heure est alors lisible dans la
fenêtre d’affichage.
--- Choisir la porte >>> en pressant
la touche Tür 1 ( porte 1 ) ou
Tür 2 ( porte 2 ).
Le code d’accès actuellement en
vigueur apparaît dans la fenêtre
d’affichage.
--- >>> Presser la touche de fonction
supplémentaire ENG .
Dans la fenêtre d’affichage, deux
points apparaissent en lieu et
place de deux chiffres.
--- >>> Composer l’ordre 16 sur le
bloc de touches numériques.
--- Confirmer l’introduction >>> en
pressant la touche ENT . Dans
la fenêtre d’affichage, on peut lire
dV 0 quand la fonction est
désactivée et dV 1 quand elle est
activée.
--- Choisir l’état activé ou désactivé
de la fonction >>> en pressant la
touche 0 ou 1 sur le bloc de
touches numériques de la
centrale.
--- Quand on choisit 0 ( fonction
désactivée ), confirmée >>> en
pressant ENT , on voit apparaître
dans la fenêtre d’affichage deux
points en lieu et place de deux
chiffres. On peut alors introduire
un nouvel ordre.
------------ Ordres
(page 19) ------------------ On peut aussi mettre fin à la
programmation >>> en pressant
successivement les touches
ENG et
(fonctionnement
normal).
--- Quand on choisit 1 ( fonction
activée ), il convient alors de
poursuivre la programmation
comme suit.
-*- Dans la mémoire de la centrale,
10 registres sont préparés pour
la programmation des périodes
de temps (-1- premier registre). Il
convient de définir le début et la
fin, ainsi que le jour de la semaine.
Lors de la programmation, on
est obligé de passer par tous
les 10 registres.
Les données éventuellement déjà
en mémoire peuvent être
remplacées par d’autres valeurs
ou ramenées à 0000 avec la
touche CE .
23
......
Réglage à l’usine : jour de la
semaine, heure de début et heure
de fin sont mis à 0.
--- Chaque nouvelle introduction,
chaque choix est à valider >>> en
pressant ENT .
-*- Dans la fenêtre d’affichage, on
voit apparaître A (Zeit) : demande
de l’heure de début de la première
période de temps à programmer.
>1< Composer sur le bloc de touches
numériques l’heure à 4 chiffres
en heures et minutes.
--- Confirmer l’introduction >>> en
pressant la touche ENT .
-*- Dans la fenêtre d’affichage, on
voit apparaître E (Zeit) : demande
de l’heure de fin de la première
période de temps à programmer.
--- Composer sur le bloc de touches
numériques l’heure à 4 chiffres
en heures et minutes.
-*- Dans la fenêtre d’affichage, on
voit ensuite apparaître le jour de
la semaine, par exemple t = 0 :
le(s) jour(s) de validation de la
période de verrouillage définie
précédemment.
t = 0 signifie tous les jours de la semaine
t = 1 signifie Lundi uniquement
t = 2 signifie Mardi uniquement
t = 7 signifie Dimanche uniquement
--- Sur le bloc de touches
numériques, composer le chiffre
qui correspond au choix qui a été
fait.
--- Confirmer l’introduction >>> en
pressant la touche ENT .
-*- Dans la fenêtre d’affichage, on
voit apparaître A (Zeit) : demande
de l’heure de début de la seconde
période de temps à programmer.
-*- La procédure de programmation
est à répéter de manière
semblable pour la seconde
période de temps depuis le pas
>1< et ce, jusqu’à la 10ème
période de temps. Après
confirmation >>> avec la touche
ENT , des jours de validation
de cette 10ème période de temps,
on voit apparaître dans la fenêtre
d’affichage deux points en lieu et
place de deux chiffres. On peut
alors introduire un nouvel ordre.
------------ Ordres
(page 19) ------------------ On peut aussi mettre fin à la
programmation >>> en pressant
successivement les touches
ENG et
(fonctionnement
normal).
--- Ramener la clé en position normale.
24
Programmation :
Code de nuit
(Ordre 17)
A chaque porte, on peut affecter un
code d’accès supplémentaire dont
la validité (début 20:00 heures et fin
06:00 heures par exemple) est à
préciser sur le bloc de touches
numériques dans l’ordre 17.
Procédure de programmation :
Réglage du code
Porte 1
Porte 2
--- Tourner la clé de programmation
sur la position de programmation
--- Choisir la porte >>> en pressant
la touche Tür 1 ( porte 1 ) ou
Tür 2 ( porte 2 ).
Le code d’accès en vigueur
apparaît dans la fenêtre
d’affichage.
--- >>> Presser la touche de fonction
supplémentaire ENG .
Dans la fenêtre d’affichage, deux
points apparaissent en lieu et
place de deux chiffres.
--- >>> Composer l’ordre 17 sur le
bloc de touches numériques.
--- Confirmer l’introduction >>> en
pressant la touche ENT . Dans
la fenêtre d’affichage, on peut lire
nc 0 quand la fonction est
désactivée et nc 1 quand elle est
activée.
--- Choisir l’état activé ou désactivé
de la fonction >>> en pressant la
touche 0 ou 1 sur le bloc de
touches numériques de la
centrale.
--- Quand on choisit 0 ( fonction
désactivée ), confirmée >>> en
pressant ENT , on voit apparaître
dans la fenêtre d’affichage deux
points en lieu et place de deux
chiffres. On peut alors introduire
un nouvel ordre.
------------ Ordres
(page 19) ------------------ On peut aussi mettre fin à la
programmation >>> en pressant
successivement les touches
ENG et
(fonctionnement
normal).
--- Quand on choisit 1 ( fonction
activée ) , il convient alors de
poursuivre la programmation
comme suit.
--- Valider le choix >>> en pressant
la touche ENT . S’il existe un
code de nuit déjà en mémoire, il
apparaît alors dans la fenêtre
d’affichage.
--- Pour effacer un code de nuit déjà
en mémoire , >>> presser la
touche CE . Dans la fenêtre
d’affichage on voit alors 6 points
rouges (réglage d’origine usine).
--- Composer sur le bloc de touches
numériques le code de nuit qui a
été choisi ( combinaison de 6
chiffres au maximum ).
--- Confirmer votre choix >>> en
pressant la touche ENT .
-*- Dans la fenêtre d’affichage, on
voit apparaître A (Zeit) : demande
de l’heure à partir de laquelle le
code de nuit doit entrer en vigueur.
--- Composer sur le bloc de touches
numériques l’heure à 4 chiffres
en heures et minutes.
--- Confirmer l’introduction >>> en
pressant la touche ENT .
-*- Dans la fenêtre d’affichage, on
voit apparaître E (Zeit) : demande
de l’heure à laquelle le code de
nuit cesse d’être valide.
--- Composer sur le bloc de touches
numériques l’heure à 4 chiffres
en heures et minutes.
--- Confirmer l’introduction >>> en
pressant la touche ENT .
--- On voit apparaître dans la fenêtre
d’affichage deux points en lieu et
place de deux chiffres. On peut
alors introduire un nouvel ordre.
------------ Ordres
(page 19) ------------------ On peut aussi mettre fin à la
programmation >>> en pressant
successivement les touches
ENG et
(fonctionnement
normal).
--- Ramener la clé en position normale.
®
effeff – Fritz Fuss GmbH & Co.
Elektrotechnische Fabrik
Johannes-Mauthe-Strasse 14
D – 724 58 Albstadt-Ebingen
Postfach 490
D – 724 25 Albstadt
Telefon 074 31 . 123 - 0
Telefax 074 31 . 123 240
oder 123 303
Telex 763 731 ffus d
C7
C8
ZD 14
R 26
ZD 13
R 24
ZD 12
R 25
ST 8 ZD 10
R 23
ZD 11
1
ZD 9
R 22
R 20
ZD 8
R 21
ZD 6
R 19
ZD 7
R 18
ZD 5
R 17
ZD 1
R 14
ZD 2
ST 7 R 15
ZD 3
1
R 16
ZD 4
VR8 VR7 VR6 VR5 VR4 VR3 VR2
S 13
VR15 VR14 VR13 VR12 VR11 VR10 VR9
ST 9
ST 3
D 20
D 18
D 16
D 17
D 19
D 21
D 14
D 12
D 10
D 11
D 13
D 15
ST 2
ST 1
9
0V
8 +12 V
7
6
5
4
3
2
1
7
6
5
4
3
2
1
1
2
R 13
27
26
25
24
23
22
21
20
19
18
17
16
D9
ST 12
REL 4
D8
REL 3
D7
REL 2
D4
REL 1
VR 21
VR 20
VR 19
VR 17
VR 18
VR 16
S5
REG 1
Akku
ST 13
S3
PO1
R12
MP 1
Nur bei Modell 451-10 enthalten
Comes only with model 451-10
Figure uniquement
dans modèle 451-10
R 27
ZD 15
ST 5
ZD 16
R 28
15
14
13
12
11
10
ST 4
S4
LD1
S3
AUS
OFF
HS
C4
DB 1
GL 1
EIN
ON
ES
VR 1
C1
T1
P
R2
R5
N
C3
ST 6
S4
S5
Sélecteurs de programmation
Si fonctionnement sans accu : amener S3
en position HS (si accu: position ES).
Programming switch
When operating without accumulator, place switch
S3 in OFF position (with accumulator in ON position)
Anschlußplatine
Connection board
Platine de
raccordement
Sélecteurs de programmation
Si utilisation de gâches sans contact de
fond de pêne: amener S4 et S5 en
position ES.
Programming switch
When using door openers without
acknowledgement message contacts,
slide switches S4 and S5 to ON position.
Programmierschalter
Bei Verwendung von Türöffnern ohne
Rückmeldekontakte sind die Schalter
S4 und S5 in Stellung EIN zu bringen.
EIN
ON
ES
AUS
OFF
HS
Programmierschalter
Bei Betrieb ohne Akku Schalter S3 in Stellung AUS
(mit Akku Stellung EIN)
SM
TR 1
C2
R1
ST 11
D1
R11
R10
R9
R8
T2
C6
D3
D4
S 12
R6
R3
R4
D5
T3
C5
ST 10
Anschlußplatine / Connection board / Platine de raccordement
25
T 11
TA 3
TA 4
TA 1
TA 6
TA 9
TA 7
TA 10
T 10
R 18
S 51
R 17
R 26
T9
R 28
R 16
R 27
T8
R 24
T7
IC 9
C7
R 14
R 25
R 15
R 29
AZ 2
R 31
R 21
AZ 1
R 22
IC 5
TA 13
TA 2
TA 11
TA 12
TA 14
TA 5
C 14
TA 15
TA 16
TA 8
T6
R 23
R 13
R 30
AZ 3
DB 1
IC 1
IC 8
C1
R 20
AZ 4
R1
AZ 5
RN 2
RN 1
TA 17
D1
C9
C2
C3
IC 3
R 10
R 19
R9
C 11
D3
AZ 6
IC 4
IC 2
C8
R8
MP 1
LD 4
C6
LD 3
LD 2
LD 1
PW 1
PW 2
R 11
R 12
S1
C 15
REG 1
D5
D6
IC 6
C 13
IC 7
C 17
D4
D7
C 16
RN 5
FB 1
R5
D9
D1
R7
R4
ST 3
RN 7
D2
D8
C4
C5
S2
C 17
C 18
T1
RN 6
RN 9
RN 3
RN 8
FB 2
R2
ST 1
ST 2
R3
26
R4
C 10
MP 4
MP 2
MP 3
S1
AUS
OFF
HS
EIN
ON
ES
S2
Programmierschalter
Programming switch
Sélecteurs de
programmation
Hauptplatine
Mains board
Platine de base
Hauptplatine / Mains board / Platine de base
1
2
3
4
5
6
7
8
5
2
0
9
6
3
–
+
1
4
7
0
2
5
8
3
6
9
Tastatur 1
7
4
1
+
8
5
2
0
9
6
3
–
Schaltbild der
Matrixtastaturen
Tastatur 2
7
4
1
+
1 2 3 4 5 6 7
8 (+ 12V)
Tastatur 1
Tastatur 2
zur Versorgung des
Gerätes mit ext. Spannung (12 V)
ext. Verbraucher 12 Vmax. 1A
9 (0V)
gelb
1 2 3 4 5 6 7
1AT
SI 1
Türöffner 1
grün
Türöffnertaster T1
10
11
12
13
14
15
gelb
blau
S4
S5
EIN
S3
SI 3
0,25 AT
Meßpunkte
P
Türöffner 2
Türöffnertaster T2
Anschluß für
Kabelschirme
u. Betriebserde
Mantelklemme
Netz 220 V/50 Hz
N
Bei Betrieb ohne Akku
Schalter S 3 in Stellung
”AUS”
gelb (Störung Akku)
SI 2
1,25 AF
LD 1
AUS EIN
PO 1
DB 1
Durch das Auftrennen
der Brücke ”DB 1” wird
die Verbindung zwischen
Masse und Betriebserde
aufgehoben
Bei Verwendung von Türöffnern ohne Rückmeldekontakt sind die Schalter S4
und S5 in Stellung ”EIN” zu
bringen
AUS
Achtung
4K7 Bei 4K7 Last Akkuspannung
Anschlußmögauf 13,7 V mittels PO1 einlichkeit an eine
stellen (werksseitig eingeSabotagelinie
Akku 5,7 Ah
stellt)
V
bei Bedarf
19
20
21
16
17
18
grün
1
2
3
4
5
6
7
grau
Öffner 1
Öffner 2
blau
1
2
3
4
5
6
7
rot
Schalterspannung max. 65 V
Schalterstrom max. 2 A
Deckelkontakt des
Gerätes einschleifbar
in eine Sabotagelinie
grau
rot
Deckelkontakt des
Gerätes (bei Nichtbedarf überbrücken)
Anschlußschaltbild 441-10
27
1
2
3
4
5
6
7
8
5
2
0
9
6
3
–
+
1
4
7
0
2
5
8
3
6
9
8
5
2
0
9
6
3
–
Tastatur 2
7
4
1
+
Schaltbild der
Matrixtastaturen
Tastatur 1
7
4
1
+
1 2 3 4 5 6 7
zur Versorgung des
Gerätes mit ext. Spannung (12 V)
ext. Verbraucher 12 Vmax. 1A
9 (0V)
8 (+ 12V)
blau
1 2 3 4 5 6 7
Tastatur 2
Tastatur 1
1AT
Türöffner 1
rot
SI 1
1
2
3
4
5
6
7
grün
gelb
Türöffnertaster T1
Anschlußmöglichkeit an eine
Sabotagelinie
Türöffner 2
Akku 5,7 Ah
bei Bedarf
S5
25
26
27
S4
EIN
SI 3
0,25 AT
Meßpunkte
SI 2
1,25 AF
gelb (Störung Akku)
P
Türöffnertaster T2
Anschluß für
Kabelschirme
u. Betriebserde
Mantelklemme
Netz 220 V/50 Hz
N
AUS EIN Bei Betrieb ohne Akku
Schalter S 3 in Stellung
”AUS”
LD 1
4K7 Bei 4K7 Last Akkuspannung auf 13,7 V
mittels PO1 einstellen
(werksseitig eingestellt)
V
S3
PO 1
DB 1
Durch das Auftrennen
der Brücke ”DB 1” wird
die Verbindung zwischen
Masse und Betriebserde
aufgehoben
Bei Verwendung von Türöffnern ohne Rückmeldekontakt sind die Schalter S4
und S5 in Stellung ”EIN” zu
bringen
AUS
Achtung
22
23
24
21
20
19
16
17
18
10
11
12
13
14
15
Deckelkontakt des
Gerätes einschleifbar
in eine Sabotagelinie
blau
1
2
3
4
5
6
7
grau
Öffner 1
Öffner 2
Falschcode
Alarm
rot
grau
Schalterspannung max. 65 V
Schalterstrom max. 2 A
28
grün
gelb
Deckelkontakt des
Gerätes (bei Nichtbedarf überbrücken)
Anschlußschaltbild 451-10
1
2
3
4
5
6
7
9
6
3
–
+
1
4
7
0
2
5
8
3
6
9
Keypad 1
8
5
2
0
8
5
2
0
9
6
3
–
Circuit diagram of
matrix keypads
Keypad 2
7
4
1
+
yellow
7
4
1
+
Keypad 1
Keypad 2
For supply of the appliance with
an ext. voltage (12V)
ext. consumption 12 Vmax. 1A
Door opener 1
green
1 2 3 4 5 6 7
8 (+ 12V)
9 (0V)
grey
1 2 3 4 5 6 7
1AT
SI 1
1
2
3
4
5
6
7
Door opener
pushbutton T1
yellow
blue
Door opener 2
ON
OFF
S3
P
Door opener
pushbutton T2
Sheath
termminal
Mains 220 V/50 Hz Connection for
cable screening
and system earth
4K7 At 4K7 set accumulator load
voltage to 13.7 V by means
of PO1 (preset ex-factory)
SI 3
0,25 AT
measuring points
N
If operating without an
accumulator move switch
S3 to OFF position
yellow (malfunction accum.)
SI 2
1,25 AF
LD 1
OFF ON
PO 1
DB 1
By sectionalizing the bypass
DB 1 the connection between
earth and system earth is
suspended
If using door openers without
acknowledgement message
contact, slide switches S4
and S5 to ON position
5.7 Ah accuV
mulator
where required
S5
Connection
facility for a
sabotage line
19
20
21
16
17
18
10
11
12
13
14
15
S4
Appliance’s cover contact can be looped into
a sabotage lline
green
1
2
3
4
5
6
7
red
Opener 1
Opener 2
blue
Appliance’s cover
contact (bypass it
if not required)
grey
red
Switching voltage 65 V max.
Switching current 2 A max.
Caution
Connection diagram 441-10
29
1
2
3
4
5
6
7
8
5
2
0
9
6
3
–
+
1
4
7
0
2
5
8
3
6
9
Keypad 1
7
4
1
+
8
5
2
0
9
6
3
–
Circuit diagram of
matrix keypads
Keypad 2
7
4
1
+
1 2 3 4 5 6 7
for supply of the appliance
with an ext. voltage (12 V)
ext. consumption
12V- / 1A max.
9 (0V)
8 (+ 12V)
blue
1 2 3 4 5 6 7
1AT
Keypad 2
Keypad 1
SI 1
Door opener 1
green
yellow
Door opener
pushbutton T1
OFF
S3
SI 3
0,25 AT
measuring points
SI 2
1,25 AF
P
N
If operating without an
accumulator, move switch
S3 to OFF position
yellow (malfunction accum.)
LD 1
OFF ON
PO 1
Door opener 2
Door opener
pushbutton T2
Connection faci4K7 At 4K7 set accumulator
Sheath
lity to a sabotage
load voltage to 13.7 V
termminal
line
by means of PO1 (pre5,7 Ah
set ex-factory)
V
accumulator
where required
Connection for
Mains 220 V/50 Hz
cable screening
and system earth
25
26
27
22
23
24
21
20
19
16
17
18
10
11
12
13
14
15
S5
DB 1
By sectionalizing the bypass
DB1 the connection between
earth and system earth is
suspended
If using door openers without
acknowledgement message
contact, slide switches S4
and S5 to ON position
ON
Caution
S4
Appliance’s cover contact can be looped into
a sabotage line
blue
1
2
3
4
5
6
7
red
Opener 1
Opener 2
Alarm
Erroneuos code
red
grey
1
2
3
4
5
6
7
grey
Switching voltage 65 V max.
Switching current 2A max.
30
green
yellow
Appliance’s cover
contact (bypass it
if not required)
Connection diagram 451-10
1
2
3
4
5
6
7
8
5
2
0
9
6
3
–
+
1
4
7
0
2
5
8
3
6
9
Clavier 1
7
4
1
+
8
5
2
0
9
6
3
–
Clavier 2
7
4
1
+
1 2 3 4 5 6 7
Principe des
claviers marticiels
1 2 3 4 5 6 7
Clavier 1
Clavier 2
8 (+ 12V)
consommateur externe
12 V- max. 1 A
9 (0V)
pour alimentation
externe 12 V
1AT
SI 1
jaune
Gâche 1
Bouton
poussoir T1
10
11
12
13
14
15
jaune
bleu
S5
ES
HS
S3
SI 3
0,25 AT
Points de mesure
P
Gâche 2
Bouton
poussoir T2
Secteur
220 V/50 Hz
N
Si fonctionnement sans
accu amener S3 en position HS
jaune (dérangement accu)
SI 2
1,25 AF
LD 1
HS ES
PO 1
Raccordement
por écrans et
terre
Borne de
mise à terre
DB 1
L’ouverture du strap DB1
dissocie la mssse de la
terre électrique
Attention Quand on utilise des gâches
sans contact de fond de
pêne, amener S4 et S5 en
position ES
4K7 Avec charge de 4K7 régeler
Possibilité de
tension de charge accu sur
raccordement
13,7 V avec PO1 (réglage
sur une ligne
Accu 5,7 Ah
usine)
d’autoprotection
si besoin est V
19
20
21
16
17
18
vert
1
2
3
4
5
6
7
vert
S4
gris
rouge
1
2
3
4
5
6
7
gris
Gâche 1
Gâche 2
bleu
Contact d’autoprotection (straper si pas
utilisé)
rouger
Pouvoir decoupure
max. 65V / 2A
Contact d’autoprotection intégrable dans
une ligne d’autoprotection
Schéma de câblage 441-10
31
1
2
3
4
5
6
7
8
5
2
0
9
6
3
–
+
1
4
7
0
2
5
8
3
6
9
Clavier 1
7
4
1
+
8
5
2
0
9
6
3
–
Clavier 2
7
4
1
+
1 2 3 4 5 6 7
Principe des
claviers marticiels
1 2 3 4 5 6 7
9 (0V)
8 (+ 12V)
consommateur
ext. 12V- max. 1A
pour alimentation
externe (12V)
1AT
Clavier 2
Clavier 1
SI 1
bleu
Gâche 1
vert
jaune
Bouton
poussoir T1
S5
Possibilité de
raccordement
sur une ligne Accu 5,7 Ah
d’autoprotection si besoin est
25
26
27
S4
ES
HS
Gâche 2
SI 3
0,25 AT
Points de mesure
SI 2
1,25 AF
P
Bouton
poussoir T2
Raccordement
pour écrans
et terre
Borne de
mise à terre
Secteur
220 V/50 Hz
N
Si fonctionnement sans
accu amener S3 en position HS
jaune (dérangement accu)
LD 1
HS ES
4K7 Avec charge de 4K7 régler tension de charge
accu sur 13,7V avec
PO1 (réglage usine)
V
S3
PO 1
DB 1
L’ouverture du strap DB 1
dissocie la masse de la
terre électrique
Attention Quand on utilise des gâches
sans contact de fond de
pêne, amener S4 et S5 en
position ES
22
23
24
21
20
19
16
17
18
10
11
12
13
14
15
bleu
1
2
3
4
5
6
7
rouge
Gâche 1
Gâche 2
Faux code
Alarme
rouge
gris
1
2
3
4
5
6
7
gris
Pouvoir de coupure
max. 65V / 2A
Contact d’autoprotection intégrable dans
une ligne d’autoprotection
vert
jaune
Contact d’autoprotection
(straper si pas utilisé)
Schéma de câblage 451-10