Transcript
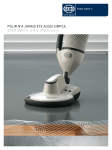
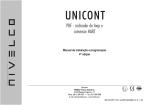
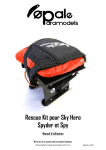
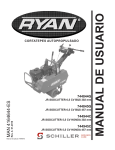
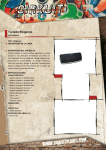
SMC/FIBERGLASS REPAIR ADHESIVE #06417
Damaged Area
ADHÉSIF POUR RÉPARATION DE SMC/FIBRE
DE VERRE #06417
ADHESIVO PARA REPARACION DE SMC/FIBRA
DE VIDRIO #06417
Figure A
SMC patch slightly larger than the damage
Figure B
“U” groove
Figure C
Filer Patch
Figure D
Form # SG-A-6417 4/10
SMC/FIBERGLASS REPAIR ADHESIVE #06417
Applications: Structural and cosmetic repair of body plastics such as
fiberglass, Metton®, SMC, GTX and carbon fiber. Ideal for structural
repairs on bumpers, hoods, fenders, wind deflectors, fairings, decks,
doors, grills and trailer side walls.
ADHÉSIF POUR RÉPARATION DE SMC/FIBRE
DE VERRE #06417
ADHESIVO PARA REPARACION DE SMC/FIBRA
DE VIDRIO #06417
PROPIEDADES TÉCNICAS
Aplicaciones: La reparación estructural y cosmética de cuerpos plásticos como
fibra de vidrio, Metton®, SMC, GTX y la fibra de carbono. El ideal para
reparaciones estructurales en parachoques, cofres, salpicaderas, reductores de
viento, rieles, alerones, plataformas, puertas, parrillas y paredes de lado de
remolque.
PROPRIÉTÉS TECHNIQUES
– 40 Minutes @ 70°F (21°C)
– 10 Minutes @ 180°F (82°C)
– 60 Minutes @ 180°F (82°C)
– 60 Minutes @ 180°F (82°C)
– 24 Hours @ 70°F (21°C)
TIEMPO DE TRABAJO
TIEMPO DE LIJADO
TIEMPO PO PARA PINTAR
TIEMPO DE CURADO
1. Cubra el área dañada con cinta adhesiva para prevenir que el limpiador penetre el
sustrato. Limpie el área alrededor de la reparación con el Limpiador de Partes
plásticas NORTON #82780
2. Utilizando un miniesmeril con disco de lija grano 50, limpie el área a reparar y
desgaste hasta el final del daño, creando una ranura en "U", sin esquinas rectas o
cuadradas (Vea Figura B).
3. Utilizando una pieza de Película plástica de respaldo, contenida en el Refuerzo de
fibra de vidrio Norton #06397, como base. Preparé el refuerzo, que consiste en dos
capas de Refuerzo de Fibra de vidrio Norton #06307 alternada entre capas de
adhesivo para reparación de SMC/Fibra de Vidrio. Intercalar capas de refuerzo y
adhesivo para rellenar el área (Vea Figura C)
4. Coloque el parche de repuesto en el área a reparar, ligeramente caliente el parche
con una pistola de calor por 10 segundos para aligerar el adhesivo. Utilizando una
espátula limpia, presione el parche contra el material y reparta el adhesivo
uniformemente para liberar cualquier partícula de aire. (Vea Figura D)
5. Fije con calor de 5 a 10 minutos a 180°F (82°C) usando una pistola de calor o
coloque debajo de una lámpara de calor IR.
6. Remueva la película plástica de respaldo y lije a emparejar con una
miniesmerialdora con disco de lija grano 50 y después lije con lijadora Orbital con
un disco de lija grano 80.
7. Utilizando una espátula, apliqué una capa de Adhesivo para reparación de
SMC/Fibra de Vidrio. Espere a curar con calor por una hora a 180°F (82°). Permita
que el área se enfríe a temperatura ambiente antes de lijar con discos de lija grano
80, 180 y 320 con una lijadora orbital.
8. Si se requiere una capa adicional utilice Adhesivo para reparación de SMC/Fibra de
Vidrio ó Plástico Reparador Skim-Plus #06400
9. Aplique primer y pintura según las recomendaciones del fabricante.
Reparación por la parte frontal
1. Cubra el área dañada con cinta adhesiva para prevenir que el limpiador penetre el
sustrato. Limpie el área alrededor de la reparación con el Limpiador de Partes
plásticas NORTON #82780
2. Si la pieza esta craqueada o punteada, requerirá un parche de refuerzo. El Parche
puede hacerse utilizando Refuerzo de Fibra de vidrio Norton #06397 con adhesivo
para reparación de SMC/Fibra de Vidrio. También puede hacerse de una pieza de
SMC del mismo tamaño y forma, adherido con adhesivo para reparación de
SMC/Fibra de Vidrio. Asegúrese que el parche este limpio y lijado con abrasivo
grano 50 antes de unir (Vea Figura A)
3. Utilizando un miniesmeril con disco de lija grano 50, ligeramente desgaste la parte
trasera de la reparación para colocar el parche.
4. Utilizando una pieza de Película plástica de respaldo, contenida en el Refuerzo de
fibra de vidrio Norton #06397, como base. Preparé el refuerzo, que consiste en dos
capas de Refuerzo de Fibra de vidrio Norton #06307 alternada entre capas de
adhesivo para reparación de SMC/Fibra de Vidrio. Empalme el refuerzo y el adhesivo
para asegurar al refuerzo.
5. Coloque el parche de repuesto en el área a reparar, ligeramente caliente el parche
con una pistola de calor por 10 segundos para aligerar el adhesivo. Utilizando una
espátula limpia, presione el parche contra el material y reparta el adhesivo
uniformemente para liberar cualquier partícula de aire.
6. Fije con calor de 5 a 10 minutos a 180°F (82°C) usando una pistola de calor o
coloque debajo de una lámpara de calor IR.
Reparación por parte trasera
RUCCIONES PARA SU USO:
Importante: El SMC/FRP/la fibra de vidrio deben estar totalmente secos antes
de continuar. En caso de alguna duda, caliente la superficie suavemente con
una pistola térmica. No sobrecaliente. Para obtener los mejores resultados,
utilice cuando la temperatura del producto y la superficie se encuentren entre
21 y 24 °C (70 y 75 °F).
PARA USO POR PARTE DE PERSONAL CAPACITADO Y CALIFICADO
PROFESIONALMENTE, UTILIZANDO TODO EL EQUIPO DE SEGURIDAD Y LAS
TÉCNICAS DE APLICACIÓN ADECUADAS.
– 40 Minutes @ 70°F (21°C)
– 10 Minutes @ 180°F (82°C)
– 60 Minutes @ 180°F (82°C)
– 60 Minutes @ 180°F (82°C)
– 24 Hours @ 70°F (21°C)
Applications :Conçu pour la réparation et la restauration des structures de plastiques
telles que le fibre de verre, Metton®, le SMC, le GTX et la fibre de carbone. L’idéal
pour les réparations structurelles des pare chocs, capots, ailes, déflecteurs,
carénages, conteneurs, portes, calandres et parois latérales des remorques
TECHNICAL PROPERTIES
TEMPS DE TRAVAIL
POLISSABLE
DÉLAI POUR LA PEINTURE
TEMPS DE SÉCHAGE
MODE D’EMPLOI :
Important : S’assurer que la fibre de verre ainsi que le SMC et le FRP sont
complètement secs avant de procéder à l’application du produit. En cas de doute,
chauffer doucement la surface à l’aide d’un chalumeau à air chaud. Éviter de trop
chauffer. Pour obtenir de meilleurs résultats, utiliser ce produit lorsque sa
température se situe entre 21 °C et 24 °C (70 °F et 75 °F).
D’APPLICATION APPROPRIÉS.
POUR UNE UTILISATION PAR DES PROFESSIONNELS FORMÉS ET QUALIFIÉS
UTILISANT TOUS LES PRODUITS ET TOUTES LES TECHNIQUES
WORKING TIME
– 40 Minutes @ 70°F (21°C)
SANDING TIME
– 10 Minutes @ 180°F (82°C)
PAINT TIME
– 60 Minutes @ 180°F (82°C)
CURE TIME
– 60 Minutes @ 180°F (82°C)
–24 Hours @ 70°F (21°C)
FOR USE BY PROFESSIONALLY TRAINED AND QUALIFIED PERSONNEL USING
ALL PROPER SAFETY EQUIPMENT AND APPLICATION TECHNIQUES.
Important: SMC/FRP/Fiberglass must be thoroughly dry before proceeding.
In case of any doubt, heat surface gently using a heat gun. Do not
overheat. For best results use when temperature of the product and the
surface is between 21°C and 24°C (70°F and 75°F).
Back-side Repair
DIRECTIONS FOR USE:
1. Tape off damaged area to prevent cleaner from penetrating the substrate. Clean the
area around the repair with NORTON Panel and Adhesive Cleaner #82780.
2. If the part is cracked or punctured all the way through, a backing reinforcement
patch will be required. Patch can be made using Norton #06397 Fiberglass Cloth
with SMC/FIBERGLASS Repair Adhesive. It can also be made from a piece of SMC,
of the same size and shape, bonded with Norton SMC/FIBERGLASS Repair
Adhesive. Make sure the SMC patch is cleaned and sanded with 50 grit abrasive
before bonded (see Figure A).
3. Using a die grinder with a 50 grit abrasive disc, slightly taper the back of the repair
to receive the backing reinforcement patch.
4. Using a piece of plastic film backing, supplied with Norton #06397 Fiberglass Cloth,
as the base. Prepare the backing reinforcement patch, which consists of 2 layers of
Norton #06397 Fiberglass Cloth sandwiched between alternate layers of Norton
SMC/FIBERGLASS Repair Adhesive. Layer the cloth and adhesive to secure the
backing reinforcement patch.
5. Place reinforcement patch in the repair area, gently heat patch with a heat gun for
10 seconds to flow adhesive. Using a clean spreader press the patch material into
the repair area and spread the adhesive evenly through the patch to force out any
entrapped air.
6. Heat set for 5–10 minutes at 180°F (82°C) using a heat gun or under an
IR heat lamp.
Réparation surface arrière
1. Couvrir la surface endommagée de ruban de masquage afin de l’imperméabiliser
contre le produit nettoyant. Nettoyer la surface autour de la réparation à l’aide du
nettoyant pour panneau et adhésif Norton #82780
2. Appliquer une pièce de renforcement si la région endommagée est craquée ou
fissurée. Utiliser une toile de fibre de verre Norton # 06397 conjointement avec
l’adhésif de réparation pour fibre de verre et SMC Norton. La pièce de
renforcement peut aussi être faite à partir de SMC de la même dimension et
forme, conjointement avec l’adhésif de réparation pour fibre de verre et SMC
Norton. Avant de coller la pièce, s’assurer que celle-ci est propre et poncer
préalablement avec un abrasif de grain 50. (Voir figure A)
3. Utiliser une ponceuse avec un disque abrasif de grain 50 pour aplanir légèrement
la surface arrière de la surface endommagée.
4. Utiliser le film de plastique compris dans la trousse pour fibre de verre # 06397
comme support. Préparer la pièce de renforcement en juxtaposant 2 couches de
toile de fibre de verre Norton #06397 et les insérer en sandwich en alternant avec
l’adhésif pour fibre de verre et SMC de Norton. Appliquer en couche la toile et
l’adhésif afin de fixer la pièce de renforcement.
5. Placer la pièce de renforcement sur la surface endommagée, chauffer
doucement la surface à l’aide d’un chalumeau à air chaud pendant 10 secondes
pour amollir l’adhésif.
À l’aide d’une spatule propre, presser la pièce sur la surface endommagée et
étendre l’adhésif de façon uniforme sur toute la pièce pour éliminer toutes
bulles d’air.
6. Chauffer pendant 5 –10 minutes à une température de 180°F (82°C) à l’aide d’un
chalumeau à air chaud ou d’une lampe à infrarouge.
Front-side Repair
1. Tape off damaged area to prevent cleaner from penetrating the substrate. Clean the
area around the repair with NORTON Panel and Adhesive Cleaner #82780
2. Using a die grinder with a 50 grit abrasive disc, dish out the repair area and taper it
all the way to the bottom of the damage, creating a "U" groove with no square edges
(see Figure B).
3. Using a piece of plastic film backing, supplied with Norton #06397 Fiberglass Cloth,
as the base. Prepare the filler patch, which consists of multiple layers of Norton
#06397 Fiberglass Cloth sandwiched between alternate layers of Norton
SMC/FIBERGLASS Repair Adhesive. Layer the cloth and adhesive to fill the repair
area (see Figure C).
4. Place filler patch in the repair area, gently heat filler patch with a heat gun for 10
seconds to flow the adhesive. Using a clean spreader press the filler material into
the repair area and spread the adhesive evenly through the patch to force out any
entrapped air (see Figure D).
5. Heat set for 5–10 minutes at 180°F (82°C) using a heat gun or under a
IR heat lamp.
6. Remove the plastic film backing and sand down to low spot using a die grinder with
50 grit and then follow with an 80 grit DA.
7. Using a spreader apply a top coat of Norton SMC/FIBERGLASS Repair Adhesive.
Heat cure the entire repair area for one hour at 180°F (82°C). Allow repair area to
cool to room temperature before final sanding with 80, 180 and 320 grit DA.
8. If an additional skim coat is needed use Norton SMC/FIBERGLASS Repair Adhesive
or Plastic Repair Skim-Plus#06400.
9. Prime and paint per manufacturer’s recommendations.
Réparation surface avant
1. Couvrir la surface endommagée de ruban de masquage afin de l’imperméabiliser
contre le produit nettoyant. Nettoyer la surface autour de la réparation à l’aide du
nettoyant pour panneau et adhésif Norton #82780.
2. Utiliser une ponceuse avec un disque abrasif de grain 50 pour poncer la surface
endommagée, poncer de façon à former un canal en ’’ U’’ sans que les rebords ne
soient coupants (voire Figure B)
3. Utiliser le film de plastique compris dans la trousse pour fibre de verre # 06397
comme support. Préparer la pièce de renforcement en juxtaposant 2 couches de
toile de fibre de verre Norton #06397 et les insérer en sandwich en alternant avec
l’adhésif pour fibre de verre et SMC de Norton. Appliquer en couche la toile et
l’adhésif jusqu’à l’obtention d’une pièce de grandeur suffisante pour remplir la
surface endommagée (voire figure C)
4. Placer la pièce de remplissage sur la surface endommagée, chauffer
doucement la surface à l’aide d’un chalumeau à air chaud pendant 10 secondes
pour amollir l’adhésif.
À l’aide d’une spatule propre, presser la pièce sur la surface endommagée et
étendre l’adhésif de façon uniforme sur toute la pièce pour éliminer toutes bulles
d’air. (voire figure D).
5. Chauffer pendant 5 –10 minutes à une température de 180°F (82°C) à l’aide d’un
chalumeau à air chaud ou d’une lampe à infrarouge.
6. Enlever le film de plastique servant de support, et poncer pour enlever les
imperfections avec une ponceuse et un abrasif de grain 50, suivi d’un grain 80.
7. Appliquer une couche finale de l’adhésif pour fibre de verre et SMC de Norton à
l’aide d’une spatule. Faire sécher la surface réparée pendant une heure à 180°F
(82°C). Laisser refroidir la surface réparée jusqu’à température pièce avant de
compléter le ponçage avec un grain 80, 180 et 320.
8. S’il est nécessaire d’appliquer un dernière couche mince, utiliser l’adhésif pour
fibre de verre et SMC de Norton ou encore le produit pour réparation du plastique
Skim-Plus # 06400.
9. Appliquer un apprêt et la peinture selon les recommandations du manufacturier.