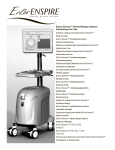
1
Biopsy System Instructions
Système de biopsie - Instructions
Biopsiesystem – Anleitung
Sistema per biopsia Istruzioni
Instrucciones del sistema de biopsia mamario
Instructies voor biopsiesysteem
Instrukcja obsługi systemu do biopsji
Please read all information carefully.
Failure to properly follow the instructions may lead to serious surgical consequences.
IMPORTANT: This package insert is designed to provide instructions for use of the Mammotome® elite Holster and Probe. It is
not a reference to surgical techniques.
Mammotome® and CorMARK™ are trademarks of Devicor® Medical Products, Inc.
Indications
The Mammotome® elite Biopsy System is indicated to obtain imaged or palpated tissue samples from the breast or axillary
lymph nodes for diagnostic analysis of breast abnormalities.
• The Mammotome® elite Biopsy System is intended to provide breast tissue for histologic examination with partial or
complete removal of the imaged abnormality.
• The Mammotome® elite Biopsy System is intended to provide breast tissue for histologic examination with partial
removal of a palpable abnormality.
The extent of a histologic abnormality cannot always be readily determined from the palpation or imaged appearance
of these abnormalities. Therefore, the extent of removal of the palpated or imaged evidence of an abnormality does
not predict the extent of removal of a histologic abnormality, e.g., malignancy. When the sampled abnormality is not
histologically benign, it is essential that the tissue margins be examined for completeness of removal using standard
surgical procedures.
In instances when a patient presents with a palpable abnormality that has been classified as benign through clinical and/
or radiological criteria (e.g., fibroadenoma, fibrocystic lesion), the Mammotome® elite Biopsy System may also be used
to partially remove such palpable lesions. Whenever breast tissue is removed, histological evaluation of the tissue is the
standard of care. When the sampled abnormality is not histologically benign, it is essential that the tissue margins be
examined for completeness of removal using standard surgical procedures.
Contraindications
• This instrument is for diagnostic use only and is not indicated for therapeutic use.
• This instrument is contraindicated for those patients where increased risk or complications may be associated with core
removal or biopsy based upon the physician’s judgment. Patients receiving anticoagulant therapy or who may have
bleeding disorders may be at increased risk.
Device Description
Devicor’s Mammotome® elite Biopsy System is composed of a Holster and a Probe. The Mammotome® elite system may be
used with ultrasound imaging guidance to excise and collect diagnostic samples with a single insertion of the Probe. The
components of the system are designed to operate safely when used together for diagnostic sampling of tissue during a
biopsy procedure.
The Holster, reusable and supplied non-sterile, is a self-contained, handheld, electro-mechanical vacuum-assisted biopsy
device that consists of a rechargeable lithium-polymer battery and includes a charging base with an AC power cord and
adapters (See Figure 1).
The Probe, single use and supplied sterile, includes an outer trocar shaft with distal aperture and a translating inner hollow
cutter (See Figure 2). The Probe also includes an Integrated Coaxial Cannula, and a proximal Specimen Collection Cup with
an enclosed Tissue Sample Basket and cap (See Illustration 2). The body of the Probe contains one Alignment Tab and two
Locking Tabs to secure the Probe into the Holster.
The Holster creates vacuum inside the device to assist in pulling tissue into the aperture while the sharpened inner cutter
rotates at high speeds and advances across the aperture to acquire targeted tissue. The tissue sample is transported by
vacuum to the Specimen Collection Cup. The Integrated Coaxial Cannula may be detached from the Probe after the biopsy
and remain in the breast to retain a track to the biopsy site when placing a biopsy site identifier. The Holster is designed with
3 biopsy button options to accommodate multiple hand positions (See Figure 3).
IMPORTANT: The 14 GA CorMARK™ biopsy site identifiers may be used in conjunction with the Mammotome® elite Biopsy
System to radiographically mark the location of the biopsy procedure. DO NOT USE A MARKER NOT APPROVED FOR USE IN
THE Mammotome® ELITE BIOPSY SYSTEM.
Figure 1
2
Figure 2
Figure 3
Warnings and Precautions
• Minimally invasive procedures should be performed only by persons having adequate training and familiarity with
minimally invasive techniques. Consult medical literature relative to techniques, complications, and hazards prior to
performance of any minimally invasive procedure.
• Minimally invasive instruments may vary in diameter from manufacturer to manufacturer. When minimally invasive
instruments and accessories from different manufacturers are employed together in a procedure, verify compatibility
prior to initiation of the procedure.
• Do not autoclave device.
• Do not submerse device.
• Do not spray the Holster with any fluids.
• This instrument should only be used by physicians trained in percutaneous needle techniques for tissue collection.
• Special care should be taken to avoid bending or twisting the Probe.
• If Probe is bent, do not use. Dispose of the Probe in an appropriate container.
• The Probe is not designed for percutaneous skin puncture.
• As with any biopsy instrument, there may be a potential for infection.
• Do not use this instrument in conjunction with Magnetic Resonance Imaging (MRI).
• The Holster must only be used with Mammotome® elite Biopsy Probes.
• Products manufactured or distributed by companies not authorized by Devicor® Medical Products, Inc. may not be
compatible with the Mammotome® elite System. Use of such products may lead to unanticipated results and possible
injury to the user or patient.
• Instruments or devices which come into contact with bodily fluids may require special disposal handling to prevent
biological contamination.
• Dispose of all opened disposable instruments whether used or unused.
• The Probe is packaged and sterilized for single use only. Do not reuse, reprocess or resterilize. Reuse, reprocessing,
or resterilization may compromise the structural integrity of the device and/or lead to device failure that in turn may
result in patient injury, illness or death. Also, reprocessing or resterilization of single use devices may create a risk
3
of contamination and/or cause patient infection or cross-infection, including, but not limited to, the transmission of
infectious disease(s) from one patient to another. Contamination of the device may lead to injury, illness, or death of the
patient.
Illustration 1. Device Assembly Illustration and Nomenclature
Illustration 2. Probe Illustration and Nomenclature
Equipment Required
• Appropriate imaging modality and accessories
• Mammotome® elite Biopsy Holster
• Mammotome® elite Biopsy Probe
• Surgical gloves and drapes
• Local anesthetic
• Scalpel
• Other equipment as necessary
4
Instructions For Use
IMPORTANT: Inspect all packaging before use. If product packaging is compromised or product is dropped when
removing packaging, use the following protocol:
• Holster: Follow Cleaning the Holster and Disinfecting the Holster procedures.
• Probe: Dispose as it is no longer a sterile instrument.
Verify compatibility of all minimally invasive instruments and accessories prior to using the instrument (Refer to Warnings
and Precautions).
First Time Use
Holster ships without a full battery charge. The Holster must be completely charged prior to first time use. Clean and
disinfect the Holster, according to Cleaning the Holster and Disinfecting the Holster. To charge the battery, place the
Holster in the Charging Base. The Holster will indicate proper placement by an audio indicator. Once the Holster has
been fully charged, as indicated by a solid green light on the Battery Indicator, it may be removed from the Charging
Base for use. An audio indicator will sound when the Holster is removed from the Charging Base. The battery will require
approximately 200 minutes to fully charge.
IMPORTANT: The Holster MUST BE FULLY CHARGED before the initial use.
Loading the Probe
1.
sing sterile technique, remove the Probe from the package. To avoid damage, do not drop the device into the
U
sterile field. If the Probe comes in contact with a non-sterile surface, it must be disposed of in the appropriate
container.
• The Probe is packaged with a protective sleeve over the trocar shaft. It is recommended that the protective
sleeve remain on the trocar shaft until the Probe is ready to be introduced into the percutaneous site. Take
care to avoid injury when removing the sleeve.
2.
rasp the Probe body and align the Alignment Tab with the Holster notch. Begin pushing the Probe base into the
G
Holster cavity while lining up the Holster’s Alignment Tab with the Holster notch in the Probe body (See Illustration
3, Step 1).
3.
ush the Probe body firmly into the Holster until a click is heard indicating the Locking Tabs have engaged the
P
Holster (See Illustration 3, Step 2).
Illustration 3
CAUTION: To avoid pinching fingers while loading the Probe into the Holster, grasp the Holster on the sides above the
logo and near the Probe Locking Tabs.
4.
If the Probe has been properly inserted, the Holster will automatically turn on and begin an initialization sequence.
During initialization, the motor is audible and the active Biopsy Indicator Light is illuminated solid orange. At the
end of a successful initialization, the Holster beeps 2 times and the active Biopsy Indicator Light illuminates green
indicating the system is ready for sampling.
• If the Probe is inserted into the Holster incorrectly, the initialization sequence WILL NOT begin.
• If the system is not ready for sampling, the Holster will beep 3 times and the Fault Indicator Light will
illuminate amber. See Troubleshooting for the corrective action.
CAUTION: Moving parts. Ensure nothing is blocking the needle aperture at this time.
• If the Holster is left undisturbed for 30 seconds after loading a Probe, the Holster will enter a sleep mode to conserve
battery charge. During sleep mode, the Biopsy and Battery Indicator Lights will turn off and the buttons will be
5
inactive. Once the Holster is moved, the device will wake from sleep mode. The Holster will remain in sleep mode if a
Probe is not connected.
Biopsy Button Selection
The Center Biopsy Button is pre-selected when shipped. Only one Biopsy Button remains active when the device is on. The
active Biopsy Button is identified by a solid green Biopsy Indicator Light. To change the desired active Biopsy Button, ensure
the Probe is attached then press and hold the two inactive Biopsy Buttons simultaneously for 3 seconds (See Illustration
4, Step 1). There will be an audible indicator and all 3 Biopsy Indicator Lights will be flashing green (See Illustration 4, Step
2). User may then press and release the desired active Biopsy Button (See Illustration 4, Step 3). The active Biopsy Button
selection is stored in the device for future use.
Illustration 4
Procedures for Tissue Sampling
1.
Prepare the percutaneous site in accordance with standard surgical technique prior to insertion of the Probe.
2.
Incise the selected area adequately to accommodate the trocar shaft.
3.
Remove the protective sleeve from the Probe.
• The Integrated Coaxial Cannula may be removed if further ease of insertion is desired. If it is removed, discard
appropriately. It is recommended that the Integrated Coaxial Cannula not be reattached to the Probe to
minimize injury.
4.
If necessary, use the Needle Rotation Knob to adjust the position of the Needle Aperture before introducing the
Probe into the incision. To rotate, pull the Needle Rotation Knob out (See Illustration 5, Step 1). Rotate to desired clock
position (See Illustration 5, Step 2) and release (See Illustration 5, Step 3). The Aperture Locator indicates the position
of the aperture.
6
Illustration 5
5.
Introduce the Probe through the incision and position the Probe tip in the target area with the tip past the lesion.
Imaging guidance should be used as appropriate.
6.
Push the active Biopsy Button on the Holster to acquire a tissue sample. The biopsy cycle proceeds automatically.
A vacuum is created, the inner cutter cannula of the Probe is retracted, tissue is drawn into the Needle Aperture
and the hollow cutter rotates and translates forward, cutting tissue. When the cutter reaches the distal end of the
Needle Aperture, it will stop moving and use the vacuum to transport the sample to the Specimen Collection Cup.
The Biopsy Indicator Light continuously illuminates orange and the motor will be audible during the sampling and
tissue collection process. At the end of the biopsy cycle, the vacuum will turn off and the Biopsy Indicator Light will
illuminate solid green.
• Keep fingers clear of active Biopsy Button until target site has been reached.
• Do not remove the Specimen Collection Cup during tissue acquisition.
• The biopsy cycle may be interrupted to avoid unnecessary injury or visualize the location of the aperture via
imaging (sonogram).
• Push the active Biopsy Button only once to initiate the biopsy cycle. To interrupt the biopsy cycle, push the
Biopsy Button again when the cutter is retracting from position 1 to 3 (See Illustration 6) or when the cutter
is advancing from position 3 to 2. When the biopsy cycle is interrupted, the cutter will retract to position 3.
The Biopsy Indicator LED flashes orange. To complete the biopsy cycle, push the Biopsy Button.
Illustration 6
CAUTION: Once the Probe has been inserted into the tissue and the sampling cycle has started, DO NOT REPOSITION
NEEDLE until sampling cycle has ended.
7.
Rotate the aperture, via rotation of the Holster and Probe, for the next sample acquisition and repeat step 6 as
necessary to obtain additional samples.
• To avoid bending the needle, do not apply excessive pressure when positioning within the breast.
• Verify collection of desired specimen using post biopsy imaging of the patient as necessary.
8.
If proceeding WITHOUT using a biopsy site identifier, once the final tissue sample is obtained, remove the device
and care for the incision site as appropriate. Advance to Step 10.
9.
If proceeding WITH using a biopsy site identifier, once the final tissue sample is obtained, disconnect the Integrated
Coaxial Cannula and remove the Probe, leaving the cannula in place, by pressing the Coaxial Release Button (See
Illustration 7) to facilitate marker placement in the biopsy cavity.
7
Illustration 7
a.
Using standard surgical technique, insert CorMARK™ 14 GA through Coaxial Cannula until the handle stops at
the Coaxial Release Button.
b.
When CorMARK™ 14 GA has reached the full depth of the Coaxial Cannula needle track, deploy marker.
c.
Use imaging to verify marker has reached desired location.
d.
Remove and dispose of the Coaxial Cannula and care for the incision site as appropriate.
IMPORTANT: For CorMARK™ use, refer to the manufacturer’s instructions.
10. To assure a cleared needle after the needle has been removed from the breast, press the Biopsy Button to activate a
test cycle.
11. Rotate the Specimen Collection Cap counter clockwise a quarter turn (See Illustration 8 Step 1). Remove the Cap and
Tissue Basket together (See Illustration 8, Step 2). Press the Tissue Basket Release Button to remove the Tissue Basket
from the Specimen Collection Cap for ease of sample pathology (See Illustration 8, Step 3).
Illustration 8
12. Sterile forceps may be used to aid in removing the samples from the Tissue Basket, if needed.
13. Replace Specimen Collection Cap to dispose of Probe. To replace, rotate Specimen Collection Cap a quarter turn
counter clockwise, insert into Specimen Collection Cup (See Illustration 9, Step 1) and rotate clockwise a quarter turn
(See Illustration 9, Step 2). The lock symbol should be at the 12 o’clock position. If applicable, insert new Tissue Basket
and Specimen Collection Cap to continue sampling (See Illustration 9).
Illustration 9
CAUTION: Probe is meant for SINGLE-USE ONLY. Dispose of Probe immediately after use.
8
Removing Probe from Holster
While pressing down on the Probe’s Locking Tab, pull the Probe out of the Holster cavity (See Illustration 10). Dispose of
Probe in the appropriate container.
Illustration 10
CAUTION: Probe is meant for SINGLE-USE ONLY. Dispose of Probe immediately after use.
CAUTION: Do not recap Probe tip.
Cleaning the Holster
After each use, manually clean the Holster thoroughly utilizing a pH neutral enzymatic detergent. Proceed with manual
cleaning utilizing an enzymatic detergent as follows:
1.
Prepare a pH neutral detergent or pH neutral enzymatic detergent according to the manufacturer’s directions.
2.
Use a soft, clean cloth lightly moistened with the cleaning solution to manually clean all surfaces. In addition, use a
standard soft bristle toothbrush to clean areas containing crevices.
3.
Rinse thoroughly using a soft, clean cloth lightly moistened with lukewarm (27°C – 44°C) tap water.
4.
Dry with a clean, soft cloth.
5.
Inspect the device for visible contamination. If contamination is present, repeat steps 1-5 until no visible
contamination is present.
CAUTION: Do not attempt to sterilize the Holster through autoclave, radiation, or plasma sterilization procedures; do
not spray with fluids or submerge in fluids; this may damage the instrument. If the Holster is cleaned improperly, the
warranty is void.
Disinfecting the Holster
A disinfection process must follow the cleaning procedure. The following chemical disinfectants are approved for use
with the Holster:
• 10% Bleach Solution (1 part bleach to 9 parts purified or deionized water)
Disinfectants should be prepared and used according to the manufacturer’s recommendations for use, concentration
and contact time. The use of other disinfectants, other than those specified in these instructions, should be assessed
for equivalency before using. Technical data sheets are typically available through the manufacturer’s web pages to
assist in this assessment. Any disinfection process, including tools and solutions, may influence the wear on a device or
equipment.
1.
Soak a clean cloth and a soft bristle toothbrush in the disinfectant solution. Squeeze the cloth thoroughly to
remove all excess solution. Tap toothbrush to remove excess solution.
2.
Thoroughly wipe down the Holster ensuring that a slightly wet surface is maintained for 5 minutes.
3.
Thoroughly scrub crevice areas with the soft bristle, standard toothbrush ensuring that a slightly wet surface is
maintained for 5 minutes.
4.
Sterile gauze or a clean, soft cloth moistened with purified water should be used to remove the disinfectant from
the device. Repeat 4 additional times to thoroughly remove residue.
5.
A clean soft bristle, standard toothbrush moistened with purified water should be used to remove the disinfectant
from the crevices of the device. Repeat 6 additional times to thoroughly remove residue.
6.
Dry the Holster with a clean, soft cloth and ensure the cloth is inserted into the crevices of the device.
9
Within the applied decontamination process, ensure that detergent and disinfectant residuals are sufficiently removed.
Purified or deionized water should be used during final rinsing processes, where applicable (multiple rinses may be
required). Refer to the manufacturer’s recommendations for the removal of disinfectant residuals.
CAUTION: Do not attempt to sterilize the Holster through autoclave, radiation, or plasma sterilization procedures; do
not spray with fluids or submerge in fluids; this may damage the instrument. If the Holster is disinfected improperly, the
warranty is void.
Charging the Holster
Completely charge the Holster prior to first time use. The Holster utilizes a rechargeable lithium-polymer battery. The
battery will require approximately 200 minutes to fully charge. The battery must be adequately charged prior to using the
Holster for the first time and prior to beginning each procedure. While in the Charging Base, the Battery Indicator Light will
illuminate solid green when the battery is fully charged. If the battery is not sufficiently charged, the Battery Indicator Light
will flash green or yellow to indicate reduced battery level.
To charge the Holster:
1.
Ensure the appropriate adapter plug is connected to the AC power adapter.
2.
Connect the AC power adapter cord to the charging base.
3.
Plug the AC power adapter into a wall outlet.
4.
After cleaning and disinfecting, place the Holster into the charging base. When properly placed on the Charging Base,
the Holster will emit a two-tone beep to indicate correct placement into the base. If the yellow light illuminates, the
battery will require approximately 200 minutes to fully charge.
5.
The Battery Indicator Light will flash yellow or green to indicate active charging and level of charge while on the
charging base. The Holster is adequately charged when the Battery Indicator Light illuminates solid green. The Holster
will emit a two-tone beep when removed from the Charging Base.
• After every use or when not in use, the Holster should remain in the Charging Base to maintain a fully charged battery. A
safety circuit prevents overloading the battery.
• Any time Holster is motionless for 30 seconds with or without a Probe attached, the Battery Indicator Light will turn off.
When the Holster is moved, the Battery Indicator Light will illuminate to indicate the current state of charge.
• Any time Holster is motionless for 1 hour with or without a Probe attached, the Holster will go into a deep sleep. Place
the Holster into the Charging Base without the probe and remove it to turn the Holster back on.
• During a biopsy procedure, the Battery Indicator Light will illuminate solid green. If the Battery Indicator Light flashes
green, the Holster has sufficient charge to complete one procedure. If the Battery Indicator Light illuminates a continuous
yellow, the Holster will not function and must be placed on the Charging Base immediately.
IMPORTANT: If the Battery Indicator Light turns off after a continuous yellow light, the Holster cannot be recharged.
Contact the MAMMOTOME Customer Support Center or a representative.
Troubleshooting
1.
The Fault Indicator Light is solid amber:
The Holster performs periodic system checks while the device operates. If a fault is detected, the Fault Indicator Light
will illuminate solid amber. If this occurs, ensure the Probe is outside of the patient, remove the Probe from the Holster
and replace with a new Probe. If the Fault Indicator Light does not turn off, contact the MAMMOTOME Customer
Support Center or a representative.
2.
The Battery and Biopsy Indicator Lights do not illuminate after loading a Probe into the Holster:
Check the Battery Indicator to ensure sufficient charge. Ensure the Alignment and Locking Tabs are securely in place.
Ensure it is the initial use of the Probe. If these conditions are satisfied and lights still do not illuminate, replace
the Probe with a new Probe. If the indicator lights do not turn on after properly inserting a new Probe, contact the
MAMMOTOME Customer Support Center or a representative.
3.
The Holster is not charging when placed into the Charging Base:
Check that the AC power cord is securely inserted into the Charging Base and a wall outlet. Check that there are no
obstructions over the charging connections on the Charging Base or Holster and then insert the Holster into the
Charging Base. Ensure the audible tone sounds from the Holster and the Battery Indicator Light flashes. If there is
no audible tone or flashing light, replace the Charging Base and AC power cord by contacting the MAMMOTOME
Customer Support Center or a representative.
10
Holster Specifications
Electrical Conformity
This medical equipment has passed all required testing for electric shock, fire and mechanical
hazards in accordance with UL 60601-1, IEC/EN 60601-1, CAN/CSA C22.2 No 601-1
Fluid Ingress
Not protected against the ingress of fluids
Flammability
Equipment not suitable for use in the presence of flammable anesthetic
Dimensions
Length: 18.9 cm
Width: 5.0 cm
Height: 3.8 cm
AC Power Cord and Adapters
Use only with supplied AC power accessories:
• Model : FRM015-S09-1 p/n TRM15-S10-I-351359
• Input Voltage: 100-240VAC
• Input Current: 0.7A-0.4A
• Input Frequency: 50-60Hz
• Output Voltage:10 Volts DC
• Output Current: 1.5 A
• Max Watts: 15W
System Specifications
Classification
Class II, internally powered Type BF equipment
Environmental Conditions
Transportation and Storage:
• -35°C to +54°C (-31°F to 129°F)
• 10% to 95% Relative Humidity, Non-Condensing
• 500 to 1060 hPa Atmosphere Pressure
Operation:
• +5°C to +40°C (41°F to 104°F)
Mode of Operation
Continuous
Electromagnetic Compatibility (EMC), Guidance, and Manufacturer Declarations
The Mammotome® elite Biopsy System requires special precautions regarding electromagnetic compatibility (EMC)
and must be installed and used in accordance with the EMC information provided in this installation guide. The
Mammotome® elite Biopsy System is intended for use in the electromagnetic environment specified below. The
customer or user of the Mammotome® elite Biopsy System should assure that is used in such an environment.
Guidance and manufacturer’s declaration – electromagnetic emissions
The Mammotome® elite Biopsy System is intended for use in electromagnetic environments specified below. The customer or user of the
Mammotome® elite Biopsy System should assure that is used in such an environment.
Emission Test
Compliance
Guidance
RF Emissions CISPR 11
Group 1
The Mammotome® elite Biopsy System uses RF energy only for its
internal function. Therefore, its RF emissions are very low and are not
likely to cause any interference in nearby electronic equipment.
RF Emissions CISPR 11
Class A
Harmonic Emissions
IEC 61000-3-2
Not Applicable
Voltage fluctuations/flicker
emissions
IEC 61000-3-3
Not Applicable
The Mammotome® elite Biopsy System is suitable for use in all
establishments other than domestic and those directly connected to
the public low-voltage power supply network that supplies buildings
used for domestic purposes.
Guidance and manufacturer’s declaration – electromagnetic immunity
11
The Mammotome® elite Biopsy System is intended for use in electromagnetic environments specified below. The customer or user of the
Mammotome® elite Biopsy System should assure that is used in such an environment.
Immunity Test
IEC 60601 Test
Level
Compliance Level
Electromagnetic environment - Guidance
Electrostatic
Discharge IEC
61000-4-2
± 6KV Contact
± 6KV Contact
± 8KV Air
± 8KV Air
Floors should be wood, concrete, or ceramic tile. If floors are
covered with synthetic material, the relative Humidity should be
at least 30%
Portable and mobile RF communications equipment should not
be used close to any part of the Mammotome® elite Biopsy System,
including cables, than the recommended separation distance
calculated from the equation applicable to the frequency of the
transmitter.
Conducted RF IEC
61000-4-6
3 Vrms
Radiated RF
3 V/m
IEC 61000-4-3
80 MHz
to 2.5 GHz
3V
150 KHz
to 80 MHz
Recommended separation distance
d = [1.17]√P
d = [1.17]√P 80 MHz to 800 MHz
3 V/m
d = [2.33]√P 800 MHz to 2.5 GHz
where P is maximum output power rating of the transmitter in
watts (W) according to the transmitter manufacturer and d is the
recommended separation distance in meters (m).
Field strength from fixed RF transmitters, as determined by an
electromagnetic surveya, should be less than the compliance level
in each frequency rangeb.
Interference may occur in the vicinity of equipment marked with
the following symbol:
Note 1 At 80 MHz and 800 MHz, the higher frequency range applies.
Note 2 These guidelines may not apply in all situations. Electromagnetic propagation is affected by absorption and reflection from
structures, objects, and people.
Field strengths from fixed transmitters, such as base stations for radio (cellular/cordless) telephones and land mobile radios, amateur
radio, AM and FM radio broadcast and TV broadcast cannot be predicted theoretically with accuracy. To assess the electromagnetic
environment due to fixed RF transmitters, an electromagnetic site survey should be considered. If the measured field strength in the
location in which the Mammotome® elite Biopsy System is used exceeds the applicable RF compliance level above, the Mammotome®
elite Biopsy System should be observed to verify normal operation. If abnormal performance is observed, additional measures may be
necessary, such as re-orienting or relocating the Mammotome® elite Biopsy System.
a
b
Over the frequency range 150 kHz to 80 MHz, field strengths should be less than 3 V/m.
Customer Service Information
Additional information about the Mammotome® elite Biopsy System may be obtained by calling 1-877-9-A-MAMMO
(1-877-926-2666)
(U.S. only; in the EU call 800 918 200 or 0 800 500 98 98); sending an e-mail to [email protected]; or
accessing our website at www.mammotome.com.
Disposal and Recycling Information
The Mammotome® elite Holster contains a non-removable lithium-polymer battery. Do not attempt to remove the battery.
Do not dispose of the Holster or the lithium-polymer battery in a fire. Dispose of the Holster and lithium-polymer battery in
accordance with the laws and regulations in your area or contact MAMMOTOME to learn about recycling options. Outside
the U.S., contact Customer Service for disposal of the Holster.
CAUTION: The lithium-polymer battery might present a fire or chemical burn hazard if mistreated. Do not disassemble,
crush, or puncture the lithium-polymer battery. Do not heat the lithium-polymer battery above 140°F (60°C).
12
How Supplied
• The Mammotome® elite Holster is supplied non-sterile.
• The Mammotome® elite Probes are supplied sterile for single patient use and sold separately. Discard after use.
Warranty
Devicor® Medical Products, Inc. warrants this product to be free from defects in material and workmanship under normal
use for the respective warranty period shown below.
Devicor® Medical Products, Inc.’s obligation under this warranty is limited to the replacement, at its option, of any
product, or part thereof, which has been returned to Devicor® Medical Products, Inc. or its Distributor within the
applicable time period shown below and which examination disclosed, Devicor® Medical Products, Inc.’s satisfaction, to
be defective. This warranty does not apply to any product, or part thereof, that has been: (1) adversely affected due to
use with devices manufactured or distributed by parties not authorized by Devicor® Medical Products, Inc. (2) repaired or
altered outside Devicor® Medical Products, Inc.’s factory in a way so as to, in Devicor® Medical Products, Inc.’s judgment,
affect its stability or reliability, (3) subjected to improper use, negligence or accident, or (4) used other than in accordance
with the design and use parameters, instructions and guidelines for the product or with functional, operational or
environmental standards for similar products generally accepted in the industry. Devicor® Medical Products, Inc.’s
products are warranted for the following periods after delivery to the original purchaser:
Mammotome® elite Holster Six (6) Month, Replacement
Charging Base with AC accessories Six (6) Month, Replacement
UNLESS SUPERCEDED BY APPLICABLE LOCAL LAW, THIS WARRANTY IS IN LIEU OF ALL OTHER WARRANTIES, EXPRESS OR
IMPLIED, INCLUDING THE WARRANTIES OF MERCHANTABILITY AND FITNESS FOR A PARTICULAR PURPOSE, AND OF ALL
OTHER
OBLIGATIONS OR LIABILITIES ON THE PART OF DEVICOR® MEDICAL PRODUCTS, INC. AND IS A PURCHASER’S
EXCLUSIVE REMEDY. IN NO EVENT SHALL DEVICOR® MEDICAL PRODUCTS, INC. BE LIABLE FOR SPECIAL, INCIDENTAL OR
CONSEQUENTIAL DAMAGES INCLUDING, WITHOUT LIMITATION, DAMAGES RESULTING FROM LOSS OF USE, PROFITS,
BUSINESS OR GOODWILL OTHER THAN AS EXPRESSLY PROVIDED BY A SPECIFIC LAW.
Devicor® Medical Products, Inc. neither assumes nor authorizes any other person to assume for it any other liability in
connection with the sale or use of any of Devicor® Medical Products, Inc. products. There are no warranties that extend
beyond the terms hereof. Devicor® Medical Products, Inc. reserves the right to make changes to products built and/or
sold by them at any time without incurring any obligation to make the same or similar changes on products previously
built and/or sold by them.
CAUTION: Federal (USA) law restricts this device to sale by or on the order of a physician.
Consult a MAMMOTOME Sales Representative for details regarding replacement options.
Indications
Le Système de biopsie Mammotome® elite est indiqué pour l’obtention d’échantillons de tissus mammaires ou de
ganglions axillaires lymphatiques pour le diagnostic d’anomalies mammaires.
• Le Système de biopsie Mammotome® elite permet d’obtenir des tissus mammaires en vue d’un examen histologique
ainsi que le prélèvement partiel ou complet de l’anomalie visualisée.
• Le Système de biopsie Mammotome® elite permet d’obtenir des tissus mammaires en vue d’un examen histologique
ainsi que le prélèvement partiel de l’anomalie visualisée.
L’étendue d’une anomalie histologique ne peut pas être déterminée de façon fiable d’après son aspect
mammographique. Par conséquent, l’étendue du prélèvement d’une anomalie palpée ou visualisée ne prédit pas
l’étendue du prélèvement d’une anomalie histologique, c’est-à-dire d’une malignité. Lorsque l’histologie de l’anomalie
prélevée présente des résultats malins, il est essentiel d’examiner les marges de la lésion pour s’assurer de l’ablation
complète au moyen de méthodes chirurgicales standard.
Quand un patient présente une anomalie palpable qualifiée de bénigne selon des critères cliniques et/ou radiologiques
(par ex. adénofibrome, lésion fibrokystique), le système de biopsie mammaire Mammotome® elite peut aussi servir
à effectuer l’exérèse partielle de ces lésions palpables. Lors de prélèvements de tissus mammaires, l’évaluation
histologique des tissus est une bonne pratique. Lorsque l’histologie de l’anomalie prélevée présente des résultats
malins, il est essentiel d’examiner les marges de la lésion pour s’assurer de l’ablation complète au moyen de méthodes
chirurgicales standard.
13
Contre-indications
• Cet instrument est destiné à usage exclusivement diagnostique et non thérapeutique.
• Cet instrument est contre-indiqué chez les patients pour lesquells un prélèvement profond ou une biopsie peuvent,
selon l’appréciation du médecin, présenter un risque accru ou entraîner des complications. Les patients sous
anticoagulants ou souffrant de troubles hémorragiques peuvent être également exposées à un risque accru.
Description du dispositif
Le système de biopsie mammaire Mammotome® elite de Devicor se compose d'un support et d'une sonde. Le système
Mammotome® elite pourra être utilisé à but diagnostique sous guidage échographique pour l'excision et le prélèvement
d'échantillons diagnostiques avec une insertion unique de la sonde. Les composants du système sont conçus pour
fonctionner de manière sûre à condition d'être utilisés ensemble pour le prélèvement diagnostique des tissus durant la
procédure de biopsie.
Le support, réutilisable et fourni non stérile, est un dispositif de biopsie électromécanique assisté par aspiration, manuel et
autonome qui comprend une pile au lithium-polymère rechargeable et un socle de charge avec un cordon d'alimentation
secteur et des adaptateurs (Figure 1).
La sonde, à usage unique et fournie stérile, comprend un trocart extérieur muni d'une ouverture distale et un couteau
intérieur doté d'un mouvement de translation (Figure 2).
La sonde comprend aussi une canule coaxiale intégrée et un bocal proximal de prélèvement d'échantillon avec un panier
à échantillon tissulaire fermé par un couvercle (Illustration 2). Le corps de la sonde contient un onglet d'alignement et
deux onglets de verrouillage permettant sa fixation dans le support.
Le support crée le vide dans le dispositif pour faciliter l'aspiration des tissus par l'ouverture, tandis que le couteau interne
affûté tourne à grande vitesse et avance à travers l'ouverture pour saisir les tissus ciblés. L'échantillon de tissus est aspiré
jusqu'au bocal de prélèvement de l'échantillon. La canule coaxiale intégrée peut être détachée de la sonde après la
biopsie et rester dans le sein pour maintenir une voie d'accès au site de la biopsie afin de permettre la mise en place d'un
marqueur de site de biopsie. Le support est conçu avec 3 boutons de biopsie en prévision des multiples prises en main
(Figure 3).
IMPORTANT : Les marqueurs de biopsie 14G CorMARK™ pourront être utilisés avec le système de biopsie mammaire
Mammotome® elite pour marquer radiographiquement l'emplacement de la procédure de biopsie. NE PAS UTILISER DE
MARQUEUR NON APPROUVÉ POUR L'UTILISATION AVEC LE SYSTÈME DE BIOPSIE MAMMAIRE Mammotome® ELITE.
Figure 1
Figure 2
14
Figure 3
Avertissements et précautions
• Les procédures mini-invasives doivent être confiées à des personnes ayant reçu la formation adéquate et coutumières
des techniques mini-invasives. Consulter les revues médicales pour en savoir plus sur les techniques, les complications
et les dangers avant d'effectuer toute procédure mini-invasive.
• Le diamètre des instruments mini-invasifs peut varier d’un fabricant à l’autre. Pour l’utilisation d’instruments et
d’accessoires mini-invasifs de fabricants différents au cours d’une même intervention, vérifier leur compatibilité avant
de commencer l’intervention.
• Ne pas stériliser le dispositif à l'autoclave.
• Ne pas immerger le dispositif.
• Ne pulvériser aucun fluide sur le support.
• L’utilisation de cet instrument est réservée aux médecins formés aux interventions de biopsie percutanée.
• Veiller à éviter de plier ou de tordre la sonde.
• Si la sonde est tordue, ne pas l'utiliser. Jeter la sonde dans un récipient approprié.
• La sonde n'a pas été conçue pour une perforation percutanée de la peau.
• Comme pour tout instrument de biopsie, il peut y avoir un risque d'infection.
• Ne pas utiliser cet instrument avec l'imagerie par résonance magnétique (IRM).
• Le support doit uniquement être utilisé avec des sondes de biopsie Mammotome® elite.
• Les produits fabriqués ou distribués par des entreprises non autorisées par Devicor® Medical Products, Inc. risquent
de ne pas être compatibles avec le système Mammotome® elite. L'utilisation de ces produits risque de donner des
résultats imprévisibles et de causer des lésions à l'utilisateur ou au patient.
• Les instruments ou les dispositifs qui entrent en contact avec des fluides corporels pourront exiger une manipulation
spéciale avant d'être jeter pour éviter la contamination biologique.
• Jeter tous les instruments jetables ouverts, qu'ils aient été utilisés ou non.
• La sonde est emballée et stérilisée pour un usage unique. Ne pas réutiliser, reconditionner ou restériliser. Une
réutilisation, un reconditionnement ou une restérilisation risque de compromettre l'intégrité structurelle du dispositif
et/ou d'aboutir à sa défaillance, ce qui peut se solder par des blessures, des maladies, voire la mort du patient. Par
ailleurs, le reconditionnement ou la restérilisation de dispositifs à usage unique peut créer un risque de contamination
et/ou causer l'infection ou l'infection croisée des patients notamment, la transmission de maladies infectieuses d'un
patient à l'autre. La contamination du dispositif pourra aboutir à des blessures, la maladie ou le décès du patient.
15
Illustration 1. Illustration et composants du support
Bouton droit
Choix de 3 boutons Biopsie
Voyant Pile
Voyant d'erreur
Bouton central
Bouton gauche
Haut-parleur
Voyant central
de Biopsie
Onglet d'alignement
Voyants gauche et droit de Biopsie
Illustration 2. Illustration et composants de la sonde
Gaine de protection
Canule coaxiale intégrée
Bouton de libération de la coaxiale
Localisateur d'ouverture
Ergot de la sonde
Ouverture de l'aiguille
Trocart
Bocal de prélèvement
d'échantillon
Panier à tissus
Bouton de rotation de l'aiguille
Béquille
Corps de la sonde
Béquille
Bouchon du Bocal de
prélèvement d'échantillon
Bouton de libération
du panier à tissus
Onglets de verrouillage
gauche et droit
Matériel requis
• Modalité appropriée d'imagerie et accessoires
• Support de biopsie Mammotome® elite
• Sonde de biopsie Mammotome® elite
• Gants et champs chirurgicaux
• Anesthésique local
• Scalpel
• Autre équipement nécessaire
Mode d'emploi
IMPORTANT : Inspecter tout l'emballage avant utilisation. Si l'emballage du produit est compromis ou que le produit
tombe par terre lors de son retrait de l'emballage, procéder comme suit :
• Support : Suivre les procédures Nettoyage du support et Désinfection du support.
• Sonde : Jeter dans la mesure où il ne s'agit plus d'un instrument stérile.
16
Vérifier la compatibilité de tous les instruments et accessoires mini-invasifs avant d'utiliser l'instrument (voir
Avertissements et précautions).
Première utilisation
Le support est expédié avec une pile pas complètement chargée. La pile doit être complètement chargée avant la
première utilisation. Nettoyer et désinfecter le support, en suivant les procédures Nettoyage du support et Désinfection
du support. Pour charger la pile, placer le support dans son socle de charge. Le support signalera sa correcte mise en
place par un indicateur sonore. Le support peut être enlevé de son socle une fois la charge terminée et le voyant de la
pile allumé en continu en vert. Un indicateur sonore retentit une fois le support enlevé de son socle de charge. Il faut
compter environ 200 minutes pour recharger complètement la pile.
IMPORTANT : Le support DOIT ÊTRE COMPLETEMENT CHARGÉ avant son utilisation initiale.
Chargement de la sonde
1.
E n maintenant la stérilité, sortir la sonde de son emballage. Pour éviter tout dommage, ne pas laisser tomber le
dispositif dans le champ stérile. Si la sonde entre en contact avec une surface non stérile, elle devra être jetée dans
le collecteur correspondant.
• La sonde se présente avec une gaine de protection sur le trocart. Il est recommandé de laisser la gaine de
protection sur le trocart jusqu'à ce que la sonde soit prête à être introduite dans le site percutané. Veiller à
ne pas se blesser en retirant la gaine.
2.
S aisir le corps de la sonde et aligner l'ergot d'alignement avec l'encoche du support. Commencer à pousser la base
de la sonde dans le compartiment du support tout en alignant l'ergot d'alignement du support avec l'encoche de la
sonde (Illustration 3, étape 1).
3.
ousser fermement la sonde dans le support jusqu'à ce qu'un déclic indique que les onglets de verrouillage se sont
P
enclenchés dans le support (Illustration 3, étape 2).
Illustration 3
ATTENTION : Pour éviter de se pincer les doigts en chargeant la sonde dans le support, saisir le support sur les côtés
au-dessus du logo et près des onglets de verrouillage de la sonde.
4.
Si la sonde est bien insérée, le support se met automatiquement sous tension et commence une séquence
d'initialisation. Durant l'initialisation, le moteur est audible et le voyant actif de biopsie s'allume en continu en
orange. À la fin d'une initialisation réussie, le support émet 2 bips et le voyant actif de biopsie s'allume en vert,
indiquant que le système est prêt pour le prélèvement.
• Si la sonde est mal insérée dans le support, la séquence d'initialisation ne démarrera PAS.
• Si le système n'est pas prêt pour le prélèvement, le support émettra 3 bips et le voyant d'erreur s'allumera en
orange. Pour corriger le problème, consulter la section Dépannage.
ATTENTION : Pièces en mouvement dans la sonde. S'assurer que rien ne bouche l'ouverture de l'aiguille.
• Si le support n'est pas touché pendant 30 secondes après la mise en place d'une sonde, il se met en veille pour
économiser la pile. En mode veille, les voyants Biopsie et Pile s'éteignent et les boutons se désactivent. Dès que le
support est bougé, le dispositif se réveille de son mode veille. Le support reste en veille tant qu'une sonde n'est pas
connectée.
Sélection d'un bouton de biopsie
Le bouton central de biopsie est présélectionné à l'expédition de l'appareil. Un seul bouton de biopsie est actif lorsque
l'appareil est sous tension. Le bouton actif de biopsie est identifié par un voyant lumineux vert. Pour changer de bouton
actif de biopsie, s'assurer que la sonde est attachée, puis appuyer simultanément sur les deux boutons biopsie inactifs
17
pendant 3 secondes (Illustration 4, étape 1). Il y aura un indicateur sonore et les trois voyants biopsie clignoteront en vert
(Illustration 4, étape 2). L'utilisateur peut ensuite appuyer brièvement sur le bouton biopsie désiré (Illustration 4, étape 3).
La sélection du bouton actif de biopsie est mémorisée par l'appareil pour une utilisation future.
Illustration 4
Gauche actif
Central actif
Droit actif
Bouton central de Biopsie
Bouton gauche de Biopsie
Bouton droit Biopsie
Procédures de prélèvement tissulaire
1.
Préparer le site percutané conformément à la technique chirurgicale standard avant l'insertion de la sonde.
2.
Inciser suffisamment dans la zone sélectionnée pour permettre l'insertion du trocart.
3.
Enlever la gaine de protection de la sonde.
• La canule coaxiale intégrée peut au besoin être enlevée pour faciliter l'insertion. Dans ce cas, jetez-la comme il
convient. Il est déconseillé de rattacher la canule coaxiale intégrée à la sonde pour minimiser les blessures.
4.
Si nécessaire, utiliser le bouton de rotation de l’aiguille pour ajuster la position de l'ouverture de l'aiguille avant
d'introduire la sonde dans l'incision. Pour tourner, tirer sur le bouton de rotation d'aiguille (Illustration 5, étape 1).
Tourner à la position horaire souhaitée (Illustration 5, étape 2) et relâcher (Illustration 5, étape 3). Le localisateur
d'ouverture indique la position de l'ouverture.
Illustration 5
360°
2 mm
5.
Introduire la sonde dans l'incision et positionner son extrémité dans la zone cible, au-delà de la lésion. Au besoin,
utiliser un guidage par imagerie.
• Garder les doigts à l'écart du bouton actif de biopsie jusqu'à ce que le site ciblé ait été atteint.
18
6.
Appuyer sur le bouton actif de biopsie du support pour prélever un échantillon de tissus. Le cycle de biopsie se
déroule automatiquement. L'aspiration est créée, la canule coupante interne de la sonde se rétracte, les tissus sont
aspirés dans l'ouverture de l'aiguille et le couteau tourne et effectue un mouvement de translation vers l'avant,
sectionnant les tissus. Lorsque le couteau atteint l'extrémité distale de l'aiguille, il s'arrête de bouger et utilise le
vide pour transporter l'échantillon jusqu'au bocal de prélèvement de l'échantillon. Le voyant lumineux de biopsie
s'allume en continu en orange et le moteur sera audible durant l'échantillonnage et les prélèvements des tissus. À
la fin du cycle de biopsie, l'aspiration se désactive et le voyant de biopsie s'allume en vert.
• Ne pas enlever le bocal de prélèvement d'échantillon pendant l'obtention des tissus.
• Le cycle de biopsie peut être interrompu pour éviter les blessures inutiles ou pour visualiser l'emplacement
de l'ouverture par le biais de l'imagerie (échographe).
• Appuyer une seule fois sur le bouton actif de biopsie pour lancer le cycle de biopsie. Pour interrompre le
cycle de biopsie, rappuyer sur le bouton lorsque le couteau se rétracte de la position 1 à 3 (Illustration 6)
ou qu'il avance de la position 3 à 2. Lorsque le cycle de biopsie est interrompu, le couteau se rétracte à la
position 3. Le voyant Biopsie clignote en orange. Pour terminer le cycle de biopsie, appuyez sur le bouton
biopsie.
Illustration 6
ATTENTION : Une fois la sonde insérée dans les tissus et le cycle de prélèvement démarré, NE PAS DÉPLACER
L'AIGUILLE avant la fin du cycle de prélèvement.
7.
Pivoter l'ouverture en tournant la sonde et le support pour le prélèvement suivant, puis reprendre l'étape 6 si
besoin pour obtenir des échantillons supplémentaires.
• Pour éviter de courber l'aiguille, ne pas appuyer excessivement lors de son positionnement dans le sein.
• Vérifier la récupération des prélèvements souhaités par imagerie post-biopsie de la patiente si besoin.
8.
Si la biopsie est effectuée SANS marqueur de site de biopsie, une fois le dernier échantillon tissulaire obtenu,
enlever le dispositif et soigner le site d'incision comme il est d'usage. Passer à l'étape 10.
9.
Si la biopsie est effectuée AVEC un marqueur de site de biopsie, une fois le dernier échantillon tissulaire obtenu,
déconnecter la canule coaxiale intégrée en appuyant sur le bouton de liberation de la coaxiale. Enlever la sonde en
laissant la canule en place, (Illustration 7) pour faciliter le positionnement du marqueur dans la cavité de la biopsie.
Illustration 7
a.
En utilisant une technique chirurgicale standard, insérer le CorMARK™ 14 G par la canule coaxiale jusqu'à ce
que la poignée bute sur le bouton de libération de la coaxiale.
b.
Une fois que le CorMARK™ 14 G a atteint la profondeur totale de la trajectoire de l'aiguille de la canule
coaxiale, déployer le marqueur.
c.
Utiliser l'imagerie pour vérifier si le marqueur a atteint l'emplacement souhaité.
d.
Enlever et jeter la canule coaxiale et soigner le site d'incision comme il est d'usage.
IMPORTANT : Pour l'utilisation du CorMARK™, consulter les instructions du fabricant.
10. Pour être sûr d'avoir une aiguille non obturée après son retrait du sein, appuyer sur le bouton Biopsie pour activer
un cycle de test.
11. Dévisser le couvercle du bocal de prélèvement d'échantillon d'un quart de tour dans le sens inverse des aiguilles
d'une montre (Illustration 8, étape 1). Enlever ensemble le bocal et le panier à échantillon tissulaire (Illustration 8,
19
étape 2). Appuyer sur le bouton de libération du panier à échantillon tissulaire pour enlever le panier du bocal de
prélèvement d'échantillon pour faciliter l’anatomopathologie des échantillons (Illustration 8, étape 3).
Illustration 8
12. Utiliser éventuellement, au besoin une pince stérile pour faciliter le retrait des échantillons du panier.
13. Remettre en place le couvercle du bocal de prélèvement d'échantillon avant de jeter la sonde. Pour remettre en place,
dévisser le couvercle d'un quart de tour dans le sens inverse des aiguilles d'une montre, insérer dans le bocal de
prélèvement d'échantillon (Illustration 9, étape 1) et revisser d'un quart de tour dans le sens des aiguilles d'une montre
(Illustration 9, étape 2). Le symbole du cadenas doit se trouver à 12 heures. S'il y a lieu, insérer un nouveau panier à
tissus et bocal de prélèvement d'échantillon pour continuer l’échantillonnage (Illustration 9).
Illustration 9
ATTENTION : La sonde est destinée EXCLUSIVEMENT A UN USAGE UNIQUE. Jeter la sonde immédiatement après
utilisation.
Retrait de la sonde du support
Sortir la sonde du support en appuyant sur l'onglet de verrouillage de la sonde et en tirant (Illustration 10). Jeter la sonde
dans un récipient approprié.
Illustration 10
ATTENTION : La sonde est destinée EXCLUSIVEMENT A UN USAGE UNIQUE. Jeter la sonde immédiatement après
utilisation.
ATTENTION : Ne pas reboucher l'extrémité de la sonde.
Nettoyage du support
Après chaque utilisation, nettoyer minutieusement le support à la main avec un détergent enzymatique de pH neutre.
Procéder au nettoyage manuel en utilisant comme suit un détergent enzymatique :
20
1.
Préparer un détergent de pH neutre ou un détergent enzymatique de pH neutre en suivant le mode d'emploi du
fabricant.
2.
Utiliser un chiffon doux et propre légèrement humecté de solution nettoyante pour nettoyer manuellement toutes
les surfaces. Par ailleurs, utiliser une brosse à dent souple en à soie standard pour nettoyer les zones contenant des
creux.
3.
Rincer minutieusement avec un chiffon doux et propre légèrement humecté d'eau du robinet tiède (27 à 44 °C).
4.
Essuyer avec un chiffon doux et propre.
5.
Inspecter l'appareil pour vérifier l'absence de contamination. En présence de contamination, reprendre les étapes 1
à 5 jusqu'à ce que plus aucune contamination visible ne soit présente.
ATTENTION : Ne pas essayer de stériliser le support à l'autoclave, aux rayons ou par stérilisation au plasma ; ne pas
pulvériser de liquide ni ne l'immerger dans un liquide sous peine d'endommager l'instrument. Si le support est mal
nettoyé, la garantie est nulle.
Désinfection du support
La procédure de nettoyage doit être suivie d'une procédure de désinfection. Le support peut être utilisé avec les
désinfectants chimiques suivants :
• Solution d'eau de Javel à 10 % (1 volume d'eau de Javel / 9 volumes d'eau purifiée ou désionisée)
Les désinfectants doivent être préparés et utilisés conformément aux recommandations du fabricant, à la concentration
et au temps de contact. L'emploi d'autres désinfectants que ceux spécifiés dans ces instructions devra être évalué pour
tester leur équivalence avant usage. Les fiches de données techniques sont généralement disponibles sur les sites Web
des fabricants pour faciliter cette évaluation. Toute procédure de désinfection, y compris les outils et les solutions, peut
accélérer l'usure d'un dispositif ou d'un équipement.
1.
Faire tremper un chiffon propre et une brosse à dent souple en soie dans la solution désinfectante. Presser
fermement le chiffon pour essorer l'excédent de solution.
Tapoter la brosse à dent pour enlever l'excédent de solution.
2.
Essuyer minutieusement le support en veillant à maintenir une surface légèrement mouillée pendant 5 minutes.
3.
Frotter minutieusement dans les creux avec la brosse à dent souple en standard à soie, en veillant à maintenir une
surface légèrement mouillée pendant 5 minutes.
4.
Utiliser de la gaze stérile ou un chiffon propre et doux humecté d'eau purifiée pour enlever le désinfectant du
dispositif. Répéter 4 fois supplémentaires l’opération pour enlever minutieusement tous les résidus.
5.
Une brosse à dent standard humectée d'eau purifiée doit être utilisée pour enlever le désinfectant des creux du
dispositif. Répéter 6 fois supplémentaires pour enlever minutieusement tous les résidus.
6.
Essuyer le support avec un chiffon doux propre et veiller à insérer le chiffon dans les creux du dispositif.
Lors de la procédure de décontamination, s'assurer que suffisamment de résidus de détergent et de désinfectant ont été
enlevés. De l'eau purifiée ou désionisée devra être utilisée durant les procédures finales de rinçage, s'il y a lieu ( plusieurs
rinçages pourront être nécessaires ). Pour éliminer les résidus de désinfectants, voir les recommandations du fabricant.
ATTENTION : Ne pas essayer de stériliser le support à l'autoclave, aux rayons ou par stérilisation au plasma ; ne
pas pulvériser de liquide ni l'immerger dans un liquide sous peine d'endommager l'instrument. Si le support est mal
désinfecté, la garantie sera nulle.
Recharge du support
Charger le support complètement avant la première utilisation. Le support utilise une pile rechargeable au lithiumpolymère. Il faut compter environ 200 minutes pour recharger complètement la pile. La pile doit être correctement
chargée avant la première utilisation du support et avant le début de chaque procédure. Lorsque le support est dans
le socle de charge, le voyant de la pile s'allume en vert une fois la pile complètement chargée. Si la pile n'est pas
suffisamment chargée, le voyant de la pile clignotera en vert ou en jaune pour indiquer le niveau de charge réduit.
Pour charger le support :
1.
S'assurer que la fiche appropriée de l'adaptateur est connectée au secteur.
2.
Brancher le cordon de l'adaptateur secteur sur le socle de charge.
3.
Brancher l'adaptateur secteur sur une prise secteur.
4.
Après nettoyage et désinfection, placer le support dans le socle de charge. Un bip à deux tonalités confirmera le
placement correct du support dans le socle de charge. Si le voyant jaune s'allume, il faudra compter environ 200
minutes pour recharger complètement la pile.
21
5.
Le voyant de la pile clignotera en jaune ou vert pour indiquer une recharge active et le niveau de charge sur le socle.
Le support est correctement chargé lorsque le voyant de la pile s'allume en vert continu. Le support émet un bip à
deux tonalités lors de son retrait du socle.
• Après chaque utilisation ou lorsqu'il n'est pas utilisé, le support doit rester dans son socle pour maintenir la charge de la
pile au maximum. Un circuit de sécurité empêche la surcharge de la pile.
• Chaque fois que le support est immobile pendant 30 secondes avec ou sans sonde attachée, le voyant de la pile
s'éteint. Quand le support est déplacé, le voyant de la pile s'allume pour indiquer l'état de charge actuel.
• Chaque fois que le support est immobile pendant 1 heure avec ou sans sonde attachée, il se met en veille. Placer le
support dans le socle de charge sans la sonde, puis l'en retirer pour le remettre sous tension.
• Durant une procédure de biopsie, le voyant de la pile s'allume continuellement en vert. Si le voyant de la pile
clignote en vert, le support est suffisamment chargé pour réaliser une procédure. Si le voyant de la pile s'allume
continuellement en jaune, le support ne fonctionnera pas et devra être immédiatement placé sur le socle.
IMPORTANT : Si le voyant de la pile s'éteint après un voyant jaune continu, le support ne pourra pas être rechargé.
Contacter le Service Client ou un commercial MAMMOTOME.
Dépannage
1.
Le voyant d'erreur est allumé continuellement en orange :
Le support réalise des contrôles système périodiques pendant le fonctionnement du dispositif. Si une erreur est
détectée, le voyant d'erreur s'allume en orange. Dans ce cas, s'assurer que la sonde se trouve en dehors du patient,
retirer la sonde du support et remplacer la par une sonde neuve. Si le voyant d'erreur ne s'éteint pas, contacter le
Service Client ou un commercial MAMMOTOME.
2.
Les voyants de la pile et de biopsie ne s'allument pas après chargement d'une sonde dans le support :
Contrôler le voyant de la pile pour garantir une charge suffisante. S'assurer que les ergots d'alignement et de
verrouillage sont solidement en place. S'assurer que c'est la première utilisation de la sonde. Si ces conditions
sont satisfaites et que les voyants ne s'allument toujours pas, remplacer la sonde par une neuve. Si les voyants
ne s'allument pas après l’insertion correcte d'une sonde neuve, contacter le Service Client ou un commercial
MAMMOTOME.
3.
Le support ne se recharge pas lorsqu'il est dans son socle de charge :
S'assurer que le cordon d'alimentation secteur est bien branché sur le socle et sur une prise secteur. S'assurer de
l'absence d'obstruction au niveau des connecteurs du socle ou du support, puis insérer le support dans le socle.
S'assurer que la tonalité du support retentit et que le voyant de la pile clignote. En l'absence de tonalité sonore ou de
témoin clignotant, remplacer le socle de charge et le cordon d'alimentation secteur en contactant le Service Client
ou un représentant MAMMOTOME.
Carac téristiques techniques du support
Conformité électrique
Cet équipement médical a réussi à tous les tests requis pour les dangers liés à l'électrocution,
l'incendie et les dangers mécaniques, conformément à UL 60601-1, IEC/EN 60601-1, CAN/CSA C22.2
No 601-1.
Infiltration de liquides
Non protégé contre l'infiltration de fluides
Inflammabilité
Inadapté à l'utilisation en présence d'anesthésiques inflammables
Dimensions
Longueur : 18,9 cm
Largeur : 5 cm
Hauteur : 3,8 cm
Cordon d'alimentation et
adaptateurs secteur
A utiliser uniquement avec les accessoires d'alimentation :
• Modèle : FRM015-S09-1 p/n TRM15-S10-I-351359
• Tension d'entrée : 100-240 V
• Intensité d'entrée : 0,7 à 0,4 A
• Fréquence d'entrée : 50-60 Hz
• Tension de sortie : 10 V
• Intensité de sortie : 1,5 A
• Puissance max. : 15 W
22
Caractéristiques du système
Classification
Classe II, équipement de type BF à alimentation interne
Conditions environnementales
Transport et stockage :
• -35 à +54 °C (-31 à 129 °F)
• Humidité relative : 10 à 95 %, sans condensation
• Pression atmosphérique : 500 à 1 060 hPa
Fonctionnement :
• +5 à +40 °C (41 à 104 °F)
Mode de fonctionnement
Continu
Compatibilité électromagnétique (CEM), directives et déclarations du fabricant
Le système de biopsie Mammotome® elite exige des précautions spéciales relatives à sa compatibilité électromagnétique
(CEM) et doit être installé et utilisé conformément aux informations CEM fournies dans ce guide d'installation. Le système
de biopsie Mammotome® elite est destiné à une utilisation dans l'environnement électromagnétique spécifié ci-dessous.
Le client ou l'utilisateur du système de biopsie Mammotome® elite devra veiller à l'utiliser dans un tel environnement.
Directives et déclaration du fabricant – émissions électromagnétiques
Le système de biopsie Mammotome® elite est destiné à une utilisation dans les environnements électromagnétiques spécifiés ci-dessous.
Le client ou l'utilisateur du système de biopsie Mammotome® elite devra veiller à l'utiliser dans un tel environnement.
Test d'émission
Conformité
Directive
Émissions RF - CISPR 11
Groupe 1
Le système de biopsie Mammotome® elite utilise l'énergie RF
uniquement pour son fonctionnement interne. Par conséquent,
ses émissions RF sont très basses et ne risquent pas de causer
d'interférences aux équipements électroniques situés à proximité.
Émissions RF - CISPR 11
Classe A
Émissions harmoniques
IEC 61000-3-2
Non applicable
Fluctuations de tension /
oscillations
IEC 61000-3-3
Non applicable
Le système de biopsie Mammotome® elite est adapté à une utilisation
dans tous les établissements autres que des domiciles et des
établissements directement reliés au réseau d'alimentation public
basse tension qui fournit les appartements.
Directives et déclaration du fabricant – immunité électromagnétique
Le système de biopsie Mammotome® elite est destiné à une utilisation dans les environnements électromagnétiques spécifiés ci-dessous.
Le client ou l'utilisateur du système de biopsie Mammotome® elite devra veiller à l'utiliser dans un tel environnement.
Test d'immunité
Niveau de test CEI
60601
Niveau de
conformité
Environnement électromagnétique - Directives
Décharge
électrostatique IEC
61000-4-2
± 6 kV contact
± 6 kV contact
± 8 kV air
± 8 kV air
Les sols doivent être en bois, en béton ou en carrelage. Si les sols sont
recouverts de matière synthétique, l'humidité relative doit être au moins
de 30 %.
Les équipements de communications RF portables et mobiles ne
doivent pas être utilisés plus près d'un composant du système de biopsie
Mammotome® elite, notamment les câbles, que la distance de séparation
recommandée calculée à partir de l'équation applicable à la fréquence
du transmetteur.
23
RF conduite CEI
61000-4-6
3 Vrms
RF rayonnées
3 V/m
IEC 61000-4-3
80 MHz
à 2,5 GHz
3V
150 kHz
à 80 MHz
Distance de séparation recommandée
d = [1,17]√P
d = [1,17]√P 80 à 800 MHz
3 V/m
d = [2,33]√P 800 MHz à 2,5 GHz
où P représente la puissance nominale maximum de sortie du
transmetteur en watts (W) selon le fabricant du transmetteur et d la
distance recommandée en mètres (m).
La puissance du champ de transmetteurs RF fixes, telle que déterminée
par contrôle électromagnétiquea, doit être inférieure au niveau de
conformité dans chaque plage de fréquenceb.
Des interférences sont possibles à proximité d'équipements portant le
symbole suivant :
Remarque 1 À 80 MHz et 800 MHz, la plage de fréquence supérieure s'applique.
Remarque 2 Il est possible que ces consignes ne s'appliquent pas à toutes les situations. La propagation électromagnétique est affectée
par l'absorption et la réflexion sur les structures, les objets et les personnes.
Les intensités de champ des transmetteurs fixes, tels que les stations de base pour les téléphones cellulaires ou sans fil et les
radiocommunications terrestres, les radios amateurs, la diffusion des radios AM et FM et des chaînes de télévision ne peuvent pas être
théoriquement prédites avec précision. Pour évaluer l'environnement électromagnétique en présence de transmetteurs RF fixes, il faut
envisager le contrôle électromagnétique du site. Si l'intensité de champ mesurée à l'endroit où le système de biopsie Mammotome®
elite est utilisé dépasse le niveau de conformité RF applicable ci-dessus, le système de biopsie Mammotome® elite devra être observé
pour vérifier si son fonctionnement est normal. En cas de fonctionnement anormal observé, des mesures supplémentaires pourront être
nécessaires, notamment la réorientation ou le déplacement du système de biopsie Mammotome® elite.
a
b
Sur la plage de fréquence de 150 kHz à 80 MHz, les intensités de champ doivent être inférieures à 3 V/m.
Service clientèle
Pour obtenir des informations supplémentaires sur le système de biopsie mammaire Mammotome® elite, appeler le
1-877-9-A-MAMMO (1-877-926-2666) (États-Unis seulement ; pour l'UE, appeler le 0 800 918 200 ou le 0 800 500 98 98) ;
envoyer un email à [email protected] ; ou aller sur le site internet www.mammotome.com.
Mise au rebut et recyclage
Le support Mammotome® elite contient une pile inamovible au lithium-polymère. Ne pas essayer d'enlever la pile. Ne
pas jeter le support ou la pile au lithium-polymère au feu. Jeter le support et la pile au lithium-polymère conformément
aux lois et aux réglementations locales ou contacter MAMMOTOME pour en savoir plus sur les différentes options de
recyclage. En dehors des États-Unis, contacter le service clientèle pour la mise au rebut du support.
ATTENTION : La pile au lithium-polymère peut poser un risque d'incendie ou de brûlures chimiques en cas d'erreur de
manipulation. Ne pas démonter, écraser ou percer la pile. Ne pas chauffer la pile à plus de 140 °F (60 °C).
Présentation
• Le support Mammotome® elite est fourni non stérile.
• Les sondes Mammotome® elite sont fournies stériles pour un seul patient et vendues séparément. Jeter après utilisation.
Garantie
Devicor® Medical Products, Inc. garantit que ce produit est dépourvu de défauts de matériel et de fabrication dans des
conditions normales d'utilisation pendant la période de garantie respective indiquée ci-dessous.
L'obligation de Devicor® Medical Products, Inc. en vertu de cette garantie se limite au remplacement, au choix, de tout
produit ou pièce du produit, qui a été renvoyé(e) à Devicor® Medical Products, Inc. ou son distributeur durant la période
applicable indiquée ci-dessous et dont l'examen a révélé, à l’appréciation de Devicor® Medical Products, Inc., qu'il était
défectueux. Cette garantie ne s'applique à aucun produit ou pièce de produit qui a été : (1) endommagé suite à une
utilisation avec des dispositifs fabriqués ou distribués par des parties non autorisées par Devicor® Medical Products,
Inc. (2) réparé(e) ou altéré(e) en dehors de l'usine Devicor® Medical Products, Inc. d'une manière qui, selon Devicor®
24
Medical Products, Inc., compromet sa stabilité ou sa fiabilité, (3) sujet(te) à une utilisation impropre, une négligence ou
un accident, ou (4) utilisé(e) de manière non conforme aux paramètres nominaux d'utilisation, aux instructions et aux
directives relatives au produit ou aux normes fonctionnelles, opérationnelles ou environnementales pour des produits
similaires généralement acceptées dans l'industrie. Les produits Devicor® Medical Products, Inc. sont garantis pendant
les périodes suivantes après livraison à l'acheteur initial :
Support Mammotome® elite - Six (6) mois, remplacement
Socle de charge et accessoires de branchement - Six (6) mois, remplacement
SAUF PRÉSÉANCE D'UNE LOI LOCALE APPLICABLE, CETTE GARANTIE REMPLACE TOUTES LES AUTRES GARANTIES,
EXPRESSES OU TACITES, Y COMPRIS LES GARANTIES DE QUALITÉ COMMERCIALE ET D'ADAPTATION À UN BUT
PARTICULIER ET TOUTES LES AUTRES
OBLIGATIONS OU RESPONSABILITÉS DE DEVICOR® MEDICAL PRODUCTS, INC. ET REPRÉSENTE LE RECOURS EXCLUSIF
DE L'ACHETEUR. DEVICOR® MEDICAL PRODUCTS, INC. NE POURRA EN AUCUN CAS ÊTRE TENUE POUR RESPONSABLE DE
DOMMAGES SPÉCIAUX, MINEURS OU COLLATERAUX INCLUANT, ET SANS LIMITATION, LES DOMMAGES RÉSULTANT DE LA
PERTE D'UTILISATION, DE BÉNÉFICES, D'AFFAIRES OU DE CLIENTÈLE, SAUF DISPOSITION EXPRESSE CONTRAIRE DANS UNE
LOI SPÉCIFIQUE.
Devicor® Medical Products, Inc. n'endosse et n'autorise personne d'autre à endosser en son nom toute autre
responsabilité en relation avec la vente ou l'utilisation des produits Devicor® Medical Products, Inc. Aucune garantie n'est
accordée au-delà des conditions énoncées ici. La société Devicor® Medical Products, Inc. se réserve le droit de modifier à
tout moment les produits qu'elle crée et/ou vend, sans encourir d'obligation de modifications similaires sur les produits
précédemment créés et/ou vendus par elle.
ATTENTION : La loi fédérale des États-Unis limite la vente de ce dispositif à un médecin ou sur prescription médicale.
Pour les détails des options de remplacement, consulter un commercial MAMMOTOME.
Indikationen
Das Mammotome® elite Biopsiesystem ist indiziert zur Gewinnung von bildgebend oder per Tastbefund ermittelten
Gewebeproben aus der Brust oder den Achsellymphknoten zur diagnostischen Analyse von Brustanomalien.
• Das Mammotome® elite Biopsiesystem ist darauf ausgelegt, Brustgewebe zur histologischen Untersuchung zu
gewinnen, bei teilweiser oder vollständiger Entfernung der bildgebend dargestellten Anomalie.
• Das Mammotome® elite Biopsiesystem ist darauf ausgelegt, Brustgewebe zur histologischen Untersuchung zu
gewinnen, bei teilweiser Entfernung einer tastbaren Anomalie.
Das Ausmaß einer histologischen Anomalie kann nicht immer ohne weiteres aus dem Tastbefund oder dem bildgebend
dargestellten Erscheinungsbild dieser Anomalien bestimmt werden. Daher resultiert aus dem Umfang der Entfernung
der ertasteten oder bildgebend dargestellten Anomalie keine Prognose über den Umfang der Entfernung einer
histologischen Anomalie, z. B. bei Vorliegen von Bösartigkeit. Wenn die Probe der Anomalie histologisch nicht gutartig
ist, ist es unbedingt erforderlich, die Geweberänder hinsichtlich der Vollständigkeit der Entfernung mithilfe chirurgischer
Standardverfahren zu untersuchen.
In Fällen, bei denen sich eine Patientin mit einer tastbaren Anomalie vorstellt, die anhand klinischer und/oder
radiologischer Kriterien als gutartig klassifiziert wurde (z. B. Fibroadenom, fibrozystische Läsion), kann das Mammotome®
elite Biopsiesystem auch zur teilweisen Entfernung derartiger tastbarer Läsionen eingesetzt werden. Bei jeder Entfernung
von Brustgewebe muss eine histologische Beurteilung des Gewebes als Behandlungsstandard vorgenommen werden.
Wenn die Probe der Anomalie histologisch nicht gutartig ist, ist es unbedingt erforderlich, die Geweberänder hinsichtlich
der Vollständigkeit der Entfernung mithilfe chirurgischer Standardverfahren zu untersuchen.
Kontraindikationen
• Das Instrument ist ausschließlich für den Diagnoseeinsatz und nicht für die therapeutische Verwendung zugelassen.
• Das Instrument ist kontraindiziert für Patienten, bei denen auf Grundlage der ärztlichen Einschätzung ein erhöhtes
Risiko oder Komplikationen mit der Befundentfernung oder der Biopsie verbunden sein können. Patienten, die sich
einer gerinnungshemmenden Therapie unterziehen oder bei denen eventuell Blutgerinnungsstörungen vorliegen,
können einem erhöhten Risiko unterliegen.
25
Beschreibung des Instruments
Das Mammotome® elite Biopsiesystem von Devicor besteht aus einer Halterung und einer Nadel. Das Mammotome® elite
System kann zusammen mit einer bildgebenden Ultraschallführungshilfe zur Exzision und Sammlung diagnostischer
Proben mit nur einmaligen Einführen der Nadel eingesetzt werden. Die Komponenten des Systems sind bei der
gemeinsamen Verwendung zur Entnahme von Gewebeproben zu diagnostischen Zwecken im Rahmen eines
Biopsieeingriffs auf einen sicheren Betrieb ausgelegt.
Die wiederverwendbare Halterung, die unsteril ausgeliefert wird, ist ein unabhängiges, elektromechanisches,
handgehaltenes Biopsieinstrument mit Vakuumunterstützung, das einen aufladbaren Lithium-Polymer-Akku enthält und
in dessen Lieferumfang eine Ladestation mit einem Netzkabel und Adaptern enthalten ist (Siehe Abb. 1).
Die Einwegnadel, die steril ausgeliefert wird, besteht aus einem äußeren Trokarschaft mit einer distalen Öffnung sowie
einem inneren Übersetzungshohlschneidemesser (Siehe Abb. 2). Die Nadel enthält ferner eine integrierte Koaxialkanüle
sowie einen proximalen Probenauffangbehälter mit einem darin enthaltenem Gewebeprobenkorb und einer Kappe
(Siehe Abb. 2). Der Körper der Nadel enthält eine Ausrichtungslasche und zwei Verriegelungslaschen zur sicheren
Arretierung der Nadel in der Halterung.
Die Halterung erzeugt in dem Instrument ein Vakuum, um das Einsaugen von Gewebe in die Öffnung zu unterstützen,
während das geschärfte, innere Schneidemesser mit hoher Geschwindigkeit rotiert und über die Öffnung
hinweg vorgeschoben wird, um das Zielgewebe zu entnehmen. Die Gewebeprobe wird von dem Vakuum in den
Gewebeprobenkorb befördert. Die integrierte Koaxialkanüle kann nach der Biopsie von der Nadel getrennt und in der
Brust belassen werden, um beim Platzieren eines Markers für Probeentnahmestellen einen Zugang zur Biopsiestelle
geöffnet zu halten. Die Halterung verfügt über 3 mögliche Biopsietasten, die die Bedienung in verschiedensten
Handstellungen ermöglichen (Siehe Abb. 3).
WICHTIG: Die 14 GA CorMARK™ Biopsiestellenmarker können zusammen mit dem Mammotome® elite Biopsiesystem
verwendet werden, um den Ort des Biopsieeingriffs radiografisch zu markieren. NICHT ZUR VERWENDUNG IM
Mammotome® ELITE BIOPSIESYSTEM ZUGELASSENE MARKER DÜRFEN NICHT VERWENDET WERDEN.
Abbildung 1
Abbildung 2
26
Abbildung 3
Warnhinweise und Vorsichtsmaßnahmen
• Minimalinvasive Eingriffe dürfen nur von Personen mit angemessener Ausbildung und ausreichender Erfahrung mit
minimalinvasiven Methoden durchgeführt werden. Vor der Durchführung jeder minimalinvasiven Methode sollte die
medizinische Literatur zu Methoden, Komplikationen und Gefahren konsultiert werden.
• Minimalinvasive Instrumente können von Hersteller zu Hersteller unterschiedliche Durchmesser aufweisen. Bei
gemeinsamer Verwendung von minimalinvasiven Instrumenten und Zubehör verschiedener Hersteller bei einem
Eingriff muss die Kompatibilität vor Beginn des Eingriffs überprüft werden.
• Das Instrument darf nicht autoklaviert werden.
• Das Instrument darf nicht in Flüssigkeit eingetaucht werden.
• Die Halterung darf nicht mit Flüssigkeiten besprüht werden.
• Das Instrument darf nur von Ärzten verwendet werden, die in der Anwendung perkutaner Nadelmethoden zur
Gewebeentnahme ausgebildet sind.
• Besondere Sorgfalt muss aufgewendet werden, um das Biegen oder Verdrehen der Nadel zu vermeiden.
• Verbogene Nadeln dürfen nicht verwendet werden. Entsorgen Sie die Nadel in einem geeigneten Behälter.
• Die Nadel ist nicht für die perkutane Hautpunktion geeignet.
• Wie bei jedem Biopsieinstrument besteht ein potenzielles Infektionsrisiko.
• Das Instrument darf nicht zusammen mit bildgebenden Magnetresonanztomografie-Verfahren (MRT) verwendet
werden.
• Die Halterung darf nur zusammen mit Mammotome® elite Biopsienadeln verwendet werden.
• Von Firmen hergestellte oder vertriebene Produkte, die nicht von Devicor® Medical Products, Inc., autorisiert sind, sind
mit dem Mammotome® elite System möglicherweise nicht kompatibel. Die Verwendung solcher Produkte kann zu
unvorhergesehenen Ergebnissen und möglichen Verletzungen des Bedieners oder des Patienten führen.
• Instrumente bzw. Geräte, die in Kontakt mit Körperflüssigkeiten kommen, erfordern eventuell spezielle
Entsorgungsverfahren, um biologische Kontaminationen zu verhindern.
• Alle geöffneten Einweginstrumente – benutzt oder unbenutzt – müssen entsorgt werden.
• Die Nadel ist ausschließlich für den Einmalgebrauch verpackt und sterilisiert. Nicht wiederverwenden,
wiederaufarbeiten oder erneut sterilisieren. Wiederverwendung, Wiederaufarbeitung oder erneute Sterilisation
können die strukturelle Integrität des Instruments schädigen und/oder zum Versagen des Instruments führen,
was wiederum zu Verletzung, Krankheit oder Tod des Patienten führen kann. Darüber hinaus kann durch die
Wiederaufarbeitung oder erneute Sterilisation von Einweginstrumenten ein Risiko der Kontamination entstehen und/
oder Infektionen oder Kreuzinfektionen bei Patienten ausgelöst werden, einschließlich, aber nicht beschränkt auf die
Übertragung von Infektionskrankheiten zwischen Patienten. Die Kontamination des Instruments kann zu Verletzung,
Krankheit oder Tod des Patienten führen.
27
Abbildung 1. Halterung: Abbildung und Bezeichnungen
3 mögliche Biopsietasten
Rechte Taste
Batterieanzeige
Fehleranzeige
Mittlere Taste
Linke Taste
Lautsprecher
Mittlere Biopsiekontrollleuchte
Ausrichtungslasche
Linke und rechte Biopsiekontrollleuchte
Abbildung 2. Nadel: Abbildung und Bezeichnungen
Schutzhülle
Integrierte Koaxialkanüle
Koaxial-Freigabetaste
Öffnungspositionsanzeige
Halterungsaufnahmeraste
Nadelöffnung
Probenauffangbehälter
Trokarschaft
Gewebekorb
Knopf zum Drehen der Nadel
Kippständer
Nadelkörper
Kippständer
Probenauffangbehälterkappe
Freigabeknopf für Gewebekorb
Linke und rechte Verriegelungslasche
Erforderliche Ausrüstung
• Geeignetes Bildgebungsverfahren mit Zubehör
• Mammotome® elite Biopsiehalterung
• Mammotome® elite Biopsienadel
• OP-Handschuhe und -Abdecktücher
• Lokalanästhetikum
• Skalpell
• Weitere Ausrüstung nach Bedarf
Gebrauchsanleitung
WICHTIG: Untersuchen Sie die gesamte Verpackung vor der Verwendung. Ist die Produktverpackung beschädigt, oder
wird das Produkt beim Entfernen der Verpackung fallen gelassen, gehen Sie gemäß folgendem Protokoll vor:
• Halterung: Führen Sie die Verfahren Reinigung der Halterung und Desinfizieren der Halterung durch.
28
• Nadel: Entsorgen, da es sich nicht mehr um ein steriles Instrument handelt.
Überprüfen Sie die Kompatibilität aller minimalinvasiven Instrumente und des Zubehörs, bevor das Instrument
verwendet wird (Siehe unter „Warnhinweise und Vorsichtsmaßnahmen“).
Erstverwendung
Die Halterung wird mit nicht vollständig geladenem Akku geliefert. Die Halterung muss vor der ersten
Ingebrauchnahme vollständig geladen werden. Reinigen und desinfizieren Sie die Halterung gemäß den Anweisungen
unter Reinigung der Halterung und Desinfizieren der Halterung. Zum Laden des Akkus setzen Sie die Halterung in die
Ladestation. Die Halterung zeigt die ordnungsgemäße Platzierung durch ein akustisches Signal an. Nachdem die
Halterung vollständig aufgeladen wurde, was von der Batterieanzeige durch dauerhaft grünes Leuchten angezeigt wird,
kann es zur Verwendung aus der Ladestation herausgenommen werden. Beim Herausnehmen der Halterung aus der
Ladestation ertönt ein akustisches Signal. Das vollständige Aufladen des Akkus dauert ca. 200 Minuten.
WICHTIG: Die Halterung MUSS vor der ersten Ingebrauchnahme VOLLSTÄNDIG GELADEN SEIN.
Einsetzen der Nadel
1.
ehmen Sie die Nadel unter sterilen Bedingungen aus der Verpackung. Lassen Sie die Nadel im sterilen Bereich
N
nicht fallen, um Beschädigung zu vermeiden. Wenn die Nadel mit einer nicht sterilen Oberfläche in Berührung
kommt, muss sie im geeigneten Behälter entsorgt werden.
• Die Nadel ist mit einer Schutzhülle über dem Trokarschaft verpackt. Es empfiehlt sich, die Schutzhülle auf
dem Trokarschaft zu lassen, bis die Nadel zur Einführung in die perkutane Stelle bereit ist. Gehen Sie beim
Entfernen der Hülle vorsichtig vor, um Verletzungen zu vermeiden.
2.
ehmen Sie den Nadelkörper und richten Sie die Ausrichtungslasche an der Halterungsaufnahmeraste aus.
N
Beginnen Sie damit, die Nadelbasis in den Hohlraum der Halterung zu schieben, wobei die Ausrichtungslasche der
Halterung an der Halterungsaufnahmeraste im Nadelkörper ausgerichtet wird (Siehe Abb. 3, Schritt 1).
3.
rücken Sie den Nadelkörper fest in die Halterung, bis er deutlich hörbar einrastet. Dies zeigt an, dass die
D
Verriegelungslaschen in der Halterung eingerastet sind (Siehe Abb. 3, Schritt 2).
Abbildung 3
ACHTUNG: Halten Sie beim Einsetzen der Nadel in die Halterung die Halterung an den Seiten oberhalb des Logos und
in der Nähe der Verriegelungslaschen, um ein Einklemmen der Finger zu vermeiden.
4.
Wenn die Nadel ordnungsgemäß eingesetzt wurde, schaltet sich die Halterung automatisch ein und führt
eine Initialisierungssequenz durch. Während der Initialisierung ist der Motor deutlich zu hören und die aktive
Biopsiekontrollleuchte leuchtet dauerhaft orange. Am Ende einer erfolgreichen Initialisierung gibt die Halterung
2 akustische Signale aus und die aktive Biopsiekontrollleuchte leuchtet grün, was anzeigt, dass das System zur
Probenentnahme bereit ist.
• Wenn die Nadel fehlerhaft in die Halterung eingesetzt wurde, startet die Initialisierungssequenz NICHT.
• Falls das System noch nicht zur Probenentnahme bereit ist, gibt die Halterung 3 akustische Signale aus
und die Fehleranzeige leuchtet bernsteinfarben. Korrekturmaßnahmen finden Sie unter „Fehlersuche und
-beseitigung“.
ACHTUNG: Bewegliche Teile. Stellen Sie sicher, dass die Nadelöffnung zu diesem Zeitpunkt durch nichts blockiert wird.
• Wird die Halterung nach Einsetzen einer Nadel für 30 Sekunden weder verwendet noch bewegt, wechselt es in einen
Ruhemodus zur Erhaltung der Akkuladung. Im Ruhemodus blinken die Biopsie- und Batteriekontrollleuchten und die
Tasten sind deaktiviert. Sobald die Halterung bewegt wird, erwacht sie aus dem Ruhemodus. Die Halterung verbleibt
im Ruhemodus, wenn keine Nadel eingesetzt ist.
29
Festlegen der Biopsietaste
Im Auslieferungszustand ist die mittlere Biopsietaste vorbelegt. Bei eingeschaltetem Gerät ist nur eine Biopsietaste aktiv.
Die aktive Biopsietaste wird durch eine dauerhaft grün leuchtende Biopsiekontrollleuchte angezeigt. Zum Ändern der
gewünschten aktiven Biopsietaste stellen Sie sicher, dass die Nadel eingesetzt ist und drücken und halten dann die beiden
inaktiven Biopsietasten gleichzeitig 3 Sekunden lang gedrückt (Siehe Abb. 4, Schritt 1). Ein akustisches Signal ertönt und
alle 3 Biopsiekontrollleuchten blinken grün (Siehe Abb. 4, Schritt 2). Der Bediener kann dann die gewünschte Biopsietaste,
die aktiviert werden soll, drücken und loslassen (Siehe Abb. 4, Schritt 3). Die Auswahl der aktiven Biopsietaste wird zur
zukünftigen Verwendung im Instrument gespeichert.
Abbildung 4
Linke Taste aktiv
Mittlere Taste aktiv
Rechte Taste aktiv
Mittlere Biopsietaste
Linke Biopsietaste
Rechte Biopsietaste
Verfahren zur Entnahme von Gewebeproben
1.
Bereiten Sie die perkutane Stelle gemäß chirurgischen Standardverfahren vor dem Einführen der Nadel vor.
2.
Nehmen Sie im ausgewählten Bereich eine ausreichende Inzision zur Aufnahme des Trokarschafts vor.
3.
Ziehen Sie die Schutzhülle von der Nadel ab.
• Zur zusätzlichen Vereinfachung des Einführvorgangs kann die integrierte Koaxialkanüle entfernt werden.
Wenn Sie entfernt wird, muss sie ordnungsgemäß entsorgt werden. Es empfiehlt sich, die integrierte
Koaxialkanüle nicht erneut auf die Nadel aufzusetzen, um die Verletzung möglichst minimal zu halten.
4.
Verwenden Sie im Bedarfsfall den Knopf zum Drehen der Nadel, um die Position der Nadelöffnung zu justieren,
bevor die Nadel in die Inzision eingeführt wird. Ziehen Sie zum Drehen den Nadelrotationsknopf heraus (Siehe Abb.
5, Schritt 1). Drehen Sie den Knopf in die gewünschte Position (Siehe Abb. 5, Schritt 2) und lassen Sie ihn los (Siehe
Abb. 5, Schritt 3). Die Öffnungspositionsanzeige zeigt die Position der Öffnung an.
30
Abbildung 5
5.
Führen Sie die Nadel durch die Inzision ein und positionieren Sie die Nadelspitze im Zielbereich, sodass die Spitze
hinter der Läsion liegt. Eine bildgebende Führungshilfe sollte nach Erfordernis eingesetzt werden.
6.
Zum Entnehmen der Gewebeprobe drücken Sie die aktive Biopsietaste an der Halterung. Der Biopsiezyklus wird
automatisch gestartet. Ein Vakuum wird erzeugt, die innere Schneidekanüle der Nadel wird zurückgezogen, das
Gewebe wird in die Nadelöffnung gesaugt und das Hohlschneidemesser wird rotierend nach vorne geschoben,
wobei das Gewebe geschnitten wird. Wenn das Schneidinstrument das distale Ende der Nadelöffnung erreicht
hat, hält es an und befördert die Gewebeprobe mithilfe des Vakuums in den Probenauffangbehälter. Während des
Entnahmeprozesses der Gewebeprobe leuchtet die Biopsiekontrollleuchte dauerhaft orange, und der Motor ist
deutlich hörbar. Am Ende des Biopsiezyklus wird das Vakuum abgeschaltet und die Biopsiekontrollleuchte leuchtet
dauerhaft grün.
• Die aktive Biopsietaste darf erst berührt werden, wenn die Zielstelle erreicht ist.
• Während der Gewebeentnahme darf der Probenauffangbehälter nicht
entfernt werden.
• Der Biopsiezyklus darf zur Vermeidung unnötiger Verletzungen oder zur visuellen Darstellung der Öffnung
mittels Bildgebungsverfahren (Ultraschallbild) unterbrochen werden.
• Drücken Sie einmal die aktive Biopsietaste, um den Biopsiezyklus zu starten. Zum Unterbrechen des
Biopsiezyklus drücken Sie die Biopsietaste erneut, während das Schneidemesser von Position 1 auf Position
3 zurückgezogen (Siehe Abb. 6) bzw. wenn das Schneidemesser von Position 3 auf Position 2 vorgeschoben
wird. Bei einer Unterbrechung des Biopsiezyklus wird das Schneidemesser auf Position 3 zurückgezogen.
Die Biopsiekontrollleuchte blinkt dann orange. Drücken Sie zum Abschließen des Biopsiezyklus die
Biopsietaste.
Abbildung 6
ACHTUNG: Nachdem die Nadel in das Gewebe eingeführt und der Probenentnahmezyklus gestartet wurde, DARF DIE
NADEL NICHT NEU POSITIONIERT WERDEN, bis der Probenentnahmezyklus beendet ist.
7.
Drehen Sie die Öffnung für die nächste Probenentnahme, indem Sie die Halterung und die Nadel drehen, und
wiederholen Sie nach Bedarf Schritt 6, um zusätzliche Proben zu gewinnen.
• Üben Sie beim Positionieren innerhalb der Brust keinen übermäßigen Druck aus, um ein Biegen der Nadel
zu vermeiden.
• Überprüfen Sie erforderlichenfalls die Entnahme der Gewebeprobe an dem Patienten nach der Biopsie
mithilfe eines bildgebenden Verfahrens.
8.
Wenn Sie KEINEN Marker zur Markierung der Probeentnahmestelle verwenden, ziehen Sie das Instrument heraus
und versorgen die Inzisionsstelle ordnungsgemäß. Fahren Sie mit Schritt 10 fort.
9.
WENN Sie einen Marker zur Markierung der Probeentnahmestelle VERWENDEN, nehmen Sie nach Entnahme der
letzten Gewebeprobe die integrierte Koaxialkanüle ab und entfernen die Nadel, sodass die Kanüle in situ bleibt,
indem Sie die Koaxial-Freigabetaste drücken (Siehe Abb. 7), um so die Markerplatzierung in der Biopsiehöhle zu
erleichtern.
31
Abbildung 7
a.
Führen Sie den CorMARK™ 14 GA mithilfe eines chirurgischen Standardverfahrens durch die Koaxialkanüle
ein, bis die Halterung an der Koaxial-Freigabetaste anschlägt.
b.
Wenn der CorMARK™ 14 GA die volle Tiefe des Kanals der Koaxialkanülennadel erreicht hat, applizieren Sie
den Marker.
c.
Verifizieren Sie mit einem bildgebenden Verfahren, dass sich der Marker an der gewünschten Stelle befindet.
d.
Ziehen Sie die Koaxialkanüle heraus, entsorgen Sie sie und versorgen Sie die Inzisionsstelle ordnungsgemäß.
WICHTIG: Informationen zur Verwendung von CorMARK™ finden Sie in der Gebrauchsanleitung des Herstellers.
10. Zur Sicherstellung, dass die Nadel frei ist, drücken Sie nach dem Entfernen der Nadel aus der Brust die Biopsietaste,
um einen Testzyklus zu starten.
11. Drehen Sie die Probenauffangbehälterkappe um eine viertel Umdrehung gegen den Uhrzeigersinn (Siehe
Abb. 8, Schritt 1). Nehmen Sie Kappe und Gewebekorb zusammen ab (Siehe Abb. 8, Schritt 2). Drücken Sie den
Freigabeknopf für den Gewebekorb, um den Gewebekorb von der Probenauffangbehälterkappe zu trennen, damit
die Proben bequemer pathologisch untersucht werden können (Siehe Abb. 8, Schritt 3).
Abbildung 8
12. Zum leichteren Entfernen der Proben aus dem Gewebekorb kann bei Bedarf eine sterile Pinzette verwendet
werden.
13. Setzen Sie die Probenauffangbehälterkappe wieder auf, um die Nadel zu entsorgen. Zum Aufsetzen drehen
Sie die Probenauffangbehälterkappe eine viertel Umdrehung gegen den Uhrzeigersinn, setzen sie in den
Probenauffangbehälter ein (Siehe Abb. 9, Schritt 1) und drehen sie dann wieder eine viertel Umdrehung im
Uhrzeigersinn (Siehe Abb. 9, Schritt 2). Das Schlosssymbol sollte sich nun in der 12-Uhr-Position befinden.
Setzen Sie, falls zutreffend, einen neuen Gewebekorb mit einer neuen Probenauffangbehälterkappe ein, um die
Probenentnahme fortzusetzen (Siehe Abb. 9).
Abbildung 9
ACHTUNG: Die Nadel ist NUR für den EINMALGEBRAUCH bestimmt. Entsorgen Sie die Nadel sofort nach der
Verwendung.
32
Entnehmen der Nadel aus der Halterung
Ziehen Sie die Nadel bei gleichzeitigem Drücken der Verriegelungslaschen (an der Nadel) aus dem Hohlraum der
Halterung heraus (Siehe Abb. 10). Entsorgen Sie die Nadel in einem geeigneten Behälter.
Abbildung 10
ACHTUNG: Die Nadel ist NUR für den EINMALGEBRAUCH bestimmt. Entsorgen Sie die Nadel sofort nach der
Verwendung.
ACHTUNG: Setzen Sie keine neue Kappe auf die Nadelspitze.
Reinigung der Halterung
Reinigen Sie die Halterung nach jeder Verwendung gründlich manuell mit einem pH-neutralen, enzymatischen Reinigungsmittel. Führen Sie die manuelle Reinigung mit einem enzymatischen Reinigungsmittel wie folgt durch:
1.
Bereiten Sie ein pH-neutrales Reinigungsmittel oder ein pH-neutrales enzymatisches Reinigungsmittel gemäß den
Anweisungen des Herstellers vor.
2.
Reinigen Sie alle Oberflächen manuell mit einem mit der Reinigungslösung leicht befeuchteten, weichen, sauberen
Tuch. Verwenden Sie zusätzlich zum Reinigen von Bereichen mit Spalten eine herkömmliche Zahnbürste mit
weichen Borsten.
3.
Wischen Sie die Oberflächen gründlich mit einem weichen, sauberen Tuch ab, das leicht mit lauwarmem (27 °C –
44 °C) Leitungswasser befeuchtet ist.
4.
Trocknen Sie alles mit einem sauberen, weichen Tuch ab.
5.
Untersuchen Sie das Gerät auf sichtbare Kontaminationen. Sind Kontaminationen vorhanden, wiederholen Sie die
Schritte 1 bis 5, bis keine sichtbare Kontamination mehr vorhanden ist.
ACHTUNG: Versuchen Sie nicht, die Halterung mittels Autoklavierung, Bestrahlung oder Plasmasterilisationsverfahren
zu sterilisieren. Sprühen Sie keine Flüssigkeiten darauf und tauchen Sie es auch nicht in Flüssigkeiten ein – hierdurch
kann das Instrument beschädigt werden. Bei unzureichender Reinigung der Halterung erlischt die Garantie.
Desinfizieren der Halterung
Nach der Reinigung muss die Halterung desinfiziert werden. Folgende chemische Desinfektionsmittel sind für die
Verwendung mit der Halterung zugelassen:
• 10 %ige Bleichlauge (1 Teil Bleiche auf 9 Teile gereinigtes oder vollentsalztes Wasser)
Desinfektionsmittel müssen gemäß den Empfehlungen des jeweiligen Herstellers hinsichtlich Einsatz, Konzentration
und Einwirkungszeiten vorbereitet und verwendet werden. Die Verwendung anderer Desinfektionsmittel als der in der
vorliegenden Gebrauchsanweisung angegebenen muss vor dem Einsatz auf Eignung überprüft werden. Technische
Datenblätter, die Ihnen bei der Einschätzung der Eignung behilflich sein können, finden Sie in der Regel auf den
Internetseiten der Hersteller. Jeder Desinfektionsvorgang, einschließlich Hilfsmitteln und Lösungen, kann sich auf die
Abnutzung eines Geräts bzw. von Ausrüstungsgegenständen auswirken.
1.
Tränken Sie ein sauberes Tuch und eine Zahnbürste mit weichen Borsten mit der Desinfektionslösung. Wringen
Sie das Tuch gründlich aus, um alle überschüssige Lösung zu entfernen. Klopfen Sie die Zahnbürste auf, um
überschüssige Lösung zu entfernen.
2.
Wischen Sie die Halterung gründlich ab, wobei sichergestellt werden muss, dass die Oberfläche für 5 Minuten leicht
feucht bleibt.
3.
Bürsten Sie Bereiche mit Spalten gründlich mit der herkömmlichen Zahnbürste mit weichen Borsten aus, wobei
sichergestellt werden muss, dass die Oberfläche für 5 Minuten leicht feucht bleibt.
33
4.
Entfernen Sie das Desinfektionsmittel mit sterilem Mull oder einem sauberen, weichen Tuch, das mit gereinigtem
Wasser angefeuchtet ist, von dem Instrument. Wiederholen Sie diesen Vorgang weitere 4 Mal, um eventuelle
Rückständige gründlich zu entfernen.
5.
Entfernen Sie das Desinfektionsmittel aus den Spalten des Instruments mit einer herkömmlichen Zahnbürste mit
weichen Borsten, die mit gereinigtem Wasser angefeuchtet ist. Wiederholen Sie diesen Vorgang weitere 6 Mal, um
eventuelle Rückständige gründlich zu entfernen.
6.
Trocknen Sie die Halterung mit einem sauberen, weichen Tuch ab und stellen Sie sicher, dass das Tuch auch in die
Spalten des Instruments eingeführt wird.
Stellen Sie im Rahmen des angewendeten Dekontaminationsverfahrens sicher, dass Reinigungs- und
Desinfektionsmittelrückstände ausreichend entfernt werden. Verwenden Sie während der abschließenden
Reinigungsvorgänge, falls anwendbar, gereinigtes oder vollentsalztes Wasser (mehrmaliges Reinigen kann erforderlich
sein). Informationen zum Entfernen von Desinfektionsmittelrückständen finden Sie in den Empfehlungen des Herstellers.
ACHTUNG: Versuchen Sie nicht, die Halterung mittels Autoklavierung, Bestrahlung oder Plasmasterilisationsverfahren
zu sterilisieren. Sprühen Sie keine Flüssigkeiten darauf und tauchen Sie es auch nicht in Flüssigkeiten ein – hierdurch
kann das Instrument beschädigt werden. Bei unzureichender Desinfektion der Halterung erlischt die Garantie.
Aufladen der Halterung
Laden Sie die Halterung vor der ersten Verwendung vollständig auf. Die Halterung ist mit einem aufladbaren LithiumPolymer-Akku ausgestattet. Das vollständige Aufladen des Akkus dauert ca. 200 Minuten. Der Akku muss vor der ersten
Verwendung der Halterung sowie vor Beginn jedes Eingriffs ausreichend geladen sein. Während sich die Halterung in
der Ladestation befindet, leuchtet die Batteriekontrollleuchte dauerhaft grün, wenn der Akku vollständig geladen ist.
Wenn der Akku nicht ausreichend geladen ist, blinkt die Batteriekontrollleuchte grün oder gelb, um ein vermindertes
Akkuladeniveau anzuzeigen.
So laden Sie die Halterung auf:
1.
Vergewissern Sie sich, dass der geeignete Adapterstecker am Netzteil aufgesteckt ist.
2.
Stecken Sie das Netzteilkabel an der Ladestation ein.
3.
Stecken Sie das Netzteil in eine Wandsteckdose.
4.
Setzen Sie die Halterung nach dem Reinigen und Desinfizieren in die Ladestation. Wenn die Halterung
ordnungsgemäß in der Ladestation platziert wurde, wird ein zweifaches akustisches Signal ausgegeben, um die
korrekte Platzierung in der Ladestation anzuzeigen. Wenn die gelbe Kontrollleuchte aufleuchtet, erfordert das
vollständige Aufladen des Akkus ca. 200 Minuten.
5.
•
•
•
•
Der aktive Ladevorgang und der Ladezustand werden durch gelbes oder grünes Blinken der Batteriekontrollleuchte
angezeigt. Die Halterung ist ausreichend geladen, wenn die Batteriekontrollleuchte dauerhaft grün leuchtet. Beim
Herausnehmen der Halterung aus der Ladestation ertönt ein zweifaches akustisches Signal.
Lassen Sie die Halterung nach jeder Verwendung, bzw. wenn es nicht verwendet wird, in der Ladestation, damit die
vollständige Ladung des Akkus aufrechterhalten wird. Ein Überladen des Akkus wird durch eine Sicherheitsschaltung
verhindert.
Immer, wenn die Halterung mit oder ohne eingesetzte Nadel 30 Sekunden lang nicht bewegt wird, schaltet sich die
Batteriekontrollleuchte aus. Wird die Halterung bewegt, leuchtet die Batteriekontrollleuchte auf, um den aktuellen
Ladezustand anzuzeigen.
Immer, wenn die Halterung ohne eingesetzte Nadel 1 Stunde lang nicht bewegt wird, wechselt es in einen
Ruhezustand. Setzen Sie die Halterung ohne die Nadel in die Ladestation und nehmen Sie sie heraus, um sie wieder
einzuschalten.
Während einer Biopsie leuchtet die Akkukontrollleuchte dauerhaft grün. Wenn die Batteriekontrollleuchte
grün blinkt, ist die Ladung der Halterung hoch genug, um eine Biopsie vollständig durchzuführen. Wenn die
Batteriekontrollleuchte dauerhaft gelb leuchtet, funktioniert die Halterung nicht und muss sofort in die Ladestation
gesetzt werden.
WICHTIG: Wenn die Batteriekontrollleuchte erlischt, nachdem sie dauerhaft gelb geleuchtet hat, kann die
Halterung nicht wieder aufgeladen werden. Wenden Sie sich an das MAMMOTOME Kundendienstcenter oder einen
Außendienstmitarbeiter.
Fehlersuche und -beseitigung
1.
Die Fehleranzeige leuchtet dauerhaft bernsteinfarben:
Die Halterung führt während des Instrumentenbetriebs regelmäßige Selbsttests durch. Wird ein Fehler erkannt,
leuchtet die Fehleranzeige dauerhaft bernsteinfarben auf. Stellen Sie in diesem Fall sicher, dass sich die Nadel
außerhalb des Patienten befindet, entnehmen Sie die Nadel aus der Halterung und ersetzen Sie die Nadel durch
eine neue. Wenn die Fehleranzeige nicht erlischt, wenden Sie sich an das MAMMOTOME Kundendienstcenter oder
einen Außendienstmitarbeiter.
34
2.
3.
Die Batterie- und Biopsiekontrollleuchten leuchten nach dem Einsetzen einer Nadel in die Halterung nicht
auf:
Überprüfen Sie die Batteriekontrollleuchte, um einen ausreichenden Ladezustand zu gewährleisten. Vergewissern
Sie sich, dass die Ausrichtungslasche und die Verriegelungslaschen fest und ordnungsgemäß eingerastet sind.
Stellen Sie sicher, dass es sich um die Erstverwendung der Nadel handelt. Sind diese Bedingungen erfüllt und die
Kontrollleuchten leuchten weiterhin nicht auf, ersetzen Sie die Nadel durch eine neue. Wenn die Kontrollleuchten
nach dem ordnungsgemäßen Einsetzen einer neuen Nadel nicht aufleuchten, wenden Sie sich an das
MAMMOTOME Kundendienstcenter oder einen Außendienstmitarbeiter.
Die Halterung wird nicht aufgeladen, wenn es in die Ladestation eingesetzt wird:
Überprüfen Sie, ob das Netzkabel fest an der Ladestation und in der Wandsteckdose eingesteckt ist. Prüfen Sie,
ob keine Behinderungen der Ladeverbindungen an der Ladestation oder der Halterung vorliegen, und setzen
Sie die Halterung dann in die Ladestation. Vergewissern Sie sich, dass das akustische Signal an der Halterung
ausgegeben wird und dass die Batteriekontrollleuchte blinkt. Wenn kein akustisches Signal erklingt oder die
Kontrollleuchte nicht blinkt, tauschen Sie die Ladestation mit Netzkabel aus, indem Sie sich an das MAMMOTOME
Kundendienstcenter oder einen Außendienstmitarbeiter wenden.
Halterung – Spezifikationen
Elektrische Konformität
Dieses medizintechnische Gerät hat alle erforderlichen Tests auf elektrische Schläge, Brandgefahr
und mechanische Gefährdungen in Übereinstimmung mit UL 60601-1, IEC/EN 60601-1, CAN/CSA
C22.2 No 601-1 bestanden.
Eindringen von Flüssigkeiten
Nicht geschützt vor dem Eindringen von Flüssigkeiten
Entflammbarkeit
Das Instrument ist nicht für den Einsatz in Gegenwart entflammbarer Anästhetika geeignet.
Abmessungen
Länge: 18,9 cm
Breite: 5,0 cm
Höhe: 3,8 cm
Netzkabel und Adapter
Nur mit im Lieferumfang enthaltenem Netzzubehör verwenden:
• Modell: FRM015-S09-1 P/N TRM15-S10-I-351359
• Eingangsspannung: 100 – 240 V AC
• Eingangsstrom: 0,7 A – 0,4 A
• Eingangsfrequenz: 50 – 60 Hz
• Ausgangsspannung: 10 V DC
• Ausgangsstrom: 1,5 A
• Max. Leistungsaufnahme: 15 W
System – Spezifikationen
Klassifikation
Schutzklasse II, Geräte mit interner Stromversorgung vom Typ BF
Umgebungsbedingungen
Transport und Lagerung:
• -35 °C bis +54 °C (-31 °F bis 129 °F)
• 10 % bis 95 % relative Luftfeuchtigkeit, nicht kondensierend
• 500 bis 1.060 hPa Luftdruck
Betrieb:
• +5 °C bis +40 °C (41 °F bis 104 °F)
Betriebsart
Kontinuierlich
Elektromagnetische Verträglichkeit (EMV) Leitlinien und Herstellererklärungen
Das Mammotome® elite Biopsiesystem erfordert spezielle Vorsichtsmaßnahmen hinsichtlich der elektromagnetischen
Verträglichkeit (EMV) und muss in Übereinstimmung mit den in dieser Gebrauchsanweisung bereitgestellten EMVInformationen installiert und verwendet werden. Das Mammotome® elite Biopsiesystem ist für den Betrieb in einer wie
im Folgenden angegebenen elektromagnetischen Umgebung bestimmt. Der Kunde oder Bediener des Mammotome®
elite Biopsiesystems muss sicherstellen, dass es in einer solchen Umgebung benutzt wird.
Leitlinien und Herstellererklärung – Elektromagnetische Emissionen
35
Das Mammotome® elite Biopsiesystem ist für den Betrieb in wie im Folgenden angegebenen elektromagnetischen Umgebungen
bestimmt. Der Kunde oder Bediener des Mammotome® elite Biopsiesystems muss sicherstellen, dass es in einer solchen Umgebung
benutzt wird.
Emissionstest
Übereinstimmung
Leitlinien
HF-Emissionen nach CISPR 11
Gruppe 1
Das Mammotome® elite Biopsiesystem verwendet hochfrequente (HF)
Energie ausschließlich für seine interne Funktion. Daher sind seine HFEmissionen sehr gering und es ist unwahrscheinlich, dass benachbarte
elektronische Geräte gestört werden.
HF-Emissionen nach CISPR 11
Klasse A
Oberschwingungen
nach IEC 61000-3-2
Nicht anwendbar
Spannungsschwankungen/Flicker
nach IEC 61000-3-3
Nicht anwendbar
Das Mammotome® elite Biopsiesystem ist für den Gebrauch in allen
Einrichtungen außer Wohneinrichtungen und solchen bestimmt, die
unmittelbar an ein öffentliches Niederspannungsversorgungsnetz
angeschlossen sind, das auch Wohngebäude versorgt.
Leitlinien und Herstellererklärung – Elektromagnetische Störfestigkeit
Das Mammotome® elite Biopsiesystem ist für den Betrieb in wie im Folgenden angegebenen elektromagnetischen Umgebungen
bestimmt. Der Kunde oder Bediener des Mammotome® elite Biopsiesystems muss sicherstellen, dass es in einer solchen Umgebung
benutzt wird.
Störfestigkeitsprüfung
IEC
60601-Prüfpegel
Übereinstimmungspegel
Elektromagnetische Umgebung – Leitlinie
Entladung
statischer
Elektrizität (ESD)
nach IEC 61000-4-2
±6 kV
Kontaktentladung
±6 kV
Kontaktentladung
±8 kV
Luftentladung
±8 kV
Luftentladung
Fußböden sollten aus Holz oder Beton bestehen oder mit Keramikfliesen
versehen sein. Wenn der Fußboden mit synthetischem Material versehen
ist, muss die relative Luftfeuchte mindestens 30 % betragen.
Tragbare und mobile Funkgeräte sollten in keinem geringeren Abstand
zu einem Teil des Mammotome® elite Biopsiesystems, einschließlich der
Leitungen, verwendet werden, als dem empfohlenen Schutzabstand, der
nach der für die Sendefrequenz zutreffenden Gleichung berechnet wird.
Geleitete HFStörgröße nach IEC
61000-4-6
3 Vrms
Gestrahlte HFStörgrößen
3 V/m
nach IEC 61000-4-3
80 MHz
bis 2,5 GHz
3 V
150 KHz
bis 80 MHz
Empfohlener Schutzabstand
d = [1,17]√P
d = [1,17]√P 80 MHz bis 800 MHz
3 V/m
d = [2,33]√P 800 MHz bis 2,5 GHz
mit P als maximaler Ausgangsnennleistung des Senders in Watt
(W) gemäß Angaben des Senderherstellers und d als empfohlenem
Schutzabstand in Metern (m).
Die Feldstärke stationärer Funksender sollte bei allen Frequenzen gemäß
einer Untersuchung vor Ort a geringer als der Übereinstimmungspegel in
den einzelnen Frequenzbereichen sein b.
In der Umgebung von Geräten, die das folgende Bildzeichen tragen, sind
Störungen möglich:
Anmerkung 1 Bei 80 MHz und 800 MHz gilt der höhere Frequenzbereich.
Anmerkung 2 Diese Leitlinien mögen nicht in allen Fällen anwendbar sein. Die Ausbreitung elektromagnetischer Größen wird von
Absorption und Reflexion durch Gebäude, Gegenstände und Menschen beeinflusst.
a
Die Feldstärke stationärer Sender, wie z. B. Basisstationen von Funktelefonen (Handy/schnurloses Telefon) und mobilen Landfunkgeräten,
Amateurfunkstationen, AM- und FM-Rundfunk- und Fernsehsendern, kann theoretisch nicht genau vorherbestimmt werden. Um die
elektromagnetische Umgebung hinsichtlich der stationären Funksender zu ermitteln, sollte eine Studie des Standorts erwogen werden.
Wenn die gemessene Feldstärke an dem Standort, an dem das Mammotome® elite Biopsiesystem benutzt wird, die obigen HFÜbereinstimmungspegel überschreitet, sollte das Mammotome® elite Biopsiesystem beobachtet werden, um die bestimmungsgemäße
Funktion nachzuweisen. Wenn ungewöhnliche Leistungsmerkmale beobachtet werden, können zusätzliche Maßnahmen erforderlich sein,
z. B. eine veränderte Ausrichtung oder ein anderer Standort des Mammotome® elite Biopsiesystems.
b
Über den Frequenzbereich von 150 kHz bis 80 MHz sollte die Feldstärke geringer als 3 V/m sein.
36
Kundendienstinformationen
Zusätzliche Informationen zum Mammotome® elite Biopsiesystem erhalten Sie, indem Sie die Telefonnummer
1-877-9-A-MAMMO (1-877-926-2666) anrufen
(nur in den USA; in der EU wählen Sie +49 (0) 800 500 98 98), eine E-Mail an „[email protected]“
senden oder unsere Website unter „www.mammotome.com“ besuchen.
Informationen zur Entsorgung und zum Recycling
Die Mammotome® elite Halterung enthält einen nicht auswechselbaren Lithium-Polymer-Akku. Versuchen Sie nicht,
den Akku zu entfernen. Die Halterung oder der Lithium-Polymer-Akku darf nicht in Feuer entsorgt werden. Entsorgen
Sie die Halterung und den Lithium-Polymer-Akku in Übereinstimmung mit den lokal bei Ihnen gültigen Gesetzen
und Regelungen, oder wenden Sie sich an MAMMOTOME, um Informationen zu Recycling-Möglichkeiten zu erhalten.
Außerhalb der USA wenden Sie sich wegen der Entsorgung der Halterung an den Kundendienst.
ACHTUNG: Der Lithium-Polymer-Akku kann sich bei falscher Handhabung entzünden bzw. zu chemischer
Verbrennungen führen. Der Lithium-Polymer-Akku darf nicht zerlegt, zerstört oder punktiert werden. Der LithiumPolymer-Akku darf nicht über 60 °C (140 °F) erhitzt werden.
Lieferumfang
• Die Mammotome® elite Halterung wird nicht steril geliefert.
• Die Mammotome® elite Nadeln werden steril zur Einwegverwendung bei nur einem Patienten geliefert und sind
gesondert zu erwerben. Nach der Verwendung wegwerfen.
Garantie
Devicor® Medical Products, Inc., erklärt, dass dieses Produkt frei von Material- und Produktionsfehlern ist und garantiert
dies bei normalem Gebrauch für den im Folgenden jeweils angegebenen Garantiezeitraum.
Die Verpflichtungen von Devicor® Medical Products, Inc., gemäß diesen Garantiebestimmungen sind beschränkt auf
den Austausch jedes Produkts bzw. Produktteils, nach eigenem Ermessen, das innerhalb des im Folgenden aufgeführten
gültigen Zeitraums an Devicor® Medical Products, Inc., oder einen seiner Händler zurückgesendet wurde und dessen
Untersuchung zur Befriedigung von Devicor® Medical Products, Inc., einen Defekt ergeben hat. Diese Garantie gilt
für kein Produkt bzw. kein Teil eines Produkts, das: (1) durch die Verwendung mit Geräten, die von Dritten hergestellt
oder vertrieben wurden, die nicht von Devicor® Medical Products, Inc., autorisiert sind, beeinträchtigt wurde, (2)
außerhalb eines Werks von Devicor® Medical Products, Inc., so repariert oder verändert wurde, dass seine Stabilität oder
Zuverlässigkeit nach Einschätzung von Devicor® Medical Products, Inc., beeinträchtigt wurde, (3) nicht ordnungsgemäß
oder fahrlässig benutzt oder in einen Unfall verwickelt wurde, oder (4) anders als in Übereinstimmung mit seiner
Konstruktionsweise und den Verwendungsparametern, Anweisungen und Richtlinien für das Produkt oder anders
als in Übereinstimmung mit industrieweit allgemein anerkannten funktionalen, Betriebs- oder Umgebungs- und
Umweltstandards für ähnliche Produkte verwendet wurde. Für Produkte von Devicor® Medical Products, Inc., gelten
folgende Garantiezeiträume ab dem Lieferzeitpunkt an den ursprünglichen Käufer:
Mammotome® elite Halterung sechs (6) Monate, Austausch
Ladestation mit Netzzubehör sechs (6) Monate, Austausch
WENN NICHT VOM ANWENDBAREN LOKALEN RECHT ANDERWEITIG GEREGELT WIRD HIERMIT AUSDRÜCKLICH
VEREINBART, DASS DIE HIER AUFGEFÜHRTEN GARANTIEBESTIMMUNGEN ANSTELLE ALLER ANDEREN – IMPLIZITEN WIE
EXPLIZITEN – VEREINBARUNGEN ÄHNLICHEN INHALTS TRETEN, EINSCHLIESSLICH ALLER ZUSAGEN HINSICHTLICH DER
HANDELSÜBLICHEN QUALITÄT UND EINER EIGNUNG FÜR DEN NORMALEN GEBRAUCH SOWIE FÜR EINEN BESTIMMTEN
ZWECK UND ALLER WEITEREN
VERPFLICHTUNGEN ODER HAFTUNGEN SEITENS DEVICOR® MEDICAL PRODUCTS, INC., UND DASS ES SICH HIERBEI
UM DIE EINZIGE ABHILFE FÜR DEN KÄUFER HANDELT. DEVICOR® MEDICAL PRODUCTS, INC., HAFTET UNTER KEINEN
UMSTÄNDEN FÜR KONKRETE, BEILÄUFIG AUFTRETENDE ODER FOLGESCHÄDEN, EINSCHLIESSLICH, ABER NICHT
BESCHRÄNKT AUF, SCHÄDEN DURCH NUTZUNGSAUSFALL, ENTGANGENEN GEWINN, GESCHÄFTSVERLUSTE ODER
IDEELLE VERLUSTE (Z. B. GOODWILL), DIE NICHT AUSDRÜCKLICH AUS EINEM SPEZIFISCHEN GESETZ HERZULEITEN SIND.
Devicor® Medical Products, Inc., übernimmt keine Haftung und autorisiert auch keinen anderen zur Übernahme von
Haftung an seiner Stelle in Verbindung mit dem Verkauf oder dem Gebrauch eines Produkts von Devicor® Medical
Products, Inc. Es sind keine über die hier dargelegten Bestimmungen hinausgehenden Garantien vereinbart. Devicor®
Medical Products, Inc., behält sich das Recht vor, jederzeit Änderungen an den von ihnen hergestellten und/oder
verkauften Produkten vorzunehmen, ohne dadurch eine Verpflichtung einzugehen, dieselbe oder ähnliche Änderungen
an zuvor von ihnen hergestellten und/oder verkauften Produkten vornehmen zu müssen.
ACHTUNG: In den USA darf das Instrument/Gerät nur durch Ärzte oder auf ärztliche Anweisung hin verkauft werden.
Detailinformationen hinsichtlich der Austauschmöglichkeiten erhalten Sie von dem für Sie zuständigen MAMMOTOME
Außendienstmitarbeiter.
37
Indicazioni
Il sistema per biopsia Mammotome® elite è indicato per prelevare dalla mammella o dai linfonodi ascellari campioni di
lesioni individuate all’imaging o alla palpazione, per un esame diagnostico delle anomalie mammarie.
• Il sistema per biopsia Mammotome® elite è indicato per fornire tessuto mammario destinato all’esame istologico, con
rimozione parziale o completa dell’anomalia diagnosticata all’imaging.
• Il sistema per biopsia Mammotome® elite è indicato per fornire tessuto mammario destinato all’esame istologico, con
la rimozione parziale di un’anomalia palpabile.
L’estensione di un’anomalia istologica non può essere determinata accuratamente dalla palpazione o dall’aspetto rilevato
all’imaging. Pertanto, l’estensione della rimozione dell’evidenza di un’anomalia palpata o visualizzata con imaging non
predice l’estensione della rimozione di un’anomalia istologica, quale ad esempio una formazione maligna. Quando
l’anomalia campionata non è istologicamente benigna, è essenziale che vengano esaminati i margini del tessuto per
verificare la completezza della rimozione, utilizzando procedure chirurgiche standard.
Nei casi in cui il paziente presenti un’anomalia palpabile classificata benigna attraverso criteri clinici e/o radiologici
(per es. fibroadenoma, lesione fibrocistica), il sistema per biopsia Mammotome® elite può essere utilizzato anche
per rimuovere parzialmente tali lesioni palpabili. Ogniqualvolta viene rimosso del tessuto mammario, la valutazione
istologica del tessuto costituisce una prassi sanitaria standard. Quando l’anomalia campionata non è istologicamente
benigna, è essenziale che vengano esaminati i margini del tessuto per verificare la completezza della rimozione,
utilizzando procedure chirurgiche standard.
Controindicazioni
• Questo strumento è esclusivamente per uso diagnostico e non è indicato per un uso terapeutico.
• Questo strumento è controindicato per i pazienti in cui alla rimozione o alla biopsia percutanea possono essere
associati un rischio maggiore o l’insorgenza di complicazioni, sulla base del giudizio del medico. I pazienti che
assumono una terapia anticoagulante o che possono avere disturbi della coagulazione possono essere soggetti a un
maggiore rischio.
Descrizione del dispositivo
Il sistema per biopsia mammaria Mammotome® elite di Devicor è costituito da un manipolo e una sonda. Il sistema
Mammotome® elite può essere utilizzato sotto guida ecografica per asportare e prelevare campioni diagnostici con
un singolo inserimento della sonda. I componenti del sistema sono progettati per funzionare in sicurezza se utilizzati
insieme per il campionamento diagnostico del tessuto durante una procedura di biopsia.
Il manipolo, riutilizzabile e fornito non sterile, è un dispositivo manuale integrato per biopsia funzionante a vuoto
elettromeccanico, costituito da una pila ricaricabile al litio-polimero e corredato da una base di carica con cavo di
alimentazione CA e adattatori (vedere Figura 1).
La sonda, monouso e fornita sterile, comprende uno stelo trocar esterno con apertura distale e un resettore interno cavo
e mobile (vedere Figura 2). La sonda comprende anche una cannula coassiale integrata e un contenitore prossimale
di raccolta dei campioni, comprendente un vassoio per i campioni di tessuto e un cappuccio (vedere Illustrazione 2). Il
corpo della sonda contiene una linguetta di allineamento e due linguette di blocco per fissare la sonda all’interno del
manipolo.
Il manipolo crea il vuoto all’interno del dispositivo per facilitare l’aspirazione del tessuto nell’apertura, mentre il resettore
affilato interno ruota a velocità elevate e avanza attraverso l’apertura per acquisire il campione target. Per effetto del
vuoto il campione di tessuto è trasportato al contenitore di raccolta dei campioni. La cannula coassiale integrata può
essere staccata dalla sonda dopo la biopsia e rimanere nella mammella per mantenere traccia del sito bioptico ai fini
del posizionamento di un marcatore. Il manipolo è progettato con 3 opzioni di pulsanti per biopsia per adeguarsi a
molteplici posizioni delle mani
(vedere Figura 3).
IMPORTANTE: Insieme al sistema per biopsia mammaria Mammotome® elite si possono usare marcatori di sito
bioptico 14 GA CorMARK™, per contrassegnare la posizione della procedura bioptica ad uso radiografico. NON
UTILIZZARE UN MARCATORE NON APPROVATO PER L’USO NEL SISTEMA PER BIOPSIA MAMMARIA Mammotome® ELITE.
38
Figura 1
Figura 2
Figura 3
Avvertenze e precauzioni
• Le procedure mininvasive devono essere eseguite esclusivamente da persone opportunamente addestrate e aventi
adeguata familiarità con tecniche mininvasive. Prima dell'esecuzione di qualsiasi procedura mininvasiva, consultare la
letteratura medica relativa alle tecniche, alle complicanze e ai pericoli.
• Gli strumenti mininvasivi possono avere diametri variabili da un costruttore all'altro. Quando strumenti mininvasivi
e accessori di costruttori diversi sono utilizzati insieme in una procedura, verificarne la compatibilità prima dell'inizio
della procedura.
• Non sterilizzare il dispositivo in autoclave.
• Non immergere il dispositivo.
• Non irrorare il manipolo con alcun fluido.
• Questo strumento deve essere utilizzato esclusivamente da medici formati sulle tecniche ad ago percutaneo per il
prelevamento dei tessuti.
• Occorre prestare particolare attenzione a non piegare o torcere la sonda.
39
• Se la sonda è piegata, non utilizzarla. Smaltire la sonda in contenitore appropriato.
• La sonda non è progettata per la puntura percutanea della pelle.
• Come con qualsiasi strumento per biopsia, può sussistere un potenziale rischio di infezione.
• Non utilizzare questo strumento sotto guida di Imaging a Risonanza Magnetica (IRM).
• Il manipolo deve essere utilizzato esclusivamente con le sonde per biopsia Mammotome® elite.
• I prodotti fabbricati o distribuiti da società non autorizzate da Devicor® Medical Products, Inc. possono non essere
compatibili con il sistema Mammotome® elite. L'uso di tali prodotti può portare a risultati non previsti e alla possibilità
di lesioni all'utilizzatore o al paziente.
• Gli strumenti o dispositivi che entrano in contatto con i fluidi corporei possono richiedere uno smaltimento speciale
per evitare la contaminazione biologica.
• Smaltire tutti gli strumenti monouso aperti, usati o meno.
• La sonda è confezionata e sterilizzata esclusivamente per un uso singolo. Non riutilizzarla, rigenerarla o risterilizzarla.
Il riutilizzo, la rigenerazione o la risterilizzazione possono compromettere l'integrità strutturale del dispositivo e/o
portare ad un guasto del dispositivo che, a sua volta, può provocare lesioni, malattie o il decesso del paziente. Inoltre,
la rigenerazione o la risterilizzazione dei dispositivi monouso possono creare un rischio di contaminazione e/o
provocare infezioni o infezioni crociate al paziente, compresa, senza limitazioni, la trasmissione di malattie infettive da
un paziente ad un altro. La contaminazione del dispositivo può portare a lesioni, malattie o al decesso del paziente.
Illustrazione 1. Illustrazione sull'insieme del dispositivo e nomenclatura
3 opzioni per pulsante di attivazione della biopsia
Pulsante destro
Indicatore della batteria
Indicatore di errore
Pulsante centrale
Pulsante sinistro
Altoparlante
Indicatore centrale di biopsia
Linguetta di allineamento
Indicatori di biopsia sinistro e destro
Illustrazione 2. Illustrazione della sonda e nomenclatura
Guaina protettiva
Cannula coassiale integrata
Pulsante di rilascio cannula coassiale
Localizzatore dell'apertura
Apertura dell'ago
Tacca del manipolo
Contenitore di raccolta dei campioni
Stelo del trocar
Vassoio di raccolta tessuti
Manopola di rotazione
dell'ago
Cavalletto
Corpo della sonda
Cavalletto
Cappuccio del contenitore
di raccolta dei campioni
Linguetta di blocco sinistra e destra
Pulsante di rilascio del vassoio
di raccolta tessuti
40
Materiale necessario
• Modalità e accessori di diagnostica per immagini appropriati
• Manipolo per biopsia Mammotome® elite
• Sonda per biopsia Mammotome® elite
• Guanti e teli chirurgici
• Anestetico locale
• Bisturi
• Altro materiale secondo necessità
Istruzioni per l'uso
IMPORTANTE: Ispezionare tutte le confezioni prima dell'uso. Se la confezione del prodotto è compromessa o il
prodotto è caduto alla rimozione della confezione, utilizzare il protocollo seguente:
• Manipolo: Seguire le procedure di Pulizia del manipolo e Disinfezione del manipolo.
• Sonda: Smaltire la sonda, in quanto non è più uno strumento sterile.
Verificare la compatibilità di tutti gli strumenti mininvasivi e degli accessori prima di utilizzare lo strumento (fare
riferimento alle Avvertenze e precauzioni).
Primo utilizzo
Il manipolo è fornito con batteria scarica. Il manipolo deve essere caricato completamente prima del primo utilizzo.
Pulire e disinfettare il manipolo, secondo le procedure di Pulizia del manipolo e Disinfezione del manipolo. Per caricare
la batteria, posizionare il manipolo nella base di carica. Il manipolo indica il posizionamento corretto con un indicatore
audio. Una volta che il manipolo è stato caricato completamente, come indicato dalla luce verde intenso sull'indicatore
della batteria, può essere rimosso dalla base di carica per l'uso. Quando il manipolo è rimosso dalla base di ricarica si
attiva un indicatore sonoro. La batteria richiede circa 200 minuti per caricarsi completamente.
IMPORTANTE: Il manipolo DEVE ESSERE COMPLETAMENTE CARICO prima dell'utilizzo iniziale.
Caricamento della sonda
1.
T ogliere la sonda dalla confezione in condizioni sterili. Per evitare danneggiamenti, non lasciare cadere il dispositivo
nel campo sterile. Se la sonda viene a contatto con una superficie non sterile, deve essere eliminata e smaltita
nell'apposito contenitore.
• La sonda è confezionata con una guaina protettiva sopra lo stelo del trocar. Si raccomanda di lasciare la
guaina protettiva sullo stelo del trocar fino a che la sonda è pronta per essere introdotta nel sito percutaneo.
Fare attenzione ad evitare lesioni quando si rimuove la guaina.
2.
I mpugnare il corpo della sonda e allineare la linguetta di allineamento alla tacca del manipolo. Iniziare a spingere la
base della sonda nella cavità del manipolo, allineando nel contempo la linguetta di allineamento del manipolo con
la tacca del manipolo nel corpo della sonda (vedere Illustrazione 3, Passo 1).
3.
S pingere saldamente il corpo della sonda nel manipolo fino ad avvertire l'incastrarsi delle linguette di blocco nel
manipolo (vedere Illustrazione 3, Passo 2).
Illustrazione 3
41
ATTENZIONE: Per evitare di ferirsi le dita nel caricare la sonda nel manipolo, impugnare il manipolo sui lati vicino alle
linguette di bloccaggio.
4.
Se la sonda è stata adeguatamente inserita, il manipolo si accende automaticamente e inizia una sequenza di
inizializzazione. Durante l'inizializzazione, il motore è udibile e si l'indicatore luminoso della biopsia si illumina di
arancione. Al termine di una inizializzazione con esito positivo, il manipolo suona 2 volte e l'indicatore luminoso
della biopsia si illumina di verde, indicando che il sistema è pronto per il campionamento.
• Se la sonda è inserita nel manipolo in modo non corretto, la sequenza di inizializzazione NON incomincia.
• Se il sistema non è pronto per il campionamento, il manipolo suona 3 volte e si illumina l'indicatore
luminoso di errore color ambra. Vedere la sezione Risoluzione dei problemi per le azioni correttive.
ATTENZIONE: Parti in movimento. A questo punto accertarsi che non ci sia niente a bloccare l'apertura dell'ago.
• Se si lascia il manipolo inutilizzato per 30 secondi dopo il caricamento della sonda, il manipolo entra in modalità di
sospensione per conservare la carica della batteria. Durante la modalità di sospensione, gli indicatori luminosi della
biopsia e della batteria si spengono e i pulsanti si disattivano. Una volta che il manipolo viene spostato, il dispositivo
si riattiva dalla modalità di sospensione. Se non viene collegata una sonda, il manipolo rimane nella modalità di
sospensione.
Selezione dei pulsanti di attivazione della biopsia
Il sistema viene consegnato con il pulsante centrale di attivazione della biopsia pre-selezionato. Quando il dispositivo è
acceso rimane attivo un solo pulsante di attivazione della biopsia. Il pulsante di attivazione della biopsia selezionato è
identificato da un indicatore luminoso di biopsia a luce verde intenso. Per modificare il pulsante di attivazione della biopsia,
accertarsi che la sonda sia collegata, quindi tenere premuti contemporaneamente i due pulsanti della biopsia disattivi
per 3 secondi (vedere Illustrazione 4, Passo 1). Si attiva un indicatore sonoro e tutti i 3 indicatori luminosi della biopsia
appariranno verdi e lampeggianti (vedere Illustrazione 4, Passo 2). L'utilizzatore può poi premere e rilasciare il pulsante di
attivazione della biopsia desiderato (vedere Illustrazione 4, Passo 3). La selezione del pulsante di attivazione della biopsia
rimane memorizzato nel dispositivo per l'uso futuro.
Illustrazione 4
Sinistro attivo
Centrale attivo
Destro attivo
Pulsante centrale di attivazione della biopsia
Pulsante sinistro di attivazione della biopsia
Pulsante destro di
attivazione della biopsia
Procedure per il campionamento dei tessuti
1.
Preparare il sito percutaneo in accordo con la tecnica chirurgica standard prima dell'inserimento della sonda.
2.
Incidere adeguatamente l'area selezionata per inserire lo stelo del trocar.
3.
Rimuovere la guaina protettiva dalla sonda.
42
• La cannula coassiale integrata può essere rimossa se si desidera un'ulteriore facilità di inserimento. Se viene
rimossa, smaltirla in modo appropriato. Si raccomanda di non riposizionare sulla sonda la cannula coassiale
integrata, al fine di ridurre al minimo il rischio di lesioni.
4.
Se necessario, utilizzare la manopola di rotazione dell'ago per regolare la posizione dell'apertura dell'ago prima
di introdurre la sonda nell'incisione. Per ruotare, estrarre la manopola di rotazione dell'ago (vedere Illustrazione 5,
Passo 1). Ruotare alla posizione desiderata (vedere Illustrazione 5, Passo 2) e rilasciare (vedere Illustrazione 5, Passo
3). Il localizzatore dell'apertura indica la posizione dell'apertura.
Illustrazione 5
5.
Introdurre la sonda attraverso l'incisione e posizionare la punta della sonda nell'area di destinazione, con la punta
presso la lesione. Deve essere utilizzata una guida ecografica come da indicazioni.
6.
Spingere il pulsante di attivazione della biopsia sul manipolo per acquisire un campione di tessuto. Il ciclo di biopsia
procede automaticamente. Si crea il vuoto, la cannula del resettore interno della sonda viene retratto, il tessuto
viene compattato nell'apertura dell'ago e il resettore cavo ruota e si sposta in avanti, tagliando il tessuto. Quando
il resettore raggiunge l'estremità distale dell'apertura dell'ago smette di muoversi e utilizza il vuoto per trasportare
il campione al contenitore di raccolta. L'indicatore luminoso della biopsia rimane costantemente illuminato di
arancione e il motore è udibile durante il processo di campionamento e prelevamento del tessuto. Al termine del
ciclo di biopsia, il vuoto si spegne e l'indicatore luminoso della biopsia si illumina di verde intenso.
• Non toccare il pulsante di attivazione della biopsia fino al raggiungimento del sito di destinazione.
• Non rimuovere il contenitore di raccolta dei campioni durante l'acquisizione del tessuto.
• Il ciclo di biopsia può essere interrotto per evitare lesioni non necessarie o per visualizzare la posizione
dell'apertura attraverso la diagnostica per immagini (ecografia).
• Premere una sola volta il pulsante di attivazione della biopsia per iniziare il ciclo di prelievo. Per interrompere
il ciclo di biopsia, premere nuovamente il pulsante della biopsia quando il resettore si ritrae dalla posizione
1 alla 3 (vedere Illustrazione 6) o quando il resettore avanza dalla posizione 3 alla 2. Quando il ciclo della
biopsia è interrotto, il resettore si ritira alla posizione 3. Il LED dell'indicatore della biopsia diventa arancione
e lampeggia. Per completare il ciclo della biopsia, premere il pulsante di attivazione della biopsia
Illustrazione 6
ATTENZIONE: Una volta che la sonda è stata inserita nel tessuto e il ciclo di campionamento è iniziato, NON SPOSTARE
L'AGO fino al termine del ciclo di campionamento.
7.
Far ruotare l'apertura, attraverso la rotazione del manipolo e della sonda, per l'acquisizione del campione
successivo e ripetere il passo 6 secondo necessità per ottenere altri campioni.
• Per evitare di piegare l'ago, non applicare una pressione eccessiva durante il posizionamento all'interno
della mammella.
• Verificare di aver raccolto il campione desiderato sottoponendo il paziente alla diagnostica per immagini
post-biopsia secondo necessità.
8.
Se si procede SENZA utilizzare un marcatore del sito bioptico, una volta ottenuto l'ultimo campione di tessuto
rimuovere il dispositivo e medicare appropriatamente il sito di incisione. Proseguire al Passo 10.
9.
Se si procede CON l’utilizzo di un marcatore del sito bioptico, una volta ottenuto l’ultimo campione di tessuto
scollegare la cannula coassiale integrata e rimuovere la sonda, lasciando in sede la cannula e premendo il pulsante
43
di rilascio della cannula coassiale (vedere Illustrazione 7) per facilitare il posizionamento del marcatore nella cavità
bioptica.
Illustrazione 7
a.
Usando una tecnica chirurgica standard, inserire il CorMARK™ 14 GA attraverso la cannula coassiale finché
l'impugnatura si ferma In prossimità del pulsante di rilascio della cannula coassiale.
b.
Quando il CorMARK™ 14 GA giunge a fine corsa della cannula coassiale rilasciare il marcatore.
c.
Utilizzare la diagnostica per immagini per verificare che il marcatore abbia raggiunto la posizione desiderata.
d.
Rimuovere e smaltire la cannula coassiale e medicare il sito di incisione in modo appropriato.
IMPORTANTE: Per l'uso di CorMARK™ fare riferimento alle istruzioni del costruttore.
10. Al fine di assicurarsi che l'ago sia pulito dopo averlo rimosso dalla mammella, premere il pulsante di attivazione
della biopsia per attivare un ciclo di verifica.
11. Ruotare il cappuccio del contenitore di raccolta di un quarto di giro in senso antiorario (vedere Illustrazione 8 Passo
1). Rimuovere insieme il cappuccio e il vassoio di raccolta dei tessuti (vedere Illustrazione 8, Passo 2). Premere
il pulsante di rilascio del vassoio di raccolta per rimuoverlo dal cappuccio del contenitore in modo da facilitare
l'esame istologico dei campioni (vedere Illustrazione 8, Passo 3).
Illustrazione 8
12. Se necessario, è possibile utilizzare pinze sterili per aiutare la rimozione dei campioni dal vassoio.
13. Riposizionare il cappuccio del contenitore di raccolta prima di smaltire la sonda. Per riposizionarlo, ruotare il
cappuccio di un quarto di giro in senso antiorario, inserirlo nel contenitore di raccolta dei campioni (vedere
Illustrazione 9, Passo 1) e ruotare di un quarto di giro in senso orario (vedere Illustrazione 9, Passo 2). Il simbolo
di blocco deve trovarsi in posizione ore 12. Se opportuno, inserire un nuovo vassoio e un nuovo cappuccio per
continuare il prelievo (vedere Illustrazione 9).
Illustrazione 9
44
ATTENZIONE: La sonda è ESCLUSIVAMENTE MONOUSO. Smaltire la sonda immediatamente dopo l'uso.
Rimozione della sonda dal manipolo
Tenendo premuta la linguetta di blocco della sonda, spingere la sonda fuori dalla cavità del manipolo (vedere
Illustrazione 10). Smaltire la sonda in un contenitore appropriato.
Illustrazione 10
ATTENZIONE: La sonda è ESCLUSIVAMENTE MONOUSO. Smaltire la sonda immediatamente dopo l'uso.
ATTENZIONE: Non riposizionare la guaina protettiva sulla punta della sonda.
Pulizia del manipolo
Dopo ogni uso, pulire manualmente il manipolo in modo accurato utilizzando un detergente enzimatico a pH neutro.
Procedere con la pulizia manuale utilizzando un detergente enzimatico nel modo seguente:
1.
Preparare un detergente a pH neutro o un detergente enzimatico a pH neutro in base alle istruzioni del produttore.
2.
Utilizzare un panno morbido pulito leggermente inumidito con la soluzione detergente, per la pulizia manuale
delle superfici. Usare inoltre un normale spazzolino da denti a setole morbide per pulire le aree con interstizi.
3.
Sciacquare accuratamente utilizzando un panno morbido pulito leggermente inumidito con acqua del rubinetto
tiepida (27°C - 44°C).
4.
Asciugare con un panno morbido pulito.
5.
Ispezionare il dispositivo per escludere la presenza di contaminazione visibile. In caso di contaminazione, ripetere i
passi 1-5 fino a che la contaminazione non è più visibile.
ATTENZIONE: Non tentare di sterilizzare il manipolo mediante autoclave, irradiazione o procedure di sterilizzazione
al plasma; non irrorare con fluidi o immergerlo in fluidi; queste operazioni possono danneggiare lo strumento. Se il
manipolo viene pulito in modo improprio la garanzia decade.
Disinfezione del manipolo
Un processo di disinfezione deve seguire la procedura di pulizia. I seguenti disinfettanti chimici sono approvati per l'uso
con il manipolo:
• Soluzione di candeggina al 10% (1 parte di candeggina per 9 parti di acqua purificata o deionizzata)
I disinfettanti devono essere preparati e utilizzati secondo le raccomandazioni del produttore per l'uso, la concentrazione
e il tempo di contatto. L'utilizzo di disinfettanti diversi da quelli specificati in queste istruzioni deve essere valutato per
l'eventuale equivalenza prima dell'uso. Come ausilio in questa valutazione sono disponibili normalmente le schede
tecniche sulle pagine web dei singoli produttori. Qualsiasi processo di disinfezione, compresi attrezzi e soluzioni, può
influenzare il grado di usura su un dispositivo o un'apparecchiatura.
1.
Immergere un panno e uno spazzolino a setole morbide pulito nella soluzione di disinfettante. Strizzare
accuratamente il panno per rimuovere tutta la soluzione in eccesso. Scuotere leggermente lo spazzolino per
rimuovere la soluzione in eccesso.
2.
Strofinare accuratamente il manipolo, assicurandosi di mantenere una superficie leggermente umida per 5 minuti.
3.
Strofinare accuratamente gli interstizi con un normale spazzolino da denti a setole morbide, assicurandosi di
mantenere la superficie leggermente umida per 5 minuti.
4.
Per rimuovere il disinfettante dai dispositivi è necessario utilizzare una garza sterile o un panno morbido pulito
inumiditi con acqua purificata. Ripetere l'operazione altre 4 volte per rimuovere completamente i residui.
45
5.
Per rimuovere il disinfettante dagli interstizi del dispositivo usare un normale spazzolino da denti a setole morbide
pulito e inumidito con acqua purificata. Ripetere l'operazione altre 6 volte per rimuovere completamente i residui.
6.
Asciugare il manipolo con un panno morbido pulito, avendo cura di passare anche negli interstizi del dispositivo.
Durante il processo di decontaminazione applicato, accertarsi che i residui di detergente e disinfettante siano rimossi
adeguatamente. Laddove applicabile utilizzare acqua purificata o deionizzata durante i processi di risciacquo finale,
(possono essere necessari molteplici risciacqui). Per la rimozione dei residui di disinfettante fare riferimento alle
raccomandazioni del produttore.
ATTENZIONE: Non tentare di sterilizzare il manipolo mediante autoclave, irradiazione o procedure di sterilizzazione al
plasma; non irrorare con fluidi o immergerlo in fluidi; queste operazioni possono danneggiare lo strumento. Se il manipolo
è disinfettato in modo improprio la garanzia decade.
Carica del manipolo
Caricare completamente il manipolo prima del primo utilizzo. Il manipolo utilizza una batteria ricaricabile litio-polimero.
La batteria richiede circa 200 minuti per caricarsi completamente. La batteria deve essere adeguatamente caricata prima
di utilizzare il manipolo per la prima volta e prima dell'inizio di ogni procedura. Mentre si trova nella base di carica,
l'indicatore luminoso della batteria si illumina di verde intenso quando la batteria è completamente carica. Se la batteria
non è sufficientemente carica, l'indicatore luminoso della batteria lampeggia in verde o giallo a indicare un livello di
batteria ridotto.
Per caricare il manipolo:
1.
Accertarsi che l'idonea spina dell'adattatore sia collegata all'adattatore di alimentazione CA.
2.
Collegare il cavo dell'adattatore di alimentazione CA alla base di carica.
3.
Inserire l'adattatore di alimentazione CA in una presa a muro.
4.
Dopo la pulizia e la disinfezione, posizionare il manipolo nella base di carica. Quando posizionato correttamente nella
base di carica, il manipolo emette un suono bitonale per indicare il corretto posizionamento nella base. Se si illumina
la luce gialla, la batteria richiederà circa 200 minuti per caricarsi completamente.
5.
L'indicatore luminoso della batteria lampeggia in giallo o verde per indicare l'attività e il livello di carica mentre si
trova sulla base di carica. Il manipolo è adeguatamente carico quando l'indicatore luminoso della batteria diventa
verde intenso. Il manipolo emette un suono bitonale quando viene rimosso dalla base di carica.
• Dopo ogni utilizzo o quando non è in uso, il manipolo deve rimanere nella base di carica per mantenere la batteria
completamente carica. Un circuito di sicurezza impedisce il sovraccarico della batteria.
• Ogni volta che il manipolo è immobile per 30 secondi, senza una sonda collegata, l’indicatore luminoso della batteria si
spegne. Quando il manipolo viene mosso, l'indicatore luminoso della batteria si illumina per indicare lo stato corrente
della carica.
• Ogni volta che il manipolo è immobile per un'ora, con o senza una sonda collegata, il manipolo va in una modalità di
standby. Posizionare il manipolo nella base di carica senza la sonda e rimuoverlo per riaccenderlo.
• Durante una procedura bioptica l'indicatore luminoso della batteria si illumina di una luce verde intenso. Se l'indicatore
luminoso della batteria si illumina in modo fisso di giallo, il manipolo non funziona e deve essere posizionato
immediatamente sulla base di carica.
IMPORTANTE: Se l'indicatore luminoso della batteria si spegne dopo la luce gialla fissa, il manipolo non può essere
ricaricato. Contattare il centro di assistenza clienti MAMMOTOME o un rappresentante.
Individuazione e risoluzione dei problemi
1.
L'indicatore luminoso di errore è color ambra intenso:
Il manipolo esegue controlli periodici del sistema mentre il dispositivo è in funzione. Se viene rilevato un guasto,
l'indicatore luminoso di errore si illumina di un colore ambra intenso. Se si verifica questa situazione, accertarsi
che la sonda si trovi all'esterno del paziente, rimuovere la sonda dal manipolo e sostituirla con una nuova sonda.
Se l'indicatore luminoso di errore non si spegne, contattare il centro di assistenza clienti MAMMOTOME o un
rappresentante.
2.
Gli indicatori luminosi della batteria e della biopsia non si illuminano dopo aver caricato la sonda nel
manipolo:
Controllare l'indicatore della batteria per accertarsi che la carica sia sufficiente. Accertarsi che le linguette di
allineamento e di blocco siano ben salde al loro posto. Verificare che la sonda sia nuova e mai utilizzata prima. Se
queste condizioni sono soddisfatte e gli indicatori non si illuminano ancora, sostituire la sonda con una nuova sonda.
Se gli indicatori luminosi non si accendono dopo aver inserito correttamente una nuova sonda, contattare il centro di
assistenza clienti MAMMOTOME o un rappresentante.
3.
Il manipolo non si carica quando posizionato nella base di carica:
46
Controllare che il cavo di alimentazione CA sia inserito saldamente nella base di carica e in una presa a muro.
Controllare che i collegamenti di carica sulla base di carica o sul manipolo non siano ostruiti e successivamente
inserire il manipolo nella base di carica. Accertarsi che l'indicatore sonoro del manipolo si attivi e che l'indicatore
luminoso della batteria lampeggi. Se non vi sono toni udibili o luci lampeggianti, sostituire la base di carica e il cavo
di alimentazione CA contattando il centro di assistenza clienti MAMMOTOME o un rappresentante.
Specifiche del manipolo
Conformità elettrica
Questa apparecchiatura medica ha superato tutti i test necessari per il rischio di scossa elettrica,
i pericoli di incendio e meccanici in accordo con le norme UL 60601-1, IEC/EN 60601-1, CAN/CSA
C22.2 No 601-1
Ingresso di fluidi
Non protetto dall'ingresso di fluidi
Infiammabilità
Apparecchiatura non idonea all'uso in presenza di anestetico infiammabile
Dimensioni
Lunghezza: 18,9 cm
Cavo di alimentazione CA e
adattatori
Utilizzare esclusivamente con gli accessori di alimentazione CA forniti:
Larghezza: 5,0 cm
Altezza: 3,8 cm
• Modello: FRM015-S09-1 p/n TRM15-S10-I-351359
• Tensione in ingresso: 100-240 VCA
• Corrente in ingresso: 0,7 A-0,4 A
• Frequenza in ingresso: 50-60 Hz
• Tensione in uscita: 10 Volt CC
• Corrente in uscita: 1,5 A
• Watt max: 15 W
Specifiche del sistema
Classificazione
Apparecchiatura di classe II, ad alimentazione interna di tipo BF
Condizioni ambientali
Trasporto e conservazione:
• da -35°C a +54°C (-31°F a 129°F)
• umidità relativa dal 10% al 95% senza condensa
• da 500 a 1060 hPa pressione atmosferica
Condizioni operative:
• da +5°C a +40°C (41°F a 104°F)
Modalità di funzionamento
Continuo
Compatibilità elettromagnetica (CEM), Linee guida, e Dichiarazioni del costruttore
Il sistema per biopsia Mammotome® elite richiede precauzioni speciali riguardo alla compatibilità elettromagnetica
(CEM) e deve essere installato e utilizzato in accordo con le informazioni di CEM fornite in questa guida di installazione. Il
sistema per biopsia Mammotome® elite è indicato per l'uso nell'ambiente elettromagnetico specificato sotto. Il cliente o
l'utilizzatore del sistema per biopsia Mammotome® elite deve assicurarne l'utilizzo in tale ambiente.
Linee guida e dichiarazione del costruttore - emissioni elettromagnetiche
Il sistema per biopsia Mammotome® elite è indicato per l'uso negli ambienti elettromagnetici specificati sotto. Il cliente o l'utilizzatore del
sistema per biopsia Mammotome® elite deve assicurarne l'utilizzo in tale ambiente.
Test di emissione
Conformità
Indicazioni
Emissioni RF CISPR 11
Gruppo 1
Il sistema per biopsia Mammotome® elite utilizza energia a
radiofrequenza esclusivamente per le sue funzioni interne. Pertanto
le sue emissioni a radiofrequenza sono molto basse e difficilmente
provocano interferenze con le apparecchiature elettroniche adiacenti.
Emissioni RF CISPR 11
Classe A
47
Emissioni armoniche IEC 61000-3-2
Non applicabile
Fluttuazioni di tensione/emissioni
fluttanti IEC 61000-3-3
Non applicabile
Il sistema per biopsia Mammotome® elite è idoneo per l'uso in tutti gli
edifici diversi da quelli domestici e da quelli collegati direttamente alla
rete di alimentazione pubblica a bassa tensione che rifornisce edifici
utilizzati a scopi domestici.
Linee guida e dichiarazione del costruttore - immunità elettromagnetica
Il sistema per biopsia Mammotome® elite è indicato per l'uso negli ambienti elettromagnetici specificati sotto. Il cliente o l'utilizzatore del
sistema per biopsia Mammotome® elite deve assicurarne l'utilizzo in tale ambiente.
Test di immunità
IEC 60601 Livello
di prova
Livello di
conformità
Ambiente elettromagnetico
- Indicazioni
Scariche
elettrostatiche IEC
61000-4-2
± 6KV a contatto
± 6KV a
contatto
I pavimenti devono essere in legno, cemento o piastrelle di ceramica. Se
i pavimenti sono coperti da materiale sintetico, l'umidità relativa deve
essere almeno il 30%
± 8KV in aria
± 8KV in aria
Le apparecchiature di comunicazione a radiofrequenza portatili e mobili
non devono essere utilizzate più vicino a nessuna parte del sistema per
biopsia Mammotome® elite, compresi i cavi, della distanza di separazione
raccomandata, calcolata dall'equazione applicabile alla frequenza del
trasmettitore.
RF condotta IEC
61000-4-6
3 Vrms
RF irradiata
3 V/m
IEC 61000-4-3
da 80 MHz a
2,5 GHz
3V
da 150 KHz a
80 MHz
Distanza di separazione raccomandata
d = [1,17]√P
d = [1,17]√P da 80 MHz a 800 MHz
3 V/m
d = [2,33]√P da 800 MHz a 2,5 GHz
dove P è la potenza nominale massima in uscita del trasmettitore in watt
(W) secondo il costruttore del trasmettitore e d è la distanza di separazione
raccomandata in metri (m).
L'intensità del campo proveniente da trasmettitori a radiofrequenza fissi,
determinata da un'indagine elettromagneticaa, deve essere inferiore al
livello di conformità in ogni intervallo di frequenzab.
Può verificarsi interferenza in prossimità di apparecchiature
contrassegnate con il simbolo seguente:
Nota 1 Da 80 MHz a 800 MHz, si applica l'intervallo a frequenza più alta.
Nota 2 Queste linee guida possono non essere applicabili in tutte le situazioni. La propagazione elettromagnetica è influenzata
dall'assorbimento e dalla riflessione da strutture, oggetti e persone.
Le intensità dei campi provenienti da trasmettitori fissi, come le stazioni base per i telefoni radio (cellulari/cordless) e le radio mobili
terrestri, le radio amatoriali, le trasmissioni radio in AM e FM e le trasmissioni televisive non possono essere previste in modo teorico con
precisione. Per valutare l'ambiente elettromagnetico in presenza di trasmettitori RF fissi, occorre prendere in considerazione un'indagine
elettromagnetica del sito. Se l'intensità di campo misurata nel luogo in cui è usato il sistema per biopsia Mammotome® elite supera il
livello di conformità alle RF applicabile di cui sopra, è necessario tenere in osservazione il sistema per biopsia Mammotome® elite per
verificarne il normale funzionamento. Se sono osservate prestazioni anomale, possono essere necessarie misure aggiuntive, come il
riorientamento o il riposizionamento del sistema per biopsia Mammotome® elite.
a
b
Sopra l'intervallo di frequenza da 150 kHz a 80 MHz, le intensità di campo devono essere minori di 3 V/m.
Informazioni sull'assistenza al cliente
È possibile ottenere informazioni aggiuntive sul sistema per biopsia mammaria Mammotome® elite telefonando a
1-877-9-A-MAMMO (1-877-926-2666) (solo Stati Uniti; in UE telefonare ai numeri 800 918 200 o 0 800 500 98 98); inviando
una e-mail a [email protected]; o visitando il sito www.mammotome.com.
Informazioni sullo smaltimento e il riciclo
Il manipolo di Mammotome® elite contiene una batteria al litio-polimero non rimovibile. Non tentare di rimuovere la
batteria. Non gettare il manipolo o la batteria al litio-polimero nel fuoco. Smaltire il manipolo e la batteria al litiopolimero ai sensi delle leggi e norme locali o contattare MAMMOTOME per informazioni sulle opzioni di riciclo. Fuori
dagli Stati Uniti, per lo smaltimento del manipolo contattare l'Assistenza clienti.
48
ATTENZIONE: La batteria al litio-polimero può presentare pericolo di incendio o ustioni chimiche se trattata in modo
non corretto. Non smontare, comprimere o forare la batteria al litio-polimero. Non riscaldare la batteria al litio-polimero
ad una temperatura superiore ai 60°C (140°F).
Modalità di fornitura
• Il manipolo del Mammotome® elite è fornito non sterile.
• Le sonde del Mammotome® elite sono fornite sterili per l'uso su un singolo paziente e sono vendute separatamente.
Smaltire dopo l'utilizzo.
Garanzia
Devicor® Medical Products, Inc. garantisce che questo prodotto è privo di difetti materiali e di fabbricazione in condizioni
di utilizzo e di manutenzione normali, per il relativo periodo di garanzia indicato di di seguito.
L'obbligo di Devicor® Medical Products, Inc. ai sensi di questa garanzia è limitato alla sostituzione, a sua discrezione, di
qualsiasi prodotto o sua parte che sia stato restituito a Devicor® Medical Products, Inc. o ad un suo distributore, entro il
periodo di tempo applicabile indicato di seguito e il cui esame ha rivelato, secondo Devicor® Medical Products, Inc. essere
difettoso. Questa garanzia non si applica a nessun prodotto o parte di esso che sia stato: (1) influenzato negativamente a
causa dell'uso con dispositivi prodotti o distribuiti da terzi non autorizzati da Devicor® Medical Products, Inc. (2) riparati
o alterati fuori dalla fabbrica di Devicor® Medical Products, Inc. in un modo che, a giudizio di Devicor® Medical Products,
Inc. ne influenza la stabilità o l'affidabilità, (3) sottoposto a uso improprio, negligenza o incidente, o (4) utilizzato non in
accordo con i parametri progettuali e d'uso, le istruzioni e le linee guida del prodotto o con norme funzionali, operative
o ambientali per prodotti simili generalmente accettati nell'industria. I prodotti Devicor® Medical Products, Inc. sono
garantiti per i seguenti periodi dopo la consegna all'acquirente originario:
Manipolo Mammotome® elite sei (6) mesi, Sostituzione
Base di carica con accessori CA sei (6) mesi, Sostituzione
A MENO CHE NON SIA SUPERATA DALLA NORMATIVA LOCALE APPLICABILE, QUESTA GARANZIA SOSTITUISCE TUTTE
LE ALTRE GARANZIE, ESPRESSE O IMPLICITE, INCLUSE LE GARANZIE DI COMMERCIABILITÀ E IDONEITÀ PER UNO SCOPO
PARTICOLARE E TUTTI GLI ALTRI
OBBLIGHI O RESPONSABILITÀ A CARICO DI DEVICOR® MEDICAL PRODUCTS, INC. E COSTITUISCE UNA TUTELA ESCLUSIVA
DELL'ACQUIRENTE. IN NESSUN CASO DEVICOR® MEDICAL PRODUCTS, INC. SARA' RESPONSABILE DI DANNI SPECIALI,
ACCIDENTALI O CONSEQUENZIALI INCLUSI, SENZA LIMITAZIONI, DANNI DERIVANTI DALLA PERDITA DI USO, DI PROFITTI,
DI ATTIVITÀ ECONOMICA O DI CREDIBILITÀ DIVERSI DA QUANTO ESPRESSAMENTE PREVISTO DALLA LEGGE.
Devicor® Medical Products, Inc. non si assume, né autorizza nessun'altra persona ad assumersi in sua vece nessuna altra
garanzia in correlazione alla vendita o all'uso di qualsiasi prodotto Devicor® Medical Products, Inc. Non vi sono garanzie
che si estendono oltre i termini della presente. Devicor® Medical Products, Inc. si riserva il diritto di effettuare modifiche
ai prodotti costruiti e/o venduti in qualsiasi momento senza incorrere in nessun obbligo di realizzare le stesse modifiche
o modifiche simili su prodotti costruiti e/o venduti in precedenza.
ATTENZIONE: La legge federale degli Stati Uniti limita la vendita di questo dispositivo a medici o dietro richiesta
medica.
Consultare un rappresentante commerciale MAMMOTOME per i dettagli relativi alle opzioni di sostituzione.
Indicaciones
El sistema para biopsia Mammotome® elite está indicado para obtener muestras de tejido por palpación o por imagen
de la mama o los ganglios linfáticos de la axila con el fin de realizar un análisis diagnóstico de una posible anomalía en la
mama.
• El sistema de biopsia Mammotome® elite se utiliza para extraer tejido mamario a fin de realizar un análisis histológico
con extirpación total o parcial de la anomalía detectada por imagen.
• El sistema de biopsia Mammotome® elite se utiliza para proporcionar tejido mamario a fin de realizar un análisis
histológico con extirpación parcial de una anomalía detectable por palpación.
49
El alcance de la anomalía histológica no siempre puede determinarse a partir de la palpación o del aspecto que la
anomalía presenta en la imagen diagnóstica. Por lo tanto, el volumen extirpado de la anomalía palpada o detectada por
imagen no permite predecir el alcance de extirpación de una anomalía histológica, como puede ser un cáncer. Cuando la
anomalía de la que se ha extraído una muestra no es histológicamente benigna, es imprescindible analizar los márgenes
del tejido para garantizar una extirpación completa mediante técnicas quirúrgicas estándar.
En los casos en los que el paciente presenta una anomalía perceptible en la palpación que se ha clasificado como
benigna según criterios clínicos o radiológicos (como puede ser un fibroadenoma o una lesión fibroquística), el sistema
para biopsia Mammotome® elite también puede utilizarse para extirpar parcialmente estas lesiones perceptibles en la
palpación. Siempre que se extirpa tejido de la mama es preciso realizar una evaluación histológica del mismo. Cuando la
anomalía de la que se ha extraído una muestra no es histológicamente benigna, es imprescindible analizar los márgenes
del tejido para garantizar una extirpación completa mediante técnicas quirúrgicas estándar.
Contraindicaciones
• Este instrumento sólo está indicado para uso diagnóstico y no está concebido para fines terapéuticos.
• El uso de este instrumento está contraindicado en los casos en los que, según el criterio del médico, la extracción de
núcleos o biopsia puede estar asociada a un aumento del riesgo del paciente o a la aparición de complicaciones. Los
pacientes que reciben tratamiento con anticoagulantes o que tienen trastornos hemorrágicos pueden presentar un
riesgo más alto.
Descripción del dispositivo
El sistema para biopsia mamaria Mammotome® elite de Devicor está compuesto de una pieza de mano y una sonda. El
sistema Mammotome® elite puede utilizarse con un ecógrafo como guía para realizar la incisión y recoger las muestras
para diagnóstico mediante una simple inserción de la sonda. Los componentes del sistema están diseñados para
funcionar de forma segura cuando se utilizan juntos para recoger muestras de tejido para diagnóstico durante una
intervención de biopsia.
La pieza de mano, reutilizable y suministrada no estéril, es un dispositivo para biopsia independiente, electromecánico y
asistido por vacío que se maneja con la mano y consta de una batería recargable de polímero de litio. Incluye además un
base de carga con un cable de alimentación de CA y adaptadores (véase ilustración 1).
La sonda, de un solo uso y suministrada estéril, incluye una barra del trocar con un orificio distal y una cuchilla hueca
interna (véase ilustración 2). La sonda también incluye una cánula coaxial integrada, así como un envase proximal de
recogida de muestras con una cesta para muestras de tejido y un tapón (véase ilustración 2). El cuerpo de la sonda
contiene una pestaña de alineación y dos pestañas de bloqueo para fijar la sonda a la pieza de mano.
La pieza de mano crea un vacío dentro del dispositivo para ayudar a arrastrar el tejido hacia el orificio, mientras que la
afilada cuchilla interior gira a alta velocidad y avanza a través del orificio para obtener el tejido deseado. La muestra de
tejido se transporta mediante vacío al envase de recogida de muestras. La cánula coaxial integrada puede separarse de
la sonda después de la biopsia y permanecer en la mama para mantener un seguimiento del sitio de la biopsia cuando
se coloque el identificador del sitio de la biopsia. La pieza de mano está diseñada con tres opciones del botón de biopsia
para adaptarse a múltiples posiciones de la mano (véase ilustración 3).
IMPORTANTE: Los identificadores del sitio de la biopsia 14 GA CorMARK™ pueden utilizarse en combinación con el
sistema para biopsia mamaria Mammotome® elite para marcar radiográficamente la ubicación de la intervención de
biopsia. NO UTILICE UN MARCADOR QUE NO ESTÉ HOMOLOGADO PARA USO CON EL SISTEMA PARA BIOPSIA MAMARIA
Mammotome® ELITE.
Figura 1
50
Figura 2
Figura 3
Advertencias y precauciones
• Las intervenciones mínimamente invasivas deben correr a cargo exclusivamente de personal que disponga de la
formación adecuada y que esté familiarizado con estas técnicas. Consulte la bibliografía médica relativa a las técnicas,
así como a sus complicaciones y riesgos, antes de realizar una intervención mínimamente invasiva.
• Los instrumentos mínimamente invasivos pueden variar en cuanto a diámetro de un fabricante a otro. Si emplea
instrumentos mínimamente invasivos y accesorios de varios fabricantes al mismo tiempo en una intervención,
asegúrese de que son compatibles entre sí antes de comenzar.
• No esterilice el dispositivo en autoclave.
• No sumerja el dispositivo en ningún líquido.
• No rocíe ningún fluido sobre la pieza de mano.
• El instrumento sólo debe ser manejado por médicos que dispongan de formación suficiente en técnicas con agujas
percutáneas para la recogida de muestras de tejidos.
• Además, debe tenerse un cuidado especial para evitar que la sonda se doble o se tuerza.
• Si la sonda se dobla, no la use. Elimine la sonda en un contenedor adecuado.
• La sonda no está concebida para punciones percutáneas.
• Al igual que sucede con cualquier instrumento para biopsia, siempre existe un cierto riesgo de infección.
• No utilice este dispositivo en combinación con aparatos de resonancia magnética.
• La pieza de mano sólo debe utilizarse con sondas para biopsia Mammotome® elite.
• Los productos fabricados o distribuidos por empresas no autorizadas por Devicor® Medical Products, Inc. pueden no
ser compatibles con el sistema Mammotome® elite.
Por lo tanto, el uso de tales productos puede dar lugar a resultados inesperados, así como provocar lesiones al usuario
o al paciente.
• Los instrumentos o los dispositivos que entran en contacto con los fluidos corporales pueden requerir un
procedimiento de eliminación especial para evitar una contaminación biológica.
• Elimine todos los instrumentos desechables que estén abiertos, independientemente de si los ha utilizado o no.
51
• La sonda se suministra empaquetada y esterilizada y está concebida para un solo uso. No la reutilice, reprocese ni
reesterilice. La reutilización, el reprocesamiento o la reesterilización pueden poner en peligro la integridad estructural
del dispositivo, así como provocar un fallo en el mismo que, a su vez, puede provocar lesiones, enfermedades o incluso
la muerte del paciente. Del mismo modo, el reprocesamiento y la reesterilización de dispositivos de un solo uso puede
aumentar el riesgo de contaminación, así como provocar infecciones o infecciones cruzadas al paciente, entre las que
cabe citar la transmisión de enfermedades infecciosas de un paciente a otro. La contaminación del dispositivo puede
provocar lesiones, enfermedades o incluso la muerte del paciente.
Ilustración 1. Montaje del dispositivo. Ilustración y nomenclatura
3 opciones del botón de biopsia
Botón derecho
Indicador LED de la batería
Indicador LED de fallo
Botón central
Botón izquierdo
Altavoz
Indicador de biopsia central
Pestaña de alineación
Indicador de biopsia derecho e izquierdo
Ilustración 2. Sonda. Ilustración y nomenclatura
Protective Sleeve
Cánula coaxial integrada
Botón de liberación coaxial
Localizador de la abertura
Muesca de la pieza de mano
Abertura de la aguja
Envase de recogida de muestras
Vástago del trocar
Cesta de tejidos
Mando giratorio de la aguja
Soporte
Cuerpo de la sonda
Soporte
Tapón de recogida de muestras
Botón de liberación de
la cesta de tejidos
Pestaña de bloqueo izquierda y derecha
Equipo necesario
• Modalidad apropiada de adquisición de imágenes y accesorios
• Pieza de mano para biopsia Mammotome® elite
• Sonda para biopsia Mammotome® elite
• Guantes quirúrgicos y gasas
• Anestésico local
• Bisturí
• Otro equipo que pueda necesitarse
52
Instrucciones de uso
IMPORTANTE: Inspeccione el envoltura y su contenido antes de su uso. Si observa algún desperfecto en el embalaje
o si el dispositivo se cae al quitar el embalaje, proceda de la siguiente manera:
• P
ieza de mano: Siga los procedimientos descritos en los apartados con respecto a Limpieza de la pieza de mano y
Desinfección de la pieza de mano de estas instrucciones.
• Sonda: Deséchela, pues ya no es un componente estéril.
Antes de comenzar la intervención, asegúrese de que todos los instrumentos mínimamente invasivos y los accesorios
que va a utilizar son compatibles (consulte el apartado de advertencias y precauciones).
Uso por primera vez
La pieza de mano se entrega con la batería sin cargar. Así pues, ésta debe cargarse por completo antes de utilizarla
por primera vez. Limpie y desinfecte la pieza de mano según se describe en los apartados Limpieza de la pieza de
mano y Desinfección de la pieza de mano de estas instrucciones de uso. Para cargar la batería, coloque la pieza de mano
en la base de carga. La pieza de mano indicará si está correctamente colocada mediante un indicador acústico. Una
vez que la pieza de mano está totalmente cargada, lo que se indica mediante una luz verde continua en el indicador
de la batería, puede retirarse de la base de carga para utilizarla. Cuando la pieza de mano se retira de la base de
carga también se escucha un indicador acústico. La batería requiere aproximadamente 200 minutos para cargarse
totalmente.
IMPORTANTE: La pieza de mano DEBE ESTAR TOTALMENTE CARGADA antes del primer uso.
Carga de la sonda
1.
tilice una técnica estéril para extraer la sonda del envase. Para evitar daños, no deje caer el dispositivo en el
U
campo estéril. La sonda debe desecharse en un recipiente adecuado si entra en contacto con una superficie que
no esté esterilizada.
• La sonda se suministra empaquetada y esterilizada y está concebida para un solo uso. Se recomienda dejar
la manga protectora puesta hasta que la sonda esté lista para introducirse en el sitio percutáneo. Tome las
debidas precauciones para evitar lesiones cuando retire dicha manga.
2.
garre el cuerpo de la sonda para alinear la pestaña de alineación con la muesca de la pieza de mano. Empiece
A
a empujar la base de la sonda hacia la cavidad de la pieza de mano mientras alinea la pestaña de alineación de
dicha pieza con la muesca para la pieza de mano del cuerpo de la sonda (véase ilustración 3, paso 1).
3.
E mpuje la sonda firmemente hacia la pieza de mano hasta que oiga un clic, lo que indica que las pestañas de
bloqueo la han encajado correctamente (véase ilustración 3, paso 2).
Ilustración 3
PRECAUCIÓN: Para evitar pincharse los dedos, agarre la pieza de mano por los lados y cerca de las pestañas de
bloqueo mientras carga la sonda en dicha pieza.
4.
Si la sonda se ha insertado correctamente, la pieza de mano se enciende automáticamente y comienza una
secuencia de inicialización. Durante la inicialización se escucha el motor y el indicador LED de biopsia activa
muestra una luz naranja continua. Si la inicialización se realiza correctamente, la pieza de mano emite dos pitidos
y el indicador LED de biopsia activa muestra una luz verde, lo que significa que el sistema está listo para recoger
muestras.
• Si la sonda no se inserta correctamente en la pieza de mano, la secuencia de inicialización NO comienza.
53
• Si el sistema no está listo para recoger muestras, la pieza de mano emite tres pitidos y el indicador LED de
fallo se enciende en color ámbar. Consulte el apartado Detección y solución de problemas para obtener más
detalles al respecto.
PRECAUCIÓN: Componentes móviles Asegúrese de que no haya nada que obstruya el orificio de la aguja en ese
momento.
• Si la pieza de mano se deja sin actividad durante 30 segundos después de cargar una sonda, dicha pieza pasa al modo
de reposo para ahorrar carga de la batería. Durante el modo de reposo, las luces indicadoras de biopsia y de la batería
se apagan y los botones están inactivos. Una vez que la pieza de mano se mueve, el dispositivo vuelve a activarse. La
pieza de mano permanece en el modo de reposo mientras no se conecte una sonda.
Selección del botón de biopsia
El botón de biopsia central es el que está seleccionado de forma predeterminada cuando se entrega el dispositivo. Sólo
puede haber un botón de biopsia activo cuando el dispositivo está encendido. El botón de biopsia activo se identifica con
una luz verde continua. Para cambiar el botón de biopsia activo, asegúrese de que la sonda está acoplada y, a continuación,
mantenga pulsados los dos botones de biopsia inactivos al mismo tiempo durante tres segundos (véase ilustración 4, paso
1). Se escucha una señal acústica y los tres indicadores de biopsia emiten una luz verde intermitente (véase ilustración 4,
paso 2). A continuación, pulse el botón de biopsia deseado y suéltelo (véase ilustración 4, paso 3). La selección del botón de
biopsia activo se almacena en el dispositivo para su uso en el futuro.
Ilustración 4
Botón izquierdo activo
Botón central activo
Botón derecho activo
Botón central de biopsia
Botón izquierdo
de biopsia
Botón derecho
de biopsia
Procedimiento para la toma de muestras de tejidos
1.
Prepare el sitio percutáneo siguiendo una técnica quirúrgica estándar antes de insertar la sonda.
2.
En el área seleccionada realice una incisión adecuada para alojar la barra del trocar.
3.
Retire la manga protectora de la sonda.
• La cánula coaxial integrada puede retirarse para realizar la inserción con más facilidad. Si la retira, deséchela
según proceda. Se recomienda no volver a acoplar esta cánula una vez retirada para reducir a un mínimo el
riesgo de lesiones.
4.
En caso necesario, utilice el mando giratorio de la aguja para ajustar la posición de su abertura antes de introducir la
sonda en la incisión. Para girar tire hacia fuera del mando giratorio de la aguja (véase ilustración 5, paso 1). Gire hasta
la posición de reloj deseada (véase ilustración 5, paso 2) y suelte el botón (véase ilustración 5, paso 3). El localizador
de la abertura indica la posición de dicha abertura.
54
Ilustración 5
5.
Introduzca la sonda a través de la incisión y coloque la punta de la sonda en el área deseada con la punta pasada la
lesión. Utilice un sistema de diagnóstico por imagen adecuado como guía.
6.
Pulse el botón de biopsia activo de la pieza de mano para extraer una muestra de tejido. El ciclo de biopsia se
desarrolla de forma automática. Se crea un vacío, la cánula con la cuchilla interna de la sonda se retrae, el tejido
se aspira hacia la abertura de la aguja y la cuchilla hueca gira y avanza hacia delante, cortando tejido. Cuando la
cuchilla alcanza el extremo distal de la abertura de la aguja, deja de moverse y utiliza el vacío para transportar
la muestra al envase de recogida de muestras. El indicador LED de biopsia muestra una luz naranja continua y el
motor se escucha durante el muestreo y el proceso de recogida de muestras. Al final del ciclo de biopsia, el vacío se
desconecta y el indicador LED de biopsia muestra una luz verde continua.
• Mantenga los dedos retirados del botón de biopsia activo hasta alcanzar el sitio de actuación.
• No retire el envase de recogida de muestras mientras se está extrayendo tejido.
• El ciclo de biopsia puede interrumpirse para evitar una lesión innecesaria o para visualizar la ubicación de la
abertura con un sistema de diagnóstico por imagen (sonograma).
• Pulse el botón de biopsia activo sólo una vez para iniciar el ciclo de biopsia. Para interrumpir el ciclo de
biopsia, pulse el botón de biopsia de nuevo cuando la cuchilla esté retrayéndose de la posición 1 a 3
(véase ilustración 6) o cuando la cuchilla esté avanzando de la posición 3 a 2. Cuando el ciclo de biopsia
se interrumpe, la cuchilla se retrae a la posición 3. El indicador LED de biopsia muestra una luz naranja
intermitente. Para terminar un ciclo de biopsia, pulse el botón de biopsia.
Ilustración 6
PRECAUCIÓN: Una vez que la sonda se ha insertado en el tejido y el ciclo de recogida de muestras ha comenzado, NO
MUEVA LA AGUJA hasta que el ciclo haya finalizado.
7.
Gire la abertura, girando la pieza de mano y la sonda, para recoger la siguiente muestra y repita el paso 6 según sea
necesario para obtener muestras adicionales.
• Para evitar que la aguja se doble, no ejerza una presión excesiva cuando la coloque en la mama.
• Asegúrese de que ha recogido las muestras necesarias utilizando una técnica de adquisición de imágenes
tras la biopsia según sea necesario.
8.
Si realiza el proceso SIN utilizar un identificador del sitio de la biopsia, una vez obtenida la última muestra de tejido
retire el dispositivo y aplique los cuidados que correspondan en el sitio de la incisión. Salte al paso 10.
9.
Si realiza el proceso CON un identificador del sitio de la biopsia, una vez obtenida la última muestra desconecte la
cánula coaxial integrada y retire la sonda, dejando la cánula en su lugar, pulsando el botón de liberación coaxial
(véase ilustración 7) para facilitar la colocación del marcador en la cavidad de biopsia.
55
Ilustración 7
a.
Utilice una técnica quirúrgica estándar para insertar el CorMARK™ 14 GA a través de la cánula coaxial hasta
que el mango se detenga en el botón de liberación coaxial.
b.
Cuando el CorMARK™ 14 GA haya alcanzado la profundidad completa del trayecto de la aguja de la cánula
coaxial, aplique el marcador.
c.
Use un sistema de diagnóstico por imagen adecuado para verificar que se ha alcanzado la ubicación deseada.
d.
Retire y elimine la cánula coaxial y aplique los cuidados que correspondan en el sitio de la incisión.
IMPORTANTE: Para obtener más información sobre el uso del CorMARK™, consulte las instrucciones del fabricante.
10. Para garantizar la eliminación completa después de que la aguja se haya retirado de la mama, pulse el botón de
biopsia para activar un ciclo de prueba.
11. Gire el tapón de recogida de muestras un cuarto de vuelta hacia la izquierda (véase ilustración 8, paso 1). Retire el
tapón y la cesta de tejidos juntos (véase ilustración 8, paso 2). Pulse el botón de liberación de la cesta de tejidos para
extraer la cesta de tejidos del tapón de recogida de muestras y facilitar la patología de las muestras (véase ilustración
8, paso 3).
Ilustración 8
12. En caso necesario, puede utilizar unas pinzas estériles para extraer las muestras de la cesta con más facilidad.
13. Vuelva a colocar el tapón de recogida de muestras tras eliminar la sonda. A tal fin, gire este tapón un cuarto de vuelta
a la izquierda, insértelo en el envase de recogida de muestras (véase ilustración 9, paso 1) y gire un cuarto de vuelta
a la derecha (véase ilustración 9, paso 2). El símbolo de bloqueo debe estar en la posición de las 12. Si procede,
inserte una nueva cesta de tejidos y un tapón de recogida de muestras para continuar la recogida de muestras (véase
ilustración 9).
Ilustración 9
PRECAUCIÓN: La sonda está concebida EXCLUSIVAMENTE PARA UN SOLO USO. Elimine la sonda inmediatamente
después del uso.
56
Retirada de la sonda de la pieza de mano
Mientras presiona hacia abajo la pestaña de bloqueo de la sonda, tire de ésta hacia fuera para extraerla de la cavidad de
la pieza de mano (véase ilustración 10). Elimine la sonda en un contenedor adecuado.
Ilustración 10
PRECAUCIÓN: La sonda está concebida EXCLUSIVAMENTE PARA UN SOLO USO. Elimine la sonda inmediatamente
después del uso.
PRECAUCIÓN: No vuelva a cerrar la punta de la sonda.
Limpieza de la pieza de mano
Después de cada uso, limpie manualmente y de forma completa la pieza de mano utilizando un detergente enzimático
de pH neutro. Proceda a la limpieza manual utilizando un detergente enzimático tal como se indica a continuación:
1.
Prepare un detergente de pH neutro o un detergente enzimático de pH neutro según lo indiquen las instrucciones
del fabricante.
2.
Utilice un paño limpio y suave humedecido con la solución de limpieza para limpiar manualmente todas las
superficies. Utilice también un cepillo de dientes estándar de cerdas suaves para limpiar las áreas que contienen
ranuras.
3.
Enjuague bien un paño limpio y suave ligeramente humedecido con agua corriente tibia (27 °C a 44 °C).
4.
Seque con un paño limpio y suave.
5.
Inspeccione el dispositivo para ver si presenta alguna contaminación visible. Si hay contaminación, repita los pasos
1 a 5 hasta que ésta desaparezca.
PRECAUCIÓN: No esterilice la pieza de mano con procedimientos de autoclave, radiación o esterilización por plasma;
del mismo modo, no rocíe el instrumento con ningún fluido ni lo sumerja en ningún líquido, pues esto podría dañarlo. Si
la pieza de mano no se limpia correctamente, la garantía quedará anulada.
Desinfección de la pieza de mano
El proceso de limpieza debe estar seguido por uno de desinfección. Los siguientes desinfectantes químicos están
aprobados para uso con la pieza de mano:
• Solución de lejía al 10% (1 parte de lejía por 9 partes de agua purificada o desionizada)
Los desinfectantes deben prepararse y utilizarse siguiendo las recomendaciones del fabricante en cuanto a uso,
concentración y tiempo de contacto. Antes de utilizar otros desinfectantes distintos de los especificados en estas
instrucciones, es preciso asegurarse de que son equivalentes a los recomendados. Por lo general en las páginas Web de
los diversos fabricantes hay hojas de datos técnicos que pueden ayudar a realizar esta comprobación. Recuerde además
que todo proceso de desinfección, incluidas las herramientas y soluciones, puede influir en el desgaste del dispositivo o
el equipo.
1.
Empape un paño limpio y un cepillo de cientes de cerdas suaves con la solución desinfectante. Escurra bien para
eliminar cualquier exceso de solución. Presione el cepillo de dientes para eliminar el exceso de solución.
2.
Frote bien las áreas con rendijas con un cepillo de dientes estándar de cerdas suaves, asegurándose de que se
mantiene una superficie ligeramente húmeda durante 5 minutos.
3.
Frote toda la pieza de mano asegurándose de que se mantiene una superficie ligeramente húmeda durante 5
minutos.
4.
Utilice una gamuza estéril o un paño limpio y suave humedecidos con agua purificada para retirar el desinfectante
de los dispositivos. Repita cuatro veces más para eliminar cualquier residuo.
57
5.
Utilice un cepillo de dientes de cerdas suaves limpio humedecido con agua purificada para eliminar el desinfectante
de las ranuras del dipositivo. Repita seis veces más para eliminar cualquier residuo.
6.
Seque la pieza de mano con un paño limpio y suave e inserte también dicho paño
en las ranuras del dispositivo.
Dentro del proceso de descontaminación, asegúrese de que se eliminan todos los restos de detergente y desinfectante.
Si procede, utilice agua purificada o desionizada durante los procesos de enjuague finales (puede que se necesiten varios
enjuagues). Consulte las recomendaciones del fabricante relativas a la eliminación de residuos de desinfectante.
PRECAUCIÓN: No esterilice la pieza de mano con procedimientos de autoclave, radiación o esterilización por plasma;
del mismo modo, no rocíe el instrumento con ningún fluido ni lo sumerja en ningún líquido, pues esto podría dañarlo. Si
la pieza de mano no se desinfecta correctamente, la garantía quedará anulada.
Carga de la pieza de mano
Cargue completamente la pieza de mano antes de usarla por primera vez. La pieza de mano utiliza una batería recargable
de polímero de litio. Esta batería requiere aproximadamente 200 minutos para cargarse totalmente y debe estar
totalmente cargada antes de usar la pieza de mano por primera vez y comenzar un procedimiento. Mientras está en la
base de carga, el indicador LED de la batería muestra una luz verde continua cuando la batería está totalmente cargada. Si
la batería no está suficientemente cargada, el indicador LED de la batería muestra una luz verde intermitente, o amarilla si
el nivel de carga es reducido.
Para cargar la pieza de mano:
1.
Asegúrese de que ha acoplado el conector correcto en el adaptador de CA.
2.
Conecte el cable de alimentación del adaptador de CA en la base de carga.
3.
Conecte el adaptador de CA en la toma de la pared.
4.
Después de la limpieza y la desinfección, coloque la pieza de mano en la base de carga. Si está colocada
correctamente en la base de carga, la pieza de mano emite dos pitidos para indicar que la posición es la correcta. Si
se enciende la luz amarilla, la batería requerirá aproximadamente 200 minutos para cargarse totalmente.
5.
El indicador LED de la batería emite una luz intermitente amarilla o verde para indicar que el proceso de carga está
en curso y para mostrar el nivel de carga mientras la pieza de mano está en la base. La pieza de mano tiene una carga
adecuada cuando el indicador LED de la batería muestra una luz verde continua. La pieza de mano emite dos pitidos
cuando se retira de la base de carga.
• Después de cada uso o siempre que no esté en uso, la pieza de mano debe permanecer en la base de carga para
mantener la batería totalmente cargada. Un circuito de seguridad impide una sobrecarga de la batería.
• Siempre que la pieza de mano no se mueve durante 30 segundos y no hay una sonda acoplada, el indicador LED de la
batería se apaga. Cuando la pieza de mano se mueve, el indicador LED de la batería se enciende para indicar el estado
de carga actual.
• Siempre que la pieza de mano está sin moverse durante una hora con o sin una sonda acoplada, la pieza de mano
pasa al modo de reposo. Coloque la pieza de mano en la base de carga sin la sonda y retírela de la base para volverla a
encender.
• Durante una intervención de biopsia, el indicador LED de la batería muestra una luz verde continua. Si el indicador LED
de la batería muestra una luz verde intermitente, significa que la pieza de mano tiene suficiente carga para completar
un procedimiento. Si el indicador LED de la batería muestra una luz amarilla continua, la pieza de mano no está lista
para el funcionamiento, por lo que debe colocarse en la base de carga de inmediato.
IMPORTANTE: Si el indicador LED de la batería se apaga después de una luz amarilla continua, la pieza de mano no
puede recargarse. Póngase en contacto con el centro de atención al cliente de MAMMOTOME o con su representante más
cercano.
Detección y solución de problemas
1.
El indicador LED de fallo es una luz continua de color ámbar:
La pieza de mano realiza comprobaciones periódicas del sistema mientras el dispositivo se encuentra en servicio. Si
se detecta un fallo, el indicador LED de fallo muestra una luz continua de color ámbar. Si esto ocurre, asegúrese de
que la sonda se encuentra fuera del paciente, retire la sonda de la pieza de mano y reemplace por una nueva sonda.
Si el indicador LED de fallo no se apaga, póngase en contacto con el centro de atención al cliente de MAMMOTOME o
con su representante más cercano.
2.
Los indicadores LED de la batería y de biopsia no se encienden después de cargar una sonda en la pieza de
mano:
Verifique que el indicador LED de la batería para asegurarse de que el dispositivo tiene carga suficiente. Asegúrese de
que las pestañas de alineación y de bloqueo están en su posición correcta. Asegúrese de que la sonda está lista para
58
el uso. Si se cumplen estas condiciones y las luces siguen sin encenderse, sustituya la sonda por una nueva. Si los
indicadores LED no se encienden después de insertar correctamente una nueva sonda, póngase en contacto con el
centro de atención al cliente de MAMMOTOME o con su representante más cercano.
3.
La pieza de mano no carga cuando se coloca en la base de carga:
Asegúrese de que el cable de alimentación de CA está insertado de forma segura en la base de carga y en la toma
de la pared. Asegúrese de que no hay obstrucciones en las conexiones de carga de la base de carga o la pieza de
mano y, después, coloque la pieza de mano en la base de carga. Asegúrese de que se escucha una señal acústica de
la pieza de mano y de que el indicador LED de la batería parpadea. Si no hay señales acústicas o luces intermitentes,
reemplace la base de carga y el cable de alimentación de CA poniéndose en contacto con el centro de atención al
cliente de MAMMOTOME o con su representante más cercano.
Especificaciones de la pieza de mano
Conformidad eléctrica
Este equipo médico ha pasado todas las pruebas necesarias relativas a los riesgos mecánicos, de
descarga eléctrica y de incendio según las normas UL 60601-1, IEC/EN 60601-1, CAN/CSA C22.2
No 601-1.
Penetración de líquidos
No protegido frente a la penetración de líquidos
Inflamabilidad
Equipo no apto para su uso en presencia de anestésicos inflamables
Dimensiones
Longitud: 18.9 cm
Anchura: 5.0 cm
Altura: 3,8 cm
Cable de alimentación de CA y
adaptadores
Uso sólo con los accesorios de alimentación de CA suministrados:
• Modelo: FRM015-S09-1 N/P TRM15-S10-I-351359
• Tensión de entrada: 100-240 V CA
• Corriente de entrada: 0,7 A a 0,4 A
• Frecuencia de entrada: 50 a 60 Hz
• Tensión de salida: 10 V CC
• Corriente de salida: 1,5 A
• Máx. vatios: 15 W
Especificaciones del sistema
Clasificación
Clase II, equipo tipo BF alimentado de forma interna
Condiciones medioambientales
Transporte y almacenamiento:
• -35 °C a +54 °C (-31 °F a 129 °F)
• 10% a 95% de humedad relativa, sin condensación
• 500 a 1060 hPa de presión atmosférica
Funcionamiento:
• +5 °C a +40 °C (41 °F a 104 °F)
Modo de funcionamiento
Continuo
Compatibilidad electromagnética (CEM), guía y declaraciones del fabricante
El sistema para biopsia Mammotome® elite requiere precauciones especiales en lo que se refiere a la compatibilidad
electromagnética (CEM) y debe instalarse y usarse según la información sobre CEM incluida en esta guía de instalación.
El sistema para biopsia Mammotome® elite está concebido para su uso en el entorno electromagnético que se especifica
a continuación. El cliente o el usuario del sistema para biopsia Mammotome® elite deben asegurarse de que se usa en un
entorno de este tipo.
Guía y declaración del fabricante: emisiones electromagnéticas
El sistema para biopsia Mammotome® elite está concebido para su uso en el entorno electromagnético que se especifica a continuación.
El cliente o el usuario del sistema para biopsia Mammotome® elite deben asegurarse de que se usa en un entorno de este tipo.
59
Prueba de emisiones
Cumplimiento
Guía
Emisiones RF CISPR 11
Grupo 1
El sistema para biopsia Mammotome® elite utiliza energía de RF sólo
para su funcionamiento interno. Así pues, las emisiones de RF son muy
bajas y no es probable que provoquen interferencia alguna en los
equipos electrónicos cercanos.
Emisiones RF CISPR 11
Clase A
Emisiones armónicas
IEC 61000-3-2
No procede
Fluctuaciones de tensión/
Parpadeos
IEC 61000-3-3
No procede
El sistema para biopsia Mammotome® elite puede ser utilizado en
todos los ámbitos que no sean domésticos y en aquéllos conectados
directamente a la red pública de alimentación de baja tensión que
abastece a los edificios destinados a vivienda.
Guía y declaración del fabricante: inmunidad electromagnética
El sistema para biopsia Mammotome® elite está concebido para su uso en el entorno electromagnético que se especifica a continuación.
El cliente o el usuario del sistema para biopsia Mammotome® elite deben asegurarse de que se usa en un entorno de este tipo.
Prueba de
inmunidad
IEC 60601 Prueba
de nivel
Nivel de
cumplimiento
Entorno electromagnético: Guía
Descarga
electrostática IEC
61000-4-2
± 6 KV por contacto
± 6 KV por
contacto
Los suelos deben ser de madera, hormigón o baldosas de cerámica. Si
los suelos están revestidos de material sintético, la humedad relativa
debe ser de al menos el 30%.
± 8KV por aire
± 8KV por aire
Los equipos de comunicaciones por RF portátiles y móviles no deben
utilizarse más próximos a ninguna parte del Mammotome® elite
(incluidos los cables) que la distancia de separación recomendada,
que se calcula a partir de la ecuación aplicable a la frecuencia del
transmisor.
RF conducida IEC
61000-4-6
3 Vrms
RF radiada
3 V/m
IEC 61000-4-3
80 MHz
a 2.5 GHz
3V
150 KHz
a 80 MHz
Distancia de separación recomendada
d = [1,17]√P
d = [1,17]√P 80 MHz a 800 MHz
3 V/m
d = [2,33]√P 800 MHz a 2,5 GHz
donde P es la potencia nominal máxima de salida del transmisor en
vatios (W) según el fabricante del transmisor y d es la distancia de
separación recomendada en metros (m).
Las intensidades de campo de transmisores fijos de RF, determinadas a
partir de un estudio electromagnético del lugara, deben ser inferiores
al nivel de conformidad en cada gama de frecuenciasb.
Pueden producirse interferencias en las cercanías de los equipos
marcados con el siguiente símbolo:
Nota 1: A 80 MHz y 800 MHz, se aplica la gama de frecuencias más alta.
Nota 2: Estas directrices pueden no ser aplicables en todas las situaciones. La absorción y la reflexión provocadas por estructuras, objetos
y personas afectan a la propagación electromagnética.
Las intensidades de campo creadas por los transmisores fijos, como son las estaciones base para radiotelefonía (móvil/inalámbrica)
y radios móviles terrenas, las emisoras de radioaficionado, las emisoras de radio AM y FM y las emisoras de televisión, no se pueden
predecir teóricamente con precisión. Para evaluar el entorno electromagnético provocado por transmisores de RF fijos, debe considerarse
la necesidad de efectuar un control electromagnético del lugar. Si la intensidad del campo medida en el lugar en el que va a utilizarse
el sistema para biopsia Mammotome® elite supera el nivel de conformidad de RF pertinente indicado antes, el sistema para biopsia
Mammotome® elite debe vigilarse atentamente para verificar su buen funcionamiento. Si se observa un funcionamiento no normal,
puede que sea necesario tomar medidas adicionales, como la reorientación o la reubicación del sistema para biopsia Mammotome® elite.
a
b
Dentro de la gama de frecuencias comprendida entre 150 kHz y 80 MHz, las intensidades de campo deben ser inferiores a 3 V/m.
Información del servicio de atención al cliente
Puede obtener información adicional sobre el sistema para biopsia mamaria Mammotome® elite llamando al número
1-877-9-A-MAMMO (1-877-926-2666) (sólo en los Estados Unidos; en la UE llame al 800 918 200 o 0 800 500 98 98),
enviando un correo electrónico a la dirección [email protected] o visitando la página Web
www.mammotome.com.
60
Información sobre eliminación y reciclado
La pieza de mano Mammotome® elite contiene una batería de polímero de litio no extraíble. No intente extraer la batería.
No elimine la pieza de mano ni la batería de polímero de litio arrojándolas a un fuego. Elimine la pieza de mano y la
batería de polímero de litio conforme a las leyes y las regulaciones que se encuentren en vigor en su país, o bien póngase
en contacto con MAMMOTOME para conocer las opciones de reciclaje. Si reside fuera de los Estados Unidos, póngase en
contacto con el servicio de atención al cliente para eliminar la pieza de mano.
PRECAUCIÓN: La batería de polímero de litio puede desencadenar un incendio o provocar una quemadura química
si no se trata adecuadamente. No desmonte, rompa ni pinche la batería de polímero de litio. No caliente la batería de
polímero de litio por encima de 60 °C (140 °F).
Forma de suministro
• La pieza de mano Mammotome® elite se suministra no estéril.
• Las sondas Mammotome® elite se suministran estériles para uso con un solo paciente y se venden por separado.
Deseche después del uso.
Garantía
Devicor® Medical Products, Inc. garantiza que este producto estará libre de defectos de material o mano de obra en
condiciones normales de uso durante el período de garantía que se especifica a continuación.
La obligación de Devicor® Medical Products, Inc. dentro de esta garantía está limitada al reemplazo, a su discreción, de
cualquier producto, o de parte del mismo, que haya sido devuelto a Devicor® Medical Products, Inc. o a su distribuidor
dentro del período de tiempo aplicable que se muestra a continuación si, al realizar una inspección correspondiente
aprobada y aceptada por Devicor® Medical Products, Inc., se constata que efectivamente está defectuoso. Esta garantía
no se aplica a ningún producto o parte del mismo que: (1) presente un defecto que tenga su causa en el uso de
dispositivos fabricados o distribuidos por proveedores no autorizados por Devicor® Medical Products, Inc.; (2) se haya
reparado o alterado fuera de la fábrica de Devicor® Medical Products, Inc. de una forma que, a juicio de esta empresa, la
estabilidad o la fiabilidad hayan podido verse afectadas; (3) haya sido objeto de un uso inadecuado o negligencia o haya
sufrido un accidente; o (4) no se haya utilizado conforme a los parámetros, las instrucciones y las directrices del producto
ni de acuerdo con los estándares de funcionamiento, operativos y medioambientales aceptados de forma general para
productos similares del sector. Los productos de Devicor® Medical Products, Inc. presentan una garantía durante los
períodos que se especifican a continuación, contados a partir de la fecha de la entrega al comprador original:
Pieza de mano Mammotome® elite: Seis (6) meses, sustitución
Base de carga con accesorios de CA: Seis (6) meses, sustitución
A MENOS QUE LAS LEYES LOCALES ASÍ LO ESTIPULEN, ESTA GARANTÍA REEMPLAZA TODAS LAS DEMÁS GARANTÍAS,
EXPRESAS O IMPLÍCITAS, INCLUIDAS LAS GARANTÍAS DE COMERCIABILIDAD Y ADECUACIÓN PARA UN FIN CONCRETO,
ASÍ COMO TODAS LAS DEMÁS
OBLIGACIONES O RESPONSABILIDADES POR PARTE DE DEVICOR® MEDICAL PRODUCTS, INC. Y ES REMEDIO EXCLUSIVO
DEL COMPRADOR. DEVICOR® MEDICAL PRODUCTS, INC. NO SERÁ RESPONSABLE EN NINGÚN CASO DE LOS DAÑOS
ESPECIALES, CASUALES O CONSECUENTES, INCLUIDOS, ENTRE OTROS, LOS DAÑOS RESULTANTES DE LA PÉRDIDA DE
USO, BENEFICIOS, NEGOCIO O BUENA VOLUNTAD, EXCEPTO EN LA MEDIDA QUE LO ESTIPULE DE FORMA EXPRESA UNA
LEY CONCRETA.
Devicor® Medical Products, Inc. no asume ni autoriza a otras personas a asumir en su nombre ninguna otra
responsabilidad por la venta o el uso de cualquier producto de Devicor® Medical Products, Inc. No existen otras garantías
que se extiendan más allá de los términos aquí presentados. Devicor® Medical Products, Inc. se reserva el derecho
de realizar cambios en los productos construidos o vendidos por la empresa en cualquier momento, sin incurrir en
la obligación de realizar los mismos cambios o cambios similares en los productos ya construidos o vendidos con
anterioridad.
PRECAUCIÓN: Las leyes federales de los Estados Unidos restringen la venta de este dispositivo a médicos o por
prescripción de éstos.
Consulte al representante de ventas de MAMMOTOME para obtener detalles sobre las opciones de sustitución.
61
Indicaties
Het Mammotome® elite-biopsiesysteem is geïndiceerd voor het verkrijgen van afgebeelde of gepalpeerde
weefselmonsters van de borst of axillaire lymfeklieren voor de diagnostische analyse van borstafwijkingen.
• Het Mammotome® elite-biopsiesysteem is bedoeld voor het leveren van borstweefsel voor histologisch onderzoek,
waarbij de afgebeelde afwijking gedeeltelijk of geheel verwijderd wordt.
• Het Mammotome® elite-biopsiesysteem is bedoeld voor het leveren van borstweefsel voor histologisch onderzoek,
waarbij de gepalpeerde afwijking gedeeltelijk of geheel verwijderd wordt.
De omvang van een histologische afwijking kan niet op betrouwbare wijze worden bepaald op basis van palpatie of
beeldvorming van deze afwijkingen. Daarom voorspelt de mate van verwijdering, van de op basis van het gevormde
beeld of palpatie gevonden afwijking, niet in hoeverre een histologische afwijking, zoals een maligniteit, daadwerkelijk
is verwijderd. Als de gevonden afwijking histologisch gezien niet goedaardig is, is het van essentieel belang dat de
weefselmarges worden onderzocht op volledige verwijdering; daarbij moet gebruik worden gemaakt van standaard
chirurgische procedures.
In gevallen waarbij een patiënt een palpeerbare afwijking heeft die als goedaardig is geclassificeerd door middel van
klinische en/of radiologische criteria (bijv. fibroadenoom, fibrocystische laesie), kan het Mammotome® elite-systeem voor
biopsie ook worden gebruikt om dergelijke palpeerbare laesies gedeeltelijk te verwijderen. Wanneer borstweefsel wordt
verwijderd, is histologische evaluatie van het weefsel de standaard procedure. Als de gevonden afwijking histologisch
gezien niet goedaardig is, is het van essentieel belang dat de weefselmarges worden onderzocht op volledige
verwijdering; daarbij moet gebruik worden gemaakt van standaard chirurgische procedures.
Contra-indicaties
• Dit instrument is uitsluitend voor diagnostisch gebruik en niet geïndiceerd voor therapeutisch gebruik.
• Dit instrument is gecontra-indiceerd voor gebruik bij patiënten die naar het oordeel van de arts een verhoogd risico
hebben op complicaties die aan verwijdering van weefselmonsters of biopsie verbonden zijn. Patiënten die een
behandeling met anticoagulantia ondergaan of mogelijk een bloedingsstoornis hebben, kunnen een verhoogd risico
op complicaties hebben.
Beschrijving van het instrument
Het Mammotome® elite-systeem voor biopsie van Devicor bestaat uit een houder en een sonde. Het Mammotome®
elite-systeem kan worden gebruikt onder begeleiding van echografie om diagnostische monsters uit te snijden en
te verzamelen met een enkele invoering van de sonde. De componenten van het systeem zijn ontworpen voor een
veilige werking als ze gezamenlijk worden gebruikt voor diagnostische monsterafname van weefsel tijdens een
biopsieprocedure.
De herbruikbare en niet steriel geleverde houder is een op zichzelf staand, handmatig bediend, elektromechanisch
vacuüm-assisted biopsieapparaat dat bestaat uit een oplaadbare lithium-polymeer batterij en een oplaadstation met
een netsnoer en adapters (zie afbeelding 1).
De sonde is voor eenmalig gebruik, wordt steriel geleverd en heeft een trocartschacht met distale opening aan de
buitenkant en een doorschuivende holle cutter aan de binnenkant (zie figuur 2). De sonde bevat ook een geïntegreerde
coaxiale canule en een proximale monsterkamer met een gesloten weefselmonstermand en dop (zie afbeelding 2). Het
sondelichaam bevat een uitlijningslipje en twee vergrendellipjes om de sonde vast te zetten in de houder.
De houder creëert een vacuüm in het instrument zodat het weefsel in de opening kan worden getrokken, terwijl de
scherpe binnenste cutter met hoge snelheid roteert en door de opening naar voren komt om het beoogde weefsel
weg te nemen. Het weefselmonster wordt door een vacuüm naar de monsterkamer getransporteerd. De geïntegreerde
coaxiale canule kan worden losgemaakt van de sonde na de biopsie en in de borst blijven om de biopsielocatie
te kunnen traceren bij het plaatsen van een identifier voor de biopsielocatie. De houder is ontworpen met 3
biopsieknopopties voor diverse handposities (zie figuur 3).
BELANGRIJK: De 14 GA CorMARK™-identifiers van de biopsielocatie kunnen worden gebruikt in combinatie met het
Mammotome® elite-biopsiesysteem om de locatie van de biopsieprocedure radiografisch te markeren. GEBRUIK GEEN
MARKER DIE NIET IS GOEDGEKEURD VOOR GEBRUIK MET HET Mammotome® ELITE-BIOPSIESYSTEEM.
62
Afbeelding 1
Afbeelding 2
Afbeelding 3
Waarschuwingen en voorzorgsmaatregelen
• Minimaal invasieve procedures mogen alleen worden uitgevoerd door personen met een adequate opleiding en
bekendheid met minimaal invasieve technieken. Raadpleeg de medische literatuur met betrekking tot technieken,
complicaties en gevaren voordat u een minimaal invasieve procedure uitvoert.
• Minimaal invasieve instrumenten kunnen per fabrikant variëren in diameter. Bij gebruik van minimaal invasieve
instrumenten en accessoires van verschillende fabrikanten in een procedure, dient u de compatibiliteit ervan te
controleren voordat u de procedure start.
• Het instrument niet autoclaveren.
• Het instrument niet onderdompelen.
• De houder niet inspuiten met vloeistof.
• Dit instrument mag alleen worden gebruikt door artsen die zijn opgeleid in percutane naaldtechnieken voor
weefselverzameling.
• Vermijd verdraaien of buigen van de sonde.
• Gebruik geen gebogen sonde. Gooi de sonde weg in een daarvoor bestemde container.
63
• De sonde is niet ontworpen voor percutane huidpunctie.
• Net als met ieder ander biopsie-instrument, bestaat er kans op infectie.
• Gebruik dit instrument niet in combinatie met MRI (Magnetic Resonance Imaging).
• De houder mag uitsluitend worden gebruikt met Mammotome® elite-biopsiesondes.
• Producten die worden vervaardigd of gedistribueerd door bedrijven die niet zijn goedgekeurd door Devicor® Medical
Products, Inc. zijn mogelijk niet compatibel met het Mammotome® elite-systeem. Het gebruik van dergelijke producten
kan leiden tot onverwachte resultaten en mogelijk letsel bij de gebruiker of de patiënt.
• Voor instrumenten of apparaten die in contact komen met lichaamsvloeistoffen gelden speciale
verwijderingsprocedures teneinde biologische besmetting te voorkomen.
• Gooi alle geopende wegwerpinstrumenten weg, ongeacht of ze wel of niet gebruikt zijn.
• De sonde is uitsluitend verpakt en gesteriliseerd voor eenmalig gebruik. Niet opnieuw gebruiken, opnieuw verwerken
of opnieuw steriliseren. Hergebruik, herbewerking of hersterilisatie kunnen de structuur van het instrument
beschadigen en/of leiden tot het niet goed functioneren van het instrument, hetgeen weer kan resulteren in letsel,
ziekte of overlijden van de patiënt. Bij herverwerking of hersterilisatie van instrumenten voor eenmalig gebruik
bestaat tevens het risico van besmetting van de patiënt en/of infectie of kruisbesmetting van de patiënt, met inbegrip
van, maar niet beperkt tot de overdracht van infectieziekte(n) van de ene patiënt op de andere. Besmetting van het
instrument kan leiden tot letsel, ziekte of overlijden van de patiënt.
Afbeelding 1. Afbeelding en nomenclatuur van het instrument
3 biopsieknopopties
Rechter knop
Batterij-indicator
Foutindicator
Middelste knop
Linker knop
Luidspreker
Middelste biopsie-indicator
Uitlijningslipje
Biopsie-indicator links en rechts
Afbeelding 2. Afbeelding en nomenclatuur van de sonde
Beschermhuls
Geïntegreerde coaxiale canule
Coaxiale ontgrendelknop
Openingbegrenzer
Inkeping houder
Naaldopening
Monsterkamer
Trocartschacht
Weefselmand
Naaldrotatieknop
Kickstand
Sondelichaam
Kickstand
Monsterkamerdop
Vergrendellipje links en rechts
Ontgrendelknop weefselmand
64
Benodigde apparatuur
• Juiste beeldvormingsmodaliteit en accessoires
• Mammotome® elite-biopsiehouder
• Mammotome® elite-biopsiesonde
• Chirurgische handschoenen en doeken
• Plaatselijk anestheticum
• Scalpel
• Indien nodig andere apparatuur
Gebruiksaanwijzing
BELANGRIJK: Inspecteer alle verpakkingen voor gebruik. Als de verpakking van het product beschadigd is of het
product is gevallen bij het verwijderen uit de verpakking, gebruik dan het volgende protocol:
• Houder: Volg de procedures Reinigen van de houder en Desinfecteren van de houder.
• Sonde: Gooi de sonde weg, want hij is niet langer steriel.
Controleer de compatibiliteit van alle minimaal invasieve instrumenten en accessoires voordat u het instrument gaat
gebruiken (zie Waarschuwingen en voorzorgsmaatregelen).
Eerste gebruik
Als de houder wordt geleverd is de batterij niet volledig opgeladen. De houder moet voor het eerste gebruik volledig
worden opgeladen. Reinig en desinfecteer de houder conform de instructies in Reinigen en desinfecteren van de houder.
Plaats de houder in het oplaadstation om de batterij op te laden. De houder geeft de juiste plaatsing aan door middel
van een geluidsindicator. Zodra de houder volledig is opgeladen, blijft de batterij-indicator continu groen branden en
kan de houder voor gebruik uit het oplaadstation worden gehaald. Er klinkt een hoorbare pieptoon als de houder uit het
oplaadstation wordt gehaald. Het duurt ongeveer 200 minuten voordat de batterij volledig is opgeladen.
BELANGRIJK: De houder MOET VOLLEDIG ZIJN OPGELADEN voor het eerste gebruik.
De sonde laden
1.
aal de sonde met behulp van een steriele techniek uit de verpakking. Laat het instrument niet vallen in het steriele
H
veld om beschadiging te voorkomen. Als de sonde in contact komt met een niet-steriel oppervlak, moet deze
worden weggegooid in de aangewezen afvalcontainer.
• De sonde is verpakt met een beschermende huls over de trocartschacht. Aanbevolen wordt om de
beschermhuls op de trocartschacht te laten totdat de sonde klaar is om in de huidlocatie te worden
ingevoerd. Probeer letsel te voorkomen bij het verwijderen van de huls.
2.
ak het sondelichaam vast en breng het uitlijningslipje op een lijn met de inkeping van de houder. Begin met de
P
sondebasis in de opening van de houder te drukken, terwijl u het uitlijningslipje van de houder op een lijn brengt
met de inkeping van de houder in het sondelichaam (zie afbeelding 3, stap 1).
3.
ruk het sondelichaam stevig in de houder, totdat u een klik hoort die aangeeft dat de vergrendellipjes de houder
D
hebben vastgeklikt (zie afbeelding 3, stap 2).
Afbeelding 3
65
LET OP: Om te voorkomen dat uw vingers bekneld raken tijdens het laden van de sonde in de houder, dient u de houder
aan weerszijden boven het logo en in de buurt van de vergrendellipjes vast te pakken.
4.
Als de sonde correct is geplaatst, wordt de houder automatisch ingeschakeld en wordt de initialisatie opgestart.
Tijdens de initialisatie is de motor hoorbaar en het actieve biopsie-indicatorlampje blijft continu oranje branden. Aan
het einde van een succesvolle initialisatie, laat de houder 2 pieptonen horen en het actieve biopsie-indicatorlampje
brandt groen om aan te geven dat het systeem klaar is voor monsterafname.
• Als de sonde verkeerd in de houder wordt ingevoerd, wordt de initialisatie NIET opgestart.
• Als het systeem niet gereed is voor monsterafname, laat de houder 3 pieptonen horen en gaat het
foutindicatorlampje geel branden. Zie Problemen oplossen voor de corrigerende maatregelen.
LET OP: Bewegende delen. Zorg ervoor dat de naaldopening op dit moment door niets wordt geblokkeerd.
• Als de houder gedurende 30 seconden na het laden van een sonde niet wordt aangeraakt, gaat de houder in de
slaapmodus om de batterij te sparen. Tijdens de slaapmodus gaan de biopsie- en batterij-indicatorlampjes uit en zijn
de knoppen niet actief. Zodra de houder wordt bewogen, komt het instrument uit de slaapmodus. De houder blijft in
de slaapmodus als er geen sonde is aangesloten.
Biopsie-selectieknop
De middelste biopsie-knop is vooraf geselecteerd bij verzending. Slechts één biopsie-knop blijft actief als het instrument
is ingeschakeld. De actieve biopsie-knop is te herkennen aan een continu groen brandend biopsie-indicatorlampje. Om
de gewenste actieve biopsie-knop te wijzigen, moet u eerst controleren of er een sonde is aangesloten en vervolgens
de twee niet-actieve biopsie-knoppen gedurende 3 seconden gelijktijdig ingedrukt houden (zie afbeelding 4, stap
1). Er klinkt een pieptoon en alle 3 biopsie-indicatorlampjes knipperen groen (zie afbeelding 4, stap 2). De gebruiker
kan vervolgens de gewenste actieve biopsie-knop indrukken en loslaten (zie afbeelding 4, stap 3). De actieve biopsieknopselectie wordt opgeslagen in het instrument voor toekomstig gebruik.
Afbeelding 4
Linker actief
Middelste actief
Rechter actief
Middelste biopsieknop
Linker biopsieknop
Rechter biopsieknop
Procedures voor het afnemen van een weefselmonster
1.
Bereid de huidlocatie voor in overeenstemming met de standaard chirurgische techniek voorafgaand aan het
inbrengen van de sonde.
2.
Maak een nauwkeurige incisie in het geselecteerde gebied om de trocartschacht te plaatsen.
3.
Verwijder de beschermhuls van de sonde.
• De geïntegreerde coaxiale canule kan eventueel worden verwijderd om het inbrengen te vergemakkelijken.
Als de canule wordt verwijderd, moet deze op de aangewezen manier worden afgevoerd. Aanbevolen wordt
66
om de geïntegreerde coaxiale canule niet opnieuw aan de sonde te bevestigen om letsel tot een minimum
te beperken.
4.
Indien nodig kunt u de naaldrotatieknop gebruiken om de positie van de naaldopening aan te passen voordat u de
sonde in de incisie plaatst. Trek de naaldrotatieknop naar buiten om te roteren (zie afbeelding 5, stap 1). Roteer naar
de gewenste klokpositie (zie afbeelding 5, stap 2) en laat los (zie afbeelding 5, stap 3). De openingbegrenzer geeft
de positie van de opening aan.
Afbeelding 5
360°
2 mm
5.
Breng de sonde in door de incisie en plaats de sondetip in het doelgebied met de tip voorbij de laesie. Gebruik de
aangewezen beeldvormingstechniek naar gelang van toepassing.
6.
Druk op de actieve biopsie-knop op de houder om een weefselmonster te nemen. De biopsiecyclus verloopt
automatisch. Er wordt een vacuüm gecreëerd, de binnenste snijcanule van de sonde wordt teruggetrokken, het
weefsel wordt in de naaldopening getrokken en de holle cutter roteert en schuift naar voren terwijl weefsel wordt
uitgesneden. Wanneer de cutter het distale uiteinde van de naaldopening bereikt, stopt de beweging en wordt het
monster door het vacuüm naar de monsterkamer getransporteerd. Het biopsie-indicatorlampje brandt continu
oranje en de motor is hoorbaar tijdens de monsterafname en het weefselverzamelproces. Aan het einde van de
biopsiecyclus, wordt het vacuüm uitgeschakeld en het biopsie-indicatorlampje blijft continu groen branden.
• Houd uw vingers uit de buurt van de actieve biopsie-knop totdat het doelgebied is bereikt.
• U mag de monsterkamer niet verwijderen tijdens de weefselverzameling.
• De biopsiecyclus kan worden onderbroken om onnodig letsel te voorkomen
of de locatie van de opening via beeldvorming (echo) te visualiseren.
• Druk slechts één maal op de actieve biopsie-knop om de biopsiecyclus te starten. Om de biopsiecyclus te
onderbreken, drukt u nogmaals op de biopsie-knop als de cutter wordt teruggetrokken van positie 1 naar
3 (zie afbeelding 6) of wanneer de cutter naar voren schuift van positie 3 naar 2. Wanneer de biopsiecyclus
wordt onderbroken, wordt de cutter teruggetrokken naar positie 3. Het biopsie-indicatorlampje knippert
oranje. Om de biopsiecyclus te voltooien, drukt u op de biopsie-knop.
Afbeelding 6
LET OP: Zodra de sonde is ingebracht in het weefsel en de monsterafnamecyclus is gestart, mag u DE NAALD NIET
OPNIEUW PLAATSEN totdat de monsterafnamecyclus is beëindigd.
7.
Roteer de opening, door middel van rotatie van de houder en de sonde, voor de volgende monsterafname en
herhaal stap 6 indien nodig om aanvullende monsters te verzamelen.
• Om buigen van de naald te voorkomen, dient u geen overmatige druk uit te oefenen bij het plaatsen in de
borst.
• Controleer de verzameling van het gewenste monster indien nodig met behulp van postbiopsiebeeldvorming van de patiënt.
8.
Als u verdergaat ZONDER gebruik van een marker van de biopsielocatie, verwijdert u het instrument en verzorgt u
de incisieplaats zoals gebruikelijk nadat het laatste weefselmonster is verzameld. Ga door naar stap 10.
9.
Als u verdergaat MET gebruik van een marker van de biopsielocatie, koppelt u de geïntegreerde coaxiale canule
los nadat het laatste biopsiemonster is verzameld en verwijdert u de sonde, waarbij de canule op zijn plaats blijft,
door de coaxiale ontgrendelknop in te drukken (zie afbeelding 7) om plaatsing van de marker in de biopsieholte te
vergemakkelijken.
67
Afbeelding 7
a.
Breng met behulp van een standaard chirurgische techniek een CorMARK™ 14 GA in via de coaxiale canule
totdat de hendel stopt bij de coaxiale ontgrendelknop.
b.
Wanneer de CorMARK™ 14 GA de volledige diepte van het naaldtraject van de coaxiale canule heeft bereikt,
kan de marker worden geplaatst.
c.
Maak gebruik van beeldvorming om te controleren of de marker de gewenste locatie heeft bereikt.
d.
Nu kunt u de coaxiale canule verwijderen en afvoeren en de incisieplaats zoals gebruikelijk verzorgen.
BELANGRIJK: Raadpleeg de instructies van de fabrikant voor het gebruik van de CorMARK™.
10. Om ervoor te zorgen dat de naald vrij wordt gemaakt nadat de naald is verwijderd uit de borst, drukt u op de biopsieknop om een testcyclus te activeren.
11. Roteer de monsterkamerdop een kwartslag tegen de klok in (zie afbeelding 8, stap 1). Verwijder de dop samen met
de weefselmand (zie afbeelding 8, stap 2). Druk op de ontgrendelknop van de weefselmand om de weefselmand uit
de monsterkamerdop te verwijderen voor pathologisch onderzoek van het monster (zie afbeelding 8, stap 3).
Afbeelding 8
12. Indien nodig kunnen steriele forceps worden gebruikt bij het verwijderen van de monsters uit de weefselmand.
13. Plaats de monsterkamerdop terug om de sonde te verwijderen. Roteer de monsterkamerdop voor het terugplaatsen
een kwartslag tegen de klok in, plaats hem op de monsterkamer (zie afbeelding 9, stap 1) en roteer een kwartslag met
de klok mee (zie afbeelding 9, stap 2). Het vergrendelsymbool dient op 12 uur te staan. Plaats indien van toepassing
een nieuwe weefselmand en monsterkamerdop om door te gaan met de monsterafname (zie afbeelding 9).
Afbeelding 9
LET OP: De sonde is UITSLUITEND BEDOELD VOOR EENMALIG GEBRUIK. Gooi de sonde direct na gebruik weg.
68
Verwijdering sonde uit houder
Trek de sonde uit de houderopening terwijl u het vergrendellipje van de sonde ingedrukt houdt (zie afbeelding 10). Gooi
de sonde weg in de daarvoor bestemde container.
Afbeelding 10
LET OP: De sonde is UITSLUITEND BEDOELD VOOR EENMALIG GEBRUIK. Gooi de sonde direct na gebruik weg.
LET OP: De sondetip niet meer afsluiten.
Reinigen van de houder
Na elk gebruik dient u de houder grondig handmatig te reinigen met behulp van een pH-neutraal enzymatisch reinigingsmiddel. Het handmatig reinigen met behulp van een enzymatisch reinigingsmiddel gaat als volgt:
1.
Bereid een pH-neutraal reinigingsmiddel of pH neutraal enzymatisch reinigingsmiddel voor volgens de
aanwijzingen van de fabrikant.
2.
Gebruik een zachte, schone doek die licht bevochtigd is met de reinigingsvloeistof om alle oppervlakken
handmatig te reinigen. Gebruik verder een normale zachte tandenborstel om gebieden met gleufjes te reinigen.
3.
Spoel grondig af met een zachte, schone doek die licht bevochtigd is met lauwwarm (27°C - 44°C) leidingwater.
4.
Droog met een schone, zachte doek.
5.
Inspecteer het instrument op zichtbare verontreiniging. Als verontreiniging aanwezig is, herhaalt u stap 1 tot 5
totdat er geen zichtbare verontreiniging meer aanwezig is.
LET OP: Probeer niet om de houder te steriliseren door middel van autoclaaf-, stralings- of plasmasterilisatieprocedures;
niet inspuiten met vloeistof of onderdompelen in vloeistof, dit kan het instrument beschadigen. Als de houder niet goed
is gereinigd, vervalt de garantie.
Desinfecteren van de houder
De reinigingsprocedure moet gevolgd worden door een desinfectieproces. De volgende chemische desinfectiemiddelen
zijn goedgekeurd voor gebruik met de houder:
• 10% bleekoplossing (1 deel bleekmiddel op 9 delen gezuiverd of gedemineraliseerd water)
Desinfectiemiddelen moeten worden voorbereid en gebruikt volgens de aanbevelingen van de fabrikant wat betreft
gebruik, concentratie en contacttijd. Het gebruik van andere desinfectiemiddelen dan die aangegeven in deze
instructies, moet voor gebruik worden beoordeeld op geschiktheid. Ten behoeve van deze beoordeling zijn standaard
technische gegevens beschikbaar via de website van de fabrikant. Het desinfectieproces, inclusief de hulpmiddelen en
oplossingen, kan invloed hebben op de slijtage van een instrument of apparatuur.
1.
Drenk een schone doek en een zachte tandenborstel in de desinfecterende oplossing. Wring de doek grondig uit
om alle overtollige oplossing te verwijderen. Tik op de tandenborstel om overtollige oplossing te verwijderen.
2.
Veeg de houder grondig af en zorg ervoor dat het oppervlak gedurende 5 minuten vochtig blijft.
3.
Maak het gebied met gleufjes grondig schoon met de standaard zachte tandenborstel en zorg ervoor dat het
oppervlak gedurende 5 minuten vochtig blijft.
4.
Het desinfectiemiddel moet van het instrument worden verwijderd met behulp van een steriel gaasje of een
schone, zachte doek bevochtigd met gezuiverd water. Herhaal dit nog eens 4 maal om resterende aanslag grondig
te verwijderen.
69
5.
Een schone, standaard zachte tandenborstel bevochtigd met gezuiverd water moet worden gebruikt om het
desinfectiemiddel uit de gleufjes van het instrument te verwijderen. Herhaal dit nog eens 6 maal om resterende
aanslag grondig te verwijderen.
6.
Droog de houder met een schone, zachte doek en zorg ervoor dat de doek in de gleufjes van het instrument komt.
Zorg er bij het toegepaste ontsmettingsproces voor dat resten van reinigings-en desinfectiemiddelen afdoende worden
verwijderd. Tijdens het laatste spoelproces moet voor zover van toepassing gezuiverd of gedemineraliseerd water worden
gebruikt (meerdere spoelingen kunnen nodig zijn). Raadpleeg de aanbevelingen van de fabrikant voor het verwijderen
van resten van het desinfectiemiddel.
LET OP: Probeer niet om de houder te steriliseren door middel van autoclaaf-, stralings- of plasmasterilisatieprocedures;
niet inspuiten met vloeistof of onderdompelen in vloeistof, dit kan het instrument beschadigen. Als de houder niet goed
is gedesinfecteerd, vervalt de garantie.
Het opladen van houder
Laad de houder volledig op vóór het eerste gebruik. De houder maakt gebruik van een oplaadbare lithium-polymeer
batterij. Het duurt ongeveer 200 minuten voordat de batterij volledig is opgeladen. De batterij dient volledig te worden
opgeladen voor het eerste gebruik van de houder en voorafgaand aan het begin elke procedure. Als de batterij in
het oplaadstation is geplaatst, brandt het batterij-indicatorlampje continu groen als de batterij volledig is opgeladen.
Als de batterij niet voldoende is opgeladen, knippert het batterij-indicatorlampje groen of geel om een verminderd
batterijniveau aan te geven.
Om de houder op te laden, gaat u als volgt te werk:
1.
Zorg ervoor dat de juiste adapterstekker is aangesloten op de netsnoeradapter.
2.
Sluit de netsnoeradapter aan op het oplaadstation.
3.
Steek de netsnoeradapter in een stopcontact.
4.
Plaats de houder na reiniging en desinfectie in het oplaadstation. Als de houder correct in het oplaadstation is
geplaatst, geeft de houder een tweetonig piepsignaal ter bevestiging van de correcte plaatsing in het oplaadstation.
Als het gele lampje brandt, duurt het ongeveer 200 minuten voordat de batterij volledig is opgeladen.
5.
Het batterij-indicatorlampje knippert geel of groen om het actieve laden en het ladingsniveau aan te geven, terwijl
de houder in het oplaadstation staat. De houder is volledig opgeladen wanneer het batterij-indicatorlampje continu
groen brandt. De houder laat een tweetonig geluidssignaal horen bij verwijdering uit het oplaadstation.
• De houder moet na elk gebruik of wanneer deze niet in gebruik is in het oplaadstation blijven om steeds een volledig
opgeladen batterij te hebben. Een beveiligingscircuit voorkomt overlading van de batterij.
• Elke keer dat de houder gedurende 30 seconden niet wordt bewogen en er wel of geen sonde is bevestigd, wordt het
batterij-indicatorlampje uitgeschakeld. Wanneer de houder wordt bewogen, gaat het batterij-indicatorlampje branden
om de huidige status van de lading aan te geven.
• Elke keer dat de houder gedurende 1 uur niet wordt bewogen, met of zonder bevestigde sonde, gaat de houder in de
diepe slaapstand. Plaats de houder zonder de sonde in het oplaadstation en haal de houder uit het oplaadstation om
hem weer in te schakelen.
• Tijdens een biopsie procedure brandt het batterij-indicatorlampje continu groen. Als het batterij-indicatorlampje groen
knippert, bevat de houder voldoende lading om één procedure te voltooien. Als het batterij-indicatorlampje continu
geel brandt, zal de houder niet werken en moet deze onmiddellijk in het oplaadstation worden geplaatst.
BELANGRIJK: Als het batterij-indicatorlampje uitgaat nadat het continu geel heeft gebrand, kan de houder niet worden
opgeladen. Neem contact op met het Customer Support Center of een vertegenwoordiger van MAMMOTOME .
Probleemoplossing
1.
Het foutindicatorlampje brandt continu geel:
De houder voert periodieke systeemcontrole uit terwijl het instrument in werking is. Als een fout wordt
gedetecteerd, gaat het foutindicatorlampje continu geel branden. Als dit gebeurt, moet u ervoor zorgen dat
de sonde buiten de patiënt is, de sonde uit de houder verwijderen en vervangen door nieuwe sonde. Als
het foutindicatorlampje niet uit gaat, dient u contact op te nemen met het Customer Support Center of een
vertegenwoordiger van MAMMOTOME .
2.
De batterij- en biopsie-indicatorlampjes branden niet na het laden van een sonde in de houder:
Controleer de batterij-indicator om te zien of deze voldoende is opgeladen. Zorg ervoor dat de uitlijnings- en
vergrendellipjes goed op hun plaats zitten. Controleer of de sonde niet eerder is gebruikt. Als aan deze voorwaarden
wordt voldaan en de lampjes nog steeds niet branden, dient u de sonde te vervangen door een nieuwe sonde. Als de
indicatorlampjes niet gaan branden na correcte plaatsing van een nieuwe sonde, dient u contact op te nemen met
het Customer Support Center of een vertegenwoordiger van MAMMOTOME .
70
3.
De houder wordt niet opgeladen als deze in het oplaadstation is geplaatst:
Controleer of het netsnoer goed is ingestoken in het oplaadstation en een stopcontact. Controleer of er geen
obstakels aanwezig zijn op de laadaansluitingen van het oplaadstation of de houder en plaats vervolgens
de houder in het oplaadstation. Controleer of de houder een geluidssignaal laat horen en of het batterijindicatorlampje knippert. Als er geen geluidssignaal klinkt of het lampje niet knippert, moeten het oplaadstation
en het netsnoer worden vervangen; neem daarvoor contact op met het Customer Support Center of een
vertegenwoordiger van MAMMOTOME .
Specificaties houder
Elektrische conformiteit
Deze medische apparatuur heeft alle benodigde testen op elektrische schokken, brand- en
mechanische gevaren doorstaan in overeenstemming met UL 60601-1, IEC/EN 60601-1, CAN/CSA
C22.2 nr. 601-1
Binnendringen van vloeistof
Niet beschermd tegen het binnendringen van vloeistof
Ontvlambaarheid
Deze apparatuur is niet geschikt voor gebruik in de nabijheid van ontvlambare anesthetica
Afmetingen
Lengte: 18,9 cm
Breedte: 5,0 cm
Hoogte: 3,8 cm
Netsnoer en adapters
Gebruik uitsluitend met de meegeleverde stroomvoorzieningsaccessoires:
• Model: FRM015-S09-1 p/n TRM15-S10-I-351359
• Ingangsvoltage: 100-240VAC
• Ingangsstroom: 0,7A-0,4A
• Ingangsfrequentie: 50-60Hz
• Uitgangsvoltage: 10 Volt DC
• Uitgangsstroom: 1,5 A
• Max Watt: 15W
Systeemspecificaties
Classificatie
Klasse II, intern gevoede apparatuur, type BF
Omgevingsomstandigheden
Transport en opslag:
• -35°C tot +54°C (-31°F tot 129°F)
• 10% tot 95% relatieve luchtvochtigheid, niet condenserend
• 500 tot 1060 hPa atmosfeer druk
Werking:
• +5°C tot +40°C (41°F tot 104°F)
Werkingsmodus
Continu
Elektromagnetische compatibiliteit (EMC), richtlijnen en verklaringen van de fabrikant
Het Mammotome® elite-biopsiesysteem vereist speciale voorzorgsmaatregelen met betrekking tot elektromagnetische
compatibiliteit (EMC) en moet worden geïnstalleerd en gebruikt in overeenstemming met de EMC-informatie in deze
installatiehandleiding. Het Mammotome® elite-biopsiesysteem is bedoeld voor gebruik in de hierna gespecificeerde
elektromagnetische omgeving. De klant of de gebruiker van het Mammotome® elite-biopsiesysteem moet zich ervan
vergewissen dat het systeem in een dergelijke omgeving wordt gebruikt.
Richtlijn en verklaring van de fabrikant - elektromagnetische emissies
Het Mammotome® elite-biopsiesysteem is bedoeld voor gebruik in de hierna gespecificeerde elektromagnetische omgevingen. De klant
of de gebruiker van het Mammotome® elite-biopsiesysteem moet zich ervan vergewissen dat het systeem in een dergelijke omgeving
wordt gebruikt
Emissietest
Compliantie-
richtlijn
71
Het Mammotome® elite-biopsiesysteem gebruikt enkel RF-energie
voor zijn interne functie. Daarom zijn de RF-emissies van het systeem
zeer laag en veroorzaken ze geen interferentie in nabije elektronische
apparatuur.
RF-emissies CISPR 11
Groep 1
RF-emissies CISPR 11
Klasse A
Harmonische emissies
IEC 61000-3-2
Niet van toepassing
Voltageschommelingen/
trillingsemissies
IEC 61000-3-3
Niet van toepassing
Het Mammotome® elite-biopsiesysteem is geschikt voor gebruik in
alle gesloten ruimtes, behoudens huishoudelijke omgevingen en
ruimtes die direct verbonden zijn met het openbare laagspanningsnet
dat gebouwen met een huishoudelijke bestemming van stroom
voorziet.
Richtlijn en verklaring van de fabrikant - elektromagnetische immuniteit
Het Mammotome® elite-biopsiesysteem is bedoeld voor gebruik in de hierna gespecificeerde elektromagnetische omgevingen. De klant
of de gebruiker van het Mammotome® elite-biopsiesysteem moet zich ervan vergewissen dat het systeem in een dergelijke omgeving
wordt gebruikt
Immuniteitstest
IEC 60601
testniveau
Conformiteitsniveau
Elektromagnetische omgeving - Richtlijn
Elektrostatische
ontlading IEC
61000-4-2
±6 kV contact
±6 kV contact
± 8 kV lucht
± 8 kV lucht
De vloer moet zijn vervaardigd van hout of beton, of bedekt met keramische
tegels. Indien vloeren zijn bedekt met synthetisch materiaal, dient de relatieve
vochtigheid ten minste 30% te zijn.
Draagbare en mobiele RF communicatieapparatuur mogen niet dichter bij het
Mammotome® elite-biopsiesysteem, inclusief de kabels, gebruikt worden dan
de aanbevolen afstand, berekend met de vergelijking die van toepassing is op
de frequentie van de zender
Geleide RF IEC
61000-4-6
3 Vrms
Uitgestraalde RF
3 V/m
IEC 61000-4-3
80 MHz
tot 2,5 GHz
3V
150 KHz
tot 80 MHz
Aanbevolen scheidingsafstand
d = [1,17]√P
d = [1,17]√P 80 MHz tot 800 MHz
3 V/m
d = [2,33]√P 800 MHz tot 2,5 GHz
waarbij P de maximale uitgangsvermogenswaarde van de transmitter is,
uitgedrukt in watt (W), volgens opgave van de fabrikant van de transmitter, en
waarbij d de aanbevolen scheidingsafstand in meters (m) is.
De veldsterkte van vaste RF-zenders, bepaald middels een elektromagnetisch
onderzoek a, moet lager zijn dan het compliantieniveau in de afzonderlijke
frequentiebereikenb.
Dit symbool geeft aan dat in de nabijheid van daarmee gemerkte apparatuur
interferentie kan optreden:
Opmerking 1 Bij 80 MHz en 800 MHz is het hoogste van de vermelde frequentiebereiken van toepassing.
Opmerking 2 Deze richtlijnen zijn niet noodzakelijkerwijs in alle omstandigheden van toepassing. Overdracht van elektromagnetische
energie wordt beïnvloed door absorptie en reflectie van constructies, voorwerpen en mensen.
De veldsterkte van vaste zenders, zoals grondstations voor radio, (draadloze) telefoons, landmobiele radio’s, amateurradiozenders,
AM- en FM-radiozenders en TV-zendstations kan niet langs theoretische weg nauwkeurig worden voorspeld. Voor beoordeling van de
elektromagnetische omgeving in samenhang met vaste RF-zendinstallaties moet een elektromagnetisch werkplekonderzoek worden
overwogen. Als de gemeten veldsterkte op de locatie waar het Mammotome® elite-biopsiesysteem gebruikt wordt het bovengenoemde
niveau waar de RF aan moet voldoen overtreft, dient het Mammotome® elite-biopsiesysteem geobserveerd te worden op normale
werking. Als u een abnormale werking vaststelt, kunnen bijkomende maatregelen nodig zijn, bijvoorbeeld het Mammotome® elitebiopsiesysteem heroriënteren of het op een andere plaats installeren.
a
b
in het frequentiebereik150 kHz tot 80 MHz moet de veldsterkte lager zijn dan 3 V/m.
Informatie klantenservice
Aanvullende informatie over het Mammotome® elite-biopsiesysteem kunt u krijgen door te bellen naar
1-877-9-A-MAMMO (1-877-926-2666) (alleen in de VS; voor de EU belt u naar 800 918 200 of 0 800 500 98 98 ). U kunt ook
een e-mail sturen naar [email protected] of onze website bezoeken op www.mammotome.com.
72
Informatie over afvoeren en recycling
De Mammotome® elite-houder bevat een niet-verwijderbare lithium-polymeer batterij. Probeer de batterij niet zelf
te verwijderen. Gooi de houder of de lithium-polymeer batterij niet in het vuur. Gooi de houder en lithium-polymeer
batterij weg in overeenstemming met de wet-en regelgeving in uw regio of neem contact op met MAMMOTOME voor
meer informatie over recycling. Neem buiten de VS contact op met Customer Service voor afvoeren van de houder.
LET OP: Bij onjuiste behandeling kan de lithium-polymeer batterij gevaar voor brand of chemische brandwonden
veroorzaken. De lithium-polymeer batterij niet uit elkaar halen, pletten of doorboren. De lithium-polymeer batterij niet
verwarmen boven 60°C (140°F).
Levering
• De Mammotome® elite-houder wordt niet-steriel geleverd.
• De Mammotome® elite-sondes worden steriel geleverd voor eenmalig gebruik en worden apart verkocht. Weggooien
na gebruik.
Garantie
Devicor® Medical Products, Inc. garandeert dat dit product bij normaal gebruik vrij is van materiaal- en fabricagefouten
gedurende de hieronder aangegeven respectieve garantieperiode.
De aansprakelijkheid van Devicor® Medical Products, Inc. onder deze garantie is beperkt tot de vervanging, naar
eigen keuze, van een product of een deel daarvan, dat aan Devicor® Medical Products, Inc. of haar leverancier is
geretourneerd binnen de hieronder aangegeven geldende periode en dat bij nader onderzoek door Devicor® Medical
Products, Inc. gebreken vertoont. Deze garantie is niet van toepassing op een product, of een deel daarvan, dat: (1)
nadelig is beïnvloed door gebruik met apparaten die zijn vervaardigd of gedistribueerd door partijen die niet zijn
goedgekeurd door Devicor® Medical Products, Inc. (2) is gerepareerd of veranderd buiten de fabriek van Devicor®
Medical Products, Inc. op een wijze die, naar oordeel van Devicor® Medical Products, Inc., invloed heeft op de stabiliteit
of betrouwbaarheid, (3) is onderworpen aan onjuist gebruik, nalatigheid of ongeval, of (4) is gebruikt voor andere
doeleinden dan in overeenstemming met het ontwerp en de gebruiksparameters, instructies en richtlijnen voor het
product of met de functionele, operationele of milieunormen voor vergelijkbare producten die algemeen in de industrie
zijn geaccepteerd. Garantie op producten van Devicor® Medical Products, Inc. geldt voor de volgende periodes na
levering aan de oorspronkelijke koper:
Mammotome® elite-houder zes (6) maanden, vervanging
Oplaadstation met netstroomaccessoires zes (6) maanden, vervanging
IN ZOVERRE ALS TOEGESTAAN DOOR DE VAN TOEPASSING ZIJNDE PLAATSELIJKE WETGEVING, VERVANGT DEZE
GARANTIE ALLE ANDERE GARANTIES, EXPLICIET OF IMPLICIET, WAARONDER GARANTIES VAN VERKOOPBAARHEID EN
GESCHIKTHEID VOOR EEN BEPAALD DOEL, EN ALLE ANDERE
VERPLICHTINGEN OF AANSPRAKELIJKHEDEN VAN DEVICOR® MEDICAL PRODUCTS, INC. EN IS DEZE GARANTIE DE ENIGE
MOGELIJKHEID TOT VERHAAL VAN DE KOPER. DEVICOR® MEDICAL PRODUCTS, INC. IS IN GEEN GEVAL AANSPRAKELIJK
VOOR BIJZONDERE, INCIDENTELE OF GEVOLGSCHADE MET INBEGRIP VAN, MAAR NIET BEPERKT TOT SCHADE ALS
GEVOLG VAN HET VERLIES VAN GEBRUIK, WINST, HANDEL OF GOODWILL, ANDERS DAN UITDRUKKELIJK VERMELD IN EEN
SPECIFIEKE WET.
Devicor® Medical Products, Inc. noch andere personen kunnen op enige andere wijze aansprakelijk worden gehouden
in verband met de verkoop of het gebruik van een van de producten van Devicor® Medical Products, Inc. Er zijn geen
andere garanties dan die uit deze bepalingen. Devicor® Medical Products, Inc. behoudt zich het recht voor om op
elk moment wijzigingen aan te brengen aan de door haar vervaardigde en/of verkochte producten, zonder enige
verplichting om dezelfde of soortgelijke wijzigingen aan te brengen op producten die eerder door haar zijn vervaardigd
en/of verkocht.
LET OP: Volgens federale Amerikaanse wetten is verkoop van dit product alleen toegestaan aan of op bestelling van
een arts.
Raadpleeg een vertegenwoordiger van MAMMOTOME voor details met betrekking tot vervangingsopties.
73
Wskazania
System do biopsji Mammotome® elite jest przeznaczony do uzyskiwania zobrazowanych lub zlokalizowanych
palpacyjnie próbek tkanek z gruczołu sutkowego bądź węzłów chłonnych w celu analizy diagnostycznej zmiany.
• System do biopsji Mammotome® elite jest przeznaczony do pozyskiwania tkanki gruczołu sutkowego do badań
histologicznych z częściowym lub pełnym usunięciem zobrazowanych zmian.
• System do biopsji Mammotome® elite jest przeznaczony do pozyskiwania tkanki gruczołu sutkowego do badań
histologicznych z częściowym usunięciem zlokalizowanych palpacyjnie zmian.
Rozległość zmian histologicznych nie zawsze może być łatwo określona na podstawie palpacji lub ich zobrazowanego
wyglądu. Z tego powodu zakres usuwania wymacanych palpacyjnie lub zobrazowanych dowodów zmian nie
prognozuje zakresu usuwania zmiany histologicznej (np. guza złośliwego). Gdy pobrana próbka ze zmiany nie
jest łagodna histologicznie, wymagane jest zbadanie obrzeży tkanki, aby zapewnić pełne usunięcie przy użyciu
standardowych technik chirurgicznych.
W przypadkach, gdy wyczuwalna palpacyjnie zmiana została sklasyfikowana jako łagodna według kryteriów klinicznych
i/lub radiologicznych (np. gruczolakowłókniak, zmiana włóknisto-torbielowata), system do biopsji piersi Mammotome®
elite może zostać także użyty do częściowego usuwania takich zmian możliwych do zlokalizowania palpacyjnego.
Zawsze gdy usuwana jest tkanka gruczołu sutkowego standardem badania jest ocena histologiczna tkanki. Gdy pobrana
próbka ze zmiany nie jest łagodna histologicznie, wymagane jest zbadanie obrzeży tkanki, aby zapewnić pełne usunięcie
przy użyciu standardowych technik chirurgicznych.
Przeciwwskazania
• Niniejszy przyrząd jest przeznaczony wyłącznie do celów diagnostycznych i nie jest wskazany do zastosowań
terapeutycznych.
• Przyrząd jest przeciwwskazany u pacjentów, u których według oceny lekarza występuje zwiększone ryzyko powikłań
związanych z biopsją gruboigłową. Pacjenci otrzymujący leczenie przeciwzakrzepowe lub mający zaburzenia
krzepnięcia mogą być w grupie podwyższonego ryzyka.
Opis przyrządu
System do biopsji piersi Mammotome® elite firmy Devicor składa się z uchwytu i sondy. System Mammotome® elite może
być używany łącznie z obrazowaniem ultrasonograficznym, aby podczas pojedynczego wprowadzenia sondy wyciąć
i pobrać diagnostyczne próbki. Elementy systemu zostały opracowane z myślą o bezpiecznej eksploatacji podczas ich
jednoczesnego stosowania do diagnostycznego pobierania tkanek w trakcie zabiegu biopsji.
Uchwyt wielorazowego użytku, dostarczany niejałowy jest autonomicznym, ręcznym, elektromechanicznym przyrządem
do biopsji ze wspomaganiem podciśnieniowym, który składa się z akumulatora litowo-polimerowego i ładowarki z
sieciowym przewodem zasilającym oraz adapterami (patrz Rys. 1).
Sonda jednorazowego użytku, dostarczana jałowa obejmuje zewnętrzny trzonek trokara z otworem dystalnym
oraz przesuwający się wewnętrzny obcinak (patrz Rys. 2). Sonda zawiera także zintegrowaną kaniulę współosiową,
proksymalny pojemnik na pobrane próbki z dołączonym koszykiem na próbki tkanki oraz zatyczką (patrz Ilustracja 2).
Korpus sondy zawiera jeden języczek wyrównujący i dwa języczki blokujące do mocowania sondy w uchwycie.
Uchwyt wytwarza w przyrządzie podciśnienie, aby wspomóc pobieranie tkanki do otworu, natomiast zaostrzony obcinak
wewnętrzny obraca się z dużą prędkością i przesuwa przez otwór, aby pobrać docelową tkankę. Za pomocą podciśnienia
próbka tkanki jest transportowana do pojemnika na pobrane próbki. Zintegrowana kaniula współosiowa może być
po biopsji odłączona od sondy i pozostać w piersi, aby umożliwić śledzenie miejsca biopsji podczas umieszczania
identyfikatora miejsca biopsji. Uchwyt jest wyposażony w 3 opcje przycisku biopsji, aby dopasować się do różnych
pozycji rąk
(patrz Rys. 3).
WAŻNE: Identyfikatory miejsca biopsji 14 GA CorMARK™ mogą być użyte w połączeniu z systemem do biopsji piersi
Mammotome® elite w celu radiograficznego oznaczenia miejsca przeprowadzenia zabiegu biopsji. NIE STOSOWAĆ
ZNACZNIKÓW, KTÓRE NIE SĄ ZATWIERDZONE DO UŻYTKU Z SYSTEMEM DO BIOPSJI PIERSI Mammotome® ELITE.
74
Rysunek 1
Rysunek 2
Rysunek 3
Ostrzeżenia i środki ostrożności
• Minimalnie inwazyjne procedury powinny być wykonywane jedynie przez osoby odpowiednio przeszkolone i
zaznajomione z technikami małoinwazyjnymi. Przed wykonaniem minimalnie inwazyjnej procedury należy zapoznać
się z literaturą medyczną dotyczącą technik, powikłań i zagrożeń.
• Minimalnie inwazyjne instrumenty mogą się różnić średnicą w zależności od producenta. Gdy podczas zabiegu
stosowane są jednocześnie przyrządy i akcesoria pochodzące od różnych producentów, przed rozpoczęciem zabiegu
należy sprawdzić ich zgodność.
• Nie wyjaławiać przyrządu w autoklawie.
• Nie zanurzać przyrządu.
• Nie rozpylać płynów na uchwyt.
• Narzędzie może być stosowane jedynie przez lekarzy przeszkolonych w zakresie przezskórnych technik igłowych do
pobierania tkanek.
• Należy zachować szczególną ostrożność, aby nie dopuścić do zgniecenia lub skręcenia sondy.
75
• Jeżeli sonda jest zgięta, nie należy jej używać. Poddać sondę utylizacji w odpowiednim pojemniku.
• Sonda nie jest przeznaczona do nakłuwania przezskórnego.
• Podobnie jak w przypadku każdego narzędzia do biopsji, istnieje możliwość zakażenia.
• Niniejszego narzędzia nie należy stosować w połączeniu z obrazowaniem metodą rezonansu magnetycznego.
• Uchwyt może być stosowany jedynie z sondami do biopsji Mammotome® elite.
• Produkty produkowane lub rozprowadzane przez firmy niemające upoważnienia firmy Devicor® Medical Products,
Inc. mogą nie być zgodne z systemem Mammotome® elite. Stosowanie takich produktów może prowadzić do
nieoczekiwanych rezultatów i możliwych obrażeń użytkownika bądź pacjenta.
• Narzędzia lub przyrządy, które zetkną się z płynami ustrojowymi, mogą wymagać szczególnych metod utylizacji, aby
zapobiec skażeniu biologicznemu.
• Wszystkie otwarte narzędzia jednorazowe należy wyrzucić niezależnie od tego, czy były używane czy nie.
• Sonda jest pakowana i wyjaławiana wyłącznie do jednorazowego użytku. Nie używać ponownie, nie przetwarzać
ani nie sterylizować ponownie. Powtórne użycie, przygotowanie do ponownego użytku lub powtórne wyjałowienie
może naruszyć strukturę urządzenia i/lub prowadzić do jego uszkodzenia, co z kolei może stać się przyczyną obrażeń,
choroby lub zgonu pacjenta. Ponowne przygotowywanie lub wyjaławianie urządzeń do jednorazowego użytku
może także stwarzać ryzyko skażenia i/lub spowodować zakażenie pacjenta albo zakażenie krzyżowe, między innymi
przeniesienie choroby zakaźnej z jednego pacjenta na drugiego. Skażenie urządzenia może prowadzić do obrażeń,
choroby lub zgonu pacjenta.
Ilustracja 1. Ilustracja i nazewnictwo zespołu przyrządu
Przycisk prawy
3 opcje przycisku biopsji
Wskaźnik akumulatora
Wskaźnik błędu
Przycisk środkowy
Lewy przycisk
Głośnik
Środkowy wskaźnik biopsji
Języczek wyrównujący
Lewy i prawy wskaźnik biopsji
Ilustracja 2. Ilustracja i nazewnictwo sondy
Rękaw ochronny
Zintegrowana kaniula współosiowa
Przycisk zwalniania współosiowego
Lokalizator apertury
Wycięcie w uchwycie
Apertura igły
Pojemnik do pobierania próbki
Trzonek trokara
Koszyk tkanki
Pokrętło obracania igły
Występ
Korpus sondy
Występ
Zatyczka do pobierania próbki
Lewy i prawy języczek blokujący
Przycisk zwalniania koszyka tkanki
76
Wymagany sprzęt
• Odpowiednie metody obrazowania i akcesoria
• Uchwyt do biopsji Mammotome® elite
• Sonda do biopsji Mammotome® elite
• Rękawiczki i obłożenia chirurgiczne
• Znieczulenie miejscowe
• Skalpel
• W razie potrzeby inny sprzęt
Instrukcja użycia
WAŻNE: Przed użyciem sprawdzić wszystkie opakowania. Jeżeli opakowanie produktu jest uszkodzone lub produkt
zostanie upuszczony podczas wyjmowania z opakowania, należy zastosować następujący protokół:
• Uchwyt: Postępować zgodnie z procedurami Czyszczenie uchwytu i Dezynfekowanie uchwytu.
• Sonda: Wyrzucić, ponieważ nie jest już narzędziem jałowym.
Przed użyciem narzędzia zweryfikować zgodność wszystkich narzędzi i akcesoriów minimalnie inwazyjnych (patrz
Ostrzeżenia i środki ostrożności).
Pierwsze użycie
Uchwyt nie jest dostarczany z całkowicie naładowanym akumulatorem. Przed pierwszym użyciem akumulator uchwytu
musi zostać całkowicie naładowany. Wyczyścić i zdezynfekować uchwyt zgodnie z procedurami Czyszczenie uchwytu i
Dezynfekowanie uchwytu. Aby naładować akumulator, należy umieścić uchwyt w ładowarce. Uchwyt wskaże prawidłowe
umieszczenie sygnałem dźwiękowym. Po całkowitym naładowaniu uchwytu, co wskaże zielona lampka na wskaźniku
akumulatora, można go zdjąć z ładowarki i używać. Po zdjęciu uchwytu z ładowarki rozlegnie się sygnał dźwiękowy.
Pełne naładowanie akumulatora trwa około 200 minut.
WAŻNE: Przed pierwszym użyciem uchwyt MUSI BYĆ W PEŁNI NAŁADOWANY.
Ładowanie sondy
1.
osługując się techniką sterylną, wyjąć sondę z opakowania. Aby uniknąć uszkodzenia, nie wolno upuszczać
P
sondy na sterylne pole. Jeżeli sonda zetknie się z niesterylną powierzchnią, należy ją wyrzucić do odpowiedniego
pojemnika.
• Sonda jest zapakowana z ochronną koszulką na trzonku trokara. Zaleca się, aby koszulka ochronna
pozostawała na trzonku trokara do czasu, aż sonda będzie gotowa do wprowadzenia do miejsca
przezskórnego. Podczas zdejmowania koszulki należy zachować ostrożność, aby uniknąć zranienia.
2.
hwycić korpus sondy i dopasować języczek wyrównujący do wycięcia w uchwycie. Rozpocząć wpychanie
C
podstawy sondy do komory uchwytu, dopasowując języczek wyrównujący uchwytu do wycięcia uchwytu na
korpusie sondy (patrz Ilustracja 3, punkt 1).
3.
chnąć mocno korpus sondy do uchwytu aż będzie słyszalne kliknięcie wskazujące na zaczepienie języczków
P
blokujących uchwytu (patrz Ilustracja 3, punkt 2).
Ilustracja 3
77
PRZESTROGA: Aby uniknąć przytrzaśnięcia palców w momencie ładowania sondy do uchwytu, należy chwycić uchwyt
po stronie powyżej logo i obok języczków blokujących sondy.
4.
Jeżeli sonda została prawidłowo włożona, uchwyt automatycznie włączy się i rozpocznie sekwencję inicjalizacyjną.
Podczas inicjalizacji słyszalny jest silnik, a lampka wskaźnika biopsji świeci na pomarańczowo. Po pomyślnym
zakończeniu inicjalizacji uchwyt emituje 2 sygnały dźwiękowe i lampka wskaźnika aktywnej biopsji świeci na zielono
wskazując, że system jest gotowy do pobrania próbki.
• Jeżeli sonda jest włożona do uchwytu nieprawidłowo, sekwencja inicjalizacyjna NIE rozpocznie się.
• Jeżeli system nie jest gotowy do pobierania próbek, uchwyt wyemituje 3 sygnały dźwiękowe i lampka
wskaźnika błędu będzie świecić na bursztynowo. Działania korygujące, patrz Rozwiązywanie problemów.
PRZESTROGA: Poruszające się części. Upewnić się, że w tym momencie nic nie blokuje otworu igły.
• Jeżeli po załadowaniu sondy uchwyt zostanie zostawiony w bezruchu na 30 sekund, przejdzie w tryb uśpienia, aby
oszczędzać akumulator. W trybie uśpienia wskaźniki biopsji i akumulatora są wyłączane, a przyciski nieaktywne. Po
poruszeniu uchwytu przyrząd budzi się z trybu uśpienia. Jeżeli sonda nie jest podłączona, uchwyt pozostanie w trybie
uśpienia.
Przycisk wyboru biopsji
Po dostarczeniu urządzenia wstępnie wybrany jest środkowy przycisk biopsji. Po włączeniu urządzenia aktywny pozostaje
tylko jeden przycisk biopsji. Aktywny przycisk biopsji jest zaznaczony zieloną lampką wskaźnika biopsji. Aby zmienić
żądany aktywny przycisk biopsji, należy upewnić się, że sonda jest włożona i przytrzymać jednocześnie dwa nieaktywne
przyciski biopsji przez 3 sekundy (patrz Ilustracja 4, punkt 1). Będzie słyszalny sygnał dźwiękowy i wszystkie 3 lampki
wskaźników biopsji będą migać na zielono (patrz Ilustracja 4, punkt 2). Następnie użytkownik może nacisnąć i zwolnić
żądany aktywny przycisk biopsji (patrz Ilustracja 4, punkt 3). Wybór aktywnego przycisku biopsji jest przez przyrząd
zapamiętywany na przyszłość.
Ilustracja 4
Aktywny lewy
Aktywny środkowy
Aktywny prawy
Środkowy przycisk biopsji
Lewy przycisk biopsji
Prawy przycisk biopsji
Procedury pobierania próbek tkanki
1.
Przed włożeniem sondy przygotować miejsce przezskórne zgodnie ze standardową techniką chirurgiczną.
2.
Naciąć odpowiednio wybrany obszar tak, aby zmieścił trzonek trokara.
3.
Zdjąć koszulkę ochronną z sondy.
• Jeżeli wymagane jest dodatkowe ułatwienie wprowadzania, można zdjąć zintegrowaną kaniulę współosiową.
Jeżeli zostanie zdjęta, należy ją odpowiednio zutylizować. Zaleca się, aby w celu ograniczenia możliwości
urazu zintegrowana kaniula współosiowa nie była ponownie mocowana do sondy.
78
4.
W razie potrzeby przed wprowadzeniem sondy do nacięcia użyć pokrętła obrotu igły w celu dostosowania
położenia otworu igły. Aby obracać, należy wysunąć pokrętło obrotu igły (patrz Ilustracja 5, punkt 1). Obrócić w
żądaną pozycję zegara (patrz Ilustracja 5, punkt 2) i zwolnić (patrz Ilustracja 5, punkt 3). Lokalizator otworu wskazuje
na położenie otworu.
Ilustracja 5
5.
Wprowadzić sondę przez nacięcie i umieścić końcówkę sondy w obszarze docelowym tak, aby końcówka znalazła
się za zmianą chorobową. W razie potrzeby można użyć kierowania obrazowego.
6.
Nacisnąć aktywny przycisk biopsji na uchwycie, aby pobrać próbkę tkanki. Cykl biopsji jest wykonywany
automatycznie. Tworzone jest podciśnienie, wewnętrzna kaniula obcinaka sondy jest cofana, tkanka jest pobierana
do otworu igły, a obcinak obraca się i przesuwa do przodu, odcinając tkankę. Gdy obcinak osiągnie dystalny koniec
otworu igły, przestanie przesuwać się i wykorzysta podciśnienie do transportu próbki do pojemnika na pobrane
próbki. Podczas procesu pobierania próbki i zbierania tkanki lampka wskaźnika biopsji będzie stale świecić na
pomarańczowo i będzie słychać silnik. Pod koniec cyklu biopsji podciśnienie wyłączy się, a lampka wskaźnika
biopsji zaświeci na zielono.
• Do czasu osiągnięcia miejsca docelowego należy trzymać palce z dala od aktywnego przycisku biopsji.
• Podczas pobierania tkanki nie wolno wyjmować pojemnika do pobierania próbki.
• Cykl biopsji można przerwać, aby uniknąć niepotrzebnych obrażeń lub wykonać wizualizację położenia
otworu dzięki obrazowaniu (ultrasonogram).
• Aby rozpocząć cykl biopsji, aktywny przycisk biopsji należy nacisnąć tylko jeden raz. Aby przerwać cykl
biopsji, należy ponownie nacisnąć aktywny przycisk biopsji, gdy obcinak jest wycofywany z pozycji 1 do 3
(patrz Ilustracja 6) lub jest przesuwany z pozycji 3 do 2. Po przerwaniu cyklu biopsji obcinak jest wycofywany
do pozycji 3. Dioda wskaźnika biopsji miga na pomarańczowo. Aby zakończyć cykl biopsji, należy nacisnąć
przycisk biopsji.
Ilustracja 6
PRZESTROGA: Po włożeniu sondy do tkanki i rozpoczęciu cyklu biopsji NIE ZMIENIAĆ POŁOŻENIA IGŁY do czasu
zakończenia cyklu pobierania próbki.
7.
Obrócić otwór obracając uchwyt i sondę w celu pobrania kolejnej próbki i w razie potrzeby powtórzyć punkt 6, aby
uzyskać próbki dodatkowe.
• Aby uniknąć zgięcia igły, podczas umieszczania w piersi nie należy stosować nadmiernego nacisku.
• W razie potrzeby zweryfikować pobranie żądanej próbki, stosując obrazowanie po wykonaniu biopsji.
8.
W przypadku procedury BEZ użycia identyfikatora miejsca biopsji, po uzyskaniu ostatecznej próbki tkanki należy
usunąć przyrząd i odpowiednio zabezpieczyć miejsce nacięcia. Przejść do punktu 10.
9.
W przypadku procedury Z użyciem identyfikatora miejsca biopsji, po uzyskaniu ostatniej próbki tkanki należy
odłączyć zintegrowaną kaniulę współosiową i wyjąć sondę, pozostawiając kaniulę na miejscu przez naciśnięcie
przycisku zwalniania współosiowego (patrz Ilustracja 7) w celu ułatwienia umieszczenia znacznika w jamie biopsji.
79
Ilustracja 7
a.
Stosując standardową technikę chirurgiczną, umieścić CorMARK™ 14 GA przez kaniulę współosiową, aż
rękojeść zatrzyma się na przycisku zwalniania współosiowego.
b.
Gdy CorMARK™ 14 GA osiągnie pełną głębokość śladu igły kaniuli współosiowej, należy umieścić znacznik.
c.
Użyć obrazowania do zweryfikowania osiągnięcia przez znacznik żądanego położenia.
d.
Wyjąć i zutylizować kaniulę współosiową oraz odpowiednio zabezpieczyć miejsce nacięcia.
WAŻNE: W celu stosowania CorMARK™ należy zapoznać się z instrukcją producenta.
10. Aby zapewnić oczyszczenie igły po jej wyjęciu z piersi, nacisnąć przycisk biopsji w celu aktywowania cyklu
testowego.
11. Obrócić zatyczkę pojemnika na próbki o jedną czwartą w kierunku przeciwnym do ruchu wskazówek zegara (patrz
Ilustracja 8, punkt 1). Zdjąć jednocześnie zatyczkę i koszyk na tkanki (patrz Ilustracja 8, punkt 2). Nacisnąć przycisk
zwalniania koszyka na tkanki w celu wyjęcia koszyka na tkanki z pojemnika na pobrane próbki , aby łatwiej ocenić
patologię próbki (patrz Ilustracja 8, punkt 3).
Ilustracja 8
12. W razie potrzeby do ułatwienia wyjmowania próbek z koszyka tkanki można użyć jałowych kleszczyków.
13. Założyć ponownie zatyczkę na pojemnik do pobierania próbek w celu utylizacji sondy. W celu wymiany obrócić
zatyczkę na pojemniku do pobierania próbek o jedną czwartą w kierunku zgodnym z ruchem wskazówek zegara,
włożyć do pojemnika do pobierania próbki (patrz Ilustracja 9, punkt 1) i obrócić o jedną czwartą w kierunku
przeciwnym do ruchu wskazówek zegara (patrz Ilustracja 9, punkt 2). Symbol blokady powinien znajdować się w
położeniu godziny 12. Jeżeli zaistnieje potrzeba, założyć nowy koszyk na tkanki i zatyczkę w celu dalszego pobierania
próbek (patrz Ilustracja 9).
Ilustracja 9
PRZESTROGA: Sonda jest przeznaczona WYŁĄCZNIE DO JEDNORAZOWEGO UŻYTKU. Sondę należy wyrzucić
natychmiast po użyciu.
80
Wyjmowanie sondy z uchwytu
Naciskając języczek blokujący sondy wyciągnąć sondę z komory uchwytu (patrz Ilustracja 10). Wyrzucić sondę do
odpowiedniego pojemnika.
Ilustracja 10
PRZESTROGA: Sonda jest przeznaczona WYŁĄCZNIE DO JEDNORAZOWEGO UŻYTKU. Sondę należy wyrzucić
natychmiast po użyciu.
PRZESTROGA: Nie nakładać ponownie końcówki sondy.
Czyszczenie uchwytu
Po każdym użyciu dokładnie oczyścić uchwyt, używając detergentu enzymatycznego o obojętnym pH. Przeprowadzić
czyszczenie ręczne, wykorzystując detergent enzymatyczny:
1.
Przygotować detergent o obojętnym pH lub detergent enzymatyczny o obojętnym pH zgodnie ze wskazówkami
producenta.
2.
Użyć miękkiej, czystej ściereczki lekko zwilżonej w roztworze czyszczącym do ręcznego wyczyszczenia wszystkich
powierzchni. Dodatkowo, aby oczyścić obszary zawierające szpary należy użyć standardowej miękkiej szczoteczki
do zębów.
3.
Dokładnie spłukać używając miękkiej, czystej ściereczki lekko zwilżonej w letniej (27–44°C) bieżącej wodzie.
4.
Osuszyć czystą, miękką ściereczką.
5.
Skontrolować urządzenie pod kątem widocznych zanieczyszczeń. Jeżeli występują zanieczyszczenia, powtarzać
punkty 1–5, aż widoczne zanieczyszczenia zostaną usunięte.
PRZESTROGA: Nie podejmować prób wyjaławiania uchwytu za pomocą wyjaławiania w autoklawie,
napromieniowania lub wyjaławiania plazmowego; nie rozpylać płynów i nie zanurzać w płynach, może to spowodować
uszkodzenie narzędzia. Nieprawidłowe czyszczenie uchwytu powoduje utratę gwarancji.
Dezynfekowanie uchwytu
Po procedurze czyszczenia należy przeprowadzić proces dezynfekcji. Do dezynfekcji uchwytu zatwierdzono następujące
chemiczne środki dezynfekujące:
• 10% roztwór wybielacza (1 część wybielacza na 9 części wody oczyszczonej lub dejonizowanej)
Środki dezynfekujące należy przygotowywać i stosować zgodnie z zaleceniami producenta dotyczącymi stosowania,
stężeń i czasu kontaktu. Stosowanie środków dezynfekujących innych niż wymienione w niniejszej instrukcji należy
przed użyciem ocenić pod kątem równoważności. Arkusze danych technicznych ułatwiające tę ocenę są zazwyczaj
dostępne na stronach internetowych producentów. Każdy proces dezynfekcji, w tym narzędzia i roztwory, może wpłynąć
na zużycie przyrządów i sprzętu.
1.
Namoczyć czystą ściereczkę i miękką szczoteczkę do zębów w roztworze dezynfekującym. Dokładnie wycisnąć
ściereczkę w celu usunięcia nadmiaru roztworu. Postukać szczoteczkę do zębów w celu usunięcia nadmiaru
roztworu.
2.
Dokładnie wytrzeć uchwyt upewniając się, że powierzchnia jest lekko zwilżona przez 5 minut.
3.
Dokładnie potrzeć obszary zawierające szpary standardową miękką szczoteczką do zębów upewniając się, że
powierzchnia jest lekko zwilżona przez 5 minut.
4.
Do usunięcia środka dezynfekującego z przyrządu należy użyć jałowej gazy lub czystej, miękkiej ściereczki
zwilżonej w wodzie oczyszczonej. Powtarzać punkt 4 w celu dokładnego usunięcia pozostałości.
81
5.
Do usunięcia środka dezynfekującego ze szpar przyrządu należy użyć czystej,
miękkiej standardowej szczoteczki do zębów zwilżonej wodą oczyszczoną.
Powtarzać punkt 6 w celu dokładnego usunięcia pozostałości.
6.
Osuszyć uchwyt czystą, miękką ściereczką i upewnić się, że ściereczka została wprowadzona do szpar przyrządu.
W ramach stosowanego procesu odkażania upewnić się, że pozostałości detergentu i środka dezynfekującego zostały
skutecznie usunięte. Do końcowego zmywania, jeżeli zaistnieje taka potrzeba należy stosować wodę oczyszczoną lub
dejonizowaną (może być wymagane kilkakrotne zmywanie). Należy zapoznać się z zaleceniami producenta dotyczącymi
usuwania pozostałości środka dezynfekującego.
PRZESTROGA: Nie podejmować prób wyjaławiania uchwytu za pomocą wyjaławiania w autoklawie, napromieniowania
lub wyjaławiania plazmowego; nie rozpylać płynów i nie zanurzać w płynach, może to spowodować uszkodzenie
narzędzia. Nieprawidłowe dezynfekowanie uchwytu powoduje utratę gwarancji.
Ładowanie uchwytu
Przed pierwszym użyciem uchwyt należy całkowicie naładować. Uchwyt wykorzystuje akumulator litowo-polimerowy.
Pełne naładowanie akumulatora trwa około 200 minut. Przed pierwszym i każdym kolejnym użyciem uchwytu do
procedury akumulator musi być odpowiednio naładowany. Podczas ładowania na ładowarce, po całkowitym naładowaniu
akumulatora lampka wskaźnika akumulatora świeci na zielono. Jeżeli akumulator nie jest wystarczająco naładowany,
lampka wskaźnika akumulatora będzie migać na zielono lub żółto, wskazując obniżony poziom naładowania akumulatora.
Aby naładować uchwyt:
1.
Upewnić się, że do adaptera zasilania sieciowego podłączona jest odpowiednia wtyczka adaptera.
2.
Podłączyć przewód adaptera zasilania sieciowego do ładowarki.
3.
Podłączyć adapter zasilania sieciowego do gniazdka ściennego.
4.
Po czyszczeniu i dezynfekcji umieścić uchwyt na ładowarce. Po prawidłowym umieszczeniu na ładowarce uchwyt
wyemituje dwutonowy sygnał wskazujący prawidłowe umieszczenie na bazie. Jeżeli świeci żółta lampka, pełne
naładowanie akumulatora potrwa około 200 minut.
5.
Gdy przyrząd znajduje się na ładowarce, lampka wskaźnika akumulatora będzie migać na żółto lub zielono,
wskazując ładowanie oraz poziom naładowania. Uchwyt jest prawidłowo naładowany, gdy lampka wskaźnika
akumulatora świeci na zielono. Po zdjęciu z ładowarki uchwyt wyemituje dwutonowy sygnał.
• Po każdym użyciu lub gdy nie jest używany, uchwyt powinien pozostać na ładowarce w celu utrzymania akumulatora w
stanie pełnego naładowania. Obwód bezpieczeństwa zapobiega przeładowaniu akumulatora.
• Zawsze, gdy uchwyt jest nieruchomy przez 30 sekund z zamocowaną sondą lub bez, lampka wskaźnika akumulatora
wyłączy się. Po poruszeniu uchwytu lampka wskaźnika akumulatora zaświeci się, wskazując bieżący stan naładowania.
• Zawsze, gdy uchwyt jest nieruchomy przez 1 godzinę lub nie ma zamocowanej sondy, uchwyt przejdzie w stan
głębokiego uśpienia. Umieścić uchwyt na ładowarce bez sondy i zdjąć go z niej w celu ponownego włączenia.
• Podczas procedury biopsji lampka wskaźnika akumulatora będzie świecić na zielono. Jeżeli lampka wskaźnika
akumulatora miga na zielono, uchwyt ma wystarczający poziom akumulatora do zakończenia jednej procedury. Jeżeli
lampka wskaźnika akumulatora świeci na żółto, uchwyt nie będzie działał i niezwłocznie musi być umieszczony na
ładowarce.
WAŻNE: Jeżeli lampka wskaźnika akumulatora wyłączy się, gdy wcześniej świeciła na żółto, uchwytu nie można
naładować. Należy skontaktować się z Centrum Obsługi Klienta lub przedstawicielem firmy MAMMOTOME.
Rozwiązywanie problemów
1.
Lampka wskaźnika błędu świeci na bursztynowo:
Uchwyt podczas pracy okresowo przeprowadza kontrolę systemów. W przypadku wykrycia błędu lampka wskaźnika
błędu będzie świecić na bursztynowo. Jeżeli tak się stanie, upewnić się że sonda jest poza ciałem pacjenta, wyjąć
sondę z uchwytu i założyć nową sondę. Jeżeli lampka wskaźnika błędu nie gaśnie, skontaktować się z Centrum
Obsługi Klienta lub przedstawicielem firmy MAMMOTOME.
2.
Po załadowaniu sondy do uchwytu nie zapalają się lampki wskaźnika akumulatora i biopsji:
Sprawdzić wskaźnik akumulatora, aby upewnić się, że jest wystarczająco naładowany. Sprawdzić, czy języczki
wyrównujące i blokujące są na swoim miejscu. Sprawdzić, czy jest to wstępne użycie sondy. Jeżeli te warunki są
spełnione i lampki nadal nie zapalają się, wymienić sondę na nową. Jeżeli lampki wskaźników nie zapalają się
po poprawnym włożeniu nowej sondy, skontaktować się z Centrum Obsługi Klienta lub przedstawicielem firmy
MAMMOTOME.
3.
Uchwyt nie ładuje się po umieszczeniu na ładowarce:
82
Sprawdzić, czy przewód zasilania sieciowego jest prawidłowo włożony do ładowarki i gniazdka ściennego.
Sprawdzić, czy nic nie blokuje styków ładowania na ładowarce lub uchwycie, a następnie umieścić uchwyt na
ładowarce. Sprawdzić, czy uchwyt emituje sygnały dźwiękowe i czy miga lampka wskaźnika akumulatora. Jeżeli
brak sygnału dźwiękowego lub lampka nie miga, wymienić ładowarkę i przewód zasilania sieciowego, kontaktując
się z Centrum Obsługi Klienta lub przedstawicielem firmy MAMMOTOME.
Dane techniczne uchwytu
Zgodność elektryczna
Niniejszy sprzęt medyczny przeszedł wszystkie wymagane testy zagrożeń porażenia prądem
elektrycznym, pożaru oraz zagrożeń mechanicznych zgodnie z normami UL 60601-1, IEC/EN
60601-1, CAN/CSA C22.2 No 601-1
Wnikanie cieczy
Niezabezpieczone przed wnikaniem cieczy
Łatwopalność
Sprzęt nie nadaje się do użytku w obecności łatwopalnych środków znieczulających
Wymiary
Długość: 18,9 cm
Szerokość: 5,0 cm
Wysokość: 3,8 cm
Przewód zasilania sieciowego i
adaptery
Stosować wyłącznie z dostarczonymi akcesoriami zasilania sieciowego:
• Model: FRM015-S09-1 nr kat. TRM15-S10-I-351359
• Napięcie wejściowe: 100-240 V prądu zmiennego
• Natężenie prądu wejściowego: 0,7–0,4 A
• Częstotliwość wejściowa: 50–60 Hz
• Napięcie wyjściowe: 10 V prądu stałego
• Natężenie prądu wyjściowego: 1,5 A
• Moc maksymalna: 15 W
Dane techniczne systemu
Klasyfikacja
Klasa II, zasilany wewnętrznie sprzęt typu BF
Warunki środowiskowe
Transport i przechowywanie:
• od -35 °C do +54 °C (od -31 °F do 129 °F)
• od 10% do 95% wilgotności względnej, bez kondensacji
• Ciśnienie atmosferyczne od 500 do 1060 hPa
Eksploatacja:
• od +5 C do +40 °C (od 41 °F do 104 °F)
Tryb działania
Praca ciągła
Wskazówki dotyczące zgodności elektromagnetycznej (EMC), wytyczne
i oświadczenia producenta
System do biopsji Mammotome® elite wymaga szczególnych środków ostrożności dotyczących zgodności
elektromagnetycznej (EMC) i musi być instalowany oraz stosowany zgodnie z informacjami EMC dostarczonymi w
niniejszym przewodniku instalacji. System do biopsji Mammotome® elite jest przeznaczony do stosowania w środowisku
elektromagnetycznym o parametrach określonych poniżej. Nabywca lub użytkownik systemu do biopsji Mammotome®
elite powinien dopilnować, aby podane warunki były przestrzegane.
83
Wytyczne i oświadczenie producenta — promieniowanie elektromagnetyczne
System do biopsji Mammotome® elite jest przeznaczony do stosowania w środowisku elektromagnetycznym o parametrach określonych
poniżej. Nabywca lub użytkownik systemu do biopsji Mammotome® elite powinien dopilnować, aby podane warunki były przestrzegane.
Test emisji
Środowisko
Wytyczne
Emisja RF CISPR 11
Grupa 1
System do biopsji Mammotome® elite wykorzystuje energię radiową
wyłącznie do funkcji wewnętrznych. Z tego względu moc emitowanych
fal o częstotliwościach radiowych jest bardzo niska i fale takie nie
powinny powodować żadnych zakłóceń w znajdującym się w pobliżu
sprzęcie elektronicznym.
Emisja RF CISPR 11
Klasa A
Emisje harmoniczne zgodne z
normą IEC 61000-3-2
Nie dotyczy
Fluktuacje napięcia/emisje
migotania zgodne
z normą IEC 61000-3-3
Nie dotyczy
System do biopsji Mammotome® elite nadaje się do użytku we
wszystkich typach obiektów z wyjątkiem domów oraz takich obiektów,
które są bezpośrednio podłączone do publicznej, sieci elektrycznej
niskiego napięcia, zasilającej budynki mieszkalne.
Wytyczne i oświadczenie producenta — odporność elektromagnetyczna
System do biopsji Mammotome® elite jest przeznaczony do stosowania w środowisku elektromagnetycznym o parametrach określonych
poniżej. Nabywca lub użytkownik systemu do biopsji Mammotome® elite powinien dopilnować, aby podane warunki były przestrzegane.
Test odporności
Poziom testu
IEC 60601
Poziom
zgodności
Środowisko elektromagnetyczne — wytyczne
Wyładowanie
elektrostatyczne
zgodnie z normą
IEC 61000-4-2
± 6 kV
kontaktowe
± 6 kV
kontaktowe
± 8 kV
powietrzne
± 8 kV
powietrzne
Podłogi powinny być drewniane, betonowe lub pokryte płytkami ceramicznymi.
Jeżeli podłoga jest pokryta materiałem syntetycznym, wilgotność względna
powinna wynosić co najmniej 30%
Przenośne urządzenia komunikacji radiowej nie powinny być używane w
pobliżu jakiegokolwiek elementu systemu do biopsji Mammotome® elite, w tym
przewodów, w odległości mniejszej niż minimalny zalecany odstęp wyliczony na
podstawie równania odpowiedniego do częstotliwości nadajnika.
Zaburzenia
przewodzone,
indukowane
przez pola o
częstotliwości
radiowej zgodnie
z normą IEC
61000-4-6
3 Vrms
Emitowane
promieniowanie o
częstotliwościach
radiowych
3 V/m
IEC 61000-4-3
Od 80 MHz
do 2,5 GHz
3 V
od 150 kHz
do 80 MHz
Zalecany odstęp
d = [1,17]√P
d = [1.17]√P od 80 MHz do 800 MHz
d = [2,33]√P od 800 MHz do 2,5 GHz
Gdzie P jest maksymalną znamionową mocą wyjściową nadajnika w watach (W)
według producenta nadajnika, a d jest zalecanym odstępem w metrach (m).
3 V/m
Natężenia pola ze stałych nadajników RF określone przez badanie
elektromagnetyczne miejscaa powinno być w każdym zakresie częstotliwości
mniejsze niż poziom zgodnościb.
Zakłócenia mogą występować w pobliżu urządzeń oznaczonych następującym
symbolem:
Uwaga 1 W przypadku częstotliwości 80 MHz i 800 MHz ma zastosowanie wyższy zakres częstotliwości.
Uwaga 2 Niniejsze zalecenia mogą nie mieć zastosowania we wszystkich sytuacjach. Na propagację elektromagnetyczną wpływa
pochłanianie i odbijanie od budynków, obiektów i osób.
Nie można precyzyjnie przewidzieć w sposób teoretyczny natężenia pól pochodzących od nadajników stacjonarnych, takich jak stacje
bazowe telefonów radiowych (komórkowych/bezprzewodowych), radia przenośne, radiostacje amatorskie, radiostacje krótkofalowe i
FM, a także pochodzących od stacji telewizyjnych. W celu określenia stanu środowiska elektromagnetycznego wynikającego z działania
stacjonarnych nadajników o częstotliwości radiowej należy przeprowadzić pomiary w terenie. Jeśli zmierzone natężenie pola w miejscu
eksploatacji systemu do biopsji Mammotome® elite przekracza powyższe poziomy zgodności, należy sprawdzić, czy system do biopsji
Mammotome® elite działa poprawnie. Jeśli zaobserwowane zostanie nieprawidłowe działanie, należy rozważyć dodatkowe czynności, takie
jak zmiana ustawienia lub lokalizacji systemu do biopsji Mammotome® elite.
a
b
Powyżej zakresu częstotliwości od 150 kHz do 80 MHz natężenia pola powinny być niższe niż 3 V/m.
84
Dział obsługi klienta
Dodatkowe informacje na temat systemu do biopsji piersi Mammotome® elite można uzyskać dzwoniąc pod numer1877-9-A-MAMMO (1-877-926-2666)
(tylko USA; w UE należy dzwonić pod numer 800 918 200 lub 0 800 500 98 98); wysyłając e-mail na adres
[email protected] lub odwiedzając naszą stronę internetową pod adresem www.mammotome.com.
Informacje na temat utylizacji i recyklingu
Uchwyt Mammotome® elite zawiera stały akumulator litowo-polimerowy. Nie należy podejmować prób wyjęcia
akumulatora. Nie utylizować uchwytu ani akumulatora litowo-polimerowego w ogniu. Utylizować uchwyt i akumulator
litowo-polimerowy zgodnie z prawem i przepisami danego kraju lub skontaktować się z firmą MAMMOTOME w
celu uzyskania informacji na temat możliwości recyklingu. Poza terytorium USA w celu utylizacji uchwytu należy
skontaktować się z Działem Obsługi Klienta.
PRZESTROGA: Nieprawidłowa obsługa akumulatora litowo-polimerowego grozi pożarem lub oparzeniami
chemicznymi. Nie demontować, nie miażdżyć ani nie przebijać akumulatora litowo-polimerowego. Nie ogrzewać
akumulatora litowo-polimerowego powyżej temperatury 60 °C (140 °F).
Sposób dostarczania
• Uchwyt Mammotome® elite jest dostarczany niejałowy.
• Sondy Mammotome® elite są dostarczane jałowe w celu stosowania u jednego pacjenta i sprzedawane oddzielnie.
Wyrzucić po wykorzystaniu.
Gwarancja
Firma Devicor® Medical Products, Inc. gwarantuje, że w warunkach normalnego użytkowania niniejszy produkt jest
wolny od wad materiałowych i wykonania przez odpowiedni okres gwarancji podany niżej.
Obowiązki firmy Devicor® Medical Products, Inc. w ramach niniejszej gwarancji ograniczają się według jej uznania do
wymiany dowolnego produktu lub jego części, które zostały zwrócone do firmy Devicor® Medical Products, Inc. bądź jej
dystrybutora w stosownym czasie podanym niżej i gdy po ich zbadaniu firma Devicor® Medical Products, Inc. uznała je
za wadliwe. Niniejsza gwarancja nie dotyczy żadnych produktów lub ich części, które zostały: (1) uszkodzone wskutek
stosowania urządzeń wytwarzanych lub rozprowadzanych przez firmy nieupoważnione przez firmę Devicor® Medical
Products, Inc., (2) naprawiane lub modyfikowane poza fabryką firmy Devicor® Medical Products, Inc. w taki sposób, że
według oceny firmy Devicor® Medical Products, Inc. wpływa to na ich stabilność lub niezawodność, (3) nieprawidłowo
użytkowane, uległy zaniedbaniu lub wypadkowi lub (4) stosowane w sposób niezgodny z przeznaczeniem i parametrami
użytkowania, instrukcjami i wytycznymi dla produktu lub powszechnie przyjętymi w branży normami funkcjonalnymi,
eksploatacyjnymi bądź środowiskowymi dla podobnych produktów. Produkty firmy Devicor® Medical Products, Inc. mają
gwarancję na następujący okres od momentu dostawy do pierwotnego nabywcy:
Uchwyt Mammotome® elite sześć (6) miesięcy, wymiana
Ładowarka z akcesoriami sieciowymi, sześć (6) miesięcy, wymiana
JEŚLI NIE JEST ZASTĄPIONA PRZEZ OBOWIĄZUJĄCE PRAWO LOKALNE, NINIEJSZA GWARANCJA ZASTĘPUJE WSZYSTKIE
INNE GWARANCJE, WYRAŻONE LUB DOMNIEMANE, ŁĄCZNIE Z GWARANCJAMI DOTYCZĄCYMI PRZYDATNOŚCI
HANDLOWEJ I PRZYDATNOŚCI DO OKREŚLONEGO CELU ORAZ WSZYSTKIMI INNYMI
OBOWIĄZKAMI LUB ZOBOWIĄZANIAMI ZE STRONY FIRMY DEVICOR® MEDICAL PRODUCTS, INC. I JEST WYŁĄCZNĄ
REKOMPENSATĄ NABYWCY. FIRMA DEVICOR® MEDICAL PRODUCTS, INC. W ŻADNYM WYPADKU NIE BĘDZIE
ODPOWIEDZIALNA ZA ŻADNE SZKODY SZCZEGÓLNE, PRZYPADKOWE I NASTĘPCZE, WŁĄCZAJĄC W TO BEZ OGRANICZEŃ
SZKODY WYNIKAJĄCE Z UTRATY MOŻLIWOŚCI KORZYSTANIA, ZYSKÓW, DZIAŁALNOŚCI GOSPODARCZEJ LUB DOBREJ
WOLI INNEJ NIŻ WYRAŹNIE OKREŚLONA PRZEZ STOSOWNE PRAWO.
Firma Devicor® Medical Products, Inc. nie przyjmuje ani nie upoważnia żadnych innych osób do przyjmowania za nią
wszelkich innych odpowiedzialności powiązanych ze sprzedażą lub używaniem dowolnego produktu firmy Devicor®
Medical Products, Inc. Nie ma żadnych gwarancji, które wykraczałyby poza wymienione tu warunki. Firma Devicor®
Medical Products, Inc. zastrzega sobie prawo do dokonywania zmian w produkcie przez nią wyprodukowanym i
sprzedawanym bez przyjmowania na siebie zobowiązania do wprowadzenia takich samych lub podobnych poprawek do
produktów wcześniej przez nią wyprodukowanych i sprzedanych.
PRZESTROGA: Prawo federalne (USA) zezwala na sprzedaż urządzenia tylko przez lekarza lub na jego zlecenie.
W sprawie szczegółów dotyczących możliwości wymiany należy skonsultować się z przedstawicielem handlowym firmy
MAMMOTOME.
85
This page is intentionally blank.
86
Holster
Type BF Applied Parts
Pièces appliquées de type BF
Typ BF-Anwendungsteile
Parti applicate di tipo BF
Partes aplicadas tipo BF
Type BF toegepaste onderdelen.
Części klasy BF stykające się z pacjentem
Separate Collection For Electrical and Electronic Equipment. Follow decontamination
instructions before returning to waste.
Ramassage séparé pour les équipements électriques et électroniques. Suivre les
instructions de décontamination avant de mettre au rebut.
Gesonderte Entsorgung von elektrischen und elektronischen Geräten. Vor der Entsorgung
über den Müll Dekontaminationsanweisungen befolgen.
Raccolta differenziata per apparecchiature elettriche e elettroniche. Seguire le istruzioni di
decontaminazione prima di smaltirlo nei rifiuti.
Recogida separada de equipos eléctricos y electrónicos Siga las instrucciones de
descontaminación antes de desechar el producto.
Elektrische en elektronische apparatuur moet apart worden opgehaald. Volg de
ontsmettingsinstructies voordat u het product afvoert bij het afval.
Selektywna zbiórka sprzętu elektrycznego i elektronicznego. Przed wyrzuceniem do
odpadów należy postępować zgodnie z instrukcjami odkażania.
Temperature Limitations
Températures
Zulässiger Temperaturbereich
Limitazioni di temperatura
Limitaciones de temperatura
Temperatuurlimieten
Ograniczenia temperatury
Relative Humidity Limitations
Humidité relative
Zulässige relative Luftfeuchtigkeit
Limitazioni Umidità relativa
Limitaciones de la humedad relativa
Beperkingen relatieve vochtigheid:
Ograniczenia dotyczące wilgotności względnej
Atmospheric Pressure Limitations
Pression atmosphérique
Zulässiger Luftdruck
Limitazioni Pressione atmosferica
Limitaciones de la presión atmosférica
Beperkingen atmosferische druk
Ograniczenia dotyczące ciśnienia atmosferycznego
Battery
Pile
Akku
Batteria
Batería
Batterij
Akumulator
!
Fault Indicator
Voyant d’erreur
Fehleranzeige
Indicatore di guasto
LED de fallo
Foutindicator
Wskaźnik błędu
87
1:1 Scale Artwork
Biopsy
Biopsie
Biopsie
Biopsia
Biopsia
Biopsie
Biopsja
* Note:
Serial Number
Numéro de série
Seriennummer
Numero di serie
Número de serie
Serienummer
Numer seryjny
- Icon can only be scaled proportionally.
- Colors can vary but limited to approved colors per part drawing.
- Function title text maybe used along with artwork.
- Icon can be mirrored / flipped horizontally depending on what side
it is being applied to.
- Final configuration must be approved by marketing.
* Vector-based artwork is supplied as an electronic 1:1 file. Do NOT use other reproductions as camera ready/production artwork.
TITLE
Artwork, Sample Function
ARTWORK NO.
AW-000055
SCALE
DATE
1:1
06.02.2011
DRAWN BY
E. Tanghal
Class II Equipment
Équipement de classe II
Gerät der Schutzklasse II
Apparecchiatura di Classe II
Equipo de clase II
Klasse II apparatuur
Sprzęt klasy II
A Division of
PROPRIETARY AND CONFIDENTIAL
THE INFORMATION CONTAINED IN THIS DRAWING
IS THE SOLE PROPERTY OF MAMMOTOME. ANY
REPRODUCTION IN PART OR AS A WHOLE
WITHOUT THE WRITTEN PERMISSION OF
MAMMOTOME IS PROHIBITED.
TÜV Rheinland certified
Certifié TÜV Rheinland
TÜV Rheinland zertifiziert
Certificazione TÜV Rheinland
Certificación de TÜV Rheinland
TÜV Rheinland gecertificeerd
Certyfikat TÜV Rheinland
TÜV Rheinland certified
Certifié TÜV Rheinland
TÜV Rheinland zertifiziert
Certificazione TÜV Rheinland
Certificación de TÜV Rheinland
TÜV Rheinland gecertificeerd
Certyfikat TÜV Rheinland
88
Probe
Sterilized by Irradiation
Stérilisé par irradiation
Sterilisiert durch Bestrahlung
Sterilizzata mediante irraggiamento
Esterilizado mediante radiación
Steriel door bestraling
Sterylizowano przez napromieniowanie
Single Patient Use
Réservé à un seul patient
Einwegverwendung bei nur einem Patienten
Per singolo paziente
Uso con un solo paciente
Gebruik voor één patiënt
Do użytku u jednego pacjenta
Use Until Date
Date de péremption
Verwendbar bis
Utilizzare fino alla data
Fecha de caducidad
Houdbaar tot
Data ważności
Do Not Use if Package is Damaged
Ne pas utiliser si l’emballage est endommagé
Bei beschädigter Verpackung nicht benutzen.
Non utilizzare se la confezione è danneggiata
No usar si el envase está dañado
Niet gebruiken indien de verpakking beschadigd is
Nie używać, jeśli opakowanie jest uszkodzone
89
Holster/Probe Assembly
Consult Instructions For Use
Consulter le mode d’emploi
In der Gebrauchsanleitung nachschlagen
Consultare le Istruzioni per l’uso
Consultar las instrucciones de uso
Raadpleeg de gebruiksaanwijzing
Należy zapoznać się z instrukcją użytkowania
Lot
Lot
Charge
Lotto
Número de lote
Lot
Seria
Catalog Number
Numéro de référence
Katalognummer
Numero catalogo
Número de catálogo
Catalogusnummer
Numer katalogowy
Manufacturer
Fabricant
Hersteller
Costruttore
Fabricante
Fabrikant
Producent
Authorized Representative in the U.S.A.
Représentant agréé aux États-Unis
Bevollmächtigter Vertreter in den USA
Rappresentante autorizzato negli Stati Uniti
Representante autorizado en Estados Unidos
Gemachtigde in de V.S.
Autoryzowany przedstawiciel w USA
Authorized Representative in Europe
Représentant agréé en Europe
Bevollmächtigter Vertreter in Europa
Rappresentante autorizzato in Europa
Representante autorizado en Europa
Gemachtigde in Europa
Autoryzowany przedstawiciel w Europie
90
This page is intentionally blank.
91
MEP10
MEP13
MEH1
Devicor Medical Germany GmbH
Südportal 3
22848 Norderstedt
Germany
DEVICOR® MEDICAL PRODUCTS, INC.
300 E-Business Way, Fifth Floor
Cincinnati, OH 45241
1-877-9-A-MAMMO
DEVICOR® MEDICAL PRODUCTS, INC.
300 E-Business Way, Fifth Floor
Cincinnati, OH 45241 USA
CC-000147-001
Rev Number
9/11
Part Number/Revision
©2011 Devicor® Medical Products, Inc.
LTR
CHANGE REQUEST
NUMBER
DATE
A
2011-0154
09.09.11
PRODUCT CODE
ARTWORK
NUMBER
PACKAGE
COMPONENT
NUMBER
MEH1
AW-000029
CC-000147-001
COLORS: CMYK
PROPRIETARY AND CONFIDENTIAL
THE INFORMATION CONTAINED IN THIS DRAWING IS THE
SOLE PROPERTY OF MAMMOTOME. ANY REPRODUCTION IN
PART OR AS A WHOLE WITHOUT THE WRITTEN PERMISSION
OF MAMMOTOME IS PROHIBITED.
REVISIONS