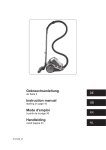
1
Gebrauchsanleitung ab Seite 3 Instruction manual starting on page 18 Mode d'emploi à partir de la page 32 Handleiding vanaf pagina 48 DE GB FR NL Z 08925_V0 08925_DE-GB-FR-NL_V0.indb 1 26.05.2014 09:20:05 08925_DE-GB-FR-NL_V0.indb 2 26.05.2014 09:20:26 DE Inhalt Bedeutung der Symbole in dieser Anleitung _________________________4 Bestimmungsgemäßer Gebrauch _________________________________4 Sicherheitshinweise____________________________________________5 Verletzungsgefahren _______________________________________________ 5 Das richtige Anschließen ____________________________________________ 5 Der richtige Gebrauch ______________________________________________ 5 Lieferumfang und Geräteübersicht ________________________________7 Gesamtübersicht __________________________________________________ 7 Rückansicht ______________________________________________________ 8 Saugdüsen _______________________________________________________ 8 Vor dem ersten Gebrauch _______________________________________9 Zusammenbau________________________________________________9 Schlauch einsetzen / abnehmen ______________________________________ 9 Teleskoprohr einsetzen / abnehmen____________________________________ 9 Länge des Teleskoprohres verstellen __________________________________10 Saugdüsen anbringen / abnehmen ____________________________________10 Staubbehälter abnehmen / einsetzen ___________________________________10 Bedienung __________________________________________________ 10 Gerät reinigen _______________________________________________ 12 Staubbehälter leeren und reinigen ____________________________________12 Staubfilter und Kunststoff-Staubfilter reinigen ____________________________13 Abluftfilter reinigen _________________________________________________15 Aufbewahrung _______________________________________________ 16 Fehlerbehebung _____________________________________________ 16 Technische Daten ____________________________________________ 17 Entsorgung _________________________________________________ 17 3 08925_DE-GB-FR-NL_V0.indb 3 26.05.2014 09:20:26 Sehr geehrte Kundin, sehr geehrter Kunde, wir freuen uns, dass Sie sich für diesen Bodenstaubsauger entschieden haben. Bitte lesen Sie vor dem ersten Gebrauch des Gerätes die Anleitung sorgfältig durch und bewahren Sie sie gut auf. Bei Weitergabe des Gerätes ist diese Anleitung mit auszuhändigen. Hersteller und Importeur übernehmen keine Haftung, wenn die Angaben in dieser Anleitung nicht beachtet werden! Im Rahmen ständiger Weiterentwicklung behalten wir uns das Recht vor, Gerät, Verpackung oder Beipackunterlagen jederzeit zu ändern. Bitte beachten Sie: Die in dieser Anleitung verwendeten Abbildungen können Abweichungen zum eigentlichen Gerät aufweisen. Sollten Sie Fragen haben, kontaktieren Sie den Kundenservice über unsere Webseite: www.service-shopping.de Bedeutung der Symbole in dieser Anleitung Alle Sicherheitshinweise sind mit diesem Symbol gekennzeichnet. Lesen Sie diese aufmerksam durch und halten Sie sich an die Sicherheitshinweise, um Personen- und Sachschäden zu vermeiden. Tipps und Empfehlungen sind mit diesem Symbol gekennzeichnet. Bestimmungsgemäßer Gebrauch ❐ Dieses Gerät ist zum Aufsaugen von normalem Hausstaub vorgesehen. ❐ Saugen Sie auf keinen Fall folgende Dinge auf: – Flüssigkeiten oder nasse Stoffe (z. B. nasses Teppich-Shampoo) – glühende Asche, Zigarettenkippen, Streichhölzer etc. – brennbare oder entzündliche Stoffe – sehr feinen Staub (z. B. Betonstaub), Asche oder Toner – spitze, harte Gegenstände, wie z. B. größere Glassplitter ❐ Dieses Gerät kann von Kindern ab 8 Jahren und darüber sowie von Personen mit reduzierten physischen, sensorischen oder mentalen Fähigkeiten oder Mangel an Erfahrung und/oder Wissen benutzt werden, wenn sie beaufsichtigt oder bezüglich des sicheren Gebrauchs des Gerätes unterwiesen wurden und die daraus resultierenden Gefahren verstanden haben. Kinder dürfen nicht mit dem Gerät spielen. Reinigung und BenutzerWartung dürfen nicht von Kindern ohne Beaufsichtigung durchgeführt werden. ❐ Das Gerät ist für den Privatgebrauch, nicht für eine gewerbliche Nutzung bestimmt. ❐ Nutzen Sie das Gerät nur wie in der Anleitung beschrieben. Jede weitere Verwendung gilt als bestimmungswidrig. ❐ Von der Gewährleistung ausgeschlossen sind alle Mängel, die durch unsachgemäße Behandlung, Beschädigung oder Reparaturversuche entstehen. Dies gilt auch für den normalen Verschleiß. 4 08925_DE-GB-FR-NL_V0.indb 4 26.05.2014 09:20:26 Sicherheitshinweise Verletzungsgefahren ❐ Erstickungsgefahr! Halten Sie das Verpackungsmaterial von Kindern und Tieren fern. ❐ Halten Sie das Gerät, das Kabel und den Stecker von Wasser oder anderen Flüssigkeiten fern, um Stromschläge zu vermeiden. Fassen Sie den Netzstecker, das Kabel oder Gerät nie mit nassen bzw. feuchten Händen an. ❐ Halten Sie Tiere, Haare, Schmuck, weite Kleidung, Finger und alle übrigen Körperteile von den Düsen des Gerätes fern. Sie könnten sich festsaugen. Sollte sich der Staubsauger doch einmal festsaugen, schalten Sie das Gerät sofort aus. ❐ Seien Sie bei der Reinigung von Stufen besonders vorsichtig, damit Sie nicht stürzen. ❐ Tragen Sie beim Gebrauch festes Schuhwerk. ❐ Benutzen und lagern Sie das Gerät nur außerhalb der Reichweite von Kindern. Unsachgemäße Bedienung kann zu Verletzungen und Stromschlägen führen. Auch das Netzkabel darf für Kinder nicht erreichbar sein. Das richtige Anschließen ❐ Schließen Sie das Gerät nur an eine vorschriftsmäßig installierte Steckdose an. Die Steckdose muss auch nach dem Anschließen gut zugänglich sein. Die Netzspannung muss mit den technischen Daten des Gerätes übereinstimmen (siehe Kapitel „Technische Daten“). Verwenden Sie nur ordnungsgemäße Verlängerungskabel, deren technische Daten mit denen des Gerätes übereinstimmen. ❐ Achten Sie darauf, dass das angeschlossene Netzkabel keine Stolpergefahr darstellt, nicht gequetscht oder geknickt wird und nicht mit heißen Flächen in Berührung kommt. Der richtige Gebrauch ❐ Verwenden und lagern Sie das Gerät nur in geschlossenen Räumen. Betreiben Sie es nicht im Freien, in Räumen mit hoher Luftfeuchtigkeit oder auf heißen Oberflächen. ❐ Überprüfen Sie das Gerät, das Netzkabel, den Netzstecker und das Zubehör vor jeder Inbetriebnahme auf Beschädigungen. Wenn das Gerät, das Kabel, der Stecker oder ein Filter sichtbare Schäden aufweisen, darf das Gerät nicht benutzt werden. Versuchen Sie nicht, das Gerät eigenständig zu reparieren oder Teile zu ersetzen. Kontaktieren Sie in Schadensfällen den Kundenservice. ❐ Verwenden Sie das Gerät nicht, wenn es eine Fehlfunktion hatte, Flüssigkeiten oder Gegenstände aufgesogen wurden oder das Gerät heruntergefallen ist. Lassen Sie das Gerät von einem Fachmann prüfen. ❐ Benutzen Sie das Gerät nur, wenn es vollständig und korrekt zusammengebaut ist! Der Staubbehälter und die Filter müssen eingesetzt und unbeschädigt sein! Damit der Staubbehälter richtig eingesetzt werden kann, muss er verschlossen sein. ❐ Setzen Sie das Gerät keinen extremen Temperaturen, starken Temperaturschwankungen, offenem Feuer, direkter Sonneneinstrahlung, Feuchtigkeit oder Nässe aus. ❐ Lassen Sie das Gerät nicht fallen und setzen Sie es keinen starken Stößen aus. 5 08925_DE-GB-FR-NL_V0.indb 5 26.05.2014 09:20:26 ❐ Stellen Sie niemals schwere Gegenstände auf das Gerät. ❐ Tauchen Sie das Gerät, das Netzkabel oder den Netzstecker nicht in Wasser oder andere Flüssigkeiten, um Stromschläge zu vermeiden. Füllen Sie keine Flüssigkeiten in den Staubbehälter. ❐ Berühren Sie das Gerät, das Kabel oder den Stecker niemals mit feuchten Händen. ❐ Stecken Sie nichts in die Öffnungen / Düsen des Gerätes und achten Sie darauf, dass diese nicht verstopft sind. ❐ Lassen Sie das Gerät niemals unbeaufsichtigt eingeschaltet oder an das Stromnetz angeschlossen. ❐ Schalten Sie das Gerät aus und ziehen Sie den Netzstecker aus der Steckdose, – wenn Sie Ihre Arbeit mit dem Gerät unterbrechen, – wenn Sie das Gerät nicht mehr verwenden, – bevor Sie das Zubehör wechseln, – wenn während des Betriebes ein Fehler oder eine Störung auftritt, – wenn Flüssigkeiten oder Fremdkörper in das Gerät gelangt sind, – vor einem Gewitter, – bevor Sie Geräte- und Zubehörteile reinigen. ❐ Das Gerät muss ausgeschaltet sein, wenn Sie den Netzstecker ziehen oder ihn in die Steckdose stecken. ❐ Ziehen Sie immer am Stecker und nie am Kabel! ❐ Ziehen Sie das Gerät nie am Kabel, um es zu bewegen. Benutzen Sie die Griffe. ❐ Versuchen Sie nicht, die Rollen mit Schmiermittel oder Öl zu schmieren. Danach würde Staub oder Schmutz verstärkt an den Rollen haften bleiben. ❐ Leeren Sie den Staubbehälter nach jedem Gebrauch. Auch die Filter müssen regelmäßig gereinigt werden, um eine Überlastung des Motors zu vermeiden. ❐ Staubbehälter, Kunststoff-Staubfilter und Abluftfilter müssen vollständig trocken sein, bevor Sie diese wieder in das Gerät einsetzen. ❐ Verwenden Sie nur Original-Zubehörteile des Herstellers. ❐ Bewahren Sie das Gerät bei Nichtgebrauch an einem kühlen, trockenen, Kindern und Tieren unzugänglichen Ort auf. 6 08925_DE-GB-FR-NL_V0.indb 6 26.05.2014 09:20:26 Lieferumfang und Geräteübersicht Zum Nachbestellen von original Ersatz- / Zubehörteilen besuchen Sie unsere Webseite: www.service-shopping.de Gesamtübersicht 1 11 10 9 8 2 3 4 7 5 6 1 2 3 4 5 Saugschlauch Staubbehälter Kunststoff-Staubfiltereinheit (im Staubbehälter) Anschlussstück Staubbehälterboden 6 7 8 9 10 11 Bodendüse Abluftfilterfach Staubfilter im Staubbehälterdeckel Staubbehälterdeckel mit Griff Teleskoprohr Nebenluftventil am Saugschlauchgriff 7 08925_DE-GB-FR-NL_V0.indb 7 26.05.2014 09:20:26 Rückansicht 12 13 17 14 16 15 12 Entriegelungsknopf für Staubbehälter 15 Fugen- und Bürstendüse 13 Ein / Aus-Schalter 16 Netzstecker 14 Halterung zum Einhaken der Bodendüse 17 Taste zur Kabelaufwicklung Saugdüsen ACHTUNG! ❐ Bevor Sie die Düsen austauschen, schalten Sie immer zuerst den Staubsauger aus. Bodendüse Die Bodendüse ist sowohl für Teppiche als auch für glatte Böden geeignet. Mit dem Fußschalter können Sie zwischen Teppich und glattem Boden umschalten. Für glatte Böden wird auf der Unterseite eine Bürste ausgefahren. 2in1 Fugen-und Bürstendüse Die Düse finden Sie im Steckfach in der Motoreinheit (siehe Abschnitt „Rückansicht“). Drücken Sie die Bürste nach unten, um aus der Bürstendüse eine Fugendüse zu machen: • Die Fugendüse ist für Polsterungen, die Innenreinigung von PKWs und alle Ecken und Winkel, die Sie mit den anderen Düsen nicht erreichen können, geeignet. • Die Bürstendüse ist für alle unebenen Gegenstände, Möbel, Lampen, Profil- und Fußleisten, Fensterbänke etc. geeignet. 8 08925_DE-GB-FR-NL_V0.indb 8 26.05.2014 09:20:27 Vor dem ersten Gebrauch ACHTUNG! ❐ Erstickungsgefahr! Halten Sie das Verpackungsmaterial von Kindern und Tieren fern. • • Packen Sie alle Teile aus und überprüfen Sie den Lieferumfang auf Vollständigkeit (siehe Kapitel „Lieferumfang und Geräteübersicht“) und Transportschäden. Falls die Bestandteile Schäden aufweisen sollten, verwenden Sie diese nicht (!), sondern kontaktieren Sie unseren Kundenservice. Falls vorhanden, entfernen Sie Zettel, Aufkleber etc. aus dem Staubbehälter. Im Kapitel „Gerät reinigen“ können Sie nachlesen, wie man den Staubbehälter abnimmt und öffnet. Zusammenbau ACHTUNG! ❐ Stellen Sie sicher, dass das Gerät nicht an das Stromnetz angeschlossen ist, bevor Sie das Zubehör anbringen oder abnehmen. Schlauch einsetzen / abnehmen • • Stecken Sie das Anschlussstück des Saugschlauches in die Ansaugöffnung (siehe Pfeil). Es muss hörbar einrasten. Zum Abnehmen des Saugschlauches drücken Sie die Rasten am Anschlussstück und ziehen den Schlauch heraus. Teleskoprohr einsetzen / abnehmen • • • Stecken Sie den Saugschlauch in den Handgriff. Er muss hörbar einrasten. Stecken Sie das offene Ende des Handgriffs in die passende Öffnung des Teleskoprohres. Drehen Sie den Handgriff dabei leicht hin und her. Überprüfen Sie die Verbindung anschließend auf festen Sitz. Um das Teleskoprohr abzunehmen, ziehen Sie es vom Handgriff ab. 9 08925_DE-GB-FR-NL_V0.indb 9 26.05.2014 09:20:28 Länge des Teleskoprohres verstellen • • Schieben Sie den Schieber am Teleskoprohr nach unten und ziehen Sie das Teleskoprohres auf die gewünschte Länge aus. Lassen Sie den Schieber los und bewegen Sie das Rohr noch ein Stückchen weiter, bis es einrastet. Saugdüsen anbringen / abnehmen • • • Stecken Sie das freie Ende des Teleskoprohres bis zum Anschlag in eine der mitgelieferten Saugdüsen. Drehen Sie die Düse dabei leicht hin und her. Für mehr Flexibilität können die Saugdüsen auch direkt auf den Saugschlauch gesteckt werden, ohne Teleskoprohr. Um eine Saugdüse abzunehmen, ziehen Sie diese ab. Staubbehälter abnehmen / einsetzen • • Abnehmen: Drücken Sie den Entriegelungsknopf des Staubbehälters und nehmen Sie diesen am Tragegriff aus dem Gerät. Einsetzen: Nehmen Sie den Staubbehälter am Griff und setzen Sie zuerst den Behälterboden in das Gerät ein (der Boden zeigt nach unten, der Griff nach oben). Dann drücken Sie den Griff gegen das Gerätegehäuse, bis der Staubbehälter hörbar in der Verriegelung einrastet. Halten Sie das Gerät am Tragegriff und heben Sie es an, um zu überprüfen, ob der Staubbehälter richtig sitzt. Bedienung ACHTUNG! ❐ Halten Sie die Düsen während des Gebrauchs niemals in die Nähe von Körperteilen und fassen Sie nicht hinein. Sie könnten sich festsaugen / verletzen. Sollte sich der Staubsauger doch einmal festsaugen, schalten Sie das Gerät sofort aus ( Ein / Aus-Schalter hinunterdrücken). 10 08925_DE-GB-FR-NL_V0.indb 10 26.05.2014 09:20:29 ❐ Halten Sie die Düsen während des Gebrauchs von Tieren fern. Versuchen Sie nicht, Tiere mit dem Gerät abzusaugen. Sie könnten sich festsaugen / verletzen. Sollte sich der Staubsauger doch einmal festsaugen, schalten Sie das Gerät sofort aus ( Ein / Aus-Schalter hinunterdrücken). ❐ Schalten Sie den Staubsauger erst ein, wenn Sie sichergestellt haben, dass alle Teile komplett zusammengebaut und der Staubbehälter und alle Filter korrekt eingesetzt sind. ❐ Damit das Kabel während des Betriebs nicht heiß wird, ziehen Sie mindestens zwei Drittel seiner Gesamtlänge aus dem Gerät heraus, bevor Sie den Staubsauger einschalten. Ziehen Sie das Kabel nicht mit Gewalt bis zum Anschlag heraus (nicht weiter als bis zur roten Markierung auf dem Kabel), um Beschädigungen zu vermeiden! ❐ Schalten Sie das Gerät immer aus und ziehen Sie den Netzstecker aus der Steckdose, bevor Sie eine Düse austauschen bzw. sonstiges Zubehör anbringen oder abnehmen! ❐ Saugen Sie auf keinen Fall folgende Dinge auf: – Flüssigkeiten oder nasse Stoffe (z. B. nasses Teppich-Shampoo) – glühende Asche, Zigarettenkippen, Streichhölzer etc. – brennbare oder entzündliche Stoffe – sehr feinen Staub (z. B. Betonstaub), Asche oder Toner – spitze, harte Gegenstände, wie z. B. größere Glassplitter 1. Stellen Sie sicher, dass das Zubehör richtig am Gerät angebracht ist (siehe Kapitel „Zusammenbau“). 2. Ziehen Sie das Netzkabel so weit aus dem Gehäuse heraus, wie Sie es benötigen, idealerweise bis zur gelben Markierung, jedoch nicht weiter als bis zur roten Markierung auf dem Kabel! 3. Stecken Sie den Netzstecker in eine ordnungsgemäß installierte, gut zugängliche Steckdose. 4. Drücken Sie den Ein / Aus-Schalter hinunter, um den Staubsauger einzuschalten. 5. Führen Sie die Düse über die zu reinigende Fläche. Beim Saugen kann der Staubsauger wie ein Schlitten gezogen werden. 6. Drücken Sie den Ein / Aus-Schalter nach dem Staubsaugen wieder hinunter, um den Staubsauger auszuschalten. 7. Ziehen Sie den Netzstecker aus der Steckdose, halten Sie das Netzkabel fest und drücken Sie die Taste zur Kabelaufwicklung mit dem Fuß hinunter. Durch das Festhalten des Netzkabels vermeiden Sie, dass das Kabel mit „Peitscheneffekt“ z. B. gegen Ihre Beine schlägt. 8. Für eine optimale Leistung des Gerätes leeren Sie nach jedem Gebrauch den Staubbehälter und reinigen Sie regelmäßig alle Filter (siehe Kapitel „Gerät reinigen“). Tipp: Am Handgriff befindet sich ein Nebenluftventil. Öffnen Sie es (durch Schieben der Abdeckung), um die Saugkraft zu verringern, wenn Sie Polster, Teppiche oder leichte, bewegliche Gegenstände absaugen. Normalerweise soll das Nebenluftventil geschlossen sein, damit die Saugkraft nicht unnötig vermindert wird. 11 08925_DE-GB-FR-NL_V0.indb 11 26.05.2014 09:20:30 Gerät reinigen ACHTUNG! ❐ Leeren Sie den Staubbehälter regelmäßig, idealerweise nach jedem Gebrauch, spätestens aber, wenn der Staubbehälter bis zur MAX-Markierung gefüllt ist. ❐ Reinigen Sie die Filter regelmäßig, um eine Überhitzung des Motors zu vermeiden. ❐ Ziehen Sie vor Reinigungstätigkeiten am Gerät immer den Netzstecker aus der Steckdose. ❐ Halten Sie das Gerät, das Kabel und den Netzstecker von Wasser oder anderen Flüssigkeiten fern, um Stromschläge zu vermeiden. Achten Sie beim Reinigen darauf, dass keine Flüssigkeit in das Gerät gelangt. Lediglich der Staubbehälter, Kunststoff-Staubfilter und der Abluftfilter dürfen mit Wasser gereinigt werden. Sie müssen aber beim Einsetzen in das Gerät vollständig trocken sein. ❐ Reinigen Sie den Staubfilter im Staubbehälterdeckel niemals mit Wasser oder anderen Flüssigkeiten! ❐ Die Filter sind weder waschmaschinen- noch spülmaschinen- oder trocknergeeignet! Trocknen Sie die Filter ausschließlich an der Luft, keinesfalls mit einem Haartrockner. ❐ Verwenden Sie zum Reinigen keine scharfen oder scheuernden Reinigungsmittel oder Reinigungspads. Diese können die Oberflächen beschädigen. • • • Reinigen Sie den Staubfilter, den Kunststoff-Staubfilter und den Abluftfilter regelmäßig, bzw. wenn Sie ein Nachlassen der Saugleistung bemerken. Reinigen Sie das Gehäuse bei Bedarf mit einem feuchten, weichen Tuch. Trocknen Sie mit einem weichen Tuch nach. Entfernen Sie regelmäßig Haare und Fussel von den Düsen. Mit der Zeit können sich die Filter verfärben. Dies ist normal und beeinträchtigt nicht die Funktionalität. Staubbehälter leeren und reinigen 1. Drücken Sie die Entriegelungstaste des Staubbehälters und nehmen Sie diesen am Tragegriff aus dem Gerät. 2. Halten Sie den Staubbehälter über einen geöffneten Mülleimer. Der Abstand zum Mülleimer sollte möglichst klein sein, damit der Staub aus dem Staubbehälter nur in den Mülleimer fällt und sich nicht in der Umgebung verteilt. 12 08925_DE-GB-FR-NL_V0.indb 12 26.05.2014 09:20:30 3. Entriegeln Sie die Taste zum Öffnen des Staubbehälters. Der Boden des Staubbehälters öffnet sich und der Schmutz fällt heraus. 4. Klappen Sie den Staubbehälterboden wieder zu. Der Verschluss muss hörbar einrasten. 5. Wenn Sie den Staubbehälter reinigen möchten, nehmen Sie zunächst den Staubbehälterdeckel vom Staubbehälter ab, indem Sie ihn gegen den Uhrzeigersinn drehen und ihn dann vom Behälter abziehen. HINWEIS: Auf Staubbehälterdeckel und Staubbehälter befinden sich Pfeil-Markierungen, die Ihnen das Abnehmen und Aufsetzen des Deckels erleichtern. Sie können den Deckel abnehmen, wenn die ▼-Markierung am Deckel auf die -Markierung am Staubbehälter zeigt. Bei Bedarf spülen Sie den Staubbehälter mit klarem, lauwarmem Wasser gründlich aus. Achtung: Reinigen Sie den Staubbehälter auf keinen Fall in der Wasch- oder Spülmaschine! Schütteln Sie überschüssiges Wasser anschließend ab und lassen Sie den Staubbehälter vollständig an der Luft trocknen. 6. Wenn der Staubbehälter komplett trocken ist, setzen Sie den Staubbehälterdeckel wieder auf den Staubbehälter und drehen ihn im Uhrzeigersinn fest. HINWEIS: Auf Staubbehälterdeckel und Staubbehälter befinden sich Pfeil-Markierungen, die Ihnen das Abnehmen und Aufsetzen des Deckels erleichtern. Setzen Sie den Staubbehälterdeckel so auf den Staubbehälter, dass die ▼-Markierung am Deckel die Markierung am Staubbehälter zeigt. Drehen Sie dann den Deckel im Uhrzeigersinn, bis die ▼-Markierung am Deckel auf die -Markierung am Staubbehälter zeigt. 7. Setzen Sie den Staubbehälter in das Gerät: Nehmen Sie ihn am Tragegriff und setzen Sie zuerst den Behälterboden in das Gerät. Dann drücken Sie den Griff gegen das Gerätegehäuse, bis der Staubbehälter hörbar in der Verriegelung einrastet. Halten Sie das Gerät am Tragegriff und heben Sie es an, um zu überprüfen, ob der Staubbehälter richtig sitzt. Staubfilter und Kunststoff-Staubfilter reinigen 1. Drücken Sie die Entriegelungstaste des Staubbehälters und nehmen Sie diesen am Tragegriff aus dem Gerät. 13 08925_DE-GB-FR-NL_V0.indb 13 26.05.2014 09:20:30 2. Der Staubfilter befindet sich im Staubbehälterdeckel. Öffnen Sie den Staubbehälterdeckel, indem Sie den Riegel am Griff anheben und den Deckel aufklappen. 3. Entfernen Sie den Staubfilter, um ihn zu reinigen. Klopfen Sie ihn aus oder bürsten Sie ihn mit einer weichen Bürste ab, um Staub und Schmutz zu entfernen. Waschen Sie ihn nicht mit Wasser aus! 4. Wenn Sie den Kunststoff-Staubfilter reinigen möchten, entfernen Sie zunächst den Staubbehälter vom Staubbehälterdeckel, indem Sie ihn gegen den Uhrzeigersinn drehen und ihn dann vom Behälter abziehen. HINWEIS: Auf Staubbehälterdeckel und Staubbehälter befinden sich Pfeil-Markierungen, die Ihnen das Abnehmen und Aufsetzen des Deckels erleichtern. Sie können den Deckel abnehmen, wenn die ▼-Markierung am Deckel auf die -Markierung am Staubbehälter zeigt. 5. Entfernen Sie als nächstes den Staubbehälterdeckel vom Kunststoff-Staubfilter. Der Staubbehälterdeckel sitzt auf dem Kunststoff-Staubfilter. Zum Lösen müssen Sie ihn einfach herunterdrücken. 6. Bei Bedarf spülen Sie den Kunststoff-Staubfilter mit klarem, lauwarmem Wasser gründlich aus. Achtung: Reinigen Sie den Filter auf keinen Fall in der Wasch- oder Spülmaschine! Schütteln Sie überschüssiges Wasser anschließend ab und lassen Sie ihn vollständig an der Luft trocknen. 14 08925_DE-GB-FR-NL_V0.indb 14 26.05.2014 09:20:31 7. Wischen Sie bei Bedarf den Staubbehälter-Deckel mit einem feuchten Tuch ab und setzen Sie den KunststoffStaubfilter wieder in den Behälterdeckel ein. Achten Sie darauf, dass der Filter korrekt im Deckel einrastet. 8. Setzen Sie den Staubbehälterdeckel inkl. Kunststoff-Staubfilter wieder auf den Staubbehälter und drehen ihn im Uhrzeigersinn fest. HINWEIS: Auf Staubbehälterdeckel und Staubbehälter befinden sich Pfeil-Markierungen, die Ihnen das Abnehmen und Aufsetzen des Deckels erleichtern. Setzen Sie den Staubbehälterdeckel so auf den Staubbehälter, dass die ▼-Markierung am Deckel die -Markierung am Staubbehälter zeigt. Drehen Sie dann den Deckel im Uhrzeigersinn, bis die ▼-Markierung am Deckel auf die -Markierung am Staubbehälter zeigt. 9. Setzen Sie den Staubfilter wieder in den Staubbehälterdeckel ein und schließen Sie den Deckel. Er muss hörbar einrasten. 10. Setzen Sie den Staubbehälter in das Gerät: Nehmen Sie ihn am Tragegriff und setzen Sie zuerst den Behälterboden in das Gerät. Drücken Sie den Griff gegen das Gerätegehäuse, bis der Staubbehälter hörbar in der Verriegelung einrastet. Halten Sie das Gerät am Tragegriff und heben Sie es an, um zu überprüfen, ob der Staubbehälter richtig sitzt. Abluftfilter reinigen Der Abluftfilter befindet sich im Fach seitlich am Staubsauger (siehe Kapitel „Lieferumfang und Geräteübersicht“, Abschnitt „Gesamtübersicht“). HINWEIS: Auf der Abdeckung des Abluftfilterfaches und auf der Motoreinheit befinden sich Pfeilmarkierungen, die Ihnen das Öffnen und Schließen des Filterfaches erleichtern. 1. Öffnen Sie das Abluftfilterfach, indem Sie die Filterfachabdeckung in Richtung des Pfeiles OPEN (Öffnen) drehen und nehmen die Abdeckung ab. 2. Entnehmen Sie den Abluftfilter, indem Sie ihn aus dem Filterfach herausziehen. 3. Klopfen Sie den Abluftfilter über einem Müllbehälter aus und bürsten Sie losen Schmutz ab. 4. Bei Bedarf spülen Sie den Abluftfilter mit klarem, lauwarmem Wasser gründlich aus. ACHTUNG: Reinigen Sie den Filter auf keinen Fall in der Wasch- oder Spülmaschine! Schütteln Sie überschüssiges Wasser anschließend ab und lassen Sie den Filter vollständig an der Luft trocknen, bevor Sie ihn wieder einsetzen. 5. Wenn alle Teile trocken sind, setzen Sie den Abluftfilter in das Filterfach ein. 6. Setzen Sie die Filterfachabdeckung auf das Abluftfilterfach. Achten Sie darauf, dass der nach oben zeigende Pfeil auf der Abdeckung in einer Linie mit dem linken Pfeil auf der Motoreinheit steht, und drehen Sie die Filterfachabdeckung in Richtung des Pfeiles LOCK (Schließen). 15 08925_DE-GB-FR-NL_V0.indb 15 26.05.2014 09:20:32 Aufbewahrung • • • Zur praktischen Aufbewahrung können Sie die Bodendüse in die Halterung auf der Rückseite des Gerätes einhaken und das Teleskoprohr so weit wie möglich zusammenschieben. Die 2in1 Fugen- Bürstendüse können Sie im Steckfach in der Motoreinheit verstauen (siehe Kaptitel „Lieferumfang und Geräteübersicht“, Abschnitt „Rückansicht“). Bewahren Sie den Staubsauger Kindern und Tieren unzugänglich in einem trockenen, kühlen Innenraum auf. Fehlerbehebung Sollte Ihr Gerät einmal nicht ordnungsgemäß funktionieren, einen Schaden aufweisen oder ein Ersatzteil benötigen, so wenden Sie sich bitte an den Kundenservice. Führen Sie zu Ihrer eigenen Sicherheit keine Reparaturen selbst durch. In der folgenden Tabelle finden Sie Tipps, wie Sie kleine Probleme selbst beheben können. Problem Mögliche Ursache / Lösung / Tipps • Das Gerät saugt nicht. • • • Steckt der Netzstecker nicht korrekt in der Steckdose? Korrigieren Sie den Sitz des Netzsteckers. Ist die Steckdose defekt? Probieren Sie eine andere Steckdose. Überprüfen Sie die Sicherung Ihres Netzanschlusses. Sind die Filter verstopft? Reinigen Sie alle Filter. • • • • Ist das Nebenluftventil im Handgriff geöffnet? Schließen Sie es. Ist der Staubbehälter zu voll? Leeren Sie den Behälter. Sind die Filter stark verschmutz? Reinigen Sie diese. Ist die Düse, das Teleskoprohr oder der Saugschlauch verstopft? Schalten Sie das Gerät aus, ziehen Sie den Netzstecker aus der Steckdose und entfernen Sie den Störfaktor (siehe auch Kapitel „Zusammenbau“). Beim Saugen entweicht Staub aus dem Gerät. • Ist der Staubbehälter nicht korrekt geschlossen und / oder nicht (korrekt) in das Gerät eingesetzt? Korrigieren Sie dies. Das Netzkabel lässt sich nicht ganz aufwickeln. • Das Kabel wurde im Gerät nicht richtig aufgewickelt. Ziehen Sie es ein Stück heraus und betätigen Sie danach erneut die Taste zur Kabelaufwicklung. Während des Saugens lässt sich ein unangenehmer Geruch feststellen. • Wird das Gerät zum ersten Mal benutzt? Eine Geruchsentwicklung tritt bei der ersten Benutzung neuer Geräte häufig auf. Der Geruch sollte verschwinden, nachdem Sie das Gerät mehrmals benutzt haben. Die Leistung ist schwach. 16 08925_DE-GB-FR-NL_V0.indb 16 26.05.2014 09:20:33 Technische Daten Modellnummer: Artikelnummer: Spannungsversorgung: Leistung: Schutzklasse: VC349 Z 08925 220 – 240 V~, 50/60 Hz 650 W II Entsorgung Das Verpackungsmaterial ist wiederverwertbar. Entsorgen Sie die Verpackung umweltgerecht und führen Sie sie der Wertstoffsammlung zu. Entsorgen Sie das Gerät umweltgerecht. Das Gerät gehört nicht in den Hausmüll. Entsorgen Sie es an einem Recyclinghof für elektrische und elektronische Altgeräte. Nähere Informationen erhalten Sie bei Ihrer örtlichen Gemeindeverwaltung. Kundenservice / Importeur: DS Produkte GmbH, Am Heisterbusch 1, 19258 Gallin, Deutschland Tel.: +49 (0) 38851 314650 *) *) 0 – 30 Ct. / Min. aus dem dt. Festnetz, Mobilfunkpreise können abweichen. Alle Rechte vorbehalten. 17 08925_DE-GB-FR-NL_V0.indb 17 26.05.2014 09:20:33 GB Content: Meaning of symbols in these instructions __________________________ 19 Proper use __________________________________________________ 19 Safety instructions ____________________________________________20 Risks of injury ___________________________________________________ 20 Proper connection ________________________________________________ 20 Proper use ______________________________________________________ 20 Product contents and device overview ____________________________22 Complete device overview __________________________________________ 22 Rear view _______________________________________________________ 23 Suction nozzles __________________________________________________ 23 Prior to first use ______________________________________________ 24 Assembly ___________________________________________________ 24 Inserting/removing the hose ________________________________________ Inserting/removing the telescoping tube _______________________________ Adjusting the length of the telescoping tube ____________________________ Mounting/removing suction nozzles __________________________________ Removing/inserting the dust container ________________________________ 24 24 25 25 25 Operation___________________________________________________25 Cleaning the Device __________________________________________27 Emptying and cleaning the dust container _____________________________ 27 Cleaning the dust filter and the plastic dust filter _________________________ 28 Cleaning the Exhaust Air Filter ______________________________________ 30 Storage ____________________________________________________30 Troubleshooting ______________________________________________30 Technical data _______________________________________________ 31 Disposal____________________________________________________ 31 18 08925_DE-GB-FR-NL_V0.indb 18 26.05.2014 09:20:33 Dear customer, We are delighted that you have decided on this vacuum cleaner. Prior to using the device for the first time, please carefully read through the operating instructions and store them in a safe place. These instructions are to accompany the device when it is passed on to others. The manufacturer and importer assume no liability in the event the data in these instructions have not been observed! As part of ongoing development, we reserve the right to alter the device, packaging or enclosed documentation at any time. Please note: The illustrations in these operating instructions may vary slightly from the real appliance. If you have any questions, please contact customer service via our website: www.service-shopping.de Meaning of symbols in these instructions All safety notices are marked with this symbol. Please carefully read through and obey the safety notices in order to avoid injury to persons and damage to property. Tips and recommendations are marked with this symbol. Proper use ❐ This device is designed for vacuuming up normal household dust. ❐ Do not in any case vacuum up the following: – Liquids or wet materials (such as wet carpet shampoo) – smouldering ashes, cigarette butts, matches etc. – flammable or ignitable materials – very fine dust (e.g. cement dust), ash or toner – hard, pointy objects such as bigger glass shards ❐ This device may be used by children aged 8 and over and by people with reduced physical, sensory or mental abilities or a lack of experience and/or knowledge if they are supervised or have received instruction on how to use the device safely and have understood the dangers resulting from this. Children may not play with the device. Cleaning and user maintenance may not be performed by children, unless they are supervised. ❐ The device is intended for domestic, not commercial, use. ❐ Only use the device as described in these instructions. Any other use is deemed improper. ❐ Defects arising due to improper handling, damage or attempts at repair are excluded from the warranty. This also applies to normal wear and tear. 19 08925_DE-GB-FR-NL_V0.indb 19 26.05.2014 09:20:33 Safety instructions Risks of injury ❐ Risk of suffocation! Keep the packaging material away from children and animals. ❐ Keep the device, cord and plug away from water or other liquids in order to avoid the risk of electrical shock. Never touch the mains plug, cord or device with wet or damp hands. ❐ Keep animals, hair, jewellery, loose fitting clothing, fingers and all other body parts away from the device's nozzles. They could be caught in the vacuum cleaner. If something does get caught in the vacuum cleaner, immediately turn off the device. ❐ Take special care to avoid falling when cleaning stairs. ❐ Wear firm footwear during use. ❐ Only use and store the device out of the reach of children. Improper use may result in injury and electrical shock. The mains cord may also not be accessible for children. Proper connection ❐ Only connect the device to a properly installed socket. The socket must also be easily accessible after the device has been connected. The mains voltage must correspond to the technical data of the device (see chapter “Technical data”). Only use proper extension cords, whose technical data correspond to those of the device. ❐ Make sure that the connected mains cable does not get pinched, pose a tripping hazard or get kinked and that it does not come into contact with hot surfaces. Proper use ❐ Only use and store the device in enclosed areas. Do not use the device outdoors, in rooms with high humidity or on hot surfaces. ❐ Check the device and accessories for damages prior to each use. If the device, cord, plug or a filter are visibly damaged do not use the device. Do not attempt to repair the device or to replace parts yourself. In the event of damage, contact customer service. ❐ Do not use the device if it malfunctions, has vacuumed up liquids or objects or has fallen down. Have the device repaired by a qualified professional. ❐ Only use the device if it has been completely and correctly assembled! The dust bin and filter must be in place and not be damaged! Dirt that has penetrated the inside of the device could damage the motor. The dust bin must be shut in order for it to be inserted properly. ❐ Do not subject the device to extreme temperatures, severe changes in temperatures, open flames, direct sunlight, moisture or wetness. ❐ Do not allow the device to fall and do not subject it to strong percussions. ❐ Never place heavy objects on the device. ❐ Do not submerge the device in water or other liquids in order to avoid electrical shocks. Do not fill the dust bin with liquids. 20 08925_DE-GB-FR-NL_V0.indb 20 26.05.2014 09:20:33 ❐ Never touch the device, the cord or the plug with wet hands. ❐ Do not insert anything in the device’s openings/nozzles and ensure that they are not plugged. ❐ Never leave the device unattended when on or when connected to a power supply. ❐ Turn the device off by pulling the mains plug out of the socket – if you stop using the device, – if you are finished using the device, – before you change any accessories, – if an error or fault occurs during operation, – if liquids or foreign debris have penetrated the device, – before a storm, – before you clean the device parts and accessories. ❐ The device must be deactivated when you pull the mains plug out of the socket or insert it in the socket. ❐ Always pull on the plug itself and never on the cable! ❐ Never move the device by pulling it by the cord. Use the handles. ❐ Do not attempt to grease the wheels with lubricants or oil. Otherwise, this may cause more dust or dirt to accumulate on the wheels. ❐ Empty the dust bin after every use. The filters must also be cleaned regularly to prevent the motor from being overloaded. ❐ Allow the dust bin, plastic dust filter and exhaust filter to dry completely before you reinstall them in the device. ❐ Only use original spare parts provided by the manufacturer. ❐ Store the device in a cool, dry area that is not accessible to children and animals when not in use. 21 08925_DE-GB-FR-NL_V0.indb 21 26.05.2014 09:20:33 Product contents and device overview Visit our website to reorder original spare parts/accessories: www.service-shopping.de Complete device overview 1 11 10 9 8 2 3 4 7 5 6 1 2 3 4 5 6 Suction hose Dust container Plastic dust filter (in the dust container) Connection piece Dust container base Floor nozzle 7 8 9 10 11 Exhaust filter compartment Dust filter in the dust container lid Dust container lid with handle Telescopic tube Exhaust air valve on the vacuum hose handle 22 08925_DE-GB-FR-NL_V0.indb 22 26.05.2014 09:20:33 Rear view 12 13 17 14 16 15 12 Release button for dust bin 13 On/Off switch 14 Bracket for hooking in the floor nozzle 15 2in1 crevice and brush nozzle 16 Mains plug 17 Button for cable winder Suction nozzles ATTENTION! ❐ Always turn off the vacuum cleaner first before changing the nozzles. Floor nozzle The floor nozzle is suitable both for carpets and smooth floors. With the foot switch, you can switch between a smooth floor and a carpet. A brush is deployed on the device bottom for smooth floors. 2in1 Crevice and Brush Nozzle You find this nozzle in the storage compartment in the motor unit (see section „Rear view“). Push the brush down in order to make a crevice nozzle out of the brush nozzle • The crevice nozzle is suitable for upholstery, cleaning the inside of cars and for all nooks and crannies that cannot be reached with the other nozzles. • The brush nozzle is suitable for all uneven objects, furniture, lamps, profiles and skirting boards, window ledges, etc. 23 08925_DE-GB-FR-NL_V0.indb 23 26.05.2014 09:20:34 Prior to first use ATTENTION! ❐ Risk of suffocation! Keep the packaging material away from children and animals. • • Unpack all parts and make sure that the scope of delivery is complete (see chapter “Product contents and device overview”) and check for any damages from transport. If you identify damages to the components, do not use them (!), instead contact our customer service centre. If necessary, remove any piece of paper or sticker etc. from the dust bin. In chapter „Cleaning the Device“ you will find instructions on how to remove and open the dust bin. Assembly ATTENTION! ❐ Make sure that the device is not connected to the power supply before you attach or remove any accessories. Inserting/removing the hose • • Insert the suction hose connector into the suction opening (see arrow). It must audibly lock into place. To remove the suction hose push the knobs on the connector and pull the suction hose out. Inserting/removing the telescoping tube • • • Insert the suction hose into the handle. It has to lock into place audibly. Insert the open end of the handle into the corresponding opening on the telescoping tube. In the process, turn the handle back and forth somewhat. Check to make sure that the connection is secure. To remove the telescoping tube pull it off of the handle. 24 08925_DE-GB-FR-NL_V0.indb 24 26.05.2014 09:20:35 Adjusting the length of the telescoping tube • • Push the slider on the telescopic tube downwards and then pull the telescopic tube out to the required length. Release the slider and move the tube slightly up or down until it engages. Mounting/removing suction nozzles • • • Insert the open end of the telescoping tube in one of the enclosed suction nozzles up to the stop. Turn the nozzle back and forth slightly in the process. The suction nozzles can also be attached directly to the suction hose without the telescoping tube for more flexibility. To remove a suction nozzle pull it off. Removing/inserting the dust container • • Removal: Push the release button on the dust container and take it out of the device by the handle. Insertion: Take the dust container by the handle and first place the bottom of the container in the device (the bottom is facing down and handle is facing up). Then push the handle against the device housing until the dust container audibly locks into place. Hold the device by the handle and lift it to check whether the dust bin is properly seated. Operation CAUTION! ❐ Never hold the nozzles close to parts of your body during use and do not place your hands inside the nozzles. They could become stuck to the device/injured. If the vacuum cleaner becomes firmly attached due to suction, turn it off immediately ( press down the On / Off switch). 25 08925_DE-GB-FR-NL_V0.indb 25 26.05.2014 09:20:35 ❐ Keep the nozzles away from animals during operation. Never attempt to vacuum animals using the device. They could become stuck to the device/injured. If the vacuum cleaner becomes firmly attached due to suction, turn it off immediately ( press down the On / Off switch). ❐ Switch on the vacuum cleaner only when you have checked that all parts have been properly assembled and that the dust container and all filters have been inserted correctly. ❐ To ensure that the cable does not become hot during operation, pull out at least two thirds of its total length from the device before you switch on the vacuum cleaner. Do not pull out the cable with force up to its maximum length (not further than the red marking on the cable) in order to prevent damage! ❐ Always switch the device off first and remove the mains plug from the mains socket before replacing a nozzle or attaching or removing any accessories. ❐ On no account should the device be used to suck up the following: – Liquids or wet substances (e.g. wet carpet shampoo) – Glowing ash, cigarette ends, matches, etc. – Inflammable or explosive substances – Very fine dust (e.g. concrete dust), ash or toner – Pointed, hard objects such as large pieces of broken glass 1. Make sure that the accessories are attached correctly to the device (see the „Assembly“ chapter). 2. Pull the mains cable out of the unit as far as you require, ideally up to the yellow marking, but not further than the red marking on the cable! 3. Insert the mains plug into a properly installed mains socket that is easily accessible. 4. Press the On/Off switch down to switch on the vacuum cleaner. 5. Guide the nozzle over the surface to be cleaned. The vacuum cleaner can be pulled along like a sledge during cleaning. 6. Press the On/Off switch down again after you have finished vacuum cleaning to switch off the vacuum cleaner. 7. Pull the mains plug out of the socket, hold the mains cable firmly and using your foot, depress the button to retract the cable. Holding the mains cable prevents any „whiplash“ effect of the cable, e.g. against your legs. 8. To ensure optimum performance of the device, you should empty the dust container and clean all dust filters regularly (see the „Cleaning the Device“ chapter) after every use. Tip: The handle is equipped with an exhaust air valve. Open this valve (by sliding the cover) to reduce the suction force when cleaning upholstery or rugs or light, movable objects. Normally the exhaust air valve should be closed to prevent the unnecessary reduction of the suction force. 26 08925_DE-GB-FR-NL_V0.indb 26 26.05.2014 09:20:35 Cleaning the Device CAUTION! ❐ Empty the dust container frequently. Ideally, empty the dust container after every use or when the MAX mark is reached at the latest. ❐ Clean the filter regularly to prevent overheating of the motor. ❐ Remove the mains plug from the plug socket before doing any cleaning of the device. ❐ Keep the device, the cable and the mains plug away from water or other liquids in order to avoid electric shocks. Make sure that no liquid gets into the device during cleaning. Only the the dust bin, the plastic dust filter and the exhaust air filter may be cleaned with water. However, they must be completely dry before they are put back into the device. ❐ Never clean the dust filter in the dust container lid using water or other liquids! ❐ The filters are neither machine-washable, dishwasher-safe nor suitable for tumble drying! Only ever dry the filters in the air, and never use a hair dryer to do so. ❐ Do not use any sharp or abrasive cleaning agents or cleaning pads to clean the device. These could damage the surfaces. • • • Clean the dust filter, the plastic dust filter and the exhaust air filter regularly, or if you notice a reduction in the suction power. Clean the housing if necessary using a damp, soft cloth. Dry it with a soft cloth. Remove hair and fluff from the nozzles at regular intervals. The filters may lose some of their colour over time. This is normal and does not have any adverse effect on function. Emptying and cleaning the dust container 1. Push the release button on the dust container and pull it out of the device by the handle. 2. Hold the dust container over an open garbage bin. The dust container should be as close as possible to the garbage bin so that dust from the dust container only falls into the garbage bin and is not dispersed in the surrounding area. 3. Unlock the release button to open the dust container. The bottom of the dust container will open and the dirt will fall out. 4. Shut the bottom of the dust container again. The fastener must audibly lock into place. 27 08925_DE-GB-FR-NL_V0.indb 27 26.05.2014 09:20:36 5. If you need to clean the dust container, you have to remove the dust container lid first by turning it conterclockwise and pulling it off. NOTE: Orientation marks for the removal and placement of the lid are provided on the lid and dust container. You can remove the lid when the ▼ mark on the lid is pointing towards the mark on the dust container. If necessary, thoroughly rinse the dust container with clear, lukewarm water. CAUTION: Do not under any circumstances clean the dust container in a washing machine or dishwasher! Then shake off any excess water and allow the dust container to dry completely in the air. 6. When the dust container is completely dry, screw the dust container lid firmly back onto the dust container. NOTE: Orientation marks for the removal and placement of the lid are provided on the lid and dust container. Place the lid on the dust container. The ▼ mark on the lid has to point to the mark on the dust container. Turn the lid clockwise until the ▼ mark on the lid is pointing to the mark on the dust container. 7. Place the dust container into the device: Hold it by the handle and place the bottom of the container into the device first. Then push the handle against the device housing until the dust container is heard to lock in place. Hold the device by the handle and lift it to check that the dust container is in the correct position. Cleaning the dust filter and the plastic dust filter 1. Push the release button on the dust bin and pull it out of the device by the handle. 2. The dust filter is located in the dust container lid. Open the dust container lid by releasing the catch on the handle and flipping up the lid. 3. Remove the dust filter for cleaning. Tap out the contents of the dust filter over a dustbin and brush off the loose dirt. Never clean the dust filter with water! 28 08925_DE-GB-FR-NL_V0.indb 28 26.05.2014 09:20:36 4. If you need to clean the plastic dust filter, you have to remove the dust bin cover first by turning it conterclockwise and pulling it off. NOTE: Orientation marks for the removal and placement of the cover are provided on the cover and dust bin. You can remove the cover when the ▼ mark on the lid is pointing towards the mark on the dust bin. 5. Then, remove the dust bin cover from the plastic dust filter. The cover is sitting on the plastic dust filter. In order to remove it, push the cover down. 6. If necessary, thoroughly rinse the plastic dust filter with clear, lukewarm water. CAUTION: Do not under any circumstances clean the dust container in a washing machine or dishwasher! Then shake off any excess water and allow the dust container to dry completely in the air. 7. If necessary, wipe the dust bin cover with a wet cloth and place tht plastic dust filter back into the dust bin cover. Make sure that the filter locks correctly into place. 8. Place the dust container lid with the plastic dust filter back onto the dust container. NOTE: Orientation marks for the removal and placement of the cover are provided on the cover and dust bin. Place the lid on the dust bin. The ▼ mark on the lid has to point to the mark on the dust bin. Turn the lid clockwise until the ▼ mark on the lid is pointing to the mark on the dust bin. 9. Place the dust filter back in the dust container lid. Close the dust container lid. Make sure that the latch on the dust container lid is locked in place correctly. 10. Place the dust container into the device: Hold it by the handle and place the bottom of the container into the device first. Then push the handle against the device housing until the dust container is heard to lock in place. Hold the device by the handle and lift it to check that the dust container is in the correct position. 29 08925_DE-GB-FR-NL_V0.indb 29 26.05.2014 09:20:37 Cleaning the Exhaust Air Filter The exhaust air filter is located in the compartment on the side of the vacuum cleaner (see „Product contents and device overview“ chapter, „Complete Device overview“ section). NOTE: Orientation marks for the removal and placement of the compartment cover are provided on the cover of the exhaust air filter compartment and the motor unit. 1. Open the exhaust air filter compartment by turning the compartment cover in the direction of the arrow OPEN and remove the cover. 2. Remove the exhaust air filter by pulling it down and out of the filter compartment. 3. Tap out the contents of the exhaust air filter over a dustbin and brush off the loose dirt. 4. If necessary, thoroughly rinse the exhaust air filter using clear, lukewarm water. CAUTION: Do not under any circumstances clean the filter in a washing machine or dishwasher! Then shake off any excess water and allow the filter to dry completely in the air before reinserting it. 5. When all parts are dry, insert the exhaust air filter in the filter compartment. 6. Place the filter compartment cover onto the exhaust filter compartment. Make sure that arrow on the cover in the middle of the OPEN and LOCK arrow points to the left hand arrow on the motor unit and turn the cover in the direction of the arrow LOCK. Storage • • • You can hook the floor nozzle into the bracket on the back of the device for convenient storage and push the telescoping tube together as far as possible. You can store the 2in1 Crevice and Brush nozzle in the storage compartment in the motor unit (see chapter „Product contents and device overview“, section „Rear View“) Store the vacuum cleaner in a dry, cool indoor room that is not accessible for children and animals. Troubleshooting If your device no longer functions properly, exhibits damages or requires a spare part, please contact our customer service centre. For your own safety, do not perform any repairs yourself. The following table gives you tips on how to resolve minor problems yourself. Problem Potential cause/solution/tips • The vacuum cleaner has no suction power. • • • Is the mains plug not correctly connected with the socket? Correct the position of the mains plug. Is the socket defective? Try another socket. Check the fuse for your mains connection. Are the filters plugged? Clean the dust and exhaust filter. 30 08925_DE-GB-FR-NL_V0.indb 30 26.05.2014 09:20:37 Problem Potential cause/solution/tips • • The suction power • is weak. • Is the auxiliary air valve on the handle open? Close it. Is the dust bin too full? Empty the bin. Are the filters very dirty? Clean them. Is the nozzle, telescoping tube or suction hose plugged? Turn the device off, pull the mains plug out of the socket and remove the obstruction (also see chapter “Assembly”). The device emits dust when vacuuming. • Has the dust bin not been closed properly and/or is it not (properly) inserted in the device? Correct this. The power cord cannot be wound up completely. • The cord has not been properly wound up in the device. Pull for engaging it out somewhat and then push the button the cord winder again. An unpleasant odour develops when vacuuming. • Are you using the device for the first time? An odour often develops when using new devices for the first time. The odour should disappear once you have used the device a few times. Technical data Model number: Product number: Voltage supply: Output: Safety class: VC349 Z 8925 220 – 240 V~, 50/60 Hz 650 W II Disposal The packaging material can be recycled. Dispose of the packaging in an environmentally-friendly manner and make it available to the collection service for recyclable materials. Dispose of the device in an environmental-friendly manner. The device does not belong in the household waste. Dispose of it at a recycling centre for old electrical and electronic devices. For more information, please contact the administration in your community. Customer service/importer: DS Produkte GmbH, Am Heisterbusch 1, 19258 Gallin, Germany Tel.: +49 38851 314650 *) *) Calls subject to a charge. All rights reserved. 31 08925_DE-GB-FR-NL_V0.indb 31 26.05.2014 09:20:38 FR Contenu Signification des symboles contenus dans ce mode d’emploi __________33 Utilisation adéquate ___________________________________________33 Consignes de sécurité _________________________________________34 Risques de blessure ______________________________________________ 34 Le bon raccordement ______________________________________________ 34 Le bon usage ____________________________________________________ 34 Étendue de la livraison et vue générale de l’appareil _________________36 Vue générale ____________________________________________________ 36 Vue de dos ______________________________________________________ 37 Embouts d'aspiration ______________________________________________ 37 Avant la première utilisation ____________________________________38 Assemblage_________________________________________________38 Mettre en place/retirer le tuyau ______________________________________ Mettre en place/retirer le tube télescopique ____________________________ Régler la longueur du tube télescopique _______________________________ Mettre en place/retirer les embouts d'aspiration _________________________ Retirer/mettre en place le bac à poussière _____________________________ 38 39 39 39 39 Utilisation ___________________________________________________40 Nettoyer l’appareil ____________________________________________ 41 Vider et nettoyer le bac à poussière ___________________________________42 Nettoyer le filtre à poussière et filtre à poussière en mousse _______________ 43 Nettoyage du filtre de sortie d’air _____________________________________ 44 Rangement _________________________________________________45 Suppression des défauts _______________________________________46 Données techniques __________________________________________46 Élimination __________________________________________________ 47 32 08925_DE-GB-FR-NL_V0.indb 32 26.05.2014 09:20:38 Chère cliente, cher client, nous nous réjouissons que vous ayez décidé d'acheter cet aspirateur pratique. Avant d’utiliser pour la première fois l‘appareil, veuillez lire attentivement ce mode d’emploi et le conserver précieusement. Si vous cédez l‘appareil à un tiers, veuillez également lui remettre ce mode d’emploi. Le fabricant et l’importateur déclinent toute responsabilité si les indications de ce mode d’emploi ne sont pas respectées ! Dans le cadre de l‘évolution permanente, nous nous réservons le droit de modifier à tout moment l‘appareil, l‘emballage et les documents d‘accompagnement. Faites attention : Les illustrations dans ce mode d’emploi peuvent différer facilement de l’appareil réel. Si vous avez des questions, veuillez vous adresser au service après-vente sur notre site Internet : www.service-shopping.de Signification des symboles contenus dans ce mode d’emploi Toutes les consignes de sécurité sont marquées de ce symbole. Veuillez lire attentivement et entièrement ces consignes et tenez-vous en aux consignes de sécurité pour éviter les dommages corporels et matériels. Tous les conseils et recommandations sont caractérisés par ce symbole. Utilisation adéquate ❐ Cet appareil est destiné à aspirer de la poussière ménagère normale. ❐ N'aspirez en aucun cas les choses suivantes : – des liquides et les substances humides (p. ex. le shampooing à moquette humide) – de la cendre incandescente, des mégots de cigarettes, des allumettes etc. – des matières inflammables – de la poussière très fine (p. ex. de la poussière de béton), des cendres ou du toner – des objets pointus et durs, comme, p. ex. de gros débris de verre ❐ Cet appareil peut être utilisé par les enfants à partir de 8 ans et les personnes dont les capacités physiques, sensorielles ou mentales sont réduites ou manquant d’expérience et / ou de connaissances lorsqu’elles sont sous surveillance ou qu’elles ont été instruites quant à l’utilisation sécurisée de l’appareil et qu’elles ont compris les risques en découlant. Les enfants ne doivent pas jouer avec l’appareil. Le nettoyage et l’entretien utilisateur ne doivent pas être réalisés par les enfants sauf qu’ils sont sous surveillance. ❐ L’appareil est destiné à un usage en privé, pas pour une utilisation commerciale. 33 08925_DE-GB-FR-NL_V0.indb 33 26.05.2014 09:20:38 ❐ Utilisez l’appareil uniquement comme la description du mode d’emploi. Toute autre utilisation est considérée comme contraire aux dispositions. ❐ Sont exclus de la garantie tous les défauts causés par une manipulation non appropriée, par un dommage ou par des tentatives de réparation par un tiers. Ceci est aussi valable pour l’usure normale. Consignes de sécurité Risques de blessure ❐ Risque d'asphyxie ! Gardez le matériel d'emballage loin des enfants et des animaux. ❐ Gardez l'appareil, le câble et les fiches électriques éloignés de l'eau ou d'autres liquides afin d'éviter toute électrocution. Ne touchez jamais la fiche électrique, le câble ou l'appareil lorsque vous avez les mains mouillées. ❐ Gardez les animaux, les cheveux, les bijoux, les vêtements amples, les doigts et les autres parties du corps éloignés des embouts de l'appareil. Vous pourriez les aspirer et rester coincé. Cependant, si l'aspirateur devait se bloquer, coupez l'alimentation électrique immédiatement. ❐ Lors du nettoyage de marches d'escalier, soyez particulièrement prudent pour ne pas tomber. ❐ Lorsque vous passez l'aspirateur, portez des chaussures solides. ❐ Utilisez et rangez l’appareil uniquement hors de portée des enfants. Une utilisation non appropriée peut causer des blessures et des électrocutions. Même le câble d’alimentation ne doit pas être accessible aux enfants. Le bon raccordement ❐ Branchez l’appareil uniquement à une prise électrique installée dans les règles. Après le branchement, la prise doit aussi être bien accessible. La tension électrique doit correspondre aux données techniques de l'appareil (voir chapitre « Données techniques »). Utilisez uniquement des câbles de rallonge corrects dont les données techniques correspondent à celles de l’appareil. ❐ Veillez à ce que le câble électrique ne représente pas un risque de trébuchement, qu'il ne soit pas écrasé ni plié et qu’il n’entre pas en contact avec des surfaces chaudes. Le bon usage ❐ Utilisez et rangez l'appareil uniquement dans des pièces fermées. N'utilisez l'appareil ni en extérieur ni dans des locaux à forte humidité de l'air ou sur des surfaces brûlantes. ❐ Vérifiez avant chaque utilisation que l’appareil et les accessoires ne sont pas endommagés. Lorsque l’appareil, le câble, la fiche électrique ou un filtre présentent des dommages visibles, l’appareil ne doit plus être utilisé. N'essayez pas de réparer 34 08925_DE-GB-FR-NL_V0.indb 34 26.05.2014 09:20:38 ❐ ❐ ❐ ❐ ❐ ❐ ❐ ❐ ❐ ❐ ❐ ❐ ❐ ❐ ❐ ❐ ❐ ❐ vous-même l'appareil ou de remplacer des pièces. Contactez le service après-vente en cas de dommages. N'utilisez pas l'appareil s'il présente un dysfonctionnement, si des liquides ou des objets ont été aspirés ou si l'appareil est tombé. Faites réparer l’appareil par un professionnel. N'utilisez l'appareil que lorsqu'il est entier et correctement assemblé ! Le bac à poussière et les filtres doivent être en place et ne présenter aucun dommage ! Si de la saleté venait à pénétrer à l'intérieur de l'appareil, ceci pourrait causer des dommages sur le moteur. Pour que le bac à poussière soit correctement utilisé, il faut qu'il soit fermé. N'exposez pas l'appareil à des températures extrêmes, à de fortes variations de température, au feu, aux rayons directs du soleil ou à l'humidité. Ne laissez pas tomber l’appareil et ne l’exposez pas à de forts chocs. Ne posez jamais des objets lourds sur l'appareil. Ne plongez pas l'appareil dans de l'eau ou d'autres liquides pour éviter toute électrocution. Ne versez aucun liquide dans le bac à poussière. Ne touchez jamais l’appareil, le câble ou la prise électrique lorsque vous avez les mains mouillées. Dans les ouvertures/les embouts, n'introduisez aucun objet et veillez à ce qu'elles ne soient pas bouchés. Ne laissez jamais l'appareil en marche ni branché sur le secteur sans surveillance. Coupez l'appareil et débranchez la prise électrique – lorsque vous interrompez le travail avec l'appareil, – lorsque vous n'utilisez pas l'appareil, – avant de remplacer les accessoires, – si, pendant le fonctionnement, une erreur ou une panne survient, – lorsque des liquides ou des corps étrangers ont pénétré dans l'appareil, – avant un orage, – avant de nettoyer les pièces de l'appareil et des accessoires. L'appareil doit être arrêté lorsque vous débranchez ou branchez la fiche électrique dans la prise. Débranchez toujours au niveau de la prise, ne tirez jamais le câble ! Ne tirez jamais l'appareil par le câble pour le déplacer. Utilisez les poignées. N'essayez pas de lubrifier les roulettes avec du lubrifiant ou de l'huile. La poussière ou la saleté y resterait sinon collée. Videz le bac à poussière après usage. Même les filtres doivent être régulièrement nettoyés pour éviter une surcharge du moteur. Le bac à poussière, le filtre à poussière en plastique et le filtre d'air évacué doivent être totalement secs avant de les réutiliser sur l'appareil. Utilisez uniquement des accessoires d’origine du fabricant. En cas de non-utilisation, rangez l'appareil dans un endroit frais, sec, inaccessible pour les enfants et les animaux. 35 08925_DE-GB-FR-NL_V0.indb 35 26.05.2014 09:20:38 Étendue de la livraison et vue générale de l’appareil Pour commander des accessoires/pièces de rechange, veuillez aller sur notre site Internet : www.service-shopping.de Vue générale 1 11 10 9 8 2 3 4 7 5 6 1 2 3 4 5 6 7 tuyau d‘aspiration Bac à poussière Filtre à poussière en plastique (dans le bac à poussière) Raccord Fond du bac à poussière Suceur pour sols Logement du filtre d‘air évacué 8 Filtre à poussière dans le couvercle du bac à poussière 9 Couvercle du bac à poussière avec poignée 10 Tube télescopique 11 Clapet de régulation d‘aspiration sur la poignée du flexible d‘aspiration 36 08925_DE-GB-FR-NL_V0.indb 36 26.05.2014 09:20:38 Vue de dos 12 13 17 14 16 15 12 Bouton de déverrouillage du bac de poussière 13 Interrupteur Marche/Arrêt 14 Support pour accrocher l’embout de sol 15 Suceur pour fentes, à brosse intégrée 16 Fiche électrique 17 Touche pour enrouler le câble Embouts d'aspiration ATTENTION ! ❐ Avant de remplacer les embouts, arrêtez toujours l'aspirateur en premier lieu. Embout de sol L’embout de sol convient aussi bien aux moquettes qu'aux sols lisses. Avec le levier à pédale vous pouvez commuter entre moquette et sol lisse. Pour les sols lisses, une brosse sort par dessous. 37 08925_DE-GB-FR-NL_V0.indb 37 26.05.2014 09:20:39 Suceur pour fentes, à brosse intégrée Vous pouvez trouver le suceur pour fentes, à brosse intégrée dans le compartiment de rangement dans l’unité moteur (voir paragraphe « Vue de dos »). Appuyez sur la brosse vers le bas pour pour transformer le suceur à brosse en un suceur pour fentes: • Le suceur pour fentes convient pour le nettoyage des meubles matelassés, de l’intérieur des voitures et de tous les recoins qui ne sont pas accessibles avec les autres suceurs. • Le suceur à brosse convient pour le nettoyage de tous les objets aux surfaces irrégulières, tels que les meubles, les lampes, les moulures, les plinthes, les appuis de fenêtres, etc. Avant la première utilisation ATTENTION ! ❐ Risque d’asphyxie ! Gardez le matériel d’emballage loin des enfants et des animaux. • • Déballez toutes les pièces et vérifiez l’intégralité de la livraison (voir chapitre « Étendue de la livraison et vue générale de l’appareil ») ainsi que les éventuels dommages de transport. Si les composants comportaient des dommages, ne les utilisez pas (!) mais contactez notre service après-vente. Si nécessaire, retirez les morceaux de papier et les autocollants etc. du bac à poussière. Dans le chapitre « Nettoyage de l’appareil », vous trouvez les informations sur la façon de retirer et ouvrir le bac à poussière. Assemblage ATTENTION ! ❐ Assurez-vous que l’appareil n‘est pas branché au secteur avant d‘installer ou d‘enlever les accessoires. Mettre en place/retirer le tuyau • • Branchez le raccord du tuyau d'aspiration dans l'ouverture d'aspiration (voir flèche). On doit entendre un clic. Pour retirer le tuyau d'aspiration, appuyez sur les crans du raccord et sortez le tuyau. 38 08925_DE-GB-FR-NL_V0.indb 38 26.05.2014 09:20:39 Mettre en place/retirer le tube télescopique • • • Introduisez le tuyau d‘aspiration dans la poignée jusqu’à ce qu’il s’enclenche audiblement. Introduisez l'extrémité ouverte de la poignée dans l'ouverture du tube télescopique. Faites tourner la poignée dans un sens et l'autre. Vérifiez ensuite le bon raccordement. Pour retirer le tube télescopique, retirez-le de la poignée. Régler la longueur du tube télescopique • • Introduisez l‘extrémité ouverte de la poignée dans l‘ouverture du tube télescopique. Faites tourner la poignée dans un sens et l‘autre. Vérifiez ensuite le bon raccordement. Relâchez le coulisseau et poussez encore un peu le tube jusqu'à ce qu'il s'enclenche. Mettre en place/retirer les embouts d'aspiration • • • Introduisez l'extrémité libre du tube télescopique jusqu'à la butée dans une des embouts d'aspiration fournies. Faites tourner la poignée dans un sens et l'autre. Pour plus de souplesse, vous pouvez aussi introduire les embouts d'aspiration directement sur le tuyau d'aspiration, sans tube télescopique. Pour retirer un embout d'aspiration, tirez-la simplement. Retirer/mettre en place le bac à poussière • • Retirer : Appuyez sur la touche de déverrouillage et retirez le bac à poussière de l'appareil en le prenant par la poignée. Mettre en place : Prenez le bac à poussière par la poignée et placez d'abord le fond du bac dans l'appareil (le fond est orienté vers le bas, la poignée vers le haut). Ensuite, appuyez la poignée en direction du boîtier de l'appareil jusqu'à ce que le bac à poussière s'enclenche dans le verrouillage. Maintenez l'appareil par la poignée de transport et soulevez-le pour vérifier que le bac à poussière est bien en place. 39 08925_DE-GB-FR-NL_V0.indb 39 26.05.2014 09:20:39 Utilisation ATTENTION ! ❐ Veillez à maintenir les suceurs à une distance suffisante du corps et à ne pas y engager les doigts. Sous l’effet de l’aspiration, ceux-ci risqueraient d’adhérer fermement à l’appareil / de se blesser. S’il arrive toutefois que l’aspirateur fasse ventouse et ne se décolle plus, arrêtez immédiatement l’appareil (enfoncez l’interrupteur marche/arrêt ). ❐ Durant l’utilisation, tenez les suceurs à distance des animaux. N’essayez pas d’aspirer les animaux avec cet appareil. Sous l’effet de l’aspiration, ceux-ci risqueraient d’adhérer fermement à l’appareil / de se blesser. S’il arrive toutefois que l’aspirateur fasse ventouse et ne se décolle plus, arrêtez immédiatement l’appareil (enfoncez l’interrupteur marche/arrêt ). ❐ Avant de mettre l’aspirateur en marche, vérifiez impérativement l’assemblage complet de toutes les pièces ainsi que le montage correct du bac à poussière et de tous les filtres. ❐ Avant de mettre l’aspirateur en marche, déroulez au moins les deux tiers du cordon afin qu’il ne surchauffe pas pendant le fonctionnement. Afin d’éviter toute détérioration, ne forcez pas en tirant le cordon jusqu’à la butée (pas plus loin que la marque rouge se trouvant sur le cordon) ! ❐ Avant de procéder à un changement de suceur, de monter ou de retirer d’autres accessoires, arrêtez toujours d’abord l’appareil, puis débranchez la fiche de la prise ! ❐ N’aspirez en aucun cas les matières suivantes : – liquides ou matières mouillées (par ex. du shampooing moquette au mouillé) ; – cendres, mégots, allumettes encore incandescents, etc. ; – matières combustibles ou inflammables ; – poussières très fines (par ex. poussière de béton), cendres ou toner ; – objets durs à angles vifs, tels que des éclats de verre assez gros. 1. Vérifiez le montage correct de l’accessoire sur l’appareil (voir paragraphe « Assemblage »). 2. Déroulez le cordon d’alimentation à la longueur voulue, l’idéal étant jusqu’à la marque jaune et sans dépasser la marque rouge ! 3. Branchez la fiche de l’appareil sur une prise réglementaire bien accessible. 4. Appuyez sur l’interrupteur marche/arrêt pour mettre l’aspirateur en marche. 5. Passez le suceur sur la surface à nettoyer. Au cours du travail, l’aspirateur peut être tiré comme un traîneau. 6. Appuyez à nouveau sur l’interrupteur marche/arrêt afin d’arrêter l’aspirateur une fois le ménage terminé. 7. Retirez la fiche de la prise de courant, tenez fermement le cordon d’alimentation électrique et appuyez sur la touche d’enroulement du cordon avec le pied. En retenant le cordon d’alimentation, on évite par ex. le « coup de fouet aux jambes » qui pourrait se produire en cas d’enroulement intempestif. 40 08925_DE-GB-FR-NL_V0.indb 40 26.05.2014 09:20:40 8. Pour une performance optimale de l’appareil, videz le bac à poussière après chaque utilisation et nettoyez régulièrement tous les filtres (voir paragraphe « Nettoyage de l’appareil »). Conseil : la poignée est équipée d’un clapet de régulation d’aspiration. Ouvrez-le (en faisant coulisser le cache) pour réduire la puissance d’aspiration lorsque vous aspirez des meubles rembourrés, des tapis ou des objets mobiles légers. Normalement, il convient de laisser le clapet de régulation d’aspiration fermé pour ne pas réduire inutilement la puissance d’aspiration. Nettoyer l’appareil ATTENTION ! ❐ Vider le bac à poussière régulièrement, idéalement après chaque utilisation. Videz le bac à poussière lorsqu‘il est plein (voir la marque MAX sur le bac à poussière). ❐ Nettoyez les filtres régulièrement pour éviter toute surchauffe du moteur. ❐ Avant d'effectuer des travaux de nettoyage sur l'appareil, débranchez toujours la fiche de la prise électrique. ❐ Gardez l'appareil, le câble et la fiche électrique éloignés de l'eau ou d'autres liquides afin d'éviter toute électrocution. Lors du nettoyage, veillez à ce qu'aucun liquide ne pénètre dans l'appareil. Seuls le filtre à poussière en plastique, le bac à poussière et le filtre d'air évacué peuvent être nettoyés à l'eau. Cependant, avant d'être remis dans l'appareil, ils doivent être complètement secs. ❐ Ne nettoyez jamais le filtre à poussière dans le couvercle de bac à l’eau ou autres liquides. ❐ Le filtres ne peuvent être ni lavées en machine, ni en lave-vaisselle ni séchées en séchoir ! Séchez les filtres exclusivement à l'air libre, en aucun cas avec un sèchecheveux. ❐ Pour nettoyer, n'utilisez aucun détergent ni serviette de nettoyage agressif ou abrasif. Ceux-ci pourraient endommager la surface. • • • Nettoyez le bac à poussière, le filtre à poussière en plastique et le filtre de sortie d’air à intervalles réguliers ainsi qu’à chaque fois que vous remarquez une baisse de puissance de l’aspiration. Si nécessaire, nettoyez le corps de l’appareil avec un chiffon doux humide. Pour finir, essuyez le tout avec un chiffon doux. Enlevez régulièrement les cheveux et peluches restés dans les suceurs. Avec le temps, on peut observer une coloration des filtres. C’est un phénomène normal qui ne nuit en rien à la fonctionnalité de l’appareil. 41 08925_DE-GB-FR-NL_V0.indb 41 26.05.2014 09:20:40 Vider et nettoyer le bac à poussière 1. Appuyez sur la touche de déverrouillage du bac à poussière et retirez-le par la poignée hors de l'appareil. 2. Maintenez le bac à poussière au-dessus d'une poubelle ouverte. La distance par rapport à la poubelle devra être la plus petite possible pour que la poussière ne tombe que dans la poubelle et non pas aux alentours. 3. Appuyez sur la touche pour ouvrir le bac à poussière. Le fond du bac à poussière s'ouvre et la saleté tombe. 4. Refermez le fond du bac à poussière. Pour la fermeture, on doit entendre un clic. 5. Si vous voulez nettoyer le bac à poussière vous devez retirer le couvercle du bac à poussière en tournant le couvercle et retirer-le. REMARQUE : sur le couvercle et le bac à poussière même sont apposées des marques avec flèches pour vous faciliter le retrait et la mise en place du couvercle. Le couvercle s’enlève lorsque la ▼ marque sur le couvercle pointe vers le symbole placé sur le bac à poussière. Si nécessaire, rincez abondamment le bac à poussière à l’eau tiède et propre. ATTENTION : ne nettoyez en aucun cas le bac à poussière au lave-linge ou au lave-vaisselle ! Ensuite, éliminez l’excédent d’eau en secouant le bac à poussière et laissez-le sécher intégralement à l’air libre. 6. Quand le bac à poussière est entièrement sèche, revissez le couvercle du bac à poussière à sa place. REMARQUE : sur le couvercle et le bac à poussière même sont apposées des marques avec flèches pour vous faciliter le retrait et la mise en place du couvercle. Placez le couvercle sur le bac à poussière. La ▼ marque sur le couvercle doit pointer vers le symbole. Le couvercle s’enclenche lorsque la ▼ marque sur le couvercle pointe vers le symbole placé sur le bac à poussière. 7. Placez le bac à poussière dans l’appareil : saisissez-le par la poignée de préhension et insérez d’abord le fond du bac dans l’appareil. Puis appuyez la poignée contre le corps de l’appareil jusqu’à ce que le bac à poussière s’enclenche dans le verrouillage en produisant un déclic audible. Saisissez l’appareil par la poignée de préhension et soulevez-le pour vérifier que le bac à poussière soit bien en place. 42 08925_DE-GB-FR-NL_V0.indb 42 26.05.2014 09:20:40 Nettoyer le filtre à poussière et filtre à poussière en mousse 1. Appuyez sur la touche de déverrouillage du bac à poussière et retirez-le par la poignée hors de l‘appareil. 2. Sur le couvercle du bac à poussière se trouve le filtre à poussière. Pour ouvrir le couvercle du bac à poussière, déverrouillez-le au niveau de la poignée pour ensuite le relever. 3. Retirez le filtre à poussière pour le nettoyer. Tapotez le filtre à poussière au-dessus d’une poubelle puis brossezle pour éliminer la saleté. Au besoin, essuyez le filtre à poussière avec un chiffon humide. Ne nettoyez jamais le filtre à poussière à l’eau. 4. Si vous voulez nettoyer le filtre à poussière en plastique vous devez retirer le couvercle du bac à poussière en tournant le couvercle et retirer-le. REMARQUE : sur le couvercle et le bac à poussière même sont apposées des marques avec flèches pour vous faciliter le retrait et la mise en place du couvercle. Le couvercle s’enlève lorsque la ▼ marque sur le couvercle pointe vers le symbole placé sur le bac à poussière. Si nécessaire, rincez abondamment le bac à poussière à l’eau tiède et propre. 5. Retirer le couvercle du bac à poussière du filtre à poussière en plastique. Le couvercle est placé fermement sur le filtre à poussière en plastiqe. Pour retirer le couvercle vous devez appuyer sur le couvercle. 43 08925_DE-GB-FR-NL_V0.indb 43 26.05.2014 09:20:41 6. Si nécessaire, rincez abondamment le filtre à poussière en plastique à l’eau tiède et propre. ATTENTION : ne nettoyez en aucun cas le filtre à poussière en plastique ou le bac à poussière au lave-linge ou au lave-vaisselle ! Ensuite, éliminez l’excédent d’eau en secouant le filtre et laissez-le sécher intégralement à l’air libre avant de le remettre en place. 7. Si nécessaire, nettoyez le couvercle à poussière avec un chiffon doux humide et placez le filtre à poussière en plastique dans le couvercle à poussière. Veillez à ce que le filtre s’enclenche correctement. 8. Revissez le couvercle du bac à poussière avec le filtre à poussière en plastiqe au bac à poussière. REMARQUE : sur le couvercle et le bac à poussière même sont apposées des marques avec flèches pour vous faciliter le retrait et la mise en place du couvercle. Placez le couvercle sur le bac à poussière. La ▼ marque sur le couvercle doit pointer vers le symbole. Le couvercle s’enclenche lorsque la ▼ marque sur le couvercle pointe vers le symbole placé sur le bac à poussière. 9. Placez le filtre à poussière dans le couvercle du bac à poussière. Fermez le couvercle du bac à poussière. Veillez à ce que le verrouillage du couvercle s’enclenche correctement. 10. Placez le bac à poussière dans l’appareil : saisissez-le par la poignée de préhension et insérez d’abord le fond du bac dans l’appareil. Puis appuyez la poignée contre le corps de l’appareil jusqu’à ce que le bac à poussière s’enclenche dans le verrouillage en produisant un déclic audible. Saisissez l’appareil par la poignée de préhension et soulevez-le pour vérifier que le bac à poussière soit bien en place. Nettoyage du filtre de sortie d’air Le filtre de sortie d’air se trouve dans le compartiment sur le côté de l’aspirateur (voir paragraphe « Étendue de la livraison et vue générale de l’appareil », section « Vue générale »). REMARQUE : sur le couvercle du compartiment de filtre de sortie d’air et l’unité moteur sont apposées des marques avec flèches pour vous faciliter le retrait et la mise en place du couvercle. 44 08925_DE-GB-FR-NL_V0.indb 44 26.05.2014 09:20:42 1. Ouvrez le compartiment en tournant le couvercle dans le sens de la flèche OPEN (Ouvrir) et retirez le couvercle . 2. Enlevez le filtre de sortie d’air en l’extrayant du compartiment du filtre. 3. Tapotez le filtre de sortie d’air au-dessus d’une poubelle puis brossez-le pour éliminer la saleté. 4. Si nécessaire, rincez abondamment le filtre de sortie d’air à l’eau chaude et propre. ATTENTION : ne nettoyez en aucun cas le filtre au lave-linge ou au lave-vaisselle ! Ensuite, éliminez l’excédent d’eau en secouant le filtre et laissez-le sécher intégralement à l’air libre avant de le remettre en place. 5. Remettez en place le filtre de sortie d’air dans le compartiment du filtre une fois toutes les pièces sèches. 6. Replacez le couvercle du filtre sur le compartiment du filtre de sortie d’air. Assurezvous que la flèche pointant vers le haut sur le couvercle du compartiment est en ligne avec la flèche gauche sur l’unité moteur et maintenant tournez le couvercle du compartiment dans le sens de la flèche LOCK (Fermer). Rangement • • • Pour le rangement pratique, vous pouvez accrocher l’embout de sol dans le support au dos de l'appareil et plier le tube télescopique le plus possible. Rangez le suceur pour fentes, à brosse intégrée dans le compartiment dans l’unité moteur (voir paragraphe « Étendue de la livraison et vue générale de l’appareil », section « Vue de dos »). Rangez l'aspirateur de manière à ce qu'il ne soit accessible ni pour les enfants ni pour les animaux, dans un endroit sec et frais. 45 08925_DE-GB-FR-NL_V0.indb 45 26.05.2014 09:20:42 Suppression des défauts Si votre appareil devait ne pas fonctionner correctement, présenter un dommage ou nécessiter une pièce de rechange, veuillez vous adresser au service après-vente. Pour votre propre sécurité, n'effectuez aucune réparation vous-même. Dans le tableau suivant, vous trouverez des astuces pour pouvoir résoudre de petits problèmes. Problème Cause possible/Solutions/Astuces • L'appareil n'aspire pas. • • • • La fiche n'est pas bien branchée dans la prise électrique ? Corrigez l'emplacement de la prise électrique. Est-ce que la prise électrique est défectueuse ? Branchez dans une autre prise. Vérifiez le fusible de votre branchement au secteur. Est-ce que les filtres sont bouchés ? Nettoyez le filtre à poussière et le filtre d'air évacué. Est-ce que la vanne de déviation d'air sur la poignée est ouverte ? Fermez-la. Est-ce que le bac à poussière est plein ? Videz le bac. Est-ce que les filtres sont fortement encrassés ? Nettoyez-les. Est-ce que l’embout, le tube télescopique ou le tuyau d'aspiration est bouché ? Arrêtez l'appareil, débranchez la prise électrique et enlevez le bouchon (voir chapitre « Assemblage »). La puissance d'aspiration est faible. • • • En aspirant, de la poussière sort de l'appareil. • Est-ce que le bac à poussière n'est pas correctement fermé et/ou pas (correctement) placé dans l'appareil ? Faites la correction nécessaire. Le câble d'alimentation ne peut pas être entièrement enroulé. • Le câble n'a pas été correctement enroulé dans l'appareil. Retirez-le un peu et actionnez ensuite de nouveau la touche pour enrouler le câble. Pendant • l'aspiration, une odeur désagréable se dégage. Est-ce que l'appareil est utilisé pour la première fois ? Lors de la première utilisation d'appareils neufs, il se dégage souvent une odeur. L'odeur devra disparaître lorsque l'appareil aura été utilisé plusieurs fois. Données techniques Numéro de modèle : Numéro de référence : Alimentation électrique : Puissance : Catégorie de protection : VC349 Z 08925 220 – 240 V~ 50/60 Hz 650 W II 46 08925_DE-GB-FR-NL_V0.indb 46 26.05.2014 09:20:42 Élimination Le matériel d’emballage peut être réutilisé. Il faut mettre l’emballage au rebut en respectant l’environnement et l’apporter au service de collecte de matières recyclables. Éliminez l'appareil en respectant l'environnement. Il ne doit pas être jeté avec les déchets ménagers. Éliminez-le dans un centre de recyclage pour les appareils électriques et électroniques usés. De plus amples informations sont à disposition auprès de votre municipalité. Service après-vente/importateur : DS Produkte GmbH, Am Heisterbusch 1, 19258 Gallin, Allemagne Tél. : +49 38851 314650 *) *) Appel payant. Tous droits réservés. 47 08925_DE-GB-FR-NL_V0.indb 47 26.05.2014 09:20:42 NL Inhoud Betekenis van de symbolen in deze handleiding_____________________49 Reglementair gebruik _________________________________________49 Veiligheidsinstructies __________________________________________50 Verwondingsgevaren ______________________________________________ 50 Juiste aansluiting _________________________________________________ 50 Het juiste gebruik _________________________________________________ 50 Leveringspakket en overzicht van het apparaat _____________________52 Volledig overzicht _________________________________________________ 52 Achteraanzicht ___________________________________________________ 53 Zuigmondstukken_________________________________________________ 53 Voor het eerste gebruik ________________________________________54 Montage ___________________________________________________54 Zuigslang plaatsen/verwijderen ______________________________________ Telescopische buis plaatsen/verwijderen ______________________________ Lengte van de telescopische buis verstellen ____________________________ Zuigmondstukken aanbrengen/verwijderen ____________________________ Stofbak verwijderen/plaatsen _______________________________________ 54 55 55 55 55 Bediening __________________________________________________56 Apparaat reinigen ____________________________________________57 Stofbak leegmaken en reinigen ______________________________________ 57 Stoffilter en kunststof stoffilter reinigen ________________________________ 58 Filter voor afvoerlucht reinigen ______________________________________ 60 Bewaring ________________________________________________________61 Oplossing van fouten__________________________________________ 61 Technische gegevens _________________________________________62 Verwijdering_________________________________________________62 48 08925_DE-GB-FR-NL_V0.indb 48 26.05.2014 09:20:42 Geachte klant, We zijn blij dat u hebt gekozen voor deze vloerstofzuiger. Voordat u het apparaat voor het eerst in gebruik neemt, dient u de handleiding zorgvuldig te lezen en goed te bewaren. Als u het apparaat aan iemand anders geeft, dient u ook de handleiding te overhandigen. Producent en importeur zijn niet aansprakelijk, wanneer de gegevens in deze handleiding niet worden opgevolgd! In het kader van de voortdurende ontwikkeling behouden we ons het recht voor, apparaat, verpakking of bijgeleverde documenten op elk moment te wijzigen. Let erop: De afbeeldingen in deze handleiding kunnen iets van het werkelijke apparaat afwijken. Hebt u vragen, contacteer dan de klantenservice via onze website: www.service-shopping.de Betekenis van de symbolen in deze handleiding Alle veiligheidsinstructies zijn met dit symbool aangeduid. Neem deze aandachtig door en houd u aan de veiligheidsinstructies om lichamelijke letsels en materiële schade te vermijden. Tips en aanbevelingen zijn aangeduid met dit symbool. Reglementair gebruik ❐ Dit apparaat is bedoeld voor het opzuigen van normaal huisstof. ❐ Zuig zeker niet de volgende zaken op: – vloeistoffen of vochtige stoffen (bijv. vochtige tapijtshampoo) – gloeiende as, sigarettenpeuken, lucifers etc. – brandbare of ontvlambare stoffen – zeer fijn stof (bijv. betonstof), as of toner – puntige, harde voorwerpen, zoals groter glassplinters ❐ Dit apparaat kan worden gebruikt door kinderen vanaf 8 jaar alsook door personen met beperkte lichamelijke, sensorische of geestelijke vermogens of kinderen die niet beschikken over ervaring en/of kennis, wanneer zij onder toezicht staan en instructies hebben gekregen over hoe het apparaat op veilige wijze kan worden gebruikt en wanneer zij de daaruit voortvloeiende gevaren hebben begrepen. Kinderen mogen niet met het apparaat spelen. Reiniging en gebruikersonderhoud mogen niet worden uitgevoerd door kinderen, tenzij zij onder toezicht staan. ❐ Het apparaat werd ontworpen voor het privégebruik, niet voor commerciële doeleinden. ❐ Gebruik het apparaat alleen volgens de beschrijvingen in de handleiding. Elk ander gebruik geldt als onreglementair. 49 08925_DE-GB-FR-NL_V0.indb 49 26.05.2014 09:20:42 ❐ De garantie dekt geen gebreken die ontstaan door verkeerd gebruik, beschadiging of reparatiepogingen. Dit geldt ook voor de normale slijtage. Veiligheidsinstructies Verwondingsgevaren ❐ Verstikkingsgevaar! Houd het verpakkingsmateriaal weg van kinderen en dieren. ❐ Houd het apparaat, het snoer en de stekker uit de buurt van water of andere vloeistoffen om elektrische schokken te vermijden. Raak de stekker, het snoer of het apparaat nooit met natte of vochtige handen aan. ❐ Houd dieren, haar, sieraden, ruime kledij, vingers en alle overige lichaamsdelen weg van de mondstukken van het apparaat. Ze kunnen worden vastgezogen. Zuigt de stofzuiger zich toch eens vast, schakel het apparaat dan meteen uit. ❐ Wees bijzonder voorzichtig bij de reiniging van trappen, zodat u niet valt. ❐ Draag vast schoeisel bij het gebruik. ❐ Gebruik en bewaar het apparaat alleen buiten het bereik van kinderen. Verkeerd gebruik kan leiden tot letsels en elektrische schokken. Ook het elektrische snoer mag voor kinderen niet toegankelijk zijn. Juiste aansluiting ❐ Sluit het apparaat alleen aan op een reglementair geïnstalleerd stopcontact. Het stopcontact moet ook na de aansluiting goed toegankelijk zijn. De netspanning moet overeenstemmen met de technische gegevens van het apparaat (zie hoofdstuk “Technische gegevens”). Gebruik alleen reglementaire verlengsnoeren, waarvan de technische gegevens overeenstemmen met die van het apparaat. ❐ Zorg ervoor dat het aangesloten snoer geen struikelblok vormt, dat het niet wordt geklemd of geplooid en niet in aanraking komt met hete oppervlakken. Het juiste gebruik ❐ Gebruik en berg het apparaat slechts op in gesloten ruimten. Gebruik het niet in open lucht, in ruimten met een hoge luchtvochtigheid of op hete oppervlakken. ❐ Kijk het apparaat en de toebehoren voor elk gebruik na op beschadigingen. Als het apparaat, het snoer, de stekker of een filter zichtbare schade vertonen, mag het apparaat niet worden gebruikt. Probeer niet het apparaat eigenhandig te repareren of onderdelen te vervangen. Contacteer bij schade de klantenservice. ❐ Gebruik het apparaat niet als het een storing vertoonde, als er vloeistoffen of voorwerpen werden opgezogen of als het apparaat is gevallen. Laat het apparaat nakijken door een gekwalificeerd vakman. ❐ Gebruik het apparaat alleen als het volledig en correct werd gemonteerd! De stofbak en de filters moeten geplaatst en onbeschadigd zijn! Als er vuil binnenin het 50 08925_DE-GB-FR-NL_V0.indb 50 26.05.2014 09:20:43 ❐ ❐ ❐ ❐ ❐ ❐ ❐ ❐ ❐ ❐ ❐ ❐ ❐ ❐ ❐ ❐ apparaat belandt, kan er motorschade ontstaan. Om de stofbak correct te kunnen plaatsen, moet hij gesloten zijn. Stel het apparaat niet bloot aan extreme temperaturen, hevige temperatuurschommelingen, een open vuur, directe zonnestralen, vochtigheid of natheid. Zorg ervoor dat het apparaat niet valt en dat het geen hevige schokken ondergaat. Plaats nooit zware voorwerpen op het apparaat. Dompel het apparaat niet onder in water of andere vloeistoffen, zodat elektrische schokken worden vermeden. Doe geen hete vloeistoffen in het reservoir. Raak het apparaat, het snoer of de stekker nooit met vochtige handen aan. Steek niets in de openingen/mondstukken van het apparaat en let erop dat deze niet zijn verstopt. Laat het apparaat nooit onbewaakt achter als het is aangesloten op het elektriciteitsnet. Schakel het apparaat uit en trek de stekker uit het stopcontact, – als u het werk met het apparaat onderbreekt, – als u het apparaat niet meer gebruikt, – vooraleer u de accessoires vervangt, – als er tijdens het gebruik een fout of een storing optreedt, – als er vloeistoffen of vreemde voorwerpen in het apparaat zijn beland, – voor een onweer, – alvorens delen van het apparaat en de accessoires te reinigen. Het apparaat moet zijn uitgeschakeld, als u de stekker uittrekt of hem in het stopcontact steekt. Trek steeds aan de stekker en nooit aan het snoer! Trek het apparaat nooit aan het snoer, om het te bewegen. Gebruik de grepen. Probeer niet de wielen met smeermiddel of olie te smeren. Dan zou het stof of het vuil nog meer aan de wielen blijven kleven. Maak de stofbak leeg na elk gebruik. Ook de filters moeten regelmatig worden gereinigd om een overbelasting van de motor te vermijden. Stofbak, kunststof stoffilter en afvoerluchtfilter moeten volledig droog zijn alvorens ze terug te plaatsen in het apparaat. Gebruik alleen originele vervangstukken van de producent. Bewaar het apparaat op een koele, droge en voor kinderen en dieren ontoegankelijke plaats als het niet wordt gebruikt. 51 08925_DE-GB-FR-NL_V0.indb 51 26.05.2014 09:20:43 Leveringspakket en overzicht van het apparaat Als u originele vervangstukken/accessoires wilt bijbestellen, gaat u naar onze website: www.service-shopping.de Volledig overzicht 1 11 10 9 8 2 3 4 7 5 6 1 2 3 4 5 6 Zuigslang Stofreservoir Kunststoffilter (in het stofreservoir) Aansluitstuk Stofreservoirbodem Vloerzuigmond 7 8 Afvoerluchtfiltervak Stoffilter in de deksel van het stofreservoir 9 Deksel van het stofreservoir met greep 10 Telescoopbuis 11 Luchtregelaar op de zuigslanggreep 52 08925_DE-GB-FR-NL_V0.indb 52 26.05.2014 09:20:43 Achteraanzicht 12 13 17 14 16 15 12 Ontgrendelkop voor de stofbak 13 Aan/uit schakelaar 14 Houder voor het inhaken van het vloermondstuk 15 Kieren- en borstelzuigmond 16 Stekker 17 Toets om het snoer op te rollen Zuigmondstukken OPGELET! ❐ Alvorens de mondstukken te vervangen, dient u steeds eerst de stofzuiger uit te schakelen. Vloermondstuk Het vloermondstuk is geschikt voor zowel tapijten als gladde vloeren. Met de voetschakelaar kunt u kiezen tussen tapijt en gladde vloer. Voor gladde vloeren wordt op de onderkant een borstel geschoven. 53 08925_DE-GB-FR-NL_V0.indb 53 26.05.2014 09:20:43 Kieren- en borstelzuigmond De kieren- en borstelzuigmond vindt u in het opbergvak onder de motoreenheid (zie afdeling „Achteraanzicht). Druk op de borstel om van de borstelzuigmond een kierenzuigmond te maken: • De kierenzuigmond is geschikt voor bekledingen, het interieur van auto’s en alle hoeken en gaten waar u met de andere zuigmond niet bij kunt. • De borstelzuigmond is geschikt voor alle oneffen voorwerpen, meubels, lampen, profielstrips en plinten, vensterbanken, enz. Voor het eerste gebruik OPGELET! ❐ Verstikkingsgevaar! Houd het verpakkingsmateriaal weg van kinderen en dieren. • • Pak alle onderdelen uit en controleer het leveringspakket op volledigheid (zie “Leveringspakket en overzicht van het apparaat”) en transportbeschadigingen. Indien er onderdelen schade vertonen, gebruik deze dan niet (!), maar contacteer onze klantenservice. Indien nodig, verwijder de briefjes en de stickers etc. van de stofbak. In het hoofdstuk “Apparaat reinigen” vindt u informatie voor het verwijderen en openen van de stofbak. Montage OPGELET! ❐ Zorg ervoor dat het apparaat niet op het stroomnet is aangesloten, als u accessoires aanbrengt of eraf haalt. Zuigslang plaatsen/verwijderen • • Steek het aansluitstuk van de zuigslang in de zuigopening (zie pijl). Dit moet hoorbaar vastklikken. Om de zuigslang te verwijderen, drukt u op de vergrendelclips van het aansluitstuk en trekt de zuigslang eruit. 54 08925_DE-GB-FR-NL_V0.indb 54 26.05.2014 09:20:44 Telescopische buis plaatsen/verwijderen • • • Steek de zuigslangn in de handgreep. Stecken Sie den Saugschlauch in den Handgriff tot deze vastklikt. Steek het gebogen uiteinde van de handgreep in de passende opening van de telescopische buis. Draai de handgreep daarbij lichtjes heen en weer. Controleer de verbinding vervolgens op stevig houvast. Als u de telescopische buis wilt verwijderen, trekt u hem van de handgreep af. Lengte van de telescopische buis verstellen • • Duw de schuif op de telescoopbuis naar beneden en trek de telescoopbuis er tot de gewenste lengte uit. Laat de schuiver los en beweeg de buis nog een stukje verder tot deze vastklikt. Zuigmondstukken aanbrengen/verwijderen • • • Steek het vrije uiteinde van de telescopische buis tot aan de aanslag in een van de meegeleverde zuigmondstukken. Draai het mondstuk daarbij lichtjes heen en weer. Voor meer flexibiliteit kunnen de zuigmondstukken ook direct op de zuigslang worden gestoken, zonder telescopische buis. Als u een zuigmondstuk wilt verwijderen, trekt u het eraf. Stofbak verwijderen/plaatsen • • Verwijderen: Druk op de ontgrendeltoets van de stofbak en neem hem aan de draaggreep uit het apparaat. Plaatsen: Neem de stofbak aan de greep vast en plaats eerst de bodem van de stofbak in het apparaat (de bodem wijst naar beneden, de greep naar boven). Druk dan de greep tegen de behuizing van het apparaat tot de stofbak hoorbaar vast klikt in de vergrendeling. Houd het apparaat aan de draaggreep en til het op om te controleren of de stofbak goed zit. 55 08925_DE-GB-FR-NL_V0.indb 55 26.05.2014 09:20:44 Bediening OPGELET! ❐ Houd de zuigmonden tijdens gebruik nooit in de buurt van lichaamsdelen en steek uw vingers er niet in. Zij zouden zich kunnen vastzuigen / u kunnen bezeren. Mocht stofzuiger zich echter toch eens vastzuigen, schakel dan het apparaat direct uit ( aan- / uitschakelaar omlaag drukken). ❐ Houd de zuigmonden tijdens gebruik uit de buurt van dieren. Probeer niet om dieren met het apparaat schoon te zuigen. Zij zouden zich kunnen vastzuigen / u kunnen bezeren. Mocht stofzuiger zich echter toch eens vastzuigen, schakel dan het apparaat direct uit ( aan- / uitschakelaar omlaag drukken). ❐ Schakel de stofzuiger in, wanneer u hebt vastgesteld, dat alle onderdelen compleet zijn gemonteerd en de stofbak en alle filters op de juiste wijze zijn geplaatst. ❐ Zodat het snoer tijdens bedrijf niet heet wordt, trekt u minimaal tweederde van zijn totale lengte uit het apparaat, voordat u de stofzuiger inschakelt. Trek de kabel er niet met geweld uit tot de aanslag (niet verder dan de rode markering op de kabel), om beschadigingen te voorkomen! ❐ Schakel het apparaat altijd eerst uit en trek de netstekker uit de contactdoos, voordat u een zuigmond verwisselt resp. overige toebehoren aanbrengt of verwijdert! ❐ Zuig in geen geval het volgende op: – vloeistoffen of natte stoffen (bijv. natte tapijtshampoo) – gloeiende as, sigarettenpeuken, luciferstokjes, enz. – brandbare of ontvlambare stoffen – zeer fijn stof (bijv. betonstof), as of toner – scherpe, harde voorwerpen zoals grote glassplinters 1. Zorg ervoor dat de toebehoren op de juiste manier aan het apparaat worden aangebracht (zie hoofdstuk ‘Montage’). 2. Trek het netsnoer zo ver uit de behuizing, als u nodig hebt, indien mogelijk tot aan de gele markering, echter niet verder dan de rode markering op het snoer! 3. Steek de netstekker in een correct geïnstalleerde, goed toegankelijke contactdoos. 4. Druk de aan-/uitschakelaar omlaag om de stofzuiger in te schakelen. 5. Leid de zuigmond over het te reinigen oppervlak. Tijdens het zuigen kan de stofzuiger als een slee worden voortgetrokken. 6. Druk de aan-/uitschakelaar na het stofzuigen weer omlaag, om de stofzuiger uit te schakelen. 7. Trek de netstekker uit de contactdoos, houd het netsnoer vast en druk de knop voor de snoeropwikkeling met de voet omlaag. Door het snoer vast te houden voorkomt u dat het snoer als een zweep tegen uw benen slaat. 8. Voor een optimale werking van het apparaat, dient u na elk gebruik de stofbak te legen en reinigt u regelmatig alle filters (zie hoofdstuk ‘Apparaat reinigen’). 56 08925_DE-GB-FR-NL_V0.indb 56 26.05.2014 09:20:45 Tip: op de handgreep bevindt zich een luchtregelaar. Open het (door schuiven van de afdekking) om de zuigkracht te verminderen wanneer u bekledingen, tapijten of lichte, beweegbare voorwerpen afzuigt. Normaal gesproken dient de luchtregelaar dicht te zijn, zodat de zuigkracht niet onnodig wordt verminderd. Apparaat reinigen OPGELET! ❐ Maak de stofbak regelmatig leeg, liefst na elk gebruik of als hij vol is (zie MAXmarkering). ❐ Reinig de filters regelmatig om een oververhitting van de motor te vermijden. ❐ Trek voor de reiniging van het apparaat steeds de stekker uit het stopcontact. ❐ Houd het apparaat, het snoer en de stekker uit de buurt van water of andere vloeistoffen om elektrische schokken te vermijden. Let er bij de reiniging op dat er geen vloeistof in het apparaat dringt. Alleen de de stofbak, de kunststof stoffilter en de afvoerluchtfilter mogen met water worden gereinigd. Ze moeten echter bij de plaatsing in het apparaat volledig droog zijn. ❐ Reinig de stoffilter in de deksel niet met water of andere vloeistoffen.. ❐ De filters zijn niet geschikt voor de wasmachine, noch de vaatwasmachine of droogtrommel! Laat de filters uitsluitend in open lucht drogen, gebruik zeker geen haardroger. ❐ Gebruik voor de reiniging geen bijtende of schurende reinigingsmiddelen of reinigingspads. Daardoor kan de bovenlaag worden beschadigd. • • • Reinig de kunststof stoffilter, de stoffilter en de afvoerluchtfilter regelmatig of als u een verminderd zuigvermogen vaststelt. Reinig de behuizing indien nodig met een vochtige, zachte doek. Veeg ze droog met een zachte doek. Verwijder regelmatig haar en pluisjes van de mondstukken. Na verloop van tijd kunnen de filters verkleuren. Dit is normaal en heeft geen negatieve invloed op het functioneren van het apparaat. Stofbak leegmaken en reinigen 1. Druk op de ontgrendeltoets van de stofbak en neem deze aan de draaggreep uit het apparaat. 2. Houd de stofbak boven een geopende vuilnisbak. De afstand tot de vuilbak moet indien mogelijk klein zijn, zodat het stof uit de stofbak alleen in de vuilbak valt en niet in de omgeving wordt verspreid. 57 08925_DE-GB-FR-NL_V0.indb 57 26.05.2014 09:20:45 3. Open de grendel van de stofbak. De bodem van de stofbak wordt geopend en het vuil valt eruit. 4. Klap de bodem van de stofbak opnieuw dicht. De sluiting moet hoorbaar vastklikken. 5. Wilt u de stofbak schoon te maken, draai aan het deksel van de stofbak om het deksel te verwijderen. TIP: Op het deksel en de stofbak bevinden zich markeringen om het u gemakkelijker te maken het deksel te verwijderen en te plaatsen. U kunt het deksel verwijderen als de ▼ markering aan het deksel wijst naar de markering op de stofbak. Bij behoefte spoelt u de stofbak uit met schoon, lauwwarm water. OGELET: de stofbak in geen geval in de wasmachine of vaatwasser reinigen! Schud overtollig water vervolgens af en laat de stofbak volledig aan de lucht drogen voordat u hem weer plaatst. 6. Wanneer de stofbak is volledig droog, zet de stofbak deksel op de stofbak en draai hem stevig vast. TIP: Op het deksel en de stofbak bevinden zich markeringen om het u gemakkelijker te maken het deksel te verwijderen en te plaatsen. Plaats het deksel op de stofbak zodat de ▼ markering aan het deksel wijst op de markering op de stofbak. Draai het deksel tot de ▼ markering aan het deksel wijst op de markering op de stofbak. 7. Plaats de stofbak in het apparaat: neem hem bij de draaggreep en plaats als eerste de bodem van het reservoir in het apparaat. Druk vervolgens de greep tegen de behuizing van het apparaat, tot de stofbak hoorbaar vastklikt in de vergrendeling. Houd het apparaat bij de draaggreep en til hem op, om te controleren, of het stofbak correct zit. Stoffilter en kunststof stoffilter reinigen 1. Druk op de ontgrendeltoets van de stofbak en neem deze aan de draaggreep uit het apparaat. 58 08925_DE-GB-FR-NL_V0.indb 58 26.05.2014 09:20:45 2. De stoffilter bevindt zich in de deksel. Open de deksel van de stofbak door de grendel bij de greep op te lichten en de deksel omhoog te klappen. 3. Haal de stoffilter eruit om hem te reinigen. Klop het filterelement uit boven een vuilnisbak en borstel los vuil af. Neem de stoffilter indien nodig af met een vochtige doek. Reinig de stoffilter in de deksel niet met water! 4. Wilt u de kunststof stoffilter schoon te maken, draai aan het deksel van de stofbak om het deksel te verwijderen. TIP: Op het deksel en de stofbak bevinden zich markeringen om het u gemakkelijker te maken het deksel te verwijderen en te plaatsen. U kunt het deksel verwijderen als de ▼ markering aan het deksel wijst naar de markering op de stofbak. Bij behoefte spoelt u de stofbak uit met schoon, lauwwarm water. OGELET: de stofbak in geen geval in de wasmachine of vaatwasser reinigen! Schud overtollig water vervolgens af en laat de stofbak volledig aan de lucht drogen voordat u hem weer plaatst. 5. Verwijder vervolgens de stofbak deksel van de kunststof stoffilter. Druk het deksel naar beneden om het te verwijderen. 59 08925_DE-GB-FR-NL_V0.indb 59 26.05.2014 09:20:46 6. Bij behoefte spoelt u het stofreservoir en de kunststof stoffilter uit met schoon, lauwwarm water. OGELET: de kunststof stoffilter resp. het stofreservoir in geen geval in de wasmachine of vaatwasser reinigen! Schud overtollig water vervolgens af en laat de filter volledig aan de lucht drogen voordat u hem weer plaatst. 7. Reinig het stofbak deksel indien nodig met een vochtige, zachte doek. Veeg ze droog met een zachte doek en plaats de kunststoff stoffilter in de deksel van het stofbak. Let op dat de filter correct vastklikt. 8. Zet de stofbak deksel met de kunststof stoffilter op de stofbak en draai hem stevig vast. TIP: Op het deksel en de stofbak bevinden zich markeringen om het u gemakkelijker te maken het deksel te verwijderen en te plaatsen. Plaats het deksel op de stofbak zodat de ▼ markering aan het deksel wijst op de markering op de stofbak. Draai het deksel tot de ▼ markering aan het deksel wijst op de markering op de stofbak. 9. Plaats het stofbak in het apparaat: neem hem bij de draaggreep en plaats als eerste de bodem van het reservoir in het apparaat. Druk vervolgens de greep tegen de behuizing van het apparaat, tot het stofbak hoorbaar vastklikt in de vergrendeling. Houd het apparaat bij de draaggreep en til hem op, om te controleren, of het stofbak correct zit. Filter voor afvoerlucht reinigen De filter voor afvoerlucht bevindt zich in het vak aan de zijkant van de stofzuiger (zie hoofdstuk ‘Leveringspakket en overzicht van het apparaat’, sectie ‘Volledig overzicht’). TIP: Op het deksel van het afvoerluchtfiltervak bevinden zich markeringen om het u gemakkelijker te maken het deksel te verwijderen en te plaatsen. 1. Draai het deksel in de richting van de pijl OPEN om het deksel te verwijderen. 2. Verwijder de filter voor afvoerlucht, door hem uit de filtervak te trekken. 3. Klop de filter voor afvoerlucht uit boven een vuilnisbak en borstel los vuil af. 4. Bij behoefte spoelt u de filter voor afvoerlucht grondig uit met schoon, lauwwarm water. OPGELET: de filter in geen geval in de wasmachine of vaatwasser reinigen! Schud overtollig water vervolgens af en laat de filter volledig aan de lucht drogen voordat u hem weer plaatst. 60 08925_DE-GB-FR-NL_V0.indb 60 26.05.2014 09:20:46 5. Wanneer alle onderdelen droog zijn, plaatst u de filter voor afvoerlucht in het filtervak. 6. Plaats het deksel van de filterhouder op de filterhouder voor afvoerlucht. Zorg ervoor dat de naar boven wijzende pijl wijst op het deksel op de pijl aan de linkerkant op de motoreenheid en drai het deksel in de richtung van de pijl LOCK. Het deksel moet hoorbaar vastklikken. Bewaring • • • Voor de praktische bewaring kunt u het vloermondstuk in de houder op de achterkant van het apparaat inhaken en de telescopische buis zo ver mogelijk ineenschuiven. De kieren-en borstelzuigmond kunt u in het opbergvak in de motoreenheid opbergen (zie hoofdstuck „Leveringspakket en overzicht van het apparaat“, sectie „Achteraanzicht“). Bewaar de stofzuiger in een voor kinderen en dieren ontoegankelijke, droge en koele binnenruimte. Oplossing van fouten Als uw apparaat niet naar behoren functioneert, schade vertoont of als er een onderdeel moet worden worden vervangen, dient u zich te wenden tot de klantenservice. Voer voor uw eigen veiligheid zelf geen reparaties uit. In de volgende tabel vindt u tips om kleine problemen zelf op te lossen. Probleem Mogelijke oorzaak/oplossing/tips • Het apparaat zuigt niet. • • • Steekt de stekker niet goed in het stopcontact? Corrigeer de positie van de stekker. Is het stopcontact defect? Probeer een ander stopcontact. Kijk de zekering van uw elektrische aansluiting na. Zijn de filters verstopt? Reinig de stof- en afvoerluchtfilter. • • • • Is het extra-luchtventiel aan de handgreep geopend? Sluit het. Is de stofbak te vol? Maak de stofbak leeg. Zijn de filters heel erg vuil? Reinig ze. Is het mondstuk, de telescopische buis of de zuigslang verstopt? Schakel het apparaat uit, trek de stekker uit het stopcontact en verwijder de verstopping (zie ook hoofdstuk “Montage”). • Is de stofbak niet correct gesloten en/of niet (correct) in het apparaat geplaatst? Corrigeer dit. Het elektrisch snoer • kan niet volledig worden opgerold. Het snoer werd in het apparaat niet volledig opgerold. Trek het een beetje uit en druk daarna opnieuw op de toets om het snoer op te rollen. Het zuigvermogen is zwak. Bij het stofzuigen ontsnapt er stof uit het apparaat. 61 08925_DE-GB-FR-NL_V0.indb 61 26.05.2014 09:20:47 Probleem Mogelijke oorzaak/oplossing/tips Tijdens het stofzuigen wordt een onaangename geur vastgesteld. • Wordt het apparaat voor de eerste keer gebruikt? Een reukontwikkeling treedt vaak op bij het eerste gebruik van nieuwe apparaten. De reuk zou moeten verdwijnen als u het apparaat meerdere keren hebt gebruikt. Technische gegevens Modelnummer: Artikelnummer: Stroomvoorziening: Vermogen: Veiligheidsklasse: VC349 Z 08925 220 – 240 V~ 50/60 Hz 650 W II Verwijdering Het verpakkingsmateriaal is recycleerbaar. Verwijder de verpakking op een milieuvriendelijke manier en geef ze mee met de inzameling van recycleerbare materialen. Verwijder het apparaat op een milieuvriendelijke wijze. Het apparaat hoort niet thuis bij het huisvuil. Breng het naar de gemeentewerf of naar een inzamelstation voor elektrische en elektronische oude apparaten. Meer informatie vindt u bij uw plaatselijk gemeentebestuur. Klantenservice/importeur: DS Produkte GmbH, Am Heisterbusch 1, 19258 Gallin, Duitsland Tel.: +49 38851 314650 *) *) Niet gratis. Alle rechten voorbehouden. 62 08925_DE-GB-FR-NL_V0.indb 62 26.05.2014 09:20:47 63 08925_DE-GB-FR-NL_V0.indb 63 26.05.2014 09:20:47 08925_DE-GB-FR-NL_V0.indb 64 26.05.2014 09:20:47