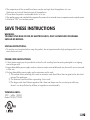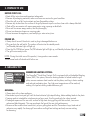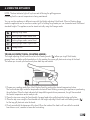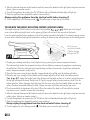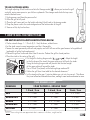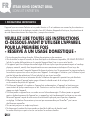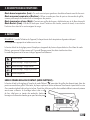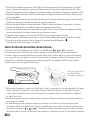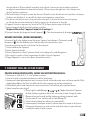
1
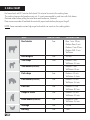
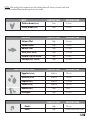
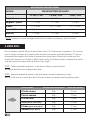
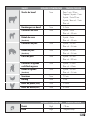
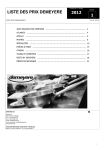
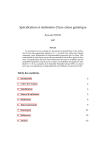
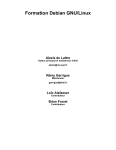
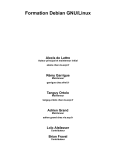
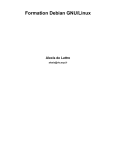
STEAK KING
CONTACT GRILL
CARE & USE
SOINS ET ENTRETIEN
EN .............................. 3
FR .............................. 15
TABLE OF CONTENTS
1. Important Safeguards..............................................................4
Special instructions........................................................................5
Power cord instructions .................................................................5
Technical info ...............................................................................5
2. Parts diagram............................................................................6
3. Prepare to use............................................................................7
Before first use...............................................................................7
Power up.......................................................................................7
4. Grilling tips.................................................................................7
Embedded Heating System.............................................................7
General........................................................................................7
Grilling tips....................................................................................8
5. Using the heat settings............................................................8
6. Using the appliance..................................................................9
To use as contact grill (Floating hinge)............................................9
To use with the height adjusting feature (Locking hinge)...................10
To use in storage mode..................................................................11
7. How to grill the perfect steak.................................................11
8. Grill chart....................................................................................12
9.Cleaning......................................................................................14
10. Environment...............................................................................14
EN
Steak King Contact Grill
Care and Use Instruction
1. IMPORTANT SAFEGUARDS
When using electrical appliances, basic safety precautions should be followed, including the following:
READ ALL INSTRUCTIONS BEFORE FIRST USE
- FOR HOUSEHOLD USE ONLY • Do not touch hot surfaces; use handles or knobs.
• To protect against fire, electric shock, and injury to persons, DO NOT IMMERSE appliance, cord or plug
in water or other liquids.
• This appliance can be used by children aged from 8 years and above and persons with reduced physical,
sensory or mental capabilities of lack of experience and knowledge if they have been given supervision
or instruction concerning use of the appliance in a safe way and understand the hazards involved.
Children shall not play with the appliance. Cleaning and user maintenance shall not be made by children
unless they are older than 8 and supervised.
• Keep the appliance and its cord out of reach of children less than 8 years.
• Close supervision is necessary when any appliance is used by or near children.
• Unplug from outlet when not in use and before cleaning. Allow to cool before putting on or taking off parts,
and before cleaning appliance.
• Do not operate any appliance with a damaged cord or plug or after the appliance malfunctions, or has been
damaged in any manner. Return appliance to the nearest authorized service facility for examination,
repair or adjustment.
• Do not let power cord hang over edge of table or counter, or touch hot surfaces.
• If the supply cord is damaged, it must be replaced by the manufacturer, its service agent or similarly qualified
persons in order to avoid a hazard.
• The use of accessory attachments not recommended by GreenPanTM may cause injuries.
• Do not use outdoors.
• Do not place on or near hot gas or electric burner, or in a heated oven.
• Unplug the unit when finished using.
• Do not use appliance for other than intended use.
• Extreme caution must be exercised when moving an appliance containing hot oil or other hot liquids.
• To disconnect, press the On/Off button so the red Standby Indicator light will go on, then remove the plug
from the wall outlet.
4
EN
• The temperature of the accessible surfaces may be very high when the appliance is in use.
Make sure not to touch these hot parts of the appliance.
• Do not leave the product unattended while it is in use.
• The appliances are not intended to be operated by means of an external timer or separate remote-control system.
• 60 minutes “ON” in a two hour period.
SAVE THESE INSTRUCTIONS
WARNING:
TO REDUCE THE RISK OF FIRE OR ELECTRIC SHOCK, ONLY AUTHORIZED PERSONNEL
SHOULD DO REPAIRS.
SPECIAL INSTRUCTIONS:
• To avoid a circuit overload when using this product, do not operate another high-wattage product on the
same electrical circuit.
POWER CORD INSTRUCTIONS:
• A short power-supply cord is provided to reduce the risk resulting from becoming entangled in or tripping
over a longer cord
• Longer detachable power-supply cords or extension cords are available and may be used if care is exercised
in their use.
• If a long detachable power-supply cord or extension cord is used:
1) The marked electrical rating of the cord or extension cord should be at least as great as the electrical
rating of the appliance;
2) The extension cord should be a grounding 3-wire cord;
3) The longer cord should be arranged so that it does not drape over the countertop or table top
where it can be pulled on by children or tripped over unintentionally.
Technical info:
120V ~60Hz, 1800W
Model: GP-EA-CTG001
EN
5
2. PARTS DIAGRAM
2
5
Front handle
4
Height adjusting
& lock pin
Side bar
6
1
Upper & lower
grill plate
3
Height adjusting
& lock knob
7
6
Fat drip tray
Control panel
1
Casted plates with ThermolonTM ceramic non-stick
coating for great food release & easy clean-up.
2
Fits in the Height adjusting & lock knob.
3
Allows the upper grill plate to float above your
meal for even toasting or melting, or locks the grill
in closed position.
6
EN
4
Solid cast-metal construction.
5
Solid stay-cool phenolic handle adjusts the cover
to fit your meal.
6
Choose your cooking mode with the temperature
buttons with heat indicator lights.
7
Collects grease and can be removed from the base.
3. PREPARE TO USE
Before first use:
• Read all the instructions and important safeguards.
• Remove all packaging materials; make sure items are received in good condition.
• Place the grill on a flat, heat resistant and non-flammable surface.
• Remove any stickers from the surface of the grill plate and wipe the surface clean with a damp dishcloth.
• Wash all the accessories with warm soapy water using a sponge or dishcloth.
• Rinse well to remove soapy residue, then dry thoroughly.
• Do not use abrasive cleaners or scouring pads.
• Do not immerse the appliance, cord and plug in water at any time.
Power up:
• Always check to see if the electric cord or plug is damaged before use.
• Plug cord into the wall outlet. The cooker will enter into the standby mode
(red Standby Indicator light will light up)
• Press the On/Off Button (green On/Off Indicator light will light up; red Standby Indicator light will go out).
• The grill is now ready to use.
NOTE: During the initial uses of this product, it may produce some smoke.
This is normal and will subside with further use.
4. GRILLING TIPS
Embedded Heating System:
The GreenPanTM Steak King Contact Grill is equipped with an Embedded Heating
System (EHS). This system, where the heating element is locked inside the grill
plate, ensures maximum heat transfer into the plates, resulting in faster cooking
and reduced preheating time. Very high sear temperatures will be reached,
making it the perfect sizzling indoor barbecue grill.
General:
• Always start with a clean appliance.
• Remember to pre-heat your grill until the heat indicator light stops blinking, before adding foods to the plate.
• Searing mode is intended for extra browning of your meat. Use this mode only for a short period.
• Prolonged exposure of the non-stick surface to high heat during grilling with fats and oils, can cause
carbonized black deposits. This may accelerate the loss of the non-stick performance.
• Because of the excellent heat conductivity of your grilling plate and the ThermolonTM layer, food and oil
carbonize very rapidly. So always grill on medium and high heat settings and only use sear setting
for browning.
EN
7
• Never use metal utensils on any non-stick surface. Heat-resistant rubber, nylon, silicone or wooden utensils
are recommended to prolong the life of the grilling plate. Never leave a utensil on a hot grilling plate.
• Do not cut food whilst it is on the grilling plate.
• The temperature settings of the appliance are tested on 220-240V at 50Hz. When higher voltages are used,
the appliance will reach very high temperatures which will burn the food with carbonization as result.
Grilling Tips:
• Do not overload the cooking plate.
• Do not use heavy pressure on the grill cover at any time.
• Brush a little oil over the food before cooking. Do not add oil directly to the grill plates.
• Remove food from the refrigerator 10 minutes before you intend to cook or fry. Ice cold food is more likely to
stick to a hot pan. Do not use this product to cook or defrost frozen food
• The cooking time for different foods depends on the type and thickness of the foods.
• Foods should be cooked thoroughly before consumption.
• We recommend using oil with a high smoke point. Some oils and fats burn at lower temperatures, which can
cause carbonization.
• Tender cuts of meat are best suited for grilling.
• Less-tender cuts of meat can be grilled, but they benefit from the tenderizing effects of marinating
in an acid-based wet marinade.
• A wet marinade usually consists of oil (vegetable or olive) for moisture, an acid (lemon juice, vinegar, wine,
tomatoes or yogurt) to tenderize, and flavorings (herbs and spices) to enhance or add flavor.
The flavor grows stronger the longer the marinade is left on the food before cooking, the amount
of time usually ranges from 1 hour to 24 hours.
• Some marinades contain high sugar levels which can scorch on the grill plates when cooking at high heat.
Therefore we recommend medium heat settings for marinated meat.
5. USING THE HEAT SETTINGS
Low heat mode: Use this setting to keep grilled foods warm until serving.
Medium heat mode: Choose this setting for toasting breads or sandwiches such as grilled cheese
and other Panini-style sandwiches. High heat mode: This setting is ideal for grilled burgers, pork chops and chicken breasts.
Sear mode: Try this setting for searing the outside of meats, such as steaks,
when you want the outside brown, while the inside stays juicy and pink.
8
EN
6. USING THE APPLIANCE
NOTE: The heat indicator light will cycle on and off during the grilling process
indicating that the correct temperature is being maintained.
You can use the appliance in different ways with the Height adjusting & lock knob. When in Floating hinge
mode the appliance can be used as a contact grill. In Locking hinge mode you can choose between 3 different
standard heights. The appliance can be stored vertically using the Storage mode.
Floating hinge mode
Locking hinge mode: lowest level
Locking hinge mode: central level
Locking hinge mode: highest level
Storage mode
To use as contact grill (floating hinge):
The height adjusting & lock knob turned into the Floating mode (
) allows you to grill thick foods,
prepare Panini and other grilled sandwiches. In this position the upper grill plate rests on top of the food.
This allows you to cook your food evenly from both top and bottom.
1. Choose your cooking mode (Low, Med, High or Sear) by pushing the desired temperature button.
The heat indicator light inside the temperature button will start blinking, meaning the appliance is preheating
the grill plates. When the heat indicator light stops blinking and shines permanent, the grill has reached
the correct temperature and is ready to use.
2. Open the top cover using the Front handle. Arrange foods to be grilled onto the bottom grill plate.
3. Close the top cover using the Front handle with the height adjusting & lock knob into Floating mode (
).
Let the top grill plate rest onto the foods.
4. Check periodically the doneness of the food. When the inside of the food is still raw while the outside
has a brown crust, consider to lower the heat setting.
EN
9
5.Whenthedesireddonenessofthefoodsisreached,removethefoodsfromthegrillplateusingheatresistant
plastic, nylon or wooden utensils.
6.TurnofftheappliancebypushingtheOn/Offbutton(theredStandbyIndicatorlightwilllightup).
7. When the appliance has completely cooled, clean and dry it.
Always unplug the appliance from the electrical outlet before cleaning it!
8. Turn the appliance in the Storage mode ( ).Thisallowsyoutostorethegrillvertically.
TO USE WITH THE HEIGHT ADJUSTING FEATURE (LOCKING HINGE):
The height adjusting & lock knob turned into the Locking mode (
,
or
) allows you to fix the grill
coverinthreedifferentheightlevels,sotheuppergrillplatewillnottouchthetopsideofthefoods.
It can be used to grill delicate ingredients such as fish without squashing the foods. The indirect heating creates
anoveneffect,idealfortoastingsoftsandwiches,meltingofcheeseontopofhamburgersorformakingpizzas.
1
2
First lift the cover
using the front handle
(1) before changing
the height level (2)
1.Chooseyourcookingmode(Low,Med,HighorSear)bypushingthedesiredtemperaturebutton.
The indicator light inside the temperature button will start blinking, meaning the appliance is preheating
the grill plates. When the indicator light stops blinking and shines permanent, the grill has reached the
correct temperature and is ready to use.
2.Openthetopcoverusingthefronthandle.Arrangefoodstobegrilledontothebottomgrillplate.
3.ClosethetopcoverusingtheFrontHandlewiththeheightadjusting&lockknobintoLockingmode
(
,
or
).Adapttheheightleveltothethicknessofthefoodssothereisnodirectcontactbetween
thetopgrillplateandthefoods.HeightlevelE1hasthetopgrillplateinlowestposition,whileE3isthe
highestposition.Whenchangingtheheightlevel,liftthecoverusingthefronthandle.Makesurethetop
coverislineduphorizontallyabovethefood.Alwaysuseovenmittswhentouchingthetopcover!
4. Check periodically the doneness of the food. When the inside of the food is still raw while the outside
has a brown crust, consider to lower the heat setting.
5.Whenthedesireddonenessofthefoodsisreached,removethefoodsfromthegrillplateusingheatresistant
rubber, nylon, silicone or wooden utensils.
6.TurnofftheappliancebypushingtheOn/Offbutton(theredStandbyIndicatorlightwilllightup).
7. When the appliance has completely cooled, clean and dry it.
Always unplug the appliance from the electrical outlet before cleaning it!
8. Turn the appliance in the Storage mode ( ).Thisallowsyoutostorethegrillvertically.
10
EN
To use in Storage mode:
The height adjusting & lock knob turned into the Storage mode ( ) allows you to store the grill
vertically, saving more space in your kitchen cupboards. The storage mode locks the top cover
onto the bottom cover.
1. Unplug power cord from the power outlet.
2. Allow the grill to fully cool.
3. Close the grill cover and turn the height adjusting & lock knob in the storage mode.
4. Wrap the power cord in the cord storage area at the bottom side of the grill.
5. Store on a flat, dry level surface
7. HOW TO GRILL THE PERFECT STEAK
For best results follow the instructions below:
• Go for a steak of app. 1 - 1.2 inch (2,5 - 3cm) thickness, without bone.
• Let the steak come to room temperature and dry it thoroughly.
• Season the meat generously with salt and pepper, and rub it all over with a good amount of vegetable oil
(preferably oil with a high smoke point).
• Preheat the grill on Sear mode for at least 5 minutes. Preheat the grill in closed position.
• Place the steak in the center of the grill.
• Put the grill in locking hinge mode (
,
or
). Adapt the height
to the thickness of the steak, the upper plate must still touch the steak.
Using the locking hinge mode will prevent that the total weight
of the upper plate will squash the steak.
For a 1.2inch (3cm) steak, set the locking hinge mode on E2.
• Follow the grill chart time table for the desired doneness.*
• Let the steak rest for app. 5 minutes before you cut into it or serve it. This allows
the juices to flow back towards the surface, making it more tender and easier to carve.
STEAK DONENESS CHART
DONENESS
Rare
STEAK THICKNESS - GRILLING TIMES*
1.2 inch / 3 cm
1.6 inch / 4 cm
2 inch / 5 cm
1 - 1 ½ min.
1 ½ - 2 min.
2 - 2 ½ min.
Medium Rare
1 ½ - 2 min.
2 - 3 min.
3 - 4 min.
Medium
2 - 2 ½ min.
2 ½ - 3 ½ min.
3 ½ - 4 ½ min.
Medium Well
2 ½ - 3 min.
3 - 4 min.
4 - 5 min.
3 - 4 min.
4 - 5 min.
5 - 6 min.
Well Done
*NotE: These cooking times are approximate due to variances in thickness, weight and cuts.
EN
11
8. GRILL CHART
For frozen food, add 2-3 minutes for fish and 3-6 minutes for meat to the cooking times.
The cooking times are for boneless meat cuts. It is not recommended to cook items with thick bones.
Marinate meats before grilling for extra flavor and tenderness, if desired.
Drain excess marinade off and dab the meat with paper towels before placing on the grill.
NOTE: Some marinades contain high sugar levels which can scorch on the cooking plates.
Meat
Heat Setting
COOKINg Time
Beef steaks
SearRare: 1 min. 30 sec.
Medium Rare: 2 min.
Medium: 2 min 30 sec.
Medium Well: 3 min.
Well done
Beef burgers
Sear 4-5 min.
Veal chops
Sear
Medium: 4 min.
Well done: 4-5 min.
Veal kebab (brochette)
Medium: 4 min.
Well done:4-5 min.
Pork chops
Sear Medium: 4-5 min.
Well done: 5-6 min.
Pork kebab (brochette)
Sear
Medium: 4-5 min.
Well done: 5-6 min.
Pork loin
Sear
Medium: 6-7 min.
Well done: 8-9 min.
Chops or Steak
Sear
Medium: 3-4 min.
Well done: 4-5 min.
Lamb kebab (brochette)
Sear
Medium:4-5 min.
Well done: 5-6 min.
Sausage
Sear
7-9 min.
Hot dog
Sear
5 min.
12
EN
Note: After cooking fish or seafood, wipe the cooking plates with lemon juice and a soft towel
to prevent seafood flavor transferring into the next recipe.
MEAT
Chicken breast (half)
Sear
3-4 min.
Turkey breast (half)
Sear
4-5 min.
seafood
Heat Setting
Heat Setting
COOKINg Time
COOKINg Time
Salmon fillet
High
5-6 min.
Salmon steak
High
7-8 min.
Halibut fillet
High
5-6 min.
Trout (whole, drawn)
High
9-10 min.
Prawns (large, not shelled)
High
3-4 min.
Shrimps (large, shelled)
High
2-3 min.
vegetables and fruit
Heat Setting
COOKINg Time
Eggplant (sliced)
Medium
Zucchini (sliced)
Medium
7-8 min.
7-8 min.
Paprika (half)
Medium
9-10 min.
7-8 min.
Potato (sliced)
Medium
Banana (half)
High
4 min.
Pineapple
High
4-5 min.
Heat Setting
COOKINg Time
Panini
High
7-8 min.
Pizza
High
Follow recipe instructions
EN
13
9. CLEANING
• Before cleaning the appliance, wait for the grill plates to cool down and unplug the power cord from the
electrical outlet.
• The grill is easier to clean when slightly warm.
• Do not immerse the appliance in water or any other liquid.
• Do not clean the appliance or the grill plates with steel wool, harsh scouring pads or nylon scrubbing pads.
For best results, clean with a soft cloth or sponge.
• The appliance and the grill plates can be easily cleaned with a wet, warm and soapy soft cloth or sponge.
Be sure that you have removed all traces of cooking oil and food before you store your appliance.
• The fat drip tray collects redundant fats from the grilled foods. The drip tray can easily be cleaned with a wet,
warm and soapy soft cloth or sponge. The drip tray is not dishwasher safe.
• For tough stains and non-removable black deposits, it is recommended to use melamine foam sponges,
available in most department and hardware stores.
• Slight surface marks and discolorations are normal and will not affect the performance of the product.
10. ENVIRONMENT
This marking indicates that this product should not be disposed with other household wastes
throughout the EU. Do not throw away the appliance with the normal household waste
at the end of its life, but hand it in at an official collection point for recycling.
By doing this, you help to preserve the environment.
14
EN
Sommaire
1. Précautions importantes..........................................................28
Instructions spéciales.....................................................................29
Instructions relatives au cordon d’alimentaton ................................29
Infos techniques ............................................................................29
2. Schéma des éléments...............................................................30
3.Préparation.................................................................................31
Avant la première utilisation...........................................................31
Mise sous tension...........................................................................31
4. Astuces pour la grillade...........................................................31
Embedded Heating System.............................................................31
Générale.......................................................................................31
Astuces pour la grillade..................................................................32
5. Description des fonctions.........................................................33
6.Emploi..........................................................................................33
Emploi comme grill (mode Flottant).................................................33
Emploi du réglage en hauteur (mode Blocage)................................34
Ranger l’appareil (mode Rangement)..............................................35
7. Comment griller le steak parfait............................................ 35
8. Menu grill....................................................................................36
9.Nettoyage....................................................................................38
10. Environnement...........................................................................38
FR
15
FR
Steak King Contact Grill
SOINS ET ENTRETIEN
1. précautions importantes
L’appareil que vous venez d’acheter est un produit dernier cri. Il est conforme aux normes les plus récentes en
matière de sécurité et de technologie; toutefois, lors de l’utilisation d’appareils électriques, les précautions de
sécurité élémentaires doivent être respectées, y compris les suivantes :
VEUILLEZ LIRE TOUTES LES INSTRUCTIONS
CI-DESSOUS AVANT D’UTILISER L’APPAREIL
POUR LA PREMIÈRE FOIS
- RÉSERVE À UN USAGE DOMESTIQUE • Ne touchez pas les surfaces chaudes. Utilisez des poignées ou des maniques.
• Afin de réduire le risque d’incendie, de choc électrique ou de blessures corporelles, NE JAMAIS PLONGEZ
la fiche, le cordon d’alimentation ou le corps de l’appareil dans l’eau ni aucun autre liquide.
• Cet appareil peut être utilisé par des enfants âgés de 8 ans et plus et par des personnes ayant un handicap
physique, sensoriel, mental, étant inexpérimentés ou sans connaissances techniques s’ils ont reçu des
instructions concernant l’usage de l’appareil de façon sécuritaire et qu’ils comprennent les risques impliqués.
Les enfants ne peuvent en aucun cas jouer avec l’appareil. Le nettoyage et l’entretien par l’utilisateur ne peut
pas être faits par des enfants sauf s’ils ont plus de huit ans et sont surveillés.
• Une surveillance attentive est nécessaire lors de l’utilisation des appareils à proximité ou près d’enfants.
• Débranchez toujours l’appareil après usage et laissez-le refroidir avant de le nettoyer, d’enlever
ou de remettre des pièces de l’appareil.
• N’utilisez pas l’appareil si le cordon ou l’appareil est endommagé ou si l’appareil ne fonctionne pas
correctement de quelque manière que ce soit. Contactez un service client qualifié qui peut contrôler,
réparer ou régler l’appareil.
• N’utilisez jamais un appareil avec un cordon ou une fiche endommagée. N’utilisez jamais un appareil
après un dysfonctionnement de l’appareil ou un appareil qui a été endommagé d’une façon ou une autre.
Retournez l’appareil auprès de votre service client autorisé le plus près pour inspection, réparation
ou réglage. L’utilisation d’accessoires qui ne sont pas recommandées par GreenPanTM peut causer
des blessures corporelles.
• Ne convient pas pour un emploi en plein air.
• Ne laissez pas le cordon électrique pendre au bord de la table ou du plan de travail.
Le cordon électrique ne peut en aucun cas toucher les surfaces chaudes.
16
FR
• Si le cordon d’alimentation est endommagé, il doit être remplaçé par le fabricant, son agent de service
ou par une personne qualifiée de la même façon pour eviter les risques.
• L’appareil ne peut pas être placé au dessus ou aux environs d’un brûleur à gaz ou d’un brûleur électrique chaud.
• Débranchez l’appareil après utilisation.
• N’utilisez pas l’appareil pour un usage autre que prévu.
• Soyez toujours très prudents lorsque vous déplacez un appareil contenant de l’huile chaude ou des liquides chauds.
• Afin de débrancher l’appareil, appuyez sur la touche On/Off de telle sorte que la lampe témoin rouge s’allume.
Ensuite débranchez la fiche.
• La température des surfaces accesibles peut être très haute quand l’appareil s’utilise.
Soyez prudents et ne touchez pas ces parties très chaudes de l’appareil.
• Ne pas laisser l’appareil sans surveillance.
• Les appareils ne peuvent pas être utilisés à l’aide d’une minuterie externe ou d’ un système de commande
à distance indépendants.
• N’allumez cet appareil que 60 minutes dans une période de 2 heures.
CONSERVEZ CE MODE D’EMPLOI
AVERTISSEMENT :
SEULS DES EXPERTS QUALIFIÉS PEUVENT EFFECTUER DES OPÉRATIONS DE MAINTENANCE
AFIN DE DIMINUER LE RISQUE D’INCENDIE OU DE CHOCS ÉLECTRIQUES.
INSTRUCTIONS SPÉCIALES :
• Afin d’éviter une surcharge électrique lors de l’application de cet appareil, n’allumez pas d’autres appareils
à haute puissance sur le même circuit électrique.
INSTRUCTIONS RELATIVES AU CORDON D’ALIMENTATION :
• Un cordon d’alimentation court est fourni, ceci afin de réduire le risque de s’emmêler ou de trébucher
sur un long cordon.
• Des cordons d’alimentation détachables plus longs ou des rallonges sont disponibles et peuvent être utilisés,
en faisant attention lors de leur utilisation.
• En cas d’utilisation d’un cordon d’alimentation détachable plus long ou d’une rallonge :
1) Les données de puissance indiquées sur le cordon ou sur la rallonge doivent être au moins égales
à celles de l’appareil ;
2) Si l’appareil est mis à la terre, il faut également une rallonge à trois brins ;
3) Un cordon plus long doit être placé de façon à éviter que des enfants tirent sur la rallonge
ou qu’on trébuche dessus.
infoS TECHNIQUES :
120V ~60Hz, 1800W
Model: GP-EA-CTG001
FR
17
2. Schéma des éléments
2
5
Poignée avant
4
Ajustement
de la hauteur
& goupille
de verrouillage
Poignée
latérale
6
1
Plaque de grille
supérieure &
inférieure
3
Bouton d’arrêt
et de réglage
7
6
Tiroir ramasse-graisse
1
2
3
18
Plaques avec revêtement en céramique antiadhésif
en ThermolonTM pour un enlèvement
et un nettoyage facile.
Permet de fixer la plaque supérieure du grill
au-dessus des aliments afin des les griller
ou faire fondre d’une manière égale.
Permet également de ranger l’appareil.
Permet au plaque supérieur d’être au dessus de votre
préparation afin de toaster ou fondre de manière uniforme
vos aliments, ou bloque le grill dans une position fermée.
FR
Panneau de commande
4
Métal coulé d’une construction solide.
5
La poignée solide résiste à la chaleur et
permet d’ajuster le couvercle afin d’obtenir
une bonne préparation.
6
Employez les touches pourvus d’une lampe
témoin pour sélectionner les températures
de cuisson.
7
Le tiroir ramasse les graisses superflues
et peut être retiré de l’appareil.
3. Préparation
Avant la première utilisation :
• Lisez toutes les instructions et précautions importantes.
• Retirez tous les emballages ; assurez-vous que tous les éléments sont en bon état.
• Placez le grill sur une surface plane, résistante à la chaleur et non inflammable.
• Retirez tous les autocollants de la surface du grill et essuyez-le à l’aide d’un torchon humide.
• Lavez tous les accessoires à l’eau chaude savonneuse en utilisant une éponge ou un torchon.
• Rincez-les soigneusement afin d’éliminer les résidus de savon et séchez-les bien.
• N’utilisez pas de produits abrasifs ou de tampons à récurer.
• Ne jamais plongez l’appareil, le cordon ou la prise dans l’eau.
Mise sous tension :
• Vérifiez toujours que le cordon ou la fiche électrique ne soient pas endommagés.
• Commencez par raccorder le cordon à l’appareil et branchez ensuite le cordon de la prise murale.
Le grill se mettra en mode veille (une lampe témoin rouge s’éclaircira).
• Appuyez sur la touche On/Off (la lampe témoin verte s’éclaircira ; la lampe témoin rouge s’éteindra).
• Votre grill est maintenant prêt à être utilisé.
REMARQUE : Lorsque l’appareil est utilisé la première fois, une petite quantité de fumée peut
se dégager. Ceci est un phénomène normal qui se résorbera au cours des utilisations ultérieures.
4. Astuces pour la grillade
EMBEDDED HEATING SYSTEM :
GreenPanTM Steak King Grill est équipé de Embedded Heating System (EHS).
Ce système, contenant des éléments chauffants intégrés dans les plaques du grill,
garantit que la chaleur est distribuée de la manière la plus efficace.
Ceci permet de cuisiner plus rapidement et de réduire le temps d’amorçage.
Cet appareil est approprié à un usage à l’intérieur, permettant de faire
des grillades absolument appétissantes grâce aux températures élevées.
Générale :
• Assurez-vous que l’appareil soit propre.
• Respectez le temps d’amorçage de l’appareil. Aussitôt que la lampe témoin arrête de clignoter,
l’appareil est prêt à utiliser.
• Le mode Roussir permet de conférer à votre viande un brun-doré plus intense.
Ce mode ne peut être utilisé que brièvement.
FR
19
• Dans le cas où les graisses et l’huiles qui se trouvent sur les surfaces anti-adhésives soient longtemps exposées
à des chaleurs élevées, des tâches carbonisées noires pourraient apparaître. Ceci peut réduire la performance
du revêtement anti-adhésif de l’appareil.
• Il est recommandé d’utiliser les températures basse et moyenne le plus souvent puisque les plaques de grill
permettent une excellente conduction de chaleur. Tenez compte que les aliments et huiles peuvent carboniser
très rapidement. Le mode Sear convient seulement pour brièvement dorer des aliments.
• La surface antiadhésive ne permet pas l’utilisation d’ustensiles en métal. L’emploi des ustensiles résistant
à la chaleur, comme ceux de caoutchouc, nylon, silicones ou de bois, protège les surfaces antiadhésives.
Ne jamais déposez des ustensiles sur la surface chaude du grill.
• Ne jamais coupez des aliments lorsqu’ils se trouvent sur la plaque.
• Le réglage des températures de cet appareil a été testé sur 220-240V (50Hz). L’emploi d’un voltage plus
élevé engendrera des températures plus hautes. Il en résulte que les aliments brûleront plus rapidement.
Astuces pour la Grillade :
• Ne placez pas trop d’aliments sur la plaque.
• N’exercez jamais trop de pression sur la couverture du grill.
• Frottez un peu d’huile sur les aliments avant de les placer sur le grill. Ne verser pas directement sur les plaques
des huiles de cuisson.
• Sortez du réfrigérateur les aliments 10 minutes avant de commencer de cuisiner ou de cuire. Tenez compte que
les aliments très froids s’attachent plus facilement aux plaques. Cet appareil ne convient pas pour cuire ou dégeler
des produits congelés.
• Le temps de cuisson varie selon l’épaisseur et la structure des aliments.
• Il faut bien cuire les aliments avant de les manger.
• Il est recommandé d’utiliser des huiles raffinées possédant un point de fumée élevé. Certaines huiles et graisses
brûlent plus rapidement. Il en résulte que leur utilisation entraîne également une carbonisation plus rapide
des aliments.
• Les morceaux de viandes tendres conviennent parfaitement pour la grillade.
• Les morceaux de viandes moins tendres conviennent également pour la grillade, mais il est conseillé de les
mariner dans une marinade humide composée d’un ingrédient acide, afin de les attendrir.
• Les marinades humides contiennent généralement de l’huile (végétale, comme huile d’olive) pour éviter
le dessèchement de la viande, un acide (jus de citron, vinaigre, vin, tomates ou yaourt) pour attendrir, et des
aromatisants (herbes et épices) pour renforcer ou améliorer le goût. Si on met la viande à mariner plus longtemps,
la saveur deviendra plus forte. Une marinade peut prendre de 1 à 24 heures.
• Certaines marinades contiennent beaucoup de sucre, ce qui peut donner lieu à des roussissements
sur les plaques du grill. Si vos ingrédients contiennent de viandes marinés, il est conseillé de les cuire
à des températures moyennes.
20
FR
5. DESCRIPTION DES FONCTIONS
Mode basse température (Low) :Cemodeconvientpourgarderauchauddesalimentsavantdelesservir.
Mode moyenne température (Medium) : Utilisez ce mode pour faire du pain ou des sandwichs grillés,
comme par exemple des sandwiches au fromage ou des paninis.
Mode température élevée (High) :Convientpourgrillerdesburgers,côtelettesdeporcetdublancdepoulet.
Mode Roussir (Sear) :Utilisezcemodepourroussirl’extérieurdesviandes,commedusteak,sivousvoulez
l’extérieurbrun-doréetlecentresaignantetrouge.
6. EMPLOI
REMARQUE:Lorsdel’utilisationdel’appareil,lalampetémoindelatempératureclignoteraindiquant
si la température appropriée est obtenue oui ou non.
Leboutond’arrêtetderéglagepermetd’employercetappareildeplusieursfaçonsdistinctes.Enutilisantlemode
Flottant,vouspouvezl’utilisezcommegrill.LemodeBlocagepermetdechoisirtroishauteursfixes.
LemodeRangementsertàfermeretrangerl’appareilverticalement.
ModeFlottant
ModeBlocage:étageleplusbas
ModeBlocage:étagecentral
ModeBlocage:étageleplushaut
ModeRangement
EMPLOI COMME GRILL PAR CONTACT (MODE FLOTTANT) :
Leboutond’arrêtetderéglageetl’emploidumodeFlottant( ) permettent de griller des aliments épais, faire des
paninisousandwichesgrillés.Utiliséainsi,laplaquesupérieurecouvreentièrementlesalimentsetpermetdelescuire
d’unemanièreégaleàlafoisenhautetenbas.Ilpeutêtreutilisépourgrillerdesingrédientsdélicatscommelepoisson
sans écraser ce dernier. Le chauffage indirect crée un effet
de four, idéal pour un toaster des sandwichs, fondre du
fromage sur le dessus des hamburger ou pour faire des pizzas.
FR
21
1.Sélectionnezlemodedecuisson(Low,Med,HighouSear)enappuyantsurlatoucheappropriée.Lalampe
témoin,indiquantlatempérature,commenceàclignoterlorsquelatempératuredesplaquesdugrills’élève.
Quandlalampetémoinarrêtedeclignoter,latempératuredésiréeaétéobtenueetl’appareilestprêtàêtreutilisé.
2.Employezlapoignéeavantpouréleverlaplaquesupérieure.Rangezlesalimentssurlaplaqueinférieurepour
passeràlagrillade.
3.LemodeFlottantpermetlaplaquesupérieuredereposersurlesaliments.Utilisezlapoignéeavantetlebouton
d’arrêtetderéglagepourchangerlapositiondelaplaquesupérieure.
4.Vérifiezdetempsentempslacuissondesaliments.Quandlecentredesalimentsn’estpasbiencuitlorsque
l’extérieurestdéjàdoré,ilestconseillédechoisirunetempératuremoinsélevée.
5.Unefoisquelesalimentssontcuitsàpointselonvotregoût,ilconvientdelesenleverdelaplaqueenutilisant
desustensilesrésistantàlachaleurcommeceuxensiliconesouennylon.
6.L’appareils’éteintenappuyantsurlatoucheOn/Off(Lalampetémoinrouges’éclaircira).
7.Laissezl’appareilrefroidiravantdelenettoyeretsécher.Toujoursdébrancherl’appareilavantdelenettoyer!
8.Tournezlatoucheafindepouvoirfermerl’appareiletchoisissezlemodeRangement( ).
Cettefonctionpermetdelerangerverticalement.
EMPLOI DU RéGLAGE EN HAUTEUR (MODE BLOCAGE) :
Leboutond’arrêtetderéglagepermetd’utiliserlemodeBlocage(
,
or
) permettant
de choisir trois hauteurs fixes, afin que la plaque supérieure ne touche pas les surfaces des alimentes.
Lachaleurindirecteconvientparfaitementpourfairefondred’unemanièreégalelessurfacesdesaliments,
cequipermetdefairedespaninisouvertsoudefairefondredufromageau-dessusd’hamburgerschauds
déjàgrillés.Lamodalitédeblocagepermetégalementdegrillerdesingrédientsdélicatssanslesaplatir
commedupoissonoudespainsàhamburgers.
Utilisez la poignée avant (1)
en modifiant l’hauteur
de la plaque supérieure (2).
1
2
1.Sélectionnezlemodedecuisson(Low,Med,HighouSear)enappuyantsurlatoucheappropriée.Lalampe
témoin,indiquantlatempérature,commenceàclignoterlorsquelatempératuredesplaquesdegrille
s’élève.Quandlalampetémoins’arrêtedeclignoter,latempératuredésiréeaétéobtenueetl’appareil
estprêtàêtreutilisé.
2.Employezlapoignéevantpourmonterlaplaquesupérieure.Déposezlesalimentssurlaplaqueinférieure
pourpasseràlagrillade.
3.LemodeBlocagepermetlaplaquesupérieuredereposersurlesaliments.Utilisezlapoignéeavant
etleboutond’arrêtetderéglagepourutiliserlemodeBlocageetpourchoisirunedestroispositionsfixes
de la plaque supérieure (
,
or
).Choisissezlapositiondelaplaquesupérieureselonl’épaisseur
desalimentsafind’éviterquelaplaquetouchelesaliments.ChoisissezleniveauE1pourobtenirlaposition
22
FR
lamoinsélevéeetE3pourobtenirlapositionlaplusélevée.Assurez-vousquelaplaquesupérieure
estalignéehorizontalementaudessusdesaliments.Utiliseztoujoursdesgantsdecuisinelorsquevous
touchez la plaque supérieure.
4.Vérifiezdetempsentempslacuissondesaliments.Quandlecentredesalimentsn’estpasbiencuitlorsque
l’extérieurestdéjàdoré,ilestconseillédechoisirunetempératuremoinsélevée.
5.Unefoisquelesalimentssontcuitsàpointselonvotregoût,ilconvientdelesenleverdelaplaque
enutilisantdesustensilesrésistantàlachaleurcommeceuxdesiliconesoudenylon.
6.L’appareils’éteintenappuyantsurlatoucheOn/Off(lalampetémoinrouges’éclaircira).
7.Laissezl’appareilrefroidiravantdelenettoyeretsécher.
Toujours débrancher l’appareil avant de le nettoyer !
8.Tournezleboutonafindepouvoirfermerl’appareil( ).Cettefonctionpermetdelerangerverticalement.
RANGER L’APPAREIL (MODE RANGEMENT) :
Leboutond’arrêtetderéglagepermetderangerl’appareilverticalement.Choisissezlemode
rangement ( )afind’économiserplusd’espacedansvotreplacardsdecuisine.
Cemodevouspermetdeplieretdefermerlesdeuxplaques.
1.Toujoursdébranchezl’appareil.
2.Laissezl’appareilrefroidir.
3.Fermerl’appareilenutilisantleboutond’arrêtetderéglageetlemodeRangement.
4.Pourrangerlecordon,utilisezl’organisateurdecâbleaubasdel’appareil.
5.Rangezl’appareilsurunesurfaceplane,horizontaleetsèche.
7. COMMENT GRILLER LE STEAK PARFAIT
POUR DE MEILLEURS RéSULTATS, SUIVEZ LES INSTRUCTIONS EN BAS :
•Choisissezunsteakde2,5-3cmd’épaisseur,sansos.
•Amenezlesteakàtempératureambianteetséchez-lefortement.
•Assaisonnezlesteakgénéreusementavecdupoivreetduseletfrottezlepartoutavecunebonnequantitéd’huile
végétale(depréférencedel’huilequirelâchedelafuméeuniquementàunefortetempérature).
•PréchauffezlegrillenmodeSearpouraumoinscinqminutes.Préchauffezlegrillenpositionfermée.
•Mettezlesteakaucentredugrill.
•PlacezlegrillenmodeBlocage( ,
or
).Adaptezlahauteuràl’épaisseur
dusteak,laplaquesupérieuredoitentoutcastoucherlesteak.L’usagedumode
Blocageéviteraquelepoidstotaldelaplaquesupérieureécraseralesteak.
Pour un steak de 3 cm, mettez le grill en mode Blocage E2.
•Suivezlacharteindiquéedugrillpourlecuissondésiré*.
•Laissezreposerlesteakpourenviron5minutesavantdelecouperoudeleservir.
Cecipermetdelaisserlejuscoulerverslescotésdelasurface,etpermetd’avoir
unsteakplustendreetfacileàcouper.
FR
23
GRAPHIQUE DU CUISSON DE STEAK
CuissonÉpaisseur et temps de cuisson*
1.2 inch / 3 cm
1.6 inch / 4 cm
2 inch / 5 cm
Saignant
1 - 1 ½ min.
1 ½ - 2 min.
2 - 2 ½ min.
Saignant / à point
1 ½ - 2 min.
2 - 3 min.
3 - 4 min.
A point
2 - 2 ½ min.
2 ½ - 3 ½ min.
3 ½ - 4 ½ min.
A point / bien cuit
2 ½ - 3 min.
3 - 4 min.
4 - 5 min.
3 - 4 min.
4 - 5 min.
5 - 6 min.
Bien cuit
*Note : Les temps de cuisson sont approximatifs selon les variations en épaisseur, poids et tranches.
8. MENU GRILL
Pour les aliments surgelés, ajoutez à la durée de cuisson 2 à 3 minutes pour le poisson et 3 à 6 minutes
pour la viande. Les temps de cuissons stipulés sont pour les tranches de viande désossées. Il n’est pas
recommandé de préparer des viandes ou poissons avec des os épais. Marinez les viandes pour plus
de goût (plus de saveur) et tendreté, si désiré. Faites couler l’excès de marinade et tamponnez la viande
avec des serviettes en papier avant de la mettre sous le grill.
Note : Certains marinades contiennent un taux de sucre élevé, qui peuvent laisser
des marques de brûlures sur les plaques de cuisson.
Note : Après avoir préparé du poisson ou des fruits de mer, essuyez les plaques de cuisson
avec du jus de citron et un essuie doux afin d’éviter que la saveur se transmet dans la prochaine recette.
Fruits de mer
Filet de saumon
High
Pavé de saumon
High
7-8 min.
Filet de flétan
High
5-6 min.
Truite
High
9-10 min.
Prawns (géants, décortiqués)
High
3-4 min.
Gambas (larges, pelées)
High
2-3 min.
24
FR
(entière, sans arêtes)
Réglage de Température
Temps de cuisson
5-6 min.
Réglage
de Température
* Les temps de cuisson sontVIANDE
approximatifs selon les variations
en épaisseur,
poids et tranche.
Temps de cuisson
Steaks de boeuf
SearRare: 1 min. 30 sec.
Saignant / à point : 2 min.
A point : 2 min 30 sec.
A point / bien cuit : 3 min.
Bien cuit
Hamburgers au boeuf
Sear
4-5 min.
Côtelettes de veau
SearA point : 4 min.
Bien cuit : 4-5 min.
(brochette)
Côtelettes de porc
Sear
A point : 4-5 min.
Bien cuit : 5-6 min.
Kebab de porc
(brochette)
Sear
A point : 4-5 min.
Bien cuit : 5-6 min.
Carré de porc
Sear
A point : 6-7 min.
Bien cuit : 8-9 min.
Côtelettes d’agneau
ou bifteak agneau
Sear
A point : 3-4 min.
Bien cuit : 4-5min.
Kebab d’agneau
(brochette)
Sear
A point : 4-5 min.
Bien cuit : 5-6 min.
Kebab de veauA point : 4 min.
Bien cuit : 4-5 min.
Saucisses
Sear
7-9 min.
Hotdog
Sear
5 min.
Blanc de poulet (demi)
Sear
3-4 min.
Blanc de dinde (demi)
Sear
4-5 min.
Réglage de Température
Temps de cuisson
Panini
High
7-8 min.
Pizza
High
Volg het recept
FR
25
Légumes et fruits
Réglage de Température
Aubergine (tranché)
Medium
Temps de cuisson
7-8 min.
Courgette (tranché)
Medium
7-8 min.
Paprika (demi)
Medium
9-10 min.
Pomme de terre (tranché)
Medium
7-8 min.
Banane (demi)
High
4 min.
Ananas
High
4-5 min.
9. NETTOYAGE
• Débranchez toujours l’appareil et laissez-le refroidir avant de le nettoyer.
• La chaleur résiduelle facilite le nettoyage.
• Ne jamais plongez le corps de l’appareil dans l’eau ni aucun autre liquide.
• Lorsque vous nettoyez l’appareil, n’utilisez pas de la laine d’acier, des tampons métalliques à nettoyer
ni des tampons à récurer en nylon. Il faut mieux utiliser un torchon doux ou une éponge.
• Essuyez le corps de l’appareil ainsi que les plaques du grill à l’aide d’une éponge ou un torchon
humide et savonneux. Assurez-vous d’avoir enlevé tous les restes d’huile de cuisson et les restes
des aliments qui ont attaché avant de ranger l’appareil.
• Le tiroir ramasse-graisses rassemble les graisses superflues des aliments grillés. Retirez-le de l’appareil
afin de le nettoyer à l’aide d’une éponge ou un torchon mouillé, chaud et savonneux.
Le tiroir ne convient pas au lave-vaisselle.
• Utilisez une éponge en mélamine (éponge magique), en vente dans la plupart des grands magasins,
afin d’enlever les tâches tenaces et les dépôts noirs non-amovibles.
• L’utilisation de l’appareil fait apparaître des traces et des décolorations légères sur les plaques,
ce qui ne diminue d’ailleurs pas la performance de l’appareil.
10. Environnement
Ce logo indique que ce produit ne peut pas être jeté avec d’autres déchets dans l’EU
À la fin de sa vie, ne jetez pas l’appareil avec les déchets normaux. Apportez-le à un point
de collecte officiel pour qu’il soit recyclé. Ainsi, vous contribuerez à préserver l’environnement.
26
FR
FR
27
www.green-pan.com