1
OW3000 TEFAL ref 3313489
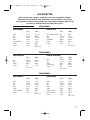
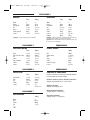
F
2 - 14
GB
15 - 27
NL
28 - 40
D
41 - 53
P
54 - 66
DK
67 - 79
S
80 - 92
N
93 - 105
FIN
106 - 118
GR
119 - 131
19/07/06
14:21
Page 1
Ref. 3313489
OW3000 TEFAL ref 3313489
19/07/06
14:21
Page 2
F
GB
NL
D
P
DK
S
N
FIN
www.tefal.com
GR
OW3000 TEFAL ref 3313489
19/07/06
14:21
Page 3
AVANT DE COMMENCER
Une légère odeur peut se dégager lors de la première utilisation.
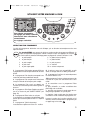
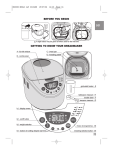
FAIRE CONNAISSANCE
AVEC VOTRE MACHINE A PAIN
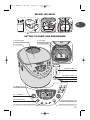
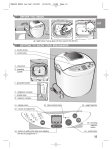
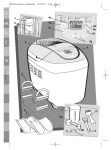
A - couvercle avec hublot
B - tableau de bord
C - cuve à pain
D - mélangeur
gobelet gradué - E
cuillère à soupe - f1
dosette double - F
cuillère à café - f2
b1 - écran de visualisation
b2 - bouton départ/arrêt
b3 - sélection du poids
b4 - touches de réglage du départ différé
2
choix des programmes - b6
sélection de la couleur - b5
de la croûte
OW3000 TEFAL ref 3313489
19/07/06
14:21
Page 4
F
INTRODUCTION
Le pain joue un rôle important dans notre alimentation.
Qui n’a jamais rêvé de faire son pain à la maison ?
Voici la chose réalisable grâce à la machine à pain.
Que vous soyez novice ou expert, il vous suffira d’ajouter les ingrédients et la machine à pain s’occupera
du reste. Vous pourrez réaliser facilement pains, brioches, pâtes, confitures sans aucune intervention.
Mais attention, un temps d’apprentissage est toutefois nécessaire afin d’utiliser au mieux votre machine
à pain. Prenez le temps de faire connaissance avec elle et ne soyez pas déçu(e) si vos premiers essais
paraissent un peu moins que parfaits. Si vous êtes impatient, une recette se trouvant dans le paragraphe
démarrage rapide vous aidera à faire vos premiers pas. Sachez que la texture du pain obtenu est plus
compacte que celle du pain de boulangerie.
PREMIERS PAS
Conseils et astuces pour réussir vos pains
1
Lisez attentivement le mode d’emploi et utilisez ses recettes : on ne fait pas son pain dans cet appareil
comme on le fait à la main !
2
Tous les ingrédients utilisés doivent être à température ambiante, et doivent être pesés avec précision.
Mesurez les liquides avec le gobelet gradué fourni. Utilisez la dosette double fournie
pour mesurer d'un côté les cuillères à café et de l'autre les cuillères à soupe. Des
mesures incorrectes se traduiront par de mauvais résultats.
3
Utilisez des ingrédients avant leur date limite de consommation et conservez-les dans des endroits frais
et secs.
4
La précision de la mesure de la quantité de farine est importante. C’est pourquoi la farine doit être pesée
à l’aide d’une balance de cuisine. Utilisez de la levure de boulangerie active déshydratée en sachet. Sauf
indication contraire dans les recettes, n'utilisez pas de levure chimique. Lorsqu’un sachet de levure est
ouvert, il doit être utilisé sous 48 heures.
5
Afin d’éviter de perturber la levée des préparations, nous vous conseillons de mettre tous les ingrédients
dans la cuve dès le début et d’éviter d’ouvrir le couvercle en cours d’utilisation. Respecter précisément
l’ordre des ingrédients et les quantités indiquées dans les recettes. D’abord les liquides ensuite les solides.
La levure ne doit pas entrer en contact avec les liquides ni avec le sel.
Ordre général à respecter :
Liquides (beurre, huile, œufs, eau, lait)
Sel
Sucre
Farine première moitié
Lait en poudre
Ingrédients spécifiques solides
Farine deuxième moitié
Levure
3
OW3000 TEFAL ref 3313489
19/07/06
14:21
Page 5
DEMARRAGE RAPIDE
Pour faire connaissance avec votre machine à pain nous vous suggérons d’essayer la
recette du PAIN BASIQUE pour votre premier pain.
PAIN BASIQUE DORAGE >
(programme 1)
POIDS
>
TEMPS
>
HUILE
>
EAU
>
MOYEN
1000 g
3 : 18
1,5 cuillères à soupe
300 ml
SEL
SUCRE
LAIT EN POUDRE
FARINE
LEVURE
>
>
>
>
>
1,5 cuillères à café
1 cuillère à soupe
2 cuillères à soupe
550 g
5g
ou 1,5 cuillère à café
>
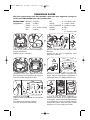
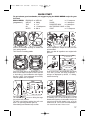
Retirez la cuve à pain en soulevant la poignée et
en tirant verticalement.
Adaptez ensuite le mélangeur.
Ajoutez les ingrédients dans la cuve dans l’ordre
préconisé.
Assurez-vous que tous les ingrédients soient
pesés avec exactitude.
>
Introduisez la cuve à pain. Appuyez sur la cuve
pour l’enclencher sur l’entraineur et de manière à
ce qu’elle soit bien clipsée des 2 côtés.
MENU
MENU
TIMER
Branchez la machine à pain et mettez-la sous
tension. Après le signal sonore, le programme 1
s’affiche par défaut, soit 1000 g dorage moyen.
TIMER
1H
>
Appuyez sur la touche
.
Le témoin visuel en face l’étape du cycle atteinte
s’affiche.
Les 2 points de la minuterie clignotent.
Le temoin de fonctionnement s’allume.
4
A la fin du cycle de cuisson, débranchez la
machine à pain. Retirez la cuve à pain en tirant
sur la poignée. Utilisez toujours des gants isolants
car la poignée de la cuve est chaude ainsi que
l’intérieur du couvercle. Démoulez le pain à chaud
et placez-le 1 h sur une grille pour refroidir.
OW3000 TEFAL ref 3313489
19/07/06
14:21
Page 6
UTILISEZ VOTRE MACHINE A PAIN
Pour chaque programme,
un réglage par défaut s’affiche.
Vous devrez donc sélectionner
manuellement
les réglages souhaités.
SELECTION D’UN PROGRAMME
Le choix d’un programme déclenche une suite d’étapes, qui se déroulent automatiquement les unes
après les autres.
La touche MENU vous permet de choisir un certain nombre de programmes différents. Le
temps correspondant au programme s’affiche. Chaque fois que vous appuyez sur la touche
le numéro dans le panneau d’affichage passe au programme suivant et ainsi de 1 à 10 :
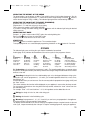
1
2
3
4
5
>
>
>
>
>
pain basique
pain français
pain complet
pain sucré
pain super rapide
1 Le programme Pain basique permet d’effectuer
la plupart des recettes de pain utilisant de la farine
de blé.
2 Le programme Pain français correspond à une
recette de pain blanc traditionnel français.
3 Le programme Pain complet est à sélectionner
lorsqu’on utilise de la farine pour pain complet.
4 Le programme Pain sucré est adapté aux
recettes qui contiennent plus de matière grasse et
de sucre.
5 Le programme Pain Super Rapide est spécifique à la recette du pain SUPER RAPIDE (voir
page 10).
6 Le programme Pâtes levées ne cuit pas.
Il correspond à un programme de pétrissage et de
pousse pour toutes les pâtes levées. Ex : la pâte à
pizza.
7 Le programme 7 pétrit uniquement.
Il est destiné aux pâtes non levées. Ex : nouilles.
6
7
8
9
10
>
>
>
>
>
pâtes levées (ex pizza)
pâtes fraîches
pain au yaourt
confiture
cuisson uniquement
8 Le pain au yaourt est une spécialité au goût
acide, en dorage medium et 1000 g uniquement.
9 Le programme Confiture cuit automatiquement
la confiture dans la cuve.
10 Le programme Cuisson uniquement permet de
cuire 60 mn. Il peut être sélectionné seul et être
utilisé :
a) en association avec le programme Pâtes
levées,
b) pour réchauffer ou rendre croustillants des
pains déjà cuits et refroidis,
c) pour finir une cuisson en cas de panne de courant prolongée pendant un cycle de pain.
La machine à pain ne doit pas être laissée sans
surveillance lors de l’utilisation du programme 10.
Lorsque la couleur de la croûte souhaitée a été
obtenue, arrêtez manuellement le programme par
un appui long sur la touche .
5
OW3000 TEFAL ref 3313489
19/07/06
14:21
Page 7
SELECTION DU POIDS DU PAIN
Le poids du pain se règle par défaut sur 1000 g. Le poids est donné à titre indicatif. Se référer au détail
des recettes pour plus de précisions. Les programmes 6, 7, 8 et 9 ne possèdent pas le réglage du poids.
Appuyez sur la touche
pour régler le poids choisi 750 g ou 1000 g. Le témoin visuel s’allume en face
du réglage choisi.
SELECTION DE LA COULEUR DE LA CROÛTE (DORAGE)
La couleur de la croûte se règle par défaut sur MOYEN . Les programmes 6, 7, 8 et 9 ne possèdent pas
le réglage de la couleur.
Trois choix sont possibles : CLAIR/MOYEN/FONCÉ. Si vous souhaitez modifier le réglage par défaut,
appuyez sur la touche
jusqu’à ce que le témoin visuel s’allume en face du réglage choisi.
SELECTION DU MODE RAPIDE
Les recettes 1, 2, 3 et 4 peuvent être réalisées en mode RAPIDE et réduire ainsi le temps de cuisson.
Appuyez 4 fois sur la touche
pour sélectionner le mode rapide.
Le mode RAPIDE ne permet pas le réglage de la couleur de la croûte.
DEPART/ARRET
Appuyez sur la touche
pour mettre l’appareil en marche. Le compte à rebours commence.
Pour arrêter le programme ou annuler la programmation différée, appuyez 5 secondes sur la touche
.
LES CYCLES
Le témoin visuel s’allume en face l’étape du cycle atteinte par la machine à pain.
Un tableau (page 12-13) vous indique la décomposition des différents cycles suivant le programme choisi.
Préchauffage > Pétrissage > Repos
> Levée
> Cuisson
> Maintien au chaud
Utilisé dans
Permet de
Permet à
Temps pendant Transforme
Permet de garder le pain
les programmes
former la
la pâte de
lequel la levure la pâte en mie chaud après la cuisson.
3 et 8 pour
structure de la se détendre
agit pour faire
et permet
Il est toutefois
améliorer la
pâte et donc
pour améliorer lever le pain
le dorage et
recommandé
levée de la pâte. sa capacité
la qualité
et développer
le croustillant
de démouler le pain
à bien lever.
du pétrissage.
son arôme.
de la croûte.
dès la fin de la cuisson.
Préchauffage : n’est actif que pour les programmes 3 et 8. Le mélangeur ne fonctionne pas pendant cette période. Cette étape permet d’accélérer l’activité des levures et ainsi favoriser la pousse des
pains constitués de farines ayant tendance à ne pas trop lever.
Pétrissage : la pâte se trouve dans le 1er ou 2ème cycle de pétrissage ou en période de brassage
entre les cycles de levées. Au cours de ce cycle, et pour les programmes 1,3,4 et 8, vous avez la possibilité d’ajouter des ingrédients : fruits secs, olives, lardons etc…
Un signal sonore vous indique à quel moment intervenir. Reportez-vous au tableau récapitulatif des temps
de préparation (pages 12-13) et à la colonne “extra”.
Cette colonne indique le temps qui sera affiché sur l’écran de votre appareil lorsque le signal sonore
retentira. Pour savoir plus précisément au bout de combien de temps se produit le signal sonore, il suffit
de retrancher le temps de la colonne “extra” au temps total de cuisson.
Ex : “extra” = 2:51 et “temps total” = 3:13, les ingrédients peuvent être rajoutés au bout de 22 mn.
Levée : la pâte se trouve dans le 1er 2ème ou 3ème cycle de levée.
Cuisson : le pain se trouve dans le cycle final de cuisson.
Maintien au chaud : pour les programmes 1, 2, 3, 4, 5, 8 et 10, vous pouvez laisser la préparation
dans l’appareil. Un cycle de maintien au chaud d'une heure s'enchaîne automatiquement après la cuisson.
L’afficheur reste à 0:00 pendant l’heure de maintien au chaud. Un bip retentit à intervalles réguliers. En
fin de cycle l’appareil s’arrête automatiquement après l’émission de 3 bips.
6
OW3000 TEFAL ref 3313489
19/07/06
14:21
Page 8
PROGRAMME DIFFERE
Vous pouvez programmer l’appareil afin d’avoir votre préparation prête à l’heure que
vous aurez choisie, jusqu’à 15 h à l’avance.
Les programmes 5,6,7,9,10 n'ont pas le programme différé.
Cette étape intervient après avoir sélectionné le programme, le niveau de dorage et le poids. Le temps
du programme s'affiche. Calculez l’écart de temps entre le moment où vous démarrez le programme et
l’heure à laquelle vous souhaitez que votre préparation soit prête.
La machine inclut automatiquement la durée des cycles du programme. A l’aide des touches
et
,
affichez le temps trouvé ( vers le haut et vers le bas). Les appuis courts permettent un défilement par
tranche de 10 mn + bip court. Avec un appui long, le défilement est continu par tranche de 10 mn.
Ex : il est 20 h et vous voulez votre pain prêt à 7 h 00 le lendemain matin. Programmez 11 h 00 à l’aide
des touches
et
.
Appuyez sur la touche . Un signal sonore est émis. Le témoin visuel s’affiche en face
et les 2
points : du minuteur clignotent. Le compte à rebours commence. Le voyant de fonctionnement s’allume.
Si vous faites une erreur ou souhaitez modifier le réglage de l’heure, appuyez longuement sur la touche
jusqu’à ce qu’elle émette un signal sonore. Le temps par défaut s’affiche. Renouvelez l’opération.
Certains ingrédients sont périssables. N'utilisez pas le programme différé pour des recettes contenant :
lait frais, oeufs, yaourts, fromage, fruits frais.
CONSEILS PRATIQUES
En cas de coupure de courant : si en cours de cycle, le programme est interrompu par une
coupure de courant ou une fausse manœuvre, la machine dispose d’une protection de 7 mn pendant
lesquelles la programmation sera sauvegardée. Le cycle reprendra où il s’est arrêté. Au-delà de ce temps,
la programmation est perdue.
Si vous enchaînez deux programmes, attendez 1 h avant de démarrer la deuxième préparation.
LES INGREDIENTS
Les matières grasses et huiles : les matières grasses rendent le pain plus moelleux et plus
savoureux. Il se gardera également mieux et plus longtemps. Trop de gras ralentit la levée. Si vous
utilisez du beurre, émiettez-le en petits morceaux pour le répartir de façon homogène dans la préparation
ou faites-le ramollir. Ne pas incorporer le beurre chaud. Evitez que le gras ne vienne en contact avec la
levure, car le gras pourrait empêcher la levure de se réhydrater.
Œufs : les œufs enrichissent la pâte, améliorent la couleur du pain et favorisent un bon développement
de la mie. Si vous utilisez des œufs, réduisez la quantité de liquide en conséquence. Cassez l’œuf et
compléter avec le liquide jusqu’à obtenir la quantité de liquide indiquée dans la recette. Les recettes ont
été prévues pour un œuf moyen de 50 g, si les œufs sont plus gros, ajouter un peu de farine ; si les œufs
sont plus petits, il faut mettre un peu moins de farine.
Lait : vous pouvez utilisez du lait frais ou du lait en poudre. Si vous utilisez du lait en poudre, ajoutez la
quantité d’eau initialement prévue. Si vous utilisez du lait frais, vous pouvez également ajouter de l’eau : le
volume total doit être égal au volume prévu dans la recette. Le lait a aussi un effet émulsifiant qui permet
d’obtenir des alvéoles plus régulières et donc un bel aspect de la mie.
Eau : l’eau réhydrate et active la levure. Elle hydrate également l’amidon de la farine et permet la formation
de la mie. On peut remplacer l’eau, en partie ou totalement par du lait ou d’autres liquides. Utilisez des
liquides à température ambiante.
Farines : le poids de la farine varie sensiblement en fonction du type de farine utilisé. Selon la qualité de
la farine, les résultats de cuisson du pain peuvent également varier. Conservez la farine dans un contenant
hermétique, car la farine réagira aux fluctuations des conditions climatiques, en absorbant de l’humidité ou
au contraire en en perdant. Utilisez de préférence une farine dite “de force”, “panifiable” ou “boulangère”
plutôt qu’une farine standard.
7
OW3000 TEFAL ref 3313489
19/07/06
14:21
Page 9
L’addition d’avoine, de son, de germe de blé, de seigle ou encore de grains entiers à la pâte à pain, vous
donnera un pain plus lourd et moins gros.
L'utilisation d'une farine T55 est recommandée, sauf indication contraire dans les recettes.
Le tamisage de la farine influe aussi sur les résultats : plus la farine est complète (c’est à dire qu’elle
contient une partie de l’enveloppe du grain de blé), moins la pâte lèvera et plus le pain sera dense.
Vous trouverez également, dans le commerce, des préparations pour pains prêtes à l'emploi. Reportezvous aux recommandations du fabricant pour l'utilisation de ces préparations. De façon générale, le choix
du programme se fera en fonction de la préparation utilisée. Ex : Pain complet - Programme 3.
Sucre : privilégiez le sucre blanc, roux ou du miel. N’utilisez pas de sucre raffiné ou en morceaux. Le
sucre nourrit la levure, donne une bonne saveur au pain et améliore le dorage de la croûte.
Sel : il donne du goût à l’aliment, et permet de réguler l’activité de la levure. Il ne doit pas entrer en
contact avec la levure. Grâce au sel, la pâte est ferme, compacte et ne lève pas trop vite. Il améliore aussi
la structure de la pâte.
Levure : la levure permet de faire lever la pâte. Utilisez de la levure de boulangerie active déshydratée
en sachet. La qualité de la levure peut être variable, elle ne gonfle pas toujours de la même façon. Les
pains peuvent donc être différents en fonction de la levure utilisée.
Une vieille levure ou une levure mal conservée ne fonctionnera pas aussi bien que de la levure déshydratée
fraîchement ouverte.
Les proportions indiquées sont pour une levure déshydratée. En cas d’utilisation de levure fraîche, il faut
multiplier la quantité par 3 (en poids) et diluer la levure dans un peu d’eau tiède légèrement sucrée pour
une action plus efficace.
Il existe des levures déshydratées sous forme de petites billes qu’il faut réhydrater avec un peu d’eau tiède
légèrement sucrée. Elles s’utilisent dans les mêmes proportions que la levure déshydratée en paillettes,
mais nous vous conseillons cette dernière pour plus de facilité d’utilisation.
Les additifs (olives, lardons etc) : vous pouvez personnaliser vos recettes avec tous les ingrédients
additionnels que vous souhaitez en prenant soin :
> de bien respecter le signal sonore pour l’ajout d’ingrédients, notamment les plus fragiles,
> les graines les plus solides (comme le lin ou le sésame) peuvent être incorporées dès le début du
pétrissage pour faciliter l’utilisation de la machine (départ différé par exemple),
> de bien égoutter les ingrédients très humides (olives),
> de fariner légèrement les ingrédients gras pour une meilleure incorporation,
> de ne pas les incorporer en trop grande quantité, au risque de perturber le bon développement de la pâte.
CONSEILS PRATIQUES
La préparation du pain est très sensible aux conditions de température et d’humidité. En cas de
forte chaleur, il est conseillé d’utiliser des liquides plus frais qu’à l’accoutumée. De même, en cas de froid,
il est possible qu’il soit nécessaire de faire tiédir l’eau ou le lait (sans jamais dépasser 35°C).
Il est aussi parfois utile de vérifier l’état de la pâte en milieu de pétrissage : elle doit former une boule
homogène qui se décolle bien des parois.
> s’il reste de la farine non incorporée, c’est qu’il faut mettre un peu plus d’eau,
> sinon, il faudra éventuellement ajouter un peu de farine.
Il faut corriger très doucement (1 cuillère à soupe maxi à la fois) et attendre de constater l’amélioration ou
non avant d’intervenir de nouveau.
Une erreur courante est de penser qu’en ajoutant de la levure le pain lèvera davantage. Or, trop de
levure fragilise la structure de la pâte qui lèvera beaucoup et s’affaissera lors de la cuisson. Vous pouvez
juger de l’état de la pâte juste avant la cuisson en tâtant légèrement du bout des doigts : la pâte doit offrir
une légère résistance et l’empreinte des doigts doit s’estomper peu à peu.
8
OW3000 TEFAL ref 3313489
19/07/06
14:21
Page 10
LES RECETTES
Pour chacune des recettes, respecter l’ordre des ingrédients indiqué.
Suivant la recette choisie et le programme correspondant, vous pouvez
vous reporter au tableau récapitulatif des temps de préparation (page 12-13)
et suivre la décomposition des différents cycles.
PROGRAMME 1
c à c > cuillère à café - c à s > cuillère à soupe
PAIN BASIQUE
Huile
Eau
Sel
Sucre
Lait en poudre
Farine
Levure
PAIN AU LAIT
750 g
1000 g
1càs
245 ml
1càc
3càc
1càs
455 g
1càc
1,5 c à s
300 ml
1,5 c à c
1càs
2càs
550 g
5g
ou 1,5 c à c
Beurre ramolli en dés
Sel
Sucre
Lait liquide
Farine
Levure
750 g
1000 g
50 g
1,5 c à c
2càs
260 ml
400 g
1càc
60 g
2càc
2,5 c à s
310 ml
470 g
5g
ou 1,5 c à c
PROGRAMME 2
PAIN FRANÇAIS
PAIN DE CAMPAGNE
750 g
Eau
Sel
Farine
Levure
270 ml
1,5 c à c
460 g
5g
ou 1,5 c à c
1000 g
Eau
Sel
Farine
Farine seigle
Levure
360 ml
2càc
620 g
2càc
750 g
1000 g
270 ml
1,5 c à c
370 g
90 g
5g
ou 1,5 c à c
360 ml
2càc
500 g
120 g
2càc
750 g
1000 g
2càc
270 ml
1, 5 c à c
2càc
230 g
110 g
110 g
1càc
1càs
360 ml
2càc
1càs
300 g
150 g
150 g
5g
ou 1,5 c à c
PROGRAMME 3
PAIN PAYSAN
PAIN COMPLET
Huile
Eau
Sel
Sucre
Farine
Farine complète
Levure
750 g
1000 g
2càc
270 ml
1,5 c à c
2càc
225 g
225 g
1càc
1càs
360 ml
2càc
1càs
300 g
300 g
5g
ou 1,5 c à c
Huile
Eau
Sel
Sucre
Farine
Farine de seigle
Farine complète
Levure
9
OW3000 TEFAL ref 3313489
19/07/06
14:21
Page 11
PROGRAMME 4
c à c > cuillère à café - c à s > cuillère à soupe
BRIOCHE
KUGELHOPF
Œufs
Beurre
Lait liquide
Sel
Sucre
Farine type 55
Levure
750 g
1000 g
2
150 g
60 ml
1càc
3càs
360 g
2càc
3
175 g
70 ml
1,5 c à c
4càs
440 g
2,5 c à c
optionnel : 1 cuillère à café d’eau de fleur d’oranger.
Œufs
Beurre
Lait liquide
Sel
Sucre
Farine
Levure
Raisins
750 g
1000 g
1càs
270 ml
1càc
1càs
1càs
430 g
3càc
1,5 c à s
360 ml
1,5 c à c
1càs
2càs
570 g
3,5 c à c
1000 g
Eau
Yaourt nature
Sel
Sucre
Farine
Farine de seigle
Levure
200 ml
1 (125 g)
2càc
1càs
480 g
70 g
2,5 c à c
PROGRAMME 9
COMPOTES ET CONFITURES
PATE A PIZZA
750 g
1000 g
1càs
240 ml
1,5 c à c
480 g
1càc
1,5 c à s
320 ml
2càc
640 g
5g
ou 1,5 c à c
Coupez ou hachez vos fruits selon vos goûts avant de
les mettre dans votre machine à pain.
Confiture de fraises, pêches, rhubarbe ou abricots :
580 g de fruit, 360 g de sucre, 1 jus de citron.
Confiture d’orange :
500 g de fruit, 400 g de sucre.
Compote pommes/rhubarbe :
750 g de fruit, 4,5 c à s de sucre
PROGRAMME 7
PATE FRAICHES
1000 g
10
3
160 g
100 ml
1càc
5càs
420 g
2,5 c à c
150 g
PAIN AU YAOURT
PROGRAMME 6
Œufs
Eau
Farine
Sel
2
140 g
80 ml
1/2 c à c
4càs
350 g
2càc
100 g
PROGRAMME 8
PAIN SUPER RAPIDE
Huile d’olive
Eau
Sel
Farine
Levure
1000 g
optionnel : imbiber les raisins avec un sirop léger (50% sucre 50% eau)
ou un alcool type schnaps ou eau de vie de marc de raisin.
optionnel : mettre des amandes entières sur le dessus de la pâte, à la
fin du dernier cycle de pétrissage.
PROGRAMME 5
Huile
Eau (35 à 40°C maxi)
Sel
Sucre
Lait en poudre
Farine
Levure
750 g
5
60 ml
600 g
1càc
Compote de rhubarbe :
750 g de fruit, 4,5 c à s de sucre.
OW3000 TEFAL ref 3313489
19/07/06
14:21
Page 12
GUIDE DE DEPANNAGE
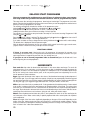
Vous n’obtenez pas le résultat attendu ? Ce tableau vous aidera à vous repérer.
Pain
trop levé
Pain affaissé
après avoir
trop levé
Pain
pas assez
levé
Croûte
Côtés bruns
Côtés
pas assez mais pain pas et dessus
dorée
assez cuit
enfarinés
La touche a été actionnée
pendant la cuisson
Pas assez de farine
Trop de farine
Pas assez de levure
Trop de levure
Pas assez d’eau
Trop d’eau
Pas assez de sucre
Mauvaise qualité de farine
Les ingrédients ne sont pas
dans les bonnes proportions
(trop grande quantité)
Eau trop chaude
Eau trop froide
Programme inadapté
GUIDE DE DEPANNAGE TECHNIQUE
PROBLEMES
SOLUTIONS
Le mélangeur reste coincé dans la cuve
• Laisser tremper avant de le retirer.
Le mélangeur reste coincé dans le pain
• Huiler légèrement le mélangeur avant d’incorporer
les ingrédients dans la cuve.
Après appui sur
• La machine est trop chaude. Attendre 1 heure entre 2 cyles.
• Un départ différé a été programmé.
• Il s’agit d’un programme avec préchauffage.
rien ne se passe
Après appui sur le moteur tourne
mais le pétrissage ne se fait pas
• La cuve n’est pas insérée complètement.
• Absence de mélangeur ou mélangeur mal mis en place.
Après un départ différé,
le pain n’a pas assez levé
ou rien ne s’est passé
• Vous avez oublié d’appuyer sur après la programmation
du départ différé.
• La levure est entrée en contact avec le sel et/ou l’eau.
• Absence de mélangeur.
Odeur de brûlé
• Une partie des ingrédients est tombée à côté de la cuve :
laissez refroidir la machine et nettoyez l’intérieur de la machine
avec une éponge humide et sans produit nettoyant.
• La préparation a débordé : trop grande quantité d’ingrédients,
notamment de liquide. Respecter les proportions des recettes.
11
12
3
1000 g
750
3.45
3.45
2.30
3
Rapide
2.28
Rapide
2
3.43
3
3.45
3.43
1
3.43
2.32
Rapide
2
3.32
3
1
3.32
2
2.30
Rapide
3.32
3.30
1
3.30
3
2.17
Rapide
2
3.18
3
3.30
3.18
1
3.18
2.12
Rapide
2
3.13
3
1
3.13
2
5
30
30
30
5
30
30
30
5
5
5
5
5
5
5
5
5
5
5
5
5
5
5
5
5
5
5
5
5
5
5
5
5
5
5
5
5
5
5
5
5
5
5
5
5
5
5
5
5
5
5
5
5
5
5
5
15
15
15
15
15
15
15
15
20
20
20
20
20
20
20
20
20
20
20
20
20
20
20
20
24
49
49
49
24
49
49
49
15
39
39
39
15
39
39
39
15
39
39
39
15
39
39
39
10
10
10
10
10
10
10
10
10
10
10
10
10
10
10
10
10
10
10
10
10
10
10
10
11
26
26
26
11
26
26
26
16
31
31
31
16
31
31
31
9
26
26
26
9
26
26
26
10
10
10
10
10
10
10
10
10
10
10
10
10
10
10
10
10
15
15
15
10
15
15
15
35
45
35
45
35
45
45
45
39
60
60
60
39
60
60
60
30
50
50
50
30
50
50
50
50
50
50
50
48
48
48
48
52
52
52
52
50
50
50
50
53
53
53
53
48
48
48
48
60
60
60
60
60
60
60
60
60
60
60
60
60
60
60
60
60
60
60
60
60
60
60
60
2.08
2.58
2.58
2.58
2.06
2.56
2.56
2.56
2.32
3.32
3.32
3.32
2.30
3.30
3.30
3.30
1.55
2.56
2.56
2.56
1.50
2.51
2.51
2.51
14:21
1000 g
750
1000 g
3.13
1
19/07/06
2
1
750
PROGRAMME TAILLE DORAGE TEMPS PRECHAUFFAGE
1er
REPOS
2ème
1ère
3ème
2ème
4ème
3ème CUISSON MAINTIEN EXTRA
(h)
(mn)
PETRISSAGE (mn) PETRISSAGE LEVEE PETRISSAGE LEVEE PETRISSAGE LEVEE (mn) AU CHAUD
(mn)
(mn)
(mn)
(sec)
(mn)
(sec)
(mn)
(mn)
OW3000 TEFAL ref 3313489
Page 13
13
1000 g
1000 g
1
1
3
1
2
1
30
1.05
5
3
0.14
3.55
5
2
2
1.30
1.20
3
2
2
2
2
5
5
5
5
5
5
5
5
10
5
5
5
5
5
5
5
5
5
5
20
11
20
10
10
10
10
10
10
20
20
20
20
20
20
20
20
39
60
20
20
20
20
20
20
25
39
39
39
25
39
39
39
10
10
10
10
10
10
10
10
10
Remarque : la durée totale n’inclut pas le temps de maintien au chaud pour les programmes 1,2,4,5,8 et 10.
10
9
6
7
8
1.20
2
1.17
1.20
3
1
1.17
2.42
Rapide
1.17
3.22
3
2
3.22
1
3.22
2.37
Rapide
2
3.17
3
1
3.17
2
26
16
26
26
26
16
26
26
26
10
5
5
5
5
5
5
5
5
10
45
36
52
52
52
36
52
52
52
60
60
60
50
60
48
48
48
45
45
45
55
55
55
55
50
50
50
50
60
60
60
60
60
60
60
60
60
60
60
60
60
60
60
60
60
60
2.58
2.20
3.00
3.00
2.15
2.55
2.55
2.55
2.55
14:21
1000 g
750
1000 g
3.17
1
19/07/06
5
4
750
PROGRAMME TAILLE DORAGE TEMPS PRECHAUFFAGE
1er
REPOS
2ème
1ère
3ème
2ème
4ème
3ème CUISSON MAINTIEN EXTRA
(h)
(mn)
PETRISSAGE (mn) PETRISSAGE LEVEE PETRISSAGE LEVEE PETRISSAGE LEVEE (mn) AU CHAUD
(mn)
(mn)
(mn)
(sec)
(mn)
(sec)
(mn)
(mn)
OW3000 TEFAL ref 3313489
Page 14
OW3000 TEFAL ref 3313489
19/07/06
14:21
Page 15
NETTOYAGE ET ENTRETIEN
> Débranchez l’appareil et laissez-le refroidir.
> Nettoyez le corps de l’appareil et l’intérieur de la cuve avec une éponge humide. Séchez soigneusement.
• Lavez la cuve et le mélangeur à l’eau chaude.
Si le mélangeur reste dans la cuve, laissez tremper 5 à 10 mn.
• Démontez le couvercle pour le nettoyer à l’eau chaude.
• Ne lavez aucune partie au lave vaisselle.
• N’utilisez pas de produit ménager, ni tampon abrasif, ni alcool. Utilisez un chiffon doux et humide.
• N’immergez jamais le corps de l’appareil ou le couvercle.
CONSIGNES DE SECURITE
Participons à la protection de l’environnement !
Votre appareil contient de nombreux matériaux valorisables ou recyclables.
Confiez celui-ci dans un point de collecte pour que son traitement soit effectué.
• La sécurité de cet appareil est conforme aux règles
techniques et aux normes en vigueur.
• Lisez attentivement le mode d’emploi avant la première utilisation de votre appareil : une utilisation non
conforme au mode d’emploi dégagerait le fabriquant
de toute responsabilité.
• Cet appareil n’est pas destiné à être utilisé par des
enfants ou d’autres personnes sans assistance et supervision si leurs capacités physiques, sensorielles ou mentales
les empêchent d’utiliser l’appareil en toute sécurité.
• Vérifiez que la tension d’alimentation de votre appareil
corresponde bien à celle de votre installation électrique.Toute erreur de branchement annule la garantie.
• Branchez impérativement votre appareil sur une prise
de courant reliée à la terre. Le non respect de cette obligation peut provoquer un choc électrique et entraîner
éventuellement des lésions graves. Il est indispensable
pour votre sécurité que la prise de terre corresponde aux
normes d’installation électrique en vigueur dans votre
pays. Si votre installation ne comporte pas de prise de
courant reliée à la terre, il est impératif que vous fassiez
intervenir, avant tout branchement, un organisme agréé
qui mettra en conformité votre installation électrique.
• Votre appareil est destiné uniquement à un usage
domestique et à l’intérieur de la maison.
• Débranchez votre appareil dès que vous cessez de
l’utiliser et lorsque vous le nettoyez.
• N’utilisez pas votre appareil s’il ne fonctionne pas correctement ou s’il a été endommagé. Dans ce cas,
adressez-vous à un centre service agréé (voir liste dans
le livret service).
• Toute intervention autre que le nettoyage et l’entretien
usuel par le client doit être effectuée par un centre service agréé.
• Ne mettez pas l’appareil, le câble d’alimentation ou la
fiche dans l’eau ou tout autre liquide.
• Ne laissez pas pendre le câble d’alimentation à portée
de mains des enfants.
• Le câble d’alimentation ne doit jamais être à proximité
ou en contact avec les parties chaudes de l’appareil,
près d’une source de chaleur ou sur angle vif.
• Si le câble d’alimentation ou la fiche sont endommagés, n’utilisez pas l’appareil. Afin d’éviter tout danger, fai-
14
tes-les obligatoirement remplacer par un centre service
agréé (voir liste dans le livret service).
• Ne pas toucher le hublot pendant et juste après le
fonctionnement. La température du hublot peut être élevée.
• Ne débranchez pas l'appareil en tirant sur le cordon.
• N'utilisez qu'une rallonge en bon état, avec une prise
reliée à la terre, et avec un fil conducteur de section au
moins égale au fil fourni avec le produit.
• Ne placez pas l'appareil sur d'autres appareils.
• N'utilisez pas l'appareil comme source de chaleur.
• Ne placez jamais de papier, carton ou plastique dans
l'appareil et ne posez rien dessus.
• S' il arrivait que certaines parties du produit s'enflamment, ne tentez jamais de les éteindre avec de l'eau.
Débranchez l'appareil. Etouffez les flammes avec un
linge humide.
• Pour votre sécurité, n’utilisez que des accessoires et
des pièces détachées adaptés à votre appareil.
• Tous les appareils sont soumis à un contrôle qualité
sévère. Des essais d’utilisation pratiques sont faits avec
des appareils pris au hasard, ce qui explique d’éventuelles traces d’utilisation.
• En fin de programme, utilisez toujours des gants de cuisine pour manipuler la cuve ou les parties chaudes de
l’appareil. L’appareil devient très chaud pendant l’utilisation.
• N’obstruez jamais les grilles d’aération.
• Faites très attention, de la vapeur peut s’échapper lorsque vous ouvrez le couvercle en fin ou en cours de programme.
• Lorsque vous êtes en programme n°11 (confiture,
compote) faites attention au jet de vapeur et aux projections chaudes à l’ouverture du couvercle.
• Attention, la pâte en débordant hors de la cavité de
cuisson sur l'élement chauffant peut s'enflammer, aussi :
- ne dépassez pas les quantitées indiquées dans les
recettes.
- ne dépassez pas 1500 g de pâte au total.
• Le niveau de puissance accoustique relevé sur ce produit est de 64 dBa.
OW3000 TEFAL ref 3313489
19/07/06
14:21
Page 16
BEFORE YOU BEGIN
GB
A slight odour may be given off when used for the first time
GETTING TO KNOW YOUR BREADMAKER
A - lid with window
B - control panel
C - bread pan
D - kneading paddle
graduated beaker - E
tablespoon measure - f1
double doser - F
teaspoon measure - f2
b1 - display screen
b2 - on/off button
b3 - weight selection
b4 - buttons for setting delayed start time
choice of programmes - b6
browning selection button - b5
15
OW3000 TEFAL ref 3313489
19/07/06
14:21
Page 17
INTRODUCTION
Bread plays an important role in our nutrition.
Who has never dreamed of making their own freshly baked bread at home?
Now you can using a breadmaker.
Whether you are a beginner or an expert, all you have to do is add the ingredients and the breadmaker
does the rest. You can easily make bread, bread dough, pizza dough, brioche, pasta and jam effortlessly.
However be aware that to make the most of your breadmaker a certain learning curve is necessary. Take
the time to get to know it and don’t be disappointed if your first attempts aren’t quite perfect. But if you’re
impatient to make your first loaf, one of the recipes in the quick-start paragraph will help you take your
first steps. Note that the texture of the bread you’ll get is more compact than bread from a bakery.
Also, remember that all baked loaves have a hole underneath where the kneading paddle is positioned
while the bread is baking in the pan.
FIRST STEPS
Tips for making good bread
1
Read the instructions carefully and use the recipes: breadmaking using this appliance is not the same as
breadmaking by hand!
2
All the ingredients used must be at room temperature and should be weighed precisely. Measure
liquids with the graduated beaker supplied. Use the double doser supplied to measure
teaspoons on one side and tablespoons on the other. All spoon measures are level and not
heaped. Incorrect measurements give bad results.
3
For successful bread making using the correct ingredients is critical (see page 20 & 21). Use ingredients
before their use-by date and keep them in a cool, dry place.
4
It is important to measure the quantity of flour precisely. That is why you should weigh out flour using a
kitchen scale. Use packets of active dry baker’s yeast. Unless otherwise indicated in the recipe, do not
use baking powder. Once a packet of yeast has been opened, it should be used within 48 hours.
5
To avoid disturbing the preparation while it is rising, we recommend that you place all the ingredients into
the pan at the beginning and do not open the lid during use. Carefully follow the order of ingredients and
quantities indicated in the recipes. First the liquids, then the solids. Yeast should not come
into contact with liquids, sugar or salt.
General order to be followed:
Liquids (butter, oil, eggs, water, milk)
Salt
Sugar
Flour, first half
Powdered milk
Specific solid ingredients
Flour, second half
Yeast
16
OW3000 TEFAL ref 3313489
19/07/06
14:21
Page 18
QUICK-START
To get to know your breadmaker, we suggest trying the BASIC BREAD recipe for your
first loaf.
BASIC BREAD BROWNING > MEDIUM
SALT
> 1.5 teaspoons
(programme 1)
WEIGHT
> 1000 g
SUGAR
> 1 tablespoon
TIME
> 3 :18
POWDERED MILK
> 2 tablespoon
OIL
> 1.5 tablespoons
WHITE BREAD FLOUR > 550 g
WATER
> 300 ml
YEAST
> 1.5 teaspoons
>
Remove the bread pan by lifting the handle and
firmly pulling upward.
Then insert the kneading paddle.
Put the ingredients in the pan in exactly the order
recommended.
Make sure that all ingredients are weighed with
precision.
MENU
TIMER
>
Place the bread pan in the breadmaker. Press
down on both sides of the pan so that it clips well
to both sides of the breadmaker and engages
the drive. NOTE: If the baking pan is incorrectly
fitted the paddle with not operate.
MENU
Close the lid. Plug in the breadmaker and switch
it on. After you hear the beep, programme 1
settings are displayed by default, i.e. 1000 g,
medium browning.
TIMER
1H
>
Press the
button.
The indicator light comes on facing the stage
the program has reached.
The timer colon flashes. and the timer will count
down. The operating indicator lights up.
When baking has finished a beep sounds.
Unplug the breadmaker at the end of the cooking
or warming cycle. Lift the bread pan out of the
breadmaker by pulling on the handle. Always use
oven gloves as the pan handle is hot, as is the
inside of the lid. Turn out the hot bread and place
it on a rack for at least 1 hour to cool.
17
OW3000 TEFAL ref 3313489
19/07/06
14:21
Page 19
USING YOUR BREADMAKER
A default setting is
displayed for each programme.
You will therefore have
to select the desired settings
manually.
SELECTING A PROGRAMME
Choosing a programme triggers a series of steps which are carried out automatically one after another.
The MENU button enables you to choose a certain number of different programmes. The
time corresponding to the programme is displayed. Every time you press the
button, the
number on the display panel advances to the next programme, from 1 to 10:
1
2
3
4
5
>
>
>
>
>
basic white bread
French bread
wholemeal bread
sweet bread
super fast bread
6
7
8
9
10
>
>
>
>
>
leavened dough (pizza for example)
fresh pasta
yoghurt bread
jams and compots
cooking only
1 The Basic Bread programme is used to make
most bread recipes using white wheat flour.
8 Yoghurt bread is a speciality with an acidic
taste, with medium browning, 1000 g only.
2 The French Bread programme corresponds to
a traditional French crusty white bread recipe.
9 The Jams programme automatically cooks
jams and compots (stewed fruits) in the pan.
3 The Wholemeal Bread programme should be
selected when using wholemeal bread flour.
10 The Cooking Only programme is used to cook
for 60 min. It can be selected alone and used:
a) with the Leavened Dough programme,
b) to reheat cooked and cooled breads
or to make them crusty,
c) to finish cooking in case of a prolonged
electricity cut during a bread baking cycle.
4 The Sweet Bread programme is suited to recipes which contain more fat and sugar.
5 The Super Fast Bread programme is specific to
the SUPER FAST bread recipe (see page 23).
6 The Leavened Dough programme does not bake.
It is a kneading and rising programme for all leavened doughs such as pizza dough, rolls, sweet buns.
7 Programme 7 only kneads.
It is for unleavened pasta, like noodles for example.
18
The breadmaker should not be left unattended
when using programme 10.
When the crust has browned to the colour you
want, manually stop the programme by pressing
the
button for several seconds.
OW3000 TEFAL ref 3313489
19/07/06
14:21
Page 20
SELECTING THE WEIGHT OF THE BREAD
The bread weight is set by default at 1000 g. This weight is shown for informational purposes. See the
recipes for more details. Programmes 6, 7, 8 and 9 do not have weight settings. Press the
button to
set the desired weight of 750 g or 1000 g. The indicator light against the selected setting comes on.
SELECTING THE COLOUR OF THE CRUST (BROWNING)
By default, the colour of the crust is set at MEDIUM.
Programmes 6, 7, 8 and 9 do not have a colour setting.
Three choices are possible: LIGHT/MEDIUM/DARK.
If you want to change the default setting, press the
button until the indicator light facing the desired
setting comes on.
SELECTING FAST MODE
Recipes 1, 2, 3 and 4 can be made in FAST mode, thus reducing baking time.
Press on the
button 4 times to select FAST mode.
The colour of the crust cannot be set in FAST mode.
START/STOP
Press the
button to switch the appliance on. The countdown begins.
To stop the programme or to cancel delayed programming, hold down on the
button for 5 seconds.
CYCLES
The indicator light comes on facing the cycle that the breadmaker has reached.
A table (page 24-25) indicates the breakdown of the various cycles for the programme chosen.
Preheating
Used for
programmes
3 and 8 to
let the dough
rise better.
> Kneading
For forming
the dough’s
structure so
that it can
rise better.
> Rest
Allows
the dough
to rest
to improve
kneading
quality.
> Rising
Time during
which the yeast
works to let
the bread rise
and to develop
its aroma.
> Baking
Transforms
the dough
into bread
and gives it
a golden,
crusty crust.
> Warming
Keeps the bread
warm after baking.
It is recommende that
the bread should be
turned out promptly
after baking, however.
Preheating: only activated for programmes 3 and 8. The kneading paddle does not operate during
this period. This step accelerates yeast activity and thus encourages rising in breads made of flours which
tend not to rise well.
Kneading: the dough is in the 1st or 2nd kneading cycle or in a stirring period between rising cycles.
During this cycle, and for programmes 1, 3, 4 and 8, you can add ingredients: dried fruit or nuts, olives,
bacon pieces, etc.
A beep indicates when you can intervene. See the summary table for preparation times (page 24-25) and
the “extra” column.
This column indicates the time that will be displayed on your appliance’s screen when the beep sounds.
For more precise information on how long before the beep sounds, subtract the “extra” column time from
the total baking time.
For example: “extra” = 2:51 and “total time” = 3:13, the ingredients can be added after 22 min.
Rising: the dough is in the 1st, 2nd or 3rd rising cycle.
Baking: the bread is in the final baking cycle.
Warming: for programmes 1, 2, 3, 4, 5, 8 and 10, you can leave your preparation in the appliance.
A one-hour warming cycle automatically follows baking.
The display remains at 0:00 for one hour of warming. The appliance beeps at regular intervals. At the end
of the cycle, it stops automatically after 3 beeps. To stop the warming programme, unplug the appliance.
19
OW3000 TEFAL ref 3313489
19/07/06
14:21
Page 21
DELAYED START PROGRAMME
You can programme the appliance up to start 15 hours in advance to have your preparation ready at the time you want. This function cannot be used on programmes 5,6,7,9,10.
This step comes after selecting the programme, browning level and weight. The programme time is displayed. Calculate the time difference between the moment when you start the programme and the time at
which you want your preparation to be ready.
The machine automatically includes the duration of the programme cycles.
Using the
and
buttons, display the calculated time ( up and down).
Short presses change the time by intervals of 10 min + a short beep.
Holding the button down gives continuous scrolling of 10-min intervals.
For example, it is 8 pm and you want your bread to be ready for 7 am the next morning. Programme 11:00
using the
and
buttons.
Press the
button. A beep is emitted. The facing indicator light switches on
and the timer colon :
blinks. The countdown begins. The ON light switches on.
If you make a mistake or want to change the time setting, hold down the
button until it makes a beep.
The default time is displayed. Start the operation again.
With the delayed start programme do not use recipes which contain fresh milk, eggs, soured cream,
yoghurt, cheese or fresh fruit as they could spoil or stale overnight.
PRACTICAL ADVICE
If there is a power cut: if, during the cycle, the programme is interrupted by a power cut or
mishandling, the machine has a 7-min protection time during which the settings are saved. The cycle
starts again where it stopped. Beyond that time, the settings are lost.
If you plan to run a second programme bake a second loaf, open the lid and wait 1 hour
before beginning the second preparation.
INGREDIENTS
Fats and oils: fats make the bread softer and tastier. It also stores better and longer. Too much fat
slows down rising. If you use butter, cut it into tiny pieces so that it is distributed evenly throughout the
preparation, or soften it. You can substitute 15g butter for 1 tablespoon of oil. Do not add hot butter. Keep
the fat from coming into contact with the yeast, as fat can prevent yeast from rehydrating. Do not use
low fat spreads or butter substitutes.
Eggs: eggs make the dough richer, improve the colour of the bread and encourage the development of
the soft, white part. If you use eggs, reduce the quantity of liquid you use proportionally. Break the egg and
top up with the liquid until you reach the quantity of liquid indicated in the recipe. Recipes are designed for
one 50 g size egg; if your eggs are bigger, add a little flour; if they are smaller, use less flour.
Milk: recipes use either fresh or powdered milk. If using powdered milk, add the quantity of water stated
in the recipe. It enhances the flavour and improves the keeping qualities of the bread. For recipes using
fresh milk, you can substitute some of it with water but the total volume must equal the quantity stated in
the recipe. Semi-skimmed or skimmed milk is best to avoid bread having a close texture. Milk also has an
emulsifying effect which evens out its airiness, giving the soft, white part a better aspect.
Water: water rehydrates and activates the yeast. It also hydrates the starch in the flour and helps the
soft, white part to form. Water can be totally or partially replaced with milk or other liquids. Use liquids at
room temperature.
Flour: the weight of the flour varies significantly depending on the type of flour used. Depending on the
quality of the flour, baking results may also vary. Keep flour in a hermetically sealed container, as flour
reacts to fluctuations in atmospheric conditions, absorbing moisture or losing it. Use “strong flour”, “bread
flour” or “baker’s flour” rather than standard flour.
20
OW3000 TEFAL ref 3313489
19/07/06
14:21
Page 22
Adding oats, bran, wheat germ, rye or whole grains to the bread dough will give a smaller, heavier loaf of
bread.
Using T55 flour is recommended unless otherwise specified in the recipe.
Sifting the flour also affects the results: the more the flour is whole (i.e. the more of the outer envelope of
the wheat it contains), the less the dough will rise and the denser the bread. You can also find readyto-use bread preparations on the market. Follow the manufacturer’s instructions when using these
preparations. Usually, the choice of the programme will depend on the preparation used. For example:
Wholemeal bread - Programme 3.
Sugar: use white sugar, brown sugar or honey. Do not use unrefined sugar or lumps. Sugar acts as food
for the yeast, gives the bread its good taste and improves browning of the crust. Artificial sweeteners cannot be substituted for sugar as the yeast will not react with them.
Salt: salt gives taste to food and regulates the yeast’s activity. It should not come into contact with the
yeast. Thanks to salt, the dough is firm, compact and does not rise too quickly. It also improves the
structure of the dough. Use ordinary table salt. Do not use coarse salt or salt substitutes.
Yeast: yeast is what makes the dough rise. Use active dry baker’s yeast in packets. The quality of
yeast can vary, and it does not always rise in the same way. Bread can therefore come out differently
depending on the yeast used.
Old or poorly stored yeast will not work as well as a freshly opened packet of dry yeast.
The proportions indicated are for flaked dried yeast. If you use fresh yeast, multiply the quantity by 3 (in
weight) and dilute the yeast in a small amount of warm water with a little sugar for more effective action.
There are dry yeasts in the form of small granular pellets that have to be rehydrated with a small amount
of warm water with a little sugar. These are used in the same proportions as flaked dry yeast, but we
recommend the latter as it is easier to use.
Additives (olives, bacon pieces, etc.): you can add a personal touch to your recipes by adding
whatever ingredients you want, taking care:
> to add following the beep for additional ingredients, especially those that are fragile such as dried fruit,
> to add the most solid grains (such as linseed or sesame) at the start of the kneading process to facilitate
use of the machine (delayed starting, for example),
> to thoroughly drain moist ingredients (olives),
> to lightly flour fatty ingredients for better blending,
> not to add too large a quantity of additional ingredients, especially cheese, fresh fruit
and fresh vegetables, as they can affect the development of the dough,
> to finely chop nuts as they can cut through the loaf structure and reduce the cooked height.
PRACTICAL ADVICE
Bread preparation is very sensitive to temperature and humidity conditions. In case of high heat,
use liquids that are cooler than usual. Likewise, if it is cold, it may be necessary to warm up the water or
milk (never exceeding 35°C). Any liquid used should be tepid, about 20 to 25 C (except for Super Fast
Bread which should be 35 to 40 C max.).
It can also sometimes be useful to check the state of the dough during the second kneading:
it should form an even ball which comes away easily from the walls of the pan.
> if not all of the flour has been blended into the dough, add a little more water,
> if the dough is too wet and sticks to the sides, you may need to add a little flour.
Such corrections should be undertaken very gradually (no more than 1 tablespoon at a time) and wait to
see if there is an improvement before continuing.
A common error is to think that adding more yeast will make the bread rise more. Too much yeast
makes the structure of the bread more fragile and it will rise a lot and then fall while baking. You can determine the state of the dough just before baking by touching it lightly with your fingertips: the dough should
be slightly resistant and the fingerprint should disappear little by little.
21
OW3000 TEFAL ref 3313489
19/07/06
14:21
Page 23
RECIPES
For each recipe, add the ingredients in the exact order indicated.
Depending on the recipe chosen and the corresponding programme,
you can take a look at the summary table of preparation times (page 24-25)
and follow the breakdown for the various cycles.Do not alter the quantities
or omit ingredients as it can upset the critical balance of the recipe.
PROGRAMME 1
tsp > teaspoon - tbsp > tablespoon
BASIC WHITE BREAD
750 g
Sunflower oil
1 tbsp
Water
245 ml
Salt
1 tsp
Sugar
3 tsp
Powdered milk
1 tbsp
White Bread Flour
455 g
Yeast*
1 tsp
MILK LOAF
1000 g
1.5 tbsp
300 ml
1.5 tsp
1 tbsp
2 tbsp
550 g
5g
or 1.5 tsp
Butter, softened, diced
Salt
Sugar
Liquid milk
White Bread Flour
Yeast*
750 g
50 g
1.5 tsp
2 tbsp
260 ml
400 g
1 tsp
1000 g
60 g
2 tsp
2.5 tbsp
310 ml
470 g
5g
or 1.5 tsp
750 g
270 ml
1.5 tsp
370 g
90 g
5g
or 1.5 tsp
1000 g
360 ml
2 tsp
500 g
120 g
2 tsp
750 g
2 tsp
270 ml
1.5 tsp
2 tsp
230 g
110 g
110 g
1 tsp
1000 g
1 tbsp
360 ml
2 tsp
1 tbsp
300 g
150 g
150 g
5g
or 1.5 tsp
PROGRAMME 2
FARMHOUSE LOAF
FRENCH BREAD **
Water
Salt
White Bread Flour
Yeast
750 g
270 ml
1.5 tsp
460 g
5g
or 1.5 tsp
1000 g
360 ml
2 tsp
620 g
2 tsp
Water
Salt
White Bread Flour
Rye flour
Yeast
PROGRAMME 3
PEASANT BREAD
WHOLEMEAL LOAF
Sunflower oil
Water
Salt
Sugar
Flour
Wholemeal flour
Yeast*
750 g
2 tsp
270 ml
1.5 tsp
2 tsp
225 g
225 g
1 tsp
1000 g
1 tbsp
360 ml
2 tsp
1 tbsp
300 g
300 g
5g
or 1.5 tsp
Sunflower oil
Water
Salt
Sugar
Flour
Rye flour
Wholemeal flour
Yeast*
* = Flaked dried type. In UK us e”Easy Bake” or “Fast Action” yeast.
** = Sugar is not included in the recipe, instead the yeast feeds on the natural starches and sugars in the flour.
*** = Add when machine beeps.
22
OW3000 TEFAL ref 3313489
19/07/06
14:21
Page 24
PROGRAMME 4
tsp > teaspoon - tbsp > tablespoon
BRIOCHE
KUGELHOPF
Eggs
Butter
Liquid milk
Salt
Sugar
White Bread Flour,
type 55
Yeast*
750 g
2
150 g
60 ml
1 tsp
3 tbsp
1000 g
3
175 g
70 ml
1.5 tsp
4 tbsp
360 g
2 tsp
440 g
2.5 tsp
Optional: 1 teaspoon orange blossom water.
1000 g
3
160 g
100 ml
1 tsp
5 tbsp
420 g
2.5 tsp
150 g
PROGRAMME 8
YOGHURT BREAD
1000 g
1.5 tbsp
360 ml
1.5 tsp
1 tbsp
2 tbsp
570 g
3.5 tsp
PROGRAMME 6
Water
Plain yoghurt
Salt
Sugar
White Bread Flour
Rye flour
Yeast*
1000 g
200 ml
1 (125 g)
2 tsp
1 tbsp
480 g
70 g
2.5 tsp
PROGRAMME 9
JAMS AND COMPOTES
PIZZA DOUGH
Olive oil
Water
Salt
White Bread Flour
Yeast*
750 g
2
140 g
80 ml
1/2 tsp
4 tbsp
350 g
2 tsp
100 g
Optional: soak the raisins in a light syrup (50% sugar 50% water) or
alcohol such as schnapps or grape eau de vie.
Optional: place whole almonds on the top of the dough at the end of the
last kneading cycle.
PROGRAMME 5
SUPER FAST BREAD
750 g
Sunflower oil
1 tbsp
Water (35 to 40°C max.) 270 ml
Salt
1 tsp
Sugar
1 tbsp
Powdered milk
1 tbsp
White Bread Flour
430 g
Yeast*
3 tsp
Eggs
Butter
Liquid milk
Salt
Sugar
White Bread Flour
Yeast*
Raisins***
750 g
1 tbsp
240 ml
1.5 tsp
480 g
1 tsp
1000 g
1.5 tbsp
320 ml
2 tsp
640 g
5g
or 1.5 tsp
Strawberry, peach, rhubarb or apricot jam:
580 g fruit, 360 g sugar, juice of 1 lemon.
Orange marmalade:
500 g fruit, 400 g sugar.
Apple/rhubarb compote:
750 g fruit, 4.5 tbsp sugar
PROGRAMME 7
FRESH PASTA
Eggs
Water
Flour (in UK Plain Flour)
Salt
Cut or chop up the fruit of your choice before putting in
the breadmaker.
1000 g
5
60 ml
600 g
1 tsp
Rhubarb compote:
750 g fruit, 4.5 tbsp sugar.
Note: When making jam never exceed the quantity in
the recipe otherwise it could boil over.
23
24
1000 g
3.45
3.45
2.30
3
Fast
2.28
Fast
2
3.43
3
3.45
3.43
1
3.43
2
2.32
Fast
1
3.32
3
5
30
30
30
5
30
30
30
5
5
5
5
5
5
5
5
5
5
5
5
5
5
5
5
5
5
5
5
5
5
5
5
5
5
5
5
5
5
5
5
5
5
5
5
5
5
5
5
5
5
5
5
* Time on display to add extra infredients egg, dried fruit, nuts, olives, etc.
Wholemeal
Bread
3
750
3.32
2
2.30
Fast
3.32
3.30
1
3.30
3
2.17
Fast
2
3.18
3
3.30
3.18
2
1
3.18
1
5
5
5
5
49
24
15
49
49
24
49
49
49
15
39
39
39
15
39
39
39
15
39
39
39
15
39
39
39
15
15
15
15
15
15
15
20
20
20
20
20
20
20
20
20
20
20
20
20
20
20
20
10
10
10
10
10
10
10
10
10
10
10
10
10
10
10
10
10
10
10
10
10
10
10
10
11
26
26
26
11
26
26
26
16
31
31
31
16
31
31
31
9
26
26
26
9
26
26
26
10
10
10
10
10
10
10
10
10
10
10
10
10
10
10
10
10
15
15
15
10
15
15
15
35
45
35
45
35
45
45
45
39
60
60
60
39
60
60
60
30
50
50
50
30
50
50
50
50
50
50
50
48
48
48
48
52
52
52
52
50
50
50
50
53
53
53
53
48
48
48
48
60
60
60
60
60
60
60
60
60
60
60
60
60
60
60
60
60
60
60
60
60
60
60
60
3 rd COOKING KEEP
RISING (mn)
WARM
(mn)
(mn)
2.08
2.58
2.58
2.58
2.06
2.56
2.56
2.56
2.32
3.32
3.32
3.32
2.30
3.30
3.30
3.30
1.55
2.56
2.56
2.56
1.50
2.51
2.51
2.51
EXTRA*
14:21
French Bread 1000 g
750
1000 g
3.13
3
2.12
3.13
2
Fast
3.13
1
REST
2 nd
1st
3 rd
2 nd
4th
(mn) KNEADING RISING KNEADING RISING KNEADING
(mn)
(mn)
(sec)
(mn)
(sec)
19/07/06
2
Basic White
Bread
1
750
PROGRAMME WEIGHT BROWNING TOTAL PREHEATING
1st
TIME
(mn)
KNEADING
(h)
(mn)
OW3000 TEFAL ref 3313489
Page 25
1000 g
1000 g
1
1
1
1
2
3
3.55
30
1.05
5
3
0.14
10
5
5
5
5
5
5
5
5
5
5
20
11
20
10
10
10
10
10
10
20
20
20
20
20
20
20
20
39
60
20
20
20
20
20
20
25
39
39
39
25
39
39
39
Comment: the total duration does not include warming time for programmes 1, 2, 4, 5, 8 and 10.
Bake only
10
Jam
9
Dough
2
2
5
1.20
3
2
2
1.30
1.20
2
6
7
Pasta
8
Yoghurt Bread
1.17
1.20
3
1
2
2
5
5
5
5
5
5
5
5
10
10
10
10
10
10
10
10
10
26
16
26
26
26
16
26
26
26
10
5
5
5
5
5
5
5
5
10
45
36
52
52
52
36
52
52
52
60
60
60
50
60
48
48
48
45
45
45
55
55
55
55
50
50
50
50
60
60
60
60
60
60
60
60
60
60
60
60
60
60
60
60
60
60
3 rd COOKING KEEP
RISING (mn)
WARM
(mn)
(mn)
2.58
2.20
3.00
3.00
2.15
2.55
2.55
2.55
2.55
EXTRA*
14:21
1000 g
5
2.42
Fast
Super Fast
Bread
3.22
3
1.17
3.22
1.17
3.22
2.37
Fast
2
3.17
3
1
3.17
2
2
750
1000 g
3.17
1
REST
2 nd
1st
3 rd
2 nd
4th
(mn) KNEADING RISING KNEADING RISING KNEADING
(mn)
(mn)
(sec)
(mn)
(sec)
19/07/06
1
Sweet Bread
4
750
PROGRAMME WEIGHT BROWNING TOTAL PREHEATING
1st
TIME
(mn)
KNEADING
(h)
(mn)
OW3000 TEFAL ref 3313489
Page 26
25
OW3000 TEFAL ref 3313489
19/07/06
14:21
Page 27
TROUBLESHOOTING GUIDE
Not getting the expected results? This table will help you.
Bread rises
too much
Bread falls
after rising
too much
Bread does
not rise
enough
Crust not
golden
enough
Sides brown
but bread not
fully cooked
Top
and sides
floury
The button was pressed
during baking
Not enough flour
Too much flour
Not enough yeast
Too much yeast
Not enough water
Too much water
Not enough sugar
Poor quality flour
Wrong proportions
of ingredients
(too much)
Water too hot
Water too cold
Wrong programme
TECHNICAL TROUBLESHOOTING GUIDE
PROBLEMS
SOLUTIONS
The kneading paddle is stuck in the pan
• Let it soak before removing it.
The kneading paddle is stuck
in the bread
• Lightly oil the kneading paddle before adding the ingredients
to the pan
After pressing on
• The machine is too hot. Wait 1 hour between 2 cycles.
• A delayed start has been programmed.
• The programme includes preheating
, nothing happens
After pressing on , the motor is on
but no kneading takes place
• The pan has not been correctly inserted.
• Kneading paddle missing or not installed properly.
After a delayed start,
the bread has not risen enough
or nothing happens
• You forgot to press on after programming.
• The yeast has come into contact with salt and/or water.
• Kneading paddle missing.
Burnt smell
• Some of the ingredients have fallen outside the pan:
let the machine cool down and clean the inside of the machine
with a damp sponge and without any cleaning product.
• The preparation has overflowed:
the quantity of ingredients used is too great, notably liquid.
Follow the proportions given in the recipe.
26
OW3000 TEFAL ref 3313489
19/07/06
14:21
Page 28
CLEANING AND MAINTENANCE
> Unplug the appliance and let it cool down.
> Clean the body of the appliance and the inside of the pan with a damp sponge. Dry thoroughly.
> Wash the pan and kneading paddle in hot water.
If the kneading paddle remains stuck in the pan, let it soak for 5 to 10 min.
> Remove the lid to clean it with hot water.
> Do not wash any part in a dishwasher.
> Do not use household cleaning products, scouring pads or alcohol. Use a soft, damp cloth.
> Never immerse the body of the appliance or the lid.
SAFETY RECOMMENDATIONS
Let’s help to protect the environment!
Your appliance contains many materials that can be reused or recycled.
Take it to a collection point so it can be processed.
> This appliance complies with the technical safety rules
and standards in force.
> Carefully read the instructions before using your appliance for the first time: the manufacturer does not accept
responsibility for use that does not comply with the
instructions.
> This appliance is not intended for use by children or
other persons without assistance or supervision if their
physical, sensory or mental capabilities prevent them
from using it safely.
> Make sure that the power it uses corresponds to your
electrical supply system. Any error in connection will
cancel the guarantee.
> Your appliance must be plugged into an earthed socket. If this is not the case, an electric shock may be
received, should a fault develop. For your safety, earthing must correspond to the electrical system standards
applicable in your country.
> Your appliance is designed for indoor home use only.
> Unplug the appliance when you have finished using it
and when you clean it.
> Do not use the appliance if it is not working properly
or if it has been damaged. If this occurs, contact an
authorised service centre (see the list in the service
booklet).
> All interventions other than cleaning and everyday
maintenance by the customer must be performed by an
authorised service centre.
> Do not immerse the appliance, power cord or plug in
water or any other liquid.
> Do not leave the power cord hanging within reach of
children.
> The power cord must never be close to or in contact
with the hot parts of your appliance, near a source of
heat or over a sharp corner.
> Do not use the appliance if the power cord or plug is
damaged. The power cord must be replaced by an
authorised service centre to avoid any danger (see the
list in the service booklet).
> Do not touch the viewing window during and just after
operation. The window can reach a high temperature.
> Do not pull on the supply cord to unplug the appliance.
> Only use an extension cord that is in good condition,
has an earthed socket and is suitably rated.
> Do not place the appliance on other appliances.
> Do not use the appliance as a source of heating.
> Do not place paper, card or plastic in the appliance
and place nothing on it.
> Should any part of the appliance catch fire, do not
attempt to extinguish it with water. Unplug the appliance.
Smother flames with a damp cloth.
> For your safety, only use accessories and spare parts
designed for your appliance.
> All appliances undergo strict quality control. Practical
usage tests are performed on randomly selected appliances, which would explain any slight traces of use.
> At the end of the programme, always use oven gloves
to handle the pan or hot parts of the appliance. The
appliance gets very hot during use.
> Never obstruct the air vents.
> Be very careful, steam can be released when you
open the lid at the end of or during the programme.
> When using programme No. 9 (jam, compotes) watch
out for steam and hot spattering when opening the lid.
> Caution, if the dough overflows the baking cavity and
touches the heating element, it can catch fire, therefore:
- do not exceed the quantities indicated in the recipes.
- do not exceed a total of 1000 g of dough.
> The measured noise level of this product is 64 dBA.
27