1
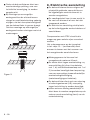
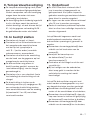
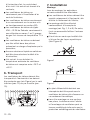
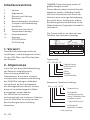
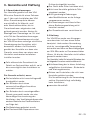
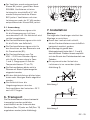
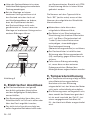
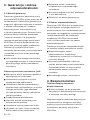
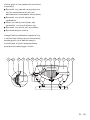
VDA EExe Handleiding Mode d‘emploi Manual Bedienungsanleitung Instrukcja Heating Cooling Fresh Air Clean Air Inhoudsopave 1.Voorwoord 2.Algemeen 3. Garantie en aansprakelijkheid 4.Veiligheid 5.Ventilatoromschrijving Transport en handeling 6. 7.Installatie Elektrische aansluiting 8. 9.Temperatuurbeveiliging In bedrijf stellen 10. 11.Onderhoud ATEX certificaat CE Verklaring 1. Voorwoord Deze handleiding bevat installatie- en onderhoudsvoorschriften van de VDA EExe, de EExe ventilator van Zehnder 2. Algemeen Leest u voor gebruik deze handleiding zorgvuldig door. Deze handleiding bevat informatie die bijdraagt aan een veilige en optimale installatie en onderhoud van de VDA EExe. Het is tevens bedoeld als naslagwerk bij onderhoudswerkzaamheden zodat deze op een verantwoorde wijze kunnen worden uitgevoerd. De VDA EExe is onderworpen aan voortdurende ontwikkeling en verbetering. Hierdoor bestaat er de mogelijkheid dat de VDA EExe enigszins afwijkt van de omschrijvingen in deze handleiding. 2 - NL N.B.: Deze handleiding is met de grootste zorgvuldigheid samengesteld. Er kunnen echter geen rechten aan worden ontleend. Tevens behouden wij ons ten allen tijde het recht voor om zonder voorafgaande mededelingen de inhoud van deze handleiding te wijzigen. Het typeplaatje is bevestigd op de bovenkap van de ventilator. typeplaat VDA 200/4D EX VDA 200/4D EX explosieveilige uitvoering Ex(e) draaistroom pooltal bouwgrootte explosieveilige type dakventilator uitvoering Ex(e) draaistroom pooltal bouwgrootte EEx c e (d) IIB T3 typetemperatuurklasse dakventilator Algemeen typeomschrijving gas groep IIB ‘d’ drukvaste omhulsel interne deel werkschakelaar EEx c e (d) IIB T3 temperatuurklasse ‘e’ verhoogde veiligheid gas IIB ‘c’groep constructieve beschermwijze ‘d’ drukvaste omhulsel interne deel werkschakelaar ‘e’ verhoogde veiligheid ontwerpen volgens Europese standaard ‘c’ constructieve beschermwijze KEMA03ATEX2017 ontwerpen volgens product keuringsinstantie Europese standaard KEMA03ATEX2017 keuringsinstantie product Verklaring Eex(e) 3. Garantie en aansprakelijkheid 3.1 Garantiebepalingen De fabrikant garandeert de VDA EExe voor een periode van 1 jaar na installatie van de VDA EExe. Garantieclaims kunnen alleen worden ingediend voor materiaalfouten en/of constructiefouten ontstaan in de garantieperiode. (De-) montagekosten ter plekke vallen niet onder de garantiebepalingen. In het geval van een garantieclaim mag de VDA EExe niet worden gedemonteerd zonder de schriftelijke toestemming van de fabrikant. Garantie op reserveonderdelen wordt alleen verstrekt indien deze door de fabrikant zijn geleverd en door een erkend installateur zijn geïnstalleerd. �Indien binnen de garantietermijn een defect aan de dakventilator optreedt, dient deze direct te worden gemeld bij de installateur De garantie vervalt indien: �De installatie niet volgens de geldende voorschriften is uitgevoerd; �De schade is veroorzaakt door onjuiste aansluiting; �De schade is veroorzaakt door ondeskundig gebruik die overmatige vervuiling van de ventilator, ventilatorbehuizing of andere componenten van de dakventilator tot gevolg heeft; �De bedrading gewijzigd is; �Reparaties door derden aan de dakventilator zijn verricht; �Het apparaat gebruikt wordt zonder rooster; �Onderdelen worden toegepast die niet door de fabrikant zijn geleverd; �Niet geautoriseerde wijzigingen en of modificaties van de installatie zijn aangebracht; �Niet houden aan aanwijzingen en voorschriften in deze handleiding; �De garantieperiode verstreken is. 3.2 Aansprakelijkheid De VDA EExe is ontworpen en gefabriceerd voor toepassing voor het afzuigen van vervuilde lucht uit een ruimte. Elk ander gebruik wordt gezien als “onbedoeld gebruik” en kan leiden tot schade aan de VDA EExe of persoonlijk letsel, waarvoor de fabrikant niet aansprakelijk kan worden gesteld. De fabrikant is niet aansprakelijk voor schade welke is terug te leiden tot: �Het niet opvolgen van de installatie, veiligheids- en onderhoudsinstructies in deze handleiding; �Het toepassen van onderdelen welke niet door de fabrikant zijn geleverd. De verantwoordelijkheid voor het toepassen van dergelijke onderdelen ligt geheel bij de installateur; �Normale slijtage. NL - 3 4. Veiligheid Algemene veiligheidsvoorschriften �Neem steeds de veiligheidsvoorschriften in deze handleiding in acht. Indien de veiligheidsvoorschriften, waarschuwingen, opmerkingen en instructies niet worden opgevolgd kan dit leiden tot persoonlijk letsel of schade aan de VDA EExe. �De installatie van de VDA EExe dient uitgevoerd te worden overeenkomstig de algemene en plaatselijk geldende bouw-, veiligheids- en installatievoorschriften van gemeente en elektriciteitsbedrijf; �Alleen een erkend installateur mag de VDA EExe installeren, aansluiten en in bedrijf stellen; �Volg steeds de veiligheidsvoorschriften, waarschuwingen, opmerkingen en instructies zoals beschreven in deze handleiding op; �Bewaar de handleiding gedurende de gehele levensduur in de nabijheid van de VDA EExe; �Modificatie van de VDA EExe is niet toegestaan. �Ter voorkoming van aanraking van personen of aanzuigen van vreemde voorwerpen, dient de ventilator aan de zuigzijde te worden voorzien van een metalen rooster met een maaswijdte van 12mm (IP20), of een gelijkwaardige bescherming aan de aanzuigzijde van de ventilator, wanneer deze niet door de wijze van ventilatorinbouw gewaarborgd is; �Voor het de eerste keer in bedrijfstellen als ook voor het weer inschakelen na onderhoudswerkzaamheden dienen de voorschriften zoals omschreven in deze handleiding worden opgevolgd; �De werkschakelaar, die aan de buitenzijde van de dakventilator is gemonteerd, mag niet als aan schakelaar gebruikt worden; �Voor het openen van de ventilatorbehuizing c.q. de elektrische aansluiting, moet de motor van de dakventilator volledig van het elektrische net worden afgeschakeld; �Het toestel kan niet worden geopend zonder gebruik te maken van gereedschappen. 5. Ventilatoromschrijving �De Aanbevolen wordt een onderhoudscontract af te sluiten zodat het toestel regelmatig gecontroleerd wordt. Via uw leverancier kunt u adressen verkrijgen van erkende installateurs in uw omgeving. Getroffen veiligheidsvoorzieningen en maatregelen �Met de hand aanraken van de draaiende delen mag niet mogelijk zijn; 4 - NL verticaal uitblazende dakventilatoren zijn in EExe uitvoering, voorzien van centrifugaal vleugel, vervaardigd uit aluminium en met achterovergebogen schoepen; �De ventilatorbehuizing is vervaardigd uit hoogwaardig, glasvezel versterkte kunststof en met een zwarte, antistatische coating behandeld; �De ventilator is gebalanceerd volgens klasse BV zoals vermeld in de EN14964. Ventilatoren met een vermogen t/m 3,7kW zijn gebalanceerd volgens klasse BV2. Ventilatoren met een vermogen hoger dan 3,7kW zijn gebalanceerd volgens klasse BV3. 5.1. Toepassing �De dakventilatoren zijn geschikt voor afzuiging van lucht c.q. vervuilde lucht. De afvoerlucht wordt verticaal uitgeblazen; �De dakventilatoren zijn niet geschikt voor het toevoeren van verse buitenlucht; �De dakventilatoren zijn geschikt voor aansluiting op het electrische net en continubedrijf (S1); �De dakventilatoren type VDA.../.D EX van Zehnder zijn geschikt voor toepassing in de zone 1 en 2, gasgroepen II en temperatuurklassen T1 tot T3; �De dakventilatoren mogen niet in stof explosiegevaarlijke ruimtes toegepast worden; �In de afvoerluchtstroom mogen geen vaste of vloeibare stoffen afgevoerd worden; �De afvoerlucht c.q. omgevingstemperatuur van de dakventilator bedraagt -20°C tot +40°C. 6. Transport De dakventilatoren dienen horizontaal te worden getransporteerd en mogen uitsluitend aan de onderkap (pos. 12) of aan de voet (pos. 13) worden opgetild (zie figuur). 5 6 8 9 4 10 2 1 3 11 15 14 7 12 13 7. Installatie Montage De volgende handelingen dienen bij de montage te worden verricht: �Om aanlopen van de vleugel te voorkomen, mogen de dakventilatoren uitsluitend horizontaal worden gemonteerd; �De montage dient volgens het montagevoorbeeld (zie fig 1, 2 en 3) plaats te vinden. Daarnaast is het aan te raden de dakopstand van Zehnder toe te passen; �Het dient te worden voorkomen, dat de luchtstroom asymmetrisch plaatsvindt. (Zie figuur 3); Figuur 1 Figuur 2 NL - 5 �Onder de dakventilatoren dient een weerbestendige pakking, voor een luchtdichte bevestiging, te worden aangebracht; �Bij montage op een ongelijke ondergrond kan de afstand tussen vleugel en ventilatorbehuizing zodanig wijzigen, dat het de explosieveiligheid van de dakventilator in gevaar brengt. Ook kan montage op een ongelijke ondergrond andere storingen met zich meebrengen. 8. Elektrische aansluiting �De dakventilatoren dienen volgens de plaatselijk geldende voorschriften en de bijgevoegde aansluitschema’s te worden aangesloten; �De voedingskabel kan via een wartel in de voet van binnenuit of over het dak toegevoerd worden; �De elektrische aansluiting vindt plaats op de buitenliggende werkschakelaar of aansluitdoos. Componenten met ATEX classificatie mogen op geen enkele wijze veranderd worden. Het schemanummer op de typeplaat in het vakje ‘S…’ (rechtsonder) dient overeen te komen met het nummer van het meegeleverde aansluitschema. �Motorgegevens Figuur 3 6 - NL zie hiervoor het meegeleverde motorcertificaat; �De motor dient tegen overbelasting c.q. oververhitting (bij direct inschakelen met 1, bij ster/driehoekaanloop met 1 of 2) te worden beveiligd door toepassing van een meerpolige stroomafhankelijke overbelastingsbeveiliging (motorbeveiligingsschakelaar); �De dakventilator dient met een zekering of zekeringautomaat (LS), meerpolig, tegen kortsluiting te worden beveiligd; �Indien externe aarding noodzakelijk is dient deze te worden aangesloten op de externe aarde aansluiting (bout) van de motorbehuizing. 9. Temperatuurbeveiliging 11. Onderhoud �De �De temperatuurbeveiliging vindt plaats door een motorbeveiligingsschakelaar. Na het aanspreken van een beveiliging mogen deze de motor niet meer zelfstandig inschakelen; �De beveiliging dient dusdanig ingesteld te zijn, dat deze zowel de nominaal stroom beveiligt, als ook binnen de tijd tE - bij de gegeven verhouding IA/IN de geblokkeerde motor afschakelt. 10. In bedrijf stellen �Controleer of vleugel vrij loopt; �Controleer of het schemanummer van het meegeleverde aansluitschema met het op het typeplaatje in veld ‘S ...’(rechts onder) vermelde schemanummer, overeenkomt; �Controleer de elektrische aansluiting aan de hand van de gegevens op het meegeleverde aansluitschema; �De dakventilator mag alleen in bedrijf worden gesteld, wanneer de ‘aanraakbeveiliging’ van de vleugel gewaarborgd is; �Controleer d.m.v. een draaitest (korte inschakeling) de draairichting van de vleugel; �De draairichting is buiten op de behuizing met een pijl aangegeven. Bij een verkeerde draairichting moeten twee aansluitklemmen van de voeding (bijvoorbeeld L1 en L3) met elkaar verwisseld worden. VDA EExe dient minimaal elke 2 jaar te worden schoongemaakt en geïnspecteerd. Als tijdens inspectie gebreken worden geconstateerd dienen deze direct te worden opgelost; �De lagers van de motor dienen minimaal elke 10 jaar te worden vervangen; �Zodra er merkbare problemen optreden dient er direct een volledige inspectie te worden uitgevoerd. Let op!!Voordat begonnen wordt met onderhoudwerkzaamheden, dient de dakventilator spanningsvrij gemaakt te worden. �Demonteer de montageplaten(6) door middel van het losdraaien van de moeren(5); �Verwijder de bovenkap van de dakventilator(7) en het beschermrooster(1); �Controleer of de vleugel en of de voet vervuild zijn; �Bij het reinigen van de onderdelen, dient erop gelet te worden dat de antistatische coating niet wordt beschadigd. Let op!!De dakventilator mag niet met water worden schoongespoten c.q. met een hogedrukreiniger worden gereinigd. �Demonteer de voedingskabel van de motor uit de aansluitdoos of schakelaar; �Demonteer de ventilatorkap(3), door de kap naar boven te trekken en gelijktijdig de klemveren(2) naar buiten te drukken; �Demonteer de montageplaat(9) door middel van de moeren(8) los te draaien; NL - 7 �Neem het motorframe(10) met motor en vleugel uit de dakventilator. �Controleer: De antistatische coating mag niet beschadigd zijn of los laten van de ventilatorbehuizing; �Controleer of de vleugel vrij loopt; �Controleer na het aansluiten van de ventilator d.m.v. een draaitest (korte inschakeling) de draairichting van de vleugel; �Controleer de vleugel op onbalans; �Controleer de lagers van motor. Let op! Niet met de vleugel op de grond zetten! �Demonteer de meeneemplaat(14) van de vleugel door middel van de bouten(15) los te draaien; �Neem de vleugel van de naaf van de motor; �Montage geschiedt in omgekeerde volgorde. Let op! Lees de meegeleverde handleidingen van de klemmenkast, werkschakelaar en motor nauwkeurig voor de onderhoudsinstructies van deze onderdelen. Let op! Dat het eventueel aangebrachte merkteken op de vleugel tegenover de spiebaan van de motoras komt te liggen, aangezien in deze positie de balancering van de vleugel heeft plaatsgevonden. 5 8 - NL 6 8 9 4 10 2 1 3 11 15 14 7 12 13 Table des matières 1. Avant-propos 2. Informations générales 3. Garantie et responsabilité 4. Sécurité 5. Description du ventilateur 6. Transport et déballage 7. Installation 8. Raccordement électrique 9. Protection thermique 10. Mise en service 11. Maintenance Certificat ATEX Déclaration de conformité CE N.B.: Ce manuel a été établi avec la plus grande minutie. Il n’ouvre cependant aucun droit. De plus, nous nous réservons le droit de modifier à tout moment le contenu de ce manuel sans préavis. En cas de différend, seule la version néerlandaise de ce mode d’emploi est contraignante. La plaque signalétique est située sur le côté supérieur du ventilateur. Ce manuel contient des consignes pour l’installation et la maintenance du VDA EExe, le ventilateur EExe de Zehnder. Plaque signalétique VDA 200/4D EX Modèle avec dispositif de protection antidéflagrante Ex(e) courant triphasé nombre de pôles dimensions ventilateur modèle toiture 2. Informations générales Lisez attentivement ce manuel avant l’utilisation. Ce manuel contient des informations nécessaires pour une installation, commande et maintenance sûres et optimales du VDA EExe. Il sert également d’ouvrage de référence afin de pouvoir effectuer des travaux de maintenance de façon raisonnée. Le VDA EExe est soumis à un développement et une amélioration continus. Il est donc possible que le VDA EExe dévie légèrement des descriptions contenues dans ce manuel. 1. Avant-propos Description générale du modèle EEx c e (d) IIB T3 classe de température groupe de gaz IIB ‘d’ enveloppe résistante à la pression partie interne interrupteur de service ‘e’ sécurité accrue ‘c’ protection de conception conception conforme au standard européen Déclaration de conformité Eex(e) FR - 9 3. Garantie et responsabilité 3.1 Conditions de garantie Le fabricant garantit le VDA EExe pour une période d’1 an après son installation. Les réclamations ne peuvent être formulées que pour les vices de matériel et/ou de construction qui surviennent pendant la période de garantie. Les frais de (dé)montage sur place sont exclus des clauses de garantie. Dans le cas d’une réclamation, le VDA EExe ne peut être démonté sans l’autorisation par écrit du fabricant. La garantie sur les pièces de rechange ne s’appliquera que si les pièces ont été fournies par le fabricant et installées par un installateur agréé. �Lorsqu’un vice apparaît sur le ventilateur de toiture pendant la période de garantie, l’acheteur est tenu de le signaler à l’installateur. La garantie est annulée si : n’a pas été effectuée suivant les consignes en vigueur; �Les dommages sont causés par un raccordement incorrect; �Les dommages sont causés par une mauvaise utilisation entraînant un encrassement excessif du ventilateur, de l’enveloppe du ventilateur ou d’autres composants du ventilateur de toiture; �Le câblage a été modifié; �Des réparations au ventilateur de toiture ont été effectuées par des tiers; �L’appareil est utilisé sans la grille; �L’installation 10 - FR �Des pièces qui n’ont pas été livrées par le fabricant sont utilisées; �Des changements et/ou modifications non autorisés ont été apportés à l’installation; �Les indications et consignes contenues dans ce manuel n’ont pas été respectées; �La période de garantie a expiré. 3.2 Responsabilité Le VDA EExe a été conçu et fabriqué pour être utilisé pour l’extraction d’air vicié d’une pièce. Tout autre usage est considéré comme “usage impropre” et peut provoquer des dommages au VDA EExe ou des blessures corporelles pour lesquels le fabricant ne pourra être tenu responsable. Le fabricant n’est pas responsable pour des dommages causés par : �Le non respect des instructions d’installation, de sécurité et de maintenance contenues dans ce manuel; �L’installation de pièces non fournies par le fabricant. l’installateur est entièrement responsable de l’utilisation de telles pièces; �Une usure normale. 4. Sécurité Consignes générales de sécurité �Observez toujours les consignes de sécurité contenues dans ce manuel. Le non respect des consignes de sécurité, des mises en garde, des observations et des instructions peut provoquer des blessures corporelles ou des dommages au VDA EExe. �L’installation du VDA EExe doit être effectuée conformément aux consignes de construction, de sécurité et d’installation en vigueur des autorités municipales et de la compagnie d’électricité; �Seul un installateur agréé est autorisé à installer, brancher et mettre le VDA EExe en service; �Suivez les consignes de sécurité, mises en garde, remarques et instructions telles qu’elles sont décrites dans ce manuel; �Conservez le manuel à proximité du VDA EExe pendant toute sa durée de vie; �Il est interdit de modifier le VDA EExe. en service suivant des travaux de maintenance, les consignes décrites dans ce manuel doivent être respectées; �L’interrupteur de service, qui est monté sur la face externe du ventilateur de toiture, ne doit pas être utilisé comme interrupteur; �L’ouverture de l’enveloppe du ventilateur et le cas échéant du boîtier de raccordement électrique ne doit avoir lieu que lorsque le ventilateur de toiture est entièrement débranché du secteur; �L’appareil ne peut être ouvert sans l’utilisation d’outils. Il est recommandé de passer un contrat d’entretien de sorte que l’appareil soit contrôlé régulièrement. Vous pouvez obtenir des adresses d’installateurs agréés dans votre région par l’intermédiaire de votre fournisseur. �Les Dispositifs et mesures de sécurité doit être impossible que la main entre en contact avec les parties rotatives; �Afin d’éviter le contact avec des personnes ou l’aspiration de corps étrangers, le ventilateur doit être équipé du côté de l’aspiration d’une grille métallique à maillage de 12mm (IP20), ou d’une protection équivalente du côté de l’aspiration du ventilateur lorsque celle-ci n’est pas garantie par le mode de conception du ventilateur; �Lors de la première mise en service ainsi que lors de la première remise �Il 5. Description du ventilateur ventilateurs de toiture à soufflage vertical de type EExe sont équipés d’une ailette centrifuge fabriquée en aluminium et dotée d’aubes incurvées vers l’arrière; �L’enveloppe est réalisée en matière plastique de haute qualité renforcée de fibres de verre et dotée d’un revêtement noir antistatique; �Le ventilateur est équilibré conformément à la classe BV, telle qu’indiquée dans la norme EN14964. Les ventilateurs dont la puissance est inférieure ou égale à 3,7 kW sont équilibrés conformément à la classe BV2. Les ventilateurs dont la puissance est supérieure à 3,7 kW sont équilibrés conformément à la classe BV3. 5.1. Utilisation ventilateurs de toiture conviennent �Les FR - 11 à l’extraction d’air, le cas échéant d’air vicié. L’air extrait est évacué à la verticale; �Les ventilateurs de toiture ne conviennent pas à l’insufflation d’air neuf de l’extérieur; �Les ventilateurs de toiture conviennent à un raccordement sur le secteur et à un fonctionnement en continu (S1); �Les ventilateurs de toiture de types VDA.../.D EX de Zehnder conviennent à une utilisation en zones 1 en 2, groupe de gaz II et classes de température T1 à T3; �Les ventilateurs de toiture ne doivent pas être utilisé dans des pièces présentant un danger d’explosion par la poussière; �Aucune substance liquide ou solide ne doit être évacuée dans le débit d’air d’extraction; �L’air extrait, le cas échéant la température ambiante du ventilateur de toiture est comprise entre -20°C et +40°C. 7. Installation Montage Lors du montage, les opérations suivantes doivent être effectuées: �Les ventilateurs de toiture doivent être montés uniquement à l’horizontal, afin d’éviter le frottement de l’ailette; �Le montage doit être effectué conformément à l’exemple de montage (voir Fig. 1, 2 et 3). En outre, il est recommandé d’utiliser l’embase Zehnder; �Il faut faire en sorte que le débit d’air n’ait pas lieu de façon asymétrique. (Voir Figure 3). Figure 1 6. Transport Les ventilateurs de toiture doivent être transportés à l’horizontal et ne doivent être soulevés que (voir Figure) par le coté inférieur (pos. 12) ou par le socle (pos. 13). Figure 2 �Un 5 6 8 12 - FR 9 4 10 2 1 3 11 15 14 7 12 13 joint d’étanchéité résistant aux intempéries doit être posé sous le ventilateur de toiture afin d’assurer un raccordement hermétique; �Lors d’un montage sur une surface non plane, la distance entre l’ailette et l’enveloppe du ventilateur peut se trouver modifiée de telle sorte que la protection antidéflagrante du ventilateur de toiture n’est plus assurée. De même, un montage sur une surface non plane peut entraîner d’autres défauts. Figure 3 8. Raccordement électrique �Le raccordement électrique des ventilateurs de toiture doit avoir lieu conformément aux prescriptions locales en vigueur et aux schémas de câblage en annexe; �Le câble d’alimentation peut être passé de l’intérieur du socle au moyen d’un émerillon ou par le toit; �Le câble est connecté à l’interrupteur de service à l’extérieur ou au boîtier de raccordement. Les composants de classification ATEX ne doivent en aucune manière être modifiés. numéro du schéma de câblage fourni avec l’appareil. �Pour les données concernant le moteur, consultez le certificat relatif au moteur fourni avec l’appareil; �Le moteur doit être protégé contre la surcharge, et le cas échéant la surchauffe (lors d’une mise marche directe avec 1, lors d’un démarrage en étoile-triangle avec 1 ou 2) en utilisant un dispositif de protection contre la surcharge multipolaire et tributaire du courant (interrupteur de sûreté du moteur); �Le ventilateur de toiture doit être protégé contre les courts-circuits à l’aide d’un fusible ou d’un disjoncteur automatique (LS), multipolaire; �Si une mise à la terre externe est nécessaire, celle-ci doit être reliée au connecteur de terre externe (boulon) situé sur l’enveloppe du moteur. 9. Protection thermique �La protection thermique est assurée par un interrupteur de sûreté du moteur. Une fois que le dispositif de protection a été enclenché, le moteur ne doit pas être remis en marche de façon autonome; �Le réglage de la protection doit être effectué de telle sorte que le courant nominal soit 1protégé et que le moteur bloqué soit également mis à l’arrêt dans le délai de temps tE - pour le rapport donné IA/IN. Le numéro de schéma indiqué dans la case “S...” (en bas à droite) sur la plaque signalétique doit correspondre avec le FR - 13 10. Mise en service �Contrôlez si l’ailette peut tourner librement; �Contrôlez si le numéro du schéma fourni avec l’appareil correspond avec le numéro de schéma indiqué sur la case “S...” (en bas à droite) de la plaque signalétique; �Contrôlez le raccordement électrique à l’aide des données contenues dans le schéma de câblage fourni avec l’appareil; �Le ventilateur de toiture ne doit être mis en service que lorsque le dispositif de protection empêchant le contact avec l’ailette a été mis en place; �Contrôlez le sens de rotation de l’ailette en effectuant un essai de rotation (brève mise en marche); �Le sens de rotation est indiqué par une flèche située à l’extérieur sur l’enveloppe. Si l’ailette tourne dans le mauvais sens, deux bornes de raccordement (par exemple L1 et L3) doivent être interverties à l’alimentation. 11. Maintenance �Le VDA EExe doit être nettoyé et inspecté au moins tous les 2 ans. Si au moment de l’inspection des défauts sont constatés, ceux-ci doivent immédiatement être réparés; �Les roulements du moteur doivent être remplacés au moins tous les 10 ans; �Dès que des problèmes surviennent de façon perceptible, une inspection complète doit immédiatement être exécutée. 14 - FR Attention !! Le ventilateur de toiture doit être mis hors tension avant de procéder à des travaux de maintenance. �Démontez les panneaux de montage(6) en dévissant les écrous(5); �Retirez le capot supérieur du ventilateur de toiture(7) et la grille de protection(1); �Contrôlez si l’ailette et le socle ne sont pas encrassés; �Lors du nettoyage des composants, il convient de faire attention à ce que le revêtement antistatique ne soit pas endommagé. Attention !! Le ventilateur de toiture ne doit pas être nettoyé au jet d’eau, ni au nettoyeur à haute pression. �Débranchez le câble d’alimentation du moteur du boîtier de raccordement ou de l’interrupteur; �Démontez le capot du ventilateur(3) en le tirant vers le haut et en poussant simultanément les ressorts de serrage(2) vers l’extérieur; �Démontez le panneau de montage(9) en dévissant les écrous(8); �Sortez le châssis du moteur(10) avec moteur et ailette du ventilateur de toiture. Attention ! L’ailette ne doit pas toucher le sol! �Démontez le panneau mobile(14) de l’ailette en dévissant les boulons(15); �Retirez l’ailette du moyeu du moteur; �Suivez la procédure inverse pour le montage. Attention ! Lisez attentivement les manuels livrés en accompagnement du bornier, de l’interrupteur de service et du moteur pour les consignes de maintenance de ces composants. Attention ! Assurez-vous que la marque située éventuellement sur l’ailette soit à l’opposé de la trajectoire de la clavette de l’axe du moteur, étant donné que l’équilibrage de l’ailette a eu lieu dans cette position. �Vérifiez : Le revêtement antistatique en doit pas être endommagé ni se détacher de l’enveloppe du ventilateur; �Contrôlez si l’ailette peut tourner librement; �Après le branchement, contrôlez le sens de rotation de l’ailette en effectuant un essai de rotation (brève mise en marche); �Vérifiez que l’ailette n’est pas en déséquilibre; � Vérifiez les roulements du moteur. 5 6 8 9 4 10 2 1 3 11 15 14 7 12 13 FR - 15 Table of contents 1. Foreword 2. General 3. Guarantee and liability 4. Safety 5 Fan description 6 Transport and handling 7. Installation 8. Electrical connection 9. Thermal protection 10. Commissioning 11. Maintenance ATEX certificate CE statement N.B.: This manual has been compiled with the greatest care. However, no rights may be derived from this publication. Zehnder also retains all rights to change the contents of this manual without prior notification. In case of disputes the Dutch version of these instructions will be binding. The identification plate can be found on the top cover of the fan. This manual contains installation and maintenance instructions for the VDA EExe, the EExe fan from Zehnder. plate Identification Explosion proof version Ex(e) three-phase current no. of poles constructional size type of roof extract fan General description EEx c e (d) IIB T3 ‘temperature class gas group IIB ‘d’ pressure-proof casing for internal part of operating switch ‘e’ increased safety ‘c’ constructive protection method designed according to European standards Eex(e) Statement 16 - EN VDA 200/4D EX 2. General Please read these instructions carefully. This manual contains information required for safe, optimal installation, and maintenance of the VDA EExe. It is also intended as a reference work for maintenance work, in order that this can be carried out in a sound manner. The VDA EExe is subject to continuous development and improvement. There is therefore a possibility that the VDA EExe differs slightly from the descriptions given. 1. Foreword 3. Guarantee and liability 3.1 Guarantee conditions The manufacturer guarantees the VDA EExe for a period of one year following installation. Guarantee claims may only be submitted for material faults and/ or construction faults arising during the guarantee period. On-site disassembly and assembly costs are not covered by the terms of the guarantee. In the case of a guarantee claim, the VDA EExe may not be dismantled without written permission from the manufacturer. Spare parts are only covered by guarantee, if they were supplied by the manufacturer and have been installed by an approved installer. �If a roof extract fan defect occurs during the guarantee period, please notify the installer. The guarantee will be cancelled, if: has not been carried out according to the applicable regulations; �The damage was caused by incorrect connection; �The damage was caused by inexpert use resulting in excess soiling of the fan, fan housing or other components of the roof extract fan; �The wiring has been altered; �Repairs have been made to the fan by unauthorised parties; �The unit has been used without a grille; �Parts are used which were not supplied by the manufacturer; �Unauthorised alterations and/or modifications have been made to the unit; �Installation �The instructions and regulations in this manual have not been adhered to; �The guarantee period has elapsed. 3.2 Liability The VDA EExe was designed and manufactured to extract used air from a room. Any other application is seen as ‘inappropriate use’ and can result in damage to the VDA EExe or personal injury, for which the manufacturer cannot be held liable. The manufacturer is not responsible for any damage derived from: �Non compliance with the installation, safety and maintenance instructions in this guide; �The use of components not supplied by the manufacturer. Responsibility for the use of such components lies entirely with the installer; �Normal wear and tear. 4. Safety General safety regulations �Always comply with the safety regulations of this manual. If the safety regulations, warnings, comments and instructions are not complied with, this can lead to personal injury or damage to the VDA EExe. �Installation of the VDA EExe must be carried out in accordance with the general and locally applicable construction, safety and installation instructions of the local council and electricity board; EN - 17 �The VDA EExe may only be installed, connected and rendered operational by a registered installer; �Always follow the safety regulations, warnings, comments and instructions given in this manual; �Store the manual in the vicinity of the VDA EExe for its entire working life; �Modifications may not be made to the VDA EExe. We recommend that a maintenance agreement is taken out, so that the unit is regularly checked. Your manufacturer can provide you with addresses of authorised fitters in your region. Safety provisions and measures to be taken �It must not be possible to touch moving parts by hand; �In order to avoid contact by persons or the suction of foreign objects, the fan must have a metal grille of mesh size 12 mm (IP20) fitted to the suction side, or a similar form of protection on the suction side of the fan if it is not protected by virtue of the method of mounting the fan; �When commissioning for the first time or taking back into operation after maintenance work, follow the instructions as given in this manual; �The operating switch fitted to the outside of the roof extract fan must not be used as an on/off switch; �Before opening the fan housing or electrical connection, the roof extract fan motor must have been completely disconnected from the mains network; �The unit cannot be opened without the use of tools. 18 - EN 5. Fan description �The vertically exhausting roof fans of the EExe type have a centrifugal impeller made from aluminium with backward-curved blades; �The fan housing is made from top quality, glass fibre reinforced plastic and has a black, anti-static coating; �The fan is balanced in accordance with class BV as stated in EN14964. Ventilators with capacities of up to 3.7 kW are balanced in accordance with class BV2. Ventilators with capacities of more than 3.7 kW are balanced in accordance with class BV3. 5.1. Application roof extract fans are suitable for extraction of used air or polluted air. The exhaust air is vertically exhausted; �The roof extract fans are not suitable for the input of fresh air from outside; �The roof extract fans are suitable for connection to the mains network and for continuous operation (S1); �The roof extract fans type VDA .../.D EX from Zehnder are suitable for use in zones 1 and 2, gas groups II and temperature classes T1 to T3; �The roof extract fans may not be used in rooms containing explosive substances; �The exhaust air flow may not contain any solids or liquids; �The exhaust air or ambient temperature of the roof extract fan is -20°C to +40°C. �The 6. Transportation The roof extract fans must be horizontally transported and may only be lifted by the bottom cover (pos. 12) or the base (pos. 13), see figure below. 5 6 8 9 4 10 2 1 3 11 15 14 7 12 13 Figure 2 �A �In weatherproof seal must be fitted under the roof extract fans, for airtight mounting; �When mounted on an unlevel base, the distance between the impeller and the ventilator housing may change in such a manner that it affects the explosion safety of the roof extract fan. Mounting on an unlevel base can also result in other problems. Figure 1 Figure 3 7. Installation Assembly The following procedures must be followed during assembly: order to avoid the impeller working out of true, the roof extract fans may only be horizontally mounted; �Mounting must take place according to the example given (see fig. 1. 2 and 3); �We therefore recommend the use of a Zehnder mounting curb; �The situation must be avoided in which the air flow takes place asymmetrically. (See figure 3). EN - 19 8. Electrical connection �The roof extract fans must be connected according to the locally applicable regulation and the enclosed wiring diagrams; �The power supply cable can be fed through a cable gland in the base from inside or over the roof; �The connection is on the exterior operating switch or connection box. Components with an ATEX classification must not be changed in any manner whatsoever. The diagram number on the identification plate in the ‘S…’ section (bottom right) must match the number of the supplied wiring diagram. �For motor specifications, see the enclosed motor certificate; �The motor must be protected against overloading or overheating (by 1 for direct starting, by 1 or 2 for star-delta starting) through the use of a multipole, current based overload protection device (motor protection switch); �The roof extract fan must be protected against short circuiting by a fuse or fuse unit (LS), multi-pole; �If additional earthing is required, it must be connected to the external earthing connection (bolt) of the motor casing. 9. Temperature protection �The temperature protection takes place by means of a motor protection switch. Once the protection device has come into operation, it may no longer automatically restart the motor; 20 - EN �The protection device must be set in such a way that it both protects the nominal current and switches off the blocked motor within the tE time, in the given IA/IN ratio. 10. Commissioning �Check whether the impeller moves freely; �Check whether the diagram number of the enclosed wiring diagram matches the diagram number given on the identification plate in field ‘S...’ (bottom right); �Check the electrical connection on the basis of the information in the enclosed wiring diagram; �The roof extract fan must not be started until the ‘contact safety device’ of the impeller has been set; �Turn on the fan briefly to check which way the impeller turns; �The rotating direction is given on the outside of the housing with an arrow. If it turns in the wrong direction, two supply connection clamps (L1 and L3) need to be switched. 11. Maintenance �The VDA EExe must be cleaned and inspected at least once every 2 years. Any faults or defects indentified during this inspection must be rectified immediately; � The bearings of the motor must be replaced at least every 10 years; � A full inspection must be carried out as soon as a noticeable defect occurs. Take care!! Before starting on any maintenance work, the roof extract fan must be disconnected from the mains voltage. �Dismantle the carrier plate of the impeller(14) by unscrewing the bolts(15); �Take the impeller off the hub of the motor; �Put everything back in the reverse order. �Dismantle the mounting plates(6) by unscrewing the bolts(5); �Remove the top cover of the roof extract fan(7) and the protective grille(1); �Check that the impeller and the base are not dirty; �When cleaning any components, take care not to damage the protective layer. Take note! The marking on the impeller must be located facing the key way of the motor shaft, as this is the position in which the impeller is balanced. �Check: The anti-static coating must not be damaged or come loose from the fan housing; �Check whether the impeller moves freely; �Turn on the fan briefly to check which way the impeller turns; �Check the impeller to ensure it is balanced; � Check the bearings of the motor. Take care!! The roof extract fan must not be sprayed with water or with a high pressure cleaner. �Dismantle the power cable of the motor from the connection box or switch; �Dismantle the roof extract fan cover(3) by pulling the hood up and at the same time pushing out the clamp springs(2); �Dismantle the mounting plate(9) by unscrewing the bolts(8); �When cleaning the parts, make sure not to damage the antistatic coating. Take note! Carefully read the maintenance instructions in the supplied instruction manuals of the branching box, operating switch and motor. Take note! Do not place with the impeller on the ground! 5 6 8 9 4 10 2 1 3 11 15 14 7 12 13 EN - 21 Inhaltsverzeichnis 1. Vorwort 2. Allgemeines Garantie und Haftung 3. Sicherheit 4. Beschreibung des Ventilators 5. Transport und Handhabung 6. Installation 7. Elektrischer Anschluss 8. Temperatursicherung 9. Inbetriebnahame 10. Wartung 11. ATEX-Zertifikat CE-Erklärung 1. Vorwort Diese Betriebsanleitung enthält die Installations- und Wartungsvorschriften für den VDA EExe, den EExe-Ventilator von Zehnder. HINWEIS: Diese Anleitung wurde mit größter Sorgfalt erstellt. Daraus können jedoch keinerlei Rechte abgeleitet werden. Außerdem behält sich das Unternehmen das Recht vor, jederzeit ohne vorherige Ankündigung den Inhalt dieser Anleitung zu ändern. Bei Meinungsverschiedenheiten ist der Niederländische Originaltext letzendlich verbindlich. Das Typenschild ist auf oben auf dem Gehäuse des Ventilators befestigt. Typenschild VDA 200/4D EX Explosionssichere Ausführung Ex(e) Drehstrom Polzahl Baugröße Typ Dachventilator 2. Allgemeines Lesen Sie sich diese Betriebsanleitung vor Gebrauch sorgfältig durch. Diese Anleitung enthält alle Informationen, die zu einer sicheren und optimalen Installation und Wartung des VDA EExe beitragen. Außerdem soll sie Ihnen als Nachschlagewerk bei Wartungsarbeiten dienen, so dass diese auf verantwortungsvolle Weise durchgeführt werden können. Der VDA EExe wird laufend weiterentwickelt und verbessert. Dadurch kann Ihr VDA EExe ein wenig von den Beschreibungen dieser Anleitung abweichen. Allgemeine Typenbeschreibung EEx c e (d) IIB T3 Temperaturklasse Gas Gruppe IIB ‘d’ druckfeste Kapselung interner Teil Betriebsschalter ‘e’ erhöhte Sicherheit ‘c’ konstruktive Schutzart Entwürfe gemäß europäischen Standards Erklärung Eex(e) 22 - DE 3. Garantie und Haftung 3.1 Garantiebestimmungen Der Hersteller gewährt auf den VDA EExe eine Garantie für einen Zeitraum von 1 Jahr nach Installation des VDA EExe. Garantieansprüche können ausschließlich für Material- und/ oder Konstruktionsfehler, die im Garantiezeitraum aufgetreten sind, geltend gemacht werden. Kosten für Montage bzw. Demontage vor Ort sind nicht Teil der Garantiebestimmungen. Im Falle eines Garantieanspruchs darf der VDA EExe ohne vorherige schriftliche Genehmigung des Herstellers nicht demontiert werden. Auf Ersatzteile gewährt der Hersteller nur dann eine Garantie, wenn diese von einem vom Hersteller anerkannten Installateur installiert wurden. �Falls während der Garantiezeit ein Defekt am Dachventilator auftritt, so ist dies unverzüglich dem Installateur zu melden. Die Garantie erlischt, wenn: Installation nicht vorschriftsgemäß durchgeführt wurde; �Der Schaden durch einen unvorschriftsmäßigen Anschluss verursacht wurde; �Der Schaden durch unsachgemäßen Einsatz verursacht wurde, der eine übermäßige Verschmutzung des Ventilators, des Ventilatorgehäuses oder anderer Bauteile des Dachventilators zur Folge hat; �Die Bekabelung geändert wurde; �Am Dachventilator Reparaturen von �Die Dritten durchgeführt wurden; Gerät ohne Gitter betrieben wird; �Nicht vom Hersteller gelieferte Teile eingebaut werden; �Nicht genehmigte Änderungen oder Modifikationen an der Anlage vorgenommen wurden; �Die Anweisungen und Vorschriften dieser Bedienungsanleitung nicht beachtet wurden; �Der Garantiezeitraum verstrichen ist. �Das 3.2 Haftung Der VDA EExe wurde zum Absaugen verschmutzter Luft aus einem Raum konzipiert. Jede andere Verwendung wird als ‘unsachgemäße Verwendung’ betrachtet und kann zu Beschädigungen am VDA EExe oder zu Personenschäden führen, für die der Hersteller nicht haftbar gemacht werden kann. Der Hersteller haftet für keinerlei Schaden, der auf folgende Ursachen zurückzuführen ist: �Nichtbeachtung der in dieser Anleitung aufgeführten Installations-, Sicherheitsund Wartungshinweise; �Einbau von Ersatzteilen, die nicht vom Hersteller geliefert wurden; Die Verantwortung für die Verwendung solcher Ersatzteile liegt vollständig beim Installateur; �normalen Verschleiß. DE - 23 4. Sicherheit Allgemeine Sicherheitsvorschriften �Jederzeit die geltenden Sicherheitsvorschriften dieser Anleitung beachten. Die Nichtbeachtung der Sicherheitsvorschriften, Warnhinweise, Anmerkungen und Anweisungen kann Körperverletzungen oder Beschädigungen am VDA EExe zur Folge haben. �Die Installation des VDA EExe ist gemäß den allgemeinen vor Ort geltenden Bau-, Sicherheitsund Installationsvorschriften der entsprechenden Gemeinde oder des Elektrizitätswerks vorzunehmen; �Einzig ein anerkannter Installateur darf den VDA EExe installieren, anschließen und in Betrieb setzen; �Befolgen Sie immer die in dieser Anleitung beschriebenen Sicherheitsvorschriften, Warnhinweise, Anmerkungen und Anweisungen; �Bewahren Sie diese Anleitung während der gesamten Lebensdauer des VDA EExe in der Nähe des Geräts; �Jegliche Modifikation des VDA EExe ist untersagt. Um zu gewährleisten, dass das Gerät regelmäßig kontrolliert wird, empfiehlt sich der Abschluss eines Wartungsvertrags. Ihr Lieferant kann Ihnen die Adressen von anerkannten Installateuren in Ihrer Nähe nennen. Getroffene Sicherheitsvorrichtungen und -maßnahmen �Es muss ausgeschlossen sein, dass die drehenden Teile mit der Hand berührt 24 - DE werden können; Schutz vor der Berührung durch Per-sonen oder dem Ansaugen von Fremdkör-pern muss der Ventilator an der Ansaugseite mit einem Metallgitter mit einer Maschen-weite von 12mm (IP20) oder einem gleichwertigen Schutz versehen werden, sofern ein entsprechender Schutz nicht durch die Art des Einbaus des Ventilators gegeben ist; �Bei der ersten Inbetriebnahme sowie beim Einschalten nach der Durchführung von Wartungsarbeiten sind die in dieser Anleit-ung beschriebenen Vorschriften einzuhalten; �Der an der Außenseite des Dachventilators montierte Betriebsschalter darf nicht zum Einschalten des Geräts verwendet werden; �Vor dem Öffnen des Ventilatorgehäuses bzw. vor dem elektrischen Anschluss ist der Motor des Dachventilators vollständig vom Stromnetz zu lösen; �Das Gerät kann nicht ohne Werkzeug geöffnet werden. �Als 5. Beschreibung des Ventilators �Die vertikal ausblasenden Dachventilatoren wurden in der EExeAusführung mit einem Zentrifugallaufrad aus Aluminium mit nach hinten gebogenen Schaufeln ausgestattet; �Das Ventilatorgehäuse ist aus hochwertigem, glasfaserverstärktem Kunststoff hergestellt und mit einer schwarzen, antistatischen Beschichtung versehen; �Der Ventilator wurde entsprechend Klasse BV justiert, gemäß der Norm EN14964. Ventilatoren mit einer Leistung bis einschließlich 3,7 kW wurden entsprechend der Klasse BV2 justiert. Ventilatoren mit einer Leistung von mehr als 3,7 kW wurden entsprechend der Klasse BV3 justiert. 5.1. Anwendung �Die Dachventilatoren eignen sich für die Absaugung von Luft bzw. verschmutzter Luft. Die Abfuhrluft wird vertikal ausgeblasen; �Die Dachventilatoren eignen sich nicht für die Zufuhr von Außenluft; �Die Dachventilatoren eignen sich für den Anschluss an das Stromnetz und für Dauerbetrieb (S1); �Die Dachventilatoren vom Typ VDA .../.D EX von Zehnder eignen sich für die Verwen-dung in Zone 1 und 2, Gasgruppen II und die Temperaturklassen T1 bis T3; �Die Dachventilatoren dürfen nicht in Räumen mit Staub-Explosionsgefahr eingesetzt werden; �Mit dem Abfuhrluftstrom dürfen keine festen oder flüssigen Stoffe abgeführt werden; �Die Abfuhrluft bzw. die Umgebungstempe-ratur des Dachventilators darf zwischen -20°C und +40°C liegen. 5 6 8 9 4 10 2 1 3 11 15 14 7 12 13 7. Installation Montage Die folgenden Handlungen sind bei der Montage zu verrichten: �Damit das Laufrad nicht schleift, dürfen Dachventilatoren ausschließlich horizontal montiert werden; �Die Montage ist gemäß dem Montagebeispiel (siehe Abb. 1, 2 und 3) durchzuführen. Darüber hinaus empfiehlt sich der Einsatz des Flachdachsockels von Zehnder; �Ein asymmetrischer Verlauf des Luftstroms ist zu vermeiden (siehe Abbildung 3); Abbildung 1 6. Transport Die Dachventilatoren müssen horizontal transportiert werden und dürfen ausschließlich an der Unterseite des Gehäuses (Pos. 12) oder am Fuß (Pos. 13) angehoben werden (siehe Abbildung). Abbildung 2 DE - 25 �Unter den Dachventilatoren ist zu einer luftdichten Befestigung eine wetterfeste Packung anzubringen; �Bei der Montage auf einem unebenen Unter-grund kann sich der Abstand zwischen Lauf-rad und Ventilatorgehäuse so ändern, dass die Explosionssicherheit des Dachventilators nicht mehr gewährleistet ist. Ferner kann eine Montage auf unebenem Untergrund zu anderen Störungen führen. am Klemmenkasten. Bauteile mit ATEXKlassifizierung dürfen in keiner Weise geändert werden. Die Nummer auf dem Typenschild im Fach “SE” (rechts unten) muss mit der Nummer des mitgelieferten Schaltbilds übereinstimmen. �Motordaten: siehe hierzu das mitgelieferte Motorzertifikat; �Der Motor ist vor Überlastung bzw. Überhitzung (bei direktem Einschalten mit 1, bei Stern-/Dreiecksanlauf mit 1 oder 2) durch den Einbau einer mehrpoligen, stromabhängigen Überlastungssicherung (Motorsicherungsschalter) zu schützen; �Der Dachventilator ist mithilfe einer Sicherung oder Sicherungsautomatik (LS), mehrpolig, gegen Kurzschluss zu sichern; �Falls externe Erdung notwendig ist, muss diese an den externen Erdungsanschluss (Bolzen) des Motorgehäuses angeschlossen werden. 9. Temperatursicherung Abbildung 3 8. Elektrischer Anschluss �Die Dachventilatoren sind gemäß den örtlich geltenden Vorschriften und den beigefügten Schaltplänen anzuschließen; �Das Spannungskabel kann über eine Kabeldurchfuhr im Fuß nach außen oder über das Dach zugeführt werden; �Der elektrische Anschluss erfolgt am außen liegenden Betriebsschalter oder 26 - DE �Die Temperatursicherung erfolgt mithilfe eines Motorsicherungsschalters. Nachdem sich eine Sicherung eingeschaltet hat, darf diese den Motor nicht mehr selbstständig einschalten; �Die Sicherung muss so eingestellt sein, dass sowohl der Nennstrom gesichert ist als auch innerhalb der Zeit tE - bei einem vorgegebenen Verhältnis IA/ IN - der blockierte Motor ausgeschaltet wird. 10. Inbetriebnahme �Kontrollieren Sie, ob das Laufrad frei läuft; �Kontrollieren Sie, ob die Nummer des mitgelieferten Schaltbilds mit der auf dem Typenschild in Fach “S ...” (rechts unten) angegebenen Nummer übereinstimmt; �Kontrollieren Sie den elektrischen Anschluss anhand der Daten des mitgelieferten Schalt-bilds; �Der Dachventilator darf nur in Betrieb gesetzt werden, wenn die “Berührungssicherung” des Laufrads gewährleistet ist; �Kontrollieren Sie mithilfe eines Lauftests (kurz einschalten) die Laufrichtung des Laufrads; �Die Laufrichtung ist außen am Gehäuse mit einem Pfeil gekennzeichnet. Bei einer falschen Laufrichtung müssen die beiden Anschlussklemmen der Netzspannung (beispielsweise L1 und L3) umgetauscht werden. 11. Wartung D er VDA EExe muss mindestens alle 2 Jahre gereinigt und kontrolliert werden. Falls während der Kontrolle Mängel festgestellt werden, müssen diese direkt behoben werden; � D ie Lager des Motors müssen mindestens alle 10 Jahre ausgetauscht werden; � S obald merklich Probleme auftreten, muss direkt eine vollständige Kontrolle durchgeführt werden. � Achtung! Vor Beginn der Wartungsarbeiten den Dachventilator immer spannungsfrei machen! �Demontieren Sie die Montageplatten(6), indem Sie die Muttern lösen(5); �Entfernen Sie das obere Gehäuse des Dachventilators(7) und das Schutzgitter(1); �Kontrollieren Sie das Laufrad und den Fuß auf Verschmutzung hin; �Achten Sie beim Reinigen der Teile darauf, dass die Schutzschicht nicht beschädigt wird; �Bei der Reinigung der Teile muss darauf geachtet werden, dass die antistatische Beschichtung nicht beschädigt wird. Achtung! Den Dachventilator niemals mit Wasser abspritzen bzw. mit einem Hochdruckreiniger reinigen! �Lösen Sie das Speisekabel des Motors vom Klemmenkasten oder vom Schalter; �Demontieren Sie das Ventilatorgehäuse(3), indem Sie das Gehäuse nach oben ziehen und gleichzeitig die Klemmfedern(2) nach außen drücken; �Demontieren Sie die Montageplatte(9), indem Sie die Muttern(8) lösen; �Nehmen Sie den Motorrahmen(10) mit Motor und Laufrad aus dem Dachventilator. Achtung! Nicht mit dem Laufrad nach unten abstellen! �Demontieren Sie die Mitnehmerplatte(14) des Laufrads, indem Sie die Bolzen(15) lösen; �Ziehen Sie das Laufrad von der Motornabe ab; �Die Montage erfolgt in umgekehrter Reihenfolge. DE - 27 Achtung! Lesen Sie sich die Wartungshinweise in den mitgelieferten Anleitungen des Klemmenkastens, des Betriebsschalters und des Motors aufmerksam durch. Achtung! Die ggf. am Laufrad angegebene Markierung muss gegenüber der Keilnut der Motorachse liegen, da das Laufrad in dieser Position ausgewuchtet wurde. �Kontrollieren Sie: Die antistatische Beschichtung darf nicht beschädigt sein oder sich vom Ventilatorgehäuse ablösen; �Kontrollieren Sie, ob das Laufrad frei läuft; �Kontrollieren Sie nach dem Anschließen des Ventilators mithilfe eines Lauftests (kurz einschalten) die Laufrichtung des Laufrads; �Kontrollieren Sie, ob der Flügel korrekt justiert ist; �Kontrollieren Sie die Lager des Motors. 5 28 - DE 6 8 9 4 10 2 1 3 11 15 14 7 12 13 Spis treści 1. Przedmowa 2. Informacje ogólne 3. Gwarancja i zakres odpowiedzialności 4. Bezpieczeństwo 5. Opis wentylatora 6. Transport i przenoszenie 7. Montaż 8. Podłączenie elektryczne 9. Zabezpieczenie termiczne 10. Pierwsze uruchomienie 11. Konserwacja Atest ATEX Deklaracja WE 1. Przedmowa Niniejsza instrukcja zawiera informacje na temat montażu oraz konserwacji wentylatora VDA EExe firmy Zehnder. 2. Informacje ogólne Należy dokładnie zapoznać się z tymi instrukcjami. Niniejsza instrukcja obsługi zawiera informacje konieczne do bezpiecznego i optymalnego montażu, eksploatacji i konserwacji wentylatora VDA EExe. Należy z niej także korzystać podczas wykonywania prac konserwacyjnych, które należy wykonać poprawnie. Wentylator VDA EExe jest rozwijany i ulepszany w sposób ciągły. Dlatego też wentylator VDA EExe może nieco różnić się od przedstawionych opisów. UWAGA: Niniejsza instrukcja obsługi została sporządzona z najwyższą starannością. Nie wiąże się to jednak z nabyciem przez użytkownika jakichkolwiek praw. Firma Zehnder zastrzega sobie ponadto prawa do wprowadzenia zmian w treści niniejszej instrukcji obsługi bez uprzedzenia. W przypadku sporów wiążąca jest wersja niniejszej instrukcji w języku niderlandzkim. Tabliczkę znamionową można znaleźć na górnej pokrywie wentylatora. Tabliczka znamionowa VDA 200/4D EX Wersja przeciwwy buchowa prąd trójfazowy nie. biegunów konstrukcyjnych rozmiar typu wentylator dachu Opis ogólny EEx c e (d) IIB T3 klasa temperatury gazu grupy IIB ‘d’ odporne na zgniatanie obudowy wewnętrznej części przełącznika ‘e’ większe bezpieczeństwo ‘c’ konstruktywne metody ochrony zaprojektowane zgodnie z normami europejskimi Deklaracja Eex(e) PL - 29 3. Gwarancja i zakres odpowiedzialności 3.1 Warunki gwarancji Producent gwarantuje poprawna pracę wentylatora VDA EExe przez jeden rok od zamontowania. Roszczenia gwarancyjne mogą być zgłaszane wyłącznie w związku z wadami materiałowymi i wadami konstrukcyjnymi, które pojawiły się w okresie gwarancyjnym. Gwarancja nie obejmuje zwrotu kosztów demontażu i napraw na miejscu. W przypadku roszczenia gwarancyjnego wentylatora VDA EExe nie wolno demontować bez uzyskania pisemnej zgody producenta. Gwarancją są objęte tylko części zapasowe dostarczone przez producenta i zamontowane przez autoryzowanego instalatora. �Jeśli usterka dachowego wentylatora wyciągowego wystąpi w trakcie okresu gwarancyjnego, należy powiadomić instalatora. Gwarancja zostanie anulowana, jeśli: �Montaż nie został wykonany zgodnie z obowiązującymi przepisami; �Uszkodzenie wystąpiło w wyniku niepoprawnego podłączenia; �Uszkodzenie zostało spowodowane niewłaściwym użytkowaniem, w wyniku którego wentylator, jego obudowa lub inne elementy zostały nadmiernie zanieczyszczone; �Zmodyfikowano okablowanie; �Naprawa została wykonana przez nieupoważnioną osobę; �Urządzenie było używane bez kratki; �Używane są części, które nie zostały dostarczone przez producenta; 30 - PL �Dokonano zmian i modyfikacji urządzenia bez odpowiedniego zezwolenia; �Nie przestrzegano instrukcji podanych w tym dokumencie; �Zakończył się okres gwarancyjny. 3.2 Zakres odpowiedzialności Wentylator VDA EExe jest przeznaczony do wyciągania zużytego powietrza z pomieszczenia. Inne zastosowanie jest uznawane za niezgodne z przeznaczeniem i może doprowadzić do uszkodzeń urządzenia VDA EExe lub obrażeń ciała, za które producent nie ponosi odpowiedzialności. Producent nie ponosi odpowiedzialności za wszelkie szkody powstałe na skutek: �Nieprzestrzegania zasad bezpieczeństwa, eksploatacji i konserwacji zawartych w niniejszej instrukcji obsługi; �Używania podzespołów, które nie zostały dostarczone przez producenta. Odpowiedzialność za użycie takich podzespołów ponosi wyłącznie instalator; �Normalnego zużycia i zniszczenia. 4. Bezpieczeństwo Ogólne przepisy dotyczące bezpieczeństwa �Należy stosować się do przepisów dotyczących bezpieczeństwa zawartych w niniejszej instrukcji obsługi. Nieprzestrzeganie przepisów dotyczących bezpieczeństwa, uwag oraz instrukcji może być przyczyną obrażeń ciała lub uszkodzenia obudowy wentylatora VDA EExe. �Instalacja wentylatora VDA EExe musi być przeprowadzona zgodnie z ogólnymi i lokalnie obowiązującymi przepisami budowlanymi, bezpieczeństwa i montażu określonymi przez władze lokalne i dostawcę energii elektrycznej; �Wentylator VDA EExe może montować, podłączać i przekazywać do eksploatacji wyłącznie certyfikowany instalator; �Należy przestrzegać przepisów dotyczących bezpieczeństwa, stosować się do ostrzeżeń, komentarzy i uwag w sposób zalecany przez niniejszą instrukcję obsługi; �Instrukcję obsługi należy przechowywać w pobliżu wentylatora VDA EExe przez cały okres jego eksploatacji; �Nie można wprowadzać modyfikacji w konstrukcji wentylatora VDA EExe. Zalecane jest zawarcie umowy konserwacyjnej, aby zapewnić regularne kontrolowanie urządzenia. Producent udostępnia adresy autoryzowanych instalatorów w danym regionie. Środki bezpieczeństwa wolno dotykać ruchomych części rękami; �Aby uniknąć kontaktu z osobami lub wessania obcych przedmiotów, wentylator musi być wyposażony od stronny ssawnej w metalową kratkę o wielkości oczka siatki 12 mm (IP20) lub w podobne zabezpieczenie od stronny ssawnej, jeśli metoda montażu wentylatora nie zapewnia jego �Nie bezpieczeństwa; postępować zgodnie z zaleceniami przedstawionymi w niniejszej instrukcji po wykonaniu konserwacji lub przy pierwszym uruchomieniu; � Nie wolno używać przełącznika roboczego, który jest zamocowany na zewnątrz dachowego wentylatora wyciągowego, do włączania lub wyłączania urządzenia; � Przed otwarciem obudowy wentylatora lub odłączeniem przewodów należy całkowicie odłączyć zasilanie sieciowe silnika wentylatora; � Urządzenie należy otwierać za pomocą narzędzi. �Należy 5. Opis wentylatora � Pionowy wyciągowy wentylator dachowy typu EExe jest wyposażony w wykonany z aluminium wirnik odśrodkowy z wygiętymi do tyłu łopatkami; � Obudowa wentylatora jest wykonana z wysokiej jakości tworzywa wzmacnianego włóknem szklanym oraz ma czarną powłokę antystatyczną; � Wentylator jest wyważony zgodnie z wymogami dla klasy BV przedstawionymi w normie EN14964. Wentylatory o mocy do 3,7 kW są wyważane zgodnie z wymogami dla klasy BV2. Wentylatory o mocy powyżej 3,7 kW są wyważane zgodnie z wymogami dla klasy BV3. 5.1. Zastosowanie �Dachowy wentylator wyciągowy może być używany do wyciągania zużytego lub zanieczyszczonego powietrza. PL - 31 Powietrze wywiewane jest wyciągane pionowo; � Dachowy wentylator wyciągowy nie może być używany do nawiewania świeżego powietrza z zewnątrz; � Dachowy wentylator wyciągowy może być podłączony do sieci elektrycznej i pracować w trybie ciągłym (S1); �Dachowy wentylator wyciągowy typu VDA.../.D EX firmy Zehnder może być używany w strefach 1 i 2, w odniesieniu do grup gazów II i w klasach temperatury T1 do T3; � Dachowy wentylator wyciągowy nie może być używany w pomieszczeniach zawierających substancje wybuchowe; �Powietrze wywiewane nie może zawierać ciał stałych ani cieczy; �Temperatura powietrza wywiewanego lub otoczenia dachowego wentylatora wyciągowego wynosi od -20°C do +40°C. 7. Montaż Zamontowanie Podczas montażu należy przestrzegać następujących procedur: �Aby uniemożliwić pracę wirnika w pozycji innej niż pionowa, dachowy wentylator wyciągowy można montować tylko w pozycji poziomej; �Montaż musi zostać wykonany zgodnie z podanym przykładem (patrz Rys. 1, 2 i 3); �Zalecane jest zastosowanie stopnia montażowego firmy Zehnder; �Należy unikać sytuacji, w których będzie występował asymetryczny przepływ powietrza (patrz Rys. 3). Rys. 1 6. Transport Dachowy wentylator wyciągowy może być transportowany tylko w pozycji poziomej. Można go podnosić tylko za dolną pokrywę (poz. 12) lub za podstawę (poz. 13) (patrz rysunek poniżej). 5 6 8 32 - PL 9 4 10 2 1 3 11 15 14 7 12 13 Rys. 2 �W celu zapewnienia szczelności, pod dachowym wentylatorem wyciągowym należy zamocować uszczelnienie odporne na działanie czynników atmosferycznych; �Gdy montaż odbywa się na nierównej podstawie, może ulec zmianie odległość pomiędzy wirnikiem a obudową wentylatora na tyle, iż będzie miało to wpływ na zabezpieczenie przeciwwybuchowe dachowego wentylatora wyciągowego. Montaż na nierównej podstawie może być źródłem innych problemów. Rys. 3 8. Podłączenie elektryczne �Dachowy wentylator wyciągowy musi być podłączony zgodnie z obowiązującymi lokalnymi przepisami oraz z załączonymi schematami elektrycznymi; �Kabel zasilania można przeprowadzić przez dławik w podstawie od wewnątrz lub po dachu; �Podłączenie wykonuje się w zewnętrznym przełączniku roboczym lub w skrzynce połączeniowej. znamionowej w sekcji „S...” (z prawej strony u dołu) musi odpowiadać numerowi dostarczonego schematu elektrycznego. �Dane techniczne silnika można znaleźć w dołączonym ateście silnika; �Silnik musi być zabezpieczony przed przeciążeniem lub przegrzaniem (przez 1 w przypadku rozruchu bezpośredniego, przez 1 lub 2 w przypadku rozruchu gwiazda-trójkąt) przy użyciu wielobiegunowego zabezpieczenia nadprądowego (wyłącznik ochronny silnika); �Dachowy wentylator wyciągowy musi być zabezpieczony przed zwarciem za pomocą bezpiecznika lub wielobiegunowego wyłącznika automatycznego (LS); �Jeśli wymagane jest dodatkowe uziemienie, należy go podłączyć do zewnętrznego przyłącza uziemienia (śruby) na obudowie silnika. 9. Zabezpieczenie termiczne �Zabezpieczenie termiczne jest uzyskiwane za pomocą wyłącznika ochronnego silnika. Gdy urządzenie zabezpieczające zostanie wyzwolone, nie można ponownie uruchomić silnika w sposób automatyczny; �Urządzenie zabezpieczające musi być ustawione w taki sposób, aby zapewniało ochronę dla prądu znamionowego oraz wyłączało zablokowany silnik w czasie tE przy zadanym ilorazie IA/IN. W żaden sposób nie wolno modyfikować konstrukcji urządzeń z atestem ATEX. Numer schematu na tabliczce PL - 33 10. Pierwsze uruchomienie �Sprawdź, czy wirnik obraca się swobodnie; �Sprawdź, czy numer załączonego schematu elektrycznego odpowiada numerowi podanemu w polu „S...” na tabliczce znamionowej (z prawej strony u dołu); �Sprawdź podłączenie elektryczne na podstawie informacji podanych w załączonym schemacie elektrycznym; �Nie można uruchomić dachowego wentylatora wyciągowego, dopóki nie zostanie ustawione urządzenie zabezpieczające przed kontaktem z wirnikiem; �Włącz na chwilę wentylator, aby sprawdzić, czy wirnik obraca się; �Kierunek obrotów jest wskazany strzałką na zewnętrznej części obudowy. Jeśli wirnik obraca się w niewłaściwym kierunku, zamień dwa zaciski zasilania L1 i L3. 11. Konserwacja �Wentylator VDA EExe należy czyścić i kontrolować co najmniej 2 razy w roku. Należy natychmiast usunąć wszystkie błędy lub usterki wykryte podczas tych kontroli; � Łożyska silnika należy wymieniać co najmniej co 10 lat; � Pełną kontrolę należy przeprowadzić natychmiast po wykryciu znaczącej usterki. Uwaga! Przed rozpoczęciem prac konserwacyjnych należy całkowicie odłączyć zasilanie sieciowe silnika 34 - PL wentylatora. �Wymontuj płytki montażowe(6), odkręcając śruby(5); �Wymontuj górną pokrywę dachowego wentylatora wyciągowego(7) i kratkę ochronną(1); �Sprawdź, czy wirnik i podstawa nie są zanieczyszczone; �Należy uważać, aby podczas czyszczenia elementów nie uszkodzić warstwy ochronnej; Uwaga! Dachowego wentylatora wyciągowego nie wolno płukać wodą ani myć strumieniem z myjki wysokociśnieniowej. �Odłącz kabel zasilania silnika od skrzynki połączeniowej lub przełącznika; �Wymontuj pokrywę dachowego wentylatora wyciągowego(3), podnosząc płytę pokrywy i jednocześnie naciskając sprężyny dociskowe(2); �Wymontuj płytkę montażową(9), odkręcając śruby(8); �Należy uważać, aby podczas czyszczenia części nie uszkodzić powłoki antystatycznej. Uwaga! Nie wolno stawiać wirnika na podłożu! �Wymontuj płytkę nośną wirnika(14), odkręcając śruby(15); �Wymontuj wirnik z piasty silnika; �Zmontuj wszystkie części w odwrotnej kolejności. Uwaga! Oznaczenie na wirniku musi być ustawione w stronę wpustu na wałku silnika, gdyż w tym położeniu wirnik jest wyważony. �Sprawdź: czy powłoka antystatyczna nie jest uszkodzona lub nie jest obluzowana na obudowie wentylatora; �Sprawdź, czy wirnik obraca się swobodnie; �Włącz na chwilę wentylator, aby sprawdzić, czy wirnik obraca się; �Sprawdź, czy wirnik jest wyważony; � Sprawdź łożyska silnika. Uwaga! Należy dokładnie zapoznać się z instrukcjami dotyczącymi konserwacji, znajdującymi się w dostarczonych instrukcjach skrzynki połączeniowej, przełącznika roboczego i silnika. 5 6 8 9 4 10 2 1 3 11 15 14 7 12 13 PL - 35 36 - NL EG-verklaring van overeenstemming Zehnder Group Nederland B.V., Lingenstraat 2, 8028 PM Zwolle-NL Tel.: +31 (0)38-4296911 - Fax: +31 (0)38-4225694 Handelsregister Zwolle 05022293 Omschrijving machine : Dakventilator: VDA EEXe EG-Typeonderzoek :Explosieveiligheid. : DEKRA 11ATEX0180 - Nummer : DEKRA, notified body number 0344. - Naam keuringsinstantie :Utrechtseweg 310, - Adres 6812 AR Arnhem-NL Voldoet aan richtlijnen: - Machinerichtlijn (2006/42/EEG) -Laagspanningsrichtlijn ((2006/95/EEG) - EMC-richtlijn (2004/108/EEG) - ATEX-richtlijn (94/9/EG) Voldoet aan geharmoniseerde europese normen Zwolle, 01-08-2014 Zehnder Group Nederland B.V. : : : : : EN EN EN EN EN 50014 : 1997 50018 : 2000 50019 : 2000 13463-1 : 2009 14986 : 2007 O. Schulte Directeur Productie Zwolle Déclaration CE de conformité Zehnder Group Nederland B.V., Lingenstraat 2, NL-8028 PM Zwolle Tél. : +31 (0)38-4296911 - Fax : +31 (0)38-4225694 Registre du commerce Zwolle 05022293 Description de l’appareil :Ventilateur de toiture : VDA EEXe Examen de type CE : - Numéro : - Nom instance d’homologation : - Adresse : Protection antidéflagrante DEKRA 11ATEX0180 DEKRA, numéro d’organisme déclaré 0344 Utrechtseweg 310 NL-6812 AR Arnhem, Pays-Bas Conforme aux directives: - Directive - Directive -Directive - Directive Conforme aux normes européennes harrmonisées Zwolle, 01-08-2014 Zehnder Group Nederland B.V. : : : : : Olaf Schulte, Président-directeur Produktion Zwolle 37 EN EN EN EN EN machine ((2006/42/CEE) basse tension (2006/95/CEE) compatibilité électromagnétique (2004/108/CEE) ATEX (94/9/CE) 50014 : 1997 50018 : 2000 50019 : 2000 13463-1 : 2009 14986 : 2007 Déclaration CE de conformité Zehnder Group Nederland B.V., Lingenstraat 2, 8028 PM Zwolle-NL Tel.: +31 (0)38-4296911 - Fax: +31 (0)38-4225694 Company register Zwolle 05022293 Machine description : Roof extract fan: VDA EEXe : EC Type Examination : - Number : - Name of inspecting body : - Address: Explosion proof DEKRA 11ATEX0180 DEKRA, notified body number 0344 Utrechtseweg 310 NL-6812 AR Arnhem - - - - Machine directive (2006/42/EEC) Low voltage directive (2006/95/EEC) EMC directive (2004/108/EEC ATEX directive (94/9/EC) Complies with directives: Complies with harmonized : : European standards : : : Zwolle, 01-08-2014 Zehnder Group Nederland B.V. EN EN EN EN EN 50014: 1997 50018: 2000 50019: 2000 13463-1: 2009 14986 : 2007 O. Schulte, Director Production Zwolle EWG-Konformitätserklärung Zehnder Group Nederland B.V., Lingenstraat 2. 8028 PM Zwolle-NL Tel.: +31 (0)38-4296911 - Fax: +31 (0)38-4225694 Handelsregister Zwolle 05022293 Bezeichnung des Geräts : Dachventilator: VDA EEXe EG-Typenuntersuchung :Explosionssicherheit - Nummer : DEKRA 11ATEX0180 - Name Prüforgan : DEKRA,, benannte Stelle Nummer 0344 - Adresse : Utrechtseweg 310 NL-6812 AR Arnhem Entspricht den Richtlinien: - Maschinenrichtlinie (2006/42/EWG) -Niederspannungsvorschrift (2006/95/EWG) - EMC-Vorschrift (2004/108/EWG) - ATEX-Richtlinie (94/9/EG) Entspricht den harmonisierten europäischen Normen Zwolle, 01-08-2014 Zehnder Group Nederland B.V. : : : : : EN EN EN EN EN Olaf Schulte, Geschäftsführer Produktion Zwolle 50014: 1997 50018: 2000 50019: 2000 13463-1: 2009 14986 : 2007 Deklaracja zgodności EWG Zehnder Group Nederland B.V., Lingenstraat 2, 8028 PM Zwolle-NL Tel.: +31 (0)38-4296911 - Faks: +31 (0)38-4225694 Rejestr sądowy Zwolle 05022293 Opis maszyny : Dachowy wentylator wyciągowy: VDA EEXe : Badanie typu WE: : – Numer : – Nazwa jednostki kontrolującej : – Adres: Zgodna z: - - - - Zgodna z normami zharmonizowanymi: : : Normy europejskie : : : Zwolle, 01-08-2014 Zehnder Group Nederland B.V. Olaf Schulte, Dyrektor Produkcji Zwolle przeciwwybuchowość DEKRA 11ATEX0180 DEKRA, numer jednostki notyfikowanej 0344 Utrechtseweg 310 NL-6812 AR Arnhem Dyrektywa Dyrektywa Dyrektywa Dyrektywa EN EN EN EN EN maszynowa (2006/42/EWG) niskonapięciowa (2006/95/EWG) zgodności elektromagnetycznej EMC (2004/108/EWG) ATEX (94/9/WE) 50014: 1997 50018: 2000 50019: 2000 13463-1: 2009 14986: 2007 (China) Great Britain Sverige (Sweden) Zehnder Comfosystems A division of Zehnder Group UK Ltd Unit 1, Brookside Avenue Rustington West Sussex BN16 3LF T +44 1903 777 333 F +44 1903 782 398 [email protected] www.zehnder.co.uk Zehnder Group Nordic AB Mallslingan 22 - Box 7209 187 13 Täby T +46 8 630 93 00 F +46 8 630 93 50 [email protected] www.zehnder.se Zehnder (China) Indoor Climate Co., Ltd. Tuqiao, Liyuan Zhen, Tongzhou District 101149 Beijing T +86 10 6156 6704 / 139 0133 3341 F +86 10 6957 5690 Italia (Italy) [email protected] Zehnder Group Italia S.r.l. www.zehnder.com.cn Via XXV Luglio, 6 Campogalliano (MO) 41011 Europe T +39 059 978 62 00 F +39 059 978 62 01 België (Belgium) [email protected] Zehnder Group Belgium nv/sa www.comfosystems.it Stephenson Plaza, Blarenberglaan 3C/001 Polska (Poland) 2800 Mechelen Zehnder Polska Sp. z o.o. T +32 15 28 05 10 ul. Kurpiów 14a F +32 15 28 05 11 52-214 Wrocław [email protected] T +48 71 367 64 24 www.zehnder.be F +48 71 367 64 25 [email protected] Deutschland (Germany) www.zehnder.pl Zehnder Group Deutschland GmbHt Almweg 34 (Russia) 77933 Lahr Sevastopolsky Prospect 11G T +49 7821 586 0 (2nd Floor) F +49 7821 586 223 117152 Moscow [email protected] T +7 495 988 50 15 www.zehnder-systems.de F +7 495 988 50 16 France (France) [email protected] www.zehndergroup.ru Zehnder Group Services SAS 7, rue Jean Mermoz, Courcouronnes / Saint Guénault 91031 Evry Cedex T +33 169 361 646 F +33 169 474 581 [email protected] www.comfosystems.fr Nederland (The Netherlands) Zehnder Group Nederland B.V. Lingenstraat 2 · 8028 PM · Postbus 621 · 8000 AP Zwolle T 0 900 555 19 37 (€0,10 per minuut) · F +31 38 422 56 94 [email protected] · www.zehnder.nl Schweiz (Switzerland) Zehnder Group Schweiz AG Zugerstrasse 162 8820 Wädenswil T +41 43 833 20 20 F +41 43 833 20 21 [email protected] www.zehnder-systems.ch España (Spain) Zehnder Group Iberica IC, S.A. Argenters, 7, Parque Tecnológico del Vallès 08290 Cerdanyola (Barcelona) T +34 90 210 61 40 F +34 93 582 45 99 [email protected] www.zehnder.es North America United States Zehnder America Inc. 540 Portsmouth Avenue Greenland, NH 03840 T +1 603 422 6700 F +1 603 422 9611 [email protected] www.zehnderamerica.com ZGNL-Manual_849050005, V0814, NL_FR_EN_DE_PL, Subject to change Asia