1
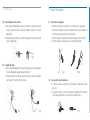
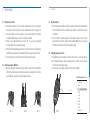
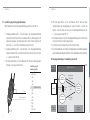
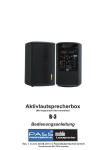
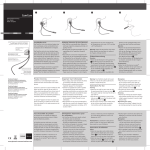
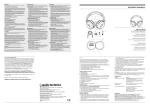
User Guide
Gebrauchsanweisung
Mode d'emploi
FreeCom 7100
Ultra-light aviation headset with
professional hearing protection
Manufactured by Phonak Communications AG
Länggasse 17, 3280 Murten, Switzerland
Phone +41 (0) 26 672 96 72
FreeCom 7100
Ultraleichtes Piloten-Headset mit
professionellem Gehörschutz
Hergestellt von Phonak Communications AG
Länggasse 17, 3280 Murten, Schweiz
Telefon +41 (0) 26 672 96 72
FreeCom 7100
Headset d'aviation ultra-léger avec
protection auditive professionelle
Produit par Phonak Communications SA
Länggasse 17, 3280 Morat, Suisse
Tél. +41 (0) 26 672 96 72
page 4 to 26
Merci d’avoir choisi le headset d’aviation FreeCom de Phonak, leader mondial de la protection
auditive. Tous les FreeCom de Phonak sont conçus pour s’adapter confortablement aux oreilles,
tout en offrant une excellente intelligibilité et une transmission de la voix très claire.
Gebrauchsanweisung
Deutsch
Danke, dass Sie sich für ein FreeCom Aviation Headset von Phonak, dem weltweit führenden
Hörgerätehersteller, entschieden haben. Alle Phonak FreeCom Systeme bieten einen
komfortablen Sitz im Ohr, während sie gleichzeitig eine exzellente Sprachverständlichkeit und
kristallklare Stimmübertragung ermöglichen.
Mode d’emploi
Français
Thank you for choosing a FreeCom aviation headset by Phonak, the world's leading hearing
healthcare company. All Phonak FreeComs are designed to offer a comfortable in-ear fit while
at the same time allowing excellent speech intelligibility and crystal clear voice transmission.
Seite 27 bis 52
page 53 à 78
Liberate your ears!
English
User Guide
earJack™ adapter (incl. ambient microphone and in-ear speaker)
Ear mold for right ear with red marking
A EarJackTM adapter
6
B Boom Microphone
9
Ear mold for left ear with blue marking
Boom microphone. Microphone sound inlet to be placed
always parallel to the mouth.
Connectors with safety break point.
Allow to put the microphone on the right or on the left side
Battery door and ON/OFF switch
Ambient sound ON/OFF Switch (short press)
Ambient sound volume control mode (long press)
C Control Box
10
Intercom Volume Control +/Ambient sound Volume Control +/-
QD connector
4
D Connectors
14
E
F
G
H
Important informations
Technical Data
Troubleshooting
Miscellaneous
16
17
21
24
5
A EarJackTM adapter
A1
A
(incl. ear molds, ambient microphone and in-ear speaker)
To attach the earJack
u Attach the ear molds to the earJack™ adapters by first hooking the lower hinge of the
earJack™ adapter into the mold (Fig 1), then pushing the upper part firmly into the mold
until it clicks (Fig 2). By correctly connecting these, you will ensure a tight seal and proper
operation of the headset’s hearing protection.
Fig 1
EarJackTM adapter
Regularly adjust the air pressure within the ear by breaking the seal between the
ear-channel and the ear-shells (for example by making jaw movements)
Fig 2
Fig 3
A2
6
To insert ear molds in the ears
u The ear mold marked red is for your right ear, the ear mold marked blue is for your left ear.
u Place the neckloop over your head and insert the ear mold into your outer ear with the
opening pointing into your ear canal (Fig 3).
u Twist the ear mold slightly to insert it fully into your ear (Fig 4). Ensure that the ear molds
are well inserted and locked in the concha (Fig 5). Press softly on the earjack to remove the
remaining air in the ear channel and ensure a good seal.
A3
Fig 4
Fig 5
To remove the earjack from the ear
u Hold the ear mold by the earjack adapter and withdraw carefully from the ear, using a slight
upward movement to avoid a rapid pressure drop.
7
A
EarJackTM adapter
B Boom Microphone
A4
To attach windscreens to the earJacks
u When using FreeCom 7100 outdoors, snap-on foam windscreens significantly reduce the
wind noise generated by turbulence around the microphones located on each earJack™
adapter (Fig 6).
u When attaching these windscreens, ensure that the snappers are inserted precisely into both
slots on the adapter (Fig 6).
B1
To place the boom microphone
u Adjust the boom microphone to sit within 1 cm of your mouth, close to your upper lip.
u Ensure that the microphone sound inlet, marked with a white dot points towards your
mouth (Fig 9) to avoid any twisting of the boom microphone.
u The boom microphone sound inlet has to be placed always parallel to the mouth (Fig 9).
u The boom microphone can be placed on the left or on the right side (Fig 10).
Fig 6
A5
To maintain the system
u Remove the earJack™ adapter from the ear mold by pressing the snap lock springs together
(Fig 7) and withdrawing the adapter, starting at the top (Fig 8).
u Clean and disinfect the ear molds with soap and water. Never use water or other liquids to
clean the earJack™. Let ear molds dry fully before use.
Fig 7
8
Fig 8
Fig 9
B2
Fig 10
To use / mount / remove the windscreen
u To keep the windscreen in position, the boom microphone is equipped with a Velcro
part (Fig 11).
u To mount the windscreen to, or remove it from, the boom microphone, lift the windscreen
over the Velcro part and pull it on or remove it from the microphone (Fig 11).
Fig 11
9
C Control Box
C
Control Box
C1
C3
Battery end-of-life
u When battery power runs low, the system signals this with a beep every 30 secs. Shortly
before powering down, the frequency of the beeps is increased.
u If the battery is dead, or if the battery is not present, or if the system is off (position "0"),
the FreeCom 7100 behaves as a headset with passive hearing protection and intercom
works without volume control.
C4
To control the Intercom volume
u By default, the + - buttons (Fig14) allow to change the Intercom audio volume.
u Intercom levels can be adjusted 2 levels up and 7 levels down from the default position.
u 3 beeps signal indicates when the maximum or minimum level is reached.
C2
To turn the system on
u To insert the battery, turn the battery door counter-clockwise to the "battery symbol“
(Fig 11) and remove the battery door.
u Insert the battery with its positive (+) pole pointing outwards (Fig 12). Push the battery
door back into the control box and turn it clockwise.
u With the battery door in position "0“ the system is off (Intercom is active without volume
control).
u With the battery door in position "I“ (Fig 13), the intercom and the ambient sound
awareness are active and the volume can be adjusted for both of them separately.
u A beep indicates correct operation.
Microphone VOX adaptation
u When the VOX system of the audio panel is switched ON, adjust the sensitivity of the voice
activated switch with the dedicated knob on the audio panel. This will ensure that the
microphone is switched ON as soon as any speech is pronounced.
Intercom Volume Scale
+ - buttons
Fig 11
10
Fig 12
Fig 13
Fig 14
+6 dB (max)
+3 dB
0 dB (default)
-3 dB
-6 dB
-9 dB
-12 dB
-15 dB
-18 dB
-21 dB (min)
11
C
Control Box
C
C5
To control the ambient sound volume
The ambient sound mode can be changed with the change-mode button (Fig 15).
u Ambient sound on "ON" (by default mode) – in this mode, the ambient (surrounding) sound
is introduced in the earjack allowing to hear people not connected to the intercom system,
the engine (e.g. during landing phase) or alarms without removing the earshells from the
ears. Intercom is still working and can be adjusted with + - buttons (Fig 15).
u Ambient sound on "OFF" – in this mode, the ambient sound is completely damped. Intercom
is still working and can be adjusted with + - buttons (Fig 15).
u A short press (<2 sec) on change-mode button (Fig 15) allows to switch ambient sound
on "OFF" and "ON".
Control Box
u A long press (>2 sec) on change-mode button (Fig 15) allows to enter in the «ambient
sound volume control» mode (a three tone beep indicates the changing mode). In this
mode, the user can adjust the ambient sound level with buttons + - (Fig 15) .
u Ambient sound levels can be adjusted 4 levels up and 7 levels down from the default position.
u 3 beeps signal indicates when the maximum or minimum level is reached.
u After 3 sec of inactivity (no button touched), the mode returns automatically back to
standard mode (a three tone beep indicates the changing mode).
By default, the ambient sound mode is on "ON"
Power button
in position ”0”
Power button in position ”I”
Ambient sound Volume Scale
+ - buttons
change mode button
Fig 15
12
12 dB (max)
9 dB
6 dB
3 dB
0 (default)
-3 dB
-6 dB
-9 dB
-12 dB
-15 dB
-18 dB
-21 dB (min)
Ambient sound
”ON”
System OFF
Short press
(<2sec)
Short press
(<2sec)
Ambient sound
”OFF”
Intercom without
volume control
Fig16
+/- intercom
volume control
Automatic after 3 sec
of inactivity
Long press
(>2sec)
Ambient sound
volume control
Long press
(>2sec)
+/- ambient sound
volume control
13
D
D Connectors
D1
To connect FreeCom 7100
u The Phonak FreeCom 7100 headset can be combined with a variety of Phonak FreeCom
adapters for connecting to different aircraft audio panels (Fig 17).
u To connect the FreeCom 7100 to the aircraft audio panel, use the suitable adapter:
U Twin plugs PJ055/PJ068
U XLR-5
U U174/U
e-Box
Connectors
The QD-connector is used to connect the Phonak FreeCom headset to the FreeCom Adapter.
It can be easily connected and disconnected, allowing a pilot to leave his/her seat without
needing to remove the headset or disconnect the FreeCom adapter from the aircraft's main
panel (e.g. for getting out of the plane while keeping a hearing protection).
u To open: pull apart the connector housing (never pull on the cables!)
u To close: the white markings on both connector housings must be aligned and then pushed
together (Fig 18).
u Do not turn on the cable screw jonts.
u Do not fold the cable (Fig 19).
u Never pull any connector by the cable! This may damage the cable and the connector and
cause communication problems.
PJ055/PJ068
Fig 18
FreeCom
e-Box
XLR-5
Fig 19
e-Box
U174/U
Fig 17
14
15
E Important User Information
u This headset is providing ambient sound awarness with a volume limited to a level of 82
(+/2) dB(A). Check correct operation before use. If distortion or failure is detected, refer to
the manufacturer’s advice for maintenance and replacement of the battery.
u Performance may deteriorate with battery usage. While headset communication is
always possible also with low battery or without any battery, the intercom volume
control and the ambient awareness only work with a correctly functioning battery.
The typical period of continuous use that can be expected from the applied battery
type AAA is 150 hours. When the battery is too low (or not present), the system still
provides passive hearing protection and intercom works without volume control.
u If it is not used for prolonged time (for example during winter), remove the battery from
the control box.
u Put on, adjust, clean and maintain your headset in accordance with these instructions;
otherwise, you may adversely impact the noise protection provided.
u The ear molds are reusable. They should be inspected regularly for serviceability.
u The material and design of the ear molds is long-lasting. Nevertheless, the shape of your
ear canal may change over time (e.g. if your body weight changes significantly). This could
adversely affect the sealing of the ear molds and thereby the provided attenuation.
u For full protection, you must wear the ear molds correctly during all exposure to loud noise.
u FreeCom 7100 is equipped with a built-in ear speakers for reproducing sound. Verify that
this feature is operating correctly before use and ensure that the sound emitted does not
exceed the values known to constitute a risk to hearing.
u The output of the FreeCom 7100 ear speakers may exceed the daily limit sound level.
u Certain chemical substances may be harmful to this product. Contact the manufacturer
for more information.
16
E
Important User Information
u Hearing protection devices can block out warning sounds, alarms, and other important
signals. Always pay extra attention to your surroundings when wearing hearing protection.
u Keep your clean FreeCom 7100 in the pouch provided before and after use, as well as
during transport. Store in a dry place at temperatures not below -20°C or above +60°C.
u Your headset should not be used when there is a risk that the connecting cords could
become caught up during use.
u Never use the device without the earJack™ adapters correctly inserted into the
custom-made ear molds. Verify that they are mounted according to these instructions
before use.
F Technical Data
FreeCom 7100 has been tested according to EN352-7:2002 for Hearing Protectors, Part 7:
Ear-plugs with level dependent attenuation. The tables below list test results according to
ear shell type. Tables 1 and 2 list only passive (electronic system switched-off) attenuation
values. When the system is switched on, ambient sounds are reproduced by the ear speakers
up to a maximum level of 84dBA. The criteria levels (H, M, L) listed in Tables 1a and 2a
represent the noise exposure at which in-ear sound pressure first exceeds 85 dBA with
electronic attenuation switched on.
17
APV (dB)
Standard
deviation (dB)
APV (dB)
Frequency (Hz)
Table 3: Passive attenuation values for the FreeCom
7100 with GENERIC ear shells with foam eartips
125
21.9
5.2
16.7
125
23.4
3.6
19.8
125
25
3.9
21.1
250
21.9
5.2
16.7
250
21.4
4.2
17.2
250
23.4
4.7
18.7
500
21.1
5.8
15.3
500
20.5
2.5
18.0
500
23.1
4.3
18.8
1000
26.7
4.0
22.7
1000
22.7
3.5
19.2
1000
26.4
4.9
21.5
2000
32.7
3.5
29.2
2000
27.0
3.0
24.0
2000
29.7
2.2
27.5
4000
29.8
3.4
26.4
4000
23.1
4.2
18.9
4000
28.3
2.7
25.6
8000
31.7
4.7
27.0
8000
26.4
4.8
21.6
8000
31.6
3.8
27.8
L=18
M=20
H=27
L=19
M=19
H=21
L=20
M=22
H=26
SNR=24
SNR=22
Table 1a: Criteria levels for FreeCom 7100 with
CUSTOM ear shells.
18
Standard
deviation (dB)
Table 2: Passive attenuation values for the FreeCom
7100 with GENERIC ear shells with silicone eartips
APV (dB)
Standard
deviation (dB)
Frequency (Hz)
Mean
attenuation (dB)
Table 1: Passive attenuation values for the FreeCom
7100 headset with the CUSTOM ear molds.
Technical Data
Mean
attenuation (dB)
F
Frequency (Hz)
Technical Data
Mean
attenuation (dB)
F
H
108.42 dB .
M
103.80 dB .
L
98.85 dB .
Table 2a: Criteria levels for FreeCom 7100 with
GENERIC ear shells with silicone eartips.
SNR | Single Number Rating attenuation value
L | Low-frequency attenuation value
M | Medium-frequency attenuation value
H | High-frequency attenuation value
APV | Assumed Protection Value
SNR=25
Table 3a: Criteria levels for FreeCom 7100 with
GENERIC ear shells with silicone eartips.
H
102 dB .
H
102 dB .
M
104.5 dB .
M
104 dB .
L
101.5 dB .
L
106 dB .
19
F
Technical Data
G Troubleshooting
u Headphone: according to regulation RTCA/DO-214
u Microphone
U Directivity: noise-canceling
U Max. sound pressure (@ 10% THD): 120dBA
u Loudspeaker systems
U Type of loudspeaker: Balanced Armature
U DC bias voltage: decoupled
U Max sound pressure (ambient): 84dBA
U Max sound pressure (communication): 98dBA
U Frequency range: 500Hz – 4.4kHz
U Speaker impedance DCR: 48Ω
u Power source
U Communication: Aircraft audio panel (no batteries)
U Dynamic hearing protection & ambient awareness:
Battery powered, 1 battery type AAA
u Voltage
U Aircraft audio panel: 4-20 V (MIC biasing)
U Battery powered: 1-1.5V (alkaline or rechargeable)
u Headset weight: 75g
u Storage temperature: -20°C - +60°C
u Operations temperature: -20°C - +60°C
G1
Communication
Problem:
Problem :
Problem:
Problem:
20
No communication possible
u Check that the headset's QD-connectors are connected correctly.
u Check that the headset's connector is inserted correctly in aircraft panel.
u Check that the aircraft panel volume controls are not set too low.
u Check the aircraft fuse of circuit breaker.
u Try using the headset in a different headset socket.
u Disconnect the QD-connectors and check for damage of connector or pins.
u Check if the connectors from the earJack adapters are correctly attached to the
cables of the control box (connectors with safety break points).
u Disconnect the headset connector from aircraft panel and check for connector
or pin damage.
u Try to use another headset. If the problem persists then it is probably aircraft
panel related. If you conclude it is a headset problem, contact an authorized
Phonak dealer.
Beginning of sentence are cut (boom microphone switching on too late)
u If VOX system is activated on the audio pannel (in which the intercom becomes
active automatically when a crew member begins to speak), adjust the VOX
sensitivity by turning the dedicated knob.
Beep every 30 seconds in headset
u Battery is on low level 1 replace battery (section C3)
Beep every 5 seconds in headset
u Battery is on low level 2 replace battery (section C3)
21
G
Troubleshooting
Problem:
Problem:
Problem:
22
Low volume of outgoing communications
u Check that the boom microphone is positioned correctly by the mouth. (section B1)
u Check that the aircraft panel stereo/mono switch (if available) is set to “mono”.
u Ensure only one headset is plugged into the aircraft intercom system and
check that the volume is set to a normal level.
Low volume of incoming communications
u Increase Intercom volume with +/- buttons (section C4)
u Check that the aircraft panel volume controls are not set too low.
u Check that the headset’s earJackTM adapters are mounted correctly in the
ear shells.
u Check if the custom ear molds or the generic ear shells are clean.
u Check that the custom ear molds or the generic ear shells are fitted correctly
in the ears.
u Check that the aircraft panel stereo/mono switch (if available) is set on “mono”.
u Ensure only one headset is plugged into the aircraft intercom system and that
the volume is set to a normal level, then check if the volume increases and can
be set to normal level.
Intermittent communication
u Check the QD-connectors are connected correctly.
u Check the connector is plugged correctly to the aircraft panel (no loose
connection).
u Try to use the headset in a different seat location.
G
Troubleshooting
Problem:
G2
Reduced volume or no communication in one ear
u Check on low volume side if the headset’s earJackTM adapter is mounted
correctly into the ear shell (section A1)
u Check on low volume side if the custom ear mold or the generic ear shell is
fitted correctly in the ear (section A2)
u Verify that the aircraft panel stereo/mono switch (if available) is set on “mono”
Hearing protection /Ambient sound awareness
Problem:
Insufficient noise attenuation
u Check that the headset’s earJackTM adapters are mounted correctly into the ear
shells (section A1).
u Check that the custom ear molds or the generic ear shells are mounted correctly in
the ears (section A2).
u Run a fit test (e.g. using Phonak SafetyMeter) with your acoustician or sales contact
in order to confirm that the fit of your custom ear molds is still correct.
u The shape of your ear canal may change over time (e.g., if your body weight changes
significantly). This could adversely affect the sealing of the ear molds and thereby
the attenuation provided.
Problem:
No ambient sound awareness
u
u
u
u
Check if the headset is switched on (section C1)
Check if the ambient sound awareness is switched on (section C5)
Increase ambient sound volume with +/- buttons (section C5)
The battery may be below shut-down level, if needed replace battery (section C1)
23
H Miscellaneous
H
Miscellaneous
H1
Service
u In case of technical problems please see “Troubleshooting” section.
u Do not repair FreeCom yourself.
u For servicing contact an authorized Phonak dealer.
H4
Warning
Please note that some parts of FreeCom 7100 are very small. You should store them safely out
of children‘s reach.
H2
Contact information
Please contact an authorized Phonak dealer for:
u Spare parts and accessories
u Technical information
u Handling & installation information
u Warranty and repair information
For other sales contacts check www.phonak-communications.com or www.phonak-aviation.com
H5
Warranty
According to “General conditions of sales and delivery”, the FreeCom 7100 warranty period
is five years from the date of purchase. Any responsibility for incidental or consequential
damages will be refused.
H6
Conformity
u Phonak FreeCom 7100 hearing protection complies with EU directive 89/686/EEC for
personal protective equipment and has been tested and approved according to EN 3527:2002 Hearing Protectors - Safety requirements and testing - Part 7: Level-dependent
ear-plugs. EC type examination certificate was issued by notified body BSI Group,
Kitemark Court, Davy Avenue, Knowlhill, Milton Keynes, MK5 8PP, United Kingdom.
H3
24
Replacement parts and accessories
u Custom shells
u Generic ear shells
u EarJackTM adapter FreeCom 7100 with boom microphone
u EarJackTM adapter FreeCom 7100 without boom microphone
u Snap on neck cord
u Foam windscreen for boom microphone
u Snap -on foam wind screen for ear microphones (2pcs)
u Clip holder
u Etui
u Battery AAA
u FreeCom 7100 is in conformity with EN 55022:2010 + A1:2000 + A2:2003 class B and
EN 55024:2010 + A1:2001 + A2:2003, implementing the provisions of the EMC directive
89/336/EEC.. The test report is provided by the accredited test laboratory Montena EMC
SA (STS 024), route de Montena 75, CH-1728 Rossens, Switzerland.
u The FreeCom 7100 should not be disposed of with household waste. To discard the
FreeCom 7100 please take it to an approved collection site.
25
Miscellaneous
u This hearing protection headset system also protects you against very short ‚impulse‘
noises, such as eg. gun shots. Nevertheless the degree of protection achieved depends on
the energy of the noise in question and how often you are exposed to this noise.
English
H
User Guide
page 4 to 26
For more information on protection against impulse noise, please visit
www.phonak-communications.com/en/impulse/ or contact us:
Phonak Communications AG, Laenggasse 17, CH-3280 Murten, +41 26 672 96 72.
This symbol indicates that this device should not be disposed of as household waste.
Please hand over your old appliance to the applicable collection point for the recycling
of electrical and electronic equipment. The correct disposal of this product will help
prevent potential negative effects on the environment and human health.
Deutsch
Description of symbols
Gebrauchsanweisung
Seite 27 bis 52
Français
H7
Mode d’emploi
page 53 à 78
26
27
earJack™ Adapter (inkl. Umgebungsmikrofon und Im-Ohr-Lautsprecher)
Ohrschale rechts, mit roter Markierung
A EarJackTM Adapter
30
B Schwanenhalsmikrofon
33
C Kontrollbox
34
Ohrschale links, mit blauer Markierung
Schwanenhalsmikrofon. Die Mikrofonöffnung sollte
sich immer parallel zum Mund befinden.
Stecker mit Sicherheitsverschluss
Das Mikrofon kann wahlweise links oder rechts
vom Mund montiert werden.
Batterieabdeckung und EIN-/AUS-Taste
EIN-/AUS-Taste für Umgebungsgeräusche (kurzes Drücken)
Lautstärkeregelung für Umgebungsgeräusche (langes Drücken)
Lautstärkeregelung für Intercom +/Lautstärkeregelung für Umgebungsgeräusche +/-
QD-Stecker
28
D Stecker
38
E
F
G
H
Wichtige Informationen
Technische Daten
Fehlerbehebung
Sonstige Hinweise
40
42
46
50
29
A earJack™ Adapter
A1
(inkl. Ohrschalen, Umgebungsmikrofon und Im-Ohr-Lautsprecher)
Befestigung der earJack-Adapter
u Setzen Sie die earJack™ Adapter wieder in die Ohrschalen ein, indem Sie das untere
Gelenk des earJack™ Adapters in die Ohrschalen einhaken (Abb. 1) und dann den oberen
Teil vorsichtig eindrücken (Abb. 2), bis es klickt. Das korrekte Einsetzen des Adapters
garantiert Ihnen eine sichere Abdichtung und eine korrekte Funktionsweise des im Headset
integrierten Gehörschutzes.
Abb. 1
A2
30
A
Stellen Sie den Druckausgleich zwischen dem Ohrkanal und den Ohrschalen regelmässig
wieder her (zum Beispiel durch Kieferbewegungen).
Abb. 2
Einsetzen der Ohrschalen
u Die Ohrschale mit der roten Markierung ist für Ihr rechtes Ohr, die Ohrschale mit der blauen
Markierung für Ihr linkes Ohr.
u Ziehen Sie die Kordel über den Kopf und setzen Sie die Ohrschale in das Außenohr ein, wobei
die Öffnung nach innen zeigen muss (Abb. 3).
u Drehen Sie die Ohrschale etwas, damit sie genau in Ihr Ohr passt (Abb. 3). Überprüfen Sie,
ob die Ohrschalen korrekt eingesetzt sind und fest im Ohrkanal sitzen (Abb. 5). Drücken Sie
vorsichtig auf den earJack, um Restluft zu entfernen und die Dämmung zu optimieren. (Abb.5).
earJack™ Adapter
Abb. 3
A3
Abb. 4
Abb. 5
Herausnehmen des earJack
u Halten Sie die Ohrschale am earJack™ Adapter fest und drehen Sie diese vorsichtig aus dem
Ohr. Durch eine langsame Drehung nach oben vermeiden Sie einen schnellen Druckabfall.
31
A
earJack™ Adapter
B Schwanenhalsmikrofon
A4
Befestigung des Windschutzes an den earJacks
u Bei Verwendung des FreeCom 7100 im Freien können Windgeräusche, die durch Turbulenzen
um das Mikrofon an jedem earJack™ Adapter (Abb. 6) entstehen, mit Windschutzabdeckungen
aus Schaumstoff erheblich verringert werden.
u Achten Sie bei der Befestigung darauf, dass die Stecker genau in die beiden Öffnungen am
Adapter einrasten (Abb. 6).
B1
A5
Abb. 6
Pflege des Systems
u Lösen Sie den earJack™ Adapter aus der Ohrschale, indem Sie die Klemmen zusammendrücken
(Abb. 7) und den Adapter von oben (Abb. 8) herausziehen.
u Reinigen und desinfizieren Sie die Ohrschale mit Wasser und Seife. Der earJack™ Adapter
darf nie mit Wasser oder anderen Flüssigkeiten gereinigt werden. Die Ohrschalen müssen vor
Wiedergebrauch vollständig trocken sein.
Abb. 9
B2
Abb. 7
32
Abb. 8
Position des Schwanenhalsmikrofons
u Stellen Sie das Mikrofon so ein, dass es sich 1 cm vor Ihrer Oberlippe befindet.
u Stellen Sie sicher, dass der mit einem weißen Punkt gekennzeichnete Phono-Eingang des
Mikrofons auf Ihren Mund gerichtet ist (Abb. 9), um ein Verdrehen des Schwanenhalsmikrofons zu vermeiden.
u Die Öffnung des Schwanenhalsmikrofons sollte sich immer parallel zum Mund befinden (Abb. 9).
u Das Schwanenhalsmikrofon kann wahlweise rechts oder links vom Mund montiert werden
(Abb. 10).
Abb. 10
Anwendung, Benutzung und Entfernen des Windschutzes
u Um das Verrutschen des Windschutzes zu vermeiden, ist das Schwanenhalsmikrofon mit
einem Klettband ausgestattet (Abb. 11).
u Zum Aufstecken oder Entfernen des Windschutzes am Mikrofon den Windschutz über das
Klettband anheben und darüberziehen (Abb. 11).
Abb. 11
33
C Kontrollbox
C
Kontrollbox
C1
C3
Entladene Batterie
u Wenn der Ladezustand der Batterie niedrig ist, signalisiert das System dies alle 30 Sekunden
durch einen Warnton. Kurz bevor die Batterie ganz entladen ist, erhöht sich die Frequenz
der Warntöne.
u Wenn die Batterie vollständig entladen oder keine Batterie eingesetzt oder das System
ausgeschaltet ist (Position "0“), funktioniert das FreeCom 7100 Headset wie ein passiver
Gehörschutz und Intercom arbeitet ohne Lautstärkeregelung.
C4
Laustärkeregelung des Intercom
u Standardmäßig wird die Lautstärke des Intercom mit den Tasten +/- eingestellt (Abb. 14).
u Die Standardeinstellung der Intercom-Lautstärke kann um 2 Stufen nach oben und um
7 Stufen nach unten korrigiert werden.
u Ist die höchste oder niedrigste Lautstärke erreicht, ertönen 3 Pieptöne.
C2
Einschalten des Systems
u Zum Einsetzen der Batterie öffnen Sie die Batterieabdeckung, indem Sie diese im Gegenuhrzeigersinn in die Position drehen, die durch das Batteriesymbol (Abb. 11) angegeben ist.
u Setzen Sie die Batterie so ein, dass der positive (+) Pol nach außen zeigt (Abb. 12). Schließen
Sie die Batteriebabdeckung, indem Sie sie im Uhrzeigersinn drehen.
u Befindet sich die Batterieabdeckung auf Position "0“, ist das System ausgeschaltet
(Intercom funktioniert ohne Lautstärkeregelung).
u Befindet sich die Batterieabdeckung auf Position "I“, (Abb. 13) sind Intercom und Umgebungswahrnehmung eingeschaltet und die Lautstärke kann für beide separat eingestellt werden.
u Es ertönt ein Piepton, wenn das Gerät korrekt in Betrieb genommen wurde.
Audio-Anpassung des Mikrofons
u Wenn das Audiosystem des Audio-Panel eingeschaltet ist, passen Sie die Sprachempfindlichkeit mit dem dafür vorgesehenen Knopf am Audio-Panel an. Dadurch stellen Sie sicher,
dass das Mikrofon eingeschaltet wird, sobald gesprochen wird.
Lautstärkeregelung Intercom
+ - Tasten
Abb. 11
34
Abb. 12
Abb. 13
Abb. 14
+6 dB (max)
+3 dB
0 (Standardeinstellung)
-3 dB
-6 dB
-9 dB
-12 dB
-15 dB
-18 dB
-21 dB (min)
35
C
Kontrollbox
C
C5
Lautstärkeregelung der Umgebungswahrnehmung
Mit der Modustaste kann zur Umgebungswahrnehmung gewechselt werden (Abb. 15).
u Umgebungswahrnehmung EIN – In diesem Modus ist die Umgebungswahrnehmung
eingeschaltet und nicht mit dem Intercom verbundene Personen, Motorengeräusche (z.B.
während der Landephase) oder Alarmsignale sind zu hören. Intercom funktioniert und
kann mit den + / - Tasten (Abb. 15) der Modustaste eingestellt werden.
u Umgebungswahrnehmung AUS – In diesem Modus ist die Umgebungswahrnehmung
komplett unterdrückt. Intercom funktioniert trotzdem und kann mit den beiden Tasten
+ / - eingestellt werden (Abb. 15).
u Mit einem kurzen Drücken (<2 Sek.) der Modustaste (Abb. 15) kann die Umgebungswahrnehmung ein- oder ausgeschaltet werden.
Lautstärkeregelung der
Umgebungsgeräusche
+ - Tasten
Modus ein-/ausschalten
Abb. 15
36
12 dB (max)
9 dB
6 dB
3 dB
0 (Standardeinstellung)
-3 dB
-6 dB
-9 dB
-12 dB
-15 dB
-18 dB
-21 dB (min)
Kontrollbox
u Mit einem langen Drücken (>2 Sek.) der Modustaste (Abb. 15) kann zum Modus
"Lautstärkeregelung für Umgebungsgeräusche" gewechselt werden (es ertönen drei
Pieptöne). In diesem Modus kann der Pegel der Umgebungswahrnehmung mit den
+ / - Tasten angepasst werden (Abb. 15).
u Die Standardeinstellung des Pegels für Umgebungswahrnehmung kann um 4 Stufen nach
oben und um 7 Stufen nach unten korrigiert werden.
u Ist der höchste oder der niedrigste Pegel erreicht, ertönen 3 Pieptöne.
u Nach 3 Sek. Inaktivität (d.h. wenn 3 Sek. keine Taste betätigt wurde), wird der Modus automatisch
auf den Standardwert zurückgesetzt (beim Wechsel in den Standardmodus ertönen 3 Pieptöne).
Die Umgebungswahrnehmung ist standardmässig eingeschaltet.
Abb.16
EIN/AUS-Taste
auf Position ”0”
EIN/AUS-Taste auf Position ”I”
Umgebungswahrnehmung EIN
System AUS
Kurzes Drücken
(>2 Sek)
Kurzes Drücken
(>2 Sek)
Umgebungswahrnehmung AUS
Kein IntercomLautstärkeregler
+/- IntercomLaustärkeregler
Automatisch nach
3 Sek. Inaktivität
Langes Drücken
(>2 Sek)
Lautstärkeregler
für Umgebungswahrnehmung
Langes Drücken
(>2 Sek)
+/- IntercomLaustärkeregler
37
D
D Stecker
D1
Anschluss des FreeCom 7100
u Das Phonak FreeCom 7100 Headset kann mit verschiedenen Phonak FreeCom Adaptern für
den Anschluss an unterschiedliche Flugzeug-Audio-Panels kombiniert werden (Abb. 17).
u Verwenden Sie für den Anschluss des FreeCom 7100 an das Flugzeug-Audio-Panel den
passenden Adapter:
U Twin Stecker PJ055/PJ068
U XLR-5
U U174/U
e-Box
Stecker
Der QD-Stecker verbindet das FreeCom Headset mit dem FreeCom Adapter. Dieser Stecker
ermöglicht ein schnelles Verbinden oder Lösen des Headsets und des Adapters. Dadurch kann
ein Pilot seinen Sitz verlassen, ohne das Headset abzunehmen oder den FreeCom Adapter vom
Flugzeug-Audio-Panel zu entfernen.
u Zum Öffnen: Ziehen Sie das Steckergehäuse auseinander (nie an den Kabeln ziehen!).
u Zum Schließen: Richten Sie die weißen Markierungen aufeinander aus und stecken Sie die
Steckerteile zusammen (Abb. 18).
u Drehen Sie nie an der Gewindeverschraubung des Kabels.
u Das Kabel darf nicht geknickt werden (Abb. 19).
u Ziehen Sie nie an einem Steckerkabel! Dadurch kann das Kabel beschädigt werden und es
können Kommunikationsprobleme auftreten.
PJ055/PJ068
Abb. 18
FreeCom
e-Box
XLR-5
Abb. 19
e-Box
U174/U
Abb. 17
38
39
E Wichtige Benutzerinformationen
u Dieses Headset ist mit einer einstellbaren Umgebungswahrnehmung mit einer maximalen
Lautstärke von 82 (+/2) dB(A) und einer pegelabhängigen Geräuschdämmung ausgestattet.
Prüfen Sie vor dem Gebrauch, ob dieses korrekt funktioniert. Bei Verzerrungen oder
Funktionsfehlern beachten Sie bitte die Hinweise des Herstellers für die Wartung und das
Ersetzen der Batterie.
u Die Leistung kann sich bei einer längeren Nutzung der Batterie mit der Zeit
verschlechtern. Während die Headset-Kommunikation auch bei niedrigem
Batteriestand oder ohne Batterien noch immer möglich ist, funktionieren der
Intercom-Lautstärkeregler und die Umgebungswahrnehmung nur mit aufgeladenen
Batterien. Die zu erwartende Funktionsdauer der verwendeten AAA-Batterie beträgt
bei fortlaufender Nutzung 150 Stunden. Bei zu tiefem Batteriestand (oder ohne
Batterien) bietet das System weiterhin einen passiven Gehörschutz und Intercom
funktioniert ohne Lautstärkeregler.
u Entfernen Sie die Batterie aus der Kontrollbox, wenn das Headset für längere Zeit nicht
benutzt wird.
u Ihr Headset muss gemäß dieser Gebrauchsanweisung eingesetzt, angepasst, gereinigt und
gepflegt werden, andernfalls kann der verfügbare Gehörschutz beeinträchtigt werden.
u Die Ohrschalen sind wiederverwendbar. Sie sollten regelmäßig auf ihre Betriebstauglichkeit
geprüft werden.
u Das Material und das Design der Ohrschalen sind langlebig. Ihr Ohrkanal kann sich aber im
Lauf der Zeit verändern (besonders wenn sich Ihr Gewicht stark verändert). Dies kann die
Abdichtung der Ohrschalen und damit die Dämmwirkung negativ beeinflussen.
u Um eine optimalen Schutz zu gewährleisten, müssen Sie die Ohrschalen immer tragen,
wenn Sie Lärm ausgesetzt sind.
40
E
Wichtige Benutzerinformationen
u FreeCom 7100 ist mit einem eingebauten Lautsprecher für die Klangwiedergabe ausgestattet.
Prüfen Sie vor der Nutzung, ob dieser korrekt funktioniert und stellen Sie sicher, dass die eingestellte Lautstarke nicht die Werte übersteigt, die Ihrem Gehör Schaden zufügen könnten.
u Die Ausgangslautstärke der FreeCom 7100 Lautsprecher kann den Tagesgrenzwert
für den Geräuschpegel übersteigen.
u Bestimmte chemische Substanzen können diesem Produkt schaden. Kontaktieren Sie den
Hersteller für weitere Informationen.
u Gehörschutzsysteme können Warnsignale, Alarmsignale und andere wichtige Signale
unterdrücken. Achten Sie besonders auf Ihre Umgebung, wenn Sie einen Gehörschutz tragen.
u Bewahren Sie Ihr FreeCom 7100 bei Nichtgebrauch in sauberem Zustand im mitgelieferten
Etui an einem trockenen Ort, nicht unter -20°C oder über +60°C, auf.
u Verwenden Sie Ihr Headset nicht, wenn das Risiko besteht, dass die Verbindungskabel
einhängen und hängen bleiben könnten.
u Verwenden Sie Ihr Headset nie, wenn der earJack™ Adapter nicht ordnungsgemäß in
der individuell angepassten Ohrschale sitzt. Stellen Sie sicher, dass diese entsprechend
der Anweisung zusammengefügt sind.
41
Technische Daten
APV (dB)
Standardabweichung (dB)
Tabelle 1: Passive Dämmwerte für das FreeCom 7100
Headset mit INDIVIDUELL ANGEPASSTEN Ohrschalen
Angenommene
Dämmung (dB)
Das FreeCom 7100 Gehörschutz-Headset wurde getestet und gemäß EN 352-7:2002
"Gehörschützer – Sicherheitstechnische Anforderungen und Prüfungen – Teil 7: Pegelabhängig
dämmende Gehörschutzstöpsel“ zugelassen. Die folgenden Tabellen zeigen die Testergebnisse
für den jeweiligen Typ Ohrschalen. In Tabelle 1 und 2 sind nur die passiven Dämmwerte (bei
ausgeschaltetem elektronischem System) aufgeführt. Wenn der pegelabhängige Gehörschutz
und die Umgebungswahrnehmung eingeschaltet sind, werden die Umgebungsgeräusche von
den Im-Ohr-Lautsprechern mit maximal 84 dBA reproduziert. Die Pegelkriterien (H, M, L) in
den Tabellen 1a und 2a geben die Lärmexposition an, bei welcher der Schalldruck im Ohr mit
eingeschalteter elektronischer Dämmung erstmals 85 dBA übersteigt.
F
Frequenz (Hz)
F Technische Daten
125
21.9
5.2
16.7
250
21.9
5.2
16.7
500
21.1
5.8
15.3
1000
26.7
4.0
22.7
2000
32.7
3.5
29.2
4000
29.8
3.4
26.4
8000
31.7
4.7
27.0
L=18
M=20
H=27
SNR=24
Tabelle 1a: Pegelkriterien für FreeCom 7100 mit
INDIVIDUELL ANGEPASSTEN Ohrschalen
42
H
108.42 dB .
M
103.80 dB .
L
98.85 dB .
SNR / Dämmwert für Single Number Rating
L / Dämmwert für Niedrigfrequenz
M / Dämmwert für Mittelfrequenz
H / Dämmwert für Hochfrequenz
APV / Wert für angenommene Schutzwirkung
43
Technische Daten
F
APV (dB)
Standardabweichung (dB)
125
23.4
3.6
19.8
125
25
3.9
21.1
250
21.4
4.2
17.2
250
23.4
4.7
18.7
500
20.5
2.5
18.0
500
23.1
4.3
18.8
1000
22.7
3.5
19.2
1000
26.4
4.9
21.5
2000
27.0
3.0
24.0
2000
29.7
2.2
27.5
4000
23.1
4.2
18.9
4000
28.3
2.7
25.6
8000
26.4
4.8
21.6
8000
31.6
3.8
27.8
L=19
M=19
H=21
L=20
M=22
H=26
SNR=22
Tabelle 2a: Pegelkriterien für FreeCom 7100 mit
GENERISCHEN OHRSCHALEN mit SilikonOhrkomfort-Stücken
44
Tabelle 3: Passive Dämmwerte für das FreeCom
7100 Headset mit GENERISCHEN Ohrschalen
mit Schaumstoff-Ohrkomfort-Stücken
Angenommene
Dämmung (dB)
APV (dB)
Standardabweichung (dB)
Frequenz (Hz)
Angenommene
Dämmung (dB)
Tabelle 2: Passive Dämmwerte für das FreeCom
7100 Headset mit GENERISCHEN Ohrschalen
mit Silikon-Ohrkomfort-Stücken
Frequenz (Hz)
F
SNR=25
Tabelle 3a: Pegelkriterien für FreeCom 7100 mit
GENERISCHEN OHRSCHALEN mit SchaumstoffOhrkomfort-Stücken
H
102 dB .
H
102 dB .
M
104.5 dB .
M
104 dB .
L
101.5 dB .
L
106 dB .
Technische Daten
u Headset: entsprechend den Richtlinien RTCA/DO-214
u Mikrofone
U Direktionalität: Geräuschunterdrückung
U Max. Schalldruck (@ 10% THD): 120dBA
u Lautsprechersysteme
U Lautsprechertyp: Balanced-Armature
U DC bias Spannung: entkoppelt
U Max. Schalldruck (Umgebungsgeräusche): 84dBA
U Max. Schalldruck (Kommunikation): 98dBA
U Frequenzbereich: 500Hz – 4.4kHz
U Lautsprecherimpedanz DCR: 48 Ω
u Energiequelle
U Kommunikation: Flugzeug-Audio-Panel (keine Batterien notwendig)
U Dynamischer Gehörschutz & Umgebungswahrnehmung: batteriebetrieben,
1 AAA-Batterie
u Spannung
U Flugzeug-Audio-Panel: 4-20 V (Mikrophon biasing)
U Batteriebetrieben: 1-1.5 V (Alkali- oder aufladbare Batterien)
u Headset-Gewicht: 75 g
u Lagertemperatur: -20 °C bis +60 °C
u Betriebstemperatur: -20 °C bis +60 °C
45
G Fehlerbehebung
G1
Kommunikation
Problem:
Problem:
Keine Kommunikation
u Überprüfen Sie, ob der QD-Stecker des Headsets richtig eingesteckt ist.
u Überprüfen Sie, ob der Headset-Stecker korrekt mit dem Flugzeug-Audio-Panel
verbunden ist.
u Überprüfen Sie, ob die Lautstärke des Flugzeug-Panels nicht zu leise eingestellt wurde.
u Überprüfen Sie den Schutzschalter des Flugzeug-Panels.
u Verwenden Sie das Headset in einer anderen Headset-Buchse.
u Trennen Sie den QD-Stecker und überprüfen Sie diesen auf Beschädigungen
am Stecker oder an den Anschlussstiften.
u Überprüfen Sie, ob die Stecker der earJack™ Adapter korrekt mit den Kabeln der
Kontrollbox verbunden sind (Stecker mit Sicherheitsverschlüssen).
u Trennen Sie den Headset-Stecker vom Flugzeug-Panel und überprüfen Sie
diesen auf Beschädigungen des Steckers oder der Kontaktstifte.
u Probieren Sie ein anderes Headset. Bleibt das Problem bestehen, dann liegt es
wahrscheinlich am Flugzeug-Panel. Falls Sie annehmen, dass es am Headset
liegt, nehmen Sie bitte Kontakt mit einem autorisierten Phonak Händler auf.
Die Satzanfänge sind abgeschnitten (Das Schwanenhalsmikrofon
schaltet zu spät ein).
u Das Audiosystem ist mit dem Audio-Panel des Flugzeugs verbunden. Dieses schaltet
das Intercom automatisch ein, wenn ein Besatzungsmitglied anfängt zu sprechen.
Passen Sie die Sprachemfindlichkeit mit dem dafür vorgesehenen Knopf an.
46
G
Fehlerbehebung
Problem:
Signalton alle 30 Sekunden im Headset
u Der Ladezustand der Batterie ist sehr niedrig (Level 1). Wechseln Sie die Batterie
aus (Abschnitt C1).
Problem:
Signalton alle 5 Sekunden im Headset
u Die Batterie ist fast ganz entladen (Level 2) und muss ausgewechselt werden
(Abschnitt C1).
Problem:
Ausgehende Kommunikation zu leise
u Überprüfen Sie, ob das Schwanenhalsmikrofon korrekt zum Mund positioniert ist.
u Überprüfen Sie, ob der Stereo-/Monoschalter des Flugzeug-Panels (wenn
vorhanden) auf "mono“ steht.
u Verwenden Sie nur ein Headset und stellen Sie die Lautstärke des Flugzeugpanels
auf einen normalen Pegel.
Problem:
Eingehende Kommunikation zu leise
u Regeln Sie die Lautstärke mit den +/- Tasten (Abschnitt C3)
u Überprüfen Sie, ob die Lautstärke des Flugzeug-Panels nicht zu leise eingestellt ist.
u Überprüfen Sie, ob der earJack™ Adapter des Headsets korrekt in den
Ohrschalen sitzt.
u Überprüfen Sie, ob die individuell angepassten oder die generischen Ohrschalen
sauber sind.
u Überprüfen Sie, ob die individuell angepassten Ohrschalen oder die generischen
Ohrschalen korrekt in den Ohren sitzen.
47
G
Fehlerbehebung
u Überprüfen Sie, ob der Stereo-/Monoschalter des Flugzeug-Panels (wenn
vorhanden) auf "mono“ eingestellt ist.
u Verwenden Sie nur ein Headset und stellen Sie die Lautstärke auf einen
normalen Pegel. Überprüfen Sie dann, ob die Lautstärke zunimmt und auf
einen normalen Pegel eingestellt werden kann.
48
Problem:
Unterbrüche in der Kommunikation
u Überprüfen Sie, ob der QD-Stecker korrekt verbunden ist.
u Überprüfen Sie, ob der Stecker korrekt im Flugzeug-Panel sitzt (keine lockere
Verbindung).
u Stecken Sie das Headset an einem anderen Sitzplatz ein.
Problem:
Kommunikation in einem Ohr zu leise oder nicht vorhanden
u Überprüfen Sie auf der Seite, auf der die Lautstarke zu tief ist, ob der earJack™
Adapter des Headsets korrekt in der Ohrschale sitzt (Abschnitt A1).
u Überprüfen Sie auf der Seite, auf der die Lautstärke zu tief ist, ob die individuell
angepasste Ohrschale oder die generische Ohrschale korrekt im Ohr sitzt
(Abschnitt A2).
u Überprüfen Sie, ob der Stereo-/Monoschalter des Flugzeug-Panels (wenn
vorhanden) auf "mono“ eingestellt ist.
G
Fehlerbehebung
G2
Gehörschutz / Umgebungswahrnehmung
Problem:
Unzureichende Lärmdämmung
u Überprüfen Sie, ob die earJack™ Adapter des Headsets korrekt in den Ohrschalen
sitzen (Abschnitt A1).
u Überprüfen Sie, ob die individuell angepassten Ohrschalen oder die generischen
Schalen korrekt in Ihren Ohren sitzen (Abschnitt A2).
u Führen Sie einen Gehörschutztest (z.B. SafetyMeter) bei Ihrem Akustiker oder
Fachhändler durch, um zu kontrollieren, dass Ihre individuell angepassten
Ohrschalen noch korrekt in Ihren Ohren sitzen.
u Ihr Ohrkanal kann sich mit der Zeit verändern (besonders wenn sich Ihr
Gewicht stark verändert). Dies kann die Abdichtung der Ohrschalen und damit
die Dämmwirkung negativ beeinflussen.
Problem:
Keine Umgebungswahrnehmung
u Überprüfen Sie, ob das Headset eingeschaltet ist (Abschnitt C1).
u Überprüfen Sie, ob die Umgebungslautstärke nicht zu leise eingestellt oder
ausgeschaltet ist (Abschnitt C5).
u Regeln Sie die Lautstärke mit den +/- Tasten (Abschnitt C5)
u Überprüfen Sie, ob der Ladezustand der Batterie noch ausreicht und wechseln
Sie diese falls nötig aus (Abschnitt C1).
49
H Sonstige Hinweise
H1
Service
u Bei technischen Problemen schauen Sie im Abschnitt "Fehlerbehebung“ nach.
u Reparieren Sie FreeCom nicht selbst.
u Falls Sie einen technischen Service benötigen, wenden Sie sich an einen autorisierten
Phonak Händler.
H2
Kontaktinformationen
Kontaktieren Sie bitte einen autorisierten Phonak Händler für:
u Ersatzteile und Zubehör
u Technische Informationen
u Handhabungs- und Installationsinformationen
u Garantie- und Reparaturinformationen
H
Sonstige Hinweise
u
u
u
u
Schaumstoff-Windschutz für das Umgebungsmikrofon (2 Stück)
Befestigungsclip
Etui
AAA-Batterie
H4
Warnung
Beachten Sie bitte, dass einige Teile des FreeCom 7100 Systems sehr klein sind. Bitte deshalb
außerhalb der Reichweite von Kindern aufbewahren.
H5
Garantie
Entsprechend unseren "Allgemeinen Verkaufs- und Lieferbedingungen“ beträgt die Garantie
für das FreeCom 7100 System fünf Jahre ab Kaufdatum. Diese Garantie schließt die Haftung
für jegliche Art von Schäden oder Folgeschäden aus.
H6
Konformität
u Das FreeCom 7100 Gehörschutz-Headset entspricht der EU-Richtlinie 89/686/EEC
für persönliche Gehörschutzsysteme. Es wurde getestet und gemäß EN 352-7:2002
"Gehörschützer – Sicherheitstechnische Anforderungen und Prüfungen – Teil 7:
Pegelabhängig dämmende Gehörschutzstöpsel“ zugelassen. Das EC-Zertifikat wurde bei
der zuständigen Stelle des BSI Group, Kitemark Court, Davy Avenue, Knowlhill, Milton
Keynes, MK5 8PP, United Kingdom, ausgestellt.
Für weitere Verkaufskontakte besuchen Sie bitte www.phonak-communications.com
H3
50
Ersatzteile und Zubehör
u Individuell angepasste Ohrschalen
u Generische Ohrschalen - Silikon
u earJack™ Adapter FreeCom 7100 mit Schwanenhalsmikrofon
u earJack™ Adapter FreeCom 7100 ohne Schwanenhalsmikrofon
u Umhängeset mit Befestigungsclip
u Schaumstoffwindschutzhülle für das Schwanenhalsmikrofon
51
Sonstige Hinweise
u FreeCom 7100 entspricht den Normen EN 55022:2010 + A1:2000 + A2:2003 Klasse B
und EN 55024:2010 + A1:2001 + A2:2003 in Umsetzung der Bestimmungen der EMCRichtlinie 89/336/EEC. Der Prüfungsbericht wurde vom akkreditierten Testlabor Montena
EMC SA (STS 024), Route de Montena 75, CH-1728 Rossens, Schweiz, ausgestellt.
English
H
User Guide
page 4 to 26
u Dieses Headset schützt Sie auch gegen sehr kurz auftretenden Impulslärm, wie z.B.
Gewehrschüsse. Der Grad des gebotenen Schutzes hängt jedoch von der Stärke des
aktuellen Lärmpegels ab und wie oft Sie diesem Lärmpegel ausgesetzt sind.
Für weitere Informationen über Gehörschutz gegen Impulslärm besuchen Sie bitte:
www.phonak-communications.com/de/impulse/ oder kontaktieren Sie uns unter:
Phonak Communications AG, Länggasse 17, CH-3280 Murten, +41 26 672 96 72.
Seite 27 bis 52
Erklärung Symbole
Das Produkt nicht als normalen Hausmüll entsorgen.
Bitte entsorgen Sie alte oder nicht mehr gebrauchte Produkte an den für die Entsorgung
für Elektronikabfall vorgesehenen Sammelstellen. Eine fachgerechte Entsorgung
schützt Umwelt und Gesundheit.
52
Gebrauchsanweisung
Français
H7
Deutsch
u FreeCom 7100 darf nicht im Hausmüll entsorgt werden. Bringen Sie das FreeCom 7100
bitte System zu einer entsprechenden Entsorgungsstelle.
Mode d’emploi
page 53 à 78
53
Adaptateur earJack™ (y compris microphone d’ambiance
et écouteur intra-auriculaire)
Coque d’oreille moulée droite, repère rouge
A Adaptateur EarJackTM 56
Coque d’oreille moulée gauche, repère bleu
Microphone col de cygne. L’entrée sonore du microphone
doit être parallèle à la bouche.
Connecteur avec verrouillage de sécurité
Permet de placer le microphone sur le côté droite ou gauche
B Microphone
col de cygne
59
C Boîtier de
commande
60
Compartiment de pile et commutateur
Interrupteur « ON/OFF » des sons ambiants (pression brève)
Mode de contrôle du volume des sons ambiants (pression longue)
Contrôle de volume Intercom +/Contrôle de volumes des sons ambiants +/-
Connecteur QD
54
D Connecteurs
64
E
F
G
H
Informations importantes
Données techniques
Dépannage
Divers
66
68
72
76
55
A Adaptateur earJack™ (y compris microphone d’ambiance et écouteur intra-auriculaire)
A1
Fixer les adaptateurs earJack
u Fixez les adaptateurs earJack™ dans les coques en accrochant d’abord le pivot en bas de
l'earJack™ dans la coque (fig. 1) puis poussez fermement la partie supérieure jusqu’à ce
qu’elle s’enclenche (fig. 2). En connectant correctement les adaptateurs, vous assurez un
joint hermétique et un bon fonctionnement du système de protection auditive.
fig. 1
A2
56
A
Egalisez régulièrement la pression de l'air entre le conduit auditif et les coques d'oreilles
(par exemple avec des mouvements de la machoire).
fig. 2
Insérer les coques dans les oreilles
u La coque d’oreille moulée marquée en rouge est pour votre oreille droite, la coque d’oreille
moulée marquée en bleu est pour votre oreille gauche.
u Placez le cordon autour de votre cou et insérez la coque dans votre oreille externe, en
orientant son ouverture vers votre conduit auditif (fig. 3).
u Exercez de légers mouvements de rotation pour insérer totalement la coque dans votre
oreille (fig. 4). Assurez-vous que les coques sont bien insérées et fixées aux oreilles externes
(fig. 5). Appuyez doucement sur l’écouteur pour chasser l’air du conduit auditif et assurer
ainsi un bon isolement (fig. 5).
Adaptateur earJack™
fig. 3
A3
fig. 4
fig. 5
Retirer l'earJack de l'oreille
u Tenez la coque par l’earJack™ et retirez-la délicatement de votre oreille en exerçant un
mouvement de rotation lent vers le haut, afin d’éviter que la pression varie brusquement.
57
A
Adaptateur earJack™
B Microphone col de cygne
A4
Fixer les écrans anti-vent sur les earJacks
u Quand le FreeCom 7100 est utilisé à l’extérieur, des écrans anti-vent en mousse enfichables
réduisent nettement le bruit du vent provoqué par les turbulences autour des microphones
placés sur chaque adaptateur earJack™ (fig. 6).
u En fixant ces écrans anti-vent, assurez-vous que les ergots s’insèrent avec précision dans
les deux fentes de l’adaptateur (fig. 6).
B1
A5
fig. 6
Entretien du système
u Retirez l’adaptateur earJack™ de la coque en pressant simultanément sur les ressorts de
verrouillage (fig. 7) et en tirant sur l’adaptateur en commençant par le haut (fig. 8).
u Nettoyez et désinfectez les coques à l’eau et au savon. N’utilisez jamais d’eau, ni aucun
autre liquide pour nettoyer les adaptateurs earJack™. Attendez que les coques soient
parfaitement sèches avant de les utiliser.
fig. 7
58
fig. 8
Positionner le microphone col de cygne
u Ajustez le microphone col de cygne de telle sorte qu’il soit à moins de 1 cm de votre
bouche, près de votre lèvre supérieure.
u Assurez-vous que l’entrée sonore du microphone, repérée par un point blanc, est bien
orientée vers votre bouche (fig. 9) pour éviter de tordre le microphone col de cygne.
u L’entrée sonore du microphone col de cygne doit toujours être parallèle à la bouche (fig. 9).
u Le microphone col de cygne peut être placé du côté droite ou gauche (fig. 10).
fig. 9
B2
fig. 10
Utiliser / Monter / Démonter l'écran anti-vent
u Le microphone col de cygne dispose d’une zone Velcro pour maintenir en place le manchon
anti-vent (fig. 11).
u Pour monter le manchon anti-vent sur le microphone col de cygne, ou pour le retirer,
soulevez-le au-dessus de la zone Velcro et appuyez pour le mettre en place sur le
microphone (fig. 11).
fig. 11
59
C Boîtier de commande
C
Boîtier de commande
C1
C3
Indication d'usure de la pile
u Le système signale que la pile devient faible par un bip toutes les 30 secondes. Peu avant
de cesser de fonctionner, la fréquence des bips augmente.
u Si la pile est usée, s’il n’y a pas de pile ou si le système est arrêté (position « 0 »), le FreeCom
7001 se comporte comme une protection auditive passive et l’intercom fonctionne sans
contrôle de volume.
C4
Contrôle du volume de l'intercom
u Par défaut, les boutons + - (fig.14) permettent de modifier le volume audio de l’intercom.
u Le volume sonore de l'intercom peut être augmenté de 2 niveaux ou diminué de 7 niveaux
par rapport à la position par défaut.
u 3 bips indiquent que le niveau minimum ou maximum est atteint.
C2
Mettre en marche le système
u Pour mettre la pile en place, tournez le couvercle de pile dans le sens inverse des aiguilles
d’une montre jusqu’au « symbole de la pile » (fig. 11) et retirez-le.
u Insérez la pile, son pôle positif (+) orienté vers l’extérieur (fig. 12). Remettez en place le
couvercle de pile et tournez-le dans le sens des aiguilles d’une montre en exerçant une
pression.
u Le système est coupé quand le couvercle de pile est en position « 0 » (Intercom possible sans
contrôle de volume).
u Avec le couvercle de pile en position « I » (fig.13), l’intercom et le son ambiant sont actifs, et
leur volume peut être réglé indépendamment.
u Un bip indique que l’opération est réussie.
Adaptation audio du microphone
u Lorsque le système audio est enclenché sur le panneau audio, ajustez la sensibilité de
la voix à l'aide du bouton prévu à cet effet sur le panneau audio pour garantir que le
microphone se mette en marche dès que des paroles sont prononcées.
Echelle du volume de
l’Intercom
Boutons + -
fig. 11
60
fig. 12
fig. 13
fig. 14
+6 dB (max)
+3 dB
0 dB (par défaut)
-3 dB
-6 dB
-9 dB
-12 dB
-15 dB
-18 dB
-21 dB (min)
61
C
Boîtier de commande
C
C5
Contrôle du volume sonore ambiant
Le mode de son ambiant peut être changé avec le sélecteur (fig.15).
u Sons ambiants « ON » – Dans ce mode, les sons ambiants sont transmis aux coques d’oreilles
pour écouter les personnes non connectée à l’intercom, le moteur (lors de l’atterrissage par
exemple), ou en cas d’alarme. L’intercom fonctionne toujours et il peut être réglé avec les
boutons + - (fig.15).
u Sons ambiants « OFF » - dans ce mode, les sons ambiants sont totalement étouffés.
L’intercom fonctionne toujours et il peut être réglé avec les boutons + - (fig. 15).
u Une pression brève (< 2 sec) sur le sélecteur de mode (fig. 15) permet de changer le son
ambiant.
Echelle du volume du
son ambiant
Boutons + Sélecteur de mode
fig. 15
62
12 dB (max)
9 dB
6 dB
3 dB
0 (par défaut)
-3 dB
-6 dB
-9 dB
-12 dB
-15 dB
-18 dB
-21 dB (min)
Boîtier de commande
u Une pression longue (> 2 sec) sur le sélecteur de mode (fig. 15) permet d’entrer en mode
« Contrôle du volume des sons ambiants » (3 bips indiquent le changement de mode). Dans ce
mode, l’utilisateur peut régler le niveau sonore des sons ambiants avec les boutons + - (fig. 15).
u Les sons ambiants peuvent être augmentés de 4 niveaux et diminués de 7 niveaux par
rapport à la position par défaut.
u 3 bips indiquent que le niveau maximum ou le niveau minimum est atteint.
u Après 3 secondes d’inactivité (aucun bouton n’est touché), le mode revient automatiquement
en mode standard (3 bips indiquent le changement de mode).
Par défaut, les sons ambiants sont sur « ON ».
fig.16
Bouton
d’alimentation
en position « 0 »
Bouton d’alimentation en position « I »
Son ambiant « ON »
Système « OFF »
Pression brève
(< 2sec.)
Pression brève
(< 2sec.)
Son ambiant « OFF »
Pas de contrôle de
volume d’intercom
Contrôle +/du volume d’intercom
Automatique après
3 secs. d’inactivité
Pression longue
(> 2sec.)
Contrôle du volume
des sons ambiants
Pression longue
(> 2sec.)
Contrôle +/- du volume
des sons ambiants
63
D
D Connecteur
D1
Connecter le FreeCom 7100
u Le casque pilote FreeCom 7100 de Phonak peut se combiner à tout un choix d’adaptateurs
FreeCom pour se connecter aux différents panneaux audio des avions (fig. 17).
u Pour connecter le FreeCom 7100 au panneau audio de l'avion, utilisez l'adaptateur
approprié:
U Prises jumelées PJ055/PJ068
U XLR-5
U U174/U
e-Box
Connecteur
Le connecteur QD est utilisé pour connecter le FreeCom de Phonak à l’adaptateur FreeCom. Il
se connecte et se déconnecte facilement, permettant au pilote de quitter son siège sans devoir
retirer son FreeCom ni déconnecter l’adaptateur FreeCom du panneau audio de l’avion (p.ex.
pour quitter l'avion tout en gardant la protection auditive).
u Pour déconnecter: tirez sur les boîtiers du connecteur pour les séparer (ne jamais tirer sur
les câbles).
u Pour connecter: alignez les marques blanches des deux boîtiers du connecteur puis
poussez-les l’un contre l’autre (fig. 18).
u Ne pas tourner les joints à vis des câbles.
u Ne pas plier le câble (fig. 19).
u Ne jamais tirer sur un connecteur par son câble! Ceci risque d’endommager le câble et le
connecteur et de provoquer des problèmes de communication.
PJ055/PJ068
fig.18
FreeCom
e-Box
XLR-5
fig. 19
e-Box
U174/U
fig. 17
64
65
E
Informations importantes pour l'utilisateur
u Ce casque transmet les sons ambiants avec un volume limité à 82 (+/2) dB(A). Vérifiez son bon
fonctionnement avant de l’utiliser. Si vous détectez des pannes ou des parasites, reportezvous aux consignes de maintenance et de remplacement de la pile données par le fabricant.
u Les performances risquent d’être affectées par l’usure de la pile. Alors que la
communication par casque est encore possible même avec des piles faibles ou sans
pile, la protection antibruit et la perception de l’environnement ne fonctionnent
qu’avec des piles en bon état. La durée typique d’utilisation continue avec la pile
AAA est de 150 heures. Quand la pile est trop faible (ou absente), le système assure
toujours une protection passive ainsi que le fonctionnement de l'intercom sans
contrôle du volume.
u Si le système ne doit pas être utilisé pendant un certain temps, retirez la pile du boîtier de
commande.
u Mettez en place, ajustez, nettoyez et entretenez votre FreeCom conformément aux
instructions de ce mode d’emploi; sinon, vous risquez d'altérer la protection contre le bruit.
u Les coques d’oreilles sont réutilisables. Leur état doit être examine régulièrement.
u Le matériau et le design des coques d’oreilles sont durables. Toutefois, la forme de vos conduits
auditifs peut évoluer dans le temps (si votre poids change significativement, par exemple). Ceci
peut réduire l’étanchéité des coques et donc l’atténuation du bruit qu’elles procurent.
u Pour une protection totale, vous devez porter correctement les coques d’oreille pendant
toute exposition à un bruit intense.
u FreeCom 7100 est équipé d’un écouteur intégré qui reproduit les sons. Avant l’emploi,
vérifiez qu’il fonctionne correctement et assurez-vous que le son produit n’excède pas les
valeurs connues pour présenter un risque auditif.
66
E
Informations importantes pour l'utilisateur
u Le niveau de sortie des écouteurs du FreeCom 7100 peut dépasser les limites de la
dose de bruit quotidienne.
u Certaines substances chimiques peuvent être nocives pour ce produit. Pour plus
d’informations, veuillez contacter le fabricant.
u Les appareils de protection auditive peuvent supprimer des sons d’alertes, des alarmes
ou d’autres signaux importants. Soyez toujours particulièrement attentif à votre
environnement quand vous portez des protections auditives.
u Avant et après leur utilisation, ainsi que pendant leur transport, rangez votre FreeCom
7100 propre dans la pochette fournie à cet effet. Stockez-le dans un endroit sec, a des
températures qui ne sont ni inferieures a -20°C, ni supérieures à +60°C.
u Votre headset aviation ne doit pas être utilisé s’il y a un risque que les câbles de
connexion s’emmêlent pendant l’emploi.
u N’utilisez jamais les appareils sans des adaptateurs earJack™ correctement insérés
dans les coques sur-mesure. Avant l’emploi, assurez-vous qu’ils sont montés
conformément à ces instructions.
67
Données techniques
APV (dB)
Ecart-type (dB)
Table 1: Valeurs d’atténuation passive du casque
FreeCom 7100 avec coques d’oreilles SUR-MESURE
Atténuation
moyenne (dB)
Le FreeCom 7100 a été testé conformément à la norme EN 353-7:2002 pour les protecteurs
individuels contre le bruit. Les tableaux ci-dessous donnent les résultats d’essais en fonction du
type de coque. Les tableaux 1 et 2 ne donnent que les valeurs d’atténuation passives (système
électronique arrêté). Quand le système est en marche, les sons ambiants sont reproduits par les
écouteurs avec un niveau maximal de 84 dB(A). Les critères de niveaux (L, M, H) des tables 1a et
2a représentent l’exposition au bruit à laquelle le niveau de pression acoustique dans l’oreille
commence à dépasser 85 dB(A), l’atténuation électronique étant en marche.
F
Fréquence (Hz)
F Données techniques
125
21.9
5.2
16.7
250
21.9
5.2
16.7
500
21.1
5.8
15.3
1000
26.7
4.0
22.7
2000
32.7
3.5
29.2
4000
29.8
3.4
26.4
8000
31.7
4.7
27.0
L=18
M=20
H=27
SNR=24
Table 1a: Critères de niveaux pour le FreeCom 7100
avec coques d’oreilles SUR-MESURE
68
H
108.42 dB .
M
103.80 dB .
L
98.85 dB .
SNR / Single Number Rating Attenuation Value
(Indice global d’affaiblissement)
L / Valeur d’atténuation des graves
M / Valeur d’atténuation des médiums
H / Valeur d’atténuation des aigus
APV / Assumed Protection Value
(Valeur de protection globale)
69
Données techniques
F
APV (dB)
Ecart-type (dB)
125
23.4
3.6
19.8
125
25
3.9
21.1
250
21.4
4.2
17.2
250
23.4
4.7
18.7
500
20.5
2.5
18.0
500
23.1
4.3
18.8
1000
22.7
3.5
19.2
1000
26.4
4.9
21.5
2000
27.0
3.0
24.0
2000
29.7
2.2
27.5
4000
23.1
4.2
18.9
4000
28.3
2.7
25.6
8000
26.4
4.8
21.6
8000
31.6
3.8
27.8
L=19
M=19
H=21
L=20
M=22
H=26
SNR=22
Table 2a: Critères de niveaux pour FreeCom 7100
avec coques d’oreilles GÉNÉRIQUES et embouts
silicone
70
Table 3: Valeurs d’atténuation passive du casque
FreeCom 7100 avec coques d’oreilles GÉNÉRIQUES
et embouts en mousse
Atténuation
moyenne (dB)
APV (dB)
Ecart-type (dB)
Atténuation
moyenne (dB)
Fréquence (Hz)
Table 2: Valeurs d’atténuation passive du casque
FreeCom 7100 avec coques d’oreilles GÉNÉRIQUES
et embouts silicone
Fréquence (Hz)
F
SNR=25
Table 3a: Critères de niveaux pour FreeCom 7100
avec coques d’oreilles GÉNÉRIQUES et embouts
en mousse
H
102 dB .
H
102 dB .
M
104.5 dB .
M
104 dB .
L
101.5 dB .
L
106 dB .
Données techniques
u Headset: conforme à la directive RTCA/DO-214
u Microphone
U Directivité: antibruit
U Pression acoustique maximale (@ 10% THD):120 dB(A)
u Systèmes écouteurs
U Type d’écouteur: armature équilibrée
U Tension de polarisation: découplée
U Pression acoustique maximale (ambiance): 84 dB(A)
U Pression acoustique maximale (communication): 98 dB(A)
U Bande passante: 500 Hz – 4,4 kHz
U Impédance DCR: 48 Ω
u Source d’alimentation
U Communication: panneau audio de l’avion (pas de batterie)
U Protection auditive dynamique et perception de l’environnement: 1 batterie type AAA
u Tension
U Panneau audio de l’avion 4 à 20 V (biasing microphone)
U Batterie: 1 à 1,5 V (alcaline ou rechargeable)
u Poids de l’headset aviation: 75g
u Température de stockage: -20°C à + 60° C
u Température de fonctionnement: -20°C à + 60° C
71
G Dépannage
G1
Communication
Problème:
Problème
72
Pas de communication possible
u Vérifiez si les connecteurs QD sont correctement branchés.
u Vérifiez si le connecteur du casque est correctement branché sur le panneau
audio de l’avion.
u Vérifiez si les réglages de volume du panneau audio de l’avion ne sont pas trop faibles.
u Vérifiez le fusible ou le disjoncteur de l’avion.
u Essayez de connecter le casque sur une autre prise.
u Déconnectez le connecteur QD et assurez-vous que le connecteur ou les
broches ne sont pas endommagés.
u Vérifiez si les connecteurs des adaptateurs earJack sont correctement fixés aux
câbles du boitier de commande (connecteurs avec points de rupture de sécurité).
u Déconnectez le connecteur du casque et assurez-vous que le connecteur ou les
broches ne sont pas endommagés.
u Essayez un autre casque. Si le problème subsiste, il s’agit probablement d’un
problème associe au panneau audio de l’avion. Si vous pensez quele problème
est dû au casque, veuillez contacter un revendeur Phonak autorisé.
Les débuts de phrase sont coupés (le microphone col de cygne
s'enclenche trop tard).
u Le système audio est activé sur le panneau audio de l'avion qui s'enclenche
automatiquement lorsqu'un membre de l'équipage commence à parler.
Adaptez la sensibilité de la voix à l'aide du bouton prévu à cet effet.
G
Dépannage
Problème:
Bip toutes les 30 secondes dans le casque
u La batterie est au niveau 1 de sa décharge. Remplacez la batterie (chapitre C1).
Problème:
Bip toutes les 5 secondes dans le casque
u La batterie est au niveau 2 de sa décharge. Remplacez la batterie (chapitre C1).
Problème:
Volume sonore de la communication sortante trop faible
u Vérifiez si le microphone col de cygne est correctement positionné près de la
bouche.
u Vérifiez si le commutateur stéréo / mono du panneau audio de l’avion (le cas
échéant) est bien place sur « mono ».
u Assurez-vous qu’un seul casque est connecte au système d’intercommunication
de l’avion et vérifiez que le volume sonore est règle a un niveau normal.
Problème
Volume sonore de la communication entrante trop faible
u Augmentez le volume de l'intercom avec les boutons +/- buttons (chapitre C3).
u Vérifiez que les réglages de volume du panneau audio de l’avion ne sont pas
trop faibles.
u Vérifiez si les adaptateurs earJack™ du casque sont correctement montés dans
les coques.
u Vérifiez si les coques d’oreilles sur-mesure ou les coques standards sont propres.
u Vérifiez si les coques d’oreilles sur-mesure ou les coques standards sont
correctement placées dans les oreilles.
73
G
Dépannage
u Vérifiez si le commutateur stéréo / mono du panneau audio de l’avion (le cas
échéant) est bien place sur « mono ».
u Assurez-vous qu’un seul casque est connecté au système d’intercommunication
de l’avion et que le réglage de volume est normal, puis vérifiez si le volume
sonore augmente et peut être réglé à un niveau normal.
74
Problème:
Communication intermittente
u Vérifiez si les connecteurs QD sont correctement branchés.
u Vérifiez si le connecteur est correctement branché dans le panneau audio de
l’avion (pas de mauvais contact).
u Essayez d’utiliser le casque à une autre place.
Problème:
Volume réduit ou pas de communication dans une oreille
u Vérifiez si l’adaptateur earJack™ du côté faible est correctement monté dans la
coque (chapitre A1).
u Vérifiez si la coque d’oreille sur-mesure ou la coque générique du côté faible
est correctement placée dans l’oreille (chapitre A2).
u Vérifiez si le commutateur stéréo / mono du panneau audio de l’avion (le cas
échéant) est bien place sur « mono ».
G
Dépannage
G2
Protection auditive /Perception de l'environnement
Problème:
Atténuation insuffisante du bruit
u Vérifiez si les adaptateurs earJack™ du casque sont correctement montés dans
les coques (chapitre A1).
u Vérifiez si les coques d’oreilles sur-mesure ou les coques standards sont
correctement placées dans les oreilles (chapitre A2).
u Faites un test d’étanchéité des coques (par ex. SafetyMeter) avec votre
audioprothésiste ou votre interlocuteur commercial pour confirmer que
l’adaptation des coques d’oreille est encore correcte.
u La forme de votre conduit auditif peut évoluer dans le temps (si votre poids
change significativement, par exemple). Ceci peut affecter négativement
l’étanchéité des coques d’oreille et donc l’atténuation du bruit qu’elles procurent.
Problème:
Pas de perception de l’ambiance
u Vérifiez si le casque est en marche (chapitre C1).
u Vérifiez si le volume pour le son ambiant n’est pas trop faible ou arrêté
(chapitre C5).
u Augmentez le volume pour les sons ambiants avec les boutons +/- (chapitre C5).
u La batterie est peut-être trop faible. Remplacez la batterie (chapitre C1).
75
H Divers
H Divers
H1
Service
u En cas de problèmes techniques, veuillez consulter la section « Dépannage ».
u Ne réparez pas vous-même FreeCom.
u Pour toute opération de service, veuillez contacter un revendeur autorisé Phonak.
H4
Avertissement
Veuillez noter que certains composants de FreeCom 7100 sont très petits. Veuillez les ranger en
toute sécurité hors de portée des enfants.
H2
Informations de contact
Veuillez contacter un revendeur autorise Phonak pour:
u Les pièces détachées et les accessoires
u Les informations techniques
u Les informations sur la manipulation et l’installation
u Les informations sur la garantie et les réparations
Pour tout autre contact commercial, veuillez consulter www.phonak-communications.com
H5
Garantie
Conformément aux « Conditions générales de vente et de livraison », la période de garantie de
FreeCom 7100 est de cinq ans à compter de la date d’achat. Toute responsabilité sera rejetée en
cas de dommages indirects ou consécutifs.
H6
Conformité
u La protection auditive Phonak FreeCom 7100 est conforme à la directive européenne
89/686/ CEE pour les équipements de protection individuelle et a été testée et approuvée
conformément à la norme européenne EN 352-7: 2002 Protecteurs individuels contre
le bruit - Exigences de sécurité et essais - Partie 7: bouchons d’oreilles à atténuation
dépendante du niveau. Le Certificat de contrôle CE a été délivré par le bureau de
vérification BSI Group, Kitemark Court, Davy Avenue, Knowlhill, Milton Keynes, MK5 8PP,
Royaume Uni.
H3
76
Pièces détachées et accessoires
u Coques sur-mesure
u Coques génériques
u Adaptateur earJack™ 7100 avec microphone col de cygne
u Adaptateur earJack™ 7100 sans microphone col de cygne
u Collier enfichable
u Ecran anti-vent en mousse pour microphone col de cygne
u Ecran anti-vent enfichable en mousse pour microphone intra-auriculaire (2 pcs.)
u Clip de maintien
u Pochette
u Batterie AAA
u FreeCom 7100 est conforme aux normes EN 55022:2010 + A1:2000 + A2:2003 classe B et
EN 55024:2010 + A1:2001 + A2:2003, mettant en application les réglementations de la
directive EMC 89/336/CEE. Le rapport d’essai est fourni par le laboratoire d’essai accrédité
Montena EMC SA (STS 024), route de Montena 75, CH-1728 Rossens, Suisse.
77
H Divers
u FreeCom 7100 ne doit pas être considéré comme un déchet ménager. Pour éliminer
FreeCom 7100, rapportez-le dans un centre de collecte agréé.
u Ce système de protection auditive vous protège aussi contre les impulsions sonores très
brèves telles que les coups de feu. Le degré de protection obtenu dépend toutefois de
l’énergie du bruit en question et de la fréquence à laquelle vous y êtes exposé.
Pour plus d’information sur la protection contre les impulsions sonores, veuillez visiter le site
www.phonak-communications.com/en/impulse/ ou nous contacter:
Phonak Communications SA, Laenggasse 17, CH-3280 Morat, +41 26 672 96 72.
H7
Description des symboles
Ce symbole indique que ce produit ne devra pas être considéré comme un déchet
ménager. Veuillez rapporter vos vieux appareils aux points de collecte pour le recyclage
des équipements électriques et électroniques. En veillant à éliminer ce produit dans les
règles, vous contribuerez à éviter les risques potentiels pour l‘environnement et la santé.
78
Phonak Communications AG
Laenggasse 17, 3280 Murten, Switzerland
www.phonak-communications.com
029-3193 / cinq-neuf.ch / © Phonak AG, all rights reserved
0086