1
Kaiser
LED-Ringleuchte
3248
Bedienungsanleitung
Operating Instructions
Mode d’emploi
Istruzioni per l’uso
B
A
1
1
4
2
5
6
C
1
7
8
3
9
E
D
10
b
8
a
9
F
G
2
3
11
DEUTSCH
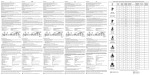
1. Lieferumfang (Abb. A)
(1) Batteriegehäuse
(2) Ringleuchte
(3) Adapterringe mit Anschlussgewinde 49,
52, 55, 58, 62 und 67 mm
2. Einsatzbereich
Die LED-Ringleuchte R48 ermöglicht eine schattenfreie
Ausleuchtung im Nahbereich.
Die Ringleuchte kann an Objektiven mit Filtergewinde
befestigt werden.
Bitte beachten Sie,
- dass bei Objektiven, bei denen sich beim Fokussieren die Frontlinse bzw. das Filtergewinde mitdreht, der Autofokus abgeschaltet und manuell
fokussiert werden sollte, damit das Objektiv nicht
beschädigt wird.
- dass es bei Weitwinkelaufnahmen zu Vignettierungen kommen kann.
4. Montage
Stecken Sie den Fuß (9) des Batteriegehäuses (1) in
den Zubehörschuh der Kamera (a) (Abb. E). Sichern Sie
das Batteriegehäuse mit dem Sicherungsring (8) gegen
Herunterfallen (b).
Da der Fuß (9) über ein Stativgewinde verfügt, kann
das Batteriegehäuse (1) auch auf einem Stativ, Kugelkopf, usw. mit Anschlussgewinde B 1/4 (1/4“) befestigt
werden.
Im Lieferumfang befinden sich sechs Adapterringe (3)
mit den Anschlussgewinden 49, 52, 55, 58, 62 und
67 mm. Wählen Sie den passenden Adapterring und
schrauben Sie ihn in das Filtergewinde des Objektivs.
Schieben Sie die Ringleuchte (2) dann von oben auf
den Adapterring (Abb. F) und stecken Sie das Anschlusskabel der Ringleuchte in die Buchse „OUT
PUT“ (4) am Batteriegehäuse (1) (Abb. B).
5. Inbetriebnahme
Schalten Sie die Ringleuchte mit dem Schalter (7) ein
(Abb. C). Wählen Sie „DC 3V“ für Netzbetrieb oder
„BATT“ für Akku-/Batteriebetrieb. Bitte beachten Sie,
dass bei angeschlossenem Netzteil der Akku-/Batteriebetrieb nicht möglich ist.
3. Stromversorgung
Schalten Sie die Ringleuchte bei Nicht-Gebrauch wieder aus („OFF“).
Die Ringleuchte kann mit Akkus bzw. Batterien oder
mit einem Netzteil betrieben werden.
Wenn bei Akku-/Batteriebetrieb die Helligkeit der LEDs
sichtbar abnimmt, ersetzen Sie die erschöpften Akkus
bzw. Batterien gegen geladene Akkus bzw. neue Batterien.
3.1. Akku-/Batteriebetrieb
Zum Betrieb der Ringleuchte sind zwei Akkus bzw.
Batterien Mignon (AA) erforderlich (nicht im Lieferumfang). Öffnen Sie den Batteriefachdeckel (10) (Abb. D)
und legen Sie die Akkus bzw. Batterien in das Batteriefach. Achten Sie auf die richtige Polarität (+/-) entsprechend der Kennzeichnung im Batteriefach. Schließen
Sie das Batteriefach wieder.
Um eine möglichst lange Betriebsdauer zu gewährleisten, sollten Akkus verwendet werden.
3.2. Netzbetrieb
Die Ringleuchte kann auch über das Netz betrieben
werden. Verwenden Sie dazu das als Zubehör erhältliche Universal-Netzteil 3271 oder ein anderes geeignetes Netzteil. Bitte beachten Sie die Hinweise in der
Bedienungsanleitung des Netzteils und achten Sie
unbedingt darauf, dass zum Betrieb der Ringleuchte
die Ausgangsspannung am Netzteil auf 3 V eingestellt werden muss. Verwenden Sie den Stecker 5.0 x
2.1 mm, Polarität: plus innen.
Überprüfen Sie gegebenenfalls, ob die Netzspannung
mit der auf dem Netzteil angegebenen Betriebsspannung übereinstimmt.
Stecken Sie den Stecker des Netzteils in die Anschlussbuchse „DC 3V IN“ (5) am Batteriegehäuse (1)
(Abb. B). Anschließend stellen Sie die Verbindung zum
Netz her. Die Kontroll-LED (6) leuchtet nun rot.
Bei Netzbetrieb können die Akkus/Batterien im Batteriegehäuse bleiben.
Bei Netzbetrieb eignet sich die Ringleuchte für unbegrenzten Dauerbetrieb.
Mit dem Schalter (11) an der Ringleuchte (2) können
Sie wählen, ob alle 48 LEDs gleichzeitig („ALL“) oder
nur – von vorne betrachtet - die LEDs auf der rechten Seite („R“) oder linken Seite („L“) leuchten sollen
(Abb. G).
6. Wichtige Hinweise
Verwenden Sie die Ringleuchte und das Batteriegehäuse nur mit Ausrüstungsteilen, die dafür vorgesehen
sind.
Halten Sie sowohl Wasser als auch brennbare Stoffe
und Flüssigkeiten von der Ringleuchte und dem Batteriegehäuse fern.
Achten Sie darauf, dass die Ringleuchte und das Batteriegehäuse während des Betriebes nicht abgedeckt
sind.
Sollte die Ringleuchte längere Zeit nicht benutzt werden, nehmen Sie die Akkus bzw. Batterien aus dem
Batteriegehäuse.
Das Gehäuse der Ringleuchte darf nicht geöffnet werden.
Eine Instandsetzung der Ringleuchte und des Batteriegehäuses darf nur von Fachkräften durchgeführt
werden.
7. Wartung und Pflege
Die Ringleuchte und das Batteriegehäuse sind wartungsfrei. Achten Sie darauf, dass die Frontscheibe
der Ringleuchte frei von Flecken und Fremdkörpern ist.
Entfernen Sie diese gegebenenfalls vor der Inbetriebnahme.
Reinigen Sie die Ringleuchte und das Batteriegehäuse mit einem weichen Tuch. Verwenden Sie keinesfalls
Benzin oder andere Lösungsmittel.
ENGLISH
R48 LED Ring Light
1. Scope of supply (fig. A)
(1) Battery compartment
(2) Ring light
8. Technische Daten
Lichtquelle:
48 LEDs
Farbtemperatur:
6000 K ± 500 K
Beleuchtungsstärke:
ca. 1550 Lux
(in 30 cm Entfernung)
ca. 610 Lux
(in 50 cm Entfernung)
ca. 165 Lux (in 1 m Entfernung)
Abstrahlwinkel:
60°
Geringster
Arbeitsabstand:
3 cm
Betriebszeit mit
2 NiMH-Akkus:
ca. 2,5 Stunden
Betriebsspannung:
3V
Abmessungen:
Ringleuchte:
Batteriegehäuse:
13 x 11 x 3 cm
9 x 5 x 5 cm
Gewichte:
Ringleuchte, mit Adapterring: ca. 140 g
Batteriegehäuse, ohne Batterien: ca. 55 g
9. Zubehör
3271 Universal-Netzteil
Eingangsspannung: AC 100 – 240 V,
Ausgangsspannung: DC 3 / 4,5 / 5 / 6 /
7,5 / 9 / 12 V, einstellbar
Maximaler Ausgangsstrom: 1000 mA
Technische Änderungen vorbehalten.
(3) Adapter rings with connecting threads 49,
52, 55, 58, 62 and 67 mm
2. Application area
The R48 ring light provides shadowless illumination for
close-up and macro photography.
It mounts on lenses with filter thread.
Please note:
- If the front element or the filter thread of your lens
rotates while the lens focuses, disable autofocus
and focus manually to avoid damage if the ring light
is mounted.
- Vignetting may occur with wide-angle shots.
3. Power supply
The ring light can be powered by batteries, rechargeables or by a mains adapter.
3.1. Battery operation
Two AA batteries or rechargeables are required to operate the ring light (not included). Open the cover (10)
of the battery compartment (fig. D) and insert the batteries. Make sure, that the polarity complies with the
markings inside the battery compartment. Close the
battery compartment.
If a longer operation time is required, the use of rechargeables is recommended.
3.2. Mains operation
The ring light can also be operated from the mains by
use of the 3271 mains adapter (available as an accessory) or another suitable adapter. Please take note of
the details given in the mains adapter’s instructions.
Please ensure that the mains adapter is set to 3 V output voltage and use a 5.0 x 2.1 mm plug with positive
polarity inside.
If necessary, please check if the mains voltage is the
same as indicated on the mains adapter.
Insert the plug of the mains adapter to the connector
marked “DC 3V IN” (5) on the battery compartment (1)
(fig. B). Now connect the adapter to the mains. The red
LED light (6) will light up.
Batteries or rechargeables may remain in the battery
compartment during mains operation.
4. Attaching ring light and battery compartment
8. Specifications
Insert the accessory foot (9) of the battery compartment (1) into the camera’s hot shoe (a) (fig. E). Rotate
the locker ring (8) to secure the battery compartment
(b).
Color temperature: 6000 K ± 500 K
The battery compartment (1) can also be attached on
a stand, ball head etc. by using the 1/4” tripod thread
situated inside the accessory foot (9).
The light comes with six adapter rings (3) for 49, 52,
55, 58, 62 and 67 mm filter threads. Choose the applicable adapter ring and screw it in the filter thread
of your lens. Now push the ring light (2) from the top
on the adapter ring (fig. F) and insert the ring light’s
connecting cable in the socket marked “OUT PUT” (4)
of the battery compartment (1) (fig. B).
5. Operating the ring light
To switch on the light, set the switch (7) (fig. C) either
on “DC 3V” for mains operation or on “BATT” for battery operation. Please note that battery operation is not
possible if the unit is connected to the mains adapter.
Please set the switch to “OFF” when the light is not
in use.
If you are observing brightness going down during battery operation, replace batteries.
For unlimited continuous operation please choose
mains operation.
You can light all 48 LEDs or only the LEDs on the right
side or the left side by setting the switch (11) accordingly (either to “ALL” or “R” or “L”) (fig. G).
6. Important notes
Only use the ring light and the battery compartment
with parts designed for them.
Make sure that:
- both water and flammable substances and
liquids are kept away from the unit.
- ring light and battery compartment are not
covered during operation.
Please remove batteries if the ring light is not in use for
an extended time.
Do not open the housing of the light.
Repairs must only be carried out by qualified persons.
7. Maintenance and care
Ring light and battery compartment are maintenancefree. Make sure, that the front pane of the ring light
is free of stains and dirt. If necessary remove these
before operation. Clean the light and the battery compartment with a soft cloth. On no account use petrol or
other cleaning agents and solvents.
Light source:
Illumination:
48 LEDs
approx. 1550 lux at 30 cm (1 ft.)
approx. 610 lux at 50 cm (1 ft. 8 in.)
approx. 165 lux at 1 m (3 ft. 3 in.)
Angle of coverage: 60°
Minimum working
distance:
3 cm (1.2 in.)
Operating time
with 2 nickel
metal hydrides:
approx. 2.5 hours
Operating voltage: 3 V
Dimensions:
Ring light:
13 x 11 x 3 cm (5.1 x 4.3 x 1.2 in.)
Battery
compartment: 9 x 5 x 5 cm (3.5 x 2 x 2 in.)
Weight:
Ring light with adapter ring: 140 g (4.9 oz.)
Battery compartment: 55 g (1.9 oz.) (w/o batteries)
9. Accessories
3271 Mains Adapter
Input voltage: AC 100 – 240 V
Output voltage: DC 3 / 4.5 / 5 / 6 / 7.5 / 9 / 12 V,
switchable
Maximum output current: 1000 mAmps
Right reserved to make technical modifications.
FRANÇAIS
Eclairage annulaire LED R48
1. Détail des accessoires livrés (fig. A)
(1) Boîtier compartiment pour piles
(2) Torche annulaire
(3) Bagues d’adaptation pour montage sur les Ø 49,
52, 55, 58, 62 et 67 mm
2. Utilisation
La torche annulaire R48 permet d’éclairer des prises de
vues en gros plan et macro sans ombres.
Elle se monte sur le filetage avant des objectifs.
Note importante :
- Si l’élément frontal ou le filetage de votre objectif
tourne lors de la mise au point en autofocus, découpler la mise au point autofocus et faite la mise
au point manuellement pour éviter tout dommage
quand la torche annulaire est montée.
- Un vignettage peut apparaitre avec des objectifs
grands angles.
3. Alimentation
La torche annulaire peut-être alimentée par piles, batteries rechargeables ou adaptateur secteur.
3.1. Alimentation par piles
Deux piles ou batterie rechargeable type AA sont nécessaires pour alimenter la torche annulaire (elles ne
sont pas livrées). Ouvrer le couvercle (10) du compartiment piles (fig. D) et insérer les piles. Assurez-vous
que la polarité des piles correspond à celle inscrite à
l’intérieur du compartiment. Refermer le couvercle du
compartiment.
Si vous devez faire fonctionner votre torche pendant
une longue période, il est recommandé d’utiliser des
piles rechargeables.
3.2. Alimentation secteur
La torche annulaire peut-être aussi alimentée sur le
secteur en utilisant l’adaptateur secteur 3271 (disponible comme accessoire) ou par un autre adaptateur
compatible. Attention, suivez bien les instructions
d’alimentation fournies sur l’adaptateur secteur compatible. Assurer-vous bien que cet adaptateur délivre
un voltage de 3 V et utilise une prise de 5.0 x 2.1 mm
avec la polarité plus (+) au centre.
Si nécessaire, vérifier aussi que l’alimentation secteur
est identique à celle indiquée sur l’adaptateur secteur
compatible.
Insérer la prise de l’adaptateur secteur dans le connecteur marqué « DC 3V IN » (5) sur le boîtier batterie (1) (fig. B). Maintenant brancher l’adaptateur sur le
secteur. La LED rouge (6) s’allumera.
Les piles ou batteries rechargeables peuvent rester
dans le compartiment piles pendant l’alimentation
secteur.
4. Fixation torche annulaire et boîtier piles
Insérer la griffe flash (9) du boîtier piles (1) dans la griffe
porte accessoire de l’appareil photo (a) (fig. E). Tourner
l’anneau de blocage (8) pour sécuriser le boîtier piles
(b).
Le boîtier piles (1) peut être fixé aussi sur un pied, rotule, etc… en utilisant le filetage de fixation 1/4“ situé
sous la griffe flash (9).
La torche est livrée avec six bagues d’adaptation (3)
pour les Ø 49, 52, 55, 58, 62 et 67 mm. Choisissez
l’adaptateur approprié au diamètre de votre objectif et
visser le sur le filetage de l’objectif. Maintenant glisser
la torche annulaire (2) sur l’adaptateur comme indiqué
sur la fig. F et insérer le câble de connexion dans la prise marquée « OUT PUT » (4) du boîtier piles (1) (fig. B).
5. Utilisation de la torche annulaire
Pour allumer la torche, mettez l’interrupteur (7) (fig. C)
soit sur « DC 3V » pour l’adaptateur secteur ou sur
« BATT » pour alimentation par piles. Notez que la position sur batterie n’est pas possible si le boîtier est
branché sur le secteur.
Mettez l’interrupteur sur « OFF » quand la torche n’est
plus utilisé.
Si vous observez une baisse de l’intensité lumineuse
pendant le fonctionnement sur piles, changer les piles.
Vous pouvez allumer les 48 LEDs ensemble ou seulement les LEDs sur la droite ou la gauche en actionnant
le commutateur (11) soit « ALL » ou « R » ou « L » (fig. G).
6. Notes importantes
Utilisez seulement la torche annulaire et le boîtier pile
avec des pièces conçues pour eux.
Etre sûr que :
- De l’eau, substances inflammables ou liquides
ne sont pas en contact avec le produit.
- La torche annulaire ou le boîtier piles ne sont
pas couvert pendant le fonctionnement.
Retirer les piles du boîtier si vous n’utilisez pas la torche pendant une longue période.
Ne pas ouvrir le boîtier de la torche annulaire.
Les réparations et le service après-vente doit être réalisé par une personne qualifiée.
7. Maintenance et entretien
ITALIANO
La torche annulaire et le boîtier piles sont d’un entretien facile. Assurez-vous que la face avant de la torche
annulaire est sans taches ou poussières. Si nécessaire
retirer les avant utilisation. Nettoyez la torche et le boîtier pile avec un chiffon doux. Ne pas utiliser de pétrole
ou d’autres nettoyants ou solvants.
Illuminatore anulare R48
1. Corredo (fig. A)
(1) Alloggiamento batterie
8. Caractéristiques
Source lumineuse :
(2) Illuminatore anulare
48 LEDs
Température de couleur : 6000 K ± 500 K
Puissance :
environ 1550 Lux à 30 cm
environ 610 Lux à 50 cm
environ 165 Lux à 1 m
Angle de couverture :
60°
Distance minimum
de travail :
3 cm
Durée de fonctionnement
avec 2 piles nickel métal
hybrides:
environ 2 h 30
Voltage d’alimentation : 3 V
Dimensions :
Torche annulaire :
Boîtier piles :
13 x 11 x 3 cm
9 x 5 x 5 cm
Poids :
Torche annulaire
avec bague :
Boîtier piles :
140 g
55 g (sans piles)
(3) Anelli di raccordo con filettatura 49,
52, 55, 58, 62 e 67 mm
2. Utilizzo
L’illuminatore anulare R48 fornisce un’illuminazione
senza ombre per riprese ravvicinate e macro.
Viene applicato sull’obiettivo per mezzo della filettatura.
Avvertenze:
- Se la parte frontale o il filetto del filtro dell’obiettivo
ruota mentre si mette a fuoco, escludere l’autofocus
e mettere a fuoco manualmente ad evitare danni se
l’illuminatore anulare è montato.
- Se si eseguono riprese con obiettivi grandangolari
possono comparire vignettature.
3. Alimentazione
9. Accessoire
3271 Adaptateur secteur
Alimentation secteur : AC 100 – 240 V
Alimentation de sortie : DC 3 / 4,5 / 5 / 6 /
7,5 / 9 / 12 V, commutable
Intensité de sortie maximum : 1000 mA
Tout droit réservé pour modifications techniques sans
préavis.
L’illuminatore anulare può essere alimentato per mezzo
di batterie, ricaricabili o per mezzo di un adattatore a
rete.
3.1. Alimentazione a batteria
Per alimentare l’illuminatore anulare si richiedono due
batterie AA normali o ricaricabili (non incluse). Aprire il
coperchio (10) dell’alloggiamento delle batterie (fig. D)
e inserire le batterie. Assicurarsi che la polarità corrisponda con l’indicazione all’interno dell’alloggiamento
delle batterie. Chiudere il coperchio dell’alloggiamento
delle batterie.
Se viene richiesto un tempo operativo superiore, si raccomanda l’utilizzo di batterie ricaricabili.
3.2. Alimentazione a rete
L’illuminatore anulare può essere alimentato a corrente per mezzo dell’adattatore a rete 3271 (disponibile
come accessorio) o un altro adattatore idoneo. Prendere nota delle caratteristiche fornite nelle istruzioni
dell’adattatore a rete. Assicurarsi che l’adattatore a
rete sia impostato su un voltaggio di uscita di 3 V e
utilizzi una presa 5.0 x 2.1 mm con polarità positiva
incorporata.
Se necessario, controllare che il voltaggio sia lo stesso
di quello indicato sull’adattatore a rete.
Inserire la spina dell’adattatore a rete nel connettore
contrassegnato “DC 3V IN” (5) sullo scomparto delle
batterie (1) (fig. B). Collegare l’adattatore alla corrente.
Il LED rosso (6) si accenderà.
Durante l’utilizzo a rete, le batterie normali o ricaricabili
possono rimanere inserite nello scomparto delle batterie.
Inserire lo zoccolo (9) dello scomparto delle batterie (1)
nella slitta con attacco caldo dell’apparecchio fotografico (a) (fig. E). Ruotare l’anello di bloccaggio (8) per
fissare lo scomparto delle batterie (b).
Lo scomparto delle batterie (1) può anche essere supportato da uno stativo, testa a sfera etc. per mezzo
del foro per treppiedi 1/4” situato nella slitta porta accessori (9).
L’illuminatore viene fornito con sei anelli adattatori (3)
per filettatura filtri 49, 52, 55, 58, 62 e 67 mm. Scegliere l’anello adattatore da applicare e avvitarlo nella filettatura del vostro obiettivo. Inserire ora l’illuminatore
anulare (2) sulla parte superiore dell’anello di raccordo
(fig. F) e inserire il cavo di collegamento dell’illuminatore
anulare nello zoccolo marcato “OUT PUT” (4) dello
scomparto delle batterie (1) (fig. B).
Non aprire la carcassa dell’illuminatore.
Le riparazioni devono essere eseguite solamente da
persone qualificate.
7. Manutenzione e cura
L’illuminatore anulare e lo scomparto delle batterie
sono privi di manutenzione. Assicurarsi che il pannello
frontale dell’illuminatore non sia macchiato o sporco.
Se necessario, rimuoverli prima delle operazioni. Pulire l’illuminatore e lo scomparto delle batterie con un
panno soffice. Per nessun motivo usare petrolio o altre
sostanze di pulizia o solventi.
8. Caratteristiche
Sorgente di illuminazione: 48 LED
Temperatura colore:
6000 K ± 500 K
Illuminazione:
circa 1550 lux a 30 cm
5. Utilizzo dell’illuminatore anulare
Per accendere l’illuminatore, premere il pulsante (7)
(fig. C) su “DC 3V” per utilizzo a rete o su “BATT” per utilizzo a batteria. Non è possibile utilizzare l’illuminatore
con le batterie se è collegato con l’adattatore a rete.
Premere il pulsante “OFF” quando non si usa l’illuminatore.
Se alimentando l’illuminatore con le batterie la luminosità diminuisce, sostituire le batterie.
Per un utilizzo continuativo illimitato, scegliere l’alimentazione a rete.
circa 610 lux a 50 cm
circa 165 lux a 1 m
Angolo di copertura:
60°
Distanza minima di lavoro: 3 cm
Autonomia con 2 batterie
nickel metal idrato:
circa. 2,5 ore
Voltaggio operativo:
3V
Dimensioni:
Illuminatore anulare:
Scomparto batterie:
13 x 11 x 3 cm
9 x 5 x 5 cm
E’ possibile illuminare tutti i 48 LED o solo i LED sul lato
destro o sul lato sinistro utilizzando di conseguenza il
pulsante (11) (sia su “ALL” o “R” o “L”) (fig. G).
Peso:
Illuminatore anulare
con anello adattatore: 140 g
Scomparto batterie:
55 g (senza batterie)
6. Note importanti
9. Accessori
Usare l’illuminatore anulare e lo scomparto delle batterie solamente con accessori studiati appositamente.
3271 Adattatore a rete
Assicurarsi che:
- tenere lontano dallo strumento sia acqua che
sostanze infiammabili e liquidi.
- l’illuminatore anulare e lo scomparto delle batterie
non siano coperte durante l’utilizzo.
Se non si utilizza l’illuminatore anulare per parecchio
tempo, togliere le batterie.
Voltaggio entrata: AC 100 – 240 V
Voltaggio uscita: DC 3 / 4,5 / 5 / 6 / 7,5 /
9 / 12 V, commutabile
Massima corrente in uscita: 1000 mAmpere
Ci riserviamo il diritto di eseguire modifiche tecniche.
Kaiser Fototechnik GmbH & Co. KG
Im Krötenteich 2 · 74722 Buchen · Germany
Telefon +49(0)6281 407-0 · Fax +49(0)6281 407-55
www.kaiser-fototechnik.de · [email protected]
Printed in Germany 0212 000324800900
4. Collegamento del flash anulare
con lo scomparto delle batterie