1
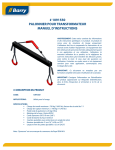
Veuillez lire attentivement les avertissements avant de commencer.
L'épissure automatique Splicing Nut est conçue pour être utilisée avec des cordages tressés avec une âme.
Elle ne convient pas aux cordes creuses.
L'épissure automatique se compose de deux pièces, un écrou bombé et un élément à visser.
1 - Dévissez l'écrou bombé
2 - Examinez l'élément à visser et observez les
numéros inscrits sur les deux faces.
Montage étape par étape :
Etape 1 :
Une fois l'écrou bombé et l'élément à visser séparés, faites coulisser le cordage à travers le
petit trou de l'écrou bombé.
Ensuite, si vous souhaitez installer de la quincaillerie, faites la coulisser après l'écrou bombé.
Etape 2 : Maintenez l'élément à visser avec les numéros 1-2 et 3-4 en face de vous dans une
main tout en maintenant le bout du cordage avec l'écrou bombé dans l'autre main.
Repérez la rainure 1-2 et placez en butée le bout du cordage à coté du numéro 1.
Etape 3 : Suivez la flèche jusqu'au numéro 2 pour aller ensuite sur le numéro 3. Suivez la
flèche jusqu'au numéro 4. Si vous avez installé de la quincaillerie dans l'étape 1, faites la
coulisser maintenant dans la boucle. Tirez maintenant le cordage jusqu'au numéro 5. Pour
bien ajuster le cordage tenez le avec 3 doigts, le long des rainures. Amenez ensuite le cordage
sur le numéro 6.
Etape 4 : Placez l'écrou bombé sur l'élément à visser tout en maintenant le cordage
fermement, faites 2 tours d'écrou puis étirez le cordage pour qu'il se place correctement dans
les rainures.
Etape 5 : Vissez l'écrou bombé jusqu'a ce qu'il arrive en butée, étirez le cordage
régulièrement, tous les 2 tours, pour qu'il se place correctement dans les rainures.
Si l'écrou est difficile à visser il faut pour chaque demi-tour, revenir en arrière d'un quart de
tour et recommencer ainsi de suite jusqu'au vissage total.
Pour ne pas forcer il faut utiliser le cordage de diamètre adéquat au diamètre d'épissure
automatique. Après montage et serrage le cordage doit rester de la même fermeté que sur
l'ensemble de sa longueur.
Avertissement : Il est impératif de suivre les instructions telles qu'indiquées, veuillez lire les conseils de prudence très
attentivement.
L'épissure automatique Splicing Nut est conçue pour être utilisée avec des cordages tressés avec une âme.
Elle ne convient pas aux cordes creuses.
Ce produit n'est pas recommandé pour utilisation avec des applications de forte résistance pouvant aller jusqu'à la force
de rupture du cordage.
En élément de référence l'utilisation d'un nœud réduit la capacité de la solidité du cordage d'environ 60 à 70 % de la
résistance de rupture indiquée…50 % étant la règle pratique.
Les cordages et cordes comportant des protections externes solides et robustes (glissantes) tels que les cordes
d'alpinisme ne sont pas recommandés, ce produit ne doit pas être utilisé avec ces types de cordes et cordages.
Les cordages et cordes qui sont relativement doux et souples au toucher et qui se manipulent facilement sont les plus
appropriés pour l'utilisation de ce produit. Ce produit ne doit pas être utilisé sur les câbles métalliques.
Please read the warnings attentively before beginning.
The SplicingNut is composed of two pieces, a rounded nut and an element to screw.
SplicingNut is intended for use with braided line. SplicingNut doesn't suit the hollow ropes.
1 - Unscrew the nut from the core counter clockwise
2 - Examine core - observe numbered channels
Step By Step Directions to Install a Splicing Nut
Step 1 Slide the nut on the line through the small hole located on the top of the nut .
Then if you have any closed hardware to attach, slide hardware on after the nut .
Step 2 Hold Core with groove 1-2, 3-4 facing towards you in one hand and in opposite hand
hold the bitter end of line with the nut already attached.
Find groove 1-2 and place the bitter end of the rope at the stop located next to the #1
Step 3 Follow the arrow up to #2 across to #3.
Follow arrow down to channel #4. If you attached hardware in Step 1 now slide fixed hardware
onto the loop.
Now pull line across to #5. Pull on line to snug while holding onto the lines along the grooves
with three fingers. Take line up to #6
Step 4 Place Nut on core still holding the line securely with three fingers rotate 2 times and
stretch the line tight into the grooves
Step 5 Screw together until the nut bottoms on the core, stop approximately every three turns
and pull the line tight, this keeps the line from bunching together under the nut. See the done
illustration, note line at inspection port.
If the nut is difficult to close, the closing motion on the nut should be, for every 1/2 turn of
closure you back off a 1/4 turn and do another 1/2 turn of closure, with another 1/4 back turn
and so on, (similar to a motorcycle throttle motion), until you bottom on the core !
Warning: Instructions must be followed exactly, please read the following cautions carefully.
SplicingNut is intended for use with braided line. It is not recommended for use in high tensile applications where the
ultimate breaking strength of the line expected to be reached. A point of reference, the use of a knot reduces breaking
strength of line to approximately 60-70 % of the listed break strength, 50% being the rule of thumb. Cordage institute
standards call for lines to be tested in an eye to eye splice arrangement, most lines are not used in this fashion.
Lines with heavy and tightly covered outer sleeves such as climbing ropes and marine lines such as Samson’s warp speed
are not recommended, this product should not be used with this type of line. Line with a soft hand that takes a turn easily
works best with our product.
This version of our product is not intended for use with high tensile lines such as Sampson’s Amstel unless the line’s tensile
bearing capabilities are being used strictly for it’s elongation properties and the actual loads are comparable to what would
be expected for high quality braided polyester line. This product should not be used for unattended dock lines, anchor lines
or other applications where storm surge may bring the line to loads close to the breaking strength.
Man aloft or overhead loads, Do not exceed the working load of the line.