1
取扱説明書
ラックマウントフレーム
RM-608J/E
© PRINTED IN JAPAN
B68-0033-10
ラックマウントフレーム RM-608J/E は、当社電源製品をJIS規格または EIA 規格の標準ラックにマウントするためのフレームです。
製品の取付には機器により別売りの取付金具をお求めください。
1. 構成部品リスト
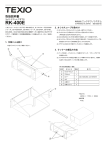
2. ラックマウントフレーム組立方法
数量
④*RM-608Jのみ
備考
①
取手フレーム(R)
1個
②
取手フレーム(L)
1個
③
フレーム(棚板)
1個
④
フレーム(上)
1個
*RM-608Jのみ
⑤
丸皿ネジ
4個
N33-5014-41
⑥
山形ワッシャ
4個
N19-0722-05
⑦
皿ネジ
10 個
N32-3006-41
③
②
⑦×2
(対面共)
⑥×2
(対面共)
⑦×3
(対面共)
⑤×2
(対面共)
3、機器組み込み手順
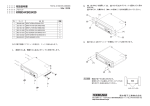
(1) 組立てたラックマウントフレームに、取付準備をした収納する機器
(2) RM-608Jの場合
を載せてください。
①
固定した収納機器の上側にフレーム(上)④を載せ、両側の取手フレーム
収納機器の背面側取付金具の凹部が、フレーム(棚板)③背面側の
(R)(L)へ皿ネジ⑦を使用し取付けます。
凸部にはまるまで、そのまま後方へ機器をスライドさせてください。
次に収納機器の前面側取付金具を、フレーム(棚板)③にセムスネジ
にて固定します(ネジは取付金具についているものをお使いください)。
フレーム(上)
凸部に合わせて
機器の天面
スライドさせる
③
前面側を
ネジ止めする
⑦×2
(対面共止める)
注意事項
○ 重量物ですので、ラックに収納後はサポートアングルを取付けてください。
○ ラックマウントフレームと機器は、完全に固定されているわけで
はありません。機器をフレームに収納する際に、フレームを立てたり、
横にしたり、逆さまにすると大変危険ですのでご注意ください。
仕様
質量
サポートアングル
*当社ではサポートアングルを用意しておりません。
市販のラックを使用されている場合、サポートアングルはそのラック
のメーカが販売しているものをご使用ください。
上下に隙間無く収納される場合は、サポートアングルにより取付か
ない場合がありますのでご確認のうえ取付けてください。
RM-608J
RM-608E
寸法(組立後)
RM-608J
RM-608E
約 5.2kg
約 5.0kg
476(W)×149(H)×420(D)mm
476(W)×133(H)×420(D)mm
INSTRUCTION MANUAL
RACK MOUNT FRAME
RM-608J/E
© PRINTED IN JAPAN
B68-0033-10
The RJ-608J/E is the standard rack mount frame in conformance to the JIS or EIA Standards. It is designed to mount our products.
Use the optional brackets to mount products suitable to them.
2. ASSEMBLY PROCEDURES OF RACK MOUNT FRAMES
1. COMPONENT PARTS LIST
④*RM-608J only
Q'ty
Remark
①
Handle frame(R)
1
②
Handle frame(L)
1
③
Frame(shelf)
1
④
Frame(upper)
1
*RM-608J only
⑤
Oval head screw
4
N33-5014-41
⑥
Angle washer
4
N19-0722-05
⑦
Flat head screw
10
N32-3006-41
③
②
⑦×2
(Both sides)
⑥×2
(Both sides)
⑦×3
(Both sides)
⑤×2
(Both sides)
3. INSTRUMENT MOUNTING PROCEDURES
(1) Place an instrument ready to be mounted on the assembled rack
mount frame. Slide the instrument backward until the projection at
the back of the frame (shelf) ③ is inserted in the notch of the bracket
fixed on the rear of the instrument.
Then, fix the front bracket on the instrument to the frame (shelf) ③
with the Semmes screws. (Use the screws supplied with the bracket.)
①
(2) RM-608J
Place the frame (upper) 4 on the top of the fixed instrument.
Fix it to the handle
frames on both sides (R) and (L) with the flat head screws 7.
Frame(upper)
Slide to fit the
projection.
Top of instrument
③
Screw the
front side.
⑦×2
(Fix both sides)
INSTRUCTIONS
○The instrument is heavy.
Attach support angles after mounting it on the rack. ○The instrument is not fixed completely with the rack mount frame.
It is very dangerous to stand the frame, place it on its side or turn it upside
down when mounting the instrument on the frame.
Specifications
Weight
RM-608J: Approx. 5.2 kg
RM-608E: Approx. 5.0 kg
Dimensions (after assembly)
RM-608J: 476 W x 149 H x 420 D mm
Support angles
We provide no support angles. Use support angles provided by
the rack manufacturer, when a mass-marketed rack is used.
If the instrument is mounted with no spaces above and below it, the support
angles may not be attached. Check before mounting.
RM-608E: 476 W x 133 H x 420 D mm