1
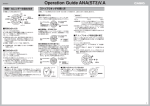
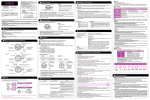
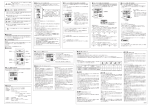
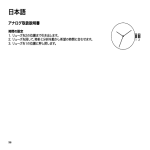
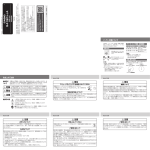
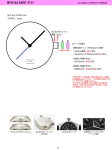
USER’S GUIDE ANA(J3)V.B
● 時刻・曜日の合わせ方
● 日付の合わせ方
(1)リューズを2段引きます。
(2)リューズを回して時・分針を進めると、曜日も進み
ますので、時刻を進めながら曜日を合わせます。曜
日を合わせましたら、午前/午後に注意して時刻を
合わせます。
(3)リューズを押し込みます。
(1)リューズを1段引きます。
(2)リューズを回して、日付を合わせます。
(3)リューズを押し込みます。
日付表示 リューズ
リューズ
1 23 25
92
SUN M
TUE
FRI SA
T
ON
分針
1段引き
(日付合わせ)
29 1 3
5 7 9 1
時針
27
3 15 17 1
防水時計の一部(特に10気圧・20気圧防水)で
リューズがネジ込み式になっているものは時刻・
カレンダーを合わせる際は左回しにしてネジ込み
をゆるめた後、リューズを引いてください(無理
に引っ張らないでください)。
なお、リューズをゆるめた状態では防水機能を保
てませんので、合わせ終わったら必ずネジ込みを
してください。
※機種により形状は異なります(モジュール番号は時計本体裏面に刻印されています)。
11
時刻・カレンダーの合わせ方
T
WED HU
リューズ
24
SUN M
8
12
<モジュール1794>
TUE
FRI SA
3 15 17 1
T
ON
T
WED HU
曜日表示
4
16
5 7 9 1
1 23 25
92
29 1 3
20
11
27
1段引き
(日付合わせ)
24
20
8
27
T
WED HU
24
29 1 3
5 7 9 1
TUE
FRI SA
SUN M
20
4
16
8
12
リューズ
27
1 23 25
92
3 15 17 1
TUE
T
WED HU
24
20
4
8
16
日付表示
<モジュール 1343・2364>
29 1 3
11
SUN M
5 7 9 1
T
ON
FRI SA
1段引き
(日付合わせ)
曜日表示
12
2段引き
(時刻・曜日合わせ)
24時間針
現在
T
ON
<モジュール 1794>
回転ベゼルを回し、▼マークを分針に合わせる
と、その位置をスタートとして経過時間を知るこ
とができます。
※内 転 ベ ゼ ル 方 式 に な っ て い る も の は 右 上 の
リューズを回すとベゼルが回転します。
経過時間
1段引き
(日付合わせ)
24時間針
● 回転ベゼルのついているものは
スタート
リューズ
2段引き
(時刻・曜日合わせ)
12
1 23 25
92
16
3 15 17 1
秒針
11
ゆるめる
4
※日付は31日制になっていますので、2、4、6、9、
11月の月末には必ず修正してください。
※午後8時〜午前1時の間は、日付合わせを行なわない
でください(この間に日付合わせをすると翌日になっ
ても変わらないことがあります)。
<モジュール 1343・2364>
時刻を合わせるときは、針を正転方向(進む方向)に回
して合わせてゆき、分針を正しい時刻より4〜5分進め
てから逆に戻して合わせると正確に合わせることができ
ます。
※時報は「時報サービス117番」が便利です。
★24時間針は時・分針に連動しています(24時間で1
回転します)。
1
USER’S GUIDE ANA(J3)V.B
To set time
Setting time and day of the week
Setting date
1) Pull the crown out to the second click when the
second hand is at 12 o’clock position and the
second hand stops.
2) Set the hands by turning the crown. As you do,
the day of the week changes accordingly.
• After setting day of the week, carefully set the time,
making sure to distinguish between AM and PM.
3) In accordance with a time signal, push the
crown in.
1) Pull the crown out to the first click.
2) Set the date by turning the crown.
3) Push the crown in to the normal position.
Date
1 23 25
92
Start
TUE
FRI SA
3 15 17 1
SUN M
● The watch attached with a bezel can measure the elapsed time. Align the ▼ mark on
the bezel with the minute hand by turning it
so that the time elapsed from the ▼ mark
can be measured.
ON
T
WED HU
24-Hour Hand
24
20
Elapsed
time
4
16
The 24-Hour Hand indicates the current hour of the
day, making one complete rotation every 24 hours.
8
12
<Module 1794>
Crown (Normal position)
Crown
(normal position)
Hour Minutes
3 15 17 1
T
WED HU
T
WED HU
20
24
20
29 1 3
1 23 25
92
FRI SA
27
24
5 7 9 1
11
1 23 25
92
SUN M
TUE
TUE
FRI SA
T
ON
SUN M
ON
T
5 7 9 1
Day of
the week
First click
(setting date)
First click
(Setting date)
29 1 3
3 15 17 1
27
11
4
4
16
16
8
12
8
Second click
(Setting time and
day of the week)
12
Seconds 24-Hour Hand
Date
<Module 1343 • 2364>
<Module 1794>
Crown (Normal position)
SUN M
27
T
WED HU
24
20
● Avoid setting the date during the time from
8:00p.m. to 1:00a.m. (If the watch is set during
this period of time, the date may not change in
the following day.)
5 7 9 1
TUE
1 23 25
92
29 1 3
3 15 17 1
T
ON
Day of
the week
FRI SA
First click
(Setting date)
11
Crown
T
First click
(setting date)
29 1 3
11
27
Crown
(normal position)
5 7 9 1
• Some water resistant models are equipped
with a screw lock crown.
• With such models, you must unscrew the
crown in the direction noted in the illustration
to loosen it before you can pull it out. Do not
pull too forcibly on such crowns.
• Also note that such watches are not water
resistant while their crowns are loosened.
Be sure to screw the crowns back in as far as
they will go after making any setting.
4
16
8
12
Second click
(Setting time and
day of the week)
24-Hour Hand
<Module 1343 • 2364>
2