1
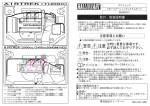
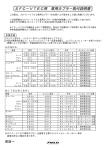
SUPER
AIRFLOW CONVERTER
SUPER AIR FLOW CONVERTERⅡ
WIRING DIAGRAM BY MODEL
SUPER
AIRFLOW CONVERTER
This document describes car models to which the Super Airflow
Converter (Product code: 401-A911/401-A913) is applicable, and
ECU terminal arrangement drawings. For the operating method
and precautions for the Super Airflow Converter, refer to the
Instruction Manual.
When installing the Super Airflow Converter, both this document
and the Instruction Manual are required.
Even if the car model and manufacturing year coincide with the
contents described in this document, this product may not be
installed in certain specification vehicles or remodeled vehicles.
The manufacturing years of applicable vehicles are as of
February 2003. For the latest vehicles applications, Please
contact your local A’PEX Office or dealer for more information.
A’PEX Chasing Our Dreams - A complete line of customized car and
automotive parts developed with state of the theart technology and
new ideas. Our company is A'PEX which means the highest in quality.
A’PEX CO., LTD
1
■Contents
■Introduction ______________________________________________________ P3
■Precaution on Installation ________________________________________ P4
■Installation _______________________________________________________ P6
■ECU Arrangement Diagram _______________________________________ P12
■How to Refer to the ECU Terminal Arrangement Diagram ________ P13
■TOYOTA
Table of Applicable Models ............................................................P14
ECU Terminal Arrangement Table ..................................................P22
■NISSAN
Table of Applicable Models ............................................................P28
ECU Terminal Arrangement Table ..................................................P33
■HONDA
Table of Applicable Models ............................................................P37
ECU Terminal Arrangement Table ..................................................P41
■MITSUBISHI
Table of Applicable Models ............................................................P44
ECU Terminal Arrangement Table ..................................................P47
■MAZDA
Table of Applicable Models ............................................................P49
ECU Terminal Arrangement Table ..................................................P51
■SUBARU
Table of Applicable Models ............................................................P54
ECU Terminal Arrangement Table ..................................................P56
■SUZUKI
Table of Applicable Models ............................................................P58
ECU Terminal Arrangement Table ..................................................P59
■DAIHATSU・ISUZU
Table of Applicable Models ............................................................P61
ECU Terminal Arrangement Table...................................................P62
2
■Introduction
“Safety precautions” are described in the Instruction Manual.
Please read them before starting installation work.
“Signal words and their meanings” are described in the
Instruction Manual for this product. The “Electronic Control
Unit” is abbreviated as “ECU” in this document.
! CAUTION
●Entrust an experienced professional with the installation work of this product.
After completion of the installation, hand over this document, Instruction Manual, and
Warranty to the customer (user)
●Do not pull the harness of the vehicle and the harness of this product.
This may cause wire damage or short circuits, resulting in damage to the product and
vehicle.
●When removing or connecting a connector, be sure to unlock the locked
(claw) status beforehand.
When the connector is provided with a securing bolt, loosen this bolt
completely before pulling out the connector
Failure to do so may damage the connector.
● Keep the harness of this product and vehicle harness away from high
temperatures and moving parts. Also, Keep this harness away from water.
Failure to do so may result in cut wires or short circuits that can lead to vehicle and product
damage.
●Do not route the harness of this product and the harness of the vehicle near a
sharp-edges. Do not insert the harness between objects by applying pressure
to it.
Failure to do so may result in cut wires or short circuits that can lead to vehicle and product
damage.
3
■Precautions for Installation
●When installing this product, do not use any electro-taps
Using the electro-tap makes the electrical contact status unstable. This contact
defect may cause a malfunction in the product and damage this product and the
vehicle.
Be sure to use the attached splice and dedicated tools such as cutting pliers for
electric work to install this product securely and properly.
●Insulate the metallic portion of the harness securely with electrical
tape.
●Caulking the plug
(1) Peel off①線の被覆を5mm
the coating of
the wires
about 8 mm
ぐらい剥ぐ
②スリーブを
(2) Cover
with a sleeve
(4) Caulk
securely
④確実にかしめる
(3)③線を折り返す
Fold the wires
被せる
※Check ※下の図を参考に、かしめが確実に行われているか確認してください。
if caulking has been performed securely by referring to the following figure
この部分で、
導線をかしめる
Caulk
the conductors by these portions
かしめを配線に、
くいこませる
Make the caulking thrust into the wire
Caulk the coating by この部分で、
these portions
被覆をかしめる
●Caulking the splice
①接続する線の被覆を
(1) Peel off the coating of the wires to
5mmぐらい剥ぐ
be connected about 5 mm
②分岐させる線を
(2) Peel
off the wires to be
10mmぐらい剥ぐ
branched about 10 mm
③線をからめる
(3)
Entwine the wires
※かしめた部分はビニールテープなどで確実に絶縁してください
※Insulate
the caulked portion securely with a vinyl tape
4
④確実にかしめる
(4) Caulk securely
●This product has two grounding wires (Black + Brown)
This has a very important significance when securing voltage conversion accuracy.
Connect the grounding wires by referring to the following figure. Installing the
grounding wires in a different way from the installation method specified by A’PEX
will damage this product and the vehicle engine
Correct
Installation Method for the Grounding Wires
正しいアースの接続方法
Connect the grounding wires to the two positions on the same line.
Be sureアースは同一の線に2ヶ所で接続する。
to connect the brown wire to the ECU side.
Allow a必ず茶色線をECU側に接続する
space of 1 cm or more between the connecting。
point of the black wire and the connecting 黒色線の接続点と茶色線の接続点の間隔を1cm以上にしてください。
point of the brown wire.
車両ハーネス
Vehicle
harness
Electronic
エレクトロニック
コントロール
Control Unit
ユニット
(ECU)
(ECU)
Brown wire (ground)
茶色線(アース)
Black
wire (ground)
黒色線(アース)
Improper
Connecting Method for the Grounding Conductor
誤ったアースの接続方法
Vehicle
harness
車両ハーネス
Electronic
エレクトロニック
コントロール
Control Unit
ユニット
(ECU)
(ECU)
アースを1本に
Combining
the grounding
まとめないで
wires
into a single line
ください。
Brown wire
(ground)
茶色線(アース)
Black wire
(ground)
黒色線(アース)
車両ハーネス
Vehicle
harness
Electronic
エレクトロニック
コントロール
Control Unit
ユニット
(ECU)
(ECU)
Do アースを指定位置以外
not connect the grounding
(車体アース等)に接続
wires
to any position (e.g.
しないでください。
chassis
grounding) other than
the specified position
Brown wire
(ground)
茶色線(アース)
黒色線(アース)
Black wire
(ground)
The figure above only shows the connection of the grounding wires.
For the other signal lines, refer to page 8 and page 9.
Be sure to wire the power cable, grounding wires and other signal
lines to the positions specified by A’PEX.
5
■Installation
●Connecting the SAFC II
1.Remove the negative (ー) terminal of the battery
advice!
There is some setting data on car audio, car navigation, etc. that is backed up by the battery power
supply. We recommend you to take a note of the data in case it is lost.
! CAUTION
●Before starting the wiring work, remove the negative terminal of the battery.
Failure to do so way cause a short circuit and damage the wires. If the ECU connector is
removed while the battery is connected, the engine warning lamp may light up continuously
regardless of whether the SUPER AFC II is installed or not. At this time, you must ask the
distributor of the car model to perform maintenance and inspection.
●We shall not take any responsibility for damage to the vehicle or related
devices that may be caused by installation error.
2.Locate the Electronic Control Unit (hereafter referred to as ECU) of the vehicle by referring
to the vehicle specific wiring diagram.
3.Connect the harness attached to the SUPER AFC II securely to the power cable of the
vehicle harness, grounding wire, engine rpm signal wire, throttle signal wire, and knocking
signal wire from to the ECU by referring to the vehicle specific wiring diagram. (Refer to
page 8 and page 9.)
Connect
Connect
Connect
Connect
Connect
Connect
the red wire to the power supply.
the green wire to the engine rpm signal wire.
the gray wire to the throttle signal wire.
the black wire to the ground wire.
brown wire to the ground wire.
the purple wire to the knocking signal wire ・・・※
※For models with a single knocking wire.
Connect the purple wire directly to the knocking signal wire.
※For models with multiple knocking wires (knocking signal 1,
knocking signal 2, ・・・)
Refer to page 11 without making any connection at this time.
6
■Installation (cont.)
! CAUTION
●Be sure to connect the black wire and the brown wire of the harness attached to the SAFC II to the ground wire.
Failure to do so may cause this product not to function properly, thereby causing damage
to the product and the engine.
●When locating each wire, take special care not to cause a short circuit.
An electrical fire may be caused or electrical devices may be damaged as a result.
●Securely install the splice without any loose contacts.
Electric devices may be damaged as a result.
4.Cut the airflow signal wire or pressure signal wire of the vehicle harness and install a plug by
referring to the vehicle specific wiring diagram.
Plug :ECU side
Plug receptacle :Airflow sensor or pressure sensor side
Vehicles equipped with the RB26DETT have 2 airflow signal wires. Cut
these 2 wires.
5.Connect the harness attached to the SAFC II to the plug installed in step 4
For Hot Wire/
Flap/Pressure
sensor
For Karman
Plug receptacle: White wire
Plug: Yellow wire
Plug receptacle: Orange wire
Plug: Pink wire
6.Insulate the splice and unused plug with electrical tape.
7.Reconnect the negative (ー) terminal of the battery
7
■Installation (cont.)
●Wire connecting method
※For vehicles using a hot wire/flap/pressure sensor
車両ハーネス
Vehicle
harness
エレクトロニック
Electronic
コントロール
Control
ユニット Unit
(ECU)
(ECU)
×
Splice
スプライス
赤色線(電源)
Red wire (power supply)
緑色線(回転信号)
Green wire (rpm signal)
紫色線(ノック信号)
Purple wire (knocking signal)
灰色線(スロットル信号)
Gray wire (throttle signal)
茶色線(アース)
Brown wire (ground)
黒色線(アース)
Black wire (ground)
黄色線(エアフロー・圧力信号出力)
Yellow wire (airflow/pressure signal output)
白色線(エアフロー・圧力信号入力)
White wire (airflow/pressure signal input)
オスギボシ
Plug
メスギボシ
Plug
receptacle
! CAUTION
●Be sure to connect the brown wire to the ECU side.
Failure to do so may cause this product to function improperly, thereby causing damage
to the product and the engine
※For vehicles equipped with the RB26DETT
Vehicle車両ハーネス
harness
エレクトロニック
Electronic
コントロール
Control
ユニット Unit
(ECU)
(ECU)
×
×
Splice
スプライス
オスギボシ
Plug
赤色線(電源)
Red wire (power supply)
緑色線(回転信号)
Green wire (rpm signal)
紫色線(ノック信号)
Purple wire (knocking signal)
灰色線(スロットル信号)
Gray wire (throttle signal)
茶色線(アース)
Brown wire (ground)
黒色線(アース)
Black wire (ground)
分岐用ハーネス
Harness
for branching
黄色線(エアフロー・圧力信号出力)
Yellow wire (airflow/pressure signal output)
白色線(エアフロー・圧力信号入力1)
White wire (airflow/pressure signal input 1)
青色線(エアフロー・圧力信号入力2)
Blue wire (airflow/pressure signal input 2)
メスギボシ
Plug
receptacle
! CAUTION
●Be sure to connect the brown wire to the ECU side from the black wire
Failure to do so may cause this product to function improperly, thereby causing damage
to the product and the engine
8
■Installation (cont.)
※For vehicles using the Karman type frequency sensor
Vehicle
車両ハーネス
harness
×
スプライス
Splice
オスギボシ
Plug
メスギボシ
Plug
receptacle
エレクトロニック
Electronic
コントロール
Control
ユニット Unit
(ECU)
(ECU)
赤色線(電源)
Red
wire (power supply)
緑色線(回転信号)
Green
wire (rpm signal)
紫色線(ノック信号)
Purple
wire (knocking signal)
灰色線(スロットル信号)
Gray
wire (throttle signal)
茶色線(アース)
Brown
wire (ground)
黒色線(アース)
Black
wire (ground)
桃色線
Pink
wire(エアフロー信号出力)
(airflow signal output)
橙色線wire
(エアフロー信号入力)
Orange
(airflow signal input)
! CAUTION
●Be sure to connect the brown wire to the ECU side from the black wire
Failure to do so may cause this product to function improperly, thereby causing damage
to the product and the engine
! WARNING
●Mount the SAFC II so that it does not interfere with driving.
Normal driving operations may be prevented, resulting in an accident.
●Do not install the SAFC II in a high-temperature place or in a location where it
may come in contact with water.
An electric shock/fire may be caused. This may cause damage to the product and vehicle.
●When routing the connecting harness of the SAFC II, route the harness
away from moving parts.
The connecting harness may be cut or short-circuited.
The SAFC II will be damaged, thereby causing damage to the vehicle and other electric
parts.
9
●Check points after installation.
After installing the SUPER AFC II, check the following items once again
・Check if the harness attached to the SAFC II is securely connected
・Check if the harness is not routed improperly
・Check if the SAFC II is securely mounted
・Check if the negative (ー) terminal of the battery is securely connected
●Turn on the ignition switch. (Do not start the engine.)
Check the following contents after turning on the ignition switch
・Check if the characters are correctly displayed on the display screen of the SAFC II
If the display of this product is not correct, discontinue use of the product immediately and contact the distributor.
・Check for any abnormal noise or abnormal smell from the SAFC II and the vehicle.
If any abnormal noise or abnormal smell is sensed, discontinue use of this product
immediately and contact the distributor.
●Initial setup
・If no abnormality is found with the ignition switch ON, perform initial setup for the
SAFC II.
・When the engine is ready to start after initial setup, the installation work is completed .
Perform sensor type and sensor number setting, number-of-cylinders setting, throttle sensor
voltage check,
throttle sensor type setting, throttle learning, and knocking signal correction
別冊の取扱説明書の『初期設定』の章P13に基づき、センサタイプ及びセンサナンバー
according の設定、気筒数の設定、スロットルセンサ電圧の確認、スロットルセンサタイプの設定、
to “Initial Setup” on page 13 in the separate Instruction Manual.
スロットル開度の学習、ノッキング信号補正を行います。
! CAUTION
●Do not start the engine under any circumstance before the initial setup is
performed
If the engine is started before initial setup, the engine may be damaged. Set the corresponding items by referring to page 13 in the Chapter pertaining to “Initial Setup” in the
separate Instruction Manual.
! WARNING
●If the engine check lamp illuminates, you must contact a dealer for inspection. If the vehicle is driven at a high speed with the engine warning lamp
ON, the engine may be damaged, leading to an unexpected accident. Do not
drive the vehicle under these conditions.
10
■Installation (cont.)
※For vehicles equipped with multiple knocking signal wires
Connect only the power wire, ground wire, engine rpm signal wire, and throttle signal
wire and proceed to the following operations.
For connecting the knocking signal wire, perform this work separately according to the
following procedure
電源線、アース線、エンジン回転信号線、スロットル信号線の接続
Connect
the power wire, ground wire, engine rpm signal wire, and throttle signal wire
Page
本書P6
6 in this document
エアフローまたは圧力信号線の接続
Connect
the airflow or pressure signal wire
本書P7
Page 7 in this document
Make checks取付終了後の確認
after completion of installation
本書P10
Page 10 in this document
イグニションONにして・・・
With the
ignition switch ON
・SUPER
AFCⅡの画面表示確認
●Check the display
screen of the SAFC II
・SUPER
AFCⅡ及び車両からの異音・異臭などの異常の有無確認
●Check for any abnormal noise or abnormal smell from the SAFC II and the vehicle
本書P10
Page
10 in this document
Perform
sensor type and sensor number setting, number-of-cylinders setting, throttle sensor
別冊の取扱説明書の『初期設定』の章P13に基づき、センサタイプ及びセンサナンバーの
voltage
checking, throttle sensor type setting, and throttle learning according to “Initial
設定、気筒数の設定、スロットルセンサ電圧の確認、スロットルセンサタイプの設定、
Setup”
on page 13 in the separate Instruction Manual
スロットル開度の学習を行います。
After the以上、ノック信号を除いた部分の初期設定が終了し、エンジンの始動ができる状態に
initial setup (except knocking signal correction) is completed and the engine is
ready to なった後で別冊の取扱説明書『その他のモード』章のセンサチェックの項目P52を参照し、
start, check the sensor output value of each knocking sensor signal by referring to
各ノックセンサ信号のセンサ出力値を確認し、出力値が最も高いセンサ信号線に
the sensor
check items on page 52 in the Chapter pertaining to “etc. Mode”. Perform wiring
配線します。出力値に差があまりない場合、回転をアイドリングから2000rpmまで上げて
to the sensor
signal wire with the highest output value. If there is only a small difference
比べて見て下さい。特に差が無い場合はノック信号1に接続して下さい。
among output
values, increase the rpm speed from idling to 2000 rpm. Make a comparison
under this condition. If there is no difference, make a connection to knocking signal 1.
11
■ECU Arrangement Diagram
●Perform installation by referring to the symbols in the corresponding
columns of the tables of applicable models on and after page 14
P
B
C
D
F
E
A
G
A : Lower part of the passenger seat dash side
I
H
K
12
J
B : Left side of the glove box
C : Foot position of the passenger seat
D : Inner part of the glove box
E : Inner part of the center console
F : Under the driver’s seat
G : Under the passenger seat
H : Near the steering column
I : Right side of the meter panel
J : Lower part of the driver’s seat dash side
K : Right side of the center console
L : Engine room
M : Before the rear trunk
N : Behind after the driver’s seat
O : Behind the passenger seat
P : Upper inner part of the center console
■How to Refer to the ECU Terminal
Arrangement Diagram
This ECU terminal arrangement diagram is viewed from the direction of
the arrow.
The direction of the ECU varies depending upon the vehicle. Perform
the installation work after confirming the connector shape and the
number of pins.
! WARNING
●If any abnormal noise or abnormal smell is sensed during the installation work
of this product, stop the work immediately and contact the distributor or your
nearest A’PEX business office
Continuing the installation under such conditions may cause an electric shock or fire causing
damage to electric devices.
13
■Table of Applicable Models (TOYOTA)
Explanation of sensor type indication
Example PR−3
Sensor type
Sensor number
Car name
Car model
Engine model
UCF2#
1UZ−FE
Manufacturing year
ECU position
’97.7∼‘00.7
L
HW−HotWire
PR−Pressure
Remarks
Terminal drawing
Sensortype
T10−e
HW−13
HW−12
‘94.10∼‘97.6
T8−a
CELCIOR
‘92.9∼‘94.9
UCF1#
CROWN
ROYAL
CROWN
ATHLETE
D
1UZ−FE
JZS173
1JZ−GE
JZS171
1JZ−GTE
KR
‘89.11∼‘92.8
T5−f
‘99.9∼‘01.7
T10−a
PR−16
T10−b
HW−23
T10−a
PR−16
T7−b
KR
T10−b
HW−23
T10−a
PR−16
D
T8−b
PR−3
L
T10−e
HW−13
L
‘99.9∼‘01.7
JZS173
1JZ−GE
UZS141
1UZ−FE
JZS171W
1JZ−GTE
CROWN
MAJESTA
CROWN
ESTATE
FL−Flap
KR−Karman
‘91.10∼‘95.7
D
‘99.9∼‘01.7
L
JZS173W
1JZ−GE
JZS14#
2JZ−GE
‘91.10∼‘95.7
JZS161
2JZ−GTE
‘97.8∼※
JZS160
2JZ−GE
‘97.8∼‘00.6
CROWN
2JZ−GTE
ARISTO
JZS147
PR−1
2JZ−GE
SOARER
T7−c
‘91.10∼‘97.7
C
UZS143
IUZ−FE
‘92.10∼‘97.7
UZZ40
3UZ−FE
‘01.4∼※
JZZ30
1JZ−GTE
JZZ31
2JZ−GE
UZZ31
1UZ−FE
PR−3
T7−b
KR
T11−b
HW−25
‘96.8∼‘01.4
T8−d
HW−12
‘91.5∼‘96.7
T8−c
PR−1
T8−b
PR−3
‘94.1∼‘96.7
L
C
‘94.1∼‘95.4
T8−a
‘91.5∼‘93.12
T7−a
‘88.1∼‘91.4
T5−a
KR
MZ20
7M−GTE
T2−b
‘86.1∼‘87.12
D
GZ20
14
‘88.1∼‘91.4
T5−a
‘86.1∼‘87.12
T2−e
1G−GTE
FL−1
Car name
Car model
Engine model
SOARER
GZ20
1G−GE
Manufacturing year
ECU position
Remarks
Terminal drawing
Sensor type
T5−b
‘88.1∼‘91.4
D
PR−3
‘86.1∼‘87.12
T2−d
‘97.8∼‘02.8
T10−c
HW−13
2JZ−GTE
JZA80
C
PR−1
T7−c
‘93.5∼‘97.7
2JZ−GE
PR−3
JZA70
1JZ−GTE
‘90.8∼‘93.4
T6−a
‘88.9∼‘90.7
T5−a
MA70
7M−GTE
‘86.2∼‘88.8
T2−b
PR−1
KR
SUPRA
‘88.8
PR−1
Including TURBO A
D
T5−a
‘88.9∼‘93.4
1G−GTE
FL−1
‘86.2∼‘88.8
T2−e
‘88.9∼‘93.4
T5−b
‘86.2∼‘88.8
T2−d
GA70
1G−GE
JZX110
PR−3
1JZ−GTE
MARK II
T10−b
HW−23
T10−a
PR−16
T10−b
HW−23
T10−a
PR−16
‘00.10∼※
JZX115
1JZ−GE
L
MARK II
BLID
JZX110W
1JZ−GTE
‘02.1∼※
JZX115W
1JZ−GE
MCV20W
1MZ−FE
T10−f
‘99.8∼‘02.1
MARK II
QUALIS
‘97.5∼‘99.7
E
MCV21W
HW−13
T8−f
2MZ−FE
‘97.5∼‘02.1
1JZ−GTE
‘01.7∼※
MCV25W
VEROSSA
JZX110
JZX100
1JZ−GTE
L
T10−b
HW−23
‘96.9∼‘01.7
T8−d
HW−12
‘94.9∼‘96.8
T8−e
‘92.10∼‘94.8
T8−c
PR−1
JZX90
E
1JZ−GE
MARK II
CRESTA
CHASER
JZX91
‘92.10∼‘96.8
T6−a
‘94.9∼‘96.8
T8−d
‘92.10∼‘94.8
T8−b
‘90.8∼‘92.9
T6−a
PR−3
2JZ−GE
1JZ−GTE
JZX81
PR−1
1JZ−GE
PR−3
D
1G−GTE
GX81
T5−a
FL−1
T5−b
PR−3
‘88.8∼‘92.9
1G−GE
15
Car name
Car model
Engine model
Manufacturing year
SW20
3S−GE
SW20Ⅲ~Ⅴ
SW20Ⅲ,Ⅳ
Remarks
Terminal drawing
Sensor type
‘97.12∼‘99.10
T9−b
HW−13
3S−GTE
‘93.10∼‘99.10
T5−c
PR−2
3S−GE
‘93.10∼‘97.11
T6−b
PR−3
‘89.10∼‘91.11
T5−b
ECU position
3S−GTE
MR2
FL−2
‘91.12∼‘93.9
T5−c
M
SW20Ⅰ,Ⅱ
‘89.10∼‘91.11
T5−b
‘91.12∼‘93.9
T5−c
4A−GZE
‘86.8∼‘89.9
T2−a
FL−3
4A−GE
‘84.6∼‘89.9
T1−a
PR−3
T9−b
HW−24
PR−2
3S−GE
PR−3
AW11
ZZT230
1ZZ−FE
ZZT231
2ZZ−GE
ST205
3S−GTE
‘94.2∼‘99.8
T5−c
3S−GE
‘93.10∼‘97.11
T6−b
‘99.9∼※
L
M/T
T4−f
A/T
T5−g
M/T
T4−a
‘96.6∼‘99.8
ST202
ST203
PR−3
3S−FE
CELICA
‘95.8∼‘96.5
A/T
E
T5−c
‘93.10∼‘95.7
‘91.9∼‘93.9
ST185
3S−GTE
ST182
3S−GE
ST165
3S−GTE
FL−2
‘89.10∼‘91.8
T5−b
‘89.10∼‘93.9
T5−c
T2−a
FL−2
‘85.8∼‘89.9
ST162
3S−GE
3S−GE
PR−3
T2−c
T6−b
‘94.1∼‘98.7
M/T
T4−f
A/T
T5−g
M/T
T4−a
With A/T TRC
T6−b
Without A/T TRC
T5−c
With TRC
T6−b
Without TRC
T5−c
‘96.6∼‘98.7
CURREN
ST206
ST207
E
3S−FE
‘95.10∼‘96.5
PR−3
‘94.1∼‘95.9
16
Car name
Car model
Engine model
Manufacturing year
3S−GE
‘93.10∼‘98.4
ECU position
Remarks
Terminal drawing
Sensor type
T6−b
M/T
T4−f
A/T
T5−g
M/T
T4−a
With A/T TRC
T6−b
Without A/T TRC
T5−c
With TRC
T6−b
Without TRC
T5−c
‘96.6∼‘98.4
CARINA ED
CORONA
EXIV
ST202
ST203
E
3S−FE
‘95.8∼‘96.5
PR−3
‘93.10∼‘95.7
ST246W
3S−GTE
PR−2
T11−c
‘02.9∼※
ZZT241W
1ZZ−FE
ST215W
3S−GTE
ST215G
HW−24
T9−a
PR−2
‘97.8∼‘02.8
3S−FE
T5−d
ST210G
ST195G
3S−GE
T6−b
‘95.2∼‘97.7
‘96.1∼‘97.7
M/T
T4−f
2WD・A/T
T5−e
4WD・A/T
T5−g
FF・With TRC
T6−b
FF・Without TRC
T5−C
4WD・M/T
T4−a
4WD・A/T
T5−c
FF・A/T
T6−c
4WD・M/T
T4−a
4WD・A/T
T5−c
D
CALDINA
ST195G
ST191G
3S−FE
‘92.11∼‘94.1
ST190G
4S−FE
PR−3
‘94.2∼‘95.12
M/T
T4−e
A/T
T5−a
M/T
T4−b
A/T
T5−b
M/T
T4−b
A/T
T5−c
‘92.11∼‘97.7
FL−4
4A−GE
AE101
COROLLA
FX
‘92.5∼‘95.4
4A−FE
E
PR−3
AE92
‘89.5∼‘92.4
T4−a
‘87.5∼‘89.4
T1−a
4A−GE
17
Car name
Car model Engine model
Manufacturing year
ECU position
Remarks
4A−GE
AE111
4A−FE
Terminal drawing
Sensor type
T5−b
PR−3
‘95.5∼‘00.9
5A−FE
T4−b
M/T
4A−GE
COROLLA
SPRINTER
FL−4
E
AE101
A/T
T5−b
M/T
T4−b
A/T
T5−c
‘91.6∼‘95.4
4A−FE
PR−3
AE92
‘89.5∼‘91.5
T4−b
‘87.5∼‘89.4
T1−a
4A−GE
4A−GE
AE111
4A−FE
T5−b
PR−3
‘95.5∼‘00.9
T4−b
5A−FE
4A−GZE
T5−b
M/T
T4−b
A/T
T5−b
M/T
T4−b
A/T
T5−c
4A−GE
AE101
PR−1
FL−4
‘91.6∼‘95.4
E
LEVIN
TRUENO
4A−FE
PR−3
‘89.5∼‘91.5
T5−b
PR−1
‘87.5∼‘89.4
T2−a
FL−3
‘89.5∼‘91.5
T4−a
‘87.5∼‘89.4
T1−a
4A−GZE
AE92
4A−GE
AE86
4A−GE
‘83.5∼‘87.4
A
T1−c
M/T
T4−b
A/T
T5−b
M/T
T4−b
A/T
T5−c
M/T
T9−c
A/T
T10−d
4A−GE
CERES
MARINO
AE101
FL−4
‘92.5∼‘95.4
E
4A−FE
ALTEZZA
ALTEZZA
GITA
MRーS
SXE10
3S−GE
PR−3
PR−3
‘98.10∼※
L
HW−15
JCE10W
2JZ−GE
‘01.7∼※
L
1ZZ−FE
‘99.10∼※
O
T10−b
HW−24
T9−b
HW−24
JCE15W
ZZW30
18
Including
Sequential M/T
Car name
Car model Engine model
4E−FTE
Manufacturing year
ECU position
4E−FTE
M/T
T4−d
A/T
T4−c
Sensor type
PR−1
D
T3−b
‘96.1∼‘97.12
M/T
‘89.12∼‘95.11
STARLET
Terminal drawing
‘96.1∼‘99.7
EP91
4E−FE
Remarks
PR−3
T3−a
T4−b
‘92.1∼‘95.11
EP82
PR−1
A/T
T3−a
‘89.12∼‘91.12
E
4E−FE
‘89.12∼‘95.11
T3−c
‘86.1∼‘89.11
T1−b
PR−3
2E−TE
EP71
PR−1
2E−E
PR−3
ZCA25W
1ZZ−FE
‘00.5∼※
D
T9−b
HW−24
ZCA26W
SXA1#G
M/T
T4−f
A/T
T5−g
3S−FE
‘97.9∼‘00.4
SXA11W
3S−GE
RAV4
SXA10W
T5−c
‘96.8∼‘00.4
E
SXA11G
PR−3
M/T
T4−a
A/T
T5−c
M/T
T4−a
A/T
T5−c
‘95.4∼‘97.8
3S−FE
SXA10G
NCP13
‘94.5∼‘97.8
‘02.8∼※
T11−c
‘00.10∼‘02.7
T6−d
1NZ−FE
T11−c
‘02.8∼※
VITZ
NCP10
D
HW−24
‘00.10∼‘02.7
T6−d
‘02.8∼※
T11−c
‘00.10∼‘02.7
T6−d
2NZ−FE
NCP15
NCP21
1NZ−FE
NCP25
NCP20
T6−d
2NZ−FE
FUN CARGO
‘99.8∼※
HW−24
P
NCP21
1NZ−FE
NCP25
NCP20
With
Steermatic
T9−d
2NZ−FE
19
Car name
Car model
Engine model
ZZE12#
1ZZ−FE
NZE121
Manufacturing year
ECU position
Remarks
Terminal drawing
Sensor type
T11−c
‘02.9∼※
1NZ−FE
NZE124
D
COROLLA
ZZE12#
HW−24
1ZZ−FE
NZE121
T9−b
‘00.8∼‘02.8
1NZ−FE
T6−d
ZZE123G
2ZZ−GE
T10−g
ZZE122G
1ZZ−FE
NZE124
M/T
A/T
‘02.9∼※
NZE121G
COROLLA
FIELDER
T9−b
T11−c
1NZ−FE
NZE124G
D
ZZE123G
2ZZ−GE
ZZE122G
1ZZ−FE
HW−24
T10−g
T9−b
‘00.8∼‘02.8
NZE121G
1NZ−FE
T6−d
2ZZ−GE
T10−g
NZE124G
ZZE123
NZE121
‘02.9∼※
1NZ−FE
COROLLA
RUNX
ALEX
T11−c
NZE124
D
ZZE123
2ZZ−GE
NZE121
HW−24
T10−g
‘01.1∼‘02.8
1NZ−FE
T6−d
NZE124
ZZE122N
COROLLA
SPACIO
1ZZ−FE
ZZE124N
T9−b
‘01.5∼※
D
HW−24
NZE121N
1NZーFE
T6−d
ZZE128
2ZZ−GE
T10−g
ZZE127
WILL VS
‘01.4∼※
D
1ZZ−FE
HW−24
T9−b
ZZE129
NCP75
1NZ−FE
NCP70
2NZ−FE
ZZT240
1ZZ−FE
NZT240
1NZ−FE
WILL
CYPHA
ALLION
20
‘02.10∼※
D
T11−c
HW−24
‘01.12∼※
B
T11−c
HW−24
Car name
Car model
Engine model
NCP12
1NZ−FE
NCP16
2NZ−FE
SCP11
1SZ−FE
NCP12
1NZ−FE
NCP16
2NZ−FE
SCP11
1SZ−FE
NCP30
2NZ−FE
Manufacturing year
ECU position
Remarks
Terminal drawing
T11−c
‘02.8∼※
HW−24
E
PLATZ
Sensor type
‘99.8∼‘02.7
T6−d
‘02.8∼※
T11−c
NCP35
NCP31
1NZ−FE
NCP34
D
bB
NCP30
HW−24
2NZ−FE
NCP35
‘00.2∼‘02.7
T6−d
NCP31
1NZ−FE
NCP34
‘01.6∼‘02.7
NCP61
1NZ−FE
NCP60
2NZ−FE
ZNE1#G
1ZZ−FE
ZZE137
2ZZ−GE
ist
WISH
VOLTZ
ZZE138
‘02.5∼※
D
T11−c
HW−24
‘03.1∼※
A
T11−c
HW−24
‘02.8∼※
D
T11−c
HW−24
1ZZ−FE
ZZE136
OPA
ZCT1#
1ZZ−FE
‘00.8∼‘02.5
D
T9−b
HW−24
WINDOM
MCV30
1MZ−FE
‘01.8∼※
B
T11−a
HW−13
ESTIMA
MCR#0W
1MZ−FE
‘00.1∼※
D
T10−f
HW−15
ALPHARD
MNH1#W
1MZ−FE
‘02.5∼※
D
T10−f
HW−15
21
■ECU Terminal Arrangement Table (TOYOTA)
rpm 1
rpm 2
Ground
Throttle signal
Pressure signal
Ground
IG power
※Without knocking signal
Knocking signal
IG power
※Without throttle signal
rpm 1
rpm 1
Airflow signal
Pressure signal
Ground
rpm 2
rpm 1
rpm 2
Pressure signal
IG power
rpm 2
Ground
Throttle signal
IG power
Knocking signal
※Without knocking signal and throttle signal
rpm 1
rpm 2
Ground
Throttle signal
Knocking signal 2
Knocking signal 1
IG power
Airflow signal
rpm 1
Airflow signal
rpm 2
Ground Throttle signal
IG power
※Without knocking signal
rpm 2
Ground
Throttle signal Pressure signal
IG power
rpm 2
※Without knocking signal
rpm 1
Ground
Knocking signal
※Without throttle signal
Ordinary connection : rpm 1
Multiple connection : rpm 2
22
Knocking signal 1
Ground
IG power
Knocking signal 2
※Without throttle signal
rpm 1
Pressure signal
rpm 2
Airflow signal
rpm 1
rpm 1
IG power
Ground
Knocking signal
Pressure signal
Throttle signal
rpm 2
IG power
rpm 1
Ground
Pressure signal
rpm 2
rpm 1
IG power
pressure signal
Knocking signal
rpm 2
Ground
IG power
Throttle signal
※Without knocking signal and throttle signal
Airflow signal
/pressure signal
rpm 1
Ground
rpm 2
Throttle signal IG power
Knocking signal
rpm 1
Ground
IG power
rpm 2
Ground
rpm 1
Ground
Knocking signal
rpm 2
Ground
Knocking signal
rpm 2
IG power
Pressure signal
Throttle signal
IG power
rpm 1
rpm 2
Knocking signal 1
Ground
Knocking signal 2
rpm 2
Knocking signal
Ground
Throttle signal
Airflow signal
/pressure signal
IG power
rpm 1
rpm 2
Airflow signal
IG power
Throttle signal
rpm 1
Pressure signal
※Without throttle signal
※Without throttle signal
rpm 1
IG power
Throttle signal
Knocking signal
Pressure signal
Knocking signal
Pressure signal
rpm 1
Turbo A pressure signal
Airflow signal/pressure signal
Ground
Throttle signal
Knocking signal
Ordinary connection : rpm 1
Multiple connection : rpm 2
23
IG power
rpm 1
rpm 2
Pressure signal
Ground
Knocking signal
Throttle signal
rpm 2
Knocking signal
rpm 1
IG power
Knocking signal 1
Knocking signal 2
rpm 1
Pressure signal
Airflow signal
Ground
rpm 2
Knocking signal
Throttle signal
rpm 2 Knocking signal
Ground
rpm 1
Throttle signal
Ground
24
Pressure signal
Throttle signal
Knocking signal 2
IG power
Knocking signal
rpm 1
IG power Ground
Airflow signal
Throttle signal
Ordinary connection : rpm 1
Multiple connection : rpm 2
rpm 1
IG power
Pressure signal
Throttle signal
Knocking signal
IG power
Pressure signal
Ground
rpm 2
Ground
Throttle signal
IG power
rpm 2 Knocking signal 1
rpm 1
Pressure signal
rpm
IG power
rpm 2
Pressure signal
Throttle signal
IG power
rpm 2
Knocking
signal 1
rpm 1
rpm 2
Ground
Knocking signal 2
Airflow signal Throttle signal IG power
Knocking
signal 1
rpm 1
Ground
Knocking
signal 2
rpm 1
Throttle signal
Pressure signal
Knocking
signal 1
rpm 2
Knocking signal 2
Ground
Throttle signal
Airflow signal
Knocking signal 1
Airflow signal
rpm 1
IG power
rpm 2
Throttle signal
IG power
IG power
Ground
Knocking signal 2
Knocking signal 1
rpm 1
Pressure signal
Throttle signal
Knocking signal 2
rpm 2
rpm 2
Ground
IG power
Knocking
signal 1 Airflow signal/pressure signal
rpm 1
Ground
Knocking signal 2
Throttle
signal
Knocking
signal 2
Knocking signal 1
IG power
rpm 2
Knocking signal 1
rpm 1
pressure signal
Throttle signal
Ground
IG power
Knocking signal 2
rpm 1
rpm 2
Ground
Pressure
signal
Throttle
signal
IG power
Airflow signal
Throttle signal
Knocking signal 2
Knocking signal 1
Ground
rpm
Knocking signal
IG power
Throttle signal
pressure signal
Ground
rpm
IG power
Ordinary connection : rpm 1
Multiple connection : rpm 2
25
Knocking signal
Airflow signal
Knocking signal
Throttle signal
Ground
Ground
rpm
IG power
Airflow signal
Knocking signal 2 Throttle signal
Knocking signal
rpm
IG power
Airflow signal
Knocking signal 1
rpm
Ground
IG power
Airflow signal
Throttle signal
Knocking signal 1
Knocking signal 2
Throttle signal
26
Throttle signal
Knocking signal 1
Throttle signal
Knocking signal
Airflow signal
rpm
Knocking signal 1
Knocking
signal 2
rpm
Knocking signal
IG power
IG power
Throttle
signal
Ground
rpm
IG power
Airflow signal
Throttle
signal
IG power Knocking signal 2
Airflow signal
Ground
Throttle signal
rpm
rpm
Pressure signal
Knocking signal 2
Knocking signal 1
Ground
Ground
Ground
IG power
Airflow signal
Ground
rpm
IG power
Airflow signal
Throttle signal
Ground
rpm
IG power
Knocking signal 1
Throttle signal
Knocking signal 2
Ground
IG power
Airflow signal
Ground Knocking signal 2 Knocking signal 1
Throttle signal
rpm
rpm
IG power
Airflow signal
Ground
Throttle signal
Knocking signal
rpm
IG power
Airflow signal/pressure signal
27
■Table of Applicable Models (NISSAN)
Explanation of sensor type indication
Example PR−3
Sensor type
Sensor number
Car name
Car model
Engine model
Manufacturing year
ECU position
PRESIDENT
G50
VH45DE
‘90.10∼※
INFINITY
Q45
G50
VH45DE
CIMA
HF50
VQ30DET
FGY33
VH41DE
HW−HotWire
PR−Pressure
Remarks
FL−Flap
KR−Karman
Terminal drawing
Sensor type
A
N4−c
HW−1
‘89.11∼‘97.9
A
N4−c
HW−1
‘01.2∼※
D
N8ーc
HW−17
N10−a
HW−1
N5−a
HW−4
N6−a
HW−1
N5−a
HW−4
N4−c
HW−1
‘93.9∼‘96.5
N4−d
HW−4
‘89.8∼‘91.7
N4−h
‘98.10∼‘00.12
FHY33
VQ30DET
A
CIMA III
FGY33
VH41DE
‘96.6∼‘98.9
FHY33
VQ30DET
FGY32
VH41DE
‘91.8∼‘96.5
A
CIMA II
FPY32
VG30DET
VG30DET
VG30DE
FPY31
CIMA I
A
HW−4
VG30DET
N2−a
‘88.1∼‘89.7
VG30DE
Z33
VQ35DE
‘02.7∼※
D
N11−d
HW−26
‘89.7∼‘00.8
C
N3−d
HW−2
VG30DETT
FAIRLADY Z
Z32
VG30DE
VQ25DE
Y33
‘97.10∼‘99.6
VQ30DET
N5−a
‘96.3∼‘99.6
VQ30DE
A
LEOPARD
HW−4
VG30DET
UF31
N4−f
VG30DE
LEOPARD J
FERIE
GF31
VG20DET
JGBY32
VH41DE
‘88.8∼‘92.5
N2−a
‘92.6∼‘96.2
JPY32
28
VG30DE
N4−c
HW−1
N4−g
HW−4
A
Car name
Car model Engine model
Y34
Manufacturing year
ECU position
‘99.6∼※
D
Remarks
Terminal drawing
Sensor type
N8−c
HW−18
VQ30DET
Y33
N5−a
‘95.6∼‘99.5
VQ30DE
CEDRIC
GLORIA
VG30DET
Y32
‘91.6∼‘95.5
A
N4−g
HW−4
VG30DE
VG20DET
Y31
‘89.6∼‘91.5
N4−e
‘01.1∼※
N8−a
‘98.12∼‘00.12
N8−b
VG20E
A33
VQ20DE
HW−17
VQ30DE
N6−c
VQ25DE
‘97.1∼98.12
E
M/T
N3−d
A/T
N6−c
VQ20DE
A32
CEFIRO
VQ30DE
HW−4
VQ25DE
‘94.8∼‘96.12
N4−a
RB20DET
‘88.9∼‘94.7
N4−i
RB25DE
‘92.5∼‘94.7
RB20DE
‘88.9∼‘94.7
VQ20DE
A31
A
N4−a
N4−i
VQ30DE
CEFIRO
WAGON
W#A32
VQ25DE
‘97.1∼‘00.8
E
N6−c
HW−4
VQ20DE
RB25DET
C35
RB25DE
N6−b
‘97.6∼※
RB20DE
RB25DET
‘94.1∼‘97.5
A
LAUREL
C34
HW−4
RB25DE
‘93.1∼‘97.5
RB20DE
N4−c
RB20DET
C33
‘89.1∼‘92.12
RB20DE
CPV35
SKYLINE
PV35
N11−d
‘03.2∼※
VQ35DE
D
‘02.2∼※
HW−26
N8−c
29
Car name
Car model
Remarks
Sensor type
Engine model
Manufacturing year
RB26DETT
‘99.1∼‘02.8
N4−b
HW−3
RB25DET
‘98.5∼‘01.5
N6−b
HW−4
RB26DETT
‘95.1∼‘98.12
N4−b
HW−3
N4−c
HW−4
N4−b
HW−3
ECU position
Terminal drawing
R34
RB25DET
‘96.1∼‘98.4
R33
RB25DE
RB25DET
‘93.8∼‘95.12
A
RB25DE
SKYLINE
RB26DETT
‘89.8∼‘94.12
RB25DE
‘91.8∼‘93.7
R32
RB20DET
N4−c
‘89.5∼‘93.7
RB20DE
HW−4
RB20ET
R31
N1−a
‘87.8∼‘89.5
RB20E
NM35
VQ25DET
‘01.10∼※
D
N8−c
HW−18
‘96.8∼‘01.10
A
N6−b
HW−4
‘97.10∼‘01.10
A
N4−b
HW−3
RB25DET
STAGEA
W#C34
RB25DE
STAGEA
AUTECH
Ver.260RS
WGNC34
RB26DETT
2WD
N9−a
QG18DE
BLUEBIRD
SYLPHY
G10
‘00.8∼※
L
4WD
HW−18
N7−a
QG15DE
SR20VE
U14
HW−14
‘97.9∼‘01.7
SR20DE
‘96.1∼‘01.7
Except the
SR18DE
Lean Burn
SR20DET
U13
BLUEBIRD
SR20DE
N3−a
‘91.9∼‘95.12
HW−6
E
SR18DE
SR20DET
‘89.10∼‘91.8
SR20DE
U12
CA18DET
‘87.9∼‘89.9
CA18DE
30
N3−d
HW−7
Car name
Car model Engine model
S15
Manufacturing year
ECU position
Remarks
Terminal drawing
Sensor type
‘99.1∼‘02.7
N3−a
SR20DET
S14
HW−5
‘96.6∼‘98.12
N3−d
‘93.10∼‘96.5
SR20DE
N3−a
‘93.10∼‘98.12
A
SILVIA
SR20DET
PS13
N3−b
HW−6
‘91.1∼‘93.9
SR20DE
N3−a
CA18DET
S13
‘88.5∼‘91.1
N3−d
‘96.8∼‘99.1
N3−a
HW−7
CA18DE
SR20DET
RPS13
SR20DE
HW−6
A
180SX
RS13
SR20DET
‘91.1∼‘96.7
N3−b
CA18DET
‘89.3∼‘90.12
N3−d
SR16VE
‘97.9∼‘00.8
SR18DE
‘95.1∼‘00.8
Except the N1
specification
N15
PULSER
HW−7
E
HW−6
HW−14
N3−a
SR20DET
N14
HW−5
‘90.8∼‘94.12
SR18DE
HW−6
N11−c
‘02.5∼※
QR20DE
P12
HW−18
‘01.1∼‘02.4
D
N8−d
‘01.8∼※
HW−21
‘97.9∼‘01.1
HW−14
SR20VE
PRIMERA
P11
SR20DE
‘95.9∼‘01.1
SR18DE
E
N3−a
HW−6
SR20DE
‘90.2∼‘95.8
SR18DE
‘92.9∼‘95.8
P10
N11−c
‘02.5∼※
QR20DE
W#P12
HW−18
‘01.1∼‘02.4
D
N8−d
HW−21
‘01.8∼※
PRIMERA
WAGON
SR20VE
HW−14
W#P11
SR20DE
‘97.9∼‘01.1
E
N3−a
HW−6
SR18DE
31
Car name
Car model
Engine model
Manufacturing year
ECU position
Remarks
Terminal drawing
HW−5
SR20DET
W11
‘98.8∼‘00.4
SR20DE
AVENIR
W10
Sensor type
HW−6
SR20DET
‘95.8∼‘98.7
SR20DE
‘90.5∼‘98.7
SR18DE
‘93.1∼‘98.7
D
N3−a
HW−5
HW−6
B14
‘94.1∼‘98.9
SR18DE
SUNNY
B13
B13
NX COUPE
E
N3−a
HW−6
‘90.1∼‘93.12
E
N3−a
HW−6
‘02.3∼※
L
N11−b
PR−11
‘92.1∼‘02.2
E
N3−c
HW−9
‘90.1∼‘93.12
SR18DE
CR14DE
K12
CR12DE
A/T
CR10DE
MARCH
CG13DE
K11
CG10DE
Z11
CR14DE
‘02.10∼※
L
N11−b
PR−11
Z10
CG13DE
‘98.2∼‘02.9
C
N3−c
HW−9
TERRANO
YD21
VG30E
‘89.10∼‘95.8
F
N3−a
HW−6
QR20DE
‘00.11∼※
XーTRAIL
T30
B
N8−d
CUBE
SR20VET
‘01.2∼※
HW−18
HW−19
WINGROAD
Y11
QR20DE
‘01.10∼※
E
N8−d
HW−18
ELGRAND
E51
VQ35DE
‘02.5∼※
L
N11−a
HW−18
BASSARA
JHU30
VQ30DE
‘01.8∼※
E
N8−a
HW−18
32
■ECU Terminal Arrangement Table (NISSAN)
rpm
IG power
Ground
Knocking
signal 6
Airflow signal
Knocking signal
rpm
Knocking signal 1
Knocking
signal 2
Knocking signal 3
IG power
Airflow signal
Airflow signal
Airflow signal
rpm
Ground
Knocking signal
Throttle signal
rpm
Ground
※Without throttle signal
※Knocking signal 2 to 6 : For FPY31 only
※Without throttle signal
rpm
Knocking signal 5
Knocking signal 4
Airflow signal
Knocking signal
IG power
Ground
Knocking signal (99/11∼)
Throttle signal
Ground
Throttle signal
rpm
Knocking signal
Airflow signal
IG power
Throttle signal
IG power
IG power
Ground
Knocking signal 2
rpm
Knocking signal 1
Knocking signal 1
Airflow signal
Knocking signal 2
IG power
Airflow signal 2
Knocking signal 2
Knocking signal 1
Airflow signal 1
Ground
Throttle signal
rpm
rpm
Throttle signal
IG power
rpm
Airflow signal
Ground
Throttle signal
IG power
Airflow signal
Knocking signal
Throttle signal
33
Ground
Ground
IG power
rpm
Airflow signal
Ground
IG power
Knocking signal
Knocking signal 1 ・ 2 ・ 3
rpm
Airflow signal
Knocking signal 4 ・ 5 ・ 6
※Without throttle signal
IG power
Throttle signal
rpm
rpm
Knocking signal 1 ・ 2 ・ 3
Airflow signal
Airflow signal
Ground
Knocking signal 1 ・ 2 ・ 3
Knocking signal 4 ・ 5 ・ 6
IG power
Ground
IG power
Knocking signal 4 ・ 5 ・ 6
Ground
Throttle signal
※Without throttle signal
Knocking signal 1 Knocking signal 2
rpm
Airflow signal
Throttle signal
rpm
Airflow signal
34
Knocking signal 2
Throttle signal Ground
Knocking signal
Throttle signal
IG power
Knocking signal
IG power
Ground
IG power
Knocking signal 1 IG power
Throttle signal Ground
Airflow signal
rpm
rpm
Ground
Airflow signal
rpm
Throttle signal
Ground
Airflow signal
Knocking signal 1
IG power
Knocking
signal 2
rpm
Ground
Airflow signal
IG power
Throttle signal
Airflow signal
Knocking
signal
rpm
Ground
IG power
rpm
Knocking signal
rpm
Ground
Knocking signal
Knocking
signal
Throttle signal
Throttle signal
Airflow signal
IG power
Airflow signal
IG power
Throttle signal
Ground
Throttle signal
Ground
rpm
Airflow signal
IG power
Knocking signal
IG power
Ground
rpm
Knocking signal 2
Airflow signal
Knocking
Throttle signal
signal 1
Knocking signal
Pressure signal
rpm
Throttle signal
IG power
Ground
IG power
Airflow signal
rpm
Ground
Knocking
signal
rpm
Knocking signal
Airflow signal
IG power
Ground
Throttle signal
rpm
Knocking signal
Airflow signal
Throttle signal
Throttle signal
35
IG power
Ground
IG power
Knocking signal
Airflow signal
rpm
36
Throttle signal
Ground
■Table of Applicable Models (HONDA)
Explanation of sensor type indication
Example PR−3
Sensor type
Sensor number
Car name
Car model
Engine model
Manufacturing year
NA2
C32B
‘97.2∼※
ECU position
HW−HotWire
PR−Pressure
Remarks
FL−Flap
KR−Karman
Terminal drawing
Sensor type
H3−f
NSX
‘95.3∼※
NA1
N
C30A
H3−a
‘90.9∼‘95.2
KA9
LEGEND
C35A
KA8
‘96.2∼※
‘90.12∼‘96.1
C
H3−a
E
H7−b
C32A
KA7
‘90.10∼‘96.1
UA5
J32A
UA4
J25A
UA2
G25A
UA1
G20A
CC2
G25A
‘92.1∼‘95.1
H3−d
CB5
G20A
‘89.10∼‘91.12
H3−b
‘96.12∼‘00.9
H6−a
‘98.10∼※
INSPIRE
H3−c
‘95.2∼‘98.9
C
PR−6
BB6
BB8
H22A
PRELUDE
C
BB1
With TRC
H3−e
Without TRC
H2−b
‘91.9∼‘96.11
BB4
ACCORD
EURO R
CL1
H22A
‘00.6∼‘02.11
E
CL3
F20B
‘00.6∼‘02.9
E
CF3
F18B
CF4
F20B
ACCORD
A/T
H8−b
M/T
H8−a
H7−a
‘97.9∼‘00.6
C
CD5
H8−a
F22B
A/T
H8−b
M/T
H8−a
H2−a
‘93.9∼‘97.8
CD6
H22A
H2−b
37
Car name
Car model Engine model
CH9
Manufacturing year
ECU position
Remarks
Terminal drawing
A/T
H8−b
M/T
H8−a
A/T
H8−b
M/T
H8−a
Sensor type
‘99.1∼‘02.10
H23A
CL2
ACCORD
WAGON
‘00.6∼‘02.10
C
CF6
F23A
‘97.10∼‘02.10
CE1
F22B
‘94.3∼‘97.9
CB9
F22A
‘91.3∼‘94.2
CL1
H22A
‘00.6∼‘02.11
CL3
F20B
‘00.6∼‘02.9
H7−a
CF7
H2−a
TORNEO
EURO R
TORNEO
CF3
F18B
CF4
F20B
E
A/T
H8−b
M/T
H8−a
E
‘97.9∼‘00.6
S2000
H8−a
H7−a
A/T
H8−b
M/T
H8−a
AP1
F20C
‘99.4∼※
A
H8−a
DC5
K20A
‘01.7∼※
D
H9−a
M/T
H6−a
A/T
H3−e
M/T
H2−b
A/T
H3−e
‘95.9∼‘01.6
INTEGRA
DC2
DB8
(including the
98 specification)
B18C
A
‘93.5∼‘95.8
DA6
B16A
‘89.4∼‘93.5
H1−a
EP3
K20A
‘01.12∼※
H9−a
EU1
Except the
D15B
D
EU2
Lean Burn
‘00.9∼※
H9−b
‘00.8∼‘00.9
H8−c
‘98.9∼‘00.7
H8−b
EU3
D17B
EU4
CIVIC
EK9
B16B
‘97.6∼‘98.8
EK4
38
A
H6−a
‘98.9∼‘00.7
H7−a
‘95.9∼‘98.8
H6−a
B16A
PR−6
Car name
CIVIC
Car model
Engine model
EK3
D15B
EG6
Manufacturing year
ECU position
H7−a
‘95.9∼‘98.8
H6−a
EF9
B16A
EG2
B16A
Sensor type
H2−b
A
‘91.9∼‘95.8
D15B
Terminal drawing
‘98.9∼‘00.7
B16A
EG4
Remarks
Except the
Carburetor
H2−a
H1−a
‘89.9∼‘91.8
A
H2−b
B
H2−a
‘92.3∼‘95.10
CRーX
EG1
D15B
EF8
B16A
‘89.9∼‘92.2
C
H1−a
K20A
‘01.9∼※
D
H9−a
B20B
‘97.10∼‘01.8
A
RD4
RD5
CRーV
RD2
H8−b
RD1
RA9
RA8
H3−b
H7−b
‘00.8∼※
J30A
‘00.1∼※
E
RA7
H8−b
F23A
‘99.12∼※
PR−6
RA6
ODYSSEY
RA5
J30A
RA4
H6−b
‘97.10∼‘99.12
F23A
H8−b
RA3
C
RA2
F22B
H2−a
‘94.10∼‘97.9
RA1
SーMX
RH2
RH1
H8−b
‘99.9∼‘02.1
B20B
E
‘96.11∼‘99.8
H3−b
‘01.4∼※
H9−a
RF4
K20A
RF3
STEP
WAGON
H8−b
‘99.5∼‘01.3
RF2
C
‘96.5∼‘99.4
H3−b
‘99.5∼‘01.3
H8−b
‘96.5∼‘99.4
H3−b
B20B
RF1
Z
PA1
E07Z
‘98.10∼ ‘02.1
T/C
H5−b
NA
H4−b
N
39
Car name
Car model
Engine model
E07Z
LIFE
JB2
JB1
JA4
E07A
‘97.4∼‘98.10
G
H4−a
E07Z
‘00.12∼※
A
H5−c
A
H5−a
E
H9−a
Manufacturing year
ECU position
Remarks
Terminal drawing
Sensor type
H5−c
‘00.12∼※
A
H5−d
‘98.10∼‘00.11
JB4
LIFE DUNK
JB3
GA6
GA4
CAPA
‘99.10∼‘02.1
D15B
GA4
RN4
RN3
STREAM
‘98.4∼‘99.9
K20A
‘01.1∼※
D17A
‘00.10∼※
L15A
‘02.9∼※
RN2
RN1
GD4
PR−6
GD3
E
H9−b
‘02.12∼※
E
H9−b
FIT
GD2
‘01.7∼※
L13A
GD1
‘01.6∼※
GD9
L15A
GD8
FIT ARIA
GD7
L13A
GD6
THAT’S
JD2
JD1
E07Z
‘02.2∼※
D
H5−c
MOBILIO
GB2
GB1
L15A
‘01.12∼※
B
H9−b
MOBILIO
SPIKE
GK2
GK1
L15A
‘02.9∼※
B
H9−b
40
■ECU Terminal Arrangement Table (HONDA)
IG power
Pressure signal
Knocking signal
rpm
Ground
rpm
IG power
Throttle signal
※SOHC E/g no knocking signal is available
rpm IG power Knocking signal Pressure signal
※Without knocking signal
Knocking signal 2
IG power
rpm
Ground
Throttle signal
Pressure signal
rpm
Throttle signal
Pressure signal
IG power
Throttle signal
Ground
Ground
Ground
Pressure signal
Throttle signal
Knocking signal 1
Knocking signal 1 Pressure signal
IG power
rpm Ground Knocking signal 2 Throttle signal
※Without knocking signal
IG power
rpm
Ground
IG power
Ground
Knocking signal 1
Knocking signal 2
Knocking signal 2
rpm
Knocking signal
Pressure signal
IG power
Throttle signal
rpm Ground
Pressure signal
Knocking signal 1
Pressure signal
Pressure signal
Throttle signal
IG power
Throttle signal
Ground
rpm
Throttle signal
※Without knocking signal
41
Throttle signal
IG power
rpm
Pressure signal
IG power
Ground
Ground
※Without knocking signal
Throttle signal
rpm
※Without knocking signal
rpm
rpm
IG power
Pressure signal
IG power
Pressure signal
Ground
Throttle signal
Ground
Pressure signal
Throttle signal
Knocking
signal
※Without knocking signal
rpm
IG power
Pressure signal
Ground
IG power
Throttle signal Pressure signal
Ground
rpm
Knocking signal
※Without knocking signal and throttle signal
rpm
IG power
Pressure signal
Ground
Throttle signal
rpm
IG power
Ground
Pressure signal
Knocking signal
Throttle signal
※Without knocking signal
rpm
IG power
Ground
42
Knocking
signal
Pressure signal
Throttle signal
rpm
Pressure signal
IG power
Ground
Knocking
signal
Throttle signal
IG power
Pressure signal
Knocking signal
Throttle signal
Ground
rpm
Ground
IG power
Knocking signal
Throttle signal
IG power
Ground
Throttle signal
rpm
Pressure signal
Knocking signal
Pressure signal
rpm
43
■Table of Applicable Models (MITSUBISHI)
Explanation of sensor type indication
Example PR−3
Sensor type
Sensor number
Car name
Car model Engine model
Manufacturing year
ECU position
HW−HotWire
PR−Pressure
Remarks
FL−Flap
KR−Karman
Terminal drawing
Sensor type
M5−a
‘97.8∼‘02.9
F46A
Without MIVEC
‘96.1∼‘97.7
E
6G72
KR
M5−a
‘97.8∼‘02.9
DIAMANTE
M6−a
With MIVEC
M3−b
PR−5
Without MIVEC
M6−a
KR
With MIVEC
M3−b
PR−5
DOHC
M6−a
‘96.1∼‘97.7
F36A
‘95.1∼‘95.12
KR
F17A
‘90.5∼‘94.12
A
M2−a
DIAMANTE
WAGON
F36W
6G7
‘97.10∼‘02.9
E
M6−b
KR
GTO
Z16A
6G72
‘90.10∼‘00.7
E
M2−a
KR
Without MIVE A/T
M6−a
Without MIVE M/T
M2−a
With MIVEC
M3−b
KR
‘97.2∼‘00.7
DE3A
6A12
‘94.10∼‘97.1
PR−5
B
FTO
M3−a
‘96.2∼‘00.7
M2−a
KR
‘94.10∼‘96.1
LEGNUM
GALANT
DE2A
4G93
M3−a
EC5W
6A13
‘96.8∼※
EC5A
6A13
‘96.8∼※
E84A
6A12
‘92.5∼‘96.7
E39A
4G63
‘87.10∼‘92.4
D32A
DOHC T/C
E
DOHC T/C
D27A
M3−a
KR
M3−a
M2−a
B
DOHC
KR
M1−a
M3−a
‘95.6∼‘99.12
4G63
ECLIPSE
E
E
KR
‘89.11∼‘95.6
M1−a
‘00.5∼※
M6−c
EA7A
4G94
EC7A
E
ASPIRE
KR
EA1A
4G93
‘98.8∼‘00.4
4G93
‘92.5∼‘00.5
M3−a
EC1A
LIBERO
CD5W
44
B
M2−a
KR
Car name
Car model Engine model
Manufacturing year
CP9A
‘98.1∼‘01.1
CN9A
‘96.8∼‘97.12
ECU position
Remarks
Terminal drawing
Sensor type
Ⅴ・Ⅵ・TM
M3−a
4G63
CE9A
KR
‘93.10∼‘96.7
M2−a
LANCER
CD9A
CK4A
‘92.10∼‘93.9
B
4G92
MIVEC
M3−b
PR−5
‘95.10∼‘00.5
CM5A
M3−a
4G93
CD5A
KR
M2−a
‘91.10∼‘95.9
CQ5A
4G93
CQ2A
4G15
‘00.2∼‘02.8
M6−c
MIRAGE
DINGO
KR
‘00.1∼‘02.8
CQ1A
4G13
CM5A
4G93
E
‘98.12∼‘99.12
M3−a
‘00.1∼※
M6−d
PR−12
M3−a
KR
T/C
‘95.10∼‘00.5
MIRAGE
CJ4A
B
4G92
CA4A
M3−b
MIVEC
PR−5
‘91.10∼‘95.9
M2−a
‘00.7∼※
M6−e
V75W
A/T
‘99.9∼※
6G74
PAJERO
M6−e
‘00.7∼※
V65W
A
V25W
6G72
N64WG
KR
A/T
‘99.9∼※
V23W
M6−f
M6−f
‘93.7∼‘97.5
M2−a
‘91.1∼‘97.5
M1−a
‘99.10∼‘02.8
C
4G64
N74W
M3−a
‘97.10∼‘02.8
N73W
B
M/T
4G63
A/T
RVR
M6−a
‘99.10∼‘02.8
C
M6−c
‘97.10∼‘02.8
B
M3−a
‘99.10∼‘02.8
C
M6−c
KR
N71W
4G93
N61W
M3−a
‘97.10∼‘02.8
B
N23W
4G63
H81W
3G83
M2−a
‘92.10∼‘97.9
M3−d
‘02.9∼※
ek WAGON
B
ek SPORTS
H81W
3G83
‘02.9∼※
PR−12
M4−a
‘01.10∼‘02.8
B
M3−d
PR−12
45
Car name
Car model Engine model
CU4W
4G64
AIRTREK
Manufacturing year
Remarks
Terminal drawing
E
T/C
M6−e
4G63
M6−a
‘01.6∼※
N86W
N96W
CHARIOT
GRANDIS
6G72
‘99.10∼※
M6−c
‘00.5∼※
N84W
N94W
4G64
H76W
4G93
‘00.7∼※
4G94
‘00.6∼※
CT9A
4G63
‘03.1∼※
CT9A
4G63
C
M3−c
‘97.10∼‘00.4
H67W
H77W
PAJERO io
T/C
D
M5−a
D
M5−a
H62W
H72W
LANCER
EVOLUTION Ⅷ
M3−a
‘01.2∼‘02.3
LANCER
EVOLUTION Ⅶ
D
A/T
‘02.2∼‘02.12
LANCER
CEDIA
M6−a
CS5A
4G93
‘00.5∼※
D
M6−c
CS5W
4G93
‘00.11∼※
D
M6−c
LANCER
CEDIA
WAGON
46
Sensor type
M7−a
‘01.6∼※
‘02.6∼※
CU2W
ECU position
KR
■ECU Terminal Arrangement Table (MITSUBISHI)
Airflow signal
Knocking signal
rpm
IG power
Ground
Throttle signal
※In E39A, a knocking signal is available for TURBO only
※In V23W, no knocking signal is available
Knocking signal
IG power
rpm
Ground
Knocking signal
rpm
IG power
Throttle signal
Ground
Airflow signal/pressure signal
※In CD5W, a knocking signal is available for DOHC only
Airflow signal
Knocking signal
Throttle signal
IG power
Throttle signal
Pressure signal
rpm
Ground
※DE2A, no knocking signal is available
Airflow signal
Knocking signal
IG power
Ground
rpm
Knocking signal
Pressure signal
IG power
Throttle signal
rpm
Ground
Pressure signal
Throttle signal
IG power
Ground
rpm
IG power
Throttle signal
Knocking signal
Airflow signal
rpm
Ground
※Without knocking signal
Throttle signal
Ground
IG power
rpm
Airflow signal
Throttle signal
Knocking signal
IG power
rpm
Ground
Throttle signal
Airflow signal
※Without knocking signal
47
Ground
IG power
Ground
rpm
Airflow signal Knocking signal
Throttle signal
Ground
Pressure signal
IG power
rpm
48
rpm
IG power
Knocking signal
Airflow signal
Knocking signal
Throttle signal
Throttle signal
■Table of Applicable Models (MAZDA)
Explanation of sensor type indication
Example PR−3
Sensor type
Sensor number
Car name
Car model Engine model
JC3S
Manufacturing year
ECU position
HW−HotWire
PR−Pressure
Remarks
FL−Flap
KR−Karman
Terminal drawing
Sensor type
Z3−a
FL−6
‘94.3∼‘95.8
13B−REW
EUNOS
COSMO
JC3SE
‘90.3∼‘94.2
JCES
‘94.3∼‘95.8
C
B◎
20B−REW
JCESE
‘90.3∼‘94.2
‘00.10∼‘02.8
Z4−a
‘99.1∼‘00.9
FD3S
13B−REW
A
PR−4
‘95.12∼‘98.12
RXー7
Z3−b
‘91.12∼‘95.11
Z2−a
FL−6
‘85.9∼‘88.8
Z1−a
FL−5
BP−VE(RS)
‘00.7∼※
Z8−a
BP−ZE(RS)
‘97.12∼‘00.6
Z2−b
‘00.7∼※
Z8−a
‘97.12∼‘00.6
Z2−b
‘88.9∼‘91.11
FC3S
13B
C
NB8C
NB6C
B6−ZE(RS)
HW−11
C
ROADSTER
NA8C
NA6CE
‘95.8∼‘97.12
Z6−a
‘93.8∼‘95.7
Z5−a
BP−ZE
B6−ZE
M/T
Z5−c
A/T
Z5−a
FL−8
‘89.9∼‘93.7
4WD M/T
Z3−c
ZL−DE
4WD A/T
‘98.6∼※
BJ5P
2WD
‘98.6∼‘99.7
D
Z8−b
M/T
HW−22
ZL−VE
FAMILIA
A/T
‘98.6∼‘01.11
Z3−c
M/T
BJ3P
B3−ME
‘98.6∼‘02.8
A/T
BG8Z
BP−ZET
‘89.8∼‘94.3
E
Z5−b
FL−7
◎:EC-AT position
49
Car name
Car model Engine model
Manufacturing year
ECU position
Remarks
Terminal drawing
Sensor type
Z3−c
HW−11
4WD M/T
FAMILIA
S WAGON
BJFW
FS−ZE
‘99.8∼※
D
4WD A/T
2WD
MD12S
F6A T/C
L
MD11S
F6A T/C
DY5W
ZY−VE
DY3W
ZJ−VE
GGES
LF−DE
DEMIO
ATENZA
SPORT
Z7−c
‘00.12∼※
AZ-WAGON
‘02.8∼※
L
Z10−a
HW−22
C
Z9−a
HW−22
Z9−a
HW−22
Z9−a
HW−22
‘02.5∼※
GG3S
L3−VE
M/T
‘02.11∼※
ATENZA
SPORT
WAGON
GYEW
LF−DE
‘02.5∼※
C
GY3W
L3−VE
M/T
‘02.11∼※
ATENZA
SEDAN
PR−8
Z7−a
‘98.10∼‘00.11
GGEP
LF−DE
GG3P
L3−VE
‘02.5∼※
50
C
■ECU Terminal Arrangement Table (MAZDA)
IG power
Airflow signal
Throttle signal
Throttle signal
rpm
Ground
Ground
Ground
Knocking signal
rpm
Throttle signal
Knocking signal
Airflow signal
IG power
rpm
Airflow signal
Knocking signal
IG power
Ground Knocking signal 2 Knocking signal 1Throttle signal
Knocking signal 3
Airflow signal
rpm
IG power
※Only the knocking signal 1 of 13B-REW
※The turn signal connects with EA-AT(Z3-AT)
Ground
Throttle signal
Knocking signal
rpm
Pressure signal
IG power
Pressure signal
rpm
IG power
Throttle signal
Ground rpm
Knocking signal
IG power
Airflow signal
Throttle signal
Knocking signal
Ground
51
Ground
Airflow signal
rpm
Throttle signal
Ground
Airflow signal
Throttle signal
IG power
rpm
Knocking signal
IG power
※Without knocking signal
Ground
Ground
Airflow signal
rpm
IG power
※Without knocking signal and throttle signal
IG power
rpm
Knocking signal
Ground
Throttle signal
Airflow signal
52
IG power
Airflow signal
※Without knocking signal
Pressure signal
rpm IG power
Ground
Throttle signal
Pressure signal
※Without knocking signal
IG power
rpm
Throttle signal
rpm
Ground
Knocking signal
Throttle signal
IG power
Airflow signal
Knocking signal
Ground
rpm
Throttle signal
IG power
Ground
Throttle signal
Airflow signal
rpm (Set the number of cylinders to 2 at initial setup )
※In GG#P, GG#S, and GY#W, a knocking signal is not available
Knocking signal
Ground
rpm
Throttle signal
IG power
Airflow signal
53
■Table of Applicable Models (SUBARU)
Explanation of sensor type indication
Example PR−3
Sensor type
Sensor number
Car name
Car model
Engine model
BE9
EJ254
Manufacturing year
ECU position
HW−HotWire
PR−Pressure
Remarks
FL−Flap
KR−Karman
Terminal drawing
Sensor type
F5−b
HW−16
F6−a
HW−20
F5−b
HW−16
EJ208
‘01.5∼※
EJ206
C
LEGACY B4
BE5
EJ204
EJ208
HW−20
F4−a
‘98.12∼‘01.4
EJ204
HW−16
EJ208
BH5
EJ204
HW−20
F5−b
HW−16
‘01.5∼※
BH9
LEGACY
TOURING
WAGON
F6−a
EJ206
EJ254
BHC
C
EJ208
HW−20
BH5
EJ204
F4−a
‘98.6∼‘01.4
BH9
HW−16
EJ254
BHC
EJ20R
HW−1
EJ20H
EJ20D
BD5
BG5
M/T
F1−b
A/T
F3−a
‘96.6∼‘98.5
EJ20H
C
HW−4
EJ20D
EJ20H
LEGACY
F2−a
‘93.10∼‘96.5
EJ20D
F1−a
BC5
EJ20G
‘89.2∼‘93.9
H
F2−b
HW−10
BF5
BD9
BG9
54
F3−a
‘96.6∼‘98.5
EJ25D
C
‘94.10∼‘96.9
HW−4
F1−a
Car name Car model Engine model
GDB
GGB
EJ207
GDA
GGA
EJ205
GD9
GG9
EJ204
GG2
GG3
EJ152
IMPREZA
Manufacturing year
ECU position
‘00.10∼※
Remarks
Terminal drawing
Sensor type
F6−a
HW−20
F5−b
HW−16
F5−a
PR−8
Including Spec C
‘00.8∼※
M/T
C
EJ207
F4−a
‘98.9∼‘00.7
EJ205
HW−1
GC8
GF8
EJ20K
‘96.9∼‘98.8
F1−b
HW−4
‘96.9∼‘98.8
EJ20G
‘93.10∼‘96.8
F2−b
HW−10
‘92.11∼‘96.8
SG5
‘02.2∼※
M/T
F6−a
A/T
F6−b
D
EJ205
HW−20
FORESTER
‘98.9∼‘02.1
SF5
EJ20G
‘97.2∼‘98.8
HW−1
F1−b
HW−4
SOHC NA
EN07E
EN07Z
SOHC SC
‘01.10∼※
EN07X
PLEO
F4−a
C
F5−c
DOHC SC
RA1
RA2
B
PR−14
SOHC SC M/T
F7−a
SOHC SC CVT
EN07
‘98.10∼‘01.9
DOHC SC M/T
F2−c
DOHC SC CVT
F2−d
55
■ECU Terminal Arrangement Table (SUBARU)
Knocking signal
Knocking signal
Airflow signal
rpm
Ground
Throttle signal
Throttle signal
Throttle signal
IG power
Ground
rpm
Pressure signal
Knocking signal
Knocking signal
Throttle signal
Knocking signal
Throttle signal
rpm
Pressure signal
56
Knocking signal
IG power
Airflow signal
rpm
rpm
IG power
Knocking signal
Airflow signal
Ground
rpm
Airflow signal
IG power
Ground
Airflow signal
Ground
rpm
IG power
Ground
Knocking signal
rpm
Ground
rpm
Ground
Throttle signal
Throttle signal
Ground
IG power
Pressure signal
Throttle signal
IG power
Airflow signal
Throttle signal
Knocking signal
Throttle signal
IG power
Ground
IG power
Knocking signal
rpm
IG power
Airflow signal
Ground
Throttle signal
IG power
Knocking
signal
rpm
Pressure signal
Throttle signal
IG power
rpm
IG power
Airflow signal
Airflow signal
Throttle signal
rpm
Throttle signal
rpm
Pressure signal
IG power
Knocking signal
Ground
Knocking signal
Ground
Knocking signal
Ground
57
■Table of Applicable Models (SUZUKI)
Explanation of sensor type indication
Example PR−3
Sensor type
Sensor number
Car name
ALTO
WORKS
Car model
Engine model
Manufacturing year
ECU position
HA12S
F6A T/C
‘98.10∼‘00.12
L
HA11S
HB11S
F6A T/C
‘94.11∼‘97.4
B
EA11R
F6A T/C
‘91.11∼‘95.10
MC12S
F6A T/C
‘00.12∼‘01.4
CAPPUCCINO
HW−HotWire
PR−Pressure
Remarks
FL−Flap
KR−Karman
Terminal drawing
Sensor type
S6−b
M/T
S2−a
A/T
S4−a
B
S1−a
PR−8
PR−8
S6−c
L
MC11S
F6A T/C
‘98.10∼‘00.12
S6−a
CT51S
CV51S
K6A T/C
‘97.4∼‘98.9
S5−a
WAGON R
‘95.11∼‘98.9
CT21S
CV21S
B
M/T
S2−a
A/T
S4−a
M/T
S1−a
A/T
S4−a
PR−8
F6A T/C
‘93.9∼‘95.10
WAGON R
PLUS
WAGON R
WIDE
WAGON R
SOLIO
LAPIN
MA63S
K10A T/C
‘99.5∼‘00.12
B
S8−b
PR−8
K10A T/C
‘97.2∼‘99.5
B
S5−a
PR−8
M13A
‘00.12∼※
S8−c
PR−13
S8−b
PR−8
S7−a
PR−13
S6−a
PR−13
S6−b
PR−8
MA61S
MB61S
MA34S
B
MA64S
K10A
‘00.12∼‘02.10
HE21S
K6A
‘02.1∼※
HN12S
K6A
‘01.4∼※
L
Kei
HN11S
F6A T/C
JA22W
K6A T/C
JIMNY
CHEVROLET
CRUISE
L
‘98.10∼‘01.3
S3−a
‘95.11∼‘98.9
JA12W
F6A T/C
HR51S
M13A
58
B
M/T
PR−8
S2−b
‘01.10∼※
L
S8−a
PR−13
■ECU Terminal Arrangement Table (SUZUKI)
rpm
IG power
rpm
Ground
IG power
Ground
Pressure signal
Pressure signal
※Without knocking signal and throttle signal
rpm
IG power
※Without knocking signal and throttle signal
Ground
Pressure signal
Knocking
signal
Ground
rpm
Pressure signal
IG power
Throttle signal
※Without knocking signal and throttle signal
rpm
Ground IG power Pressure signal
rpm
Ground
Pressure signal
IG power
Throttle signal
Knocking
signal
Throttle signal
※Without knocking signal
IG power
Ground
IG power
Ground
Knocking signal
rpm
rpm
Pressure
signal
IG power
rpm
Pressure signal
Pressure
Throttle signal
signal
※Without knocking signal
Throttle signal
Ground
Knocking signal
Throttle signal
rpm
IG power
Pressure signal
Ground
Knocking signal
Throttle signal
59
Throttle signal
Ground
IG power
Knocking signal
Pressure signal
Throttle signal
Pressure signal
Ground
Knocking signal
60
IG power
rpm
Ground
rpm
Pressure signal
IG power
Knocking signal
Throttle signal
rpm
■Table of Applicable Models (DAIHATSU)
Explanation of sensor type indication
Example PR−3
Sensor type
Sensor number
Car name
Car model
Engine model
Manufacturing year
ECU position
MIRA AVY
L250S
L260S
EF−DET
‘02.12∼※
MIRA
L700S
L710S
EF−DET
MIRA
TR-XX
L502S
L512S
JB−JL
L152S
JB−DET
L150S
HW−HotWire
PR−Pressure
Remarks
FL−Flap
KR−Karman
Terminal drawing
Sensor type
D
D5−a
PR−8
‘98.10∼‘02.11
D
D2−a
PR−8
‘94.9∼‘98.9
D
D1−a
PR−8
PR−15
‘02.10∼※
D5−a
‘01.10∼‘02.9
D3−a
L160S
EF−DET
PR−8
L900S
D4−a
‘00.10∼‘01.9
D
MOVE
L902S
JB−DET
PR−15
D3−a
‘01.10∼‘02.9
L910S
EF−DET
L902S
JB−DET
PR−8
PR−15
‘98.10∼‘01.9
D4−a
D1−a
L910S
EF−DET
L602S
JB−JL
‘95.8∼‘98.9
L880K
JB−DET
‘02.6∼※
D
D3−a
L952S
JB−DET
‘01.10∼※
D
D3−a
PR−8
COPEN
MAX
L960S
PR−15
PR−15
EF−DET
PR−8
■Table of Applicable Models (ISUZU)
Explanation of sensor type indication
Example PR−3
Sensor type
Sensor number
Car name
Car model
Engine model
Manufacturing year
ECU position
BIGHORN
UBS25
6VD1
‘91.12∼‘02.8
E
HW−HotWire
PR−Pressure
Remarks
FL−Flap
KR−Karman
Terminal drawing
Sensor type
I1−a
PR−7
61
■ECU Terminal Arrangement Table (DAIHATSU)
IG power Pressure signal
Ground
rpm
Knocking signal
Ground
Pressure signal
Throttle signal
IG power
rpm
Knocking signal
※Without throttle signal
Pressure signal
Knocking signal Throttle signal
Ground
Pressure signal
Ground
IG power
rpm
Throttle signal
IG power
Ground
rpm
Knocking signal
Throttle signal
IG power
Pressure signal rpm
Knocking signal
■ECU Terminal Arrangement Table (ISUZU)
Throttle signal
Pressure signal
Ground
IG power
rpm
※Without knocking signal
62
●Memo
63
Notes
1. The contents of this document are subject to change without prior notice
2. The contents of this document have been prepared with extreme care. However, if
you find, error, or other fault, please inform us of it
3. A part or all of this document may not be reproduced in any form without prior
written permission, and also may not used without the prior written permission of
A’PEX CO., LTD. under the copyright except for private use.
・The company names and product names described in this document are the registered
trademarks or brands of the respective companies
・The
names, addresses and telephone numbers mentioned as where to contact
are as of December 10, 2002. Note that this information is subject to
change
■Revision Record
No.
1
Date of issue Part No. of instruction manual
Edition
7107-0240-00
Dec. 10, 2002
First edition
Where to contact
Change of description
http://www.apexi.co.jp
Authorized Agencies
TAIWAN
HONG KONG
AUSTRALIA
MALAYSIA,
SINGAPORE
KOREA
AAI MOTORSPORTS CO.,LTD
B1, NO. 162, Jian-Yi Road, Jung-He City Taipei, Taiwan
GT SPORTS LTD
DD 115 Lot 1045 BRP,Castle Peak,Road,Au
Tau Yuen Long,NT Hong Kong
ACCESS AUTO ENGINEERING PTY.
9 Traid Place Vermont Vic.3133 Australia
SPEEDWORKS (M) SDN. BHD
Lot2,Lorong 51A/227B, Section 51A, 46100
Petaling Jaya, Selangor, Malaysia
CAREX CO., LTD
787-15 Youksam-Dong, Kangnam-ku, Seoul,
+886-2822-63988 +886-2822-65788
+852-2398-8866 +852-2398-8862
+61-3-9873-0133 +61-3-9873-1311
+603-7955-5533 +603-7955-7745
+82-2-508-4646 +82-2-508-2244
Contact
Apex Integration, Inc 330 W. Taft Orange, CA 92865
Apex Co., Ltd.
1-17-14 Tanashioda, Sagamihara-city,
Kanagawa, 229-1124 Japan
64
+1-714-685-5700 +1-714-685-5701
+81-42-778-3991 +81-42-778-4495