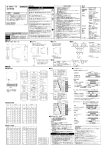
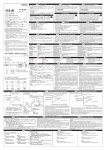
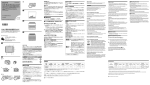
1
Precautions for Safe Use
SAFETY PRECAUTIONS
● Definition of Precautionary Information
Indicates a potentially hazardous situation which,
CAUTION if not avoided, may result in minor or moderate
injury or in property damage.
MODEL H7CX-R
Digital Tachometer
● Precautionary Information
INSTRUCTION MANUAL
English
CAUTION
Thank you for purchasing this H7CX-R. This INSTRUCTION
MANUAL describes the information such as function, performance,
and how to use the product required for using the H7CX-R.
For using this product, please follow keep the precautions as shown
in the following:
・Please operate this product by the qualified specialist having the
electrical know how.
・Read this instruction manual with enough, and use the product
correctly with enough understanding.
・Keep this instruction manual close at hand and use it for reference during operation.
Loose screws may occasionally result in fire or malfunction.
Tighten the terminal screws securely. The recommended
tightening torque is 0.5 N•m.
There may occasionally be a risk of explosion. Do not use
the product where flammable or combustion gases are
present.
If the output relay is used beyond its life expectancy, its
contacts may occasionally become fused or there may
occasionally be a risk of fire. The life expectancy of the
output relay varies considerably according to its usage.
Use the output relay within its rated load and electrical life
expectancy.
This may occasionally cause electric shock, fire or
malfunction.
Never disassemble, repair or modify the product.
This may occasionally cause electric shock, fire or malfunction.
Do not allow metal fragments or lead wire scraps to fall inside this product.
OMRON Corporation
©All Rights Reserved
1617581-6A
Please comply strictly with the following instructions which are intended to ensure safe
operation of the controller.
1. Environmental Precautions
• Do not use in locations affected by excessive vibration or shock, or in locations
subject to exposure to water or oil.
• Do not use this equipment in dusty environments or expose it to corrosive gases
or direct sunlight.
• Wire signal lines and power lines separately to reduce the influence of noise.
• Do not install the H7CX close to sources of excessive static electricity
(e.g., forming compounds,powders,or fluid materials being transported by pipe).
• To prevent damage to the exterior of the tachometer, it must not be exposed to
organic solvents(e.g., Paint thinner or benzine),strong alkalies,or strong acids.
• Do not install the H7CX in the following places:
Locations subject to condensation as a result of high humidity.
Locations subject to severe changes in temperature.
2. Usage Precautions
• Store at the specified temperature. If the H7CX has been stored at a temperature
of less than –10°C, allow the H7CX to stand at room temperature for at least 3
hours before use.
• Use in locations subject to temperatures or humidity within the range specified in
the specifications.
• Application of voltages other than the rated voltage may seriously damage the
internal elements.
• Do not exceed the rated load current.
• Operate the DIP switch with the power supply turned OFF. Touching the terminal
applied the high voltage may be caused electric shock.
• Ensure that the terminals are connected with the correct polarity.
• Always maintain the power supply voltage within specifications.
• Apply power voltage by way of switch and relay quickly so as to reach the rated
voltage within 2 seconds. Gradual application of the voltage may be caused the
invalid of the power reset or unstable performance of the product.
• Set the each value adjusting to the measurement item. Not matching the setting
content and the content of the measurement item may cause the unexpected
breakage or accident.
Mounting
Nomenclature
Mounting and Panel-cutout Dimensions Diagram
<Flush mounting>
Model Y92S-29 (sold separately)
Model P3GA-11
Rubber packing
Model Y92F-30 (sold separately)
Mounting adapter
TACHOMETER
48
HLD
TACHOMETER
HLD
MODE
Operation key
MODE
6
5
4
3
2
1
⑦ Mode key
(Used to switch mode and setting items.)
⑧ Hold key
(Hold measurement value and output (Hold).)
⑨ Up key
HLD
48
98.7
7.5
● Panel-cutout Dimensions Diagram
(Units: mm)
<Surface mounting>
15 or greater
4
3
2
1
6th digit
1st digit
・Please check the power supply specifications, and install wiring.
・Recommended lead wire:AWG 18 to 24 (Cross-section:0.205 to 0.823mm2), single wire
or stranded wire, copper.
58
+0.6
5
HLD
*HOLDs(⑦⑤④pin)have
the same function.
HOLD*
45 −0
6
Terminal Arrangement
Model P2CF-11
Standard panel cutout is shown in the following diagram (conforms to DIN 43700).
A space of 15mm or greater (a panel cutout
distance of 60 mm or greater) is recommended
towards the Adapter’s hook side to enable
easier mounting work.
60 or greater
① Hold indicator (Orange)
② Key protection indicator (Orange)
③ Control output indicator (Orange)
④ Measurement value
(Character height 9mm,Red)
⑤ Relative value
(Character height 6mm,Green)
⑥ Stage indication Relative values 1 and 2
48
109.7
COUNT
112
HOLD*
HOLD*
Notes
※ The thickness of a mounting panel should
be 1 to 5 mm.
※ It is possible to mount the counters side-byside. (But only towards the non-hook side.)
0V
In the pack
(ー)
・Main unit
・Instruction manual
(this document)
4
8
3
9
10
2
Sensor etc.
DC12V
n Units mounted
side-by-side
Internal circuit
5 6 7
1 11
■ Operation
Setting
● Set the parameter, which cannot be set with the DIP switch.
※ The reverse video shows the default setting.
dp
----------..----..----..---
Decimal point
position (DP)
------
No decimal point
First decimal place
Second decimal place
Third decimal place
MODE
● Set the basic parameter.
pscl
1.000
autz
ON
HLD
999.9
OFF
1 2 3 4 5 6 7 8
Item
OFF
ON
1
―
―
―
2 Counting speed 30Hz
10kHz
3
Output mode
See at right
4
5 Averaging number
See at right
6
―
7
―
―
8 Input mode switching NPN
PNP
※The reverse video shows the default setting.
Switch 3
OFF
ON
OFF
ON
Prescaling value
(PSCL)
0.001 ∼ 1.000 ∼ 99.999
Auto-zero time
(AUTZ)
0.1 ∼ 999.9 sec
Switch 4
Output mode
OFF Bounds pair output
OFF
Range output
ON
Upper limit output
ON
Lower limit output
Start-up
compensation
timer (STMR)
0.0
0.0 ∼ 99.9 sec
MODE
kypt
kp-1
Key protect level 1
Key protect level 2
Key protect level 3
Key protect level 4
Key protect level 5
kp-1
kp-2
kp-3
kp-4
kp-5
Level of key
protection
(KYPT)
MODE
※ Available only for the key protect switch in ON.
Step3
< Output mode(Bounds pair, Range)>
Relative
value 2
Relative
value 2
Measurement
value
Relative
value 1
Relative
value 1
OUT
OUT
Upper limit
2280.00
Measurement value
MODE
MODE
2280.00
Power ON
MODE +
SET1
U1
2300.00
OUT ON condition:
Measurement value ≧ Relative value
Function setting mode
RUN mode
U1
MODE +
Press for more than 1 second.
MODE Press for more than 3 seconds.
2280.00
SET2
2000.00
Model AMD-S
2280.00
SET
2300.00
Measurement
value
Measurement
value
Measurement value
Relative value
Relative
value
OUT
OUT
Measurement value
Relative value 2
● Specifications
Model H7CX-R
・Connecting socket:
Model 8PFA
・Connecting socket:
Model P2CF-11
Black(White)
Brown(Red)
Blue(Black)
HOLD
HOLD
Black
(White)
⑥ ⑤ ④ ③
⑧ ⑦ ⑥ ⑤
P2CF-11 ④
8PFA
Model AMD-S
Sensor
⑨
③ Blue
⑩ ⑪ ① ② (Black)
⑦ ⑧ ① ②
Tc
Ta
Tb
AC100 to 110V
(AC200 to 220V) Relay output
Tb Ta
Relay output
AC100 to 240V
※ The wiring changing from 8 pin to 11 pin is required.
※ Pay attention to the length of the wire and terminal No.
※ The connecting socket (Model P2CF-11) is sold separately.
Model H7CX-R
・AC100 to 110V
・AC200 to 220V
・AC100 to 240V
・AC24V/DC12 to 24V
Input mode
Voltage input
(H:4 to 14V,L:0 to 1V)
No-voltage input/
Voltage input (H:4.5 to 30V,L:0 to 2V)
External power
supply
DC12V ± 1V 12mA
DC12V(± 10%) 100mA
Relay output
AC200V 5A (resistive load)
AC250V/DC30V 3A
(resistive load)
Detected speed-up of rotation
Output mode
Brown(Red)
Tc
● Setting
Power supply
voltage
Sensor
(Model AMD-SU □)
Bounds pair, Range,
Upper limit, Lower limit
(Model AMD-SL □)
(Switchable with DIP switch)
Detected lowering of rotation
Setting *
Interval of Input Pulse (s)
Frequency (Hz)
Range of
detection rpm
6 to 6000rpm
0.06 to 600000rpm
(at 1 pulse/round)
Set each item according to the conditions shown in the following table precisely for
realizing the function of the Model AMD-S on the Model H7CX-R.
※ The reverse video shows the default setting.
【DIP switch setting】
Model AMD-S
0.01 to 0.1s
(Model AMD-S□1)
Model H7CX-R
State of DIP switch
Key-protect Switch Settings
ON (enable)
OFF (disable)
Level
* Mode change
Display switch in
the RUN mode
Hold key
KP-1
Invalid
Valid
Valid
Valid
KP-2
Invalid
Valid
Invalid
Valid
Invalid
Up key
KP-3
Invalid
Valid
Valid
KP-4
Invalid
Valid
Invalid
Invalid
KP-5
Invalid
Invalid
Invalid
Invalid
Self-Diagnostic Functions
Measurement
value
display
Relative
value
display
ffffff
No change
Measurement
Measurement
No change value ≦ 999999
value Overflow
e1
No display
CPU error
e2
No display
Memory error
(RAM)
e2
sum
Memory error
(EEP-ROM)
Details
Set value
after
recovery
Output state Recovering method
No change
Hold key or
Power recycle
No change
OFF
Power recycle
No change
OFF
Recovers to the
default setting with
Hold key
OFF
0
Set value
10kHz
30Hz
Averaging
number
Rotational speed
decrease detection
(Model AMD-SL □)
Rotational speed
increase detection
(Model AMD-SU□)
ON
Lower limit
OFF
1 2 3 4 5 6 7 8
ON
Upper limit
OFF
1 2 3 4 5 6 7 8
ON
Life of relay
Electrical life of relay
500,000 operations
Electrical life of relay
100,000 operations
Input mode Voltage input
Invalid
EEP-ROM
【Setting with the keys on the front panel】
Invalid
OFF
OFF
1 2 3 4 5 6 7 8
ON
PNP
OFF
1 2 3 4 5 6 7 8
(Times of rewriting: 100,000)
Model AMD-S
Start-up
Fix timer value
compensation
(0.1 to 10s)
timer
● Contact Address (North America)
OMRON ELECTRONICS L L C
(OEI)
Phone : 1-847-843-7900 or 1-800-55-OMRON
※ For using this product under 0.03s,
set [10kHz] without fail.
Output
mode
NEVER USE THE PRODUCTS FOR AN APPLICATION INVOLVING SERIOUS RISK TO LIFE OR
PROPERTY WITHOUT ENSURING THAT THE SYSTEM AS A WHOLE HAS BEEN DESIGNED TO ADDRESS THE RISKS, AND THAT THE OMRON PRODUCT IS PROPERLY RATED AND INSTALLED FOR
THE INTENDED USE WITHIN THE OVERALL EQUIPMENT OR SYSTEM.
1 2 3 4 5 6 7 8
Fix timer value between 0.1 to 10s Variable between 0.0 to 99.9s
* The interval of time and related formula of the frequency are shown as
follows.
Frequency (Hz)=1/Interval of Input Pulse (s)
【ex.】Interval of Input Pulse=0.01s ⇒
Frequency =1/0.01s=100Hz
Interval of Input Pulse=10s ⇒
Frequency =1/10s=0.1Hz
When the key-protect switch is ON, individual key operations can be disabled
to prevent setting errors according to the key-protection levels shown in the
following table.
※ Key-protection levels are set in Function Setting mode.
OFF
※ All measurement range is possible to
Measure- 0.1 to 1s
be measured with [10kHz] setting.
ment
(Model AMD-S□2) In the case of using the contact for
input signal, set at [30Hz].
range
The chattering removal process of
1 to 10s
input signal is performed.
(Model AMD-S□3)
(at 1 pulse/round)
(Unless otherwise specified, fix timer value at 10s)
Key protection indicator
ON
Start-up
compensation
timer
Memorizing
method for service
interruption
Supply voltage (VDC)
OMRON shall not be responsible for conformity with
any standards,codes, or regulations that apply to the
combination of the products in the customer's application or use of the product.
Take all necessary steps to determine the suitability
of the product for the systems,machines,and equipment
with which it will be used.
Know and observe all prohibitions of use applicable to
this product.
Replacement from Model AMD-S to Model H7CX-R
● Terminal Arrangement/Wiring Connection
(1) When power is supplied, an inrush current(approx.10 A) will flow
for a short time. If the power supply capacity is too small, the
H7CX may not operate. Make sure that a power supply of a sufficiently large capacity is used.
(2) In the case of setting the relative value under Bounds pair output
mode, the output becomes always ON so as that the setting of
the relative value be relative value 1 ≧ relative value 2.
(3) Missetting of the prescaling value may cause the difference of the
count. Check all setting conditions are correct and operate the
product.
(4) The product memorizes the status just before occurring the electric failure memory with EEP-ROM. The rewriting life of the EEPROM is 100,000 or more. The EEP-ROM rewrites the setting
condition into the initial setting one when the power source is OFF.
(5) In the case of using the external
power supply for the models with
100
AC24 V/DC12-24 V specification,
Load
the load should be reduced ac- current
cording to the power supply volt- (mA)
age as shown in the diagram on
20
the right. (Only when DC power is
supplied)
0
10.8 15
Suitability for Use
MODE
MODE Press for more than 3 seconds.
Press for more than 1 second.
X :Auxiliary relay
(e.g., MY Relay)
X2
OUT ON condition:
Measurement value ≦ Relative value
Measurement value
MODE
MODE
Measurement value
Relative value 1
X1
※ Measurement value display blinks when overflow occurs.
Lower limit
Relative
value
2280.00
X1/a
* Transition to "DIP switch monitor mode" and "Function setting mode"
<Output mode(Upper limit, Lower limit)>
● Switch the RUN mode to the Function setting mode.
1off
Range
・Relative value 1 ≦ Relative value 2
OUT ON condition: Relative value 1 ≦
Measurement value ≦ Relative value 2
・Relative value 1 > Relative value 2
OUT ON condition: Relative value 2 ≦
Measurement value ≦ Relative value 1
●After switching the Function setting mode to the RUN mode, set the relative value.
Step2
dip
Bounds pair
OUT ON condition:
Measurement value ≦ Relative value 1
or Measurement value ≧ Relative value 2
Measurement
value
MODE
stmr
Switch 5 Switch 6 Averaging number
OFF
OFF
OFF
ON
OFF
2 times
OFF
ON
4 times
ON
ON
8 times
※The setting content of the DIP switch can be checked with the DIP switch monitor mode.
DIP switch
monitor mode
■ Output Mode Settings
MODE
(Default setting)
X1/a
• When mounting on a panel, tighten the two screws alternately and evenly until
they become secured. If the screws are not tightened evenly, water may penetrate inside of the panel.
• Since this product adopts the reading method all the time, the output status
may be affected by changing the relative value for changing the current measurement value during operation.
• In the case of operating the product with no-voltage
Sensor
input (NPN input), approx. 14V is output from the input terminal. Therefore, in case of supplying the under 14V power source from external, connect the di0V
Input
ode.
• Applying the power to the product with the initial setting status and leaving not
activating the pulse onto the count input, the product turnes ON after passing
999.9 seconds.
• Install a switch or circuit breaker that allows the operator to immediately turn
off the power, and label suitably.
• The H7CX's panel surface is water-resistive (conforming to NEMA4 and IP66.)In
order to prevent the internal circuit from water penetration through the space
between the tachometer and operating panel, attach a water0.5 to 1mm
proof packing (Model Y92S-29)
in the space and be sure to seIt is recommended that
cure it by tightening screws of the
the space between the
flush-mounting adapter (Model
screw head and the
Y92F-30).
adapter is 0.5 to 1mm.
Conformance to EN/IEC Standards
(−)(+)
Step1
T
T/a
Precautions for Correct Use
● Power supply voltage/
AC100-240 V 50/60Hz
9.4VA
Power consumption
AC24 V 50/60Hz/DC12-24 V 7.1VA/4.7W
● Operating voltage range 85 to 110 % of the rated voltage
(90 to 110 % in the case of DC12-24 V)
● Ambient temperature
-10 to +55℃
(When side-by-side mounting: -10 to +50℃)
(Avoid freezing or condensation)
● Ambient humidity
25 to 85 %
● Storage temperature
-25 to +65℃ (Avoid freezing or condensation)
● Altitude
MAX. 2,000 m
● Recommended external fuse T2A, 250 VAC, time-lag, low-breaking capacity
● Weight
Approximately 140 g (main unit only)
● Installation environment Over-voltage category Ⅱ , pollution degree 2
(as per IEC61010-1)
● Control output
Relay output 250 VAC, 3 A (resistive load)
30 VDC, 3 A (resistive load)
● Electrical life of relay
100,000 operations
● Mechanical life of relay 10,000,000 operations
● External power supply
12 VDC,100 mA
● Enclosure rating
Individual mounting: The front surface of the enclosure of the Type
H7CX series tachometer meets UL 508 Type 4X
for Indoor Use Only, when all of the following
conditions are met:
* The Y92S-29 rubber packing and Y92F-30 mounting adapter are
used with the tachometer. Use only these parts for replacement.
* The tachometer is mounted on the flat surface of an enclosure that
is rated and marked "Type 4X for Indoor Use Only."
・There exists basic insulation between the power supply and input, power
supply and output, and between input and output terminals.
・Connect input and output terminals to devices in such a way that there
are no accessible live parts.
・Connect input and output terminals to devices containing basic insulation
suitable for the maximum usage voltage.
power supply
For setting parameter, both the setting using DIP switch
and the setting using front key are required.
Refer to the following procedures for details.
(
HLD
A=(48n−2.5) +1
−0
※ When more than one tachometer is mounted
in an opening, such as side-by-side mounting,
the water resistance rating does not apply.
X2/b
(Default setting)
(+)External
A
<Reference Figure>
Specifications
Display
● Mounting (Units: mm)
• If left at high temperatures for long periods with the output turned ON, there is
risk of accelerated deterioration of the internal components (such as the electrolytic capacitor). Therefore, make sure that it is used in combination with a
relay and avoid leaving it with output ON for long periods (e.g., greater than 1
month).
Model H7CX-R
Set range
Set value
stmr
0 .0 ∼ 99.9
0 .0
(0.0s) (99.9s)
(OCI)
● Contact Address (Europe)
EUROPEAN H. Q.
OMRON EUROPE B. V.
Phone : 31-23-56-81-300
Fax
: 31-23-56-81-388
● Contact Address (Asia, Pacific)
中国
欧姆龍(中国)有限公司
Phone: (8610)8391-3005
Parameter
(STMR)
OMRON CANADA INC.
Phone : 416-286-6465
Phone : 1-514-636-6676 (French Language)
香港
歐姆龍亞洲有限公司
Phone: 852-2375-3827
(OCE) 大韓民国
(OKC)
韓国OMRON株式会社
Phone: 82-2-512-0871(Korean)
Phone: 82-2-549-2766
(OEA)
(English/Japanese)
SINGAPORE
(OEP-HQ)
OMRON ASIA-PACIFIC PTE LTD.
台灣
(OTE) Phone:65-6-835-3011
台灣歐姆龍股 有限公司 總公司
Phone: 886-2-2715-3331
AUSTRALIA
(OEP-AU)
OMRON ELECTRONICS PTY. LTD.
Phone: 02-9878-6377
安全上の要点
安全上のご注意
以下に示す項目は、安全を確保するために必ず守ってください。
形 H7CX-R
●警告表示の意味
電子タコメータ
正しい取扱いをしなければ、この危険のために、時
に軽傷・中程度の傷害を負ったり、あるいは物的損
害を受ける恐れがあります。
注意
取扱説明書
Japanese
●警告表示
このたびは、オムロン製品をお買い上げいただきまして、
まことにありがとうございます。この取扱説明書では、
この製品を使用する上で、必要な機能、性能、使用方法などの情
報を記載しています。
この製品をご使用に際して下記のことを守ってください。
・この製品は電気の知識を有する専門家が扱ってください。
・この取扱説明書をよくお読みになり、十分にご理解のうえ、
正しくご使用ください。
・この取扱説明書はいつでも参照できるように大切に保管
ください。
注意
ネジがゆるむと、
稀に発火および誤動作の恐れがありま
す。端子ネジは規定トルク(0.5N・m 程度)で締めてくだ
さい。
2. 使用上の要点
・ 保存は、記載された定格範囲内としてください。また、-10℃以下
で保存後使用する場合は、常温に3時間以上放置してから通電して
ください。
・ 使用周囲温度や使用周囲湿度については、
記載された定格範囲内で
ご使用ください。
・ 定格以外の電圧を印加しますと、
内部素子を破壊する恐れがありま
す。
・ 負荷電流は必ず定格以下でご使用ください。
・ ディップスイッチの操作は電源 OFF 時に行ってください。高電圧
が印加された端子に触れて感電する危険があります。
・ 端子の極性は、誤配線のないようにしてください。
・ 電源電圧の変動範囲は、許容範囲内としてください。
・ 電源電圧は2秒以内に定格電圧に達するようにスイッチ、リレー等
の接点を介して一気に印加してください。
徐々に電圧を印加します
と、電源リセットしなかったり出力が不確定動作することがありま
す。
・ 各種設定値は、計測対象に合わせて正しく設定してください。設定
内容と計測対象の内容が異なる場合には、
意図しない動作により装
置の破損や事故の原因になります。
稀に爆発の恐れがあります。引火性、爆発性ガスのある
ところでは使用しないでください。
寿命を超えた状態で使用すると、
稀に接点溶着や焼損の
恐れがあります。出力リレーの寿命は、開閉容量、開閉
条件により大きく異なるので必ず実使用条件を考慮し、
定格負荷、電気的寿命回数内でご使用ください。
稀に感電、火災、故障の原因になります。
分解したり、修理、改造はしないでください。
稀に感電、火災、故障の原因になります。
製品の中に金属や導線を入れないでください。
©All Rights Reserved
詳細は、
「新商品ニュース H7CX-R」(SGTB-006)を参照ください。
■取付方法
フロント部の名称
取付およびパネル加工寸法図
< 埋込取付 >
形 Y92S-29(別売)ゴムパッキン
形 P3GA-11
形 Y92F-30(別売)取付アダプタ
TACHOMETER
①ホールド表示(橙色)
②キープロテクト表示(橙色)
③制御出力表示(橙色)
④計測値(文字高 9mm、赤色)
⑤比較値(文字高 6mm、緑色)
⑥比較値 1,2 の段数表示
TACHOMETER
HLD
48
MODE
操作キー部
6
5
4
3
2
⑦モードキー
(モードの移行、設定項目の切替)
⑧ホールドキー
(計測値、出力の保持(ホールド))
⑨アップキー
48
98.7
7.5
●パネル加工寸法図(単位:mm)
< 表面取付 >
5
3
4
2
1
15 以上
HLD
6 桁目
1 桁目
端子配置
形 P2CF-11
・電源仕様を確認し、配線をしてください。
・推奨リード線:AWG18 ∼ 24(断面積:0.205 ∼ 0.823mm2 )、単線または撚り線、銅。
*ホールド
(⑦⑤④pin)
は
同じ機能です。
ホールド*
58
45 −0
+0.6
標準パネルカットは下図のとおりです。
(DIN43700 準拠)
アダプタのフック側方向への取付間隔は、
作業性を考慮すると 15mm 以上(パネル
カット間隔 60mm 以上)あけることを
推奨します。
60 以上
6
1
HLD
48
109.7
カウント
112
ホールド*
0V
梱包内容
(ー)
・製品本体
・取扱説明書(本紙)
3
9
10
2
1 11
※反転文字は、出荷時の設定です。
dp
----------..----..----..---
小数点位置
(DP)
小数点なし
小数点第一位
小数点第二位
小数点第三位
MODE
pscl
プリスケール値
(PSCL)
1.000
autz
■出力モードの設定
上下限
範囲
OUT ON 条件:計測値≦比較値 1
または 計測値≧比較値 2
0.001 ∼ 1.000 ∼ 99.999
999.9
1 2 3 4 5 6 7 8
0.1 ∼ 999.9 sec
MODE
スイッチ3 スイッチ4
OFF
OFF
ON
OFF
OFF
ON
ON
ON
stmr
出力モード
上下限
範囲
上限
下限
MODE
kypt
キープロテクトレベル 1
キープロテクトレベル 2
キープロテクトレベル 3
キープロテクトレベル 4
キープロテクトレベル 5
kp-1
kp-2
kp-3
kp-4
kp-5
キープロテクト
レベル (KYPT)
kp-1
スイッチ5 スイッチ6
平均回数
OFF
OFF
OFF(平均化処理なし)
ON
OFF
2回
OFF
ON
4回
ON
ON
8回
※ディップスイッチで設定した内容はディップスイッチモニタモードで確認できます。
0.0 ∼ 99.9 sec
起動補償タイマ
(STMR)
0.0
MODE
※キープロテクトスイッチ ON 時のみ有効
2280.00
dip
1off
2280.00
SET1
2300.00
機能設定モード
運転モード
U1
2280.00
SET2
MODE 3秒以上押す
2280.00
2000.00
計測値
比較値 1
HOLD
黒(白)
⑥ ⑤ ④ ③
HOLD
⑧ ⑦ ⑥ ⑤
P2CF-11 ④
8PFA
⑨
③
⑩ ⑪ ① ②
計測値
⑦ ⑧ ① ②
Tc
Ta
Tb
AC100∼110V
(AC200∼220V) リレー出力
Tb Ta
茶(赤)
Tc
リレー出力
AC100∼240V
2280.00
SET
2300.00
計測値
比較値
形 H7CX-R
電源電圧
・AC100 ∼ 240V
・AC24V/DC12 ∼ 24V
入力方式
電圧入力
(H:4 ∼ 14V,L:0 ∼ 1V)
無電圧入力 /
電圧入力(H:4.5 ∼ 30V,L:0 ∼ 2V)
外部供給電源
DC12V ± 1V 12mA
DC12V(± 10%) 100mA
出力モード
設定方法 *
検出回転数範囲
不可
可
可
不可
可
不可
不可
KP-5
不可
不可
不可
不可
自己診断機能
比較値
表示
内容
計測値
オーバーフロー
出力状態
復帰方法
復帰後の
設定値
ホールドキーまたは
電源再投入
変化なし
比較値 1
比較値 1
e2
消灯
メモリ異常
(RAM)
OFF
電源再投入
変化なし
e2
sum
メモリ異常
(EEP-ROM)
OFF
ホールドキーで
出荷時の状態に復帰
OUT
OUT
上限
OUT ON 条件:計測値≧比較値
変化なし 計測値≦ 999999
変化なし
0
※ オーバーフロー時の計測値表示は点滅表示をします。
下限
OUT ON 条件:計測値≦比較値
計測値
計測値
OUT
OUT
AC200V 5A(抵抗負荷)
回転上昇(形 AMD-SU □)
回転低下(形 AMD-SL □)
※反転文字は、出荷時の設定です。
【ディップスイッチ設定】
形 AMD-S
ディップスイッチ状態
0.01 ∼ 0.1s
(形AMD-S□1)
計測範囲
(ディップスイッチにて切替え可能)
周波数 (Hz)
6 ∼ 6000rpm
0.06 ∼ 600000rpm
(1 パルス / 回転の時)
(1 パルス / 回転の時)
OFF
1 2 3 4 5 6 7 8
[30Hz]に設定してください。入力信号
のチャタリング除去処理を行います。
10kHz
30Hz
※ 0 . 0 3 s 以下の設定を行う場合には、
必ず[10kHz]設定にしてください。
上下限、範囲、上限、下限
入力パルス間隔 (s)
設定値
ON
0.1 ∼ 1s
※ [10kHz]設定にて全範囲計測可能です。
(形AMD-S□2) 入 力 信 号 に 接 点 を お 使 い の 場 合 は
1 ∼ 10s
(形AMD-S□3)
AC250V/DC30V 3A(抵抗負荷)
出力モード
起動補償タイマ
寿命
停電記憶方式
0.1 ∼ 10s の範囲で固定
(特に指定がない場合は 10s 固定)
0.0 ∼ 99.9s で可変可能
回転低下検出
(形 AMD-SL □)
回転上昇検出
(形AMD-SU□)
平均回数
無し
下限
1 2 3 4 5 6 7 8
ON
上限
OFF
1 2 3 4 5 6 7 8
入力モード 電圧入力
無し
EEP-ROM(書換え回数 10 万回以上)
【前面キー設定】
*入力パルス間隔と周波数の関係式は以下の通りです。
周波数(Hz)=1/ 入力パルス間隔(s)
【例】入力パルス間隔 =0.01s の時 ⇒ 周波数 =1/0.01s=100Hz
入力パルス間隔 =10s の時
⇒ 周波数 =1/10s=0.1Hz
OFF
OFF
起動補償
タイマ
固定(0.1 ∼ 10s)
クイック
オムロン
0120-919-066
携帯電話・PHSなどは 055-982-5015です。
直通の制御機器の技術窓口は055-982-5000です。
OFF
PNP
【営業のお問い合わせ時間】
■営業時間:9:00∼12:00/13:00∼17:30(土・日・祝祭日は休業)
■営 業 日:土・日・祝祭日/春期・夏期・年末年始を除く
1 2 3 4 5 6 7 8
形 AMD-S
営業統轄事業部
東京都品川区大崎1-11-1 ゲートシティ大崎ウエストタワー14F(〒141-0032)
【技術のお問い合わせ時間】
■営業時間:9:00∼12:00/13:00∼19:00(土・日・祝祭日は17:00まで)
■営 業 日:年末年始を除く
1 2 3 4 5 6 7 8
出力リレー
電気的 10 万回以上
*上記は適合用途の条件の一部です。当社のベスト、
総合カタログ、データシート等最新版のカタログ、
マニュアルに記載の保証・免責事項の内容をよく読
んでご使用ください。
●営業にご用の方も、技術的なお問い合わせの方も、フリーコールへ。
音声ガイダンスが流れますので、案内に従って操作ください。
ON
OFF
ON
出力リレー
電気的 50 万回以上
下記用途に使用される場合、当社営業担当者までご相
談のうえ仕様書などによりご確認いただくとともに、
定格・性能に対し余裕を持った使い方や、万一故障が
あっても危険を最小にする安全回路などの安全対策を
講じてください。
a) 屋外の用途、潜在的な化学的汚染あるいは電気的
妨害を被る用途またはカタログ、取扱説明書等に
記載のない条件や環境での使用
b) 原子力制御設備、焼却設備、鉄道・航空・車両設備、
医用機械、娯楽機械、安全装置、および行政機関や
個別業界の規制に従う設備
c) 人命や財産に危険が及びうるシステム・機械・装置
d) ガス、水道、電気の供給システムや 24 時間連続運
転システムなど高い信頼性が必要な設備
e) その他、上記a)∼d)に準ずる、高度な安全性が
必要とされる用途
形 H7CX-R
ON
※ 8 ピン⇒ 11 ピンへの配線変更が必要です。
※ 配線の長さ、端子番号にはご留意ください。
※ 接続ソケット(形 P2CF-11)は別売です。
不可
KP-3
KP-4
OFF
比較値
・AC100 ∼ 110V
・AC200 ∼ 220V
リレー出力
青(黒)
可
CPU 異常
センサ
センサ
不可
消灯
形 AMD-S の機能を形 H7CX-R で実現させるためには下表の通り設定してください。
黒(白)
茶(赤)
青(黒)
可
変化なし
計測値
比較値 2
形 AMD-S
・接続ソケット:形P2CF-11
不可
e1
●設定方法
形 H7CX-R
・接続ソケット:形 8PFA
可
KP-2
アップキー
ffffff
MODE
MODE
●性能
形 AMD-S
可
計測値
形 AMD-S から形 H7CX-R への置換
●端子配置 / 配線接続
可
比較値 2
MODE
MODE 3秒以上押す
MODE +
1秒以上押す
不可
計測値
<出力モード(上限、下限)>
計測値
MODE
MODE
1秒以上押す
ホールドキー
KP-1
ご使用に際してのご承諾事項
●運転モードを機能設定モードに切替えます。
電源投入
運転モードでの
表示切替
比較値 2
比較値
U1
*モードの移行
* 「ディップスイッチモニタモード」・「機能設定モード」への移行
●機能設定モードから運転モードに切替えた後、比較値を設定します。
<出力モード(上下限、範囲)>
MODE +
レベル
・比較値 1 ≦比較値 2 の場合
OUT ON 条件:比較値 1 ≦計測値≦比較値 2
・比較値 1 >比較値 2 の場合
OUT ON 条件:比較値 2 ≦計測値≦比較値 1
Step3
Step2
ディップスイッチ
モニタモード
キープロテクトスイッチ「ON」時は、下表のキープロテクトレベル(KP-1
∼ KP-5)に応じて、各キーの操作を禁止し、誤設定を防止することができま
す。
計測値
表示
オートゼロ時間
(AUTZ)
HLD
10.8 15
電源電圧 (VDC)
キープロテクト表示
MODE
(出荷時設定値)
0
※ キープロテクトレベルは機能設定モードで設定します。
●ディップスイッチで設定できないパラメータを設定します。
------
(1)電源投入時に短時間ですが突入電流(約 10A)が流れ、電源の
容量によっては起動しないことがありますので、充分な容量
の電源をご使用ください。
(2)上下限出力モードで比較値を設定する場合に、比較値 1 ≧比
較値 2 となるように設定すると出力が常時 ON します。
(3)プリスケール値の設定を間違えるとカウント誤差につながり
ます。設定に間違いがないか確かめてからご使用ください。
(4)EEP-ROM により停電記憶をおこなっています。EEP-ROM
の書き換え寿命は 10 万回以上です。EEP-ROM は電源 OFF
時、設定変更時に書き換えます。
(5)AC24V/DC12-24V仕様の機種
で外部供給電源をご使用の場
100
合、供給する電源電圧に応じ
負荷電流
て右図のように負荷を軽減し
(mA)
てください。
(DC 電圧供給時
のみ)
20
EN/IEC 規格対応について
設 定 方 法
項目
OFF
ON
1
―
―
―
2
計数速度
30Hz
10kHz
3
出力モード
右記参照
4
5
平均回数
右記参照
6
7
―
―
―
8 NPN/PNP入力モード切替 NPN
PNP
※反転文字は工場出荷時の設定です。
・ パネルへの取り付けの際は2ヶ所のネジを交互にバランスをとり
ながらしっかり締めてください。バランスがとれていない場合、
パネルの内部に水が浸入する恐れがあります。
・ 常時読込方式を採用しているため、
動作中に比較値を変更する場
合に、
現在計測値をまたぐような変更をすると出力状態に影響し
ます。
センサ
・ 無電圧入力(NPN入力)で使用される場合、
入力端子より約 14V が出力されますので、
外部から 14V 以下の電源を供給する場合は
0V
入力
ダイオードを接続してください。
・ 工場出荷時の設定で電源を投入し、
カウント入力にパルスが入ら
ない状態で放置すると 999.9 秒後に出力が ON します。
・ 作業者がすぐ電源を OFF できるよう、スイッチまたはサーキッ
トブレーカを設置し、適切に表示してください。
・ 操作部は水が浸入しない構造(NEMA4、IP66 準拠)となってい
ますが、
タコメータ本体とパネルカットの隙間から水が浸入しな
いようゴムパッキン(形 Y92S-29(別売)
)をご使用ください。
このゴムパッキンが十分押圧
0.5∼1mm
されていないとパネル内部に
水が浸入する可能性がありま
すので取りつけアダプタ(形
左図程度までの
Y92F-30(別売))の取りつけ補
締付をおすすめ
強ねじを必ず締めてご使用く
します。
ださい。
HLD
■操作方法
ON
X :補助リレー
形MYリレーなど
X2
キープロテクトスイッチの設定
(−)(+)
※密着取付け時は耐水性が失われます。
OFF
X1
X1/a
(出荷時設定)
A
●基本的なパラメータの設定を行います。
T
X1/a
使用上の注意
AC100 ∼ 240V 50/60Hz
9.4VA
AC24V 50/60Hz/DC12-24V 7.1VA/4.7W
●許容電圧変動範囲
定格電圧の 85 ∼ 110% (DC12-24V は 90 ∼ 110%)
●使用周囲温度
-10 ∼ +55℃(密着取付時は -10 ∼ +50℃)
(ただし、氷結、結露のないこと)
●使用周囲湿度
25 ∼ 85%
●保存温度
-25 ∼ +65℃(ただし、氷結、結露のないこと)
●高度
2,000m 以下
●推奨ヒューズ
T2A、AC250V、タイムラグヒューズ、低遮断容量
●質量
約 140g(本体のみ)
●設置環境
過電圧カテゴリⅡ、汚染度 2(IEC61010-1 による)
●制御出力
リレー出力 AC250V 3A(抵抗負荷)
DC30V 3A(抵抗負荷)
●リレーの電気的寿命 10 万回
●リレーの機械的寿命 1000 万回
●外部供給電源
DC12V 100mA
●保護構造
単品取付け:形 H7CX シリーズタコメータのフロント部の保護構造
は、以下の条件が全て満たされた場合に、UL508 Type
4X(屋内使用のみ)に適合します。
*ゴムパッキン(形 Y92S-29)と取付アダプタ(形 Y92F-30)をタコ
メータと共に使用する。取り替え時も、これらの部品を使用する。
*タコメータは、"Type 4X for Indoor Use Only" の認定の表示がある
制御ボックスの平面に取り付ける。
・電源−入力−出力間は基礎絶縁です。
・入力、出力端子は露出した充電部をもたない装置に接続してください。
・入力、出力端子は最高使用電圧に適した基礎絶縁のされている装置に接
続してください。
A=(48n−2.5) +1
−0
Step1
T/a
ON(有効)
8
(+)外部供給電源
パラメータを設定するにはディップスイッチによる設定と
前面キーによる設定の両方が必要になります。
詳細は以下手順をご覧ください。
(
OFF(無効)
4
センサ等
DC12V
n 個密着取付
内部回路
5 6 7
ホールド*
※取付パネルの板厚は 1 ∼ 5mm が適当
です。
※アダプタの取付により密着取付が
可 能 で す 。( た だ し フ ッ ク の な い
方向のみ)
X2/b
仕 様
HLD
MODE
・ 高温中に長時間、出力 ON の状態で放置すると、内部部品(電解
コンデンサなど)の劣化を早める恐れがあります。そのためリ
レーと組み合わせて使用するようにし、長時間(例えば 1ヶ月以
上)の出力 ON 放置は避けてください。
< 参考図 >
●電源電圧 / 消費電力
表示部
●取付寸法図(単位:mm)
1. 環境上の要点
・ 振動、衝撃の影響が大きいところ、水がかかるところ、被油のある
ところでの使用は避けてください。
・ 粉塵の多いところ、腐食ガスの発生するところ、直射日光のあたる
場所での使用は避けてください。
・ ノイズの発生源、ノイズがのった強電線から、入力信号源の機器、
入力信号線の配線、および製品本体を離してください。
・ 多量の静電気が発生する環境(成形材料、粉、流体材料をパイプ搬
送する場合など)
でご使用の場合は静電気発生源を製品本体より離
してください。
・ 本体の外装は有機溶剤(シンナー・ベンジンなど)、強アルカリ性物
質、強酸性物質に侵されるためご注意ください。
・ 湿度が高く結露が生じる恐れのある場所、
温度変化の激しいところ
での使用は避けてください。
●FAXによるお問い合わせは下記をご利用ください。
カスタマサービスセンタ お客様相談室 FAX 055-982-5051
●インターネットによるお問い合わせは下記をご利用ください。
http://www.fa.omron.co.jp/support/
形 H7CX-R
パラメータ
stmr
(STMR)
設定範囲
設定値
0 .0 ∼ 99.9
0 .0
(0.0s) (99.9s)
●FAQ(よくあるご質問)ホームページをご用意しています。
http://www.dom.omron.co.jp/faq.nsf/
●その他のお問い合わせ先
納期・価格・修理・サンプル・承認図は貴社のお取引き、
または貴社担当オムロン営業員にご相談ください。