1
Service
Manual
SR6004 /FB/N1B/U1B
/K1SG/N1SG
TABLE OF CONTENTS
SECTION
PAGE
1. TECHNICAL SPECIFICATIONS........................................................................................... 1
2. TECHNICAL DESCRIPTION................................................................................................ 9
3. POWER AMPLIFIER ADJUSTMENT ......................................................................................15
4. SERVICE MODE .................................................................................................................16
5. SYSTEM ERROR .................................................................................................................18
6. TROUBLE SHOOTING ......................................................................................................... 22
7. JIG FOR SERVICING ........................................................ ...................................................
24
8. DUAL BACKUP MEMORY.................................................................................................... 31
9. WRITING AND UPDATE SOFTWARE ............................................................................... 32
10. WIRING DIAGRAM ...............................................................................................................77
11. BLOCK DIAGRAMS ............................................................................................................. 79
12. SCHEMATIC DIAGRAM ....................................................................................................... 83
13. PARTS LOCATION ............................................................................................................. 117
14. EXPLODED VIEW AND PARTS LIST ................................................................................. 143
15. MICROPROCESSOR AND IC DATA ................................................................................. 149
16. ELECTRICAL PARTS LIST .................................................................................................. 186
17. ABOUT REPLACE THE MICROPROCESSOR WITH A NEW ONE ........................................255
Please use this service manual with referring to the user guide (D.F.U.) without fail.
修理の際は、必ず取扱説明書を準備し操作方法を確認の上作業を行ってください。
SR6004
X0435V02DM/DG0911
Copyright 2009 D&M Holdings Inc. All rights reserved.
WARNING: Violators will be prosecuted to the maximum extent possible.
Ver. 2
Please refer to
MODIFICATION NOTICE.
Part no. 90M27DW855020
First Issue 2009.11
SR6004
AV Surround Receiver
MARANTZ DESIGN AND SERVICE
Using superior design and selected high grade components, MARANTZ company has created the ultimate in stereo sound.
Only original MARANTZ parts can insure that your MARANTZ product will continue to perform to the VSHFL¿FDWLRQV for
which it is famous.
Parts for your MARANTZ equipment are generally available to our National Marantz Subsidiary or Agent.
ORDERING PARTS :
3DUWVFDQEHRUGHUHGHLWKHUE\PDLORUE\)D[,QERWKFDVHVWKHFRUUHFWSDUWQXPEHUKDVWREHVSHFL¿HG
The following information must be supplied to eliminate delays in processing your order :
1. Complete address
2. Complete part numbers and quantities required
3. Description of parts
4. Model number for which part is required
5. Way of shipment
6. Signature : any order form or Fax. must be signed, otherwise such part order will be considered as null and void.
64"
&6301&53"%*/(
%.&6301
10#09#6*-%*/(4*-7&310*/5
#&&.%453""5."&*/%)07&/
5)&/&5)&3-"/%4
1)0/&
'"9
."3"/5;".&3*$"*/$
$03103"5&%3*7&
.")8")/&8+&34&:
64"
$"/"%"
%.$BOBEB*OD
"11-&$3&&,#-7%
."3,)".0/5"3*0-3#
$"/"%"
1)0/&
'"9
,03&"
+"1"/
%.)PMEJOHT*OD
%.#6*-%*/(/*44)*/$)0
,"8"4",*,6,"8"4",*4)*
,"/"("8"+"1"/
%.4"-&4"/%."3,&5*/(,03&"-5%
':&0/#-%(
#"/10%0/(4&0$)0(6
4&06-,03&"
1)0/&
'"9
$)*/"
%.4"-&4"/%."3,&5*/(4)"/()"*-5%
300.4)"/()"*"*31035$*5:5&3.*/"-
/0/"/+*/(8&45
30"%4)"/()"*
$)*/"
5&-
'"9
NOTE ON SAFETY :
Symbol
Fire or electrical shock hazard. Only original parts should be used to replaced any part marked with symbol
$Q\RWKHUFRPSRQHQWVXEVWLWXWLRQRWKHUWKDQRULJLQDOW\SHPD\LQFUHDVHULVNRI¿UHRUHOHFWULFDOVKRFNKD]DUG
.
安全上の注意:
がついている部品は、安全上重要な部品です。必ず指定されている部品番号のものを使用して下さい。
SHOCK, FIRE HAZARD SERVICE TEST :
CAUTION : After servicing this appliance and prior to returning to customer, measure the resistance between either primary
AC cord connector pins (with unit NOT connected to AC mains and its Power switch ON), and the face or Front Panel of
product and controls and chassis bottom.
Any resistance measurement less than 1 Megohms should cause unit to be repaired or corrected before AC power is applied,
and YHUL¿HG before it is return to the user/customer.
Ref. UL Standard No. 60065.
,QFDVHRIGLI¿FXOWLHVGRQRWKHVLWDWHWRFRQWDFWWKH Technical
Department at above mentioned address.
091105DM/DG
1. TECHNICAL SPECIFICATIONS s
FM TUNER SECTION
GENERAL
Frequency Range ................. 87.5 - 108.0 MHz [ /U, /N, /K ]
................................................. 76.0 - 90.0 MHz [ /F ]
Usable Sensitivity................................ IHF 1.8 μV/16.4 dBf
Signal to Noise Ratio ....................... Mono/Stereo 75/70 dB
Distortion......................................... Mono/Stereo 0.2/0.3 %
Power Requirement ....................... AC 100 V 50/60Hz [ /F ]
........................................................... AC 220 V 50 Hz [ /K ]
......................................................AC 230 V 50/60 Hz [ /N ]
...........................................................AC 120 V 60 Hz [ /U ]
Power Consumption...................................................650 W
Standby Power Consumption ......................(Normal) 0.7 W
................................................................. (Economy) 0.4 W
Weight...................................................................... 13.3 kg
AM TUNER SECTION
Frequency Range ............................... 520 - 1710 kHz [ /U ]
........................................531 - 1602 kHz [ /F, /N, /K ]
Signal to Noise Ratio ..................................................50 dB
Usable Sensitivity........................................ Loop 400μV/m
Distortion...................................... 400Hz, 30 % Mod. 0.5 %
Specifications subject to change without prior notice.
ACCESSORIES
Remote controller (RC007SR) ........................................... 1
AAA-size batteries ............................................................. 2
AC power cable.................................................................. 1
AM loop antenna................................................................ 1
FM antenna........................................................................ 1
Microphone ........................................................................ 1
Wireless receiver RX101 ................................................... 1
(Please refer to RX101 Service Manual for this item.)
AUDIO SECTION
Power Output (8Ω/20Hz-20kHz/THD=0.08%)
Front L&R........................................110 W / Ch [ /U, /N, /F ]
.........................................................100 W / Ch [ /K ]
Center .............................................110 W / Ch [ /U, /N, /F ]
.........................................................100 W / Ch [ /K ]
Surround L&R .................................110 W / Ch [ /U, /N, /F ]
.........................................................100 W / Ch [ /K ]
Surround Back L&R ........................110 W / Ch [ /U, /N, /F ]
.........................................................100 W / Ch [ /K ]
Power Output (6Ω/20Hz-20kHz/THD=0.08%) [ /U, /N ]
Power Output (6Ω/JEITA) [ /F, /K ]
Front L&R............................................. 130 W / Ch [ /U, /N ]
....................................................160 W / Ch [ /F, /K ]
Center .................................................. 130 W / Ch [ /U, /N ]
...................................................160 W / Ch [ /F, /K ]
Surround L&R ....................................... 130 W / Ch [/U, /N ]
....................................................160 W / Ch [ /F, /K ]
Surround Back L&R ............................. 130 W / Ch [ /U, /N ]
....................................................160 W / Ch [ /F, /K ]
22.5 (15/16)
DIMENSION
348.5 (13-11/16)
389 (15-3/8)
Input Sensitivity/Impedance ...................180 mV/ 47 Kohms
Signal to Noise Ratio(Analog Input / Pure Direct).....105 dB
Frequency Response
(Analog Input / Pure Direct) ....... 8 Hz - 100 kHz ( ± 3 dB)
(Digital Input / 96 kHz PCM) ........ 8 Hz - 45 kHz ( ± 3 dB)
VIDEO
17.5
(11/16)
Television Format .........................................NTSC [ /F, /U ]
..............................................................NTSC/PAL [ /N, /K ]
Input Level/Impedance................................1 Vp-p/75 ohms
Output Level/Impedance.............................1 Vp-p/75 ohms
Video Frequency Response.............. 5 Hz to 8 MHz (-1 dB)
Video Frequency (Component)....... 5 Hz to 80 MHz (-1 dB)
S/N ..............................................................................60 dB
HDMI
440 (17-3/8)
Unit : mm (in)
1
14.5
(5/8)
146.5 (5-3/4)
161 (6-3/8)
Input / Output jacks .......................... 19-pin HDMI terminals
(HDMI V.1.3 with Deep
Color, Dolby True HD,
DTS-HD Master Audio,
SACD, DVD-Audio)
The relation between the selected surround mode and the input signal
The surround mode is selected with the surround mode buttons on SR6004 or the remote control unit. However, the sound
you hear is subject to the relationship between the selected surround mode and input signal. That relationship is as follows;
s
Surround
サラウンドモード
Mode
AUTO
Input
Signal
入力信号
Dolby Surr.EX
Dolby D (5.1ch)
Dolby D (2ch)
Dolby D (2ch Surr)
Dolby Digital Plus (2ch)
Dolby Digital Plus (5.1ch)
Dolby Digital Plus (6.1ch)
Dolby Digital Plus (7.1ch)
Dolby TrueHD (2ch)
Dolby TrueHD (5.1ch)
Dolby TrueHD (6.1ch)
Dolby TrueHD (7.1ch)
Dolby TrueHD 192kHz (5.1ch)
DTS-ES
DTS 96/24
DTS (5.1ch)
DTS-HD (2ch)
DTS-HD (5.1ch)
DTS-HD (6.1ch)
DTS-HD (7.1ch)
DTS Express
AAC (5.1ch)
AAC (2ch)
Multi Ch-PCM (5.1ch)
Multi Ch-PCM 96kHz (5.1ch)
Multi Ch-PCM 192kHz (5.1ch)
SA-CD (5.1ch)
SA-CD (2ch)
PCM (Audio)
PCM 96kHz
HDCD
Analog
Dolby Surr.EX
SOURCE
Dolby D (5.1ch)
DIRECT
PURE DIRECT Dolby D (2ch)
Dolby D (2ch Surr)
Dolby Digital Plus (2ch)
Dolby Digital Plus (5.1ch)
Dolby Digital Plus (6.1ch)
Dolby Digital Plus (7.1ch)
Dolby TrueHD (2ch)
Dolby TrueHD (5.1ch)
Dolby TrueHD (6.1ch)
Dolby TrueHD (7.1ch)
Dolby TrueHD 192kHz (5.1ch)
DTS-ES
DTS 96/24
DTS (5.1ch)
DTS-HD (2ch)
DTS-HD (5.1ch)
DTS-HD (6.1ch)
DTS-HD (7.1ch)
DTS Express
AAC (5.1ch)
AAC (2ch)
Output Channel
出力チャンネル
Decoding
デコーディング
L/R C
Dolby Digital EX
Dolby Digital 5.1
Dolby Digital 2.0
Pro Logic IIx movie
DolbyDigital +
DolbyDigital +
DolbyDigital +
DolbyDigital +
DolbyTrueHD
DolbyTrueHD
DolbyTrueHD
DolbyTrueHD
DolbyTrueHD
DTS-ES
DTS-96/24
DTS 5.1
DTS-HD
DTS-HD
DTS-HD
DTS-HD
DTS EXPRESS
AAC 5.1
AAC 2.0
Multi Ch-PCM
Multi Ch-PCM 96kHz
Multi Ch-PCM 192kHz
SA-CD (5.1ch)
SA-CD (Stereo)
PCM (Stereo)
PCM (Stereo 96kHz)
HDCD
Stereo
Dolby Digital EX
Dolby Digital 5.1
Dolby Digital 2.0
Pro Logic IIx movie
DolbyDigital +
DolbyDigital +
DolbyDigital +
DolbyDigital +
DolbyTrueHD
DolbyTrueHD
DolbyTrueHD
DolbyTrueHD
DolbyTrueHD
DTS-ES
DTS-96/24
DTS 5.1
DTS-HD
DTS-HD
DTS-HD
DTS-HD
DTS EXPRESS
AAC 5.1
AAC 2.0
‡
‡
‡
‡
‡
‡
‡
‡
‡
‡
‡
‡
‡
‡
‡
‡
‡
‡
‡
‡
‡
‡
‡
‡
‡
‡
‡
‡
‡
‡
‡
‡
‡
‡
‡
‡
‡
‡
‡
‡
‡
‡
‡
‡
‡
‡
‡
‡
‡
‡
‡
‡
‡
‡
‡
‡
‡
–
‡
–
‡
‡
‡
–
‡
‡
‡
‡
‡
‡
‡
–
‡
‡
‡
‡
‡
–
‡
‡
‡
‡
–
–
–
–
–
‡
‡
–
‡
–
‡
‡
‡
–
‡
‡
‡
‡
‡
‡
‡
–
‡
‡
‡
‡
‡
–
SL
SR
‡
‡
–
‡
–
‡
‡
‡
–
‡
‡
‡
‡
‡
‡
‡
–
‡
‡
‡
‡
‡
–
‡
‡
‡
‡
–
–
–
–
–
‡
‡
–
‡
–
‡
‡
‡
–
‡
‡
‡
‡
‡
‡
‡
–
‡
‡
‡
‡
‡
–
SR6004_F_02.indd 67
2
Front information
display
表示部
Signal format
HL SBL
Channel
status
SubW indicators
信号形式インジケーター チャンネルステータス・インジケーター
HR SBR
‡
‡ 2 DIGITAL EX
L, C, R, SL, SR, S, LFE
–
‡ 2 DIGITAL
L, C, R, SL, SR, LFE
–
–
‡ 2 DIGITAL
L, R
–
–
‡
‡ 2 DIGITAL
L, R, S
–
‡ 2 DIGITAL PLUS
L, R
–
–
‡ 2 DIGITAL PLUS
L, C, R, SL, SR, LFE
–
–
‡
‡ 2 DIGITAL PLUS
L, C, R, SL, SR, S, LFE (,ex1)
–
‡
‡ 2 DIGITAL PLUS
L, C, R, SL, SR, SBL, SBR, LFE
–
‡ 2 TrueHD
L, R
–
–
‡ 2 TrueHD
L, C, R, SL, SR, LFE (,ex1,ex2)
–
–
‡
‡ 2 TrueHD
L, C, R, SL, SR, S, LFE (,ex1,ex2)
–
‡
‡ 2 TrueHD
–
L, C, R, SL, SR, SBL, SBR, LFE (,ex1,ex2)
‡ 2 TrueHD
L, C, R, SL, SR, LFE
–
–
‡
‡ dts, ES
–
L, C, R, SL, SR, S, LFE
‡ dts 96/24
–
–
L, C, R, SL, SR, LFE
‡ dts
–
–
L, C, R, SL, SR, LFE
‡ dts-HD MSTR/HIRES L, R
–
–
‡ dts-HD MSTR/HIRES L, C, R, SL, SR, LFE (,ex1,ex2)
–
–
‡
‡ dts-HD MSTR/HIRES L, C, R, SL, SR, S, LFE (,ex1,ex2)
–
‡
‡ dts-HD MSTR/HIRES L, C, R, SL, SR, SBL, SBR, LFE (,ex1,ex2)
–
‡ dts express
–
–
L, C, R, SL, SR, LFE
‡ AAC
–
–
L, C, R, SL, SR, LFE
‡ AAC
–
–
L, R
‡ PCM
–
–
L, C, R, SL, SR, LFE
‡ PCM
–
–
L, C, R, SL, SR, LFE
‡ PCM
–
–
L, C, R, SL, SR, LFE
‡ DSD
–
–
L, C, R, SL, SR, LFE
‡ DSD
–
–
L, R
‡ PCM
–
–
L, R
‡ PCM
–
–
L, R
‡ PCM, HDCD
–
–
L, R
‡ ANALOG
–
–
‡
‡ 2 DIGITAL EX
L, C, R, SL, SR, S, LFE
–
‡ 2 DIGITAL
L, C, R, SL, SR, LFE
–
–
–
–
– 2 DIGITAL
L, R
‡
‡ 2 DIGITAL
L, R, S
–
L, R
–
–
– 2 DIGITAL PLUS
‡ 2 DIGITAL PLUS
L, C, R, SL, SR, LFE
–
–
‡
‡ 2 DIGITAL PLUS
L, C, R, SL, SR, S, LFE (,ex1)
–
‡
‡ 2 DIGITAL PLUS
L, C, R, SL, SR, SBL, SBR, LFE
–
–
–
– 2 TrueHD
L, R
‡ 2 TrueHD
L, C, R, SL, SR, LFE (,ex1,ex2)
–
–
‡
‡ 2 TrueHD
L, C, R, SL, SR, S, LFE (,ex1,ex2)
–
‡
‡ 2 TrueHD
–
L, C, R, SL, SR, SBL, SBR, LFE (,ex1,ex2)
‡ 2 TrueHD
L, C, R, SL, SR, LFE
–
–
‡
‡ dts, ES
–
L, C, R, SL, SR, S, LFE
‡ dts 96/24
–
–
L, C, R, SL, SR, LFE
‡ dts
–
–
L, C, R, SL, SR, LFE
–
–
– dts-HD MSTR/HIRES L, R
‡ dts-HD MSTR/HIRES L, C, R, SL, SR, LFE (,ex1,ex2)
–
–
‡
‡ dts-HD MSTR/HIRES L, C, R, SL, SR, S, LFE (,ex1,ex2)
–
‡
‡ dts-HD MSTR/HIRES L, C, R, SL, SR, SBL, SBR, LFE (,ex1,ex2)
–
‡ dts express
–
–
L, C, R, SL, SR, LFE
‡ AAC
–
–
L, C, R, SL, SR, LFE
–
–
– AAC
L, R
s
Surround
サラウンドモード
Mode
Input
Signal
入力信号
Multi Ch-PCM (5.1ch)
SOURCE
DIRECT
Multi Ch-PCM 96kHz (5.1ch)
PURE DIRECT Multi Ch-PCM 192kHz (5.1ch)
SA-CD (5.1ch)
SA-CD (2ch)
PCM (Audio)
PCM 96kHz
HDCD
Analog
7.1ch input
EX/ES
Dolby Surr.EX
Dolby D (5.1ch)
Dolby Digital Plus (5.1ch)
Dolby TrueHD (5.1ch)
DTS-ES
DTS (5.1ch)
DTS-HD (5.1ch)
AAC (5.1ch)
Multi-PCM (5.1ch)
SA-CD (5.1ch)
DOLBY PLIIz
Dolby Surr.EX
Dolby D (5.1ch)
DOLBY
(PLIIx movie)
(PLIIx music)
(PLIIx game)
Dolby D (2ch)
Dolby D (2ch Surr)
Dolby Digital Plus (2ch)
Dolby Digital Plus (5.1ch)
Dolby Digital Plus (6.1ch)
Dolby Digital Plus (7.1ch)
Dolby TrueHD (2ch)
Dolby TrueHD (5.1ch)
Dolby TrueHD (6.1ch)
Dolby TrueHD (7.1ch)
DTS-HD (2ch)
AAC (5.1ch)
AAC (2ch)
Multi Ch-PCM (5.1ch)
SA-CD (5.1ch)
SA-CD (2ch)
PCM (Audio)
HDCD
Analog
Dolby Surr.EX
Dolby D (5.1ch)
Dolby D (5.1ch)
Dolby D (2ch)
Dolby D (2ch Surr)
Dolby Digital Plus (2ch)
Dolby Digital Plus (5.1ch)
Dolby Digital Plus (5.1ch)
Dolby TrueHD (2ch)
Dolby TrueHD (5.1ch)
Dolby TrueHD (5.1ch)
DTS-HD (2ch)
AAC (5.1ch)
AAC (2ch)
Multi Ch-PCM (5.1ch)
SA-CD (5.1ch)
SA-CD (2ch)
PCM (Audio)
HDCD
Analog
Decoding
デコーディング
Multi Ch-PCM
Multi Ch-PCM 96kHz
Multi Ch-PCM 192kHz
SA-CD (5.1ch)
SA-CD (Stereo)
PCM (Stereo)
PCM (Stereo 96kHz)
HDCD
Stereo
Multi Ch
Dolby Digital EX
Dolby Digital EX
DolbyDigital + +EX
DolbyTrueHD +EX
DTS-ES
DTS-ES
DTS-HD + NEO6
AAC + Dolby EX
Multi Ch-PCM +
Dolby Digital EX
SA-CD (5.1ch) +
Dolby Digital EX
Dolby Digital 5.1 + PLIIz
Dolby Digital 5.1+ +
PLIIz
PLIIz
PLIIz
PLIIz
DolbyDigital Plus + PLIIz
DolbyDigital Plus + PLIIz
DolbyDigital Plus + PLIIz
PLIIz
DolbyTrueHD + PLIIz
DolbyTrueHD + PLIIz
DolbyTrueHD + PLIIz
PLIIz
AAC + PLIIz
Pro Logic IIz
Multi Ch-PCM + PLIIz
SA-CD (5.1ch) + PLIIz
PLIIz
PLIIz
PLIIz
PLIIz
Dolby Digital EX
Dolby Digital 5.1
Dolby Digital 5.1 + PLIIx
Pro Logic IIx
Pro Logic IIx
Pro Logic IIx
DolbyDigital +
Dolby Digital Plus + PLIIx
Pro Logic IIx
DolbyTrueHD + PLIIx
DolbyTrueHD
DTS-HD
AAC + PLIIx
Pro Logic IIx
Multi Ch-PCM + PLIIx
SA-CD (5.1ch) + PLIIx
Pro Logic IIx
Pro Logic IIx
Pro Logic IIx
Pro Logic IIx
Front information
display
表示部
Signal format
HL SBL
Channel
status
SubW indicators
信号形式インジケーター チャンネルステータス・インジケーター
HR SBR
‡ PCM
–
–
L, C, R, SL, SR, LFE
‡ PCM
L, C, R, SL, SR, LFE
–
–
‡ PCM
L, C, R, SL, SR, LFE
–
–
‡ DSD
–
–
L, C, R, SL, SR, LFE
–
–
– DSD
L, R
–
–
– PCM
L, R
–
–
– PCM
L, R
–
–
– PCM, HDCD
L, R
–
–
– ANALOG
‡
‡ ANALOG
–
‡
‡ 2 DIGITAL EX
L, C, R, SL, SR, S, LFE
–
‡
‡ 2 DIGITAL
L, C, R, SL, SR, LFE
–
‡
‡ 2 DIGITAL PLUS
L, C, R, SL, SR, LFE
–
‡
‡ 2 TrueHD
L, C, R, SL, SR, LFE (,ex1,ex2)
–
‡
‡ dts, ES
–
L, C, R, SL, SR, S, LFE
‡
‡ dts
–
L, C, R, SL, SR, LFE
‡
‡ dts-HD MSTR/HIRES L, C, R, SL, SR, LFE (,ex1,ex2)
–
‡
‡ AAC
–
L, C, R, SL, SR, LFE
Output Channel
出力チャンネル
‡
‡
‡
‡
‡
‡
‡
‡
‡
‡
‡
‡
‡
‡
‡
‡
‡
‡
‡
‡
‡
‡
–
–
–
–
–
‡
‡
‡
‡
‡
‡
‡
‡
‡
SL
SR
‡
‡
‡
‡
–
–
–
–
–
‡
‡
‡
‡
‡
‡
‡
‡
‡
‡
‡
‡
–
‡
‡
PCM
L, C, R, SL, SR, SW
‡
‡
‡
–
‡
‡
DSD
L, C, R, SL, SR, SW
‡
‡
‡
‡
–
‡
2 DIGITAL EX
L, C, R, SL, SR, S, LFE
‡
‡
‡
‡
–
‡
2 DIGITAL
L, C, R, SL, SR, LFE
‡
‡
‡
‡
‡
‡
‡
‡
‡
‡
‡
‡
‡
‡
‡
‡
‡
‡
‡
‡
‡
‡
‡
‡
‡
‡
‡
‡
‡
‡
‡
‡
‡
‡
‡
‡
‡
‡
‡
‡
‡
‡
‡
‡
‡
‡
‡
‡
‡
‡
‡
‡
‡
‡
‡
‡
‡
‡
‡
‡
‡
‡
‡
‡
‡
‡
‡
‡
‡
‡
‡
‡
‡
‡
‡
‡
‡
‡
‡
‡
‡
‡
‡
‡
‡
‡
‡
‡
‡
‡
‡
‡
‡
‡
‡
‡
‡
‡
‡
‡
‡
‡
‡
‡
‡
‡
‡
‡
‡
‡
‡
‡
‡
‡
‡
‡
‡
‡
‡
‡
‡
‡
‡
‡
‡
–
‡
‡
‡
‡
‡
‡
‡
‡
‡
‡
–
–
–
–
–
–
–
–
–
–
–
–
–
–
–
–
–
–
–
–
–
–
–
–
–
–
–
–
–
–
–
–
–
–
–
–
–
–
–
–
–
‡
‡
‡
‡
–
‡
‡
‡
–
‡
‡
‡
‡
‡
‡
‡
‡
‡
‡
‡
‡
‡
‡
‡
‡
‡
‡
‡
‡
‡
‡
‡
‡
‡
‡
‡
‡
‡
‡
‡
‡
‡
‡
‡
‡
‡
‡
‡
‡
‡
‡
‡
‡
‡
‡
‡
‡
2 DIGITAL
2 DIGITAL
2 DIGITAL PLUS
2 DIGITAL PLUS
2 DIGITAL PLUS
2 DIGITAL PLUS
2 TrueHD
2 TrueHD
2 TrueHD
2 TrueHD
dts-HD MSTR/HIRES
AAC
AAC
PCM
DSD
DSD
PCM
PCM, HDCD
ANALOG
2 DIGITAL EX
2 DIGITAL
2 DIGITAL
2 DIGITAL
2 DIGITAL
2 DIGITAL PLUS
2 DIGITAL PLUS
2 DIGITAL PLUS
2 TrueHD
2 TrueHD
2 TrueHD
2 TrueHD
AAC
AAC
PCM
DSD
DSD
PCM
PCM, HDCD
ANALOG
L, R
L, R, S
L, R
L, C, R, SL, SR, LFE
L, C, R, SL, SR, S,LFE
L, C, R, SL, SR, SBL, SBR, LFE
L, R
L, C, R, SL, SR, LFE (,ex1,ex2)
L, C, R, SL, SR, S, LFE (,ex1,ex2)
L, C, R, SL, SR, SBL, SBR, LFE (,ex1,ex2)
L, R
L, C, R, SL, SR, LFE
L, R
L, C, R, SL, SR, LFE
L, C, R, SL, SR, LFE
L, R
L, R
L, R
–
L, C, R, SL, SR, S, LFE
L, C, R, SL, SR, LFE
L, C, R, SL, SR, LFE
L, R
L, R, S
L, R
L, C, R, SL, SR, LFE
L, C, R, SL, SR, LFE
L, R
L, C, R, SL, SR, LFE (,ex1,ex2)
L, C, R, SL, SR, LFE (,ex1,ex2)
L, R
L, C, R, SL, SR, LFE
L, R
L, C, R, SL, SR, LFE
L, C, R, SL, SR, LFE
L, R
L, R
L, R
-
L/R C
09.9.11 4:27:08 PM
3
s
Output Channel
出力チャンネル
Surround
サラウンドモード
Mode
Input
Signal
入力信号
Decoding
デコーディング
L/R C
DTS
(Neo:6
Cinema)
(Neo:6 Music)
DTS-ES
DTS 96/24
DTS (5.1ch)
DTS-HD (2ch)
DTS-HD (5.1ch)
DTS-HD (6.1ch)
DTS 5.1
DTS-96/24
DTS 5.1
Neo:6
DTS-HD
DTS-HD
‡
‡
‡
‡
‡
‡
‡
‡
‡
‡
‡
‡
SL
SR
‡
‡
‡
‡
‡
‡
DTS-HD (7.1ch)
DTS-HD
‡
‡
‡
Dolby D (2ch)
Dolby D (2ch Surr)
Dolby Digital Plus (2ch)
Dolby TrueHD (2ch)
AAC (2ch)
SA-CD (2ch)
PCM (Audio)
HDCD
Analog
Dolby D (2ch)
Dolby D (2ch Surr)
AAC (2ch)
SA-CD (2ch)
PCM (Audio)
HDCD
Analog
Dolby D (2ch)
Dolby D (2ch Surr)
AAC (2ch)
SA-CD (2ch)
PCM (Audio)
HDCD
Analog
Dolby Surr.EX
Dolby D (5.1ch)
Dolby D (2ch)
Dolby D (2ch Surr)
Dolby Digital Plus (2ch)
Dolby Digital Plus (5.1ch)
Dolby Digital Plus (6.1ch)
Dolby Digital Plus (7.1ch)
Dolby TrueHD (2ch)
Dolby TrueHD (5.1ch)
Dolby TrueHD (6.1ch)
Dolby TrueHD (7.1ch)
Dolby TrueHD 192kHz(5.1ch)
DTS-ES
DTS 96/24
DTS (5.1ch)
DTS-HD (2ch)
DTS-HD (5.1ch)
DTS-HD (6.1ch)
DTS-HD (7.1ch)
DTS Express
AAC (5.1ch)
AAC (2ch)
Multi Ch-PCM
Multi Ch-PCM 96kHz (5.1ch)
Multi Ch-PCM 192kHz (5.1ch)
SA-CD (5.1ch)
SA-CD (2ch)
PCM (Audio)
PCM 96kHz
HDCD
Analog
Dolby Surr.EX
Dolby D (5.1ch)
Dolby D (2ch)
Dolby D (2ch Surr)
Dolby Digital Plus (2ch)
Dolby Digital Plus (5.1ch)
Dolby Digital Plus (6.1ch)
Dolby Digital Plus (7.1ch)
Dolby TrueHD (2ch)
Dolby TrueHD (5.1ch)
Neo:6
Neo:6
Neo:6
Neo:6
Neo:6
Neo:6
Neo:6
Neo:6
Neo:6
CSII
CSII
CSII
CSII
CSII
CSII
CSII
NEURAL
NEURAL
NEURAL
NEURAL
NEURAL
NEURAL
NEURAL
Stereo
Stereo
Stereo
Stereo
Stereo
Stereo
Stereo
Stereo
Stereo
Stereo
Stereo
Stereo
Stereo
Stereo
Stereo
Stereo
Stereo
Stereo
Stereo
Stereo
Stereo
Stereo
Stereo
Stereo
Stereo
Stereo
Stereo
Stereo
Stereo
Stereo
Stereo
Stereo
Dolby Virtual Speaker
Dolby Virtual Speaker
PLII+ Dolby Virtual Speaker
PLII+ Dolby Virtual Speaker
Dolby Virtual Speaker
Dolby Virtual Speaker
Dolby Virtual Speaker
Dolby Virtual Speaker
Dolby Virtual Speaker
Dolby Virtual Speaker
‡
‡
‡
‡
‡
‡
‡
‡
‡
‡
‡
‡
‡
‡
‡
‡
‡
‡
‡
‡
‡
‡
‡
‡
‡
‡
‡
‡
‡
‡
‡
‡
‡
‡
‡
‡
‡
‡
‡
‡
‡
‡
‡
‡
‡
‡
‡
‡
‡
‡
‡
‡
‡
‡
‡
‡
‡
‡
‡
‡
‡
‡
‡
‡
‡
‡
‡
‡
‡
‡
‡
‡
‡
‡
‡
‡
‡
‡
‡
‡
‡
‡
‡
‡
‡
‡
‡
‡
–
–
–
–
–
–
–
–
–
–
–
–
–
–
–
–
–
–
–
–
–
–
–
–
–
–
–
–
–
–
–
–
–
–
–
–
–
–
–
–
–
–
‡
‡
‡
‡
‡
‡
‡
‡
‡
‡
‡
‡
‡
‡
‡
‡
‡
‡
‡
‡
‡
‡
‡
–
–
–
–
–
–
–
–
–
–
–
–
–
–
–
–
–
–
–
–
–
–
–
–
–
–
–
–
–
–
–
–
–
–
–
–
–
–
–
–
–
–
CSII
(Cinema
/Music
/ Mono)
NEURAL
STEREO
Dolby Virtual
Speaker
SR6004_F_02.indd 68
4
Front information
display
表示部
Signal format
HL SBL
Channel
status
SubW indicators
信号形式インジケーター チャンネルステータス・インジケーター
HR SBR
‡ dts, ES
–
–
L, C, R, SL, SR, S, LFE
‡ dts 96/24
–
–
L, C, R, SL, SR, LFE
‡ dts
–
–
L, C, R, SL, SR, LFE
‡
‡ dts-HD MSTR/HIRES L, R
–
‡ dts-HD MSTR/HIRES L, C, R, SL, SR, LFE (,ex1,ex2)
–
–
‡
‡ dts-HD MSTR/HIRES L, C, R, SL, SR, S, LFE (,ex1,ex2)
–
‡
‡ dts-HD MSTR/HIRES L, C, R, SL, SR, SBL, SBR, LFE
–
(,ex1,ex2)
‡
‡ 2 DIGITAL
L, R
–
‡
‡ 2 DIGITAL
L, R, S
–
‡
‡ 2 DIGITAL PLUS
L, R
–
‡
‡ 2 TrueHD
L, R
–
‡
‡ AAC
–
L, R
‡
‡ DSD
–
L, R
‡
‡ PCM
–
L, R
‡
‡ PCM, HDCD
–
L, R
‡
‡ ANALOG
–
‡
‡ 2 DIGITAL
L, R
–
‡
‡ 2 DIGITAL
L, R, S
–
‡
‡ AAC
–
L, R
‡
‡ DSD
–
L, R
‡
‡ PCM
–
L, R
‡
‡ PCM, HDCD
–
L, R
‡
‡ ANALOG
–
‡
‡ 2 DIGITAL
L, R
–
‡
‡ 2 DIGITAL
L, R, S
–
‡
‡ AAC
–
L, R
‡
‡ DSD
–
L, R
‡
‡ PCM
–
L, R
‡
‡ PCM, HDCD
–
L, R
‡
‡ ANALOG
–
‡ 2 DIGITAL EX
L, C, R, SL, SR, S, LFE
–
–
‡ 2 DIGITAL
L, C, R, SL, SR, LFE
–
–
‡ 2 DIGITAL
L, R
–
–
‡ 2 DIGITAL
L, R, S
–
–
‡ 2 DIGITAL PLUS
L, R
–
–
‡ 2 DIGITAL PLUS
L, C, R, SL, SR, LFE
–
–
‡ 2 DIGITAL PLUS
L, C, R, SL, SR, S, LFE (,ex1)
–
–
‡ 2 DIGITAL PLUS
L, C, R, SL, SR, SBL, SBR, LFE
–
–
‡ 2 TrueHD
L, R
–
–
‡ 2 TrueHD
L, C, R, SL, SR, LFE (,ex1,ex2)
–
–
‡ 2 TrueHD
L, C, R, SL, SR, LFE
–
–
‡ 2 TrueHD
L, C, R, SL, SR, LFE
–
–
‡ 2 TrueHD
L, C, R, SL, SR, LFE
–
–
‡ dts, ES
–
–
L, C, R, SL, SR, S, LFE
‡ dts 96/24
–
–
L, C, R, SL, SR, LFE
‡ dts
–
–
L, C, R, SL, SR, LFE
‡ dts-HD MSTR/HIRES L, R
–
–
‡ dts-HD MSTR/HIRES L, C, R, SL, SR, LFE (,ex1,ex2)
–
–
‡ dts-HD MSTR/HIRES L, C, R, SL, SR, S, LFE (,ex1,ex2)
–
–
‡ dts-HD MSTR/HIRES L, C, R, SL, SR, SBL, SBR, LFE (,ex1,ex2)
–
–
‡ dts express
–
–
L, C, R, SL, SR, LFE
‡ AAC
–
–
L, C, R, SL, SR, LFE
‡ AAC
–
–
L, R
‡ PCM
–
–
L, C, R, SL, SR, LFE
‡ PCM
–
–
L, C, R, SL, SR, LFE
‡ PCM
–
–
L, C, R, SL, SR, LFE
‡ DSD
–
–
L, C, R, SL, SR, LFE
‡ DSD
–
–
L, R
‡ PCM
–
–
L, R
‡ PCM
–
–
L, R
‡ PCM, HDCD
–
–
L, R
‡ ANALOG
–
–
L, C, R, SL, SR, S, LFE
–
–
– 2 DIGITAL EX
–
–
– 2 DIGITAL
L, C, R, SL, SR, LFE
L, R
–
–
– 2 DIGITAL
–
–
– 2 DIGITAL
L, R, S
–
–
– 2 DIGITAL PLUS
L, R
–
–
– 2 DIGITAL PLUS
L, C, R, SL, SR, LFE
–
–
– 2 DIGITAL PLUS
L, C, R, SL, SR, S, LFE (,ex1)
–
–
– 2 DIGITAL PLUS
L, C, R, SL, SR, SBL, SBR, LFE
–
–
– 2 TrueHD
L, R
L, C, R, SL, SR, LFE
–
–
– 2 TrueHD
s
Surround
サラウンドモード
Mode
Dolby Virtual
Speaker
Input
Signal
入力信号
Dolby TrueHD (6.1ch)
Dolby TrueHD (7.1ch)
DTS-ES
DTS 96/24
DTS (5.1ch)
DTS-HD (2ch)
DTS-HD (5.1ch)
DTS-HD (6.1ch)
DTS-HD (7.1ch)
AAC (5.1ch)
AAC (2ch)
Multi Ch-PCM (5.1ch)
SA-CD (5.1ch)
SA-CD (2ch)
PCM (Audio)
HDCD
Analog
Dolby Surr.EX
Multi Ch.
Dolby D (5.1ch)
Movie
Dolby D (2ch)
Music
Dolby D (2ch Surr)
DTS-ES
DTS 96/24
DTS (5.1ch)
AAC (5.1ch)
AAC (2ch)
Multi Ch-PCM
Multi Ch-PCM 96kHz
SA-CD (5.1ch)
SA-CD (2ch)
PCM (Audio)
(‡): Movie mode HDCD
only.
Analog
Dolby Surr.EX
Headphone
Dolby D (5.1ch)
(DolbyHP
Dolby D (2ch)
or Normal
Headphone) Dolby D (2ch Surr)
Dolby Digital Plus (5.1ch)
Dolby Digital Plus (6.1ch)
Dolby Digital Plus (7.1ch)
Dolby TrueHD (5.1ch)
Dolby TrueHD (6.1ch)
Dolby TrueHD (7.1ch)
Dolby TrueHD 192kHz(5.1ch)
DTS-ES
DTS 96/24
DTS (5.1ch)
DTS-HD (5.1ch)
DTS-HD (6.1ch)
DTS-HD (7.1ch)
DTS Express
AAC (5.1ch)
AAC (2ch)
Multi Ch-PCM (5.1ch)
PCM
HDCD
ANALOG
Output Channel
出力チャンネル
Decoding
デコーディング
L/R C
Dolby Virtual Speaker
Dolby Virtual Speaker
Dolby Virtual Speaker
Dolby Virtual Speaker
Dolby Virtual Speaker
Dolby Virtual Speaker
Dolby Virtual Speaker
Dolby Virtual Speaker
Dolby Virtual Speaker
Virtual
Virtual
Dolby Virtual Speaker
Dolby Virtual Speaker
PLII+ Dolby Virtual Speaker
PLII+ Dolby Virtual Speaker
PLII+ Dolby Virtual Speaker
PLII+ Dolby Virtual Speaker
Dolby Digital EX
Dolby Digital 5.1
Multi Channel
Multi Channel
DTS-ES
DTS-96/24
DTS 5.1
AAC 5.1
Multi Channel Stereo
Multi Ch-PCM
Multi Ch-PCM 96kHz
SA-CD (5.1ch)
Multi Channel
Multi Channel
Multi Channel
Multi Channel
Dolby H.P
Dolby H.P
Dolby H.P
Dolby H.P
Stereo
Stereo
Stereo
Stereo
Stereo
Stereo
Stereo
Dolby H.P
Dolby H.P
Dolby H.P
Stereo
Stereo
Stereo
Stereo
Dolby H.P
Dolby H.P
Dolby H.P
Dolby H.P
Dolby H.P
Dolby H.P
‡
‡
‡
‡
‡
‡
‡
‡
‡
‡
‡
‡
‡
‡
‡
‡
‡
‡
‡
‡
‡
‡
‡
‡
‡
‡
‡
‡
‡
‡
‡
‡
‡
‡
‡
‡
‡
‡
‡
‡
‡
‡
‡
‡
‡
‡
‡
‡
‡
‡
‡
‡
‡
‡
‡
‡
‡
–
–
–
–
–
–
–
–
–
–
–
–
–
–
–
–
–
(‡)
(‡)
(‡)
(‡)
(‡)
(‡)
(‡)
‡
‡
(‡)
(‡)
(‡)
(‡)
(‡)
(‡)
(‡)
–
–
–
–
–
–
–
–
–
–
–
–
–
–
–
–
–
–
–
–
–
–
–
–
SL
SR
–
–
–
–
–
–
–
–
–
–
–
–
–
–
–
–
–
‡
‡
‡
‡
‡
‡
‡
‡
‡
‡
‡
‡
‡
‡
‡
‡
–
–
–
–
–
–
–
–
–
–
–
–
–
–
–
–
–
–
–
–
–
–
–
–
Notes
Front information
display
表示部
HL SBL
Signal format
Channel
status
SubW indicators
信号形式インジケーター チャンネルステータス・インジケーター
HR SBR
L, C, R, SL, SR, LFE
–
–
– 2 TrueHD
L, C, R, SL, SR, LFE
–
–
– 2 TrueHD
–
–
– dts, ES
L, C, R, SL, SR, S, LFE
–
–
– dts 96/24
L, C, R, SL, SR, LFE
–
–
– dts
L, C, R, SL, SR, LFE
–
–
– dts-HD MSTR/HIRES L, R
–
–
– dts-HD MSTR/HIRES L, C, R, SL, SR, LFE (,ex1,ex2)
–
–
– dts-HD MSTR/HIRES L, C, R, SL, SR, S, LFE (,ex1,ex2)
–
–
– dts-HD MSTR/HIRES L, C, R, SL, SR, SBL, SBR, LFE (,ex1,ex2)
–
–
– AAC
L, C, R, SL, SR, LFE
–
–
– AAC
L, R
–
–
– PCM
L, C, R, SL, SR, LFE
–
–
– DSD
L, C, R, SL, SR, LFE
–
–
– DSD
L, R
–
–
– PCM
L, R
–
–
– PCM, HDCD
L, R
–
–
– ANALOG
‡
‡ 2 DIGITAL EX
L, C, R, SL, SR, S, LFE
–
‡ 2 DIGITAL
L, C, R, SL, SR, LFE
–
–
‡
‡ 2 DIGITAL
L, R
–
‡
‡ 2 DIGITAL
L, R, S
–
‡
‡ dts, ES
–
L, C, R, SL, SR, S, LFE
‡ dts 96/24
–
–
L, C, R, SL, SR, LFE
‡ dts
–
–
L, C, R, SL, SR, LFE
‡ AAC
–
–
L, C, R, SL, SR, LFE
‡
‡
‡ AAC
L, R
‡ PCM
–
–
L, C, R, SL, SR, LFE
‡ PCM
–
–
L, C, R, SL, SR, LFE
‡ DSD
–
–
L, C, R, SL, SR, LFE
‡
‡ DSD
–
L, R
‡
‡ PCM
–
L, R
‡
‡ PCM, HDCD
–
L, R
‡
‡ ANALOG
–
L, C, R, SL, SR, S, LFE
–
–
– 2 DIGITAL EX
L, C, R, SL, SR, LFE
–
–
– 2 DIGITAL
L, R
–
–
– 2 DIGITAL
L, R, S
–
–
– 2 DIGITAL
L, C, R, SL, SR, LFE
–
–
– 2 DIGITAL PLUS
L, C, R, SL, SR, S, LFE (,ex1)
–
–
– 2 DIGITAL PLUS
L, C, R, SL, SR, SBL, SBR, LFE
–
–
– 2 DIGITAL PLUS
L, R
–
–
– 2 TrueHD
L, R
–
–
– 2 TrueHD
L, R
–
–
– 2 TrueHD
L, C, R, SL, SR, LFE
–
–
– 2 TrueHD
–
–
– dts, ES
L, C, R, SL, SR, S, LFE
–
–
– dts 96/24
L, C, R, SL, SR, LFE
–
–
– dts
L, C, R, SL, SR, LFE
–
–
– dts-HD MSTR/HIRES L, C, R, SL, SR, LFE (,ex1,ex2)
–
–
– dts-HD MSTR/HIRES L, C, R, SL, SR, S, LFE (,ex1,ex2)
–
–
– dts-HD MSTR/HIRES L, C, R, SL, SR, SBL, SBR, LFE (,ex1,ex2)
–
–
– dts express
L, C, R, SL, SR, LFE
–
–
– AAC
L, C, R, SL, SR, LFE
–
–
– AAC
L, R
–
–
– PCM
L, C, R, SL, SR, LFE
–
–
– PCM
L, R
–
–
– PCM, HDCD
L, R
–
–
– ANALOG
L, R
Abbreviations
L/R :
C:
SL/SR :
HL/HR :
SBL/SBR :
SubW :
LFE :
ex :
• Dolby Digital (2 channel L/R): Speakers for
signal with Dolby Surround are fully equipped.
• No sound is outputs from the surround speaker,
center speaker and subwoofer if the DVD disc has
no surround data.
• Surround modes other than Stereo are not
available during Dolby TrueHD, Dolby Digital
Plus, or DTS-HD playback.
If surround modes other than Stereo are selected
and Dolby TrueHD, Dolby Digital Plus, or DTSHD content is played, the surround mode setting
is disabled.
Front speakers
Center speaker
Surround speakers
Front height speakers
Surround back speakers
Subwoofer
Low frequency efects
Extension
09.9.11 4:27:10 PM
5
AUTO
PURE DIRECT
When this mode is selected, the unit determines
whether the digital input signal is Dolby Digital,
Dolby Digital Surround EX, Dolby Digital Plus, Dolby
TrueHD, DTS-HD, DTS, DTS-ES, DTS 96/24 or PCM
audio.
Surround EX & DTS-ES will operate for multichannel
sources that have a Dolby Digital Surround EX or
DTS-ES auto trigger flag in the digital signal.
When a Dolby Digital or DTS signal is input, the
number of channels for which the corresponding
signal is encoded will be played.
Inputting a Dolby Digital two channel signal with
Dolby surround status automatically subjects that
signal to Pro Logic IIx movie processing before
play.
PCM 96 kHz source material can be played in this
mode.
The Pure Direct mode further reduces sources
of noise in addition to effect of the Source Direct
mode, by blocking output from the video jacks
(VIDEO, S-VIDEO, COMPONENT VIDEO and HDMI)
and turning the FL display off.
Note
• In PURE DIRECT mode, ACOUSTIC EQ and MDAX are not available.
EX/ES
This mode provides 6.1 channel surround for Dolby
Digital EX, and DTS-ES-encoded source material
such as DVD.
This mode cannot be used when an analog input has
been selected.
Notes
Dolby Digital EX
• When you use this mode with certain DVD and
CD players, performing operations such as skip
or stop may momentarily interrupt the output.
• When the signal is not decoded, the mode is
changed to AUTO mode automatically. See page
83 to confirm the available decoding modes.
In a movie theater, film soundtracks that have been
encoded with Dolby Digital Surround EX technology
are able to reproduce an extra channel which has
been added during the mixing of the program.
This channel, called surround back, places sounds
behind the listener in addition to the currently
available front left, front center, front right, surround
right, surround left and subwoofer channels.
This additional channel provides the opportunity
for more detailed imaging behind the listener and
brings more depth, spacious ambience and sound
localization than ever before.
Dolby Digital EX is not available in systems that do
not have without surround back speaker(s).
SOURCE DIRECT
In the Source Direct mode, the tone control circuit
Acoustic EQ. and bass management configuration
are bypassed for full-range frequency response and
the purist audio reproduction.
Notes
• Speaker size is set to Front L/R = Large, Center
= Large, Surround L/R = Large and Subwoofer
= Yes automatically. Tone controls, equalizer and
additional processing are deactivated.
• When you use this mode with certain DVD and
CD players, performing operations such as skip
or stop may momentarily interrupt the output.
• In SOURCE DIRECT mode, ACOUSTIC EQ and
M-DAX are not available.
DTS-ES (Discrete 6.1, Matrix 6.1)
DTS-ES adds the surround center channel audio to
the DTS 5.1 channel format to improve the acoustic
positioning, and makes acoustic image movement
more natural with the 6.1 channel reproduction.
This unit incorporates a DTS-ES-decoder, which
can handle DTS-ES Discrete-encoded and DTS-ES
Matrix-encoded program sources from DVD, etc.
DTS-ES Discrete 6.1 features digital discrete
recording of all channels, including the surround back
channel(s), and higher quality audio reproduction.
DTS-ES is not available in systems that do not have
surround back speakers.
6
2 MODE
Pro Logic IIz Height
Dolby Pro Logic IIz Height is designed to more
effectively use existing program material when
height channel speaker outputs are present. Dolby
Pro Logic IIz Height can be used to upmix a variety of
sources from movies and music, but are particularly
well-suited to upmix game content.
(Dolby Digital, Pro Logic IIx MOVIE, Pro
Logic IIx MUSIC, Pro Logic IIx GAME)
This mode is used with source materials encoded in
Dolby Digital and Dolby Surround.
DOLBY DIGITAL
dts
This mode is enabled when playing source materials
encoded in Dolby Digital.
Playing multichannel-encoded 5.1 channel Dolby
Digital sources provides 5 main audio channels (left,
center, right, surround left and surround right) and a
Low Frequency Effect channel.
Dolby Digital EX decoding is not available in this
mode.
dts, Neo:6 Cinema, Neo:6 Music
This mode is for DTS-encoded source materials
such as laserdisc, CD and DVD. Neo:6 is for some
2 channel sources.
dts
This mode is enabled when playing source materials
encoded in dts multichannel.
Playing multichannel encoded-5.1 channel dts
sources provides five main audio channels (left,
center, right, surround left and surround right) and a
Low Frequency Effects channel.
dts-ES decoding is not available in this mode.
The DTS mode cannot be used when an analog
input has been selected.
Dolby Pro Logic IIx has 5 modes:
Pro Logic IIx MOVIE
This mode provides 6.1 or 7.1 channel surround
sound from Dolby Surround, encoded stereo movie
soundtracks.
Pro Logic IIx MUSIC
This mode provides 6.1 or 7.1 channel surround
sound from conventional stereo sources (analog or
digital), such as CD, tape, FM, TV, stereo VCR, etc.
Neo:6 Cinema, Neo:6 Music
Pro Logic IIx GAME
This mode decodes 2 channel signals into 6 channel
signals using high-accuracy digital matrix technology.
The DTS Neo:6 decoder has near-discrete properties
in the frequency characteristics of the channels as
well as in channel separation.
According to the signals to be played back, DTS
Neo:6 uses either the Neo:6 Cinema mode
optimized for movie playback or the Neo:6 Music
mode optimized for music playback.
This mode restores the impact low-frequency
surround effects by routing them to the system’s
subwoofer.
5.1ch + Pro Logic IIx Movie
This mode provides 7.1 channel surround sound
from 5.1 channel sources movie soundtracks.
5.1ch + Pro Logic IIx Music
This mode provides 6.1 or 7.1 channel surround sound
from 5.1 channel sources music soundtracks.
Note
• The Neo:6 mode is available for 2 channel input
signals which are encoded in Dolby Digital,
HDCD or PCM format.
Notes
• Pro Logic IIx mode will decode as Pro Logic II
mode when the Surr. B is set to “None” from
SPEAKER SETUP menu. (See page 28)
• Pro Logic IIx mode is available for a 2 channel
input signal which is encoded in Dolby Digital,
HDCD or PCM format.
7
CIRCLE SURROUND II
(CSII-CINEMA, CSII-MUSIC, CSII-MONO)
Neural Surround
Neural Surround TM represents the latest
advancement in surround technology developed
for music.
Neural Surround TM employs psychoacoustic
frequency domain processing which allows delivery
of a more detailed sound stage with superior channel
separation and localization of audio elements.
System playback is scalable from 5.1 to 7.1 multichannel surround playback.
Circle Surround is designed to enable multichannel
surround sound playback of non-encoded and
multichannel encoded material.
Backward compatibility provides listeners with
up to 6.1 channels of surround performance from
an entire collection of music and film, including
broadcast, videotape and stereo recorded music.
Depending on source material, you can select CSIICinema mode, CSII-Music mode or CSII-Mono mode.
CAUTION
Note
Note for DTS
• The CS II mode is available for 2 channel input
signals which are encoded in Dolby Digital,
HDCD or PCM format.
• To connected DVD player, laserdisc player or CD
player needs to support DTS digital output. You
may not be able to play some DTS source signals
from certain CD players and LD players even if
you connect the player to the unit digitally. This
is because the digital signal has been processed
(such as the output level, sampling frequency
or frequency response), and the unit cannot
recognize the signal as DTS data.
• Depending on the player used, DTS play may
produce a short noise. This is not a malfunction.
• While signals from a DTS laserdisc or CD are
playing in another surround mode, you cannot
switch to digital input or from digital input to
analog input from the INPUT SETUP in the MAIN
MENU or by pressing the A/D button.
• You can not listen to DTS-encoded software in a
multiroom.
• The outputs for VCR OUT, TAPE OUT and CD/CDR OUT output analog audio signals only. Do not
record from CDs or LDs that support DTS using
these outputs. If you do, the DTS-encoded signal
will be recorded as noise.
STEREO
This mode bypasses all surround processing.
In stereo program sources, the left and right
channels play normally when PCM audio or analog
stereo is input.
With Dolby Digital and DTS sources, the 5.1
channels are converted to two channel stereo. 96
kHz PCM source material can be played back in
stereo mode.
Dolby Virtual Speaker
Dolby Virtual Speaker technology uses proprietary
technology of Dolby Laboratories to create a virtual
surround sound field using only two speakers for the
front channels, allowing the user to experience sound
as if surround speakers were actually being used.
MULTI CH. (MOVIE, MUSIC)
Note or Dolby Digital Surround EX
This mode is used to create a wider, deeper and
more natural soundstage from two channel source
material.
This is done by feeding the left channel signal to
both the left front and left surround speakers and the
right channel signal to both the right front and right
surround speakers. Additionally, the center channel
reproduces a mix of the right and left channels.
• When playing Dolby Digital Surround EX-encoded
software in 6.1 channels, it is required to set the
EX/ES mode.
• Note that some Dolby Digital Surround EXencoded software does not contain the
identification signal. In this case, set the EX/ES
mode manually.
Note
Note for 96 kHz/192 kHz PCM audio
• Audio is not output from the CENTER channel
when using MULTI CH. MUSIC mode.
• The AUTO, Pure Direct, and Stereo modes can be
used when playing PCM signals with a sampling
frequency of 96/192 kHz (such as from DVDVideo/Audio discs).
• Certain DVD player models inhibit digital output.
For details, refer to the player’s operation
manual.
• Some DVD discs feature copy protection. When
using such disc, 96 kHz PCM signal are not output
from the DVD player. For details, refer to the
player’s operation manual.
Note for HDCD
• HDCD is effective only through digital input.
• You may not be able to play some HDCD source
signals from certain CD players if you connect
the player to the unit digitally. This is because the
digital signal has been processed (such as the
output level, sampling frequency or frequency
response) and the unit cannot recognize the
signal as HDCD data.
8
2. TECHNICAL DESCRIPTION
• dts Digital Surround
DTS was introduced in 1994 to provide 5.1 channels
of discrete digital audio into home theater systems.
DTS brings you premium quality discrete multichannel
digital sound to both movies and music.
DTS is a multichannel sound system designed to
create full range digital sound reproduction.
The no compromise DTS digital process sets the
standard of quality for cinema sound by delivering
an exact copy of the studio master recordings to
neighborhood and home theaters.
Now, every moviegoer can hear the sound exactly
as the moviemaker intended.
DTS can be enjoyed in the home for either movies
or music on of DVD’s, LD’s, and CD’s.
DTS Neural Surround has been chosen as the
surround sound format for XM Satellite Radio’s
“XM HD Surround, ” TV sports broadcasting, 7.1
games, Music Direct Internet streaming as well as
leading FM/HD radio stations. It delivers the rich
envelopment and discrete image detail of surround
sound by unmasking the audio details, typically lost
by other playback modes audiences will experience
the deep ambience and subtle details of movies,
music and games.
DTS Manufactured under license from DTS
Licensing Limited. DTS is a registered trademark &
the DTS Logos and Symbol are trademarks of DTS,
Inc. © 1996-2008 DTS, Inc. All Rights Reserved.
• dts Neo:6®
The advantages of discrete multichannel systems
over matrix are well known.
But even in homes equipped for discrete
multichannel, there remains a need for high-quality
matrix decoding. This is because of the large library
of matrix surround motion pictures available on disc
and on VHS tape; and analog television broadcasts.
The typical matrix decoder of today derives a center
channel and a mono surround channel from twochannel matrix stereo material. It is better than a
simple matrix in that it includes steering logic to
improve separation, but because of its mono, bandlimited surround it can be disappointing to users
accustomed to discrete multichannel.
Manufactured under license under U.S. Patent
No’s: 5,451,942; 5,956,674; 5,974,380; 5,978,762;
6,226,616; 6,487,535; 7,003,467; 7,212,872 & other
U.S. and worldwide patents issued & pending. DTS,
DTS Digital Surround, ES, and Neo:6 are registered
trademarks and the DTS logos, Symbol and DTS
96/24 are trademarks of DTS, Inc. © 1996-2008
DTS, Inc. All Rights Reserved.
Neo:6 offers several important improvements as
follow,
• Neo:6 provides up to six full-band channels of
matrix decoding from stereo matrix material.
Users with 6.1 and 5.1 systems will derive
six and five separate channels, respectively,
corresponding to the standard home-theater
speaker layouts.
• Neo:6 technology allows various sound elements
within a channel or channels to be steered
separately, and in a way which follows naturally
from the original presentation.
• Neo:6 offers a music mode to expand stereo
nonmatrix recordings into the five- or six-channel
layout, in a way which does not diminish the
subtlety and integrity of the original stereo
recording.
9
• dts Digital Surround ES®
DTS-ES Extended Surround is a new multichannel
digital signal format developed by Digital Theater
Systems Inc. While offering high compatibility with
the conventional DTS Digital Surround format, DTSES Extended Surround greatly improves the 360degree surround impression and space expression
thanks to further expanded surround signals. This
format has been used professionally in movie
theaters since 1999.
In addition to the 5.1 surround channels (FL, FR, C,
SL, SR and LFE), DTS-ES Extended Surround also
offers the SB (Surround Back) channel for surround
playback with a total of 6.1 channels. DTS-ES
Extended Surround includes two signal formats
with different surround signal recording methods,
as DTS-ES Discrete 6.1 and DTS-ES Matrix 6.1.
DTS-HD Master Audio is capable of delivering audio
that is a bit-for-bit identical to the studio master.
DTS-HD Master Audio delivers audio at super high
variable bit rates -24.5 mega-bits per second (Mbps)
on Blu-ray discs and 18.0 Mbps on HD-DVD - that
are significantly higher than standard DVDs . This bit
stream is so “fast” and the transfer rate is so “high”
that it can deliver the Holy Grail of audio: 7.1 audio
channels at 96k sampling frequency/24 bit depths
that are identical to the original. With DTS-HD
Master Audio, you will be able to experience movies
and music, exactly as the artist intended: clear, pure,
and uncompromised.
Manufactured under license under U.S. Patent
No’s: 5,451,942; 5,956,674; 5,974,380;5,978,762;
6,226,616; 6,487,535, 7,212,872; 7,333,929;
7,392,195; 7,272,567 & other U.S. and worldwide
patents issued & pending.
DTS is a registered trademark and the DTS logos,
Symbol, DTS-HD and DTS-HD Master Audio are
trademarks of DTS, Inc. © 1996-2008 DTS, Inc. All
Rights Reserved.
• dts Digital Surround 96/24
The stereo CD is a 16-bit medium with sampling at
44.1 kHz. Professional audio has been 20- or 24-bit
for some time, and there is increasing interest in
higher sampling rates both for recording and for
delivery into the home. Greater bit depths provide
extended dynamic range. Higher sampling rates
allow wider frequency response and the use of antialias and reconstruction filters with more favorable
aural characteristics.
DTS 96/24 allows for 5.1channel sound tracks to
be encoded at a rate of 96kHz/24bits on DVD-Video
titles.
When DVD-video appeared, it became possible to
deliver 24-bit, 96 kHz audio into the home, but only
in two channels, and with serious limitations on
picture. This capability has had little use.
DVD-audio allows 96/24 in six channels, but a
new player is needed, and only analog outputs are
provided, necessitating the use of the D/A converters
and analog electronics provided in the player.
DTS-HD High Resolution Audio can deliver up to 7.1
channels of sound that is virtually indistinguishable
from the original. DTS-HD High Resolution Audio
delivers audio at high constant bit rates superior to
standard DVDs---6.0 Mbps on Blu-ray discs and 3.0
Mbps on HD-DVD to produce outstanding sound
quality. It is capable of delivering up to 7.1 channels
at 96k sampling frequency/24 bit depth resolution.
It allows content creators to deliver rich, high
definition audio on movies where disc space may
not allow for DTS-HD Master Audio.
DTS 96/24 offers the following:
1. Sound quality transparent to the original 96/24
master.
2. Full backward compatibility with all existing
decoders. (Existing decoders will output a 48 kHz
signal)
3. No new player required: DTS 96/24 can be carried
on DVD-video, or in the video zone of DVD-audio,
accessible to all DVD players.
4. 96/24 5.1-channel sound with full-quality fullmotion video, for music programs and motion
picture soundtracks on DVD-video.
Manufactured under license under U.S. Patent
No’s: 5,451,942; 5,956,674; 5,974,380; 5,978,762;
6,226,616; 6,487,535, 7,212,872; 7,333,929 & other
U.S. and worldwide patents issued & pending.
DTS is a registered trademark and the DTS logos,
Symbol, DTS-HD, DTS-HD High Resolution Audio
and DTS-HD High Res Audio are trademarks of DTS,
Inc. © 1996-2008 DTS, Inc. All Rights Reserved.
10
About Dolby Pro Logic IIx
DTS-EXPRESS is a low-bitrate encoding technology
supporting up to 5.1 channels with fixed data
transfer rates. This format is incorporated with sub
audio on HD DVD and secondary audio on Blu-ray
Disc while boasting the potential applicability to
upcoming broadcasts and memory audio contents.
Dolby Pro Logic IIx technology delivers a natural
and immersing 7.1-channel listening experience
to the home theater environment. A product of
Dolby's expertise in surround sound and matrix
decoding technologies, Dolby Pro Logic IIx is a
complete surround sound solution that maximizes
the entertainment experience from stereo as well
as 5.1-channel encoded sources.
Manufactured under license under U.S. Patent
No’s: 5,451,942; 5,956,674; 5,974,380; 5,978,762;
6,487,535; 7,333,929 & other U.S. and worldwide
patents issued & pending. DTS is a registered
trademark & the DTS logos, Symbol and DTS
Express are trademarks of DTS, Inc. © 1996-2008
DTS, Inc. All Rights Reserved.
Dolby Pro Logic IIx is fully compatible with Dolby
Surround Pro Logic technology and can optimally
decode the thousands of commercially available
Dolby Surround encoded video cassettes and
television programs with enhanced depth and
spatiality. It can also process any high-quality
stereo or Advanced Resolution 5.1-channel music
content into a seamless 6.1- or 7.1-channel listening
experience.
Dolby Digital identifies the use of Dolby Digital audio
coding for such consumer formats as DVD and
DTV. As with film sound, Dolby Digital can provide
up to five full-range channels for left, center, and
right screen channels, independent left and right
surround channels, and a sixth (“.1”) channel for
low-frequency effects.
Dolby Pro Logic IIz Height is designed to more
effectively use existing program material when
height channel speaker outputs are present. Dolby
Pro Logic IIz Height can be used to upmix a variety of
sources from movies and music, but are particularly
well-suited to upmix game content.
Dolby Surround Pro Logic II is an improved matrix
decoding technology that provides better spatiality
and directionality on Dolby Surround program
material; provides a convincing three-dimensional
soundfield on conventional stereo music recordings;
and is ideally suited to bring the surround experience
to automotive sound. While conventional surround
programming is fully compatible with Dolby Surround
Pro Logic II decoders, soundtracks will be able to be
encoded specifically to take full advantage of Pro
Logic II playback, including separate left and right
surround channels. (Such material is also compatible
with conventional Pro Logic decoders.)
Dolby Digital EX creates six full-bandwidth output
channels from 5.1-channel sources. This is done
using a matrix decoder that derives three surround
channels from the two in the original recording. For
best results, Dolby Digital EX should be used with
movies soundtracks recorded with Dolby Digital
Surround EX.
11
The Dolby Headphone technology provides a
surround sound listening experience over
headphones.
When listening to multichannel content such as DVD
movies over headphones, the listening experience is
fundamentally different than listening to speakers.
Since the headphone speaker drivers are covering
the pinna of the ear, the listening experience differs
greatly from traditional speaker playback. Dolby
utilizes patented headphone perspective curves to
solve this problem and provides a non-fatiguing,
immersive, home theater listening experience.
Dolby Headphone also delivers exceptional 3D
audio from stereo material.
Dolby Virtual Speaker is a technologycertified
by Dolby Laboratories that creates a virtualized
surround sound experience from two speakers using
a multichannel Dolby Digital source. Additionally,
Dolby Virtual Speaker can simulate the surround
sound effect produced by Dolby Pro Logic or Dolby
Pro Logic II.
Dolby Virtual Speaker retains all the original
Multichannel audio information and provides the
listener with the sensation of being surrounded by
additional speakers.
Dolby® TrueHD is Dolby’s next-generation lossless
technology developed for high-definition disc-based
media. Dolby TrueHD delivers tantalizing sound
that is bit-for-bit identical to the studio master,
unlocking the true high-definition entertainment
experience on next-generation discs. When coupled
with high-definition video, Dolby TrueHD offers an
unprecedented home theater experience that lets
you enjoy sound as stunning as the high-definition
picture.
Circle Surround II® (CS-II) is a powerful and versatile
multichannel technology. CS-II is designed to enable
up to 6.1 multichannel surround sound playback
from mono, stereo, CS encoded sources and other
matrix encoded sources. In all cases the decoder
extends it into 6 channels of surround audio and a
LFE/subwoofer signal. The CS-II decoder creates
a listening environment that places the listener
“inside” music performances and dramatically
improves both hi-fi audio conventional surroundencoded video material. CS-II provides composite
stereo rear channels to greatly improve separation
and image positioning– adding a heightened sense
of realism to both audio and A/V productions.
CS-II is packed with other useful feature like dialog
clarity (SRS Dialog) for movies and cinema-like bass
enrichment (TruBass). CS-II can enable the dialog
to become clearer and more discernable in movies
and it enables the bass frequencies contained in
the original programming to more closely achieve
low frequencies–overcoming the low frequency
limitations of the speakers by full octave.
Circle Surround II, SRS and
symbol are
trademarks of SRS Labs, Inc.
Circle Surround II technology is incorporated under
license from SRS Labs, Inc.
Dolby Digital Plus is a highly sophisticated and
versatile audio codec based on Dolby Digital and
designed specifically to adapt to the changing
demands of future audio, video delivery, and audio
storage systems while simultaneously retaining
backwards compatibility with the existing Dolby
Digital 5.1-channel home theater systems in use
today.
Manufactured under license from Dolby
Laboratories. “Dolby”, “Pro Logic”, “Surround
EX”, and the double-D symbol are trademarks of
Dolby Laboratories.
12
HDCD® (High Definition Compatible Digital®) is
a patented process for delivering on Compact
Disc the full richness and details of the original
microphone feed.
HDCD encoded CDs sound better because they are
encoded with 20-bits of real musical information as
compared to 16-bits for all other CDs.
HDCD overcomes the limitation of the 16-bit CD
format by using a sophisticated system to encode
the additional four bits onto the CD while remaining
completely compatible with the CD format.
When listening to HDCD recordings, you hear more
dynamic range, a focused 3-D sound stage, and
extremely natural vocal and musical timbre. With
HDCD, you get the body, depth and emotion of the
original performance not a flat, digital imitation.
HDCD system manufactured under license from
Microsoft. This product is covered by one or more
of the following: In the United States 5,479,168
5,638,074 5,640,161 5,808,574 5,838,274 5,854,600
5,864,311 5,872,531 and in Australia 669,114 with
other patents pending.
HDMI, the
and High-Definition Multimedia
Interface are trademarks or registered trademarks
of HDMI Licensing LLC.
Macrovision
This product incorporates copyright protection
technology that is protected by method claims of
certain U.S. patents and other intellectual property
rights owned by Macrovision Corporation and other
rights owners. Use of this copyright protection
technology must be authorized by Macrovision
Corporation, and is intended for home and other
limited viewing uses only unless otherwise
authorized by Macrovision Corporation. Reverse
engineering or disassembly is prohibited.
MultEQ®
Audyssey MultEQ is a room equalization solution
that calibrates any audio system so that it can
achieve optimum performance for every listener in
a large listening area. MultEQ captures acoustical
information at multiple locations throughout a
listening area in both the time and frequency
domains. It uses a sophisticated clustering algorithm
to combine this information so that acoustical
problems are accurately analyzed. Based on these
measurements, MultEQ calculates an equalization
solution that corrects for both time and frequency
response problems in the listening area and also
performs a fully automated surround system setup.
The result is clear, well-balanced sound for every
listener.
Dynamic EQTM
Audyssey Dynamic EQ solves the problem of
deteriorating sound quality as volume is decreased
by taking into account human perception and
room acoustics. Dynamic EQ selects the correct
frequency response and surround levels momentby-moment at any userselected volume setting. The
result is bass response, tonal balance and surround
impression that remain constant despite changes
in volume. Dynamic EQ combines information from
incoming source levels with actual output sound
levels in the room, a prerequisite for delivering a
loudness correction solution. Audyssey Dynamic
EQ works in tandem with Audyssey MultEQ to
provide well-balanced sound for every listener at
any volume level.
Dynamic VolumeTM
Audyssey Dynamic Volume solves the problem of
large variations in volume level between television
programs, commercials, and between the soft and
loud passages of movies.
Dynamic Volume looks at the preferred volume
setting by the user and then monitors how the
volume of program material is being perceived by
listeners in real time to decide whether an adjustment
is needed. Whenever necessary, Dynamic Volume
makes the necessary rapid or gradual adjustments
to maintain the desired playback volume level while
13
optimizing the dynamic range. Audyssey Dynamic
EQ is integrated into Dynamic Volume so that as
the playback volume is adjusted automatically, the
perceived bass response, tonal balance, surround
impression, and dialog clarity remain the same
whether watching movies, flipping between
television channels, or changing from stereo to
surround sound content.
Manufactured under license from Audyssey
Laboratories. U.S. and foreign patents pending.
Audyssey MultEQ®, Audyssey Dynamic Volume™,
and Audyssey Dynamic EQ™ are registered
trademark of Audyssey Laboratories.
SIRIUS, XM Satellite Radio Ready
SIRIUS, XM and all related marks and logos
are trademarks of Sirius XM Radio Inc. and its
subsidiaries. All rights reserved. Service not
available in Alaska and Hawaii.
XM HD Surround uses Neural SurroundTM technology
to achieve optimal surround sound from XM radio.
エーエーシー
アドバンスド
オーディオ
コーディング
AAC(Advanced Audio Coding)s
• ”Made for iPod” means that an electronic
accessory has been designed to connect
specifically to iPod and has been certified by
the developer to meet Apple performance
standards.
“Works with iPhone” means that an electronic
accessory has been designed to connect
specifically to iPhone and has been certified
by the developer to meet Apple performance
standards.
Apple is not responsible for the operation of
this device or its compliance with safety and
regulatory standards.
BS デジタル放送および地上波デジタル放送が採用
している音声方式で、MPEG2 規格のひとつです。
高圧縮率と高音質が特長で、2CH ステレオ音声に
加え、5.1CH サラウンド音声や多言語放送を可能に
しています。以下はパテントナンバーです。
iPod is a trademark of Apple Inc. registered in the
US and other countries. iPhone is a trademark of
Apple Inc.
5848391
5,357,594
5,633,981
5,579,430
98/03036
5,781,888
08/894,844
5,490,170
5,548,574
08/576,495
5,291,557
5 752 225
5 297 236
08/678,666
5,227,788
08/039,478
5,299,238
5,264,846
5,717,821
08/392,756
5 400 433
5,583,962
5,235,671
97/02875
5,481,614
5,703,999
5,299,240
5,375,189
05-183,988
5,222,189
5,274,740
07/640,550
97/02874
5,592,584 08/557,046
5,197,087
5,581,654
08/506,729
5,451,954
5,394,473
4,914,701
98/03037
5,285,498
08/211,547
5,299,239
5,268,685
08/937,950
09.9.14 1:31:41 PM
14
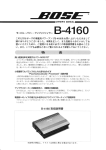
3. POWER AMPLIFIER ADJUSTMENT
Idling Current Alignment
アイドリング電流調整
1. Each of the measurement points are provided with the two
test points. Set a digital Voltage meter to DC voltage input,
connect the meter to the test points at both contact points.
2. After the setup above, turn on the main switch.
3. Adjust variable resistors (VR60 - VR66) according to the
digital voltmeter readings. The target setting value is the
following table for each channels.
1. 電源を ON する前にそれぞれの "+" 端子と "-" 端子間にデジ
タルボルトメーターを接続します。デジタルボルトメー
ターを DC 電圧入力にセットします。
2. 上記のセットアップの後に、本機の電源を ON します。
3. デジタルボルトメーターの電圧値を監視しながら可変抵抗
器 (VR60 ∼ VR66) を調節します。
各チャンネルの目標値は下記の表を参照下さい。
Settings :
セッティング :
Master Volume- - - - Minimum
Speaker out - - - - - No Load
Top lid - - - - - - - - - - OPEN
マスター・ボリューム - - - - 最小
スピーカー接続 - - - - - - - - - 無し
トップカバー - - - - - - - - - - 無し
s
MAIN PWB
CUP12206Z
DC
VOLTMETER
+
TEST POINT
3
4
5
6
7
CN74
CN72
CN75
CN73
CN76
2
1
CN70
VR63
CN71
VR64
VR65
VR60
VR61
VR66
VR62
HEAT SINK ASS'Y
Time Table of Idling Current Rise
DC voltmeter
NO.
1
Channel
Surround Right
Measurement Voltage
(CN7X)
Measurement
Point
Alignment
point
After Turning ON
CN70
VR63
5 min
7.5 mV ± 0.5 mV
7.5 mV ± 0.5 mV
2
Surround Left
CN71
VR64
10 min
3
Center
CN74
VR65
20 min
7.5 mV ± 0.5 mV
7.5 mV ± 0.5 mV
4
Front Left
CN72
VR60
30 min
5
Surround Back Left
CN75
VR61
40 min
7.5 mV ± 0.5 mV
VR66
50 min
7.5 mV ± 0.5 mV
VR62
60 min
7.5 mV ± 0.5 mV
6
7
Front Right
Surround Back Right
CN73
CN76
15
4. SERVICE MODE
MAIN CPU (IC105) Version, DSP (IC111) Version,
HDMI CPU (IC61), USB CPU (IC35) Version and
Segment CheckMode.
MAIN CPU (IC105) Version, DSP (IC111)
Version, HDMI CPU (IC61), USB CPU (IC35)
Version and Segment Check Mode.
1. Connect the mains cord into the unit.
2. Press the POWER ON/OFF (STANDBY) button for turn
on the unit.
3. Press the AUTO, EXIT and CLEAR buttons
simultaneously more then 3 seconds.
4. The FL display shows “SERVICE MODE” for 2 seconds
then shows the model name and the software version of
the MAIN CPU (IC105) is displayed the format below.
1. 本機に電源コードを接続します。
2. POWER ON/OFF (STANDBY) ボタンを押し、本機の電
源を入れます。
3. AUTO, EXIT, CLEAR の 3 つのボタンを同時に 3 秒以上
押します。
4. FL に "SERVICE MODE" と 2 秒表示し、次にモデル名と
MAIN マイコン (IC105) を表示します。
s
S
V
0
7
Year
R
0
6
9
Month
0
2
B
L
U
-
R
A
Y
S
E
R
V
I
C
E
0
4
:
7
A
M
O
A
D
E
H
V
0
Destination
Z
R
6
0
0
4
X
X
X
X
X
X
1
R
6
0
0
4
2
9
7
0
5
7. Press the ENTER button again, the TI DSP (IC111) B2
code is displayed.
S
B
2
H
D
M
R
6
0
0
4
2
9
7
0
4
S
B
0
2
7
月
日
4
:
A
H
1
0
仕向け
R
I
X
X
X
X
1
7
1
0
2
1
8. 更に ENTER ボタンを押すと、HDMI CPU(IC61) のバー
ジョンが表示されます。
6
0
0
4
V
e
r
.
9. Press the ENTER button again, the software version of
the USB CPU (IC35) is displayed.
U
0
9
7. 更に ENTER ボタンを押すと、TI DSP(IC111) B2
Code が表示されます。
8. Press the ENTER button again, the software version of
the HDMI CPU (IC61) is displayed.
S
6
0
6. 更に ENTER ボタンを押すと、TI DSP(IC111) B1
Code が表示されます。
6. Press the ENTER button again, the TI DSP (IC111) B1
code is displayed.
B
R
7
5. 更に ENTER ボタンを押すと、ソフトウエアシリアルナン
バーが表示されます。
S
S
1
S
年
5. Press the ENTER button again, the software serial
Number of the unit is displayed.
M
H
s
s
1
0
Date
:
h
X
X
9. 更に ENTER ボタンを押すと、USB CPU(IC35) のバー
ジョンが表示されます。
S
R
6
0
0
4
:
0
8
0
5
0
16
7
1
10. Press the ENTER button again, the left half, right half and
center of the label area in the FLD light on and off each
other.
10.更に ENTER ボタンを押すと、FL のラベル部分の左半分
と右半分および中心部が交互に点灯と消灯を繰り返しま
す。
11. Press the ENTER button again, the segments of the
character area in the FLD flick in checker pattern.
11.更に ENTER ボタンを押すと、FL のキャラクタセグメン
ト部がチェッカーフラグのように点灯と消灯を繰り返しま
す。
12. Press the ENTER button again, all the FL segments turn
off.
12.更に ENTER ボタンを押すと、FL は全消灯します。
13. Press the ENTER button again to quit this mode.
13.更に ENTER ボタンを押すと、サービスモードを終了しま
す。
HOW TO RESET THE UNIT
初期状態に戻すには(リセット)
Should the operation or display seem to be abnormal, reset
the unit with the following procedure.
The unit is turned on, press and hold the SURROUND
MODE and CLEAR buttons simultaneously for 3 seconds or
more. Remember that the procedure will reset the settings of
the function selector, Surround mode, delay time, TUNER
PRESET etc., to their initial settings.
但しリセット行うと、プリセットメモリ等の設定した内容が消
去されます。
1. 電源が入っていることを確認します。
2. 本体の SURROUND MODE ボタンを押しながら、
CLEAR
ボタンを 3 秒以上押します。
本機は一度スタンバイ状態になった後、再度 POWER − ON
状態となり、各種設定された内容が初期化され、工場出荷時の
状態に戻ります。
17
5. SYSTEM ERROR
Check 1
• Indication of abnormalities with the EEP-ROM
(HDMI PWB / IC89) Interface
Check 1
・ EEP-ROM (INPUT PWB / IC89) Interface 異常検出
EEP-ROM (INPUT PWB / IC89) との通信で ACK が帰っ
てこない状態(通信エラー)が約2秒以上生じた場合 FL
Display に下記の様な表示がされます。
This indicates a communication error wherein the ACK will
not return for 2 seconds or more while the system is in communication with the EEP-ROM (INPUT PWB / IC89).
- Message on FL displayw.
- FL Display への Error 表示
C
H
E
C
K
E
2
P
I
F
Points to be checked
1. The IIC Clock Line (IC105/116 pin . IC89/6 pin) is normal
when the power is ON.
2. The IIC Data Line (IC105/117 pin . IC89 / 5 pin) is normal
when the power is ON
3. The IC89/8 pin is supplied with VCC +3.3V.
4. If none of the above is negative, the IC89 may be having
a defect.
回路上の確認箇所
1. Power ON 時に IIC Clock Line (IC105/116pin - IC89
/6pin) が正常なのを確認する。
2. Power ON 時に IIC Data Line (IC105/117pin - IC89
/5pin) が正常なのを確認する。
3. IC89 / 8pin に VCC (+3.3V) が供給されていることを確
認する。
4. 上記の 1 − 3 に不具合が生じていない場合は IC89 の不
良が考えられます。
Check 2
• +5V supply Error Detection (_5V DOWN)
Check 2
・ +5V Supply 異常検出 (_5V DOWN)
When the power is turned on or while the unit is in normal
operation, an abnormality occurs with the +5V power
supply, and the +5V power into the CPU 137 pin cannot be
detected.
電源 ON 時又は通常動作時に +5V 電源に異常が発生し、
CPU の 137pin に入力される +5V の検出が出来なかった
(出来なくなった)場合。
• Detection of DC on Power Amp Output
(_P AMP FAIL)
・ Power Amp 出力の DC 検出 (_P AMP FAIL)
電源 ON 時又は通常動作時に Power Amp に異常が発生し、
CPU の 121pin で Power Amp 出力の DC 検出がされた
場合。
When the power is turned on or while the unit is in normal
operation, an abnormality occurs with the Power Amp, and
DC is detected on the CPU 121 pin.
• Detection of abnormal heat of Power Amp
(_P AMP FAIL)
・ Power Amp の異常温度検出 (_P AMP FAIL)
通常動作時に Power Amp の異常な温度上昇が発生し、
CPU の 121pin で異常が検出がされた場合。
The Power Amp is overheated while in normal
operation,with an abnormality detected on the CPU 121
pin.
• Detection of Overcurrent below 200msec on
Power Amp (_P CUR FAIL)
・ Power Amp の 200msec 未満の過電流検出
(_P CUR FAIL)
When the product is in normal operation, an abnormality
occurs with the POWER AMP, and an overcurrent of less
than 200msec is detected on the CPU 120 pin.
When errors like the above abnormalities are detected, the
software automatically puts the product into STANDBY
mode, with the STANDBY LED flickering approximately
every 500msec.
NOTE : The product can recover from the SYSTEM ERROR when the user turns on and then off the
STANDBY. However, once any of the above errors
is redetected, the product goes into STANDBY
again.
通常動作時に Power Amp に異常が発生し、CPU の
120pin で Power Amp の過電流が 200msec 未満で検出
された場合。
上記の様な異常検出がされた場合は、Software は自動的に製
品を STANDBY 状態にして、STANDBY LED を約
500msec 間隔で点滅させます。
復帰操作 :
この System Error は User が STANDBY ON/OFF 操
作を行うことで通常動作に復帰しますが、上記の異常を
再検出することで製品は再び System Error となりま
す。
Points to be checked
1. The CN81 (HDMI PWB) 7 & 8 pins are supplied with +5V
when the power is ON
2. The CN85 10pin (Power Amp Fail) is outputting the "H"
signal; (If the 10 pin continues to be in the "L" state for 2
seconds or more after the power is turned ON, the Power
Amp circuit is having a problem.)
回路上の確認箇所
1. 電源 ON 時に CN81 (HDMI PWB) 7, 8pin に +5V が供
給されていることを確認する。
2. 電源 ON 時に CN85 の 10pin (Power Amp Fail) が "H"
になっていることを確認する。
(10pin が電源 ON してから2秒以上 "L" 状態が継続して
いる場合は POWER AMP 回路に異常が発生している )
18
3. Check that the speaker cable connected to the product is
not in contact and shorting out.
4. The Microprocessor 25 pin (Power Down) is outputting
the "H" signal when the power is turned ON. (If the 25pin
continues to be in the "L" state after the power is turned
on, the MAIN PWB circuit , the IC60 and its adjacent circuits are developing an abnormality.)
NOTE : HOW TO RECOVER FROM SYSTEM ERROR
(STANDBY LED flickering) The product can recover by turning on STANDBY on the remote controller after the above errors are rectified.
3. 製品に接続されている Speaker Cable が +/- 又は
RearPanel 等に Short していないか確認する。
4. 電源 ON 時にマイコンの 25pin (Power Down) が "H" に
なっていることを確認する。
( 電源 ON しても、25pin が "L" 状態で継続している場合
は MAIN PWB 上の IC60 及び周辺回路に異常が発生して
いる )
復帰操作 :
System Error (STANDBY LED の点滅 ) からの復帰は
上記の不具合を改善後リモコンの STANDBY ON 操作
で復帰できます。
Check 3
• Detection of Overcurrent over 200 msec on POWER AMP (_P CUR FAIL)
Check 3
When the power is turned on or while the product is in normal operation, an abnormality occurs with the POWER
AMP, and an overcurrent of 200msec or more (500msec or
more when the power is on) is detected on the CPU 120
pin.
・ Power Amp の 200msec 以上の過電流検出
(_P CUR FAIL)
電源 ON 時又は通常動作時に Power Amp に異常が発生し、
CPU の 120pin で Power Amp の過電流が 200msec 以
上 (Power ON 時は 500msec 以上 ) 検出された場合。
• Detection of an abnormality on +/-12V Supply or
Power Amp power supply (_P LINE FAIL)
・ +/- 12V Supply 又は、Power Amp 用電源の異常
検出 (_P LINE FAIL)
When the power is turned on or while the product is in normal operation, an abnormality occurs with the +/-12V supply or POWER AMP power supply with an abnormality
detected on CPU 122 pin.
When errors like the above abnormalities are detected, the
software automatically puts the product into STANDBY
mode, with the STANDBY LED flickering approximately
every 125msec.
NOTE : This SYSTEM ERROR cannot be rectified by
users. In order to power on the product, please do
the following.
: Hold down "SURROUND MODE", "EXIT" &
"CLEAR" at the same time for 3 seconds or
more. However, if any problem remains with
the product, the SYSTEM ERROR will occur
again.
電源 ON 時又は通常動作時に +/-12V 電源又は、Power
Amp 用の電源に異常が発生し、CPU の 122pin で異常検
出がされた場合。
上記の様な異常検出がされた場合は、製品を STANDBY 状態
にして、STANDBY LED を約 125 msec 間隔で点滅させま
す。
ご注意 : この System Error は User が通常動作に復帰さ
せることは出来ません。製品の電源を ON させる
場合は次の操作を行います。
復帰操作 :
"SURROUND MODE" + "EXIT" + "CLEAR"
ボタンを同時に押して 3 秒以上保持する。
但し、製品に不具合が残っている場合は再び
SYSTEM ERROR が働きます。
回路上の確認箇所
1. 電源 ON 時にマイコンの 120pin (_P CUR Fail) が "H"
になっていることを確認する。
(120pin が電源 ON してから 500 msec 以上 "L" 状態が
継続している場合は POWER AMP 回路に異常が発生して
いる )
2. 電源 ON 時にマイコンの 122pin (Power Line Fail) が
"H" になっていることを確認する。
(122pin が電源 ON してから 2 秒以上 "L" 状態が継続し
ている場合は +/-12V 電源又は、Power Amp 用の電源
に異常が発生している )
Points to be checked on the circuit
1. Check that the 120 pin (_P CUR FAIL) of the
microprocessor is outputting "H". (If the 120pin is in the
L-state for 500msec or more after the power is turned on,
the POWER AMP circuit is developing an abnormality.)
2. Make sure that the 122pin of the microprocessor
(POWER LINE FAIL) is "H". (If the 122 pin is in the
L-state for 2 seconds or more after the power is turned
on, the +/-12V power supply or the POWER AMP power
supply is developing an abnormality.)
19
Check 4
• TIMING CHART
Check 4
・ TIMING CHART
Normal operation when the power is turned on
電源 ON 時の正常動作
7sec
3.5sec
2sec
_STAND BY (138pin)
(OUT)
_PDOWN (25pin)
_STAND BY䋺CANCEL
㽲 _STAND BY䋺解除
AC POWER SUPPLY: POWER ON
(IN)
Hi䋺P_LINE=OK
不定
_P_LINE_FAIL (122pin)
(IN)
INCONSTANT
不定
_P_AMP_FAIL (121pin)
(IN)
INCONSTANT
500msec
_P_CUR_FAIL (120pin)
(IN)
_5V_DOWN (137pin)
㽶 After 3.5sec, the detection start
3.5sec後、検出開始
䌈䌩䋺P_AMP=OK
㽴 After 2sec, the detection start
2sec後、検出開始
䌈䌩䋺P_CUR=OK
㽳 After 500msec, the detection start
500msec後、検出開始
+5VDD=OK
(IN)
FLRA_ON (IC88 : 4pin)
FLRB_ON (IC88 : 5pin)
SURR_ON (IC88 : 6pin)
SBLR_ON (IC88 : 7pin)
SPEAKER䋺OFF
(OUT)
各ch MUTE
EACH CHANNEL MUTE
(OUT)
_STAND BY LED (135pin)
(OUT)
MUTE䋺ON
STANDBY LED: LIGHTS OUT
STAND BYLED䋺ᶖἮ
For the product to start operating normally when the power is turned on, the circuit connected to each input port of _P DOWN, _5V DOWN, _P CUR FAIL, _P AMP FAIL and _P LINE FAIL needs to be operating normally.
20
電源 ON 時に製品が通常動作を開始するためには、上図の様
な Timing で _P DOWN, _5V DOWN_P CUR FAIL, _P
AMPFAIL, _P LINE FAIL の各入力 Port で接続されている回
路が正常動作している必要があります。
Normal detection operation when the power is turned on
電源 ON 時の異常検出動作
_STAND BY(OUT):
㽲㽳㽴㽵䈱㗅䈪ᬌ䉕ⴕ䈇䇮
Lo䉕ᬌ䈚䈢䉌䇮એᓟLo䈮䈜䉎
STANDBY (OUT): If it detects in order of
㽲㽳㽴㽵 and Lo is detected, it will be made Lo
after that.
3.5sec
2sec
500msec
if 㽲=H
if 㽳=H
if 㽴=H
if 㽵=H
if 㽲=L
if 㽳=L
if 㽴=L
if 㽵=L
_STAND BY (138pin)
(OUT)
AC POWER SUPPLY: POWER ON
_P DOWN (25pin)
(IN)
ਇቯ
_P_LINE_FAIL (122pin)
Hi: Normal
INCONSTANT
(IN)
㽴 Lo: Abnormal
_STAND BY LEDߩಣℂψA
How to respond to the
flickering
__STANDBY LED㸢A
Lo䋺⇣Ᏹ
ਇቯ
_P_AMP_FAIL (121pin)
(IN)
INCONSTANT
_STAND BY LEDߩಣℂψB
How to respond to the
flickering
_STANDBY LED㸢B
Hi䋺Normal
㽳
Lo䋺Abnormal
Lo䋺⇣Ᏹ
(IN)
_STAND BY LEDߩಣℂψA
How to respond to the
flickering
__STANDBY LED㸢A
Hi䋺Normal
_P_CUR_FAIL (120pin)
Lo䋺Abnormal
㽲
Hi: Normal
_5V_DOWN (137pin)
(IN)
㽵 Lo: Abnormal
Lo䋺⇣Ᏹ
+5VDD=OK
FLRA_ON (IC88 : 4pin)
FLRB_ON (IC88 : 5pin)
SURR_ON (IC88 : 6pin)
SBLR_ON (IC88 : 7pin)
Lo
SPEAKER䋺OFF
(OUT)
Lo
MUTE䋺ON
_STAND BY LED (135pin)
STANDBY LED:
LIGHTS OUT
(OUT)
ฦch MUTE
EACH CHANNEL MUTE
LED䋺ᶖἮ
(OUT)
䌁
_STAND BY LED (135pin)
(OUT)
䌂
LED䋺ᶖἮ
STANDBY LED:
LIGHTS OUT
Flickering (every 125msec)
ὐṌ(125msec㑆㓒)
Flickering (every 500msec)
点滅(500msec間隔)
21
_STAND BY LEDߩಣℂψB
How to respond to the
flickering
_STANDBY LED㸢B
6. TROUBLE SHOOTING
Symptom
The power cannot be turned on.
Standby LED blinks slowly.
Reason
Check Points
・ +5VL is not outputted.
・T600,IC51,D606~D609 (MAIN)
・ The voltage between CN85-20pin and
GND is not 5V.
・ Main CPU is not work.
・ IC105,IC90(HDMI)
・ Front panel is not correctly connected with ・ CN82(HDMI)
Main CPU.
・ BN82(FRONT)
・ F602 has been disconnected.
・ Main Transformer
(When F602 has been disconnected, the ・ D201,C636,C637(MAIN)
serious stumbling block might be
generated. )
・ F603 has been disconnected.
・ F603,Q610,CN66(MAIN)
(F603 cuts when the protection of Main ・ CN31,BN85(USB/CNT)
CPU doesn't work. )
・ Each Transistor of Power amplifier.(MAIN)
・ The temperature of the heat sink is ・ RL20,Q200,Q201,CN23(REG)
abnormally high.
・ CN69,TH60,Q615(MAIN)
・ The voltage-controlled circuit is defective.
・ The temperature detection circuit is
defective.
Turns on and then off the STANDBY. ・ P_AMP_FAIL(CN85-10pin) is 0V.
Standby LED flickering slowly.
・ The DC voltage of several V or more has ・ The voltage between each 1pin and GND
been generated in the output of the power
of CN70~76(MAIN) is confirmed.
amplifier.
・ Each Tr. Of Power amplifier (MAIN)
・ P_AMP_FAIL(CN85-10pin) is 0V.
・ ET60,CN68(MAIN)
・ CN51(INPUT)
・ The power supply circuit breaks down and ・ IC24,IC25,D201~D205(REG)
a more abnormal voltage has been ・ C636,C637(MAIN)
detected short. (+12V/-12V/+55V/-55V)
・ Q513,Q514(INPUT)
・ P_LINE_FAIL(CN85-12pin) is 0V. s
Turns on and then Standby LED flickering ・ An abnormal current flows to any power ・ The voltage between each 1pin and 2pin
faster.
transistor due to the breakdown of the
of CN70~76(MAIN) is confirmed.
power amplifier.
・ Q706,708,713,715,
・ P_CURR_FAIL(CN85-16pin) is 0V.
703,705,719,721,
709,710,716,718,
711,712(MAIN)
All segment of FL Display is turrn on.
・ +5VD Supply is fail.
・ +5V is not supplied to FL display.
・ F201,D208,IC21,BN22(REG)
・ CN81,CN82(HDMI PWB)
・ BN82,FL10(FRONT)
"CHECK E2P IF"on the FL DISPLAY
・ EEP-ROM cannot be normally rewritten.
・ IC86,IC115(HDMI)
( ):PWB name
22
6. トラブルシューティング
症状
電源が入らない
理由
チェックポイント
・ +5VL 電源が故障している
・T600,IC51,D606 ∼ D609(MAIN)
・ CN85-20pin と GND 間の電圧が 5V になっ
ていない
・ Main CPU が動作していない
・ IC105,IC90(HDMI)
・ 操作パネルが Main CPU と正しく接続され ・ CN82(HDMI)
ていない
・ BN82(FRONT)
・ F602 が断線している
・ Main Transformer
(F602 が断線している場合は、重大な障害 ・ D201,C636,C637(MAIN)
が発生していることがあります。)
電源を入れると、Standby LED がゆっくりと
点滅する
・ F603 が断線している
・ F603,Q610,CN66(MAIN)
(F603 は Main CPU による保護が万一機能 ・ CN31,BN85(USB/CNT)
しなかった場合に溶断します )
・ Power amplifier の各トランジスタ (MAIN)
・ ヒートシンクの温度が異常に高い
・ RL20,Q200,Q201,CN23(REG)
・ 電圧制御回路が不良
・ CN69,TH60,Q615(MAIN)
・ 温度検出回路が不良
・ P_AMP_FAIL(CN85-10pin) が 0V になっ
ている
電源を入れると直ぐに電源が落ちて、Standby
LED がゆっくりと点滅する
・ パワーアンプから DC 電圧が出力されてい
・ The voltage between each 1pin and
GND of CN70~76(MAIN) is confirmed.
るs
・ P_AMP_FAIL(CN85-10pin) が 0V になっ ・ Each Tr. Of Power amplifier (MAIN)
・ ET60,CN68(MAIN)
ている s
・ CN51(INPUT)
・ 電源回路の故障やショートにより異常電圧 ・ IC24,IC25,D201~D205(REG)
が検出されている
・ C636,C637(MAIN)
( + 12V/-12V/+55V/-55V)
・ Q513,Q514(INPUT)
・ P_LINE_FAIL(CN85-12pin) が 0V になっ
ている s
電源を入れるとStandby LEDが速く点滅する ・ パワーアンプの故障によりどれかの Power ・ CN70 ∼ 76(MAIN) の各 1pin と 2pin 間
Transistor に異常な電流が流れている
の電圧を確認
・ P_CURR_FAIL(CN85-16pin)が0Vになっ ・ Q706,708,713,715,
ている
703,705,719,721,
709,710,716,718,
711,712(MAIN)
FL Display のセグメントが全て点灯する
・ +5VD 電源が故障している
・ FL display に +5V が供給されていない
・ F201,D208,IC21,BN22(REG)
・ CN81,CN82(HDMI PWB)
・ BN82,FL10(FRONT)
FL Display に、"CHECK E2P IF" と表示され ・ EEP-ROM とのリード / ライトが正常に行え ・ IC86,IC115(HDMI)
る
ない
( ) 内は基板名称
23
7. JIG FOR SERVICING s
When you repair the printing board, you can use the following
JIG (Extension cable kit). Please order to Marantz Official
Service. Distributor in your region if necessary.
Note:
When the connection which is wrong in the JIG (Extension cable kit) is done it becomes cause of damage.
998619000470S :
extension wire for SR6004/5004 HDMI PWB : 2 Set
998619000480S :
extension wire for SR6004/5004 INPUT PWB : 1 Set
HDMI PWB (CUP12207)、INPUT PWB (CUP12208)、
MAIN PWB (CUP12206) を修理する場合、必要に応じて以
下のサービス用延長治具をご使用下さい。発注は SPC にご連
絡ください。
注意)
サービス用延長治具を間違った接続をすると故障する場合が
あります。
998619000470S :
extension wire for SR6004/5004 HDMI PWB : 2 本
998619000480S :
extension wire for SR6004/5004 HDMI PWB : 1 本
998619000470S : extension wire for SR6004/5004 HDMI PWB : 2 Set
Connector : 40pins male
A side near the red wire connector is "The first pin."
40 ピン オス
赤いワイヤーが 1 番ピン側
Connector : 40pins female
A side near the red wire connector is "The first pin."
40 ピン メス
赤いワイヤーが 1 番ピン側
998619000480S : extension wire for SR6004/5004 INPUT PWB : 1 Set
Connector : 50pins male
A side near the red wire connector is "The first pin."
50 ピン オス
赤いワイヤーが 1 番ピン側
Connector : 50pins female
A side near the red wire connector is "The first pin."
50 ピン メス
赤いワイヤーが 1 番ピン側
24
7-1 Connection of HDMI PWB JIG
7-1 HDMI PWB 用延長治具の接続
-Preparation998619000470S :
extension wire for SR6004/5004 HDMI PWB : 2 Set
Insulation sheet 1(Do not supply it)
- 準備する物 998619000470S :
extension wire for SR6004/5004 HDMI PWB : 2 本
絶縁シート -- 1 枚 (D&M では供給しません )
1. HDMI PWB (CUP12207) is detached from the chassis,
and it puts it into the state turned inside out.
Please pave an insulation sheet that is larger than HDMI
PWB under PWB.
1. HDMI PWB(CUP12207)をシャーシから取り外し、
裏返した状態にします。
HDMI PWB の下に PWB より大きい絶縁シートを敷いて
下さい。
CN84, CN85
Insulation sheets that is larger than PWB
PWB より大きい絶縁シート
25
BN85, BN84
2. Two extension wires for SR6004/5004 HDMI PWB are
connected.
Refer to the close-up also.
2. extension wire for SR6004/5004 HDMI PWB を接
続します。
拡大図も併せて参照して下さい。
Note:
When the connection which is wrong in the JIG (Extension cable kit) is done it becomes cause of damage.
注意)
サービス用延長治具を間違った接続をすると故障する場合が
あります。
Fig.2
Confirm 1st pin (red wire) on the wire side (male)
and 1st pin on the connector side.
Fig.1
Confirm 1st pin (red wire) on the wire side (female)
and 1st pin on the connector side.
ワイヤー(オス)の 1 番ピン(赤ワイヤー)とコネ
クタの 1 番ピンを合わせる
ワイヤー(メス)の 1 番ピン(赤ワイヤー)とコネ
クタの 1 番ピンを合わせる
Fig.1 USB/CNT PWB Side
䊪䉟䊟䊷䋨䊜䉴䋩䈱
⇟䊏䊮䋨⿒䊪䉟䊟䊷䋩
㪈 ⇟䊏䊮䋨⿒䊪䉟䊟䊷䋩
Confirm 1st pin㪈 (red
wire) on the wire side (female)䊪䉟䊟䊷䋨䊜䉴䋩䈱
Confirm
1st pin (red wire) on the wire side(female)
and
1st
pin
on
the
connector
of
BN85.
and
1st
pin
on the connector of BN84.
䈫䉮䊈䉪䉺䈱 㪈 ⇟䊏䊮䉕ว䉒䈞䉎㩷
䈫䉮䊈䉪䉺䈱 㪈 ⇟䊏䊮䉕ว䉒䈞䉎㩷
ワイヤー(メス)の 1 番ピン(赤ワイヤー)とコネ
㪪㪩㪍㪇㪇㪋㪑㪙㪥㪏㪌㩷
㩷 㪪㪩㪌㪇㪇㪋㪑㪙㪥㪋㪈㩷
クタの BN85
の 1 番ピンを合わせる。
ワイヤー(メス)の 1 番ピン(赤ワイヤー)とコネ
㪪㪩㪍㪇㪇㪋㪑㪙㪥㪏㪋㩷クタの
㩷 㪪㪩㪌㪇㪇㪋㪑㪙㪥㪋㪇㩷
BN84 の 1 番ピンを合わせる。
26
Fig.2 HDMI PWB Side
Confirm 1st pin (red wire) on the wire side(male) and
1st pin on the connector of CN84
Confirm 1st pin (red wire) on the wire side (male)
and 1st pin on the connector of CN85.
ワイヤー(オス)の 1 番ピン(赤ワイヤー)とコネ
クタ CN84 の 1 番ピンを合わせる。
ワイヤー(オス)の 1 番ピン(赤ワイヤー)とコネ
クタ CN85 の 1 番ピンを合わせる
Note:
As for CN66 of CN31 of USB/CNT PWB, and MAIN PWB, the
connection becomes loose upon service. Please confirm the
firm connection.
注意)
サービスに際し、USB/CNT PWB の CN31 と MAIN PWB
の CN66 は接続が緩くなります。しっかり接続されているこ
とを必ず確認して下さい。
USB/CNT PWB
CN31
MAIN PWB
CN66
27
7-2 Connection of INPUT PWB JIG
7-2 INPUT PWB 用延長治具の接続方法
-Preparation998619000480S :
extension wire for SR6004/5004 INPUT PWB : 1 Set
Insulation sheet 1(Do not supply it)
- 準備する物 998619000480S :
extension wire for SR6004/5004 INPUT PWB : 1 本
絶縁シート -- 1 枚 (D&M では供給しません )
1. First of all, please connect the extension treatment device for HDMI PWB in the foregoing paragraph (7-1 Connection of HDMI PWB JIG).
INPUT PWB(CUP12208) is detached from the chassis,
and turned inside out. Please pave an insulation sheet
that is larger than INPUT PWB.
1. 事前に、前節 (7-1 HDMI PWB 用延長治具の接続 ) の
HDMI PWB 用延長治具の接続を行って下さい。
INPUT PWB(CUP12208)をシャーシから取り外し、
裏返します。INPUT PWB より大きい絶縁シートを敷い
て下さい。
Insulation sheets that is larger than PWB
PWB より大きい絶縁シート
DL PWB
CN50
CN32
28
2. Two extension wire for SR6004/5004 INPUT PWB are
connected.
Refer to the close-up also.
2. extension wire for SR6004/5004 INPUT PWB を接
続します。
拡大図も併せて参照して下さい。
Note:
When the connection which is wrong in the JIG (Extension cable kit) is done it becomes cause of damage.
注意)
サービス用延長治具を間違った接続をすると故障する場合が
あります。
Fig.1
Confirm 1st pin (red wire) on the wire side (male)
and 1st pin on the connector of CN32
Fig.2
ワイヤー(オス)の 1 番ピン(赤ワイヤー)とコネ
クタ CN32 の 1 番ピンを合わせる。
ワイヤー(メス)の 1 番ピン(赤ワイヤー)とコネ
クタの CN50 の 1 番ピンを合わせる。
Confirm 1st pin (red wire) on the wire side (female)
and 1st pin on the connector of CN50.
Fig.1 USB/CNT PWB Side
Confirm 1st pin (red wire) on the wire side (male)
and 1st pin on the connector of CN32.
ワイヤー(オス)の 1 番ピン(赤ワイヤー)とコネ
クタの CN32 の 1 番ピンを合わせる。
29
Fig.2 INPUT PWB Side
Confirm 1st pin (red wire) on the wire side (female)
and 1st pin on the connector of CN50.
ワイヤー(メス)の 1 番ピン(赤ワイヤー)とコネ
クタの CN50 の 1 番ピンを合わせる。
Note:
As for CN66 of CN31 of USB/CNT PWB, and MAIN PWB, the
connection becomes loose upon service. Please confirm the
firm connection.
注意)
サービスに際し、USB/CNT PWB の CN31 と MAIN PWB
の CN66 は接続が緩くなります。しっかり接続されているこ
とを必ず確認して下さい。
USB/CNT PWB
CN31
MAIN PWB
CN66
30
8. DUAL BACKUP MEMORY
This product has a Dual Backup Memory function. The
conventional Backup functions to memorize, in the EEPROM (IC89) in the circuit, a current setting of the moment the
main power is turned off so that it can be restored when it is
turned ON again. Meanwhile, the DUAL BACKUP MEMORY
is capable of memorizing any arbitrary setting that is
configured while the product is in operation so as to restore
it at any time.
When servicing units returned from end-users for repairs,
use this function to back up the current setting (e.g. Tuner
Preset). This will enable the units to be returned to the users
after repairs, with the setting unchanged.
NOTE : If end-users use this function, the data will be
overwritten.
本機は Dual Backup Memory 機能を持っています。
通常の Backup は製品の主電源が切られた時に、その時の状態
を回路上の EEP-Rom (IC89) に Memory して、電源が ON
された時にその状態を復帰させますが、 DUAL BACKUP
MEMORY 機能は、動作状態にある任意の状態を Memory し
て、いつでもその状態を復帰させることが出来る機能です。
この機能を使って End User から修理依頼を受けた時の状態
を Back Up させておけば、修理後に確認の操作をしても、
User が使用していたときの状態 (Tuner の Preset 等 ) を復
帰させて返却することもできます。
ご注意 : End User がこの機能を使用していた場合はその
Data は上書きされてしまうので注意が必要です。
• HOW TO OPERATE
・ 操作方法
-Backup1. Configure a setting you would like to save in the MEMORY and hold down the [MEMORY] and [ENTER] buttons
on the Front Panel at the same time for 3 seconds or
more.
2. The FL Display indicates "MEMORY SAVING" while the
Backup is being performed.
3. The FL Display indicates "COMPLETE" when the Backup
is completed.
-Backup 操作 1. 製品を Memory したい状態にして、 Front Panel 上の
[MEMORY] と [ENTER] ボタンを同時に 3 秒以上押し続
けます。
2. FL Display に "MEMORY SAVING" と表示され Backup
処理が行われます。
3. FL Display に "COMPLETE" と表示されれば処理は完了
です。
-Recovery1. Hold down the [MEMORY] and [MENU] buttons on the
Front Panel at the same time for 3 seconds or more. s
2. The FL Display indicates "MEMORY LOAD" while the
Recovery is being performed.
3. After the FL Display indicates "COMPLETE", the product
goes into Standby mode. When the power is restored, the
Recovery is completed. The FL Display indicates "NO
BACKUP" if the DUAL BACKUP MEMORY has not been
activated with no data to be recovered saved in the
Memory. This function does not back up the levels of
Main ZONE Volume, ZONE A Volume and ZONE A
Speaker Volume. When the Recovery is done, - ∞ is indicated.
-Recovery 操作 1. Front Panel 上の [MEMORY] と [MENU] ボタンを同時
に 3 秒以上押し続けます。
2. FL Display に "MEMORY LOAD" と表示され Recovery
処理が行われます。
3. FL Display に "COMPLETE" と表示され製品は一度
Standby 状態となり復帰後 Recovery 処理が完了します。
この時、DUAL BACK UP MEMORY 操作がされてなく、
Recovery する Data が Memory されていない場合は FL
Display に "NO BACKUP" と表示されます。
また、Main ZONE Volume , ZONE A Volume ,ZONE A
Speaker Volume の各 Volume 値についてはこの機能で
は Backup されずに - ∞で Recovery されます。
・ Service 時の注意点
• SERVICE PRECAUTIONS
INPUT PWB 上の Flash Rom (IC89) を交換した場合また
は、DSPCODE を Version Up 等の理由から書き換えた場合
は、BackupMemoryとの整合性の為に必ず次の方法でDUAL
BACKUPMEMORY の消去を行います。
-Backup Memory の Clear 操作 1. Front Panel 上の [MEMORY] と [CLEAR] ボタンを同時
に 3 秒以上押し続けます。 s
2. FL Display に "BACKUP CLEAR" と表示され Clear 処
理が行われます。
3. L Display に "COMPLETE" と表示されれば処理は完了で
す。
When the Flash Rom (IC89) on the INPUT PWB is replaced
or when the DSP CODE is rewritten for a version upgrade,
make sure, in order to maintain consistency with the Backup
Memory, to clear the DUAL BACKUP MEMORY in
thefollowing way :
-How to clear the Backup Memory-1. Hold down the [MEMORY] and [CLEAR] buttons on theFront Panel at the same time for 3 seconds or more. s
2. The FL Display indicates "BACKUP CLEAR" while the
memory is being cleared.
3. After the FL Display indicates "COMPLETE", the operation is completed.
31
9. WRITING AND UPDATE SOFTWARE
Software for MAIN CPU, flash ROM for DSP, HDMI CPU can
be updated/downloaded. Have update/download application
software. ("FDT V4.03", "da708_writer.exe", "FlashSta. exe")
There are four mode of download, regarding to the target of
software as bellow.
MAIN マイコン、DSP のフラッシュ ROM、HDMI マイコン
のソフトウェアは更新、および書き込みが出来ます。
更新および書き込みには書き込み用アプリケーションが必要で
す。("FDT V4.03", "da708_writer.exe", "FlashSta.exe")
書き込みには下記の 4 つのモードがあります。
• Mode 1: Update/Download MAIN CPU's software
to internal Flash-ROM
・ Mode 1: Update/Download MAIN CPU's
software to internal Flash-ROM
このモードは MAIN マイコンの更新および書き込み用です。
基板 CUP12207Z (HDMI PWB) の IC105 のマイコン内
部のフラッシュ ROM に書き込みます。
書き込みにかかる時間は約 2 分 40 秒です。
This mode is to update/download the software for MAIN
CPU.
The target devise is internal flash ROM of CPU (IC105) on
CUP12207Z (HDMI PWB).
The updating of software takes about 2 minutes and 40
seconds.
• Mode 2: Update/Download DSP's software to
Flash-ROM
・ Mode 2: Update/Download DSP's software to
Flash-ROM
This mode is to update/download the software for DSP.
The target devise is Flash-ROM (IC116) on CUP12207Z
(HDMI PWB).
The unit needs to be set writing condition, by three front
buttons.
The updating of software takes about 6 minutes and 30
seconds.
このモードは DSP のフラッシュ ROM の更新および書き込
み用です。
基板 CUP12207Z (HDMI PWB) の IC116 のフラッシュ
ROM に書き込みます。
本機のフロントボタン 3 つから書き込みモードにする必要
があります。
書き込みにかかる時間は約 6 分 30 秒です。
・ Mode 3: Update/Download HDMI CPU's
software to internal Flash-ROM
• Mode 3: Update/Download HDMI CPU's software
to internal Flash-ROM
このモードは HDMI マイコンの更新および書き込み用です。
基板 CUP12207Z (HDMI PWB) の IC61 のマイコン内部
のフラッシュ ROM に書き込みます。
本機のフロントボタン 3 つから書き込みモードにする必要
があります。
書き込みにかかる時間は約 1 分です。
This mode is to update/download the software for HDMI
CPU.
The target devise is internal flash ROM of CPU (IC61) on
CUP12207Z (HDMI PWB).
The unit needs to be set writing condition, by three front
buttons.
The updating of software takes about 1 minutes.
・ Mode 4: Update/Download USB CPU's
software to internal Flash-ROM
• Mode 4: Update/Download USB CPU’s software
to internal Flash-ROM.
このモードは USB マイコンの更新および書き込み用です。
基板 CUP12211Z (USB PWB) の IC35 のマイコン内部
のフラッシュ ROM に書き込みます。
本機のフロントボタン 3 つから書き込みモードにする必要
があります。
書き込みにかかる時間は約 1 分です。
This mode is to update/download the software for USB
CPU. The target devise is internal flash ROM of CPU
(IC35) on CUP12211Z (USB PWB).
The unit needs to be set writing condition, by three front
buttons.
The updating of software takes about 1 minute.
NECESSARY EQUIPMENT
The following items are required for updating/downloading.
Windows PC (OS: Windows2000 or WindowsXP) with
Serial port.
RS-232C Dsub-9 pin cable (female to female/straight type)
Update software to MAIN CPU. (FDT V4.03)
Update software to flash ROM for DSP. (da708_writer.
exe, etc... in DSP folder)
Update software to HDMI CPU. (FlashSta.exe, etc... in
HDMI folder)
Update software to USB CPU. (FlashSta.exe, etc... in USB
folder)
Use RS232C Dsub-9 pin cable (female to female/straight
type) to connect PC and the RS-232C port in rear panel of
the unit, when updating/downloading each of software.
必要機器
下記は更新および書き込みに必要な機器です。
Windows PC (OS : Windows2000 またはWindowsXP)
で Serial ポートのあるもの
RS-232C ストレートケーブル (9Pin メス -9Pin メス )
MAIN マイコン用書き込みソフトウェア (FDT V4.03、な
ど)
DSP フラッシュ ROM 用書き込みソフトウェア (DSP フォ
ルダ内 da708_writer.exe、など )
HDMI マイコン用書き込みソフトウェア (HDMI フォルダ内
FlashSta.exe, など )
USB マイコン用書き込みソフトウェア (USB フォルダ内
FlashSta.exe、など )
それぞれのソフトウェアを更新および書き込みする場合、RS232C ケーブルで本機リアパネルの RS232C コネクタと
Windows PC の Serial ポートを接続します。
32
Download Utility (FDT)
ユーティリティのダウンロード
[A] SOFTWARE (fdtv403r00.exe) DOWNLOADS
AND INSTALLS PROCEDURE
[A] ソフトウェア (fdtv403r00.exe) のダウンロード
とインストール手順
[A-1] DOWNLOADS OF THE SOFTWARE
(Flash Development Toolkit: the rest is FDT)
Download the software for update of the MAIN CPU.
1. Launch the browser.
2. Type the "http://www.renesas.com/" into an address. And
click the Go or press the Enter on keyboard of PC.
NOTE : This site is managed by RENESAS technology corp.
The following explanation may differ from the actual
composition. When different, please proceed alonwith the site composition of RENESAS.
[A-1] ソフトウェアのダウンロード
(Flash Development Toolkit: 以下 FDT)
メイン CPU アップデート用ソフトのダウンロード
1. ブラウザ ( インターネットエクスプローラー等 ) を起動し
ます
2. アドレスバーに http://www.renesas.com/ を入力して、
キーボードの Enter を押します。
ご注意 : このサイトは株式会社ルネサステクノロジーが管理し
ているため、説明と実際のサイト構成が異なる場合が
あります。その場合は実際のルネサスのサイト構成に
沿って進めて下さい。
A login ID is necessary to download the FDT.
If you have Login ID, please advance to step 8.
If you do not have Login ID, Click the MY RENESAS.
FDT をダウンロードするにはログイン ID が必要です
既にログイン ID をお持ちの方は手順 8 へ進んでください。
ログイン ID を持っていない方は MY RENESAS をクリック
してください。
3. Click the "REGISTER NOW!".
3. " 新規登録 " をクリックしてください。
33
4. Choose Non secure or Secure in Security Level your network environment.
Choose English or another one in region and language.
5. Input the each item.
Note: The items displayed by a language and region are
different.
4. PC のネットワーク環境により、Non secure または
Secure を選択してください。
Choose Region and Language から日本語を選択して
ください。
5. 各項目を記入します。
言語や地域によって表示は異なります。
34
6. If you have inputted the necessary items, click the
"I agree", and click "Submit".
6. 必須項目の入力が済んだら "I agree"( 同意します ) を選択
し、"Submit"( 送信 ) をクリックします。
7. Immediately, an e-mail arrives from the renesas.
Click the link in the e-mail to go to the registration site,
And input the login ID and password. And click the submit.
7. 直ちに、RENESAS から電子メールが届きます。電子
メール内にある登録サイトへのリンクをクリックします。
ログイン ID とパスワードを入力し "Submit"( 送信 ) をク
リックします。
35
8. Click the Software download in the Design support.
8. Design support 内の Software download をクリック
します。
9. Type the "Flash Development toolkit" into the keyword
search.
9. キーワードサーチに「フラッシュ開発ツールキット」を入
力します。
36
10. Click the [Evaluation Software] Flash Development Toolkit V4.03 Release 01
The latest edition is FDT V4.03 at present. (July. 2009)
It is in FDT V4.03 as follows and explains it.
11. Input Login ID and password. And click the submit.
10.【無償評価版】フラッシュ開発ツールキット V.4.03
Release 01」をクリックします。
11. ログイン ID とパスワードを入力し、送信をクリックしま
す。
37
12. Scroll down the page.
12. ページをスクロールします。
13. Click the Agree, and click the submit.
13. Agree( 同意 ) を選択してから、Submit( 送信 ) をクリッ
クします。
38
14. Scroll down the page.
14. ページをスクロールします。
15. Click the Download.
15. Download( ダウンロード ) をクリックします。
16. Click the Save. Save the fdtv403r00.exe on your PC's
hard disc.
NOTE: A file name is change by improvement.
16. Save( 保存 ) をクリックします。Fdtv403r00.exe をパ
ソコンのハードディスクに保存します。
ご注意 : 改版によりファイル名は変更されることがあります。
39
Installs Utility (FDT)
ユーティリティのインストール
[A-2] [A] INSTALLS OF THE SOFTWARE
(Flash Development Toolkit Ver.4.03)
1. Open the folder with the downloaded file.
2. And double click the fdtv403r00.exe
[A-2] [A] ソフトウェアのインストール
(Flash Development Toolkit Ver.4.03)
1. ダウンロードしたファイルのあるフォルダを開きます。
2. Fdtv403r00.exe をダブルクリックします。
3. Click the Next.
3. Next をクリックします。
40
4. Check the International (English),and click the Next.
4. "International (English)" にチェックを入れ、Next をク
リックします。
5. Check the I accept the terms of the license agreement,
and Click the Next.
5. I accept the terms of the license agreement に
チェックを入れ、Next をクリックします。
41
6. Click the next.
6. Next をクリックします。
7. Check the mot file type, and click the Next..
7. mot ファイル形式をチェックし、Next をクリックしま
す。
42
8. Click the Next.
8. Next をクリックします。
9. Click the Install.
9. Install をクリックします
43
10. The Setup Status bar appears.
10. インストールの状態が表示されます。
11. Click the Finish.
11. Finish をクリックします。
44
Update Firmware (SR6004 Main FDT)
ファームウェアのアップデート
• Mode 1: Update/Download MAIN CPU's software
to internal Flash-ROM
・ Mode 1: Update/Download software for MAIN
CPU. メイン CPU ソフトウェアのアップ
デート
NECESSARY EQUIPMENT
必要機器
The following items are required for updating/downloading.
下記はアップデートに必要な機器です
Windows PC(OS: Windows2000 または Windows XP)
でシリアルポートを備えたもの
RS232C 用ストレートケーブル (9 ピンメス -9 ピンメス )
Flash Development Toolkit 4.03 または最新版
(fdtv403r00.exe または最新版 )
夫々のソフトウェアをアップデートする場合、本機のリアパ
ネルにある RS232C コネクターとパソコンのシリアルポー
トを接続します
• Windows PC (OS: Windows2000 or Windows XP) with Serial port.
RS-232C Dsub-9 pin cable (female to female/straight type)
Flash Development Toolkit 4.03 or latest version
(fdtv403r00.exe or latest version)
Use RS232C Dsub-9 pin cable (female to female/straight
type) to connect PC and the RS-232C port in rear panel of
the unit, when updating/downloading MAIN CPU
[M1-1] The writing software setup procedure
1. Launch the Flash Development Toolkit v4.03 (FDT)
NOTE : Please refer to "[A] SOFTWARE (fdtv403r00.exe)
INSTALL PROCEDURE", when you do not install
FDT.
[M1-1]メイン CPU 書き込み用ソフトウェアのセットアップ
1. Flash Development Toolkit v4.03 (FDT) を起動しま
す。
ご注意 : FDT がインストールされていない場合は、[A] ソ
フトウェアインストール手順を参照して下さい。
2. Click Start, Programs, Renesas, Flash Development
Toolkit 4.03 and Flash Development Toolkit 4.03.
2. スタート、プログラム、RENESAS、Flash
Development Toolkit 4.03 および Flash
Development Toolkit 4.03 をクリックします。
45
3. Check the Create a new project workspace, and click the
OK.
NOTE : It is needs setup for SR6004 When you have
already setup, please advance to "[M1-2] Writing
Procedure for MAIN CPU".
3. Create a new project workspace をチェックし、OK
をクリックします。
ご注意 : すでに SR6004 用のセットアップが済んでいる
場合は、[M1-2] メイン CPU の書き込み手順へ進
んでください。.
4. SR6004 is inputted into the Workspace Name. (It is simultaneously inputted into Project Name.)
4. Workspace Name に SR6004 を入力します。( 同時に
Project Name にも入力されます )
OK をクリックします。
Click the OK.
46
5. Input the Filter "M3087".
Then, selected "M3087BFK " and Click the Next. s
5. Filter に M3087 を入力します。
M3087BFK を選択し Next をクリックします。s
6. Choose the Serial port number in the Select Port. And
click the Next.
6. シリアルポート番号を選択し、Next をクリックします。
47
7. Un-check the Use Default, and choose the 57600 in
Recommended Speeds. Click the Next.
7. Use Default のチェックを外し、Recommended
Speeds として 57600 を選択します。
8. Check the Automatic in Protection. Check the Advanced
in Messaging. Click the Finish
8. Protection から Automatic を、Messaging から
Advanced にチェックをして、Finish をクリックします。
48
[M1-2] Writing Procedure for MAIN CPU
1. Connect the RS-232C on rear panel of the unit and the
Serial Port of windows PC with RS-232C cable.
2. Launch the Flash Development Toolkit (FDT), When FDT
is not launch.
When FDT is already launch, please advance to step
No.6.
3. Click Start, Programs, Renesas, Flash Development
Toolkit 4.03 and Flash Development Toolkit 4.03.
[M1-2]メイン CPU の書き込み手順
1. 本機のリアパネルの RS232C コネクターとパソコンのシ
リアルポートを RS-232C ケーブルで接続します。
2. Flash Development Toolkit (FDT) を起動します。FDT
が既に起動している場合は、6 へ進んでください。
3. スタート、プログラム、RENESAS、Flash
Development Toolkit 4.03 および Flash
Development Toolkit 4.03 の順にクリックしてくださ
い。
4. Check the Browse to another project workspace, and
click OK.
3. Browse to another project workspace をチェックし
OK をクリックします。
49
5. Choose SR6004.AWS in SR6004 folder under Workspace folder. And Click the Open.
5. Workspace フォルダーの下にある SR6004 フォルダー
の中の SR6004.AWS を選択します。
6. Right button of mouse click on the SR6004, and select
the Add Files... in a menu.
6. SR6004 から右クリックして、Add Files…を選択しま
す。
50
7. Browse and choose the sr6004_rom_yymmddv.mot, and
click the Add.
NOTE : The yy is two digits of year. The mm is month. The
dd is date. The v is release number.
7. sr6004_rom_yymmddw.mot を選択し、Add をクリッ
クします。
ご注意 : yy は西暦下 2 桁、mm は月、dd は日にち、v はリ
リース番号を表しています。
• Update/Download DSP's software to Flash-ROM
・ Update/Download DSP's software to FlashROM
8. Connect RS-232C on the rear panel of the unit and Serial
Port of windows PC with RS-232C cable.
9. Insert a thin rot to the hole near the RS-232C terminal
and push the switch inside to turn on the switch.
8. 本機のリアパネルの RS232C コネクターとパソコンのシ
リアルポートを RS-232C ケーブルで接続します。
9. 本機リアパネルの RS232C コネクター近くにある穴に細
い棒を挿して内部のスイッチを押します。
Hole of rear panel
51
10. Connect the mains cord into the unit.
And press the POWER ON/OFF button for turn on the
unit. (N, K version)
NOTE : When the unit is into boot mode, STANDBY LED is
not lights.
11. Click the Device in the menu bar and select the Connect
to Device.
10. 本機に電源コードを接続します。
POWER ON/OFF ボタンを押して本機の電源を入れま
す。(N、K バージョンのみ )
ご注意 : このとき本機はブートモードになりますが、
STANDBY インジケーターは点灯しません。
11. メニューバーから Device をクリックして Connect to
Device を選択します。
12. Click the Device in the menu bar and select the Erase
FLASH Blocks.
12.メニューバーから Device をクリックし、Erase FLASH
Blocks を選択します。
52
13. Click the Select All and Erase.
13. Select All と Erase をクリックします。
s
14. Press right button of mouse on the
sr6004_rom_yymmddv.mot, and select the Download
File in a menu.
14. sr6004_rom_yymmddv.mot の上からマウスを右ク
リックし、メニューから Download File を選択します。
53
15. Software is written into the MAIN CPU. The writing of
software takes about 2 minutes.
15. メイン CPU にソフトウェアが書き込まれます。書き込み
には約 2 分かかります。
16. Click the Device in the menu bar and select the Disconnect.
16. メニューバーから Device をクリックし、Disconnect
を選択します。
54
17. Click the OK.
17. OK をクリックします。
18. Click the File and select the Exit in menu.
18. File をクリックし、メニューから Exit を選択します。
s
19. Press the POWER ON/OFF button for turn off the unit.
(N and K version).
20. Disconnect the mains cord and RS-232C cable from the
unit.
21. Insert a thin rot to the hole and push the switch inside to
turn off the switch.
19. POWER ON/OFF ボタンを押して本機の電源を切りま
す。(N,K バージョン )
20. 本機から電源コードと RS-232C ケーブルを外します。
21. 穴に細い棒を差し込み、内部のスイッチを押して書き込み
モードを解除します。
55
MAIN CPU Version
1. Connect the mains cord into the unit.
2. Press the POWER ON/STANDBY or POWER ON/OFF
button for turn on the UNIT.
3. Press the AUTO, EXIT and CLEAR buttons simultaneously more then 3 seconds.
4. The FL display shows "SERVICE MODE" and the model
name for 2 seconds.
S
E
R
V
メイン CPU バージョン
1. 本機に電源コードを接続します。
2. POWER ON/STANDBY または POWER ON/OFF ボタ
ンを押して電源を入れます。
3. AUTO, EXIT および CLEAR ボタンを同時に 3 秒以上押
します。
4. 本機の FL ディスプレイに SERVICE MODE と機種名が
表示されます。
I
C
E
S
R
6
5. Press the [ENTER] button, The FL display changes as
follows .
MAIN CPU Version → Serial No. of unit → TI DSP Code
B1 Version → TI DSP Code B2 Version → HDMI CPU
Version→USB CPU Version→FL Test 1 →FL Test 2→FL
all clear → Normal operation (Exit Service Mode)
0
M
O
0
4
D
E
5. ENTER ボタンを押すと FL ディスプレイの表示が下記の
通りに変化します
MAIN CPU Version → Serial No. of unit → TI DSP
Code B1 Version → TI DSP Code B2 Version →
HDMI CPU Version → USB CPU Version → FL Test
1 → FL Test 2 → FL all clear → Normal operation
(Exit Service Mode)
MAIN CPU Version
V
0
9
Year
0
7
Month
2
3
Date
1
N
Version
56
Destination
Mode 2: Update/Download DSP’s software to FlashROM
Update/Download Software for DSP (Mode 2)
1. Put the "DSP (SR5004 SR6004)" folder into anywhere
on your PC's hard disc.
Mode2: Update/Download DSP'ssoft wareto FlashROM
Update/Download Soft warefor DSP (Mode2)
1. "DSP(SR5004 SR6004)"フォルダをPCの任意のフォ
2.
2. 本機のリアパネルにあるRS-232CコネクタとWindows
PCのSerialポートをRS-232Cケーブルで接続します。
3. 本機に電源ケーブルを差します。
4. POWER ON/OFF (STANDBY)ボタンを押し、本機の電
8.
Connect the RS-232C on rear panel of the unit and the
Serial Port of windows PC with RS-232C cable.
Connect the mains cord into the unit.
Press the POWER ON/OFF (STANDBY) button for turn
on the unit.
Press the ENTER, CLEAR and BAND buttons
simultaneously more than 3 seconds to turn the unit into
Loading Mode.
The FLD shows "SELECT MAIN" after showed
"LOADING MODE".
Turn the INPUT SELECTOR to change display from
"SELECT MAIN" to "SELECT DSP" on FLD.
Press the ENTER button.
9.
"SELECTED : DSP" shows on the FLD.
3.
4.
5.
6.
7.
ダにコピーします。
を入れます。
5. ENTER, CLEAR, BANDの3つボタンを同時に3秒以上押
し続け、本機をローディングモードにします。
6. FLに"LOADING MODE"と表示された後、"SELECT
MAIN"と表示されます。
7. 本機のINPUT SELECTORを回して、FLの表示
を"SELECT MAIN"から"SELECT DSP"に換えます。
8. ENTERボタンを押します。
9. FLに"SELECTED : DSP"と表示されます。
57
10. Double click the da708_writer.exe. And launch the
SR8001 TI Writer.
10. da708_writer.exeをダブルクリックし、SR8001 TI Writer
11. Choose the #/-0ORTNUMBER.
11. 使用するCOMポート番号を選択します。
を起動します。
58
12. Click the #ONNECT.
12. CoNNecTをクリックします。
13. "Connection OK!!" appears on SR8001 TI Writer. And
click the &ILE/PEN.
13. SR8001 TI Writer上に"Connection OK!!"と表示された
ら、&iLeOpeNをクリックします。
59
14. Choose the pa17_c78_yymmdd_v.upd. And click the
/PEN.
NOTE : The yy is two digits of year. The mm is month. The
dd is date. The v is release number.
14. pa17_c78_yymmdd_v.updを選択し、OpeNをクリックし
ます。
注意 : yyは年の下二桁、mmは月、ddは日、vはリリース番号
15. Click the OK.
15. OKをクリックします。
16. Click the 3%.$.
16. 3%.$をクリックします。
60
17. Software is written into the DSP Flash ROM.
The writing of software takes about 6 minutes and 30
seconds.
17. ソフトウェアがDSPフラッシュROMに書き込まれます。
書き込みにかかる時間は約6分30秒です。
18. Click the OK.
18. OKをクリックします。
19. Click the $ISCON.
19. DiScoNをクリックします。
61
20. Click the %XIT.
20. ExiTをクリックします。
21. Press the 0/7%2/./&& button for turn off the unit.
(Except /F B, /U1B)
22. Disconnect the mains cord.
23. Disconnect the RS-232C cable from the unit.
21. PO7ER ONO&&ボタンを押し、本機の電源を切りま
す。(/F B, /U1Bを除く)
22. 本機から電源コードを外します。
23. 本機からRS-232Cケーブルを外します。
62
-ODE 5PDATE$OWNLOAD($-)#05SSOFTWARETO
INTERNAL&LASH2/-
5PDATE$OWNLOAD3OFTWAREFOR($-)#05-ODE
4 SR6003)”
4 folder into anywhere
1. Put the “HDMI (SR5003
on your PC’s hard disc.
MoDe : UpDaTeDoWNLoaD (DM) CPUgS SoFTWare To
iNTerNaL &LaSH-ROM.
UpDaTeDoWNLoaD 3oFTWare For (DM) CPU MoDe 4 SR6003)"
4 フォルダをPCの任意のフォル
1. "HDMI (SR5003
2.
2.
本機のリアパネルにあるRS-232CコネクタとWindows
3.
4.
本機に電源ケーブルを差します。
3.
4.
5.
6.
7.
8.
9.
Connect the RS-232C on rear panel of the unit and the
Serial Port of windows PC with RS-232C cable.
Connect the mains cord into the unit.
Press the 0/7%2/./&&34!.$"9 button for turn
on the unit.
Press the ENTER, CLEAR and BAND buttons
simultaneously more than 3 seconds to turn the unit into
Loading Mode.
The FLD shows “SELECT MAIN” after showed
“LOADING MODE”.
Turn the ).0543%,%#4/2 to change display from
“SELECT MAIN” to “SELECT HDMI” on FLD.
Press the ENTER button.
“SELECTED : HDMI” shows on the FLD.
ダにコピーします。
PCのSerialポートをRS-232Cケーブルで接続します。
PO7ER ONO&& 3TANDBYボタンを押し、本機の電源
を入れます。
5.
ENTER, CLEAR, BANDの3つボタンを同時に3秒以上押
し続け、本機をローディングモードにします。
6.
7.
8.
9.
63
FLに"LOADING MODE"と表示された後、"SELECT
MAIN"と表示されます。
本機の)NPUT 3ELECTORを回して、FLの表示
を"SELECT MAIN"から"SELECT HDMI"に換えます。
ENTERボタンを押します。
FLに"SELECTED : HDMI"と表示されます。
10. Double click the FlashSta.exe. And launch the M16
Flash Start.
10. FlashSta.exeをダブルクリックし、M16 Flash Startを起
11. Check the )NTERNALFLASHMEMORY in the Select
Program.
Choose the #/-0ORTNUMBER.
And click the OK.
11. Select Programの)NTerNaL FLaSH MeMoryにチェックをし
動します。
て下さい。
使用するCOMポート番号を選択します。
OKをクリックします。
64
12. Click the 2EFER.
12. ReFer...をクリックします。
13. Choose the HDMI_REPV5_yymmdd_hvv.upd. And click
the /PEN.
NOTE : The yy is two digits of year. The mm is month. The
dd is date. The vv is release number.
13. HDMI_REPV5_yymmdd_hvv.updを選択し、OpeNをクリ
ックします。
注意 : yyは年の下二桁、mmは月、ddは日、vvはリリース番号
65
14. The FilePath and ID are inputted automatically, and the
MCU Type is selected to R8C automatically.
Click the OK.
14. FilePathとIDは自動的に記入され、MCU TypeはR8Cが選
15. Click the 3ETTING.
15. 3eTTiNG...をクリックします。
ばれます。
OKをクリックします。
66
16. Choose the 576 in the Baud rate.
Choose the in Program_intervals(ms).
Click the OK.
16. Baud rateから576を選択します。
Program_intervals(ms)をにします
OKをクリックします。
17. Click the E.P.R....
17. E.P.R...をクリックします。
67
18. Click the OK.
18. OKをクリックします。
19. Software is written into the internal Flash-ROM of HDMI
CPU.
The writing of software takes about 1 minute.
19. ソフトウェアがHDMI CPUの内部フラッシュROMに書き
20. Click the OK.
20. OKをクリックします。
込まれます。
書き込みにかかる時間は約1分です。
68
21. Click the %XIT.
21. ExiTをクリックします。
22. Press the 0/7%2/./&& button for turn off the unit.
(Except /F B, /U1B)
23. Disconnect the mains cord.
24. Disconnect the RS-232C cable from the unit.
22. PO7ER ONO&&ボタンを押し、本機の電源を切りま
す。(/F B, /U1Bを除く)
23. 本機から電源コードを外します。
24. 本機からRS-232Cケーブルを外します。
69
-ODE5PDATE$OWNLOAD53"#05gSSOFTWARETO
INTERNAL&LASH2/-
5PDATE$OWNLOAD3OFTWAREFOR53"#05-ODE
4 folder into anywhere on your
1. Put the "USB (SR6003)"
PC's hard disc.
MoDe : UpDaTeDoWNLoaD U3B CPUgS SoFTWare To
iNTerNaL &LaSH-ROM.
UpDaTeDoWNLoaD 3oFTWare For U3B CPU MoDe 1. "USB (SR6003)"
4 フォルダをPCの任意のフォルダにコピー
2. Connect the RS-232C on rear panel of the unit and the
Serial Port of windows PC with RS-232C cable.
3. Connect the mains cord into the unit.
4. Press the 0/7%2/./&& (34!.$"9) button for turn
on the unit.
5. Press the ENTER, CLEAR and BAND buttons
simultaneously more than 3 seconds to turn the unit into
Loading Mode.
6. The FLD shows "SELECT MAIN" after showed
"LOADING MODE".
7. Turn the ).0543%,%#4/2 to change display from
"SELECT MAIN" to "SELECT USB" on FLD.
8. Press the ENTER button.
9. "SELECTED: USB" shows on the FLD.
2. 本機のリアパネルにあるRS-232CコネクタとWindows PC
のSerialポートをRS-232Cケーブルで接続します。
3. 本機に電源ケーブルを差します。
4. PO7ER ONO&& (3TANDBY) ボタンを押し、本機の電源
します。
を入れます。
5. ENTER、CREAR、BANDの3つボタンを同時に3秒以上押
し続け、本機をローディングモードにします。
6. FLに"LOADING MODE"と表示された後、"SELECT
MAIN"と表示されます。
7. 本機のINPUT SELECTORを回して、FLの表示が"SELECT
MAIN"から"SELECT USB"に換えます。
8. ENTERボタンを押します。
9. FLに"SELECTED: USB"と表示されます。
70
10.Double click the FlashSta.exe. And launch the M16
Flash Start.
10.FlashSta.exeをダブルクリックし、M16 Flash Startを起動
11.Check the )NTERNALFLASHMEMORY in the Select
Program.
Choose the #/-0ORTNUMBER.
And click the OK.
11.Select Programの)NTerNaL FLaSH MeMoryにチェックをし
します。
て下さい。
使用するCOMポート番号を選択します。
OKをクリックします。
71
12.Click the 2EFER.
12.ReFer...をクリックします。
4
13.Choose the SR6003_USB_yymmdd_v.mot.
And click the
/PEN.
NOTE : The yy is two digits of year. The mm is month. The
dd is date. The v is release number.
4
13.SR6003_USB_yymmdd_v.mot
を選択し、OpeNをクリッ
クします。
注意 : yyは年の下二桁、mmは月、ddは日、vはリリース番号
72
14.The FilePath and ID are inputted automatically, and the
MCU Type is selected to R8C automatically.
Click the OK.
14.FilePathとIDは自動的に記入され、MCU TypeはR8Cが選
15.Click the 3ETTING.
15.3eTTiNG...をクリックします。
ばれます。
OKをクリックします。
73
16.Choose the in the Baud rate.
Choose the in Program_intervals(ms).
Click the OK.
16.Baud rateから576を選択します。
Program_intervals(ms)をにします
OKをクリックします。
17.Click the E.P.R....
17.E.P.R...をクリックします。
74
18.Click the OK.
18.OKをクリックします。
19.Software is written into the internal Flash-ROM of USB
CPU.
The writing of software takes about 1 minute.
19.ソフトウェアがUSB CPUの内部フラッシュROMに書き込
20.Click the OK.
20.OKをクリックします。
まれます。
書き込みにかかる時間は約1分です。
75
21.Click the %XIT.
21.ExiTをクリックします。
22.Press the 0/7%2/./&& button for turn off the unit.
(Except FB and U1B)
23.Disconnect the mains cord.
24.Disconnect the RS-232C cable from the unit.
22.PO7ER ONO&&ボタンを押し、本機の電源を切ります。
(FBとU1Bを除く)
23.本機から電源コードを外します。
24.本機からRS-232Cケーブルを外します。
76