1
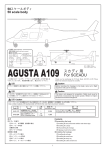
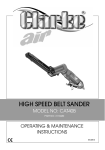
30スケールボディ
30 scale fuselage
0412-903 青 (BLUE)
0412-904 赤 (RED)
275mm
220mm
164mm
1110mm
228mm
ボディ重量:約600g
Body weight: approx. 600g
この度は30スケールボディ LONG RANGER をお買い上げ頂き誠に
ありがとうございます。取扱説明書に従い、組立を行って下さい。
Shuttle Plus用
For Shuttle Plus
Thank you for purchasing the 30 scale fuselage LONG RANGER.
Read these instructions carefully for the proper assembly.
Caution
注意
・Before mounting the chassis to the fuselage, adjust the flight of
the chassis only. In this regard, install the vertical fin to the
chassis.
A maneuver without the vertical fin will cause tail hunting.
・This aircraft is not designed for flight competitions. It is
dangerous to maneuver this aircraft at high speeds (1800 rpm
or higher).
Never fly this aircraft at excessive speeds.
・When there is vibration in the chassis: Not only will this model's
full flight characteristics be degraded, even if mounted on the
fuselage, it is also possible to cause damage or crashes.
Perform thorough maintenance in advance of mounting.
・ボディに搭載する前に機体のみでフライト調整して下さい。そ
の際、垂直尾翼を取り付けてフライトして下さい。垂直尾翼が
ないとテールがハンチング(左右に振れる現象)します。
・このボディは競技用ではありません。高回転(1800rpm以上)
での無理なフライトは危険ですので行わないで下さい。
・機体に振動がある場合。ボディに搭載しても充分なフライト性
能が発揮できない上、破損や墜落の原因になる可能性がありま
す。搭載前に充分なメンテナンスを行って下さい。
別売品
Scale: 1/9
このキットはボディのみです。
搭載可能機種
シャトルプラス
シャトルプラス+2
シャトルZXX
シャトルSXX
Sold separately
Model's that can be mounted
Shuttle Plus
Shuttle Plus+2
Shuttle ZXX
Shuttle SXX
マフラー許容サイズ
ø45mm以下
70mm以下
This kit includes only the fuselage unit.
20mm以下
65mm以下
Muffler Tolerance Size
Max. ø45 mm
Max. 70 mm Max. 20 mm
Max. 65 mm
Genuine muffler
純正適合マフラー
JI-50 muffler set
0402-050 ○2,100 (2,000)
JI-50マフラーセット
0402-050 ○2,100 (2,000)
1
〈組立をはじめる前に〉
〈Before Assembling〉
組立に必要なもの (別売)
Required Tools (sold separately)
¥税込価格(税抜価格)
ラジオペンチ
Long-nose pliers
+ドライバー
大・小
Large and small
Phillips screwdrivers
ニッパー
Nipper
¥ Price including Tax (Price excluding Tax)
定規
Ruler
カッターナイフ
Cutter knife
ハサミ
Scissors
2513-045 ¥840 (800)
(曲面/Curve)
2513-046 ¥630 (600)
(ミニ/Mini)
ネジロック剤
Thread locking
agent
瞬間接着剤
Instant adhesive
ロッドエンドペンチ
Rod-end (ball link)
pliers
エポキシ接着剤
Epoxy adhesive
六角レンチ
Allen hex socket driver
1.5mm2513-054¥945 (900)
2mm 2513-055¥945 (900)
2.5mm2513-056¥945 (900)
3mm 2513-057¥945 (900)
ピンバイス
(ø2.4, 3.0, 3.2ドリル)
Pin vise
(ø2.4, 3.0, 3.2 mm drill)
2513-041
¥3,675 (3,500)
マスキングテープ
Masking tape
両面テープ
厚さ1mm・2mm
1mm- and 2mmthick double-sided
adhesive tape
ヤスリ各種
Files
(平・丸など)
(Flat,round,etc)
サンドペーパー荒目
Rough sandpaper
(300番程度)
(about #300)
電動リューター
Electric router
十字レンチ
Cross wrench
2513-044 ¥315 (300)
Other Helpful Tools (sold separately)
あると便利な周辺用具(別売)
プラグレンチ
グロープラグコード
防音シート
Sound isolation sheet
メカクッションパッド
¥2,625(2,500)
¥1,050(1,000)
¥1,050(1,000)
¥1,365(1,300)
ピンク
キイロ
¥525(500)
¥525(500)
* The prices in parentheses are the prices excluding consumption tax.
コード
品 名
RCグラスター
税込価格
(税抜価格)円
Price (Yen)
945
(900)
備 考
汚れの除去とつや出しが一度にできるワックス入りクリーナー
Wax cleaner to remove dirt and polish surfaces.
RC脱脂クリーナー
1,050
(1,000)
グローエンジン内部及びシリコン部品の洗浄には使用出来ません
RCアルコールスプレー
1,260
(1,200)
グローエンジン内部及びシリコン部品にも使用出来ます(飲用不可)
(Not to be consumed)
RCほこりとばしスプレー
1,890
(1,800)
強力エアーでほこりを一発除去
Forced air from the nozzle removes dust.
RC冷却スプレー
1,890
(1,800)
瞬間的にマイナス温度に冷却、エンジンのオーバーヒート、ニッカドバッテリーの急速冷却に有効
Instantly cools overheated engine parts or nickel-cadmium batteries.
RCグリススプレー
840
(800)
たれ落ちないグリス、垂直面にも !
Non-drip grease. Use on vertical surfaces.
RC防錆潤滑スプレー
840
(800)
さらっとした防錆潤滑剤
Smooth, non-greasy anti-rust lubricant.
2
機体搭載の準備
Preparing to mount the chassis
1
シャトルプラス・シャトルZXX・シャトルSXXの場合
Shuttle Plus, Shuttle ZXX and Shuttle SXX
注意 Caution
テールユニットケースを外します。
Remove the tail unit case.
ボディに搭載する前に機体のみでフライト調整して下さい。
Before mounting the chassis to the fuselage, carry out a
flight adjustment with just the chassis.
ローターヘッド部をメインマストより外します。
Remove the rotor head together with the main mast.
メインギヤ
Main gear
使用しません
Not used
マフラー
Muffler
20mm
カットします
Cut off
シャトルプラスに付属のマフラーはボディに搭載
できません。0402-050 JIマフラーセット(別売)
を使用して下さい。
The muffler supplied with the Shuttle Plus cannot be
mounted on the fuselage. Use the 0402-050 JI muffler
set (sold separately).
テープ等でラダーガイドパイプを固定します。
ラダーロッドがスムーズに動く様に注意します。
Secure the rudder guide pipe with tape etc.
Ensure that the rudder rod moves smoothly.
外す
Remove
印
Marking
ラダーガイドパイプ
Rudder guide pipe
2mm
テールギヤケース(R)の凸部分を2mm程度カットします。
Cut approx. 2mm off of the convex part of the tail gear case (R).
3
ロッドエンドのネジ込み量がわかる様に、
油性ペン等で印を付けてからロッドエンド
を外します。
After marking (with a permanent marker, etc) so
that you know the place to where the rod end
was screwed in, remove the rod end.
シャトルプラス+2の場合
Shuttle Plus+2
注意 Caution
ボディに搭載する前に機体のみでフライト調整して下さい。
Before mounting the chassis to the fuselage, carry out a
flight adjustment with just the chassis.
テールユニットケースを外します。
Remove the tail unit case.
ローターヘッド部をメインマストより外します。
Remove the rotor head together with the main mast.
メインギヤ
Main gear
使用しません
Not used
マフラー
Muffler
20mm
カットします
Cut off
シャトルプラスに付属のマフラーはボディに搭載
できません。0402-050 JIマフラーセット(別売)
を使用して下さい。
The muffler supplied with the Shuttle Plus cannot be
mounted on the fuselage. Use the 0402-050 JI muffler
set (sold separately).
瞬間接着剤
Instant adhesive
80 mm
190 mm
190 mm
外す
Remove
ラダーコントロールロッドがスムーズに動くように、ラダーロッド
ガイドの位置を調整します。(上記の位置寸法は目安です。)
Adjust the position of the rudder rod guides to ensure the rudder control rod
can move smoothly. (The positions indicated above are rough guides.)
印
Marking
テールギヤケース(R)の凸部分を2mm程度カットします。
Cut approx. 2mm off of the convex part of the tail gear case (R).
2mm
ロッドエンドのネジ込み量がわかる様に、
油性ペン等で印を付けてからロッドエンド
を外します。
After marking (with a permanent marker, etc)
so that you know the place to where the rod end
was screwed in, remove the rod end.
4
2
ボディの加工
Preparing the fuselage
機体をボディに入れ、フレームを仮組みし、メインマスト位置、
機体取付位置を決め、ボディを加工します。
Place the chassis in the fuselage, temporarily assemble the frames, determine
the main mast position and the chassis mounting position, and then prepare
the fuselage.
ポイント
Point
FRPボディの加工にはヤスリ・リューター等を使用し、
慎重に行います。
ボディを加工した後は、カット面に瞬間接着剤を塗
ってください。
Carefully prepare the FRP fuselage using a file
and router, etc.
After preparing the fuselage, apply instant
adhesive to the cut surfaces.
スワッシュプレートが干渉しない様にヤスリ等でカットします。
Cut with a file etc so that the swash plate does not come in contact.
メインマスト
Main mast
スターターカップリング
Starter coupling
メインマストが開口部のほぼ中心にきます。
The main mast should be at the center of the opening.
マフラーに合わせてマフラー排気用穴(約ø14mm)をあけます。
Align with the muffler, and drill the muffler exhaust hole (approx. ø14 mm).
71.5mm
140mm
フレーム位置に合わせ、
ø3.2穴をあけます。
Align with the frame position,
and drill ø3.2 holes.
5
3
テール部分の加工
Preparing the tail
シャトルプラス・シャトルZXX・シャトルSXXの場合
Shuttle Plus, Shuttle ZXX and Shuttle SXX
テール部分の加工は特にありませんが、機体を搭載した後テー
ルユニットやリンケージ可動部がボディに干渉する場合は、ヤ
スリ等でボディを削り、修正して下さい。
There is no particular preparation needed for the tail unit. If the tail unit or
the moving part of the linkage touches the fuselage after mounting the
chassis, file the fuselage to adjust.
シャトルプラス+2の場合
Shuttle Plus+2
テール部分の加工を行います。
Prepare the tail unit.
テールボディ
Tail fuselage
テールコーン
Tail cone
約15mm
Approx. 15 mm
約14mm
Approx. 14 mm
約50mm
Approx. 50 mm
約65mm
Approx. 65 mm
真下から見た図
Seen from below
中央のつなぎ目部分の盛った
ところをヤスリ等で削り、
ラダーコントロールロッド、
ラダーロッドガイドが干渉
しないようにします。
File the protruding part of the
joint of the tail fuselage so that
the rudder control rod and the
rudder rod guide do not touch
the tail fuselage.
右側面から見た図
Seen from the right
約50mm
Approx. 50 mm
約22mm
Approx. 22 mm
真下から見た図
Seen from below
6
4
機体の搭載
Mount the chassis
シャトルプラス+2の場合
Shuttle Plus+2
オプション
Option
M3X16TS ……………………… 4
M3X10TS ……………………… 2
シャトルプラスの場合
Shuttle Plus
オプションの2513-064防音シートをボディの内側(フ
レームの下など)に貼ると音が静かになります。
If the optional sound-insulating sheet (2513-064)
is affixed to the inside of the fuselage (below the
frame, etc), the noise is reduced.
ベルトの回転方向に
注意して下さい。
Pay attention to the belt
rotation direction.
M2ロッドエンドを
印の位置まで取付
けます。
Insert the M2 rod end
to the marked position.
ø2.4の穴をあけます。
Open ø2.4 holes.
エポキシ
Epoxy
M3X10TS
ポイント
Point
引き出す
Pull out
テールユニットを取付ける際はテールブームをボディ後部
より引き出して取付けます。
When mounting the tail unit, pull the tail boom out from
the back of the fuselage.
M3X16TS
M3X16TS
シャトルプラスに付属のネジを使用します。
Screws supplied with the Shuttle Plus.
注意 Caution
1. タイミングベルトは、ドライバー等で軽
く押さえて、接しない程度に張ります。
張りすぎるとスムーズにテールローター
が回転しません。又、振動の原因になる
場合もあります。
2. ベルトの回転方向を確認します。
テールプーリー
1. Adjust the tension of the timing
Tail pulley
belt so that twosides do not
touch each other when gently
タイミングプーリー
pressed with a screwdriver or
Timing pulley
other tool.
If it is too tight, the tail rotor will
not rotate smoothly. It may also lead to vibration.
2. Check the rotational direction of the timing belt.
7
5
ボディの組立
Assembling the fuselage
M3X6TS塗装済 ……………… 10
M3X6TS (painted)
M2.6X12皿TS塗装済 ………… 4
M2.6X12 countersunk TS (painted)
テールコーン取付けネジM3X6TSが、テ
カット ールユニットケースに干渉するようであ
Cut off れば、ヤスリ等で削って下さい。
If the tail cone mounting screws (M3X6TS)
touch the tail unit case, file them down.
M3X6TS
M3X6TS
ø3の穴をあけます。
Open ø3 hole.
M3X6TS
エポキシ
Epoxy
エポキシ
Epoxy
キャノピーボンド又は
エポキシで接着します。
Adhere with canopy bond
or epoxy adhesive.
M2.6X12皿TS
塗装済
M2.6X12
countersunk TS
(painted)
注意 Caution
接着が完全に出来る様、接着面はサンドペー
パーでサンディングしておきます。
To achieve a secure bond, prepare the
surface by filing with sandpaper.
組み終わったら、リンケージやスワッシュプレート、テール
ピッチプレートなどがボディと当たったり、こすれたりして
いないか入念にチェックします。もし、干渉しているところ
がある場合はヤスリ等で削ります。
When the assembly is complete, do a thorough check for any contact
or rubbing between the fuselage and linkage, swash plate, or tail pitch
plate. If you discover any interference, trim the offending portions
using a file or suitable tool.
重心が後ろよりの場合は、ノーズ側にウェイト等を入れて調整して下さい。
If the center of gravity is toward the rear, adjust by placing a weight toward nose.
注意 Caution
ウェイトが飛行中に外れない様に、ボディまたは
胴枠にエポキシ接着剤かFRP樹脂でしっかりと接
着・拘束して下さい。
Glue the weight in place on the fuselage or
fuselage frame with epoxy glue or FRP resin
so that it does not come loose in flight.
ウェイト
Weight
8
パーツリスト
0412-283
0412-284
0412-281
0412-282
0412-285
* The prices in parentheses are the prices excluding consumption tax.
コードNo.
Code No.
0412-281
0412-282
0412-283
0412-284
0412-285
品名
Part
入数
Q'ty
1式
1 set
1式
1 set
ロングレンジャー 尾翼セット 青
30 LONG RANGER fin set Blue
30ロングレンジャー 尾翼セット 赤
30 LONG RANGER fin set Red
30ロングレンジャー テールコーン 青
30 LONG RANGER tail cone Blue
30ロングレンジャー テールコーン 赤
30 LONG RANGER tail cone Red
30ロングレンジャー ウィンドウセット
30 LONG RANGER window set
1
1
1式
1 set
9
税込価格
(税抜価格)円
Price (Yen)
10,500
(10,000)
10,500
(10,000)
3,675
(3,500)
3,675
(3,500)
5,775
(5,500)
備考
Remarks
受注生産
Made-to-order
受注生産
Made-to-order
受注生産
Made-to-order
受注生産
Made-to-order
受注生産
Made-to-order
MEMO
MEMO
注意 Note
①本書の内容の一部または全部を無断で転載することは禁止されています。
②本書の内容については、将来予告なしに変更することがあります。
③本書の内容について万全を期しておりますが、万一ご不審な点や誤り、記載もれなどお気付
きのことがありましたら、ご一報くださいますようお願いいたします。
④運用した結果については③項にかかわらず責任を負いかねますので、ご了承ください。
①Reproduction of this manual, or any part thereof, is strictly prohibited.
②The contents of this manual are subject to change without prior notice.
③Every effort has been made to ensure that this manual is complete and correct. Should there,
however, be any oversights, mistakes or omissions that come to your attention, please inform
us.
④Item ③ not withstanding, we cannot be responsible for events related to the operation of your
model.
初版発行
平成12年5月
第2版発行
平成12年7月
第3版発行
平成12年12月
第4版発行
平成18年1月
第5版発行
平成18年7月
First printing
May 2000
Second printing
July 2000
Third printing
December 2000
Fourth printing
January 2006
Fifth printing
July 2006
No.10A54