1
[Digital display]
Digital time/calendar setting
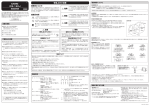
NX-04
本 社 東京都中央区京橋2丁目15番1号 〒104-8331
アルバ製品について、修理その他のご相談は、「お買い上げ店」でうけた
まわっております。
取扱説明書
なお、ご不明の点は下記へお問い合わせください。
INSTRUCTION
ALBA NX-04
〒104-0031 東京都中央区京橋2-7-16
このたびはアルバデジタル NX-04をお
買いあげいただきありがとうございま
した。ご使用の前にこの取扱説明書を
よくお読みのうえ正しくご愛用くださ
いますようお願い申しあげます。
なお、この取扱説明書はお手元に保存
し必要に応じてご覧ください。
(03)3535-2211
〒550-0013 大阪市西区新町1-4-24(大阪四ツ橋第一生命ビル)(06)
6538-6541
Button C
Button C
Seconds
Button C
Minutes
Button C
Hour
Button C
Year
Button C
Month
Button C
Date
12-/24-hour indication
〒060-0061 札幌市中央区南一条西7-20-1(札幌スカイビル)
(011)
231-0615
〒980-0021 仙台市青葉区中央2-7-28(セイコー仙台ビル)
(022)
227-4171
Button C
〒460-0002 名古屋市中区丸の内1-8-24(綿常第5ビル8階)
(052)
223-4476
〒730-0037 広島市中区中町7-16(ポレスター広島)
(082)248-1020
〒810-0801 福岡市博多区中洲5-1-22(松月堂ビル)
(092)271-2538
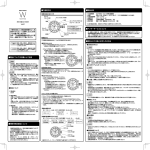
■FEATURES
This is a duo-display watch having both analogue and digital ●World time function:
display. Besides having hands for easy checking of the time, • The time and time difference from your area of 27 cities in
it provides various convenient functions on the digital dis- different time zones throughout the world can be displayed. The daylight saving time (summer time) can be set
play.
for each city.
• For some cities among the 27 cities, the time difference is
[Analogue display]
●Hour, minute and second hands are provided to indicate indicated in 30-minute increments.
●Stopwatch function
the time.
The stopwatch can measure up to 23 hours, 59 minutes and
[Digital display]
59 seconds in 1/100 second increments for the first hour,
●Time/calendar display:
<Time display>: The hour, minutes and seconds are dis- and in second increments thereafter.
played. (Changeover between 12- and 24-hour indications ●Alarm function
Two types of alarms are provided. The regular alarm can be
can be made.)
The hourly time signal can be set to ring every hour on the set to ring every day at a designated time, while the singletime alarm can be set to ring only once at a designated time.
hour.
<Calendar display>: The date and day of the week are dis- ●Illuminating light (Electroluminescent panel) function
By pressing butten B, the light illuminates the display for 3
played.
∗Desired display can be selected from the time/calendar, seconds for easy viewing in the dark.
●Demonstration function
calendar and blank displays.
●Full auto calendar function: The calendar adjusts automat- Each display (time/calendar, world time, stopwatch and
ically for odd and even months including February of leap alarm displays) can be shown for approximately 2 seconds
in order for demonstration.
years up to the end of the year 2050.
■SPECIFICATIONS
4 With each press of button D, one digit is advanced. The digits move quickly if button D is kept pressed.
When setting the city, select the city representing your area. If you use the watch in a city in Japan, for example, select
“TYO (Tokyo)”, and set the time/calendar of Japan.
∗For the city names and time differences, refer to “TIME DIFFERENCES”.
When the time is set in the 12-hour indication, only “PM” mark is displayed for the PM setting, and there is no indication for
the AM setting. In the 24-hour indication, “24” is displayed.
5 After all the adjustments are completed, press button A to return to the TIME/CALENDAR display.
●Seconds setting
While the second digits are flashing, press button D in accordance with a time signal. The seconds are reset to “00”. When
the seconds count any number from “30” to “59” and button D is pressed, one minute is added, and the seconds immediately
start counting from “00”.
<All the segments lighting up>
∗While in the TIME/CALENDAR SETTING display, the display as shown below will appear if both buttons C and D are pressed at the same time. This is not a malfunction. Press button A, C or D to
return the display to the TIME/CALENDAR, and then, set the time/calendar again following the steps
above starting from “1”.
●When you are traveling around different time zones, the time/calendar of the place you are visiting
can easily be set only by re-setting the city.
• When you move to a city in a different time zone, select the city representing the place of your visit in
the TIME/CALENDAR SETTING display. The watch displays the time/calendar of the place.
∗When the time/calendar of the place you are visiting is shown in the TIME/CALENDAR display, “+0” or “-0” is shown at the
left of the city name.
■HOW TO USE THE WORLD TIME FUNCTION
• The time of 27 cities in different time zones throughout the world can be displayed together with the time difference from the
time of your area you have set in the TIME/CALENDAR display.
• For some cities among the 27 cities, the time difference is indicated in 30-minute increments.
• The daylight saving time (summer time) can be set for each city.
■DISPLAY AND BUTTON OPERATION
Date
Crown
First click: Analogue time setting
Normal position
Button D
Hour Minutes Seconds
● How to use the world time function
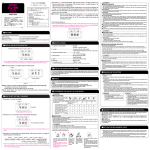
1 Press button A to show the WORLD TIME display.
The name and time of the city selected previously are displayed together with the time difference from the time of your area.
Time difference from
the time of your area
Name of the selected city
World map
A time zone of the world
map that includes the city
you have selected flashes.
Time of the selected city
2 Press button C or D to select the desired city.
Selection of the cities is made eastward and westward on the world map by pressing button C and button D, respectively.
∗ If "-- -- --" is displayed in place of the city name, it indicates that no city name is registered for the time zone.
∗ When a city in the same time zone as your area is selected, “+0” or “-0” will be shown as the time difference.
● To set the daylight saving time (summer time)
• The daylight saving time can be set for each city.
1 Press button A to show the WORLD TIME display, and press button C or D to
select the desired city.
Day
Button C
∗The illustrations in the following sections are simplified to provide
either of the analogue and digital displays as required.
[Analogue display]
Crown at the normal position: Free
Crown at the first click: Time setting
[Digital display]
∗Certain button operation in each function will be followed by a beeping sound for confirmation.
●With each press of button A, the display changes over in the following order.
2 Press button A for 2 to 3 seconds to show the daylight savig time setting display
(DST mark flashing). With each press of button D, engage (Summer time mark
appears) and disengage (Summer time mark disappears) of the daylight saving
time can be selected.
∗ If the watch is left untouched with the digits
flashing, it will automatically return to the
WORLD TIME display in 1 to 2 minutes.
Summer time mark
Button A
Button D
Button C
Button D
∗ Time display charges depending on
engagement of the daylight saving time.
3 After the adjustment is completed, press button A to return to the WORLD TIME display.
4 To set the daylight saving time for the other city, return to 1 and follow the procedure.
∗ Before using the daylight saving time function, be sure to check if the daylight saving time is in effect in the city you have
selected. The use of the daylight saving time may change when it is so decided by the country concerned.
∗ If the daylight saving time is set for the city representing your area in the WORLD TIME display, the time in the TIME/CALENDAR display will also be advanced by one hour to show the daylight saving time.
Button A
Button A
Button A
STOPWATCH display
REGULAR ALARM display
TIME/CALENDAR display
WORLD TIME display
Button A
∗If the watch left untouched for 1~2 minutes in the WORLD TIME display, it will automatically return to the
TIME/CALENDAR display.
●By pressing button B in any display, the light illuminates the display for approximately 3 seconds.
●By pressing button C in the TIME/CALENDER display, the single-time alarm is shown. For its use, refer to “<How to use
the single-time alarm>” in “■HOW TO USE THE ALARM (REGULAR AND SINGLE-TIME ALARMS)”.
●With each press of button D in the TIME/CALENDAR display, the digital display changes over in the following order.
Button D
CALENDAR display (All the segments of
the display are unlighted.)
BLANK display
Button D
●Demonstration function
By pressing button D for more than 2 seconds in the TIME/CALENDAR display, the demonstration function is activated, and each display is shown for approximately 2 seconds in order.
Pressing any of the buttons will deactivate the demonstration function and return the display to TIME/CALENDAR.
■HOW TO SET THE TIME/CALENDAR
Single-time alarm mark
Button B
“PM” mark (Displayed for the PM
period in the 12-hour indication)
“24H” mark (Displayed in
Button C
Crown
First click: Analogue time setting
Regular alarm mark
Button D
Button A
Designated alarm time
Button C
●Regular alarm setting
1 Press button A to show the ALARM display.
2 Press button A for 2 to 3 seconds to show the REGULAR ALARM SETTING display. The hour digits (and “PM” or “24”
mark if the time is set in the 12- or 24-hour indication, respectively) start flashing. (If the watch is left untouched with the digits
flashing, it will automatically return to the ALARM display in 1 to 2 minutes.)
3 Press button C to select the digits to be adjusted (flashing). With each press of button C, selection of the digits to be adjusted (flashing) is made in the following order.
4 Press button D to set the flashing digits. With each press of button D, one digit is advanced. The digits move quickly if the button is kept pressed.
∗Even is the regular alarm is disengaged, it will be engaged automatically as the it is newly set, and the regular alarm
mark will be shown.
∗When setting the hour digits in the 12-hour indication, check that AM/PM is properly set. Only “PM” mark is displayed
for the PM setting.
5 After all the adjustments are completed, press button A to return to the ALARM display.
●Engagement/disengagement of the regular alarm.
With each press of button C in the ALARM display, the engagement
The alarm rings ➔ The alarm will not ring
and disengagement of the regular alarm is made as follows. The regular alarm mark appears and disappears accordingly.
●To stop the regular alarm
At the designated time, the regular alarm rings for 20 seconds and stops. To stop it manually, press button A, B, C or D.
∗The regular alarm can be stopped manually in any display by pressing a button.
●Regular alarm test
The regular alarm can be tested by keeping button C pressed for 2 to 3 seconds in the ALARM display. The alarm
sounds while the button is kept pressed.
∗The above procedure will engage or disengage the regular alarm, as the respective mark appear or disappear
accordingly. Refer to “Engagement/disengagement of the regular alarm” to engage/disengage it as you desire.
<How to use the single-time alarm>
The single-time alarm can be set to ring at a coming time in minute increments starting from the current time. It is, therefore, convenient for reminding you of an approaching event. The single-time alarm rings only once at the designated
time. As it rings, it is automatically disengaged. To ring the alarm every day at a fixed time, use the regular alarm.
Designated single-time alarm time
∗The above illustration is intended to
show all the marks that can be displayed
in the TIME/CALENDAR display.
Actually, “24H” and “PM” marks are not
shown together at the same time.
[Analogue display]
Analogue time setting
1 Pull out the crown when the second hand is at the 12 o’clock position. The second hand will stop on the spot.
2 Turn the crown to set the hands to the desired time.
∗To set the time accurately, first advance the minute hand 4 to 5 minutes ahead of the desired time, and then, turn it back
to the exact minute.
3 Push the crown back in to the normal position in accordance with a time signal.
The abbreviated names of the 27 cities and their time differences from the Greenwich Mean Time are listed in the table below.
Addreviated city name
UTC
LON
PAR
CAI
JRS
JED
THR
DXB
KBL
KHI
DEL
DAC
RGN
BKK
HKG
TYO
ADL
SYD
NOU
WLG
-- -- -HNL
ANC
LAX
DEN
CHI
NYC
CCS
RIO
-- -- --- -- --
Name of city area
(Universal Time Coordinated)
London
Paris
Cairo
Jerusalem
Jedda
Teheran
Dubai
Kabul
Karachi
Delhi
Dacca
Yangon
Bangkok
Hong Kong
Tokyo
Adelaide
Sydney
Noumea
Weilington
−
Honolulu
Anchorage
Los Angels
Denver
Chicago
New York
Caracas
Rio de Janeiro
−
−
Time difference from GMT
0
0
+1
+2
+2
+3
+3.5
+4
+4.5
+5
+5.5
+6
+6.5
+7
+8
+9
+9.5
+10
+11
+12
–11
–10
–9
–8
–7
–6
–5
–4
–3
–2
–1
Use of daylight saving time
○
○
○
○
○
○
○
○
●To stop the single-time alarm
At the designated time, the single-time alarm rings for 20 seconds and stops. To stop it manually, press button A,
B, C or D.
∗The single-time alarm can be stopped manually in any display by pressing a button.
∗The single-time alarm rings only once at the designated time. As it rings, it is automatically disengaged.
●How to check, correct or cancel the alarm time already set for the single-time alarm
• If you wish to check the alarm time you have set for the single-time alarm; or
• If you wish to correct or cancel the set alarm time;
Follow the procedure below.
1 Press button C in the TIME/CALENDAR display to show the SINGLE-TIME ALARM display. The alarm time you
have set for the single-time alarm will be shown.
2 Press button c or D to correct the alarm time.
To cancel the alarm time, press both buttons c and D at the same time, or press button c or D to adjust the alarm
time so that it corresponds with the current time.
As the set alarm time is canceled, “1-AL” disappears from the display, indicating that the alarm is disengaged and will
not ring.
Button D
RESET
After batteries are replaced, or when an abnormal digital display (broken digits, etc.) appears, follow the procedure
below. The built-in IC will be reset and the watch will resume normal operation.
●How to reset the IC
After batteries are replaced, be sure to press buttons A, B, C and D at the same time for 2 to 3 seconds. The display will become black, and then, “12:00’ oo SAT 1 JAN Your area: UTC” will be displayed.
●After setting the IC
Before using the watch, adjust the following display in the order below by referring to the corresponding sections of
this instruction manual.
1. TIme/calendar (including your area)
2. Alarm time
• The case and bracelet touch the skin
directly just as underwear. If they are left
dirty, the edge of a sleeve may be stained
with rust or those who have a delicate
skin may have a rash.
• After removing the watch from your wrist,
wipe perspiration or moisture with a soft
cloth. This will prevent the watch from
being soiled, adding to the life of the gasket.
METAL BRACELET
LEATHER BAND
• Clean the watch bracelet with
a soft toothbrush dipped in
water or soapy water.
If your watch is not water-resistant, be careful not to get the
case wet when cleaning.
• When removing moisture
from a leather band, do not
rub the band with the cloth
as this may discolor it or
reduce its gloss. Be sure to
blot up the mois-ture using a
soft dry cloth.
SOFT PLASTIC BRACELET
• If your watch has a soft plastic band such as urethane band, do not leave the watch under a fluorescent lamp
or direct sunlight for a long time, or do not leave the band soiled. Otherwise, the band may be discolored, hardened or broken. Also, do not keep the watch in a place where it is exposed to high humidity, or do not leave
the band wet with perspiration or water. Otherwise, the band may be discolored in a very short time.
When the band is soiled, rinse it in soapy water. Do not use solvents for cleaning as some solvents may deteriorate the band.
If your watch has a semitransparent urethane band which is easily discolored, special care should be taken to
keep it clean. Depending on the condition of use, the semitransparent band may be disoolored after several
months of use.
• If your watch is not water-resistant, be careful not to get wet with water or sweat. When it gets wet with water
or sweat, wipe it thoroughly dry with a hygroscopic cloth.
• If your watch is 5, 10 or 20 bar water resistant, rinse it in a bowl of fresh water after used in seawater. Do not
use chemicals to wash it.
• If your watch has a rotating bezel, clean the bezel regulary. Otherwise, dust will gather under it, making the
rotation harder.
CAUTION
●RASH AND ALLERGY
• Adjust the bracelet or band so that there will be a little clearance between the bracelet or band and your
wrist to avoid accumulation of perspiration.
• If you are constitutionally predisposed to rash, the band may cause you to develop a rash or an itch depending on your physical condition.
• The possible causes of the rash are as follows:
1. Allergy to metals or leathers
2. Rust, dust or perspiration on the watch or band
• If you develop any skin reactions, take off the watch and consult a doctor immediately.
×
×
×
• If the watch is left in a temperature • Do not leave the
below –5˚C or above +50˚C for a watch in a place
long time, it may function improper- where it is subjected to strong magly or stop operating.
∗ This watch is so adjusted that it will netism or static
maintain stable time accuracy in electricity.
normal temperatures.
(5˚C~35˚C)
It will lose or gain slightly, but it will
regain high time accuracy when it
returns to normal temperature.
• Do not leave the • Do not expose the watch to
watch
where gases or chemicals. (Ex.:
there is strong Organic solvents such as benzine and thinner, gasoline,
vibration.
• Do not leave the nail polish, cosmetic spray,
watch in a dusty detergent, adhesives, mercury, and iodine antiseptic
place.
solution.)
• Do not leave the watch in a
hot spring, or do not keep it in
a drawer having insecticides
inside.
CAUTION
●WATER RESISTANCE
• Check the dial or case back of your watch for
the water resistant quality, and then see the
table below.
• Do not turn or pull out the crown when the
watch is wet, as water may get inside the
watch.
Designed and manufactured to withstand
the water usually
experienced in a daily
living such as splashes and rain.
Designed
and
manufactured for
swimming and
kitchen work.
Skindiving without scuba and
bathing
Genuine diving
using scuba or
heliumgas.
Button operation
when the whatch
is wet.
×
○
○
○
×
×
○
○
×
×
×
○
×
×
×
×
×
×
○
○
“WATER RESISTANT” is not inscribed on the
back of your watch case.
“WATER RESISTANT” is inscribed on the back
of your watch case.
“WATER RESISTANT 5・10・15・20
BAR.”, “WATER RESISTANT” and
marks inscribed on the back of your
watch case.
5 BAR.
10・15・20
BAR.
●ABOUT BATHING
Your watch can be worn while bathing if it is equipped with water resistance over 10 bar. In that case, please note
the following carefully.
• Please do not operate your watch (Crown operation, Button operation etc.) when it is wet with soap or shampoo. It
sometimes causes a reduction in the water proofing.
• When the watch gets warm due to warm water, the watch could gain or lose time to some degree. However, the
watch will return to its usual accuracy at normal temperatures.
• If your watch is 3 bar water resistant, do not use it in the water.
• If your watch is 5 bar water resistant, do not use it in any type of diving including skin diving.
• If your watch is 10 or 20 bar water resistant, do not use it in saturation diving or scuba diving.
When new normal batteries are installed, this watch operates for approximately 2 years.
(If the alarm is used for more than 10 second a day and/or the illuminating light for more
than 3 seconds a day, the battery life may be less than the specified period.)
∗If you find either of the analogue and digital displays runs down, replace two batteries for
both displays with new ones at a time.
(2)Monitor battery
The battery in your watch may run down in less than 2 years after the date of purchase, as it is a monitor battery
which is inserted at the factory to check the function and performance of the watch.
○
○
○
○
○
○
1 Press button A to show the STOPWATCH display.
2 Before starting measurement, press button D to reset the digits to “00”.
∗When the stopwatch is measuring, press button C to stop the stopwatch, and
then, press button D to reset it.
∗When the stopwatch is stopped, press button D to reset it.
Measurement 3 Restart and stop of the stopwatch can be repeated by pressing button C. If button D is pressed while the stopwatch is stopped, it will reset the digits to “00”.
Button C
STOP
●CARE OF YOUR WATCH
(1)Battery life
The stopwatch can measure up to 23 hours, 59 minutes and 59 seconds in 1/100 second increments for the first hour, and in
second increments thereafter. When the measurement reaches 24 hours, the stopwatch automatically stops counting.
Button C
RESTART
CAUTION
●PLACES TO KEEP YOUR WATCH
∗If the watch is left untouched with this display shown, it will automatically return to the TIME/CALENDER display in 20
to 30 seconds.
●Single-time alarm setting
1 Press button A to show the TIME/CALENDAR display.
2 Press button C to show the SINGLE-TIME ALARM display. The set alarm time is shown in the upper row of the display while the current time is shown in the lower row. If the alarm time has not been set, the current time is shown in
both rows.
3 Press button C or D to set the desired alarm time. With each press of button C or D, one minute is advanced or
moved back, respectively.
4 When the alarm time has been set, the single-time alarm mark “1-AL”appears on the display, indicating that the single-time alarm is engaged.
∗If the alarm time is set to the current time, the single-time alarm mark disappears, and the single-time alarm will be
disengaged. In that case, the single-time alarm will not ring.
5 Press button A to return to the TIME/CALENDAR display. (It is recommended that you follow this step to prevent
the alarm time you have set from being changed by pressing button C or D by mistake in the SINGLE-TIME
ALARM display. If the watch is left untouched in the SINGLE-TIME ALARM display, it will automatically return to the
TIME/CALENDAR display in 20 to 30 seconds.)
■NOTES ON THE BATTERY
■HOW TO USE THE STOPWATCH
Button C
STOP
■TO PRESERVE THE QUALITY OF YOUR WATCH
WARNING
∗ If “-- -- --” in the above table is selected in the WORLD TIME display, “-- -- --” will be displayed in place of the city
name, and no portion of the world map will flash.
* UTC (Universal Time Coordinated) is another term for the Greenwich Mean Time.
* The time differences and use of daylight saving time may change in some areas or countries when they are so
decided by the countries concerned.
Button C
START
Single-time
alarm mark
■NECESSARY PROCEDURE AFTER THE BATTERY CHANGE (RESETTING THE IC)
■TIME DIFFERENCES
Button D
TIME/CALENDAR display
Two types of alarms are available. The regular alarm can be set to ring once every day at a designated time. The singletime alarm can be set to ring only once at a designated time, and, it is automatically disengaged as it rings.
Please note that the regular alarm is set in the ALARM display while the single-time alarm is set in the TIME/CALENDAR display.
Button C
<How to use the regular alarm>
Regular alarm mark
Hour
Minutes
Single-time alarm mark
For the world time function to work properly, it is necessary to select the city representing your area and set its time/calendar accurately in the TIME/CALENDAR display. Refer to “■ HOW TO SET THE TIME/CALENDAR”.
1. Frequency of crystal oscillator ..............32,768 Hz
2. Loss/gain (monthly rate) .......................Less than 30 seconds when the watch is worn on the wrist at a temperature
between 5°C and 35°C
∗The time accuracy of the analogue and digital displays may differ as they operate independently of each other.
...........
3. Operational temperature range
–5°C~+50°C (0°C~+50°C for the digital display).
4. Analogue display driving system..........Step motor, 1 piece
..........................
5. Digital display medium
Nematic Liquid Crystal, FEM (Field Effect Mode)
6. Battery....................................................For analogue display: Miniature silver oxide battery SB-AW, 1 piece
For digital display: Miniature silver oxide battery SB-B1, 1 piece
7. Battery life ..............................................Approx. 2 years
.....................................
8. Illuminating light
Electroluminescent panel
9. IC (Integrated Circuit)............................Oscillator , frequency divider and driving circuit (C-MOS-LSI), 2 pieces
∗The above specifications are subject to change without prior notice, for product improvement.
Button A
Changeover of
displays
1 Press button A to show the TIME/CALENDAR display.
2 Press button A for 2 to 3 seconds to show the TIME/CALENDAR SETTING display. The time zone digits start flashing on
the map.
∗If the watch is left untouched with the digits flashing, it will automatically return to the TIME/CALENDAR display in 1 to 2
minute.
3 Press button C repeatedly to select the digits to be adjusted (flashing). With each press of button C, selection of the digits
to be adjusted (flashing) is made in the following order.
Your area
0000D
Button B
Turning on the
illuminating light
■HOW TO USE THE ALARM (REGULAR AND SINGLE-TIME ALARMS)
The watch is provided with a world time function. By setting the time in the TIME/CALENDAR display, the time of the cities
covered in the WORLD TIME display will be adjusted accordingly. When setting the TIME/CALENDAR, therefore, be sure
to select the city representing the area for which you wish to set the time/calendar. Otherwise, the world time function will
not work properly.
(3)Battery change
1 When replacing the battery, please specify the “ALBA BATTERY” at the retailer from whom your watch was
purchased or at an ALBA DEALER.
2 If the old battery is left in the watch for a long time, a malfunction may be caused due to battery leakage, etc.
Have it replaced with a new one as soon as possible.
3 Battery replacement is charged even if it runs down within the guarantee period.
4 Once the case back is opened for battery replacement or other purposes, the original water resistant quality
designed for the watch may deteriorate when it is closed. When you have the battery replaced with a new one,
also request the water resistance test pertaining to the water resistant quality of your watch. If your watch has
10-bar or higher water resistant quality, be sure to have such test performed on the watch every time the battery is replaced.
WARNING
CAUTION
1. Do not remove the battery from the
watch.
2. If it is necessary to take out the battery,
keep it out of the reach of children.
3. If the child swallows it, consult a doctor immediately as it will adversely
affect the health of the child.
1. Never short-circuit, tamper with or heat the battery, or never expose
it to fire as it may explode, generate and intense heat or catch fire.
2. The battery in your watch is not rechargeable.
Never attempt to recharge it, as this may cause battery leakage or damage to the battery.
3. If the watch is left in a temperature below 5˚C or above 35˚C
for a long time, it may cause the battery life to be shortened.
■NOTE ON THE ELECTROLUMINESCENT PANEL (FOR ILLUMINATING LIGHT)
The electroluminescent panel for illumination of the display loses its luminance as the battery voltage gets lowered.
Also, its luminance level decreases gradually with use.
∗After 120 hours of use, the luminance level decreases by about half. When the illuminating light becomes dim, replace
the battery with a new one. If the illuminating light remains dim after the battery is replaced, have the electroluminescent
panel replaced with a new one by the retailer from whom the watch was purchased. It will be made at cost.
●PRECAUTIONS ON WEARING YOUR WATCH
CAUTION
Take utmost care in the following cases:
• When clasping and unclasping the band, you may damage your
nail, depending on the type of clasp used with the band.
• In case you tumble and fall or bump into others with the watch
worn on your wrist, you may be injured by the reason of the fact
that you wear the watch.
• When you make contact with children, especially with infants,
they may get injured or develop a rash caused by allergy.
• If your watch is of the fob or pendant
type, the strap or chain attached to the
watch may damage your clothes, or
injure the hand, neck, or other parts of
your body.
●PERIODIC CHECK
• We suggest that you have your watch checked by ALBA DEALER every 2 or 3 years or when
the battery is replaced for oil condition, battery electrolyte leakage or damage due to water or
sweat. After checking the watch, adjustment and repair may be required.
• When the replacing the parts or battery, please specify “ALBA GENUINE PARTS”. If an old
battery is kept in the watch for a long time, electrolyte leakage from the battery may damage
the module.
• Be sure to have the gasket and push-pin replaced with new ones by the ALBA DEALER when
checking the watch or the battery is replaced.
Push-pin
■NOTES ON THE REPLACEMENT PARTS
1 ALBA makes it a policy to usually keep a stock of spare parts for its watches for 7 years. In principle, your watch
can be reconditioned within this period if used normally. (Replacement parts are those which are essential to
maintaining the functional integrity of the watch.)
2 The number of years that a watch is considered repairable may vary greatly depending on the condition under
which it was used, and normal accuracy may not be achieved in some cases. We recommend, therefore, that you
consult the retailer from whom the watch was purchased, when having them repair your watch.
3 The case, dial, hands, glass, bracelet, or parts thereof may be replaced with substitutes if the originals are not
available.
■特長
この時計は、針表示式(アナログ部)時計の見やすさと、 含まれています。
数字表示式(デジタル部)時計の多機能性、便利さを兼 ・サマータイム(DST)の設定もできます。
ね備えています。
●ストップウオッチ機能:
【アナログ部】
・23時間59分59秒まで計測できます。
●時・分・秒を針で表示します。
・60分までは1/100秒単位で計測ができます。60
【デジタル部】
分(1時間)経過後は1秒単位の計測となります。
●時刻・カレンダー機能:
●アラーム機能:
<時刻>時・分・秒を表示します。(12/24時間制の切り ・1日1回鳴るデイリーアラーム機能と、希望の時
替えができます)
間に1回だけ鳴るワンタッチアラーム機能とが
<カレンダー>日付けと曜日を表示します。
あります。
※時刻・カレンダー表示を点灯または消灯が選択できます。 ●内部照明機能:ボタンBを押すと内部照明(パネ
●フルオートカレンダー機能:月末のカレンダー修正の
ライト)が点灯します。約3秒間の残照式です。
必要がありません。2000∼2050年
●デモンストレーション機能:
●ワールドタイム機能:
・各表示(時刻・カレンダー表示、ワールドタイ
・世界27都市(地域)の時刻表示およびホームタイム都
ム表示、ストップウオッチ表示、デイリーアラ
市との時差を表示します。
ーム表示等)を約2秒間ずつ表示します。
・27都市の中には、GMTとの時差が30分単位の都市も
4ボタンDを押すと点滅している箇所の数字が1つずつ進みます。「分、時、年、月、日」の場合は、ボタン
Dを押し続けると早く進みます。
ここで設定する「ホームタイム都市名」は、この時計を使用される場所と同じタイムゾーンにある都市に
してください。通常(日本国内でご使用になる場合)は、「TYO(東京)」を選択し、時刻は日本時間を合
わせることになります。
※都市名とその時差については「■都市名と時差について」をご参照ください。12時間制表示のときはマ
ーク無し(=午前)または「PM」(=午後)マークで午前・午後が表示されます。24時間制表示のときは
「24」マークが表示されます。
5合わせ終わったら、ボタンAを押して時刻・カレンダー表示に戻してください。
●秒合わせ ………(秒)を点滅させ時報に合わせてボタンDを押すと、00秒に合います。
(秒)が30∼59のときは(分)が1分くり上がって00秒に合います。
<全点灯表示>
※時刻・カレンダー合わせの途中で「全点灯表示」になるのは故障ではありません。ボタン
CとボタンDが同時に押された状態です。その場合は、ボタンA、C、Dのいずれかを押
して「時刻・カレンダー表示」に戻してください。次にあらためて、上記の1から合わせ直してください。
●ホームタイム都市を合わせ直せば、海外旅行などのとき便利です。
・時差のある場所に移動した場合、ホームタイム都市を選択し直せば、基本時計および日付もその現地のも
のが表示されます。
※ホームタイム都市を選択中は、都市の左に表示される数字は「+0」または「−0」が表示されます。
■ワールドタイムの使いかた
■製品仕様
1. 水晶振動数……………32,768Hz(Hz=1秒間の振動数)
2. 精度……………………平均月差±30秒(気温5℃∼35℃において腕につけた場合)
※アナログ部とデジタル部は独立しており、それぞれの精度に従って動きます。
3. 作動温度範囲…………−5℃∼+50℃ ただし、デジタル部の表示機能は0℃∼+50℃
4. アナログ部駆動方式…ステップモーター:1個
5. デジタル部表示体……FE型ネマチック液晶
6. 使用電池………………アナログ部:小型酸化銀電池 SB-AW:1個
デジタル部:小型酸化銀電池 SB-B1:1個
7. 電池寿命………………約2年
8. 内部照明………………EL(エレクトロルミネッセンス)
9. 電子回路………………発振、分周、駆動、EL回路(C-MOS-LSI):2個
※上記の製品仕様は改良のため、予告なく変更することがあります。
・世界27都市・地域の時刻表示およびホームタイム都市を基準とした時差を表示します。
・27都市の中には、GMTとの時差が30分単位の都市もあります。
・サマータイム(DST)の設定ができます。
ワールドタイム機能が正しくはたらくためには、「時刻・カレンダー表示」でのホームタイム都市の選択
とその時刻を正しく合わせることが必要です。→「■時刻・カレダーの合わせかた」をご参照ください。
● ワールドタイム機能の使いかた
1ボタンAを押してワールドタイム表示にしてください。
都市名とその時刻、およびホームタイム都市との時差を±数字で表示します。
ホームタイム都市との時差
4ボタンDを押して合わせます。1回押すごとに点滅している箇所の数字が1つずつ進みます。押し続ける
と早く進みます。
※アラームマークが消えていても、アラーム時刻合わせをすると自動的にアラームマークが点灯します。
※時合わせのとき、午前・午後をよく確認してください。午後の場合、「PM」マークが点灯します。
(12
時間制表示の場合のみ)
5合わせ終わったらボタンAを押してアラーム表示に戻してください。
●デイリーアラームの鳴る/鳴らないの設定方法
アラーム表示でボタンCを押すと次の順序で設定が変わります。
それにともない、アラームマークの点灯/消灯してアラームの
ON/OFFを表示します。
アラーム鳴る アラーム鳴らない
●鳴っているアラームを止めるには
アラーム設定時刻になると20秒間アラーム音が鳴り続けます。
鳴っているアラームを途中で止める場合は、ボタンA、B、C、Dいずれかを押してください。
※どの表示のときでも、この操作は可能です。
●サウンドデモンストレーション(アラーム音の試し聴き)
アラーム音を試し聴きしたいときは、アラーム表示のときに、ボタンCを2∼3秒間押してください。押
し続けている間アラーム音の試聴ができます。
※この操作をした後は、アラームのON/OFFの状態が変わりますので「●デイリーアラームの鳴る/鳴ら
ないの設定方法」を参照して元の状態に戻してください。
<ワンタッチアラーム>
・ワンタッチアラームの設定は、ボタン操作によって現在時刻から1分毎にアップ/ダウンさせてセットしま
すので、現在時刻に近い時刻に設定するのに適しています。
・ワンタッチアラームの設定は1回アラームが鳴るとキャンセルされますので、毎日決まった時刻にアラー
ムを鳴らしたい場合はデイリーアラーム機能を使用してください。
●ワンタッチアラームの合わせかた
1ボタンAを押して、時刻・カレンダー表示にしてください。
2ボタンCを押してワンタッチアラーム表示にしてください。上段にワンタッチアラーム時刻、下段に現在
時刻が表示されます。ワンタッチアラームが未設定の場合には、上段も現在時刻を表示します。
ワンタッチアラーム設定時刻
地図の一部が点滅し、選択している都
市と同じ時差の地域を示します。
ボタンC
日
●サマータイム(DST:Daylight-saving Time)の設定変更について
・ サマータイム(DST)の設定ができます。
1ワールドタイム表示で、サマータイム(DST)を設定したい都市を表示させます。
リュウズ
1段目:(アナログ部時刻合わせ)
通常位置
ボタンA
表示切替え
ボタンD
ボタンC
※以降の各説明ではアナログ部とデジタル部
の表示を分けた図を使用しております。
時 分 秒
【アナログ部】
リュウズ通常位置……………機能はありません。
(フリー位置)
リュウズ1段目 ………………アナログ部の時刻合わせ
ボタンD
サマータイムマーク
ボタンA
ボタンA
ボタンA
時刻・カレンダー表示
ワールドタイム表示
ストップウォッチ表示
アラーム表示
ボタンA
※ワールドタイム表示にて1∼2分ボタン操作が無い場合、「時刻・カレンダー表示」に戻ります。
●ボタンBを押すとパネライトが点灯します。約3秒間の残照式です。
●時刻・カレンダー表示でボタンCを押すとワンタッチアラーム表示になります。くわしくは「アラームの
使いかた」の中の<ワンタッチアラームの使いかた>の項目をご参照ください。
● 時刻・カレンダー表示でボタンDを押すごとに次の順序でデジタル表示の点灯・消灯ができます。
ボタンD
ボタンA
※設定により時刻表示が変ります。
※この状態で1∼2分間操作をしないと自動的にワールドタイム表示に戻ります。
3設定が終わったら、ボタンAを押してワールドタイム表示に戻してください。
4他の都市にサマータイム設定をする場合には、「操作1」から行なってください。
※時刻・カレンダー合わせで設定している「ホームタイム都市」のサマータイム設定(解除)を行なうと、
「時刻・カレンダー表示」の時刻も変ります。
※同じタイムゾーンにある都市は、サマータイムの設定/解除が共通になります。また、実際にはサマー
タイムを行わない都市および地域でも、設定ができますのでご注意ください。
■都市名と時差について
ボタンD
ボタンD
時刻・カレンダー表示
カレンダーのみ表示
表示無し(全消灯)
ボタンD
●デモンストレーション機能
時刻・カレンダー表示の状態でボタンDを2秒以上押しつづけるとデモンストレーション表示が開始しま
す。デモンストレーションは、約2秒ずつ各モードの表示を繰り返します。ボタンA、B、C、Dのどれ
かを押すとデモンストレーションが解除され、時刻・カレンダー表示に戻ります。
■時刻とカレンダーの合わせかた
ワンタッチアラームマーク
ボタンB
ボタンC
PMマーク
(12時間制表示時(午後)に点灯)
24Hマーク
(24時間制表示時に点灯)
リュウズ
※この図は説明用のものです。「24」
マークと「PM」マークが同時に
点灯することはありません。
ボタンA
【アナログ部】
時刻の合わせかた
1リュウズを引き出します。秒針が止まります。秒針は12時の位置に止めてください。
2リュウズを回して針を動かし正しい時刻に合わせます。
※この時、正確に合わせるために分針を正しい時刻より4∼5分進めてから針を戻して合わせてください。
3時報と同時にリュウズを押し込みます。
【デジタル部】
時刻の合わせかた
東京
アデレード
シドニー
ヌメア
ウエリントン
−
ホノルル
アンカレッジ
ロサンゼルス
デンバー
シカゴ
ニューヨーク
カラカス
リオデジャネイロ
−
−
+9
+9.5
+10
+11
+12
−11
−10
−9
−8
−7
−6
−5
−4
−3
−2
−1
○
○
○
○
○
○
○
○
○
※ワールドタイム機能で、表中の「-- -- --」を選択した場合、都市名表示は「-- -- --」となり、地図の点滅
はありません。
※UTC(世界協定時)=グリニッジ標準時です。
※各国の時差、およびサマータイムは国および地域の都合により変更する場合があります。
ボタンC
ストップ
ボタンC
スタート
1ボタンAを押して時刻・カレンダー表示にしてください。
2ボタンAを2∼3秒間押し続けて時刻・カレンダー合わせ状態にしてください。
(世界地図とホームタイム都市名が表示され、さらにその地図部分が点滅します。
)
※この状態で1∼2分間操作をしないと時刻・カレンダー表示に戻ります。
3ボタンCを押して、合わせたい箇所を点滅させます。
ボタンCを押すたびに点滅箇所が変わります。
ボタンC ボタンC ボタンC ボタンC
秒
分
時
ボタンC
年
ボタンC
月
日
●ワンタッチアラーム時刻の確認および、修正またはキャンセルする方法
・セットしてあるワンタッチアラーム時刻を確認したい。
・セットしてあるワンタッチアラーム時刻を修正または、キャンセルしたい。
1「時刻・カレンダー表示」で、ボタンCを押して「ワンタッチアラーム表示」にしてください。このとき、
セットしてあるワンタッチアラーム時刻が表示されます。
2ボタンCまたはボタンDを押して、ワンタッチアラーム時刻の修正ができます。ワンタッチアラームをキ
ャンセルするには、ボタンCとDを同時に押すか、ボタンCまたはDを押してワンタッチアラーム時刻を
現在時刻の時・分と一致させてください。ワンタッチアラームがキャンセルされると、「1-AL」マークは
消灯します。
■電池交換後のお願い(システムリセット)
●システムリセットのしかた
A、B、C、Dの4つのボタンを同時に2秒以上押すと表示が消え、ボタンを離した後「午前12時00分00秒、
2000年1月1日SAT(土曜日)ホームタイム都市:UTC」の初期状態になりますので、時刻・カレンダー合
わせ(ホームタイム都市も含む)、アラーム時刻合わせ等を行なってください。
●電池について
(1)電池寿命
この時計は新しい正常な電池を組み込んだ場合、その後約2年間作動します。
ただし、アラーム音を1日10秒以内、パネライトの点灯を1日1回(3秒)を基準とし
ていますので、それ以上使用した場合は上記の期間に満たないうちに電池寿命が切
れる場合があります。
※アナログ部、デジタル部のどちらかが止まったら、2個とも電池交換をしてくださ
い。
12H/24H
・ウレタンバンドなど軟質プラスチックでできているバンドは、蛍光灯や太陽光の下に長時間放
置されたり、汚れが染み込んだりすることによって、色あせ・変色、あるいは硬くなったり切
れたりする場合があります。特に半透明のウレタンバンドは、変色などが目立ちやすく、条件
によっては数ヵ月のご使用で起こり始める場合があります。湿気の多い場所に保管したり、汗
や水で濡れたまま放置しておくと、早く変色することがありますので、汚れたときは、石けん
水で洗ってください。ただし、化学製品ですので溶剤によっては変質する場合があります。
●非防水時計は、水(水道の水はね、雨、雪など)や多量の汗にご注意ください。万一、水や汗
でぬれた場合には吸湿性のよい布などで水分を拭きとってください。
●日常生活用強化防水時計は海水中などでの使用のあと、化学薬品類を使用せず、ためた真水で洗
ってください。
●回転ベゼルつきの時計の場合、ベゼル下に汚れなどがたまり、回転が重くなったりしますので清
潔にしてご使用ください。
ボタンC
ストップ
ボタンD
リセット
お買い上げの時計にあらかじめ組み込まれている電池は、機能・性能をみるためのモニター用です。
お買い上げ後上記の期間に満たないうちに電池寿命が切れることがありますのでご了承ください。
1電池交換は、必ずお買い上げ店または、アルバ取扱店で「アルバ専用電池」とご指定の上、ご用命くだ
さい。
2電池寿命切れの電池をそのまま長時間放置しますと、漏液などで故障の原因になりますので、お早めに
交換してください。
3電池交換は、保証期間内でも有料となります。
4電池交換等で裏ぶたを開閉しますと当初の防水性能を維持できなくなる場合があります。電池交換の際
には、お客様の時計の防水性能に合った防水検査をご依頼ください。特に10気圧以上のものは検査が必
要です。
計測時間
・1日(24時間)に1回鳴る「デイリーアラーム機能」と、設定した時刻に1回鳴らすとセットした時刻が
解除される「ワンタッチアラーム機能」があります。
・デイリーアラームの設定はアラーム表示から、ワンタッチアラームの設定は時刻・カレンダー表示から
おこないます。
<デイリーアラームの使いかた>
ワンタッチ
●デイリーアラーム時刻の合わかた
1ボタンAを押して、アラーム表示にしてください。 アラームマーク
2ボタンAを2∼3秒押し続けて、アラーム時刻合わせ
にしてください。
ボタンC
「時」と「PM」マーク(午後の場合)または「24」
時
分
マーク(24時間制表示の場合)が点滅します。
※この状態で1∼2分間操作をしないと自動的にアラ
ーム表示に戻ります。
3ボタンCを押すごとに点滅する箇所が変わります。
ボタンC
注意
・バンドは多少余裕を持たせ、通気性をよくしてご使用ください。
・かぶれやすい体質の人や体調によっては、皮膚にかゆみやかぶれをきたすことがあります。
・かぶれの原因として考えられますのは、
1.金属・皮革に対するアレルギー
2.時計本体及びバンドに発生した錆、汚れ、付着した汗などです。
・万一肌などに異常を生じた場合は、ただちに使用を中止し、医師にご相談ください。
●保管について
×
×
×
・「−5℃∼+50℃からはずれた ・磁気や静電 ・強い振動のあ
るところに放
気の影響が
温度」下では、機能が低下した
置しないでく
あるところ
り、停止する場合があります。
ださい。
に放置しな
※この時計は常温(5℃∼35℃
いでくださ ・極端にホコリ
の範囲内)で腕に付けた時に
の多いところ
い。
安定した精度を得られるよう
に放置しない
に調整してあります。よって
でください。
温度によって多少の進み遅れ
が生ずることがありますが、
常温に戻ればもとの精度に戻
ります。
・薬品の蒸気が発散しているところ
や薬品にふれるところに放置しな
いでください。
(薬品の例:ベンジン、シンナー
などの有機溶剤、及びそれらを含
有するもの−ガソリン、マニキュ
ア、化粧品などのスプレー液、ク
リーナー剤、トイレ用洗剤、接着
剤など−水銀、ヨウ素系消毒液な
ど)
・温泉や防虫剤の入ったひきだしな
ど特殊な環境に放置しないでくだ
さい。
注意
●防水性能
・時計の文字板または裏ぶたにある防水性能
表示をご確認の上、使用可能範囲にそって
正しくご使用ください。
・水分のついたままリュウズを回したり引き出し
たりしないでください。時計内部に水分が入
ることがあります。
洗顔や雨など 水泳や水仕事 空気ボンベを使 空 気 ボンベや 水滴がついた
用しないスキン ヘリウムガスな
一 時 的 にか など長時間水 ダイビングや入 どを使用する本 状態でのボタ
かる水滴。
にふれる場合。 浴。
格的な潜水。 ン操作。
水
ケースの裏に
WATER RESISTANT
の表示のない時計
×
×
×
×
×
日常 生 活 用 防 水
ケースの裏に
WATER RESISTANT
の表示のある時計
○
×
×
×
×
○
○
×
×
○
○
○
○
×
○
非
防
日常生活用
5気圧
防水
強 化 防 水 10・15・20
気圧防水
ケースの裏にWATER
RESISTANT5・10・15
・20BARか、
WATER
RESISTと マーク
の表示のある時計
警告
・日常生活用防水(3気圧)の時計は水の中に入れてしまうような環境での使用はできません。
・日常生活用強化防水(5気圧)の時計は、スキンダイビングを含めて全ての潜水に使用できません。
・日常生活用強化防水(10・20気圧)の時計は、飽和潜水/空気潜水には使用できません。
(2)最初の電池
警告
1.お客様は、時計から電池を取り出さな
いでください。
2.やむを得ずお客様が時計から電池を取
り出した場合は、電池はただちに幼児
の手が届かないところに保管してくだ
さい。
3.万一飲み込んだ場合は、身体に害があ
るため直ちに医師とご相談ください。
注意
1.破裂、発熱、発火などのおそれがありますので、電池
を絶対にショート、分解、加熱、火に入れるなどしな
いでください。
2.この時計に使用している電池は、充電式ではないの
で、充電すると液漏れ、破損のおそれがあります。
絶対に充電しないでください。
3.「常温(5℃∼35℃)からはずれた温度」下で長時
間放置すると、電池寿命が短くなることがあります。
●その他、携帯上ご注意いただきたいこと
注意
・バンドの着脱の際に中留などで爪を傷つける恐れがありますのでご注
意ください。
・転倒時や他人との接触などにおいて、時計の装着が原因で思わぬケガ
を負う場合がありますのでご注意ください。
・特に乳幼児を抱いたりする場合は、時計に触れることでケガを負った
り、アレルギーによるかぶれをおこしたりする場合もありますので十
分ご注意ください。
・提げ時計やペンダント
時計の場合、ひもやチ
ェーンによって衣類や
手・首などを傷つける
事がありますのでご注
意ください。
●定期点検について
・長くご愛用いただくために、2∼3年に一度程度の点検調整をおすすめします。定期的
な点検により目に見えない部分が原因となる損傷を未然に防ぎ、より安心してご使用い
ただけます。保油状態・漏液の有無・汗や水分の侵入などの点検をお買い上げ店または
アルバ取扱店で点検をご依頼ください。点検の結果によっては分解掃除を必要とする場
合があります。
・部品(電池)交換の時は、「純正部品(電池)」とご指定ください。電池が切れたまま長 バネ棒
時間放置しますと漏液などで故障の原因となりますので早めに交換をご依頼ください。
・その時(点検時、電池交換時)にパッキンやバネ棒の交換もご依頼ください。
■修理について
アラームマーク
ボタンC
軟質プラスチックバンド
10気圧以上の防水の場合、時計をつけたまま入浴してもかまいませんが下記のことに注意して下さい。
・時計に、石けんやシャンプーがついた状態で、リュウズ操作やボタン操作を行なわないでください。
(防水機能が維持できなくなることがあります)
・温水で時計が温まりますと、多少の進み、遅れを生ずることがあります。ただし、常温に戻れば精度は
もとに戻ります。
■電池について
(3)電池交換
・ 60分までは1/100秒単位で、それ以降は1秒単位で計測表示します。
・ 最大計測時間は、23時間59分59秒です。自動的に停止します。
1ボタンAを押して、ストップウオッチ表示にしてください。
2使う前に00秒に戻してください。(ボタンDでリセット)
※ストップウオッチが動いている時は・・・ボタンCを押して表示を止め、ボタンDでリセット
※ストップウオッチが止まっている時は・・・ボタンDでリセット
3ボタンCを押すごとに、スタート・ストップを繰り返します。
ストップした状態でボタンDを押すとリセットされます。
ボタンC
スタート
・ケース・バンドは肌着類と
同様に直接肌に接していま
す。汚れたままにしておく
とサビて衣類の袖口を汚し
たり、かぶれの原因になる
ことがありますので常に清
・金属バンドは時々柔らかい歯 ・革バンドは水分を吸い取る
潔にしてご使用ください。
ように軽く拭いてください。
ブラシなどを使い、石けん水
・時計をはずしたときには、
こするように拭くと色が落
で部分洗いなどのお手入れを
柔らかい布などで汗や水分
ちたり、ツヤがなくなった
お願いします。その際に、非
を拭き取ってください。汚
りする場合があります。
防水の時計の場合には時計本
れも取れ、ケース、バンド、
体に水がかからないようにご
およびパッキンの寿命が違
注意ください。
ってきます。
●入浴について
■アラームの使いかた(デイリーアラーム・ワンタッチアラーム)
この時計のデジタル部にはワールドタイム機能があります。このため、時刻・カレンダー合わせの際に
その時刻にあった都市名(ホームタイム都市)を選択する必要があります。合わせる時刻に対応しない
ホームタイム都市を選択した場合、ワールドタイム機能が正しくはたらきませんので、ご注意ください。
ホームタイム都市
TYO
ADL
SYD
NOU
WLG
-- -- -HNL
ANC
LAX
DEN
CHI
NYC
CCS
RIO
-- -- --- -- --
GMTとの時差 サマータイム○:有
0
0
○
+1
○
+2
○
+2
○
+3
+3.5
○
+4
+4.5
+5
+5.5
+6
+6.5
+7
+8
■ストップウオッチの使いかた
ボタンD
アラームマーク
都市名
(世界協定時)
ロンドン
パリ
カイロ
エルサレム
ジェッダ
テヘラン
ドバイ
カブール
カラチ
デリー
ダッカ
ヤンゴン
バンコク
香港
3ボタンCを押すごとにワンタッチアラーム時刻が1分単位でアップ、ボタンDを押すごとに1分単位でダ
ウンします。希望する時刻に合わせてください。
4ワンタッチアラームの設定を行なうと、ワンタッチアラームマーク「1-AL」が点灯し、ワンタッチアラ
ームがセットされていることを表示します。
※ワンタッチアラーム時刻(上段)が現在時間(下段)と一致した場合にはワンタッチアラームマーク
「1-AL」は消灯し、ワンタッチアラームは未設定の状態となり、ワンタッチアラームは鳴りません。
5ボタンAを押して、時刻・カレンダー表示に戻してください。
※ボタンCまたはDを押され、ワンタッチアラーム時刻が変わることを防ぎます。
※ボタンAを押さなくても、この状態で20∼30秒間操作をしないと自動的に時刻・カレンダー表示に戻
ります。
電池交換後または、デジタル表示部が万一異常な表示(読めない表示など)をした場合、以下の操作を行な
ってください。時計内部(デジタル表示部)がシステムリセットされ、正常に機能するようになります。
各都市の表記とGMT(グリニッジ標準時)との時差は以下のとおりです。
都市表記
UTC
LON
PAR
CAI
JRS
JED
THR
DXB
KBL
KHI
DEL
DAC
RGN
BKK
HKG
※この状態で20∼30秒間操作をしないと自動的に時刻・カレンダー表示に戻ります。
●鳴っているアラームを止めるには
ワンタッチアラーム設定時刻になると20秒間アラーム音が鳴り続きます。アラーム音はデイリーアラー
ム音とは異なります。鳴っているアラームを途中で止める場合は、ボタンA、B、C、Dのどれかを押し
てください。
※どの表示のときでも、この操作は可能です。
※ワンタッチアラームは1回鳴ると自動的に設定がキャンセルされます。
2ボタンAを2∼3秒押し続けてください。
サマータイム設定状態になり、「DST」マークが点滅します。
ボタンDを押すごとに「サマータイム設定」⇔「サマータイム解除」が選択できます。
(「 」マーク点灯) (「 」マーク消灯)
【デジタル部】
※各表示におけるボタン操作の中には確認音が鳴る操作があります。
●ボタンAを押すごとに次の順序で切り替わります。
皮革バンド
金属バンド
●日常のお手入れ
●かぶれやアレルギーについて
ワンタッチアラームマーク
2ボタンCまたはボタンDを押して、都市を選択してください。
ボタンCで東の方向、ボタンDで西の方向の都市を選択できます。
※都市名が入っていないタイムゾーンでは都市名の位置が「- - - - - - 」になります。
※ホームタイム都市と同じ時差の都市を選択した場合、「ホームタイム都市との時差」の表記が「+0」ま
たは「−0」となります。
曜日
ボタンB
内部照明の点灯
注意
都市名
世界地図
選択した都市の時刻
■ボタンの名称と表示の切り替え
■使用上の注意とお手入れの方法
■エレクトロルミネッセンス(内部照明)について
アラーム設定時刻
内部照明として使用されているエレクトロルミネッセンス(EL)は、電池の電圧が低くなると、輝度(明る
さ)が低下します。また、ELは発光時間の経過と共に、徐々に輝度が減衰する特性を持っています。
※ELの輝度は、点灯時間の累積で約120時間経過すると半減します。ご使用中に内部照明が暗くなったときは、
まず、電池を新しいものに交換してください。
電池を交換しても暗すぎる場合は、ELの交換となります。お買い上げ店に交換をお申しつけください。有
料にて申し受けします。
1この時計の補修用性能部品の保有期間は通常7年間を基準としています。
正常なご使用であれば、この期間中は原則として修理可能です。(補修用性能部品とは、時計の機能を
維持するのに不可欠な修理用部品です。)
2修理可能な期間はご使用条件によりいちじるしく異なり、精度が元通りにならない場合がありますので、
修理ご依頼の際にお買い上げ店とよくご相談ください。
3修理のとき、ケース・文字板・針・ガラス・バンドなどは一部代替部品を使用させていただいたり、ま
たはケースごとの一式交換や代替品に替わることもありますので、ご了承ください。
4修理の内容によっては、修理代が標準小売価格を上まわる場合があります。その他、わからない点があ
りましたら、「セイコー株式会社お客様相談室」または「セイコーサービスセンターお客様相談係」へ
お問い合わせください。