1
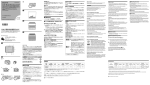
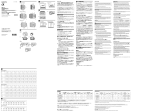
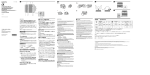
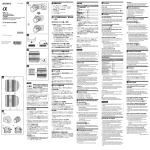
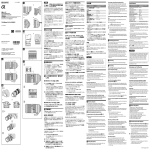
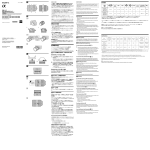
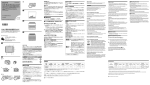
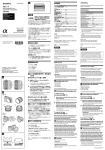
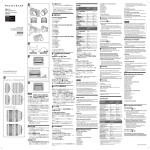
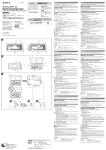
4-261-648-04(1) 日本語 DT 11-18mm F4.5-5.6: 3 2 ピントを合わせる 示しています。この取扱説明書をよくお読みの上、製品を安全にお使いください。 オートフォーカスでピントを合わせる場合は、カメラが自動的に ピントを合わせます。手動でピントを合わせる場合は、カメラを マニュアルフォーカス(手動によるピント合わせ)にして、ファイ ンダー等を見ながらフォーカスリングを回してください。 お読みになったあとは、いつでも見られる所に必ず保管してください。 フォーカス さまざまな温度条件下でも良好なピントが確保できるよう、 電気製品は、安全のための注意事項を守らないと、人身への 4 危害や火災などの財産への損害を与えることがあります。 この取扱説明書には、事故を防ぐための重要な注意事項と製品の取り扱いかたを 交換レンズ/ Interchangeable Lens/ Objectif interchangeable/ 取扱説明書/Operating Instructions/Mode d'emploi/Manual de instrucciones/ SAL1118/SAL18200 8 7 9 DT 11-18mm F4.5-5.6 DT 18-200mm F3.5-6.3 この「取扱説明書」ではレンズごとの使いかたを説明していま す。使用上のご注意など、レンズに共通したご注意や説明につ いては別冊の「使用前のご注意」でご覧頂けます。 必ずご使用の前に、本書と合わせてよくお読みのうえでご使用 ください。 5 1 本機はソニー製αカメラ(APS-Cサイズ相当の撮像素子搭載機種) で使用できる、Aマウント用レンズです。35mm判カメラではお 使いになれません。 6 DT 18-200mm F3.5-6.3: 2 3 4 使用上のご注意 A-mount Eマウントカメラでお使いの場合は、別売のマウントアダプターをご使用 ください。破損のおそれがありますので、レンズをEマウントカメラに直 接取り付けないでください。 カメラとレンズの両方を レンズを取り付けてカメラを持ち運ぶときは、 しっかり持ってください。 ズームにより繰り出されたレンズ部分でカメラを保持しないでくださ い。 ©2006 Sony Corporation 1 5 フラッシュ使用時のご注意 レンズフードをはずし、1m以上離れ カメラ内蔵フラッシュ使用時には、 9 8 7 –1 6 て撮影してください。レンズとフラッシュの組み合わせによっては、レ ンズがフラッシュ光を妨げ、写真の下部に影ができることがあります。 内蔵フラッシュはご使用にな DT 11-18mm F4.5-5.6をお使いの場合は、 れません。別売りのフラッシュをお使いください。 周辺光量について レンズは原理的に画面周辺部の光量が中心部に比べ低下します。周辺光 量の低下が気になる場合は、開放絞りから1∼ 2段絞り込んでご使用くだ さい。 フィルター枠が入射光を レンズとフィルターの組み合わせによっては、 妨げるため、開放絞り付近では、画面周辺の光量が著しく低下することが あります。あらかじめ絞り値を変えてテスト撮影することをおすすめし ます。 (DT 11-18mm F4.5-5.6のみ) (1) (2) 各部のなまえ 1…レンズフード指標 2…距離目盛 3…フォーカスリング 4…ズームリング 5…レンズ信号接点 6…マウント標点 7…焦点距離指標 8…焦点距離目盛 9…距離指標 Printed in Japan –2 レンズの取り付けかた/取りはずしかた 取り付けかた(イラスト–参照) 1 レンズの前後レンズキャップとカメラのボディキャップ をはずす。 レンズフロントキャップは図の(1)、(2)の2通りの方法で取り付け/ 取りはずしができます。(2)は、レンズフードを付けた状態でのレン ズキャップの取り付け/取りはずしに便利です。 2 レンズとカメラのオレンジの点(マウント標点)を合わせ てはめ込み、レンズを軽くカメラに押し当てながら、時計 方向に「カチッ」とロックがかかるまでゆっくり回す。 This lens is designed for A-mount which can be used on Sony α cameras (models equipped with APS-C sized image sensor). You cannot use on 35mm-format cameras. Notes on use When using this lens with an E-mount camera, attach a separately sold Mount Adaptor. Do not attach the lens directly to the E-mount camera or you may damage both. When you carry the camera with the lens attached, make sure to hold both the camera and the lens steadily. Do not hold by any part of the lens that protrudes when zooming. Precautions for flash use When using a built-in camera flash, make sure to remove the lens hood and shoot from at least 1m (3.3 feet) away from your subject. With certain of lens/ flash combinations, the lens may partially block the light of the flash, resulting in a shadow at the bottom of the picture. The built-in flash cannot be used with DT 11-18mm F4.5-5.6. Use a separately sold flash. Vignetting When you use lens, the corners of the screen become darker than the center. To reduce this phenomena (called vignetting), close the aperture by 1 to 2 stops. With certain of lens/filter combinations, the frame of the filter may block the incident radiation. This may significantly lower the light intensity when shooting with the aperture wide open. Take test photographs at different aperture settings for best results. (DT 11-18mm F4.5-5.6 only) Names of parts 1…Lens hood index 2…Distance scale 3…Focusing ring 4…Zooming ring 5…Lens contacts 6…Mounting index 7…Focal-length index 8…Focal-length scale 9…Distance index Attaching/detaching the lens To attach the lens (See illustration –.) 1 Remove the rear and front lens caps and the camera body cap. You can attach/detach the lens front cap in two ways, (1) and (2). When you attach/detach the lens cap with the lens hood attached, use method (2). 2 Align the orange index on the lens barrel with the orange index レンズを斜めに差し込まないでください。 Do カメラのレンズ取りはずしボタンを押したまま、レンズを反 時計方向に回してはずす。 レンズフードを取り付ける 画面外にある光が描写に影響するのを防ぐために、レンズフード の使用をおすすめします。 レンズフードの赤線をレンズの赤線(レンズフード指標)に合 わせ、そのままレンズフードの赤点とレンズの赤線が合い、 「カチッ」というまで時計方向に回す。 You will find information on using each lens in this manual. Precautions common to lenses, such as notes on use will be found in “Precautions before using” on a separate sheet. Be sure to read both documents before using the lens. on the camera (mounting index), then insert the lens into the camera mount and rotate it clockwise until it locks. 取りはずしかた(イラスト–参照) English カメラのレンズ取りはずしボタンを押 レンズを取り付けるときは、 さないでください。 リングは無限遠側に余分に回転する仕組みになっています。手動でピン ト合わせをする場合は、無限遠撮影時でもフォーカスリングを無限遠の 終端まで(止まるまで)回さず、ファインダー等を見ながら正確にピント 合わせをしてください。 フォーカスリングを回す方向が通常のAマウ DT 18-200mm F3.5-6.3は、 ントレンズと反対です。 レンズフードは正確に取り付けてください。レンズフードの効果が出な かったり、画面の一部にレンズフードが写り込むことがあります。 逆向きにレンズに取り付けてく 撮影後レンズフードを収納するときは、 ださい。 Do not press the lens release button on the camera when mounting the lens. not mount the lens at an angle. To remove the lens (See illustration –.) While pressing and holding the lens release button on the camera, rotate the lens counterclockwise until it stops, then detach the lens. Attaching lens hood It is recommended that you use a lens hood to reduce flare and ensure maximum image quality. Align the red line on the lens hood with the red line on the lens (Lens hood index). Turn the lens hood clockwise until the red line on the lens meets the red dot on the lens hood and it clicks into place. Attach the lens hood properly. Otherwise, the lens hood may interfere with the desired effect or may appear in pictures. When storing, turn over the lens hood and place it onto the lens backwards. ズームする Zooming ズームリングを回して、希望の焦点距離(ズームの位置)に合 わせる。 Rotate the zooming ring to the desired focal length. Focusing When using the auto focus, the camera focuses the lens automatically. When focusing manually, set your camera to the manual focus and rotate the focusing ring while looking through the viewfinder, etc. The focusing ring can be rotated slightly past the infinity to provide accurate focusing under various operating temperatures. Do not rotate the focusing ring all the way to the end when focusing manually, even at infinity. Look through the viewfinder, etc., and set the focus precisely. For Lens model DT 18-200mm F3.5-6.3, the focusing ring rotates the opposite way than on standard A-mount lenses. 主な仕様 商品名 (型名) 35mm判 1 換算焦点距離* DT11-18mm F4.5-5.6 (SAL1118) DT18-200mm F3.5-6.3 (SAL18200) 最短 最大撮影倍率 2 撮影距離* (倍) 外形寸法(最 大径×長さ) レンズ 群一枚 画角* 16.5-27 12-15 104゚-76゚ 0.25 0.125 F22-29 77 約83×80.5 約360 27-300 13-15 76゚-8゚ 0.45 0.27 F22-40 62 約73×85.5 約405 (mm) 1 最小絞り フィルター径 (mm) (m) 質量(g) (mm) *1 ここでの35mm判換算焦点距離および画角とは、APS-Cサイズ相当の撮像素子を搭載したレンズ交換式デジタルカメラでの値を表します。 *2 撮像素子面から被写体までの距離を表します。 高精度な調光(ADI調光)をADI対応フラッシュとの組み合わせで実現していま このレンズは距離エンコーダーを搭載しています。距離エンコーダーにより、 す。 撮影距離の変化に伴って焦点距離が変化する場合があります。記載の焦点距離は撮影距離が無限遠での定義です。 レンズの機構によっては、 同梱物:レンズ(1)、レンズフロントキャップ(1)、レンズリヤキャップ(1)、レンズフード(1)、印刷物一式 仕様および外観は、改良のため予告なく変更することがありますが、ご了承ください。 はソニー株式会社の商標です。 Specifications Dimensions Filter diameter (maximum diameter (mm) × height) (mm (in.)) Name (Model name) Equivalent 35mm-format focal length*1 (mm) Lens groupselements Angle of view*1 Minimum focus*2 (m (feet)) Maximum magnification (X) Minimum f-stop DT 11-18mm F4.5-5.6 (SAL1118) 16.5-27 12-15 104°-76° 0.25(0.8) 0.125 f/22-29 77 Approx. 83×80.5 (3 3/8×3 1/4) Approx. 360 (12 11/16) DT 18-200mm F3.5-6.3 (SAL18200) 27-300 13-15 76°-8° 0.45(1.5) 0.27 f/22-40 62 Approx. 73×85.5 (2 7/8×3 3/8) Approx. 405 (14 5/16) Mass (g (oz.)) *1 The values for equivalent 35mm-format focal length and angle of view are based on Interchangeable Lens Digital Cameras equipped with an APS-C sized image sensor. *2 Minimum focus is the distance from the image sensor to the subject. This lens is equipped with a distance encoder. The distance encoder allows more accurate measurement (ADI) by employing a flash for the process. on the lens mechanism, the focal length may change with any change of the shooting distance. The focal length assumes the lens is focused at infinity. Depending Included items: Lens (1), Lens front cap (1), Lens rear cap (1), Lens hood (1), Set of printed documentation Designs and specifications are subject to change without notice. is a trademark of Sony Corporation. 相反方向旋转。 将可变焦距圈转至所需焦距。 Français DT 11-18mm F4.5-5.6: 3 2 4 Des informations relatives à l’utilisation de chaque objectif sont disponibles dans ce manuel. La section « Précautions avant toute utilisation », qui fait l’objet d’un document séparé, contient des précautions relatives aux objectifs, telles que des remarques sur leur utilisation. Veuillez lire attentivement ces deux documents avant d’utiliser l’objectif. 5 1 Cet objectif est conçu pour les montures A, à utiliser sur les appareils photo Sony α (modèles équipés d’un capteur d’image au format APS-C). Vous ne pouvez pas l’utiliser avec des appareils photos au format 35 mm. Remarques sur l’utilisation 8 7 9 6 cet objectif est utilisé avec un appareil photo à monture E, rattachez un adaptateur pour monture d’objectif vendu séparément. Ne rattachez pas directement l’objectif à l’appareil photo à monture E sinon l’objectif et l’appareil pourraient être endommagés. Tenez fermement à la fois l’appareil photo et l’objectif lorsque vous transportez l’appareil photo avec l’objectif fixé. Ne tenez pas l’appareil par une partie saillante de l’objectif lors d’une opération de zoom. 4 Précautions concernant l’utilisation du flash 1 5 9 8 7 –1 6 Lorsque vous utilisez un flash intégré, veillez à retirer le pare-soleil et à prendre la photo à une distance d’au moins 1 m (3,3 pieds) du sujet. Dans le cas de certaines combinaisons objectif/flash, l’objectif peut partiellement bloquer la lumière du flash, ce qui génère une ombre en bas de l’image. Le flash intégré ne peut pas être utilisé avec le DT 11-18mm F4.5-5.6. Utilisez un flash vendu séparément. Vignetage Lorsque vous utilisez l’objectif, les coins de l’écran peuvent s’assombrir par rapport au centre. Pour réduire ce phénomène (appelé vignetage), l’ouverture doit être réglée à une valeur comprise entre 1 et 2 par rapport à la position de fermeture complète. Avec certaines combinaisons objectif/filtre, la monture du filtre risque de bloquer les rayonnements incidents. Ceci risque de réduire considérablement l’intensité lumineuse lors de la prise de vue avec un diaphragme complètement ouvert. Effectuez des essais de photos avec différents réglages du diaphragme pour obtenir des résultats optimums. (DT 11-18mm F4.5-5.6 uniquement) Noms des pièces (1) (2) 1…Repère du pare-soleil 2…Echelle de mise au point 3…Bague de mise au point 4…Bague du zoom 5…Contacts de l’objectif 6…Repère de montage 7…Repère de la longueur focale 8…Echelle de longueur focale 9…Index de distance Fixation/retrait de l’objectif –2 Fixation de l’objectif (Voir l’illustration –.) 1 Retirez les capuchons d’objectif situés à l’avant et l’arrière, ainsi que le capuchon de l’appareil photo. Vous pouvez fixer/détacher le capuchon avant de l’objectif de deux façons, (1) et (2). Lorsque vous fixez/détachez le capuchon d’objectif alors que le pare-soleil est en place, utilisez la méthode (2). 2 Alignez le repère orange situé sur la monture de l’objectif sur le repère orange de l’appareil (repère de montage), puis insérez l’objectif dans la monture de l’appareil et tournez-le dans le sens horaire jusqu’à ce qu’il se bloque. N’appuyez pas sur le bouton de déblocage de l’objectif de l’appareil lorsque vous fixez l’objectif. Ne fixez pas l’objectif de travers. Retrait de l’objectif (Voir l’illustration –.) Tout en appuyant et en maintenant enfoncé le bouton de déblocage de l’objectif sur l’appareil, tournez l’objectif dans le sens anti-horaire jusqu’à la butée, puis détachez l’objectif. Fixation du pare-soleil Il est recommandé d’utiliser un pare-soleil afin de réduire la lumière parasite et d’assurer une qualité d’image maximale. Alignez la ligne rouge située sur le pare-soleil avec le demi-point rouge de l’objectif (repère du pare-soleil). Tournez le pare-soleil dans le sens horaire jusqu’à ce que le demi-point rouge de l’objectif se trouve en face de son point rouge et qu’il émette un déclic de mise en place. Fixez correctement le pare-soleil. Sinon, le pare-soleil risque de perturber l’effet souhaité ou d’apparaître sur les images. Lorsque vous le rangez, retournez le pare-soleil et placez-le sur l’objectif à l’arrière. Utilisation du zoom Tournez la bague du zoom pour obtenir la longueur focale de votre choix. Utilización del zoom Lorsque vous utilisez la mise au point automatique, l’appareil photo fait la mise au point automatiquement au niveau de l’objectif. Pour effectuer une mise au point manuelle, réglez votre appareil en mode de mise au point manuelle et tournez la bague de mise au point tout en regardant dans le viseur, etc. Gire el anillo de zoom hasta la distancia focal que desee. La bague de mise au point peut être tournée légèrement au-delà de l’infini afin d’obtenir une mise au point précise à diverses températures de fonctionnement. Ne tournez pas la bague de mise au point au maximum lorsque vous effectuez une mise au point manuelle, même sur l’infini. Regardez dans le viseur, etc., et réglez la mise au point avec précision. Sur le modèle d’objectif DT 18-200mm F3.5-6.3, la bague de mise au point tourne dans le sens contraire de celui des objectifs à monture A standard. Lorsque DT 18-200mm F3.5-6.3: 2 3 Mise au point Español ˎ Cuando utilice el enfoque automático, la cámara enfocará el objetivo automáticamente. Cuando enfoque manualmente, ajuste la cámara en el modo de enfoque manual y gire el anillo de enfoque mientras mira a través del visor, etc. ˎ anillo de enfoque puede girarse ligeramente hasta el infinito para proporcionar un enfoque adecuado en diferentes temperaturas de funcionamiento. No gire el anillo de enfoque por completo hasta el final cuando enfoque manualmente, incluso al infinito. Mire a través del visor, etc., y ajuste el enfoque con precisión. En el modelo de objetivo DT 18-200mm F3.5-6.3, el anillo de enfoque gira en dirección contraria a los objetivos de montura A estándar. En este manual encontrará información sobre la utilización de cada objetivo. Las precauciones comunes que se aplican a los objetivos, como por ejemplo las notas sobre la utilización, se encuentran en una hoja separada con el título “Precauciones previas a la utilización del producto”. Asegúrese de leer ambos documentos antes de utilizar el objetivo. Este objetivo está diseñado para las monturas A que se pueden utilizar en las cámaras Sony α (modelos equipados con sensor de imágenes de tamaño APS-C). No se puede utilizar en cámaras de formato de 35 mm. Notas sobre el uso Cuando utilice este objetivo en una cámara con montura E, fíjele un adaptador de montura de objetivo a la venta por separado. No fije el objetivo directamente al la cámara con montura E o podría dañar ambos. Cuando transporte la cámara con el objetivo colocado, sujete firmemente tanto la cámara como el objetivo. No sujete ninguna parte sobresaliente del objetivo al utilizar el zoom. 中文(简) 您可以在本手册中找到关于使用各镜头的信息。有关使用注意事项 等镜头的一般注意事项可以在单页的“使用前的注意事项”中找 到。务必在使用镜头前阅读以上两份文件。 usar una cámara con flash incorporado, asegúrese de extraer el parasol y tomar fotografías desde como mínimo 1 m de distancia desde el motivo. Con algunas combinaciones de objetivo y flash, el objetivo puede bloquear parcialmente la luz del flash, lo que podría provocar una sombra en la parte inferior de la imagen. No es posible utilizar el flash integrado con DT 11-18mm F4.5-5.6. Utilice un flash adquirido por separado. 使用注意事项 ˎ ˎ ˎ ˎ ˎ 1…Índice de cubierta del objetivo 2…Escala de distancia 3…Anillo de enfoque 4…Anillo de zoom 5…Contactos del objetivo 6…Índice de montaje 7…Índice de distancia focal 8…Escala de distancia focal 9…Índice de distancia Colocación/extracción del objetivo ˎ ˎ cuerpo de la cámara. Puede colocar o extraer la tapa frontal del objetivo de dos modos, (1) y (2). Cuando coloque o extraiga la tapa del objetivo con el parasol colocado, utilice el método (2). 2 Alinee el índice naranja del tambor del objetivo con el índice naranja de la cámara (índice de montaje) y, a continuación, inserte el objetivo en la montura de la cámara y gírelo hacia la derecha hasta que quede encajado. No pulse el botón de liberación del objetivo de la cámara cuando monte el objetivo. No monte el objetivo inclinado. Para extraer el objetivo (consulte la ilustración –.) Gire el objetivo hacia la izquierda hasta que se detenga mientras mantiene el botón de liberación del objetivo pulsado y, a continuación, extráigalo. 使用内置相机闪光灯时,务必拆下镜头遮光罩并在距离拍摄物至少 1m的地方拍摄。使用镜头/闪光灯的某种组合时,镜头可能会遮住闪 光灯的部分亮光,而造成图片的底部阴影。 内置闪光灯无法与 DT 11-18mm F4.5-5.6 配合使用。请使用另售的 闪光灯。 使用镜头时,屏幕的角落要比其中心暗。为避免这种现象(称之为晕 影),请将光圈推近1~2圈。 对于某些镜头/滤光镜的组合,滤光镜的外框可能会挡住入射光线。 这在很大程度上会降低当光圈全开时拍摄的光线强度。为获得最佳效 果,请以不同光圈设置进行试拍。(仅适用于 DT 11-18mm F4.55.6) ȏ 安装/拆下镜头 1 Longueur focale équivalente au format 35 mm*1 (mm) Elément en groupes de l’objectif Angle de vue*1 Mise au point minimale*2 (m (pieds)) Agrandissement maximum (X) Valeur f minimale Diamètre du filtre (mm) Dimensions (diamètre maximum × hauteur) (mm (po)) Poids (g (on.)) DT 11-18mm F4.5-5.6 (SAL1118) 16,5-27 12-15 104°-76° 0,25(0,8) 0,125 f/22-29 77 Environ 83×80,5 (3 3/8×3 1/4) Environ 360 (12 11/16) DT 18-200mm F3.5-6.3 (SAL18200) 27-300 13-15 76°-8° 0,45(1,5) 0,27 f/22-40 62 Environ 73×85,5 (2 7/8×3 3/8) Environ 405 (14 5/16) Cet objectif dispose d’un encodeur de distance. L’encodeur de distance permet d’effectuer des mesures plus précises (ADI) à l’aide d’un flash. le mécanisme d’objectif, la longueur focale peut varier en fonction de la distance de prise de vue. La longueur focale suppose que l’objectif est réglé sur l’infini. Selon Articles inclus: Objectif (1), capuchon d’objectif avant (1), capuchon d’objectif arrière (1), pare-soleil (1), Jeu de documents imprimés La conception et les spécifications peuvent être modifiées sans préavis. est une marque commerciale de Sony Corporation. Especificaciones 2 拆下前、后镜头盖和相机机身罩。 ˎ 可以 (1)和 (2)两种方式装上/取下前镜头盖。在不取下镜头遮光罩 的情况下装 上/取下镜头盖时,请使用方法 (2)。 将镜头镜身上的橙色标记与相机上的橙色标记(安装标记)对 准,然后将镜头插入相机安装部位并顺时针旋转直至镜头锁紧。 ˎ ˎ 请勿在安装镜头时按相机上的镜头释放按钮。 请勿倾斜安装镜头。 拆下镜头(参见插图 ȏ-Ȫ。) 当按住相机上的镜头释放按钮时,逆时针转动镜头直至其停止,然后 拆下镜头。 Ȑ 安装镜头遮光罩 建议使用镜头遮光罩以减少反光,从而确保最佳画质。 ˎ ˎ 正确安装镜头遮光罩。否则镜头遮光罩可能会影响拍摄效果或可能出现在 照片上。 存放时,翻转遮光罩并将其倒过来放在镜头上。 使用自动对焦时,相机自动调整镜头的焦点。使用手动对焦时,将相机 设定为手动对焦并在透过取景器等查看的同时旋转对焦环。 ˎ ˎ 可将对焦环稍微旋过无限远,以便在不同的操作温度下提供精确的焦距。 当手动对焦时,请勿将对焦环一直旋到底,即使可旋至无限远也不行。透 过取景器等查看,并精确设置对焦。 对于镜头型号DT 18-200mm F3.5-6.3,对焦环沿着与标准A卡口系统镜头 相反方向旋转。 SAL1118 制造商: 索尼公司 总经销商: 索尼(中国)有限公司 总经销商地址: 北京市朝阳区太阳宫中路12号楼冠城大厦701 日本制造(主机) SAL18200 Distancia focal*1 (mm) equivalente al formato de 35 mm Elementos y grupos del objetivo Ángulo de visión*1 Enfoque mínimo*2 (m) Ampliación máxima (X) F-stop mínimo DT 11-18mm F4.5-5.6 (SAL1118) 16,5-27 12-15 104°-76° 0,25 0,125 f/22-29 77 Aprox. 83×80,5 Aprox. 360 DT 18-200mm F3.5-6.3 (SAL18200) 27-300 13-15 76°-8° 0,45 0,27 f/22-40 62 Aprox. 73×85,5 Aprox. 405 Dimensiones Diámetro del (diámetro máximo filtro (mm) × altura) (mm) Peso (g) Este objetivo está equipado con un codificador de distancia. El codificador de distancia permite una medición más exacta (ADI) mediante el uso de un flash para la realización del proceso. En función del mecanismo del objetivo, es posible que la distancia focal varíe si la distancia de toma de imagen también lo hace. La distancia focal asume que el objetivo está enfocado al infinito. Elementos incluidos: Objetivo (1), tapa frontal del objetivo (1), tapa posterior del objetivo (1), parasol (1), juego de documentación impresa El diseño y las especificaciones están sujetos a cambio sin previo aviso. es una marca comercial de Sony Corporation. 规格 ȑ 变焦 Ȓ 对焦 Nombre (Nombre del modelo) *1 Los valores de la distancia focal equivalente al formato de 35 mm y al ángulo de visión se basan en cámaras digitales de objetivo intercambiable equipadas con un sensor de imágenes de tamaño APS-C. *2 El enfoque mínimo es la distancia desde el sensor de imágenes hasta el motivo. 将镜头遮光罩上的红线与镜头上的红线(镜头遮光罩标记)对准。顺 时针转动镜头遮光罩直至镜头上的红线与镜头遮光罩上的红点对齐 并且咔嗒入位。 Es recomendable utilizar un parasol para reducir los reflejos y garantizar la máxima calidad de imagen. el parasol correctamente. Si no, es posible que la cubierta impida el efecto deseado o puede que aparezca en las fotografías. Cuando la guarde, gire el parasol y colóquelo al revés en el objetivo. Nom (Désignation du modèle) *1 Les valeurs pour une longueur focale et un angle de vue équivalents au format 35 mm sont basées sur des appareils photos numériques à objectifs interchangeables équipés d’un capteur d’image au format APS-C. *2 La mise au point minimale est la distance entre le capteur d’image et le sujet. 安装镜头(参见插图 ȏ-ȩ。) Colocación del parasol Fije 索尼公司 索尼(中国)有限公司 北京市朝阳区太阳宫中路12号楼冠城大厦701 中国(主机) 2011年12月 1…镜头遮光罩标记 2…距离刻度 3…对焦环 4…可变焦距圈 5…镜头 接点 6…安装标记 7…焦距标记 8…焦距刻度 9…距离标记 将可变焦距圈转至所需焦距。 Alinee la línea roja de la cubierta del objetivo con el medio punto rojo del objetivo (Índice de cubierta del objetivo). Gire la cubierta en el sentido de las agujas del reloj hasta que el medio punto rojo del objetivo coincida con el medio punto rojo de la cubierta y encaje correctamente. 索尼公司 索尼(中国)有限公司 北京市朝阳区太阳宫中路12号楼冠城大厦701 中国(主机) 2011年12月 Spécifications Ȏ 部件名 Para colocar el objetivo (consulte la ilustración –.) 1 Extraiga las tapas frontal y posterior del objetivo y la tapa del SAL18200 制造商: 总经销商: 总经销商地址: 原产地: 出版日期: 在E卡口系统相机上使用本镜头时,请安装另售的卡口适配器。切勿将镜 头直接安装在E卡口系统相机上,以免造成两者损坏。 当您携带安装了镜头的相机时,务必同时握稳相机和镜头。 请勿握住在变焦时镜头突出的任何部分。 晕影 Si Nombres de las piezas SAL18200 制造商: 总经销商: 总经销商地址: 原产地: 出版日期: SAL1118 制造商: 索尼公司 总经销商: 索尼(中国)有限公司 总经销商地址: 北京市朝阳区太阳宫中路12号楼冠城大厦701 日本制造(主机) 闪光灯使用的注意事项 Viñeteado utiliza el objetivo, las esquinas de la pantalla se vuelven más oscuras que el centro. Para reducir este fenómeno (llamado viñeteado), cierre la abertura de 1 a 2 puntos. Con algunas combinaciones de filtro/objetivo, el cuadro del filtro puede bloquear las radiaciones accidentales. De este modo se reducirá de manera significativa la intensidad de la luz cuando se tomen imágenes con el diafragma muy abierto. Para obtener mejores resultados, haga fotografías de prueba con aberturas diferentes. (sólo para DT 11-18mm F4.5-5.6) 可将对焦环稍微旋过无限远,以便在不同的操作温度下提供精确的焦距。 当手动对焦时,请勿将对焦环一直旋到底,即使可旋至无限远也不行。透 过取景器等查看,并精确设置对焦。 对于镜头型号DT 18-200mm F3.5-6.3,对焦环沿着与标准A卡口系统镜头 相反方向旋转。 本镜头是专为A卡口系统所设计,可以用于Sony D相机(配有APS-C尺 寸图像传感器的机型)。您不能用于35mm规格的相机。 Precauciones en el uso del flash Al 使用自动对焦时,相机自动调整镜头的焦点。使用手动对焦时,将相机 设定为手动对焦并在透过取景器等查看的同时旋转对焦环。 Enfoque El SAL1118 制造商: 索尼公司 总经销商: 索尼(中国)有限公司 总经销商地址: 北京市朝阳区太阳宫中路12号楼冠城大厦701 日本制造(主机) Ȓ 对焦 名称 (型号名称) 相当于 35mm 规格 焦距*1(mm) 镜头组元件 视角*1 最小对焦*2 (m) 最大放大 倍数(倍) 最小光圈值 滤光镜 直径 (mm) 尺寸(最大 直径×高)(约mm) 质量 (g) DT 11-18mm F4.5-5.6 (SAL1118) 16.5-27 12-15 104ˇ-76ˇ 0.25 0.125 f/22-f/29 77 83×80.5 约360 DT 18-200mm F3.5-6.3 (SAL18200) 27-300 13-15 76ˇ-8ˇ 0.45 0.27 f/22-f/40 62 73×85.5 约405 *1 相当于35mm格式焦距和视角的数值是基于配备APS-C尺寸图像传感器的可更换镜头数码相机。 *2 最小焦距指的是影像传感器到拍摄对象的距离。 ˎ ˎ 此镜头配备有距离编码器。距离编码器采用闪光灯,可进行更精确的测量(ADI)。 视镜头结构而定,焦距可能会随拍摄距离的改变而变化。假设镜头对焦在无限远处。 所含物品:镜头 (1)、镜头前盖 (1)、镜头后盖 (1)、镜头遮光罩 (1)、成套印刷文件 设计或规格如有变动,恕不另行通知。 是Sony Corporation的商标。