1
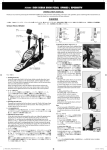
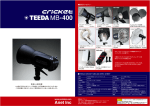
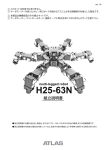
IRON COBRA DRUM PEDAL
INSTRUCTION MANUAL
Please read through this manual first before starting to use your Iron Cobra Drum Pedal.
Thank you for your purchase of the Iron Cobra Drum Pedal. To ensure safe and efficient use of this
product, please read through this manual before beginning assembly. Store the manual in a convenient
place for future reference.
IRON COBRA SINGLE PEDAL
HP900P / HP900RS / HP900F
Beater Balancer
ビーター•バランサー
4
Vari-Pitch Beater Holder
バリピッチ•ビーターホルダー
2
5
取扱説明書
Speedo-Ring
スピードリング
Angle Memory Cap
アングルメモリーキャップ
ご使用になる前に、必ず説明書をお読み下さい。
この度はアイアンコブラ・ドラムペダルをお買い上げ頂き、誠にありがとうございます。製品の機能を十分
に発揮し、安全にご使用頂くために、組み立て前に必ず本説明書をお読み下さい。また本書は大切に保管し
て下さい。
Beater Head
ビーターヘッド
Iron Cobra Beater
アイアンコブラ•ビーター
6 3
Quick Hook
クイックフック
Spring
スプリング
Drum Hammer
ドラムハンマー
7
8
Spring-Tight
スプリング•タイト
1
• This pedal should be used for musical-performance purposes only.
• Retighten screws, bolts, and nuts before starting each session.
• Exercise due caution to avoid injury.
Keep hands and feet away from blade tip (on the twin-pedal model), gears, chains, and plate hinges.
• Avoid physical contact with areas where metal is rusted or otherwise damaged.
• Do not operate pedal without appropriate footwear.
• To avoid clothing stains, keep clothes clear of chain, bearings, and other lubricated areas.
• Take care to avoid damage to flooring.
Note that the twin-pedal blade tip can cause damage to flooring. Note also that the non-slip rubber on the
pedal underplate can cause discoloration of flooring if left in the same position for a prolonged period of
time. It is recommended that you set this equipment up on thick carpeting or on an appropriate mat.
Para-Clamp 2
パラ•クランプ 2
9 Cobra Coil
コブラ・コイル
(HP900RS)
・演奏以外の目的に使用しないで下さい。
・ネジ類は演奏する前に、しっかりと締めて下さい。
・取り扱いには十分注意して下さい。
ツインペダルの剣先や、ギアー、チェーン部、プレートのヒンジ部などに触れる場合は、ケガをする
恐れがありますので、十分に注意して下さい。
・サビや金属の劣化により傷ついた部分に触れてケガをしないように注意して下さい。
・はだしで演奏しないで下さい。
・チェーンやベアリング部には潤滑油が使われています。衣服に付着する恐れがありますので、十分に
ご注意下さい。
・床面を傷つけないように、ご注意下さい。
ツインペダルの剣先等を使用する場合、
床面を傷つけます。
またペダルのアンダープレートの裏には、
すべり防止のためのゴムが貼り付けてあり、長期間同じ場所に設置すると、床面に色移りします。ご
使用の際はあらかじめ厚手のカーペットや専用マットを敷いた上で設置されることをお勧めします。
• Dieses Pedal sollte nur für musikalische Anwendungen benutzt werden.
• Ziehen Sie Schrauben und Muttern vor jedem Gebrauch nach.
• Gehen Sie mit größter Vorsicht vor, um Verletzungen zu vermeiden.
Halten Sie Ihre Hände und Füße von der Pedalspitze (beim Doppelpedal-Modell), von den Kettentrieben
und den Pedalscharnieren fern.
• Vermeiden Sie direkten Kontakt mit angerosteten oder sonstwie beschädigten Metallteilen.
• Betätigen Sie das Pedal nicht ohne entsprechendes Schuhwerk.
• Um Flecken auf der Kleidung zu vermeiden, halten Sie Kleidungsstücke von den Ketten, Zahnrädern
und Scharnieren und anderen gefetteten oder geölten Teilen fern.
• Achten Sie darauf, mit der Fußmaschine nicht den Fußboden zu beschädigen.
Beachten Sie, daß die Pedalspitze des Doppelpedals den Fußboden beschädigen kann. Beachten Sie
auch, daß die rutschsichere Gummiauflage der Pedalunterseite zu einer Verfärbung der Bodenauflage
(Teppich) führen kann, wenn das Pedal längere Zeit an der gleichen Position steht. Es wird empfohlen,
das Set einschließlich der Fußmaschine auf einem separaten, dicken Teppich oder einer geeigneten
Matte aufzustellen.
Speedo-Ring
スピードリング
• Este pedal debería utilizarse únicamente para la interpretación de música.
• Vuelva a apretar los tornillos, bulones y tuercas antes de iniciar cada sesión.
• Para evitar lesiones, tenga sumo cuidado.
Mantenga las manos y los pies lejos del extremo de la lámina (modelo de pedal doble), engranajes,
cadenas y las bisagras de placa.
• Evite el contacto físico con las zonas en las que el metal está oxidado o dañado de alguna otra forma.
• No haga funcionar el pedal sin el calzado apropiado.
• Para no mancharse la ropa, no la acerque demasiado de las cadenas, de los cojinetes o de otras zonas
engrasadas.
• Tenga cuidad de no deteriorar el piso.
Observe que el extremo de la lámina del pedal doble puede deteriorar el piso. Observe igualmente que
el caucho antideslizante de la placa inferior del pedal puede provocar una decoloración del suelo si se
deja en la misma posición durante un período prolongado. Le recomendamos que instale este equipo
sobre un suelo de moqueta espesa o un tapiz adecuado.
iron_cobra_drum_pedal.p65
1
1. スプリングフック(クイックフック)
まずクイックフックを、スピードリングのベアリン
グ部にセットします。
Bearing
ベアリング
Quick Hook
クイックフック
1
A
2. Hoop Clamp (Para-Clamp 2)
Adjust the para-clamp opening by turning nut
A. Adjust as necessary to match the thickness
of the bass drum's hoop. Then loosen the T-bolt
1 and set the pedal onto the drum hoop. Then
retighten the T-bolt.
2. フープクランプ(パラ・クランプ 2)
パラ・クランプのナットAで、クランプの開き具合
を調整できます。バスドラム・フープの厚みに合わ
せて、クランプの開き具合をあらかじめ調整して下
さい。次に T 型ボルト 1 を緩め、バスドラムフープ
にペダル本体をセットし、しっかりと締めて固定し
て下さい。
• Cette pédale est exclusivement destinée à être employée en combinaison avec une grosse caisse.
• Avant chaque séance d’entraînement ou chaque performance, veillez à resserrer les vis, boulons et
écrous de la pédale.
• Soyez prudent afin d’éviter toute blessure.
Veillez à ne pas vous blesser les mains ou les pieds sur le crampon (double pédale), les pignons, les
chaînes et les articulations.
• Veillez à ne pas érafler ou blesser vos mains ou vos pieds sur des pièces rouillées ou autrement
endommagées.
• Ne jouez jamais de la batterie sans porter des chaussures adéquates.
• Afin d’éviter de souiller vos vêtements, veillez à ne pas laisser ces derniers entrer en contact avec la
chaîne, les roulements, ou d’autres pièces lubrifiées.
• Veillez à protéger le sol.
Notez que le crampon de la double pédale pourrait endommager le sol. De même, le revêtement en
caoutchouc couvrant la plaque inférieure de la pédale pourrait entraîner une décoloration du sol si la
pédale est installée au même endroit pendant une longue période. Veuillez placer un morceau de moquette
épaisse ou un tapis prévu à cet effet sous la pédale de grosse caisse afin de protéger le sol.
• Questo pedale deve essere utilizzato solo per effettuare performance musicali.
• Riserrare le viti, i bulloni ed i dadi prima di ogni sessione musicale.
• Agire con estrema cautela per evitare lesioni.
Tenere le mani ed i piedi lontano dalla punta della lama (sul modello con doppio pedale), dagli ingranaggi,
dalle catene e dalle cerniere della piastra.
• Evitare il contatto fisico con le parti in cui il metallo è arrugginito o che sono danneggiate.
• Non azionare il pedale senza calzature appropriate.
• Per evitare di macchiare gli indumenti, tenerli lontano dalle catene, dai cuscinetti e dalle altre parti
lubrificate.
• Evitare di danneggiare il pavimento.
Notare che la punta della lama del doppio pedale può causare danni al pavimento. Notare anche che la
gomma antiscivolo situata sulla sottopiastra del pedale può causare uno scolorimento del pavimento, se
lasciata nella stessa posizione per un lungo periodo di tempo. Si raccomanda quindi di appoggiare
questo equipaggiamento su un tappeto spesso o su una base appropriata.
1. Spring Hook (Quick Hook)
Fit the quick hook onto the speedo-ring bearing.
2
Iron Cobra
Beater
アイアンコブラ・
ビーター
3
3. Beater (Iron Cobra Beater)
The beater is designed so that you can adjust the angle
of the beater head. To get a good, fat, tight sound,
you will want to adjust the angle so that the beater
head hits flat against the drumhead. To adjust the
angle: loosen square-headed bolt 2, turn the head as
necessary, and then retighten the bolt. To adjust the
length of the beater: loosen square-headed bolt 3,
move the head as necessary, and the retighten the blot.
3. ビーター(アイアンコブラ・ビーター)
アイアンコブラ・ビーターは、ビーターヘッドのアン
グルを調整することができます。バスドラムヘッドを
面でヒットするため、太くタイトなバスドラムサウン
ドを引き出します。ビーターがバスドラムヘッドに面
で当たるように、ビーターヘッドの角度を角頭ボルト
2 で調整して下さい。ビーターの長さは角頭ボルト
3 で調整し、しっかりと固定して下さい。
4. Beater Balancer (accessory)
The beater balancer lets you change the
resistance of the pedal. To make the change,
loosen square-headed bolt 4, slide the balancer
as necessary, and then retighten the bolt. For
an even lighter feel, you can simply remove the
balancer. If you prefer an especially heavy feel,
you can attach two or even more balancers.
4. ビーター・バランサー(付属)
付属のビーター・バランサーの位置を調整すること
で、ペダルの踏み込みのフィーリングを変えることが
できます。角頭ボルト 4 で位置を調整し、しっかりと
固定して下さい。重過ぎる場合、ビーター・バランサー
を外して使用されても、機能上問題はありません。ま
た軽過ぎる場合、ビーター・バランサーを複数併用す
ることも可能です。
5. Adjusting the Beater and Footboad Angle
(Speedo-Ring)
The angle of the beater can be adjusted along
with the angle of the footboard by loosening
the bolt 5 on top of the Speedo-Ring. You
may test the gradations of the Angle memory
cap, attached to the end of the shaft (The longer
line on Angle memory cap shows the factory
set-up position), by adjusting it a bit at a time.
As the angle of the beater is lowered, the
footboard rises. Once the desired angle is
reached, tighten the bolt firmly to secure it.
5. ビーター / プレートアングル調整 (スピードリング)
スピードリング上端のボルト 5 を緩めるとビー
ター角度とフットボード角度を連動して調整するこ
とが出来ます。シャフトの端にあるアングルメモ
リー・キャップの目盛りを目安に少しずつ調整して
下さい(長い目盛りが出荷時の位置です)。ビーター
角度を倒すにしたがってフットボードが上がりま
す。好みの角度が決まったらボルトをしっかり締め
て固定して下さい。
06.11.21, 10:46
continued on the back
裏面へ続く
Beater Balancer
ビーター•バランサー
4
IRON COBRA TWIN PEDAL
Beater Head
ビーターヘッド
Iron Cobra Beater
アイアンコブラ•ビーター
Vari-Pitch Beater Holder
バリピッチ•ビーターホルダー
HP900PTW / HP900RSW / HP900FTW / HP900PTWL
Operation and adjustment methods are the same as for the single-pedal models. Please read the
information for the single-pedal models before proceeding.
2
5
各部の基本的な操作、調整方法は、シングルペダルと同じです。はじめにシングルペダルの説明を必ずお読み下さい。
Speedo-Ring
スピードリング
Angle Memory Cap
アングルメモリーキャップ
Angle Memory Cap
アングルメモリーキャップ
Beater Balancer
ビーター•バランサー
Quick Hook
クイックフック
6 3
Spring
スプリング
7
8
Drum Hammer
ドラムハンマー
Spring-Tight
スプリング•タイト
Speedo-Ring
スピードリング
Beater Head
ビーターヘッド
Vari-Pitch Beater Holder
バリピッチ•ビーターホルダー
Iron Cobra Beater
アイアンコブラ•ビーター
9
0 97
7
9
0
1
Para-Clamp 2
パラ•クランプ 2
Drum Hammer
ドラムハンマー
Conecting Rod
コネクティングロッド
8
Para-Clamp 2
パラ•クランプ 2
Spring-Tight
スプリング•タイト
9 Cobra Coil
コブラ・コイル
(HP900RS)
6. Adjusting the Beater Angle (Vari-Pitch
Beater Holder)
The vari-pitch beater holder lets you adjust the
beater angle independently (without affecting
the pedal plate).
Adjust bolt 6 using the drum hammer.
Spring
スプリング
6. ビーターアングル調整
(バリピッチ・ビーターホルダー)
バリピッチ・ビーターホルダーで、ビーターのア
ングルを独立して調整することができます。ボル
ト 6 を、ドラムハンマーで調整して下さい。
Quick Hook
クイックフック
Cobra Coil
コブラ・コイル
(HP900RSW)
1. Fit the quick hook onto the speedo-ring
bearing.
1. クイックフックをスピードリングのベアリング
部にセットして下さい。
Spring
スプリング
Loosen
緩める
Locknut
ロックナット
Cap
キャップ
Adjusting nut
調整ナット
Fig. 1
Press down
押し下げる
Tighten
締める
Fig. 2
7. Adjusting the Spring Tension
Adjust the spring tension using the nut 8 on the
lower end. When adjusting the spring, first loosen
the locknut 7, and then turn the adjusting nut while
pressing down on the locknut as in Fig. 1 and 2.
Tightening the nut makes the pedal's resistance
heavier, but the beater's return time is
correspondingly faster.
In order to prevent the spring from loosening while
playing, the adjusting nut engages the cap attached
to the unit roughly every 1/3 of a turn. Once the
desired tension is reached, secure it by tightening
the locknut as in Fig. 3.
Fig. 3
7. スプリングテンションの調整
スプリングテンションは、下側にあるナット8で調整
できます。スプリングの調整をする時にはまずFig.1の
ようにロックナット 7 を緩めた後、Fig. 2 のように
ロックナットを下に押し下げながら下側のナットを回
して調整して下さい。ナットを締めるにつれて踏み心
地は重くなりますが、ビーターの戻りは早くなります。
調整ナット 8 は約 1/3 回転ごとに本体に取り付けられ
たキャップにかみ合い、演奏中のスプリングの緩みを
防止する構造になっています。好みのテンションが決
まったらロックナットを締めて固定します (Fig. 3)。
8. Tight-Lock
Remember to retighten all bolts and nuts (1
to 7) before beginning drum play. Also attach
the accessory tight-lock to beater-fastening bolt
3 so that the bolt is locked in place.
8. タイトロック
各アングルのセッティングがすべて終わったら、演
奏前に必ずもう一度1∼7のボルト&ナットをしっ
かりと締めて固定して下さい。またビーターを固定
する角頭ボルト 3 には、付属のタイトロックを取り
付けることで、ボルトをロックし緩みを防ぎます。
Photo 2-L
Photo 2-R
写真 2-L
写真 2-R
2. Connecting rod
Attach the connecting rod to the left and right
pedal cam shafts.To the right pedal (as seen by
the player), attach the cam shaft so that the
square-headed bolts at the end of the connecting
rod are positioned as shown in Photo 2-R, and
use the drum key to tighten the bolts.In the same
way, fasten the rod to the cam shaft for the left
pedal (as seen by the player), while using one
hand to hold the wheel with the chain wrapped
around it (Photo 2-L).When you have completed
the assembly, check your work by comparing it
to the photo of the finished product.
2. コネクティングロッド
コネクティングロッドを左右のペダルカムシャ
フトに取り付けます。奏者側向かって右のペダ
ルには、コネクティングロッド端の角頭ボルト
が写真 2-R のような位置関係でカムシャフトに
付くよう取り付け、ボルトをドラムキーで固定
してください。同様に奏者側向かって左のペダ
ルにも、片手でチェーンがホイールに巻きつく
ようホイールを固定しながら(写真 2-L)、カム
シャフトにロッドを固定してください。正常に
取り付けられた状態を、ツインペダルの完成品
写真で確認してください。
3. Using para-clamp 2, fasten the right-side pedal (or leftside pedal, if model HP900PTWL) to the bass drum.
3. パラ・クランプ 2 で右脚側(HP900PTWL の場合は
左脚側)のペダルをバスドラムに固定して下さい。
4. Adjust the angle of the Iron Conbra beater
head.
4. アイアンコブラ・ビーターのビーターヘッドの
アングルを調整します。
5. Adjust the position of the beater balancer
(accessory).
5. ビーター・バランサー(付属)の位置を調整します。
6. Adjust the plate angle using bolt 7 on the
speedo-ring.
7. Adjust the beater angle using bolt 8 on the
vari-pitch beater holder.
9. Cobra Coil
The Cobra Coil is a spring that assists the return
of the foot board, allowing smoother and
lighter pedal action.
The strength of the spring can be adjusted by
shifting its location. Loosen the square-headed
bolt located on the back of the under plate,
and move the spring toward H (Harder Action)
to increase the strength of the spring, or toward
S (Softer Action) to lighten the strength of the
spring. It is also possible to remove the Cobra
Coil. You can adjust the system as desired to
suit your preferred footboard action.
A separately sold Cobra Coil (CC900S) can also
be installed on the Power Glide or Flexi Glide,
allowing you to enjoy smoother action. (It can
be installed only on models that have a Cobra
Coil compatible hole in the center of the under
plate.)
9. コブラコイル
Cobra Coil はフットボードの返りをアシストし、よ
りスムーズで軽快なペダルアクションを可能にする
スプリングです。
スプリングの効き具合は、位置をずらすことで調整
が可能です。アンダープレート裏側にある角頭ボル
H (Harder Action)
トを緩め、H
Action)の方向に動かすとス
S (Softer Action)
プリングの効果が強まり、S
Action)の方
向に動かすと効果が弱まります。また Cobra Coil は
取り外すことも可能です。お好みのフットボードア
クションに合わせ、適宜調整してください。
Power Glide と Flexi Glide にも、単品販売の Cobra
Coil(CC900S)を取り付けることで、よりスムーズ
なアクションをお楽しみいただけます(アンダープ
レート中央に Cobra Coil 対応の穴が付いている機種
のみ、取り付け可能です)。
7. ビーターアングル調整をバリピッチ・ビーター
ホルダーのボルト 8 で調整できます。
8. Adjust the spring tension using the spring-tight.
8. スプリング・タイトでスプリング・テンション
を調整して下さい。
9. Attach the tight-lock.
9. タイトロックを取り付けます。
10. Pedal Anchor
When setup is completed, manually adjust the
pedal anchor bolts on the left-side pedal (or rightside pedal, if model HP900PTWL) as necessary.
Pedal Anchor Bolts
アンカーボルト
CC900S
6. プレートアングルをスピードリングのボルト 7
で調整できます。
10. ペダルアンカー
セッティングが決まったら、必要に応じて左脚
側(HP900PTWL の場合は右脚側)のペダルの
アンカーボルトを手で調整して下さい。
11. Retighten all bolts and nuts (1 to 0
above) before beginning drum play.
11. 各アングルのセッティングがすべて終わった
ら、演奏前に必ずもう一度 1 ∼ 0 のボルト
&ナットをしっかりと締めて固定して下さい。
Maintenance
メインテナンス
• To maintain the pedal in top working condition:
Wipe clean as necessary with a dry cloth, and
periodically lubricate the chain (using TAMA
tune-up oil TOL2). Note that bearings are packed
with special grease and do not require lubrication.
• The small fixing bolts mentioned as below may
become loose during transport or playing. Please
retighten as necessary using the attached hex wrench.
• より長く滑らかなアクションをお楽しみ頂くために、
時々乾いた布でほこりを拭い、チェーンには、オイルを
(TAMA チューンナップ・オイル:TOL2)をさして下さ
い。ベアリング部にはあらかじめ専用のグリスが注入
されていますので、オイルをさす必要はありません。
* Cam sprocket wheel fixing bolt (3mm hex wrench)
* Inner collar fixing bolts (Inside beater holder
/3mm hex wrench)
* Bearing fixing bolts (On the top of frame /
2mm hex wrench)
* Footboard hinge shaft fixing bolts (On the
back side of under plate /2.5mm hex wrench)
This instruction manual was issued in January
2007. Specifications and design are subject to
change without notice.
• 下記の小さな固定ボルトは、
演奏中や運搬中の振
動で緩むことがあります。付属の六角レンチで
時々増し締めしてください。
* カムギアー固定ボルト (3mm 六角レンチ)
* ビーターホルダーカラー固定ボルト (3mm 六角レンチ)
* ベアリング固定ボルト (フレーム上部 2mm 六角レンチ)
* フットボードヒンジ部 シャフト固定ボルト
(アンダープレート裏側 2.5mm 六角レンチ)
この取扱説明書は 2007 年 1 月現在のものです。商
品改良のため予告なく仕様を変更することがありま
すので、あらかじめご了承下さい。
〒 489-0071 愛知県瀬戸市暁町 3-31
iron_cobra_drum_pedal.p65
2
06.11.21, 10:47