1
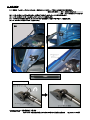
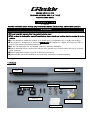
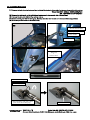
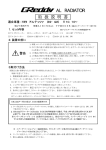
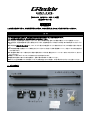
エンジンフード リフター
Engine Hood Lifter
【SUBARU IMPREZA GDB-F,G 型】
純正ボンネット用
取扱説明書
2-140422
この製品を装着する前に、本取扱説明書をよく読み、内容を理解した上で正しく取付けを行なってください。
重 要
●この製品を装着する前には、取扱説明書をよく読み内容を理解した上で正しくお使い下さい。
●この製品の使用期間中は、取扱説明書を大切に保管して下さい。
●この製品は、適合車種別に設定されております。取付け車輌の車種(型式)と本製品が適合しているかを確認して下さい。
●この製品は、適合車種専用に設計・開発されております。適合車種以外への取付けや改造・加工等は絶対に行わないで下
さい。
●この製品は純正ボンネット専用です。FRP、カーボン製などの軽量ボンネットに使用するとボンネットが破損する恐れがありま
す。
●この取扱説明書に記載されている事項を守らなかった事により発生した事故・損害等について、当社は一切その責任を負う
ことが出来ません。
●一般通常の条件において使用された場合の経年変化による外傷、機能上のクレームには一切応じかねますので、あらかじ
めご了承下さい。
●車種により純正のボンネットロッドが使用できなくなる場合があります。
●装着後は定期的に取り付け状況を確認し、各部に緩み等が無いか点検してください。
●ボンネットを長時間開けている場合はリフターの支持状態をこまめに確認し、不意に閉まることがないよう注意してください。
1.パーツリスト
2.取付け手順
(1) 車両側 フェンダー・ボンネットボルトの一部を取外しKITのステー、ブラケットを取付けます(写真参照)。
規定トルク(目安)
M6 8.83Nm(0.9kgf-m)
M8 12.7~23.5Nm(1.3~2.4kgf-m)
(2) リフター本体のロッククリップを取外し、付属のグリスをボールジョイント(メス側)に塗布します。
(3) リフター本体のシリンダーを上側にしてボールジョイントを接続します。
(4) ロッククリップを確実に取付け、ゆっくりとボンネットを開閉させ、各部の干渉が無いことを確認します。
(5) カーボンボディに転写ステッカーを貼付けます。
RH
ロッククリップの取付け
株式会社 トラスト
〒289-1605 千葉県山武郡芝山町大台3155番地5 芝山第2工業団地
TEL.0479-77-3000㈹
ENGINE HOOD LIFTER
【SUBARU IMPREZA GDB-F,G TYPE】
FOR FACTORY HOOD
INSTRUCTION MANUAL
2-140422
Read this instruction manual carefully and proceed with installation only if you fully understand the procedure
WARNING
●Please keep this manual while the product is being used.
●This product is designed for a specific application, please check and confirm that the product is for the
vehicle.
●Do not attempt to install this product on a vehicle that is not designed for or modify the product.
●This product is designed to be used on factory hood. If installed on a lighter hood such as FRP or
carbon, This product may damage the hood.
●We are not responsible for any damage caused by improper installation.
●Please understand that normal wear and tear from general use of the product will not be covered
under warranty.
●Certain application requires removal of the factory hood rod.
●Please double check the installation and make sure everything is installed properly.
1. Part List
Locking clip×4
Lifter
Plain washer
Hood bracket
Ball joint
Zigzagged washer
Grease for ball joint
Sticker
2.Installation Procedure
(1) Remove the bolts from the fender and food and install the brackets with provided hardware as shown in the picture below.
Torque Spec M6 bolt&nut 8.83N-m(0.9kgf-m)
M8 12.7~23.5N-m(1.3~2.4kgf-m)
(2) Remove the locking clip on the ball joint and apply grease in the opposite side of the ball joint.
(3) Connect the ball joint with the lifter cylinder side up.
(4) Secure the ball joint with the locking clip. Carefully close the hood to make sure it closes without any problems.
(5) Place the provided sticker to the carbon body.
RH
Fender bracket RH
Zigzagged washer
Plain washer
Factory bolt
Ball joint
+
Plain washer
Installation of locking clip
Locking clip
After attaching rod end to ball
joint insert the locking clip
Locked
TRUST CO., LTD
Postal Code 289-1605 TEL.0479-77-3000
Overseas Sales Department, 3155-5 Odai, Shibayama‐machi, Sanbu‐gun, Chiba-ken, Japan