1
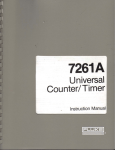
3-810-971-02(1) 下記の注意を守らないと、 火災や感電により死亡や大けがにつながることがあります。 安全のために ポータブルチューナーマウントアダプター 電気製品は、安全のための注意事項を守らないと、火災や感電な 内部に水や異物を入れない Portable Tuner Mount Adapter どにより死亡や大けがなど人身事故につながることがあり、危険 BTA-801 です。事故を防ぐために次のことを必ずお守りください。 水や異物が入ると火災の原因となることがあります。 万一、水や異物が入ったときは、すぐに電源を切り、バッテリーまたは DC 電源ケーブルや 接続ケーブルを抜いて、お買い上げ店またはソニーのサービス窓口にご相談ください。 取扱説明書 お買い上げいただきありがとうございます。 電気製品は安全のための注意事項を守らないと、 火災や人身事故になることがあります。 この取扱説明書には、事故を防ぐための重要な注意事項と製品の 取り扱いかたを示しています。この取扱説明書をよくお読みのう 安全のための注意事項を守る Operating Instructions Before operating the unit, please read this manual thoroughly and retain it for future reference. 1995 by Sony Corporation Warning 指定の電圧および極性で使用する 右ページの注意事項をよくお読みください。 定期的に点検する ニーのサービス窓口にご相談ください。 DC 電源ケーブルを傷つけない 故障したら使用を中止する DC 電源ケーブルを傷つけると、火災や感電の原因となります。 ・ DC 電源ケーブルを加工したり、傷つけたりしない。 ・ 重いものをのせたり、引っ張ったりしない。 ・ 熱器具に近づけたり、加熱したりしない。 ・DC 電源ケーブルを抜くときは、必ずコネクターを持って抜く。 万一、DC 電源ケーブルが傷んだら、ソニーのサービス窓口に交換をご依頼ください。 お買い上げ店またはソニーのサービス窓口にご連絡ください。 万一、異常が起きたら ・異常な音、に おい、煙が出 たら ・落としたら b 1 電源を切る。 のポータブルチューナーマウントアダプターです。 WRR-855を本機に完全に装着することにより、JIS防滴II型*に対 *JIS防滴II型: The BTA-801 Portable Tuner Mount Adapter is designed to attach the WRR-855A UHF Synthesized Tuner Unit to a Betacam-series Camcorder (equipped with a DC 12V OUT connector). Weatherproof structure By properly mounting the WRR-855A UHF Synthesized Tuner Unit to the BTA-801, a weatherproof structure is obtained. 鉛直方向から15度の範囲で落ちてくる水滴によって有害な影 響のないもの。 Compact and lightweight Using the WRR-855A in combination with the BTA-801 provides a highly reliable portable diversity tuner. 小型・軽量 WRR-855と組み合わせることによって、小型・軽量のUHFシン セサイザーチューナーを構成できます。 2 DC電源ケーブル、およびすべて の接続ケーブルを抜く。 下記の注意を守らないと、 3 お買い上げ店またはソニーのサー けがをしたり周辺の物品に損害を与えることがあります。 ビス窓口に修理を依頼する。 b DC電源ケーブルを抜き、消火する。 You are cautioned that any changes or modifications not expressly approved in this manual could void your authority to operate this equipment. は、次のような表示をしていま す。表示の内容をよく理解して Für Kunden in Deutschland Dieses Produkt kann im kommerziellen und in begrenztem Maße auch im industriellen Bereich eingesetzt werden. Dies ist eine Einrichtung, welche die Funk-Entstörung nach Klasse B besitzt. WRR-855をベータカム (DC 12V OUT端子付き) に装着するため 5年に1度くらいは内部の点検について、お買い上げ店またはソ 炎が出たら Pour les utilisateurs au Canada Cet appareil numérique de la classe B respecte toutes les exigences du Règlement sur le matériel brouilleur du Canada. BTA-801は、別売りのUHFシンセサイザーチューナーユニット 応する防滴構造となります。 規定外の電圧および極性で使用すると、火災の原因となることがあります。 この取扱説明書に記されている電圧および極性で使用してください。 For the customers in the U.S.A. This device complies with Part 15 of the FCC Rules. Operation is subject to the following two conditions: (1) This device may not cause harmful interference, and (2) this device must accept any interference received, including interference that may cause undesired operation. For the customers in Canada This Class B digital apparatus meets all requirements of the Canadian Interference-Causing Equipment Regulations. Overview 防滴構造 え、製品を安全にお使いください。お読みになったあとは、いつ でも見られるところに必ず保管してください。 概要 警告表示の意味 外装を外さない、改造しない 外装を外したり、改造したりすると、感電やけがの原因となることがあります。内部の点検 や修理は、お買い上げ店またはソニーのサービス窓口にご依頼ください。 注意を促す記号 仕様 この取扱説明書および製品で から本文をお読みください。 入力電圧 DC 10∼17 V (定格12 V) 保証書とアフターサービス 行為を禁止する記号 出力電圧 DC 7 V 負荷電流 保証書について この表示の注意事項を守らない と、火災や感電などにより死亡 や大けがなど人身事故につなが 行為を指示する記号 ● ることがあります。 ● この表示の注意事項を守らない と、感電やその他の事故により けがをしたり周辺の物品に損害 を与えたりすることがあります。 アフターサービスについて この製品には保証書が添付されていますので、お買い上げの際 調子が悪いときはまずチェックを お受け取りください。 この説明書をもう一度ご覧になってお調べください。 200 mA以下 (DC 7 V時) 許容動作温度 0 ℃∼+50℃ 許容保存温度 −20℃∼+60℃ 出力コネクター キャノンXLR-3-11C相当 (1) 外形寸法 所定事項の記入および記載内容をお確かめのうえ、大切に保存 してください。 Specifications 88×142.5×31.5 mm (幅/高さ/奥行き) (最大突起部含む) それでも具合の悪いときはサービスへ お買い上げ店にご相談ください。 質量 約180 g 付属品 DC電源ケーブル (1) ベータカム用取り付けキット (1組) 保証期間中の修理は 保証書の記載内容に基づいて修理させていただきます。詳しくは 保証書をご覧ください。 Input voltage Output voltage Load current Operating temperature Storage temperature Output connector Dimensions 取り付けホルダー (1) 取り付け金具 (1) 取り付けネジ (バインド小ネジM4×6) (2) Mass Supplied accessories DC 10 to 17 V (12 V nominal) DC 7 V 200 mA DC or less (at DC 7 V) 0°C to +50°C (32°F to 122°F) –20°C to +60°C (–4°F to +140°F) XLR-3-11C-type connector (1) 88×142.5×31.5 mm (w/h/d) (31/2×55/8 ×11/4 inches) including projecting parts Approx. 180 g (6.3 oz) DC power cable (1) Betacam attachment kit (1 set): Bracket (1) Holder (1) Binding head screws (M4×6) (2) Binding head screws (M3×6) (2) Operating instructions (1) Warranty booklet (1) 取り付けネジ (バインド小ネジM3×6) (2) 保証期間経過後の修理は 修理によって機能が維持できる場合は、ご要望により有料修理さ 取扱説明書 (1) 保証冊子 (1) せていただきます。 本機の仕様および外観は、改良のため予告なく変更することがあ りますが、ご了承ください。 Design and specifications are subject to change without notice. WRR-855の装着 / Mounting the WRR-855A 各部の名称と働き / Parts Identification WRR-855をBTA-801に完全に装着してアンテナ2本を取り付ける DC 12V IN 端子のピン配列 Pin assignment of the DC 12V IN connector 4 1 3 2 Attaching and Connecting to a Betacam 付属のベータカム取り付け用キットを使用します。 ことにより、防滴構造(JIS防滴II型)になります。 1: GND 2: NC 3: NC 4: +12 V ベータカムへの取り付けと接続 Use the supplied Betacam attachment kit. WRR-855/855A 3 出力ケーブル(別売り)を接続する。 Connect the output cable (optional). 1 キットの取り付け用ホルダーと取り付け金具を取り付ける。 装着の前に WRR-855とBTA-801との接合面にごみや異物がないことを確認し Attach the holder and bracket to the Betacam. てから装着してください。 OUTPUT 端子の 装着手順 ピン配列 2 Pin assignment of the OUTPUT connector 3 1 1: GND 2: HOT 3: COLD ED HESIZ 855 WRRUHF SYNT R UNIT TUNE 1 WRR-855の向きを確認してBTA-801に挿入する。 取り付けホルダー Holder 2 WRR-855底面のアクセサリー端子が完全に接合し、カチッと バインド小ネジ(M3×6)(2本) OUTPUT Binding head screws (M3×6)(2) 音がするまで差し込む。 バインド小ネジ(M4×6)(2本) れを固く締める。 2 3 1 DC 12V IN (power input) connector 付属のDC電源ケーブルでベータカムなどの外部電源(DC 10∼17 Connect to an external power supply (DC 10 to 17 V) of a Betacam using the supplied DC power cable. Note 電源電圧と極性には充分ご注意ください。 Be sure to check the operating voltage and polarity when connecting to a power source. 2 Betacam attachment knob 2 ベータカム取り付けつまみ ベータカムに装着するとき使用します。 ◆「ベータカムへの取り付けと接続 」(右ページ) 参照。 3 OUTPUT (出力) 端子 (XLR 3ピン、オス) WRR-855のオーディオ信号を出力します。ベータカムやミキ サー、テープレコーダーなどのマイクロホン入力端子に接続しま す。 ご注意 マイクロホン用ファンタム電源の供給機能を持ったミキサーへ接 BTA-801 AUDIO IN 取り付け金具 Bracket 1 DC 12V IN (電源入力) 端子 V)を接続します。 Binding head screws (M4×6)(2) 3 対角のネジを交互に少しずつ締めて仮止めし、最後にそれぞ 1 Used to fix the unit to a Betacam. For attaching the unit to a Betacam, see the page to the right. 3 OUTPUT connector (XLR 3-pin, male) Supplies audio signals of the WRR-855A. You can connect this to the microphone input connector of a Betacam, mixer, tape recorder or other similar equipment. By properly mounting the WRR-855A to the BTA-801 and attaching the two supplied antennas, a weatherproof structure is obtained. 切欠きを上にして 取り付ける。 Attach with the slit facing upward. Before mounting Be sure to clean the abutting surfaces of the WRR-855A and the BTA-801 before mounting. Mounting procedure 1 Observing the direction, insert the WRR-855A in the BTA-801. 2 Push the WRR-855A until the accessory connector 4 付属のDC電源ケーブルで、DC 12 V IN端子とベータカムの DC OUT端子を接続する。 Connect the DC 12 V IN connector to the DC OUT connector of a Betacam-series Camcorder using the supplied DC power cable. 2 BTA-801後面の取り付け板を、ホルダーと金具に合わせてはめ 込む。 Align the attachment plate of the back of the BTA-801 with the holder and bracket. コネクター内側のガイドを 合わせて差し込む。 Match the connector pins with the inside of the connector and insert. clicks into place. 3 Run in the four mounting screws little by little in turn to DC電源ケーブル(付属) gradually secure the units together, then tighten them. DC power cable (supplied) 外すときは コネクターの金属部を矢印方向に引き、そのまま引き抜く。 Note When connecting to an audio mixer which has a Phantom powering capability for microphones, it is recommended to use the mixer with the Phantom power OFF. To remove Pull the metal part of the connector in the direction of the arrow and remove. 続する場合、なるべくファンタム電源はOFFにして使用してくだ さい。 つまみを押しながら時計方向に 90°回して固定する。 Press the knob and turn it 90° in a clockwise manner to secure.