1
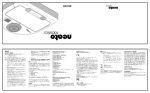
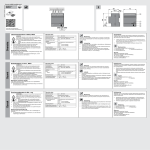
フランス語
441
20150901 発行1版
手動式鉛筆削り
取扱説明書
小 ( 商品番号 : 37318946)
大 ( 商品番号 : 37318939) 対象年齢 4 歳以上
この度は鉛筆削りをお買い上げいただきましたことまこ
とにありがとうございます。 この取扱説明書をよくお読
みの上、 正しくご使用ください。
取扱説明書は大切に保管してください。
警告
「死亡または重傷を負うことが想定
される」 内容です。
芯詰りを取り除く際、 素手で直接カッターに触れな
いでください。
注意
「傷害を負うまたは物的損害が発生
することが想定される」 内容です。
はじめてご使用の際は、 ギア部分、 ハンドルに異音 ( カチ
カチ音 ) ・ 破損が無いことをご確認ください。
りして軽くならない (空回りしない) 場合があります。 削りす
ぎないようご注意ください。
つまみ 3
天面
鉛筆差し込み穴
2
3
改造 ・ 分解 ・ 修理はしないでください。
チャックが止まらないまま使用しないでください。
不安定な場所で使用しないでください。
4
ハンドル
チャック
くずケース
本体
5. チャックつまみを押しながら鉛筆を抜いてください。
【芯詰まりの解決方法】
(大人の方が行ってください)
1. ハンドルのはずし方
鉛筆が途中で削れなくなった時は、 カッターに芯が詰まって
いる場合があります。
(1) 図の矢印の方向にギヤ部を回すと回転軸部がはずれ
ます。
(2) ギヤを引き出すとカッター部を取り出すことができます。
ギヤ
ハンドル拡大図
1
・ けがをする原因となります。
くずケースをはずして中に手を入れないでください。
鉛筆の差し込み穴に指を入れないでください。
3
2
カッター
ハンドル
2. 芯の取り出し方
L字型に曲げた針金などを使用して芯を取り出してください。
① 針金などで芯を押し出す。
カッター拡大図
・ カッターの破損や故障の原因となります。
木製の鉛筆以外は差し込まないでください。
(ボールペンやドライバーなど)
削りくずがくずケースの 3 分の 2 の高さになりましたら
捨ててください。
・ お子様のご使用に際して。
この製品を正しく使用していただく為に、 お子様には特に
[ 注意 ] ・ [ ご使用方法 ] の内容をご指導いただきます
ようお願いいたします。
4歳未満のお子様には使用させないでください。
誤ったご利用でハンドルが回らない、 きちんと削れな
い、 チャックのつまみが折れたなど本体に破損があ
る場合はすみやかにご使用をお止めください。
●本品は鉛筆を削る機器であり、用途以外のご利用
はできません。
【ご使用方法】
1. 鉛筆を用意する。
・ 通常の鉛筆 (H、F、HB)
・ 柔らかい鉛筆 (B ~ 6B、色鉛筆 )
2. 本体の天面を押さえ、チャックがストップするまで引き出して
ください。
3. チャックつまみを矢印の方向に押しながら、 鉛筆を差し込
んでください。
4. 本体の天面を押さえ、ハンドルを矢印の方向に回してくださ
い。 削り終わると空回りします。 柔らかい芯の鉛筆を削る
場合チャックを 1 ㎝程引き出し削りはじめてください。完全
に削れていない場合はもう 1 度 1 ㎝程チャックを引き出し 削ってください。 ( 状態を確認しながら行ってください。) 芯
先の柔らかい鉛筆の場合は、 芯先が折れたり、 くずれた
② 押し出された芯が出てくる。
【お手入れ方法】
・ くずケースは手前に引き出し、 くずをこまめに捨ててください。
・ 材質の特性上、 削りくずによって本体 ・ くずケースに汚れが
付着し目立つ場合があります。
・ 無理に逆さにしたり、 振ったりしますとくずによる汚れが付着
します。
・ 柔らかい布に 50%程度に希釈した中性洗剤を染み込ませ、 軽く本体を拭いてください。
・ 酸性の洗剤は使用しないでください。 腐食の原因になります。
・ 持ち運びの際は、 くずケースが落ちないよう手でおさえて移 動してください。
部品名
鉛筆削り器本体
送り装置
くずケース
つまみ
本体側面
ギヤ
ハンドル
材質
ABS+AS
ABS+AS
GPPS
ABS
ABS
POM
ABS
部品名
材質
鉄(表面:
送り装置金属板
ニッケルメッキ )
ハンドルつまみ
ABS
鉄(表面:
チャック金属板
ニッケルメッキ )
鉄(炭素鋼)
カッター刃
カッター刃ホルダー 亜鉛合金
本製品及び破損した場合、 破損部品の廃棄は各自治体の
分別に従い廃棄してください。
【お問い合わせ先】
株式会社 良品計画 http://www.muji.com/
お客様室電話 0120-14-6404
MADE IN CHINA
Vol. 20150901 Issue No.1
Manual Pencil Sharpener
Small (Product No.: 37318946)
Large (Product No.: 37318939)
User’s Manual
For Ages 4+
Thank you for purchasing this product. Please read
this User Manual for correct use. Keep this User
Manual in a safe place for future reference.
Warning
Matters that may cause
death or injury.
When removing a stuck pencil lead, never touch the
blades directly with bare hands.
Matters that may cause physical
Caution injury or property damage.
When first using, check for damage or abnormal sounds from
the gear and handle (rattling, grinding sound)
• Unusual sounds may be a cause for injury.
Never remove the pencil shaving tray and put your
finger inside the sharpener.
Never put your finger inside the pencil insertion hole.
Do not attempt to modify, disassemble, or repair.
Never use while the front cover is not fixed in place.
Never use on an unstable surface.
• Doing so may lead to damage to the blades or other malfunction.
Do not insert anything other than wooden pencils
(ball point pens, screw drivers, etc.)
Dispose of pencil shavings when the pencil shaving
tray becomes 2/3 full.
• When used by children.
To use this product correctly, instruct children in proper
usage, particularly regarding matters under
Caution
and How to Use.
Not for use by children aged three years or younger.
Improper usage may result in the handle ceasing to
turn, improper sharpening, broken front cover grips
or other damage. Promptly stop using this product in
the event of this type of damage.
●This product is a pencil sharpener. Do not use for any
other purposes.
[How to Use]
1. Pencil selection.
• Regular pencil (H, F, or HB)
• Soft lead pencils (B to 6B, coloured pencils)
2. Press down on the top of the main sharpener and pull the
front cover out until it stops.
3. Push the front cover grips in the direction of the arrow,
and insert the pencil.
4. Press down on the top of the main sharpener, and turn the
handle in the direction of the arrow. When sharpening is
completed, the blades will stop making contact with the
pencil. When sharpening a pencil with a soft lead, pull the
front cover out about 1cm to begin sharpening. If
sharpening is insufficient, pull the front cover out about
1cm more and sharpen again. (Check progress while
sharpening.) Soft pencil leads may break at the tip or
crumble, preventing complete sharpening (no loss of
blade contact). Do not over-sharpen.
Grips
Taille-crayon mécanique
3
Pencil Insertion Hole
Top
2
3
3
Petit (Numéro de produit : 37318946)
Grand (Numéro de produit : 37318939)
4
Handle
Front Cover
Pencil Shaving Tray
Main Body
5. Pull out the pencil while pressing the front cover grips.
[Removing pencil shaving clogs]
(To be performed by an adult)
1. Remove the handle
When the pencil sharpener stops without fully sharpening the
pencil, there may be a pencil lead stuck inside the blades.
(1) Turn the gear in the direction of the arrow on the figure to
remove the axle.
(2) Pull the gear to expose and remove the blades.
Gear
Handle (expanded view)
1
2
Blades
Handle
2. Remove the lead
Bend a wire or similar into an L shape to push out the lead.
Blade Cross Section
① Use a wire to push out the lead.
② Lead is pushed out.
[Care and Maintenance]
• Pull the pencil shaving tray forward to remove shavings.
• The sharpener or pencil shaving tray may become visibly dirty
depending on the type of pencil and shavings sharpened.
• Turning the sharpener upside down and shaking it may
result in the case becoming dirty.
• Dampen and soft cloth with 50% diluted neutral detergent,
and wipe lightly to clean.
• Do not use an acidic detergent. Using an acidic detergent
may result in corrosion.
• When moving the sharpener, hold the pencil shaving case
so it doesn’t fall.
Part Names
Pencil sharpener main body
Feeding device
Pencil shaving tray
Grip
Main body sides
Gear
Handle
Material
ABS+AS
ABS+AS
GPPS
ABS
ABS
POM
ABS
Part Names
Feeding device
metal plate
Handle grip
Front cover
metal plate
Blades
Blade holder
Première édition 01/09/2015
Material
Iron (surface:
nickel plating)
ABS
Iron (surface:
nickel plating)
Iron (carbon steel)
Zinc alloy
When disposing of this product or broken parts, do so in
compliance with your local disposal regulations.
MADE IN CHINA
Manuel d'utilisation
Age cible : plus de 4 ans.
Merci d'avoir acheté ce taille-crayon mécanique. Avant toute
utilisation et pour utiliser ce produit correctement, merci de
lire ce manuel d’utilisation. Conserver ce manuel d’utilisation.
AVERTISSEMENT !
Contenu ayant un « risque de mort ou de blessure grave ».
Lorsque vous retirer des débris de crayon, ne pas
toucher la lame à main nue.
ATTENTION !
Contenu ayant un
« risque de blessure ou de dommage matériel ».
Lors de la première utilisation vérifier qu’il n’y a pas de son
anormal ou de cassure dans les rouages ou la manivelle.
• Risque de blessure
Ne pas retirer le compartiment à débris et mettre les
doigts à l'intérieur de l'appareil.
Ne pas mettre les doigts dans le porte crayon.
Ne pas démonter, modifier ou réparer l'appareil.
Ne pas utiliser si le bouton-poussoir ne s’arrête pas.
Ne pas utiliser sur une surface instable.
• Risque d’endommagement ou de cassure de la lame.
Ne pas insérer autre chose que des crayons en bois
(stylo à bille, tournevis, etc).
Quand le compartiment à débris est à deux tiers plein,
jeter les débris de crayon.
• A propos de l’utilisation de l’appareil par des enfants.
Pour utiliser correctement ce taille-crayon, bien lire et
expliquer ce manuel d'utilisation aux enfants, en particulier
les points [ ATTENTION !].
Ne pas laisser à porter d’un enfant de moins de 4 ans.
Lorsque l’appareil est endommagé, par exemple la manivelle
ne tourne plus, le crayon ne se taille plus, le bouton-poussoir
est cassé, arrêter immédiatement l’utilisation.
●C’est appareil a été conçu exclusivement pour tailler des
mines de crayon, il ne doit pas être utilisé autrement.
[Utilisation]
1. Préparer un crayon.
• Crayon normal (H, F, HB)
• Crayon à mine tendre (B ~ 6B, crayon de couleur)
2. Tenir l'appareil sur une surface plane et tirer en arrière la
face avant du taille-crayon.
3. Insérer le crayon tout en appuyant sur le bouton-poussoir
dans le sens indiqué par les flèches.
4. Tenir le taille-crayon par le haut puis tourner la manivelle
dans le sens des aiguilles d'une montre. Quand le crayon
est taillé, l’appareil tournera à vide. Pour tailler un crayon à
mine tendre, tirer en arrière la face avant du taille-crayon
d'environ 1 cm. Quand cela ne taille plus, tirer sur environ
1 cm et tailler à nouveau. (Vérifier l’état du crayon pendant
le taillage) Pour un crayon à mine tendre, la pointe peut se
briser ou s'effriter et ne pas être correctement taillée.
Veillez à ne pas trop tailler le crayon.
Bouton-poussoir 3
Porte crayon
Haut
2
3
4
3
Manivelle
Face-avant
Compartiment à débris
Appareil
5. Retirer le crayon en appuyant sur le bouton poussoir.
[Pour retirer un débris de crayon coincé]
(À effectuer par un adulte)
1. Pour retirer la manivelle
Si le crayon ne se taille plus, la lame est peut être coincée par
un débris de crayons.
(1) En tournant la base de la manivelle dans le sens indiquée
par la flèche, le support de lame se détache.
(2) Retirer la manivelle complètement pour accéder à la lame.
Rouage
Détail de la manivelle
1
2
Lame
Manivelle
2. Comment retirer les débris de crayon
Utiliser une épingle tordue en forme de « L ».
① Sortir la mine coincée avec
Détail de la lame
une épingle.
② La mine sort.
[Entretien]
• Sortir le compartiments à débris en tirant dessus, et le
vider régulièrement.
• En raison des caractéristiques des matériaux, les débris de
crayon peuvent adhérer sur l'appareil.
• Ne pas renverser ou secouer l'appareil, cela peut provoquer
des salissures (débris salissants).
• Laver l’appareil avec un tissu doux imbibé d’un liquide
vaisselle neutre dilué à environ 50%.
• Ne pas utiliser de liquide vaisselle acide. Risque de corrosion.
• Lors du transport de l’appareil tenir le compartiment à
débris afin qu’il ne tombe pas.
Noms des parties
Corps principal du produit
Porte crayon
Compartiment à débris
Bouton-poussoir
Côtés du produit
Rouage
Manivelle
Matériaux
ABS+AS
ABS+AS
GPPS
ABS
ABS
POM
ABS
Noms des parties
Plaque du
porte-crayon
Poigné
Plaque de la
face avant
Lame
Support de la lame
Matériaux
Fer
(revêtement nickel)
ABS
Fer
(revêtement nickel)
Fer (alliage carbone)
Alliage de zinc
Jeter cet appareil ou des parties de cet appareil en suivant
les consignes de votre municipalité.
MUJI Europe Holdings Ltd
8-12 Leeke Street London WC1X 9HT
www.muji.eu
Fabriqué en Chine
200
英語
20150901 发行第 1 版
手动卷笔刀
小(商品编号:37318946)
大(商品编号:37318939)
使用说明书
适用于 4 岁以上年龄层
感谢您购买手动卷笔刀。
使用时要认真阅读此使用说明书。
请谨慎保管此说明书。
警告
笔芯被夹的解决方法
为了正确使用此商品,一定要阅读此注意 (由成年人来取)
事项。特别是儿童使用时,家长要遵照
1.摇柄的拆卸方法
・本品为削铅笔工具,请不要用于
其他用途。
使用方法
注意
・可能会造成刀片破损及故障发生
的原因。
不要插入木制铅笔以外的物品
(如圆珠笔、螺丝刀等)。
铅笔屑到达笔屑盒的 3 分之 2 后及时
处理掉。
按钮 3
插入铅笔的孔洞 2
3
摇柄放大图
2
刀片
2. 笔芯取出方法
用 L 型钢丝取出笔芯。
刀片放大图
①使用钢丝顶出笔芯。
・拉出笔屑盒,时常清理笔屑。
・由于材质的原因,铅笔屑污垢会粘在主体
和铅笔屑盒上。
・强行颠倒、摇晃会使铅笔屑污垢付着在主
体或铅笔屑盒上。
・使用柔软布料沾上大约稀释50%左右的
中性洗剂,轻轻擦拭主体。
・不要使用酸性洗剂。会导致腐蚀。
・为避免笔屑盒掉落,
请在移动时按住笔屑盒。
3
材质
ABS+AS
ABS+AS
GPPS
ABS
ABS
POM
ABS
铁 ( 表面:镍镀金 )
ABS
铁 ( 表面:镍镀金 )
铁 ( 碳素钢 )
亚铅合金
②被顶出的笔芯。 本产品损坏、零部件损坏需要需要丢弃时,
请遵从各个自治体的分类要求进行处理。
Piccolo (codice articolo: 37318946)
Grande (codice articolo: 37318939)
摇柄
主体
Istruzioni per l’uso
Per persone di età
superiore a 4 anni
Grazie per avere acquistato questo temperamatite. Per usarlo
correttamente e in sicurezza si raccomanda innanzitutto di
leggere attentamente queste istruzioni per l’uso. Si suggerisce
inoltre, di conservarle con cura per ogni necessità futura.
AVVERTENZA
Pericolo di
lesioni gravi o fatali
Durante la rimozione dei residui, non toccare
direttamente a mani nude, la parte di appuntitura.
ATTENZIONE danneggiamento materiale
Prima dell’uso iniziale accertarsi che la rondella e la
manovella non generino rumori anomali (stridio o ticchettio
metallico) né siano danneggiate.
• Per evitare lesioni personali:
Non inserire le dita nel serbatoio dei residui mentre è aperto.
Non inserire le dita nel foro d’inserimento della matita.
Non smontare, modificare o tentare di riparare da sé il
temperamatite.
Non usarlo se la morsa di bloccaggio matita non è ben
bloccata.
Non usarlo su una superficie instabile.
• Per non danneggiare o guastare la parte di appuntitura:
Usare il temperamatite esclusivamente con matite di legno.
(Non usarlo con penne a sfera, cacciaviti e oggetti analoghi.)
Svuotarlo non appena il serbatoio dei residui si riempie a
due terzi della sua capacità.
• Prima che lo usi un bambino:
Affinché lo usi in modo corretto, in particolare gli si deve spiegare
il contenuto delle sezioni [
ATTENZIONE] e [Modalità d’uso].
Impedire che lo usino bambini d’età inferiore a quattro anni.
Qualora in caso d’uso errato la manovella non dovesse
girare, la matite non si dovessero appuntire
correttamente oppure le prese della morsa di bloccaggio
dovessero rompersi, per evitare di danneggiamento del
resto del temperamatite cessarne immediatamente l’uso.
●Non usare il temperamatite per scopi diversi da quello previsto.
Modalità d’uso
4
5. 按着卡盘的按钮把铅笔拔出来。
Temperamatite manuale
Pericolo di lesioni o
零部件名称
卷笔刀主体
传动装置
笔屑盒
按钮
主体侧面
齿轮
摇柄
传动装置金属板
摇柄按钮
卡盘金属板
刀刃
刀刃架
顶部
卡盘
笔屑盒
摇柄
20150901 Prima edizione
维护保养的方法
卷削时如削不下来,可能是刀片夹住了
笔芯。
请按以下方法解决。
(1)按图中箭头所指方向旋转齿轮,取下
旋转轴。
(2)卸下齿轮后,就可以取下刀片。
齿轮
1
可能会导致死亡或负重伤。 1. 准备铅笔。
・ 普通铅笔(H、F、HB)
笔芯被夹需要取出时,
请不要触摸刀片。
・ 软铅笔(B~6B,彩色铅笔)
2. 按压主体的顶部,把卡盘拉到停止位置。
可能会受伤或产生对物
3. 一边按着卡盘的按钮,一边把铅笔插入。
品的损坏。
4. 按着主体的顶部,向箭头方向旋转摇柄。
初次使用时,请确认齿轮和摇柄部分有无
削好后空转。削软铅笔时,把卡盘拉出
奇怪声音(咔嚓咔嚓声)以及破损情况。
1cm 后再开始削。如削得不彻底 , 再次
拉出 1cm 削一次。
(一边看情况一边
・可能会造成受伤的原因。
削)
。
笔芯比较脆弱的铅笔,
卷削时会发
不要把手伸入到拿下来的铅笔屑盒里。
生笔芯尖折断、变形等现象(削好不空
不要把手指插入插铅笔的孔洞里。
转)。为此,不要削过多。
不要改造、分解、修理卷笔刀。
不要在卡盘还未固定时使用。
不要在不平稳的地方使用。
441
・儿童使用时要注意。
“ 注意 ”・“ 使用方法 ”来指导儿童。
未满 4 岁的儿童不得使用。
因误操作而导致摇柄不转,不能彻底
削铅笔,或者卡盘的按钮折断等本体
损坏时,请立即停止使用。
イタリア語
无印良品(上海)
商业有限公司
www.muji.com.cn
电话:021-6375-6677
中国制造 Made in China
1. Preparare la matita da appuntire:
• Con mina normale (H, F o HB)
• Con mina morbida (B-6B o matita colorata)
2. Facendo pressione sul lato superiore del temperamatite
estrarne completamente la morsa di bloccaggio matita.
3. Mentre si premono nel senso della freccia le prese della
morsa di bloccaggio matita introdurre la matita.
4. Mentre si continua a premere sul temperamatite ruotare la
manovella nella direzione indicata dalla freccia. Al termine
dell’appuntitura la manovella inizia a girare a vuoto. Se la
mina è morbida si suggerisce d’iniziare ad appuntirla dopo
avere estratto la morsa di bloccaggio matita di circa 1 cm.
Se non si appuntisce completamente provare ad estrarre la
morsa di un altro centimetro. (Estraendo ogni tanto la
matita per verificare il progredire dell’appuntitura.) Poiché
durante l’appuntitura la punta delle mine morbide si può
spezzare o danneggiare, la manovella potrebbe non girare
mai a vuoto. È pertanto opportuno accertarsi che la matita
non si stia consumando eccessivamente.
Presa 3
Lato
Foro
superiore
d’inserimento matita
2
3
Morsa di
bloccaggio
matita
3
4
Manovella
Serbatoio dei residui
Corpo principale
5. Mentre si premono le prese della morsa di bloccaggio inserire
la matita.
Come liberare il temperamatite dall’intasamento di mine
(Questa operazione deve essere condotta solo da un adulto.)
1. Come smontare la manovella
Se le matite non si appuntiscono può significare che la parte
di appuntitura è intasata dai residui di mina.
(1) Smontare l’asse di rotazione facendo ruotare la rondella in
direzione della freccia mostrata nel disegno qui sotto.
(2) Rimuovere la rondella e quindi la parte di appuntitura.
Rondella
Disegno ingrandito
della manovella
1
2
Parte di
appuntitura
Manovella
2. Come rimuovere i residui di mina
Rimuovere i residui con un filo metallico piegato a L:
Disegno ingrandito della
① Filo metallico di rimozione
parte di appuntitura
dei residui di mina.
② Uscita dei
residui di mina
Modalità di pulizia
• Svuotare spesso il serbatoio dei residui.
• A causa della natura dei materiali, i residui dell’appuntitura
possono aderire al corpo principale.
• Per evitare di sporcare si consiglia di non capovolgere e/o
scuotere il temperamatite.
• Inumidire un tessuto delicato con detergente neutro diluito
al 50% con acqua e con questo strofinare delicatamente il
corpo principale.
• Non usare detergenti acidi. Possono corrodere i materiali.
• Durante il trasporto del temperamatite tenere bene chiuso il
serbatoio per evitare che, fuoriuscendo, cada.
Nome delle parti
Corpo principale del temperamatite
Meccanismo di avanzamento
Serbatoio dei trucioli
Prese della morsa di bloccaggio
Parti laterali del corpo principale
Rondella
Manovella
Materiale
ABS+AS
ABS+AS
GPPS
ABS
ABS
POM
ABS
Nome delle parti
Piastra metallica del
meccanismo di avanzamento
Presa della manovella
Piastra metallica della
morsa di bloccaggio
Parte di appuntitura
Supporto della parte di appuntitura
Materiale
Ferro
nichelato
ABS
Ferro
nichelato
Acciaio al carbonio
Lega di zinco
In caso di eliminazione del prodotto intero o di sue parti si raccomanda
di osservare i regolamenti in vigore nel proprio comune.
MUJI Europe Holdings Ltd
8-12 Leeke Street London WC1X 9HT
www.muji.eu
MADE IN CHINA
200
中国語