1
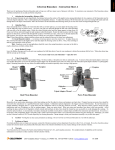
VW-CTA100_VQT5C41_B4.fm 1 ページ 2013年5月22日 水曜日 午前10時37分 1 2 取扱説明書 /Operating Instructions/ Bedienungsanleitung/ Manuel d’utilisation/Istruzioni d’uso/ Instrucciones de funcionamiento/ Инструкция по эксплуатации 1 トライポッドマウントを三脚などに取り付ける トライポッドマウントの三脚取り付け穴 1 は、三脚などのねじ (1/4-20UNC)に対応しています。 ≥ 長さが 8 mm 以上のねじを取り付けると、トライポッドマ ウントを傷つける場合があります。 2 トライポッドマウントにカメラ部を取り付ける 図のように台座部分 2 を押さえながら、 矢印の方向に カメラ部を「カチッ」と音がするまで差し込む ≥ 取り付け後はカメラの向きを確認してください。 A トライポッドマウントからカメラ部を取り外す EU Manufactured by: Panasonic Corporation Kadoma, Osaka, Japan Importer: Panasonic Marketing Europe GmbH Panasonic Testing Centre Winsbergring 15, 22525 Hamburg, Germany には 図のように台座部分 2 を押さえながら、 矢印の方向に カメラ部を引き抜く Panasonic Corporation ∫仕様 Web site: http://panasonic.net 外形寸法:幅 35 mmk 高さ 44 mmk 奥行き 44 mm 質量: 約 17 g C Panasonic Corporation 2013 ∫ お守りいただく内容を次の図記号で説明しています。 (次は図記号の例です) 実行しなければな らない内容です。 VQT5C41 F0513AS0 until 2013/6/13 While holding the pedestal portion 2, insert the camera unit in the direction of the arrow until it clicks into place as shown in the figure. • Check the orientation of the camera after attaching it. A Removing the camera unit from the tripod mount While holding the pedestal portion 2, pull out the camera unit in the direction of the arrow as shown in the figure. ∫ Notes for Using the Tripod Mount • Do not attach the tripod mount to a location where the tripod mount ends up restricting your body movements. Doing so may cause accidents and injuries. Check if your body can move freely after attaching it. • Do not disassemble or modify. Doing so may cause trouble, such as the wearable camera and other parts falling off. • Attach correctly as per these operating instructions. • Check how securely the tripod mount and wearable camera are attached on a regular basis. Failure to do so may cause accidents and injuries, such as the tripod mount or wearable camera coming off or falling off during use. Check if the tripod mount and wearable camera have not become loose. Dimensions: 警告 動作を妨げる場所などに取り付けない 事故やけがの原因となります。取り付け後、 問題なく動作できるか確認してください。 注意 分解や改造をしない カメラの落下などの原因となります。 分解禁止 取り付け状態を定期的に点検する 使用中に外れたり落下すると、事故やけがの 原因となります。トライポッドマウントおよ びカメラの取り付けに緩みがないか確認して ください。 35 mm (W)k44 mm (H)k44 mm (D) [1.38 q (W)k1.74 q (H)k1.74 q (D)] Mass (Weight): Approx. 17 g (Approx. 0.038 lb) DEUTSCH Vielen Dank, dass Sie sich für ein Panasonic-Produkt entschieden haben. • Lesen Sie diese Anleitung bitte sorgfältig, bevor Sie dieses Produkt verwenden, und heben Sie dieses Handbuch für ein weiteres Nachschlagen auf. • Bei Verwendung des Stativadapters können Sie das Kameragerät der tragbaren Mini-Kamera an einem Stativ usw. anbringen. • Die tragbare Mini-Kamera wird einzeln verkauft. • Vermeiden Sie beim Anbringen und Abnehmen ein Berühren des Objektives oder ein Ziehen am Verbindungskabel. • Achten Sie darauf, dass sich das Verbindungskabel der tragbaren MiniKamera zwischen Kamera/Gerät beim Gebrauch nicht verheddert. • Wird der Stativadapter über einen längeren Zeitraum nicht benutzt, sollte sie vor dem Verwahren vom Stativ entfernt werden. 1 Anbringen des Stativadaspters an einem Stativ, o.ä. Die Bohrung zur Befestigung des Stativs 1 des Stativadapters passt zur Schraube (1/4-20 UNC) eines Stativs, o.ä. • Durch das Anbringen einer Schraube mit einer Länge von 8 mm oder mehr kann zu einer Beschädigung des Stativadapters führen. 2 Anbringen der Kamera am Stativadapter Fügen Sie, während das Fußteil 2 festgehalten wird, die Kamera in Pfeilrichtung ein, wie in der Abbildung gezeigt, bis sie mit einem Klicken einrastet. • Prüfen Sie die Ausrichtung der Kamera nach ihrem Anbringen. ENGLISH Thank you for purchasing this Panasonic product. • Please read these instructions carefully before using this product, and save this manual for future use. • Using the tripod mount enables you to attach the camera unit of the wearable camera to a tripod, etc. • The Wearable camera is sold separately. • Avoid touching the lens of the wearable camera or pulling the camera/unit connection cable when performing the attachment or removal procedures. • Be careful that the camera/unit connection cable of the wearable camera does not get tangled up during use. • If the tripod mount will not be used for an extended period of time, remove it from a tripod, etc. before storing. 1 Attaching the tripod mount to a tripod, etc. The tripod mounting hole 1 of the tripod mount is compatible with the screw (1/4-20 UNC) of a tripod, etc. • Attaching a screw with a length of 8 mm (0.31 q) or longer may damage the tripod mount. Printed in China/Imprimé en Chine 2 Attaching the camera unit to the tripod mount ∫ Specifications ≥ 取り付け・取り外し時に、ウェアラブルカメラのレンズ に触ったり、カメラ / 本体接続ケーブルを引っ張らない でください。 ≥ 使用時は、ウェアラブルカメラのカメラ / 本体接続ケーブル が絡まないように、お気をつけください。 ≥ 長期間使用しない場合は、三脚などから取り外して保管 してください。 〒 571-8504 大阪府門真市松生町 1 番 15 号 注意 「軽傷を負うことや、財産の損害が 発生するおそれがある内容」です。 日本語 このたびは、パナソニック製品をお買い上げいただき、まことに ありがとうございます。 ≥ 取扱説明書をよくお読みのうえ、正しく安全にお使いくだ さい。 ≥ ご使用前に「安全上のご注意」を必ずお読みください。 ≥ この取扱説明書は大切に保管してください。 ≥ このトライポッドマウントを使うと、ウェアラブルカメラ のカメラ部を三脚などに取り付けることができます。 ≥ ウェアラブルカメラは別売です。 パナソニック株式会社 AVC ネットワークス社 警告 「死亡や重傷を負うおそれがある 内容」です。 してはいけない 内容です。 品番 /Model No./Modell-Nr./Modèle/Modello N./ Modelo N./Номер модели Изготовлено 必ずお守りください 人への危害、財産の損害を防止するため、必ずお守りい ただくことを説明しています。 ∫ 誤った使い方をしたときに生じる危害や損害の程度を 区分して、説明しています。 A トライポッドマウント /Tripod Mount/ Stativ Adapter/Support pour trépied/ Aggancio Treppiede/Soporte Para Trípode/ Крепление на штатив VW-CTA100 安全上のご注意 A Entfernen der Kamera vom Stativadapter: Ziehen Sie, während das Fußteil 2 festgehalten wird, die Kamera in Pfeilrichtung heraus, wie in der Abbildung gezeigt wird. ∫ Hinweise zum Gebrauch des Stativadapters • Bringen Sie den Stativadapter nicht an Stellen an, an denen ihre Enden die Bewegungen Ihres Körpers einschränkt. Dies kann zu Unfällen und Verletzungen führen. Prüfen Sie nach dem Anbringen, ob Sie Ihren Körper ungehindert bewegen können. • Nicht zerlegen oder verändern. Dies kann zu Problemen führen, wie einem Herunterfallen der tragbaren Mini-Kamera oder anderer Teile. • Nehmen Sie die Montage gemäß dieser Bedienungsanleitung vor. • Prüfen Sie regelmäßig, ob der Stativadapter und die tragbare Mini-Kamera richtig angebracht sind. Anderenfalls kann es zu Unfällen und Verletzungen kommen, wie einem Ablösen des Stativadapters oder der tragbaren Mini-Kamera sowie ihrem Herunterfallen während des Gebrauchs. Prüfen Sie, ob sich der Stativadapter gelockert hat. ∫ Spezifikationen Abmessungen:35 mm (B)k44 mm (H)k44 mm (T) Masse: Ca. 17 g VW-CTA100_VQT5C41_B4.fm 1 2 ページ 2013年5月22日 水曜日 午前10時37分 2 ITALIANO A FRANÇAIS • Évitez de toucher l’objectif de la caméra portable ou de tirer sur le câble de connexion de l’unité caméra lors du branchement ou du débranchement. • Assurez-vous que le câble de connexion de l’unité caméra de la caméra portable ne s’emmêle pas durant l’utilisation. • Si le support pour trépied n’est pas utilisé pendant longtemps, retirez-le du trépied, etc. avant de le ranger. Installation du support pour trépied sur un trépied, etc. Le trou pour le montage du trépied 1 du support pour trépied est compatible avec la vis (1/4-20 UNC) d’un trépied, etc. • L’installation d’une vis ayant une longueur de 8 mm (0,31 po) ou plus peut endommager le support pour trépied. de l’unité caméra sur le support 2 Installation pour trépied Tout en maintenant la partie support 2, introduisez l’unité caméra dans le sens de la flèche jusqu’au déclic d’enclenchement comme montré sur l’illustration. • Vérifiez l’orientation de la caméra après l’avoir installée. de l’unité caméra du support pour A Retrait trépied Tout en maintenant la partie support 2, retirez l’unité caméra dans le sens de la flèche comme montré sur l’illustration. ∫ Notes pour l’utilisation du support pour trépied • N’installez pas le support pour trépied dans un endroit où il pourrait limiter vos mouvements. Cela pourrait causer des accidents et des blessures. Vérifiez la liberté de vos mouvements après l’avoir installé. • Ne le désassemblez pas et ne le modifiez pas. Cela pourrait causer des problèmes, comme la chute de la caméra portable ou d’autres pièces. • Installez-le correctement selon ce manuel d’utilisation. • Vérifiez régulièrement la solidité de l’installation du support pour trépied et de la caméra portable. Le contraire pourrait causer des accidents ou des blessures, comme le détachement ou la chute du support pour trépied ou de la caméra portable pendant l’utilisation. Vérifiez que le support pour trépied et la caméra portable ne sont pas desserrés. ∫ Spécifications Dimensions : 35 mm (L)k44 mm (H)k44 mm (P) [1,38 po (L)k1,74 po (H)k1,74 po (P)] Masse (Poids) :Environ 17 g (Environ 0,038 lb) • Evitare di toccare l’obiettivo della videocamera indossabile o di tirare il cavo di connessione videocamera/unità durante la connessione o la rimozione. • Fare attenzione che il cavo di connessione videocamera/unità della videocamera indossabile non si aggrovigli durante l’utilizzo. • Se un aggancio treppiede non viene usato per lungo tempo, rimuoverlo dal treppiede o simili prima di riporlo. dell’aggancio treppiede ad un 1 Fissaggio treppiede o simili Merci d’avoir acheté ce produit Panasonic. • Veuillez lire attentivement ces instructions avant d’utiliser ce produit et conservez ce manuel d’utilisation pour une consultation ultérieure. • L’utilisation du support pour trépied vous permet d’installer l’unité caméra de la caméra portable sur un trépied, etc. • La caméra portable est vendue séparément. 1 Grazie per aver acquistato questo prodotto Panasonic. • Leggere attentamente queste istruzioni prima di utilizzare questo prodotto e conservare questo manuale per utilizzi futuri. • L’utilizzo dell’aggancio treppiede consente di fissare l’unità principale della videocamera indossabile ad un treppiede o simili. • La Videocamera indossabile è venduta separatamente. Il foro di fissaggio del treppiede 1 dell’aggancio treppiede è compatibile con la vite (1/4-20 UNC) di un treppiede, ecc. • Se si fissa una vite lunga 8 mm o più, questa può danneggiare l’aggancio treppiede. dell’unità videocamera 2 Fissaggio all’aggancio treppiede Tenendo la parte del piedistallo 2, inserire l’unità videocamera nella direzione indicata dalla freccia finché non scatta in posizione come mostrato in figura. • Controllare l’orientamento della videocamera dopo il fissaggio. dell’unità videocamera A Rimozione dall’aggancio treppiede: Tenendo la parte del piedistallo 2, rimuovere l’unità videocamera nella direzione indicata dalla freccia come mostrato in figura. ∫ Note relative all’uso dell’aggancio treppiede • Non fissare l’aggancio treppiede in una posizione dove l’aggancio treppiede possa limitare i movimenti del corpo. Questo può provocare incidenti e lesioni. Verificare di poter muovere liberamente il corpo dopo il fissaggio. • Non smontare o modificare. Questo può provocare problemi, come la caduta della Videocamera indossabile e di altre parti. • Fissare correttamente seguendo queste istruzioni per l’uso. • Verificare periodicamente la tenuta del fissaggio dell’aggancio treppiede e della videocamera indossabile. La mancata verifica può portare ad incidenti e lesioni, come il distacco o la caduta dell’aggancio treppiede o della videocamera indossabile durante l’utilizzo. Verificare se l’aggancio treppiede e la videocamera indossabile si sono allentati. ∫ Dati tecnici Dimensioni: 35 mm (L)k44 mm (A)k44 mm (P) Massa: Circa 17 g ESPAÑOL Gracias por comprar este producto Panasonic. • Lea atentamente estas instrucciones antes de usar este producto, y guarde este manual para el uso futuro. • El uso del soporte para trípode le permite colocar la unidad de la cámara portátil en un trípode, etc. • La cámara portátil se vende por separado. • Evite tocar la lente o tirar del cable de conexión de la cámara portátil o unidad mientras coloca o retira. • Tenga cuidado de no enredar el cable de conexión de la unidad/cámara de la cámara portátil durante su uso. • Si el soporte para trípode será guardada por un largo período de tiempo, retírela del soporte, etc., antes de guardarlo. el trípode en un soporte para 1 Colocar trípode, etc. El orificio 1 del soporte para trípode es compatible con el tornillo (1/4-20 UNC) de un trípode, etc. • La colocación de un tornillo a una longitud de 8 mm o mayor puede dañar el soporte del trípode. ∫ Примечания об использовании крепления на штатив 2 Cómo colocar la unidad de la cámara al soporte para trípode Sostenga la perilla de ajuste 2 como se muestra en la figura e inserte la unidad de la cámara en la dirección de la flecha hasta que haga clic en el lugar. • Verifique la orientación de la cámara luego de colocarla. la unidad de la cámara del soporte A Quitar para trípode Sostenga la perilla de ajuste 2 como se muestra en la figura y retire la unidad de la cámara en la dirección de la fecha como se muestra en la figura. ∫ Notas sobre el Uso del Soporte para Trípode • No coloque el soporte para trípode en un lugar donde restrinja los movimientos del cuerpo, ya que esto podría causar accidentes y lesiones. Verifique si puede moverse libremente luego de colocarlo. • No desmonte ni realice modificaciones porque podría causar problemas, como la caída de la cámara portátil o de otras piezas. • Coloque en forma correcta, según se indica en estas instrucciones de funcionamiento. • Verifique la seguridad de la colocación del montaje múltiple con frecuencia. Si no lo hace, es posible que se produzcan accidentes o lesiones, como el desprendimiento o la caída del soporte para trípode o de la cámara portátil durante el uso. Compruebe que el soporte para trípode y la cámara portátil no se hayan aflojado. ∫ Especificaciones Dimensiones: 35 mm (L)k44 mm (A)k44 mm (P) Masa: Aprox. 17 g РУССКИЙ Благодарим вас за покупку изделия Panasonic. • Прежде чем использовать данное изделие, внимательно ознакомьтесь с этой инструкцией и сохраните это руководство, которое вам может понадобиться в будущем. • С помощью крепления на штатив можно прикрепить спортивную камеру к штативу и т. п. • Спортивная камера продается отдельно. • Не прикасайтесь к объективу спортивной камеры и не тяните за соединительный кабель камеры/устройства во время прикрепления или снятия. • Следите за тем, чтобы соединительный кабель спортивной камеры/ устройства не перекрутился во время использования. • Если крепление на штатив не будет использоваться длительное время, снимите его со штатива и т. п., прежде чем убрать на хранение. крепления на штатив к 1 Прикрепление штативу и т. п. Отверстие для прикрепления к штативу 1 крепления на штатив совместимо с винтом (1/4-20 UNC) штатива и т. п. • Прикрепление с помощью винта длиной 8 мм или более может повредить крепление на штатив. Прикрепление камеры к креплению на 2 штатив Возьмитесь за опорную часть 2 и вставьте камеру в направлении стрелки, так чтобы она встала на место со щелчком, как показано на рисунке. • После прикрепления проверьте направление камеры. A Снятие камеры с крепления на штатив Возьмитесь за опорную часть 2 и вытяните камеру в направлении стрелки, как показано на рисунке. • Не прикрепляйте крепление на штатив к месту, в котором крепление на штатив будет ограничивать движения вашего тела. В противном случае это может привести к повреждениям и травмам. После прикрепления проверьте, может ли ваше тело свободно двигаться. • Не разбирайте и не вносите изменения. В противном случае это может привести к проблемам, например падению спортивной камеры и других частей. • Правильно выполняйте прикрепление, как указано в данной инструкции по эксплуатации. • Регулярно проверяйте надежность прикрепления крепления на штатив. Иначе это может привести к повреждениям и травмам, например если крепление на штатив или спортивная камера соскочит или упадет во время использования. Проверяйте, не ослабло ли прикрепление крепления на штатив или спортивной камеры. ∫ Технические характеристики Размеры: 35 мм (Ш)k44 мм (В)k44 мм (Г) Масса: Прибл. 17 г Информация для покупателя Название продукции: Крепление на штатив Название страны производителя: Китай Название производителя: Панасоник Корпорэйшн Юридический адрес: 1006 Кадома, Осака, Япония Импортёр: Дополнительная информация: ООО <Панасоник Рус>, РФ, 115191, г. Москва, ул. Большая Тульская, д. 11, 3 этаж. тел. 8-800-200-21-00 Пожалуйста внимательно прочитайте инструкцию по эксплуатации. Дата производства Вы можете уточнить год, месяц, дату по номеру после слова «Изготовлено». Пример 130515 Год: Первая и вторая цифры серийного номера (12 – 2012, 13 – 2013, …) Месяц: Третья и четвертая цифры. День: пятая и шестая цифры Установленный производителем в порядке п. 2 ст. 5 федерального закона РФ “О защите прав потребителей” срок службы данного изделия равен 7 годам с даты производства при условии, что изделие используется в строгом соответствии с настоящей инструкцией по эксплуатации и применимыми техническими стандартами.