1
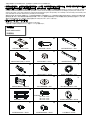
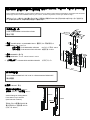
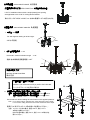
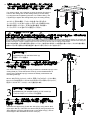
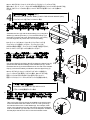
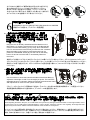
安裝說明書
INSTALLATION MANUAL
取扱説明書
4712302590399
安全警告 CAUTION 注意
1.在安裝前,請詳細閱讀本安裝說明並依指示安裝使用。請妥善保存本說明書,以便日後參考。
Please read this manual carefully before installation and install by following the instructions. Please keep this manual for future reference.
正しくお使いいただくため、取付け前に本マニュアルをよくお読みください。なお、いつでも参照できるよう、お読みになった後は、大切に保管してください。
2.本製造商不涵蓋因意外事件、濫用、誤用、錯誤的安裝與不當的使用及未授權之拆解、維修或更改等,所造成的人員傷害與設備毀壞,本製造商將完全不
負責所有衍生相關的法律責任。
The manufacturer shall not be responsible legally for damage to equipment or personal injuries that results from accident, abuse, misuse, natural or
personal disaster, or any unauthorized disassembly, repair or modification.
不慮のこと、誤用や濫用及び取付け不備による製品の損害並びに、人為的な誤り及び無断取外し、修繕や改造などにより発生した設備の損害及び人員の傷害
に対しては、弊社は一切法的責任を負いません。
3.本產品的設計重點為安裝與拆卸容易,若因人為或天然災害(如地震、颱風...等)不可抗拒之因素所造成之人員傷害與設備毀壞,本製造商將完全不負責所
有衍生相關的法律責任。
The LCD TV ceiling mount bracket is designed for installing and removing easily. The manufacturer shall not be liable for the damage to equipment and
personnel injuries due to human factors or natural disaster, such as earthquake and hurricane.
本製品は取付け及び取外しが容易に出来るよう設計されます。人為的或いは自然災害(例えば地震、台風…)のような不可抗力によって人員の傷害及び設備
の損害に対しては、弊社は一切法的責任を負いません。
4.安裝產品需由專業人員執行安裝。
The LCD TV ceiling mount bracket must be installed by professional personnel.
本製品のサポートは専門業者による取り付けのみです。
5.在安裝或移除本產品時,至少須由兩人以上執行,並避免物品掉落導致人員或物品的傷害。
At least two persons are needed to install or remove the product in order to prevent from any hazard caused by falling objects.
物品の落下による人員或いは物品の損傷を避ける為、取付け/取外しに際しては、必ず 2 人以上で行ってください。
6.安裝前請先確認產品安裝周圍的環境:
Please check carefully before installation the area where the ceiling mount bracket will be installed.
取付け前に、予め周囲環境を確認してください。
◎ 避免安裝在溼度或溫度過高與會接觸的水的地方。
Avoid any place with high temperature or humidity or any place where will contact water.
多湿、高温又は水のかかる場所をお避けください。
◎ 請勿安裝於空調設備的出入風口附近,及避免在大量灰塵及油煙處。
Do not install the product close to the vents of air conditions and avoid dusty and fumy places.
エアコンの通気孔付近、又は埃や煙の多い場所をお避けください。
◎ 請勿安裝在傾斜或不規則的壁面,建議安裝於水平的天花板。
Do not install on inclined ceiling and irregular surface.
傾き、不規則な天井板の取付けはお避けください。水平な天井板にお取り付けください。
◎ 請勿安裝於容易震動或容易受撞擊處。
Do not install at places subject to vibrations and shocks.
振動や衝撃を受けやすい場所はお避けください。
7.安裝本產品前,請先於液晶電視周圍預留足夠的空間,以確保安裝方便與空氣流通。
Please make sure the space around the LCD TV is enough for installation to ensure smooth installation process and adequate ventilation.
容易に取付け及び吸気孔や排気孔の風通しをよくするため、液晶テレビの周囲に空間を設けてください。
8.安裝前,請先確認天花板或安裝處的結構是否能支撐本產品及液晶電視總重量四倍以上,並且能承受地震或其他外力的震動。為安全及防止意外發生,請
選擇堅固耐久且安全性高的位置。
Please make sure the ceiling is strong enough to sustain the weight at least four times the total weight of the LCD TV and the ceiling mount bracket. Also
make sure the ceiling could survive the earthquakes and other shocks. To ensure safety and avoid accidents, please choose the durable and highly
secured places.
取付け場所の強度には、液晶テレビと天吊り金具の総合荷重の 4 倍以上に耐えうるよう十分ご注意の上、地震や他に外的な要素による振動に耐えうるかをよく
ご確認ください。なお、安全性及び不慮を避けるため、頑丈で耐久性のある且つ安全性の高い場所に設置してください。
9.請勿自行變更任何零件及設計或自行修改結構,請勿使用已經破損的零件,若有不良或故障請與您的經銷商聯絡。
Do not modify any accessory, design or structure. Do not use broken parts. Contact the local distributors if there is malfunction or fault.
部品の無断改造、設計や構造の変更をご遠慮ください。破損した部品の使用をお避けください。不具合や故障と思われる際にしては、販売代理店にお問い合わ
せください。
10.鎖緊螺絲 (請勿以過大扭力旋轉,避免螺絲、螺牙、本產品與液晶電視的損害)。
Tighten all screws (do not screw with excess force to prevent the screw, thread, ceiling mount bracket and the LCD TV from any damage).
ネジをしっかりと締付けてしてください。(ただし、ネジ、ネジ山、本製品や液晶テレビに損害を与えないよう過大なトルクではご遠慮ください。)
11.本產品所適用之液晶電視的重量為 40KG.(88Lbs.)以下。
The maximum loading capacity of the ceiling mount bracket is 40KG (88Lbs.).
本製品は 40kg(88Lbs.)以下の液晶テレビのみ使用されます。
12.日後移除本產品時,會在安裝的天花板或固定位置留下螺絲孔或螺栓,且因長期使用會於安裝處周圍留下污漬。
Once the ceiling mount bracket is removed, the drilled holes and bolts will be left in the ceiling or the applied position. Stains may occur after long term
use.
本製品を取外した後、取付けた天井板及び設置場所にネジ穴或いはドリル穴が残ることはあります。そして、長時間の使用により、取付け場所の周囲に染みが
残る可能です。
13.本吊架除了懸掛液晶電視外不可加掛其他物件並嚴禁人員懸掛在液晶電視吊架上。
The LCD TV ceiling mount bracket is designed to support the LCD TV only. Do not hang anything else on it, especially any person is not allowed to hang
on the mounting bracket.
本製品は液晶テレビのみ使用されます。他の物品や人員の吊り下がることは厳禁します。
14.在法律所允許的程度下,任何暗示性的產品保證或特殊目地將不予承認。即使本製造商已經被告之損害的可能性,本製造商沒有義務承擔買方或產品使
用者因購買產品無法使用產品,及其購買產品而有的損害、花費、損失(利潤、財富等)及其他附帶損害。
To the extent of permitted by applicable law, the manufacturer disclaims any implied warranty of merchantability or fitness for a particular purpose. In
no event will the manufacturer be liable to the purchaser or to the user of the ceiling mount bracket for any damages, expense, lost revenues, lost
savings, lost profits, or any other incidental or consequential damages arising from the purchase, use or inability to use the ceiling mount bracket, even
if the manufacturer has been advised of the possibility of such damages.
適用される法律に従い許容される範囲において、弊社は商業可能性および使用目的についての適切性など特定の目的に関する一切の明示および黙示的保
証の責任を負いません。購入者及び使用者は本製品のお買い上げにより、使用又は使用不能からのあらゆる損害、費用、損失(利益、財産)及び、それに伴う
損が生じる可能を告知されても、弊社は一切責任を取るものではありませんので、予めご了承ください。
15.若有任何條文爭議,請以英文說明書為主。
Please refer to the English manual for any dispute on the terms.
上記事項にご不明の点があるようでしたら、英語マニュアルをご参照ください。
包裝零件
ENCLOSED PARTS
同梱部品
CEILING PLATE—1PC
ANCHOR—4PCS
D
40mmL BOLT( M8 )—4PCS
OUTSIDE PIPE —1PC
NYLON NUT—4PCS
UPPER PROP—1PC
H
12mmL BOLT—4PCS
J
MOUNT BODY—12PCS
F
E
G
JOINT—1PC
C
B
A
I
WAVE WASHER—1PC
K
M10 WASHER—1PC
L
M10 NYLON NUT—1PC
N
M
O
SCREWS
M4 x 15L—4PC
M5 x 15L—4PC
M6 x 15L—4PC
BRACKET—2PCS
Q
P
SCREW M4X5L—2PCS
3-HOLE WASHER—4PCS
SCREW M6X8L—2PCS
R
LAG BOLT—4PCS
由於液晶電視安裝螺絲孔位規格不同,安裝前必須先確認配件包所附的螺絲(N)規格及長度,是否適用於欲安裝之液晶
電視安裝孔位,若有任何問題請與您的經銷商聯絡。
Due to different specifications of screw holes for different LCD TV, please confirm that the specification and length of the enclosed
screws (N) conform to the installation holes of your LCD TV; incase of any doubts, contact your dealer for help.
液晶テレビによって取付穴寸法が異なることがあり、設置前に同梱ネジ(N)の寸法・長さは対応できるかを十分ご注意くださ
い。不明の点があれば、当地の販売代理店にご連絡ください。
安裝時所需工具
TOOLS REQUIRED FOR INSTALLATION
112
86
Ø11x17L
取付工具
90
122
20
20
30°
30°
244
3. 鐵鎚 HAMMER 金づち
4. 扳手 WRENCH レンチ:12mm /13mm / 17mm
85
十字ドライバー
314
吊架適用範圍
APPLICABLE RANGE OF THE LCD TV CEILING MOUNT BRACKET
取付範囲
■高度 HEIGHT 高さ
1.電視吊架最短高度為 653mm,
最長為 813mm。孔位間距 20mm。
Vertical Range of Ceiling Mount:
Form 653mm up to 813mm
(with intervals of 20mm)
653mm
813mm
20mm
天井からセット底面までの寸法:
最小高 653mm、最大高 813mm
(穴ピッチ:20mm)
244
225
5. 十字螺絲起子 CROSS-HEAD SCREW DRIVER
653
1. 電鑽 POWER DRILL or MASONRY DRILL 電気ドリル・石材用ドリル
2. 鑽頭 DRILL BIT ドリルビット
-水泥天花板 FOR MASONRY CEILING コンクリート天井:10mm
-木質天花板 FOR WOOD STUD CEILING 木質天井:4.5mm
■適用範圍 APPLICABLE RANGE 対応規格
液晶電視安裝孔位在 250(H)X220(V)mm 以內皆適用此機種。
LCD TV installation holes within a 250(H)X220(V)mm spacing
are applicable to this LCD TV Ceiling Mount Bracket.
220
取付穴ピッチが 250(H)×220(V)mm 以内の液晶テレビに対応されます。
250
■調整角度 ADJUSTABLE ANGLES 角度調整
1. 可左右 360°旋轉
For 360 degrees rotating to left and right.
360°水平回転
360°
2. 水平/垂直調整角度:± 20°
Horizontal / Vertical inclination angel :± 20°
前後/左右傾斜角度調整範囲:±20°
20°
20°
安裝步驟及方式
INSTALLATION PROCESS
20°
取付方法
1
將固定盤(A)固定於天花板
INSTALL THE CEILING PLATE (A) ONTO THE CEILING
シーリングプレート(A)を天井に取付け
B
1-1 使用電鑽及鑽頭在欲安裝位置的天花板上鑽洞。
注意:如果天花板材質是水泥,鑽孔的直徑為 10.0mm 深 55mm
如果天花板材質是木頭,鑽孔的直徑為 4.5mm 深 55mm
Use an electric drill & a drilling bit to drill holes on the applied positions.
Note:For a cement ceiling, drill holes with 10mm diameter & 55mm depth.
For a wooden ceiling, drill holes with 4.5mm diameter & 55mm depth.
電気ドリル及びドリルビットで取付板に穴を開けてください。..
注意: コンクリート天井の場合、直径 10.0mm、奥行 5.5mm
の取付穴を開けてください。
天井が木造の場合、直径 4.5mm、奥行 5.5mm の取付穴を
開けてください。
A
20°
1-2 如果是水泥天花板,使用鐵鎚將壁虎螺絲(B)敲入天花板的孔內
A
,然後利用扳手鎖緊螺帽將固定盤(A)固定於天花板上。如果是
木質天花板,請直接使用螺絲(R)將固定盤(A)固定於天花板上。
For cement ceiling, use a hammer to drive the Anchor (B) into the
holes on the ceiling, then fix the Ceiling Plate (A) on the ceiling
by using the wrench tightening the nuts. For wooden ceiling, use
Lag Bolt (R) to tighten the Ceiling Plate (A) to the ceiling directly.
R
コンクリート天井の場合、アンカー(B)を金づちで打ち込み、
シーリングプレート(A)はナットをレンチでしっかりと締付けの上、
取付板に固定してください。天井が木造の場合、取付板に
シーリングプレート(A)をネジ(R)で固定してください。
安全警告 CAUTION 注意
安裝於木質天花板時,需將吊架固定於支撐天花板的樑柱上,不要安裝於裝飾用的柱子或者石膏板上。安裝於木質的天花
板時,需注意天花板是否有足夠的強度支撐液晶電視及電視吊架總重量 4 倍以上。
For installing on a wooden ceiling, secure the LCD TV ceiling mount bracket to the beam that supports the ceiling, do not fasten the
screws on a decorative beam or a gypsum board. When installing the LCD TV on a wooden ceiling, please make sure the ceiling has
sufficient strength to support a weight 4 times of that of the LCD TV and the LCD TV ceiling mount bracket.
天井が木造の場合、必ず本製品を梁に固定してください。飾り梁又は石膏ボートの設置をお避けください。天井が木造の場合、
液晶テレビと天吊り金具などの総合荷重の 4 倍以上に耐えうるよう十分ご注意ください。
2
組裝延長外管(C)
ASSEMBLING THE OUTSIDE PIPE (C)
A
延長パイプ(C)を組立
E
D
2-1 使用 40mmL 螺絲(D)與尼龍螺帽(E),將延長外管(C)固定於天花板固定盤(A)
,將 M4x5L 螺絲(P)鎖於延長外管(C)的上端螺絲孔中,使延長外管(C)與
天花板固定盤(A)更穩固組合。
P
C
Use 40mmL Bolt (D) and Nylon Nut (E) to fasten the Outside Pipe (C) to the
Ceiling Plate (A). Screw the M4x5L Screw (P) to the threaded hole on
the top of the Outside Pipe (C) to assure its steady combination with
the Ceiling Plate (A).
40mmL のネジ(D)とナイロンナット(E)で、延長パイプ(C)をプレート(A)に取付、
M4×5L ネジ(M)を延長パイプ(C)の上方にあるネジ孔に挿入することにより、
延長パイプ(C)がプレート(A)としっかりと接合されます。
3
組裝支撐管(F)與調整關節(G)
F
ASSEMBLING THE UPPER PROP(F) & THE JOINT (G)
ジョイント(G)とアッパープロップ(F)を接合
3-1 使用 40mmL 螺絲(D)與尼龍螺帽(E)組合支撐管(F) &調整關節(G)。
並將 12mmL 螺絲(H)穿過波浪華司(I)與支撐管(F)調整孔後,鎖緊在
調整關節(G)的螺絲孔中。
Assemble the Upper Prop (F) with the Joint (G) by using 40mmL Bolt
(D) & Nylon Nut (E). Then take out 12mmL Bolt (H) and go through the
Wave Washer (I) and the adjusting hole on the Upper Prop (F). Screw
the bolt tight in the threaded hole on the Joint (G).
E
I
H
G
D
40mmL のネジ(D)とナイロンナット(E)でジョインド(G)とアッパープロップ(F)を
接合します。そして、アッパープロップ(F)の角度調整用穴とジョイント(G)の上方のネジ穴を
合わせ、波ワッシャー(I)の穴に通した 12mmL のネジ(H)を挿入してしっかりと締めて
ください。
4
組裝電視架主體(J)與吊架(A&C)
ASSEMBLING THE MOUNT BODY (J) WITH THE CEILING MOUNT (A&C)
テレビマウント(J)をジョイント(A&C)に取付
F
4-1 使用 M10 華司(K)與 M10 尼龍螺帽(L),組合調整關節(G)與
電視架主體(J)。調整電視架主體(G)的希望角度後,將 M10
尼龍螺帽(L)鎖緊以固定視角,並避免日後液晶電視掉落之風
險。
G
Assemble the Joint (G) with the Mount Body (J) by using M10
Washer (K) & M10 Nylon Nut (L). Turn the Mount Body (J) to
the angle you prefer and screw M10 Nylon Nut (L) very firmly
to fix the angle and to prevent the LCD TV form falling.
K
L
M10 ワッシャー(K)と M10 ナイロンネット(L)でジョイント(F)を
テレビマウント(J)と接合してください。テレビマウント(J)を
お好みの角度に調整し、テレビマウンド(J)の落下を避けるため、
M10 ナイロンナット(L)をしっかりと締付けてください。
J
C
4-2 使用 40mmL 螺絲(D)與尼龍螺帽(E),將已組合電視架主體的
支撐管(F)固定於延長外管(C)上,將 M4x5L 螺絲(P)鎖於延
長外管(C)的下端螺絲孔中,使延長外管(C)與支撐管(F)更穩
固組合。
Use 40mmL Bolt (D) and Nylon Nut (E) to fasten the Upper Prop (F)
(assembled with the Mount Body) to the Outside Pipe (C). Screw
the M4x5L Screw (P) to the threaded hole on the end of the Outside
Pipe (C) to assure its steady combination with the Upper Prop (F).
E
P
F
40mmL ネジ(D)とナイロンナット(E)でテレビマウントと接合した
アッパープロップ(F)を延長パイプ(C)に取付、M4×5L ネジ(P)を
延長パイプ(C)の下方にあるネジ穴に挿入することにより、
延長パイプ(C)とアッパープロップ(F)がしっかりと接合されます。
5
J
將支架(M)裝於液晶電視上
ASSEMBLE THE BRACKET (M) WITH LCD TV
ブラケット(M)を液晶テレビに取付
5-1 拿出螺絲(N)並選出最符合液晶電視背面 VESA 孔位的螺絲,穿過
三孔華司(O)上合適的孔。如果 M6 螺絲是最符合的螺絲,則應穿過
三孔華司(O)中最大的孔。請平放液晶電視,使用符合的螺絲將液晶
電視與支架(M)作組合。
Take out Screws (N) and choose the suitable screw which mostly
match the VESA holes at the back of LCD TV. Then go through
the matched hole on the 3-Hole Washer(O). For example, if M6
screw is the matched screw, then it should go through the biggest
hole on the Washer (O). Place the LCD TV at flat place. Screw the
bracket (M) at the back of LCD TV with the matched screws.
P
O
N
M
D
ネジ(N)の中に液晶テレビ後面の取付穴径に対応できるネジを
選んで該当するワッシャー(O)のネジ穴に挿入してください。
例えば、M6 ネジをお選びになる場合、ワッシャー(O)の一番
大きいなネジ穴に挿入します。液晶テレビを横になり、該当する
ネジでブラケット(M)を液晶テレビに取り付けてください。
M6
6
M5
M4
安裝液晶電視與調整視角
ASSEMBLE LCD TV & ADJUST THE VIEW ANGLE YOU PREFER
液晶テレビと組合せ。ディスプレー角度調整
6-1 將固定好支架的液晶電視掛在電視架主體(J)上。請注意
支架(M)的掛勾必須緊密掛在電視架主體(J)上,在掛勾安全
掛上橫桿之前,請勿鬆開液晶電視。扳動支架(M)的安全勾
至正確位置,將 M6X8L 螺絲(Q)鎖在安全勾的螺絲孔,可避
免液晶電視意外滑落。
Q
M
Hang the LCD TV already assembled with the Bracket on the
Mount Body (J). Please notice that the hook on the Bracket (M)
must hook on the Mount Body (J) very firmly. Don’t release the
LCD TV until the hooks have securely hooked onto the crossbars.
Move the safety hook located on each Bracket (M) into the
position & insert M6X8L Screw (Q) into the hole on the safety
hook to fix and to avoid the LCD TV accidentally lifted from
the mount.
J
液晶テレビと接合したブラケット(M)をテレビマウント(J)の横パイプに引っ掛けてください。プラケット(M)のフックがしっかり
とテレビマウント(J)にかかるように十分とご注意ください。フックが横パイプに引っかかる前、必ず手を放さないでください。
液晶テレビの落下を避けるため、プラケット(M)のフックを固定位置に動かして、M6×8L ネジ(Q)をフックのネジ穴に挿入
してください。
6-2 用螺絲起子將液晶架主體(J)兩邊螺絲鬆開,調整想要的液晶電視
視角,最大傾斜角度為 10 度。為了固定最佳視角,調整角度之後
請再將兩邊的螺絲鎖緊。
Use screw driver to loose the bolts at both sides of the Mount Body (J).
Adjust the view angle of LCD TV to the angle you prefer. The maximum
adjustable angel is 10 degrees. Please screw tight the bolts at both sides
after adjustment in order to fix the optimal view angle.
ドライバーでテレビマウンド(J)両側のネジを弛め、ディスプレーをお好みの角度(最大傾斜角 10°)に調整してください。
角度調整後再度両側のネジを強く締めて、ディスプレーの位置を固定します。
安全警告 CAUTION 注意
在步驟 6-2 調整螺絲時,請勿將螺絲取出避免危險。為避免震動,在調整完成後,請記得將本吊架所有螺絲、螺帽鎖緊。
定期檢查螺絲與螺帽,當螺絲或螺帽變鬆,請再次鎖緊,如果情況沒有改善請聯絡經銷商。
When adjusting the bolts in Step 6-2, do not take them out to prevent any damage. Please remember to screw tight all bolts, nuts &
screws of the LCD TV Ceiling Mount after adjustment in case of shocks. Check the screws & nuts regularly. Screw tight the bolts
again if they become loose. Please contact the distributor if the condition is not improved.
ステップ 6-2 でネジを調整の際、危険を避けるためにネジを取外さないでください。振動対策として、本製品に使用されるネジ、
ナットをしっかりと締め付けてください。定期的にネジとナットの締め具合をチェックし、ネジやナットの締め具合がゆめるになる
場合、改めて強く締めてください。改善してない場合、販売店までご連絡ください。