1
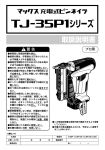
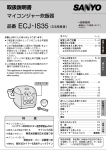
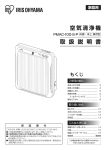
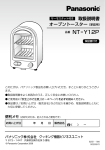
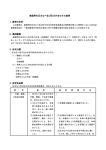
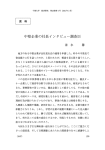
フィリップス ノンフライヤープラス
品
番
HD9530/22
D_HD9530-22_jp_CS6_A5.indd 1
取 扱 説 明 書
保証書付
保 証 書 は、この 取 扱 説 明 書 の 最
終 ページについておりますので
販売店で記入を受けてください。
14/05/20 17:52
フィリップス ノンフライヤープラスをお買い上げいただき、まことにあり
がとうございます。長い間ご愛用いただくために、ご使用前にこの取扱説明
書をよくお読みのうえ、正しくお使いください。
また、お読みになった後は、お使いになる方がいつでも見られるところに必ず
保管してください。
商品のご確認
商品をご確認ください
取扱説明書
レシピブック
本体
クッキングネット
(取り外し可能)
バスケット
バスケットカバー
バスケットパン
※改良の為、仕様を予告なく変更することがあります。
1
D_HD9530-22_jp_CS6_A5.indd 1
14/05/20 17:52
目 次
●は じ め に
商品のご確認
1
目次
2
必ずお守りください
3・4
各部の名称
5・6
初めてお使いいただく前に
●ご 使 用 方 法
7
準備する
8・9
調理する
10∼13
食材をセットする
14・15
お手入れ方法
16
保管の仕方
17
●困 っ た と き
故障かな?と思ったら
18・19
●英 文 解 説
Guidance in English
20∼30
●保 保証とアフターサービス
32
仕様/フィリップスサポートセンター
33
無料修理規定
34
証
保証書
最終ページ
2
D_HD9530-22_jp_CS6_A5.indd 2
14/05/20 17:52
安 全 上 の ご 注 意
必ずお守り
ください
○絵表示について
○絵表示の例
●ここに示した注意事項は、安全に関する重要
な内容ですので、必ず守ってください。
●誤った取扱いをしたときに想定される内容を
「警告」と「注意」とに区分けしています。
記号は、
「危険、警告、注意」を示します。
図の中や近くに具体的な注意内容を示します。
警告
人が死亡または重傷を負う可能性が想定される内容。
注意
人が傷害を負う可能性及び物的損害のみの発生が
想定される内容。
・記号は、
してはいけない
「禁止」を示します。図の
中や近くに具体的な禁
止内容(左図の場合は分
解禁止)
を示します。
・記号は、必ずしていただく
「強
制」を示します。図の中や近く
に具体的な強制内容(左図の
場合は電源プラグをコンセント
から抜くこと)
を示します。
警 告
●本製品の改造はしない。また、修理
技術者以外の人は、分解したり修理
をしない。火災、感電、ケガの原因と
なります。修理はフィリップスサポー
トセンターにご相談ください。
●異臭、
異音が出たり、
落下や破損した
ときはコンセントから電源プラグ部を
抜く。そのまま使用すると、
事故の原
因になります。
必ず使用を中止し、
フィ
リップスサポートセンターにご相談く
ださい。
●お手入れの際は必ず電源プラグ部を
コンセントから抜く。また、濡れた手
で抜き差ししない。感電やケガをす
ることがあります。
●雷が鳴ったら、製品本体や電源プラ
グ部に触らない。感電の原因となり
ます。
●電源コードや電源プラグ部が傷んだ
り、
コンセントの差し込みが緩いとき
は使用しない。感電・ショート・発火
の原因になります。
●電源プラグ部はコンセントに確実に
差し込 む。差し込 みが不 完 全 な 場
合、感電・発火の原因となります。
●本製品の内部に金属物や燃えやす
いものを入れない。事故や故障の原
因となります。
●電源コードを無理に曲げたり、引っ
張ったり、ねじったり、たばねたり、重
い物を載せたり、挟み込んだり、加工
したりしない。電源コードが破損し、
火災・感電の原因となります。
●使用後はコンセントから電源プラグ部
を抜く。
火災、
感電の原因となります。
●製品本体を水につけたり、水をかけ
たりしない。故障や、ショート・感電
の原因になります。
●電源は交流100V、定格15A以上の
コンセントを単独で使用する。延長
コードは使用しないでください。
●お子様など取り扱いに不慣れな方だ
けで使わせないでください。
●バスケットパンにオイルや、水以外の
液体を入れない。発火、火災の原因
となります。
●乳幼児の手の届くところに本製品を
置かないでください。
●バスケットに食材を入れていない状
態で10分以上加熱しない。故障・発
火の原因になります。
3
D_HD9530-22_jp_CS6_A5.indd 3
14/05/20 17:52
警 告
●テーブルクロスやカーテンなど可燃
性の物のそばで使用しない。熱に弱
い敷物の上には置かない。火災の
原因になります。
●本製品より煙があがっている場合
は、すぐにコンセントから電源プラ
グ部を抜く。煙が収まってからバス
ケットパンを取り出してください。
●壁や家具などに接触させた状態で
使用しない。製品の周辺は少なくと
も10cm以上空けて使用してくださ
い。熱により、変色、変形、火災の原
因となります。
●使用中は、
空気吸入口と空気吹き出
し口をふさがない。本体の変形・発
火・火災の原因となります。
●使用中は空気吹き出し口から熱風
が出るため、十分な距離を取り、顔
や手を近づけない。バスケットパン
を取り出す時も熱風に注意する。や
けどの原因となります。
●電源プラグ部にピンやゴミを付着
させない。感電・ショート、発火の原
因になります。
注 意
●製品本体の上に物を載せない。重
みで外装が変形したり破損するな
ど、故障の原因となることがありま
す。また、載せた物が落下したり倒
れたりし、事故や故障の原因となり
ます。
●電源プラグ部を抜くときは、電源
コード部を持たずに必ず先端の電
源プラグ部を持って引き抜く。感電
やショートして発火することがあり
ます。
●使用中や使用直後は、製品内部や
バスケット、
バスケットカバー、
クッキ
ングネットに直接触れない。高温に
なっているため、やけどの原因とな
ります。
●置く場所に注意する。油煙や湯気
が当たる場所に置かない。温度が
高くなる場所や、熱を発生する機
器のそばに置かない。直射日光の
当たる高温の場所に置かない。湿
度 や ほこりの 多 い 場 所に置 か な
い。事故や故障の原因となります。
●使用中は本体から離れない。火災
(発火)の恐れがあります。
●不安定な場所の上に置かない。
ぐら
つく台や傾いた所などの不安定な
場所に置くと、落ちたり、倒れたりし
てケガの原因となります。
●使用後は必ずお手入れをする。調
理くずや油分が残ったまま調理す
ると発煙・発火の恐れがあります。
使 用 上 の ご 注 意
1.
本製品は、家庭用調理器です。それ以外の目的で使用しないでください。
2.
はじめてお使いになる前にバスケット、クッキングネット、バスケットカバー、バスケットパンを
一度洗ってからご使用ください。
3.
電源プラグ部をコンセントに接続する前に正しく部品が取り付けられているかご確認ください。
4.
使用中は製品本体を動かさないでください。また、使用後は30分以上置いてから持ち運んだ
り、お手入れをしてください。
5.
6.
7.
使用中は本体表面が熱くなります。
食材は必ずバスケットの中で調理し、発熱体と接触しないようにしてください。
焦げ付いたものは取り除くようにしてください。
4
D_HD9530-22_jp_CS6_A5.indd 4
14/05/20 17:52
各部の名称
取り外しボタン
バスケット
ハンドル
バスケットカバー
バスケットパン
クッキングネット
(取り外し可能)
5
D_HD9530-22_jp_CS6_A5.indd 5
14/05/20 17:52
本 体
正面
温度・タイマー表示
温度・タイマー調節ボタン
空気吸入口
ディスプレイ画面
温度・タイマー
設定切替ボタン
電源ボタン
開始・停止ボタン
背面
空気吹き出し口
電源コード
収納部
電源コード
電源プラグ部
裏側
電源コードを引き出すときは、本体を手でささえながら赤印以上は引き出さないでください。
(断線の原因になります。)
6
D_HD9530-22_jp_CS6_A5.indd 6
14/05/20 17:52
初めてお使い
いただく前に
注意
●製品本体を水につけたり、水をかけたりしないでください。
●はじめてお使いになる前にバスケット、クッキングネット、バスケットカバー、バスケッ
トパンを一度洗ってからご使用ください。
●誤ってバスケットパンを落下させ、破損や怪我をされないように注意してください。
1
製品を保護している梱包材をすべて取り除いてください。
2
製品からテープ、シールなどを剥がします。
3
バスケット、
クッキングネット、
バスケットカバー、
バスケットパンをしっかり洗います。
4
本体の外部と内部の両方を湿らせた布で拭いてください。
※食洗機での洗浄も可能です。 ※クッキングネット、
バスケットカバーは外してから洗ってください。
7
D_HD9530-22_jp_CS6_A5.indd 7
14/05/20 17:52
準備する
注意
1
●電源プラグ部をコンセントに接続する前に正しく部品が取り付けられているかご確認ください。
●バスケットパンにオイルや、水以外の液体を入れないでください。発火、火災の原因となります。
●不安定な場所の上に置かないでください。
上面10cm以上
製品を平らな場所に、水平に置きます。
※熱に弱い素材でできている物の上には置かないよ
うにしてください。変色や変形する場合があります。
※製品を持ち運ぶ際は地面に平行にし、
バスケット・バ
スケットパンが滑り落ちないようにご注意ください。
※使用中のガスコンロの近くなどには置かないでくだ
さい。熱で本体が変形する原因となります。
2
側面10cm以上
後面10cm以上
※製品の周辺は少なくとも10cm以上空けて使用してく
ださい。熱により、変色、変形、火災の原因となります。
(消防法 基準適合)
バスケットにクッキングネットを取り付けます。
クッキングネットの取り付け方
バスケット下部、ハン
ドル側の溝にクッキン
グネットの 突 起 部 分
( 1ヵ所 )を差し込 み
(図❶)、両ワキの留
め金にはまるように
軽く押し
(図❷)、取り
付けます。
クッキングネットの取り外し方
2
2
クッキングネットの留
め金付近を下から軽
く押し上げ、
バスケッ
トからクッキングネッ
トを取り外します。
※調理後にクッキングネットを外す場合には、冷ましてから、
もしくは鍋つかみなど耐熱性のあるものを使ってください。
1
●バスケットカバーについて
バスケットカバーをつけることで、ポップコーンやポテトチップスなどの料理が楽しめるように
なります。また、食材の油はねを防止したり、調理で出てしまう煙や食材の粉などを抑えること
ができます。
カバーをつけると空気の循環が変わりますので、5∼7分調理時間を長めにセットし
て調理をしてください。
ノンフライヤープラスで調理をする上では、必ずしもバスケットカバーを
つける必要はありませんので、調理するレシピに合わせてご利用ください。
バスケットカバーの取り付け方
バスケット上部、
ハン
ドル 側 の 溝にバス
ケットカバーの突起
部分(2ヵ所)を差し
込み(図❶)、両ワキ
の 留め金にはまる
ように軽く押し
(図
❷)、取り付けます。
バスケットカバーの取り外し方
バスケット前面から
飛び出しているバス
ケットカバー先端の
ツメを上に持ち上げ
て、取り外します。
2
2
1
※調理後にバスケットカバーを外す場合には、冷ましてから、
もしくは鍋つかみなど耐熱性のあるものを使ってください。
1
8
D_HD9530-22_jp_CS6_A5.indd 8
14/05/20 17:52
3
4
バスケットをバスケットパンにセットします。
※バスケットパンが落下しないようにバスケットが
しっかりとセットされていることをご確認ください。
製品底部の電源コード収納部から電源コードを引き出します。
※このノンフライヤープラスは、
熱風で調理しま
す。バスケットパンにはオイルや、
水以外の液体
を入れないでください。
※製品上部に物を置かないでください。空気の循
環が妨げられると、
仕上がりに影響がでます。
※電源コードの長さは約1mです。
※電源コードを引き出すときは、
本体を手でささ
えながら赤印以上は引き出さないでください。
(断線の原因になります。)
9
D_HD9530-22_jp_CS6_A5.indd 9
14/05/20 17:52
調理する
注意
■ポイント
1
●バスケットパンが落下しないように、持運び中にボタンを押さないでください。
●食材がない状態で10分以上のカラ炊きをしないでください。
●電源プラグ部をコンセントに接続する前に正しく部品が取り付けられているかご確
認ください。
●バスケットパンを本体から取り出した時は耐熱性のある場所に置いてください。
・温度の設定は、60℃∼200℃の間で5℃刻みで選べます。
・時間の設定は、1∼60分の間で1分刻みで選べます。
・電源プラグをさしたまま電源をOFFにした場合、前回設定した温度・時間になります。
・調理途中で電源をOFFにした場合は、電源をOFFにする前の温度と時間が表示されます。
電源プラグ部をコンセントに差し込みます。
電源ボタン
( )を押してください。アラーム
音が1回鳴り、ディスプレイが表示されます。
※初期の温度設定は200℃になります。
2
バスケットパンを本体から取り出します。
※取り出す際、
ハンドルの上の取り外しボタンを
押さないように注意してください。
※誤ってバスケットパンを落下させ、破損や怪我を
されないように注意してください。
3
バスケットに食材をセットします。
※クッキングネット、
バスケットカバーがしっかりとバスケッ
トに取り付けられていることをご確認ください。
取り付け
「準備する」
の項をお読みください。
方については、P.8
MAXライン
※バスケット内のMAXラインを超えて食材をいれない
でください。調理するレシピの最大量を目安にし、
食材
は入れすぎないでください。入れすぎると適切に調理
されません。分量については、P.14「食材をセットする」
の項をお読みください。
※脂分が多い食材を調理する場合、脂が加熱されて白
い煙が発生することがあります。バスケットパンに
200mlほど、水を入れることで煙を軽減することがで
きます。
※調理中に水が加熱され大変熱くなっています。バス
ケットパンを取り出す際など、水をこぼさないようご注
意ください。
10
D_HD9530-22_jp_CS6_A5.indd 10
14/05/20 17:52
4
本体にバスケットパンを戻します。
※バスケットパンのみ
(バスケットがセットされていない
状態)
で使用しないでください。
※調理中、調理直後のバスケットパンは高温になるため、
触らないようにしてください。必ず、ハンドルを持って
作業をしてください。
5
温度・タイマー設定切替ボタン
( )
を押し、
表示が℃になっていることを確認してくださ
い。調節ボタン
( )を押し、温度をセットしま
す。温度については、P.14「食材をセットす
る」の項をお読みください。
6
温度・タイマー設定切替ボタン
( )
を押し、
表示がMIN(分)になっていることを確認し
てください。調節ボタン
( )を押し、必要な
調理時間にセットします。調理時間について
は、P.14「食材をセットする」の項をお読みく
ださい。
7
開始・停止ボタン
(
)
を押して作動を開始します。
※調理を開始すると、温度と残りの調理時間が交互に表示されます。
※1分を切るとタイマーのカウントダウン
(1秒ごと)が始まり、残りの調理時間
を指していきます。
●予熱方法
食材を入れる前に予熱してください。電源ボタン
を押した後、温度調節ボタン
( )
で温度をセッ
( )
トし、開始ボタン
( )
を押します。アラーム音が3
回鳴ると予熱が完了です。予熱は約5分で自動的
に止まり、開始ボタン
( )が点滅した状態になり
ます。その後、バスケットに食材を入れ調理時間を
セットしてください。
※予熱をしない場合には調理時間を3分ほど長く
して調理してください。
11
D_HD9530-22_jp_CS6_A5.indd 11
14/07/30 18:24
8
食材によっては、調理時間が半分過ぎたとこ
ろで、バスケットパンを軽く振ることをおす
すめします。ハンドルを持ってバスケットパン
を引き出し、振ってください。再び、バスケッ
トパンを本体に戻します。
※必ずしもバスケットパンを振る必要性はありません。
※調理中にバスケットパンを取り出す場合には、やけど
などにご注意ください。
※振っている間は取り外しボタンを
押さないでください。
■ ポイント
・バスケットパンからバスケットだけを取り出して振
ることも可能です。
その場合はバスケットパンを取
り出し、
耐熱性のある場所に置いて、
取り外しボタン
を押します。
・あらかじめタイマーを調理時間の半分にセットして
おくと、
バスケットパンを軽く振る時間にアラーム
音が鳴ります。
軽く振った後バスケットパンを戻し、
残り時間を再びタイマーでセットしてください。
・非常に強い熱風で調理するため、パン粉などが吹
き上がる場合があります。調理(例:エビフライな
ど)の際は、食材に粉をよくなじませてください。
9
調理が終わるとアラームが鳴ります。バス
ケットパンを取り出し、耐熱性のある場所に
置いてください。
※食材から出た余分な脂分は、
バスケットパンの底に溜まります。
※熱に弱い素材でできている物の上には置かないようにしてくだ
さい。変色や変形する場合があります。
※調理直後のバスケットパンと食材はとても熱くなっていますので、
取扱いには十分お気をつけください。食材によっては、調理中に
発生した水蒸気が、
バスケットパンから出てくることがあります。
10
食材が調理されているかを確認します。調理が不十分な場合は、バスケットパンを元に
戻し、さらに数分調理してください。
※脂肪分が少ない食材など、食材によっては色がつきにくい場合があります。お好みに合わせてスプーン一
杯程度の油を食材につけていただく、
またはオイルスプレーをご使用いただくと色がつきやすくなります。
※調理中、調理直後のバスケット、
クッキングネット、バスケットカバー、バスケットパンは高温になるため、素
手で触らないようにしてください。
12
D_HD9530-22_jp_CS6_A5.indd 12
14/05/20 17:52
1
11
12
バスケットパンを振って、細かい食
材を振るい落とします。取り外しボ
タンを押し( 図 ❶ )、バスケットを
バスケットパンから取り外します
(図❷)。
2
バスケットから食材を取り出し、空にします。
※バスケットカバーを取り付けている場合は、バス
ケットカバーを取り外してから食材を取り出して
ください。バスケットカバーの取り外し方につい
ては、P.8「準備する」の項をお読みください。
■ ポイント
・大きな食材、崩れやすい食材を
皿に移す時は、
トングなどを使
用することをおすすめします。
※バスケットパンの底に溜まった余分な脂分が食材にかかる
ため、バスケットパンにバスケットを装着した状態で逆さま
にしないでください。
自動電源OFF機能
本製品にはタイマーが内蔵されていま
す。残り時間が0になるとアラームが鳴り、
30分 後に自動 的に電 源がOFFになりま
す。手動で電源をOFFにする場合は、電源
ボタンを押してください。
●調理が終わっても、時間をあけずに
次の調理をすることができます。
13
D_HD9530-22_jp_CS6_A5.indd 13
14/05/20 17:52
下記の表を参考にして、調理したい食材をセット
してください。
食材をセットする
※詳しいレシピはレシピブックまたはホームページ
をご覧ください。
http://www.japan.philips.co.jp/kitchen/nonfryer/
※こちらは海外のレシピから引用しているので、日本向けに開発した同梱レシピと食材やオイルの分量・
調理時間・調理温度が異なります
(同梱されているレシピは2人前)。海外のレシピを使用していただい
ても、
美味しく召しあがれます。
※こちらの表はあくまでも参考です。食材の大きさや形などによって、調理条件は異なりますので、調理の
仕上がりを保証するものではありません。
※高速エアテクノロジーで一気に製品内部を高温にできるため、調理中にバスケットパンを引き出しても、
調理にはほとんど影響がありません。
※バスケットカバーをつけた場合には、5∼7分調理時間を長めにセットして調理をしてください。
最少-最大量(g)
調理時間(分)
調理温度(℃)
ポテト&フライ
冷凍(細)
150-700
7-16
200
冷凍(太)
150-700
12-20
200
ホームメイド
(8x8mm)
150-700
18-25
180
ホームメイド
(くさび型)
150-800
18-22
180
ホームメイド
(サイコロ型)
150-750
12-18
180
レシュティ
(ポテトパンケーキ)
250
15-18
180
ステーキ
100-500
8-12
180
ポークチョップス
100-500
10-14
180
ハンバーガー
100-500
7-14
180
ソーセージロール
100-500
13-15
200
ドラムスティック
100-500
18-22
180
チキンブレスト
100-500
10-15
180
肉類
冷凍食品等のスナック
春巻き
100-400
8-10
200
チキンナゲット
(冷凍)
100-500
6-10
200
フィッシュフィンガー(冷凍)
100-400
6-10
200
チーズフライ
(冷凍)
100-400
8-10
180
野菜の肉詰め
100-400
10
160
※上記レシピ以外にも、オーブンや油で調理できる冷凍食品はノンフライヤープラスで調理可能です。
調理時間は食材に合わせて設定してください。
14
D_HD9530-22_jp_CS6_A5.indd 14
14/05/20 17:52
■ ポイント
・小さな食材は大きな食材に比べて、短時間で調理ができます。また、調理の途中で一旦バスケットパンを
振り、均一に調理されるように残りの調理時間を調整してください。
・食材の量が多い場合は、調理時間を通常より少し長めにしてください。また、少ない場合は短く設定してください。
・オーブンや油で調理できる冷凍食品等のスナックは、
ノンフライヤープラスでも調理可能です。
・バスケット内に収まるオーブン皿を使い、ケーキやキッシュを焼いたり、崩れやすい食材をより簡単に調理
することができます。
・ノンフライヤープラスで食材を温め直すことも可能です。食材を温め直す時は、調理温度を150℃、調理
時間を10分以内に設定し、調理してください。
・ケーキやマフィンなどの膨らむ料理をつくる場合は、材料を容器の半分以下の量にしてください。
・脂肪分が少ない食材などはお好みに合わせてスプーン一杯程度の油を食材につけていただく、またはオ
イルスプレーをご使用いただくと色がつきやすくなります。
●事前に火が通ったポテト
(冷凍など)を使用すると、簡単においしく仕上がります。
ホームメイドでつくりたい場合は、下記の手順に従ってください。
■ホームメイドフライのつくり方
1
2
3
じゃがいもの皮をむき、
くし形切りにします。
切ったじゃがいもを、15分程度水に浸します。水から取り出した後、キッチンペーパーなど
で水気を拭き取ります。
ノンフライヤープラスでじゃがいもを調理します。P.10「調理する」の項をお読みください。
15
D_HD9530-22_jp_CS6_A5.indd 15
14/05/20 17:52
お手入れ方法
製品はご使用ごとにお手入れをしてください。
警告
●調理直後のバスケット、クッキングネット、バスケットカバー、バスケットパンは高温に
なるため直接触れないでください。
●バスケットカバーやクッキングネットを取り外す際は、冷ましてから、もしくは鍋つか
みなど耐熱性のある物を使ってください(取り外し方はP.8「準備する」の項をお読み
ください)。
※バスケットパン、
バスケット、製品内部はテフロン加工を施しています。テフロン加工が傷つくため、お手
入れには、
金属のキッチン器具を使ったり、研磨剤を使用しないでください。
1
コンセントから電源プラグ部を抜き、製品を冷まします。
2
湿らせた布で、本体の外側を拭きます。
3
※バスケットパンを取り出すと、製品が冷めやすくなります。
スポンジと中性洗剤を使って、バスケットパン、
クッキングネット、バスケットカバー、バスケットを洗
い、
お湯または水で洗い流してください。
※バスケットパン、
バスケットカバー、
バスケット、
クッキングネットは食洗機での洗浄も可能です。
※洗う際は、バスケットからバスケットカバー、
クッキングネットを取り外してください。 P.8「準備する」の項をお
読みください。
■ ポイント
汚れがバスケット、バスケットパンの底に残っていたら、バスケットパンにぬるま湯と中性洗剤を入れ、そ
の中にバスケットを入れます。 10分ほど浸し、汚れを取り除いてください。
4
5
本体内部をぬるま湯を含ませたスポンジで掃除してください。
ブラシを使って、発熱体についた調理くずや油分などを取り
除いてください。
発熱体
注意
●本体の丸洗いはしないでください。故障や、ショート・感電の原因になります。
16
D_HD9530-22_jp_CS6_A5.indd 16
14/05/20 17:52
保管の仕方
注意
1
2
3
●使用後は必ずお手入れをしてから保管してください。調理くずや油分が残ったまま
調理すると発煙・発火の恐れがあります。
コンセントから電源プラグ部を抜き、製品を冷まします。
すべての付属品を掃除してください。
P.16「お手入れ方法」の項をお読みください。
電源コードを電源コード収納部に押し入れてしまってください。
17
D_HD9530-22_jp_CS6_A5.indd 17
14/05/20 17:52
故障かな?
と思ったら
故障かな?と思ったら、お調べください。
ノンフライヤープラスが作動しない
▶電源プラグ部はきちんと差し込まれていますか?
電源プラグ部がコンセントにきちんと差し込まれているか、
コンセントが通電しているかを確認してください。
ブレーカーが動作しているか確認してください。
食材が十分調理されていない
▶バスケット内の食材の量が多くありませんか?
バスケット内の食材の量を減らしてください。少量の方が均一に仕上がります。
▶調理温度の設定が低くなっていませんか?
調理温度を適切な温度まで上げてください。 P.14「食材をセットする」の項をお読みください。
▶調理時間の設定が短くありませんか?
調理時間を適切な時間に設定してください。 P.14「食材をセットする」の項をお読みください。
食材が均一に調理されていない
▶食材によっては、調理の途中で軽く振ってください。
重なってセットされた食材(フライドポテトなど)
は調理時間の途中で、食材を軽く振ることをおすすめします。
調理しても食材に色がつかない
▶脂分の少ない食材など、食材によっては色がつきにくい場合があります。
お好みに合わせてスプーン一杯程度の油を食材につけていただくと色がつきやすくなります。オイルスプレーもご
使用いただけます。また、調理時間を少し長くすることで、色がつきやすくなります。
バスケットパンが適切にセットされない
▶バスケット内の食材の量が多くありませんか?
バスケット内のMAXラインを超えて、食材を入れないようにしてください。
▶バスケットがバスケットパンに適切にセットされていますか?
カチッと音がするまで、
バスケットをセットしてください。
18
D_HD9530-22_jp_CS6_A5.indd 18
14/05/20 17:52
製品から白い煙が出る
▶脂分が多い食材を調理していませんか?
脂分が多い食材を調理すると、バスケットパンにたくさんの脂が落ちます。脂が加熱されて煙が発生し、バスケット
パンが通常よりも熱くなる可能性がありますが、製品や仕上がりに影響することはありません。
▶バスケットパンに前回の脂分が残っていませんか?
白い煙はバスケットパン内の脂分が熱せられ、発生します。毎回バスケットパンを清掃してください。
※脂分が多い食材を調理する場合、脂が加熱されて白い煙が発生することがあります。バスケットパンに200ml
ほど、水を入れることで煙を軽減することができます。
生のじゃがいもが十分に調理されていない
▶調理される前に適切に水に浸していますか?
調理する前に15分程度水に浸してから、
キッチンペーパーなどで水分を拭き取ってください。
▶調理に適したじゃがいもを使用していますか?
新鮮なじゃがいもを用意し、調理中に崩れないものを使用してください。
生のじゃがいもがサクッと仕上がらない
▶サクサク感はじゃがいもに含まれているオイルと水の量に関係しています。
じゃがいもの水切りをしっかり行ってください。
じゃがいもをより小さくカットしてください。
じゃがいもにオイルを少量かけてから調理するとよりサクッと仕上がります。
(オイルをかけすぎないようにご注意ください)
以上の点検により、正常な状態に戻らない場合は、
フィリップスサポートセンターにお問い合わせ願います。
19
D_HD9530-22_jp_CS6_A5.indd 19
14/05/20 17:52
HD9530/22
ENGLISH
D_HD9530-22_EN_CS6_A5.indd 20
14/05/28 19:00
1
Control button
8
7
Temperature/
Timer button
Power button
Start /Pause
5
1
2
3
9
4
6
10
D_HD9530-22_EN_CS6_A5.indd 21
11
14/05/28 19:00
1
2
3
4
5
6
7
8
9
10
11
12
13
14
15
16
17
18
19
20
2
1
2
1
22
21
23
2
1
1
2
D_HD9530-22_EN_CS6_A5.indd 22
14/05/28 19:00
Introduction
Congratulations on your purchase and welcome to Philips! To fully benefit from the support that
Philips offers, register your product at www.philips.com/welcome.
Your new nonfryer plus allows you to prepare your favourite ingredients and snacks in a healthier way.
The nonfryer plus uses hot air in combination with high-speed air circulation (Rapid Air) and a top
grill to prepare a variety of tasty dishes in a healthy, fast and easy way. Your ingredients are heated
from all sides at once and there is no need to add oil to most of the ingredients.
For more inspiration for recipes and information about the nonfryer plus, visit www.philips.com/kitchen.
General description (Fig. 1)
1Basket
2 Basket release button
3 Basket handle
4 Non-stick removable mesh
5 Basket cover
6Pan
7 Air inlet
8 Touch screen control panel
9 Air outlet openings
10 Cord storage compartment
11 Mains cord
Important
Read this user manual carefully before you use the appliance and save it for future reference.
Danger
-- Never immerse the housing, which contains electrical components and the heating elements, in
water nor rinse it under the tap.
-- Do not let any water or other liquid enter the appliance to prevent electric shock.
-- Always put the ingredients to be fried in the basket, to prevent it from coming into contact with
the heating elements.
-- Do not cover the air inlet and the air outlet openings while the appliance is operating.
-- Do not fill the pan with oil as this may cause a fire hazard.
-- Never touch the inside of the appliance while it is operating.
Warning
-- Check if the voltage indicated on the appliance corresponds to the local mains voltage before
you connect the appliance.
-- Do not use the appliance if the plug, the mains cord or the appliance itself is damaged.
-- If the mains cord is damaged, you must have it replaced by Philips, a service centre authorised by
Philips or similarly qualified persons in order to avoid a hazard.
-- This appliance is not intended for use by persons (including children) with reduced physical,
sensory or mental capabilities, or lack of experience and knowledge, unless they have been given
supervision or instruction concerning use of the appliance by a person responsible for their
safety.
-- Children should be supervised to ensure that they do not play with the appliance.
-- Keep the appliance and its mains cord out of the reach of children younger than 8 when the
appliance is switched on or is cooling down.
-- Keep the mains cord away from hot surfaces.
-- Do not plug in the appliance or operate the control panel with wet hands.
D_HD9530-22_EN_CS6_A5.indd 23
14/05/28 19:00
-- Only connect the appliance to a wall socket. Always make sure that the plug is inserted into the
wall socket properly.
-- This appliance is not intended to be operated by means of an external timer or a separate
remote-control system.
-- Do not place the appliance on or near combustible materials such as a tablecloth or curtain.
-- Do not place the appliance against a wall or against other appliances. Leave at least 10cm free
space on the back and sides and 10cm free space above the appliance. Do not place anything
on top of the appliance.
-- Do not use the appliance for any other purpose than described in this manual.
-- Do not let the appliance operate unattended.
-- During hot air frying, hot steam is released through the air outlet openings. Keep your hands and
face at a safe distance from the steam and from the air outlet openings. Also be careful of hot
steam and air when you remove the pan from the appliance.
-- Immediately unplug the appliance if you see dark smoke coming out of the appliance. Wait for
the smoke emission to stop before you remove the pan from the appliance.
-- The baking tray becomes hot all over when it is used in the nonfryer plus. Always use oven
gloves when handling the baking tray.
Caution
-- Place the appliance on a horizontal, even and stable surface.
-- This appliance is intended for normal household use only. It is not intended for use in
environments such as staff kitchens of shops, offices, farms or other work environments. Nor is it
intended to be used by clients in hotels, motels, bed and breakfasts and other residential
environments.
-- If the appliance is used improperly or for professional or semi-professional purposes or if it is
not used according to the instructions in the user manual, the guarantee becomes invalid and
Philips refuses any liability for damage caused.
-- Always return the appliance to a service centre authorised by Philips for examination or repair.
Do not attempt to repair or open the appliance yourself, otherwise the guarantee becomes
invalid.
-- Always unplug the appliance after use.
-- Let the appliance cool down for approx. 30 minutes before you handle or clean it.
-- Make sure the ingredients prepared in this appliance come out golden-yellow instead of dark or
brown. Remove burnt remnants. Do not fry fresh potatoes at a temperature above 180°C (to
minimise the production of acrylamide).
Electromagnetic fields (EMF)
This Philips appliance complies with all standards regarding electromagnetic fields (EMF). If handled
properly and according to the instructions in this user manual, the appliance is safe to use based on
scientific evidence available today.
Before first use
1Remove all packaging material.
2Remove any stickers or labels from the appliance.
3Thoroughly clean the basket, pan and basket cover with hot water, some washing-up liquid
and a non-abrasive sponge.
Note:You can also clean these parts in the dishwasher.
4Wipe the inside and outside of the appliance with a moist cloth.
This is a nonfryer plus that works on hot air. Do not fill the pan with oil or frying fat.
D_HD9530-22_EN_CS6_A5.indd 24
14/05/28 19:00
Preparing for use
1Place the appliance on a stable, horizontal and level surface.
Do not place the appliance on non-heat-resistant surfaces.
2Place the removable mesh properly (Fig. 1).
3Place the basket in the pan properly (Fig. 2).
4Pull the mains cord out of the cord storage compartment in the bottom of the appliance.
Do not fill the pan with oil or any other liquid.
Do not put anything on top of the appliance. This disrupts the airflow and affects the hot air
frying result.
Using the appliance
The nonfryer plus can prepare a large range of ingredients. The recipe booklet included helps
you get to know the appliance. You can find more recipes at www.philips.com/kitchen.
Hot air frying
1Put the mains plug in a wall socket (Fig. 3) and press the power on/off button (Fig. 4).
2Carefully pull the pan out of the nonfryer plus (Fig. 5).
3Put the ingredients in the basket (Fig. 6).
Note: Never fill the basket beyond the MAX indication or exceed the amount indicated in the table (see
section ‘Settings’ in this chapter), as this could affect the quality of the end result.
4Slide the pan back into the nonfryer plus (Fig. 7).
Never use the pan without the basket in it.
Caution: Do not touch the pan during and some time after use, as it gets very hot. Only hold
the pan by the handle.
5Choose the temperature control to set the required temperature. See section ‘Settings’ in
this chapter to determine the right temperature (Fig. 8, 9).
6Choose the timer control to set the required time. See section ‘Settings’ in this chapter (Fig.
10, 11).
7To switch on the appliance, press the start button (Fig. 12).
Add 3 minutes to the preparation time when the appliance is cold.
Note: If you want, you can also let the appliance preheat without any ingredients inside. In that case,
after turn on the power, please set the temperature with control button (Fig. 2). After 3 minutes, the
preheat is completed. Then fill the basket and set the timer to the required preparation time.
,, The timer starts counting down the set preparation time.
,, During the hot air frying process, the heating-up light comes on and goes out from time to
time. This indicates that the heating element is switched on and off to maintain the set
temperature.
,, Excess oil from the ingredients is collected on the bottom of the pan.
8Some ingredients require shaking halfway through the preparation time (see section ‘Settings’
in this chapter). To shake the ingredients, pull the pan out of the appliance by the handle and
shake it. Then slide the pan back into the nonfryer plus (Fig. 13).
D_HD9530-22_EN_CS6_A5.indd 25
14/05/28 19:00
Caution: Do not press the basket release button during shaking (Fig. 14).
Tip:To reduce the weight, you can remove the basket from the pan and shake the basket only.To do so,
pull the pan out of the appliance, place it on a heat-resistant surface and press the basket release
button.
Tip: If you set the timer to half the preparation time, you hear the timer bell when you have to shake the
ingredients. However, this means that you have to set the timer again to the remaining preparation time
after shaking.
9When you hear the alarm sound, the set preparation time has elapsed. Pull the pan out of the
appliance and place it on a heat-resistant surface (Fig. 15, 16).
Note:You can also switch off the appliance manually.To do this, turn off power button .
10Check if the ingredients are ready.
If the ingredients are not ready yet, simply slide the pan back into the appliance and set the timer to
a few extra minutes.
11To remove small ingredients (e.g. fries), press the basket release button (1) and lift the basket
out of the pan (2).  (Fig. 17)
Do not turn the basket upside down with the pan still attached to it, as any excess oil that has
collected on the bottom of the pan will leak onto the ingredients.
After hot air frying, the pan and the ingredients are hot. Depending on the type of ingredients in
the nonfryer plus, steam may escape from the pan.
12Empty the basket into a bowl or onto a plate.  (Fig. 18)
Tip:To remove large or fragile ingredients, use a pair of tongs to lift the ingredients out of the
basket (Fig. 19).
13Please do not touch the mesh directly as it gets extremely hot after its usage. Always use
oven gloves when handling the removable mesh (Fig 20).
14When a batch of ingredients is ready, the nonfryer plus is instantly ready for preparing
another batch.
Multi functional lid
For easy cleaning and more versatile cooking, Nonfryer plus comes with multi functional lid.
1Place multi functional lid into the basket (Fig 21).
2To remove the lid, lift the lid out of the pan (1 and 2). Always use oven gloves when handling
the lid after its usages (Fig 22).
Settings
This table below helps you to select the basic settings for the ingredients you want to prepare.
Note: Keep in mind that these settings are indications. As ingredients differ in origin, size, shape as well as
brand, we cannot guarantee the best setting for your ingredients.
Because the Rapid Air technology instantly reheats the air inside the appliance, pulling the pan
briefly out of the appliance during hot air frying barely disturbs the process.
Tips
-- Smaller ingredients usually require a slightly shorter preparation time than larger ingredients.
-- A larger amount of ingredients only requires a slightly longer preparation time, a smaller amount
of ingredients only requires a slightly shorter preparation time.
D_HD9530-22_EN_CS6_A5.indd 26
14/05/28 19:00
-- Shaking smaller ingredients halfway through the preparation time optimises the end result and
can help prevent unevenly fried ingredients.
-- Add some oil to fresh potatoes for a crispy result. Fry your ingredients in the nonfryer plus
within a few minutes after you added the oil.
-- Do not prepare extremely greasy ingredients such as sausages in the nonfryer plus.
-- Snacks that can be prepared in an oven can also be prepared in the nonfryer plus.
-- The optimal amount for preparing crispy fries is 500 grams.
-- Use pre-made dough to prepare filled snacks quickly and easily. Pre-made dough also requires a
shorter preparation time than home-made dough.
-- You can also use the nonfryer plus to reheat ingredients. To reheat ingredients, set the
temperature to 150°C for up to 10 minutes.
*When using basket cover, please add extra 5-7 minutes to cook the food.
Min-max
Amount
(g)
Time
(min.)
Temperature
(°C)
Shake
Extra
information
Thin frozen fries
300-700
12-16
200
Shake
Thick frozen fries
300-700
12-20
200
Shake
Home-made fries
(8x8mm)
300-800
18-25
180
Shake
add 1/2 tbsp of
oil
Home-made
potato wedges
300-800
18-22
180
Shake
add 1/2 tbsp of
oil
Homemade  potato
cubes
300-750
12-18
180
Shake
add 1/2 tbsp of
oil
Rosti
250
15-18
180
Potato gratin
500
18-22
180
Steak
100-500
8-12
180
Pork chops
100-500
10-14
180
Hamburger
100-500
7-14
180
Sausage roll
100-500
13-15
200
Drumsticks
100-500
18-22
180
Chicken breast
100-500
10-15
180
Spring rolls
100-400
8-10
200
Shake
Use oven-ready
Frozen chicken
nuggets
100-500
6-10
200
Shake
Use oven-ready
Frozen fish fingers
100-400
6-10
200
Potatoes & fries
Meat & Poultry
Snacks
D_HD9530-22_EN_CS6_A5.indd 27
Use oven-ready
14/05/28 19:00
Min-max
Amount
(g)
Time
(min.)
Temperature
(°C)
Shake
Extra
information
Frozen
breadcrumbed
cheese snacks
100-400
8-10
180
Stuffed vegetables
100-400
10
160
Cake
300
20-25
160
Use baking tray
Quiche
400
20-22
180
Use baking tray/
oven dish
Muffins
300
15-18
200
Use baking tray
Sweet snacks
400
20
160
Use baking tray/
oven dish
Use oven-ready
Baking
Note:When you use ingredients that rise (such as with cake, quiche or muffins) the baking tray should
not be filled more than halfway.
Note: Add 3 minutes to the preparation time when you start frying while the nonfryer plus is still cold.
Making home-made fries
For the best results, we advise to use pre-baked (e.g. frozen) fries. If you want to make home-made
fries, follow the steps below.
1Peel the potatoes and cut them into sticks.
2Soak the potato sticks in a bowl for at least 30 minutes, take them out and dry them with
kitchen paper.
3Pour ½ tablespoon of olive oil in a bowl, put the sticks on top and mix until the sticks are
coated with oil.
4Remove the sticks from the bowl with your fingers or a kitchen utensil so that excess oil
stays behind in the bowl. Put the sticks in the basket.
Note: Do not tilt the bowl to put all the sticks in the basket in one go, to prevent excess oil from ending
up on the bottom of the pan.
5Fry the potato sticks according to the instructions in this chapter.
Cleaning
Clean the appliance after every use.
1Remove the mains plug from the wall socket and let the appliance cool down.
Note: Remove the pan to let the nonfryer plus cool down more quickly.
2Wipe the outside of the appliance with a moist cloth.
3Clean the inside of the appliance with hot water and a non-abrasive sponge.
4Clean the heating element with a cleaning brush to remove any food residues.
D_HD9530-22_EN_CS6_A5.indd 28
14/05/28 19:00
Storage
1Unplug the appliance and let it cool down.
2Make sure all parts are clean and dry.
3Push the cord into the cord storage compartment. Fix the cord by inserting it into the cord
fixing slot.
Ordering accessories
To purchase accessories for this appliance, please visit our online shop at www.shop.philips.com/
service. If the online shop is not available in your country, go to your Philips dealer or a Philips
service centre. If you have any difficulties obtaining accessories for your appliance, please contact the
Philips Consumer Care Centre in your country. You find its contact details in the worldwide
guarantee leaflet.
Environment
-- Do not throw away the appliance with the normal household waste at the end of its life, but
hand it in at an official collection point for recycling. By doing this, you help to preserve the
environment (Fig. 23).
Guarantee and service
This product is designed for use only in Japan and cannot be used in any other country. No service
is available outside of Japan.
Troubleshooting
Problem
Possible cause
Solution
The nonfryer plus
does not work.
The appliance is not
plugged in.
Put the mains plug in a wall socket.
You have not set the timer. Set the timer to the required
preparation time to switch on the appliance.
The ingredients
fried with
the nonfryer plus
are not done.
The amount of ingredients
in the basket is too big.
Put smaller batches of ingredients in the basket.
Smaller batches are fried more evenly.
The set temperature is too Set the temperature control to the
low.
required temperature setting (see section
‘Settings’ in chapter ‘Using the appliance’).
The ingredients
are fried unevenly
in the nonfryer
plus.
The preparation time is
too short.
Set the timer control to the required
preparation time (see section ‘Settings’ in
chapter ‘Using the appliance’).
Certain types of
ingredients need to be
shaken halfway through
the preparation time.
Ingredients that lie on top of or across each
other (e.g. fries) need to be shaken halfway
through the preparation time. See section
‘Settings’ in chapter ‘Using the appliance’.
D_HD9530-22_EN_CS6_A5.indd 29
14/05/28 19:00
Problem
Possible cause
Solution
Fried snacks are
not crispy when
they come out of
the nonfryer plus.
You used a type of snacks
meant to be prepared in a
traditional deep fryer.
Use oven snacks or lightly brush some oil onto
the snacks for a crispier result.
I cannot slide the
There are too much
pan into the
ingredients in the basket.
appliance properly.
White
smoke comes out
of the appliance.
Fresh fries are
fried unevenly in
the nonfryer plus.
Fresh fries are not
crispy when they
come out of the
nonfryer plus.
Do not fill the basket beyond the MAX
indication.
The basket is not placed in
the pan correctly.
Push the basket down into the pan until you
hear a click.
The handle of the baking
tray is obstructing the pan.
Push the handle to a horizontal position, so it
does not stick out on top of the basket.
You are preparing greasy
ingredients.
When you fry greasy ingredients in the
nonfryer plus, a large amount of oil will leak
into the pan. The oil produces white smoke and
the pan may heat up more than usual. This
does not affect the appliance or the end result.
The pan still contains
grease residues from
previous use.
White smoke is caused by grease heating up in
the pan. Make sure you clean the pan properly
after each use.
You did not soak the
potato sticks properly
before you fried them.
Soak the potato sticks in a bowl for at least 30
minutes, take them out and dry them with
kitchen paper.
You did not use the right
potato type.
Use fresh potatoes and make sure they stay
firm during frying.
Make sure you dry the potato sticks properly
The crispiness of the fries
depends on the amount of before you add the oil.
oil and water in the fries.
Cut the potato sticks smaller for a crispier
result.
Add slightly more oil for a crispier result.
D_HD9530-22_EN_CS6_A5.indd 30
14/05/28 19:00
31
D_HD9530-22_EN_CS6_A5.indd 31
14/05/28 19:00
保証と
アフターサービス
保証書と修理サービスについて
(必ずお読みください)
〈保証書・最終ページに付属〉
●保証書は、
必ず「お買い上げ日・販売店名」等の記入を
お確かめのうえ、
販売店から受け取っていただき内容を
よくお読みのあと大切に保管してください。
保証
期間
対象
部分
お買い上げ日から2年間
本体
(バスケット、
クッキングネット、
バス
ケットカバー、
バスケットパンを除く)
【補修用性能部品の最低保有期間】
●補修用性能部品の最低保有期間は製造打ち切り後6年です。
●性能部品とは、その製品の機能を維持するために必要な部品です。
【ご不明な点や修理に関するご相談は】
●修理に関するご相談ならびにご不明な点は、
フィリップスサポートセンターにお問い合わせください。
【修理を依頼されるときは】
●修理をご依頼される前に、
この取扱説明書をよくお読みいただき、再度点検ください。
尚、
異常のあるときはご使用を中止し、
フィリップスサポートセンターへご依頼ください。
【保証期間中は】
●製品に保証書を添えてフィリップスサポートセンターにご連絡ください。
保証書の記載内容により無料修理いたします。
【保証期間が過ぎているときは】
●修理によって製品の機能が維持できる場合は、補修用性能部品の保有期間内であれば、
ご希望により有料で修理させていただきます。
【海外での本製品の保証及びアフターサービスについて】
●この製品は、
日本国内用に設計されているため海外では使用できません。
また、
アフターサービスもお受けできません。
【お客様の個人情報のお取り扱いについて】
●お受けしましたお客様の個人情報は、株式会社フィリップスエレクトロニクスジャパンのホームページ
http://www.philips.co.jp/ に掲載されている「お客様の個人情報の取り扱いについての当社の方針」
に基づき適切に管理いたします。
32
D_HD9530-22_jp_CS6_A5.indd 32
14/05/20 17:52
便 利 メ モ
年 月 日
お買い上げ日
お買い上げ
店名
TEL. ( )
ご使用の時、このような症状はありませんか?
●本体にさわると時々電気を感じる。
●こげくさい臭いがする。
●電源コード部を動かすと通電したり、
しなかったりする。
●その他の異常、故障がある。
このような症状の時は、故障や事故防止のため、スイッチを切り、電源プラグを
コンセントから外して、必ずフィリップスサポートセンターにご相談ください。
仕 様
品
番
HD9530/22
消
費
電
力
1425W
定
格
電
圧
AC100V(50/60Hz)
本
体
質
量
約5.7kg
ズ
×315(H)
×384(D)mm
287(W)
サ
イ
※改良の為、仕様を予告なく変更することがあります。
●フィリップス製品の修理受付はフィリップスサポートセンターにお申し出ください。
●修理サービス等についておわかりにならないことは、下記にお問い合わせください。
お問い合わせ
0120-944-859
フィリップスサポートセンター
〒283-0013 千葉県東金市士農田17-9
受付時間:平日 9:00 ∼ 18:00 (土・日・祝日・夏期休暇・年末年始を除く)
フィリップス コンシューマー ライフスタイル事業部
ホームページアドレス
http://www.philips.co.jp/
33
D_HD9530-22_jp_CS6_A5.indd 33
14/05/20 17:52
無料修理規定
〈無料修理規定〉
1.取扱説明書、本体貼付ラベル等の注意書に従った正常な使用状態で保
証期間内に故障した場合には、無料修理します。
2.保証期間内に故障して無料修理をお受けになる場合には、フィリップスサ
ポートセンターにご依頼ください。なお、
商品を直接メーカーへ送付した
場合の送料等はお客様の負担となります。
3.保証期間内でも次の場合には有料修理になります。
1 使用上の誤り及び不当な修理や改造による故障及び損傷。
2 お買い上げ後の輸送、
移動、落下等による故障及び損傷。
3 火災、
地震、水害、落雷、その他の天災地変、公害や異常電圧による故障及び損傷。
4 一般家庭以外
(例えば、業務用の長時間使用)
に使用された場合の故障及び損傷。
5 保証書の提示がない場合。
6 保証書にお買い上げ年月日、
お客様名、
販売店名の記入のない場合、
或は字句を書き
換えられた場合。
※保証書は、本書に明示した条件のもとにおいて無料修理をお約束するも
のです。従って保証書を発行している者(保証責任者)、及びそれ以外の
事業者に対するお客様の法律上の権利を制限するものではありませ
ん。
保証期間経過後の修理についてご不明の場合は、
フィリップスサポートセ
ンターにお問い合わせください。
※保証期間経過後の修理・補修用性能部品の保有期間について詳しくは
取扱説明書の保証とアフターサービスの項目をご覧ください。
(保証書の控え)
は保証期間内の
※お客様にご記入いただいた個人情報
サービス活動及びその後の安全点検活動のために利用させていただく
場合がございます。
ご了承ください。
また個人情報は、
株式会社フィリップ
スエレクトロニクスジャパンのホームページ http://www.philips.co.jp/
に掲載されている
「お客様の個人情報の取り扱いについての当社の方
針」に基づき適切に管理いたします。
34
D_HD9530-22_jp_CS6_A5.indd 34
14/05/20 17:52
フィリップス ノンフライヤープラス 保証書 持込修理
C E R T I F I C AT E O F P U R C H A S E
この保証書は、
「 無料修理規定」記載内容で無料修理を行うことをお約束するものです。お買い上げ
の日から下記期間中に故障が発生した場合は、本書をご用意いただき、フィリップスサポートセン
ターにご連絡ください。お客様にご記入いただいた個人情報(保証書の控え)は、株式会社フィリッ
プスエレクトロニクスジャパンのホームページ http://www.philips.co.jp/ に掲載されている「お
客様の個人情報の取り扱いについての当社の方針」に基づき適切に管理いたします。
品
名
ノンフライヤープラス
品
番
HD9530/22
保
証
期
間
お買い上げ日より2年
対
象
部
分
本体(バスケット、クッキングネット、バスケットカバー、バスケットパ
ンを除く)
お買い上げ日
年 月 日
ご住所 〒
お
客
様
ご芳名
電話番号
販売店名・住所・電話番号
★
販
売
店
★ 保証書は再発行しませんので、大切に保管してください。
★ ご販売店様へ この保証書はお客様へのアフターサービスの実施と責任を明確にするものです。
贈答品、記念品の場合も含めて必ず記入捺印してお客様にお渡しください。
お問い合わせ
フィリップスサポートセンター
〒283-0013 千葉県東金市士農田17-9
0120-944-859
受付時間:平日 9:00 ∼ 18:00 (土・日・祝日・夏期休暇・年末年始を除く)
この印刷物は再生紙を使用しております。
D_HD9530-22_jp_CS6_A5.indd 4
4203.064.6194.1
14/05/20 17:52