1
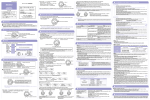
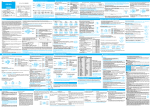
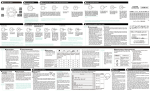
■BUTTONS AND CHANGE OF DISPLAY
S680
■ HOW TO SET THE TIME AND CALENDAR
KSS680-1201
弊社製品についての修理その他のご相談は、「お買い上げ店」で
うけたまわっております。なお、ご不明の点は下記へお問い合せ
ください。
取扱説明書
INSTRUCTIONS
全国共通フリーダイヤル
S680
Button D
Solar panel
本 社 〒105-8467 東京都港区虎ノ門2-8-10
MEMORY
RECALL
display
TIMER
display
(2)How to set the time and calendar
①Long press Button A to show the TIME/
CALENDAR SETTING display. The city
name currently set starts flashing.
②Press Button E to select the item to be
adjusted (flashing).
※If the confirmation sound for button operations is set, the watch emits a brief sound when a button
is pressed. When the display is changed to the Time/Calendar display from World time display, the
watch emits a sound different from other button operations. (Refer to“HOW TO SET THE TIME
AND CALENDAR”regarding the confirmation sound for button operations.)
http://www.seiko-watch.co.jp/
Button D
Button E
WORLD
TIME
display
ALARM
display
Button C
Button A
●With each pressing of Button A, the display changes in the following order.
STOPWATCH
display
Button B
Battery level
Power save
Sleep
Button E
TIME /
CALENDAR
display
(1)Buttons and operations
●Press Button A to show the TIME/CALENDAR display.
[About solar watch]
After being fully charged, the watch will
keep running for approximately 6 months
when it is used under the following
conditions, even if it is left uncharged (If
the stopwatch is used for one hour, the
built-in illuminating light is turned on once,
the alarm sounds once, or the Power Save
function is activated for 6 hours per day.).
TIME/CALENDAR
・Year, month, date, day, hour, minute,
second, and summer time mark can
be displayed.
Either of a 12-hour
indication or 24-hour indication of time
display can be selected. (Last 2 digits of
year will be displayed.)
・The calendar automatically adjusts for
odd and even months including February
of leap years from January 1, 2012
to December 31, 2060 (Automatic
calendar).
STOPWATCH
・The stopwatch can measure up to 99
hours 59 minutes 59 seconds 99 in
1/100 second increments.
・Up to 300 units of memory can be used
for storing measured lap time and split
time data.
・Measured time data within 300 units of
memory can be sorted by channel when
being stored.
・The positions of LAP time and SPLIT
time in the display can be changed over.
MEMORY RECALL
・The stored data (lap number, lap time,
and split time) can be recalled on
demand after measurement.
・The recalled total time, best lap time
and average lap time can be displayed.
TIMER
・The watch is equipped with a double
repeat timer function which allows you
to set two different timer times.
・The timer can be set from 10 seconds
up to 9 hours, 59 minutes and 59
seconds in one-second increments.
・The number of times that the timers
repeat their cycles can be set from 1
to 100 times. The number of times
the countdown has been completed is
displayed.
※Once the year, month and date have been set, the day of the week is automatically set.
※If the city name is set to GMT (GREENWICH), on (“on”) /off (“--”) mark of DST is not displayed.
※If the“DST (summer time)”is set to“on”the“DST”mark is displayed and the time advances for
one hour.
ALARM
・The three-channel daily alarm sounds
at a designated time (hour and minute)
every 24 hours.
・Each alarm channel can be engaged
“on”
(
) or disengaged“--”
( ) independently.
Button A
Button E
“Lap time”is the time that has
elapsed from the start of one
stage of an activity to that of
the next stage.“Split time”is
the time that has elapsed from
the start of an activity to any
given stage.
ILLUMINATING LIGHT
The built-in light illuminates any digital
display for approximately 2 seconds by
pressing the button for turning on the light.
Button C
■ HOW TO USE THE TIMER
Button E
Start
Stop
Restart
Stop
Reset
Button A
Button D
(3)How to delete the stored data
機能表示
Button A:Change to MEMORY RECALL display
Button A (long press):Data deletion
Button B:Selection of channel (moving back
channel number)
Button C:Selection of channel (advancing
channel number)
Button D:Turning on the built-in illuminating light
Button E:Data recall
※If no measurement data is stored,“----”is displayed.
・"F-297" means that 297
units of memory can be
used.
(2)How to use the memory recall function
Example: If you want to see data in channel 5 (ch-5)
①Press Button A to show the MEMORY RECALL display.
B
C
※The newest channel number is displayed.
②Press Button C (advancing) or B (moving back) to show the
desired channel number (ch. 5).
③Press Button E to check the lap time. Each stored data can be
checked in the following order.
Measurement 9
Button C
Button E
Button E
Button C
Button E
Start
Lap/Split
Lap/Split
Stop
Reset
3 to 4 units of memory
B
C
CH display → Total measurement time → LAP-1→・・→ Best lap time → Average lap time
3
Start → Lap → Stop → Reset
4 to 5 units of memory
4
Start → Stop/Restart → Lap → Stop → Reset
4 to 5 units of memory
5
Start → Lap → Lap → Stop → Reset
5 to 6 units of memory
・・・・・
・If "F-300" is displayed, it means that 300 units of
memory can be used.
・After starting the stopwatch, "F-300" changes to "L-1."
・"F-288" means that 288
units of memory can be
used.
E
※After a measurement, lap number flashes, and lap and split times are displayed for approximately
10 seconds. And then the display automatically returns to show the on-going measurement and the
current lap number.
※Measurement of lap and split times can be repeated as many times as necessary. The lap number
can be displayed until "999," and continues to 1,001("001" is displayed) 1002 ("002" is displayed)
and so on.
E
TOTAL
E
LAP-1
No display
Lap time / Split time
Total measurement Split time / Lap time
Lap number
time
・The timer can be set from 10 seconds up to 9 hours, 59 minutes and 59 seconds in one-second increments.
・Two timers are provided, and the timer 2 starts after the timer 1 counted up. The repeating
function is also included so that the timer 1 restarts after the timer 2 counted up.
●How to delete a channel
・To use either Timer 1 or Timer 2 as a standard repeat timer, set the timer not in use to“0:00’00.”
①Press Button A to show the MEMORY ・The number of times the timers repeat the countdown can be set from 1 to 100 times.
RECALL display.
(1)Buttons and operations
※The newest channel is displayed.
●Press Button A to show the TIMER display.
②Press Button B or Button C to select
the channel you want to delete.
Button B
Button C
Button A:Change to TIMER display
③Press Button A for
Button A (long press):Change to TIMER
approximately 2
SETTING display
seconds.“CLR?”will
Button B:Timer time setting (decreasing digits)
A
Button A
Button D
be displayed.
Button C:Timer time setting (increasing digits)
④Keep Button A pressed
Button E
Start/stop
for approximately 2
Button D:Turning on built-in illuminating light
seconds. When“ALL
Button E:Selection of the item or digits to be adjusted
CLR?” is displayed, A
Reset the timer
release Button A.
⑤After the number of
(2)How to set the timer
remaining units is
Example:If the timer 1 is set to three minutes, the timer 2 is set to one minute, and the repeating number is set to 5.
displayed, the watch A
①Press Button A to show the TIMER display.
automatically returns
②Long press Button A to show the TIMER SETTING display. The hour digits for Timer 1 start
to the MEMORY RECALL display.
flashing. Press Button E to select the item or digits to be adjusted (flashing).
●How to delete all channels
THE NUMBER OF TIMES
TIMER 1
TIMER 2
THE COUNTDOWN IS
①Press Button A to show the MEMORY
Hour → Minute → Second
Hour → Minute → Second
TO BE REPEATED
RECALL display.
※The newest channel is displayed.
②Press Button A for approximately 2 ③With each pressing of Button C, one digit is increased.
seconds to show“CLR?”
(With each pressing of Button B, one digit is decreased.)
③K e e p B u t t o n A p r e s s e d f o r ※If Button B or Button C is kept pressed, the digits move quickly.
approximately 2 seconds to show“ALL ④Press Button A to return to the TIMER display. If the watch is left untouched with the digits
CLR?”And then keep Button A pressed
flashing, the display will automatically return to the TIMER display in two to three minutes.
for approximately another 2 seconds.
④After the number of remaining units
is displayed, the watch automatically
returns to the MEMORY RECALL
(TIMER 1:3 minutes) (TIMER 2:1 minute) (THE NUMBER OF TIMES (TIMER display)
display.
THE COUNTDOWN IS
※Data cannot be deleted while the stopwatch
TO BE REPEATED: 5 times)
is measuring, or when it is stopped.
⑤To start or stop the timer, press Button C. To reset the timer, press Button E.
※Make sure that the stopwatch is reset
before deleting the data.
Units of memory used for
storing 1 time data
3 to 4 units of memory
E
BEST LAP
E
AVERAGE LAP
Lap time / Split time
Split time / Lap time
Lap number
No display
Average lap time
※Restarting and stopping the timer can be repeated as many times as necessary.
※A time-up warning beep sounds 3 seconds before the set time is up. When the set time
is up, the time-up beep sounds for approximately 5 seconds.
※To stop the time-up warning beep and time-up beep while sounding, press either Button A, B, C, D, or E.
※While the timer is counting, the timer mark“ ”flashes.
※ While the timer is counting or when it is stopped, it is not possible to enter the TIMER SETTING display.
※When the best lap time is displayed,“BEST”and“L-xx”are alternately displayed.
※The LAP time and SPLIT time positions are displayed in accordance with the stopwatch display
position setting.
④To check data in other channels, press Button B or Button C to select the desired
channel number and check the data in the same way as procedure 3.
■HOW TO CHARGE
LIS
Lisbon
00:00
3
LON
London
00:00
4
PAR
Paris
5
ROM
Rome
+01:00
6
BER
Berlin
+01:00
7
ATH
Athens
+02:00
8
CAI
Cairo
+02:00
Jeddah
+03:00
Baghdad
+03:00
11
THR
Tehran
+03:30
Button E
12
MOW
Moscow
+04:00
13
DXB
Dubai
+04:00
Button A:Change to WORLD TIME display
Button B:Selection of the city (moving
back)
Button C:Selection of the city (advancing)
Button D:Turning on the built-in
illuminating light
Button E:Setting / canceling the DST
14
KBL
Kabul
+04:30
15
KHI
Karachi
+05:00
16
DEL
Delhi
+05:30
17
DAC
Dhaka
+06:00
18
RGN
Yangon
+06:30
19
BKK
Bangkok
+07:00
20
JKT
Jakarta +07:00
21
SIN
Singapore
+08:00
22
HKG
Hong Kong
+08:00
23
BJS
Beijing
+08:00
24
SEL
Seoul
+09:00
25
TYO
Tokyo
+09:00
26
ADL
Adelaide
+09:30
27
GUM
Guam
+10:00
28
SYD
Sydney
+10:00
29
OOL
Gold Coast +10:00
30
NOU
Nouméa
+11:00
31
WLG
Wellington
+12:00
32
HNL
Honolulu
−10:00
33
ANC
Anchorage
−09:00
34
YVR
Vancouver
−08:00
35
LAX
Los Angels
−08:00
36
DEN
Denver
−07:00
37
CHI
Chicago
−06:00
38
NYC
New York
−05:00
39
YMQ
Montreal
−05:00
40
BOS
Boston
−05:00
41
SCL
Santiago
−04:00
42
BUE
Buenos Aires
−03:00
43
RIO
Rio de Janeiro
−03:00
44
PDL
Azores
−01:00
■SPECIFICATIONS
1. Frequency of crystal oscillator…32,768 Hz
2. Loss/gain (monthly rate)…Less than 20 seconds (when the watch is worn on your wrist
in the temperature range between 5℃ and 35℃ )
3. Operational temperature range…Between -5 ℃ and +50 ℃ (for the display function:
between 0℃ and +50℃ )
4. Display medium…Nematic Liquid Crystal, FEM (Field Effect Mode)
5. Battery…Secondary battery, 1 piece
6. Duration of operation…Approximately six months (When the watch is not exposed to light after being fully
charged, and the stopwatch is used for one hour, the built-in illuminating light is
turned on once for 2 seconds, or the alarm sounds once for 20 seconds per day.)
7. Built-in illuminating light…Electroluminescent panel
8. IC (Integrated Circuit)…Oscillator, frequency divider and driving circuits (C-MOS-LSI), 2 pieces
※The specifications are subject to change without prior notice, for product improvement.
■ Built-in illuminating light (EL:Electroluminescent Light)
The electroluminescent panel used for the built-in illuminating light loses its luminance (brightness)
as the battery voltage gets lowered. Also, its luminance level decreases gradually with use.
※After 120 hours of use, the luminance level decreases by about half. When the illuminating light becomes dim, sufficiently
charge the watch. If the illuminating light remains dim after sufficiently recharging the watch, have the electroluminescent
panel replaced with a new one by the retailer from whom the watch was purchased. It will be replaced at your cost.
■ Liquid crystal panel
The normal life expectancy for the liquid crystal panel of this watch is approximately 7 years. After that,
it may decrease in contrast, becoming difficult to read. Please contact the retailer from whom the watch
was purchased to have the liquid crystal panel replaced with a new one. It will be replaced at your cost.
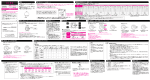
■How to charge the battery
To charge the battery, expose the solar panel to light.
Solar panel
Solar panel
Remaining battery
level display
To enjoy optimal performance of the watch, it is recommended
that the watch be kept sufficiently charged at all times.
Under the following conditions, it is very likely that the battery
will run down due to insufficient battery charge.
・When the watch is concealed under long sleeve shirts
・If the watch is used or stored continually under conditions
where it cannot receive sufficient light
※When recharging the battery, ensure that the watch
temperature is kept under 50ºC. (The operational temperature
range of the watch is between -5ºC and +50ºC.)
※Before using the watch for the first time or when the watch
has completely stopped due to battery depletion, charge the
watch sufficiently, referring to the table below as a guide.
CHARGE
Outdoor on a
sunny day
100000 LUX
1
2
3
To run the
watch for
one day
CHARGE
Approximately Approximately
7 hours
4 hours
Approximately
3 minutes
Approximately 9 hours
Approximately Approximately
72 hours
37 hours
Approximately
28 minutes
By the window
on a cloudy day
5000 LUX
Approximately 18 hours
Approximately Approximately
144 hours 74 hours
Approximately
56 minutes
Indoor under
fluorescent light
Approximately 178 hours
■RESETTING THE IC
No
restriction
Medium
1
Extremely
low
Restricted operations or functions
[PS] indicator flashes.
The watch has not
been exposed to light
and its buttons have
not been operated for a
certain length of time.
No restriction
※Display and functions in the SLEEP mode
Use the watch as it is.
Keep the watch
sufficiently charged.
→ How to charge the battery
The built-in
illuminating light
cannot be turned on.
Alarm sound and time
signal are stopped.
Sufficiently charge the watch until the
indicator ① appears on the display.
After charging the watch, use the
watch as it is.
→ How to charge the battery
CHARGE:Charging the
battery is required
4
The on-going measurement of the stopwatch or
timer will be reset.
Sufficiently charge the watch until the indicator
① appears on the display.
※If the watch operates abnormally, reset the built-in IC.
→How to reset the Built-in IC
5
Sufficiently charge the watch until the indicator
① appears on the display.
※If the watch operates abnormally, reset the built-in IC.
→ How to reset the Built-in IC
Approximately
9.4 hours
Condition
Solutions
No
restriction
[SL] indicator flashes.
The watch has not
been exposed to light
and its buttons have
not been operated for
3 days or longer.
Button C
Button D
②The built-in IC is reset.
After the built-in IC is reset, the display returns to the time display in the
HOME TIME mode. The time and calendar of the watch start moving
from12:00:00 AM, Sunday, January 1, 2012.
Before using the watch, set it to the correct time.
※ After recovery, the city code of the home time is set to TYO (Tokyo).
Alarm ··············· Stopped.
Stopwatch
on operation ··· Resett
Timer on
operation ········· Reset
Solutions
To cancel the
Power Save
function,
expose the
watch to light
or press any
button.
※How to set the Power Save function
The OFF or set time of the Power Save function can be set in the TIME/CALENDAR setting display.
The Power Save time can be selected between 30 minutes, 1 hour, 2 hours, and 4 hours. Refer to the
TIME/CALENDAR setting.
When the Power Save function is ON, the [PS] indicator flashes.
To use the stopwatch or timer in a dark place, it is recommended that you turn the Power Save
function OFF or select Power Save time longer than the time you use the stopwatch or timer.
For normal use, turn the Power Save function ON.
※When the watch is sufficiently charged (
), neither the Power Save nor Sleep function is activated.
When the stopwatch is operating, the Power Save function is not activated.
※In the displays 4 and 5, measured time stored
in memory will be deleted, or will not be
correctly displayed.
The battery used in this watch is a special secondary battery, which is totally
different from ordinary silver oxide batteries. Unlike other disposable batteries such
as dry-cell batteries or button cells, this secondary battery can be used over and over
again by repeating the cycles of discharging and recharging.
However, for various reasons such as long-term use or usage conditions, the
capacity or recharging efficiency of the secondary battery may gradually deteriorate
and recharging cycles may be shortened. If the efficiency of the secondary battery
decreases, have the watch repaired.
CAUTION
Button A
※Display and functions in the POWER SAVE mode
■POWER SOURCE
In a case that the watch moves abnormally, follow the instructions below to
reset the Built-in IC. Then the watch will resume its normal operation.
①Keep buttons A, B, C and D pressed at the same time until the display
becomes blank.
Button B
Sufficient
Restricted operations
or functions
3)Power Save function (Power Save and Sleep)
When the watch is left without being exposed to light and its buttons are not operated for a certain
length of time, the Power Save function is automatically activated to suppress its energy consumption.
2
Approximately 1 hour
By the window
on a sunny day
10000 LUX
After being fully charged, the watch will keep running for approximately 6 months when it is
used under the following conditions, even if it is left uncharged.
・Built-in illuminating light turned on ······························ Once for 2 seconds per day
・Alarm sounds ·········································································· For 20 seconds per day
・Power Save function activated··················································· For 6 hours per day
・Stopwatch ························································································ For 1 hour per day
※Frequent use of the built-in illuminating light will quickly consume the battery.
※Before using the watch for the first time or when the watch has completely stopped due to
battery depletion, charge the watch sufficiently, referring to the table on the left.
2)Display and remaining battery level
■How to check the remaining battery level
The watch displays the approximate remaining battery level.
Remaining
battery level
1)Time required to charge the battery
Charge the battery, referring to the table below as a guide.
LCD display
■HOW TO USE THE ALARM
・The three-channel daily alarm sounds at a designated time (hour and minute) every 24 hours.
・Each alarm channel can be engaged (“on”) or disengaged (“--”) independently.
(1)Buttons and operations
●Press Button A to show the ALARM display.
Button B
Button C
Button A
Button D
Button E
Button A:Change to ALARM display
Button A (long press):Change to ALARM
TIME SETTING display
Button B:Alarm time setting (decreasing digits)
Button C:Alarm time setting (increasing digits)
Engagement/disengagement of the alarm
Button D:Turning on the built-in illuminating light
Button E:Change between the alarm 1, 2, and 3
(2)How to use the alarm
・The way of using the alarm is the same for every alarm
channel.
Ex.) Selecting alarm 1 and setting the alarm time to“6:30 a.m.”
①Press Button E to show “ALARM 1.”
Long press Button A to show the ALARM SETTING display.
The hour digits start flashing.
②With each press of Button E, hour digits and minute digits
flash alternately. Select the digits to be adjusted (flashing).
(Hour:6 a.m.)
③With each pressing of Button C, one digit is increased.
(With each press of Button B, one digit is decreased.)
※If Button B or Button C is kept pressed, the digits move quickly.
④After all adjustments are completed, press Button A to
release the ALARM SETTING display and to return to
“ALARM 1” display. If the watch is left untouched with
the digits flashing, the display will automatically return to
“ALARM 1” display in two to three minutes.
(3)How to engage or disengage the alarm
※With each pressing of Button C in the ALARM display, “on”
(the alarm is engaged) or “--” (the alarm is disengaged) mark is
displayed alternately.
(4)How to stop the alarm while sounding
・At a designated time the alarm sounds for approximately 20
seconds and automatically stops. To stop the alarm manually
while sounding, press any button.
※Doing this in any display can stop the alarm.
(Minute:30 minutes)
(Alarm engaged)
Alarm mark appears.
When Alarm is ON
(Alarm disengaged)
Alarm mark disappears.
When Alarm is OFF
■TO PRESERVE THE QUALITY OF YOUR WATCH
+01:00
JED
※If summer time is set to the city which has
also been set as “HOME” in the TIME/
CALENDAR display, the summer time will also
be shown in the TIME/CALENDAR display. If
summer time is set in the TIME/CALENDAR
display and the same city is selected in the
WORLD TIME display, the summer time will
also be shown in the WORLD TIME display.
Button C
Measurement 1
Start → Stop/Restart → Stop → Reset
BGW
(2)How to use the world time
①Press Button A to show the WORLD
TIME display.
※The city name, month, date, and time are displayed.
②To select the city, press Button B or Button C.
(3)How to set the summer time
・With each pressing of the Button E in the
WORLD TIME display, the summer time
can be alternately
set or cancelled.
When the summer
time is set, the
DST appears.
(The summer time is set.)
Button C
(3)Lap time/split time measurement (if lap time measurement is repeated 10 times)
Split time
Start → Stop → Reset
10
Button D
Start
2
2
9
Button C
※ "Restart" and "Stop" can be repeated as many times as necessary.
※ While the stopwatch is operating, the stopwatch mark“ ”flashes.
1
・The time of 44 cities (including GMT) in (4)Comparison table between city and time difference
different time zones throughout the world
(GMT indicates the Greenwich mean time. + indicates advancement
can be displayed.
from the GMT and ‒ indicates time lag from the GMT.)
・The summer time (DST) can also be set No.
City name
Time difference from GMT
for each city (except GMT).
1 GMT
Greenwich
00:00
(1)Buttons and operations
●Press Button A to show the WORLD
TIME display.
Button C
・ If "F-300" is displayed, it means that 300 units
of memory can be used.
・After starting the stopwatch, "F-300" changes to
"L-1."
●About memory
■HOW TO USE THE WORLD TIME
Button C
Button E
Lap time
How to measure time
WORLD TIME
・The time of 44 cities (including GMT)
throughout the world can be displayed.
・The summer time (DST) can be set for
each city (except GMT).
Button B
(2)Standard measurement
Button A:Change to the
STOPWATCH display
Button B:Change over between the lap
time and split time displays
Button C:Start/stop
Button D:Turning on the built-in
illuminating light
Button E:Lap, split/reset
Button D
Contrast level
adjustment
※Due to the function displaying the best lap time and average lap time, it takes at least three units of ・Up to 300 units of memory can be used to store measured time data.
memory to store 1 time data. If you store data only in one channel, you can use 300 units of memory ・The stored data can be recalled per channel.
per channel. If you use more than one channel, the units of memory you can use will be less than ・The best lap time and average lap time can be displayed (if only
300 units of memory in total. For example, if the measured time data are stored in one channel, 300
one time data is stored, the best lap time is displayed.)
units of memory can be used, but if data is divided and stored in 2 channels, 297 units of memory ・The date when the measurement is started is memorized in each channel.
can be used in total.
※When the lap time/split time is measured, if the“FULL”and the lap number alternately flash, the lap/ (1)Buttons and operations
●Press Button A to show the MEMORY RECALL display.
split time cannot be stored because all units of memory have been used.
※The newest channel number is displayed.
※If "F-0" mark appears in the lower row when using the stopwatch, lap time/split time cannot be
stored. In such a case, delete data stored in channels in the MEMORY RECALL mode.
(1)Buttons and operations
●Press Button A to show the STOPWATCH display.
Button C
D.S.T
(summer time)
“on/ --”
■HOW TO USE THE MEMORY RECALL FUNCTION
・The stopwatch can measure up to 99 hours 59 minutes 59 seconds 99 in
1/100 second increments.
・The lap time and split time can be displayed at the same time. The best lap
time and average lap time can be stored in memory.
・The measured and stored lap time, split time, best lap time, and average lap
time data can be recalled in the memory recall display.
・Up to 300 units of memory can be used for storing measured time data.
・The measured data can be sorted by channel when being stored in memory.
Button B
(4)How to adjust the POWER SAVE setting
(3)How to adjust the contrast level
・The contrast level of the display (variations of light and shade) ●Press Button A to show the TIME/CALENDAR display.
can be adjusted. When the digital display is initialized or the ①Long press Button A to show the TIME/CALENDAR SETTING display. The city name currently set starts flashing.
(City name)
Power save setting
built-in IC is reset, the contrast is reset to the default level“0.” ②Press Button E to show the POWER SAVE SETTING display.
●Press Button A to show the TIME/CALENDAR display.
OFF
30 minutes
1hour
2 hours
4 hours
③Press Button B or Button C to select the OFF or set time.
second
minute
hour
date
month
year
12H/24H
①Long press Button A to show the TIME/CALENDAR SETTING ※The POWER SAVE function turns off the display to save consumption power
When POWER SAVE
When POWER SAVE
③To reset the seconds to“00,”press Button E to select the second digits (flashing), and then press
while no button operation is performed for the predetermined time under the
display. The city name currently set starts flashing.
is OFF
time is set to 1 hour
condition without the light. To recover the display, expose the solar panel to
Button B or Button C in accordance with a time signal.
②Press Button E to select“contrast.”
※If Button B or Button C is pressed while the second digits count any number between "30" and "59,”one ③Press Button B or Button C to adjust the contrast level.
the light or press any button to recover the display before turning off.
minute is added and the second digits are immediately reset to“00.”
④After the adjustment is completed, press Button A to return to the
※The telephone time signal service (Tel. 117) is convenient to set the time.
Contrast level : 0
TIME/CALENDAR display. If the watch is left untouched with the
−
2
−
1
0
1
2
④After selecting the item to be adjusted, press Button C or B to set the digits. With each pressing of Button
digits flashing, the display will automatically return to the TIME/
C, one digit is increased or the city name advances one by one. (With each pressing of Button B, one
Contrast
CALENDAR display in two to three minutes.
digit is decreased or the city name moves back one by one). (Except“second,”
“12H/24H,”and“DST”)
⑤After all adjustments are completed, press Button A to return to the TIME/CALENDAR display.
(5)How to test the alarm sound and how to engage/disengage the hourly time signal and confirmation sound for button operations
If the watch is left untouched with the digits flashing, the display will automatically return to the
・With each pressing of Button C in the TIME/CALENDAR display, the hourly time signal and confirmation sound for button
TIME/CALENDAR display in two to three minutes.
operations can be engaged or
※Because the year, month, date, and day from 2012 to 2060 have been programmed in the automatic calendar,
Hourly time signal sounds.
Hourly time signal does not sound.
disengaged.
④After the adjustment is completed, press Button A to return to
in this period, it is not necessary to manually adjust odd and even months including February of leap years.
C
C
※If summer time is set in the TIME/CALENDAR display and the same city is selected in the WORLD TIME
the TIME/CALENDAR display. If the watch is left untouched ・T h e a l a r m s o u n d c a n b e
display, the summer time will also be shown in the WORLD TIME display.
heard by pressing and holding
with the digits flashing, the display will automatically return to
※If all indicators of the display light while in the TIME/CALENDAR SETTING display, it is not a malfunction. This happens
Hourly time signal
Hourly time signal
the TIME/CALENDAR display in two to three minutes.
Button C and Button D at the
if buttons C and D are pressed at the same time. In such a case, press any one of buttons A, B, C, D, or E to return to
mark appears.
mark is not displayed.
D
D
same time.
the TIME/CALENDAR display, and then, follow the above procedures from step 1 of (2) to set the time and calendar.
With each pressing of Button E, the display changes in the following order.
Button A:Change to TIME/CALENDAR display
Button A (long press):Change to TIME/
CALENDAR
SETTING display
Button B:Selection of city name, adjusting items
or digits (moving back or decreasing)
Button C:Engagement/disengagement of hourly
time signal and confirmation sound
for button operations, adjusting items
or digits (advancing or increasing)
Button D:Turning on the built-in illuminating
light
Button E:Selection of the item or digits to
be adjusted
■HOW TO USE THE STOPWATCH
This runner’
s watch is driven by solar energy.
This watch can store time data measured
by the equipped stopwatch of up to 300
units of memory and can recall data on
demand. Data within 300 units of memory
can be sorted by channel when being stored.
Results measured by the stopwatch can be
recalled and displayed by using the memory
recall function. The best lap time and
average lap time can also be displayed. In
addition, this multifunctional digital watch is
equipped with a 3-channel alarm function,
timer function, and world time function which
can display the time of 44 cities (including
GMT) throughout the world.
Button A
Button A
〒 100-0005東京都千代田区丸の内 3-1-1 国際ビル
〒 550-0013大阪市西区新町 1-4-24 大阪四ツ橋新町ビルディング
■FEATURES
Button B
Button C
0120-612-911
お客様相談室
この度は弊社製品をお買い上げいただき、
誠にありがとうございました。
ご使用の前にこの説明書をよくお読みの上、
正しくご愛用くださいますよう、お願い申
し上げます。
なお、この説明書はお手元に保管し、必要
に応じてご覧ください。
Button B
※If the stopwatch mark“ ”is flashifng in the
display other than the stopwatch display, the
stopwatch is in use.
※If the timer mark“ ”is flashing in the display
other than the timer display, the timer is in
use.
・Do not remove the secondary battery yourself.
・Replacement of the secondary battery requires professional knowledge and skill.
Please ask the retailer from whom the watch was purchased for repair.
・Installation of an ordinary silver oxide battery can generate heat that can cause
bursting or ignition.
■AFTER-SALE SERVICE
CAUTION
■Notes on charging the watch
・When charging the watch, do not place the watch in close proximity to an
intense light source such as lighting equipment for photography, spotlights
or incandescent lights, as the watch may be excessively heated resulting in
damage to its internal parts.
・When charging the watch by exposure to direct sunlight, avoid places that
easily reach high temperatures, such as a car dashboard.
・Always keep the watch temperature under 50℃.
●Notes on guarantee and repair
・Contact the retailer from whom the watch was purchased or
SEIKO CUSTOMER SERVICE CENTER for repair or overhaul.
・Within the guarantee period, present the certificate
of guarantee to receive repair services.
・Guarantee coverage is provided in the certificate of
guarantee. Read carefully and retain it.
・For repair services after the guarantee period
has expired, if the functions of the watch can be
restored by repair work, we will undertake repair
services upon request and payment.
■REMARKS ON REPLACEMENT PARTS
SEIKO makes it a policy to typically keep a stock
of replacement parts for this watch for 7 years.
Replacement parts are those which are essential
to maintaining the functional integrity of the watch.
Please keep in mind that if original parts are not
available, they may be replaced with substitutes whose
outward appearance may differ from the originals.
●Handling cautions
WARNING
・Immediately stop wearing the watch in following cases.
○If the watch body or band becomes edged by corrosion etc.
○If the pins protrude from the band.
※ Immediately consult the retailer from whom the watch was purchased or SEIKO CUSTOMER SERVICE CENTER.
・Keep the watch and accessories out of the reach of babies and children.
WARNING
Care should be taken to prevent a baby or a child accidentally swallowing the battery or accessories.
If a baby or child swallows the battery or accessories, immediately consult a doctor, as it will be harmful to the
health of the baby or child.
・Do not remove the battery from the watch.
Replacement of the battery requires professional knowledge and skill. Please ask a watch retailer for
replacement of the battery.
Do not attempt to charge the battery, as this may cause battery explosion, heat generation, battery leakage, or
damage to the battery.
・Do not use the watch in scuba diving or saturation diving.
The various tightened inspections under simulated harsh environment, which are usually required for watches
designed for scuba diving or saturation diving, have not been conducted on the water-resistant watch with the
BAR (barometric pressure) display. For diving, use special watches for diving.
CAUTION
・Avoid wearing or storing the watch in the following places.
○Places where volatile agents
( cosmetics such as polish remover, bug repellent, thinners etc.)are vaporizing
○Places where the temperature drops below 5℃ or rises above 35℃ for a long time
○Places of high humidity
○Places affected by strong magnetism or static electricity
○Dusty places
○Places affected by strong vibrations
※For watches with batteries, do not leave a dead battery compartment for a long time as it may cause battery leakage.
・If you observe any allergic symptoms or skin irritation
Stop wearing the watch immediately and consult a specialist such as a dermatologist or an allergist.
・Do not pour running water directly from faucet.
The water pressure of tap water from a faucet is high enough to degrade the water resistant
performance of a water resistant watch for everyday life.
・Do not press buttons when the watch is wet.
Water may get inside of the watch.
※If the inner surface of the glass is clouded with condensation or water droplets appear inside of the watch
for a long time, the water resistant performance of the watch is deteriorated. Immediately consult the retailer
from whom the watch was purchased or SEIKO CUSTMER SERVICE CENTER.
・Do not leave moisture, sweat and dirt on the watch for a long time.
Be aware of a risk that a water resistant watch may lessen its water resistant performance because of
deterioration of the adhesive on the glass or gasket, or the development of rust on stainless steel.
・Do not wear the watch while taking a bath or a sauna.
Steam, soap or some components of a hot spring may accelerate the deterioration of water resistant
performance of the watch.
・Other cautions
○Replacement of the metal band requires professional knowledge and skill. Please ask a watch retailer for
replacement of the metal band, as there is a risk of hand or finger injury and fear of losing parts.
※Length adjustment service for metallic bands is available at the retailer from whom the watch was
purchased or SEIKO CUSTOMER SERVICE CENTER. The service may also be available on a chargeable
basis at other retailers, however, some retailers may not undertake the service.
○Do not disassemble or tamper with the watch.
○Keep the watch out of the reach of babies and children. Extra care should be taken to avoid risks of any
injury or allergic rash or itching that may be caused when they touch the watch.
○When disposing of used batteries, follow the instructions of your local authorities.
○If your watch is of the fob or pendant type, the strap or chain attached to the watch may damage your
clothes, or injure the hand, neck, or other parts of your body.
●Daily care
The watch requires good daily care
・Wipe away moisture, sweat or dirt with a soft cloth.
・After soaking the watch in seawater, be sure to wash the watch in clean pure water and wipe it dry carefully.
※If your watch is rated as“ non-water resistant” or“ water resistant for daily use,” do not wash the watch.
●Water resistance
Refer the table below for the description of each degree of water resistant performance of your watch before using.
Indication on the case back Water resistant performance
Condition of use
Non-water
resistance
Avoid drops of water or sweat.
WATER RESISTANT
Water resistance for
everyday life
The watch withstands accidental
contact with water in everyday life.
WATER RESISTANT
5 BAR
Water resistance for everyday
life at 5 barometric pressures
The watch is suitable for sports such as swimming.
WATER RESISTANT
10(20)BAR
Water resistance for everyday life
at 10(20) barometric pressures
The watch is suitable for diving not using an air cylinder.
No indication
Not suitable for
WARNING swimming
●Band
The band touches the skin directly and becomes dirty with sweat or dust.
Therefore, lack of care may accelerate deterioration of the band or cause skin irritation or stain on
the sleeve edge. The watch requires a lot of attention for long usage.
Metallic band
・Moisture, sweat or soil will cause rust even on a stainless steel band if they are left for a long time.
・Lack of care may cause skin irritation, or a yellowish or gold stain on the lower sleeve edge of shirts.
・Wipe off moisture, sweat or soil with a soft cloth as soon as possible
・To clean the soil around the joint gaps of the band, wipe it out in water and then brush it off
with a soft toothbrush.
(Protect the watch body from water splashes by wrapping it up in plastic wrap etc.)
・Because some titan bracelets use pins made of stainless steel, which has outstanding strength,
rust may form in the stainless steel parts.
・If rust advances, pins may poke out or drop out, and the watch case may fall off the bracelet, or
the clasp may not open.
・If a pin is poking out, personal injury may result. In such a case, refrain from using the watch
and request repair.
Leather band
・A leather band is susceptible to discoloration and deterioration from moisture, sweat and direct
sunlight.
・Wipe off moisture and sweat as soon as possible by gently blotting them up with a dry cloth.
・Do not expose the watch to direct sunlight for a long time.
・Please take care when wearing a watch with light-colored band, as dirt is likely to show up.
・Refrain from wearing a leather band watch other than Aqua Free bands while bathing,
swimming, and when working with water even if the watch itself is water-resistant enforced for
daily use(10-BAR water resistant)
.
Polyurethane band
・A polyurethane band is susceptible to discoloration from light, and may be deteriorated by
solvent or atmospheric humidity.
・Especially a translucent, white, or pale colored band easily adsorbs other colors, resulting in
color smears or discoloration.
・Wash out dirt in water and clean it off with a dry cloth.
(Protect the watch body from water splashes by wrapping it up in plastic wrap etc.)
・When the band becomes less flexible or cracked, replace the band with a new one.
Notes on the length of the band
Notes on skin irritation and allergy
Skin irritation caused by a band has various reasons such as allergy to metals or leathers, or
skin reactions against friction on dust or the band itself.
Notes on the length of the band
Adjust the band to allow a little clearance with your wrist to ensure proper airflow.
When wearing the watch, leave enough room to insert a finger between the band
and your wrist.
●Notes on overhaul
・Periodic inspection and adjustment by disassembly and cleaning (overhaul) is recommended
approximately once every 3 to 4 years in order to maintain optimal performance of the watch for
a long time. According to use conditions, the digital display may go out due to liquid leakage.
As the parts such as gasket may deteriorate, water-resistant performance may be impaired
due to intrusion of perspiration and moisture. Please contact the retailer from whom the watch
was purchased for inspection and adjustment by disassembly and cleaning (overhaul). For
replacement of parts, please specify "SEIKO GENUINE PARTS." When asking for inspection
and adjustment by disassembly and cleaning (overhaul), make sure that the gasket and push pin
are also replaced with new ones.
・When your watch is inspected and adjusted by disassembly and cleaning (overhauled), the
movement of your watch may be replaced.
■特徴
■ボタンの名称と表示の切替
■時刻・カレンダーの合わせかた
(1)ボタンの名称とはたらき
この時計はソーラー駆動をそなえたランナーズウォッ
●ボタンAを押して「時刻・カレンダー表示」状態にしてください。
チです。
※クロノグラフ表示以外でクロノグラフ表示
また、クロノグラフ機能は最大300本の計測タイムを
マーク「 」が点滅している場合は、クロノ
ボタンB
ボタンC
メモリー(記憶)し、呼び出すことができます。
ボタンA:時刻・カレンダー表示への切替
グラフが計測中であることを示しています。
ボタンB
ボタンC
メモリーは300本以内であれば、分割(チャンネル)
※タイマー表示以外でタイマー表示マーク「 」
ボタンA(長押し):時刻カレンダー合わせ状
が点滅している場合は、タイマーが計測中で
してメモリーすることもできます。
態の呼び出し
あることを示しています。
クロノグラフ機能により計測した結果はリコール機能
ボタンB:都市名の呼び出し、修正箇所の合わ
ボタ
ンA
ボタ
ンD
を使い呼び出すことができ、呼び出した際にはベスト
せ(戻り)
電池残量表示
ボタンA
ボタンD
ラップタイム・平均ラップタイム表示もおこないます。
ボタンC:報時・操作確認音のセット/解除、
パワーセーブマーク
ソーラーパネル
さらに、3チャンネルアラーム機能、タイマー機能、
ボタンE
修正箇所の合わせ(進み)
スリープマーク
ボタンE
世界44都市(GMTを含む)の時刻を表示するワール
ボタンD:内部照明の点灯
ドタイム機能をあわせもった多機能デジタル時計で
ボタンE:修正箇所の選択
●ボタンAを押すごとに、次の順序で切り替わります。
す。
(2)時刻・カレンダーの合わせかた
時刻・カレンダー クロノグラフ
リコール
タイマー アラーム
ワールドタイム
「ソーラー駆動について」
「時刻・カレンダー合わせ」
①ボタンAを長押しすると現在設定されている都市名を表示し、
表示
表示
表示
表示
表示
表示
フル充電後、光が当らない状態でも約6 ヶ月間の動作
TIME
状態になります。
CHRONO
WORLD
ALARM
RECALL
TIMER
が可能です。(1日あたりクロノグラフ1時間、ライト
②ボタンEを1回押すごとに合わせたいところ(点滅)を選ぶことができます。
1回、アラーム1回、パワーセーブ6時間で使用した時)
※年月日をセットすると「曜日」は自動的に設定されます。
「時刻・カレンダー機能」
・年、
月、
日、曜日、時、分、秒、
サマータイムマークを表示し、
12時間制24時間制いずれかの時刻表示を選択できま
す。
(年は西暦の下二桁を表示します。
)
・2012年から2060年までの間、うるう年などの月末
修正がいらない「フルオートカレンダー」です。
※操作確認音がセットされていますと、表示を切り替えるごとに「ピッ」と鳴ります。
「ワールドタイム表示」から「時刻・カレンダー表示」に切り替わるところのみ音色が違います。
(操作確認音については、
「時刻・カレンダーの合わせ方」を参照してください。)
■クロノグラフの使いかた
「リコール機能」
・メモリーしたデータ(ラップ回数、ラップタイム、スプ
リットタイム)を計測後リコール(呼び出し)することが
できます。
・合計時間、ベストラップ表示、平均ラップが表示でき
ます。
ボタンB
ボタンC
ボタンA
ボタンD
ボタンE
「ワールドタイム機能」
・世界44都市(GMTを含む)の都市名、月、日、時刻を
表示します。
・各都市ごとにサマータイム
(DST)
の設定ができます。
(GMTを除く)
ボタンA:クロノグラフ表示への切替
ボタンB:ラップ・スプリットの表示位置切替
ボタンC:スタート/ストップ
ボタンD:内部照明の点灯
ボタンE:ラップ・スプリット/リセット
スタート
「アラーム機能」
・設定した時刻(時・分)で毎日報知する3チャンネルのデ
イリーアラーム機能付です。
・各チャンネルは、アラームのon/--(セット/解除)切
替ができます。
ラップタイムは、区間ごとの経過時間
であり、スプリットタイムは、スター
トからある区間での途中経過時間です。
ボタンA
ボタンD
ボタンE
ボタンA:ワールドタイム表示への切り替え
ボタンB:都市選択(戻り)
ボタンC:都市選択(進み)
ボタンD:内部照明の点灯
ボタンE:サマータイマーのセット/解除
(2)ワールドタイムの使いかた
①ボタンAを押して「ワールドタイム表示」
にしてください。
都市名と月、日と時刻を表示します。
②ボタンB、ボタンCを押して都市名を変
更します。
(3)サマータイムのセットのしかた
・
「ワールドタイム表示」でボタンEを押す
ごとにセットと解
除ができます。
サマータイムセット
時は「DST」マーク
(サマータイムセット時)
が点灯します。
※「ワールドタイム表示」である都市のサマータ
イムをセットした場合は、
「時刻・カレンダー
表示」にした場合同じ都市のときはサマータイ
ム表示をします。また、
「時刻・カレンダー表示」
で、サマータイムをセットした場合も「ワール
ドタイム表示」で同じ都市を選択したときはサ
マータイム表示をします。
(2)普通の使いかた(積算タイムを測る)
ボタンC
ボタンC
ボタンC
ボタンC
ボタンE
スタート
ストップ
再スタート
ストップ
リセット
・
「F-300」表示は、300メモリできます。
・スタート後「L- 1」表示に切り替わります。
スプリットタイム
計測の使いかた
メモリーの使用量
1
スタート→ストップ→リセット
3∼4メモリー
2
スタート→ストップ/再スタート→ストップ→リセット
3∼4メモリー
3
スタート→ラップ→ストップ→リセット
4∼5メモリー
4
スタート→ストップ/再スタート→ラップ→ストップ→リセット
4∼5メモリー
スタート→ラップ→ラップ→ストップ→リセット
0
ボタンE
※測定結果がないときは、
「−−−−」と表示します。
B
C
B
C
CH表示 → トータル → LAP-1→・・・・・・→ BEST LAP → 平均ラップタイム
ボタンC
スタート
(1回目)
(9回目)
ボタンE
ボタンE
ラップ/スプリット
ラップ/スプリット
ボタンC
ボタンE
ストップ
2
コントラスト
・・・・・
リセット
E
5∼6メモリー
E
④調整が終わりましたら、ボタンAを押して「時刻・カレンダー表示」にもどしてください。 押し忘れた場合でも2
∼3分後には「時刻・カレンダー表示」状態へ自動的にもどります。
2
LIS
リスボン
00:00
3
LON
ロンドン
00:00
4
PAR
パリ
5
ROM
ローマ
+01:00
6
BER
ベルリン
+01:00
7
ATH
アテネ
+02:00
8
CAI
カイロ
+02:00
9
−
JED
ジッダ
+03:00
バグダッド
+03:00
11
THR
テヘラン
+03:30
12
MOW
モスクワ
+04:00
13
DXB
デュバイ
+04:00
14
KBL
カブール
+04:30
15
KHI
カラチ
+05:00
16
DEL
デリー
+05:30
17
DAC
ダッカ
+06:00
18
RGN
ヤンゴン
+06:30
19
BKK
バンコク
+07:00
20
JKT
ジャカルタ
+07:00
21
SIN
シンガポール
+08:00
22
HKG
ホンコン
+08:00
23
BJS
北京
+08:00
24
SEL
ソウル
+09:00
25
TYO
東京
+09:00
26
ADL
アデレード
+09:30
27
GUM
グアム
+10:00
28
SYD
シドニー
+10:00
29
OOL
ゴールドコースト
+10:00
30
NOU
ヌーメア(ニューカレドニア)
+11:00
31
WLG
ウェリントン
+12:00
32
HNL
ホノルル
−10:00
33
ANC
アンカレッジ
−09:00
34
YVR
バンクーバー
−08:00
35
LAX
ロサンゼルス
−08:00
36
DEN
デンバー
−07:00
37
CHI
シカゴ
−06:00
38
NYC
ニューヨーク
−05:00
39
YMQ
モントリオール
−05:00
40
BOS
ボストン
−05:00
41
SCL
サンティアゴ
−04:00
42
BUE
ブエノスアイレス
−03:00
43
RIO
リオデジャネイロ
−03:00
44
PDL
アゾレス諸島
−01:00
■製品仕様
1.
2.
3.
4.
5.
6.
水晶振動数… 32,768Hz(Hz=1 秒間の振動数)
精度… 平均月差± 20 秒(気温5℃∼ 35℃において腕に着けた場合)
作動温度範囲…− 5℃∼+ 50℃(ただし表示機能は0℃∼ +50℃)
表示体…FE(電界効果)型ネマチック液晶
使用電源…二次電池:1 個
持続時間… 約6ヶ月(フル充電後に光があたらず、1日あたりクロノグラフ1時間、ライ
ト1回(2秒)
、アラーム1回(20秒間)
、パワーセーブ6時間で使用)
7. ライト… 内部照明:EL(エレクトロルミネッセンス)
8. 電子回路…発振、分周、駆動、EL 回路:C-MOS-IC 2 個
※製品仕様は改良のため、予告なく変更することがあります。
■ ライト(EL:エレクトロルミネッセンス)について
ライト(内部照明)として使用されているエレクトロルミネッセンス(EL)パネルは、電池
の電圧が低くなると、輝度(明るさ)が低下します。また、EL パネルは発光時間の経過と共に、
徐々に輝度が減衰する特性を持っています。
※ELパネルの輝度は、点灯時間の累積で約120 時間経過すると半減します。使用中にライト
が暗くなったときは、まず十分に充電してください。十分に充電しても暗すぎる場合は、EL
パネルの交換となります。
お買い上げ店に交換をお申しつけください。
有料にて申し受けます。
■ 液晶パネルについて
この時計の液晶パネルは、7 年を過ぎるとコントラストが低下したり、数字が読みにくくなり
ます。お買い上げ店に交換をお申しつけください。有料にて申し受けます。
■充電のしかた
ソーラーパネルに光をあてて充電してください。
ソーラーパネル
ソーラーパネル
+01:00
BGW
電池残量表示
快適にご使用いただくために、十分な充電をすることを心がけま
しょう。
以下の状況では充電不足によりエネルギーが切れ、時計が止まる
可能性が高くなります。
・時計が衣類のそでの中に隠れている
・光のあたりにくい環境での使用や保管が続く
※充電の際は、時計が高温にならないようにご注意ください。
(作動温度範囲は−5℃∼+50℃です。
)
※使いはじめ、または充電不足で停止していた時計を駆動させる
ときは、下の表をめやすに十分な充電をしてください。
E
トータル
LAP-1
E
ベストラップ
E
平均ラップ
無表示
トータル時間
TOTAL
ラップタイム/スプリットタイム
スプリットタイム/ラップタイム
ラップ番号
ラップタイム/スプリットタイム
スプリットタイム/ラップタイム
ラップ番号⇔BEST
無表示
平均ラップタイム
AVG
LCD表示
CHARGE
晴れた日の屋外
10万ルクス
約1時間
環境3
くもりの日の窓際
5000ルクス
環境4
蛍光灯下の屋内
500ルクス
一日分の
充電時間
CHARGE
約7時間
約9時間
約18時間
約4時間
(タイマー2:1分)
(リピート回数:5回)
報時マーク点灯
報時マーク消灯
D
D
④セットが終わりましたらボタンAを押して修正状態を解除して「アラーム1表示」にもどし
てください。忘れた場合でも2∼3分後には「アラーム1表示」へ自動的にもどります。
(報知します。
)
アラームマーク点灯
アラームON
(タイマー表示)
⑤ボタンCを押してタイマーをスタート/ストップができます。ボタンEを押してタイ
マーがリセットされます。
※途中のストップ、再スタートは何回でも繰り返すことができます。
※タイムアップする3秒前に予告音が鳴り、タイムアップすると5秒間タイムアップ音が鳴ります。
※鳴っているタイムアップ音を止めるには、A、B、C、D、Eいずれか1つのボタンを押してください。
※タイマー計測中はタイマーマーク「 」が点滅します。
※タイマー計測中およびSTOP中は修正状態に入れません。
この時計は一度フル充電すると、以下の状況で使用した場合、その後充電されなくても約6 ヶ月間 3)パワーセーブ・スリープについて
動き続けます。
光が当らず、ボタン操作が一定時間以上ない状態が続くパワーセーブ機能(節電機能)がはたらきます。
・ライト点灯 ·····················1回
(2秒間)/1日
・アラーム音 ······························20秒間/1日
※パワーセーブ中の表示と機能
・パワーセーブ ···························· 6時間/1日
・クロノグラフ ···························· 1時間/1日
状況
操作・機能の制限
そのときは
※ライト(内部照明)をたくさん使うと、電池が早く減りますのでご注意ください。
※使い始め、充電不足で停止している時計を動かすときは、左記の表を参考に十分な充電をしてください。
「PS」マーク点滅
光があたらずにボタ
2)表示と電池残量について
機能制限はありません。
1
ン操作がない状態が
■電池残量について
設定時間を越えた
光 に 当 て る、
液晶パネルの表示で、おおまかな電池残量がわかります。
またはいずれ
かのボタンを
電池残量
操作・機能の制限
そのときは
押すと、
パワー
※スリープ中の表示と機能
セーブ機能が
アラーム音 ······ 停止
十分
「SL」マーク点滅
解除されます
動作中の
ありません
そのままお使いください
1
光があたらずにボタ
クロノグラフ ··· リセット
2
ン操作がない状態
動作中の
が、約3日間続いた
タイマー ·········· リセット
中くらい
充電を心がけてください
ありません
2
約28分
約144時間
約56分
約74時間
約178時間
極少
バックライト
点灯不可
アラーム音・
報音停止
①の状態になるまで、十
分な充電をしてください
充電後は、そのままお使
いください
→充電のしかた
CHARGE:チャージ(要充電)
4
動作中のクロノグラフ、タイマーはリセットされ
ます。
①の状態になるまで十分な充電をしてください。
※万が一、異常な動きになったときは、システム
リセットをしてください
→システムリセットのしかた
5
①の状態なるまで十分な充電をしてください。
※万が一、異常な動きになったときは、システムリ
セットをしてください
→システムリセットのしかた
約3分
約72時間 約37時間
約9.4時間
※パワーセーブ設定のしかた
「時刻・カレンダー合わせ」でOFFまたONの時間設定を行います。
時間設定は30分、1時間、2時間、4時間から選べます。
「時刻・カレンダー合わせ」を参照してください。
パワーセーブをONにすると「PS」マークが点灯します。
暗いところでクロノグラフ、またはタイマーを使うときは、パワーセーブをOFFまたは使用時間より長い
時間設定にしていただくことをおすすめします。
通常はパワーセーブをONにしてお使いください。
電池残量が十分(
)の時にはパワーセーブ及びスリープに入りません。
またクロノグラフ動作中はパワーセーブに入りません。
※この状態になると、保存してある計測タイムの
データが消去されます。または正しく表示され
ないことがあります。
■使用電源について
万が一、異常な動きになったときは、システムリセットをすることで正常に
機能するようになります。
①ボタンA,B,C,D を同時に長押しし、表示が消えたら離す
ボタンA
C
(3)アラームを鳴らしたい場合、鳴らしたくない場合
※「アラーム表示」でボタンCを押すごとにセット(on)と解除(−−)ができます。
(タイマー1:3分)
・「F-288」表示は、残り
288メモリできます。
3
■システムリセットのしかた
ボタンB
(報時しません。)
C
■アラームの使いかた
データ削除はできません。
→充電のしかた
1)充電にかかる時間のめやす
下記の時間を参考に、充電を行ってください。
環境2
晴れた日の窓際
1万ルクス
(報時します。)
(報知しません。
)
(4)鳴っているアラームを止めるには
・アラームはセットした時刻になると、20秒間鳴り続けます。鳴っているアラームを
途中で止めたい場合は、いずれかのボタンを押してください。
※どの表示の時でも、この操作は可能です。
アラームマーク消灯
アラームOFF
■使用上のご注意とお手入れについて
00:00
10
(5)アラーム音の試し聞き(サウンドデモンストレーション)と報時並びに操
作確認音のセットと解除
・
「時刻・カレンダー表示」でボタンCを押すごとに報時・操作確認音のセット
と解除ができます。
・また、ボタンCとボタンDを同時に押し続けると「アラーム音の試し聞き」
ができます。
まさらにボタンAを約2秒押し続けます。 ④セットが終わりましたらボタンAを押して修正状態を解除して「タイマー表示」にもどしてください。押し
④フリーメモリ数を表示した後、
「リコー
忘れた場合でも2∼3分後には「タイマー表示」へ自動的にもどります。
ル表示」にもどります。
※クロノグラフ計 測中およびSTOP状 態では
■充電について
GMT
※パワーセーブは光があたらない状態で一定時間ボタン操作が無い時、表示を消灯させて消費電力を低減する機能です。表示状態
へ復帰する場合は、光をあてるかいずれかのボタンを押すことで消灯前の表示状態に戻ります。
・設定した時刻(時・分)で毎日報知する3チャンネルのデイリーアラーム機能付です。
・タイマー 1、2とも10秒以上9時間59分59秒まで設定ができます。
・タイマー 1のタイムアップ後、タイマー 2がスタートする2つのタイマーを備えています。また、タ ・各チャンネルは、アラームのon/--(セット/解除)切り替えができます。
イマー 2のタイムアップ後再びタイマー 1がスタートするリピート(繰り返し)機能となっています。
●1つのチャンネルを消去する場合
・タイマー 1または2のどちらかを、0時間00分00秒に合わせると普通のリピートタイマーとして使えます。 (1)ボタンの名称とはたらき
●ボタンAを押して「アラーム表示」にしてください。
①ボタンAを押して「リコール表示」にし ・リピート回数は、1∼100回まで設定ができます。
てください。
※はじめに最新のチャンネルが表示されます。 (1)ボタンの名称とはたらき
ボタンA:アラーム表示への切り替え
ボタンB
ボタンC
②ボタンBまたはボタンCを押して消去し ●ボタンAを押して「タイマー表示」状態にしてください。
ボタンA(長押し)
:アラーム修正状態の呼び出し
たいチャンネルを呼び
ボタンB:修正箇所の合わせ(戻り)
出します。
ボタンB
ボタンC
ボタンA:タイマー表示への切り替え
ボタンC:修正箇所の合わせ(進み)
③ボ タ ンAを 約2秒 押 し
:タイマー修正状態の呼び出し
ボタンA(長押し)
アラームのON / OFF切替
ボタ
ンA
ボタ
ンD
続 け る と「CLR?」 と
ボタンB:修正箇所の合わせ(戻り)
ボタンD:内部照明の点灯
A
ボタンE
表示されます。
ボタンC:修正箇所の合わせ(進み)
ボタンE:アラームチャンネルの切替
ボタ
ンA
ボタ
ンD
④ボタンAをそのまま約
スタート/ストップ
ボタンE
2秒 押 し 続 け、「ALL
ボタンD:内部照明の点灯
(2)アラームの使いかた
CLR?」と表示された
ボタンE:修正箇所の選択
・3チャンネルとも、使いかたは同じです。
らボタンAをはなしま A
タイマーのリセット
例:
「アラーム−1」のところで、アラーム時刻「午前6時30分」にセットする場合
す。
⑤フ リ ー メ モ リ 数 を 表
(2)タイマーの使いかた
示 し た 後、
「リコール
例:タイマー 1のセットを3分、タイマー 2のセットを1分、リピート回数を5回にした場合
①ボタンEを押して「ALARM 1」を呼び出します。
表示」にもどります。 A
①ボタンAを押して「タイマー表示」にしてください。
「アラーム時刻合わせ状態」になります。
ボタンAを長押しすると「時」が点滅し、
●全 て の チ ャ ン ネ ル を
②ボタンAを長押しするとタイマー 1の「時」が点滅表示し「タイマーセット」状態になります。 ボ
消去する場合
タンEを1回押すごとに合わせたいところ(点滅)を選ぶことができます。
②ボタンEを押しますと、押すたびに「時」と「分」が交互に点滅表示します。修正す
①ボタンAを押して「リコール表示」にして
タイマー 1
タイマー 2
リピート回数
る箇所をボタンEで選択してください。
ください。
(時:午前6時)
時→分→秒
時→分→秒
※はじめに最新のチャンネルが表示されます。
②ボタンAを約2秒間押し続けると「CLR?」
③合わせたいところを点滅させたあと、ボタンCを1回押すごとに点滅している数字が1
と表示されます。
③合わせたいところを点滅させたらボタンCを押すごとに点滅している数字が1つ進みます。
つずつ進みます。
(反対にボタンBを押すごとに1つずつもどります。
)
③ボ タ ンAを そ の ま ま 約2秒 押 し 続 け、 (反対にボタンBを押すごとに点滅している数字が1つもどります。
)
※ボタンBまたはボタンCを押し続けると、早送りできます。
(分:30分)
「ALL CLR?」と表示されたら、そのま ※ボタンBまたはボタンCを押し続けると、早送りできます。
※ベストラップを表示する時は、
「BEST」表示と「L-**」表示を交互に表示します。
※ラップタイムとスプリットタイムの表示位置はクロノグラフの表示位置設定に準じて表示されます。
※ラップ/スプリット計測後、約10秒間表示をホールドし、ラップ回数が点滅します。その後自動的に計
④他の測定結果を見たい場合は、ボタンBまたはボタンCを押して見たいチャンネルを選
測表示にもどります。ラップ回数は、次のラップ回数を表示します。
び、③のように確認してください。
※途中のラップは、何回でも繰り返すことができます。ラップ回数は、999回まで表示します。以降は、
1001(表示:001)
、1002(表示:002)と順次表示します。
1
コントラストレベル「0」
パワーセーブ1時間の時
※クロノグラフがリセット状態であることを確
認してからおこなってください。
ボタンB:チャンネルの呼び出し(進み)
ボタンC:チャンネルの呼び出し(戻り)
ボタンD:内部照明の点灯
ボタンE:データ呼び出し
ボタンD
(2)リコールの使いかた
例:チャンネル5(ch-5)を見たい場合
①ボタンAを押して「リコール表示」にしてください。
※はじめに最新のチャンネルを表示します。 ②ボタンC(進み)とボタンB(戻り)を押して呼び出したいチャン
ネルを選びます。
③ボタンEを押して、ラップタイムの確認ができます。
次の順序で確認できます。
・「F-297」表示は、残り
297メモリできます。
1
パワーセーブOFFの時
(3)データ消去のしかた
(3)ラップ/スプリットタイムの計りかた(ラップを10回測定した場合)
・「F-300」表示は、300メモリできます。
・スタート後「L- 1」表示に切り替わります。
・世界44都市(GMTを含む)の時刻を表示 (4)都市と時差の比較表(GMTは、グリニッジ標
します。
準時を示しています。+はGMTより進み、−
・各都市ごとにサマータイム(DST)の設定
は遅れを示しています。)
ができます。
No.
都市名
GMTとの時差
ボタンC
−1
■タイマーの使いかた
●メモリーの考えかた
5
−2
※カレンダーは2012年から2060年までの年・月・日・曜がプログラムされていますので、この間、月の大小や、
うるう年でも修正する必要はありません。
④調整が終わりましたら、ボタンAを押して「時刻・カレンダー表示」にもどしてく
※サマータイム(DST)をセットした都市は、
「ワールドタイム表示」で同じ都市を選択するとサマータイムの表
ださい。押し忘れた場合でも2∼3分後には「時刻・カレンダー表示」状態へ自動
示になります。
的にもどります。
※時刻修正の途中で
「全点灯表示」
になるのは、
故障ではありません。ボタンCとボタンDが同時に押された状態です。
その場合はいずれか1つのボタンを押して、
「時刻・カレンダー表示」にもどしてください。次にあらためて、
(2)
の①から合わせなおしてください。
ボタンA
※途中のストップ・再スタートは、何回でも繰り返すことができます。
※クロノグラフがラン中は マークが点滅します。
■ワールドタイムの使いかた
ボタンB
④合わせたいところを選択したあと、ボタンCを1回押すごとに点滅している数字・都市名が1つずつ進
)
みます。(反対にボタンBを押すごとに1つずつ戻ります。)(「秒」「12/24H」「DST」を除く。
⑤「時刻・カレンダー合わせ」が終わりましたら、ボタンAを押して修正状態を解除して「時刻・カレ
ンダー表示」にもどしてください。押し忘れた場合でも2∼3分後には「時刻・カレンダー表示」へ
自動的にもどります。
※べストラップタイム、平均ラップタイムを表示する関係のため、1つでもデータを取ると、最低3つのメ ・最大300メモリ(記憶)できます。
モリーを使います。
・チャンネル(ch)ごとにメモリーを呼びだすことができます。
1チャンネル(ch)のみ使用した場合は300メモリー(記憶)できますが、chを複数使用した場合はメモ ・ベストラップタイム、平均ラップタイムを表示します。
リーの合計が300本に達しません。
・各チャンネルには測定開始時の日付が記憶されます。
機能表示
たとえば、
1チャンネル(ch)使用の場合は300メモリー、2チャンネル(ch)使用の場合は合計297メモリー
となります。
※ラップ/スプリットを計測した際、FULLとラップ回数が交互に点滅した場合、ラップ/スプリットタイ (1)ボタンの名称とはたらき
●ボタンAを押して「リコール表示」にしてください。
ムのメモリーができません。
※最新のチャンネルを表示します。
メモリーがいっぱいになっているという意味です。
※クロノグラフ機能を使用するときに、下段に「F- 0」と表示されていた場合は、ラップ/スプリットタ
ボタンA:リコール表示への切替
ボタンB
ボタンC
イムのメモリーができません。
ボタンA(長押し):データ消去
この場合はリコールモードでチャンネルデータを削除してください。
ラップタイム
「内部照明(パネライト)機能」
・専用ボタン操作により、どの表示状態でも1回押しで約
2秒間ライトが点灯します。
(1)ボタンの名称とはたらき
※秒表示が30∼59秒の時、ボタンBまたはボタンCを押すと1分繰り上がって「00」に合います。
※時刻合わせは、電話の時報サービス(TEL.117)が便利です。
■リコール(呼び出し)の使いかた
・1/100秒単位で計測し、最大計測時間99時間59分59秒99です。
「クロノグラフ機能」
・ラップタイムとスプリットタイム表示を同時に表示し、ベストラップタイム・平均ラップ
・1/100秒単位で計測できる最大計測時間99時間59分
タイムをメモリー(記憶)します。
59秒99のストップウォッチ機能です。
・最大300本メモリー(記憶)する事ができます。
・ラップタイム、スプリットタイム最大300本メモリー(記
・メモリーは300本以内であれば、分割してメモリーすることができます。
憶)することができます。
・メモリーは300本以内であれば、分割してメモリーする ・ここで計測したラップ/スプリットタイム、およびベストラップタイム・平均ラップタイ
ムは。リコール表示で呼び出して見ることができます。
ことができます。
・ラップタイムとスプリットタイムの表示位置を切り
(1)ボタンの名称とはたらき
替えることができます。
●ボタンAを押して「クロノグラフ表示」状態にしてください。
「タイマー機能」
・2つの設定が出来るダブルタイマー機能付です。
・10秒から9時間59分59秒までの1秒単位で設定可能
です。
・繰り返し回数設定は、1∼100回可能です。繰り返し
回数も表示します。
※都市名をGMTにすると「DST」の「onまたは--」は表示しません。
※「DST」の「on」を表示させると「DST」
(サマータイム)マークが点灯し、1時間進みます。
(4)パワーセーブ設定のあわせかた
(3)コントラスト調整の合わせかた
・表示のコントラスト(明暗)の調整ができます。初期化された時及びオールクリア ●ボタンAを押して「時刻・カレンダー表示」状態にしてください。
時のコントラストは「0」設定です。
「時刻・カレンダー合わせ」状態になります。
①ボタンAを長押しすると現在設定されている都市名が表示し、
●ボタンAを押して「時刻・カレンダー表示」状態にしてください。
②ボタンEを押して「パワーセーブ設定」状態にしてください。
HOME DST(サマータイム) 秒 分 時 日 月 年 12/24H コントラスト パワーセーブ
「時刻・カレンダー合 ③ボタンBまたはボタンCを押してOFFまたは設定時間を選択します。
①ボタンAを長押しすると現在設定されている都市名が表示し、
設定
(都市名) の on/-調整
わせ」状態になります。
②ボタンEを押して「コントラスト調整」状態にしてください。
OFF
30分
1時間
2時間
4時間
③ボタンEを押して「秒」を点滅状態にし、
時報と同時にボタンBまたはボタンCを押すと「00」に合います。 ③ボタンBまたはボタンCを押してコントラストを調整します。
ボタンEを押すたびに修正箇所が替わります。
この時計には、一般の酸化銀電池とは異なる専用の二次電池を使用しています。二次電
池とは、乾電池やボタン電池のような使い捨ての電池とは異なり、充電と放電をしなが
ら繰り返し使用可能な電池です。
長期的な使用や使用環境により、容量や充電効率が少しずつ低下し持続時間が短くなる
場合があります。性能が低下し始めたら修理にお出しください。
ボタンC
警告
ボタンD
・二次電池は取り出さないでください。
二次電池の交換には専門知識・技能が必要ですので、お買い上げ店にご依頼ください。
・一般の酸化銀電池が組み込まれると、破裂、発熱、発火などのおそれがあります。
■アフターサービスについて
警告
■充電時のご注意
・充電の際、撮影用ライト、スポットライト、白熱ライト(球)などに、近づけ
過ぎると、時計が高温になり内部の部品等が損傷を受けるおそれがありますの
でおやめください。
・太陽光にて充電する際も、車のダッシュボード等では、かなりの高温となり故
障の原因となる場合がありますので、おやめください。
・時計が50℃以上にならないようにしてください。
●保証と修理について
・修理や点検調整のための分解掃除(オーバーホール)
の際は、お買い上げ店、または弊社お客様相談窓口に
ご依頼ください。
・保証期間内に不具合が生じた場合は、必ず保証書を添
えてお買い上げ店へお持ちください。
・保証内容は保証書に記載したとおりです。
保証書をよくお読みいただき、大切に保管してください。
・保証期間終了後については、修理によって機能が維持で
きる場合には、
ご要望により有料修理させていただきます。
■補修用性能部品について
②リセットされる
表示がない状態から復帰すると、ホームタイムモードの時刻表示になります。
時刻、カレンダーは2012年1月1日、日曜日、午前12時00分00秒からカウ
ントを始めます。
正しい時刻で使っていただくために、システムリセット後は時刻合わをお
こなってください。
※ 復帰後は、ホームタイムが日本時間(都市コード:TYO)になります。
この時計の補修用性能部品の保有期間は通常7年を基準
としています。補修用性能部品とは時計の機能を維持す
るために必要な修理用部品です。修理の際、外観の異な
る代替部品を使用させていただくことがありますので、
あらかじめご了承ください。
●製品取扱上のご注意
警告
・次のような場合、ご使用を中止してください
○時計本体やバンドが腐食などにより鋭利になった場合
○バンドのピンが飛び出してきた場合
※ すぐに、お買い上げ店・弊社お客様相談窓口にご連絡ください。
・乳幼児の手の届くところに、時計本体や部品を置かないでください
部品や電池を乳幼児が飲み込んでしまうおそれがあります。
万が一飲み込んだ場合は、身体に害があるため、ただちに医師にご相談ください。
・時計から電池を取り出さないでください
電池の交換には、専門知識・技能が必要ですので、お買い上げ店にご依頼ください。
電池は充電しないでください。破裂・発熱・液漏れ・破損などのおそれがあります。
・この時計はスキューバダイビングや飽和潜水には絶対に使用しないでください
スキューバダイビングや飽和潜水用の時計に必要とされる過酷な環境を想定した様々な厳しい検査を行っていま
せん。専用のダイバーズウオッチをご使用ください。
注意
・以下の場所での携帯・保管は避けてください
○揮発性の薬品が発散しているところ
(除光液などの化粧品、防虫剤、シンナーなど)
○5℃∼35℃から外れる温度に長期間なるところ
○高湿度なところ
○磁気や静電気の影響があるところ
○ホコリの多いところ
○強い振動のあるところ
※電池式の場合は、電池が切れた状態で長時間放置しないでください。電池が漏液するおそれがあります。
・アレルギーやかぶれを起こした場合
ただちに時計の使用をやめ、皮膚科など専門医にご相談ください。
・直接蛇口から水をかけることは避けてください
水道水は非常に水圧が高く、
日常生活用強化防水の時計でも
防水不良になるおそれがあります。
・水分のついたまま、ボタンを操作しないでください。
時計内部に水分が入ることがあります。
※万が一、ガラス内面にくもりや水滴が発生し、長時間消えない場合は防水不良です。
お早めに、お買い上げ店・弊社お客様相談窓口にご相談ください。
・水や汗、汚れが付着したままにしておくのは避けてください
防水時計でもガラスの接着面・パッキンの劣化やステンレスがさびることにより、防水不良になるおそれがあり
ます。
・入浴やサウナの際はご使用を避けてください
蒸気や石けん、温泉の成分などが防水性能の劣化を早めることがあります。
・その他のご注意
○金属バンドの調整は専門知識・技能が必要ですので、お買い上げ店にご依頼ください。
手や指などをケガする可能性があるほか、部品を紛失する可能性があります。
※ご贈答、ご転居などにより、お買い上げ店での調整が受けられない場合は、弊社お客様相談窓口へご依頼くだ
さい。
お買い上げ店以外では有料もしくはお取扱いいただけない場合があります。
○商品の分解・改造はしないでください。
○乳幼児に時計が触れないようにご注意ください。
ケガやアレルギーをひき起こすおそれがあります。
○使用済み電池の処理は自治体の指示に従ってください。
○提げ時計やペンダント時計の場合、ひもやチェーンの取り扱いにご注意ください。
衣類や手、首などを傷つけたり、首を締めたりするおそれがあります。
●お手入れについて
日ごろからこまめにお手入れしてください
・水分や汗、汚れはこまめに柔らかい布でふき取るように心がけてください。
・海水につけた後は、必ず真水でよく洗ってからふき取ってください。
その際、直接蛇口から水をかけることは避け、容器に水をためるなどしてから洗ってください。
※非防水・日常生活防水の場合はおやめください。
●防水性能について
お買い上げいただいた時計の防水性能を裏ぶたでご確認の上ご使用ください。
裏ぶた表示
防水性能
お取扱方法
非防水です。
水滴がかかったり、汗を多くかく場合には、使用しないで下さい。
WATER RESISTANT
日常生活用防水です。
日常生活での「水がかかる」程
度の環境であれば使用できます。
WATER RESISTANT
5 BAR
日常生活用強化防水で
5気圧防水です。
水泳などのスポーツに使用できます。
WATER RESISTANT
10(20)BAR
日常生活用強化防水で
10(20)気圧防水です
空気ボンベを使用しないスキンダイビングに使用できます。
防水性能表示なし
警告
水泳には使用しないで下
さい。
●バンドについて
バンドは直接肌に触れ、汗やほこりで汚れます。そのため、お手入れが悪いとバンドが早く傷んだり、
肌のかぶれ・そで口の汚れなどの原因になります。
長くお使いになるためには、こまめなお手入れが必要です。
金属バンド
・ステンレスバンドも水や汗・汚れをそのままにしておくと、さびやすくなります。
・手入れが悪いと、かぶれやワイシャツのそで口が黄色や金色に汚れる原因になります。
・水や汗・汚れは、早めに柔らかな布でふき取ってください。
・バンドのすき間の汚れは、水で洗い、柔らかな歯ブラシなどで取り除いてください。
(時計本体は水にぬれないように、台所用ラップなどで保護しておきましょう。)
残った水分は柔らかな布でふき取ってください。
・チタンバンドでも、ピン類には強度に優れたステンレスが使用されているものがあり、ステンレス
からさびが発生することがあります。
・さびが進行すると、
ピンの飛び出しや抜けが発生し、
時計を脱落させてしまうことがあります。
また、
逆に中留が外れなくなることがあります。
・万が一、ピンが飛び出している場合は、怪我をするおそれがありますので、ただちに使用をやめて
修理をご依頼ください。
皮革バンド
・水や汗、直射日光に弱く、色落ちや劣化の原因になります。
・水がかかったときや汗をかいた後は、すぐに乾いた布などで、吸い取るように軽くふいてください。
・直接日光にあたる場所には放置しないでください。
・色の薄いバンドは、汚れが目立ちやすいので、ご使用の際はご注意ください。
・時計本体が日常生活用強化防水10(20)気圧防水になっているものでも、アクアフリーバンド以
外の皮革バンドは、水泳・水仕事などでのご使用はお控えください。
ポリウレタンバンド
・光で色があせたり、溶剤や空気中の湿気などにより劣化する性質があります。
・特に半透明や白色・淡い色のバンドは、他の色を吸着しやすく、また変色をおこします。
・汚れたら水で洗い、乾いた布でよくふき取ってください。
(時計本体は水にぬれないように、台所用ラップなどで保護しておきましょう。)
・弾力性がなくなったら取り換えてください。そのまま使い続けるとひび割れが生じバンドが切れや
すくなります。
かぶれやアレルギーについて
バンドによるかぶれは、金属や皮革が原因となるアレルギー反応や、汚れ、もしくはバンドとのす
れなどの不快感が原因となる場合など、いろいろな発生原因があります。
バンドサイズのめやすについて
バンドは多少余裕をもたせ、通気性をよくしてご使用ください。
時計をつけた状態で、指一本入る程度が適当です。
●点検調整のための分解掃除(オーバーホール)について
・長くご愛用いただくために、3年∼4年に1度程度の点検調整のための分解掃除(オーバーホール)
をおすすめします。
ご使用状況によっては、漏液により表示消えが生じることがあります。
またパッキンなどの部品の劣化が進み、汗や水分の浸入などで防水性能が損なわれる場合がありま
す。
点検調整のための分解掃除(オーバーホール)は、
「純正部品」とご指定の上、お買い上げ店にご
依頼ください。その際、パッキンやばね棒の交換もあわせてご依頼ください。
・点検調整のための分解掃除(オーバーホール)の際には、ムーブメント交換となる場合もあります。