1
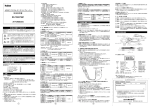
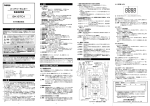
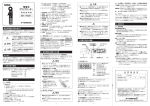
危険な電圧が存在する通電導体の周辺では使用しないで下さい。
又このような通電導体から取り外さないで下さい。
1. 測定機器のチェック
警告:測定前に本体ケースの割れや濡れがないか点検のうえ、常にきれいにして
3.安全測定と使用上の注意
乾いた状態でご使用下さい。
安全な測定をするために!!
感電事故を防止して安全な測定をする為に、説明書をよく読んでから本器を使って下さ
い。特に本器本体及び説明書の中の 記号のついている所は重要です。
警告
この表示は、その内容を守らずに誤った取り扱いをすると、『人
が死亡又は重傷を負う可能性があること』を示しています。
注意
この表示は、その内容を守らずに誤った取り扱いをすると、『人
が負傷したり、物的損害を発生させる可能性があること』 を示し
ています。
2. 強電回路の測定についての警告
警告:強電回路(大型モーター、配電用トランス、ブスバー等への電気容量の大き
い工場内外の動力線等)の測定は危険です。強電回路を測定する場合は、身体の
いかなる部分も活線部分に触れないよう充分距離をとって下さい。
3. 最大許容入力値の厳守
警告:測定仕様に記載の最大許容入力
値を超えた測定をしないで下さい。
Ⅲ
V
CAT0 0 Ⅱ
3 AT V
C 00
6
この記号は、IEC規格及びISO規格に定められている記号で、『説明書を
よく読んでから本器を使って下さい。』ということを表しています。
4. 安全線から指が出ないこと
警告:感電事故防止のため、使用中は
安全線より先に指を出さないで下さい。
(図-1参照)
図-1
3-2. 測定上の注意
交流の高周波電流を測定しないで下さい。クランプヘッドが発熱し本器を損傷する恐
れがあります。
3-3. 取り扱い上の注意
はじめに
このたびは、カイセのACクランプアダプター821をお買い上げ頂き、誠にありがとうござ
います。本器の十分な活用と安全な測定のために、取扱説明書はいつも手元に置き、
良くお読み頂いた上でご使用下さい。
1. 包装内容の確認
警告2:裸足や上半身裸での電気測定は危険です。感電事故の危険があります。
注意1:本器の構造は精密です。強い振動や衝撃を与えず、高温多湿な場所での
使用及び保管は避けて下さい。
ネジ
クランプヘッド
2-2. 測定仕様(23℃±5℃、80%RH以下、但し結露のないこと)
最大許容入力
20A rms
50A rms
100A rms
400A rms
周波数特性:40Hz∼1kHzにおいて基本確度に加算
振幅:±6%rdg(20Aレンジ)、±3% rdg(50A/100A/400Aレンジ)
レンジ切換:マニュアルレンジ
過負荷保護:600A AC rms 30秒間
注: BNCコネクタを取り外す時は、
必ずロックを解除してからコネ
クタ部を持って引き抜いてくだ
さい。
ロックを解除せずに引っ張った
り、ケーブルを持って引き抜く
とコネクタ部を破損することが
あります。
図-3
●テスターなどバナナ入力端子の機器に接続する場合
付属の731 BNC変換アダプタをコネクタに取り付けて接続します。
DMMなどのテスターに接続する場合、一般的に黒色のプラグをCOM端子に、赤
色のプラグをV端子に差し込みます。
CATⅢ
300V
CATⅡ
600V
BNC コネクタ 出力コード
安全線
731 BNC 変換アダプタ
図-2
4-1. クランプヘッド
被測定導体1本をヘッドの中心を通るようにしてクランプ(はさみ込み)します。
注:複数の導体をクランプすると測定できません。
4-2. 安全線
感電防止用の線です。本器を手に持って測定する際、線より先に指を出さないで
下さい。
4-3. レンジスイッチ
測定レンジ切り換え用のスイッチです。
20A/50A/100A/400Aの4レンジに切り換えできます。
4-4. BAT LED
実効値出力(DC Output)時に点灯します。
電池が消耗して、電源電圧が約2.1V以下になると消灯します。
注:LED消灯後は、実効値出力(DC Output)の出力確度は保証されません。
4-5. ファンクションスイッチ
生波形出力(AC Output)/実効値出力(DC Output)選択用のスライドスイッチです。
実効値出力の測定終了後は、必ずファンクションスイッチをOFFにして電源を切
って下さい。
4-6. 出力コード・BNCコネクタ
コード先端のBNCコネクタを接続機器の入力端子に差し込んで使用します。
BNCコネクタは接続機器側のガイドに合わせて差し込み、右方向に回してロック
して下さい。
2
6-2. 定期的点検・校正
安全で正確な測定を維持するためには定期的な点検・校正が必要です。
本器は、通常の使用で1年以上許容誤差内の精度を維持できるよう製造されていますが、
少なくとも1年に1回は定期的に点検・校正して下さい。点検・校正は製造元へ依頼され
るのが確実な方法です。
本器が正常な動作をせず修理を依頼される場合には、事前に次の点検をして故障を確
認して下さい。
1.電池が接触不良となっていないかどうか。電池の極性が間違って設置されていない
かどうか。
2. 電池が消耗していないかどうか。
3. 測定する場合、各スイッチの設定が正しく行われているかどうか。
4. 測定入力が本器の規定レンジ以内であるかどうか。
5. 使用環境内における測定精度であるかどうか。
6. 本器本体にひび、割れなど損傷がないかどうか。
以上の点検を通して故障であることが確認できましたら、修理を依頼して下さい。修理を
依頼される場合には、販売店へ依頼されても結構ですが、弊社の営業部サービス係宛
へ直送されますと、修理期間も短縮されます。直送される場合、品質保証書に購入年
月日、販売代理店名及び所在地が記入されているか確認し、又は購入時のレシートを
添え、裏面の「修理依頼」に故障の症状と原因を記入し、切り離して修理品と一緒に送
って下さい。この品質保証書の添付がないと、修理はお請けできませんので、ご了承下
さい。
返送小包には、「修理品在中」と記し、住所、氏名、電話番号も忘れずに明記して下さい。
修理完了後に代金引換小包便にて返送致します。
「あて先」
営業部サービス係
〒386-0156 長野県上田市林之郷422
TEL(0268)35-1600 / FAX(0268)35-1603
Email : [email protected] http://www.kaise.com
製品の仕様や外観は改良などのため予告なく変更することがあります。あらかじめご了承下さい。
品 質 保 証 書
コネクタ部
拡大図
差し込んでから右方向に回しロックする。 左方向に回しロックを解除し引き抜く。
図-4
ファンクションスイッチ
図-5
取り外し時
コネクタの溝を731の
ガイドに合わせる。
コネクタ部
拡大図
BAT LED
電池カバー
+
6-3. 修理
1.接続機器(オシロスコープ、記録計、
テスターなど)は、AC200mVが測定
できるレンジに設定します。
2. BNCコネクタの溝を接続機器側のガ
イドに合わせて差し込み、右方向に回
してロックします。取り外しは、BNCコ
ネクタを左に回してロックを解除し、引
き抜きます。
4.各部の名称と機能
2-1. 一般仕様
1. レンジ切換 : マニュアルレンジ (20A/50A/100A/400A)
2. 出力波形切換 : ファンクションスイッチで生波形出力/実効値出力切換
3. 負荷抵抗 : 200Ω以下
4. 電池消耗表示 : 約2.1V以下でBAT LED消灯
5. 過負荷保護 : 600A AC rms 30秒間
6. 耐電圧 : AC5.55kV rms 1分間(50/60Hz、入力端子とケース間)
7. 使用温・湿度 : 0∼40℃、80%RH以下 (但し、結露のないこと)
8. 保存温・湿度 : -20∼60℃、70%RH以下 (但し、結露のないこと)
9. 温度係数 : 23℃±5℃の時の確度×0.1/℃
10. 安全基準 : CEマーク認証。 IEC-61010-1、 IEC-61010-2-032 CATⅢ300V、
CATⅡ600V 及びEMC テスト合格
11. 電源 : 1.5V R03またはLR03(単4)電池2本 ※注:生波形出力時は電池使用なし。
12. 消費電流 : 約7mA
13. 連続使用時間(実効値出力時) : アルカリ電池:約170時間、マンガン電池:約85時間
14. 被測定導体径 : 最大φ27mm
15. 出力ケーブル長 : 2.5m
16. 出力端子 : BNCコネクタ(0.2V f.s)
17. 寸法・重量 : 171(H)×58(W)×35(D)mm、約220g
18. 付属品 : 731BNC変換アダプタ、1020キャリングケース、取扱説明書、
1.5V LR03(単4)電池2本、
+
● 短絡事故や人身事故を避けるため、本器はAC600V以下の電路で使用して
下さい。
● 各レンジの最大許容入力値以上の測定はしないで下さい。
● 感電事故及び本器の焼損防止のため、「3. 安全測定と使用上の注意」を
よく読んで測定して下さい。
● 測定中にクランプヘッドをひねらないで下さい。クランプヘッドに力が
加わると正確な測定が行えません。
● 身体のいかなる部分も測定回路(電源)に接触させないで下さい。
接続時
注意3: 長期間使用しない場合には、電池を取り外して下さい。
消耗した電池を内蔵したまま放置すると、電解液が漏出して内部を腐食す
ることがあります。
温度差の激しい環境で使用しないで下さい。低温の部屋から高温の部屋に
1:
移った時などは本器をしばらく放置し、その場の環境に慣れさせて下さい。
レンジスイッチ
2.仕様
1
5.測定方法
警告1: 電気測定の知識と経験のない人及び子供には使用させないで下さい。
注意2: 本器をこすったり、ベンジン、アルコール等溶剤で拭かないで下さい。
製品包装の中には、次のものが入っています。万一欠品がありましたら、販売店からお
受け取り下さい。
1. クランプアダプター
1台
2. BNC変換アダプター(731)
1個
3. キャリングケース(1020)
1個
4. 電池(1.5V LR03、単4)
2本
5. 取扱説明書
1冊
二重絶縁
交流(AC)
警 告
感電事故防止と本器の故障防止のため、以下の事項を良く理解し厳守して安全な測定
をしてください。
分解能
10mV/1A
4mV/1A
2mV/1A
0.5mV/1A
∼
3.安全測定と使用上の注意
3-1. 電気事故及び機器の故障防止
1. 交流電流(∼A) : 生波形出力
レンジ
測定確度 (45∼66 Hz)
20A
50A
±2%rdg±1%f.s
100A
400A
欧州共同体 規格準拠
−
周波数特性:40Hz∼1kHzにおいて基本確度に加算
振幅:±6%rdg(20Aレンジ)、±3% rdg(50A/100A/400Aレンジ)
レンジ切換:マニュアルレンジ
過負荷保護:600A AC rms 30秒間
1.5V
821
警告又は注意記号で「説明書を良く読んで下さい」ということを表しています。
電池が消耗してBAT LEDが消灯したら、次の手順で電池を交換して下さい。
1. クランプヘッドを被測定導体から外し、電源をOFFにします。
2. ネジを外して電池カバーを外し、使用済み電池を取り外します。
3. 電池の極性に注意して新しい1.5V R03またはLR03(単4)電池2本を入れます。
4. 電池カバーを取り付け、しっかりとネジを締めます。
注: 本器を長期間使用しない場合は電池を取り外して下さい。消耗した電池
を内蔵したまま放置すると電解液が漏出して内部を腐食することがあり
ます。
1.5V R03(単4)電池2本
1.5V
(English in reverse)
製品本体及び取扱説明書に表示されている次のシンボルは、国際規格のIEC-610101、IEC-61010-2-032及びISO3864に規定されている記号です。
最大許容入力
20A rms
50A rms
100A rms
400A rms
R03(UM-4)×2
取扱説明書 / INSTRUCTION MANUAL
4-7. シンボルマーク
分解能
10mV/1A
4mV/1A
2mV/1A
0.5mV/1A
−
ACクランプアダプター
AC CLAMP ADAPTER
2. 交流電流(∼A): 実効値出力
レンジ
測定確度 (45∼66 Hz)
20A
50A
±3%rdg±1%f.s
100A
400A
3. クランプアダプターのレンジスイッチを測定する電流の大きさに適したレンジ
に合わせます。
測定電流の大きさがわからない時は、大きいレンジ(400A)に合わせて下さい。
4. ファンクションスイッチで出力波形を設定します。
AC Output (OFFと共通位置) : 生波形出力
DC Output (RMS) : 実効値出力
注:実効値の出力には電池が必要です。電池が入っていることを確認して
下さい。
5. クランプヘッドを開き、被測定導体1本をヘッドの中心を通るようにクランプ
(はさみ込み)します。
注:複数の導線をクランプすると測定できません。
6. 接続機器に表示された測定値を確認します。
注:表示値は0.2V f.s.です。
7. 測定値に応じて、レンジスイッチを適切なレンジに切り換えます。
8. 実効値出力で測定した後は、必ずファンクションスイッチをOFFにして電源を
切って下さい。
注意: ● 直流が重畳した測定は誤差の原因となりますので避けて下さい。
● アースシールドされた導体は、正確に測定できません。
● 接続する機器は、入力抵抗の十分大きな測定機器を使用するよう
にして下さい。
● 接続機器の取扱説明書もよくお読み下さい。
● 裸線の導体を測定しないで下さい。
6.保守管理
6-1. 電池の交換 ※電池は実効値出力(DC Output)時のみ使用します。生波形出力(AC Output)
時は使用しません。
警 告
電気事故防止のため、測定を終了し、クランプヘッドを被測定導体から外し
てから電池を交換して下さい。
ファンクションスイッチは必ずOFFにして下さい。
3
Serial No.
MODEL 821
品質保証期間
購入日
年 月 日から1カ年
販売代理店及び所在地
印
※ 品質保証期間中に正常な使用状態で、万一故障等が生じました場合は、下記記載の
品質保証規定により無償で修理いたします。
製品にこの品質保証書を添えて、上記販売代理店、又は直接カイセ株式会社営業部
サービス係へご送付下さい。
※ 購入年月日は販売代理店が記入します。販売代理店名及びその押印なき品質保証書
は無効となりますので、購入時に確認して下さい。
〒386-0156 長野県上田市林之郷422
品
質
保
証
電話 0268-35-1600(代表)
規
定
品質保証期間中に説明書に則った正しい使用状態において、万一故障が生じた場合には、無償で
修理いたします。
但し、下記事項に該当する故障・破損は無償修理の対象から除外し、有償修理となります。
記
1.取扱説明書に基づかない不適当な取り扱い、又は使用による故障。
2.カイセ特約サービス代理店、又は当社サービス部門以外でなされた
修理又は改造に起因する故障。
3.お買い上げ後の輸送又は落下等によって生じた故障。
4.火災、水害、地震等天災地変によって生じた故障・破損。
5.消耗部品(電池等)の補充又は取り換え。
6.品質保証書の提出がない場合。
7.その他、当社の責任とみなされない故障。
8.本証明書は日本国内においてのみ有効です。
修理依頼
故障の症状
故障の原因
(わかったら)
4
4-1. Clamp Head
(23℃±5℃、<80%RH in non-condensing)
4-3. Range Switch
Frequency Characteristic : 40Hz to 1kHz, following readings are added.
±6%rdg(20A range), ±3% rdg(50A/100A/400A ranges)
Range Selection : Manual-ranging
Overload Protection : 600A AC rms for 30 seconds
2. AC Current (∼A) : RMS Output
Range
Accuracy (45 to 66 Hz)
20A
50A
±3%rdg±1%f.s
100A
400A
To prevent an electrical shock hazard to the operator and/or damage to the
instruments, read this instruction manual carefully before using the
instrument. WARNINGS with the symbol
on the instrument and this
instruction manual are highly important.
Important Symbols
The symbol listed in IEC 61010-1 and ISO 3864 means "Caution
(refer to instruction manual)".
WARNING : The symbol in this manual advises the user of an
electrical shock hazard that could result in serious injury or even
death.
CAUTION : The symbol in this manual advises the user of an
electrical shock hazard that could cause injury or material damages.
Frequency Characteristic : 40Hz to 1kHz, following readings are added.
±6%rdg(20A range), ±3% rdg(50A/100A/400A ranges)
Range Selection : Manual-ranging
Overload Protection : 600A AC rms for 30 seconds
3. SAFETY PRECAUTIONS
Correct knowledge of electric measurements is essential to avoid unexpected
danger such as operator's injury or damage to the instrument. Read the following
precautions carefully for safety measurements.
WARNING 1. Checks of Instrument
Before measurement, check if there is no damage to the instrument. Dust, grease
and moisture must be removed.
WARNING 2. Warning of High Power Line Measurements
2-1. GENERAL SPECIFICATIONS
1. RANGE SELECTION : Manual-ranging (20A/50A/100A/400A)
2. OUTPUT WAVEFORM : AC output or RMS output selected
by Function Switch
3. LOAD RESISTANCE : 200Ω or less
4. BATTERY WARNING : BAT LED disappears at approx. 2.1V or less
5. OVERLOAD PROTECTION : 600A AC rms for 30 seconds
6. DIELECTRIC STRENGTH : 5.55kV AC rms, for 1 minute (50/60Hz, between
input terminal and case)
7. OPERATING TEMPERATURE & HUMIDITY : 0 to 40℃, 80%RH or less in
non-condensing
8. STORAGE TEMPERATURE & HUMIDITY : -20 to 60℃, 70%RH or less in
non-condensing
9. TEMPERATURE COEFFICIENT : Accuracy in 23℃±5℃×0.1℃
10. SAFETY LEVEL : CE marking approved (IEC-61010-1, IEC-61010-2-032 CATⅢ300V, CATⅡ600V and EMC Test passed.)
11. POWER SUPPLY : 1.5V R03 or LR03 (AAA) batteries x 2
※NOTE : Batteries are not necessary for AC output
12. POWER CONSUMPTION : Approx. 7mA
13. CONTINUOUS OPERATING TIME (for RMS output) : Approx. 170 hours
(alkaline), Approx. 85 hours (manganese)
14. CONDUCTOR DIAMETER : φ27mm max.
15. OUTPUT CABLE LENGTH : 2.5m
16. OUTPUT TERMINAL : BNC connector (0.2V f.s)
17. DIMENSIONS & WEIGHT : 171(H)×58(W)×35(D)mm, Approx. 220g
18. ACCESSORIES:731 BNC Conversion Adapter, 1020 Carrying Case,
1.5V LR03 (AAA) batteries x 2, Instruction Manual
1
Caution (refer to instruction manual.)
∼
Alternating Current (AC)
CE Marking Conformity
Double Insulation
Do not apply around, or remove from HAZARDOUS LIVE conductors.
WARNING 3. Maximum Input Observance
5. MEASUREMENT PROCEDURES
WARNINGS
over 600V AC.
● Do not measure any current that might exceed maximum input value.
● Read 「3. SAFETY PRECAUTIONS」carefully to avoid electric shock
hazard and serious damage to the instrument.
● Do not twist clamp head while measurement. Measurement should be
incorrect if any pressure is applied.
Replace the batteries when BAT LED is disappeared.
1. Detach clamp head from circuit, and set Function Switch to "OFF".
2. Unscrew battery cover and
Battery Cover
screw
remove exhausted batteries.
2 pcs of new
3. Insert 2 pcs of new 1.5V R03 or
1.5V (L)R03 (AAA) Batteries
LR03 batteries in correct polarity.
4. Fix battery cover and tighten the
screw.
NOTE : Remove the batteries when
the instrument is out of use for a
long time. The exhausted batteries
might leak electrolyte and corrode
fig. 5
the inside.
Do not put your fingers over the safety line
while measurement. (Refer to fig. 1)
fig. 1
3-2. PRECAUTION FOR USE
CAUTION : Do not measure AC high-frequency current. Clamp head
becomes heated and could damage the instrument.
3-3. GENERAL WARNINGS AND CAUTIONS
WARNING 1. Children and the persons who do not have enough knowledge
about electric measurements must not use this instrument.
WARNING 2. Do not measure the electricity in naked of barefooted to
protect yourself from electrical shock hazard.
CAUTION 1. Away the instrument from hot and humid conditions. Do not
apply hard mechanical shock or vibration.
CAUTION 2. Do not polish the case or attempt to clean it with any cleaning
fluid like gasoline or benzine. If necessary, use silicon oil or
antistatic fluid.
CAUTION 3. Remove the batteries when the instrument is out of use for a
long time. The exhausted batteries might leak electrolyte and
corrode the inside.
1. Do not use the instrument under large temperature difference.
Allow the instrument for a while to let it used to the surrounded
temperature.
4. NAME ILLUSTRATION
BAT LED
1. Set the range of connecting
equipment enabling to measure
200mV AC.
(Connecting equipments・・・
Oscilloscopes, Memory recorders,
or Testers)
2. Insert BNC connector to the input
terminal of connecting equipment
fitting the both guide together. Turn
the connector to the right until it is
locked.
To remove, turn the BNC connector
to the left until it is unlocked and
pull it out.
Check the following items before asking repair service.
1. Check the battery connection, polarity, and capacity (confirm "BAT LED").
2. Confirm that the keys are set correctly.
3. Confirm that measured accuracy is adopted in the operating environment.
4. Confirm that the body of this instrument has no cracks or any other damages.
WARRANTY
NOTE :
When removing the BNC connector,
always confirm that it is completely
unlocked.
Do not pull the cable.
fig. 3
● When connecting BNC connector to banana-type input terminal
(e.g. Testers, DMMs) ;
Put 731 BNC Conversion Adapter on the tip of BNC connector.
Generally, insert black plug to COM terminal, and red plug to V terminal of the
testers.
to remove
to connect
KAISE AUTHORIZED DEALER
close up
*turn the BNC connector to the left
until it is unlocked
*turn the BNC connector to the right
until it is locked
CATⅢ
300V
CATⅡ
600V
731 BNC Conversion Adapter
BNC Connector
Output Cord
2
821 is warranted in its entirety against any defects of material or workmanship
under normal use and service within a period of one year from the date of
purchase of the original purchaser. Warranty service is available at KAISE
AUTHORIZED SERVICE AGENCY through your local dealer. Their obligation
under this warranty is limited to repairing or replacing 821 returned intact or in
warrantable defect with proof of purchase and transport charges prepaid. KAISE
AUTHORIZED DEALER and the manufacturer, KAISE CORPORATION, shall
not be liable for any consequential damages, loss or otherwise. The foregoing
warranty is exclusive and in lieu of all other warranties including any warranty of
merchantability, whether expressed or implied.
This warranty shall not apply to any instrument or other article of equipment which
shall have been repaired or altered outside of KAISE AUTHORIZED SERVICE
AGENCY, nor which have been subject to misuse, negligence, accident, incorrect
repair by users, or any installation or use not in accordance with instructions
provided by the manufacturer.
Function Switch
close up
Safety Line
6-2. PERIODICAL CHECK AND CALIBRATION
Periodical check and calibration is necessary to make safety measurements and
to maintain the specified accuracy. The recommended check and calibration term
is once a year and after the repair service. This service is available at KAISE
AUTHORIZED SERVICE AGENCY through your local dealer.
Repair service is available at KAISE AUTHORIZED SERVICE AGENCY through
your local dealer. Pack the instrument securely with your name, address,
telephone number and problem details, and ship prepaid to your local dealer.
*fit connector
guide together
Range Switch
+
6-3. REPAIR
● Do not touch any part of power line or the circuit to be measured.
WARNING 4. Safety Line
Clamp Head
To avoid electrical shock, detach clamp head from circuit when to replace
battery. Set Function Switch to "OFF".
+
● To avoid electrical shock hazard, do not use this instrument in the circuit
TⅢ
CA 0 0 V
3 TⅡ
CA 0 0 V
6
2. SPECIFICATIONS
4-7. SYMBOL MARK
3-1. WARNINGS
Do not measure any current that might exceed
the specified maximum input value.
1 pce.
1 pce.
1 pce.
2 pcs.
1 pce.
WARNING
Insert BNC connector to the input terminal of connecting equipment fitting the both
guide together. Turn the connector to the right until it is locked.
The following symbol marks shown on the instrument and instruction manual are
listed in IEC 61010-1, IEC 61010-2-032 and ISO 3864.
Thank you for purchasing KAISE "821 AC CLAMP ADAPTER". To obtain the
maximum performance of this instrument, read this Instruction Manual carefully,
and take safe measurement.
1. Clamp Adapter
2. BNC Conversion Adapter (731)
3. Carrying Case (1020)
4. Batteries (1.5V LR03)
5. Instruction Manual
※Batteries are necessary for RMS output. Not used in AC output.
4-6. Output Cord・BNC Connector
INTRODUCTION
1. UNPACKING AND INSPECTIONS
6-1. BATTERY REPLACEMENT
Selects AC output (AC Output) or RMS output (DC Output).
Set Function Switch to "OFF" after RMS output measurement.
High Power Line (High Energy Circuit) such as distribution transformers, bus bars
and large motors are very dangerous.
For safety of high power line measurement, do not touch the live line and keep
enough distance.
Confirm if the following items are contained in the package in good condition. If
there is any damage or missing items, ask your local dealer for replacement.
6.MAINTENANCE
4-5. Function Switch
−
FOR SAFETY MEASUREMENTS!!
Resolution Maximum. Input
10mV/1A
20A rms
4mV/1A
50A rms
2mV/1A
100A rms
0.5mV/1A
400A rms
4-4. BAT LED
Lights up in RMS output (DC Output).
The light disappears when battery voltage becomes at approx. 2.1V or less.
NOTE : Accuracy of RMS output is not assured after the light disappeared.
NOTE :
● Do not measure DC-superimposed circuit to avoid measurement error.
● Earth shielded conductor cannot be measured correctly.
● Confirm if the connecting equipment has enough input resistance.
● Reading the instruction manual of connecting equipment is recommended.
● Do not measure bare conductor.
R03(UM-4)×2
821
The switch to change measurement ranges. 20A, 50A, 100A, or 400A can be
selected.
1.5V
INSTRUCTION MANUAL
4-2. Safety Line
The line to protect yourself against electrical shock hazard. Do not put your fingers
over this line while measurement.
5. Open clamp head, and clamp a single conductor in its center.
NOTE : Measurement cannot be done if several conductors are clamped.
6. Select the suitable range by Range Switch if necessary.
7. Read the measurement value displayed on the connected equipment.
NOTE : The displayed value is 0.2V f.s.
8. Set Function Switch to "OFF" after the measurement of RMS output.
−
AC CLAMP ADAPTER
1. AC Current (∼A) : AC Output
Range
Accuracy (45 to 66 Hz) Resolution Maximum. Input
20A
10mV/1A
20A rms
50A
4mV/1A
50A rms
±2%rdg±1%f.s
100A
2mV/1A
100A rms
400A
0.5mV/1A
400A rms
Clamp a single conductor in the center of clamp head.
NOTE : Measurement cannot be done if several conductors are clamped.
1.5V
2-2. MEASUREMENT SPECIFICATION
fig. 2
fig. 4
3. Set Range Switch of Clamp Adapter to a suitable current range to be
measured.
If the current value to be measured is uncertain, set Range Switch to 400A.
4. Select output waveform by Function Switch.
AC Output (common with "OFF") : AC output.
DC Output (RMS) : RMS output.
NOTE : Batteries are necessary for RMS output. Confirm if the batteries are
installed properly.
3
422 Hayashinogo, Ueda City, Nagano Pref., 386-0156 Japan
TEL : +81-268-35-1601 (REP.) / FAX : +81-268-35-1603
E-mail : [email protected]
http://www.kaise.com
Product specifications and appearance are subject to change without notice due to continual improvements.
4
70-1301-0821-2 0907