1
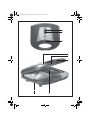
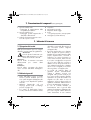
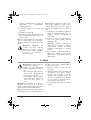
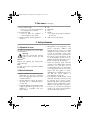
Instrucciones de servicio
Istruzioni per l’uso
Operating instructions
Bedienungsanleitung
Instruções de manejo
H-3265
53B&RYHUB6DQGZLFKPDNHUB/%LQGG
Sandwichmaker LB5 Seite 1 Mittwoch, 25. November 2009 10:35 10
1
2
3
4
5
6
8
7
Sandwichmaker LB5 Seite 2 Mittwoch, 25. November 2009 10:35 10
Español . . . . . . . . . . . . . . . . . . . . . . . . . . . . . . . . .3
Por favor, tenga en cuenta la página desplegable.
Italiano . . . . . . . . . . . . . . . . . . . . . . . . . . . . . . . 11
Osservare la pagina pieghevole
English
. . . . . . . . . . . . . . . . . . . . . . . . . . . . . . . 19
Be sure to note the fold-out page
Deutsch . . . . . . . . . . . . . . . . . . . . . . . . . . . . . . . 27
Bitte beachten Sie die Ausklappseite
H-3265_10_V1.3_ES-IT-GB-DE
Sandwichmaker LB5 Seite 2 Mittwoch, 25. November 2009 10:35 10
Sandwichmaker LB5 Seite 3 Mittwoch, 25. November 2009 10:35 10
Índice
1. Descripción del aparato . . . . . . . . . . . . . . . . . . . . . . . . . . . . . . . . . . . . . . . . . . . . . . . . . 3
2. Denominación de las piezas (vea la página desplegable) . . . . . . . . . . . . . . . . . . . . . . . . . . 4
3. Indicaciones de seguridad . . . . . . . . . . . . . . . . . . . . . . . . . . . . . . . . . . . . . . . . . . . . . . . . 4
4. Antes del primer uso . . . . . . . . . . . . . . . . . . . . . . . . . . . . . . . . . . . . . . . . . . . . . . . . . . . 7
5. Elaborar sándwiches . . . . . . . . . . . . . . . . . . . . . . . . . . . . . . . . . . . . . . . . . . . . . . . . . . . 7
6. Limpieza . . . . . . . . . . . . . . . . . . . . . . . . . . . . . . . . . . . . . . . . . . . . . . . . . . . . . . . . . . . . 8
7. Propuestas de recetas . . . . . . . . . . . . . . . . . . . . . . . . . . . . . . . . . . . . . . . . . . . . . . . . . . 9
8. Eliminación . . . . . . . . . . . . . . . . . . . . . . . . . . . . . . . . . . . . . . . . . . . . . . . . . . . . . . . . . 10
9. Datos técnicos . . . . . . . . . . . . . . . . . . . . . . . . . . . . . . . . . . . . . . . . . . . . . . . . . . . . . . . 10
10. Garantía . . . . . . . . . . . . . . . . . . . . . . . . . . . . . . . . . . . . . . . . . . . . . . . . . . . . . . . . . . . 10
1. Descripción del aparato
1.1 Uso previsto
La sandwichera SilverCrest H-3265 ha sido
diseñada
para
la
elaboración
de
sándwiches. No puede utilizarse para la
elaboración de otros alimentos.
Use su sandwichera sólo en el interior de su
domicilio, nunca al aire libre.
Este aparato está diseñado para uso
doméstico, no para uso industrial.
1.2 Volumen de suministro
• 1 Sandwichera
• 1 Instrucciones de uso
debajo de ese valor, el calefactor se vuelve a
encender, hasta alcanzar de nuevo la
temperatura deseada.
En el aparato hay unas cavidades 7, en las
que se colocan los sándwiches preparados.
Cerrando la tapa 4 se inicia el proceso de
tostado.
1.4 Señales en el aparato
Señal 3
Lugar
Tapa 4
Significado
Advertencia de
superficies calientes
1.3 Descripción del funcionamiento
El aparato se calienta previamente (se
ilumina la lámpara de control roja 2). Tan
pronto
como
la
temperatura
es
suficientemente elevada para tostar, se
ilumina la lámpara de control verde 1.
En cuanto se alcanza la temperatura
necesaria, la calefacción se apaga
automáticamente. Si la temperatura cae por
H-3265
3
Sandwichmaker LB5 Seite 4 Mittwoch, 25. November 2009 10:35 10
2. Denominación de las piezas (vea la página desplegable)
1 Lámpara de control verde
– se ilumina, tan pronto como se ha
alcanzado la temperatura para tostar
2 Lámpara de control roja
– se ilumina, tan pronto como el
aparato es alimentado con corriente
3 Símbolo de advertencia "Advertencia de
superficies calientes"
Tapa
Asa de tapa
Cierre
Cavidades
– aquí se colocan los sándwiches
preparados
8 Enrollador de cable (en la parte inferior)
4
5
6
7
3. Indicaciones de seguridad
3.1 Explicación de términos
En este Manual encontrará los siguientes
términos señalizadores:
¡Advertencia!
Alto riesgo: El no observar la
advertencia puede causar daños al
cuerpo y a la vida.
¡Cuidado!
Riesgo medio: El no observar la advertencia
puede causar un daño material.
Nota:
Riesgo pequeño: Circunstancias que
debería tener en cuenta en el manejo del
aparato.
3.2 Información general
• Antes de usar el aparato, lea
atentamente estas instrucciones de uso.
Éstas son una parte integral del aparato
y deben estar siempre a mano.
• Utilice el aparato únicamente para el
uso previsto descrito (ver "1.1 Uso
previsto" en la página 3).
• Para evitar daños, compruebe que la
tensión de red requerida (véase la placa
de características del aparato) coincide
con la de su red eléctrica.
4
• El aparato no está diseñado para que lo
usen personas (menores incluidos) con
limitaciones físicas, sensoriales o
mentales, o con una experiencia o
conocimiento deficientes, a menos que
estén vigiladas por una persona
responsable de su seguridad o hayan
recibido de la misma instrucciones sobre
cómo usar el aparato. Vigile a los
menores para asegurarse de que no
jueguen con el aparato.
• Tenga en cuenta que todo tipo de
derechos
de
garantía
o
responsabilidades expiran si se han
empleado
piezas
accesorias
no
recomendadas en estas instrucciones de
uso o si, a la hora de efectuar
reparaciones, no se han utilizado
exclusivamente piezas de recambio
originales. Esto se aplica también en el
caso de reparaciones llevadas a cabo
por
personas
no
cualificadas.
Encontrará la dirección del servicio
técnico en "10. Garantía" en la
página 10.
• Ante cualquier posible anomalía de
funcionamiento dentro del plazo de
vigencia de la garantía, la reparación
del aparato siempre será a cargo de
nuestro
Service-Center.
En
caso
Sandwichmaker LB5 Seite 5 Mittwoch, 25. November 2009 10:35 10
•
•
•
•
•
•
•
•
•
contrario se extinguirá todo derecho de
garantía. Encontrará la dirección del
servicio técnico en "10. Garantía" en la
página 10.
No deje nunca sin vigilancia el aparato
mientras esté en funcionamiento: así
podrá intervenir oportunamente en caso
de funcionamiento defectuoso.
El aparato no se puede hacer funcionar
con un reloj programador externo o un
sistema de telecontrol independiente,
como por ejemplo una base de control
remoto.
Compruebe que la toma de corriente
sea fácilmente accesible, ya que el
aparato no dispone de ningún
interruptor para encender y apagar.
Compruebe que el cable de red no esté
colocado de forma que alguien pueda
tropezar con él, ni quedar enganchado
en él o pisarlo y lesionarse.
El aparato debe instalarse siempre
sobre una base fija, plana, seca y no
inflamable; de esta manera impedirá
que vuelque, resbale o que se encienda
la base; evitando posibles daños.
Mantenga una distancia de al menos 50
cm con otros objetos para que ninguno
pueda encenderse.
El aparato no debe colocarse sobre
placas de cocina calientes, meterse en
hornos calientes o instalarse cerca de
calentadores de gas o de agua fluyente,
ya que podría provocar daños.
Use sólo cubiertos de madera o de
plástico resistentes al calor. Los cubiertos
metálicos podrían dañar el revestimiento
de las superficies.
No puede descartarse que los productos
para la conservación de las encimeras
(muebles) contengan componentes que
ataquen y reblandezcan las patas de
goma. En este caso coloque el aparato
sobre una base no inflamable.
H-3265
• No coloque objetos sobre el aparato.
3.3 Protección contra descargas
eléctricas
¡Advertencia!
Las
siguientes
indicaciones
de
seguridad
deberían protegerle de una
descarga eléctrica.
• Si el aparato está dañado, éste no debe
utilizarse bajo ningún concepto. En estos
casos, llévelo a reparar por personal
técnico cualificado. Encontrará la
dirección del servicio técnico en
"10. Garantía" en la página 10.
• Si la conexión a la red de este aparato
se daña, tiene que ser sustituida por el
fabricante u otra persona cualificada
para evitar peligros.
• En el aparato no debe penetrar nunca ni
agua ni otros líquidos. Por lo tanto:
– nunca lo instale en el exterior
– no lo sumerja nunca en líquidos
– no coloque sobre el mismo objetos
llenos de líquidos, p. ej., cazos
– nunca lo instale en ambientes con
mucha humedad.
En caso de penetrar líquido en el
aparato, desconecte inmediatamente el
enchufe de red y lleve el aparato para
que lo repare el personal técnico
cualificado. Encontrará la dirección del
servicio técnico en "10. Garantía" en la
página 10.
• Conecte siempre el aparato a una base
de enchufe con contacto de puesta a
tierra (Schuko).
• Debe evitarse la utilización de cables
prolongadores. Esto sólo está permitido
bajo
unas
condiciones
muy
determinadas:
– el cable prolongador debe ser
adecuado para la intensidad de
corriente del aparato
5
Sandwichmaker LB5 Seite 6 Mittwoch, 25. November 2009 10:35 10
•
•
•
•
•
•
•
•
– el cable prolongador no debe estar
tendido "en el aire": no debe poder
tropezar nadie con él, ni quedar al
alcance de los niños
– el cable prolongador no debe estar
nunca dañado
– en la toma de corriente no debe haber
ningún otro aparato enchufado
además de éste, ya que de lo
contrario se puede producir una
sobrecarga de la red eléctrica
(¡prohibido
utilizar
enchufes
múltiples!).
No toque nunca el cable de red, el
aparato o el enchufe con las manos
húmedas.
Para desenchufar el cable de red, tire
siempre de la clavija. No lo haga nunca
tirando del propio cable.
No lleve nunca el aparato tirando del
cable de red.
Evite doblar o aplastar el cable de red.
Cuando use el aparato, desenrolle todo
el cable de redpara evitar que se
sobrecaliente o funda.
Mantenga el cable de red alejado de las
superficies calientes (p. ej., placas de
cocina).
Cuando no utilice el aparato,
desconecte la clavija de la toma de
corriente. Sólo entonces el aparato se
encuentra totalmente sin corriente.
En una tormenta el aparato conectado a
la red eléctrica puede resultar dañado
por los rayos.
3.4 Protección contra escaldaduras y
quemaduras
¡Advertencia!
Las
superficies
calientes
pueden
provocar
lesiones. Por esta razón, observe lo
siguiente:
6
• Las superficies del aparato pueden
calentarse. Por lo tanto, cuando el
aparato esté en funcionamiento tómelo
sólo por el asa de la tapa 5.
• Tenga en cuenta que durante el tostado
puede salir vapor caliente por el lado
del aparato.
• Cuando
saque
los
sándwiches
terminados, tenga en cuenta que
también están muy calientes.
• No cambie de sitio el aparato durante la
utilización. Durante la utilización está
muy
caliente.
Así
evitará
las
quemaduras.
• Deje siempre enfriar el aparato antes de
transportarlo o limpiarlo.
3.5 Por la seguridad de su hijo
•
•
•
•
¡Advertencia! Con frecuencia, los
niños
no
pueden
evaluar
correctamente los peligros, con el
consiguiente riesgo de sufrir
lesiones. Por esta razón, observe lo
siguiente:
Este producto sólo se debe utilizar bajo
la supervisión de adultos.
Preste atención a que el aparato se
encuentre siempre fuera del alcance de
los niños.
Asegúrese que los niños no pueden
hacer caer el aparato tirando del cable.
Tenga cuidado de que los niños no
jueguen con el plástico del envase, ya
que podría suponer peligro de muerte
para ellos. Los plásticos del envase no
son un juguete.
Sandwichmaker LB5 Seite 7 Mittwoch, 25. November 2009 10:35 10
4. Antes del primer uso
En muchas piezas se aplica en el momento
de su fabricación una fina capa protectora
de aceite. Antes de usarlo por primera vez,
haga funcionar el aparato sin sándwiches,
a fin de que los posibles residuos puedan
evaporarse.
Nota: En las primeras utilizaciones el
calentamiento de la plancha puede producir
leves olores. Procure mantener, por tanto,
una adecuada ventilación.
5. Desenrolle completamente el cable de
alimentación.
1. Saque del embalaje el aparato y todos
sus accesorios.
7. Deje encendido el aparato durante unos
10 – 15 minutos.
2. Compruebe que el aparato no presenta
daños.
8. Gire el cierre 6 hacia arriba y abra la
tapa 4 por el asa 5.
3. Limpie el aparato antes de usarlo por
primera vez. Siga, para ello, las
instrucciones del capítulo "6. Limpieza"
en la página 8.
9. Desenchufe la clavija de red y deje que se
enfríe el aparato.
4. Escoja una ubicación firme, lisa e
incombustible. Mantenga una distancia
de unos 50 cm respecto a otros objetos.
6. Conecte la clavija a una toma de
corriente adecuada.
Se ilumina entonces la lámpara de
control 2 y el aparato se calienta.
Tan pronto como se alcanza la
temperatura de funcionamiento, se
enciende la lámpara de control verde 1.
10. Limpie de nuevo el aparato. Siga, para
ello, las instrucciones del capítulo
"6. Limpieza" en la página 8.
Nota: Por motivos de sabor, no deberían
comerse los primeros sándwiches que tueste.
Estos deberían desecharse.
5. Elaborar sándwiches
Notas:
• Lo mejor es utilizar pan de molde para
los sándwiches.
• Prepare los sándwiches antes de
encender el aparato.
• Distribuya el relleno de manera que los
sándwiches tengan, a ser posible, el
mismo grosor por todas partes.
1. Escoja una ubicación firme, lisa e
incombustible. Mantenga una distancia
de unos 50 cm respecto a otros objetos.
2. Desenrolle completamente el cable de
alimentación.
H-3265
3. Abra la tapa 4, girando para ello el
cierre 6 hacia arriba y girando también
la tapa 4 completamente hacia arriba
tomándola por el asa 5.
4. Quite el polvo que pueda haber con un
paño seco.
5. Cierre la tapa 4.
6. Conecte la clavija a una toma de
corriente adecuada.
Se ilumina entonces la lámpara de
control roja 2 y el aparato se calienta.
7
Sandwichmaker LB5 Seite 8 Mittwoch, 25. November 2009 10:35 10
Tan pronto como se alcanza la
temperatura de funcionamiento, se
enciende la lámpara de control verde 1.
El aparato ya puede utilizarse.
Nota: Durante el tostado, primero se apaga
la lámpara de control verde 1. Tan pronto
como se ilumina de nuevo, es el momento
de comprobar el proceso de tostado:
7. Abra la tapa 4, girando para ello el
cierre 6 hacia arriba y girando también
la tapa 4 completamente hacia arriba
tomándola por el asa 5.
11. Compruebe si los sándwiches ya han
alcanzado el grado de dorado que
desea. En caso contrario, cierre otra vez
la tapa 4.
8. Coloque los sándwiches preparados en
las cavidades 7.
12. En cuanto los sándwiches estén a su
gusto, sáquelos del aparato.
9. Cierre la tapa 4.
10. Bloquee la tapa 4, presionando para
ello el cierre 6 hacia abajo, hasta que
encaje audiblemente.
Nota: El proceso de tostado dura, según el
grosor del sándwich y del grado de dorado
deseado, varios minutos.
¡Advertencia! Al abrir la tapa 5
puede salir hacia usted vapor
caliente. Proteja por ello sus manos
con un paño de secar o con
guantes de cocina.
Precaución: Use sólo cubiertos de
madera o de plástico resistentes al calor.
Los cubiertos metálicos podrían dañar el
revestimiento de las superficies.
13. Después de cada utilización, desenchufe
la clavija de la toma de corriente. Sólo
así se encuentra el aparato totalmente
sin corriente.
6. Limpieza
¡Advertencia! Para evitar el riesgo
de una descarga eléctrica o de un
deterioro:
– Saque el enchufe de la toma de
corriente antes de cada limpieza.
– No meta nunca el aparato en
agua y protéjalo de las
salpicaduras y las gotas de agua.
– Antes de limpiar el aparato,
déjelo enfriar de modo que ya no
haya riesgo de quemadura.
¡Precaución! No utilice en ningún caso
productos de limpieza corrosivos o que
puedan rayar o dejar rozaduras. Con ello
se podría dañar el aparato, así como el
recubrimiento antiadherente.
8
Nota: no demore en exceso la limpieza; así
los restos de alimento no formarán una
costra muy difícil de eliminar.
1. Retire las migas y mayores restos de
alimentos.
2. Frote el aparato con un paño suave
húmedo, por dentro y por fuera. También
puede utilizar un poco de detergente
suave, pero tendrá que volver a frotar
con agua clara, para que los sándwiches
no adquieran un sabor no deseado.
3. Frótelo después con un paño seco.
Sandwichmaker LB5 Seite 9 Mittwoch, 25. November 2009 10:35 10
7. Propuestas de recetas
7.1 Sándwich holandés de tomate
7.2 Sándwich italiano
Ingredientes:
• Pan de molde
• Cebolletas
• Tomates
• Mantequilla (o mantequilla aderezada
con ajo o con hierbas)
• Jamón cocido
• Gouda tierno en lonchas
• Sal y pimienta
Ingredientes:
• Pan de molde
• Puré de tomate
• Tomates
• Mayonesa para ensalada
• Hierbas de la Provenza
• Mozzarella en rodajas
• Sal y pimienta
Elaboración:
1. Formar una pasta con puré de tomate,
mayonesa, sal, pimienta y hierbas de la
Provenza.
1. Lavar y dejar escurrir las cebolletas.
2. Cortar las cebolletas en tiras largas y
delgadas.
3. Sumergir las tiras durante 1 minuto en
agua hirviendo con sal (blanquear).
4. Volcar las tiras sobre un colador.
5. Enjuagar con agua fría (esto les
mantiene el color fresco) y dejar escurrir.
6. Lavar los tomates, secarlos y cortarlos en
rebanadas finas.
7. Untar con mantequilla la rebanada de
pan de molde.
Elaboración:
2. Untar las rebanadas de pan de molde
con la pasta.
3. Lavar los tomates, secarlos y cortarlos en
rebanadas finas.
4. Cubrir las rebanadas de pan de molde
untadas, con rebanadas de tomate y de
mozzarella.
5. Cubrir todo con otra rebanada de pan
de molde untada.
6. Cortar el sándwich en diagonal.
8. Cubrir la rebanada con jamón.
9. Repartir por encima las cebolletas y las
rebanadas de tomate.
10. Salpimentar
11. Cubrir con una rebanada de Gouda.
12. Cubrir todo con otra rebanada de pan
de molde untada de mantequilla.
13. Cortar el sándwich en diagonal.
H-3265
9
Sandwichmaker LB5 Seite 10 Mittwoch, 25. November 2009 10:35 10
8. Eliminación
8.1 Aparato
El símbolo del cubo de basura
tachado sobre ruedas significa
que el producto, en la Unión
Europea,
tiene
que
ser
entregado en un puesto
colector de basura separada.
Esta regla se aplica a este producto y a
todos los accesorios marcados con este
símbolo. Los productos marcados no pueden
ser desabastecidos por la basura casera
normal, sino que tienen que ser entregados
en un puesto de recepción para el reciclaje
de aparatos eléctricos y electrónicos. El
reciclaje ayuda a reducir el consumo de
materias primas y a aliviar el medio
ambiente.
8.2 Embalaje
Si desea eliminar el embalaje, respete las
correspondientes normas medioambientales
de su país. En Alemania, elimine el
embalaje a través de un punto de recogida
del Sistema Dual (Punto Verde).
9. Datos técnicos
Tensión nominal:
Potencia nominal:
Clase de protección:
230 V~/50 Hz
750 W
I
10. Garantía
La garantía por su aparato es de 3 años a
partir de la fecha de compra. El aparato ha
sido producido conforme a unas directivas
de calidad estrictas y ha sido comprobado y
controlado antes de su entrega. En caso de
que, a pesar de ello, apareciesen fallos en
el funcionamento, rogamos llame primero a
nuestro servicio de asistencia al cliente.
Nuestros asesores de clientes le ayudarán
gustosamente y acordarán el procedimiento
que se deba seguir. En caso de conexión
errónea, utilización de piezas de otros
fabricantes, desgaste normal, uso de
violencia, intentos propios de reparación o
uso indebido, se extinguirá el derecho de
garantía.
10
Para la tramitación de la garantía y en caso
de preguntas de carácter técnico rogamos
se dirijan a nuestro número de atención y
servicio:
00800/4212 4212
(lunes - viernes de 09:00 a 17:00 horas)
Sandwichmaker LB5 Seite 11 Mittwoch, 25. November 2009 10:35 10
Indice
1. Descrizione dell’apparecchio . . . . . . . . . . . . . . . . . . . . . . . . . . . . . . . . . . . . . . . . . . . . .
2. Denominazione dei componenti (vedere pagina ripiegata) . . . . . . . . . . . . . . . . . . . . . . . .
3. Indicazioni di sicurezza. . . . . . . . . . . . . . . . . . . . . . . . . . . . . . . . . . . . . . . . . . . . . . . . .
4. Prima del primo utilizzo . . . . . . . . . . . . . . . . . . . . . . . . . . . . . . . . . . . . . . . . . . . . . . . .
5. Preparazione di toast. . . . . . . . . . . . . . . . . . . . . . . . . . . . . . . . . . . . . . . . . . . . . . . . . .
6. Pulizia. . . . . . . . . . . . . . . . . . . . . . . . . . . . . . . . . . . . . . . . . . . . . . . . . . . . . . . . . . . . .
7. Proposte di ricette . . . . . . . . . . . . . . . . . . . . . . . . . . . . . . . . . . . . . . . . . . . . . . . . . . . .
8. Smaltimento . . . . . . . . . . . . . . . . . . . . . . . . . . . . . . . . . . . . . . . . . . . . . . . . . . . . . . . .
9. Dati tecnici . . . . . . . . . . . . . . . . . . . . . . . . . . . . . . . . . . . . . . . . . . . . . . . . . . . . . . . . .
11
12
12
15
15
16
17
18
18
1. Descrizione dell’apparecchio
1.1 Impiego previsto
La tostiera SilverCrest H-3265 è destinata
alla preparazione di toast. Non ne è consentito l’impiego per la preparazione di altri
generi alimentari.
La tostiera deve essere utilizzata esclusivamente all’interno dell’ambiente domestico e
mai all’aperto.
Questo apparecchio è destinato all’uso in
abitazioni private e non può essere utilizzato per applicazioni commerciali.
1.2 Entità della fornitura
• 1 Tostiera
• 1 Istruzioni per l’uso
automaticamente. Qualora la temperatura
scenda sotto tale valore, il riscaldamento
viene di nuovo attivato, fino a raggiungere
nuovamente la temperatura desiderata.
L’apparecchio è dotato di incavi 7 nei quali
vengono posizionati i toast preparati.
La chiusura del coperchio 4 avvia il processo di tostatura.
1.4 Contrassegni sull’apparecchio
Contrassegno 3
Posizione
Significato
Coperchio 4 Prestare
attenzione alle
superfici roventi
1.3 Descrizione del funzionamento
L’apparecchio viene preriscaldato (la spia di
controllo rossa 2 lampeggia). Non appena
la temperatura è sufficientemente elevata
per la tostatura, la spia di controllo verde 1
lampeggia.
Non appena viene raggiunta la temperatura
necessaria, il riscaldamento viene interrotto
H-3265
11
Sandwichmaker LB5 Seite 12 Mittwoch, 25. November 2009 10:35 10
2. Denominazione dei componenti (vedere pagina ripiegata)
1 Spia di controllo verde
– lampeggia al raggiungimento della
temperatura di tostatura
2 Spia di controllo rossa
– lampeggia quando l’apparecchio è
alimentato elettricamente
3 Simbolo di avvertenza "Prestare attenzione alle superfici roventi"
Coperchio
Impugnatura coperchio
Dispositivo di bloccaggio
Incavi
– nei quali posizionare i toast preparati
8 Avvolgicavo (sul lato inferiore)
4
5
6
7
3. Indicazioni di sicurezza
3.1 Spiegazione dei termini
Nelle presenti istruzioni per l’uso vengono
utilizzati i seguenti termini di segnalazione:
Avvertenza!
Pericolo elevato: la mancata osservanza dell’avvertenza può determinare lesioni fisiche e mortali.
Attenzione!
Pericolo medio: la mancata osservanza
dell’avvertenza
può
causare
danni
materiali.
Indicazione:
Pericolo ridotto: circostanze che devono
essere osservate nell’utilizzo dell’apparecchio.
3.2 Indicazioni generali
• Prima dell’utilizzo leggere accuratamente le presenti istruzioni per l’uso.
Sono parte integrante dell’apparecchio
e devono essere disponibili in qualsiasi
momento.
• Utilizzare l’apparecchio solo per
l’impiego previsto (vedi "1.1 Impiego
previsto" a pagina 11).
• Per evitare di danneggiare l’apparecchio, verificare che la tensione di rete
12
disponibile corrisponda alla tensione di
rete necessaria (vedere targhetta
sull’apparecchio).
• Il presente apparecchio non è destinato
all’uso da parte di persone (inclusi i
bambini) che presentino limitazioni delle
proprie capacità fisiche, sensoriali o
mentali né con scarsa esperienza e/o
scarse nozioni in merito, tranne nel caso
in cui siano sorvegliate da una persona
che si fa carico della loro sicurezza o
abbiano ricevuto da questa istruzioni su
come utilizzare l’apparecchio. I bambini
devono essere sorvegliati per accertarsi
che non giochino con l’apparecchio.
• Si ricorda che qualsiasi diritto di
garanzia decade automaticamente
qualora si utilizzino accessori non
consigliati nelle presenti istruzioni per
l’uso oppure qualora vengano effettuate
riparazioni con pezzi di ricambio non
originali. Ciò vale anche in caso di
riparazione ad opera di personale non
qualificato. L’indirizzo dell’assistenza si
trova in "10. Garanzia" a pagina 18.
• In caso di eventuali anomalie di
funzionamento entro il periodo della
garanzia, la riparazione dell’apparecchio
può essere eseguita soltanto dal nostro
centro d’assistenza. In caso contrario
Sandwichmaker LB5 Seite 13 Mittwoch, 25. November 2009 10:35 10
•
•
•
•
•
•
•
•
•
decade qualsiasi diritto di garanzia.
L’indirizzo dell’assistenza si trova in
"10. Garanzia" a pagina 18.
Durante il funzionamento non lasciare
mai l’apparecchio incustodito, in modo
tale da poter intervenire tempestivamente in caso di anomalie di funzionamento.
L’apparecchio non deve essere azionato
con un timer esterno o con un sistema di
telecontrollo separato, come ad esempio
una presa telecomandata.
Assicurarsi che la presa sia ben
accessibile in quanto l’apparecchio non
dispone di interruttore di accensione/
spegnimento.
Assicurarsi che non sussista mai il
pericolo di ferirsi inciampando nel cavo
di rete oppure impigliandovisi o
calpestandolo.
L’apparecchio deve essere posizionato
esclusivamente su una base stabile,
piana, asciutta e non infiammabile per
evitarne il rovesciamento o lo scivolamento ed impedire che la base prenda
fuoco provocando danni.
Tenere una distanza di almeno 50 cm
da altri oggetti per evitare che questi
prendano fuoco.
Non posizionare l’apparecchio su
piastre di cottura calde, nel forno caldo
o in prossimità di resistenze riscaldanti
che potrebbero causare danni.
Utilizzare esclusivamente utensili da
cucina in legno o in plastica
termoresistente. Utensili di metallo
potrebbero danneggiare le superfici
rivestite.
Non è escluso che i detergenti per piani
d’appoggio contengano componenti che
possono intaccare e danneggiare i
piedini in gomma. In questo caso
posizionare l’apparecchio su una
superficie non infiammabile.
H-3265
• Non appoggiare oggetti sull'apparecchio.
3.3 Protezione dalle folgorazioni
Avvertenza! Le seguenti istruzioni di
sicurezza servono per proteggere
l’utente da folgorazioni elettriche.
• Mai
utilizzare
l’apparecchio
se
danneggiato. In tal caso la riparazione
dell’apparecchio deve essere eseguita
da personale specializzato. L’indirizzo
dell’assistenza
si
trova
in
"10. Garanzia" a pagina 18.
• Se il cavo di rete di questo apparecchio
è danneggiato, deve essere sostituito dal
produttore
o
da
una
persona
ugualmente qualificata, per evitare
pericoli.
• Evitare che acqua o altri liquidi
penetrino nell’apparecchio. Quindi:
– non utilizzare all’aperto
– non immergere in liquidi
– non appoggiare sull’apparecchio
oggetti contenenti liquidi, ad es. pentole
– non utilizzare in ambiente molto
umido.
In caso di contatto dell’apparecchio con
liquidi, rimuovere immediatamente la
spina di rete e far riparare il dispositivo
da personale qualificato. L’indirizzo
dell’assistenza si trova in "10. Garanzia"
a pagina 18.
• Collegare l’apparecchio esclusivamente
ad una presa con contatto a terra
(schuko).
• L’utilizzo di cavi di prolunga dovrebbe
essere evitato. È consentito solo in
presenza
di
presupposti
ben
determinati:
– il cavo di prolunga deve essere adatto
all’intensità di corrente dell’apparecchio
13
Sandwichmaker LB5 Seite 14 Mittwoch, 25. November 2009 10:35 10
•
•
•
•
•
•
•
•
– il cavo di prolunga non deve essere
posato “in aria”: non deve sussistere il
pericolo di inciamparvi e non deve
essere alla portata dei bambini
– il cavo di prolunga non deve assolutamente essere danneggiato
– non collegare alla presa di corente
altri apparecchi oltre a questo, in
quanto può verificarsi un sovraccarico
elettrico (prese multiple vietate!).
Non toccare mai l’apparecchio, il cavo
di rete o la spina di rete con mani
umide.
Estrarre sempre il cavo di rete in
corrispondenza della spina. Non
estrarlo mai afferrando il cavo stesso.
Non spostare l’apparecchio tirandolo
per il cavo di rete.
Fare attenzione a non piegare o
schiacciare mai il cavo di rete.
Svolgere completamente il cavo di rete
mentre l’apparecchio è in funzione per
evitare che si surriscaldi e si fonda.
Tenere il cavo di rete lontano da
superfici calde (ad es. piastre di cottura).
Se l’unità non viene utilizzata per lungo
tempo, estrarre la spina dalla presa.
Soltanto in questo modo l’apparecchio è
completamente privo di alimentazione.
In caso di temporali, gli apparecchi
collegati alla rete di alimentazione
possono venire danneggiati dai fulmini.
3.4 Protezione da scottature e ustioni
Avvertenza! Le superfici roventi
possono provocare lesioni. Per
questo motivo osservare quanto
segue:
• Le superfici dell’apparecchio possono
diventare roventi. Pertanto durante il
funzionamento afferrare l’apparecchio
esclusivamente
in
corrispondenza
dell’impugnatura sul coperchio 5.
14
• Osservare che durante la tostatura ai lati
dell’apparecchio può fuoriuscire vapore
rovente.
• Nel prelevare i toast pronti tenere conto
che anche questi possono essere
estremamente caldi.
• Non spostare l’apparecchio durante
l’utilizzo. Quando è in funzione,
l’apparecchio diviene rovente. Come
evitare ustioni.
• Lasciare
sempre
raffreddare
l’apparecchio prima di spostarlo o
pulirlo.
3.5 Per la sicurezza dei bambini
•
•
•
•
Avvertenza!! Spesso i bambini
non sono in grado di valutare bene
i pericoli e possono così provocarsi
lesioni. Per questo motivo osservare quanto segue:
Questo prodotto può essere utilizzato
solo con la sorveglianza di adulti.
Assicurarsi
con
attenzione
che
l’apparecchio si trovi sempre al di fuori
della portata dei bambini.
Assicurarsi che i bambini non possano
far cadere l’apparecchio tirando il cavo.
Fare attenzione che la pellicola da
imballaggio non costituisca pericolo di
morte per i bambini. Le pellicole da
imballaggio non sono giocattoli.
Sandwichmaker LB5 Seite 15 Mittwoch, 25. November 2009 10:35 10
4. Prima del primo utilizzo
In fase di produzione numerosi componenti
vengono protetti con una sottile pellicola
oleosa. Prima del primo utilizzo far funzionare l’apparecchio senza toast, in modo
tale da far evaporare eventuali residui di
tale pellicola.
Nota: Durante le prime fasi di riscaldamento
l’apparecchio può emettere un leggero
odore. Provvedere pertanto ad una sufficiente aerazione.
1. Estrarre l’apparecchio e tutti gli accessori
dall’imballaggio.
2. Verificare che l’apparecchio non presenti
danni.
3. Prima del primo utilizzo pulire
l’apparecchio. A tale riguardo osservare
le indicazioni riportate nel capitolo
"6. Pulizia" a pagina 16.
4. Scegliere un punto d’installazione stabile,
piano e ignifugo. Tenere una distanza di
ca. 50 cm da altri oggetti.
5. Svolgere completamente il cavo di rete.
6. Inserire la spina in una presa adeguata.
La spia di controllo rossa 2 lampeggia
ed inizia il processo di riscaldamento
dell’apparecchio.
Al raggiungimento della temperatura di
funzionamento, la spia di controllo
verde 1 lampeggia.
7. Lasciare inserito l’apparecchio per circa
10 – 15 minuti.
8. Portare verso l’alto il dispositivo di
bloccaggio 6 ed aprire il coperchio 4 in
corrispondenza dell’impugnatura 5.
9. Estrarre la spina di rete e lasciare
raffreddare l’apparecchio.
10. Pulire nuovamente l’apparecchio. A tale
riguardo osservare le indicazioni riportate
nel capitolo "6. Pulizia" a pagina 16.
Nota: Per questioni di sapore gettare i primi
panini tostati, senza consumarli.
5. Preparazione di toast
Note:
• Utilizzare di preferenza pane per toast.
• Preparare i toast prima di accendere
l’apparecchio.
• Distribuire il ripieno in modo tale che lo
spessore dei toast sia uniforme.
1. Scegliere un punto d’installazione stabile,
piano e ignifugo. Tenere una distanza di
ca. 50 cm da altri oggetti.
2. Svolgere completamente il cavo di rete.
3. Aprire il coperchio 4 sollevando verso
l’alto il dispositivo di bloccaggio 6 e
sollevare completamente il coperchio 4
afferrandolo
in
corrispondenza
dell’impugnatura 5.
H-3265
4. Con un panno asciutto rimuovere la
polvere eventualmente presente sulla
superficie di cottura.
5. Chiudere il coperchio 4.
6. Inserire la spina in una presa adeguata.
La spia di controllo rossa 2 lampeggia
ed inizia il processo di riscaldamento
dell’apparecchio.
Al raggiungimento della temperatura di
funzionamento, la spia di controllo
verde 1 lampeggia.
L’apparecchio è ora pronto per l’uso.
7. Aprire il coperchio 4 sollevando verso
l’alto il dispositivo di bloccaggio 6 e
15
Sandwichmaker LB5 Seite 16 Mittwoch, 25. November 2009 10:35 10
sollevare completamente il coperchio 4
afferrandolo
in
corrispondenza
dell’impugnatura 5.
8. Posizionare negli incavi 7 i toast già
preparati.
9. Chiudere il coperchio 4.
10. Bloccare il coperchio 4 premendo verso il
basso l’apposito dispositivo 6 fino ad
udire lo scatto.
Nota: La durata del processo di tostatura
varia, a seconda dello spessore del toast e
del grado di doratura desiderato, tra i pochi
minuti.
Avvertenza!
All’apertura
del
coperchio 4 possono verificarsi
fuoriuscite di vapore estremamente caldo. Pertanto proteggere
le mani con un canovaccio o
guanti da cucina.
Nota: Durante la tostatura la spia di controllo verde 1 dapprima si spegne. La riaccensione della spia indica che è giunto il
momento di controllare il processo di tostatura:
11. Verificare che i toast abbiano raggiunto il
grado di doratura desiderato. In caso
negativo, chiudere nuovamente il
coperchio 4.
12. In base ai propri gusti attendere che i
toast siano pronti, quindi prelevarli
dall’apparecchio.
Attenzione! Utilizzare esclusivamente
utensili da cucina in legno o in plastica
termoresistente. Utensili di metallo
potrebbero danneggiare le superfici
rivestite.
13. Dopo l’utilizzo, estrarre la spina di rete
dalla presa. Soltanto in questo modo
l’apparecchio è completamente privo di
alimentazione.
6. Pulizia
Avvertenza! Per evitare il pericolo
di folgorazioni o di danni:
– Estrarre la spina dalla presa
prima di ogni operazione di pulizia.
– Non immergere mai l’apparecchio in acqua e proteggerlo da
eventuali gocce o spruzzi.
– Prima di pulirlo, lasciare raffreddare l’apparecchio finché non
sussiste più alcun pericolo di
ustioni.
Attenzione! Non utilizzare in nessun caso
detergenti in crema corrosivi o abrasivi.
Questi potrebbero danneggiare sia l'apparecchio che il rivestimento antiaderente.
Nota: Non aspettare troppo tempo prima di
pulire l’apparecchio, in modo tale che i resti
16
del cibo non si secchino, rendendo difficoltosa la loro rimozione.
1. Rimuovere briciole e resti di cibo
grossolani.
2. Strofinare l’apparecchio internamente ed
esternamente con un panno morbido
inumidito. Per la pulizia è possibile
utilizzare anche detergente neutro che
dovrà essere tuttavia rimosso strofinando
con acqua pulita, in modo tale da non
conferire cattivo sapore ai toast.
3. Successivamente, ripassare con un panno
asciutto.
Sandwichmaker LB5 Seite 17 Mittwoch, 25. November 2009 10:35 10
7. Proposte di ricette
7.1 Toast olandese ai pomodori
7.2 Toast italiano
Ingredienti:
• pane per toast
• cipolline
• pomodori
• burro (o burro alle erbe/burro all’aglio)
• prosciutto cotto
• formaggio Gouda non stagionato, in
fette
• sale e pepe
Ingredienti:
• pane per toast
• concentrato di pomodoro
• pomodori
• maionese per insalata
• erbe di Provenza
• mozzarella in fette
• sale e pepe
Preparazione:
1. Mescolare il concentrato di pomodoro, la
maionese, il sale, il pepe e le erbe di
Provenza.
1. Lavare le cipolline e farle sgocciolare.
2. Tagliarle nel senso della lunghezza in
fette grosse.
3. Versare le fette in acqua salata bollente e
sbollentarle per circa 1 minuto.
Preparazione:
2. Spalmare l’impasto così ottenuto sulle
fette di pane.
4. Versarle in uno scolapasta,
3. Lavare e asciugare i pomodori, quindi
tagliarli in fette sottili.
5. Sciacquarle con acqua fredda (per
mantenerne il colore fresco) e farle
sgocciolare.
4. Ricoprire con fette di pomodoro e
mozzarella
le
fette
di
pane
precedentemente spalmate.
6. Lavare e asciugare i pomodori, quindi
tagliarli in fette sottili.
5. Coprire con un’altra fetta di pane
spalmata.
7. Spalmare il burro sulle fette di pane per
toast.
6. Con un coltello incidere il toast in
diagonale.
8. Collocare una fetta di prosciutto sul pane.
9. Quindi distribuire i pezzi di cipolle e le
fette di pomodoro.
10. Insaporire con sale e pepe.
11. Aggiungere una fetta di Gouda.
12. Coprire con un’altra fetta di pane
imburrata.
13. Con un coltello incidere il toast in
diagonale.
H-3265
17
Sandwichmaker LB5 Seite 18 Mittwoch, 25. November 2009 10:35 10
8. Smaltimento
8.1 Apparecchio
Il simbolo del bidone della
spazzatura su ruote barrato
significa che il prodotto nel territorio dell’Unione Europea
deve essere smaltito nella raccolta differenziata. Ciò vale
per il prodotto e tutti gli accessori contrassegnati con questo simbolo. I prodotti contrassegnati non devono essere smaltiti assieme
ai normali rifiuti domestici ma devono
essere consegnati presso un punto di rac-
colta per il riciclaggio di apparecchi elettrici
ed elettronici. Il riciclaggio contribuisce a
ridurre il consumo di materie prime e a non
gravare sull’ambiente.
8.2 Imballaggio
Se si desidera smaltire l’imballaggio, rispettare le relative norme vigenti in materia
ambientale nel proprio paese. In Germania
smaltire l’imballaggio attraverso una
raccolta del sistema duale (“Grüner Punkt”).
9. Dati tecnici
Tensione nominale:
Potenza nominale:
Classe di protezione:
230 V~/50 Hz
750 W
I
10. Garanzia
La garanzia del vostro apparecchio è di 3
anni a partire dalla data di acquisto.
L'apparecchio è stato prodotto rispettando
rigidi criteri di qualità ed è stato controllato
prima della distribuzione. Nel caso in cui
dovessero comunque presentarsi difetti nel
funzionamento, telefonate al nostro centro
servizi clienti. I nostri consulenti saranno a
vostra disposizioni per consigliarvi come
procedere oltre. Nel caso di collegamento
errato, utilizzo di pezzi di differenti produttori, normale usura, utilizzo violento, tentativo di riparazione personale oppure
utilizzo improprio, cade la validità della
garanzia.
18
Per l‘utilizzo della garanzia e le domande
tecniche, rivolgetevi alla nostra hotline di
assistenza telefonica:
00800/4212 4212
(lunedì - venerdì
dalle ore 09:00 alle ore 17:00)
Sandwichmaker LB5 Seite 19 Mittwoch, 25. November 2009 10:35 10
Contents
1. Device description . . . . . . . . . . . . . . . . . . . . . . . . . . . . . . . . . . . . . . . . . . . . . . . . . . . .
2. Part names (see foldout page) . . . . . . . . . . . . . . . . . . . . . . . . . . . . . . . . . . . . . . . . . . .
3. Safety information. . . . . . . . . . . . . . . . . . . . . . . . . . . . . . . . . . . . . . . . . . . . . . . . . . . .
4. Before using for the first time . . . . . . . . . . . . . . . . . . . . . . . . . . . . . . . . . . . . . . . . . . .
5. Preparing sandwiches . . . . . . . . . . . . . . . . . . . . . . . . . . . . . . . . . . . . . . . . . . . . . . . . .
6. Cleaning . . . . . . . . . . . . . . . . . . . . . . . . . . . . . . . . . . . . . . . . . . . . . . . . . . . . . . . . . . .
7. Recipes . . . . . . . . . . . . . . . . . . . . . . . . . . . . . . . . . . . . . . . . . . . . . . . . . . . . . . . . . . . .
8. Disposal . . . . . . . . . . . . . . . . . . . . . . . . . . . . . . . . . . . . . . . . . . . . . . . . . . . . . . . . . . .
9. Technical data . . . . . . . . . . . . . . . . . . . . . . . . . . . . . . . . . . . . . . . . . . . . . . . . . . . . . . .
10. Warranty . . . . . . . . . . . . . . . . . . . . . . . . . . . . . . . . . . . . . . . . . . . . . . . . . . . . . . . . . .
19
20
20
23
23
24
25
26
26
26
1. Device description
1.1 Intended purpose
1.3 Function
The SilverCrest H-3265 sandwich maker is
suitable for preparing sandwiches. The
preparation of other foods is not permissible.
Only use the sandwich maker indoors, never
outside.
This product is intended for use in private
households and is not suitable for
commercial purposes.
The appliance is preheated (red indicator
light 2 lights up). As soon as the temperature
is high enough for toasting, the green
indicator light 1 lights up.
The heater switches off automatically as
soon as the necessary temperature has been
reached. If the temperature falls below this
value, the heater switches on again until the
required temperature is reached.
There are moulds 7 in the appliance into
which the prepared sandwiches are
inserted.
Toasting begins when the lid 4 is closed.
1.2 Scope of supply
• 1 Sandwich maker
• 1 Set of user instructions
1.4 Symbols on the appliance
Symbol 3 Location
Lid 4
H-3265
Meaning
Warns against hot
surfaces
19
Sandwichmaker LB5 Seite 20 Mittwoch, 25. November 2009 10:35 10
2. Part names (see foldout page)
1 Green indicator light
– comes on as soon as the temperature
for toasting has been reached
2 Red indicator light
– comes on when the appliance is
connected to the mains supply
3 Warning symbol “Warns against hot
surfaces”
Lid
Lid handle
Lock
Moulds
– into which the prepared sandwiches
are inserted
8 Cable store (on the bottom)
4
5
6
7
3. Safety information
3.1 Explanation of terms
The following keywords are used in these
user instructions:
Warning!
High risk: ignoring this warning
could result in a risk to life and
limb.
Caution!
Medium risk: ignoring this warning may
result in damage.
Note:
Low risk: points to be noted when handling
the appliance.
3.2 General information
• Please read these user instructions carefully before use. They are a constituent
part of the appliance and must be kept
to hand at all times.
• Use the appliance only for the purpose
described (see "1.1 Intended purpose"
on page 19).
• To prevent damage, check that the mains
voltage required (see type plate on the
appliance) is compatible with your
mains voltage.
20
• This appliance is not intended for use by
persons (including children) with
reduced physical, sensory or mental
capabilities or lack of experience and/
or lack of knowledge, unless either
supervised by a person responsible for
their safety or given instructions on the
use of the appliance by such a person.
Children should be supervised to ensure
they do not play with the appliance.
• Please note that any claim under the
warranty or for liability will be invalid if
accessories are used that are not
recommended in these user instructions,
or if original spare parts are not used for
repairs. This also applies to repairs
undertaken by unqualified persons. You
will find the service address in
"10. Warranty" on page 26.
• If the appliance should develop a fault
during the warranty period, it may only
be repaired by our Service Centre.
Otherwise all claims under warranty are
null and void. You will find the service
address in "10. Warranty" on page 26.
• To ensure you can intervene promptly if
a fault occurs, never leave the appliance
unsupervised during operation.
Sandwichmaker LB5 Seite 21 Mittwoch, 25. November 2009 10:35 10
• The appliance must not be operated with
an external time switch or separate
remote control system, such as a wireless
remote control socket.
• Check that the power socket is easily
accessible since the appliance does not
have an On/Off switch.
• Ensure that it is not possible for anyone to
trip over or to get caught up in or step on
the mains cable and injure themselves.
• The appliance may only be used on a
firm, level, dry and non-flammable
surface. This will prevent it from tipping
over, sliding or setting fire to the surface
and causing damage.
• Maintain a distance of at least 50 cm
from other objects to prevent them from
catching fire.
• The appliance must not be placed on hot
stoves, put in a hot oven or set up in the
vicinity of gas heaters and on-demand
water heaters, as this could cause
damage.
• Only use implements made from wood
or
heat-resistant
plastic.
Metal
implements may damage the coated
surfaces.
• Surface cleaners (furniture and work
surfaces) may contain ingredients that
could attack and soften the rubber feet.
In this case, place the appliance on a
non-flammable surface.
• Do not place any items on the
appliance.
H-3265
3.3 Protection against electric shock
Warning! The following safety
information is intended to protect
you against electric shock.
• The appliance must not under any
circumstances be used if it is damaged.
Have the device repaired in such cases
by a qualified specialist. You will find the
service address in "10. Warranty" on
page 26.
• If the mains cable for this appliance is
damaged, it must be replaced by the
manufacturer or a person with similar
qualifications in order to avoid a
hazard.
• Water or other liquids must never be
allowed to enter the appliance. For this
reason:
– never use it outdoors
– never immerse it in liquids
– never place liquid-filled objects, e.g.
pans, on the appliance
– never use in very humid environments.
If liquid should enter the appliance,
unplug the mains plug immediately and
have the appliance repaired by a
qualified technician. You will find the
service address in "10. Warranty" on
page 26.
• The appliance must be connected up to a
mains socket with earthing contact.
• Avoid using extension cables. An
extension cable may only be used under
very specific conditions:
– the extension cable must be suitable
for the current rating of the appliance;
– the extension cable must be routed
across surfaces or the floor (not
allowed to hang in mid air); ensure
the cable is out of the reach of
children and does not pose a tripping
hazard;
21
Sandwichmaker LB5 Seite 22 Mittwoch, 25. November 2009 10:35 10
•
•
•
•
•
•
•
•
– never use a damaged extension cable;
– do not connect any other appliances
to the mains socket as this could
overload the mains supply (do not use
multi-sockets).
Do not touch the grill, the mains cable or
the mains plug with wet hands.
Always unplug the mains cable by
pulling out the plug. Never pull on the
cable to remove the plug.
Never carry the appliance by the mains
cable.
Ensure that the mains cable is not
kinked, twisted or crushed.
Fully unwind the mains cable during use
to avoid overheating and scorching.
Keep the mains cable away from hot
surfaces, such as cooker hotplates.
If you are not going to use the appliance
for a while, remove the plug from the
wall socket. This is the only way to
ensure that the machine is completely
free of current.
If the appliance is connected to the
mains it may be damaged by lightning
during thunderstorms.
3.4 Protection against scalds and
burns
Warning! Hot surfaces may cause
injury. Please note therefore:
• The surfaces of the appliance can get
hot. You should therefore only hold the
appliance by the lid handle 5 when in
use.
• Please note that hot steam may escape
from the sides of the appliance while the
sandwiches are toasting.
• Take care when removing the toasted
sandwiches – they are also very hot.
• Do not move the appliance during use
as it becomes hot. This will ensure you
avoid sustaining any burns.
• Always allow the appliance to cool
down before transporting or cleaning.
3.5 For the safety of your child
•
•
•
•
22
Warning! Children are often
unaware of danger and are
injured as a result. Please note
therefore:
Only allow children to use this appliance
under the supervision of an adult.
Ensure the appliance is always kept out
of the reach of children.
Ensure that children cannot pull the
appliance down onto themselves with
the cable.
Ensure that the packing foil does not
become a deadly trap for a child.
Packing foils are not toys.
Sandwichmaker LB5 Seite 23 Mittwoch, 25. November 2009 10:35 10
4. Before using for the first time
During manufacture, many parts are given a
thin film of protective oil. Before using the
appliance for the first time, heat it up without
sandwiches so that any residues can
evaporate.
Note: When heating up for the first few time
a slight smell may be produced. Make sure
the room is adequately ventilated.
1. Take the appliance and all the accessory
parts out of the packaging.
2. Check that the appliance shows no signs
of damage.
3. Clean the appliance before using it for
the first time. Observe the information in
the section entitled "6. Cleaning" on
page 24.
4. Select a location that is firm, level and
not flammable. Maintain a distance of
approx. 50 cm from other objects.
5. Unwind the mains cable completely.
6. Insert the plug into a suitable mains
socket.
The red indicator light 2 now lights up
and the appliance heats up.
As soon as the operating temperature
has been reached, the green indicator
light 1 lights up.
7. Leave the appliance switched on for
around 10 – 15 minutes.
8. Push up the lock 6 and open the lid 4 by
the lid handle 5.
9. Unplug the mains plug and allow the
appliance to cool down.
10. Clean the appliance again. Observe the
information in the section entitled
"6. Cleaning" on page 24.
Note: For reasons of taste you should not
eat the first toasted sandwiches but should
throw them away.
5. Preparing sandwiches
Notes:
• We recommend toast bread for making
sandwiches.
• Prepare the sandwiches before switching
on the appliance.
• As far as possible, spread the filling so
that the sandwiches are evenly thick.
1. Select a location that is firm, level and
not flammable. Maintain a distance of
approx. 50 cm from other objects.
2. Unwind the mains cable completely.
3. Release the lid 4 by pulling up the lock 6
and open up the lid 4 fully by the lid
handle 5.
H-3265
4. Remove any dust that may be present
using a dry cloth.
5. Close the lid 4.
6. Insert the plug into a suitable mains
socket.
The red indicator light 2 now lights up
and the appliance heats up.
As soon as the operating temperature
has been reached, the green indicator
light 1 lights up.
The appliance is now ready to use.
7. Release the lid 4 by pulling up the lock 6
and open up the lid 4 fully by the lid
handle 5.
23
Sandwichmaker LB5 Seite 24 Mittwoch, 25. November 2009 10:35 10
8. Lay the prepared sandwiches in the
moulds 7.
9. Close the lid 4.
10. Lock the lid 4 by pushing the lock 6
down until it snaps audibly into position.
Note: Depending on the thickness of the
sandwiches and the required degree of
browning, toasting takes some minutes.
Warning! When you open the lid 4
hot steam may rise towards you.
You should therefore protect your
hands with a tea towel or kitchen
gloves.
Note: The green indicator light 1 will go off
at first during toasting. As soon as it lights
up again, it is time to check the progress.
11. Check whether the sandwiches are
already as brown as you require. If not,
close the lid 4 again.
12. As soon as the sandwiches have been
toasted to your taste, remove them from
the appliance.
Caution: Only use implements made
from wood or heat-resistant plastic.
Metal implements may damage the
coated surfaces.
13. Remove the plug from the mains socket
after use. This is the only way to ensure
that the machine is completely free of
current.
6. Cleaning
Warning! To avoid the danger of
an electric shock or damage:
– Always remove the plug from the
mains socket before starting to
clean the appliance.
– Never immerse the appliance in
water, and protect it from
splashes and water droplets.
– Before cleaning, allow the
appliance to cool down to avoid
the risk of burns.
Caution! Never use abrasive, corrosive or
caustic cleaning materials. These could
damage the appliance as well as the nonstick coating.
Note: Do not leave it too long before
cleaning the appliance, otherwise food
residue may harden and be difficult to
remove.
1. Remove crumbs
residues.
24
and
larger
food
2. Wipe the appliance inside and out with
a soft, damp cloth. You may also use a
little mild washing-up liquid, but must
then wipe the appliance again using
clean water to avoid any aftertaste
affecting the flavour of the sandwiches.
3. Dry with a cloth.
Sandwichmaker LB5 Seite 25 Mittwoch, 25. November 2009 10:35 10
7. Recipes
7.1 Dutch tomato sandwich
7.2 Italian sandwich
Ingredients:
• Toast bread
• Spring onions
• Tomatoes
• Butter (or herb butter/garlic butter)
• Cooked ham
• Sliced young Gouda cheese
• Salt and pepper
Preparation:
Ingredients:
• Toast bread
• Tomato purée
• Tomatoes
• Mayonnaise
• Herbs of Provence
• Sliced mozzarella cheese
• Salt and pepper
Preparation:
1. Wash and drain the spring onions.
2. Cut the spring onions into long, narrow
strips.
1. Stir together the tomato purée,
mayonnaise, salt, pepper and herbs of
Provence to make a paste.
3. Blanch the strips in boiling, salted water
for about one minute.
2. Spread the paste onto the slices of
bread.
4. Drain the strips into a sieve.
3. Wash, dry and thinly slice the tomatoes.
5. Rinse with cold water to retain the fresh
colour and drain.
4. Fill one of the ready-spread bread slices
with slices of tomato and mozzarella
cheese.
6. Wash, dry and thinly slice the tomatoes.
7. Butter a slice of bread.
8. Place the ham on the bread.
9. Spread the spring onions and sliced
tomatoes on top.
5. Cover with a second slice of readyspread bread.
6. Cut the sandwich diagonally.
10. Season with salt and pepper.
11. Top with a slice of Gouda.
12. Cover with a second slice of buttered
bread.
13. Cut the sandwich diagonally.
H-3265
25
Sandwichmaker LB5 Seite 26 Mittwoch, 25. November 2009 10:35 10
8. Disposal
8.1 Appliance
The symbol showing the
wheelie bin with a cross
through it means that that
product must be handed in for
the separated collection of
waste in the European Union.
This applies to the product and all
accessories that are marked with this
symbol. Products marked like this may not
be disposed of in normal domestic waste but
must be handed in at a collection point for
the recycling of electric and electronic
appliances. Recycling helps to reduce the
consumption of raw materials and hence is
better for the environment.
8.2 Packaging
If you wish to discard the packaging, please
observe the applicable environmental
regulations in your country. In Germany,
you should dispose of the packaging via the
Dual Recycling System (Grüner Punkt).
9. Technical data
Power supply:
Rated power:
Protection class:
230 V~/50 Hz
750 W
I
10. Warranty
The warranty for your appliance is valid for
3 years from the date of purchase. The
appliance has been manufactured in
accordance with strict quality guidelines and
tested before delivery. Should operational
errors occur despite this, however, please
phone the service centre first. Our customer
consultants will gladly assist you, and
arrange with you how to proceed. The
warranty will be invalidated if the appliance
is incorrectly connected, if parts from
different manufacturers are used, in the case
of normal wear and tear, upon the use of
force, independent attempts at repairing the
appliance or improper use.
26
Please contact our service hotline for
guarantee claims and technical matters:
00800/4212 4212
(Monday to Friday between
8 a.m. and 4 p.m.)
Sandwichmaker LB5 Seite 27 Mittwoch, 25. November 2009 10:35 10
Inhalt
1. Gerätebeschreibung . . . . . . . . . . . . . . . . . . . . . . . . . . . . . . . . . . . . . . . . . . . . . . . . . . .
2. Benennung der Teile (siehe Ausklappseite). . . . . . . . . . . . . . . . . . . . . . . . . . . . . . . . . . .
3. Sicherheitshinweise . . . . . . . . . . . . . . . . . . . . . . . . . . . . . . . . . . . . . . . . . . . . . . . . . . .
4. Vor dem ersten Gebrauch . . . . . . . . . . . . . . . . . . . . . . . . . . . . . . . . . . . . . . . . . . . . . . .
5. Sandwiches zubereiten. . . . . . . . . . . . . . . . . . . . . . . . . . . . . . . . . . . . . . . . . . . . . . . . .
6. Reinigen . . . . . . . . . . . . . . . . . . . . . . . . . . . . . . . . . . . . . . . . . . . . . . . . . . . . . . . . . . .
7. Rezeptvorschläge . . . . . . . . . . . . . . . . . . . . . . . . . . . . . . . . . . . . . . . . . . . . . . . . . . . .
8. Entsorgung . . . . . . . . . . . . . . . . . . . . . . . . . . . . . . . . . . . . . . . . . . . . . . . . . . . . . . . . .
9. Technische Daten . . . . . . . . . . . . . . . . . . . . . . . . . . . . . . . . . . . . . . . . . . . . . . . . . . . . .
10. Garantie . . . . . . . . . . . . . . . . . . . . . . . . . . . . . . . . . . . . . . . . . . . . . . . . . . . . . . . . . . .
27
28
28
31
31
32
33
34
34
34
1. Gerätebeschreibung
1.1 Verwendungszweck
Der Sandwich-Maker SilverCrest H-3265 ist
zum Zubereiten von Sandwiches geeignet.
Die Zubereitung anderer Lebensmittel ist nicht
zulässig.
Verwenden Sie den Sandwich-Maker ausschließlich innerhalb Ihres Haushaltes und
niemals im Freien.
Dieses Gerät ist für den Einsatz in Privathaushalten und nicht für den gewerblichen
Einsatz geeignet.
1.2 Lieferumfang
• 1 Sandwich-Maker
• 1 Bedienungsanleitung
schaltet. Sinkt die Temperatur unter diesen
Wert, wird die Heizung erneut eingeschaltet, bis die gewünschte Temperatur wieder
erreicht ist.
In dem Gerät befinden sich Vertiefungen 7,
in die die vorbereiteten Sandwiches eingelegt werden.
Durch Schließen des Deckels 4 beginnt der
Toastvorgang.
1.4 Kennzeichnungen am Gerät
Kennzeichen 3
Ort
Bedeutung
Deckel 4 Warnung vor heißen
Oberflächen
1.3 Funktionsbeschreibung
Das Gerät wird vorgeheizt (rote KontrollLampe 2 leuchtet). Sobald die Temperatur
hoch genug zum Toasten ist, leuchtet die
grüne Kontroll-Lampe 1.
Sobald die erforderliche Temperatur erreicht
ist, wird automatisch die Heizung abgeH-3265
27
Sandwichmaker LB5 Seite 28 Mittwoch, 25. November 2009 10:35 10
2. Benennung der Teile (siehe Ausklappseite)
1 Grüne Kontroll-Lampe
– leuchtet, sobald die Toasttemperatur
erreicht ist
2 Rote Kontroll-Lampe
– leuchtet, sobald das Gerät mit Strom
versorgt wird
3 Warnsymbol „Warnung vor heißen Oberflächen“
Deckel
Deckelgriff
Verriegelung
Vertiefungen
– hier werden die vorbereiteten Sandwiches eingelegt
8 Kabelaufwicklung (auf der Unterseite)
4
5
6
7
3. Sicherheitshinweise
3.1 Begriffserklärung
Folgende Signalbegriffe finden Sie in dieser
Bedienungsanleitung:
Warnung!
Hohes Risiko: Missachtung der
Warnung kann Schaden für Leib
und Leben verursachen.
Vorsicht!
Mittleres Risiko: Missachtung der Warnung
kann einen Sachschaden verursachen.
Hinweis:
Geringes Risiko: Sachverhalte, die im
Umgang mit dem Gerät beachtet werden
sollten.
3.2 Allgemeine Hinweise
• Lesen Sie vor dem Gebrauch sorgfältig
diese Bedienungsanleitung. Sie ist
Bestandteil des Gerätes und muss jederzeit verfügbar sein.
• Verwenden Sie das Gerät nur für den
beschriebenen Verwendungszweck (siehe
„1.1 Verwendungszweck“ auf Seite 27).
• Überprüfen Sie, ob die erforderliche
Netzspannung (siehe Typenschild am
Gerät) mit Ihrer Netzspannung überein-
28
stimmt, um eine Beschädigung zu verhindern.
• Dieses Gerät ist nicht dafür bestimmt,
durch Personen (einschließlich Kinder)
mit eingeschränkten physischen, sensorischen oder geistigen Fähigkeiten oder
mit mangelnder Erfahrung und/oder
mangelndem Wissen benutzt zu werden,
es sei denn, sie werden durch eine für
ihre Sicherheit zuständige Person beaufsichtigt oder erhielten von ihr Anweisungen, wie das Gerät zu benutzen ist.
Kinder sollten beaufsichtigt werden, um
sicherzustellen, dass sie nicht mit dem
Gerät spielen.
• Beachten Sie, dass jeglicher Anspruch
auf Garantie und Haftung erlischt, wenn
Zubehörteile verwendet werden, die
nicht in dieser Bedienungsanleitung
empfohlen werden oder wenn bei Reparaturen nicht ausschließlich Originalersatzteile verwendet werden. Dies gilt
auch für Reparaturen, die durch nichtqualifizierte Personen durchgeführt werden. Die Service-Adresse finden Sie in
„10. Garantie” auf Seite 34.
• Bei eventuellen Funktionsstörungen während der Garantiezeit darf die Instand-
Sandwichmaker LB5 Seite 29 Mittwoch, 25. November 2009 10:35 10
•
•
•
•
•
•
•
•
•
setzung des Gerätes nur durch unser
Service-Center erfolgen. Ansonsten
erlischt jeglicher Garantieanspruch. Die
Service-Adresse
finden
Sie
in
„10. Garantie” auf Seite 34.
Lassen Sie das Gerät während des
Betriebes niemals unbeaufsichtigt, um
rechtzeitig einschreiten zu können, falls
Funktionsstörungen auftreten.
Das Gerät darf nicht mit einer externen
Zeitschaltuhr oder einem separaten
Fernwirksystem, wie zum Beispiel einer
Funksteckdose, betrieben werden.
Achten Sie darauf, dass die Steckdose
gut zugänglich ist, da das Gerät keinen
Ein-/Ausschalter besitzt.
Achten Sie darauf, dass die Netzanschlussleitung nie zur Stolperfalle wird
oder sich jemand darin verfangen oder
darauftreten kann und sich dabei verletzt.
Das Gerät darf ausschließlich auf einem
festen, ebenen, trockenen und nicht
brennbaren Untergrund aufgestellt werden, um zu verhindern, dass es umkippt,
verrutscht oder die Unterlage Feuer
fängt und dadurch Schaden entsteht.
Halten Sie einen Abstand von mindestens 50 cm zu anderen Gegenständen
ein, damit diese kein Feuer fangen können.
Das Gerät darf nicht auf heiße Herdplatten gestellt, in den heißen Backofen
geschoben oder in der Nähe von Gasund Durchlauferhitzern aufgestellt werden, da dies zu Beschädigungen führen
könnte.
Verwenden Sie nur Besteck aus Holz
oder
hitzebeständigem
Kunststoff.
Besteck aus Metall könnte die beschichteten Oberflächen beschädigen.
Es kann nicht ausgeschlossen werden,
dass Pflegemittel für Ablageflächen
(Möbel) Bestandteile enthalten, die die
H-3265
Gummifüße angreifen und aufweichen.
Stellen Sie in diesem Falle das Gerät auf
eine nicht brennbare Unterlage.
• Stellen Sie keine Gegenstände auf das
Gerät.
3.3 Schutz vor elektrischem Schlag
Warnung! Die folgenden Sicherheitshinweise sollen Sie vor einem
elektrischen Schlag schützen.
• Wenn das Gerät beschädigt ist, darf das
Gerät keinesfalls benutzt werden. Lassen
Sie das Gerät in diesem Falle von qualifiziertem Fachpersonal reparieren. Die
Service-Adresse
finden
Sie
in
„10. Garantie” auf Seite 34.
• Wenn die Netzanschlussleitung dieses
Gerätes beschädigt wird, muss sie durch
den Hersteller oder eine ähnlich qualifizierte Person ersetzt werden, um
Gefährdungen zu vermeiden.
• In das Gerät darf keinesfalls Wasser
oder andere Flüssigkeiten eindringen.
Daher:
– niemals im Freien einsetzen
– niemals in Flüssigkeit tauchen
– keine mit Flüssigkeit gefüllten Gegenstände, z.B. Töpfe, darauf stellen
– niemals in sehr feuchter Umgebung
einsetzen.
Falls doch einmal Flüssigkeit in das
Gerät gelangt, ziehen Sie sofort den
Netzstecker und lassen das Gerät von
qualifiziertem Fachpersonal reparieren.
Die Service-Adresse finden Sie in
„10. Garantie” auf Seite 34.
• Schließen Sie das Gerät nur an eine
Netzsteckdose
mit
Schutzkontakten
(Schuko) an.
• Die Benutzung von Verlängerungskabeln
sollten Sie vermeiden. Sie ist nur unter
29
Sandwichmaker LB5 Seite 30 Mittwoch, 25. November 2009 10:35 10
•
•
•
•
•
•
•
•
30
ganz
bestimmten
Voraussetzungen
gestattet:
– das Verlängerungskabel muss für die
Stromstärke des Gerätes geeignet sein
– das Verlängerungskabel darf nicht
„fliegend“ verlegt sein: es darf nicht
zur Stolperfalle werden oder von Kindern erreichbar sein
– das Verlängerungskabel darf keinesfalls beschädigt sein
– es dürfen keine weiteren Geräte als
dieses Gerät an der Netzsteckdose
angeschlossen werden, da es sonst zu
einer Überlastung des Stromnetzes
kommen kann (Verbot von Mehrfachsteckdosen!).
Fassen Sie das Gerät, die Netzanschlussleitung oder den Netzstecker niemals mit feuchten Händen an.
Ziehen Sie die Netzanschlussleitung stets
am Netzstecker heraus. Ziehen Sie niemals an der Netzanschlussleitung selber.
Tragen Sie das Gerät nie an der Netzanschlussleitung .
Achten Sie darauf, dass die Netzanschlussleitung
nie
geknickt
oder
gequetscht wird.
Wickeln Sie die Netzanschlussleitung im
Betrieb vollständig ab, um eine Überhitzung und Durchschmoren zu verhindern.
Halten Sie die Netzanschlussleitung von
heißen Flächen (z.B. Herdplatte) fern.
Wenn Sie das Gerät nicht benutzen, ziehen Sie den Netzstecker aus der Netzsteckdose. Nur dann ist das Gerät völlig
stromfrei.
Bei einem Gewitter kann das am Stromnetz angeschlossene Gerät durch Blitzschlag beschädigt werden.
3.4 Schutz vor Verbrühungen und
Verbrennungen
•
•
•
•
•
Warnung! Heiße Oberflächen können zu Verletzungen führen.
Beachten Sie daher:
Die Oberflächen des Gerätes können
heiß werden. Fassen Sie daher das
Gerät im Betrieb ausschließlich am
Deckelgriff 5 an.
Beachten Sie, dass während des
Toastens seitlich am Gerät heißer Dampf
austreten kann.
Beachten Sie bei der Entnahme der fertigen Sandwiches, dass auch diese sehr
heiß sind.
Stellen Sie das Gerät während der
Benutzung nicht um. Dieses wird während der Benutzung heiß. So vermeiden
Sie Verbrennungen.
Lassen Sie das Gerät stets abkühlen,
bevor Sie es transportieren oder reinigen.
3.5 Zur Sicherheit Ihres Kindes
•
•
•
•
Warnung! Kinder können Gefahren oft nicht richtig einschätzen
und sich dadurch Verletzungen
zuziehen. Beachten Sie daher:
Dieses Produkt darf nur unter Aufsicht
von Erwachsenen verwendet werden.
Achten Sie sorgfältig darauf, dass sich
das Gerät immer außerhalb der Reichweite von Kindern befindet.
Achten Sie darauf, dass Kinder niemals
das Gerät an der Netzanschlussleitung
herunterziehen können.
Achten Sie darauf, dass die Verpackungsfolie nicht zur tödlichen Falle
für Kinder wird. Verpackungsfolien sind
kein Spielzeug.
Sandwichmaker LB5 Seite 31 Mittwoch, 25. November 2009 10:35 10
4. Vor dem ersten Gebrauch
Bei der Produktion bekommen viele Teile
einen dünnen Ölfilm zu ihrem Schutz. Betreiben Sie das Gerät vor dem ersten Gebrauch
ohne Sandwiches, damit eventuell vorhandene Rückstände verdampfen können.
Hinweis: Bei den ersten Aufheizvorgängen
kann es zu einer leichten Geruchsentwicklung kommen. Sorgen Sie deshalb für eine
ausreichende Belüftung.
5. Wickeln Sie die Netzanschlussleitung vollständig ab.
1. Nehmen Sie das Gerät und alle Zubehörteile aus der Verpackung.
7. Lassen Sie das Gerät etwa 10 – 15 Minuten eingeschaltet.
2. Überprüfen Sie, dass das Gerät keine
Beschädigungen aufweist.
8. Klappen Sie die Verriegelung 6 nach oben
und öffnen Sie den Deckel 4 am Deckelgriff 5.
3. Reinigen Sie das Gerät vor der ersten
Benutzung. Beachten Sie hierzu die Hinweise in dem Kapitel „6. Reinigen” auf
Seite 32.
4. Wählen Sie einen Standort, der fest,
eben und unbrennbar ist. Halten Sie
dabei einen Abstand von ca. 50 cm zu
anderen Gegenständen ein.
6. Stecken Sie den Netzstecker in eine
geeignete Netzsteckdose.
Jetzt leuchtet die rote Kontroll-Lampe 2
und das Gerät heizt auf.
Sobald die Betriebstemperatur erreicht
ist, leuchtet die grüne Kontroll-Lampe 1.
9. Ziehen Sie den Netzstecker und lassen Sie
das Gerät abkühlen.
10. Reinigen Sie das Gerät erneut. Beachten
Sie hierzu die Hinweise in dem Kapitel
„6. Reinigen” auf Seite 32.
Hinweis: Aus geschmacklichen Gründen
sollten Sie die ersten getoasteten Sandwiches nicht verzehren sondern wegwerfen.
5. Sandwiches zubereiten
Hinweise:
• Verwenden Sie für die Sandwiches am
besten Toastbrot.
• Bereiten Sie die Sandwiches vor, bevor
Sie das Gerät einschalten.
• Verteilen Sie den Belag so, dass die
Sandwiches möglichst überall die gleiche Dicke haben.
1. Wählen Sie einen Standort, der fest,
eben und unbrennbar ist. Halten Sie
dabei einen Abstand von ca. 50 cm zu
anderen Gegenständen ein.
2. Wickeln Sie die Netzanschlussleitung
vollständig ab.
H-3265
3. Öffnen Sie den Deckel 4, indem Sie die
Verriegelung 6 nach oben klappen und
auch den Deckel 4 am Deckelgriff 5
ganz nach oben klappen.
4. Entfernen Sie eventuell vorhandenen
Staub mit einem trockenen Tuch.
5. Schließen Sie den Deckel 4.
6. Stecken Sie den Netzstecker in eine
geeignete Netzsteckdose.
Jetzt leuchtet die rote Kontroll-Lampe 2
und das Gerät heizt auf.
Sobald die Betriebstemperatur erreicht
ist, leuchtet die grüne Kontroll-Lampe 1.
31
Sandwichmaker LB5 Seite 32 Mittwoch, 25. November 2009 10:35 10
Das Gerät ist nun betriebsbereit.
7. Öffnen Sie den Deckel 4, indem Sie die
Verriegelung 6 nach oben klappen und
auch den Deckel 4 am Deckelgriff 5
ganz nach oben klappen.
8. Legen Sie die vorbereiteten Sandwiches
in die Vertiefungen 7.
9. Klappen Sie den Deckel 4 zu.
10. Verriegeln Sie den Deckel 4, indem Sie
die Verriegelung 6 nach unten drücken,
bis sie hörbar einrastet.
Hinweis: Der Toastvorgang dauert je nach
Dicke des Sandwiches und dem gewünschten Bräunungsgrad einige Minuten.
Warnung! Beim Öffnen des
Deckels 4 kann Ihnen heißer
Dampf entgegen kommen. Schützen Sie daher Ihre Hände mit
einem Geschirrtuch oder Küchenhandschuhen.
Hinweis: Während des Toastens geht die
grüne Kontroll-Lampe 1 zunächst aus.
Sobald sie erneut anfängt zu leuchten, ist es
Zeit, den Toastvorgang zu überprüfen:
11. Überprüfen Sie, ob die Sandwiches den
von Ihnen gewünschten Bräunungsgrad
schon erreicht haben. Falls nicht, schließen Sie den Deckel 4 wieder.
12. Sobald die Sandwiches nach Ihrem
Geschmack fertig sind, entnehmen Sie
sie aus dem Gerät.
Vorsicht: Verwenden Sie nur Besteck aus
Holz oder hitzebeständigem Kunststoff.
Besteck aus Metall könnte die beschichteten Oberflächen beschädigen.
13. Ziehen Sie nach Gebrauch den Netzstecker aus der Netzsteckdose. Nur so ist
das Gerät völlig stromfrei.
6. Reinigen
Warnung! Um die Gefahr eines
elektrischen Schlages oder einer
Beschädigung zu vermeiden:
– Ziehen Sie vor jeder Reinigung
den Netzstecker aus der Netzsteckdose.
– Tauchen Sie das Gerät nie in
Wasser ein und schützen Sie es
vor Spritz- und Tropfwasser.
– Lassen Sie das Gerät vor dem
Reinigen soweit abkühlen, dass
keine Verbrennungsgefahr mehr
besteht.
Vorsicht! Verwenden Sie keinesfalls scheuernde, ätzende oder kratzende Reinigungsmittel. Dadurch könnte das Gerät sowie die
Antihaft-Beschichtung beschädigt werden.
32
Hinweis: Warten Sie nicht zu lange mit dem
Reinigen, damit Speisereste nicht festtrocknen und sich dann nur noch schwer entfernen lassen.
1. Entfernen Sie Krümel und größere Speisereste.
2. Wischen Sie das Gerät innen und außen
mit einem weichen, feuchten Tuch ab.
Sie können auch etwas mildes Spülmittel
benutzen, müssen dann aber mit klarem
Wasser nochmal nachwischen, damit
die Sandwiches keinen Beigeschmack
bekommen.
3. Wischen Sie mit einem trockenen Tuch
nach.
Sandwichmaker LB5 Seite 33 Mittwoch, 25. November 2009 10:35 10
7. Rezeptvorschläge
7.1 Holländisches Tomaten-Sandwich
7.2 Italienisches Sandwich
Zutaten:
• Toastbrot
• Frühlingszwiebeln
• Tomaten
• Butter (oder Kräuterbutter/Knoblauchbutter)
• gekochter Schinken
• Jungen Gouda in Scheiben
• Salz und Pfeffer
Zutaten:
• Toastbrot
• Tomatenmark
• Tomaten
• Salatmajonäse
• Kräuter der Provence
• Mozzarella in Scheiben
• Salz und Pfeffer
Zubereitung:
Zubereitung:
1. Frühlingszwiebeln waschen und abtropfen lassen.
2. Frühlingszwiebeln in längliche, schmale
Streifen schneiden.
3. Die Streifen etwa 1 Minute in kochendes
Salzwasser geben (blanchieren).
1. Aus dem Tomatenmark, Majonäse, Salz,
Pfeffer und Kräutern der Provence eine
Paste anrühren.
2. Toastscheiben mit der Paste bestreichen.
3. Tomaten waschen, trocknen und in
dünne Scheiben schneiden.
4. Streifen in ein Sieb abgießen.
4. Bestrichene Toastscheiben mit Tomatenund Mozzarella-Scheiben belegen.
5. Mit kaltem Wasser spülen (dies erhält
die frische Farbe) und abtropfen lassen.
5. Mit einer weiteren, bestrichenen Toastscheibe abdecken.
6. Tomaten waschen, trocknen und in
dünne Scheiben schneiden.
6. Sandwich diagonal
schneiden.
(schräg)
durch-
7. Toastscheibe buttern.
8. Toast mit Schinken belegen.
9. Darauf die Frühlingszwiebeln und Tomatenscheiben verteilen.
10. Salzen und Pfeffern.
11. Mit einer Scheibe Gouda belegen.
12. Mit einer weiteren, gebutterten Toastscheibe abdecken.
13. Sandwich diagonal
schneiden.
H-3265
(schräg)
durch-
33
Sandwichmaker LB5 Seite 34 Mittwoch, 25. November 2009 10:35 10
8. Entsorgung
8.1 Gerät
Das Symbol der durchgestrichenen Abfalltonne auf Rädern
bedeutet, dass das Produkt in
der Europäischen Union einer
getrennten
Müllsammlung
zugeführt werden muss. Dies
gilt für das Produkt und alle mit diesem Symbol
gekennzeichneten
Zubehörteile.
Gekennzeichnete Produkte dürfen nicht über
den normalen Hausmüll entsorgt werden,
sondern müssen an einer Annahmestelle für
das Recycling von elektrischen und elektronischen Geräten abgegeben werden. Recycling hilft, den Verbrauch von Rohstoffen zu
reduzieren und die Umwelt zu entlasten.
8.2 Verpackung
Wenn Sie die Verpackung entsorgen möchten, achten Sie auf die entsprechenden
Umweltvorschriften in Ihrem Land. Entsorgen
Sie die Verpackung in Deutschland über
eine Sammlung des Dualen Systems (Grüner
Punkt).
9. Technische Daten
Nennspannung:
Nennleistung:
Schutzklasse:
230 V~/50 Hz
750 W
I
10. Garantie
Die Garantie für Ihr Gerät beträgt 3 Jahre
ab Kaufdatum. Das Gerät wurde nach strengen Qualitätsrichtlinien produziert und vor
der Auslieferung überprüft. Sollten dennoch
Funktionsfehler auftreten, senden Sie das
defekte Gerät zusammen mit dem Kaufbeleg
in Originalverpackung an die unten aufgeführte Service-Adresse. Bei falschem
Anschließen, Verwenden von Teilen fremder
Hersteller, normalem Verschleiß, Gewaltanwendung, eigenen Reparaturversuchen oder
unsachgemäßer Benutzung entfällt der
Garantieanspruch.
34
Service-Adresse:
HOYER Service
c/o Dohmen Solutions
Robert-Bosch-Straße 21-23
85748 Garching
Tel.: 089/32 94 03 30
(Montag - Freitag von 09:00 bis 17:00 Uhr)
Österreich und Schweiz:
Für die Garantieabwicklung und bei technischen Fragen wenden Sie sich bitte an
unsere Servicehotline: 00800/4212 4212
(Montag - Freitag von 09:00 bis 17:00 Uhr)
Sandwichmaker LB5 Seite 35 Mittwoch, 25. November 2009 10:35 10
new
H-3265_5
53B&RYHUB6DQGZLFKPDNHUB/%LQGG
Hoyer Handel GmbH
Van-der-Smissen-Str.1
D-22767 Hamburg