1
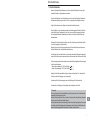
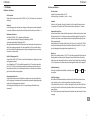
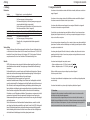
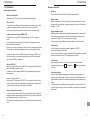
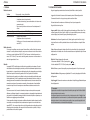
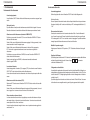
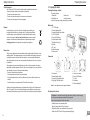
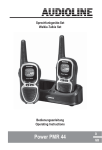
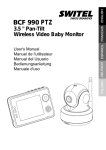
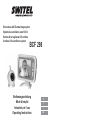
Schnurloses A/V-Überwachungssystem
Système de surveillance sans fil A/V
Sistema di sorveglianza A/V cordless
Cordless A/V surveillance system
BCF 298
Bedienungsanleitung
Mode d’emploi
Istruzioni per l’uso
Operating Instructions
D
F
I
GB
Sicherheitshinweise
1 Sicherheitshinweise
Beachten Sie folgende Sicherheitshinweise, um Feuer, körperliche Schäden an Personen oder
materiellen Schaden an Gegenständen zu vermeiden.
Lesen Sie alle Sicherheits- und Funktionshinweise, bevor Sie das Gerät benutzen. Bewahren Sie
die Gebrauchsanleitung an einem sicheren Ort auf, um später darauf zurückgreifen zu können.
Folgen Sie allen Hinweisen zum Gebrauch und beachten Sie die Warnhinweise.
Dieses Produkt ist nur zur Verwendung innerhalb von Gebäuden geeignet. Stellen Sie das Gerät
weder in die Nähe von Flüssigkeiten, noch an Orte, an denen es Wasser ausgesetzt sein kann,
wie zum Beispiel Badewanne, Waschbecken, Putzeimer, nasse Wäsche, feuchter Boden oder
Schwimmbecken.
Platzieren Sie das Gerät nicht auf einem Bett, einem Sofa, Teppich oder einer ähnlichen Oberfläche, die die Ausgänge der Lüftung blockiert.
Betreiben Sie es auch nicht an einem geschlossenen Ort wie einem Bücherschrank oder einem
ähnlichen Möbelstück, das die Luftzirkulation behindern kann.
Das Gerät darf nicht in der direkten Nähe von Heizungen oder anderen Wärmequellen aufgestellt
werden. Stellen Sie niemals eine brennende Kerze oder eine andere offene Flamme auf das Gerät.
Zur Stromversorgung der Geräte verwenden Sie ausschließlich die mitgelieferten Steckernetzgeräte mit den Anschlusswerten:
• Kamera: Stromverbindung: 9 V 400 mA (Polarität:
)
• Monitor: Stromverbindung: 12 V 600 mA (Polarität:
)
Reinigen Sie die Gehäuseoberflächen mit einem weichen und fusselfreien Tuch. Verwenden Sie
kein Wasser und keine Reinigungs- oder Lösungsmittel.
Unterbrechen Sie die Stromversorgung, wenn das Gerät längere Zeit nicht benutzt wird.
Vermeiden Sie das Eindringen von Flüssigkeiten oder Fremdkörpern in das Gerät.
a Vorsicht:
Dieses Gerät ersetzt nicht die Aufsichtspflicht eines Erwachsenen über ein Kind. Beobachten Sie
regelmäßig die Handlungen Ihrer Kinder.
Benutzen Sie das Gerät nicht in Fällen, in denen Ihr Leben oder Ihre Gesundheit oder die anderer
Personen von der Funktion des Gerätes abhängt.
Der Hersteller übernimmt keine Verantwortung für den Tod oder die Verletzung einer Person sowie
den Verlust oder die Beschädigung eines Gegenstandes, welche(r) durch eine Fehlfunktion oder
einen nicht bestimmungsgemäßen Gebrauchs des Produktes verursacht wurde.
D
1
Sicherheitshinweise
Technischer Kundendienst
Lassen Sie das Gerät durch den technischen Kundendienst überprüfen wenn:
- eine Flüssigkeit oder ein Fremdkörper in das Gerät gelangt ist
- das Gerät dem Regen ausgesetzt war
- das Gerät nicht wie gewohnt funktioniert
- das Gerät heruntergefallen ist oder das Gehäuse beschädigt ist
Entsorgung
Wollen Sie Ihr Gerät entsorgen, bringen Sie es zur Sammelstelle Ihres kommunalen Entsorgungsträgers (z. B. Wertstoffhof). Das nebenstehende Symbol bedeutet, dass Sie das Gerät auf keinen Fall in den Hausmüll werfen dürfen! Nach dem
Elektro- und Elektronikgerätegesetz sind Besitzer von Altgeräten gesetzlich gehalten, alte Elektro- und Elektronikgeräte einer getrennten Abfallerfassung zuzuführen.
Verpackungsmaterialien entsorgen Sie entsprechend den lokalen Vorschriften.
Weitere Hinweise für den Gebrauch
Bitte folgen Sie diesen Hinweisen, um Störungen in bestehenden Hausinstallationen zu vermeiden.
Das Gerät erzeugt und benutzt hochfreqente Radiowellen für die Übertragung. Wenn es nicht
bestimmungsgemäß verwendet wird, kann es z. B. Störungen im Radio- und Fernsehempfang hervorrufen. Auch bei korrekter Installation und ordnungsgemäßem Betrieb können Störungen auftreten. Um in diesem Fall das Gerät als Störungsquelle zu identifizieren sollten Sie es ein- bzw. ausschalten.
Versuchen Sie dann, die Störungen abzustellen indem Sie:
- die Ausrichtung der Antenne ändern bzw. andere Aufstellungsorte der Geräte ausprobieren.
- die Kamera und den Empfänger weiter auseinander stellen.
- die Kamera an einen anderen Stromkreis anschließen, an dem der Empfänger angeschlossen ist.
- sich beim Lieferanten oder von einem Radio-/Fernseh-Techniker beraten lassen.
Die Benutzung von nicht zugelassenem Zubehör oder ungeschirmten Kabeln begünstigt Störungen
beim Radio- oder Fernsehempfang.
Werden Veränderungen am Gerät ohne Genehmigung des Herstellers vorgenommen sowie das
Gerät durch nicht autorisiertes Personal geöffnet erlischt die Garantie.
In Betrieb nehmen
2 In Betrieb nehmen
Verpackungsinhalt prüfen
Zum Lieferumfang gehören:
1 Kamera
1 Monitor
2 Steckernetzgeräte
1 Audio/Video-Kabel
1 Bedienungsanleitung
Wenn eines der Teile fehlt, setzen Sie sich bitte mit Ihrem Lieferanten in Verbindung.
Der Monitor
1
2
3
4
5
6
7
8
9
10
11
Bildschirm
LEDs Kanalanzeige
LED Scanfunktion ein
Schalter „Bildschirm aus“
Ein-/Aus-Schalter
Schalter für Kanalwahl
Helligkeitseinstellung
Lautsprecher
Anschluss Netzgerät
Anschluss Audio/Video (A/V)
Lautstärkeeinstellung
Die Kamera
1
2
3
4
Objektiv
Kanalwahlschalter
Schalter für Geräuschaktivierung der Kamera
Schalter für das Nachtlicht
5
6
7
8
9
Ein-/Aus-Schalter
Betriebsanzeige
Anschluss Netzgerät
Mikrofon
Nachtlicht (Regenbogen-Licht)
Hinweis: Die Neigung der Kamera ist einstellbar.
Geräte aufstellen
a Achtung: Beachten Sie die Sicherheitshinweise im Kapitel 1.
Verwenden Sie nur die mitgelieferten Steckernetzgeräte.
Bei Fragen wenden Sie sich bitte an Ihren Lieferanten.
•
•
•
•
2
D
Stellen Sie die Geräte an den dafür vorgesehenen Orten auf.
Stecken Sie den Stecker des Steckernetzgerätes in die passende Buchse am jeweiligen Gerät.
Stecken Sie das Steckernetzgerät in eine Steckdose.
Schalten Sie das Gerät ein.
3
Funktionen
Ein-/Ausschalten
Schalten Sie die Kamera mit dem Schalter „POWER“ ein („ON“). Der Schalter ist auf der Unterseite
der Kamera.
Kanalwahl
Für die Übertragung stehen vier Kanäle zur Verfügung, um Störungen durch andere Signalquellen
zu vermeiden. Wählen Sie mit dem Schalter auf der Unterseite der Kamera einen der Kanäle 1…4.
Betriebsarten der Kamera
Der Schalter „CAMERA - AUTO“ ermöglicht zwei Betriebsarten:
- „normaler“ Betrieb mit ständiger Übertragung (Schalterstellung CAMERA)
- geräuschaktivierter Betrieb (Schalterstellung AUTO).
Beim geräuschaktivierten Betrieb wird die Kamera durch das Überschreiten einer bestimmten Lautstärke in ihrer Umgebung eingeschaltet. Erst dann werden Bilder und Töne zum Monitor übertragen. Nach Absinken des Geräuschpegels wird der Monitor wieder abgeschaltet, wenn er kein Signal mehr von der Kamera erhält.
Nachtlicht (Regenbogen-Licht)
Mit dem Schalter „NIGHT LIGHT“ können Sie ein Nachtlicht einschalten, das ständig in den Farben
des Regenbogens wechselt.
In der Schalterstellung „OFF“ ist das Nachtlicht ausgeschaltet, bei „ON“ leuchtet es kontinuierlich
und bei „AUTO“ wird es erst durch das Überschreiten einer bestimmten Lautstärke in der Umgebung der Kamera aktiviert (s. auch „Betriebsarten der Kamera“). Nach Absinken des Geräuschpegels wird das Nachtlicht wieder abgeschaltet.
Automatisches Infrarot-Licht
Um den Betrieb der Kamera auch bei Dunkelheit zu ermöglichen sind rund um das Objektiv Infrarot-LEDs angeordnet, die automatisch bei Unterschreiten einer bestimmten Helligkeit eingeschaltet
werden und den Übertragungsbereich ausleuchten.
Der Erfassungsbereich verringert sich auf ca. 2 m und das übertragene Monitorbild ist dann
schwarz/weiß.
Ein-/Ausschalten
Schalten Sie den seitlichen Schalter auf „ON“.
Kontrollieren Sie ggf. die Lautstärke (- = leiser / + = lauter).
Kanalwahl
Drücken Sie den Tastschalter „Channel“ ggf. mehrfach, bis Sie ein klares Bild und einen klaren
Ton empfangen. Die Kanäle sind mit LEDs bezeichnet und mit den Buchstaben A…D markiert.
Automatischer Kanal-Scan
Ist diese Funktion aktiviert, schaltet der Monitor automatisch der Reihe nach durch alle vier Kanäle.
Bei jedem Kanal wird für ca. 5 Sekunden das entsprechende Signal dargestellt. Durch diese Funktion können Informationen von verschiedenen Kameras auf unterschiedlichen Kanälen auf einem
Monitor angezeigt werden.
Zum Einschalten der Scan-Funktion drücken Sie die Taste „Channel“ so oft, bis die LED „SCAN“ in
der Reihe der Kanalanzeige-LEDs leuchtet. Zusätzlich leuchtet eine der Kanal-LEDs A…D, solange das Empfangssignal des jeweiligen Kanals dargestellt wird (ca. 5 s).
Monitor aus
Stellen Sie den seitlichen Schalter auf „LCD OFF“ wird der Monitor abgeschaltet. Dadurch wird der
Energieverbrauch des Gerätes reduziert. Solange die Kamera aktiviert ist können Sie weiterhin
Geräusche aus dem überwachten Bereich hören. Schieben Sie den Schalter wieder in die Stellung
„ON“, wird wieder das von der Kamera erfasste und übertragene Bild auf dem Monitor dargestellt.
Helligkeitseinstellung
Sie können die Helligkeit des Monitorbildes mit den beiden Tasten
ler) einstellen.
(heller) und
>>
Funktionen der Kamera
Funktionen des Monitors
>>
3 Funktionen
Funktionen
(dunk-
Audio/Video-Ausgang
Als zusätzliches Sicherheitsmerkmal dieses Gerätes können Sie den Monitor mit einem Videorecorder verbinden, um die von der Kamera gesendeten Informationen aufzuzeichnen.
Oder verbinden Sie den Monitor z. B. mit einem Fernsehgerät, das über eine „Bild-im-Bild“-Funktion verfügt. So können Sie die Überwachung durchführen während Sie Ihr bevorzugtes Fernsehprogramm verfolgen.
Die A/V-Buchse befindet sich auf der Rückseite des Monitorfußes neben der Buchse für die Stromversorgung.
D
4
5
Anhang
Consignes de sécurité
4 Anhang
1 Consignes de sécurité
Fehlersuche
Problem
Kein Bild / kein Ton
Kein Bild / Ton OK,
Bild ist schwarz-weiß
Es findet keine
Übertragung statt
Mögliche Ursache – was zu tun/überprüfen ist
· Der Monitor ist nicht eingeschaltet
· Die Stromversorgung ist nicht angeschlossen
· Die Kamera überträgt nichts (Ausfall der Spannungsversorgung oder
der geräuschaktivierte Betrieb ist eingeschaltet)
· Falscher Kanal eingestellt (Bitte beachten Sie: Monitor wird nach dem
Einschalten automatisch auf Kanal A eingestellt)
· Überprüfen Sie, ob der Schalter „OFF/ON/LCD OFF“ auf „ON“ steht.
· Die Kamera sendet mit eingeschalteter Infrarot-Nachtbeleuchtung.
· Die Kamera ist nicht eingeschaltet.
· Die Stromversorgung ist nicht angeschlossen
· Überprüfen Sie, ob der geräuschaktivierte Betrieb eingeschaltet
ist (AUTO).
Service-Hotline
Haben Sie Probleme mit Ihrem Überwachungsgerät, kontrollieren Sie zuerst die folgenden Hinweise. Bei technischen Problemen können Sie sich an unsere Service-Hotline unter Tel. 0900 00 1675
innerhalb der Schweiz (Kosten Swisscom bei Drucklegung: CHF 2.00/min) wenden. Bei Garantieansprüchen wenden Sie sich an Ihren Fachhändler. Die Garantiezeit beträgt 2 Jahre.
Garantie
SWITEL-Geräte werden nach den modernsten Produktionsverfahren hergestellt und geprüft. Ausgesuchte Materialien und hoch entwickelte Technologien sorgen für einwandfreie Funktion und lange
Lebensdauer.
Ein Garantiefall liegt nicht vor, wenn die Ursache einer Fehlfunktion des Gerätes bei dem Telefonnetzbetreiber oder einer eventuell zwischengeschalteten Nebenstellenanlage liegt. Die Garantie gilt nicht
für die in den Produkten verwendeten Batterien, Akkus oder Akkupacks.
Die Garantiezeit beträgt 24 Monate, gerechnet vom Tage des Kaufs.
Innerhalb der Garantiezeit werden alle Mängel, die auf Material- oder Herstellungsfehler zurückzuführen sind, kostenlos beseitigt. Der Garantieanspruch erlischt bei Eingriffen durch den Käufer oder durch
Dritte. Schäden, die durch unsachgemäße Behandlung oder Bedienung, natürliche Abnutzung, durch
falsches Aufstellen oder Aufbewahren, durch unsachgemäßen Anschluss oder Installation sowie durch
höhere Gewalt oder sonstige äußere Einflüsse entstehen, fallen nicht unter die Garantieleistung.
Wir behalten uns vor, bei Reklamationen die defekten Teile auszubessern, zu ersetzen oder das Gerät
auszutauschen. Ausgetauschte Teile oder ausgetauschte Geräte gehen in unser Eigentum über.
Schadenersatzansprüche sind ausgeschlossen, soweit sie nicht auf Vorsatz oder grober Fahrlässigkeit
des Herstellers beruhen.
Sollte Ihr Gerät dennoch einen Defekt innerhalb der Garantiezeit aufweisen, wenden Sie sich bitte
unter Vorlage Ihrer Kaufquittung ausschließlich an das Geschäft, in dem Sie Ihr SWITEL-Gerät gekauft
haben. Alle Gewährleistungsansprüche nach diesen Bestimmungen sind ausschließlich gegenüber
Ihrem Fachhändler geltend zu machen. Nach Ablauf von zwei Jahren nach Kauf und Übergabe unserer Produkte können Gewährleistungsrechte nicht mehr geltend gemacht werden.
6
Vous devez suivre les instructions suivantes afin d'éviter un incendie, des blessures ou des dommages à l'appareil :
Vous devez suivre les consignes de sécurité et d'utilisation suivantes avant d'utiliser l'appareil.
Vous devez conserver les instructions en lieu sûr pour mémoire.
Vous devez prêter attention aux avertissements et aux consignes d'utilisation de cet appareil.
Vous devez suivre toutes les consignes d'utilisation.
Ce produit est conçu exclusivement pour une utilisation en intérieur. Vous ne devez pas placer
l'appareil près de liquides ni de lieux où il y a de l'eau, par exemple une baignoire, un lavabo, un
évier, un sol mouillé ou une piscine.
Vous ne devez pas placer cet appareil sur un lit, un canapé, un tapis ou une surface semblable, ni
placer dans un lieu fermé comme une bibliothèque ou un meuble qui pourrait bloquer la ventilation
ou empêcher la circulation de l'air.
Vous devez garder l'appareil à l'écart de la chaleur, des radiateurs, des poêles ou de tout autre
appareil qui produit de la chaleur. Vous ne devez pas placer une bougie allumée ni aucun autre
type de flamme sur l'appareil.
Vous devez brancher l'appareil à une prise de courant :
• Caméra : adaptateurs secteur : 9 V 400 mA (centre positif
• Moniteur : adaptateurs secteur : 12 V 600 mA (centre positif
)
)
Utilisez un chiffon propre en coton pour nettoyer la poussière de l'appareil.
Ne le lavez pas avec de l'eau !
Vous devez toujours débrancher les adaptateurs secteur si vous n'utilisez pas l'appareil pendant
un certain temps.
Vous devez faire attention à ce qu'aucun objet ou liquide ne pénètre dans l'appareil.
a Précautions :
Cet appareil ne doit pas remplacer la surveillance adulte d'un mineur. Vous devez surveiller
l'activité de votre enfant de manière permanente.
Vous ne devez pas utiliser cet appareil lorsque votre vie ou votre santé, celle des autres, ou
l'intégrité d'une propriété dépend de sa fonction. Le fabricant n'assumera aucune responsabilité du
décès ou de la blessure de toute personne, de la perte ou des dommages de toute propriété à
cause d'une mauvaise fonction ou d'une mauvaise utilisation du produit.
F
7
Consignes de sécurité
Services techniques
Vous devez apporter le moniteur pour une réparation effectuée par un technicien qualifié lorsque :
- Un objet ou du liquide a pénétré dans l'appareil
- L'appareil a été exposé à la pluie
- L'appareil ne fonctionne pas normalement ou en deçà de ses capacités
- L'appareil est tombé ou la partie extérieure est endommagée
Élimination
Si vous ne voulez plus vous servir de votre appareil, veuillez l’apporter au centre
de collecte de l’organisme d’élimination des déchets de votre commune (par ex.
centre de recyclage). L’icône ci-contre signifie que vous ne devez en aucun cas
jeter votre appareil dans les ordures ménagères ! D’après la loi relative aux appareils électriques et électroniques, les propriétaires d’appareils usagés sont
tenus de mettre tous les appareils électriques et électroniques usagés dans un
collecteur séparé.
Éliminez les fournitures d’emballage conformément au règlement local.
Règles d’utilisation
Ces règles sont conçues pour donner une protection contre les interférences nuisibles dans une
installation résidentielle. Cet équipement produit, utilise et émet de l'énergie à fréquence radio et
s'il n'est pas installé et utilisé selon les instructions, peut causer des interférences nuisibles aux
communications radiophoniques. Cependant, il n'y a aucune garantie d'absence d'interférence
dans toute installation en particulier. Vous pouvez déterminer si cet appareil provoque des interférences nuisibles à la réception de la radio ou de la télévision en allumant et en éteignant l'appareil.
Il est conseillé de rechercher toute interférence possible avec l'une des étapes suivantes :
- Changer l'orientation ou l'emplacement de l'antenne de réception
- Placer l'appareil et le récepteur à une distance plus importante
- Brancher l'appareil à une sortie dans un circuit différent de celui auquel le récepteur est connecté
- Interroger le fournisseur ou un technicien qualifié radio/TV
Il est probable qu'il y ait des interférences avec la réception de la radio ou de la TV si l'appareil est
non homologué ou si les câbles sont sans protection. Il est signalé à l'utilisateur que s'il apporte
des changements ou des modifications à l'appareil sans l'accord du fabricant, cela pourra affecter
ses droits de réclamation.
Mettre en service
2 Mettre en service
Contrôler le contenu de l’emballage
Les éléments suivants font partie de la livraison :
1 Caméra
1 Moniteur
1 Câble audio/vidéo
1 Manuel d'utilisation
S'il manque une pièce, vous devez contacter votre fournisseur.
2 Adaptateurs secteur
Image du moniteur
1
2
3
4
5
6
7
8
9
10
11
Écran LCD TFT
Canal indicateur du LCD
Voyant de recherche automatique de canal
Marche/arrêt de l'écran LCD
Voyant de marche/arrêt
Bouton de sélection du canal
Contrôle de la luminosité +/Haut-parleur
Prise de l’adapteur
Sortie audio/vidéo
Contrôle du volume
Image de la caméra
1
2
3
4
Lentille de la caméra
Interrupteur de sélection du canal
Bouton d'activation de la caméra/voix
Marche/arrêt de la veilleuse/Bouton automatique
5
6
7
8
9
Bouton marche/arrêt
Voyant de marche/arrêt
Prise de l’adapteur
Micro
Veilleuse arc-en-ciel
Note: L'orientation de la caméra est réglable.
Installation
a Attention: Lisez impérativement les consignes de sécurité mentionnées au chapitre 1.
N’utilisez que le bloc d’alimentation fourni avec l’appareil !
Pour toute question, interrogez votre fournisseur.
•
•
•
•
8
F
Posez les appareils aux endroits prévus.
Branchez le cordon d'alimentation de l'adaptateur à la prise jack de l'appareil.
Branchez le cordon d'alimentation de l'adaptateur à une prise de courant standard.
Appuyez sur le bouton ON/OFF.
9
Fonctionnement
Marche/arrêt de l'alimentation
Utilisez le bouton ON/OFF en bas de la caméra pour allumer ou éteindre l'appareil.
Sélection du canal
On peut utiliser 4 canaux différents pour éviter des interférences avec d'autres sources de signal.
Positionnez l'interrupteur de sélection du canal en bas de la caméra sur le canal désiré.
Pour bien centrer l'image, il faut régler la lentille en la tournant dans un sens ou dans l'autre.
Caméra à commande vocale (bouton CAMÉRA AUTO)
Pour activer : pour choisir le mode AUTO, positionnez le bouton sur « AUTO » en bas de la
caméra.
Lorsque le niveau du son de l'environnement de l'unité atteint le niveau programmé, la caméra
transmet l'image capturée au moniteur.
Quand le niveau du son de l'environnement de l'unité se trouve sous le niveau programmé, l'écran
LCD dans l'unité du moniteur s'éteint automatiquement s'il ne reçoit aucun signal de la caméra.
Pour désactiver : pour choisir le mode CAMÉRA, positionnez le bouton sur « CAMÉRA » en bas
de l'unité de la caméra. La caméra transmet seulement le signal de CAMÉRA continuellement
quand l'option de CAMÉRA est sélectionnée.
Veilleuse ARC-EN-CIEL
Marche/arrêt : l'appareil s'allume (ON) ou s'éteint (OFF) en positionnant le bouton ON/OFF/AUTO
dans la partie inférieure gauche de la caméra.
La veilleuse arc-en-ciel fera apparaître différentes couleurs continuellement dans la partie supérieure de la caméra.
Veilleuse à commande vocale (AUTO) :
Activez le mode AUTO en positionnant ON/OFF/AUTO en bas à gauche de la caméra. Quand le
niveau de son de l'environnement de l'appareil atteint le niveau programmé, la veilleuse s'éteint. Il
n'y a pas de lumières colorées dans la zone de fixation de la veilleuse.
Vision automatique infrarouge nocturne
La vision nocturne infrarouge de la caméra est conçue pour permettre à la caméra de capter des
images dans l'obscurité ou lorsque l'intensité de la lumière est faible. La fonction est automatiquement activée lorsque le niveau de la lumière est très bas.
Sur le moniteur, on voit uniquement l'image en noir et blanc des objets enregistrés dans un rayon
de 2 m.
10
Marche/arrêt
Utilisez le volume et l'interrupteur ON/OFF sur le côté de l'unité pour l'allumer.
Sélection du canal
Appuyez sur le bouton du canal dans la partie avant du moniteur pour sélectionner un canal avec
les images et les sons les plus clairs. Les canaux sont indiqués par les voyants LCD, marqués par
les lettres A, B, C, ou D.
Balayage automatique du canal
Cette option permet au moniteur de balayer automatiquement l'ensemble des 4 canaux et de s'arrêter sur chaque canal pendant environ 5 secondes. Appuyez sur le bouton du canal jusqu'à ce
que le voyant LCD marqué « AUTO » s'allume et commence à clignoter.
Vous pouvez voir les images des différentes caméras sur différents canaux dans le moniteur.
Arrêt du moniteur
Le moniteur se déconnecte lorsque vous positionez l'interrupteur sur "LCD OFF".
La consommation d'énergie est ainsi réduite.
Tant que la caméra reste activée, vous pouvez entendre les bruits provenant de la pièce surveillée.
Lorsque vous remettez le bouton sur "ON", l'image réapparaît sur le moniteur.
Contrôle de clarté
Vous pouvez régler la luminosité du LCD grâce aux 2 boutons de contrôle de luminosité
sur la façade du moniteur. Le signal
sert à augmenter et
à diminuer la luminosité de
l'écran LCD.
>>
Fonctionnement de la caméra
Manipulation du moniteur
>>
3 Fonctionnement
Fonctionnement
Liaison sortie audio/vidéo
Vous pouvez relier l'appareil à un magnétoscope afin d'enregistrer toute image captée par la
caméra pour encore plus de sécurité. La sortie A/V est située sur le côté droit de la prise secteur. Il
doit être branché aux entrées audio et vidéo de votre magnétoscope ou de votre télévision avec le
câble AV.
Il peut également être relié à une télévision qui possède la fonction « image dans l'image » (Picture-In-Picture) qui permet de jeter un oeil à la zone surveillée tout en regardant votre programme de
télévision favori.
F
11
Annexe
Indicazioni di sicurezza
4 Annexe
1 Indicazioni di sicurezza
Recherche erronée
Problème
Aucune réception
Son mais pas d'image
Image en noir et blanc
Aucune transmission
Seguire le seguenti precauzioni onde evitare incendi, lesioni fisiche o danni al prodotto:
Cause possible – choses à faire/vérifier
· L'appareil n'est pas allumé
· L'adaptateur secteur n'est pas branché
· La caméra ne transmet pas (aucune alimentation ou elle est en mode
commande vocale)
· Mauvais canal (le moniteur revient au canal A automatiquement s'il
s'éteint
· Vérifiez que le bouton LCD ON/OFF est activé
· La caméra est allumée en mode nuit infrarouge
· L'appareil n'est pas allumé
· L'adaptateur secteur n'est pas branché
· Vérifiez pour voir si le mode commande vocale est activé (activé en
mode AUTO)
Leggere tutte le istruzioni di sicurezza e di funzionamento prima di utilizzare l'apparecchio.
Conservare le istruzioni in un luogo sicuro per poterlo consultare in futuro.
Prestare attenzione alle avvertenze e alle istruzioni per l'uso di questo apparecchio.
Seguire tutte le istruzioni per l'uso.
Acqua e umidità: Questo prodotto è stato progettato esclusivamente per l'utilizzo in interni. Non
collocare l'apparecchio vicino a liquidi o a luoghi in cui sia presente dell'acqua come, ad esempio,
vasche da bagno, lavabi, lavandini, acquai, pavimenti bagnati o piscine.
Ventilazione: Non collocare l'apparecchio su letti, divani, tappeti o superfici simili, né in luoghi
chiusi come librerie o mobili che potrebbero bloccare le uscite di ventilazione o impedire il flusso
dell'aria.
Hotline de service
Si vous avez des problèmes avec votre appareil de surveillance, contrôlez d’abord les remarques
suivantes. En cas de problèmes techniques, vous pouvez vous adresser à notre hotline de service
en Suisse au numéro de téléphone 0900 00 1675 (frais Swisscom à la date d’impression de ce
manuel : CHF 2.00/min). Si vous avez des droits de garantie, adressez-vous à votre revendeur. La
durée de la garantie est de 2 ans.
Garantie
Les appareils SWITEL sont fabriqués et contrôlés selon les procédés les plus modernes. Des matériels sélectionnés et des technologies de pointe ont pour effet un fonctionnement irréprochable et une
longue durée de vie. La garantie n’est pas valable pour les piles, piles rechargeables ou packs de piles
utilisés dans le produits. La durée de la garantie est de 24 mois, à partir de la date d’achat.
Pendant la durée de la garantie, tous les défauts dus à des vices de matériel ou de fabrication seront
éliminés gratuitement. Le droit à la garantie expire en cas d’intervention de l’acheteur ou de tiers. Les
dommages provenant d’un maniement ou d’une manipulation incorrects, d’une usure naturelle, d’une
mauvaise mise en place ou d’une mauvaise conservation, d’un raccordement ou d’une installation
incorrects ainsi que d’un cas de force majeure ou autres influences extérieures sont exclus de la
garantie.
Nous nous reservons le droit, en cas de réclamations, de réparer ou de remplacer les composants
défectueux ou d’échanger l’appareil. Les composants remplacés ou les appareils échangés deviennent
notre propriété. Les demandes de dommages et intérêts sont exclues tant qu’elles ne reposent pas sur
l’intention ou une négligence grossière du fabricant.
Si votre appareil devait malgré tout présenter une défectuosité pendant la période de garantie, veuillez
vous adressez, muni de la quittance d’achat, exclusivement au magasin où vous avez acheté votre
appareil SWITEL. Vous ne pouvez faire valoir vos droits à la garantie selon ces dispositions qu’exclusivement auprès de votre revendeur. Deux ans après l’achat et la remise de nos produits, il n’est plus
possible de faire valoir les droits à la garantie.
12
Calore: Mantenere l'apparecchio lontano da fonti di calore, termosifoni, stufe o da qualsiasi altro
elettrodomestico che emetta calore. Non collocare candele accese né qualsiasi altro tipo di fiamma
sull'apparecchio.
Elettricità: Collegare l'apparecchio alla corrente:
• Videocamera: adattatori 9 V 400 mA (centro positivo
• Monitor: adattatori AC/DC: 12V 600 mA (centro positivo)
)
)
Pulizia: Utilizzare un panno di cotone pulito per spolverare l'apparecchio. Non pulire con acqua!
Periodo di inutilizzo: Scollegare sempre gli adattatori AC in caso di prolungati periodi di inutilizzo
dell'apparecchio.
Liquidi e oggetti: Osservare la massima cura onde evitare che liquidi od oggetti indesiderati penetrino nell'apparecchio.
a Precauzioni:
L'apparecchio non sostituisce la supervisione dei bambini da parte degli adulti. Verificare l'attività
del proprio bambino in modo regolare.
Non utilizzare l'apparecchio in modo tale che la vita o la salute propria o altrui o l'integrità di una
proprietà dipendano dal suo funzionamento. Il produttore declina qualsiasi responsabilità o reclamo
derivante da decessi o lesioni a qualsiasi persona, perdita o danno a qualsiasi proprietà dovuti a
un cattivo funzionamento o ad un errato utilizzo del prodotto.
I
13
Indicazioni di sicurezza
Servizio di assistenza tecnica:
Affidare il monitor a un tecnico qualificato quando:
- Sono penetrati oggetti o liquidi nell'apparecchio
- L'apparecchio è stato esposto alla pioggia
- L'apparecchio funziona meno o non funziona normalmente
- L'apparecchio è caduto o il rivestimento risulta danneggiato
Smaltimento
Procedere allo smaltimento dell’apparecchio esaurito consegnandolo presso uno
dei punti di raccolta istituiti dalla propria società di smaltimento rifiuti comunale
(per es. centro di riciclo materiali). Il simbolo riportato qui a lato indica che non è
assolutamente consentito smaltire l’apparecchio assieme ai normali rifiuti domestici!
Secondo quanto previsto dalla legge sugli apparecchi elettrici ed elettronici, i
proprietari di apparecchi esauriti sono per legge tenuti alla consegna di tutti gli
apparecchi elettrici ed elettronici presso un centro di rilievo rifiuti in raccolta differenziata.
Smaltire confezioni ed imballaggi in base a quanto indicato dalle norme in vigore a livello locale.
Mettere in funzione
2 Mettere in funzione
Verificare il contenuto della confezione
La confezione contiene:
1 videocamera
1 monitor
2 adattatori AC/DC
1 cavo audio/video
1 Manuale delle istruzioni
Nel caso in cui manchi uno di tali componenti, contattare il proprio rivenditore.
Monitor
1
2
3
4
5
6
7
8
9
10
11
Schermo TFT PLC
Spie dei canali del PLC
Spia di ricerca automatica del canale
Accensione/spegnimento del PLC
Spia di accensione/spegnimento
Pulsante di selezione del canale
Regolatore di luminosità +/Altoparlante
Presa DC
Uscita audio/video
Regolatore del volume
Videocamera
Norme d‘uso
Le presenti norme sono state concepite per proteggere da interferenze dannose a impianti residenziali. Il presente dispositivo genera, utilizza e irradia energia a radiofrequenza e, se non installato e
impiegato secondo le istruzioni, può provocare interferenze dannose alle comunicazioni radiofoniche. Ciononostante non viene garantita l'assenza di interferenze con determinati apparecchi. È
possibile determinare la presenza di eventuali interferenze dannose per la ricezione di trasmissioni
radiofoniche o televisive dovute all'apparecchio accendendo e spegnendo l'apparecchio stesso. Si
raccomanda di verificare la presenza di qualsiasi interferenza possibile mediante uno dei seguenti
passi:
• Cambiare l'orientamento o la posizione dell'antenna in ingresso
• Collocare l'apparecchio e il ricevitore a una distanza maggiore
• Collegare l'apparecchio a un'uscita di un circuito diverso da quello a cui è collegato il ricevitore
• Consultare il rivenditore o un tecnico radio/TV qualificato
1
2
3
4
Lente della videocamera
Interruttore di selezione del canale
Interruttore di attivazione della videocamera/voce
Sensore di luce per la visione automatica notturna
5
6
7
8
9
Nota : è possibile regolare l’orientamento della videocamera.
Power ON/OFF
LED di power
Presa DC
Microfono
Luce notturna iridescente
Collegare
Se si utilizzano dispositivi non omologati o cavi senza protezione, potrebbero verificarsi interferenze con la ricezione del segnale radiofonico o televisivo.
Si avverte l'utente che eventuali cambiamenti o modifiche apportati all'apparecchio senza la previa
autorizzazione del produttore potrebbero recare pregiudizio ai diritti di reclamo dell'utente.
14
a Attenzione: Leggere attentamente le indicazioni di sicurezza riportate al capitolo 1.
Utilizzare solo l’alimentatore fornito in dotazione!
Consultare il rivenditore in caso di dubbi.
•
•
•
•
Posare gli apparecchi ai luoghi preposti.
Inserire l'adattatore AC nell'uscita DC dell'apparecchio.
Inserire l'adattatore AC in una presa elettrica standard.
Accendere l'interruttore ON/OFF.
I
15
Funzionamento
Accensione/spegnimento
Usare l'interruttore ON/OFF situato sulla base della videocamera per accendere o spegnere l'apparecchio.
Selezione del canale
È possibile utilizzare 4 canali per evitare interferenze causate da altri fonti del segnale. Far scorrere
l'interruttore di selezione del canale situato sulla base della videocamera per selezionare il canale.
Attivazione vocale della videocamera (interruttore CAMERA AUTO)
Per attivare: per accendere la funzione AUTO, far scorrere l'interruttore CAMERA AUTO situato
sulla base della videocamera.
Quando il livello sonoro dell'ambiente della videocamera raggiunge il livello programmato, la videocamera trasmetterà al monitor l'immagine ripresa.
Quando il livello sonoro dell'ambiente della videocamera è inferiore al livello programmato,
il PLC del monitor si spegnerà automaticamente se non riceverà nessun segnale dalla
videocamera.
Per disattivare: per passare alla funzione CAMERA, far scorrere l'interruttore CAMERA AUTO
situato sulla base della videocamera.
Quando è selezionata l'opzione CAMARA, la videocamera trasmetterà continuamente
soltanto il segnale CAMERA.
Luce notturna iridescente
Accensione/spegnimento: Accendere (ON) o spegnere (OFF) la luce facendo scorrere l'interruttore
ON/OFF/AUTO situato sulla parte inferiore sinistra della videocamera.
La luce notturna iridescente mostrerà continuamente colori diversi sulla parte superiore della videocamera.
Attivazione vocale della luce notturna (AUTO):
Selezionare AUTO facendo scorrere l'interruttore ON/OFF/AUTO situato a sinistra sulla base della
videocamera.
Quando il livello sonoro dell'ambiente dell'apparecchio raggiunge il livello programmato, la luce notturna si spegne. Non ci saranno colori accesi nella zona a luce notturna fissa.
Accensione/spegnimento
Utilizzare il regolatore del volume e l'interruttore ON/OFF situati sul lato dell'apparecchio.
Selezione del canale
Premere il pulsante di selezione del canale situato sulla parte frontale del monitor per selezionare
l'immagine e l'audio più nitidi. I canali sono indicati da spie PLC contrassegnate dalle lettere A, B,
C o D.
Ricerca automatica del canale
Questa opzione consente al monitor la scansione automatica di tutti e 4 i canali soffermandosi
circa 5 secondi su ogni canale. Premere il pulsante di selezione del canale fino a quando la spia
PLC contrassegnata da “AUTO” non si accenda e cominci a lampeggiare. È possibile visualizzare
immagini riprese dalle diverse videocamere sui diversi canali del monitor.
Modalità di risparmio energetico
Scegliere presso l’interruttore LCD la posizione „OFF". Ciò determina l’emissione di soli segnali
audio.
Regolatore di brillantezza
È possibile regolare la brillantezza del PLC mediante i 2 pulsanti per la regolazione della brillantezza situati sulla parte frontale del monitor. Premere il segno
o
per aumentare
o diminuire la brillantezza del PLC.
>>
Funzionamento della videocamera
Funzionamento del monitor
>>
3 Funzionamento
Funzionamento
Collegamento uscita audio/video
Una caratteristica supplementare di sicurezza del monitor è data dalla possibilità di collegarlo a un
videoregistratore per registrare qualsiasi immagine ripresa dalla videocamera. L'uscita A/V è situata sul lato destro del DC. Collegarla agli ingressi audio e video del videoregistratore o del televisore dotato di cavo AV.
È possibile collegare il monitor anche a un televisore con funzione “Picture-In-Picture” che consente di monitorare la zona sorvegliata mentre si guarda il proprio programma televisivo preferito.
Visione automatica notturna a infrarossi
La visione automatica notturna a infrarossi è progettata per consentire alla videocamera di riprendere immagini al buio o in situazioni a bassa intensità luminosa. La funzione si accende automaticamente quando il livello di luce è molto basso.
Il monitor visualizzerà solamente immagini in bianco e nero e riprenderà unicamente oggetti entro
una distanza di 2 m.
16
I
17
Appendice
Safety instructions
4 Appendice
1 Safety instructions
Localizzazione guasti
Problema
Non c'è ricezione
Please observe the following precautions to prevent fire, personal injury or damage to the product:
Possibile causa – cose da fare/verificare
· L'apparecchio è spento
· L'adattatore AC/DC è scollegato
· La videocamera non trasmette (non c'è energia elettrica o ci si trova
nella modalità “attivazione vocale”)
· Canale sbagliato (il monitor tornerà automaticamente sul Canale A allo
spegnimento dell'apparecchio)
· Verificare che l'interruttore ON/OFF del PLC sia acceso
Non ci sono immagini,
ma l'audio funziona
Immagini bianco e nero · La videocamera si trova nella modalità di visione notturna a infrarossi
Non c'è trasmissione
· L'apparecchio è spento
· L'adattatore AC/DC è scollegato
· Verificare che la modalità “attivazione vocale” sia accesa (accensione
della modalità AUTO)
All the safety and operating instructions should be carefully read before the 2.4GHz Color LCD A/V
wireless monitor is operated. The safety and operating instructions should be kept in a safe place
for future reference.
All the warnings on the 2.4GHz Color LCD A/V wireless monitor and operating instructions should
be strictly adhered to.
Water and moisture: This product is designed for the indoor use only. No liquids should be placed
on the unit to avoid it getting wet. The unit should not be used near water; for example, near a bath
tub, wash bowl, kitchen sink, laundry tub in a wet basement or near a swimming pool, etc.
Ventilation: The 2.4GHz color LCD A/V wireless monitor should not be situated on a bed, sofa,
rug, or similar surface that may block the ventilation openings, or placed in a closed space, such as
a bookcase or cabinet that may impede the flow of air through the ventilation vents.
Hotline di assistenza
In presenza di problemi con il dispositivo di sorveglianza, seguire le indicazioni riportate qui di
seguito. La nostra hotline di assistenza è a vostra disposizione in caso di problemi tecnici chiamando al numero telefonico 0900 00 1675 nell’ambito della Svizzera (costi da rete Swisscom in sede di
stampa: CHF 2.00/min). In caso di reclami entro il periodo di garanzia, rivolgersi al rivenditore autorizzato. Il periodo di garanzia ricopre 2 anni.
Garanzia
Gli apparecchi SWITEL sono costruiti e collaudati in osservanza dei processi di produzione più
moderni. L’impiego di materiali selezionati e tecnologie altamente sviluppate sono garanti di una perfetta funzionalità e lunga durata in vita. La garanzia non si estende a batterie, accumulatori o batterie
ricaricabili utilizzati all’interno degli apparecchi. Il periodo di garanzia ricopre 24 mesi a partire dalla
data di acquisto.
Entro il periodo di garanzia si procederà all’eliminazione gratuita di tutti i guasti dovuti a difetti di materiale o produzione. Il diritto di garanzia cessa in caso di interventi da parte dell’acquirente o di terzi.
Danni derivanti da un impiego o esercizio non conforme agli usi previsti, a naturale usura, a errato
montaggio o errata conservazione, a collegamento o installazione impropri, dovuti a forza maggiore o
ad altri influssi esterni non sono coperti da garanzia. In qualità di produttore ci riserviamo il diritto, in
caso di reclami, di riparare o sostituire le parti difettose o di rimpiazzare l’apparecchio. Parti o apparecchi sostituiti passano di nostra proprietà. Sono esclusi diritti di risarcimento per danni qualora non
siano dovuti a intenzione o colpa grave del costruttore.
Nel caso in cui il presente apparecchio dovesse ciò nonostante presentare un difetto durante il periodo
di garanzia, si prega di rivolgersi esclusivamente al negozio di rivendita dell’apparecchio SWITEL
assieme al relativo scontrino di acquisto. In base alle presenti disposizioni, tutti i diritti di garanzia dovranno essere fatti valere esclusivamente nei confronti del rivenditore autorizzato. Decorso il termine di
due anni dalla data di acquisto e consegna dei nostri prodotti non sarà più possibile fare valere alcun
diritto di garanzia.
18
Heat: The 2.4GHz color LCD A/V monitor should be situated away from heat sources such as
radiators, stoves, or any other appliance that produces heat. No naked flames sources, such as
lighted candles, should be placed on the apparatus.
Power Source: The 2.4GHz color LCD A/V monitor should be connected to a power supply as
detailed below:
• Camera: AC/DC adaptors: 9 V 400 mA (polarity:
)
• Monitor:AC/DC adaptors: 12 V 600 mA (polarity:
)
Cleaning: Use a dry cotton cloth to remove any dust from the 2.4GHz color LCD A/V monitor.
Do not use water!
Period of time unused: Always unplug the AC adaptors if unused during long periods of time.
Object and liquid entry: Care should be taken to avoid objects falling into the vents or liquids
being spilled on them.
a Caution:
This product cannot replace responsible adult supervision of a child. You should personally check
your child's activity at regular intervals.
Never use this 2.4GHz color LCD A/V wireless monitor to a degree where your life or health or that
of others or the integrity of a property depends on its function! The manufacturer will not accept
any responsibility or claim for death and injury of any person or lose and/or damage of any
property due to the malfunction or misuse of the product
GB
19
Safety instructions
Technical services
The 2.4GHz color LCD A/V monitor should be serviced by qualified technicians when:
- Objects have fallen or liquid has been spilled onto the product
- The units have been exposed to rain
- The units do not operate normally or its performance is sub-standard
- The units have been dropped or the casing damaged
Preparing the device
2 Preparing the device
Checking the package contents
The package contains:
1 Camera unit
1 Monitor unit
1 Audio/Video cord
1 Instruction manual
If any of the above are missing, please contact your retailer.
2 AC/DC adaptors
Monitor unit
Disposal
In order to dispose of your device, take it to a collection point provided by your
local public waste authorities (e.g. recycling centre). The adjacent symbol indicates that the device must not be disposed of in normal domestic waste! According
to laws on the disposal of electronic and electrical devices, owners are obliged
to dispose of old electronic and electrical devices in a separate waste container.
Packaging materials must be disposed of according to local regulations.
Norms of use
These norms are designed to provide reasonable protection against harmful interference in a residential installation. This equipment generates, uses and can radiate radio frequency energy and if
not installed and used in accordance with the instructions, it may cause harmful interference to
radio communications. However, there is no guarantee that interference will not occur in a particular installation.
If this equipment does cause harmful interference to radio or television reception, which can be
determined by turning the equipment off and on, the user is encouraged to try to correct the interference following one or more of the measures detailed below:
- Reorient or relocate the receiving antenna.
- Place the equipment and receiver at a greater distance.
- Connect the equipment into an outlet on a different circuit to the one that the receiver is connected to.
- Consult the dealer or an experienced radio/TV technician for assistence.
Operation with non-approved equipment or unprotected cables is likely to result in interference to
radio or TV reception. The user is cautioned that changes and modifications made to the equipment without the manufacturer's approval could void the user's authority to operate this equipment.
1
2
3
4
5
6
7
8
9
10
11
TFT LCD Display
Channel indicating LEDs
Automatic Channel Scan Indicator
LCD On/Off Switch
Power On/Off Indicator
Channel Selection Switch
Brightness Control (+)(-)
Speaker
DC Jack
Audio/Video output
Volume control
Camera unit
1
2
3
4
Camera lens
Channel Selection Switch
Camera /Voice Activation Switch
Night Light On/Off/Auto Switch
5
6
7
8
9
Power On/Off Switch
Power On/Off Indicator
DC Jack
Microphone
Rainbow Night Light
Note: You can adjust the camera’s angle of inclination.
Positioning of the devices
a Attention: It is essential to read the Safety Information in Chapter 1 before starting up.
Only use the power adapter plug supplied with the equipment!
In case of any question please contact your dealer.
•
•
•
•
20
Install the devices in the respective places.
Plug of AC adaptor into the DC jack of the unit.
Plug the AC adaptor into a standard wall AC power socket.
Switch on the ON/OFF switch. The power indicator will light up.
GB
21
Operation
3 Operation
Camera operation
Power ON/OFF
Use the Power ON/OFF sliding switch at the base of camera to turn the unit on or off.
Channel Selection
There are 4 channels that can be used to avoid interference from other signal sources.
Select the channel by sliding the channel selection switch at the base of the camera.
Voice Activated Camera (CAMERA AUTO switch)
To Activate: Switch to AUTO by sliding the CAMERA AUTO switch at the base of the camera unit.
When the sound level of the unit's surrounding area reaches the preset level, the camera will transmit the captured image to the monitor.
When the surrounding sound level is below the preset level, LCD on the monitor unit will be automatically switched off if no signal is received from the camera
To Deactivate: Switch to CAMERA by sliding the CAMERA AUTO switch at the base of the camera
unit. The camera will only transmit CAMERA signal continuously when the CAMERA option
is selected.
Operation
Monitor operation
Power ON/OFF
Use the volume and ON/OFF switch on the side of the unit to turn on the unit.
Channel Selection
Press the Channel Switching Button at the front of the monitor to a channel with optimized
clear image and sound. Channels are indicated by LED lights labeled with letters A, B, C or D.
Automatic Channel Scan
This option allows the Monitor unit to scan through all 4 channels automatically and stops
at each channel for about 5 seconds. Press the Channel Switching Button until the LED
light labeled with AUTO is turned on and starts blinking. Images from different Camera
units on different channels can then be seen on the Monitor unit.
LCD On/Off
This power saving feature is located on the side of the monitor. When the monitor is switched to
LCD “off” position and the camera is remained power on, there will be no picture on the monitor
screen. The unit is using smaller amount of power and is still operational. You can still hear the
sound signal captured from the monitoring area.
The monitor will resume working with a clear picture when the LCD is switched back to “on”.
Voice Activated ( AUTO) Night Light:
Switch to AUTO by sliding the ON/OFF/AUTO switch on the left of the base of the camera unit.
When the sound level of the unit's surrounding area reaches the preset level, the night light will be
turned on and display different colors continuously.
When the surrounding sound level is below the preset level, the night light will be turned off.
No colors will be displayed at the night light area.
Audio/Visual Output Link
An additional security feature of this 2.4GHz Color LCD Wireless Monitor is you can link the monitor to a VCR recorder for recording what ever the camera captures. Also, you can link to a television set that has a “Picture-In-Picture” feature that allows you to take a glance to the monitoring area
all the while watching your favorite TV program.
The A/V Output jack locates at the right side of the DC jack. This needs to be connected to the
Audio and Video input jacks of your VCR or TV sets with the AV cord.
>>
Brightness Control
The brightness of the LCD can be adjusted by the 2 Brightness Control buttons at the front
of the Monitor unit.
to increase and
to decrease the brightness of the LCD.
>>
Rainbow night light
ON / OFF: Switch to ON or OFF by sliding the ON/OFF/AUTO switch on the left of the base of the
camera unit. The rainbow night light will display different colors continuously at the top area of the
camera unit.
Automatic Infra-Red Night Vision
The infra-red night vision of the camera is designed to allow the camera pick up pictures during
darkness or periods of very low levels of light. The function will switch on automatically when the
level of light is low.
Only black and white image will be displayed on the monitor and only objects placed within 6ft/2m
will be monitored.
GB
22
23
Appendix
4 Appendix
Troubleshooting
Problem
No reception
No picture / sound OK
Picture only b/w
No transmission
Possible Cause – things to do/check
· Unit has not been switched on.
· AC/DC adaptor has not been connected.
· The camera may not be transmitting. (power is not on or is in voice
activation mode)
· Wrong Channel (Please note the monitor will return to Channel A
automatically after power off)
· Check if the LCD on/off switch is turned to on.
· Camera has switched to “Infrared Night Version mode“.
· Unit has not been switched on.
· AC/DC adaptor has not been connected.
· Check if the voice activation mode is switched on (switched to Auto
Mode).
Service hotline
Should problems arise with the monitoring set, please refer to the following information first. In the
case of technical problems, please contact our hotline within Switzerland under tel. 0900 00 1675
(cost with Swisscom at time of going to print: CHF 2.00/min). In the case of claims under the terms
of guarantee, contact your sales outlet. There is a 2 year period of guarantee.
Guarantee
SWITEL equipment is produced and tested according to the latest production methods. The implementation of carefully chosen materials and highly developed technologies ensure trouble-free
functioning and a long service life. The terms of guarantee do not apply where the cause of equipment malfunction is the fault of the telephone network operator or any interposed private branch
extension system. The terms of guarantee do not apply to the batteries or power packs used in the
products. The period of guarantee is 24 months from the date of purchase.
All deficiencies related to material or manufacturing errors within the period of guarantee will be
redressed free of charge. Rights to claims under the terms of guarantee are annulled following
tampering by the purchaser or third parties. Damage caused as the result of improper handling or
operation, normal wear and tear, incorrect positioning or storage, improper connection or installation or Acts of God and other external influences are excluded from the terms of guarantee. In the
case of complaints, we reserve the right to repair defect parts, replace them or replace the entire
device. Replaced parts or devices become our property. Rights to compensation in the case of
damage are excluded where there is no evidence of intent or gross negligence by the manufacturer.
If your device shows signs of defect during the period of guarantee, please return it to the sales
outlet in which you purchased the SWITEL device together with the purchase receipt. All claims
under the terms of guarantee in accordance with this agreement can only be asserted at the sales
outlet.
No claims under the terms of guarantee can be asserted after a period of two years from the date
of purchase and hand-over of the product.
24
Diese Anlage entspricht der europäischen R&TTE Richtlinie.
Für die komplette Konformitätserklärung nutzen Sie bitte den kostenlosen Download
von unserer Website www.switel.com.
Cet équipement est conforme à la directive européenne R&TTE.
Pour obtenir la déclaration de conformité intégrale, veuillez vous servir du téléchargement gratuit de notre site Internet www.switel.com.
Quest’apparecchiatura è conforme alla direttiva europea R&TTE.
Per la dichiarazione di conformità completa si prega di voler usufruire del servizio
gratuito di download dal nostro sito Internet www.switel.com.
This equipment complies with the European R&TTE directive.
To view the complete Declaration of Conformity, please refer to the free download
available at our web site: www.switel.com.
Version 1.0 • 12.06.2008