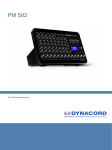
1
ELA-MONO-HOCHLEISTUNGSVERSTÄRKER HIGH-POWER MONO PA AMPLIFIER PA-1960 Best.-Nr. 17.2550 BEDIENUNGSANLEITUNG INSTRUCTION MANUAL MODE D’EMPLOI ISTRUZIONI PER L’USO GEBRUIKSAANWIJZING MANUAL DE INSTRUCCIONES INSTRUKCJA OBSŁUGI SIKKERHEDSOPLYSNINGER SÄKERHETSFÖRESKRIFTER TURVALLISUUDESTA D Bevor Sie einschalten … A Wir wünschen Ihnen viel Spaß mit Ihrem neuen Gerät von MONACOR. Bitte lesen Sie diese Bedienungsanleitung vor dem Betrieb gründlich durch. Nur so lernen Sie alle Funktionsmöglichkeiten kennen, vermeiden Fehlbedienungen und schützen sich und Ihr Gerät vor eventuellen Schäden durch unsachgemäßen Gebrauch. Heben Sie die Anleitung für ein späteres Nachlesen auf. We wish you much pleasure with your new MONACOR unit. Please read these operating instructions carefully prior to operating the unit. Thus, you will get to know all functions of the unit, operating errors will be prevented, and yourself and the unit will be protected against any damage caused by improper use. Please keep the operating instructions for later use. Der deutsche Text beginnt auf der Seite 4. The English text starts on page 4. CH Before switching on … F Avant toute installation … B Nous vous souhaitons beaucoup de plaisir à utiliser cet appareil MONACOR. Lisez ce mode d’emploi entièrement avant toute utilisation. Uniquement ainsi, vous pourrez apprendre l’ensemble des possibilités de fonctionnement de l’appareil, éviter toute manipulation erronée et vous protéger, ainsi que l’appareil, de dommages éventuels engendrés par une utilisation inadaptée. Conservez la notice pour pouvoir vous y reporter ultérieurement. Vi auguriamo buon divertimento con il vostro nuovo apparecchio di MONACOR. Leggete attentamente le istruzioni prima di mettere in funzione l'apparecchio. Solo così potete conoscere tutte le funzionalità, evitare comandi sbagliati e proteggere voi stessi e l'apparecchio da eventuali danni in seguito ad un uso improprio. Conservate le istruzioni per poterle consultare anche in futuro. La version française se trouve page 10. Il testo italiano inizia a pagina 10. CH I Prima di accendere … Antes de la utilización … NL Voor u inschakelt … B Wij wensen u veel plezier met uw nieuwe apparaat van MONACOR. Lees deze gebruikershandleiding grondig door, alvorens het apparaat in gebruik te nemen. Alleen zo leert u alle functies kennen, vermijdt u foutieve bediening en behoedt u zichzelf en het apparaat voor eventuele schade door ondeskundig gebruik. Bewaar de handleiding voor latere raadpleging. Le deseamos una buena utilización para su nuevo aparato MONACOR. Por favor, lea estas instrucciones de uso atentamente antes de hacer funcionar el aparato. De esta manera conocerá todas las funciones de la unidad, se prevendrán errores de operación, usted y el aparato estarán protegidos en contra de todo daño causado por un uso inadecuado. Por favor, guarde las instrucciones para una futura utilización. De Nederlandstalige tekst vindt u op pagina 16. El texto en español empieza en la página 16. PL S 2 GB Przed uruchomieniem … E DK Før du tænder … Życzymy zadowolenia z nowego produktu MONACOR. Dzięki tej instrukcji obsługi będą państwo w stanie poznać wszystkie funkcje tego urządzenia. Stosując się do instrukcji unikną państwo błędów i ewentualnego uszkodzenia urządzenia na skutek nieprawidłowego użytkowania. Prosimy zachować instrukcję. God fornøjelse med dit nye MONACOR produkt. Læs venligst sikkerhedsanvisningen nøje, før du tager produktet i brug. Dette hjælper dig med at beskytte produktet mod ukorrekt ibrugtagning. Gem venligst denne betjeningsvejledning til senere brug. Tekst polski zaczyna się na stronie 22. Du finder sikkerhedsanvisningen på side 25. Innan du slår på enheten … FIN Ennen kytkemistä … Vi önskar dig mycket glädje med din nya MONACOR produkt. Läs igenom säkerhetsföreskrifterna noga innan enheten tas i bruk. Detta kan förhindra att problem eller fara för dig eller enheten uppstår vid användning. Spara instruktionerna för framtida användning. Toivomme Sinulle paljon miellyttäviä hetkiä uuden MONACOR laitteen kanssa. Ennen laitteen käyttöä pyydämme Sinua huolellisesti tutustumaan turvallisuusohjeisiin. Näin vältyt vahingoilta, joita virheellinen laitteen käyttö saattaa aiheuttaa. Ole hyvä ja säilytä käyttöohjeet myöhempää tarvetta varten. Säkerhetsföreskrifterna återfinns på sidan 25. Turvallisuusohjeet löytyvät sivulta 25. PA -1960 PA POWER AMPLIFIER FAULT STANDBY PROTECT CLIP SIGNAL POWER PRIORITY POWER 10 1 23 4 5 6 7 8 12 10 SPEAKER OUTPUTS PRIORITY RELAY COM 9 11 SLAVE INPUT CONTACT MAX. 3 A 1 2 3 14 13 PGM INPUT 100V 0 16 15 FD / PRIORITY CONTROL FAULT NORMAL LEVEL 0 PILOT TONE 400 Hz PA- 6FD FAULT DETECTION MODULE A 1 75 V 2 10 0dBu(0.775V) 60kΩ BAL. MAX. 0.5A VOLTAGE IMPEDANCE 100 V 10 Ω 85 V 7.2 Ω 75 V 5.6 Ω B 60 V 70 V 85 V 70 V 4.9 Ω C 50 V 60 V 75 V 60 V 3.6 Ω CAUTION! 50 V 2.5 Ω PLEASE READ THE OPERATING INSTRUCTIONS! SPEAKER OUTPUT SETTINGS PRIORITY INPUT PRI CTL +24V GND PA- 6FD FACTORY SETTINGS “A” SPEAKER OUTPUT TABLE (INSIDE) 3 BATTERY 24 V4 4 / 80 A 85 V 100 V POWER REMOTE BATTERY 19 20 SW1 PA-6FD CN601 Fault Detector OSC Level PA-6FD 24 25 max Sensitivity Test RMS 2Vac COM HOT Line In 26 27 28 PA-6FM CN5 AC DC FAN PA-6FM FAULT MONITOR MODULE 29 3 230V~/50Hz 21 ON OFF min 18 OUT 1 2 3 ON 0dBu(0.775V) 60kΩ BAL. 17 PA- 6FM 0 FAULT MONITORING MODULE PGM 22 23 D A Bitte klappen Sie die Seite 3 heraus. Sie sehen dann immer die beschriebenen Bedienelemente und Anschlüsse. 1 Übersicht der Bedienelemente und Anschlüsse 1.1 Frontseite CH Inhalt 1 Übersicht der Bedienelemente und Anschlüsse . . . . . . . . . . . . . . . . . . . . . . 4 1.1 Frontseite . . . . . . . . . . . . . . . . . . . . . . . . . . . . 4 1.2 Rückseite . . . . . . . . . . . . . . . . . . . . . . . . . . . . 4 1.3 Fehlerüberwachungsmodul PA-6FD . . . . . . . . 5 1.4 Fehlermeldemodul PA-6FM . . . . . . . . . . . . . . 5 2 Hinweise für den sicheren Gebrauch . . . . . 5 3 Einsatzmöglichkeiten . . . . . . . . . . . . . . . . . . 6 4 Einbau von Zusatzmodulen . . . . . . . . . . . . . 6 4.1 Fehlerüberwachungsmodul PA-6FD . . . . . . . . 6 4.1.1 Einbau und Anschluss . . . . . . . . . . . . . . . . . 6 4.1.2 Kalibrierung . . . . . . . . . . . . . . . . . . . . . . . . . 6 4.2 Fehlermeldemodul PA-6FM . . . . . . . . . . . . . . 6 5 Aufstellen des Verstärkers . . . . . . . . . . . . . 7 5.1 Rackeinbau . . . . . . . . . . . . . . . . . . . . . . . . . . . 7 6 Verstärker anschließen . . . . . . . . . . . . . . . . 7 6.1 Lautsprecher . . . . . . . . . . . . . . . . . . . . . . . . . . 7 6.2 Line-Signaleingänge . . . . . . . . . . . . . . . . . . . . 7 6.3 100-V-Eingang . . . . . . . . . . . . . . . . . . . . . . . . 8 6.4 Vorrangrelais und 24-V-Ausgang . . . . . . . . . . 8 1 Lautstärkeregler PGM für das Signal am Eingang PGM INPUT (12) 2 LED PRIORITY: leuchtet, wenn der Verstärker über den Anschluss PRI CTL (15) auf den Eingang PRIORITY INPUT (17) umgeschaltet ist 3 Betriebsanzeige POWER 4 LED SIGNAL: leuchtet ab einer bestimmten Lautstärke am Ausgang SPEAKER OUTPUTS (9) 5 LEDs zur Störungsanzeige FAULT leuchtet, wenn ein Fehler im Verstärker aufgetreten ist PROTECT leuchtet, wenn der Verstärker überhitzt oder ein Fehler im Verstärker aufgetreten ist CLIP leuchtet, wenn der Verstärker übersteuert wird [Lautstärkeregler PGM (1) oder LEVEL (16) zurückdrehen] 6 Ein-/Ausschalter POWER Hinweis: Liegt eine 24-V-Spannung von einer Notstromeinheit an den Anschlüssen BATTERY (21) an, lässt sich der Verstärker nicht ausschalten. 7 LED STANDBY: leuchtet, wenn der Verstärker mit dem 230-V-Stromnetz verbunden ist, mit dem Netzschalter (6) ausgeschaltet ist und keine 24-V-Spannung an den Anschlüssen BATTERY (21) anliegt 8 Luftansaugöffnungen für den Lüfter 6.6 Strom- und Notstromversorgung . . . . . . . . . . 8 GB Inbetriebnahme . . . . . . . . . . . . . . . . . . . . . . . 8 8 Schutzschaltung . . . . . . . . . . . . . . . . . . . . . . 9 9 Technische Daten . . . . . . . . . . . . . . . . . . . . . 9 Please unfold page 3. Then you will always see the operating elements and connections described. 1 Operating Elements and Connections 1 Volume control PGM for the signal at the PGM INPUT (12) 1.1 Front panel . . . . . . . . . . . . . . . . . . . . . . . . . . . 4 2 LED PRIORITY: will light up when the amplifier is switched over to the PRIORITY INPUT (17) via the terminal PRI CTL (15) 1.2 Rear panel . . . . . . . . . . . . . . . . . . . . . . . . . . . 4 3 Power LED 1.3 Fault detection module PA-6FD . . . . . . . . . . . 5 4 LED SIGNAL: will light up when a certain volume has been reached at the SPEAKER OUTPUTS (9) 1 Operating Elements and Connections . . . . 4 1.4 Fault monitoring module PA-6FM . . . . . . . . . . 5 2 Safety Notes . . . . . . . . . . . . . . . . . . . . . . . . . 5 3 Applications . . . . . . . . . . . . . . . . . . . . . . . . . 6 4 Installation of Additional Modules . . . . . . . 6 4.1 Fault detection module PA-6FD . . . . . . . . . . . 6 4.1.1 Installation and connection . . . . . . . . . . . . . 6 4.1.2 Calibration . . . . . . . . . . . . . . . . . . . . . . . . . . 6 4.2 Fault monitoring module PA-6FM . . . . . . . . . . 6 5 Setting Up the Amplifier . . . . . . . . . . . . . . . . 7 5.1 Rack installation . . . . . . . . . . . . . . . . . . . . . . . 7 6 Connecting the Amplifier . . . . . . . . . . . . . . . 7 6.1 Speakers . . . . . . . . . . . . . . . . . . . . . . . . . . . . 7 5 LEDs for fault indication FAULT will light up if a fault has occurred in the amplifier PROTECT will light up if the amplifier is overheated or a fault has occurred in the amplifier CLIP will light up in case of overload of the amplifier [turn back volume control PGM (1) or LEVEL (16)] 6 POWER switch Note: If a 24 V voltage from an emergency power supply unit is applied to the terminals BATTERY (21), it will not be possible to switch off the amplifier. 6.4 Priority relay and 24 V output . . . . . . . . . . . . . 8 7 LED STANDBY: will light up if the amplifier is connected to the 230 V mains supply, if it is switched off with the POWER switch (6) and no 24 V voltage is applied to the terminals BATTERY (21) 6.5 Remote-controlled activation/deactivation . . . 8 8 Air intake openings for the fan 6.2 Line signal inputs . . . . . . . . . . . . . . . . . . . . . . 7 6.3 100 V input . . . . . . . . . . . . . . . . . . . . . . . . . . . 7 6.6 Power supply and emergency power supply . 8 4 7 Operation . . . . . . . . . . . . . . . . . . . . . . . . . . . . 8 8 Protective Circuit . . . . . . . . . . . . . . . . . . . . . 9 9 Specifications . . . . . . . . . . . . . . . . . . . . . . . . 9 9 Lautsprecheranschlüsse Wichtig! Ab Werk ist der Verstärker so eingestellt, dass für 100-V-Lautsprecher die Klemmen COM und 3 verwendet werden müssen. 10 Die Relaiskontakte schalten um, wenn der Verstärker über den Anschluss PRI CTL (15) auf den Eingang PRIORITY INPUT (17) umgeschaltet wird 11 alternativer Eingang SLAVE INPUT zum Anschluss an eine 100-V-Lautsprecherleitung 12 symmetrischer Line-Signaleingang PGM INPUT für normale Durchsagen und Hintergrundmusik; Empfindlichkeit für Vollaussteuerung 0,775 V (0 dBu) 13 DIP-Schalter Nr. 1 zum Ein- und Ausschalten des 400-HzHochpasses (senkt zur besseren Sprachverständlichkeit die Bässe ab) Nr. 2 untere Position ON (Werkseinstellung), wenn das Fehlerüberwachungsmodul PA6FD (Zubehör) nicht eingebaut ist obere Position OFF, wenn das Modul eingebaut ist Nr. 3 zum Ein- und Ausschalten des 20-kHzTesttons, wenn das Modul PA-6FD eingebaut ist – siehe Kap. 4.1.1, Bedienschritt 6 15 Anschluss OUT für den 24-V-Ausgang (Spannung liegt bei eingeschaltetem Verstärker immer an; belastbar mit 0,5 A) und Anschluss PRI CTL für einen Vorrangschalter: bei geschlossenem Vorrangschalter schaltet der 1.1 Front panel Contents Hinweis: Alle grünen Anschlussleisten lassen sich zu besseren Handhabung beim Festschrauben der Anschlussleitungen von ihren Steckverbindungen abziehen. 14 Kontroll-LED: leuchtet, wenn der Verstärker ordnungsgemäß arbeitet 6.5 Ferngesteuertes Ein- und Ausschalten . . . . . . 8 7 1.2 Rückseite 1.2 Rear panel Note: To facilitate handling when screwing on the connection cables, all green terminal strips can be disconnected from their plug-in connections. 9 Speaker terminals Important! Due to the factory settings of the amplifier, the terminals COM and 3 must be used for 100 V speakers. 10 The relay contacts will switch over if the amplifier is switched over to the PRIORITY INPUT (17) via the terminal PRI CTL (15) 11 Alternative SLAVE INPUT for connection to a 100 V speaker cable 12 Balanced line signal input PGM INPUT for standard announcements and background music; sensitivity for rated output power 0.775 V (0 dBu) 13 DIP switches No. 1 to activate/deactivate the 400 Hz highpass filter (will attenuate the bass frequencies to improve the speech intelligibility) No. 2 lower position ON (factory setting) if the fault detection module PA-6FD (accessory) is not installed upper position OFF if the module is installed No. 3 to activate/deactivate the 20 kHz test tone if the module PA-6FD is installed – see chapter 4.1.1, step 6 14 Indicating LED; will light up when the amplifier operates correctly 15 Terminal OUT for the 24 V output (voltage is always applied when the amplifier is switched on; current rating 0.5 A) and terminal PRI CTL for a priority switch: if the priority switch is closed, the amplifier will switch over from the PGM INPUT (12) to the PRIORITY INPUT (17) 16 Volume control LEVEL for the signal at the PRIORITY INPUT (17) 17 Balanced line signal input PRIORITY INPUT for important announcements – also see items 15 and 16; sensitivity for rated output power 0.775 V (0 dBu) Verstärker vom Eingang PGM INPUT (12) auf den Eingang PRIORITY INPUT (17) um 16 Lautstärkeregler LEVEL für das Signal am Eingang PRIORITY INPUT (17) 17 symmetrischer Line-Signaleingang PRIORITY INPUT für wichtige Durchsagen – siehe auch Positionen 15 und 16; Empfindlichkeit für Vollaussteuerung 0,775 V (0 dBu) 18 Abdeckblech, wird beim Einsetzen des Fehlermeldemoduls PA-6FM entfernt 19 Abdeckblech, wird beim Einsetzen des Fehlerüberwachungsmoduls PA-6FD entfernt 20 Luftaustrittsöffnungen 21 Anschlüsse BATTERY für eine 24-V-Notstromeinheit 22 Anschlüsse POWER REMOTE für einen externen Schalter zum ferngesteuerten Ein- und Ausschalten Hinweis: Zur Fernsteuerung darf der Verstärker nicht mit dem Schalter POWER (6) eingeschaltet sein. 23 Netzkabel zum Anschluss an eine Steckdose (230 V~/50 Hz) 1.3 Fehlerüberwachungsmodul PA-6FD Das Fehlerüberwachungsmodul ist als Zubehör erhältlich und gehört nicht zum Lieferumfang des Verstärkers. Es wird anstelle des Abdeckbleches (19) eingesetzt. 24 Relaisausgang zum Anschluss eines Signalgebers 25 Anschlüsse COM und HOT; mit den Anschlüssen SPEAKER OUTPUTS (9) verbinden: HOT an Klemme 3 und COM an COM 26 Messpunkte zum Einstellen der Ansprechempfindlichkeit 1.4 Fehlermeldemodul PA-6FM Das Fehlermeldemodul ist als Zubehör erhältlich und gehört nicht zum Lieferumfang des Verstärkers. Es wird anstelle des Abdeckbleches (18) eingesetzt. 29 Relaisausgänge zum Anschluss von Signalgebern Das Relais AC spricht an, wenn keine Netzspannung anliegt, die interne Netzsicherung durchgeschmolzen ist oder der Verstärker nicht mit dem Netzschalter (6) eingeschaltet ist. Das Relais DC spricht an, wenn die internen Sicherungen für die Notstromversorgung durchgeschmolzen sind oder keine Spannung von einer Notstromeinheit an den Anschlüssen BATTERY (21) anliegt. Das Relais FAN spricht an, wenn der interne Lüfter defekt oder nicht angeschlossen ist. G G G G Das Gerät ist nur zur Verwendung im Innenbereich geeignet. Schützen Sie es vor Tropf- und Spritzwasser, hoher Luftfeuchtigkeit und Hitze (zulässiger Einsatztemperaturbereich 0 – 40 °C). G Das Gerät entspricht allen erforderlichen Richtlinien der EU und ist deshalb mit gekennzeichnet. Eine beschädigte Netzanschlussleitung darf nur durch eine Fachwerkstatt ersetzt werden. G Ziehen Sie den Netzstecker nie an der Zuleitung aus der Steckdose, fassen Sie immer am Stecker an. Verwenden Sie für die Reinigung nur ein trockenes, weiches Tuch, keine Chemikalien oder Wasser. WARNUNG Das Gerät wird mit lebensgefährlicher Netzspannung (230 V~) versorgt. Nehmen Sie deshalb niemals selbst Eingriffe am Gerät vor und stecken Sie nichts durch die Lüftungsöffnungen! Es besteht die Gefahr eines elektrischen Schlages. Im Betrieb liegt an den Anschlüssen SPEAKER OUTPUTS (9) und SLAVE INPUT (11) berührungsgefährliche Spannung bis 100 V an. Alle Anschlüsse nur bei ausgeschalteter ELA-Anlage vornehmen bzw. verändern. G G CH Stellen Sie keine mit Flüssigkeit gefüllten Gefäße, z. B. Trinkgläser, auf das Gerät. Die in dem Gerät entstehende Wärme muss durch Luftzirkulation abgegeben werden. Decken Sie darum die Lüftungsöffnungen des Gehäuses nicht ab. Nehmen Sie das Gerät nicht in Betrieb und ziehen Sie sofort den Netzstecker aus der Steckdose, wenn: 1. sichtbare Schäden am Gerät oder an der Netzanschlussleitung vorhanden sind, 2. nach einem Sturz oder Ähnlichem der Verdacht auf einen Defekt besteht, 3. Funktionsstörungen auftreten. Geben Sie das Gerät in jedem Fall zur Reparatur in eine Fachwerkstatt. Hinweise für den sicheren Gebrauch 2 D A Wird das Gerät zweckentfremdet, nicht richtig angeschlossen, falsch bedient oder nicht fachgerecht repariert, kann keine Garantie für das Gerät und keine Haftung für daraus resultierende Sachoder Personenschäden übernommen werden. Soll das Gerät endgültig aus dem Betrieb genommen werden, übergeben Sie es zur umweltgerechten Entsorgung einem örtlichen Recyclingbetrieb. Beachten Sie auch unbedingt die folgenden Punkte: 27 Regler für den 20-kHz-Testtonpegel 28 Regler für die Ansprechempfindlichkeit Relay DC will respond if the internal fuses for emergency power supply have blown or if no voltage from an emergency power supply unit is applied to the terminals BATTERY (21). Relay FAN will respond if the internal fan is defective or not connected. 18 Cover plate, to be removed when inserting the fault monitoring module PA-6FM 19 Cover plate, to be removed when inserting the fault detection module PA-6FD 20 Air outlets 21 Terminals BATTERY for a 24 V emergency power supply unit 22 Terminals POWER REMOTE for an external switch for remote-controlled activation/deactivation Note: For remote control, the amplifier must not be switched on with the POWER switch (6). 23 Mains cable for connection to a mains socket (230 V~/50 Hz) 1.3 Fault detection module PA-6FD The fault detection module is available as an accessory and not supplied with the amplifier. It is installed instead of the cover plate (19). 2 26 Measuring points to adjust the response sensitivity 27 Control for the 20 kHz test tone level 28 Control for the response sensitivity 1.4 Fault monitoring module PA-6FM The fault monitoring module is available as an accessory and not supplied with the amplifier. It is installed instead of the cover plate (18). 29 Relay outputs to connect signal devices Relay AC will respond if no mains voltage is applied, if the internal mains fuse has blown, or if the amplifier has not been switched on with the POWER switch (6). A damaged mains cable must be replaced by skilled personnel only. G Never pull the mains cable for disconnecting the mains plug from the socket, always seize the plug. G For cleaning only use a dry, soft cloth; never use water or chemicals. G No guarantee claims for the unit and no liability for any resulting personal damage or material damage will be accepted if the unit is used for other purposes than originally intended, if it is not correctly connected, operated, or not repaired in an expert way. G Important for U. K. Customers! The wires in this mains lead are coloured in accordance with the following code: green/yellow = earth blue = neutral brown = live As the colours of the wires in the mains lead of this appliance may not correspond with the coloured markings identifying the terminals in your plug, proceed as follows: 1. The wire which is coloured green and yellow must be connected to the terminal in the plug which is marked with the letter E or by the earth symbol , or coloured green or green and yellow. 2. The wire which is coloured blue must be connected to the terminal which is marked with the letter N or coloured black. 3. The wire which is coloured brown must be connected to the terminal which is marked with the letter L or coloured red. Safety Notes This unit corresponds to all required directives of the EU and is therefore marked with . WARNING The unit is supplied with hazardous mains voltage (230 V~). Leave servicing to skilled personnel only and never insert anything into the air vents; you will risk an electric shock! During operation, there is a hazard of contact with a voltage of up to 100 V at the terminals SPEAKER OUTPUTS (9) and SLAVE INPUT (11). Always switch off the PA system before making or changing any connections. 24 Relay output to connect a signal device 25 Terminals COM and HOT; connect to the terminals SPEAKER OUTPUTS (9): HOT to terminal 3 and COM to COM G Please observe the following items in any case: G The unit is suitable for indoor use only. Protect it against dripping water and splash water, high air humidity, and heat (admissible ambient temperature range 0 – 40 °C). G Do not place any vessel filled with liquid on the unit, e. g. a drinking glass. G The heat generated within the unit must be carried off by air circulation. Therefore, do not cover the air vents of the housing. G Do not operate the unit and immediately disconnect the mains plug from the socket 1. in case of visible damage to the unit or to the mains cable, 2. if a defect might have occurred after the unit was dropped or suffered a similar accident, 3. if malfunctions occur. In any case the unit must be repaired by skilled personnel. GB Warning – This appliance must be earthed. If the unit is to be put out of operation definitively, take it to a local recycling plant for a disposal which is not harmful to the environment. 5 D 3 A Der Verstärker PA-1960 mit einer Sinusausgangsleistung von 960 W ist speziell für den Einsatz in ELA-Anlagen konzipiert. Für Hintergrundmusik und für normale Durchsagen ist ein Linepegel-Eingang vorhanden. Für Notfalldurchsagen oder andere wichtige Durchsagen ist ein zweiter Linepegel-Eingang vorhanden. Mit einem separaten Schalter oder einem externen Relais lässt sich auf den zweiten Eingang umschalten. Der PA-1960 lässt sich auch ganz einfach in eine bestehenden ELA-Anlage integrieren, wenn mehr Leistung für weitere Lautsprecher benötigt wird. Dazu ist er mit einem 100-V-Eingang ausgestattet. CH 4 Einsatzmöglichkeiten Einbau von Zusatzmodulen Der Verstärker kann mit folgenden Zusatzmodulen von MONACOR erweitert werden: PA-6FD Fehlerüberwachungsmodul PA-6FM Fehlermeldemodul WARNUNG Der Einbau von Zusatzmodulen darf nur durch Fachpersonal erfolgen. Vor dem Öffnen des Verstärkers den Netzstecker aus der Steckdose ziehen, anderenfalls besteht die Gefahr eines elektrischen Schlages! Falls eine Notstromeinheit angeschlossen ist, diese von den Anschlüssen BATTERY (21) trennen, damit der Verstärker auf jeden Fall außer Betrieb ist. 4.1 Fehlerüberwachungsmodul PA-6FD Das als Zubehör lieferbare Fehlerüberwachungsmodul PA-6FD (Abb. 3 und 4) ist speziell für diesen Verstärker konzipiert. Es erzeugt einen 20-kHzSinustestton, der auf die Endstufe gegeben wird. Liegt der Testton aufgrund eines Defekts im Verstärker nicht am Anschluss SPEAKER OUTPUTS (9) an, leuchten die Anzeigen FAULT und PROTECT (5) GB 3 Applications The amplifier PA-1960 with an RMS output power of 960 W is specially designed for applications in PA systems. A line level input is provided for background music and standard announcements; a second line level input is provided for emergency announcements or other important announcements. By means of a separate switch or an external relay, it is possible to switch over to the second input. The PA-1960 is also easily integrated into an existing PA system if more power is required for further speakers. For this purpose, it is equipped with a 100 V input. 4 Installation of Additional Modules The amplifier can be extended by the following additional modules from MONACOR: PA-6FD fault detection module PA-6FM fault monitoring module WARNING Additional modules must always be installed by skilled personnel. Prior to opening the amplifier, disconnect the mains plug from the socket, otherwise you will risk an electric shock! If an emergency power supply unit is connected, disconnect it from the terminals BATTERY (21) to ensure that the amplifier is out of operation. 4.1 Fault detection module PA-6FD The fault detection module PA-6FD (figs. 3 and 4) available as an accessory is specially designed for this amplifier. It will generate a 20 kHz sinusoidal test tone which is fed to the power amplifier. If the test tone is not applied to the SPEAKER OUTPUTS (9) due to a defect in the amplifier, the LEDs FAULT and PROTECT (5) will light up. Furthermore, the green LED (14) on the rear side of the amplifier will go out. Via a relay, a signal device can be activated in addition. 6 auf. Außerdem erlischt die grüne LED (14) auf der Verstärkerrückseite. Über ein Relais lässt sich zusätzlich ein Signalgeber aktivieren. 4.1.1 Einbau und Anschluss 1) Den Gehäusedeckel des Verstärkers abschrauben und das Abdeckblech (19) entfernen. Die 4-polige Leitung, die am Abdeckblech befestigt ist, vom Blech trennen. 2) Die Steckbrücke SW 1 auf dem Überwachungsmodul in die Position ON stecken. 3) Die 4-polige Leitung, die am Abdeckblech befestigt war, nach außen durch die neu entstandene Öffnung führen und in die Buchse CN 601 des Moduls stecken. Dabei muss der äußere Pin der Buchse frei bleiben, siehe Abb. 4. 4) Das Modul PA-6FD an der Stelle des Abdeckblechs von außen einsetzen und festschrauben. 5) Den Kontakt COM der Anschlussklemme SPEAKER OUTPUTS (9) am Verstärker mit dem Kontakt COM der Anschlussklemme Line In (25) am Modul verbinden und den Kontakt 3 von SPEAKER OUTPUTS mit dem Kontakt HOT von Line In. 6) Den DIP-Schalter Nr. 2 (13) auf der Verstärkerrückseite in die obere Position OFF stellen und den DIP-Schalter Nr. 3 in die untere Position ON. Wird jedoch der Eingang SLAVE INPUT (11) verwendet und liegt hier bereits ein 20-kHz-Testton von einem anderen Verstärker an, den DIPSchalter Nr. 3 in die obere Position OFF stellen, sonst überlagern sich zwei Testtöne! 7) Wird von dem Modul ein Fehler erkannt, leuchten die LEDs FAULT und PROTECT (5) auf und die Relaiskontakte (24) schließen. An die Kontakte lässt sich zur Alarmierung ein Signalgeber anschließen. Die Belastbarkeit der Relaiskontakte beträgt 1 A bei max. 120 V~ oder max. 24 V . Hinweis: Die Relaiskontakte schließen auch, wenn der Verstärker ausgeschaltet wird. 4.1.1 Installation and connection 1) Unscrew the housing cover of the amplifier and remove the cover plate (19). Disconnect the 4-pole cable fixed to the cover plate from the plate. 2) Set the jumper SW 1 on the fault detection module to the position ON. 3) Lead the 4-pole cable which was fixed to the cover plate outwards through the new opening created and connect it to the jack CN 601 of the module. The outer pin of the jack must remain unconnected, see fig. 4. 4) Insert the module PA-6FD at the position of the cover plate from the outside and screw it down. 5) Connect the contact COM of the SPEAKER OUTPUTS (9) on the amplifier to the contact COM of the terminal Line In (25) on the module; connect the contact 3 of the SPEAKER OUTPUTS to the contact HOT of Line In. 6) Set DIP switch No. 2 (13) on the rear side of the amplifier to the upper position OFF and DIP switch No. 3 to the lower position ON. However, if the SLAVE INPUT (11) is used and a 20 kHz test tone from another amplifier is already applied here, set DIP switch No. 3 to the upper position OFF, otherwise two test tones will be superposed! 7) If the module detects a fault, the LEDs FAULT and PROTECT (5) will light up and the relay contacts (24) will close. The contacts allow connection of a signal device for alarm triggering. The current rating of the relay contacts is 1 A at 120 V ~ max. or 24 V max. Note: The relay contacts will also close when the amplifier is switched off. 4.1.2 Kalibrierung 1) Den Verstärker einschalten und die Lautstärkeregler PGM (1) und LEVEL (16) auf Null drehen, damit nur der 20-kHz-Testton an den Lautsprecherausgängen anliegt. Wird der Eingang SLAVE INPUT (11) verwendet, darf während der Kalibrierung an diesem Eingang kein Signal einer Durchsage und kein Musiksignal anliegen, sondern eventuell nur ein 20-kHz-Testton von einem anderen Verstärker. Liegt ein 20-kHz-Testton an, den nächsten Bedienschritt überspringen und mit dem Schritt 3 fortfahren. 2) An den Kontakten COM und 3 der Anschlussklemme SPEAKER OUTPUTS (9) die Spannung des 20-kHz-Testtons messen und mit dem Trimmregler OSC Level (27) auf 2 V~ einstellen. 3) An den Messpunkten „+ -“ (26) des Moduls die Spannung des 20-kHz-Testtons kontrollieren. Mit dem Trimmregler Sensitivity (28) 2 V~ einstellen. 4) Nach der Kalibrierung die Regler PGM (1) und LEVEL (16) wieder auf die gewünschte Lautstärke drehen. 4.2 Fehlermeldemodul PA-6FM Das als Zubehör lieferbare Fehlermeldemodul PA6FM (Abb. 5 und 6) ist speziell für diesen Verstärker konzipiert. Über die drei Relaisausgänge (29) können Signalgeber bei folgenden Fehlern aktiviert werden: Die Relaiskontakte AC schalten um, wenn keine Netzspannung anliegt, die interne Netzsicherung durchgeschmolzen ist oder der Verstärker nicht mit dem Netzschalter (6) eingeschaltet ist. Die Relaiskontakte DC schalten um, wenn die internen Sicherungen für die Notstromversorgung durchgeschmolzen sind oder keine Spannung von einer Notstromeinheit an den Anschlüssen BATTERY (21) anliegt. 4.1.2 Calibration 1) Switch on the amplifier and set the volume controls PGM (1) and LEVEL (16) to zero so that only the 20 kHz test tone is applied to the speaker outputs. If the SLAVE INPUT (11) is used, no signal of an announcement or no music signal must be applied to this input while calibrating; only a 20 kHz test tone from another amplifier, if necessary. If a 20 kHz test tone is applied, skip the next step and proceed with step 3. 2) Measure the voltage of the 20 kHz test tone at the contacts COM and 3 of the SPEAKER OUTPUTS (9) and adjust it to 2 V~ with the trimming control OSC Level (27). 3) Check the voltage of the 20 kHz test tone at the measuring points “+ -” (26) of the module. Adjust 2 V~ with the trimming control Sensitivity (28). 4) After calibrating, set the controls PGM (1) and LEVEL (16) back to the desired volume. 4.2 Fault monitoring module PA-6FM The fault monitoring module PA-6FM (figs. 5 and 6) available as an accessory is specially designed for this amplifier. The three relay outputs (29) allow activation of signal devices in case of the following faults: The relay contacts AC will switch over if no mains voltage is applied, if the internal mains fuse has blown, or if the amplifier has not been switched on with the POWER switch (6). The relay contacts DC will switch over if the internal fuses for the emergency power supply have blown or if no voltage from an emergency power supply unit is applied to the terminals BATTERY (21). The relay contacts FAN will switch over if the internal fan is defective or not connected. Note: All relay contacts will also switch over when the amplifier is switched off. Die Relaiskontakte FAN schalten um, wenn der interne Lüfter defekt oder nicht angeschlossen ist. Hinweis: Alle Relaiskontakte schalten auch um, wenn der Verstärker ausgeschaltet wird. 1) Den Gehäusedeckel des Verstärkers abschrauben und das Abdeckblech (18) entfernen. Die 6-polige Leitung, die am Abdeckblech befestigt ist, vom Blech trennen. 2) Die 6-polige Leitung, die am Abdeckblech befestigt war, nach außen durch die neu entstandene Öffnung führen und in die Buchse CN 5 des Moduls stecken. 3) Das Modul PA-6FM an der Stelle des Abdeckblechs von außen einsetzen und festschrauben. 4) Die Signalgeber zur Alarmierung an die Relaisumschaltkontakte (29) anschließen. Der Aufdruck am Modul zeigt die Kontaktstellung im Fehlerfall und bei ausgeschaltetem Verstärker. Die Belastbarkeit der Relaiskontakte beträgt 1 A bei max. 120 V~ oder max. 24 V . 5 Aufstellen des Verstärkers Der Verstärker ist für den Einschub in ein Rack für Geräte mit einer Breite von 482 mm (19") vorgesehen, kann aber auch als Tischgerät verwendet werden. In jedem Fall muss Luft ungehindert durch alle Lüftungsöffnungen strömen können, damit eine ausreichende Kühlung der Endstufe gewährleistet ist. 5.1 Rackeinbau Die vom Verstärker erwärmte Luft muss aus dem Rack austreten können. Anderenfalls kommt es im Rack zu einem Hitzestau, wodurch nicht nur der Verstärker, sondern auch andere Geräte im Rack beschädigt werden können. Bei unzureichendem Wärmeabfluss in das Rack eine Lüftereinheit einsetzen. 6 5 Setting Up the Amplifier The amplifier is provided for installation into a rack for units with a width of 482 mm (19"), but it can also be used as a table top unit. In any case, make sure that air will circulate freely through all vents to provide a sufficient cooling of the power amplifier. Die ELA-Lautsprecher an die Anschlussleiste SPEAKER OUTPUTS (9) anschließen: Die Minusanschlüsse mit dem Kontakt COM verbinden und die Plusanschlüsse mit dem Kontakt 1, 2 oder 3, der der Lautsprecher-Nennspannung entspricht. Hierbei darf eine Gesamtbelastung von 960 W Sinus durch die Lautsprecher nicht überschritten werden, sonst wird der Verstärker beschädigt. Wichtig! Ab Werk ist der Verstärker so eingestellt, dass für 100-V-Lautsprecher die Klemmen COM und 3 verwendet werden müssen. In der folgenden Tabelle sind alle möglichen Nennspannungen dargestellt: Steckbrücke in Position For rack installation, 3 RS (3 rack spaces = 133 mm) are required. To prevent the rack from becoming top-heavy, insert the amplifier into the lower section of the rack. The front panel alone is not sufficient for fixing it safely. In addition, lateral rails or a bottom plate must secure the unit. The air heated by the amplifier must be able to leave the rack, otherwise this will result in heat accumulation within the rack which may not only damage the amplifier but also other units in the rack. In case of insufficient heat dissipation, install a ventilation unit into the rack. CH Den Gehäusedeckel des Verstärkers abschrauben. Auf der Leiterplatte mit den Anschlüssen SPEAKER OUTPUTS (9) und PRIORITY RELAY (10) befindet sich eine Drahtsteckbrücke. Die Brücke vom Kontakt A auf den Kontakt B oder C umstecken. Den Gehäusedeckel wieder festschrauben. 6 2 3 A Werkseinstellung 75 V 85 V 100 V B 60 V 70 V 85 V C 50 V 60 V 75 V Connecting the Amplifier Any connection should only be made by skilled personnel. Always switch off the amplifier before connecting! Note: To facilitate handling when screwing on the connection cables, all green terminal strips can be disconnected from their plug-in connections. 6.1 Speakers Connect the PA speakers to the terminal strip SPEAKER OUTPUTS (9): connect the negative poles to the contact COM and the positive poles to the contact 1, 2, or 3 corresponding to the nominal voltage of the speakers. The total load by the speakers must not exceed 960 WRMS, otherwise the amplifier will be damaged. Important! Due to the factory settings of the amplifier, the terminals COM and 3 must be used for 100 V speakers. The table below shows any nominal voltages possible: Terminal 1 2 3 A Factory setting 75 V 85 V 100 V B 60 V 70 V 85 V C 50 V 60 V 75 V WARNING Für Durchsagen und Musikwiedergabe wird ein ELA-Vorverstärker benötigt (z. B. PA-1410MX von MONACOR), an den Mikrofone und Audiogeräte (z. B. CD-Spieler, Radiogerät) angeschlossen werden können. Den Ausgang des Vorverstärkers mit dem Eingang PGM INPUT (12) verbinden. Für Notfalldurchsagen oder andere wichtige Durchsagen ist der PA-1960 mit dem Eingang PRIORITY INPUT (17) ausgestattet. Sobald ein mit den Klemmen PRI CTL (15) verbundener Vorrangschalter oder verbundenes Relais geschlossen wird, schaltet der Verstärker vom Eingang PGM INPUT auf den Eingang PRIORITY INPUT um und es ist nur die Notfalldurchsage zu hören. Die Lautstärke für Notfalldurchsagen wird separat mit dem Regler LEVEL (16) auf der Rückseite eingestellt. Klemme 1 Jumper in position 5.1 Rack installation D A 6.2 Line-Signaleingänge 6.1 Lautsprecher Für die Rackmontage werden 3 HE (3 Höheneinheiten = 133 mm) benötigt. Damit das Rack nicht kopflastig wird, muss der Verstärker im unteren Bereich des Racks eingeschoben werden. Für eine sichere Befestigung reicht die Frontplatte allein nicht aus. Zusätzlich müssen Seitenschienen oder eine Bodenplatte das Gerät halten. 1) Unscrew the housing cover of the amplifier and remove the cover plate (18). Disconnect the 6-pole cable fixed to the cover plate from the plate. 2) Lead the 6-pole cable which was fixed to the cover plate outwards through the new opening created and connect it to the jack CN 5 of the module. 3) Insert the module PA-6FM at the position of the cover plate from the outside and screw it down. 4) Connect the signal devices for alarm triggering to the switch-over relay contacts (29). The marking on the module shows the contact position in case of defect and with the amplifier switched off. The current rating of the relay contacts is 1 A at 120 V~ max. or 24 V max. Verstärker anschließen Alle Anschlüsse sollten nur durch Fachpersonal und unbedingt bei ausgeschaltetem Verstärker vorgenommen werden! Hinweis: Alle grünen Anschlussleisten lassen sich zu besseren Handhabung beim Festschrauben der Anschlussleitungen von ihren Steckverbindungen abziehen. WARNUNG Das Ändern der Werkseinstellung darf nur durch Fachpersonal erfolgen. Vor dem Öffnen des Verstärkers den Netzstecker aus der Steckdose ziehen und falls eine Notstromeinheit angeschlossen ist, diese von den Anschlüssen BATTERY (21) trennen. Anderenfalls besteht die Gefahr eines elektrischen Schlages! Modification of the factory settings must only be made by skilled personnel. Prior to opening the amplifier, disconnect the mains plug from the socket, and if an emergency power supply unit is connected, disconnect it from the terminals BATTERY (21), otherwise you will risk an electric shock! Unscrew the housing cover of the amplifier. A wire jumper is provided on the PCB with the terminals SPEAKER OUTPUTS (9) and PRIORITY RELAY (10). Rearrange the jumper from contact A to contact B or C. Screw down the housing cover again. GB 6.2 Line signal inputs For announcements and music reproduction, a PA preamplifier is required (e. g. PA-1410MX from MONACOR) which allows to connect microphones and audio units (e. g. CD player, radio set). Connect the output of the preamplifier to the PGM INPUT (12). For emergency announcements or other important announcements, the PA-1960 is equipped with the PRIORITY INPUT (17). As soon as a priority switch or a relay connected to the terminals PRI CTL (15) is closed, the amplifier will switch over from the PGM INPUT to the PRIORITY INPUT and only the emergency announcement will be audible. The volume for emergency announcements is separately adjusted with the control LEVEL (16) on the rear side. 6.3 100 V input As an alternative to the line signal inputs (12) and (17), the 100 V SLAVE INPUT (11) can be used, e. g. to provide additional power for further speakers for an existing PA system. Connect the terminals SLAVE INPUT to the 100 V speaker cable of the PA system. Note: The controls PGM (1) and LEVEL (16) will not affect the volume of the signal applied to the SLAVE INPUT. Adjust the signal volume on the amplifier which will feed the 100 V signal to the PA-1960. 7 D 6.3 100-V-Eingang 6.6 Strom- und Notstromversorgung 7 A Alternativ zu den Line-Signaleingängen (12) und (17) kann der 100-V-Eingang SLAVE INPUT (11) verwendet werden, um z. B. bei einer bestehenden ELA-Anlage zusätzliche Leistung für weitere Lautsprecher zu erhalten. Die Klemmen SLAVE INPUT an die 100-VLautsprecherleitung der ELA-Anlage anschließen. Hinweis: Die Regler PGM (1) und LEVEL (16) beeinflussen nicht die Lautstärke des Signals, das am Eingang SLAVE INPUT anliegt. Die Signallautstärke an dem Verstärker einstellen, von dem das 100-V-Signal auf den PA-1960 gegeben wird. 1) Soll der Verstärker bei einem Netzausfall weiterarbeiten, an die Klemmen BATTERY (21) eine 24-V-Notstromeinheit (z. B. PA-24ESP von MONACOR) anschließen. Der Verstärker muss über vier Leitungen mit der Notstromeinheit verbunden werden (Abb. 7). Für jede Leitung ist bei einer Länge von bis zu 4 m ein Kabelquerschnitt von mindestens 5 mm2 erforderlich (z. B. Serie CPC-... von MONACOR). Hinweis: Liegt die 24-V-Spannung von der Notstromeinheit an den Anschlüssen BATTERY an, lässt sich der Verstärker mit dem Schalter POWER (6) nicht ausschalten. Er schaltet bei einem Netzausfall oder im ausgeschalteten Zustand automatisch auf die Notstromversorgung um. Ist der Verstärker ausgeschaltet und liegt die Netzspannung an, leuchtet die Anzeige STANDBY (7). CH 6.4 Vorrangrelais und 24-V-Ausgang Sobald ein mit den Klemmen PRI CTL (15) verbundener Vorrangschalter oder verbundenes Relais geschlossen wird, schaltet das interne Vorrangrelais um. Über dessen Anschlüsse PRIORITY RELAY (10) lassen sich weitere Vorgänge steuern, z. B. können ELA-Lautstärkeeinsteller mit Pflichtempfangsrelais auf maximale Lautstärke geschaltet werden. Wird zum Schalten der Pflichtempfangsrelais eine 24-V-Spannung benötigt, kann z. B. die Spannung von der Klemme +24 V (15) über die Relaiskontakte geleitet werden. Die 24-V-Spannung ist mit 500 mA belastbar und lässt sich auch für andere Anwendungen nutzen. BATTERY 24 V4 4 / 80 A 24V BATTERY EMERGENCY POWER SUPPLY UNIT FULL 80% 60% 40 % DC POWER Der Verstärker lässt sich über einen separaten Schalter ferngesteuert ein- und ausschalten. 1) Die Schraubanschlüsse POWER REMOTE (22) über eine zweipolige Leitung mit einem einpoligen Ein-/Ausschalter verbinden. 2) Zum ferngesteuerten Ein- und Ausschalten darf der Verstärker mit dem Hauptschalter POWER (6) nicht eingeschaltet sein. GB 6.4 Priority relay and 24 V output As soon as a priority switch or a relay connected to the terminals PRI CTL (15) is closed, the internal priority relay will switch over. Its terminals PRIORITY RELAY (10) allow to control further actions, e. g. switching PA attenuators with emergency priority relay to maximum volume. If a 24 V voltage is required for switching the emergency priority relays, e. g. the voltage from the terminal +24 V (15) may be routed via the relay contacts. The 24 V voltage has a current rating of 500 mA and can also be used for other applications. Notstromversorgung maximum cable length of 4 m, a minimum cable cross section of 5 mm2 is required (e. g. CPC-... series from MONACOR). Note: If the 24 V voltage from the emergency power supply unit is applied to the terminals BATTERY, it will not be possible to switch off the amplifier with the POWER switch (6). In case of mains failure or when switched off, the amplifier will automatically switch to the emergency power supply. BATTERY 24 V4 4 / 80 A 1) Connect the terminals POWER REMOTE (22) via a two-pole cable to a single-pole on/off switch. 4) Die Lautstärke für wichtige Durchsagen, die über den Eingang PRIORITY INPUT (17) auf den Verstärker gegeben werden, mit dem Regler LEVEL (16) auf der Geräterückseite einstellen. Dazu muss der Vorrangschalter (oder das Relais), der (das) mit den Klemmen PRI CTL (15) verbunden ist, geschlossen werden. Die Anzeige PRIORITY (2) leuchtet dann auf. 5) Für eine bessere Sprachverständlichkeit lässt sich mit dem DIP-Schalter Nr. 1 (13) ein Hochpass (400 Hz) einschalten (Position ON). Tieffrequente Störgeräusche werden damit unterdrückt. BATTERY EMERGENCY POWER SUPPLY UNIT FULL 80% 60% 40 % CHARGING AC DC POWER 7 Operation If the amplifier is switched off and the mains voltage is applied, the LED STANDBY (7) will light up. 1) To prevent switching noise, switch on all other units of the PA system first. 2) Prior to switching on the amplifier for the first time, set the controls PGM (1) and LEVEL (16) to zero so that there will be no excessive volume to start with. Then switch on the amplifier with the POWER switch (6) or a switch connected to the terminals POWER REMOTE (22). The POWER LED (3) will light up. 3) Set the control PGM (1) to the desired volume. When a certain volume is reached, the LED SIGNAL (4) will light up. In case of overload, the red LED CLIP (5) will light up. In this case, reduce the volume with the control. 24V 2) For remote-controlled activation/deactivation, the amplifier must not be switched on with the POWER switch (6). 8 3) Den Regler PGM (1) auf die gewünschte Lautstärke einstellen. Die Anzeige SIGNAL (4) leuchtet ab einer bestimmten Lautstärke auf. Bei Übersteuerung leuchtet die rote Anzeige CLIP (5). Dann die Lautstärke mit dem Regler reduzieren. Hinweis: Auch wenn der Verstärker ausgeschaltet ist, verbraucht er einen geringen Strom. Darum den Netzstecker aus der Steckdose ziehen und ggf. die Notstromeinheit abklemmen, wenn der Verstärker längere Zeit nicht betrieben wird. The amplifier allows remote-controlled activation/ deactivation via a separate switch. 1) For continued operation of the amplifier in case of mains failure, connect a 24 V emergency power supply unit (e. g. PA-24ESP from MONACOR) to the terminals BATTERY (21). The amplifier must be connected to the emergency power supply unit via four cables (fig. 7). For each cable, with a 2) Vor dem ersten Einschalten des Verstärkers die Regler PGM (1) und LEVEL (16) auf Null stellen, um zu Anfang eine zu hohe Lautstärke zu vermeiden. Dann den Verstärker mit dem Schalter POWER (6) oder mit einem an den Klemmen POWER REMOTE (22) angeschlossenen Schalter einschalten. Die Betriebsanzeige POWER (3) leuchtet. 2) Zuletzt den Netzstecker des Anschlusskabels (23) in eine Steckdose (230 V~/50 Hz) stecken. 6.5 Remote-controlled activation/deactivation 6.6 Power supply and emergency power supply 1) Um Einschaltgeräusche zu vermeiden, zuerst alle anderen Geräte der ELA-Anlage einschalten. CHARGING AC 6.5 Ferngesteuertes Ein- und Ausschalten Inbetriebnahme Emergency power supply 2) Finally connect the mains plug of the connection cable (23) to a socket (230 V~/50 Hz). Note: Even when the amplifier is switched off, it will have a low power consumption. Therefore, disconnect the mains plug from the socket and, if necessary, disconnect the emergency power supply unit if the amplifier is not operated for a longer period. 4) Adjust the volume for important announcements fed to the amplifier via the PRIORITY INPUT (17) with the control LEVEL (16) on the rear side of the unit. For this purpose, the priority switch (or the relay) connected to the terminals PRI CTL (15) must be closed. The LED PRIORITY (2) will light up. 5) To improve speech intelligibility, switch on a highpass filter (400 Hz) with DIP switch No. 1 (13) [position ON]. Thus, low-frequency interference will be suppressed. 8 Schutzschaltung Der Verstärker ist mit einer Schutzschaltung gegen Überhitzung, Überlastung und Kurzschluss an den Lautsprecherausgängen ausgestattet. Bei einer Überhitzung leuchtet die Anzeige PROTECT (5) auf. Bei Überlastung, einem Kurzschluss oder einem anderen Fehler leuchtet zusätzlich die Anzeige FAULT auf. In jedem Fall wird der Verstärker stumm geschaltet. Leuchtet eine dieser Anzeigen auf, den Verstärker ausschalten und den Fehler durch Fachpersonal beheben lassen. Ist das Fehlerüberwachungsmodul PA-6FD (Abb. 3) nicht eingesetzt, den DIP-Schalter Nr. 2 (13) auf der Verstärkerrückseite in die untere Position ON stellen, sonst spricht die Schutzschaltung an. 9 Technische Daten Ausgangsleistung: . . . . . . . 960 WRMS Klirrfaktor: . . . . . . . . . . . . . < 0,4 % Ausgangsspannung/ Ausgangsimpedanz: . . . . . 75 V/5,6 Ω 85 V/7,2 Ω 100 V/10 Ω Eingänge PGM + PRIORITY INPUT: 0,775 V/60 kΩ SLAVE INPUT: . . . . . . . . 100 V Frequenzbereich: . . . . . . . . 35 – 20 000 Hz, -3 dB Signal/Rauschabstand: . . . > 100 dB (A-bewertet) Hochpassfilter: . . . . . . . . . . 400 Hz, 6 dB/Oktave Stromversorgung Netzspannung: . . . . . . . . 230 V~/50 Hz Leistungsaufnahme: . . . . 2600 VA Notstromversorgung: . . . 24 V /80 A Einsatztemperatur: . . . . . . . 0 – 40 °C Abmessungen (B × H × T): 482 × 133 × 374 mm, 3 HE (Höheneinheiten) Gewicht: . . . . . . . . . . . . . . . 25 kg D A CH Änderungen vorbehalten. Diese Bedienungsanleitung ist urheberrechtlich für MONACOR ® INTERNATIONAL GmbH & Co. KG geschützt. Eine Reproduktion für eigene kommerzielle Zwecke – auch auszugsweise – ist untersagt. 8 Protective Circuit The amplifier is equipped with a protective circuit against overheating, overload, and short circuit at the speaker outputs. In case of overheating, the LED PROTECT (5) will light up; in case of overload, short circuit, or another defect, the LED FAULT will additionally light up. In any case, the amplifier will be muted. If one of these LEDs light up, switch off the amplifier and have the fault eliminated by skilled personnel. If the fault detection module PA-6FD (fig. 3) is not installed, set DIP switch No. 2 (13) on the rear side of the amplifier to the lower position ON, otherwise the protective circuit will respond. 9 Specifications GB Output power . . . . . . . . . . . 960 WRMS THD: . . . . . . . . . . . . . . . . . < 0.4 % Output voltage/ output impedance: . . . . . . . 75 V/5.6 Ω 85 V/7.2 Ω 100 V/10 Ω Inputs PGM + PRIORITY INPUT: . 0.775 V/60 kΩ SLAVE INPUT: . . . . . . . . 100 V Frequency range: . . . . . . . . 35 – 20 000 Hz, -3 dB S/N ratio: . . . . . . . . . . . . . . > 100 dB (A weighted) High-pass filter: . . . . . . . . . 400 Hz, 6 dB/octave Power supply Mains voltage: . . . . . . . . 230 V~/50 Hz Power consumption: . . . . 2600 VA Emergency power supply: 24 V /80 A Ambient temperature: . . . . 0 – 40 °C Dimensions (W × H × D): . . 482 × 133 × 374 mm, 3 RS (rack spaces) Weight: . . . . . . . . . . . . . . . . 25 kg Subject to technical modification. All rights reserved by MONACOR ® INTERNATIONAL GmbH & Co. KG. No part of this instruction manual may be reproduced in any form or by any means for any commercial use. 9 F B Ouvrez le présent livret page 3 de manière à visualiser les éléments et branchements. 1 Eléments et branchements 1.1 Face avant CH Table des matières 1 Eléments et branchements . . . . . . . . . . . . 10 1.1 Face avant . . . . . . . . . . . . . . . . . . . . . . . . . . 10 1.2 Face arrière . . . . . . . . . . . . . . . . . . . . . . . . . 10 1.3 Module de surveillance d’erreurs PA-6FD . . 11 1.4 Module de message d’erreurs PA-6FM . . . . 11 2 Conseils de sécurité et d’utilisation . . . . . 11 3 Possibilités d’utilisation . . . . . . . . . . . . . . 12 4 Insertion de modules complémentaires . . 12 4.1 Module de surveillance d’erreurs PA-6FD . . 12 4.1.1 Insertion et branchement . . . . . . . . . . . . . 12 4.1.2 Calibrage . . . . . . . . . . . . . . . . . . . . . . . . . . 12 4.2 Module de message d’erreurs PA-6FM . . . . 12 5 Positionnement de l’amplificateur . . . . . . 13 5.1 Installation en rack . . . . . . . . . . . . . . . . . . . . 13 6 Branchement de l’amplificateur . . . . . . . . 13 6.1 Haut-parleurs . . . . . . . . . . . . . . . . . . . . . . . . 13 1 Potentiomètre de réglage de volume PGM pour le signal à l’entrée PGM INPUT (12) 2 LED PRIORITY : brille lorsque l’amplificateur est commuté sur l’entrée PRIORITY INPUT (17) via la borne PRI CTL (15) 3 Témoin de fonctionnement POWER 4 LED SIGNAL : brille à partir d’un volume donné à la sortie SPEAKER OUTPUTS (9) 5 LEDs, témoins de dysfonctionnement FAULT brille si une erreur est survenue sur l’amplificateur PROTECT brille si l’amplificateur est en surchauffe ou si une erreur est survenue sur l’amplificateur CLIP brille si l’amplificateur est en surcharge [diminuez le potentiomètre de réglage de volume PGM (1) ou LEVEL (16)] 6 Interrupteur POWER marche/arrêt Remarque : Si une tension 24 V d’une unité d’alimentation de secours est présente aux bornes BATTERY (21), l’amplificateur ne peut pas être éteint. 6.3 Entrée Ligne 100 V . . . . . . . . . . . . . . . . . . . . 13 7 LED STANDBY : brille si l’amplificateur est relié au secteur 230 V, est éteint avec l’interrupteur secteur (6) et si aucune tension 24 V n’est présente aux bornes BATTERY (21) 6.4 Relais prioritaire et sortie 24 V . . . . . . . . . . . 13 8 Ouïes d’aspiration d’air pour le ventilateur 6.2 Entrées signaux ligne . . . . . . . . . . . . . . . . . . 13 6.6 Alimentation et alimentation de secours . . . . 14 I Mise en fonctionnement . . . . . . . . . . . . . . 14 8 Circuit de protection . . . . . . . . . . . . . . . . . 14 9 Caractéristiques techniques . . . . . . . . . . . 15 Vi preghiamo di aprire completamente la pagina 3. Così vedrete sempre gli elementi di comando e i collegamenti descritti. 1 Elementi di comando e collegamenti . . . . 10 1.1 Pannello frontale . . . . . . . . . . . . . . . . . . . . . . 10 1.2 Pannello posteriore . . . . . . . . . . . . . . . . . . . . 10 1.3 Modulo di controllo errori PA-6FD . . . . . . . . . 11 1.4 Modulo di segnalazione errori PA-6FM . . . . . 11 2 Avvertenze di sicurezza . . . . . . . . . . . . . . . 11 3 Possibilità d’impiego . . . . . . . . . . . . . . . . . 11 4 Montaggio di moduli supplementari . . . . . 12 4.1 Modulo di controllo errori PA-6FD . . . . . . . . . 12 4.1.1 Montaggio e collegamento . . . . . . . . . . . . 12 4.1.2 Taratura . . . . . . . . . . . . . . . . . . . . . . . . . . . 12 4.2 Modulo di segnalazione errori PA-6FM . . . . . 12 5 Collocamento dell’amplificatore . . . . . . . . 13 5.1 Montagio in un rack . . . . . . . . . . . . . . . . . . . 13 6 Collegare l’amplificatore . . . . . . . . . . . . . . 13 6.1 Altoparlanti . . . . . . . . . . . . . . . . . . . . . . . . . . 13 6.2 Ingressi per segnali line . . . . . . . . . . . . . . . . 13 6.3 Ingresso 100 V . . . . . . . . . . . . . . . . . . . . . . . 13 6.4 Relè prioritario e uscita 24 V . . . . . . . . . . . . . 13 6.5 Accensione e spegnimento telecomandato . 14 6.6 Alimentazione di corrente e d’emergenza . . 14 10 7 Messa in funzione . . . . . . . . . . . . . . . . . . . . 14 8 Circuito di protezione . . . . . . . . . . . . . . . . . 14 9 Dati tecnici . . . . . . . . . . . . . . . . . . . . . . . . . 15 9 Borniers haut-parleurs Important ! L’amplificateur est réglé en usine de telle sorte que les bornes COM et 3 puissent être utilisées pour des haut-parleurs 100 V. 10 Les contacts de relais commutent si l’amplificateur est commuté sur l’entrée PRIORITY INPUT (17) via la borne PRI CTL (15). 11 Entrée alternative SLAVE INPUT pour brancher à une ligne haut-parleurs 100 V 12 Entrée signal ligne symétrique PGM INPUT pour des annonces normales et la musique de fond. Sensibilité 0,775 V (0 dBu) à pleine puissance 13 Interrupteurs DIP Numéro 1 pour allumer et éteindre le filtre passe-haut 400 Hz (diminue les graves pour une meilleure netteté de la parole) Numéro 2 position inférieure ON (réglage d’usine) lorsque le module de surveillance d’erreurs PA-6FD (accessoire) n’est pas installé position supérieure OFF lorsque le module est installé Numéro 3 pour allumer et éteindre le signal test 20 kHz lorsque le module PA-6FD est installé – voir chapitre 4.1.1, point 6 15 Bornes OUT pour la sortie 24 V (la tension est toujours présente lorsque l’amplificateur est allumé ; capacité de charge 0,5 A) et bornes PRI CTL pour un interrupteur de priorité : si l’interrupteur de priorité est fermé, l’amplifica- 1 Elementi di comando e collegamenti 1.1 Pannello frontale Indice Remarque : Il est possible de retirer toutes les barrettes vertes de connexion de leur emplacement pour une meilleure manipulation lorsque vous vissez les câbles de branchement. 14 LED de contrôle : brille lorsque l’amplificateur fonctionne correctement 6.5 Marche/Arrêt à distance . . . . . . . . . . . . . . . . 14 7 1.2 Face arrière 1 Regolatore volume PGM per il segnale all’ingresso PGM INPUT (12) 2 LED PRIORITY: è acceso se l’amplificatore, per mezzo del contatto PRI CTL (15), è commutato sull’ingresso PRIORITY INPUT (17) 3 Spia di funzionamento POWER 4 LED SIGNAL: è acceso a partire da un determinato volume all’uscita SPEAKER OUTPUTS (9) 5 LED per indicazione dello stato FAULT è acceso in caso di difetto nell’amplificatore PROTECT è acceso in caso di surriscaldamento o di un difetto nell’amplificatore CLIP è acceso in caso di sovrapilotaggio dell’amplificatore [ridurre il regolatore volume PGM (1) oppure LEVEL (16)] 6 Interruttore on/off POWER N.B.: Se ai contatti BATTERY (21) è presente una tensione di 24 V proveniente da un gruppo di continuità, l’amplificatore non può essere spento. 7 LED STANDBY: è acceso se l’amplificatore è collegato con la rete 230 V, se è spento con l’interruttore di rete (6) e se non è presente nessuna tensione 24 V ai contatti BATTERY (21) 8 Bocche d’aspirazione d’aria per il ventilatore 1.2 Pannello posteriore N. B.: Per facilitare le operazioni nell’avvitare i collegamenti, tutte le morsettiere verdi possono essere staccate dai connettori. 9 Contatti per altoparlanti Importante! Dalla fabbrica, l’amplificatore è regolato in modo che per altoparlanti 100 V si devono impiegare i morsetti COM e 3. 10 I contatti con relè reagiscono quando l’amplificatore, tramite il contatto PRI CTL (15), viene commutato sull’ingresso PRIORITY INPUT (17) 11 Ingresso alternativo SLAVE INPUT per il collegamento con una linea 100 V per altoparlanti 12 Ingresso simmetrico di un segnale line PGM INPUT per avvisi normali e musica di sottofondo; sensibilità per pilotaggio massimo 0,775 V (0 dBu) 13 DIP-switch n. 1 per attivare e disattivare il passa-alto 400 Hz (riduce i bassi per migliorare la comprensione della lingua parlata) n. 2 posizione inferiore ON (come dalla fabbrica), se non è montato il modulo controllo errori PA-6FD (accessorio) posizione superiore OFF, se il modulo è montato n. 3 per attivare e disattivare il tono di test di 20 kHz, se il modulo PA-6FD è montato – vedi cap. 4.1.1, passo 6 14 LED di controllo: è acceso se l’amplificatore lavora correttamente 15 Contatto OUT per l’uscita 24 V (la tensione è sempre presente con l’amplificatore acceso; potenza massima 0,5 A) e contatto PRI CTL per un commutatore prioritario: con il commutatore prioritario chiuso, l’amplificatore dall’ingresso PGM INPUT (12) passa all’ingresso PRIORITY INPUT (17) 16 Regolatore livello LEVEL per il segnale all’ingresso PRIORITY INPUT (17) teur commute de l’entrée PGM INPUT (12) sur l’entrée PRIORITY INPUT (17) 16 Potentiomètre de réglage de volume LEVEL pour le signal présent à l’entrée PRIORITY INPUT (17) 17 Entrée de signal symétrique ligne PRIORITY INPUT pour des annonces importantes – voir positions 15 et 16 ; sensibilité 0,775 V (0 dBu) à pleine puissance. 18 Cache, à retirer lorsque le module de message d’erreurs PA-6FM est installé 19 Cache, à retirer lorsque le module de surveillance d’erreurs PA-6FD est installé 20 Ouïes d’aération 21 Bornes BATTERY pour une unité d’alimentation de secours 24 V 22 Bornes POWER REMOTE pour un interrupteur externe pour marche/arrêt à distance Remarque : Pour une commande à distance, l’amplificateur ne doit pas être allumé avec l’interrupteur POWER (6). 23 Cordon secteur à relier à une prise secteur 230 V~/50 Hz 1.3 Module de surveillance d’erreurs PA-6FD Le module est disponible comme accessoire et n’est pas livré avec l’amplificateur. Il se positionne à la place du cache (19). 24 Sortie relais pour brancher un avertisseur 25 Branchements COM et HOT : à relier aux borniers SPEAKER OUTPUTS (9) : HOT à la borne 3 et COM à COM 26 Points de mesure pour régler la sensibilité de réponse 27 Réglage pour le niveau du signal test 20 kHz 28 Réglage pour la sensibilité de réponse 17 Ingresso simmetrico di un segnale line PRIORITY INPUT per avvisi importanti – vedi anche le posizioni 15 e 16; sensibilità per pilotaggio massimo 0,775 V (0 dBu) 18 Mascherina, va tolta se si monta il modulo segnalazione errori PA-6FM 19 Mascherina, va tolta se si monta il modulo controllo errori PA-6FD 20 Aperture uscita aria 21 Contatti BATTERY per un gruppo di continuità 24 V 22 Contatti POWER REMOTE per un interruttore esterno per accensione e spegnimento telecomandato N. B.: Per il telecomando, l’amplificatore non deve essere acceso con l’interruttore POWER (6). 23 Cavo per il collegamento con una presa di rete (230 V~/50 Hz) 1.3 Modulo di controllo errori PA-6FD Il modulo di controllo errori è disponibile come accessorio e non è in dotazione con l’amplificatore. Viene inserito al posto della mascherina (19). 24 Uscita relè per il collegamento di un trasduttore 25 Contatti COM e HOT; da collegare con i contatti SPEAKER OUTPUTS (9): HOT con morsetto 3 e COM con COM 26 Punti di misura per impostare la sensibilità di inserzione 27 Regolatore per il livello del tono di test 20 kHz 28 Regolatore per la sensibilità di inserzione 1.4 Modulo di segnalazione errori PA-6FM Il modulo di segnalazione errori è disponibile come accessorio e non è in dotazione con l’amplificatore. Viene inserito al posto della mascherina (18). 29 Uscita relè per il collegamento di trasduttori 1.4 Module de message d’erreurs PA-6FM Le module est disponible comme accessoire et n’est pas livré avec l’amplificateur. Il se positionne à la place du cache (18). 29 Sorties relais pour brancher des avertisseurs Le relais AC répond lorsqu’aucune tension secteur n’est présente, lorsque le fusible secteur interne a fondu ou lorsque l’amplificateur n’a pas été allumé avec l’interrupteur (6). Le relais DC répond lorsque les fusibles internes pour l’alimentation de secours ont fondu ou lorsqu’aucune tension d’une unité d’alimentation de secours n’est présente aux bornes BATTERY (21). Le relais FAN répond lorsque le ventilateur interne est défectueux ou n’est pas branché. G G G G 2 Conseils de sécurité et d’utilisation L’appareil répond à toutes les directives nécessaires de l’Union européenne et porte donc le symbole . AVERTISSEMENT L’appareil est alimenté par une tension dangereuse en 230 V~. Ne touchez jamais l’intérieur de l’appareil et ne faites rien tomber dans les ouïes de ventilation car, en cas de mauvaise manipulation, vous pouvez subir une décharge électrique. Pendant le fonctionnement, une tension dangereuse jusqu’à 100 V est présente aux bornes SPEAKER OUTPUTS (9) et SLAVE INPUT (11). Les branchements ne doivent être effectués ou modifiés que si l’installation PA est éteinte. G G G vée et de la chaleur (température ambiante admissible 0 – 40 °C). En aucun cas, vous ne devez pas poser d’objet contenant du liquide ou un verre sur l’appareil. La chaleur dégagée par l’appareil doit être évacuée par une circulation d’air correcte. N’obstruez pas les ouïes de ventilation du boîtier. Ne faites pas fonctionner l’appareil et débranchez le cordon secteur immédiatement dans les cas suivants : 1. l’appareil ou le cordon secteur présentent des dommages visibles. 2. après une chute ou accident similaire, vous avez un doute sur l’état de l’appareil. 3. des dysfonctionnements apparaissent. Dans tous les cas, les dommages doivent être réparés par un technicien spécialisé. Tout cordon secteur endommagé ne doit être remplacé que par un personnel qualifié. Ne débranchez jamais l’appareil en tirant sur le cordon secteur ; retirez toujours le cordon secteur en tirant la fiche. Pour le nettoyage, utilisez un chiffon sec et doux, en aucun cas de produits chimiques ou d’eau. Nous déclinons toute responsabilité en cas de dommages corporels ou matériels résultants si l’appareil est utilisé dans un but autre que celui pour lequel il a été conçu, s’il n’est pas correctement branché, utilisé ou réparé par une personne habilitée ; en outre, la garantie deviendrait caduque. F B Lorsque l’appareil est définitivement retiré du service, vous devez le déposer dans une usine de recyclage de proximité pour contribuer à son élimination non polluante. Respectez scrupuleusement les points suivants : G L’appareil n’est conçu que pour une utilisation en intérieur. Protégez-le des éclaboussures, de tout type de projections d’eau, d’une humidité d’air éle- Il relè AC reagisce se non è presente nessuna tensione di rete, se il fusibile interno di rete è fuso o se l’amplificatore non è acceso con l’interruttore di rete (6). Il relè DC reagisce, se i fusibili interni per il gruppo di continuità sono fusi o se ai contatti BATTERY (21) non è presente nessuna tensione proveniente da una gruppo di continuità. Il relè FAN reagisce se il ventilatore interno è difettoso o non collegato. G G G 2 Avvertenze di sicurezza L’apparecchio è conforme a tutte le direttive richieste dell’UE e pertanto porta la sigla . AVVERTIMENTO L’apparecchio funziona con pericolosa tensione di rete (230 V~). Non intervenire mai al suo interno e non inserire niente nelle fessure di aerazione! Esiste il pericolo di una scarica elettrica. Durante il funzionamento, ai contatti SPEAKER OUTPUTS (9) e SLAVE INPUT (11) è presente una tensione fino a 100 V, pericolosa in caso di contatto. Eseguire o modificare tutti i collegamento solo con l’impianto PA spento. Si devono osservare assolutamente anche i seguenti punti: G L’apparecchio è adatto solo per l’uso all’interno di locali. Proteggerlo dall’acqua gocciolante e dagli spruzzi d’acqua, da alta umidità dell’aria e dal calore (temperatura d’impiego ammessa fra 0 e 40 °C). G Non depositare sull’apparecchio dei contenitori riempiti di liquidi, p. es. bicchieri. G Dev’essere garantita la libera circolazione dell’aria per dissipare il calore che viene prodotto all’interno dell’apparecchio. Non coprire in nessun modo le fessure d’aerazione. G G Non mettere in funzione l’apparecchio e staccare subito la spina rete se: 1. l’apparecchio o il cavo rete presentano dei danni visibili; 2. dopo una caduta o dopo eventi simili sussiste il sospetto di un difetto; 3. l’apparecchio non funziona correttamente. Per la riparazione rivolgersi sempre ad un’officina competente. Un cavo rete danneggiato deve essere sostituito solo da un’officina competente. Staccare il cavo rete afferrando la spina, senza tirare il cavo. Per la pulizia usare solo un panno morbido, asciutto; non impiegare prodotti chimici o acqua. Nel caso d’uso improprio, di collegamenti sbagliati, d’impiego scorretto o di riparazione non a regola d’arte dell’apparecchio, non si assume nessuna responsabilità per eventuali danni consequenziali a persone o a cose e non si assume nessuna garanzia per l’apparecchio. I Se si desidera eliminare l’apparecchio definitivamente, consegnarlo per lo smaltimento ad un’istituzione locale per il riciclaggio. 3 Possibilità d’impiego L’amplificatore PA-1960 con potenza efficace di 960 W è stato realizzato specialmente per l’uso in impianti PA. Per la musica di sottofondo e per avvisi normali è presente un ingresso con livello line. Per gli avvisi d’emergenza o per altri avvisi importanti è presente un secondo ingresso line. Con un interruttore separato o con un relè esterno si può attivare il secondo ingresso. Se è richiesta maggiore potenza per ulteriori altoparlanti, il PA-1960 può essere integrato molto semplicemente in un impianto PA esistente. A tale scopo dispone di un ingresso 100 V. 11 F 3 B L’amplificateur PA-1960, avec une puissance de sortie RMS de 960 W est spécialement conçu pour une utilisation dans des installations Public Adress. Une entrée niveau ligne est prévue pour la musique de fond et les annonces normales. En cas d’annonces d’urgence ou d’autres annonces importantes, une seconde entrée niveau ligne est prévue. Avec un interrupteur séparé ou un relais externe, on peut commuter sur la seconde entrée. Le PA-1960 peut facilement être intégré dans une installation Public Adress existante s’il faut plus de puissance pour d’autres haut-parleurs. Il est ainsi équipé d’une entrée 100 V. CH 4 Possibilités d’utilisation Insertion de modules complémentaires L’amplificateur peut être complété par les modules supplémentaires suivants de MONACOR : PA-6FD Module de surveillance d’erreurs PA-6FM Module de message d’erreurs AVERTISSEMENT Seul un personnel qualifié peut installer des modules supplémentaires. Avant d’ouvrir l’amplificateur, débranchezle du secteur sinon il y a risque de décharge électrique! Si une alimentation de secours est reliée, débranchez-la des bornes BATTERY (21) pour que l’amplificateur soit dans tous les cas hors fonctionnement. 4.1 Module de surveillance d’erreurs PA-6FD Le module de surveillance d’erreurs PA-6FD disponible en option (schémas 3 et 4) est spécialement conçu pour cet amplificateur. Il produit un signal test sinusoïdal de 20 kHz qui est appliqué à l’amplificateur. Si le signal test n’est pas présent à la borne SPEAKER OUTPUTS (9) à cause d’un problème sur l’amplificateur, les LEDs FAULT et PROTECT (5) I 4 Montaggio di moduli supplementari L’amplificatore può essere ampliato con i seguenti moduli supplementari di MONACOR: PA-6FD modulo di controllo errori PA-6FM modulo di segnalazione errori AVVERTIMENTO Il montaggio di moduli supplementari deve essere fatto solo da personale specializzato. Prima di aprire l’amplificatore staccare la spina dalla presa di rete, altrimenti esiste il pericolo di una scarica elettrica! Se è collegato un gruppo di continuità, staccarlo dai contatti BATTERY (21) per mettere l’amplificatore in ogni caso fuori servizio. 4.1 Modulo di controllo errori PA-6FD Il modulo di controllo errori PA-6FD (figg. 3 e 4), disponibile come accessorio, è stato realizzato specialmente per questo amplificatore. Genera un tono sinusoidale di 20 kHz che viene portato sul finale. Se in seguito ad un difetto, il tono di test è assente al contatto SPEAKER OUTPUTS (9), si accendono le spie FAULT e PROTECT (5). Inoltre si spegne il LED verde (14) sul retro dell’amplificatore. Tramite un relè si può attivare in più un trasduttore. 4.1.1 Montaggio e collegamento 1) Svitare il coperchio dell’amplificatore e togliere la mascherina (19). Staccare dalla mascherina il cavo a 4 poli fissato sulla stessa. 2) Inserire il jumper SW 1 del modulo di controllo in posizione ON. 3) Far passare il cavetto a 4 poli, che era fissato sulla mascherina, verso l’esterno attraverso la nuova apertura e inserirlo nella presa CN 601 del modulo. Il pin esterno della presa deve rimanere libero, vedi fig. 4. 12 brillent. De plus, la LED verte (14) sur la face arrière de l’amplificateur s’éteint. Via un relais, un avertisseur peut en plus être activé. 4.1.1 Insertion et branchement 1) Dévissez le couvercle du boîtier de l’amplificateur et retirez le cache (19). Déconnectez de la plaque, le câble 4 pôles fixé au cache. 2) Mettez le cavalier SW 1 sur le module de surveillance sur la position ON. 3) Faites passer le câble 4 pôles qui était auparavant fixé au cache vers l’extérieur via la nouvelle ouverture créée et connectez-le à la prise CN 601 du module. Le pin extérieur de la prise doit rester libre, voir schéma 4. 4) Insérez le module PA-6FD à la place du cache depuis l’extérieur et vissez-le. 5) Reliez le contact COM de la barrette de connexion SPEAKER OUTPUTS (9) sur l’amplificateur au contact COM de la borne Line In (25) sur le module et le contact 3 de SPEAKER OUTPUTS au contact HOT de Line In. 6) Mettez l’interrupteur DIP numéro 2 (13) sur la face arrière de l’amplificateur sur la position supérieure OFF et l’interrupteur DIP numéro 3 sur la position inférieure ON. Si cependant l’entrée SLAVE INPUT (11) est utilisée, et si un signal test 20 kHz d’un autre amplificateur est déjà présent, mettez l’interrupteur DIP numéro 3 sur la position supérieure OFF sinon les deux signaux test se chevauchent! 7) Si le module détecte une erreur, les LEDs FAULT et PROTECT (5) brillent et les contacts de relais (24) se ferment. Un avertisseur pour déclencher une alarme peut être relié aux contacts. La puissance des contacts de relais est de 1 A pour 120 V~ max. ou 24 V max. Remarque : Les contacts se ferment également lorsque l’amplificateur est éteint. 4) Inserire il modulo PA-6FD al posto della mascherina e avvitarlo. 5) Collegare il contatto COM della morsettiera SPEAKER OUTPUTS (9) sull’amplificatore con il contatto COM della morsettiera Line In (25) sul modulo, e il contatto 3 di SPEAKER OUTPUTS con il contatto HOT di Line In. 6) Portare il dip-switch n. 2 (13) sul retro dell’amplificatore in posizione superiore OFF e il dip-switch n. 3 in posizione inferiore ON. Tuttavia, se si usa l’ingresso SLAVE INPUT (11) e se è presente un tono di test di 20 kHz proveniente da un altro amplificatore, portare il dipswitch n. 3 in posizione superiore OFF, perché altrimenti i due toni di test si sovrappongono! 4.1.2 Calibrage 1) Allumez l’amplificateur et tournez les réglages de volume PGM (1) et LEVEL (16) sur zéro pour que uniquement le signal test 20 kHz soit présent aux sorties haut-parleurs. Si l’entrée SLAVE INPUT (11) est utilisée, aucun signal d’une annonce ou signal de musique ne doit être présent à cette entrée pendant le calibrage, seul un signal de test 20 kHz d’un autre amplificateur si besoin. Si un signal test 20 kHz est présent, sautez le point suivant et poursuivez avec le point 3. 2) Mesurez la tension du signal test 20 kHz aux contacts COM et 3 de la barrette SPEAKER OUTPUTS (9) et avec le réglage trimmer OSC Level (27), réglez-la sur 2 V~. 3) Contrôlez la tension du signal test 20 kHz aux points de mesure “+ -” (26) du module. Réglez 2 V~ avec le réglage trimmer Sensitivity (28). 4) Après le calibrage, tournez les réglages PGM (1) et LEVEL (16) de nouveau sur le volume souhaité. 4.2 Module de message d’erreurs PA-6FM Le module de message d’erreurs PA-6FM disponible en option (schémas 5 et 6) est spécialement conçu pour cet amplificateur. Via les trois sorties relais (29), des avertisseurs peuvent être activés en cas d’erreurs suivantes : Les contacts de relais AC commutent si aucune tension secteur n’est présente, si le fusible secteur interne a fondu ou si l’amplificateur n’a pas été allumé avec l’interrupteur (6). Les contacts de relais DC commutent si les fusibles internes pour l’alimentation de secours ont fondu ou si aucune tension d’une unité d’alimentation de secours n’est présente aux bornes BATTERY (21). Les contacts de relais FAN commutent si le ventilateur interne est défectueux ou n’est pas branché. Remarque : Tous les contacts de relais commutent également lorsque l’amplificateur est éteint. 3) Ai punti di misura “+ -” (26) del modulo controllare la tensione del tono test di 20 kHz. Impostarla a 2 V~ con il regolatore trim Sensitivity (28). 4) Dopo la taratura rimettere i regolatori PGM (1) e LEVEL (16) sul volume desiderato. 4.2 Modulo di segnalazione errori PA-6FM Il modulo di segnalazione errori PA-6FM (figg. 5 e 6), disponibile come accessorio, è stato realizzato specialmente per questo amplificatore. Tramite le tre uscite con relè (29) si possono attivare dei trasduttori se si presentano i seguenti errori: i contatti relè AC reagiscono se non è presente nessuna tensione di rete, se il fusibile interno di rete è fuso o se l’amplificatore non è acceso con l’interruttore di rete (6); 7) Se il modulo riconosce un errore si accendono i LED FAULT e PROTECT (5) e si chiudono i contatti relè (24). A questi contatti, per dare l’allarme, si può collegare un trasduttore. La potenza massima dei contatti relè è 1 A con max. 120 V~ o max. 24 V . i contatti DC reagiscono, se i fusibili interni per il gruppo di continuità sono fusi o se ai contatti BATTERY (21) non è presente nessuna tensione proveniente da una gruppo di continuità; N. B.: I contatti relè chiudono anche se l’amplificatore viene spento. i contatti relè FAN reagiscono se il ventilatore interno è difettoso o non collegato. 4.1.2 Taratura 1) Accendere l’amplificatore e girare i regolatori del volume PGM (1) e LEVEL (16) sullo zero affinché solo il tono test di 20 kHz sia presente alle uscite per gli altoparlanti. Se si usa l’ingresso SLAVE INPUT (11), durante la taratura a questo ingresso non deve essere presente nessun segnale di avviso o di musica, ma eventualmente solo un tono test di 20 kHz da un altro amplificatore. Se è presente un tono test di 20 kHz, saltare il punto successivo e proseguire con il punto 3. N. B.: Tutti i contatti relè reagiscono anche quando l’amplificatore viene spento. 2) Ai contatti COM e 3 della morsettiera SPEAKER OUTPUTS (9) misurare la tensione del tono test di 20 kHz e impostarla a 2 V~ per mezzo del regolatore trim OSC Level (27). 1) Svitare il coperchio dell’amplificatore e togliere la mascherina (18). Staccare dalla mascherina il cavo a 6 poli fissato sulla stessa. 2) Far passare il cavetto a 6 poli, che era fissato sulla mascherina, verso l’esterno attraverso la nuova apertura e inserirlo nella presa CN 5 del modulo. 3) Inserire il modulo PA-6FM dall’esterno, al posto della mascherina, e avvitarlo. 4) Collegare i trasduttori per allarmi con i contatti relè (29). La stampa sul modulo indica la posizione dei contatti in caso di errore e di l’amplificatore spento. La potenza dei contatti relè è 1 A con max. 120 V~ o max. 24 V . 1) Dévissez le couvercle du boîtier de l’amplificateur et retirez le cache (18). Déconnectez de la plaque le câble 6 pôles fixé au cache. 2) Faites passer le câble 6 pôles qui était auparavant fixé au cache vers l’extérieur via la nouvelle ouverture créée et branchez-le à la prise CN 5 du module. 3) Placez le module PA-6FM à la place du cache depuis l’extérieur et vissez-le. 4) Reliez les avertisseurs d’alarme aux contacts de commutation de relais (29). L’inscription sur le module indique la configuration de contact en cas d’erreur et lorsque l’amplificateur est éteint. La puissance des contacts de relais est de 1 A pour 120 V~ max. ou 24 V max. 5 Positionnement de l’amplificateur L’amplificateur est prévu pour une installation en rack d’une largeur de 482 mm (19"), il peut également être directement posé sur une table. Dans tous les cas, la circulation de l’air par toutes les ouïes de ventilation doit pouvoir s’effectuer correctement afin de garantir une ventilation suffisante de l’amplificateur. 5.1 Installation en rack Pour un montage en rack, 3 unités (3 unités = 133 mm) sont nécessaires. Afin que le rack ne se renverse pas, l’amplificateur doit être inséré dans la partie inférieure du rack. La plaque avant seule ne suffit pas pour une fixation sûre. Des rails latéraux ou une plaque de base doivent en plus maintenir l’appareil. L’air chaud dégagé par l’amplificateur doit pouvoir être évacué du rack. Sinon, il y a accumulation de chaleur dans le rack ce qui peut endommager non seulement l’amplificateur mais aussi les autres appareils placés dans le rack. Insérez une unité de ventilation dans le rack en cas de dissipation insuffisante de chaleur. 5 Collocamento dell’amplificatore L’amplificatore è previsto per il montaggio in un rack della larghezza di 482 mm (19"), ma può essere collocato anche su un tavolo. In ogni caso dev’essere possibile che l’aria circoli liberamente attraverso tutte le fessure di aerazione per garantire un raffreddamento sufficiente del finale. 5.1 Montaggio in un rack Per il montaggio in un rack occorrono 3 RS (3 unità di altezza = 133 mm). Conviene sistemare l’amplificatore nella parte inferiore del rack per non compromettere l’equilibrio. Il pannello frontale non basta per il fissaggio sicuro. L’apparecchio deve essere supportato da guide laterali o da un piano d’appoggio supplementare. L’aria riscaldata dall’amplificatore deve poter uscire dal rack. Altrimenti nel rack si presenta un accumulo di calore con possibili danni non solo all’amplificatore ma anche alle altre apparecchiature sistemate nel rack. Se il deflusso dell’aria calda non è sufficiente, conviene installare un ventilatore nel rack. 6 Collegare l’amplificatore 6 Branchement de l’amplificateur Seul un personnel qualifié peut effectuer les branchements et uniquement lorsque l’amplificateur est éteint! Remarque : Il est possible de retirer toutes les barrettes vertes de connexion de leur emplacement pour une meilleure manipulation lorsque vous vissez les câbles de branchement. 6.1 Haut-parleurs Reliez les haut-parleurs Public Adress à la barrette SPEAKER OUTPUTS (9) : les pôles moins au contact COM et les pôles plus au contact 1, 2 ou 3, en fonction de la tension nominale des haut-parleurs. Il ne faut pas dépasser une puissance totale de 960 WRMS par les haut-parleurs sinon l’amplificateur sera endommagé. Important ! L’amplificateur est réglé en usine de telle sorte que les bornes COM et 3 puissent être utilisées pour des haut-parleurs 100 V. Le tableau suivant indique toutes les tensions nominales possibles : Cavalier sur position F B CH 6.2 Entrées signaux ligne Pour des annonces et une restitution de musique, un préamplificateur PA (par exemple PA-1410MX de MONACOR) qui permet de brancher des microphones et appareils audio (par exemple lecteur CD, appareil de radio) est nécessaire. Reliez la sortie du préamplificateur à l’entrée PGM INPUT (12). Pour des annonces d’urgence, ou d’autres annonces importantes, le PA-1960 est doté de l’entrée PRIORITY INPUT (17). Dès qu’un interrupteur de priorité ou un relais, relié aux bornes PRI CTL (15) se ferme, l’amplificateur commute de l’entrée PGM INPUT sur l‘entrée PRIORITY INPUT et seule l’annonce d’urgence est audible. Le volume pour les annonces d’urgence se règle séparément avec le réglage LEVEL (16) sur la face arrière. 6.3 Entrée Ligne 100 V Borne 1 2 3 A réglage usine 75 V 85 V 100 V B 60 V 70 V 85 V C 50 V 60 V 75 V AVERTISSEMENT Seul un personnel qualifié peut modifier le réglage d’usine. Avant d’ouvrir l’amplificateur, débranchez-le du secteur ou si une alimentation de secours est reliée, débranchez-la des bornes BATTERY (21) sinon il y a risque de décharge électrique! rare la potenza globale di 960 WRMS; altrimenti l’amplificatore subisce dei danni. Importante! Dalla fabbrica, l’amplificatore è regolato in modo che per altoparlanti 100 V si devono impiegare i morsetti COM e 3. La seguente tabella indica tutte le tensioni nominali possibili: Jumper in posizione Dévissez le couvercle du boîtier de l’amplificateur. Un cavalier se trouve sur la platine avec les connexions SPEAKER OUTPUTS (9) et PRIORITY RELAY (10). Déplacez le cavalier du contact A sur le contact B ou C. Revissez ensuite le couvercle. A la place des entrées de signaux ligne (12) et (17), on peut utiliser l’entrée 100 V SLAVE INPUT (11) pour par exemple obtenir plus de puissance pour d’autres haut-parleurs dans une installation PA existante. Reliez les bornes SLAVE INPUT à la ligne haut-parleurs 100 V de l’installation PA. Remarque : Les réglages PGM (1) et LEVEL (16) n’influencent pas le volume du signal présent à l’entrée SLAVE INPUT. Réglez le volume du signal sur l’amplificateur duquel le signal 100 V est appliqué au PA-1960. Per avvisi d’emergenza o per altri avvisi importanti, il PA-1960 dispone dell’ingresso PRIORITY INPUT (17). Non appena si chiude un interruttore prioritario o un relè collegato con i morsetti PRI CTL (15), l’amplificatore passa dall’ingresso PGM INPUT all’ingresso PRIORITY INPUT e si sente solo l’avviso d’emergenza. Il volume per gli avvisi d’emergenza viene impostato separatamente con il regolatore LEVEL (16) sul retro. I Morsetto 1 2 3 A Impostazione dalla fabbrica 75 V 85 V 100 V B 60 V 70 V 85 V C 50 V 60 V 75 V AVVERTIMENTO La modifica delle impostazioni dalla fabbrica deve essere fatta solo da parte di personale qualificato. Prima di aprire l’amplificatore staccare la spina dalla presa di rete e, se è collegato un gruppo di continuità, staccarlo dai contatti BATTERY (21), altrimenti esiste il pericolo di una scarica elettrica! Tutti i collegamenti devono essere fatti solo da una persona qualificata e assolutamente con l’amplificatore spento! N. B.: Per facilitare le operazioni nell’avvitare i collegamenti, tutte le morsettiere verdi possono essere staccate dai connettori. Svitare il coperchio dell’amplificatore. Sulla scheda con i contatti SPEAKER OUTPUTS (9) e PRIORITY RELAY (10) si trova un ponticello a filo. Spostare il ponticello dal contatto A al contatto B o C. Riavvitare il coperchio. 6.1 Altoparlanti 6.2 Ingressi per segnali line Collegare gli altoparlanti PA con la morsettiera SPEAKER OUTPUTS (9): i poli negativi con il contatto COM e i poli positivi con il contatto 1, 2 o 3, cioè con quello che corrisponde alla tensione nominale dell’altoparlante. Gli altoparlanti non devono supe- Per avvisi e riproduzione di musica è richiesto un preamplificatore PA (p. es. PA-1410MX di MONACOR), al quale si possono collegare microfoni e apparecchi audio (p. es. lettori CD, radio). Collegare l’uscita del preamplificatore con l’ingresso PGM INPUT (12). 6.3 Ingresso 100 V In alternativa agli ingressi line (12) e (17), si può usare l’ingresso 100 V SLAVE INPUT (11), per esempio per avere, in un impianto PA esistente, una potenza supplementare per ulteriori altoparlanti. Collegare i morsetti SLAVE INPUT con la linea per altoparlanti 100 V dell’impianto PA. N. B: I regolatori PGM (1) e LEVEL (16) non regolano il volume del segnale presente all’ingresso SLAVE INPUT. Impostare il volume del segnale sull’amplificatore da cui parte il segnale 100 V per il PA-1960. 6.4 Relè prioritario e uscita 24 V Non appena si chiude un interruttore prioritario o un relè collegato con i morsetti PRI CTL (15), il relè prioritario interno commuta. Tramite i suoi contatti PRIORITY RELAY (10) si possono comandare ulteriori azioni, p. es. gli attenuatori per altoparlanti PA con relè prioritari d’emergenza possono essere messi sul volume massimo. Se per la commutazione dei relè prioritari d’emergenza è richiesta una tensione di 24 V, è possibile portare la tensione dal morsetto +24 V (15) sui contatti dei relè. La tensione 24 V supporta una potenza fino a 500 mA e può essere sfruttata anche per altre applicazioni. 13 F B CH teur commute automatiquement sur alimentation de secours. 6.4 Relais prioritaire et sortie 24 V Dès qu’un interrupteur prioritaire ou un relais connecté aux bornes PRI CTL (15) est fermé, le relais prioritaire interne commute. Via ses connexions PRIORITY RELAY (10), on peut gérer d’autres actions, par exemple, on peut commuter des réglages de volume PA avec relais prioritaires d’urgence sur un volume maximal. Si une tension 24 V est nécessaire pour commuter les relais prioritaires d’urgence, la tension de la borne +24 V (15) par exemple peut être dirigée via les contacts de relais. La tension 24 V a une puissance de 500 mA et peut également être utilisée pour d‘autres applications. BATTERY 24 V4 4 / 80 A 24V BATTERY EMERGENCY POWER SUPPLY UNIT FULL 80% 60% 40 % CHARGING AC DC POWER 6.5 Marche/Arrêt à distance L’amplificateur peut être allumé ou éteint à distance via un interrupteur distinct. 1) Reliez les bornes POWER REMOTE (22) via un câble 2 pôles à un interrupteur marche/arrêt 1 pôle. 2) Pour une marche/arrêt à distance, l’amplificateur ne doit pas être allumé avec l’interrupteur principal POWER (6). I Alimentation de secours 2) Reliez enfin la fiche secteur du cordon (23) à une prise secteur 230 V~/50 Hz. Remarque : Même éteint, l’amplificateur a une faible consommation. S’il ne doit pas être utilisé pendant une période prolongée, débranchez-le du secteur ou déconnectez l’unité d’alimentation de secours, si besoin. 6.6 Alimentation et alimentation de secours 7 1) Si l’amplificateur doit continuer à fonctionner en cas de coupure de courant, reliez aux bornes BATTERY (21) une unité d’alimentation de secours 24 V (p. ex. PA-24ESP de MONACOR). L’amplificateur doit être relié via quatre câbles à l’unité d’alimentation de secours (schéma 7). Pour chaque câble d’une longueur jusqu’à 4 m, la section minimale nécessaire du câble est de 5 mm2 (p. ex. la série CPC-... de MONACOR). Remarque : Si la tension 24 V de l’unité d’alimentation de secours est présente aux bornes BATTERY, l’amplificateur ne peut pas être éteint avec l’interrupteur POWER (6). En cas de coupure de secteur ou s’il est éteint, l’amplifica- Si l’amplificateur est éteint et si la tension secteur est appliquée à l’appareil, la LED STANDBY (7) brille. 6.5 Accensione e spegnimento telecomandato 2) Alle fine inserire la spina del cavo rete (23) in una presa di rete (230 V~/50 Hz). È possibile l’accensione e lo spegnimento dell’amplificatore tramite un interruttore separato. 1) Collegare i contatti a vite POWER REMOTE (22) con un interruttore on/off ad 1 polo, servendosi di un cavo a 2 poli. 2) Per l’accensione e lo spegnimento telecomandato, l’amplificatore non deve essere stato acceso con l’interruttore principale POWER (6). 1) Se l’amplificatore deve continuare a funzionare anche dopo la caduta della rete, occorre collegare i contatti BATTERY (21) con un gruppo di continuità di 24 V (p. es. PA-24ESP di MONACOR). L’amplificatore deve essere collegato con il gruppo di continuità tramite 4 conduttori (fig. 7). Per ogni conduttore con una lunghezza fino a 4 m è richiesta una sezione del conduttore non inferiore a di 5 mm2 (p. es. serie CPC-... di MONACOR). N. B.: Se ai contatti BATTERY è presente la tensione di 24 V proveniente dal gruppo di continuità, l’amplificatore non può essere spento con l’interruttore POWER (6). In caso di caduta di rete o se spento, passa automaticamente all’alimentazione d’emergenza. BATTERY 24 V4 4 / 80 A Mise en fonctionnement 1) Pour éviter les bruits forts de mise sous tension, allumez tout d’abord l’ensemble des appareils de l’installation PA. N. B.: Anche se l’amplificatore è spento, consuma un po’ di corrente. Perciò conviene sfilare la spina dalla presa e staccare eventualmente il gruppo di continuità se l’amplificatore non viene usato per un certo periodo. Messa in funzione Se l’amplificatore è spento e se è presente la tensione di rete, è accesa la spia STANDBY (7). 1) Per escludere rumori di commutazione, accendere dapprima tutti gli altri apparecchi dell’impianto PA. 2) Prima della prima accensione dell’amplificatore, portare i regolatori PGM (1) e LEVEL (16) sullo zero per evitare inizialmente un volume troppo alto. Quindi accendere l’amplificatore con l’interruttore POWER (6) oppure con un interruttore collegato con i morsetti POWER REMOTE (22). Si accende la spia di funzionamento POWER (3). 3) Con il regolatore PGM (1) impostare il volume desiderato. La spia SIGNAL (4) si accende a partire da un determinato volume. In caso di sovrapilotaggio si accende la spia rossa CLIP (5). Allora ridurre il volume con il regolatore. 4) Con il regolatore LEVEL (16) sul retro dell’apparecchio, impostare il volume per avvisi importanti da fare attraverso l’ingresso PRIORITY INPUT (17). In questo caso occorre chiudere l’interruttore prioritario (o il relè) collegato con i morsetti PRI CTL (15). Allora si accende la spia PRIORITY (2). 24V BATTERY EMERGENCY POWER SUPPLY UNIT FULL 80% 60% 40% CHARGING AC DC POWER 14 Alimentazione d’emergenza 8 Circuit de protection L’amplificateur est protégé contre les surchauffe, surcharge et court-circuit aux sorties haut-parleurs grâce à un circuit de protection. En cas de surchauffe, la LED PROTECT (5) brille. En cas de surcharge, de court-circuit ou d’un autre problème, la LED FAULT brille en plus. Dans tous les cas, le son de l’amplificateur est coupé. Si une de ces LEDs brille, éteignez l’amplificateur, faites éliminer le problème par un personnel qualifié. Si le module PA-6FD (schéma 3) n’est pas installé, mettez l’interrupteur DIP numéro 2 (13) de la face arrière de l’appareil sur la position inférieure ON, sinon le circuit de protection répond. 2) Avant la première mise sous tension de l’amplificateur, mettez les réglages PGM (1) et LEVEL (16) sur zéro pour éviter un volume trop élevé à l’allumage. Puis allumez l’amplificateur avec l’interrupteur POWER (6) ou avec un interrupteur relié aux bornes POWER REMOTE (22). Le témoin de fonctionnement POWER (3) brille. 7 6.6 Alimentazione di corrente e d’emergenza 3) Tournez le réglage PGM (1) sur le volume souhaité. La LED SIGNAL (4) brille à partir d’un volume donné. En cas de surcharge, la LED rouge CLIP (5) brille. Diminuez alors le volume avec le réglage. 4) Réglez le volume d’annonces importantes devant être dirigées vers l’amplificateur via l’entrée PRIORITY INPUT (17) avec le réglage LEVEL (16) sur la face arrière. L’interrupteur de priorité (ou le relais) relié aux bornes PRI CTL (15) doit être fermé. La LED PRIORITY (2) brille alors. 5) Pour une meilleure netteté de la parole, un filtre passe-haut (400 Hz) peut être allumé avec l’interrupteur DIP numéro 1 (13) [position ON]. Les bruits perturbateurs à basse fréquence sont ainsi éliminés. 5) Per migliorare la comprensione della lingua parlata, con il dip-switch n. 1 (13) si può attivare un passa-alto (400 Hz) [posizione ON]. In questo modo si sopprimono le interferenze a frequenza bassa. 8 Circuito di protezione L’amplificatore è equipaggiato con un circuito di protezione contro surriscaldamento, sovraccarico e cortocircuito alle uscite per altoparlanti. In caso di surriscaldamento si accende la spia PROTECT (5). In caso di sovraccarico, cortocircuito o di un altro guasto, si accende anche la spia FAULT. In ogni caso, l’amplificatore viene messo su muto. Se si accende una di queste spie occorre spegnere l’amplificatore e fare eliminare il difetto da persone qualificate. Se il modulo di controllo errori PA-6FD (fig. 3) non è inserito, mettere il dip-switch n. 2 (13) sul retro dell’amplificatore in posizione inferiore ON, perché altrimenti reagisce il circuito di protezione. 9 Caractéristiques techniques Puissance de sortie : . . . . . . 960 WRMS Taux de distorsion . . . . . . . . < 0,4 % Tension de sortie/ Impédance de sortie : . . . . . 75 V/5,6 Ω 85 V/7,2 Ω 100 V/10 Ω Entrées PGM + PRIORITY INPUT : 0,775 V/60 kΩ SLAVE INPUT : . . . . . . . . 100 V Bande passante : . . . . . . . . 35 – 20 000 Hz, -3 dB Rapport signal/bruit : . . . . . > 100 dB (pondéré A) Filtre passe-haut : . . . . . . . . 400 Hz, 6 dB/octave Alimentation Tension secteur : . . . . . . . 230 V~/50 Hz Consommation : . . . . . . . 2600 VA Alimentation de secours : . 24 V /80 A Température fonc. : . . . . . . . 0 – 40 °C Dimensions (L × H × P) : . . . 482 × 133 × 374 mm, 3 U (unités) Poids : . . . . . . . . . . . . . . . . . 25 kg F B CH Tout droit de modification réservé. Notice d’utilisation protégée par le copyright de MONACOR ® INTERNATIONAL GmbH & Co. KG. Toute reproduction même partielle à des fins commerciales est interdite. 9 Dati tecnici I Potenza d’uscita: . . . . . . . . . 960 WRMS Fattore di distorsione: . . . . . < 0,4 % Tensione/impedenza d’uscita : . . . . . . . . . . . . . . . 75 V/5,6 Ω 85 V/7,2 Ω 100 V/10 Ω Ingressi PGM + PRIORITY INPUT: 0,775 V/60 kΩ SLAVE INPUT: . . . . . . . . . 100 V Gamma di frequenze: . . . . . 35 – 20 000 Hz, -3 dB Rapporto S/R: . . . . . . . . . . . > 100 dB (valutato A) Filtro passa-alto: . . . . . . . . . 400 Hz, 6 dB/ottava Alimentazione Tensione di rete: . . . . . . . 230 V~/50 Hz Potenza assorbita: . . . . . . 2600 VA Alimentazione d’emergenza: . . . . . . . . . . 24 V /80 A Temperatura d’esercizio: . . . 0 – 40 °C Dimensioni (l × h × p): . . . . . 482 × 133 × 374 mm, 3 RS (unità d’altezza) Peso: . . . . . . . . . . . . . . . . . . 25 kg Con riserva di modifiche tecniche. La MONACOR ® INTERNATIONAL GmbH & Co. KG si riserva ogni diritto di elaborazione in qualsiasi forma delle presenti istruzioni per l’uso. La riproduzione – anche parziale – per propri scopi commerciali è vietata. 15 NL B Vouw bladzijde 3 helemaal open, zodat u steeds een overzicht hebt van de bedieningselementen en de aansluitingen. 1 Overzicht van bedieningselementen en aansluitingen 1.1 Frontpaneel Inhoudsopgave 1 Overzicht van bedieningselementen en aansluitingen . . . . . . . . . . . . . . . . . . . . . 16 1 Volumeregelaar PGM voor het signaal op de ingang PGM INPUT (12) 1.1 Frontpaneel . . . . . . . . . . . . . . . . . . . . . . . . . 16 2 LED PRIORITY: licht op, wanneer de versterker via de aansluiting PRI CTL (15) naar de ingang PRIORITY INPUT (17) is omgeschakeld 1.2 Achterzijde . . . . . . . . . . . . . . . . . . . . . . . . . . 16 3 POWER-LED 1.3 Foutbewakingsmodule PA-6FD . . . . . . . . . . 17 4 LED SIGNAL: licht op vanaf een bepaald geluidsvolume op de uitgang SPEAKER OUTPUTS (9) 1.4 Foutmeldingsmodule PA-6FM . . . . . . . . . . . 17 2 Veiligheidsvoorschriften . . . . . . . . . . . . . . 17 3 Toepassingen . . . . . . . . . . . . . . . . . . . . . . . 18 4 Bijkomende modules monteren . . . . . . . . 18 4.1 Foutbewakingsmodule PA-6FD . . . . . . . . . . 18 4.1.1 Montage en aansluiting . . . . . . . . . . . . . . . 18 4.1.2 Kalibrering . . . . . . . . . . . . . . . . . . . . . . . . . 18 4.2 Foutmeldingsmodule PA-6FM . . . . . . . . . . . 18 5 De versterker opstellen . . . . . . . . . . . . . . . 19 5.1 Montage in een rack . . . . . . . . . . . . . . . . . . . 19 6 De versterker aansluiten . . . . . . . . . . . . . . 19 6.1 Luidsprekers . . . . . . . . . . . . . . . . . . . . . . . . . 19 6.2 Lijnsignaalingangen . . . . . . . . . . . . . . . . . . . 19 6.3 100 V-ingang . . . . . . . . . . . . . . . . . . . . . . . . . 20 6.4 Voorrangrelais en 24 V-uitgang . . . . . . . . . . . 20 6.5 Afstandsbediend in- en uitschakelen . . . . . . 20 5 LED’s als storingsindicatie FAULT licht op, wanneer er in de versterker een storing is opgetreden PROTECT licht op, wanneer de versterker oververhit is, of wanneer er in de versterker een storing is opgetreden CLIP licht op, wanneer de versterker overstuurd wordt [volumeregelaar PGM (1) of LEVEL (16) terugdraaien] 6 POWER-schakelaar Opmerking: Als er door de noodstroomeenheid een spanning van 24 V naar de aansluitingen BATTERY (21) wordt gestuurd, kunt u de versterker niet uitschakelen. 7 LED STANDBY: licht op, als de versterker aangesloten is op het 230 V-elektriciteitsnet, met de netschakelaar (6) uitgeschakeld en geen 24 Vspanning (21) beschikbaar zijn 8 Luchtaanzuigopeningen voor de ventilator 6.6 Netvoeding en noodvoeding . . . . . . . . . . . . . 20 E 7 Ingebruikneming . . . . . . . . . . . . . . . . . . . . . 20 8 Beveiligingscircuit . . . . . . . . . . . . . . . . . . . 21 9 Technische gegevens . . . . . . . . . . . . . . . . . 21 Abra la página 3 para poder ver los elementos de funcionamiento y conexiones descritas. Elementos de Funcionamiento y Conexiones . . . . . . . . . . . . . . . . . . . . . . . 16 1.1 Panel frontal . . . . . . . . . . . . . . . . . . . . . . . . . 16 1.2 Panel posterior . . . . . . . . . . . . . . . . . . . . . . . 16 1.3 Módulo de detección de errores PA-6FD . . . 17 1.4 Módulo de monitorización de errores PA-6FM . . . . . . . . . . . . . . . . . . . . 17 1 Elementos de Funcionamiento y Conexiones 1 Control de volumen PGM para la señal en la entrada PGM INPUT (12) 2 LED PRIORITY: se ilumina cuando el amplificador se cambia a la entrada PRIORITY INPUT (17) mediante el terminal PRI CTL (15) 3 LED POWER Consejos de Seguridad . . . . . . . . . . . . . . . 17 3 Aplicaciones . . . . . . . . . . . . . . . . . . . . . . . . 18 4 LED SIGNAL: se ilumina cuando se alcanza un cierto volumen en las salidas SPEAKER OUTPUTS (9) 4 Instalación de Módulos adicionales . . . . . 18 5 LEDs para indicación de error 4.1.1 Instalación y conexión . . . . . . . . . . . . . . . . 18 4.1.2 Calibración . . . . . . . . . . . . . . . . . . . . . . . . 18 4.2 Módulo de monitorización de errores PA-6FM . . . . . . . . . . . . . . . . . . . . 18 5 Establecimiento del Amplificador . . . . . . . 19 5.1 Instalación Rack . . . . . . . . . . . . . . . . . . . . . . 19 6 Conexión del Amplificador . . . . . . . . . . . . 19 6.1 Altavoces . . . . . . . . . . . . . . . . . . . . . . . . . . . 19 6.2 Entradas de señal de línea . . . . . . . . . . . . . . 19 6.3 Entrada 100 V . . . . . . . . . . . . . . . . . . . . . . . . 20 FAULT se ilumina si sucede algún fallo en el amplificador PROTECT se ilumina si se sobrecalienta el amplificador o ha sucedido algún fallo en el amplificador CLIP se ilumina en caso de sobrecarga del amplificador [baje el control de volumen PGM (1) o LEVEL (16)] 6 Interruptor POWER Nota: Si se aplica un voltaje de 24 V de un alimentador de emergencia a los terminales BATTERY (21), no se podrá desconectar el amplificador. 6.6 Alimentación y alimentación de emergencia 20 7 LED STANDBY: se ilumina si se conecta el amplificador a la alimentación de 230 V y se desconecta el interruptor POWER (6) sin tener ninguna alimentación de 24 V en los terminales BATTERY (21) 7 Funcionamiento . . . . . . . . . . . . . . . . . . . . . 20 8 Entradas de aire para el ventilador 8 Circuito de protección . . . . . . . . . . . . . . . . 21 9 Especificaciones . . . . . . . . . . . . . . . . . . . . 21 6.4 Relé de prioridad y salida de 24 V . . . . . . . . 20 6.5 Activación/desactivación por control remoto . . . . . . . . . . . . . . . . . . . . 20 16 1.1 Panel Frontal 2 4.1 Módulo de detección de errores PA-6FD . . . 18 Opmerking: Om comfortabeler tewerk te gaan kunt u alle groene aansluitklemmen bij het vastschroeven van de aansluitleidingen van hun stekkerverbindingen afnemen. 9 Luidsprekeraansluitingen Belangrijk! De versterker is standaard zo ingesteld, dat voor 100 V-luidsprekers de klemmen COM en 3 moeten worden gebruikt. 10 De relaiscontacten schakelen om, als de versterker via de aansluiting PRI CTL (15) naar de ingang PRIORITY INPUT (17) wordt omgeschakeld 11 Alternatieve ingang SLAVE INPUT voor het aansluiten op een 100 V-luidsprekerkabel 12 Gebalanceerde lijnsignaalingang voor gewone aankondigingen en achtergrondmuziek; gevoeligheid voor volledige uitsturing 0,775 V (0 dBu) 13 DIP-schakelaars Nr. 1 voor het in- en uitschakelen van het 400 Hz-hoogdoorlaatfilter (dempt de lage tonen voor een betere verstaanbaarheid) Nr. 2 onderste stand ON (fabrieksinstelling), wanneer de foutbewakingsmodule PA-6FD (toebehoren) niet is ingebouwd bovenste stand OFF, wanneer de module is ingebouwd Nr. 3 voor het in- en uitschakelen van het testsignaal van 20 kHz, als de module PA-6FD is ingebouwd – zie hfdst. 4.1.1, bedieningsstap 6 14 Controle-LED: licht op, als de versterker naar behoren werkt 15 Aansluiting OUT voor de 24 V-uitgang (steeds spanning bij ingeschakelde versterker; belastbaar met 0,5 A) en Aansluiting PRI CTL voor een voorrangschakelaar: bij gesloten voorrangschakelaar schakelt Contenidos 1 1.2 Achterzijde 1.2 Panel posterior Nota: Para facilitar el manejo cuando enrosque los cables de conexión, pueden desconectarse todas las tiras de terminal verdes de sus conexiones con enchufe. 9 Terminales de altavoz ¡Importante! Debido a los ajustes de fábrica del amplificador, los terminales COM y 3 tienen que utilizarse para altavoces de 100 V. 10 Los contactos de relé se cambian si el amplificador se pasa a la entrada PRIORITY INPUT (17) mediante el terminal PRI CTL (15) 11 Entrada alternativa SLAVE INPUT para conectar a un cable de altavoz de 100 V 12 Entrada de señal de línea simétrica PGM INPUT para anuncios normales y música de fondo. Sensibilidad para potencia RMS de salida 0,775 V (0 dBu) 13 Interruptores DIP No. 1 Activar/desactivar el filtro pasa alto de 400 Hz (atenúa las frecuencias de graves para mejorar la comprensión del habla) No. 2 Posición inferior ON (ajuste de fábrica) si el módulo de detección de errores PA-6FD (accesorio) no está instalado Posición superior OFF si el módulo está instalado No. 3 Activar/desactivar el tono de test de 20 kHz si el módulo PA-6FD está instalado – ver apartado 4.1.1, paso 6 14 LED indicador; se ilumina cuando el amplificador funciona correctamente 15 Terminal OUT para la salida 24 V (el voltaje se aplica siempre cuando el amplificador está conectado; carga máxima posible de 0,5 A) y terminal PRI CTL para interruptor de prioridad: si de versterker om van de ingang PGM INPUT (12) naar de ingang PRIORITY INPUT (17) 16 Volumeregelaar LEVEL voor het signaal op de ingang PRIORITY INPUT (17) 17 Gebalanceerde lijnsignaalingang PRIORITY INPUT voor belangrijke aankondigingen – zie ook pos. 15 en 16; gevoeligheid voor volledige uitsturing 0,775 V (0 dBu) 1.4 Foutmeldingsmodule PA-6FM 29 Relaisuitgangen voor het aansluiten van signaalmodules Het relais AC spreekt aan bij afwezige netspanning, bij doorgesmolten interne netzekering of als de versterker niet met de netschakelaar (6) is ingeschakeld. 18 Afdekplaat, wordt bij het monteren van de foutmeldingsmodule PA-6FM weggenomen 19 Afdekplaat, wordt bij het monteren van de foutbewakingsmodule PA-6FD weggenomen 21 Aansluitingen BATTERY voor een 24 V-noodstroomeenheid 23 Netsnoer voor aansluiting op een stopcontact (230 V~/50 Hz) 1.3 Foutbewakingsmodule PA-6FD De foutbewakingsmodule is als toebehoren verkrijgbaar en behoort niet tot de leveringsomvang van de versterker. De module wordt op de plaats van de afdekplaat (19) gemonteerd. 24 Relaisuitgang voor het aansluiten van een signaalmodule 25 Aansluitingen COM en HOT; met de aansluitingen SPEAKER OUTPUTS (9) verbinden: HOT op klem 3 en COM op COM 26 Meetpunten voor het instellen van de aanspreekgevoeligheid 27 Regelaar voor het testgeluidsniveau van 20 kHz 28 Regelaar voor de aanspreekgevoeligheid el interruptor de prioridad está cerrado, el amplificador cambia de la entrada PGM INPUT (12) a la entrada PRIORITY INPUT (17) 16 Control de volumen LEVEL para la señal en la entrada PRIORITY INPUT (17) 17 Entrada de señal de línea simétrica PRIORITY INPUT para anuncios importantes – ver también los puntos 15 y 16; sensibilidad para potencia RMS de salida 0,775 V (0 dBu) 18 Tapa, extráigala para insertar el módulo de monitorización de errores PA-6FM 19 Tapa, extráigala para insertar el módulo de detección de errores PA-6FD 20 Rejillas de ventilación 21 Terminales BATTERY para la alimentación de emergencia de 24 V 22 Terminales POWER REMOTE para un conmutador externo para activación/desactivación por control remoto Note: No hay que conectar el amplificador con el interruptor POWER (6) para el control remoto. 23 Cable de corriente para la conexión a una toma de corriente (230 V~/50 Hz) 1.3 Módulo de detección de errores PA-6FD Módulo disponible como accesorio y que no se entrega con el amplificador. Se instala en lugar de la tapa (19). 24 Relé de salida para conectar un aparato de señal 25 Terminales COM y HOT; conectar a los terminales SPEAKER OUTPUTS (9): HOT al terminal 3 y COM al COM 26 Puntos de medición para ajustar la sensibilidad de respuesta G G G Het relais DC spreekt aan bij doorgesmolten interne zekeringen voor de noodvoeding of bij afwezige spanning van een noodstroomeenheid op de aansluitingen BATTERY (21). 20 Luchtafzuigopeningen 22 Aansluitingen POWER REMOTE voor een externe schakelaar om afstandsbediend in en uit te schakelen Opmerking: Voor de afstandsbediening mag de versterker niet via de schakelaar POWER (6) zijn ingeschakeld. G De foutmeldingsmodule is als toebehoren verkrijgbaar en behoort niet tot de leveringsomvang van de versterker. De module wordt op de plaats van de afdekplaat (18) gemonteerd. Het relais FAN spreekt aan bij defecte interne ventilator of bij niet tot stand gebrachte aansluiting. G 2 Veiligheidsvoorschriften Het apparaat is in overeenstemming met alle vereiste EU-Richtlijnen en is daarom gekenmerkt met . WAARSCHUWING De netspanning (230 V~) van het apparaat is levensgevaarlijk. Open het apparaat niet, en zorg dat u niets in de ventilatieopeningen steekt! U loopt het risico van een elektrische schok. Tijdens het gebruik staan de aansluitingen SPEAKER OUTPUTS (9) en SLAVE INPUT (11) onder een levensgevaarlijke spanning tot 100 V. De in- en uitgangen mogen enkel aangesloten en gewijzigd worden, wanneer de 100 V-versterker is uitgeschakeld. G G G Het apparaat is enkel geschikt voor gebruik binnenshuis. Vermijd druip- en spatwater, uitzonderlijk warme plaatsen en plaatsen met een hoge vochtigheid (toegestaan omgevingstemperatuurbereik: 0 – 40 °C). Plaats geen bekers met vloeistof zoals drinkglazen etc. op het apparaat. De warmte die in het toestel ontstaat, moet door ventilatie worden afgevoerd. Dek daarom de ventilatieopeningen van de behuizing niet af. Schakel het apparaat niet in en trek onmiddellijk de stekker uit het stopcontact, wanneer: 1. het apparaat of het netsnoer zichtbaar beschadigd is, 2. er een defect zou kunnen optreden nadat het apparaat bijvoorbeeld gevallen is, 3. een apparaat slecht functioneert. Het apparaat moet in elk geval worden hersteld door een gekwalificeerd vakman. Een beschadigd netsnoer mag alleen in een erkende werkplaats worden vervangen. Trek de stekker nooit met het snoer uit het stopcontact, maar steeds met de stekker zelf. Verwijder het stof enkel met een droge, zachte doek. Gebruik in geen geval chemicaliën of water. In geval van ongeoorloofd of verkeerd gebruik, verkeerde aansluiting, foutieve bediening of van herstelling door een niet-gekwalificeerd persoon vervalt de garantie en de verantwoordelijkheid voor hieruit resulterende materiële of lichamelijke schade. NL B Wanneer het apparaat definitief uit bedrijf wordt genomen, bezorg het dan voor milieuvriendelijke verwerking aan een plaatselijk recyclagebedrijf. Let eveneens op het volgende: 27 Control para el nivel de tono de test de 20 kHz 28 Control para la sensibilidad de respuesta 1.4 Módulo de monitorización de errores PA-6FM Módulo disponible como accesorio y que no se entrega con el amplificador. Se instala en lugar de la tapa (18). 29 Salidas de relé para conectar aparatos de señal Relé AC: responde si no se aplica voltaje, si se ha fundido el fusible interno o el amplificador no se ha conectado con el interruptor POWER (6). Relé DC: responde si los fusibles internos para la alimentación de emergencia se han fundido o si no se aplica ningún voltaje desde un alimentador de emergencia a los terminales BATTERY (21). Relé FAN: responde si el ventilador interno está defectuoso o no está conectado. 2 Consejos de Seguridad Este aparato cumple con todas las directivas de la UE y por lo tanto está marcado con el símbolo . ADVERTENCIA El aparato está alimentado con un voltaje peligroso (230 V~). Deje el mantenimiento sólo para el personal cualificado y no inserte nunca nada en las rejillas de ventilación; corre el riesgo de electrocutarse. Durante el funcionamiento, existe el peligro de un contacto de hasta 100 V en los terminales SPEAKER OUTPUTS (9) y SLAVE INPUT (11). Desconecte siempre el sistema profesional antes de hacer o cambiar alguna conexión. Preste atención a los siguientes puntos bajo cualquier circunstancia: G El aparato está adecuado para su utilización sólo en interiores. Protéjalo de derramos y goteos, elevada humedad o calor (temperatura ambiente admisible 0 – 40 ºC). G No coloque ningún recipiente con líquido encima del aparato, p. ej. un vaso. G El calor generado en el interior del aparato debe expulsarse con la circulación del aire. Así pues, no cubra las rejillas de ventilación de la carcasa. G No utilice el aparato y desconecte inmediatamente el enchufe de la toma de corriente: 1. En caso de daño visible en el aparato o en el cable de red 2. Si ha sufrido algún daño por caída o accidente similar 3. Por mal funcionamiento El aparato debe repararse por expertos en cualquier caso. G Un cable de conexión dañado debe reemplazarlo sólo el personal cualificado. G No tire nunca del cable de conexión para desconectar el enchufe de la toma, tire siempre del enchufe. G Para la limpieza utilice sólo un paño seco y suave, no utilice nunca agua ni productos químicos. G No podrá reclamarse garantía ni responsabilidad alguna por cualquier daño personal o material resultante de un uso diferente al originalmente concebido, si no se conecta o se utiliza correctamente, o si no lo repara un experto. E Si va a poner el aparato fuera de servicio definitivamente, llévelo a la planta de reciclaje más cercana para una eliminación no perjudicial para el medioambiente. 17 NL B 3 Toepassingen De versterker PA-1960 met een sinusvermogen (WRMS) van 960 W is speciaal ontworpen voor het gebruik in geluidsinstallaties. Voor achtergrondmuziek en voor gewone aankondigingen is een lijnniveau-ingang beschikbaar. Voor noodberichten of andere belangrijke aankondigingen is een tweede lijnniveau-ingang voorhanden. Met een afzonderlijke schakelaar of een extern relais kunt u naar de tweede ingang omschakelen. De PA-1960 kan ook zeer eenvoudig in de bestaande geluidsinstallaties worden ingebouwd, als er een groter vermogen voor andere luidsprekers noodzakelijk is. Daarom is hij met een 100 Vingang uitgerust. 4 Bijkomende modules monteren De versterker kan met de volgende bijkomende modules van MONACOR worden uitgebreid: PA-6FD Foutbewakingsmodule PA-6FM Foutmeldingsmodule WAARSCHUWING De montage van bijkomende modules mag alleen door gekwalificeerd personeel worden uitgevoerd. Trek de netstekker uit het stopcontact, alvorens de versterker te openen. Anders loopt u het risico van een elektrische schok! Als er een noodstroomeenheid is aangesloten, koppelt u deze van de aansluitingen BATTERY (21) los, zodat de versterker zeker buiten bedrijf is. 4.1 Foutbewakingsmodule PA-6FD De foutbewakingsmodule PA-6FD (figuur 3 en 4) die als toebehoren verkrijgbaar is, werd speciaal voor deze versterker ontworpen. De module genereert een sinustestsignaal van 20 kHz die naar de eindversterker wordt gestuurd. Als er door een defect in E 3 Aplicaciones El amplificador PA-1960, con una potencia de salida RMS de 960 W, esta diseñado especialmente para aplicaciones en sistemas profesionales. Posee una entrada de nivel de línea para música de fondo y anuncios normales, además de una segunda entrada de nivel de línea para anuncios de emergencia u otros anuncios importantes. Es posible cambiar a la segunda entrada mediante un interruptor separado o un relé externo. El PA-1960 también puede integrarse fácilmente en un sistema profesional ya existente si se necesita más potencia para nuevos altavoces. Va equipado con una entrada de 100 V para este propósito. 4 Instalación de Módulos Adicionales El amplificador puede ampliarse con los siguientes módulos adicionales de MONACOR: PA-6FD módulo de detección de errores PA-6FM módulo de monitorización de errores ADVERTENCIA Los módulos adicionales tienen que ser instalados siempre por personal cualificado. Antes de abrir el amplificador desconecte el enchufe de la toma de corriente para evitar el riesgo de una descarga. 4.1.1 Montage en aansluiting 1) Schroef het deksel van de versterker los en neem de afsluitplaat (19) weg. Koppel de 4-polige leiding, die op de beschermplaat is bevestigd, los van de plaat. 2) Steek de jumper SW 1 op de bewakingsmodule in de stand ON. 3) Haal de 4-polige leiding, die op de beschermplaat was bevestigd, naar buiten door de nieuwe opening, en steek ze in de aansluiting CN 601. Daarbij moet de buitenste pen van de jack vrij blijven, zie figuur 4. 4) Monteer de module PA-6FD van buitenaf op de plaats van de afsluitplaat en schroef ze vast. 5) Verbind het contact COM van de aansluitklem SPEAKER OUTPUTS (9) op de versterker met het contact COM van de aansluitklem Line In (25) op de module, en het contact 3 van SPEAKER OUTPUTS met het contact HOT van Line In. 6) Plaats de DIP-schakelaar nr. 2 (13) op de achterzijde van de versterker in de bovenste stand OFF en de DIP-schakelaar nr. 3 in de onderste stand ON. Als u echter de ingang SLAVE INPUT (11) gebruikt dat reeds bezet is door een 20 kHz-testsignaal van een andere versterker, plaatst u de DIP-schakelaar nr. 3 in de bovenste stand OFF. Anders overlappen twee testsignalen elkaar! 7) Als de module een fout detecteert, lichten de LED’s FAULT en PROTECT (5) op. De relaiscontacten (24) gaan dicht. Op de contacten kunt u een signaalmodule aansluiten die een alarmsignaal uitstuurt. De belastbaarheid van de relaiscontacten bedraagt 1 A bij max. 120 V~ of max. 24 V . las salidas SPEAKER OUTPUTS (9) por algún defecto en el amplificador, se iluminan los LEDs FAULT y PROTECT (5). Además, el LED verde (14) de la parte posterior del amplificador se apaga. A través de un relé, puede activarse un aparato de señal adicionalmente. 4.1.1 Instalación y conexión 1) Desenrosque la tapa de la carcasa del amplificador y quite la tapa metálica (19). Desconecte el cable de 4 polos fijado a la tapa metálica desde la tapa. 2) Coloque el jumper SW 1 en el módulo de detección de errores en posición ON. 3) Dirija el cable de 4 polos que estaba fijado a la tapa metálica hacia fuera a través de la nueva apertura creada y conéctelo al jack CN 601 del módulo. El pin exterior del jack debe permanecer sin conectar, ver figura 4. 4) Inserte el módulo PA-6FD donde estaba la tapa metálica desde fuera y enrósquela. 5) Conecte el contacto COM de las salidas SPEAKER OUTPUTS (9) del amplificador al contacto COM del terminal Line In (25) del módulo; conecte el contacto 3 de las salidas SPEAKER OUTPUTS al contacto HOT del Line In. 4.1 Módulo de detección de errores PA-6FD 6) Coloque el interruptor DIP 2 (13) de la parte posterior del amplificador en la posición superior OFF y el interruptor DIP 3 en la posición inferior ON. Sin embargo, si la entrada SLAVE INPUT (11) se está utilizando y ya se está aplicando un tono de test de 20 kHz de otro amplificador aquí, coloque el interruptor DIP 3 en la posición superior OFF o se superpondrán los dos tonos de test. El módulo de detección de errores PA-6FD (Fig. 3 y 4), disponible como accesorio, está diseñado especialmente para este amplificador. Genera un tono sinusoidal de test de 20 kHz que se introduce en el amplificador. Si el tono de test no se aplica a 7) Si el módulo detecta un error, los LEDs FAULT y PROTECT (5) se encienden, y los contactos de relé (24) se cierran. Los contactos permiten la conexión de un aparato de señal para activar una alarma. La carga máxima posible de corriente de Si se ha conectado un alimentador de emergencia, desconéctelo de los terminales BATTERY (21) para asegurarse de que el amplificador ha dejado de funcionar completamente. 18 de versterker geen testsignaal naar de aansluiting SPEAKER OUTPUTS (9) wordt gestuurd, lichten de LED’s FAULT en PROTECT (5) op. Bovendien gaat de groene LED (14) op de achterzijde van versterker uit. Via een relais kunt u bovendien een signaalmodule activeren. Opmerking: De relaiscontacten sluiten ook, wanneer de versterker wordt uitgeschakeld. 4.1.2 Kalibrering 1) Schakel de versterker in en zet de volumeregelaars PGM (1) en LEVEL (16) in de nulstand, zodat alleen het testsignaal van 20 kHz op de luidsprekeruitgangen beschikbaar is. Bij gebruik van de ingang SLAVE INPUT (11) mag tijdens het kalibreren geen aankondigingsof muzieksignaal naar deze ingang worden gestuurd, tenzij alleen een 20 kHz-testsignaal van een andere versterker. In geval van een testsignaal van 20 kHz slaat u de volgende bedieningsstap over en gaat u verder met stap 3. 2) Meet aan de contacten COM en 3 van de aansluitklem SPEAKER OUTPUT (9) de spanning van het 20 kHz-testsignaal en stel ze in met de trimregelaar OSC Level (27) op 2 V~. 3) Controleer op de meetpunten “+ -” (26) van de module de spanning van het 20 kHz-testsignaal. Stel met de trimregelaar Sensitivity (28) 2 V~ in. 4) Stel de regelaars PGM (1) en LEVEL (16) na het kalibreren opnieuw in op het gewenste geluidsvolume. 4.2 Foutmeldingsmodule PA-6FM De foutmeldingsmodule PA-6FM (figuur 5 en 6) die als toebehoren verkrijgbaar is, werd speciaal voor deze versterker ontworpen. Via drie relaisuitgangen (29) kunnen signaalmodules bij volgende fouten worden geactiveerd: De relaiscontacten AC schakelen om bij afwezige netspanning, bij doorgesmolten interne netzekering of als het apparaat niet met de netschakelaar (6) is ingeschakeld. De relaiscontacten DC schakelen om bij doorgesmolten zekeringen voor de noodvoeding of bij afwezige spanning van een noodstroomeenheid op de aansluitingen BATTERY (21). los contactos de relé es de 1 A a 120 V~ máx. o 24 V máx. Nota: Los contactos de relé también se cierran cuando se desconecta el amplificador. 4.1.2 Calibración 1) Conecte el amplificador y ajuste los controles de volumen PGM (1) y LEVEL (16) a cero para que solo el tono de test de 20 kHz se aplique a las salidas de altavoz. Si la entrada SLAVE INPUT (11) está en uso, no se puede aplicar ninguna señal de anuncio o música a esta entrada mientras se calibra; sólo otro tono de test de 20 kHz de otro amplificador si es necesario. Si se aplica un tono de test de 20 kHz, sáltese el siguiente paso y pase directamente al tercer paso. 2) Mida el voltaje del tono de test de 20 kHz en los contactos COM y 3 de las salidas SPEAKER OUTPUTS (9) y ajústelo a 2 V~ con el control OSC Level (27). 3) Compruebe el voltaje del tono de test de 20 kHz en los puntos de medición “+ -” (26) del módulo. Ajuste 2 V~ con el control Sensitivity (28). 4) Después de la calibración, ajuste los controles PGM (1) y LEVEL (16) nuevamente en el volumen deseado. 4.2 Módulo de monitorización de errores PA-6FM El módulo de monitorización de errores PA-6FM (Fig. 5 y 6) disponible como accesorio está diseñado especialmente para este amplificador. Las tres salidas de relé (29) permiten la activación de aparatos de señal en caso de los siguientes errores: Los contactos de relé AC cambian si no se aplica ninguna corriente, si se ha fundido el fusible interno o si el amplificador no se ha conectado con el interruptor POWER (6). De relaiscontacten FAN schakelen om bij defecte interne ventilator of bij niet tot stand gebrachte aansluiting. Opmerking: Alle relaiscontacten schakelen ook om, wanneer de versterker wordt uitgeschakeld. 1) Schroef het deksel van de versterker los en neem de afsluitplaat (18) weg. Koppel de 6-polige leiding, die op de beschermplaat is bevestigd, los van de plaat. 2) Haal de 6-polige leiding, die op de beschermplaat was bevestigd, naar buiten door de nieuwe opening, en steek ze in de aansluiting CN 5. 3) Monteer de module PA-6FM van buitenaf op de plaats van de afsluitplaat en schroef ze vast. 4) Sluit de signaalmodules voor het uitsturen van een alarmsignaal aan op de relaiscontacten (29). De opdruk op de module geeft de contactpositie aan in geval van een fout en bij uitgeschakelde versterker. De belastbaarheid van de relaiscontacten bedraagt 1 A bij max. 120 V~ of max. 24 V . 5 De versterker opstellen De versterker is voorzien voor montage in een 19"-rack (482 mm), maar kan ook als tafelmodel gebruikt worden. In elk geval moet de lucht door alle ventilatieopeningen kunnen stromen, om voldoende ventilatie van de eindversterkers te verzekeren. 5.1 De montage in een rack Voor de montage in een rack hebt u 3 HE (rack-eenheden = 133 mm) nodig. Om te voorkomen dat het rack topzwaar wordt, dient de versterker in het onderste gedeelte van het rack gemonteerd te worden. De frontplaat alleen is niet voldoende voor een veilige bevestiging. Het toestel moet links en rechts door rails of onderaan door een bodemplaat extra ondersteund worden. Los contactos de relé DC cambian si se han fundido los fusibles internos para la alimentación de emergencia o si no hay corriente de ningún alimentador de emergencia en los terminales BATTERY (21). Los contactos de relé FAN cambian si el ventilador interno no está conectado o no funciona correctamente. Nota: todos los contactos de relé también cambian cuando se desconecta el amplificador. 1) Desenrosque la tapa de la carcasa del amplificador y extraiga la tapa metálica (18). Desconecte el cable de 6 polos fijado en la tapa metálica de la tapa. 2) Dirija el cable de 6 polos que estaba fijado en la tapa metálica hacia fuera a través de la nueva apertura creada y conéctelo al jack CN 5 del módulo. 3) Inserte el módulo PA-6FM donde estaba la tapa metálica desde fuera y enrósquelo. 4) Conecte los aparatos de señal para activar una alarma a los contactos para el cambio de relé (29). La marca en el módulo muestra la posición de los contactos en caso de defecto y con el amplificador desconectado. La carga máxima posible de corriente de los contactos de relé es de 1 A a 120 V~ máx. o 24 V máx. 5 Establecimiento del Amplificador El amplificador está preparado para su instalación en rack para aparatos con una profundidad de 482 mm (19"), aunque también puede utilizarse como aparato de sobremesa. En cualquier caso, asegúrese de que el aire circula libremente a través de todas las rejillas de ventilación para proporcionar un enfriamiento suficiente al amplificador. 5.1 Instalación Rack Para la instalación en rack, se necesitan 3 espacios rack (3 espacios = 133 mm). Para prevenir el exceso de peso en la parte superior del rack, coloque el De lucht die door versterker wordt verwarmd, moet uit het rack kunnen worden afgevoerd. Anders hoopt de warmte zich op in het rack, waardoor niet enkel de versterker maar ook andere apparaten in het rack kunnen worden beschadigd. Bij een onvoldoende warmteafvoer moet u in het rack een ventilator plaatsen. 6 De versterker aansluiten WAARSCHUWING De fabrieksinstelling mag uitsluitend door gekwalificeerd personeel worden gewijzigd. Trek de netstekker uit het stopcontact, alvorens de versterker te openen. En als er een noodstroomeenheid is aangesloten, koppel deze dan los van de aansluitingen BATTERY (21). Anders loopt u het risico van een elektrische schok! De in- en uitgangen mogen enkel door gekwalificeerd personeel worden uitgevoerd en in elk geval wanneer de versterker is uitgeschakeld! Opmerking: Om comfortabeler tewerk te gaan kunt u alle groene aansluitklemmen bij het vastschroeven van de aansluitleidingen van hun stekkerverbindingen afnemen. Schroef het deksel van de versterker af. Op de printplaat met de aansluitingen SPEAKER OUTPUTS (9) en PRIORITY RELAY (10) ziet u een draadjumper. Wissel de jumper van contact A naar contact B of C. Schroef de behuizingsplaat weer vast. 6.1 Luidsprekers 6.2 Lijnsignaalingangen Sluit de 100 V-luidsprekers aan op de aansluitstrook SPEAKER OUTPUTS (9): Verbind de negatieve aansluitingen met het contact COM en de positieve aansluitingen met het contact 1, 2 of 3, dat overeenkomt met de nominale spanning van de luidspreker. Hierbij mag een totale belasting van 960 WRMS door de luidsprekers niet worden overschreden, anders wordt de versterker beschadigd. Voor aankondigingen en muziekweergave is een voorversterker nodig (b.v. PA-1410MX van MONACOR), waarop microfoons en audioapparatuur (b.v. cd-speler, radio) kunnen worden aangesloten. Verbind de uitgang van de voorversterker met de ingang PGM INPUT (12). Voor noodberichten of andere belangrijke aankondigingen is de PA-1960 uitgerust met de ingang PRIORITY INPUT (17). Zodra een op de klemmen PRI CTL (15) aangesloten voorrangschakelaar of relais wordt gesloten, schakelt de versterker van de ingang PGM INPUT om naar de ingang PRIORITY INPUT, en is alleen het noodbericht hoorbaar. Het geluidsvolume voor noodberichten wordt afzonderlijk met de regelaar LEVEL (16) aan de achterzijde ingesteld. Belangrijk! De versterker is standaard zo ingesteld, dat voor 100 V-luidsprekers de klemmen COM en 3 moeten worden gebruikt. In de volgende tabel zijn alle mogelijke nominale spanningen weergegeven: Jumper in positie Klem 1 2 3 A Fabrieksinstelling 75 V 85 V 100 V B 60 V 70 V 85 V C 50 V 60 V 75 V amplificador en la parte inferior del rack. El panel frontal no es suficiente para fijarlo con seguridad. Puede añadir raíles laterales o una plancha metálica en la parte inferior para asegurar el aparato. El aire calentado por el amplificador tiene que salir del rack, o provocaría una acumulación de calor que no solo dañaría el amplificador sino todos los aparatos del rack. Si no existe una disipación suficiente del calor, instale un ventilador en el rack. 6 Conexión del Amplificador Sólo el personal cualificado debería hacer cualquiera de las conexiones. Desconecte siempre el amplificador antes de la conexión. Nota: Para facilitar el manejo mientras enrosca las conexiones, puede desconectar todas las tiras de terminal verdes. 6.1 Altavoces Conecte los altavoces profesionales al terminal SPEAKER OUTPUTS (9): conecte los polos negativos al contacto COM y los positivos al contacto 1, 2 ó 3 según corresponda el voltaje nominal de los altavoces. La carga total en los altavoces no puede exceder los 960 WRMS, o se dañaría el amplificador. ¡Importante! Debido a los efectos de fábrica del amplificador, los terminales COM y 3 tienen que utilizarse con altavoces de 100 V. La tabla puesta a continuación nos muestra todos los voltajes nominales posibles: Jumper en posició Terminal 1 2 3 A Ajuste de fábrica 75 V 85 V 100 V B 60 V 70 V 85 V C 50 V 60 V 75 V ADVERTENCIA La modificación de los ajustes de fábrica sólo puede llevarse a cabo por especialistas. Antes de abrir el amplificador, desconecte el enchufe de la toma de corriente, y si se ha conectado algún alimentador de emergencia, desconéctelo de los terminales BATTERY (21) para no correr ningún riesgo de descarga. NL B E Desenrosque la tapa de la carcasa del amplificador. En el PCB se encuentra un cable jumper con los terminales SPEAKER OUTPUTS (9) y PRIORITY RELAY (10). Recoloque el jumper del contacto A al contacto B o C. Enrosque nuevamente la tapa de la carcasa. 6.2 Entradas de señal de línea Para anuncios y reproducción de música, se necesita un preamplificador profesional (p. ej. PA1410MX de MONACOR) que permita conectar micrófonos y unidades de audio (p. ej. lector CD o equipo de radio). Conecte la salida del preamplificador a la entrada PGM INPUT (12). Para anuncios de emergencia u otros anuncios importantes, el PA-1960 está equipado con la entrada PRIORITY INPUT (17). En cuanto se cierra un interruptor de prioridad o un relé conectado a los terminales PRI CTL (15), el amplificador cambia de la entrada PGM INPUT a la entrada PRIORITY INPUT y sólo puede oírse el anuncio de emergencia. El volumen para anuncios de emergencia se ajusta de modo separado con el control LEVEL (16) de la parte posterior. 19 NL B 6.3 100 V-ingang 6.6 Netvoeding en noodstroomvoeding 7 In de plaats van de lijnsignaalingangen (12) en (17) kan de 100 V-ingang SLAVE INPUT (17) worden gebruikt om b.v. bij een bestaande geluidsinstallatie extra vermogen voor bijkomende luidsprekers te realiseren. Sluit de klemmen SLAVE INPUT aan op de 100 V-luidsprekerleiding van de geluidsinstallatie. Opmerking: De regelaars PGM (1) en LEVEL (16) hebben geen invloed op het volume van het signaal dat naar de ingang SLAVE INPUT is gestuurd. Stel het signaalvolume in op de versterker waarvan het 100 V-signaal naar de PA-1960 wordt gestuurd. 1) Als de versterker bij een eventuele stroomuitval verder moet werken, sluit u op de klemmen BATTERY (21) een noodvoeding van 24 V aan (b.v. PA-24ESP van MONACOR). De versterker moet via vier leidingen met de noodstroomeenheid worden verbonden (figuur 7). Voor elke leiding is bij een lengte van max. 4 meter een kabeldoorsnede van ten minste 5 mm² vereist (b.v. serie CPC-... van MONACOR). Opmerking: Als de aansluitingen BATTERY van de noodstroomeenheid onder de spanning van 24 V staan, kan de versterker met de schakelaar POWER (6) niet worden uitgeschakeld. De versterker schakelt bij een stroomuitval of in uitgeschakelde toestand automatisch om naar de noodvoeding. Als de versterker uitgeschakeld is en er is netspanning, dan licht de LED STANDBY op (7). 1) Schakel eerst alle andere apparaten van de geluidsinstallatie in; zo vermijdt u inschakelploppen. 2) Alvorens de versterker een eerste keer in te schakelen, plaatst u de regelaars PGM (1) en LEVEL (16) in de nulstand om een te hoog geluidsvolume in het begin te vermijden. Schakel de versterker in met de schakelaar POWER (6) of met een schakelaar die op de klemmen POWER REMOTE (22) is aangesloten. De POWER-LED (3) licht op. 3) Stel de regelaar PGM (1) in op het gewenste geluidsvolume. De LED SIGNAL (4) licht op vanaf een bepaald geluidsvolume. Bij oversturing licht de rode LED CLIP op (5). In dit geval moet u het geluidsvolume met de regelaar verminderen. 4) Het geluidsvolume voor belangrijke aankondigingen die via de ingang PRIORITY INPUT (17) naar de versterker worden gestuurd, moeten met de regelaar LEVEL (16) op achterzijde van het apparaat worden ingesteld. Hiervoor moet de voorrangschakelaar (of het relais), dat met de klemmen PRI CTL (15) is verbonden, gesloten zijn. De LED PRIORITY (2) licht dan op. 5) Voor een betere verstaanbaarheid kunt u met de DIP-schakelaar nr. 1 (13) een hoogdoorlaatfilter (400 Hz) inschakelen (stand ON). Zo onderdrukt u laagfrequente ruis. 6.4 Voorrangrelais en 24 V-uitgang Zodra een op de klemmen PRI CTL (15) aangesloten voorrangschakelaar of relais wordt gesloten, schakelt het interne voorrangsrelais om. Via de aansluitingen PRIORITY RELAY (10) hiervan kunnen verdere processen worden gestuurd, en kunnen b.v. geluidsvolumeregelaars met noodbericht / voorrangsrelais op maximaal geluidsvolume worden ingesteld. Als het noodbericht / voorrangsrelais een spanning van 24 V nodig heeft, kan de spanning b.v. van de klem +24 V (15) via de relaiscontacten worden geleid. De spanning van 24 V is belastbaar met 500 mA en kan ook voor andere doeleinden worden aangewend. BATTERY 24 V4 4 / 80 A 24V BATTERY EMERGENCY POWER SUPPLY UNIT FULL 80% 60% 40 % CHARGING AC POWER 6.5 Afstandsbediend in- en uitschakelen Via een afzonderlijke schakelaar kunt u de versterker afstandsbediend in- en uitschakelen. 1) Verbind de schroefaansluitingen POWER REMOTE (22) via een tweepolige kabel met een eenpolige POWER-schakelaar. 2) Voor afstandsbediend in- en uitschakelen mag de versterker met de hoofdschakelaar POWER (6) niet ingeschakeld zijn. E 6.3 Entrada 100 V Como alternativa a las entradas de señal de línea (12) y (17), la entrada 100 V SLAVE INPUT (11) puede utilizarse p. ej. para suministrar más potencia a altavoces adiciones en un sistema profesional existente. Conecte los terminales SLAVE INPUT al cable de altavoz de 100 V del sistema profesional. Nota: Los controles PGM (1) y LEVEL (16) no afectan el volumen de la señal que se aplica en la entrada SLAVE INPUT. Ajuste el volumen de señal al amplificador que alimentará la señal de 100 V en el PA-1960. 6.4 Relé de prioridad y salida de 24 V En cuanto un interruptor de prioridad o un relé conectado a los terminales PRI CTL (15) se cierra, el relé de prioridad interna cambia. Sus terminales PRIORITY RELAY (10) permiten controlar más acciones, p. ej. poner los atenuadores profesionales con relé de prioridad de emergencia al máximo volumen. Si se necesita un voltaje de 24 V para conmutar los relés de prioridad de emergencia, p.ej. el voltaje del terminal +24 V (15) puede dirigirse a través de los contactos de relé. El voltaje de 24 V tiene una carga máxima posible de corriente de 500 mA y puede utilizarse para otras aplicaciones. DC Noodstroomvoeding 2) Plug ten slotte de netstekker van het aansluitsnoer (23) in een stopcontact (230 V~/50 Hz). Opmerking: Ook wanneer de versterker is uitgeschakeld, verbruikt hij een geringe hoeveelheid stroom. Trek daarom de netstekker uit het stopcontact en koppel de noodvoeding eventueel los, wanneer u de versterker langere tijd niet gebruikt. 6.6 Alimentación y alimentación de emergencia 7 1) Para un funcionamiento continuo del amplificador en caso de fallo en la corriente, conecte un alimentador de emergencia de 24 V (p. ej. PA-24ESP de MONACOR) a los terminales BATTERY (21). El amplificador debe conectarse al alimentador de emergencia mediante cuatro cables (fig. 7). Por cada cable, con una longitud máxima de 4 m, se necesita un corte de sección de 5 mm2 (p. ej. los modelos CPC-... de MONACOR). Nota: Si el voltaje de 24 V del alimentador de emergencia se aplica a los terminales BATTERY, no será posible desconectar el amplificador con el interruptor POWER (6). En casa de un fallo en la corriente o cuando se apaga, el amplificador pasa automáticamente a la alimentación de emergencia. BATTERY 24 V4 4 / 80 A 24V BATTERY EMERGENCY POWER SUPPLY UNIT FULL 80% 60% 40 % CHARGING AC 1) Conecte los terminales POWER REMOTE (22) mediante un cable de dos polos a un interruptor ON/OFF de un polo. 2) Para la activación/ desactivación por control remoto, el amplificador no debe conectarse con el interruptor POWER (6). 20 Funcionamiento Si el amplificador está desconectado con la corriente aplicada, el LED STANDBY (7) se ilumina. 1) Para prevenir el ruido de conexión, conecte antes todos los otros aparatos del sistema profesional. 2) Antes de conectar el amplificador por primera vez, ajuste los controles PGM (1) y LEVEL (16) a cero, así no habrá un volumen excesivo para empezar. A continuación conecte el amplificador con el interruptor POWER (6) o con un interruptor conectado a los terminales POWER REMOTE (22). El LED POWER (3) se iluminará. 3) Ajuste el control PGM (1) en el volumen deseado. Cuando se alcanza un cierto volumen, el LED SIGNAL (4) se ilumina. En caso de sobrecarga, el LED CLIP rojo (5) se ilumina. En este caso, reduzca el volumen con el control. 4) Ajuste el volumen para anuncios importantes suministrados al amplificador por la entrada PRIORITY INPUT (17) con el control LEVEL (16) de la parte posterior del aparato. Para esto, el interruptor de prioridad (o relé) conectado a los terminales PRI CTL (15) debe cerrarse. Se iluminará el LED PRIORITY (2). 6.5 Activación/desactivación por control remoto El amplificador permite la activación/desactivación por control remoto mediante un interruptor separado. Ingebruikneming DC POWER Alimentación de emergencia 2) Finalmente, conecte el enchufe del cable de conexión (23) a la toma (230 V~/50 Hz). Nota: Incluso cuando el amplificador está desconectado, seguirá teniendo un bajo consumo. Así pues, desconecte el enchufe del cable de corriente de la toma, y si es necesario, desconecte el alimentador de emergencia si no va a utilizar el amplificador durante un largo periodo. 5) Para mejorar la comprensión del habla, conecte un filtro pasa alto (400 Hz) con el interruptor DIP 1 (13) [posición ON]. De este modo, se eliminan las interferencias de baja frecuencia. 8 Beveiligingscircuit De versterker is uitgerust met een beveiligingscircuit tegen oververhitting, overbelasting en kortsluiting aan de luidsprekeruitgangen. Bij een oververhitting licht de LED PROTECT (5) op. Bij overbelasting, een kortsluiting of een andere storing licht bovendien de LED FAULT op. In elk geval wordt de versterker gedempt. Als een van deze LED’s oplicht, schakelt u de versterker uit en laat u de storing door deskundig personeel verhelpen. Als de foutbewakingsmodule PA-6FD (figuur 3) niet wordt gebruikt, plaatst u de DIP-schakelaar nr. 2 (13) op de achterzijde van de versterker in de onderste stand ON; anders schakelt het beveiligingscircuit in. 9 Technische gegevens Uitgangsvermogen: . . . . . . 960 WRMS THD: . . . . . . . . . . . . . . . . . < 0,4 % Uitgangsspanning/ Uitgangsimpedantie: . . . . . 75 V/5,6 Ω 85 V/7,2 Ω 100 V/10 Ω Ingangen PGM + PRIORITY INPUT: 0,775 V/60 kΩ SLAVE INPUT: . . . . . . . . 100 V Frequentiebereik: . . . . . . . . 35 – 20 000 Hz, -3 dB Signaal/ruis-verhouding: . . > 100 dB (A-gemeten) Hoogdoorlaatfilter: . . . . . . . 400 Hz, 6 dB/octaaf Voedingsspanning Netspanning: . . . . . . . . . 230 V~/50 Hz Vermogensverbruik: . . . . 2600 VA Noodstroomvoeding: . . . 24 V /80 A Omgevingstemperatuurbereik: . . . . . . . 0 – 40 °C Afmetingen (B × H × T): . . . 482 × 133 × 374 mm, 3 HE (rackeenheden) Gewicht: . . . . . . . . . . . . . . . 25 kg NL B Wijzigingen voorbehouden. Deze gebruiksaanwijzing is door de auteurswet beschermde eigendom van MONACOR ® INTERNATIONAL GmbH & Co. KG. Een reproductie – ook gedeeltelijk – voor eigen commerciële doeleinden is verboden. 8 Circuito de Protección El amplificador está equipado con un circuito de protección contra sobrecalentamiento, sobrecarga y cortocircuito en las salidas de altavoz. En caso de sobrecalentamiento, el LED PROTECT (5) se ilumina; en caso de sobrecarga, cortocircuito o cualquier otro problema, se ilumina además el LED FAULT. En cualquier caso, el amplificador se silencia. Si cualquiera de estos LEDs se ilumina, desconecte el amplificador y haga que el personal cualificado se encargue de eliminar el problema. Si el módulo de detección de errores PA-6FD (fig. 3) no está instalado, coloque el DIP 2 (13) de la parte posterior del amplificador en la posición inferior ON o el circuito de protección no responderá. 9 Especificaciones E Potencia de salida . . . . . . . 960 WRMS THD: . . . . . . . . . . . . . . . . . < 0,4 % Voltaje de salida / Impedancia de salida: . . . . 75 V/5,6 Ω 85 V/7,2 Ω 100 V/10 Ω Entradas PGM + PRIORITY INPUT: 0,775 V/60 kΩ SLAVE INPUT: . . . . . . . . 100 V Banda pasante: . . . . . . . . . 35 – 20 000 Hz, -3 dB Relación ruido/sonido: . . . . > 100 dB (ponderada A) Filtro pasa alto: . . . . . . . . . 400 Hz, 6 dB/octavo Alimentación Voltaje: . . . . . . . . . . . . . . 230 V~/50 Hz Consumo: . . . . . . . . . . . . 2600 VA Alimentación de emergencia: . . . . . . . . . . 24 V /80 A Temperatura ambiente admisible: . . . . . . 0 – 40 °C Dimensiones (W × H × D): . 482 × 133 × 374 mm, 3 U (espacios rack) Peso: . . . . . . . . . . . . . . . . . 25 kg Sujeto a modificaciones técnicas. Manual de instrucciones protegido por el copyright de MONACOR ® INTERNATIONAL GmbH & Co. KG. Toda reproducción mismo parcial para fines comerciales está prohibida. 21 PL Proszę otworzyć niniejszą instrukcję na stronie 3. Pokazano tam elementy obsługi oraz sposób podłączania urządzenia. 1 Elementy obsługi i połączenia 9 Terminale głośnikowe Ważne! Zgodnie z ustawieniami fabrycznymi styki COM i 3 mogą być wykorzystywane tylko do linii głośnikowej 100 V. 1.1 Panel przedni Spis treści 1 Elementy obsługi i połączenia . . . . . . . . . 22 1.1 Panel przedni . . . . . . . . . . . . . . . . . . . . . . . . 22 1.2 Panel tylny . . . . . . . . . . . . . . . . . . . . . . . . . . 22 1.3 Moduł wskaźnika uszkodzeń PA-6FD . . . . . . 22 1.4 Moduł monitorowania uszkodzeń PA-6FM . . 22 2 Zasady bezpieczeństwa . . . . . . . . . . . . . . . 22 3 Zastosowanie . . . . . . . . . . . . . . . . . . . . . . . 22 4 Instalowanie modułów rozszerzających . . 23 4.1 Moduł wskaźnika uszkodzeń PA-6FD . . . . . . 23 4.1.1 Instalacja i podłączanie . . . . . . . . . . . . . . . 23 4.1.2 Kalibracja . . . . . . . . . . . . . . . . . . . . . . . . . 23 4.2 Moduł monitorowania uszkodzeń PA-6FM . . 23 5 Przygotowanie wzmacniacza do pracy . . 23 5.1 Montaż w racku . . . . . . . . . . . . . . . . . . . . . . 23 6 Podłączenie wzmacniacza . . . . . . . . . . . . . 23 6.1 Głośniki . . . . . . . . . . . . . . . . . . . . . . . . . . . . . 23 6.2 Wejścia sygnałów liniowych . . . . . . . . . . . . . 23 6.3 Wejście 100 V . . . . . . . . . . . . . . . . . . . . . . . . 23 6.4 Przełącznik priorytetu i wyjście 24 V . . . . . . . 23 6.5 Zdalne sterowanie włączanie/wyłączanie . . 23 1 Regulator głośności PGM sygnału z wejścia PGM INPUT (12) 2 Dioda PRIORITY: zapala się po przełączeniu wzmacniacza na wejście priorytetowe PRIORITY INPUT (17) poprzez terminal PRI CTL (15) 3 Dioda zasilania POWER 4 Dioda sygnałowa SIGNAL: zapala się gdy głośność sygnału na wyjściu głośnikowym SPEAKER OUTPUTS (9) osiągnie określoną wartość 5 Diody sygnalizujące uszkodzenia FAULT zapala się w przypadku uszkodzenia wzmacniacza PROTECT zapala się przy przegrzaniu lub w przypadku uszkodzenia wzmacniacza CLIP zapala się przy przesterowaniu [należy skręcić regulator głośności PGM (1) lub LEVEL (16)] 6 Włącznik zasilania POWER Uwaga: Jeżeli wzmacniacz jest zasilany awaryjnie napięciem 24 V poprzez terminale BATTERY (21), niemożliwe jest wyłączenie wzmacniacza 7 Dioda STANDBY: zapala się po podłączeniu napięcia zasilania 230 V, jeżeli wzmacniacz jest wyłączony wyłącznikiem POWER (6) i do terminali BATTERY (21) nie jest podłączone zasilanie awaryjne 24 V 8 Wloty powietrza do wentylatora 6.6 Zasilanie i zasilanie awaryjne . . . . . . . . . . . . 24 1.2 Panel tylny 7 Obsługa . . . . . . . . . . . . . . . . . . . . . . . . . . . . 24 8 Obwód zabezpieczający . . . . . . . . . . . . . . . 24 9 Specyfikacja . . . . . . . . . . . . . . . . . . . . . . . . 24 Uwaga: Aby ułatwić podłączanie przewodów do wzmacniacza możliwe jest odczepienie zielonych kostek połączeniowych na czas instalacji. 18 Pokrywa ochronna, zdejmowana przed montażem modułu monitorowania uszkodzeń PA-6FM lub gdy wzmacniacz nie został włączony włącznikiem POWER (6). 19 Pokrywa ochronna, zdejmowana przed montażem modułu wskaźnika uszkodzeń PA-6FD Przekaźnik DC reaguje w przypadku spalenia bezpiecznika zasilania awaryjnego lub gdy nie ma napięcia zasilającego na terminalu BATTERY (21). 20 Wyloty powietrza 21 Terminale BATTERY do podłączania napięcia 24 V zasilania awaryjnego 22 Terminale POWER REMOTE do zewnętrznego przełącznika do włączania/wyłączania zdalnego sterowania Uwaga: Przy zdalnym sterowaniu, wzmacniacz nie może być włączony na przełączniku POWER (6). 23 Kabel zasilający do łączenia z gniazdkiem sieciowym (230 V~/50 Hz) 1.3 Moduł wskaźnika uszkodzeń PA-6FD Moduł wskaźnika uszkodzeń jest dostępny w opcji i nie jest dołączany do wzmacniacza. Przed instalacją modułu należy zdjęć pokrywę (19). 24 Wyjście przekaźnika do podłączania urządzeń sygnałowych 25 Terminale COM i HOT; podłączanie do terminali głośnikowych SPEAKER OUTPUTS (9): HOT do styku 3 i COM do COM 26 Punkty pomiarowe do regulacji czułości 27 Regulator poziomu tonu testującego 20 kHz 28 Regulator czułości 22 G Nie korzystać z urządzenia i natychmiast odłączyć zasilanie: 1. w przypadku stwierdzenia widocznych uszkodzeń urządzenia lub kabla zasilającego, 2. jeżeli urządzenie upadło lub uległo innemu wypadkowi mogącemu spowodować jego uszkodzenie, 3. jeśli urządzenie działa niepoprawnie. Wszelkie naprawy należy zlecić przeszkolonemu personelowi. G Uszkodzony kabel zasilający musi zostać wymieniony przez przeszkolony personel. G Przy odłączaniu zasilania należy chwytać za wtyczkę, nigdy ciągnąć za kabel. G Do czyszczenia używać suchej miękkiej ściereczki, nie stosować chemikaliów. G Producent nie ponosi odpowiedzialności za uszkodzenia urządzenia spowodowane niewłaściwym jego użytkowaniem lub naprawą we własnym zakresie. Przekaźnik FAN reaguje w przypadku awarii lub nie podłączenia wewnętrznego wentylatora. 2 Zasady bezpieczeństwa Urządzenie spełnia wszystkie wymagania norm UE dzięki czemu jest oznaczone symbolems . OSTRZEŻENIE Urządzenie jest zasilane wysokim napięciem (230 V~). Wszelkie naprawy należy zlecić przeszkolonemu personelowi i nie wolno wkładać niczego do otworów wentylacyjnych; może to spowodować porażenie prądem elektrycznym! Podczas pracy na stykach terminali głośnikowych SPEAKER OUTPUTS (9) oraz SLAVE INPUT (11) występuje wysokie napięcie do 100 V. Wszystkie połączenia należy wykonywać przy wyłączonym wzmacniaczu. Jeżeli urządzenie nie będzie już więcej używane należy oddać je do punktu utylizacji. 3 Należy ponadto zwracać uwagę na poniższe punkty: G Moduł monitorowania uszkodzeń jest dostępny w opcji i nie jest dołączany do wzmacniacza. Przed instalacją modułu należy zdjęć pokrywę (18). Urządzenie przeznaczone jest wyłącznie do pracy wewnątrz pomieszczeń. Należy chronić je przed wilgocią i wodą oraz wysokimi temperaturami (dopuszczalny zakres 0 – 40 °C). G 29 Wyjście przekaźnika do podłączania urządzeń sygnałowych Na urządzeniu nie należy stawiać żadnych pojemników z cieczą np. szkalnek. G Ciepło powstające podczas pracy musi być odprowadzone. Nie wolno zakrywać otworów wentylacyjnych. 1.4 Moduł monitorowania uszkodzeń PA-6FM Przekaźnik AC reaguje jeśli nie ma napięcia zasilania, w przypadku spalenia bezpiecznika, 10 Styki przełącznika przełączają wzmacniacz na wejście priorytetowe PRIORITY INPUT (17) przez terminal PRI CTL (15) 11 Alternatywne wejście SLAVE INPUT do podłączania linii 100 V 12 Symetryczne wejście sygnału liniowego PGM INPUT dla standardowych komunikatów lub tła muzycznego; czułość 0,775 V (0 dBu) 13 Przełączniki DIP Nr 1 do włączania/wyłączania filtru dolnozaporowego 400 Hz (tłumi niskie częstotliwości w celu poprawienia zrozumiałości) Nr 2 dolna pozycja ON (ustawione fabryczne) jeżeli nie zainstalowano modułu wskaźnika uszkodzeń PA-6FD (opcja) górna pozycja OFF jeżeli moduł został zainstalowany Nr 3 do włączania/wyłączania tonu testującego 20 kHz jeżeli zainstalowano moduł PA6FD – patrz rozdz. 4.1.1, krok 6 14 Dioda sygnalizacyjna; świeci się podczas prawidłowej pracy wzmacniacza 15 Terminal wyjściowy OUT dla sygnału 24 V (napięcie jest cały czas dostępne gdy wzmacniacz jest włączony; natężenie prądu 0,5 A) oraz terminal PRI CTL do przełącznika priorytetu: jeżeli styki są zwarte, wzmacniacz przełącza się z wejścia PGM INPUT (12) na priorytetowe PRIORITY INPUT (17) 16 Regulator głośności LEVEL sygnału z wejścia PRIORITY INPUT (17) 17 Symetryczne wejście sygnału liniowego PRIORITY INPUT dla ważnych komunikatów – patrz też p. 15 i 16; czułość 0,775 V (0 dBu) Zastosowanie Wzmacniacz PA-1960 o mocy 960 WRMS przeznaczony jest do zastosowań w systemach PA. Wejście liniowe przeznaczone jest do podłączania tła muzycznego oraz standardowych komunikatów; drugie wejście liniowe służy do podłączania ważnych komunikatów alarmowych. Za pomocą zewnętrznego przełącznika możliwe jest zdalne przełączanie wzmacniacza na drugie wejście. PA-1960 w łatwy sposób może być podłączony do systemu PA jeżeli wymagane jest jego rozszerzenie o kolejne głośniki. Służy do tego wejście 100 V. 4 Instalowanie modułów rozszerzających Do wzmacniacza można podłączyć dodatkowe moduły rozszerzające marki MONACOR: PA-6FD moduł wskaźnika uszkodzeń PA-6FM moduł monitorowania uszkodzeń OSTRZEŻENIE Moduły rozszerzające mogą być instalowane tylko przez przeszkolony personel. Przed przystąpieniem do montażu należy zawsze odłączyć zasilanie, aby uniknąć ryzyka porażenia prądem elektrycznym! Jeżeli urządzenie podłączone jest do zasilania alarmowego, odłączyć je od terminalu BATTERY (21). 4.1 Moduł wskaźnika uszkodzeń PA-6FD Moduł wskaźnika uszkodzeń PA-6FD (rys. 3 i 4) dostępny w opcji jest specjalnie zaprojektowany do tego wzmacniacza. Generuje on sinusoidalny ton testowy 20 kHz, który jest podawany do wzmacniacza. Jeżeli ton nie pojawi się na wyjściu głośnikowym SPEAKER OUTPUTS (9) z powodu uszkodzenia wzmacniacza, zapalą się diody FAULT i PROTECT (5). Poza tym zgaśnie zielona dioda (14) na tylnym panelu wzmacniacza. Dodatkowo, za pomocą przekaźnika możliwa jest aktywacja urządzenia sygnałowego. 4.1.1 Instalacja i podłączenie 1) Odkręcić obudowę wzmacniacza i usunąć pokrywę (19). Odczepić 4-pinowy kabel przymocowany do pokrywy. 2) Ustawić przełącznik SW 1 na module wskaźnika uszkodzeń na pozycję ON. 3) Przeprowadzić 4-pinowy kabel przez otwór po pokrywie i podłączyć go do gniazda CN 601 modułu. Zewnętrzny pin gniazda musi pozostać niepodłączony, jak pokazano na rys. 4. 5 Przygotowanie wzmacniacza do pracy Wzmacniacz przystosowany jest do montażu w racku 19", ale może pracować także jako urządzenie wolnostojące. W każdym przypadku należy zapewnić odpowiednią ilość miejsca wokół wzmacniacza, w celu dostatecznej wentylacji i chłodzenia. 5.1 Montaż w racku Przy montażu w racku wymagane są 3 przestrzenie montażowe (3 U = 133 mm). Aby zapewnić stabilność stojaka, ciężkie wzmacniacze należy montować na dole. Ciepło wytwarzane w czasie pracy wzmacniacza musi zostać odprowadzone, w przeciwnym razie może nastąpić przegrzanie urządzeń w racku i ich uszkodzenie. W przypadku niedostatecznej wentylacji stojaka należy zamontować dodatkowe wentylatory. 6 Podłączanie wzmacniacza Wszystkie podłączenia należy zlecić przeszkolonemu personelowi. Wszystkie połączenia należy wykonywać po odłączeniu zasilania! Uwaga: Aby ułatwić podłączanie przewodów do wzmacniacza możliwe jest odczepienie zielonych kostek połączeniowych na czas instalacji. 6.1 Głośniki Podłączyć kabel głośnikowy do terminalu wyjściowego SPEAKER OUTPUTS (9): ujemną żyłę do styku COM dodatnią do styku 1, 2, lub 3 w zależności od rodzaju głośników. Całkowite obciążenie wzmacniacza nie może przekroczyć 960 WRMS, w przeciwnym razie wzmacniacz ulegnie uszkodzeniu. 4) Umieścić moduł PA-6FD w miejscu po odkręconej pokrywie a następnie przykręcić go. 5) Połączyć styk COM wyjścia głośnikowego SPEAKER OUTPUTS (9) wzmacniacza ze stykiem COM terminalu Line In (25) na module; połączyć styk 3 wyjścia SPEAKER OUTPUTS ze stykiem HOT terminalu Line In. 6) Ustawić przełącznik DIP nr 2 (13) na tylnym panelu wzmacniacza w górną pozycję OFF oraz przełącznik DIP nr 3 w dolną pozycję ON. Jeżeli jednak wykorzystywane jest wejście SLAVE INPUT (11) i ton testowy 20 kHz podawany jest już z innego wzmacniacza, należy ustawić przełącznik DIP nr 3 w górną pozycję OFF, w przeciwnym razie tony się nałożą! 7) Jeżeli moduł wykryje uszkodzenie, zaświecą się diody FAULT oraz PROTECT (5) i zamkną się styki przekaźnika (24). Styki pozwalają na podłączenie urządzenia sygnałowego, które będzie informowało dźwiękiem o powstaniu uszkodzenia. Natężenie na stykach wynosi 1 A przy 120 V ~ max. lub 24 V max. Uwaga: Styki zamkną się również po wyłączeniu wzmacniacza. 3) Zmierzyć napięcie tonu testującego 20 kHz w punktach pomiarowych “+ -” (26) na module. Wyregulować 2 V~ regulatorem Sensitivity (28). 4) Po zakończeniu kalibracji, ustawić regulatory głośności PGM (1) i LEVEL (16) do poprzedniej wartości. 4.2 Moduł monitorowania uszkodzeń PA-6FM Moduł monitorowania uszkodzeń PA-6FM (rys. 5 i 6) dostępny w opcji jest specjalnie zaprojektowany do tego wzmacniacza. Trzy wyjścia przekaźnika (29) pozwalają aktywować urządzenia sygnałowe w przypadku powstania następujących uszkodzeń: Styki przekaźnika AC przełączają się jeżeli nie ma napięcia zasilania, w przypadku spalenia bezpiecznika, lub gdy wzmacniacz nie został włączony włącznikiem POWER (6). Styki przekaźnika DC przełączają się w przypadku spalenia bezpiecznika zasilania awaryjnego lub gdy nie ma napięcia zasilającego na terminalu BATTERY (21). Styki przekaźnika FAN przełączają się w przypadku awarii lub nie podłączenia wewnętrznego wentylatora. 4.1.2 Kalibracja 1) Włączyć wzmacniacz i ustawić regulatory głośności PGM (1) i LEVEL (16) na zero, aby na wyjściu głośnikowym był tylko ton testujący 20 kHz. Jeżeli wykorzystywane jest wejście SLAVE INPUT (11), nie należy podczas kalibracji podawać na to wejście sygnału komunikatu ani muzyki; tylko ton testujący 20 kHz z innego wzmacniacza. Jeżeli ton testowy 20 kHz jest dostępny, pominąć następny krok i przeskoczyć do 3. 2) Zmierzyć napięcie tonu testującego 20 kHz pomiędzy stykami COM i 3 wyjścia SPEAKER OUTPUTS (9) i wyregulować do 2 V~ regulatorem OSC Level (27). Uwaga: Wszystkie styki przekaźników przełączają się również po wyłączeniu wzmacniacza. Ważne! Zgodnie z ustawieniami fabrycznymi styki COM i 3 mogą być wykorzystywane tylko do linii głośnikowej 100 V. wzmacniacz przełączy się z wejścia PGM INPUT na PRIORITY INPUT i będzie słyszalny tylko komunikat alarmowy. Głośność komunikatów alarmowych jest osobno regulowana pokrętłem LEVEL (16) na tylnym panelu. Poniższa tabela pokazuje dopuszczalne napięcia: Pozycja przełącznika PL 1) Odkręcić obudowę wzmacniacza i usunąć pokrywę (18). Odczepić 6-pinowy kabel przymocowany do pokrywy. 2) Przeprowadzić 6-pinowy kabel przez otwór po pokrywie i podłączyć go do gniazda CN 5 modułu. 3) Umieścić moduł PA-6FM w miejscu po odkręconej pokrywie a następnie przykręcić go. 4) Podłączyć urządzenie sygnałowe, które będzie informowało dźwiękiem o wystąpieniu awarii, do styków przekaźnika (29). Oznaczenie na module wskazuje pozycję styków w przypadku awarii oraz wyłączenia wzmacniacza. Natężenie na stykach wynosi 1 A przy 120 V ~ max. lub 24 V max. Terminal 1 2 3 A Ustawienia fabryczne 75 V 85 V 100 V B 60 V 70 V 85 V C 50 V 60 V 75 V OSTRZEŻENIE Modyfikowanie ustawień fabrycznych może być przeprowadzone wyłącznie przez przeszkolony personel. Przed otarciem wzmacniacza należy zawsze odłączyć wzmacniacz od gniazda sieciowego lub zasilania awaryjnego na terminalu BATTERY (21), aby uniknąć porażenia prądem elektrycznym! Odkręcić obudowę wzmacniacza. Na PCB dołączony jest przewód łączący terminal głośnikowy SPEAKER OUTPUTS (9) i PRIORITY RELAY (10). Przełączyć kabel ze złącza A do złącza B lub C. Skręcić z powrotem obudowę. 6.2 Wejścia sygnałów liniowych Aby podłączyć większą ilość źródeł sygnału (odtwarzacz CD, tuner) i mikrofonów konieczne jest zastosowanie przedwzmacniacza PA (np. PA-1410MX marki MONACOR). Połączyć wyjście przedwzmacniacza z wejściem PGM INPUT (12). Do podłączania ważnych i alarmowych komunikatów, PA-1960 został wyposażony w wejście priorytetowe PRIORITY INPUT (17). Jak tylko przełącznik priorytetu lub przełącznik podłączony do styków terminalu PRI CTL (15) zostaje zamknięty, 6.3 Wejście 100 V Alternatywnie do wejść sygnałowych (12) i (17), można wykorzystać wejście 100 V SLAVE INPUT (11), np. przy rozbudowywaniu systemu o dodatkowy wzmacniacz i głośniki. Podłączyć terminal SLAVE INPUT do kabla głośnikowego 100 V. Uwaga: Regulatory PGM (1) i LEVEL (16) nie mają wpływu na sygnał podany na wejście SLAVE INPUT. Regulacja tego sygnału odbywa się na wzmacniaczu 100 V do którego podłączony jest PA-1960. 6.4 Przełącznik priorytetu i wyjście 24 V Jak tylko przełącznik priorytetu lub przełącznik podłączony do terminalu PRI CTL (15) zostanie zamknięty, przełączy się wewnętrzny przełącznik priorytetu. Jego terminale PRIORITY RELAY (10) pozwalają na sterowanie dodatkowymi funkcjami np. przełączanie regulatorów z priorytetem. Jeżeli do przełączenia wymagane jest napięcie 24 V, można wykorzystać napięcie z terminalu +24 V (15). Natężenie prądu na stykach wynosi 500 mA i może być wykorzystane również do innych zastosowań. 6.5 Zdalne sterowanie włączanie/wyłączanie Wzmacniacz pozwala na włączanie/wyłączanie zdalnego sterowania przez osobnych przełączników. 1) Podłączyć terminale POWER REMOTE (22) dwużyłowym kablem do jednopolowego przełącznika on/off. 2) Uwaga: Przy zdalnym sterowaniu, wzmacniacz nie może być włączony na przełączniku POWER (6). 23 PL 6.6 Zasilanie i zasilanie awaryjne 7 1) Aby zapewnić ciągłą pracę wzmacniacza w przypadku zaniku napięcia zasilania sieciowego, do terminalu BATTERY (21) można podłączyć 24 V urządzenie zasilające (np. PA-24ESP marki MONACOR). Połączenie należy wykonać za pomocą 4 kabli (rys. 7), o maksymalnej długości 4 m i przekroju minimum 5 mm2 (np. serii CPC-... marki MONACOR). Uwaga: Jeżeli do wzmacniacza podłączono zasilanie awaryjne 24 V, nie jest możliwe jego wyłączenie wyłącznikiem POWER (6). W przypadku zaniku napięcia sieciowego lub wyłączenia wzmacniacza, przełączy się on automatycznie na zasilanie awaryjne. Jeżeli wzmacniacz jest wyłączony ale podłączony do napięcia zasilania, dioda STANDBY (7) świeci się. 1) Aby uniknąć trzasku przy włączaniu, należy najpierw włączyć pozostałe urządzenia systemu. 2) Przed pierwszym włączeniem wzmacniacza, ustawić regulatory głośności PGM (1) oraz LEVEL (16) na zer, aby uniknąć zbyt dużej głośności na starcie. Następnie włączyć wzmacniacz włącznikiem POWER (6) lub przełącznikiem podłączonym do terminalu POWER REMOTE (22). Zaświeci się dioda POWER (3). 3) Ustawić regulator PGM (1) na odpowiednią głośność. Po osiągnięciu pewnej wartości, zaświeci się dioda SIGNAL (4). W przypadku przesterowania, zaświeci się dioda CLIP (5). Należy wówczas zmniejszyć głośność. 4) Ustawić głośność komunikatów alarmowych podawanych na wejście PRIORITY INPUT (17) regulatorem LEVEL (16) na tylnym panelu. Przełącznik priorytetu podłączony do terminalu PRI CTL (15) musi być zamknięty. Zapali się dioda PRIORITY (2). 5) Aby poprawić zrozumiałość komunikatów, włączyć filtr dolnozaporowy (400 Hz) przełącznikiem DIP nr 1 (13) [pozycja ON]. Zakłócenia niskich częstotliwości zostaną wyeliminowane. BATTERY 24 V4 4 / 80 A 24V BATTERY EMERGENCY POWER SUPPLY UNIT FULL 80% 60% 40% CHARGING AC DC POWER Zasilanie awaryjne Obsługa 2) Na końcu podłączyć kabel zasilający (23) do gniazdka sieciowego (230 V~/50 Hz). Uwaga: Nawet po wyłączeniu wzmacniacz pobiera niewielką ilość mocy. W przypadku dłuższej przerwy w użytkowaniu należy odłączyć kabel zasilający od gniazdka sieciowego. 9 Specyfikacja Moc wyjściowa . . . . . . . . . . 960 WRMS THD: . . . . . . . . . . . . . . . . . < 0,4 % Napięcie wyjściowe / Impedancja wyjściowa: . . . 75 V/5,6 Ω 85 V/7,2 Ω 100 V/10 Ω Wejścia PGM + PRIORITY INPUT: 0,775 V/60 kΩ SLAVE INPUT: . . . . . . . . 100 V Pasmo przenoszenia: . . . . 35 – 20 000 Hz, -3 dB Współczynnik S/N: . . . . . . > 100 dB (ważony A) Filtr dolnozaporowy: . . . . . . 400 Hz, 6 dB/oktawę Zasilanie Zasilanie sieciowe: . . . . . 230 V~/50 Hz Pobór mocy: . . . . . . . . . . 2600 VA Zasilanie awaryjne: . . . . . 24 V /80 A Zakres temperatur: . . . . . . 0 – 40 °C Wymiary (W × H × D): . . . . 482 × 133 × 374 mm, 3U Waga: . . . . . . . . . . . . . . . . 25 kg Z zastrzeżeniem możliwości zmian. Instrukcje obsługi są chronione prawem copyright for MONACOR ® INTERNATIONAL GmbH & Co. KG. Przetwarzanie całości lub części instrukcji dla osobistych korzyści finansowych jest zabronione. 24 8 Obwód zabezpieczający Wzmacniacz wyposażony jest w obwód zabezpieczający przed przegrzaniem, przeciążeniem oraz zwarciem na wyjściu głośnikowym. W przypadku przegrzania zapali się dioda PROTECT (5), w przypadku przeciążenia, zwarcia lub innego uszkodzenia zapali się dodatkowo dioda FAULT. W każdym z tych przypadków wzmacniacz zostanie wyciszony. W razie wystąpienia którejkolwiek awarii należy wyłączyć wzmacniacz i zlecić usunięcie usterki przeszkolonemu personelowi. Jeżeli nie zainstalowano modułu wskaźnika uszkodzeń PA-6FD (rys. 3), ustawić przełącznik DIP nr 2 (13) w dolną pozycję ON, w przeciwnym wypadku obwód zabezpieczający nie będzie działał. Læs nedenstående sikkerhedsoplysninger opmærksomt igennem før ibrugtagning af enheden. Bortset fra sikkerhedsoplysningerne henvises til den engelske, tyske, franske eller italienske tekst. DK Vigtige sikkerhedsoplysninger Denne enhed overholder alle nødvendige EU-direktiver og er som følge deraf mærket . G Undgå at placere væskefyldte genstande, som f. eks. glas, ovenpå enheden. G ADVARSEL Dette produkt benytter 230 V~. Udfør aldrig nogen form for modifikationer på produktet og indfør aldrig genstande i ventilationshullerne, da du dermed risikere at få elektrisk stød. Under drift er der farlig spænding op til 100 V på terminalerne OUTPUTS (9) og SLAVE INPUT (11). Husk altid at slukke for PA-anlægget før tilslutning eller en hvilken som helst ændring af tilslutningerne. G Varmen, der udvikles i enheden, skal kunne slippe ud ved hjælp af luftcirkulation. Kabinettets ventilationshuller må derfor aldrig tildækkes. G G Tag ikke enheden i brug eller tag straks stikket ud af stikkontakten i følgende tilfælde: 1. hvis der er synlig skade på enheden eller netkablet. 2. hvis der kan være opstået skade, efter at enheden er tabt eller lignende. 3. hvis der forekommer fejlfunktion. Enheden skal altid repareres af autoriseret personel. Vær altid opmærksom på følgende: G Enheden er kun beregnet til indendørs brug. Beskyt den mod vanddråber og -stænk, høj luftfugtighed og varme (tilladt omgivelsestemperatur 0 – 40 °C). G G Tag aldrig stikket ud af stikkontakten ved at trække i kablet, tag fat i selve stikket. Til rengøring må kun benyttes en tør, blød klud; der må under ingen omstændigheder benyttes kemikalier eller vand. Hvis enheden benyttes til andre formål, end den oprindeligt er beregnet til, hvis den ikke er korrekt tilsluttet, hvis den betjenes forkert, eller hvis den ikke repareres af autoriseret personel, omfattes eventuelle skader ikke af garantien. Hvis enheden skal tages ud af drift for bestandigt, skal den bringes til en lokal genbrugsstation for bortskaffelse. Et beskadiget netkabel må kun repareres af autoriseret personel. Innan enheten tas i bruk observera följande säkerhetsinstruktioner. Behövs ytterligare information för handhavande utav enheten finner Ni det i den Tyska, Engelska, Franska eller Italienska delen i manualen. S Säkerhetsföreskrifter G Placera inte föremål innehållande vätskor, t. ex. dricksglass, på enheten. Enheten använder hög spänning internt (230 V~). Gör inga modifieringar i enheten eller stoppa föremål i ventilhålen. Risk för elskador föreligger. Vid drift så finns det mycket farliga spänningar, upp till 100 V förekommer på terminalerna OUTPUTS (9) och SLAVE INPUT (11). Stäng alltid av PA systemet innan man gör några inkopplings förändringar. G Värmen som alstras skall ledas bort genom cirkulation. Täck därför aldrig över hålen i chassiet. G Använd inte enheten och tag omedelbart ut kontakten ur elurtaget om något av följande uppstår: 1. Enheten eller elsladden har synliga skador. 2. Enheten är skadad av fall ed. 3. Enheten har andra felfunktioner. Enheten skall lämnas till auktoriserad verkstad för service. G En skadad elsladd skall endast bytas på verkstad. Ge även akt på följande: G Enheten är endast avsedd för inomhusbruk. Skydda enheten mot vätskor, hög luftfuktighet och hög värme (tillåten omgivningstemperatur 0 – 40 °C). G Dra aldrig ut kontakten genom att dra i sladden utan ta tag i kontaktkroppen. G Rengör endast med en mjuk och torr trasa, använd aldrig kemikalier eller vatten vid rengöring. Enheten uppfyller samtliga Eu-direktiv och har därför försett med symbolen . VARNING G Om enheten används på annat sätt än som avses, om den inte kopplas in ordentligt, om den används på fel sätt eller inte repareras av auktoriserad personal upphör alla garantier att gäll. I dessa fall tas inget ansvar för uppkommen skada på person eller materiel. Om enheten skall kasseras bör de lämnas in till återvinning. Ole hyvä ja huomioi aina seuraavat turvallisuutta koskevat ohjeet ennen laitteen käyttöön ottoa. Katso käyttöön liittyviä ohjeita Saksan, Englannin, Ranskan tai Italian kielisistä ohjeista, jos tarvitset lisää tietoa laitteen käytöstä. FIN Turvallisuudesta Tämä laite täyttää kaikki siihen kohdistuvat EUdirektiivit ja sille on myönnetty hyväksyntä. G Älä sijoita laitteen päälle mitään nestettä sisältävää, kuten vesilasia tms. G VAROITUS Tämä laite toimii vaarallisella 230 V~ jännitteellä. Älä koskaan tee mitään muutoksia laitteeseen taikka asenna mitään ilmanvaihto aukkoihin, koska siitä saattaa seurata sähköisku. Käytön aikana terminaaleissa OUTPUTS (9) ja SLAVE INPUT (11) on vaarallinen jopa 100 V jännite. Sammuta aina PA-laitteisto kaikkien kytkentöjen suorittamisen ajaksi. G Laitteessa kehittyvä lämpö poistetaan ilmanvaihdolla. Tämän vuoksi laitteen tuuletusaukkoja ei saa peittää. G G Älä kytke virtaa päälle ja irrota laite välittömästi sähköverkosta jos: 1. laitteessa on näkyvä vika. 2. laite on saattanut vaurioitua pudotuksessa tai vastaavassa tilanteessa. 3. laite toimii väärin. Kaikissa näissä tapauksissa laitteen saa korjata vain hyväksytty huolto. Huomioi myös seuraavat seikat: G Tämä laite soveltuu vain sisätilakäyttöön. Suojele laitetta kosteudelta, vedeltä ja kuumuudelta (sallittu ympäröivä lämpötila 0 – 40 °C). G Vioittuneen verkkojohdon saa vaihtaa vain siihen oikeutettu sahkoasentaja. G Älä koskaan irroita verkkoliitintä johdosta vetämällä. Vedä aina itse liittimestä. Käytä puhdistamiseen pelkästään kuivaa, pehmeää kangasta. Älä käytä kemikaaleja tai vettä. Laitteen takuu raukeaa, eikä valmistaja, maahantuoja tai myyjä ota vastuuta mahdollisista välittömistä tai välillisistä vahingoista, jos laitetta on käytetty muuhun kuin alkuperäiseen käyttötarkoitukseen, laitetta on taitamattomasti käytetty tai kytketty tai jos laitetta on huollettu muussa kuin valtuutetussa huollossa. Kun laite poistetaan lopullisesti käytösta, vie se paikalliseen kierrätyskeskukseen jälkikäsittelyä varten. 25 ® Copyright © by MONACOR INTERNATIONAL GmbH & Co. KG, Bremen, Germany. All rights reserved. A-0799.99.01.01.2008