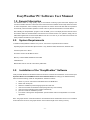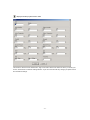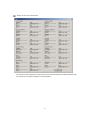
1
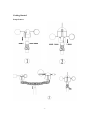
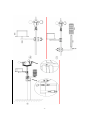
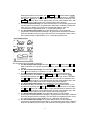
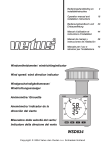
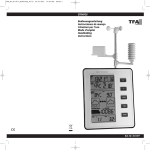
TOUCH SCREEN WEATHER STATION
(WIND AND AIR PRESSURE) PCE-FWS 20
Operation Manual
About this manual
Thank you and congratulations on selecting this professional weather station! We are positive you will enjoy
the benefits of accurate weather readings and the precise radio controlled time information that our
instruments offer.
This manual will guide you step-by-step through setting up your PCE-FWS 20 device. Use this manual to
become familiar with your professional weather station, and save it for future reference.
Glossary of Common Terms
DCF/WWVB
The DCF or WWVB time signal is an AM modulated time-of-day signal broadcasted by the Federal
Government of Germany or NIST from USA. The time base is generated from an atomic time generator which
is accurate to 10 billions of one second.
LCD
“LCD” is an acronym for ”Liquid Crystal Display”. This is a common type of display screen used in
televisions, computers, watches, and digital clocks.
BAROMETER & BAROMETRIC PRESSURE
A barometer is a device that measures the pressure of the air pushing on it—this measurement is called the
barometric pressure. We don’t actually feel the barometric pressure because the air pressure is pushing
equally in every direction.
RELATIVE AIR PRESSURE
Relative air pressure is the same as the barometric pressure.
combination of the absolute air pressure and the altitude.
The calculation of relative air pressure is a
ABSOLUTE AIR PRESSURE
Absolute air pressure is the actual air pressure on the barometer without regard to altitude.
INCHES OF MERCURY (inHg)
Inches of Mercury is the common unit of measurement for air pressure in the United States.
HECTOPASCALS (hPa)
Hectopascals are the common units of measurement for air pressure in the International System (SI) of
measurement. The hectopascal holds the same value
Important Note:
Before inserting batteries, please carefully read the operation manual.
-1-
The touch screen weather station PCE-FWS 20 includes a base station(receiver), a transmitter unit, one wind
direction sensor, one wind speed sensor, one rain gauge, USB cable and a PC software package on
CD-ROM.
The Base Station is equipped with a Touch Screen LCD Monitor and allows the display of a large variety of
time and weather data.
Left Top LCD:
IN-OUT temperature and humidity
Right Top LCD:
Wind and Rain measurement
Left Middle LCD:
Weather Forecast(Tendency)
Right Middle LCD:
Air Pressure and Air Pressure History
Bottom Line LCD:
Time and Date, Memory Data Usage
Note: The presence of the "Alarm-On icon" in the section means that the particular alarm has been enabled.
An added feature of the Weather Station is the readout of all measured and displayed time and
weather data on a PC as well as the ability to upload the data to Internet Web Sites.
Important Operation Notes
All actions and functions of the weather station are started on the touch screen by slightly
touching(not pressing!) the related areas, touch the flashing +, ON/OFF or – to make the
corresponding selection or increase the value.
Every time a programming step is activated by touching a switching area on the Touch Screen a tone will
sound , and the back light is switched on for a few seconds as well.
If no areas are pressed for 30 seconds, the LCD will automatically revert to the normal display mode
(automatic time out).
-2-
Getting Started
Setup Sensors
-3-
-4-
Important Notes:
On the edge of wind direction sensor, there are four alphabet letter of “N”,”E”,”S”and “W” representing for the
direction of North, East, South and West. Wind direction sensor has to be adjusted so that the directions on
the sensor are matching with your real location. Permanent wind direction error will be introduced when the
wind direction sensor is not positioned correctly during installation.
Wind speed sensor wire has to be inserted into the phone jacket on wind direction sensor.
Wind direction sensor wire has to be inserted into the phone jacket located on the thermo-hygro sensor with
marking of “Wind” on top.
The rain sensor wire has to be inserted into the phone jacket located on the thermo-hygro sensor with
marking of “Rain” on top.
System Start
Insert two pieces of LR6(AA size) batteries into the transmitter, the LED located in the middle front case of
transmitter will be turned on for 4 seconds, then it will be off and start to work normally. The transmitter will
make a data transmission and then start radio controlled time reception routine. If time signal can be detected
correctly, then the LED will start to flash 5 times indicating time signal has been found correctly. When time
signal is bad and reception is not possible, the transmitter will terminate radio controlled time reception within
one minute and resume normal mode. When there is a data transmission happened, the LED will be on for
20ms. During radio controlled time reception period, there is no transmission and normal transmission will
only resume after time reception routine is complete. The longest time for radio controlled time reception is 5
minutes.
After inserting the batteries into the Weather Station, all LCD segments will be turned on for a few seconds,
all possible display segments are turned on for checking.
After this, the weather station will make initial measurement and start to register the transmitter ( the radio
reception icon will be turned on). Before there is outdoor data received, it is not allowed to touch the LCD,
otherwise the outdoor sensor learning mode will be terminated right after the touch of LCD. When outdoor
transmitter has been registered, the Touch Screen Weather Station will automatically switch to the normal
display mode from which all further settings can be performed by the user.
-5-
If no RCC signal is detected in the initial setup, the transmitter will try once every hour to get an RCC signal
until a signal is received. Once the transmitter receives the RCC signal it will transmit the signal to the monitor.
On the monitor the RCC icon will be displayed, if the monitor doesn’t receive the RCC signal or loses the
signal the RCC icon will not be display.
Note: The best condition for reception is at night, between midnight and 6:00am – when there is less
atmospheric interference.
Positioning
Once you have verified that all of the components of the weather station are working, they can be positioned
in their permanent places. Before permanently mounting, make sure that all components work properly
together at their chosen mounting or standing locations. If e.g. there appear to be problems with the 868 MHz
radio transmission, they can mostly be overcome by moving the mounting locations.
Note: Commonly the radio communication between receiver and transmitter in the open field can reach a
distance of up to 330 feet providing that there are no interfering obstacles such as buildings, trees,
vehicles, high voltage lines, etc.
Radio interferences such as PC screens, radios or TV sets can, in bad cases, entirely cut off radio
communication. Please take this into consideration when choosing standing or mounting locations.
Setting Up
Note: Because of the default settings already determined by the manufacturer it may not be necessary for the
majority of users to perform – except the Relative Air Pressure (see further down) - any further basic
settings. Changes, however, can be easily made.
For basic settings, the following menu is started by touching the Touch Screen in the desired display area.
The basic settings can now be performed in the following successive order:
Note: setting procedure can be exited at any time by touching any other function area (except
“+”, “-” or “ON/OFF”).
indoor temperature
Activate the indoor temperature related setting by
1)Touch the INDOOR TEMPERATURE section, + button and – button will be flashing. Touch the
+ button or – button to Shift the display unit between ℃ and ℉
2)Touch the INDOOR TEMPERATURE section again to set the indoor temperature high alarm
function, the +, ON/OFF and – button will be flashing, HI AL icon will light up. Touch the+ button
or – button to change the value, hold the+ button or – button for 3s to change the number in
great step. Touch the ON/OFF button to choose the alarm on or off (if alarm is enabled, the
speaker icon will be turned on indicating the alarm function has been enabled).
-6-
3)Touch the INDOOR TEMPERATURE section the third time to set the indoor temperature low
alarm function, the +, ON/OFF and – button will be flashing, LO AL icon will light up. Touch the+
button or – button to change the value, hold the+ button or – button for 3s to change the
number in great step. Touch the ON/OFF button to choose the alarm on or off (if alarm is
enabled, the speaker icon will be turned on indicating the alarm function has been enabled).
4)Touch the INDOOR TEMPERATURE section the fourth time to display maximum indoor
temperature record, the maximum records will be flashing, MAX icon will light up as well. Hold
the flashing max value for 3s, the maximum value will be reset to current reading.
5)Touch the INDOOR TEMPERATURE section the fifth time to display minimum indoor
temperature record, the minimum records will be flashing, MIN icon will light up as well. Hold the
flashing min value for 3s, the minimum value will be reset to current reading.
outdoor temperature
Activate the outdoor temperature related setting by
1)Touch the OUTDOOR TEMPERATURE section, + button and – button will be flashing. Touch
the + button or – button to Shift the display between Outdoor Temperature, Wind Chill and Dew
Point.
2)Touch the OUTDOOR TEMPERATURE section again, + button and – button will be flashing.
Touch the + button or – button to Shift the display unit between ℃ and ℉
3)Touch the OUTDOOR TEMPERATURE section the third time to set the outdoor temperature
high alarm function, the +, ON/OFF and – button will be flashing, HI AL icon will light up. Touch
the+ button or – button to change the value, hold the+ button or – button for 3s to change the
number in great step. Touch the ON/OFF button to choose the alarm on or off (if alarm is
enabled, the speaker icon will be turned on indicating the alarm function has been enabled).
4)Touch the OUTDOOR TEMPERATURE section the fourth time to set the outdoor temperature
low alarm function, the +, ON/OFF and – button will be flashing, LO AL icon will light up. Touch
the+ button or – button to change the value, hold the+ button or – button for 3s to change the
number in great step. Touch the ON/OFF button to choose the alarm on or off (if alarm is
enabled, the speaker icon will be turned on indicating the alarm function has been enabled).
5)Touch the OUTDOOR TEMPERATURE section the fifth time to display maximum outdoor
temperature record, the recorded maximum value will be flashing, MAX icon will light up. Hold
the flashing max value for 3s, the maximum value will be reset to current reading.
6)Touch the OUTDOOR TEMPERATURE section the sixth time to display minimum outdoor
temperature record, the recorded minimum value will be flashing, MIN icon will light up as well.
Hold the minimum value for 3s, the minimum value will be reset to current reading.
-7-
Indoor humidity
Activate the indoor humidity related setting by
1)Touch the INDOOR HUMIDITY section again to set the indoor humidity high alarm function, the
+, ON/OFF and – button will be flashing, HI AL icon will light up. Touch the+ button or – button
to change the value, hold the+ button or – button for 3s to change the number in great step.
Touch the ON/OFF button to choose the alarm on or off (if alarm is enabled, the speaker icon
will be turned on indicating the alarm function has been enabled).
2)Touch the INDOOR HUMIDITY section again to set the indoor humidity low alarm function, the +,
ON/OFF and – button will be flashing, LO AL icon will light up. Touch the+ button or – button to
change the value, hold the+ button or – button for 3s to change the number in great step. Touch
the ON/OFF button to choose the alarm on or off (if alarm is enabled, the speaker icon will be
turned on indicating the alarm function has been enabled).
3)Touch the INDOOR HUMIDITY section the third time to display maximum indoor humidity record,
the recorded maximum value will be flashing, MAX icon will light up as well. Hold the maximum
value for 3s, the maximum value will be reset to current reading.
4)Touch the INDOOR HUMIDITY section the fourth time to display minimum indoor humidity
record, the recorded minimum value will be flashing, MIN icon will light up as well. Hold the
minimum value for 3s, the minimum value will be reset to current reading.
Outdoor humidity
Procedures and settings are similar to Indoor humidity
Wind speed
Activate the wind related setting by
1)Touch the WIND SPEED section, + button and – button will be flashing. Touch the + button or –
button to Shift the display between Wind Average Speed and Gust Speed.
2)Touch the WIND SPEED section again, + button and – button will be flashing. Touch the +
button or – button to select wind speed unit between km/h, mph, m/s, knots, bft
-8-
3)Touch the WIND SPEED section the third time to set the high alarm function, the +, ON/OFF
and – button will be flashing, HI AL icon will light up. Touch the+ button or – button to change
the value, hold the+ button or – button for 3s to change the number in great step. Touch the
ON/OFF button to choose the alarm on or off (if alarm is enabled, the speaker icon will be
turned on indicating the alarm function has been enabled).
4)Touch the Wind SPEED section the fourth time to set wind direction alarm function, the wind
direction arrow will start to flashing. Touch + or – to select desired alarm for wind direction, press
ON/OFF to enable or disable the wind direction alarm.
5)Touch the Wind SPEED section the fifth time to display maximum wind speed record, the
recorded maximum value will be flashing, MAX icon will light up as well. Hold the maximum
value for 3s, the maximum value will be reset to current reading.
Rain
Activate the rain related setting by
1)Touch the rain section, + button and – button will be flashing. Touch the + button or – button to
Shift the display between 1h,24h,week,month and total rain.
2)Touch the rain section again, + button and – button will be flashing. Touch the + button or –
button to select rain fall unit between mm,inch.
3)Touch the rain section the third time to set the high alarm function, the +, ON/OFF and – button
will be flashing, HI AL icon will light up. Touch the+ button or – button to change the value, hold
the+ button or – button for 3s to change the number in great step. Touch the ON/OFF button to
choose the alarm on or off (if alarm is enabled, the speaker icon will be turned on indicating the
alarm function has been enabled).
4)Touch the rain section the fourth time to display current maximum rain fall record. Touch the rain
section for 3s will reset the maximum rain fall value to current value.
5)Touch the rain section the fifth time to reset rain fall value to 0 by pressing the rain section for
3s, then 1h,24h,week,month and total rain will be reset to 0.
Weather forecast
-9-
1)Touch the WEATHER FORECAST section, + button and – button will be flashing. Touch the +
button or – button to Shift the display between SUNNY, PARTLY CLOUDY and CLOUDY,
RAINY icon
2)Touch the WEATHER FORECAST section again, + button and – button will be flashing. Touch
the + button or – button to set the pressure threshold from 2-4hPa(default 2hPa)
3)Touch the WEATHER FORECAST section the third time, + button and – button will be flashing.
Touch the + button or – button to set the storm threshold from 3-9hPa(default 4 hPa)
Pressure
1)Touch the PRESSURE section, + button and – button will be flashing. Touch the + button or –
button to Shift the display between Absolute pressure and Relative pressure.
2)Touch the PRESSURE section again, + button and – button will be flashing. Touch the + button
or – button to Shift the display unit between hPa, inHg and mmHg.
3)Touch the PRESSURE section the third time to set the Relative Pressure value. The + and –
button will be flashing, rel icon will light up. Touch the+ button or – button to change the value,
hold the+ button or – button for 3s to change the number in great step.
4)Touch the PRESSURE section the forth time to set the pressure high alarm function, the +,
ON/OFF and – button will be flashing, HI AL icon will light up. Touch the+ button or – button to
change the value, hold the+ button or – button for 3s to change the number in great step. Touch
the ON/OFF button to choose the alarm on or off (if alarm is enabled, the speaker icon will be
turned on indicating the alarm function has been enabled).
5)Touch the PRESSURE section the fifth time to set the pressure low alarm function, the +,
ON/OFF and – button will be flashing, LO AL icon will light up. Touch the+ button or – button to
change the value, hold the+ button or – button for 3s to change the number in great step. Touch
the ON/OFF button to choose the alarm on or off (if alarm is enabled, the speaker icon will be
turned on indicating the alarm function has been enabled).
6)Touch the PRESSURE sections the sixth time to display maximum pressure record, to display
maximum pressure, the recorded maximum value will be flashing, MAX icon will light up as well.
Hold the maximum value for 3s, the maximum value will be reset to current reading.
7)Touch the PRESSURE section the seventh time to display minimum pressure record, to display
minimum pressure record, the recorded minimum value will be flashing, MIN icon will light up as
well. Hold the minimum value for 3s, the minimum value will be reset to current reading.
Note: when absolute pressure is selected, step 3 will be skipped since absolute pressure is
selected for display.
Pressure bar graph
Touch the PRESSURE BAR GRAPH section and then press + or – to toggle the bar graph
time scale between 12hrs or 24 hrs for pressure history.
- 10 -
Time
1)Touch the TIME section, + button and – button will be flashing. Touch the + button or – button to
set the timezone.
2)Touch the TIME section again, + button and – button will be flashing. Touch the + button or –
button to Shift the 12/24 hours format.
3)Touch the TIME section the third time, + button and – button will be flashing. Touch the + button
or – button to set the DST ON or OFF(this function is only available for WWVB version, while for
DCF version, this feature is not activated).
Note: “DST OFF” indicates that the feature is off and the internal real time clock will not change
times automatically. “DST ON” indicates that the feature is on and the internal real time clock will
change times according to the DST time schedule automatically. Some locations (Arizona and
parts of Indiana) do not follow Daylight Saving Time, and should select “DST OFF”.
4)Touch the TIME section the fourth time to set the hour, the + and – button will be flashing.
Touch the+ button or – button to change the value.
5)Touch the TIME section the fifth time to set the Minute, the + and – button will be flashing.
Touch the+ button or – button to change the value.
Date
1)Touch the DATE section, + button and – button will be flashing. Touch the + button or – button
to shift between alarm time, date and week date.
2)Touch the DATE section again, + button and – button will be flashing. Touch the + button or –
button to Shift between DD-MM format and MM-DD format for the date.
3)Touch the DATE section the third time, + button and – button will be flashing. Touch the +
button or – button to set the year. Hold the+ button or – button for 3s to change the number in
great step.
4)Touch the DATE section the fourth time, + button and – button will be flashing. Touch the +
button or – button to set the month. Hold the+ button or – button for 3s to change the number in
great step.
5)Touch the DATE section the fifth time, + button and – button will be flashing. Touch the + button
or – button to set the day. Hold the+ button or – button for 3s to change the number in great
step.
6)Touch the DATE section the sixth time, + button and – button will be flashing. Touch the +
button or – button to set the alarm hour. Hold the+ button or – button for 3s to change the
number in great step.
7)Touch the DATE section the seventh time, + button and – button will be flashing. Touch the +
button or – button to set alarm minute. Hold the+ button or – button for 3s to change the number
in great step. Touch ON/OFF to enable or disable time alarm function.
- 11 -
Memory
1) Touch Memory section to activate history data toggle display, + button and – button will be
flashing. Press – to toggle forward to see earlier weather history data together time stamp,
press + to see later history weather data. When history data displayed, the corresponding time
will be displayed at the time section area( History data saving interval can only be changed
using the PC software that comes with this product, the default history data saving time
interval is preset to 30 minutes prior to shipment).
2) Touch Memory section again will trigger the memory clear procedure: the word of “CLEAR”
will be flashing, the full memory usage icon will be flashing. Press and hold the memory full
icon for 3 seconds will clear the memory.
PC Connection
As an important feature in addition to the display on the Touch Screen, the Weather Station allows
the read-out of all measured and displayed time and weather data in form of complete history data
sets on a PC.
Data Storage
For a comprehensive weather history, the Base Station allows the internal storage of up to 4080 complete
sets of weather data with time and date. These data sets are being stored in ring buffer memory.
In case the memory capacity of the Weather Station is exhausted the oldest data sets stored will be
overwritten by the new ones entered.
Data Recall
Certain weather data or setting values can only be read out, processed, and displayed by means of a PC.
Also the settings of the storing intervals from 5 minutes to 250 minutes for the storage of data sets can only
be performed by means of a PC.
Connections and Software
The wiring between Weather Station and PC takes place by means of an included USB cable. The
EasyWeather software package, also included in the shipping contents, must be installed on the PC.
This software allows the display of all present weather data with graphic symbols. It also allows the display,
storage, and printing of history data sets, whose volume exceeding the maximum 4080 data sets of the
Weather Station is only limited by the capacity of the PC’s main memory.
PC software installation
The installation of PCE-FWS 20 software is very simple: double click the setup.exe file and follow the steps
popped up.
Make sure you are running the program under the administrator accounts of your windows PC platform.
Otherwise the graphic function might not be working when graph display mode is needed to display all history
data.
If you run the program for the first time, the current weather display will be displayed and at the sub line of the
window, the program will show related information regarding the read of all history data into the PC. Please
note however, when there is large amount of data is being uploaded, it will take a few minutes time before the
system can respond to your setup settings. Otherwise it will display “read weather data fail” error message
since the USB port is reading the data from the memory and the system is not able to respond any further job
tasks.
- 12 -
When memory is full, it will take about two minutes to upload all history data into PC and it takes another two
minutes to process all history data for graphic display.
Further detailed PC software user manual can be found from the help menu.
- 13 -
Specifications
Outdoor data
Transmission distance in open field :
Frequency
:
Temperature range
Resolution
Measuring range rel. humidity
Rain volume display
Resolution
:
:
:
:
:
Wind speed
:
100m(330 feet)
868MHZ(Europe)/915MHz(North America)
-40˚C--65˚C (-40℉ to +149℉)
0.1˚C (0.2℉)
10%~99%
0 – 9999mm (show --- if outside range)
0.1mm (if rain volume < 1000mm)
1mm (if rain volume > 1000mm)
0-240km/h (0~100mph) (show --- if outside range)
Measuring interval thermo-hygro sensor: 48 sec
Water proof level
:
IPX3
Indoor data
Measuring interval pressure / temperature
Indoor temperature range
range)
Resolution
Measuring range rel. humidity
Resolution
Measuring range air pressure
Resolution
Alarm duration
Power consumption
Base station
Remote sensor
Battery life
:
:
:
:
:
:
:
:
48 sec
0˚C--50˚C (32℉ to + 122℉) (show --- if outside
0.1˚C (0.2℉)
10%~99%
1%
700-1100hpa (27.13inHg – 31.89inHg)
0.1hpa (0.01inHg)
120 sec
: 3XAA 1.5V LR6 Alkaline batteries
:
2xAA 1.5V LR6 Alkaline batteries
: Minimum 12 months for base station
Minimum 24 months for thermo-hygro sensor
Remark: where outdoor temperature is lower than -20˚C, make sure proper type of batteries to be
used to assure that the device can get enough power to maintain its function properly. Normal
alkaline batteries is not allow to be used since when outdoor temperature is lower than -20 ˚C, the
battery’s discharging capability is greatly reduced.
Please help in the preservation of the environment and return used batteries to an authorized depot.
All rights reserved. This handbook must not be reproduced in any form, even in excerpts, or duplicated or processed
using electronic, mechanical or chemical procedures without written permission of the publisher.
This handbook may contain mistakes and printing errors. The information in this handbook is regularly checked and
corrections made in the next issue. We accept no liability for technical mistakes or printing errors, or their consequences.
All trademarks and patents are acknowledged.
- 14 -
EasyWeather PC Software User Manual
1.0 General Information
This Weather Station is a high quality, easy to use weather monitoring system that reads, displays and
records the weather data from internal as well as external sensors. Besides the internally measured values
for indoor temperature, indoor humidity and air pressure the outdoor sensor will take data for temperature
and humidity, wind and rainfall. Operation of these units is by wireless transmission to the Base Station.
After installing the “EasyWeather” program on this CD-ROM, your PC can display all indoor data as well as
the weather data from the Base Station received from the external sensors. For operation, simply use the
USB cable supplied and connect the Base Station to the PC. From now on you can start to track current and
history weather information at your finger tips.
2.0
System Requirements
To install the "EasyWeather" software onto your PC, the minimum requirements are as follows:
Operating System: Windows NT4 (Service Pack >= 6a), Windows 2000, Windows XP, Windows Vista.
Internet Explorer 6.0 or above
Processor: Pentium III 500 MHz or above
Memory: at least 128MB, 256MB recommended
CD-ROM Drive
Base Station and PC must be connected by USB cable
3.0
Installation of the “EasyWeather” Software
Firstly, the Base Station and the Outdoor Sensors should be connected and checked for correct function (see
Operation Manual for PCE-FWS 20 Touch Screen Weather Station for setting up the Weather Station).
After successful checking, install the “EasyWeather” software as follows:
1.
2.
3.
4.
5.
6.
7.
Switch on your PC and insert the CD-ROM into the CD-ROM Drive.
Double click “Setup.exe”
Select the installation process language option and click next
click next and select the destination folder(change directory when needed)
click next and the software will be installed automatically
press ok to finish the installation process
From “Start—All Programs—EasyWeahter” path and double click the “EasyWeather” icon to start
application.
Note: The graphic function needs the software to be installed under the administrator account. If it is installed
under limited user accounts, the graphic function of the software might not be working correctly.
- 15 -
4.0
Basic Settings of the “EasyWeather” Software
After the “EasyWeather.exe” program has been started, the following main window will appear on
the PC screen:
All the settings from the base unit is mirrored into the PC software, so once you have done your
setting on the base unit, then you don’t need to make any setting changes on the PC software.
However you can still easily make any setting changes you wanted from the PC and download the
changes into the base station(the setting change will be refreshed when next full minute arrives on
the base station).
When base unit is connected to PC, the icon of
connected, then
will be displayed.
- 16 -
will be displayed. If no base station is
Function button:
: display and setup system configuration
This section is used to set up PC software display, base station units, as well as able or disable the
corresponding alarm function. Once you made your choice, press Save to make the setting effective.
- 17 -
: display and setup system alarm value
This section is used to set the desired time, high or low alarm value for the base unit. Once you made your
choice, choose Save to make the setting effective. If you don’t want to make any change, just press Cancel
and exit without change.
- 18 -
: display min and max recorded value
This section is used to display the recorded min and max value recorded with time stamp. Min/Max reset
can only be done through key operation on the base station.
- 19 -
: display listed history data
This section is used to display recorded history data in a spread sheet. If you wanted to see all history data in
a desired time period, choose the time duration and press Search to reload the history data. With the Export
button, you can export the selected history data into text format file for other application purpose.
When memory on base station is full, press “Clear Memory” button to refresh the memory space on the base
station (remember to upload all data before pressing this button).
If you wanted to start a new weather history record, press “Clear Data” button to clear up the data base, all
history weather data will be deleted (if you would like to keep a back up history file before deleting all weather
data, you can make a copy of the “EasyWeather.dat” file into another folder or just rename the
“EasyWeather.dat” file, such as “Jan-07.dat”, for future reference.
- 20 -
: display history data in graph mode
In this section, you can see the history data plotted in graph format for easier observation. If you want to see
more details, just use your mouse to select the area you wanted and the display will be automatically updated
in more detailed scale:
- 21 -
- 22 -
Also you can see the graph in 3D mode by selecting the 3D check box:
You can change the Y axel by scrolling the mouse up and down roller.
What to do if graph function is not working
This is the most encountered problem with this software. To make the graph function working properly, please
check the following step:
1, find the folder where the “EasyWeahter.exe” file is located
2. Create a file name “reg_graph.bat” file with wordpad or notepad editor program
3. type “regsvr32 easyweather.ocx” and save the reg_graph.bat file
4. Double click “reg_graph.bat” file and it should register the graphic driver again. If successful, then the
following window will be displayed:
- 23 -
Special Notes about time synchronization between PC and sub-station:
The PC software obtained its own time scale through the time interval marker from the base station history
data, and the PC software automatically synchronizes the weather data with a time stamp calculated. Thus
the history data file can have different time when the PC time and base station time is not same. In order to
make the time scale correct, remember to set the PC time and base station time same, and further to this, no
weather data is allowed to be missed or over-written. If history weather memory on the base station is cleared
by manual setting, then the history weather data since last uploading is lost permanently.
Before memory is used up(memory icon on LCD display showing 100% full), remember to upload weather
history data to PC periodically.
If there is a reset happened for the rain fall on the base station, then there will be rain fall value discrepancy
between PC and base station.
Legal Notes
•
•
•
We reserve the right to delete or change any image whether or not purposely uploaded
onto the server by a user of the PCE-FWS 20 and the EasyWeather software products.
The EasyWeather software products are protected by copyright laws and international
copyright treaties as well as other intellectual property laws and treaties.
You may not copy the printed materials accompanying the products.
- 24 -
TOUCH SCREEN Wetterstation Gebrauchsanweisung
Über diese Bedienungsanleitung
Vielen Dank und herzlichen Glückwunsch zur Auswahl dieser professionellen Wetterstation! Wir
sind sicher dass Sie die Vorteile der akkuraten Wettermessungen und der präzisen
funkgesteuerten Zeitinformationen die unsere Instrumente bieten, schätzen lernen.
Diese Anleitung wird Ihnen Schritt für Schritt bei der Einrichtung der Wetterstation helfen.
Benutzen Sie diese Anleitung um sich mit Ihrer professionellen Wetterstation vertraut zu machen
und heben Sie die Gebrauchsanweisung gut auf.
Überblick über gebräuchliche Begriffe
DCF/WWVB
Das DCF Zeitsignal ist ein AM moduliertes Tageszeit Signal. Die Grundzeit wird von einem
atomangetriebenen Zeitgenerator erzeugt der bis zur millionsten Sekunde genau ist.
Barometer und barometrischer Druck
Mit einem Barometer wird der Luftdruck gemessen – dieser Messwert wird barometrischer Druck
genannt.
Relativer Druck
Der relative Druck wird unter Berücksichtigung der Höhenlage errechnet. Der relative Luftdruck ist
somit in jeder Höhenlage gleich.
Absoluter Luftdruck
Der absolute Luftdruck wird ohne Berücksichtigung der Höhenlage angezeigt. Der absolute
Luftdruck ist somit in jeder anderen Höhenlage unterschiedlich.
mm/Inches in HG
mm/Inches in HG ist eine gebräuchliche Masseinheit für Luftdruck.
Hectopascal (hPa)
Hectopascal ist eine gebräuchliche Internationale Masseinheit. Der Wert für hPa und mb ist gleich.
Wichtiger Hinweis:
Bitte vor dem Einlegen der Batterien unbedingt die Gebrauchsanweisung gründlich durchlesen.
Die Wetterstation enthält eine Hauptstation (Empfänger), eine Sendeeinheit, einen
Windrichtungssensor, einen Windgeschwindigkeitssensor, einen Regenmesser, ein USB Kabel
und ein PC Softwarepaket auf CD-ROM.
- 25 -
Die Hauptstation ist mit einem Touch-Screen LCD Monitor ausgestattet und ermöglicht die
Darstellung umfangreicher Zeit und Wetterdaten.
LCD links oben:
LCD rechts oben:
LCD linke Mitte:
LCD rechte Mitte:
LCD untere Zeile:
IN (Innen) – OUT (Aussen) Temperatur und Luftfeuchtigkeit
Wind und Regenmesswerte
Wettervorhersage (Tendenz)
Luftdruck und Luftdruckaufzeichnung
Zeit und Datum, Datenspeicher
Wichtig: Wenn das Signal “Alarm-On” angezeigt, wird bedeutet das, dass die entsprechende
Alarmfunktion eingeschaltet ist.
Eine zusätzliche Funktion dieser Wetterstation ist die Möglichkeit alle gemessen und angezeigten
Wetterdaten auf einem PC anzuzeigen.
Wichtiger Bedienungshinweis
Alle Vorgänge und Funktionen der Wetterstation werden durch leichte Berührung auf dem Touch
Screen gestartet. Durch berühren der +, ON/OFF oder – Zeichen wird die entsprechende
Auswahl getroffen oder verändert. Bei jeder Berührung, wird ein neuer Programmschritt ausgelöst.
Es ertönt ein Signalton (wenn der Ton auf ON ) steht, und das Hintergrundlicht leuchtet ebenfalls
für ein paar Sekunden auf.
Falls der Bildschirm innerhalb von 30 Sekunden nicht erneut berührt wird, schaltet der
LCD-Bildschirm automatisch auf die normale Anzeigefunktion.
- 26 -
Der Aufbau
Einrichtung der Sensoren
- 27 -
- 28 -
Wichtiger Hinweis
An der oberen Kante des Windrichtungssensors sind vier Buchstaben “N”, “E”, “S”, “W”, die die
vier Himmelsrichtungen darstellen. Norden, Osten, Süden, Westen. Der Windrichtungssensor
muss so eingestellt werden, dass der Sensor in die richtigen Himmelsrichtungen zeigt. Wird der
Sender nicht richtig nach den Himmelsrichtungen ausgerichtet, zeigt die Wetterstation einen
falschen Wert für die Himmelsrichtung an.
Das Windgeschwindigkeitssensorkabel wird in die Anschlussbuchse des Windrichtungssensors
eingesteckt.
Der Windgeschwindigkeitssensor wird mit der Sendeeinheit verbunden ( Wind Anschlussbuchse).
Der Regensensor wird mit der Sendeeinheit verbunden (Rain Anschlussbuchse)
System Start
Zwei LR6 (AA) Batterien in den Sender einlegen
Drei LR6 (AA) Batterien in die Hauptstation einlegen
Nachdem die Batterien in die Wetterstation eingelegt wurden, werden alle LCD Segmente für
einige Sekunden eingeschaltet, um alle Anzeigesegmente zu überprüfen.
Danach wird die Wetterstation die Erstmessungen vornehmen und den Sender erfassen (das
Funkempfangssymbol wird angezeigt). Bevor der Empfang der Aussendaten abgeschlossen ist
bitte den Touch-Screen Bildschirm nicht berühren, da hierdurch die Empangsfunktion gestört
werden kann. Nachdem der Aussensender erfasst wurde, schaltet sich der Bildschirm
automatisch auf die normal Anzeige. Jetzt können alle weiteren Einstellungen vom Benutzer
vorgenommen werden.
- 29 -
Standortsuche
Nachdem Sie sicher gestellt haben dass alle Teile der Wetterstation funktionieren, können diese
an den endgültigen Standorten aufgestellt werden. Vor dem endgültigen Installieren bitte noch mal
überprüfen ob alle Teile an den ausgesuchten Standorten funktionieren. Falls z. B. Probleme mit
der Funkübertragung bestehen können diese meist durch Veränderung des Standortes behoben
werden.
Hinweis: Im Normalfall beträgt die Funkverbindung im freien Feld zwischen Sender und
Empfänger ca. 100 Meter wenn keine störenden Hindernisse wie Gebäude, Fahrzeuge, Bäume,
Hochspannungsleitungen, etc. die Funkübertragung behindern. Andere Funkempfänger wie Radio,
Fernseher, Computerbildschirme können ebenfalls Störungen verursachen und im schlimmsten
Fall die Funkverbindung völlig unterbrechen.
Einstellungen
Hinweis: Durch die Standardeinstellung die vom Hersteller bereits vorgenommen wurden muss in
den meissten Fällen – ausser beim relative Luftdruck (siehe weiter unten) – keine weitere
Einstellung vorgenommen werden. Einstellungsänderungen sind allerding leicht durchzuführen.
Durch Berühren des Touch Screen Bildschirms an der entsprechenden Stelle, können
entsprechende Einstellungen vorgenommen werden.
Hinweis: Die Einstellungsfunktion kann jederzeit abgebrochen werden, indem man jede andere
Funktionstaste berührt (ausser”+”, “ –“, oder “ ON/OFF” (an/aus).
Innentemperatur
Die Innentemperatur Einstellung aktivieren:
1.) Die Innentemperaturanzeige berühren, +Zeichen und – blinken. Das + oder –
Zeichen berühren um zwischen °C und °F zu wählen.
2.) Die Innentemperaturanzeige erneut berühren um die Innentemperatur
Höchstwarnfunkion einzustellen, das+, ON/OFF und – Zeichen blinken, HI AL
Symbol wird angezeigt. Das + oder – Zeichen berühren um den Wert zu verändern,
das + oder– Zeichen für 3 Sek berühren um den Schnellvorlauf zu aktivieren. Das
ON/OFF Zeichen berühren um die Warnfunktion ein oder auszuschalten (wenn das
Warnsignal eingeschaltet ist wird das Lautsprechersymbol angezeigt).
3.) Die Innentemperaturanzeige erneut berühren um die Innentemperatur
- 30 -
Niedrigwarnfunktion einzuschalten, die +, ON/OFF, und – Zeichen blinken, LO AL
Symbol wird angezeigt. Das + oder – Zeichen berühren um den Wert zu verändern,
das + oder – Zeichen für 3 Sek. berühren um den Schnellvorlauf zu aktivieren. Das
ON/OFF Zeichen berühren um die Warnfunktion ein oder auszuschalten (wenn das
Warnsignal eingeschaltet ist wird das Lautsprechersymbol angezeigt).
4.) Die Innentemperaturanzeige ein viertes Mal berühren um die höchste gespeicherte
Innentemperatur anzuzeigen, der gespeicherte Wert blinkt, zusätzlich erscheint das
MAX Symbol im Display. Der Wert kann zurückgesetzt werden, indem die
Innentemperatur im (MAX Modus) für ca. 3 Sekunden gedrückt wird.
5.) Die Aussentemperaturanzeige ein fünftes Mal berühren, um die niedrigste
gespeicherte Innentemperatur anzuzeigen, der gespeicherte Wert blinkt, zusätzlich
erscheint das MIN Symbol im Display. Der Wert kann zurückgesetzt werden, indem
die Innentemperatur im (MIN Modus) für ca. 3 Sekunden gedrückt wird.
Aussentemperatur
Die Aussentemperatur Einstellung aktivieren:
1.) Die Aussentemperaturanzeige berühren, +Zeichen und – blinken. Das + oder –
Zeichen berühren um zwischen Aussentemperatur, Wind Chill und Taupunkt zu
wählen.
2.) Die Aussentemperaturanzeige erneut berühren, +Zeichen und – blinken. Das +
oder – Zeichen berühren um zwischen °C und °F zu wählen.
3.) Die Aussentemperaturanzeige erneut berühren um die Aussentemperatur
Höchstwarnfunkion einzustellen, das+, ON/OFF und – Zeichen blinken, HI AL
Symbol wird angezeigt. Das + oder – Zeichen berühren um den Wert zu verändern,
das + oder– Zeichen für 3 Sek berühren um den Schnellvorlauf zu aktivieren. Das
ON/OFF Zeichen berühren um die Warnfunktion ein oder auszuschalten (wenn das
Warnsignal eingeschaltet ist wird das Lautsprechersymbol angezeigt).
4.) Die Aussentemperaturanzeige erneut berühren um die Innentemperatur
Niedrigwarnfunktion einzuschalten, die +, ON/OFF, und – Zeichen blinken, LO AL
Symbol wird angezeigt. Das + oder – Zeichen berühren um den Wert zu verändern,
das + oder – Zeichen für 3 Sek. berühren um den Schnellvorlauf zu aktivieren. Das
ON/OFF Zeichen berühren um die Warnfunktion ein oder auszuschalten (wenn das
Warnsignal eingeschaltet ist wird das Lautsprechersymbol angezeigt).
5.) Die Aussentemperaturanzeige ein fünftes Mal berühren um die höchste
gespeicherte Aussentemperatur anzuzeigen, der gespeicherte Wert blinkt, zusätzlich
erscheint das MAX Symbol im Display. Der Wert kann zurückgesetzt werden, indem
die Aussentemperatur im (MAX Modus) für ca. 3 Sekunden gedrückt wird.
6.) Die Aussentemperaturanzeige ein sechstes Mal berühren, um die niedrigste
gespeicherte Aussentemperatur anzuzeigen, der gespeicherte Wert blinkt, zusätzlich
erscheint das MIN Symbol im Display. Der Wert kann zurückgesetzt werden, indem
- 31 -
die Aussentemperatur im (MIN Modus) für ca. 3 Sekunden gedrückt wird.
Innenluftfeuchtigkeit
Die Innenluftfeuchtigkeit Einstellung aktivieren:
1.) Die Innenluftfeuchtigkeitsanzeige berühren um die Innenluftfuechtigkeits
Höchstwarnfunkion einzustellen, das+, ON/OFF und – Zeichen blinken, HI AL
Symbol erscheint im Display. Das + oder – Zeichen berühren, um den Wert zu
verändern, das + oder – Zeichen für 3 Sek berühren um den Schnellvorlauf zu
aktivieren. Das ON/OFF Zeichen berühren um die Warnfunktion ein oder
auszuschalten (wenn das Warnsignal eingeschaltet ist wird das Lautsprechersymbol
angezeigt).
2.) Die Innenluftfeuchtigkeitsanzeige erneut berühren um die Innenluftfeuchtigkeit
Niedrigwarnfunktion einzuschalten, die +, ON/OFF, und – Zeichen blinken, Das LO
AL Symbol erscheint im Display. Das + oder – Zeichen berühren um den Wert zu
verändern, das + oder – Zeichen fuer 3 Sek. berühren um den Schnellvorlauf zu
aktivieren. Das ON/OFF Zeichen berühren um die Warnfunktion ein oder
auszuschalten (wenn das Warnsignal eingeschaltet ist wird das Lautsprechersymbol
angezeigt).
3.) Die Innenluftfeuchtigkeitsanzeige ein drittes Mal berühren um die höchste
Innenluftfeuchtigkeitsaufzeichnung anzuzeigen, die Höchstaufzeichnung blinkt, das
MAX Symbol wird ebenfalls im Display angezeigt. Den blinkenden Wert 3 Sek halten
um den gespeicherten Wert zu löschen.
4.) Die Innenluftfeuchtigkeitsanzeige ein viertes Mal berühren um die niedrigste
Innenluftfeuchtigkeits- aufzeichnung anzuzeigen, die Niedrigsaufzeichnung blinket,
das MIN Symbol wird im Display angezeigt. Den blinkenden Wert 3 Sek halten um
den gespeicherten Wert zu löschen.
Aussenluftfeuchtigkeit
Die Einstellung wie Innenluftfeuchtigkeit vornehmen.
- 32 -
Windgeschwindigkeit
Die Windgeschwindigkeit, Einstellungen aktivieren:
1.) Die Windgeschwindigkeitsanzeige berühren, das + und – Zeichen blinken. Das + oder
– Zeichen berühren um zwischen Winddurchschnittsgeschwindigkeit und
Windböengeschwindikeit zu wählen.
2.) Die Windgeschwindigkeitsanzeige erneut berühren, das + und – Zeichen blinken. Das
+ oder – Zeichen berühren um zwischen Windgeschwindigkeitsanzeige in km/h, mph, m/s,
Knoten, bft, zu wählen.
3.) Die Windgeschwindigkeitsanzeige drittes Mal berühren, um die Höchstwarnfunktion
einzuschalten, das +, ON/OFF, – Zeichen blinken, das HI AL Symbol wird im Display
angezeigt. Das + oder – Zeichen berühren um den Wert zu verändern, Das ON/OFF
Zeichen berühren um die Warnfunktion ein oder auszuschalten (wenn das Warnsignal
eingeschaltet ist wird das Lautsprechersymbol angezeigt).
4.) Die Windgeschwindigkeitsanzeige ein viertes Mal berühren um die
Windrichtungswarnfunktion einzuschalten, der Windrichtungspfeil blinkt. Das + oder –
Zeichen berühren um das gewünschte Warnsignal für die Windrichtung auszusuchen, das
ON/OFF Zeichen berühren um das Windrichtungswarnsignal ein oder auszuschalten.
5.) Die Windgeschwindigkeitsanzeige ein fünftes Mal berühren um die
Höchtswindgeschwindigkeitsaufzeichnung anzuzeigen, der aufgezeichnete Höchstwert
blinkt, das MAX Symbol erscheint im Display. Den Höchstwert für 3 Sek halten und der
gespeicherte Wert wird zurückgesetzt.
Regenmessung
Die Regenmesser Einstellungen aktivieren:
1.) Die Regenanzeige berühren, das + und – Zeichen blinken. Das + oder – Zeichen
berühren um zwischen 1Stunde, 24Stunden, Monat und Gesamtregen Anzeige zu
wählen.
2.) Die Regenanzeige erneut berühren, das + und – Zeichen blinken, das + oder – Zeichen
berühren um zwischen Regenmenge in mm oder Inches zu wählen.
3.) Die Regenanzeige ein drittes Mal berühren um die Höchtswarnfunktion einzuschalten, die
+, ON/OFF und – Zeichen blinken, das HI AL Symbol wird im Display angezeigt. Das +
oder – Zeichen berühren um den Wert zu verändern. Das ON/OFF Zeichen berühren um
- 33 -
die Warnfunktion ein oder auszuschalten (wenn das Warnsignal eingeschaltet ist wird das
Lautsprechersymbol angezeigt).
4.) Die Regenanzeige ein viertes Mal berühren um die momentane
Regenmengenaufzeichnung anzuzeigen. Die Regenanzeige für 3 Sek berühren und der
Höchstwert wird zurückgesetzt.
5.) Die Regenanzeige ein fünftes Mal für 3 Sek berühren um die Regenmenge auf 0 zustellen,
danach werden die 1Stunde, 24Stunden, Woche, Monat und Gesamtregenmenge auf 0
zurueckgestellt.
Wettervorhersage
1.) Die Wettervorhersageanzeige berühren, das + und – Zeichen blinken. Das + oder –
Zeichen berühren um zwischen dem SONNIG, BEWÖLKT, WOLKIG und REGEN Symbol
zu wählen.
2.) Die Wettervorhersageanzeige erneut berühren, das + und – Zeichen blinken. Das +
oder – Zeichen berühren um den Luftdruckgrenzwert auf 2-4hPa (Standardeinstellung
2hPa) einzustellen.
3.) Die Wettervorhersageanzeige ein drittes Mal berühren, das + und – Zeichen blinken.
Das + oder – Zeichen berühren um den Sturmgrenzwert auf 3-9hPa (Standardeinstellung
4hPa) einzustellen.
Luftdruck
1.) Die Druckanzeige berühren, das + und – Zeichen blinken. Das + oder – Zeichen
berühren um zwischen absolutem Druck und relativen Druck zu wählen.
2.) Die Druckanzeige erneut berühren, das + und – Zeichen blinken. Das + oder – Zeichen
berühren und zwischen hPa in Hg und mmHg wählen.
3.) Die Druckanzeige ein drittes mal berühren um den relativen Druck Wert einzustellen. Das
+ und – Zeichen blinken, REL Symbol wird im Display angezeigt. Das + oder – Zeichen
berühren um den Wert einzustellen.
4.) Die Druckanzeige ein viertes Mal berühren, um die Druckhöchtswarnfunktion
einzustellen, das +, ON/OFF, – Zeichen blinken, das HI AL Symbol wird im Display
- 34 -
angezeigt. Das + oder – Zeichen berühren, um den Wert zu verändern. Das ON/OFF
Zeichen berühren um die Warnfunktion ein oder auszuschalten (wenn das Warnsignal
eingeschaltet ist wird das Lautsprechersymbol angezeigt).
5.) Die Druckanzeige ein fünftes Mal berühren um die Druckniedrigstwarnfunktion
einzustellen. Das + und – Zeichen blinken, das LO AL Symbol wird angezeigt. Das + oder
– Zeichen berühren um den Wert zu verändern Das ON/OFF Zeichen berühren um die
Warnfunktion ein oder auszuschalten (wenn das Warnsignal eingeschaltet ist wird das
Lautsprechersymbol angezeigt).
6.) Die Druckanzeige ein sechstes Mal berühren um die höchste Druckaufzeichnung
anzuzeigen, der aufgezeichnete Höchstwert blinkt. Das MAX Symbol wird ebenfalls
angezeigt. Den Höchstwert für 3 Sek berühren, um den Messwert zurückzusetzen.
7.) Die Druckanzeige ein siebtes Mal berühren um die niedrigste Druckaufzeichnung
anzuzeigen, der aufgezeichnete Niedrigstwert blinkt, das MIN Symbol wird ebenfalls
angezeigt. Den Niedrigstwert für 3 Sek halten, um den Messwert zurückzusetzen.
Luftdruck Balkendiagramm
Die luftdruckbalkendiagrammanzeige berühren und dann mit + oder–
von 12 oder 24 Stunden zu wechseln.
zwischen einer Zeitscala
Zeit
1.) Die Zeitanzeige berühren, das + und – Zeichen blinken. Das + oder – Zeichen berühren
um die Zeitzone auszuwählen.
2.) Die Zeitanzeige erneut berühren, das + und – Zeichen blinken. Das + oder – Zeichen
berühren um zwischen 12/24 Stunden Format auszuwählen.
3.) Die Zeitanzeige erneut berühren um die Stunde einzustellen, das + und – Zeichen blinken.
Das + oder – Zeichen berühren um den Wert zu verändern.
4.) Die Zeitanzeige erneut berühren, um die Minuten einzustellen, das + und – Zeichen
blinken. Das + oder – Zeichen berühren um den Wert zu verändern.
Datum
1.) Die Datumsanzeige berühren, das + und – Zeichen blinken. Das + oder – Zeichen
berühren um zwischen Weckzeit, Datum und Wochentag zu wählen.
2.) Die Datumsanzeige erneut berühren, das + und – Zeichen blinken. Das + oder – Zeichen
berühren um zwischen DD-MM (Tag-Monat) oder MM-DD (Monat-Tag) Format zu wählen.
3.) Die Datumsanzeige ein drittes Mal berühren, das + und – Zeichen blinken. Das + oder –
Zeichen berühren um das Jahr einzustellen.
4.) Die Datumsanzeige ein viertes Mal berühren, das + und – Zeichen blinken. Das + oder –
Zeichen berühren, um den Monat einzustellen.
5.) Die Datumsanzeige ein fünftes Mal berühren, das + und – Zeichen blinken. Das + oder –
- 35 -
Zeichen berühren, um den Tag einzustellen.
6.) Die Datumsanzeige ein sechstes Mal berühren, das + und – Zeichen blinken. Das + oder
– Zeichen berühren, um die Weckstunde einzustellen.
7.) Die Datumsanzeige ein siebtes Mal berühren, das + und – Zeichen blinken. Das + oder –
Zeichen berühren, um die Weckminute einzustellen.
Speicher
1.) Die Speicheranzeige berühren um die Aufzeichnungshistory anzuzeigen. Das + und –
Zeichen blinken. Das – Zeichen berühren um frühere Wetteraufzeichnungen in einem
Zeitspempel anzuzeigen, das + Zeichen berühren um spätere Wetteraufzeichnungen
anzuzeigen. Wenn Aufzeichnungen angezeigt werden, wird die entsprechende Uhrzeit in
der Zeitanzeige gezeigt (Aufzeichnungsspeicherintervalle können nur mit der
entsprechenden Software verändert werden die mit diesem Produkt mitgeliefert wird, die
Standardeinstellung ist auf 30 Minuten vorprogrammiert).
2.) Die Speichersparte erneut berühren das Wort “CLEAR” (LÖSCHEN) wird blinken, durch
Drücken des Speichersymbols für ca. 3 Sekunden wird der Speicher gelöscht.
PC Verbindung
Ein besonderes Merkmal zusaetzlich zu dem Touch-Screenbildschirm ist die Möglichkeit alle
gemessenen und angezeigten Zeit- und Wetterdaten in Form einer kompletten Aufzeichnung auf
Ihrem PC darzustellen.
Datenspeicherung
Für eine umfangreiche Wetteraufzeichnung hat die Grundstation die Möglichkeit bis zu 4080
komplette Wetter Datensätze mit Zeit und Datum zu speichern. Diese Datensätze werden in
einem Ringspeicher gespeichert (EEPROM) und gehen auch bei einer Unterbrechung der
Stromzufuhr (Stromausfall oder Batteriewechsel) nicht verloren. Ist der Speicher voll, werden
jeweils die ältesten Datensätze durch die neuen Datensätze ersetzt.
Datenabruf
Einige Wetterdaten und Einstellungswerte können nur mit Hilfe eines PC’s dargestellt, verarbeitet
und abgelesen werden. Ebenso können die Aufzeichnungsintervalle von 5Min bis zu 250 Min nur
mit Hilfe eines PCs eingestellt werden.
Verbindungen und Software
Die Verkabelung zwischen Wetterstation und PC wird mit dem mitgelieferten USB Kabel
durchgeführt. Das EasyWeather Softwarepaket, das ebenfalls mitgeliefert wird, muss auf dem PC
installiert werden.
Diese Software ermöglicht es, die momentanen Wetterdaten mittels graphischen Symbolen
darzustellen.
PC Software Installation
Die Installation der EasyWeather Software ist sehr einfach: Einfach auf die Datei setup.exe
doppelklicken und den Anweisungen am Bildschirm folgen.
Stellen Sie sicher, dass Sie beim installieren der Software auf dem PC als Administrator
angemeldet sind, da sonst nicht alle Funktionen verfügbar sind.
Wenn das Programm zum ersten mal gestartet wird, kann es ein paar Minuten dauern bis die
gespeicherten Daten übertragen werden.
Wenn Sie das Programm zum ersten Mal laufen lassen, wird die momentane Wetterdarstellung
angezeigt.
- 36 -
Wenn der Speicher voll ist, dauert es ungefähr zwei Minuten um die aufgezeichneten Daten auf
den PC runterzuladen und weitere zwei Minuten um diese Daten für eine graphische Darstellung
zu verarbeiten.
- 37 -
Technische Einzelheiten
Aussen Daten
Übertragungsentfernung im Freien:
Messbereich:
Auflösung:
Messbereich der rel. Luftfeuchtigkeit:
Regenvolumendarstellung:
Auflösung:
330 Fuss (100 meter)
-30 bis +65°C
0.1
10% ~ 99%
0 – 9999mm
0.1mm(bei Regenvolumen<1000mm)
1mm(bei Regenvolumen >1000mm)
Windgeschwindigkeit:
0~100mph
Messintervall des Thermohygrosensors: 48 SEC
Wasserabweisungsgrad:
IPX3
Innendaten
Messintervall Druck/Temperatur:
Innentemperaturspanne:
Auflösung:
Messbereich der rel Luftfeuchtigkeit:
Auflösung:
Messbereich des Luftdrucks:
Auflösung:
Warndauer:
Energieversorgung
Hauptstation:
Sensor:
48Sek
0 bis +65°C
0.1
10% - 99%
1%
27.13inHg – 31.89inHg
0.01inHg
120 Sek
3 x AA 1.5 LR6 Batterien
2 x AA 1.5 LR6 Batterien
Hinweise zur Rückgabe von Batterien gemäß §12 BatterieVO:
Batterien gehören nicht in den Hausmüll. Bitte entsorgen Sie alle Batterien so wie es vom
Gesetzgeber vorgeschrieben wird, die Entsorgung im Hausmüll ist ausdrücklich verboten.
Batterien und Akkus können an kommunalen Sammelstellen oder im Handel vor Ort kostenfrei
abgeben werden. Batterien oder Akkus, die Schadstoffe enthalten sind mit dem Symbol einer
durchgestrichenen Mülltonne gekennzeichnet. Hinweise zu diesen Batterien finden Sie in den
Bedienungsanleitungen der jeweiligen Hersteller.
Diese Anleitung kann Fehler enthalten. Die Information in dieser Anleitung wird regelmässig
kontrolliert. Änderungen werden in der nächsten Ausgabe überarbeitet und korrigiert. Wir
übernehmen keine Haftung für Druckfehler oder technische Fehler und deren Folgen.
- 38 -
ASTRO-TOUCH Gebrauchsanweisung
1.0
Allgemeines
Diese
qualitativ
hochwertige
Wetterstation
ist
ein
einfach
zu
handhabendes
Wetterbeobachtungssystem, welches die Wetterdaten abliest, anzeigt und aufzeichnet. Es hat
sowohl Innen- als auch Aussenfühler. Neben den innen gemessen Daten der Raumtemperatur,
Luftfeuchtigkeit und Luftdruck misst der Aussenfühler die Temperatur, Luftfeuchtigkeit, Windstärke
und Regenmenge. Diese Werte werden kabellos an die Hauptstation weitergeleitet.
Nach der Installation des " EasyWeather" Programmes mittels der CD-Rom wird der Computer
die Wetterdaten, die von der Hauptstation übertragen werden anzeigen. Für die Inbetriebnahme
einfach das Grundelement und den Computer mit dem mitgelieferten USB Kabel verbinden. Jetzt
können Sie anfangen, aktuelle und zurückliegende Wetterinformationen aufzuzeichnen.
2.0
System Anforderungen
Um die Software in Ihren Computer zu installieren müssen folgende Anforderungen erfüllt sein:
Betriebssystem:
Windows NT4 (Service Pack >=6a), Windows 2000, Windows XP, Windows Vista
Internet Explorer 6.0 oder höher
Prozessor: Pentium lll 500MHz oder höher
Datenspeicher: mindestens 128MB, 256MB wird empfohlen
CD-ROM Laufwerk
Hauptstation und Computer müssen mit einem USB Kabel verbunden werden
3.0
Installation der Software
Zuerst muss die Hauptstation mit dem Aussenfühler verbunden werden und auf ihre korrekte
Funktion geprüft werden (siehe Gebrauchsanleitung der Wetterstation mit Sensorbildschirm um
die Wetterstation aufzustellen). Nachdem die Funktionstüchtigkeit der Wetterstation erfolgreich
geprüft wurde, kann die Software installiert werden:
1.
2.
3.
4.
5.
6.
7.
Den Computer einschalten und die CD-ROM in das Laufwerk einlegen.
Auf die Datei Setup.exe Doppelklicken
Sprache auswählen dann auf next klicken
Speicherort auswählen.
Auf next klicken um das Programm zu installieren.
mit OK die Installation abschließen
Das Programm ist jetzt zu finden unter: Start – Alle Programme – EasyWeather.
Bitte beachten: Für die vollständige graphische Funktion sollten Sie darauf achten, dass Sie auf
Ihrem Computer über Administrationsrechte verfügen.
- 39 -
4.0
Grundeinstellung der PC Software
Nachdem das Programm
Computerbildschirm:
gestartet
wurde,
erscheint
folgendes
Fenster
auf
dem
Die gesamte Einstellung der Hauptstation wird in die Computersoftware übertragen. Wenn Sie
also die Einstellung der Hauptstation manuell beendet haben, brauchen Sie keine Änderungen in
der Einstellung Ihrer Computersoftware vorzunehmen. Es ist jedoch einfach
Einstellungsveränderungen in der Computersoftware vorzunehmen und dann an das Hauptgerät
zu übertragen. (die Einstellungsveränderungen werden mit der nächsten vollen Minute im
Hauptgerät aktualisiert).
- 40 -
Funktionstaste:
: Anzeige und Systemeinstellung
Diese Einstellung wird benutzt, um die Anzeigesprache, Grundelement, Einheiten und die
entsprechende Warnfunktion ein- oder auszuschalten. Wenn Sie Ihre Auswahl getroffen haben
die Speichertaste drücken um die Einstellungen zu übernehmen.
- 41 -
: Anzeige und Einstellen des Systemwarnwertes
Diese Einstellung wird benutzt, um die gewünschte Zeit, einen höheren oder niederen Warnwert
einzustellen. Wenn Sie Ihre Auswahl getroffen haben, die Speichertaste drücken, um die
Einstellung zu übernehmen. Falls Sie keine Veränderung möchten, die Abbruchtaste / Cancel
drücken und das Programm ohne Veränderung verlassen.
- 42 -
: Anzeige der aufgezeichneten MAX und MIN Werte
Diese Einstellung wird benutzt, um die aufgezeichneten MAX und MIN Werte mit einem
"Zeitstempel" zu kennzeichnen. Min/Max kann nur am Hauptgerät zurückgesetzt werden.
- 43 -
: Anzeige der gespeicherten Daten
Diese Einstellung wird benutzt um, die gespeicherten Daten in einer Tabelle anzuzeigen. Um die
Daten eines bestimmten Zeitraumes anzusehen, die gewünschte Zeitspanne eingeben und mit
der Searchtaste die Speicherdaten abrufen. Mit der "Exporttaste können ausgewählte
Speicherdaten in andere Anwendungen übertragen werden.
Wenn der Speicher im Hauptgerät voll ist, die "Clear Memory" Taste betätigen, um die
Speicherkapazität der Hauptstation zu erneuern (nicht vergessen die Daten vorher im Computer
abzuspeichern).
Um eine neue Wetteraufzeichnung zu beginnen die "Clear Data" Taste betätigen und alle zuvor
aufgezeichneten Daten werden gelöscht. Um eine Sicherheitskopie der gespeicherten Daten vor
dem Löschen anzulegen, entweder die Datei "EasyWeather.DAT umbenennen z. B. in "7 Jan,
DAT" oder in einen anderen Ordner kopieren.
- 44 -
: gespeicherte Daten in einer graphischen Darstellung oder Kurve
In diesem Teil ist es Ihnen möglich die gespeicherten Daten zur einfacheren Veranschaulichung
als graphische Darstellung zu betrachten. Um Einzelheiten zu betrachten, mit der Maus die
entsprechende Stelle klicken und eine Anpassung an den detaillierten Masstab erfolgt
automatisch:
- 45 -
Sie können die Y Achse verändern indem Sie mit dem Mausrädchen rauf und runter drehen.
- 46 -
Sie können die graphische Darstellung auch in 3D betrachten indem Sie das 3D Kästchen
anklicken.
Sie können die Y Achse verändern indem Sie mit dem Mausrädchen rauf und runter drehen.
Fehlerbeseitigung: Graphen werden nicht angezeigt
Dies ist der am häufigsten auftretende Fehler. Um den Graphen anzeigen zu lassen gehen Sie
bitte wie folgt vor:
1. stellen Sie fest in welchem Verzeichnis sich die Datei "EasyWeather.exe" befindet:
2. erstellen Sie in diesem Ordner ( mit Notepad / Editor oder Ähnlichem ) eine Datei mit dem
Namen "reg_graph.bat" ( bitte beachten Sie, dass Windows diese Datei auch mit der richtigen
Endung speichert und nicht als "reg_graph.bat.txt" - der Dateiname vor dem Punkt ist
unwichtig ).
3. Geben Sie folgenden "regsvr32 easyweather.ocx" ( ohne Anführungszeichen ) in den Texteditor
ein und speichern die Datei.
4. Doppelklicken Sie nun auf die gerade erstellte Datei - es sollte nun folgende Meldung die
erfolgreiche Ausführung des Befehls bestätigen:
- 47 -
Sonderanmerkung zur Zeitsynchronisation zwischen PC und Hauptstation:
Die PC Software bezieht ihre eigene Zeitskala durch die Zeitunterbrechungsmarkierung der
Hauptstation. Um die Zeitskala korrekt einzustellen muss die Zeit im PC und die Zeit der
Hauptstation gleich eingestellt sein. Dadurch wird auch verhindert, dass Wetterdaten
überschrieben oder ausgelassen werden. Wenn am Hauptgerät die gespeicherte
Wetteraufzeichnung manuell gelöscht wird, ist die Wetteraufzeichnung seit dem letzten
abspeichern Wert auf dem Computer unwiderruflich verloren.
Es wird geraten die im Grundelement aufgezeichneten Wetterdaten periodisch im PC
abzuspeichern ehe die Speicherkapazität der Hauptstation voll ausgenutzt ist (die LCD Anzeige
zeigt 100% voll an).
- 48 -