1
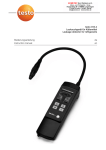
testo Gaslecksonde 0632 3330 Anwendungshinweise Application information de en Inhalt 1. 2. 3. Allgemeine Hinweise ............................................2 Sicherheitshinweise ..............................................3 Bestimmungsgemäße Verwendung ......................4 Produktbeschreibung ..........................................5 3.1 3.2 3.3 4. 5. 6. 7. 8. Anzeige- und Bedienelemente ........................................5 Schnittstellen ..................................................................5 Spannungsversorgung ....................................................5 Inbetriebnahme ....................................................6 Bedienung............................................................6 Sonde verwenden ................................................7 Wartung und Pflege..............................................9 Technische Daten ..............................................10 2 Allgemeine Hinweise Allgemeine Hinweise Dieses Kapitel gibt wichtige Hinweise zur Nutzung der vorliegenden Dokumentation. Diese Dokumentation enthält Informationen, die für einen sicheren und effizienten Einsatz des Produkts beachtet werden müssen. Lesen Sie diese Dokumentation aufmerksam durch und machen Sie sich mit der Bedienung des Produkts vertraut, bevor Sie es einsetzen. Bewahren Sie dieses Dokument griffbereit auf, um bei Bedarf nachschlagen zu können. Beachten Sie auch die Bedienungsanleitung zum Messgerät. Diese Dokumentation beschreibt das Produkt testo Gaslecksonde 0632 3330. Kennzeichnungen Darstellung Bedeutung Bemerkungen Warnhinweis: Warnung! Warnhinweis aufmerksam lesen und die genannten Vorsichtsmaßnahmen treffen! Schwere Körperverletzungen können eintreten, wenn die genannten Vorsichtsmaßnahmen nicht getroffen werden. Warnhinweis aufmerksam lesen und die genannten Vorsichtsmaßnahmen treffen! Leichte Körperverletzungen oder Sachschäden können eintreten, wenn die genannten Vorsichtsmaßnahmen nicht getroffen werden. Weist auf Besonderheiten oder Sonderfälle hin. Nennt das Ziel, welches durch die darauffolgend beschriebenen Handlungen erreicht werden soll. Muss erfüllt sein, damit eine Handlung wie angegeben ausgeführt werden kann. Handlungsschritte wie angegeben ausführen. Taste drücken. Nennt das Ergebnis einer Handlung. Warnhinweis: Vorsicht! Hinweis ± Handlungsziel Voraussetzung i, 1, 2, ... Handlungsschritt Taste - Bedientaste Resultat it Beachten Sie auch die Sicherheitshinweise in der Bedienungsanleitung zum Messgerät! en Dieses Kapitel nennt allgemeine Regeln, die für einen sicheren Umgang mit dem Produkt unbedingt beachtet werden müssen. fr Sicherheitshinweise es 1. de 1. Sicherheitshinweise 3 i Vermeiden Sie Verschmutzungen der Sonde und den Kontakt des Sensors mit Silikon oder Silikondämpfen, da dies zu Fehlanzeigen oder zur Zerstörung des Sensors führen kann. Produktsicherheit / Gewährleistungsansprüche wahren i Betreiben Sie das Produkt nur innerhalb der in den Technischen Daten vorgegebenen Parameter. i Wenden Sie keine Gewalt an. Verwenden Sie das Produkt nur sach- und bestimmungsgemäß. i Öffnen Sie das Produkt nicht. Wartungs- und Reparaturarbeiten dürfen nur durch autorisiertes Fachpersonal ausgeführt werden. Fachgerecht entsorgen i Senden Sie das Produkt nach Ende der Nutzungszeit an Testo. Wir sorgen für eine umweltschonende Entsorgung. sv nl ?? die persönliche Sicherheit ein! Das Produkt ist keine Schutzausrüstung! i Melden Sie Beschädigungen, Störungen oder Fehleranzeigen dem Hersteller und lassen Sie das Produkt überprüfen bzw. reparieren. Fehlerhafte Produkte bergen ein Sicherheitsrisiko und dürfen deshalb nicht mehr verwendet werden. ?? i Setzen Sie das Produkt nicht als Überwachungsgerät für pt Personenschäden / Sachschäden vermeiden 4 2. Bestimmungsgemäße Verwendung 2. Bestimmungsgemäße Verwendung Dieses Kapitel nennt die Anwendungsbereiche, für die das Produkt bestimmt ist. Setzen Sie dass Produkt nur für die Bereiche ein, für die es konzipiert wurde. Im Zweifelsfall bitte bei Testo nachfragen. Die testo Gaslecksonde 0632 3330 ermöglicht in Verbindung mit einem kompatiblen testo Messgerät die kurzzeitige Detektion von Gasen. Der Mehrbereichs-Sensor kann wahlweise Methan (CH4) oder Propan (C3H8) in einem Konzentrationsbereich von wenigen ppm bis 10000ppm aufspüren. Das Produkt wurde für folgende Aufgaben / Bereiche konzipiert: · Gasnachweis in Räumen · Ortung von Leckstellen an Gasanlagen. In folgenden Bereichen darf das Produkt nicht eingesetzt werden: · für kontinuierliche Messungen · als Sicherheits(alarm)-Gerät 3.2 Schnittstellen Anschlussstecker Der Anschlussstecker ermöglicht den Anschluss der Sonde an ein kompatibles testo Messgerät. 3.3 Spannungsversorgung Die Spannungsversorgung erfolgt über das testo Messgerät. en fr es it pt LEDs für die Anzeige der Gaskonzentration: > 1 Vol.% (10000ppm) > 1000ppm > 100ppm > 10ppm LEDs für die Anzeige der gewählten Gasart: Propan (C3H8) Methan (CH4) Bedientasten: Gasart wählen Unterdrückung von Hintergrundkonzentration de- / aktivieren sv 3.1 Anzeige- und Bedienelemente nl Dieses Kapitel gibt eine Übersicht über die Komponenten des Produkts und deren Funktionen. ?? Produktbeschreibung ?? 3. de 3. Produktbeschreibung 5 6 4. Inbetriebnahme 4. Inbetriebnahme Dieses Kapitel beschreibt die Handlungsschritte, die zur Inbetriebnahme des Produkts erforderlich sind. Es sind keine speziellen Handlungsschritte zur Inbetriebnahme des Produkts erforderlich. 5. Bedienung Dieses Kapitel beschreibt die Handlungsschritte, die beim Einsatz des Produkts häufig ausgeführt werden müssen. ± Sonde anschließen: Bei vielen Messgeräten müssen externe Fühler / Sonden vor dem Einschalten des Messgeräts angeschlossen werden. i Schließen Sie die Sonde entsprechend den Beschrei- bungen in der Bedienungsanleitung zum Messgerät an. ± Betriebsbereitschaft herstellen: Während der Aufheiz- und Nullungsphase muss sich die Sonde an Frischluft befinden, damit der Nullpunkt korrekt gesetzt wird. Ein Umstellen der Gasart ist nur während der Aufheiz- und Nullungsphase der Sonde möglich. Die Gaslecksonde ist an ein kompatibles testo Mess- gerät angeschlossen. Das Messgerät ist eingeschaltet. i Nur testo 330: Funktion Lecksuche aktivieren und mit die Gaslecksonde einschalten. - Durch ein Signalton und ein kurzes Aufleuchten aller LEDs wird angezeigt, dass die Sonde eingeschaltet ist. Start Laut DVGW-Merkblatt G465-4 sind Gasspürgeräte vor jeder Rohrnetzprüfung einem Empfindlichkeitstest mit einem Prüfgas von 1Vol.% Methan zu unterziehen. Gaskonzentrationen unterhalb der Unteren Explosionsgrenze können durch Lüften der Räume reduziert werden. ± Detektion von Gasen / Lecksuche durchführen: Lebensgefahr durch Gasexplosion! Bei Überschreiten der Messgrenze (alle LEDs zur Anzeige der Gaskonzentration leuchten) kann Explosionsgefahr bestehen. i Verlassen Sie das Gebäude unverzüglich und leiten Sie Sicherungsmaßnahmen durch den Gasversorger oder die Feuerwehr ein! Die Gaslecksonde ist betriebsbereit. º Siehe Kapitel BEDIENUNG. en fr es ?? Sonde verwenden ?? 6. nl sv detektierende Gasart einstellen: (kleine Taste) gedrückt halten, bis ein Signalton ertönt. - Nach Abschluss der Aufheiz- und Nullungsphase leuchtet die grüne LED der eingestellten Gasart. Der Ticker-Ton zur akustischen Anzeige der Gaskonzentration ertönt (testo 330: Alarmsignal muss eingeschaltet sein). Die Sonde ist nun betriebsbereit. it i Während der Aufheiz- und Nullungsphase die zu pt - Die Aufheiz- und Nullungsphase (ca. 45s) startet. Während dieser Phase blinkt die grüne LED der eingestellten Gasart. de 5. Bedienung 7 8 6. Sonde verwenden i Mit der Gaslecksonde die zu prüfende Räumlichkeit / Anlage auf vorhandene Gaskonzentrationen absuchen. - Die detektierte Gaskonzentration wird optisch (LEDs) und akustisch angezeigt (Ticker-Ton, testo 330: Alarmsignal muss eingeschaltet sein). Bei steigender Gaskonzentration wird die Tonfolge schneller, bei Erreichen der Alarmschwelle ertönt ein Dauerton (testo 330: Alarmsignal muss eingeschaltet sein). In einigen Anwendungsfällen kann es erforderlich sein, Gas-Hintergrundkonzentrationen zu unterdrücken. Dies ist bis max. 250ppm möglich. i Funktion aktivieren: Taste (große Taste) gedrückt halten, bis ein Signalton ertönt. - Bei Gaskonzentration in der Umgebungsluft von 0...250ppm: Die Gaslecksonde setzt den Nullpunkt auf die aktuelle Gaskonzentration in der Umgebungsluft. Bei Gaskonzentration in der Umgebungsluft größer 250ppm: Die Gaslecksonde setzt den Nullpunkt auf die maximal unterdrückbare Gaskonzentration von 250ppm. - Die LED der eingestellten Gasart blinkt. Damit wird angezeigt, dass eine Gas-Hintergrundkonzentration unterdrückt wird. i Funktion deaktivieren: Taste halten, bis ein Signalton ertönt. (große Taste) gedrückt ± Gehäuse reinigen: Gaslecksonde ist von Gerät getrennt. en fr Dieses Kapitel beschreibt die Handlungsschritte, die zur Erhaltung der Funktionsfähigkeit und zur Verlängerung der Lebensdauer des Produkts beitragen. es Wartung und Pflege it 7. de 7. Wartung und Pflege 9 Wir empfehlen, gemäß DVGW-Merkblatt G465-4, eine jährliche Überprüfung des Gasspürgeräts durch eine autorisierte Servicestelle durchführen zu lassen. i Wenden Sie sich bezüglich der Überprüfung bitte an Ihren Händler oder den Testo-Kundendienst. sv nl ?? ± Funktionssicherheit gewährleisten: ?? angefeuchteten Tuch (Seifenlauge) reinigen. Keine scharfen Reinigungs- oder Lösungsmittel verwenden! Darauf achten, dass keine Flüssigkeit in die SensorÖffnung eindringt. 2 Gaslecksonde nach einer Reinigung 30min trocknen lassen. pt 1 Gehäuse bei Verschmutzung mit einem leicht 10 8. Technische Daten 8. Technische Daten Dieses Kapitel nennt die Technischen Daten des Produkts. Eigenschaft Werte Sensor Anzeigebereiche Gassensitiver Halbleiter 0..10000ppm CH4 0..10000ppm C3H8 <10ppm <1s <3s ca. 50s -5...45 °C -20...50 °C 89/336/EWG Erfüllt die Anforderungen nach DVGW G465-4 2 Jahre Untere Ansprechschwelle Reaktionszeit Ansprechzeit t90 Aufheizzeit Betriebstemperatur Lagertemperatur EU-Richtlinie Prüfungen Garantie ?? ?? nl sv pt it es fr en de Notizen 11 12 Notizen testo Gas leak Detection probe 0632 3330 Anwendungshinweise Application information de en Content 1. 2. 3. General notes ....................................................14 Safety instructions ..............................................15 Intended purpose ..............................................16 Product description ............................................17 3.1 3.2 3.3 4. 5. 6. 7. 8. Display and control elements ........................................17 Interfaces ......................................................................17 Voltage supply ..............................................................17 Commissioning ..................................................18 Operation ..........................................................18 Using the probe..................................................19 Care and maintenance ......................................21 Technical data ....................................................22 14 General notes General notes This chapter provides important advice on using this documentation. This documentation contains information that must be applied if the product is to be used safely and efficiently. Please read this documentation through carefully and familiarise yourself with the operation of the product before putting it to use. Keep this document to hand so that you can refer to it when necessary. You must also follow the operating instructions for the measuring instrument. This documentation describes the testo gas leak detection probe 0632 3330. Identification Representation Meaning Warning advice: Warning! Step Control key Result Press the key. Denotes the result of an action. Warning advice: Caution! ± Note Objective Requirements i, 1, 2, ... Key - Comments Read warning advice carefully and take the precautionary measures indicated! Serious physical injury could occur if you do not take the precautionary measures indicated. Read warning advice carefully and take the precautionary measures indicated! Slight physical injury or damage to equipment could occur if you do not take the precautionary measures indicated. Refers to peculiarities or special cases. Denotes the goal that is to be achieved by the actions described below. Must be met before a step can be executed as indicated. Carry out the steps as indicated. i Do not use the product as a monitoring instrument for personal safety! The product is not a protective equipment! i Report damage, faults or error messages to the manufacturer and have the product inspected and repaired. Faulty products constitute a safety risk, which means they must no longer be used. i Avoid contamination of the probe and contact of the sensor with silicone or silicone vapours as these can lead to incorrect readings or destruction of the sensor. Product safety/preserving warranty claims i Operate the product only within the parameters specified in the Technical Data. i Do not use any force. Use the product properly and according to its intended purpose only. i Do not open the product. Maintenance and repair work must only be carried out by authorised personnel. Ensure correct disposal i Send the product back to Testo at the end of its useful life. We will ensure that it is disposed of in an environmentally friendly manner. en fr es it pt Avoid personal injury/damage to equipment sv You must also comply with the safety information in the instruction manual for the measuring instrument! nl This chapter gives general rules which must be followed and observed if the product is to be handled safely. ?? Safety instructions ?? 1. de 1. Safety instructions 15 16 2. Intended purpose 2. Intended purpose This chapter gives the areas of application for which the product is intended. Use the product only for those applications for which it was designed. Ask Testo if you are in any doubt. When used in combination with a compatible testo measuring instrument, the testo gas leak detection probe 0632 3330 allows gases to be detected for short periods. The multi-range sensor can optionally trace methane (CH4) or propane (C3H8) in a concentration range of a few ppm to 10,000 ppm. The product was designed for the following tasks/applications: · Gas detection in enclosed spaces · Locating of leaks in gas systems. The product must not be used in the following areas: · for long-term measurements · as a safety (alarm) device 3.2 Interfaces Connector The connector enables the probe to be connected to a compatible testo measuring instrument. 3.3 Voltage supply Voltage is supplied via the testo measuring instrument. en fr es it pt LEDs for displaying the gas concentration: > 1 vol.% (10,000 ppm) > 1,000 ppm > 100 ppm > 10 ppm LEDs for displaying the selected gas type: Propane (C3H8) Methane (CH4) Control keys: Select gas type Activate/deactivate suppression of background concentration sv 3.1 Display and control elements nl This chapter provides an overview of the components of the product and their functions. ?? Product description ?? 3. de 3. Product description 17 18 4. Commissioning 4. Commissioning This chapter describes the steps required to commission the product. No particular steps are required to commission the product. 5. Operation This chapter describes the steps that have to be executed frequently when using the product. ± Connect the probe: With many measuring instruments, external sensors/ probes need to be connected before the instrument is switched on. i Connect the probe as described in the instruction manual of the measuring instrument. ± Establish operational readiness: During the heating and zeroing phase the probe must be in fresh air so that the zero point can be set correctly. The gas type can only be changed while the probe is in the heating and zeroing phase. The gas leak detection probe is connected to a compatible testo measuring instrument. The measuring instrument is switched on. i testo 330 only: Activate the Leak detection function and switch the gas leak detection probe on with Start . - A signal tone is given and all LEDs light up briefly to indicate that the probe is switched on. According to DVGW (German Technical and Scientific Association for Gas and Water) bulletin G465-4, gas detectors must be subjected to a sensitivity test with a test gas of 1 vol.% methane before every test of a pipe system. Gas concentrations below the lower explosion limit can be reduced by ventilating the rooms. ± Detecting gases/leak detection: Risk of death from gas explosion! There may be a risk of explosion if the measuring limit is exceeded (all LEDs for displaying the gas concentration are lit). i Leave the building immediately and call the responsible gas utility company or fire service! The gas leak detection probe is ready to operate. º See the chapter OPERATION. en fr es ?? Using the probe ?? 6. nl sv type to be detected: press and hold (small key) until a signal is heard. - The green LED of the set gas type lights up when the heating and zeroing phase is over. The ticker tone for the acoustic indication of the gas concentration is heard (testo 330: Alarm signal must be switched on). The probe is now ready to operate. it i During the heating and zeroing phase, set the gas pt - The heating and zeroing phase (approx. 45 s) starts. The green LED of the set gas type flashes during this period. de 5. Operation 19 20 6. Using the probe i Use the gas leak detection probe to investigate the premises/system to be tested for any concentrations of gases. - The detected gas concentration is indicated visually (LEDs) and acoustically (ticker tone, testo 330: Alarm signal must be switched on). The rate of tones becomes faster as the gas concentration rises and a constant tone is heard when the alarm threshold is reached (testo 330: Alarm signal must be switched on). In some cases it may be necessary to suppress background concentrations of gas. This can be done up to max. 250 ppm. i Activating the function: press and hold key (large key) until a signal tone is heard. - Gas concentration in the ambient air between 0...250 ppm: The gas leak detection probe sets the zero point to the actual gas concentration in the ambient air. Gas concentration in the ambient air greater than 250 ppm: The gas leak detection probe sets the zero point to the maximum suppressible gas concentration of 250 ppm. - The LED of the set gas type flashes. This indicates that a background gas concentration is being suppressed. i Deactivating the function: press and hold key) until a signal tone is heard. key (large ± Guaranteeing functional reliability: We recommend that you comply with DVGW bulletin G465-4 by having the gas detector inspected by an authorised service centre every year. i Please contact your dealer or Testo Customer Service for the inspection. en fr es it instrument. 1 Clean the housing with a slightly moist cloth (soap suds) if it is dirty. Do not use aggressive cleaning agents or solvents. Make sure that no liquid gets into the sensor opening. 2 Allow the gas leak detection probe to dry for 30 min after cleaning. pt Gas leak detection probe is disconnected from the sv ± Cleaning the housing: nl This chapter describes the steps that help to maintain the functionality of the product and extend its operating life. ?? Care and maintenance ?? 7. de 7. Care and maintenance 21 22 8. Technical data 8. Technical data This chapter gives the technical data for the product. Characteristic Values Sensor Indication ranges Gas-sensitive semiconductor 0..10,000 ppm CH4 0..10,000 ppm C3H8 <10 ppm <1 s <3 s approx. 50 s -5...45 °C -20...50 °C 89/336/EEC Satisfies the requirements of DVGW G465-4 2 years Lower response threshold Response time Response time t90 Heating time Operating temperature Storage temperature EU Directive Tests Warranty ?? ?? nl sv pt it es fr en de Notes 23 Postfach 11 40, 79849 Lenzkirch Testo-Straße 1, 79853 Lenzkirch Telefon: (0 76 53) 6 81 - 0 Fax: (0 76 53) 6 81 - 1 00 E-Mail: [email protected] Internet: http://www.testo.com www.testo.com testo AG 0973.0354/01/T/dr/18.01.2006