1
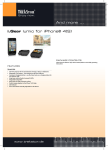
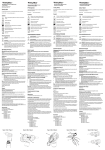
DE
EN
IT
ES
SE
i.Gear lumio
Mini Projector for iPhone® 4 | 4S
FR
Index
DE…………………………………………………………………… 4
EN…………………………………………………………………… 8
IT …………………………………………………………………… 12
ES…………………………………………………………………… 16
SE…………………………………………………………………… 20
FR…………………………………………………………………… 24
A
FOCUS
H
B
C
D
E FG
CHARGE OFF/ON
bBedienungsanleitung
Wir gratulieren Ihnen zum Kauf des TrekStor i.Gear lumio und sind
sicher, dass Sie viel Freude mit diesem Produkt haben werden. Bitte
lesen Sie die folgenden Abschnitte aufmerksam durch, damit Sie die
Funktionen dieses Produkts und seine Bedienung kennenlernen.
Aktuelle Produktinformationen finden Sie auf der TrekStor Website
www.trekstor.de.
Lieferumfang
•
TrekStor i.Gear lumio
•
USB 2.0-Kabel (USB-A auf mini-USB)
•
Bedienungsanleitung
1) Bedienelemente und Anschlüsse des TrekStor
i.Gear lumio
A)Linse
B) Fokussierrad zur Scharfstellung
C) Lautstärkeregelung (, /;)
D)30-Pin-Anschluss
E) Lade- bzw. Ein-/Ausschalter
F)LED-Anzeige
G)USB-Anschluss
H)Lautsprecher
2) Bedienung des TrekStor i.Gear lumio
Laden des TrekStor i.Gear lumio
a) Schließen Sie den i.Gear lumio über das mitgelieferte USB-Kabel
an einen USB-Anschluss Ihres Computers an.
b) Die LED-Anzeige leuchtet rot, wenn der i.Gear lumio gerade
geladen wird. Ist das Gerät vollständig geladen, leuchtet die
LED-Anzeige grün.
c) Wenn der Akku schwach ist und der i.Gear lumio geladen werden
muss, blinkt die LED-Anzeige blau.
DE 4
i Sie können den i.Gear lumio auch über einen geeigneten USB-Adapter
(z. B. TrekStor USB-Charger e.m) laden (nicht im Lieferumfang enthalten).
i Laden Sie vor der ersten Benutzung den i.Gear lumio komplett auf
(Ladedauer zwischen 3 und 5 Stunden).
i Die maximale Akkulaufzeit wird erst nach ca. 10 Ladezyklen erreicht.
Verbinden des TrekStor i.Gear lumio mit dem iPhone® 4/4S
Schieben Sie das iPhone® 4/4S mit der Anschlussseite nach unten
vorsichtig von oben nach unten auf den 30-Pin-Anschluss des
i.Gear lumio.
Einschalten des TrekStor i.Gear lumio
a) Nachdem Sie die Geräte miteinander verbunden haben, können Sie
nun den i.Gear lumio einschalten, indem Sie den Ein-/Ausschalter
nach rechts schieben und so lange gedrückt halten, bis die
LED-Anzeige blau leuchtet. Gleichzeitig wird das voreingestellte
Projektionsbild über die Projektorlinse ausgegeben.
b) Wählen Sie an Ihrem iPhone® 4/4S das gewünschte Video oder
Bild, das Sie zeigen möchten, aus und spielen dieses wie gewohnt
ab. Der i.Gear lumio projiziert nun automatisch das Bild auf die
Fläche, auf die er gerichtet ist.
a Schauen Sie nicht direkt in das Objektiv des eingeschalteten Projektors,
um Augenverletzungen zu vermeiden. Richten Sie das Projektionsbild
auch nicht in das Gesicht anderer Personen.
a Fassen Sie nicht direkt auf die Linse, um Verschmutzungen zu
vermeiden.
i Um die beste Projektionsqualität zu erreichen, positionieren Sie den
i.Gear lumio in einer dunklen Umgebung gerade ausgerichtet auf eine
möglichst helle, ebene Wand.
i Bitte beachten Sie, dass nicht alle Dateiformate, die Sie über Ihr iPhone® 4/4S
anschauen/abspielen können, auch über den i.Gear lumio ausgegeben
werden können. Die Anzeige von Power Point Präsentationen über den
i.Gear lumio ist mit speziellen Programmen (Apps) möglich.
5 DE
Einstellen der Lautstärke
Vergewissern Sie sich, dass die Lautstärke Ihres iPhone® 4/4S auf die
höchste Stufe gestellt ist. Anschließend können Sie die Laustärke am
i.Gear lumio über die Tasten , bzw. ; weiter einstellen.
Einstellen der Bildschärfe
Drehen Sie so lange am Fokussierrad, bis Sie den gewünschten
Schärfegrad erreicht haben.
i Achten Sie bitte darauf, dass Sie das Fokussierrad nur bis zum Anschlag
in eine Richtung drehen können.
Ausschalten des TrekStor i.Gear lumio
Zum Ausschalten des i.Gear lumio schieben Sie erneut den Ein-/Ausschalter
nach rechts. Halten Sie den Schalter so lange gedrückt, bis sich das
Gerät abschaltet bzw. die blaue LED erlischt.
Laden des iPhone® 4/4S über den TrekStor i.Gear lumio
i Sie können den i.Gear lumio als Aufladestation für Ihr iPhone® 4/4S
benutzen.
i Stellen Sie sicher, dass Sie den i.Gear lumio vollständig aufgeladen
haben.
a) Schieben Sie Ihr iPhone® 4/4S in den i.Gear lumio.
b) Schieben Sie anschließend den Ein-/Ausschalter nach links in die
"Charge"-Position.
c) Während das iPhone® 4/4S geladen wird, leuchtet die LED-Anzeige
des i.Gear lumio rot.
DE 6
Sicherheits- und Verwendungshinweise:
d
e
j
m
h
g
Technische Arbeiten an dem Produkt dürfen nur von entsprechend qualifizierten
Personen durchgeführt werden. Das Produkt darf weder geöffnet werden noch
dürfen Änderungen daran vorgenommen werden. Die Komponenten können
nicht vom Nutzer gewartet werden.
Setzen Sie das Gerät niemals Feuchtigkeit, Kondenswasser und Nässe aus.
Schützen Sie das Gerät vor extrem hohen und niedrigen Temperaturen und
Temperaturschwankungen.
Stellen Sie das Gerät nicht in der Nähe einer Wärmequelle auf und schützen
Sie es vor direkter Sonneneinstrahlung.
Achten Sie bei der Verwendung und Lagerung des Geräts auf eine möglichst
staubfreie Umgebung.
Die Reinigung der Oberfläche des Geräts darf niemals mit Lösungsmitteln,
Farbverdünnern, Reinigungsmitteln oder anderen chemischen Produkten erfolgen,
nutzen Sie stattdessen ein weiches, trockenes Tuch bzw. einen weichen Pinsel.
Achtung LED der Klasse 2! Optische Strahlung. Nicht in den Strahl blicken!
EN 62471:2008.Bitte blicken Sie niemals direkt in die LED und richten Sie den
Lichtstrahl nicht direkt auf Menschen oder Tiere um Verletzungen der Augen zu
Vermeiden. Die Blinkfunktion der Taschenlampe darf nicht in Gegenwart von
Personen, die unter Reflex-Epilepsie (Fotosensibilität) leiden, benutzt werden.
iPhone is a trademark of Apple Inc., registered in the U.S. and other countries.
Der Hersteller behält sich das Recht vor, das Produkt ständig weiter zu entwickeln.
Diese Änderungen können ohne direkte Beschreibung in dieser Bedienungsanleitung
vorgenommen werden. Informationen in dieser Bedienungsanleitung müssen somit
nicht den Stand der technischen Ausführung widerspiegeln.
Der Hersteller garantiert nur die Eignung für die eigentliche Bestimmung dieses
Produktes. Weiter ist der Hersteller nicht für Beschädigungen oder Verlust von Daten
und deren Folgeschäden verantwortlich.
Copyright © 2011 TrekStor GmbH. Alle Rechte vorbehalten. Bei weiteren erwähnten
Produkt- oder Firmenbezeichnungen handelt es sich möglicherweise um Warenzeichen
oder Markennamen der jeweiligen Inhaber.
7 DE
bUser Manual
Thank you for buying the TrekStor i.Gear lumio. We are confident that
this product will be the source of much enjoyment. Please read the
following instructions carefully so that you can become acquainted
with the functions of this product and its use.
Current product information can be found at the TrekStor Website
www.trekstor.de.
Package contents
•
TrekStor i.Gear lumio
•
USB 2.0 cable (USB-A to mini-USB)
•
User manual
1) Controls and connections of the TrekStor i.Gear lumio
A)Lens
B) Fine-tuning focus wheel
C) Volume control (, /;)
D) 30-pin connector
E) Charge/Power button
F) LED indicator light
G) USB port
H)Loudspeaker
2) Operating the TrekStor i.Gear lumio
Charging the TrekStor i.Gear lumio
a) Connect the i.Gear lumio via the included USB cable to a USB port
of your computer.
b) The LED indicator lights red to indicate that the i.Gear lumio is
currently loaded. The LED light reverts to green when the i.Gear
lumio is fully charged.
c) The LED display will rapidly flash blue when the battery of the
i.Gear lumio is low.
EN 8
i You may also charge the i.Gear lumio via a suitable USB adapter
(e. g. TrekStor USB-Charger e.m) (not included in the delivery).
i Fully charge the battery of the i.Gear lumio before its first use
(approx. 3 to 5 hours).
i The maximum operating time can be reached only after
approximately 10 battery charging cycles have been completed.
Connecting the TrekStor i.Gear lumio with the iPhone® 4/4S
Slide your iPhone® 4/4S with the connection side facing down carefully
straight down onto the 30-pin connector of the i.Gear lumio.
Switching on the TrekStor i.Gear lumio
a) After you have connected both devices, you can now power on
the i.Gear lumio by pushing the power switch to the right and
hold until the LED display illuminates blue. Simultaneously, the
preset projection image is emitted from the projector's lens.
b) You may now choose the video or picture you would like to view
from the menu on your iPhone® 4/4S and play it as you normally
would. The i.Gear lumio automatically projects the picture onto
the surface to which it is directed.
a Do not look directly into the lens of the projector when it is turned on,
in order to prevent eye injuries. Do also not point the projected image
on the face of other people.
a Do not touch directly on the lens to avoid contamination.
i To achieve the best projection quality, position the i.Gear lumio in
a dark environment precisely aligned to a bright, flat wall.
i Please note, that not all file formats, which you can play-back with
your iPhone® 4/4S, can as well be emitted via the i.Gear lumio.
The display of Power Point presentations over the i.Gear lumio
is possible with special programs (apps).
9 EN
Adjusting the volume
Ensure that the volume of your iPhone® 4/4S is set at its highest setting.
Then adjust the volume on the i.Gear lumio via the buttons , or ;.
Adjusting the focus
Roll the focus wheel to fine-tune the picture.
i Please note, that you roll the focus wheel only until it stops.
Switching off the TrekStor i.Gear lumio
To switch off the i.Gear lumio, push again the power switch to the
right. Hold the button until the device switches off resp. until the blue
LED turns off.
Charging the iPhone® 4/4S via the TrekStor i.Gear lumio
i You can use the i.Gear lumio as charging station for your iPhone® 4/4S.
i Make sure, that the i.Gear lumio is fully charged.
a) Slide your iPhone® 4/4S inside the i.Gear lumio.
b) Slide the power switch to the left into the "Charge" position.
c) While the iPhone® 4/4S is charged, the LED display of the i.Gear lumio
illuminates red.
EN 10
Instructions for safety and use:
d
e
j
m
h
g
Only qualified persons may perform technical work on the product. The product
may not be opened or changed. The components cannot be serviced by the user.
Never expose the device to moisture, condensation and liquids.
Protect the device from extremely high and low temperatures and temperature
fluctuations.
Never place the device close to a source of heat, and protect it from direct
sunlight.
Make sure that the surroundings are as dust-free as possible when you use and
store the device.
Never clean the surface of the device with solvents, paint thinners, cleansers or
other chemical products. Instead, use a soft, dry cloth or soft brush.
Caution LED class 2! LED radiation! Don’t stare into beam. EN 62471:2008.
Please do not look directly into the LED and direct the light beam not directly at
people or animals in order to avoid violations of the eyes. The flash function of
the flashlight should not be used in the presence of persons suffering from reflex
epilepsies (Photosensitivity).
iPhone is a trademark of Apple Inc., registered in the U.S. and other countries.
The manufacturer retains the right to continually improve the product. These changes
may be made without being directly described in these operating instructions. For this
reason, the information provided in these operating instructions may not reflect the
current state of the art.
The manufacturer only guarantees suitability for the product's intended purpose.
In addition, the manufacturer is not responsible for damages or loss of data and
subsequent consequences.
Copyright © 2011 TrekStor GmbH. All rights reserved. Other cited product or company
names may be trademarks or brand names of the respective owner.
11 EN
bManuale dell'utente
Congratulazioni per l'acquisto del TrekStor i.Gear lumio. Siamo sicuri
che vi divertirete a usare questo prodotto. Si prega di leggere
attentamente le seguenti sezioni in modo da conoscere le
funzioni di questo prodotto ed il suo uso.
Per informazioni aggiornate sul prodotto fare riferimento al sito web
TrekStor www.trekstor.de.
Contenuto della confezione
•
TrekStor i.Gear lumio
•
Cavo USB 2.0 (da USB-A a mini-USB)
•
Manuale dell'utente
1) Controlli e connettori del TrekStor i.Gear lumio
A)Lente
B) Manopola per la regolazione della nitidezza
C)Regolazione del volume (, /;)
D) Connettore a 30 pin
E) Interruttore di caricamento, accensione e spegnimento
F) Indicatore a LED
G) Porta USB
H)Altoparlante
2) Comando del TrekStor i.Gear lumio
Caricare il TrekStor i.Gear lumio
a) Collegare il i.Gear lumio con il cavo USB fornito in dotazione alla
porta USB del vostro computer.
b) L'indicatore di LED si illumina di rosso, per indicare che il i.Gear lumio
è in ricarica. Quando l'apparecchio è completamente ricaricato,
l'indicatore di LED si illumina di verde.
c) Se la batteria è quasi scarica e il i.Gear lumio deve essere ricaricato,
l'indicatore LED lampeggia di blu.
IT 12
i L'i.Gear lumio può essere ricaricato anche con un adattore USB adatto
(ad es. TrekStor USB-Charger e.m) (non fornito in dotazione).
i È preferibile caricare completamente il i.Gear lumio prima dei primi
utilizzi (tempo di caricamento tra 3 e 5 ore).
i La durata massima della batteria si raggiunge solo dopo 10 cicli
di ricarica.
Collegare il TrekStor i.Gear lumio con l'iPhone® 4/4S
Inserire l'iPhone® 4/4S con cautela con il connettore rivolto verso il
basso da sopra a sotto sul connettore a 30 pin del i.Gear lumio.
Accensione del TrekStor i.Gear lumio
a) Dopo aver collegato gli apparecchi l'uno all'altro è possibile
accendere il i.Gear lumio, spostando l'interruttore di accensione
e spegnimento a destra tenendo premuto fin quando l'indicatore
led lampeggi di blu. Contemporaneamente l'immagine
preimpostata viene proiettata sulla lente del proiettore.
b) Scelga sul suo iPhone® 4/4S il filmato o immagine desiderato
da mostrare e lo riproduci come di solito. Il i.Gear lumio proietta
adesso automaticamente l'immagine sulla superficie su cui
e puntato.
a È pregato di non guardare direttamente nell'obiettivo del proiettore
in funzione per evitare lesioni agli occhi. Non punti l'immagine del
proiettore in faccia ad altre persone.
a Non tocchi direttamente la lente per evitare che si sporchi.
i Per ottenere la massima qualità di proiezione, posizionare il i.Gear
lumio in un ambiente buio puntandolo direttamente su un muro
possibilmente chiaro e piano.
i Noti che non tutti i formati di file che possono essere visti/riprodotti
con l'iPhone® 4/4S possono essere riprodotti anche con il i.Gear lumio.
La presentazione dei file di Power Point con il i.Gear lumio è possibile
solo con programmi specifici (applicazioni).
13 IT
Regolare il volume
Assicurarsi che il volume dell'iPhone® 4/4S sia impostato sul livello più
alto. Infine è possibile regolare ancora il volume con il i.Gear lumio
utilizzando i tasti , ossia ;.
Regolare la nitidezza dell'immagine
Girare la manopola di messa a fuoco fino a raggiungere il grado di
nitidezza desiderato.
i Fare attenzione a poter girare la manopola di messa a fuoco solo
fino all'arresto in una direzione.
Spegnimento del TrekStor i.Gear lumio
Per spegnere il i.Gear lumio spingere nuovamente il pulsante di
accensione e di spegnimento a destra. Tenere premuto l'interruttore
fino a quando l'apparecchio si spegne, ossia si spegne il led blu.
Caricare l'iPhone® 4/4S attraverso il TrekStor i.Gear lumio
i Il i.Gear lumio può essere utilizzato anche come ricaricatore per
l'iPhone® 4/4S.
i Assicurarsi che il i.Gear lumio sia stato completamente ricaricato.
a) Inserire l'iPhone® 4/4S nel i.Gear lumio.
b) Premere infine il pulsante di accensione e di spegnimento
a sinistra in posizione "Charge".
c) Mentre l'iPhone® 4/4S si ricarica, l'indicatore a led del i.Gear lumio
è acceso di rosso.
IT 14
Indicazioni di sicurezza ed istruzioni per l'uso:
d
e
j
m
h
g
Le eventuali operazioni sul presente prodotto possono essere eseguite solamente
da personale qualificato. Il prodotto non deve essere aperto né modificato.
I componenti non possono essere riparati da parte dell'utente.
Non esporre mai l'apparecchio a umidità, condensa e liquidi.
Proteggere l'apparecchio da temperature particolarmente elevate o basse e
dalle variazioni di temperatura. Utilizzare l'apparecchio solo a una temperatura
ambiente compresa tra 10º C e 40º C.
Non posizionare l'apparecchio in prossimità di fonti di calore e proteggerlo dalla
luce diretta del sole.
Utilizzare e conservare l'apparecchio in un ambiente il più possibile libero da polveri.
Per la pulizia della superficie dell'apparecchio non utilizzare mai solventi, diluenti,
detergenti o altri prodotti chimici, bensì un panno morbido e asciutto o un
pennello morbido.
Attenzione, LED classe 2! Emana radiazioni LED! Non fissare il fascio laser.
EN 62471:2008. Non guardare direttamente il LED e non dirigere la luce del fascio
laser verso persone e animali, per evitare danni agli occhi. La funzione torcia non
deve essere utilizzata in presenza di persone affette da epilessia (fotosensibilità).
iPhone is a trademark of Apple Inc., registered in the U.S. and other countries.
Il produttore si riserva il diritto di effettuare ulteriori operazioni di miglioramento del
prodotto in modo costante. Tali modifiche possono essere apportate senza fornirne
una descrizione diretta all'interno delle presenti istruzioni per l'uso. Le informazioni
contenute nelle presenti istruzioni per l'uso non corrispondono necessariamente allo
stato della versione tecnica.
Il produttore garantisce esclusivamente l'idoneità all'uso previsto. Il produttore non è
tenuto a rispondere di eventuali danni o perdite di dati, né di danni secondari da essi
derivanti.
Copyright © 2011 TrekStor GmbH. Tutti i diritti riservati. Per quanto riguarda eventuali
riferimenti a prodotti o aziende, si tratta di marchi di fabbrica o di nomi dei marchi dei
rispettivi proprietari.
15 IT
bManual de usario
Le felicitamos por la compra del TrekStor i.Gear lumio y estamos
convencidos de que estará contento con este producto. Por favor, lea
detenidamente los siguientes capítulos para que se familiarizarse con
las funciones del producto y su manejo.
Encontrará la información actual sobre el TrekStor Liro Color en la
página web www.trekstor.de.
Artículos incluidos
•
TrekStor i.Gear lumio
•
Cable USB 2.0 (da USB-A en mini-USB)
•
Manual de usario
1) Componentes y conectores del TrekStor i.Gear lumio
A)Lente
B)Rueda de enfoque para controlar la nitidez
C) Control de volumen (, /;)
D) Conector de 30 pins
E) Botón de encendido, apagado y carga
F) Indicador LED
G) Conector USB
H)Altavoz
2) Utilización de TrekStor i.Gear lumio
Cargar el TrekStor i.Gear lumio
a) Conecte el i.Gear lumio a una entrada USB de su ordenador
mediante el cable USB suministrado.
b) El indicador LED se pondrá en rojo para mostrar que el i.Gear
lumio se está cargando. Cuando el aparato esté completamente
cargado, el indicador LED se pondrá verde.
c) Cuando le quede poca batería y se deba cargar el i.Gear lumio,
el indicador LED parpadeará en azul.
ES 16
i También puede cargar el i.Gear lumio mediante un adaptador USB
apropiado, por ejemplo, TrekStor USB-Charger e.m (no incluido en el
material suministrado).
i Antes de utilizarlo por primera vez, cargue el i.Gear lumio por completo
(tiempo de carga entre 3 y 5 horas).
i La capacidad máxima de la batería se alcanzará tras 10 ciclos de carga.
Conectar el TrekStor i.Gear lumio con el iPhone® 4/4S
Deslice cuidadosamente el iPhone® 4/4S (lado del conector boca abajo)
de arriba hacia abajo sobre el conector de 30 pins del i.Gear lumio.
Encender el TrekStor i.Gear lumio
a) Tras haber conectado los dispositivos, puede encender el i.Gear
lumio deslizando el botón de encendido/apagado hacia la derecha
y manteniéndolo presionado hasta que el indicador LED esté en
azul. A la vez, la imagen de proyección predefinida saldrá por la
lente del proyector.
b) Seleccione en su iPhone® 4/4S el vídeo o imagen que quiere
mostrar y reprodúzcala del modo habitual. El i.Gear lumio proyectará
automáticamente la imagen sobre la superficie hacia la que esté
orientado.
a No mire directamente el objetivo del proyector encendido para evitar
daños oculares. Tampoco oriente la imagen de proyección sobre la
cara de otras personas.
a No toque directamente la lente para evitar que se ensucie.
i Para lograr la mejor calidad de proyección, sitúe el i.Gear lumio en un
entorno oscuro y oriéntelo en perpendicular a una pared tan lisa y
clara como sea posible.
i Tenga en cuenta que mediante el i.Gear lumio no se podrán ver todos
los formatos de archivo que el usuario puede reproducir/ver con su
iPhone® 4/4S. Las presentaciones en Power Point se pueden visualizar
mediante el i.Gear lumio con programas especiales (Apps).
17 ES
Definir el volumen
Asegúrese de que el volumen de su iPhone® 4/4S esté al máximo.
A continuación, podrá definir el volumen en el i.Gear lumio mediante
los botones de , o ;.
Configurar la nitidez
Gire la rueda de enfoque hasta conseguir la nitidez deseada.
i Tenga en cuenta que la rueda de enfoque sólo se puede girar en una
dirección hasta el tope.
Apagar el TrekStor i.Gear lumio
Para apagar el i.Gear lumio, vuelva a deslizar el botón de encendido/
apagado hacia la derecha. Mantenga presionado el botón hasta que
se apague el dispositivo o el LED azul.
Cargar el iPhone® 4/4S mediante el TrekStor i.Gear lumio
i Puede utilizar el i.Gear lumio como estación de carga del iPhone® 4/4S.
i Asegúrese de que el i.Gear lumio esté completamente cargado.
a) Deslice el iPhone® 4/4S en el i.Gear lumio.
b) A continuación, deslice el botón de encendido/apagado hacia la
izquierda y póngalo en la posición de "Charge"
c) Durante la carga del iPhone® 4/4S, el indicador LED del i.Gear lumio
estará en rojo.
ES 18
Indicaciones de uso y de seguridad:
d
e
j
m
h
g
Sólo personas cualificadas pueden realizar trabajos técnicos con el producto. El
producto no debe de estar abierto ni se deben realizar modificaciones en él. El
usuario no puede realizar el mantenimiento de los componentes.
No exponga el aparato a la humedad, agua de condensación ni lo moje.
Proteja el aparato de temperaturas extremas y cambios bruscos de temperatura.
Utilícelo únicamente en un intervalo de temperaturas de ambiente de entre
10ºC y 40ºC.
No aproxime el aparato a fuentes de calor y protéjalo de la luz solar directa.
Utilice y guarde el aparato en un ambiente lo más libre de polvo posible.
Nunca limpie la superficie del aparato con disolventes, diluyentes, detergentes
u otros productos químicos. Utilice en su lugar un paño suave y seco o un pincel
suave.
¡Atención: LED de clase 2! Radiación óptica. ¡No mirar el haz de luz! EN 62471:2008.
No mire nunca directamente el LED y no oriente el haz de luz directamente hacia
personas o animales para evitar daños oculares. La función de centelleo de la
linterna no se puede utilizar en presencia de personas que sufran epilepsia refleja
(fotosensibilidad).
iPhone is a trademark of Apple Inc., registered in the U.S. and other countries.
El fabricante reserva el derecho de continuar desarrollando el producto. Los
consecutivos cambios en el producto pueden realizarse sin que aparezcan descritos
directamente en este manual. Por lo tanto, la información contenida en el presente
manual de usuario puede no coincidir con el estado técnico de la última versión.
El fabricante garantiza el producto únicamente para el uso previsto. Asimismo, el
fabricante no se responsabiliza de daños o pérdidas de datos, ni de daños resultantes
de estos.
Copyright © 2011 TrekStor GmbH. Todos los derechos reservados. Los nombres de otros
productos y empresas aquí citados son probablemente productos y marcas registradas
de sus respectivos propietarios.
19 ES
bAnvändarmanual
Vi gratulerar till ditt köp av TrekStor i.Gear lumio och vi är säkra på
att du ska få mycket glädje med denna produkt. Läs följande avsnitt
noggrant så att du lär känna funktionerna för denna produkt och
dess användning.
Den aktuella produktinformationen kan du hämta på TrekStors
webbsida www.trekstor.de.
I leveransen ingår
•
TrekStor i.Gear lumio
•
USB 2.0-kabeln (USB-A på mini-USB)
•
Användarmanual
1) Kontroller och anslutningar för TrekStor i.Gear lumio
A)Lins
B) Finjustering, fokushjul
C) Volymkontroll (, /;)
D)30-stiftskontakt
E)Laddnings-/strömknapp
F)LED-indikatorlampa
G)USB-port
H)Högtalare
2) Använda TrekStor i.Gear lumio
Ladda TrekStor i.Gear lumio
a) Anslut i.Gear lumio via den medföljande USB-kabeln till en
USB-port på din dator.
b) LED-indikatorn börjar lysa rött för att visa att i.Gear lumio för närvarande
är laddas. LED-lampan växlar till grönt när i.Gear lumio är helt laddad.
c) LED-displayen kommer blinka snabbt i blått när batteriet
i i.Gear lumio är lågt
SE 20
i Du kan också ladda i.Gear lumio via en lämplig USB-adapter
(t.ex. TrekStor USB-laddare) (ej inkluderad i leveransen).
i Ladda batteriet i i.Gear lumio helt före första användningen
(ca. 3 till 5 timmar).
i
Den maximala driftstiden kan endast nås efter att ca. 10 batteriladdningar
har genomförts.
Ansluta TrekStor i.Gear lumio till iPhone® 4/4S
Dra din iPhone® 4/4S, med anslutningssidan neråt, försiktigt rakt ner
på 30-stiftskontakten på i.Gear lumio.
Sätta på TrekStor i.Gear lumio
a) Efter att du har anslutit båda enheterna kan du nu starta i.Gear lumio
genom att trycka på strömbrytaren och hålla in den tills LED-displayen
börjar lysa blått. Samtidigt visas den förinställs projektorbilden från
projektorns lins.
b) Du kan nu välja den video eller bild som du vill visa från menyn på
din iPhone® 4/4S och spela upp den som du vanligtvis skulle göra.
i.Gear lumio projicerar automatiskt bilden på den yta mot vilken
den är riktad.
a Du kan nu välja den video eller bild som du vill visa från menyn på
din iPhone® 4/4S och spela upp den som du vanligtvis skulle göra.
i.Gear lumio projicerar automatiskt bilden på den yta mot vilken
den är riktad.
a Rör inte linsen för att förhindra nedsmutsning.
i För att nå bästa projiceringskvalitet, placera i.Gear lumio i en mörk
miljö direkt riktad mot en ljus, slät vägg.
i Notera att inte alla filformat som du kan spela på din iPhone® 4/4S
kan visas via i.Gear lumio. Visning av Power Point-presentationer
med i.Gear lumio är möjlig med specialprogram (appar).
21 SE
Justera volymen
Säkerställ att volymen på din iPhone® 4/4S är inställd på högsta nivå.
Justera sedan volymen på i.Gear lumio via knapparna , eller ;.
Justera fokus
Rulla fokushjulet för att finjustera bilden.
i Notera att du endast ska rulla fokushjulet tills det tar stopp.
Stänga av TrekStor i.Gear lumio
För att stänga av i.Gear lumio, tryck åter på strömbrytaren till höger.
Håll in knappen tills enheten stängs av, alternativt tills LED:n slocknar.
Ladda iPhone® 4/4S via TrekStor i.Gear lumio
i Du kan använda i.Gear lumio som en laddningsstation för din
iPhone® 4/4S.
i Se till att din i.Gear lumio är fulladdad.
a) Sätt i din iPhone® 4/4S i i.Gear lumio.
b) Dra strömbrytaren till vänster till "Charge"-läge.
c) Då din iPhone® 4/4S laddas lyser LED-displayen på i.Gear lumio rött.
SE 22
Säkerhets- och användningsföreskrifter:
d
e
j
m
h
g
Tekniskt arbete på produkten får bara utföras av personer med erforderlig
utbildning. Det är inte tillåtet att öppna produkten eller göra ändringar på den.
Produkten innehåller inga komponenter som användaren själv kan reparera.
Utsätt aldrig produkten för fukt, kondens eller väta.
Skydda apparaten mot alltför höga eller låga temperaturer och
temperaturvariationer. Använd den bara om omgivningstemperaturen
ligger mellan 10º C och 40º C.
Ställ inte upp apparaten nära en värmekälla och skydda den mot direkt solsken.
Se noga till att omgivningen där du använder och förvarar apparaten är så
dammfri som möjligt.
Rengör aldrig apparatens yta med lösningsmedel, förtunningsmedel,
rengöringsmedel eller andra kemikalier. Använd istället en mjuk och torr
trasa eller en mjuk borste.
Varning, LED-lektion 2! LED-strålning! Titta inte in i ljusstrålen. EN 62471:2008.
Titta inte direkt in i LED:en och rikta den inte mot människor eller djur för att
undvika ögonskador. Blixtfunktionen hos ficklampan ska inte användas
i närheten av personer som lider av reflexepilepsi (fotosensitivitet).
iPhone is a trademark of Apple Inc., registered in the U.S. and other countries.
Tillverkaren förbehåller sig rätt till kontinuerlig vidareutveckling av produkten. Ändringar kan
företas utan att de beskrivs direkt i denna bruksanvisning. Upplysningarna i bruksanvisningen
överensstämmer därför inte nödvändigtvis med det verkliga tekniska utförandet.
Tillverkaren garanterar enbart att produkten är lämplig för dess avsedda ändamål.
Tillverkaren ansvarar inte heller för skada på eller förlust av data eller för därav orsakade
följdskador.
Copyright © 2011 TrekStor GmbH. Alla rättigheter förbehållna. Om andra produkteller företagsbeteckningar nämns kan de eventuellt avse varubeteckningar eller
märkesnamn som tillhör respektive innehavare.
23 SE
bManuel de l'utilisateur
Nous vous félicitons pour l’achat de le i.Gear lumio de TrekStor.
Nous sommes certains que vous allez pleinement profiter de ce
produit avec grand plaisir. S'il vous plaît lisez attentivement les
instructions suivantes, afin que vous apprendre les caractéristiques
de ce produit et de son fonctionnement.
Informations sur les produits peuvent être trouvés sur le site
www.trekstor.de.
Livraison
•
TrekStor i.Gear lumio
•
Câble USB 2.0 (USB-A sur mini-USB)
•
Notice d’utilisation
1) Commandes et connexions du TrekStor i.Gear lumio
A)Lentille
B) Molette de réajustement de la mise au point
C) Commande de volume (, /;)
D) Connecteur 30 broches
E) Bouton de recharge/d’alimentation
F) Voyant lumineux à DEL
G) Port USB
H)Haut-parleur
2) Faire fonctionner le TrekStor i.Gear lumio
Recharger le TrekStor i.Gear lumio
a) Connectez le i.Gear lumio à un port USB de votre ordinateur grâce
au câble USB inclus.
b) Le voyant lumineux à DEL devient rouge pour indiquer que le
i.Gear lumio est branché. Le voyant devient vert lorsque le
i.Gear lumio est complètement rechargé.
c) Le voyant à DEL devient bleu et clignote lorsque la batterie du
i.Gear lumio est faible.
FR 24
i Vous pouvez également recharger le i.Gear lumio par le biais d’un
adaptateur USB approprié (par ex. TrekStor USB-Charger e.m)
(non inclus à la livraison).
i
Rechargez complètement la batterie du i.Gear lumio avant sa première
utilisation (environ 3 à 5 heures de charge).
i Le temps d’utilisation maximum peut être atteint seulement après
avoir effectué environ 10 cycles de recharge de la batterie.
Connecter le TrekStor i.Gear lumio avec l’iPhone® 4/4S
Faites glissez votre iPhone® 4/4S en plaçant le côté de connexion en
bas sur le connecteur 30 broches du i.Gear lumio.
Allumer le TrekStor i.Gear lumio
a) Après avoir connecté les deux appareils, vous pouvez allumer le
i.Gear lumio en maintenant le bouton d’alimentation poussé vers
la droite jusqu’à ce que le voyant à DEL devienne bleu. Une image
prédéfinie est simultanément projetée par la lentille du projecteur.
b) Vous pouvez choisir l’image ou la vidéo que vous voulez visionner
dans le menu de votre iPhone® 4/4S et l’afficher comme à la
normale. Le i.Gear lumio projette automatiquement l’image
sur la surface où il est orienté.
a Ne regardez pas directement dans la lentille du projecteur quand
celui-ci est allumé, afin d’éviter d’endommager vos yeux. Ne dirigez
pas non plus l’image projetée dans le visage d’autres personnes.
a Ne touchez pas directement la lentille pour éviter toute contamination.
i Pour obtenir la meilleure qualité de projection possible, positionnez le
i.Gear lumio dans un environnement sombre précisément aligné à
un mur à la surface plane et claire.
i Veuillez remarquer que les formats que vous pouvez lire sur votre
iPhone® 4/4S ne seront pas tous aussi bien projetés par le i.Gear lumio.
La projection de présentations Power Point avec le i.Gear lumio est
possible avec des programmes spéciaux (apps).
25 FR
Ajuster le volume
Assurez-vous que le volume de votre iPhone® 4/4S est réglé au plus fort.
Puis ajustez le volume du i.Gear lumio avec les boutons , or ;.
Ajuster la mise au point
Tournez la molette d’ajustement de la mise au point pour ajuster l’image.
i Veuillez remarquer que vous pouvez seulement tourner la molette
jusqu’à ce qu’elle se bloque.
Éteindre le TrekStor i.Gear lumio
Pour éteindre le i.Gear lumio, poussez à nouveau le bouton d’alimentation
vers la droite. Maintenez-le vers la droite jusqu’à ce que l’appareil
s’éteigne et jusqu’à ce que le voyant à DEL bleu s’éteigne.
Recharger votre iPhone® 4/4S avec le TrekStor i.Gear lumio
i Vous pouvez vous servir du i.Gear lumio comme d’une station de
recharge pour votre iPhone® 4/4S.
i Assurez-vous que le i.Gear lumio est complètement rechargé.
a) Faites glisser votre iPhone® 4/4S à l’intérieur du i.Gear lumio.
b) Poussez le bouton d’alimentation vers la gauche dans la position
« Charge ».
c) Lorsque l’iPhone® 4/4S se recharge, le voyant à DEL du i.Gear lumio
devient rouge.
FR 26
Consignes de sécurité et remarques relatives à l'utilisation:
d
e
j
m
h
La réalisation de travaux techniques sur le produit est strictement réservée à des
personnes en possession des qualifications correspondantes. Il est strictement
interdit d'ouvrir le produit ou d'y apporter des modifications. Les composants
ne peuvent pas être réparés par l'utilisateur.
N'exposez jamais l'appareil à l'humidité, à la condensation et à la pluie.
Protégez l'appareil de températures extrêmement basses et élevées ainsi que
des fluctuations thermiques. Exploitez l'appareil uniquement à une température
ambiante dans une plage entre 10°C et 40°C.
N'installez pas l'appareil à proximité d'une source de chaleur et protégez-le du
rayonnement direct du soleil.
Lors de l'utilisation et du stockage de l'appareil, veillez à ce que l'environnement
soit le moins poussiéreux possible.
g
Le nettoyage de la surface de l'appareil ne doit jamais être réalisé avec des
solvants, des diluants, des produits de nettoyage ou d'autres produits chimiques.
Utilisez plutôt un chiffon doux et sec ou un pinceau souple.
Attention DEL de classe 2 ! Rayonnement de la DEL ! Ne regardez pas directement
le faisceau. EN 62471:2008. Veuillez ne pas regarder directement le faisceau
de la DEL et ne dirigez pas le faisceau lumineux directement dans le visage
d’autres personnes ou animaux afin d’éviter un danger pour les yeux. La
fonction clignotante de la lumière ne doit pas être utilisée devant des personnes
présentant des risques de crises d’épilepsie (photosensibilité).
iPhone is a trademark of Apple Inc., registered in the U.S. and other countries.
Le fabricant se réserve le droit de poursuivre le développement du produit en
permanence. Ces modifications peuvent être mises en pratique sans description
directe dans cette notice d’utilisation. Les informations contenues dans cette notice
d’utilisation ne reflètent donc pas impérativement l’état d’exécution technique.
Le fabricant garantit uniquement la fonctionnalité pour la définition intrinsèque de
ce produit. En outre, le fabricant n’endosse aucune responsabilité concernant les
dommages ou pertes de données subis ainsi que les conséquences en résultant.
Copyright © 2011 TrekStor GmbH. Tous droits réservés. Toutes les autres désignations
de produits ou de firmes citées sont dans certains cas des marques déposées ou des
noms de marques du propriétaire respectif.
27 FR
Akku-Entsorgung
Informationspflicht gemäß Batterieverordnung (BattV)
Batterien und Akkus gehören nicht in den Hausmüll. Der Verbraucher ist dazu
verpflichtet, nicht mehr verwendete Batterien und Akkus ordnungsgemäß
zurückzugeben. Lassen Sie diese bitte nur über den Fachhandel oder durch
Batteriesammelstellen entsorgen. Hier leisten Sie einen konkreten Beitrag
zum Umweltschutz.
Seit 1998 verpflichtet die Deutsche Batterieverordnung alle Bürgerinnen und
Bürger, verbrauchte Batterien und Akkus ausschließlich über den Handel oder
speziell dafür eingerichtete Sammelstellen zu entsorgen (gesetzliche
Rückgabepflicht).
Handel und Hersteller sind verpflichtet, diese Batterien und Akkus unentgeltlich
zurückzunehmen und ordnungsgemäß zu verwerten oder als Sondermüll zu
beseitigen (gesetzliche Rücknahmepflicht).
Der in diesem Gerät verbaute Akku ist mit dem nebenstehenden Zeichen,
bestehend aus einer durchgestrichenen Mülltonne und der Art des
verwendeten Akkus gekennzeichnet.
Battery disposal
Reporting requirement according to the Battery Directive (BattV)
Batteries are not part of the domestic waste. The consumer is obliged to return
no longer used batteries properly. Please dispose of them by a specialized trade
or a battery collection point. Hereby you make an important contribution to
environmental protection.
Since 1998 the German Battery Directive compels all citizens to dispose of used
batteries exclusively through the trader or specially equipped departments
(legal return obligation).
Trade and manufacturers are committed to take back batteries for free and to
exploit it properly or to remove it as special waste (legal take-back obligation).
The built-in battery of this device is marked with the adjoining symbol,
consisting of a crossed out bin and the used battery type.
E C D E C L A R AT I O N O F C O N F O R M I T Y
As manufacturer and importer respectively:
TrekStor GmbH
Kastanienallee 8 - 10
D-64653 Lorsch, Germany
■ ■ ■ ■ ■ ■ ■ ■ ■ ■ ■ ■ ■ ■ ■ ■ ■ ■ ■ ■ ■ ■ ■ ■ ■ ■ ■ ■ ■ ■ ■ ■ ■ ■ ■ ■ ■ ■ ■ ■ ■ ■ ■ ■ ■ ■ ■ ■ ■ ■ ■ ■ ■ ■ ■ ■ ■ ■ ■ ■ ■ ■ ■ ■ ■ ■ ■ ■ ■ ■ ■ ■ ■ ■ ■ ■ ■ ■ ■ ■ ■ ■ ■ ■ ■ ■ ■ ■ ■ ■ ■ ■ ■ ■ ■ ■ ■ ■ ■ ■ ■ ■ ■ ■ ■ ■ ■ ■ ■ ■ ■ ■ ■ ■ ■ ■ ■ ■ ■ ■ ■ ■ ■ ■ ■ ■ ■ ■ ■ ■ ■ ■ ■ ■ ■ ■ ■ ■ ■ ■ ■ ■ ■ ■ ■ ■ ■ ■ ■ ■ ■ ■ ■ ■ ■ ■ ■ ■ ■ ■ ■ ■ ■ ■ ■ ■ ■ ■ ■ ■ ■ ■ ■ ■ ■ ■
herewith declares that the products
Product:
i.Gear lumio
■ ■ ■ ■ ■ ■ ■ ■ ■ ■ ■ ■ ■ ■ ■ ■ ■ ■ ■ ■ ■ ■ ■ ■ ■ ■ ■ ■ ■ ■ ■ ■ ■ ■ ■ ■ ■ ■ ■ ■ ■ ■ ■ ■ ■ ■ ■ ■ ■ ■ ■ ■ ■ ■ ■ ■ ■ ■ ■ ■ ■ ■ ■ ■ ■ ■ ■ ■ ■ ■ ■ ■ ■ ■ ■ ■ ■ ■ ■ ■ ■ ■ ■ ■ ■ ■ ■ ■ ■ ■ ■ ■ ■ ■ ■ ■ ■ ■ ■ ■ ■ ■ ■ ■ ■ ■ ■ ■ ■ ■ ■ ■ ■ ■ ■ ■ ■ ■ ■ ■ ■ ■ ■ ■ ■ ■ ■ ■ ■ ■ ■ ■ ■ ■ ■ ■ ■ ■ ■ ■ ■ ■ ■ ■ ■ ■ ■ ■ ■ ■ ■ ■ ■ ■ ■ ■ ■ ■ ■ ■ ■ ■ ■ ■ ■ ■ ■ ■ ■ ■ ■ ■ ■ ■ ■ ■
Type:
mobile DLP Projektor
■ ■ ■ ■ ■ ■ ■ ■ ■ ■ ■ ■ ■ ■ ■ ■ ■ ■ ■ ■ ■ ■ ■ ■ ■ ■ ■ ■ ■ ■ ■ ■ ■ ■ ■ ■ ■ ■ ■ ■ ■ ■ ■ ■ ■ ■ ■ ■ ■ ■ ■ ■ ■ ■ ■ ■ ■ ■ ■ ■ ■ ■ ■ ■ ■ ■ ■ ■ ■ ■ ■ ■ ■ ■ ■ ■ ■ ■ ■ ■ ■ ■ ■ ■ ■ ■ ■ ■ ■ ■ ■ ■ ■ ■ ■ ■ ■ ■ ■ ■ ■ ■ ■ ■ ■ ■ ■ ■ ■ ■ ■ ■ ■ ■ ■ ■ ■ ■ ■ ■ ■ ■ ■ ■ ■ ■ ■ ■ ■ ■ ■ ■ ■ ■ ■ ■ ■ ■ ■ ■ ■ ■ ■ ■ ■ ■ ■ ■ ■ ■ ■ ■ ■ ■ ■ ■ ■ ■ ■ ■ ■ ■ ■ ■ ■ ■ ■ ■ ■ ■ ■ ■ ■ ■ ■ ■
comply with the following directive(s):
2004/108/EC EMC Directive: Electromagnetic Compatibility
2006/95/EC
Low Voltage Directive
■
■
■ ■ ■ ■ ■ ■ ■ ■ ■ ■ ■ ■ ■ ■ ■ ■ ■ ■ ■ ■ ■ ■ ■ ■ ■ ■ ■ ■ ■ ■ ■ ■ ■ ■ ■ ■ ■ ■ ■ ■ ■ ■ ■ ■ ■ ■ ■ ■ ■ ■ ■ ■ ■ ■ ■ ■ ■ ■ ■ ■ ■ ■ ■ ■ ■ ■ ■ ■ ■ ■ ■ ■ ■ ■ ■ ■ ■ ■ ■ ■ ■ ■ ■ ■ ■ ■ ■ ■ ■ ■ ■ ■ ■ ■ ■ ■ ■ ■ ■ ■ ■ ■ ■ ■ ■ ■ ■ ■ ■ ■ ■ ■ ■ ■ ■ ■ ■ ■ ■ ■ ■ ■ ■ ■ ■ ■ ■ ■ ■ ■ ■ ■ ■ ■ ■ ■ ■ ■ ■ ■ ■ ■ ■ ■ ■ ■ ■ ■ ■ ■ ■ ■ ■ ■ ■ ■ ■ ■ ■ ■ ■ ■ ■ ■ ■ ■ ■ ■ ■ ■ ■ ■ ■ ■ ■ ■
The following norms were consulted to assess conformity:
■
■
■
■
EN 55013:2001 + A1:2003 + A2:2006
Sound and television broadcast receivers and associated equipment – Radio disturbance characteristics –
Limits and methods of measurement (IEC/CISPR 13:2001, modified + A1:2003 + A2:2006)
EN 55020:2007
Sound and television broadcast receivers and associated equipment – Immunity characteristics – Limits
and methods of measurement (IEC/CISPR 20:2006)
EN 60065:2002 + A2:2010
Audio, video and similar electronic apparatus – Safety requirements
(IEC 60065:2001 modified + A2:2010 modified)
EN 62471:2008
Photobiological safety of lamps and lamp systems
■ ■ ■ ■ ■ ■ ■ ■ ■ ■ ■ ■ ■ ■ ■ ■ ■ ■ ■ ■ ■ ■ ■ ■ ■ ■ ■ ■ ■ ■ ■ ■ ■ ■ ■ ■ ■ ■ ■ ■ ■ ■ ■ ■ ■ ■ ■ ■ ■ ■ ■ ■ ■ ■ ■ ■ ■ ■ ■ ■ ■ ■ ■ ■ ■ ■ ■ ■ ■ ■ ■ ■ ■ ■ ■ ■ ■ ■ ■ ■ ■ ■ ■ ■ ■ ■ ■ ■ ■ ■ ■ ■ ■ ■ ■ ■ ■ ■ ■ ■ ■ ■ ■ ■ ■ ■ ■ ■ ■ ■ ■ ■ ■ ■ ■ ■ ■ ■ ■ ■ ■ ■ ■ ■ ■ ■ ■ ■ ■ ■ ■ ■ ■ ■ ■ ■ ■ ■ ■ ■ ■ ■ ■ ■ ■ ■ ■ ■ ■ ■ ■ ■ ■ ■ ■ ■ ■ ■ ■ ■ ■ ■ ■ ■ ■ ■ ■ ■ ■ ■ ■ ■ ■ ■ ■ ■
The CE symbol confirms that this product conforms with the above mentioned norms and regulations.
■ ■ ■ ■ ■ ■ ■ ■ ■ ■ ■ ■ ■ ■ ■ ■ ■ ■ ■ ■ ■ ■ ■ ■ ■ ■ ■ ■ ■ ■ ■ ■ ■ ■ ■ ■ ■ ■ ■ ■ ■ ■ ■ ■ ■ ■ ■ ■ ■ ■ ■ ■ ■ ■ ■ ■ ■ ■ ■ ■ ■ ■ ■ ■ ■ ■ ■ ■ ■ ■ ■ ■ ■ ■ ■ ■ ■ ■ ■ ■ ■ ■ ■ ■ ■ ■ ■ ■ ■ ■ ■ ■ ■ ■ ■ ■ ■ ■ ■ ■ ■ ■ ■ ■ ■ ■ ■ ■ ■ ■ ■ ■ ■ ■ ■ ■ ■ ■ ■ ■ ■ ■ ■ ■ ■ ■ ■ ■ ■ ■ ■ ■ ■ ■ ■ ■ ■ ■ ■ ■ ■ ■ ■ ■ ■ ■ ■ ■ ■ ■ ■ ■ ■ ■ ■ ■ ■ ■ ■ ■ ■ ■ ■ ■ ■ ■ ■ ■ ■ ■ ■ ■ ■ ■ ■ ■
The manufacturer also declares the conformity of the product according to the following directives:
■
2001/95/EC
General Product Safety
■
2002/95/EC
RoHS: Hazardous substances in electrical and electronic equipment
Lorsch,
21.11.2011
Thorsten Koroscha, LPM
Supportinformationen
Sollten Sie Fragen zu Ihrem TrekStor Produkt haben, gehen Sie bitte wie folgt vor:
• Überprüfen Sie anhand der Produkteigenschaften und der Funktionen Ihres Gerätes
(auf der Verpackung ersichtlich), ob Sie die richtigen Einstellungen vorgenommen haben.
• Lesen Sie aufmerksam die gesamte Bedienungsanleitung.
• Informieren Sie sich auf unserer Website www.trekstor.de über aktuelle Informationen zu Ihrem Produkt (z. B. neu verfügbare Firmware-Updates).
Wenn Sie weitergehende Fragen zu Ihrem Produkt haben, beachten Sie bitte die folgenden
TrekStor Supportoptionen:
FAQ
Der FAQ-Bereich unserer Website bietet Ihnen vielfältige Problemlösungshinweise. Hier erhalten Sie Antworten zu den am häufigsten gestellten Fragen zu unseren Produkten.
E-Mail
Füllen Sie das Supportformular auf unserer Website aus oder senden Sie eine E-Mail an [email protected]. Telefonsupport
Von Deutschland aus wählen Sie bitte 01805-TREKSTOR*, 01805-87357867*. Die Nummer der Supporthotline für andere Länder finden Sie auf unserer Website unter "SERVICE".
* 14 Cent/Min. aus dem deutschen Festnetz der DTAG, max. 42 Cent/Min. aus Mobilfunknetzen.
Support information
If you have any questions regarding your TrekStor product, please proceed as follows:
• Check the features as well as the functions of your device (apparent on the packaging), in order to use the correct settings.
• Read the manual carefully.
• Inform yourself on our website www.trekstor.de/en about the up-to-date information concerning your product (e. g. available most recent firmware releases).
In the case you have further questions regarding your product, please note the following
TrekStor support options:
FAQ
The FAQ area of our website offers you a wide range of problem solving hints. Here you can obtain answers to the most frequently asked questions concerning our products.
E-Mail
Please fill in the support form on our website or send an E-Mail to
[email protected]. You can find mailing addresses for other
countries when you click "SERVICE" at the menu bar on our website.
Phone support
Please find the number of the support hotline for your country on our website under "SERVICE" as well. TrekStor GmbH
Kastanienallee 8-10
D-64653 Lorsch
Germany
www.trekstor.de
BA-IGL-DE-FR-V1.10-111122