1
Covatutto 16L digitale - Description of the shown steps
EN
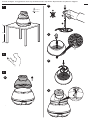
1 Remove the incubator from the package.
Put the incubator on a sturdy plane at a height of about 80 cm, in premises with a
temperature included between 17°C and 25°C (62°F-77°F) and humidity included
between 55% and 75%. It is recommendable to keep the incubator away from heat
sources, air draughts and windows to prevent sudden harmful temperature changes.
2 Carefully read the instruction manual. (Annex A)
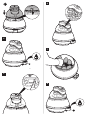
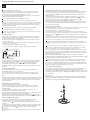
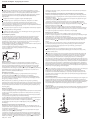
3 Assemble the supplied accessories, lift the dome (fig. a), assemble the
automatic egg turning device (fig. b- c-d), place the connection (x) so that it
engages into its own seat (y) (fig. e), and then re-install the dome so that the
cavity to be found in the dome (g) perfectly matches the tongue (h) in the cabinet
(fig. f).
4 Pour lukewarm water and fill the pan (1). Remember that this operation must be
carried out approx. every 2 days or, at any rate, when necessary.
5 Connect the plug to the mains socket with the incubator closed and without
eggs and set the display.
Default settings
The incubator leaves the manufacturing process being already prepared to
incubate chicken, or at any rate, common poultry eggs. As a consequence, the
first time you start up the machine, it will automatically adjust to reach and keep a
37.8°C (100°F) temperature constant.
The incubator display will show 3 small triangular-shaped LEDs that correspond
to the relevant explicatory icons. The aforesaid LEDs have a warning function and:
- icon no. 1: egg-hatching day, remember the time when it is necessary to prepare
the incubator to the egg-hatching phase.
- icon no. 2: remind that water must be added to the pans
- icon no. 3: button to switch ON/OFF the automatic egg turning device
1
2
3
- if you keep the same key pressed for some seconds, the digits indicating the number
of days will start blinking: now you can increase the number of days by pressing the
key, or reduce the value by pressing the key.
You can set a maximum duration of 40 days.
To exit this operation, wait more than 4 seconds before pressing any key. At any rate,
you can always display the number of days that are missing by pressing the key.
Explanation of the symbols
LED that corresponds to icon no. 1: it turns ON 3 days before egg-hatching.
Now, perform the operations that are correlated with egg-hatching.
The LED blinks when the days counter is 0.
LED that corresponds to icon no. 2: this LED turns ON once every 2 days to remind that
you must add water to the pans. After you perform this operation, press one of the two
or keys to turn OFF the LED and prepare it for the following switching ON.
LED that corresponds to icon no. 3: this LED will turn ON when the egg turning device
has activated (to deactivate it, just press the specific key); three days before egghatching, the egg turning device will automatically deactivate.
6 Wait until the light bulbs start to operate intermittently, which means that the
internal temperature is starting to stabilize (the display shows 37.8°C or 100°F).
7 Put the eggs into the specific compartment (see Egg types table); if you do not have
a sufficient quantity of eggs to fill the compartment, they will have to be distributed
over the surface without concentrating them at the centre or at the sides, so that air
circulation will be balanced. Close the incubator by putting the lid back into the correct
seat. The automatic egg turning device will rotate the eggs for about 1 minute every
two hours.
Starting from the 10th day, it is advisable to ventilate the incubator by lifting the cover
for about 30 seconds approx. every two days.
Note: before opening the incubator, for any reason, you have always to disconnect
the plug from the mains socket to prevent sudden temperature changes; however, it is
recommendable to open the incubator only to perform the necessary operations and for
short times.
8 During the last 3 days before egg-hatching, prepare the incubator: (a) completely fill
the pans with water in all compartments (pans 1-2). Do not rotate the eggs any more.
During the aforesaid 3 days, open the incubator only if strictly necessary.
The births may start 1 day in advance and finish 2 days after the established date (ex. 21
days for chickens).
Set-up of the machine
You can modify the default settings after having connected the plug into the
mains socket and after displaying the model of the incubator (C16); during the
following 5 seconds (not later), contemporary press and keys. The display will
show F01, which corresponds to the first “function” to be set. If you repeatedly
press the key, you can scroll the menu and display the other available functions.
DISCLAIMER
1-2of the instructions, the
After updates, modifications and/or technical innovations, part
specifications and the images included in this documentation may be different. The items
that are described herewith must be considered only for illustration purposes and may not
be applicable to your specific case. It is not possible to obtain legal rights or claims from the
description to be found in this manual.
Available functions:
F01 - It displays the unit of measurement of the set temperature (C or F degrees).
By means of the key, you can vary its condition.
F02 - After you have selected this function and have pressed the key, you can
activate or deactivate the LED that corresponds to icon 2 (rotate the eggs).
Warnings
The supplied knob (w) (step 3 fig b), if suitably installed*, will allow using the automatic egg
turning device as a manual egg turning device; therefore, it is advisable to keep and use it
only in case of possible malfunctions.
After you have entered all settings and in order to leave the set-up operation, wait
more than 5 seconds before pressing any other key. The last entered data will be
stored by the machine and, if you do not edit them, they will be the new default
settings at the following use.
Start-up of the machine
Device start-up is divided into four phases:
- phase 1: display test – all digits turn ON for about 1 second
- phase 2: the display shows the model of the machine (C16) for about 2 seconds
- phase 3: the display will show the set temperature (relating to the last incubation
performed) for about 2 seconds
- phase 4: the machine is operating. The display shows the temperature, which
will increase until reaching the set value.
During this phase, the heating symbol
will start blinking (and will go on
blinking for the entire duration of the incubation).
How to display and modify the temperature
The temperature that is necessary for the species that you want to incubate can
be set only when the machine is operating, by carefully following the instructions
listed below:
- if you press the key, you can display the temperature that was set for the
previous incubation.
- if you keep the same key pressed for some seconds, the temperature digits will
start blinking: now you can increase the temperature value by pressing the key,
or reduce the value by pressing the key. You can set the temperature between
25°C and 40°C (77°F – 104°F).
To exit this operation, wait more than 4 seconds before pressing any key.
Display and setting of the days that are necessary for the incubation
The number of necessary days according to the species to be incubated can be
set only when the machine is operating, and carefully following the instructions
listed below:
- if you press the key, you can display the number of days that was set for the
previous incubation.
w
y