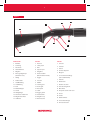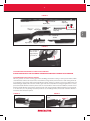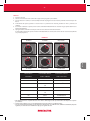
1
R I F L E S
a n d
s h o t g u n s
Bedienungsanleitung - Owner’s Manual - Manuel de l’utilisateur
Manual del propietario - Manuale di istruzioni - Пособие пользователя
2
Deutsch
P. 11
English
p. 23
Français
p. 35
Español
p. 47
Italiano
p. 59
Русский язык
p. 71
R I F L E S
a n d
s h o t g u n s
3
VERY IMPORTANT: KEEP THIS BOOKLET.
SEHR WICHTIG : BEWAHREN SIE DIESES BUCH
SORGFÄLTIG AUF.
Vor Benutzung Ihrer neuen Winchester-Feuerwaffe,
lesen Sie bitte aufmerksam diese Bedienungsanleitung
vollständig durch. Wir freuen uns, dass Sie sich für eine
Winchester Super X3 entschieden haben. Sie werden lange
Jahre Freude daran haben. Die Herstellung dieses Gewehrs
unterliegt äußerster Sorgfalt und beinhaltet sowohl
das ganze Fachwissen der Büchsenmachertradition, als
auch alle Charakteristika, um Jäger und Sportschützen
gleichermaßen bei der Ausübung ihrer jeweiligen Sportart
ein Höchstmaß an Genuss zu gewährleisten.
ELEMENTARE SICHERHEITSREGELN
1. Vergewissern Sie sich vor jeder Benutzung, dass die
Waffe nicht geladen ist.
2. Sichern Sie Ihre Waffe immer, wenn Sie nicht gerade
schießen wollen, auch wenn Sie sicher sind, dass sie
nicht geladen ist.
3. Legen Sie lhren Zeigefinger nur dann an den Abzug,
wenn Sie wirklich schießen wollen. Anderenfalls legen
Sie ihn an den Abzugsbügel.
4. Zielen Sie mit Ihrer Waffe unter gar keinen Umständen
auf eine Person, auch wenn Sie sicher sind, dass Ihre
Waffe ungeladen ist.
5. Sie müssen immer wissen, wo Ihre Projektile herab
fallen. Achten Sie besonders auf Blindgänger. Nehmen
Sie sich besonders in Acht vor Schüssen auf sehr harten
oder gefrorenen Boden.
6. Verwenden Sie nur Munition des exakten Kalibers,
welches auf der oberen Seite des Laufes Ihrer Waffe
eingraviert ist. Aus Sicherheitsgründen ist dies äußerst
wichtig.
7. Im Interesse sowohl Ihrer eigenen Sicherheit, als auch
um Ihre Waffe zu schützen, vergewissern Sie sich
vor Jedem Schuss, dass der Lauf nicht durch einen
Fremdkörper verstopft ist. Erde, Schnee, ..., es könnte in
Ihrer Waffe Überdruck erzeugen.
8. Entladen Sie Ihre Waffe wenn Sie sie nicht gerade
benutzen oder sie transportieren.
9. Verwenden Sie systematisch ein Sicherheitsschloss
(Gun Lock), wenn Sie Ihre Waffe wegräumen. Auf
unser Bestreben hin zugelassen, ist der Trigger
Lock (Abzugssperre) perfekt an die Mechanik und
das Ladungssystem unserer Waffen angepasst. Er
verhindert wirksam und zuverlässig jede versehentliche
oder absichtliche Verwendung Ihrer Waffe durch
Drittpersonen.
Carefully read this entire manual before using your new
Winchester firearm. We thank you for having chosen a
Winchester Super X3.We hope it gives you many years of
satisfaction. It has been made with the greatest of care and
includes all the know-how of ungsmith’s tradition as well
as the characteristics intended to provide the hunter or
shooter with the same pleasure when practising his sport.
BASIC SAFETY RULES
1. Before handling, always ensure that your gun is
unloaded.
2. Always keep the safety on when you are not shooting,
even if you are certain that it is unloaded.
3. Only press the trigger with your forefinger if you are
about to fire, otherwise place it against the trigger
guard.
4. Never point a gun at someone, even if you are certain
that it is unloaded.
5. Never fire without knowing the precise point of impact.
Beware of ricochets : Never fire in the water or at rocks.
Beware in particular of frozen or very hard ground.
6. Only the ammunition of the calibre engraved on the
upper side of the barrel can be used in your shotgun,
for safety reasons.
7. In your own interest, as well as that of your gun, avoid
allowing any foreign bodies enter the barrel. Earth
and snow, etc. can create dangerous zones of excess
pressure.
8. Unload your gun between uses and during transport.
9. Systematically use a gun lock when you store your gun.
Fully approved the trigger lock is perfectly adapted to
the mechanism and loading system on your guns. The
lock prevents accidents from happenong as well as
voluntary use by others
ALL WINCHESTER FIREARMS SOLD WORLDWIDE ARE
SYSTEMATICALLY DELIVERED WITH A GUN LOCK.
Safety also involves properly storing your guns at
home (out of the reach of children) : consider buying a
WINCHESTER gun-safe.
ALLE WINCHESTER-WAFFEN WERDEN WELTWEIT
SYSTEMATISCH NUR MIT GUN LOCK VERKAUFT.
Sicherheit, das heißt natürlich auch optimale
Bedingungen zur Aufbewahrung und Lagerung von
Waffen und Munition zu hause (außer Reichweite von
Kindern aufbewahren) : wir empfehlen die Benutzung
eines Winchester-Safes.
R I F L E S
a n d
s h o t g u n s
4
TRÈS IMPORTANT : CONSERVEZ CE LIVRE.
MUY IMPORTANTE : CONSERVE ESTE MANUAL.
Lisez attentivement tout le manuel avant d’utiliser
votre nouveau fusil semi-automatique WINCHESTER.
Nous sommes heureux que vous ayez choisi un fusil
semiautomatique SUPER X3. Il vous procurera de
nombreuses années de satisfaction. Sa fabrication a
fait l’objet des soins les plus attentifs et intègre tout le
savoir-faire de la tradition armurière ainsi que toutes les
caractéristiques destinées à procurer au chasseur et au
tireur le même plaisir dans la pratique de leur sport.
Para usar su nueva arma WINCHESTER lea con atención
todo este manual. Nos agrada que haya escogido un fusil
semiautomático SUPER X3. Le proporcionará muchos años
de satisfacción. Su fabricacíon ha sido objecto de la más
esmerada atención. En esta arma encontrará reunidos
todo la habilidad de la tradición en armería así como todas
las características que hacen que el cazador y el tirador
experimenten el mismo placer al praticar su deporte.
RÈGLES ÉLÉMENTAIRES DE SÉCURITÉ
1. Antes de manipular su arma, asegúrese de que no esté
cargada.
1. Avant toute manipulation, assurez-vous que votre
arme n’est pas chargée.
2. Gardez toujours votre arme en sûreté tant que vous ne
tirez pas, même si vous êtes certain qu’elle est vide.
NORMAS ELEMENTALES DE SEGURIDAD
2. Guarde siempre su arma con el seguro puesto mientras
no la use, incluso si está vacía.
3. Ne posez l’index sur la détente que lorsque vous allez
tirer, sinon tenez le contre le pontet.
3. Ponga el índice en el disparador únicamente cuando
va a disparar. de lo contrario, manténgalo contra el
guardamonte.
4. Ne pointez jamais une arme sur quelqu’un, même si
vous êtes certain qu’elle est déchargée.
4. Nunca apunte a una persona conel arma, incluso si está
seguro de que está descargada.
5. Ne tirez jamais sans connaître précisément le point
d’impact. Attention aux ricochets : ne tirez jamais dans
l’eau ou contre des rochers. Méfiez-vous en particulier
des tirs sur sols très durs ou gelés.
Cuidado con los rebotes: no dispare nunca al agua o
contra rocas. Desconfieespecialmente cuando el suelo
sea duro o esté helado.
6. Seules les munitions du calibre gravé sur la face droite
du canon doivent être utilisées dans votre arme pour
des raisons de sécurité autant que de rendement
balistique.
6. Utilice tan sólo las municiones del calibre que aparece
grabado en la cara derecha del cañón tanto por razones
de seguridad como por razones de rendimiento
balístico.
7. Dans votre intérêt, comme dans celui de votre arme,
assurez vous, avant tout tir, que votre canon n’est pas
obstrué par un corps étranger. La terre, la neige…
peuvent y créer des surpressions dangereuses.
7. Por su bien y el de su arma, evite que entre cualquier
cuerpo extraño en el cañón. La tierra, la nieve,... pueden
provocar un exceso de presión peligroso.
8. Déchargez votre arme entre les utilisations et pendant
le transport.
9. Utilisez systématiquement un cadenas (Gun Lock)
lorsque vous rangez votre arme. Homologué par
nos soins le Trigger lock est parfaitement adapté au
mécanisme et au système de chargement de nos
armes. Il interdit toute utilisation accidentelle ou
volontaire par des tiers.
TOUTES LES ARMES WINCHESTER VENDUES DANS LE
MONDE SONT SYSTÉMATIQUEMENT DÉLIVRÉES AVEC UN
GUN LOCK.
La sécurité passe également par de meilleures conditions
de rangement et de stockage des armes chez soi :
envisagez l’utilisation d’un coffre-fort WINCHESTER
R I F L E S
a n d
5. Siempre debe conocer el lugar de impacto del proyectil.
8. Descargue su arma después de cada empleo y cuando
la transporte.
9. Utilice sistemáticamente un seguro (Gun Lock) cuando
guarde su arma. O trigger lock que hemos homologado,
está perfectamente adaptado al mecanismo y al
sistema de carga de nuestras armas. Impide que otras
personas utilicen el arma, sea de forma accodental o
voluntaria.
TODAS LAS ARMAS WINCHESTER VENDIDAS EN EL MUNDO
SE ENTREGAN SISTEMÁTICAMENTE CON UN GUN LOCK.
La seguridad requiere asimismo las mejores condiciones
de almacenamiento y recogida del arma (fuera de los
niños): prevea el uso de un caja fuerte WINCHESTER
s h o t g u n s
5
ATTENZIONE: CONSERVATE QUESTO LIBRETTO.
Si consiglia di leggere per intero il presente manuale prima
di procedere all’utilizzo della vostra nuova arma da fuoco
Winchester. Vi ringraziamo per aver scelto un fucile Super
X3 Winchester.
Questo fucile vi procurerà molta soddisfazione per
tantissimi anni. La massima cura è stata dedicata alla
sua fabbricazione che integra tutto il know-how della
tradizione degli armaioli nonché tutte le caratteristiche
destinate a procurare sia al cacciatore sia al tiratore uno
stesso godimento nel praticare il loro sport.
NORME BASILARI DI SICUREZZA
1. Prima dell’uso, accertatevi che l’arma non sia caricata.
2. La sicura deve restare inserita fino al momento di tirare,
anche se si è sicuri che l’arma è scarica.
3. Ponete l’indice sul grilletto soltanto al momento di
sparare. Altrimenti tenetelo contro il ponticello.
4. Non puntate mai un’arma verso una persona anche se
siete sicuri che l’arma è scarica.
5. Non tirare mai se non si conosce esattamente il punto
d’impatto. Attenzione ai rimbalzi: non tirare mai in
acqua o contro rocce. Diffidare in particolare dei tiri su
terreni molto duri o gelati.
6. Per ragioni sia di sicurezza che di rendimento balistico,
utilizzare solo munizioni del calibro inciso sul lato
destro della canna.
7. Nel proprio interesse e per non danneggiare l’arma,
evitare di introdurre corpi estranei nella canna.Terra,
neve, ecc., possono creare pericolose sovrappressioni
all’interno dell’arma.
8. Scaricare l’arma quando non la si utilizza e durante il
trasporto.
9. Quando si ripone l’arma, utilizzare sempre un
dispositivo di sicurezza (Gun Lock). Omologato dalla
nostra azienda, il Trigger lock si adatta perfettamente al
meccanismo ed al sistema di caricamento delle nostre
armi. Impedisce qualsiasi utilizzazione accidentale o
volontaria da parte di terzi.
TUTTE LE ARMI WINCHESTER VENDUTE NEL MONDO SONO
SISTEMATICAMENTE MUNITE CON UN GUN LOCK.
Si ottiene maggiore sicurezza quando le armi e le
munizioni vengono sistemate e conservate a casa in un
posto sicuro (fuori della portata dei bambini): a questo
proposito vi raccomandiamo l’acquisto di una cassaforte
WINCHESTER.
ОЧЕНЬ ВАЖНОЕ ЗАМЕЧАНИЕ: СОХРАНИТЕ ЭТУ
ИНСТРУКЦИЮ.
Внимательно прочитайте все руководство до
того, как начнете пользоваться своим новым
полуавтоматическим ружьем WINCHESTER. Нам приятно,
что вы выбрали полуавтоматическое ружье SUPER X3. Вы
будете довольны им многие годы.
Процесс
его
изготовления
находился
под
самым пристальным вниманием и впитал в себя
профессиональный опыт многих оружейных мастеров,
что позволило придать ружью те характеристики,
которые позволяют охотнику и стрелку в полной мере
насладиться своим любимым занятием.
ОСНОВНЫЕ ПРАВИЛА БЕЗОПАСНОСТИ
1. Перед выполнением любой манипуляции с оружием
убедитесь, что оно не заряжено.
2. Всегда обращайтесь с оружием так, будто оно может
выстрелить, даже если вы уверены, что оно не
заряжено.
3. Держите палец на спусковом крючке лишь тогда,
когда собираетесь выстрелить. В прочих случаях
держите его вне спусковой скобы.
4. Никогда не направляйте оружие на кого бы то ни
было, даже если вы уверены, что оно разряжено.
5. Никогда не стреляйте, не зная, куда придется точка
попадания.
Остерегайтесь рикошетов: никогда не стреляйте в
воду или камни. Будьте особенно осторожны при
стрельбе на твердом или мерзлом грунте.
6.Из соображений безопасности, а также для
достижения
оптимальных
баллистических
характеристик в вашем оружии разрешено
использовать боеприпасы только того калибра,
который выгравирован с правой стороны ствола.
7. В интересах вашей безопасности, а также сохранности
вашего оружия перед каждой стрельбой проверяйте,
не попали ли в ствол инородные тела. Попавшие туда
земля, снег и т. п. могут вызвать повышение давления
до опасных значений.
8. Разряжайте свое ружье, когда вы им не пользуетесь и
во время транспортировки
9. При хранении ружья всегда пользуйтесь замком Gun
Lock.
Одобренная нами система блокирования спускового
крючка идеально подходит для механизмов и
систем заряжания нашего оружия. Она полностью
исключает случайное или преднамеренное
использование оружия посторонними лицами.
ВСЕ ОРУЖИЕ BROWNING, ПРОДАВАЕМОЕ В МИРЕ,
ПОСТАВЛЯЕТСЯ В КОМПЛЕКТЕ С ЗАМКАМИ GUN LOCK
Ваша безопасность зависит также от правильно
выбранных условий хранения оружия дома: возможно,
вам стоит воспользоваться сейфом WINCHESTER.
R I F L E S
a n d
s h o t g u n s
6
Figure 1
4
3
1
13
10
7
2
6
14
12
ABBILDUNG 1
1 Gehäuse
FIGURE 1
1 Receiver
1
Carcasse
2
Sicherung
2
Safety catch
2
«Sûreté»
3
Verschluss
3
Bolt
4
Auswurffenster
4
Ejection port
5
Magazin
5
Magazine
6
Entriegelungsknopf
6
Release button
(Auf linker Seite)
FIGURE 1
(On the left-hand side)
3
Verrou
4
Fenêtre d’éjection
5
Magasin
6
Levier de déverrouillage
(Sur le Côté Gauche)
7
Abzug
7
Trigger
8
Vorderschaft
8
Forearm
7
Muzzle
8
Garde-main
Bouche de canon
9
Lauf Mündung
9
Détente
10 Ladeöffnung
10 Loading port
9
11 Korn
11 Front sight
10 Trou de Chargement
12 Rückstoßkappe
12 Recoil pad
11 Mire Avant
13 Schaft
13 Stock
14 Abzugsbügel
14 Trigger guard
12 Plaque de couche anti-recul
15 Ventilierte Laufschiene
15 Ventilated rib
16 Magazinverschluss
16 Magazine cap
17 Laufhalter
17 Barrel bracket
13 Crosse
14 Pontet
15 Bande Ventilée
16 Ecrou d’assemblage
17 Anneau de Canon
R I F L E S
a n d
S h o t g u n S
7
15
11
9
5
8
16
17
FIGURA 1
1 Carcasa
FIGURA 1
1 Carcassa
РИС. 1
1 Ствольная коробка
2
“Seguro”
2
“Sicura”
2
3
Cerrojo
3
Otturatore
3
Затвор
4
Ventana de eyección
4
Finestra d’espulsione
4
Экстракционное окно
5
Cargador
5
Serbatoio
5
Магазин
6
Palanca de
6
Leva di sblocco
6
Кнопка разблокировки
Desbloqueo
(Sul Lato Sinistro)
Предохранитель
(с левой стороны)
(En el lateral izquierdo)
7
Grilletto
7
7
Disparador
8
Astina
8
Цевье
8
Guardamanos
9
Volata
9
Ствол Дуло
9
Cañón Boca
Спусковой крючок
10 Foro di Caricamento
10 Зарядное окно
10 Agujero de Carga
11 Mirino
11 Мушка
11 Mira delantera
12 Calciolo
12 Амортизирующий затыльник
12 Cantonera
13 Calcio
13 Приклад
13 Culata
14 Ponticello
14 Спусковая скоба
14 Guardamontes
15 Bindella Ventilata
15 Banda Ventilada
16 Tappo serbatoio
15 Вентилируемая наствольная
планка
16 Tuerca de montaje
17 Anello di Canna
17 Anillo de Cañón
R I F L E S
a n d
S h o t g u n S
16 Гайка-колпачок
17 Ствольное кольцо
8
Figure 2
23
22
19
20
21
ABBILDUNG 2
19 Die Schaftprofile sind für ideale Handhabung ausgelegt.
20 Leicht durch Knopfdruck bedienbare Sicherung.
21 Kontrollierter Druckausgleich durch
Anti-Rückstoß-Schaftkappe mit InflexTechnologie, basierend auf maximalen
Komfort gewährendem flexiblem Material.
22 Das aus einer sehr widerstandfesten modernen Legierung gefertigte Gehäuse ist
viel leichter als ein vergleichbares Stahlgehäuse.
23 Der besonders robust ausgelegte Drehverschluss verriegelt direkt mit der Verlängerung des Laufs, nicht mit dem oberen
Gehäuseteil.
24 Die meisten Jagdmodelle der Flinte SXP
sind mit dem Wechselchoke-System
Invector-PlusTM ausgestattet, bei dem die
Verengung am Ende auf die jeweiligen
Anforderungen des gejagten Wilds oder
die Wahrnehmung des Ziels abgestimmt
werden kann. Die Streuung der Schrotgarbe kann einfach durch Austausch des
Chokes geändert werden. Ein umfangreiches Angebot von Wechselchokes ist
verfügbar.
25 Schnelleres Pumpenladen. Die Trägheit
des Rückstoßes unterstützt das Rückziehen des Vorderschafts mit Einführen
der Patrone für den nächsten Schuss.
FIGURE 2
19 Stocks are profiled for an ideal fit
20 Easy-to-use push-button safety catchcatch
21 The Inflex technology recoil pad
uses directional deflection and a soft
durometer for providing maximum
comfort.
22 The advanced high-strength alloy receiver
is much lighter than steel
23 The sturdy rotary bolt design engages the
barrel extension rather than the upper
section of the receiver.
24 Most SXP hunting models are fitted with
interchangeable Invector-PlusTM chokes.
This gives you the possibility of changing
chokes depending on the game you are
hunting or the way in which your target
appears. You can easily change the size of
the shot-pattern just by changing chokes.
A whole range of accessory chokes is
available.
25 Faster pumping action. Inertia helps you
move the forearm backwards to load the
gun for the next shot.
The SXP breaks down into two pieces (The
receiver/stock assembly and barrel) for
cleaning and storage.
FIGURE 2
19 Le profil des crosses est conçu pour une
prise en main idéale.
20 Facilité d’utilisation de la sûreté à boutonpoussoir
21 La plaque anti-recul, conçue avec la
technologie Inflex, utilise la déflexion
contrôlée et un matériau souple pour un
maximum de confort.
22 La carcasse en alliage avancé à haute
résistance est beaucoup plus légère que
l’acier.
23 Grâce à la conception robuste du verrou
rotatif, c’est l’extension du canon qui
s’engage dans celui-ci au lieu de la partie
supérieure de la carcasse.
24 La plupart des modèles de chasse du fusil
SXP sont équipés du système de chokes
interchangeables Invector-PlusTM. Ceci
vous permet de changer de rétrécissement
de choke pour répondre aux exigences du
gibier chassé ou de la présentation de la
cible. Vous pouvez facilement modifier la
taille de la gerbe de plomb en changeant
tout simplement de chokes. Toute une
gamme de chokes est disponible.
25 Un mécanisme à pompe plus rapide.
L’inertie vous aide à actionner le gardemain en arrière pour charger l’arme pour
le coup suivant.
Le SXP peut se démonter en deux moitiés
(l’ensemble carcasse/crosse et le canon) pour le
nettoyage et l’entreposage.
Die SXP kann zum Reinigen und Aufbewahren
in zwei Teile zerlegt werden (Gruppen Gehäuse/Schaft und Lauf).
R I F L E S
a n d
S h o t g u n S
9
24
25
FIGURA 2
19 El perfil de las culatas se ha concebido para
que la escopeta se sujete de manera ideal.
FIGURA 2
19 Il profilo dei calci è stato concepito per
un’impugnatura ideale.
РИС. 2
19 Профиль ложи разработан специально
для идеальной прикладистости.
20 Facilidad de utilización del seguro pulsador
20 Facilità d’uso della sicura a pulsante
20 Удобный в применении кнопочный
предохранитель.
21 La cantonera de caucho, concebida con
la tecnología Inflex, utiliza la deflexión
controlada y un material flexible para un
máximo de confort.
22 La carcasa de aleación avanzada de alta resistencia es mucho más ligera que el acero.
23 Gracias a la concepción robusta del cerrojo
rotatorio, la extensión del cañón es la que
se introduce en el cerrojo en vez de la parte
superior de la carcasa.
24 La mayoría de los modelos de caza de la
escopeta SXP están equipados del sistema
de chokes intercambiables Invector-PlusTM.
Esto le permite cambiar de estrechamiento
de tubo para responder a las exigencias del
animal cazado o presentar el punto blanco.
Podrá modificar fácilmente el tamaño del
plomeo cambiando sencillamente de
chokes. Está disponible toda una gama de
accesorios de tubos de estrangulamiento.
25 Un mecanismo de bomba más rápido. La
inercia le ayuda a accionar el guardamanos hacia atrás para cargar el arma para el
disparo siguiente.
La SXP puede desmontarse en dos mitades (el
conjunto carcasa/culata y el cañón) para limpiarlo y guardarlo.
21 Il calciolo antirinculo, concepito con la
tecnologia Inflex, utilizza la deflessione
controllata e un materiale morbido per un
comfort massimo.
22 La carcassa in lega all’avanguardia ad alta
resistenza è molto più leggera dell’acciaio.
23 Grazie alla robusta concezione
dell’otturatore rotante, sarà l’estensione
della canna ad inserirsi in quest’ultimo,
invece della parte superiore della carcassa.
24 La maggior parte dei modelli da caccia
del fucile SXP sono dotati del sistema di
strozzatori intercambiabili Invector-PlusTM.
Si potrà così cambiare la strozzatura per
adeguarsi alla selvaggina cacciata o al
bersaglio. Si potrà facilmente modificare la
dimensione della distribuzione dei pallini
cambiando semplicemente lo strozzatore.
Un’ampia gamma di strozzatura è
disponibile.
25 Un meccanismo a pompa più rapido.
L’inerzia aiuta ad azionare l’astina
all’indietro per caricare l’arma per il colpo
successivo.
L’SXP può essere smontato in due metà (il
gruppo carcassa/calcio e la canna) per la pulizia
e la custodia.
R I F L E S
a n d
S h o t g u n S
21 Амортизирующий затыльник из
мягкого материала с контролируемым
прогибом
(технология
Inflex)
обеспечивает максимальный комфорт.
22 Ствольная коробка из высокопрочного
современного сплава гораздо легче
стальных коробок.
23 Запирание вращающегося затвора
происходит на хвостовик ствола, а не на
верхнюю часть ствольной коробки, что
обеспечивает надежность конструкции.
24 Большинство охотничьих моделей
ружья SXP оснащены системой сменных
чоков Invector-Plus™. Это позволяет
менять сужение ствола в зависимости
от вида дичи или от расположения
цели. Вы можете легко менять размер
осыпи дроби за счет одной лишь
замены чоков. Представлен широкий
набор сменных чоковых трубок.
25 Более быстрый помповый механизм.
Сила инерции помогает сдвигать цевье
назад при заряжании для следующего
выстрела.
Для чистки и хранения SXP может быть
разобрано на две части (группа ствольная
коробка/приклад и ствол).
10
DEUTSCH
Lassen Sie Ihre Waffe für eventuelle spätere Garantieansprüche
unter Angabe Ihrer Seriennummer auf unserer Website
www.browning.eu unter der Rubrik „Garantie“ registrieren.
ENGLISH
For validating the guarantee for your firearm, we invite you to
register its serial number on our www.browning.eu site under
the heading «Guarantee».
FRANÇAIS
Afin de valider la garantie de votre arme,
nous vous invitons à enregistrer votre numéro de série
sur notre site www.browning.eu, à la rubrique «Garantie».
ESPAÑOL
Con el fin de validar la garantía de su arma, le invitamos a
registrar su número de serie en nuestro sitio Web:
www.browning.eu, en la rúbrica «Garantía».
ITALIANO
Per convalidare la garanzia della vostra arma, vi invitiamo
a registrare il vostro numero di serie sul nostro sito
www.browning.eu, alla rubrica «Garanzia».
Русский язык
Для подтверждения гарантии Вашего оружия мы
приглашаем Вас зарегистрировать Ваш серийный номер
на нашем сайте www.browning.eu в разделе «Гарантия».
R I F L E S
a n d
s h o t g u n s
11
Wichtige Anweisungen zur:
Vorderschaft-Repetierflinte (Pump-Gun)
Winchester SXP
Deutsch
TM
Sollten Sie irgendwelche Fragen oder Anmerkungen zur Ihrer neuen Feuerwaffe haben, so zögern
Sie bitte nicht mit uns schriftlich oder telefonisch in Verbindung zu treten. Tragen Sie auch bitte
nachstehend die Daten Ihrer neuen Feuerwaffe ein oder www.winchesterint.com.
Modell. . . . . . . . . . . . . . . . . . . . . . . . . . . . . . . . . . . . . . . . . . . . . . . . . . . . . . . . . . . . . . . . . . . . . . . . . . . . . . . . . . . . . . . . . . . . . . . . . . . . . . . . . . . . . . . . . . . . . . . . . . . . . . . . . . . . . . . . . Serien-Nummer . . . . . . . . . . . . . . . . . . . . . . . . . . . . . . . . . . . . . . . . . . . . . . . . . . . . . . . . . . . . . . . . . . . . . . . . . . . . . . . . . . . . . . . . . . . . . . . . . . . . . . . . . . . . . . . . . . . . . . . . . . . Verkäufer. . . . . . . . . . . . . . . . . . . . . . . . . . . . . . . . . . . . . . . . . . . . . . . . . . . . . . . . . . . . . . . . . . . . . . . . . . . . . . . . . . . . . . . . . . . . . . . . . . . . . . . . . . . . . . . . . . . . . . . . . . . . . . . . . . . . . Kaufdatum. . . . . . . . . . . . . . . . . . . . . . . . . . . . . . . . . . . . . . . . . . . . . . . . . . . . . . . . . . . . . . . . . . . . . . . . . . . . . . . . . . . . . . . . . . . . . . . . . . . . . . . . . . . . . . . . . . . . . . . . . . . . . . . . . . . Winchester ist ein eingetragenes Markenzeichen der Olin Corporation.
Inhaltsverzeichnis Seite
Sie sind für die Sicherheit Ihrer Feuerwaffen verantwortlich. . . . . . . . . . . . . . . . . . . . . . . . . . . . . . . . . . . . . . . . . . . . . . . . . . . . . . . . . . . . . . . . . . . . 3
Beschreibung und Funktionsweise. . . . . . . . . . . . . . . . . . . . . . . . . . . . . . . . . . . . . . . . . . . . . . . . . . . . . . . . . . . . . . . . . . . . . . . . . . . . . . . . . . . . . . . . . . . . . . . . . . . 12
Teile der Waffe. . . . . . . . . . . . . . . . . . . . . . . . . . . . . . . . . . . . . . . . . . . . . . . . . . . . . . . . . . . . . . . . . . . . . . . . . . . . . . . . . . . . . . . . . . . . . . . . . . . . . . . . . . . . . . . . . . . . . . . . . . . . . 12
Serien-Nummer . . . . . . . . . . . . . . . . . . . . . . . . . . . . . . . . . . . . . . . . . . . . . . . . . . . . . . . . . . . . . . . . . . . . . . . . . . . . . . . . . . . . . . . . . . . . . . . . . . . . . . . . . . . . . . . . . . . . . . . . . . . 12
Erste Reinigung und Schmierung . . . . . . . . . . . . . . . . . . . . . . . . . . . . . . . . . . . . . . . . . . . . . . . . . . . . . . . . . . . . . . . . . . . . . . . . . . . . . . . . . . . . . . . . . . . . . . . . . . . . 12
Funktionsweise der Sicherung . . . . . . . . . . . . . . . . . . . . . . . . . . . . . . . . . . . . . . . . . . . . . . . . . . . . . . . . . . . . . . . . . . . . . . . . . . . . . . . . . . . . . . . . . . . . . . . . . . . . . . . . 13
Zusammenbauen. . . . . . . . . . . . . . . . . . . . . . . . . . . . . . . . . . . . . . . . . . . . . . . . . . . . . . . . . . . . . . . . . . . . . . . . . . . . . . . . . . . . . . . . . . . . . . . . . . . . . . . . . . . . . . . . . . . . . . . . . 13
Zerlegen. . . . . . . . . . . . . . . . . . . . . . . . . . . . . . . . . . . . . . . . . . . . . . . . . . . . . . . . . . . . . . . . . . . . . . . . . . . . . . . . . . . . . . . . . . . . . . . . . . . . . . . . . . . . . . . . . . . . . . . . . . . . . . . . . . . . . 14
Kapazität des Magazins . . . . . . . . . . . . . . . . . . . . . . . . . . . . . . . . . . . . . . . . . . . . . . . . . . . . . . . . . . . . . . . . . . . . . . . . . . . . . . . . . . . . . . . . . . . . . . . . . . . . . . . . . . . . . . . . . 15
3-Schuss-Beschränkung. . . . . . . . . . . . . . . . . . . . . . . . . . . . . . . . . . . . . . . . . . . . . . . . . . . . . . . . . . . . . . . . . . . . . . . . . . . . . . . . . . . . . . . . . . . . . . . . . . . . . . . . . . . . . . . . . 15
Laden . . . . . . . . . . . . . . . . . . . . . . . . . . . . . . . . . . . . . . . . . . . . . . . . . . . . . . . . . . . . . . . . . . . . . . . . . . . . . . . . . . . . . . . . . . . . . . . . . . . . . . . . . . . . . . . . . . . . . . . . . . . . . . . . . . . . . . . . 16
Abfeuern. . . . . . . . . . . . . . . . . . . . . . . . . . . . . . . . . . . . . . . . . . . . . . . . . . . . . . . . . . . . . . . . . . . . . . . . . . . . . . . . . . . . . . . . . . . . . . . . . . . . . . . . . . . . . . . . . . . . . . . . . . . . . . . . . . . . 17
Entladen. . . . . . . . . . . . . . . . . . . . . . . . . . . . . . . . . . . . . . . . . . . . . . . . . . . . . . . . . . . . . . . . . . . . . . . . . . . . . . . . . . . . . . . . . . . . . . . . . . . . . . . . . . . . . . . . . . . . . . . . . . . . . . . . . . . . . 17
Wechselchoke-System. . . . . . . . . . . . . . . . . . . . . . . . . . . . . . . . . . . . . . . . . . . . . . . . . . . . . . . . . . . . . . . . . . . . . . . . . . . . . . . . . . . . . . . . . . . . . . . . . . . . . . . . . . . . . . . . . . . 18
Vorschläge für Reinigung und Wartung . . . . . . . . . . . . . . . . . . . . . . . . . . . . . . . . . . . . . . . . . . . . . . . . . . . . . . . . . . . . . . . . . . . . . . . . . . . . . . . . . . . . . . . . . . . . 19
Teile, Service, Reparaturen und Fragen . . . . . . . . . . . . . . . . . . . . . . . . . . . . . . . . . . . . . . . . . . . . . . . . . . . . . . . . . . . . . . . . . . . . . . . . . . . . . . . . . . . . . . . . . . . . . 22
Information zur Internet-Seite. . . . . . . . . . . . . . . . . . . . . . . . . . . . . . . . . . . . . . . . . . . . . . . . . . . . . . . . . . . . . . . . . . . . . . . . . . . . . . . . . . . . . . . . . . . . . . . . . . . . . . . . . 22
R I F L E S
a n d
s h o t g u n s
12
BESCHREIBUNG UND FUNKTIONSWEISE
BESCHREIBUNG
Keine Vorderschaft-Repetierflinte ist schneller als die Winchester SXP. Ein Teil der Trägheit des Rückstoßes
wird in die Rückwärtsbewegung des Verschlusses übertragen und unterstützt das Hin- und Herbewegen des
Vorderschafts. Dies erlaubt ein beeindruckend schnelles Pumpenladen. Augenblicklich ist die neue Patrone ins
Patronenlager eingeführt, wonach die Waffe sofort den nächsten Schuss abgeben kann. Eine solche Schnelligkeit
ist von ausschlaggebendem Vorteil, da sich der Schütze bei den rasch hintereinander abgegebenen Schüssen voll
auf das Ziel konzentrieren kann und nicht durch das Laden der Waffe abgelenkt wird. Der Drehverschluss der SXP
ist so ausgelegt, dass seine Nasen direkt in die entsprechenden Vertiefungen der Laufverlängerung eingreifen.
Es handelt sich um ein solides, stabiles und zuverlässiges Verschlusskonzept. Die einzelnen Auslegungsdetails
der SXP ergänzen sich gegenseitig zu einer Waffe, die von vielen für die zuverlässigste zur Zeit auf dem Markt
verfügbare Vorderschaft-Repetierflinte gehalten wird.
FUNKTIONSWEISE
Durch die Bewegung des Verriegelungssystems der Vorderschaft-Repetierflinte SXP wird die verschossene
Patrone ausgeworfen und gleichzeitig eine frische Patrone aus dem gefüllten Magazin in das Patronenlager
eingeführt. Dies kann bis zum Leeren des Magazins wiederholt werden.
Es besteht auch die Möglichkeit eine einzelne Patrone per Hand in das Patronenlager einzuführen.
EIGENSCHAFTEN DER FLINTE
Machen Sie sich bitte vor dem Schießen mit scharfer Munition mit allen Anweisungen der vorliegenden
Anleitung zur Funktion der Flinte vertraut. Sie müssen sich an Ihre neue Feuerwaffe gewöhnen und genau im
Kopf haben welche Kräfte zur Bedienung ihres Systems erforderlich sind. Lernen Sie das Betätigen des Abzugs
und vor allem die genaue Lage und Bedienungsweise der Sicherung. Im weiteren Verlauf dieser Anleitung sind
die zum Zerlegen der Waffe erforderlichen Schritte und die Funktionsweise ihrer verschiedenen Komponenten
erklärt. Lesen Sie alles durch und bemühen Sie sich darum das Gelesene genau zu verstehen
TEILE DER WAFFE
Die herkömmlichen waffentechnischen Begriffe, die Lage und die Bewegung der Teile sind bezüglich einer
horizontal in normaler Schussposition gehaltenen Waffe beschrieben, das heißt, die Mündung des Laufs ist nach
vorn, der Schaft nach hinten, der Abzug nach unten gerichtet und die Laufschiene zeigt nach oben.
Zur Auflistung der Hauptteile beziehen Sie sich bitte auf Abbildung 1.
Die SXP wird auch so weit zerlegt dargestellt, wie dies zum Verständnis der Anweisungen der vorliegenden
Anleitung erforderlich ist (Abbildung 12). Die Abbildung 2 zeigt die Haupteigenschaften und die Vorteile der
Auslegung der SXP.
Der Begriff «Verriegelungssystem» bezeichnet in der vorliegenden Anleitung die Vorrichtung, welche die Patrone
in das Patronenlager einführt und dort festhält.
SERIEN-NUMMER
Die Serien-Nummer befindet sich auf der linken des Gehäuses, direkt über dem Abzugsbügel. Tragen Sie bitte
diese Nummer an der vorgesehenen Stelle zu Beginn der vorliegenden Anleitung ein, um später jederzeit auf sie
Bezug nehmen zu können.
ERSTE REINIGUNG UND SCHMIERUNG
ACHTUNG ! BEACHTEN SIE BITTE VOR DEM REINIGEN IHRER FEUERWAFFE DIE NACHSTEHENDEN
INFORMATIONEN.
REINIGUNG VON TEILEN MIT SPEZIELLER OBERFLÄCHENBEARBEITUNG
Bei der Reinigung von Waffen mit Tarnbeschichtung, Dura-Touch® oder anderen Spezialoberflächen ist äußerste
Sorgfalt geboten. Jegliche Behandlung dieser Flächen mit Reinigungslösungen, Scheuermitteln für den Lauf
oder anderen angreifenden Chemikalien ist zu vermeiden. Es ist vorzuziehen diese Flächen mit leichtem,
lösemittelfreiem Waffenöl zu reinigen oder auch mittels eines mit einem milden Geschirrwaschmittel getränkten
Lappens (dabei darauf achten, dass kein Wasser in das Verriegelungssystem eindringt). Beim Reinigen des Inneren
des Laufs oder des Verriegelungssystems sind die Außenflächen der Waffe zu schützen, um sicherzustellen, dass
R I F L E S
a n d
s h o t g u n s
13
Verschiedene Metallteile Ihrer neuen SXP-Flinte wurden im Werk mit einem Korrosionsschutzmittel behandelt,
das vor dem ersten Abschießen der Waffe vom Inneren des Laufs und des Gehäuses, der Verschlussgruppe und
den Oberflächen des Verriegelungssystems und des Patronenlagers entfernt werden muss. Ein leichtes Waffenöl
guter Qualität ist für diese Aufgabe ideal. Gleichzeitig wird hierdurch die Waffe zum ersten Mal geschmiert. Zur
Reinigung des Laufs einen Reinigungsstab mit Flanell verwenden, wie im Abschnitt «Vorschläge für Reinigung
und Wartung».
ABBILDUNG 3
Nasen
Schlagbolzen
Verschluss
Röhrenmagazin
Auswerfer
Vor dem Zusammenbauen Ihrer SXP immer die
gezeigten Teile des Verriegelungssystems nach
Auftrag einiger Tropfen Qualitätsöls abreiben
(Abbildung 3).
Nicht zu viel Öl auftragen. Ein ganz dünner Ölfilm
genügt. Überschüssiges Öl ist abzuwischen,
besonders bei kaltem Wetter.
An diesen Stellen leicht ölen.
An diesen Stellen leicht ölen.
FUNKTIONSWEISE DER SICHERUNG
ABBILDUNG 4ABBILDUNG 5
Sicherung in ‘‘gesicherter’’ Position.
Sicherung in ‘‘entsicherter’’ Position.
Die aus einem Querbolzen bestehende Sicherung verhindert die Betätigung des Abzugs, wenn sie auf
gesicherter Position steht. Sie befindet sich vor dem Abzugsbügel (Abbildung 4). Ist die Sicherung entsichert,
so ist zur Warnung eine rote Umrandung des Sicherungsknopfs auf der linken Seite des Abzugsbügels sichtbar.
Bevor Sie versuchen wollen diese Waffe zum ersten Mal zu laden und zu verwenden, müssen Sie sich unbedingt
mit dem Erfühlen und Betätigen des Sicherungsknopfs vertraut machen. Zum Sichern ist der Sicherungsbolzen
nach rechts zu drücken (Abbildung 4). Zum Entsichern, das heißt zur Feuerbereitschaft, den Bolzen nach links
schieben, wonach die rote Umrandung des Sicherungsknopfs erkennbar ist (Abbildung 5). In gesicherter Position
sind Abzug und Schlaghahn blockiert und jedes Abfeuern der Flinte ist unmöglich. In entsicherter Position
kann eine Patrone, falls sich eine solche im Patronenlager befindet, durch einfache Betätigung des Abzugs
abgeschossen werden.
ZUSAMMENBAUEN
Die SXP Flinte wird in ihrer Verpackung mit abgenommenem Lauf und auf dem Vorderschaft montiertem
Röhrenmagazin geliefert.
1. Den Lauf und die Gehäuse/Schaftgruppe aus der Verpackung nehmen und diese beiden Einheiten zunächst,
reinigen und schmieren.
2. Den Magazinverschluss des Röhrenmagazins abschrauben.
3. Normalerweise sollte Ihnen die Flinte mit der Verschlussgruppe in geschlossener Position (nach vorn) und bereits
R I F L E S
a n d
s h o t g u n s
Deutsch
sie nicht mit den verwendeten Mitteln in Berührung kommen. Auch jeder Kontakt dieser Flächen mit anderen
angreifenden Chemikalien, wie zum Beispiel Diethyltoluamid (DEET) enthaltenden Insektenabwehrmitteln
oder Sonnenschutzmitteln ist zu vermeiden. An den Tarn-, Dura-Touch- und anderen Beschichtungen durch
Chemikalien entstandene Schäden sind bleibend und können nicht behoben werden.
14
im Gehäuse montierter Abzugsvorrichtung geliefert werden. Die Montage des Laufs kann bei geschlossenem
Verriegelungssystem erfolgen, ist jedoch einfacher, wenn dieses leicht geöffnet ist.
4. Zum Entriegeln und Öffnen des Verriegelungssystems den links hinter dem Abzugsbügel befindlichen
Entriegelungsknopf drücken (Abbildung 6) und den Vorderschaft zurückziehen.
5. Den Lauf vor dem Laufhalter ergreifen.
6. Dann den Lauf über dem Röhrenmagazin platzieren und zu diesem parallel ausrichten.
7. Den Lauf nach hinten schieben.
8. Den Laufhalter über das Röhrenmagazin schieben und die Laufverlängerung in das Gehäuse einführen. Stellen
Sie sicher, dass der Auswerfer auf seinen Sitz im Lauf ausgerichtet ist.
9. Den Lauf bis zu seinem hinteren Anschlag in das Gehäuse drücken.
10. Sofort den Magazinverschluss anbringen und per Hand festziehen (um mindestens drei volle Umdrehungen), um
sicherzustellen, dass er richtig eingeführt ist.
ABBILDUNG 6
Zum Lösen des Verriegelungssystems
auf den Entriegelungsknopf drücken.
ZERLEGEN
1. Den links hinter dem Abzugsbügel befindlichen Entriegelungsknopf drücken (Abbildung 6), um das
Verriegelungssystems zu lösen, ohne jedoch den Schlaghahn freizugeben.
2. Das Verriegelungssystem öffnen und die Sicherung in gesicherte Position drücken. (Die rote Warn-Umrandung
darf nicht sichtbar sein.)
3. Mit der Laufmündung gegen eine sichere Stelle gerichtet, den Magazinverschluss abschrauben und entfernen.
4. Den Lauf vor dem Laufhalter ergreifen und dabei mit der anderen Hand den Schaft halten.
5. Den Lauf nach vorn aus dem Gehäuse ziehen. Den Laufhalter vom Röhrenmagazin abschieben. Keine übermäßige
Kraft anwenden.
6. Dann sofort den Magazinverschluss wieder aufsetzen und um mindestens drei volle Umdrehungen anziehen.
ABBILDUNG 7 ABBILDUNG 8
Den Magazinboden eindrücken und
m eine Vierteldrehung drehen.
Beim Abnehmen des
Magazinbodens die
Magazinfeder zurückhalten.
R I F L E S
a n d
s h o t g u n s
15
Deutsch
ABBILDUNG 9
Die Patrone nach vorn vollständig in das Magazin einschieben.
Das sicherste zum Aufbauchen oder Platzen des Laufs führende Vorgehen besteht darin eine Patrone zu kleinen
Kalibers in ein Patronenlager größeren Kalibers zu laden. Die Patrone kleineren Kalibers fällt in den Lauf, ihr Boden
bleibt am Rand des Patronenlagers oder des Chokes größeren Kalibers hängen. Es erfolgt ein Fehlschuss (danach
scheint das Patronenlager leer zu sein) und es kann eine Patrone richtigen Kalibers hinter der Patrone kleineren
Kalibers eingelegt werden. Beim Abfeuern der Flinte kann ein, je nach betroffener Munition, als «Burst 12-20, 2028 oder 28-.410» bezeichneter Vorgang (Rohrkrepierer) eintreten, der sowohl starke Schäden an der Flinte als auch
gefährliche Verletzungen des Schützen und Umstehender bewirken kann.
Wir können deshalb keinerlei Verantwortung übernehmen für Unfälle, die sich aus der Verwendung nicht normgemäß
bemessener Patronen ergeben, oder von Patronen, die einen Druck erzeugen, der die von SAAMI (Sporting Arms and
Ammunition Manufacturer’s Institute) empfohlen Werte übertrifft.
Alle derzeitigen SXP-Flintenmodelle des Kalibers 12 besitzen ein 3-Zoll-Patronenlager und sind für das Verschießen
von Fabrikpatronen von 2¾ und 3-Zoll ausgelegt, sowohl für das Sportschießen, als auch für die Jagd. Der Lauf kann
Blei- und Stahl-Schrotpatronen vollkommen sicher abfeuern. Chokes mit Feld/Zug-Profil sind für das Verschießen von
Flintenlaufgeschossen mit Treibspiegel bestimmt.
KAPAZITÄT DES MAGAZINS
Nach Entfernen der 3-Schuss-Beschränkung aus dem Magazin kann dieses bis zu vier 2¾ - oder drei 3-Zoll-Patronen
aufnehmen. Das Magazin höherer Kapazität gewisser SXP-Modelle kann fünf 2¾ Zoll- oder vier 3-Zoll-Patronen
enthalten. Auf einem Schießstand oder an einem anderen für das Schießen geeigneten Ort das Magazin vollständig
füllen und überprüfen wie viele Patronen es aufnehmen kann. Nicht vergessen, dass die Gesamtkapazität eine
zusätzliche Patrone umfasst, die bei gefülltem Magazin noch direkt in das Patronenlager eingeführt werden kann.
3-SCHUSS-BESCHRÄNKUNG
Das Gewehr SXP wird mit der im Magazin eingebauten 3-Schuss-Beschränkung geliefert, um den US-amerikanischen
Gesetzesvorschriften für die Jagd auf Zugvögel zu genügen. Diese Vorrichtung verhindert das Einführen von mehr
als zwei Patronen in das Magazin. Sind Sie von diesem Verbot nicht betroffen, so können Sie diese Beschränkung
ausbauen.
AUSBAU DER 3-SCHUSS-BESCHRÄNKUNG
1. Den Magazinverschluss abschrauben und entfernen.
2. Die 3-Schuss-Beschränkung befindet sich unter dem Magazinboden und steht unter der Spannung der
Magazinfeder. Mit dem Zeigefinger oder einem großen Flachschraubenzieher den Magazinboden ungefähr 2,5
cm (1 Zoll) in das Magazin drücken und um eine Vierteldrehung drehen (Abbildung 7).
3. Der Magazinboden steht unter der Spannung der Magazinfeder. Die Magazinfeder zurückhalten und den
Magazinboden vorsichtig herausziehen (Abbildung 8). Die 3-Schuss-Beschränkung entfernen und den
Magazinboden wieder einsetzen.
4. Die durchgehenden Rillen des Magazinbodens auf die Vorsprünge im Röhrenmagazin ausrichten.
5. Die Magazinfeder im Röhrenmagazin wieder zusammendrücken.
6. Den Magazinboden um ungefähr 2,5 cm (1 Zoll) in das Röhrenmagazin schieben und um eine Vierteldrehung in
die richtige Position bringen. Sicherstellen, dass der Magazinboden in seiner richtigen Position blockiert ist.
7. Den Magazinverschluss festschrauben.
R I F L E S
a n d
s h o t g u n s
16
EINBAU DER 3-SCHUSS-BESCHRÄNKUNG
Muss die 3-Schuss-Beschränkung wieder montiert werden, um die Kapazität des Magazins auf 2 Patronen zu
reduzieren, folgendermaßen vorgehen:
1. Den Magazinverschluss abschrauben und entfernen.
2. Mit dem Zeigefinger oder einem großen Flachschraubenzieher den Magazinboden ungefähr 2,5 cm (1 Zoll) in
das Magazin drücken und um eine Vierteldrehung drehen (Abbildung 7).
3. Der Magazinboden steht unter der Spannung der Magazinfeder. Die Magazinfeder zurückhalten und den
Magazinboden vorsichtig herausziehen. Die 3-Schuss-Beschränkung über die Magazinfeder setzen und den
Magazinboden wieder einbauen.
4. Die durchgehenden Rillen des Magazinbodens auf die Vorsprünge im Röhrenmagazin ausrichten.
5. Die Magazinfeder und die 3-Schuss-Beschränkung in das Röhrenmagazin drücken.
6. Den Magazinboden um ungefähr 2,5 cm (1 Zoll) in das Röhrenmagazin schieben und um eine Vierteldrehung in
die richtige Position bringen. Sicherstellen, dass der Magazinboden in seiner richtigen Position blockiert ist.
7. Den Magazinverschluss festschrauben.
FÜLLEN DES MAGAZINS
1. Die Sicherung in gesicherte Position drücken und das Verriegelungssystem schließen.
ABBILDUNG 10
Die Patronensperre drücken, um die folgende Patrone des Magazins freizugeben.
2. Den Zubringer mit einer Patronenspitze in die Ladeöffnung drücken (Abbildung 9).
3. Die Patrone durch Drücken auf ihren Boden so weit in das Magazin einschieben bis sie dort von der Patronensperre
blockiert wird.
4. Dieses Verfahren solange wiederholen bis das Magazin vollständig gefüllt ist.
LADEN DES PATRONENLAGERS VOM MAGAZIN
1. Bei geschlossener Verschlussgruppe den Zubringer mit der Patronenspitze eindrücken und die Patrone unter
Zuhilfenahme des Daumens in das Magazin schieben, bis sie dort von der Patronensperre gehalten wird.
2. Falls gewünscht, kann, wie oben erklärt, das Magazin vollständig gefüllt werden.
3. Soll sofort geschossen werden, so kann eine Patrone des Magazins durch Drücken des links hinter dem
Abzugsbügel befindlichen Entriegelungsknopfs und Betätigung des Vorderschafts eingeführt werden. Hierbei
wird durch die Schließbewegung der Verschlussgruppe automatisch eine Patrone aus dem Magazin in das
Patronenlager geladen. Zum vollständigen Laden der Flinte kann nun eine weitere Patrone in das Magazin
eingeführt werden.
LADEN DES PATRONENLAGERS DURCH DAS AUSWURFFENSTER
1. Den links hinter dem Abzugsbügel befindlichen Entriegelungsknopf drücken, wodurch das Verriegelungssystem
gelöst, der Schlaghahn jedoch nicht freigegeben wird. Den Vorderschaft vollständig zurückziehen. In das
Patronenlager, das Zubringsystem und das Magazin schauen, um absolut sicherzustellen, dass diese von
jeglichen Patronen geleert sind und auch keinerlei andere Fremdkörper enthalten.
2. Eine neue Patrone richtigen Kalibers und richtiger Länge durch das Auswurffenster in den offenen Verschluss
einführen.
3. Den Vorderschaft ganz nach vorn schieben.
R I F L E S
a n d
s h o t g u n s
17
4. Falls gewünscht, kann dann, wie oben erklärt, das Magazin vollständig gefüllt werden.
1. Die Sicherung auf gesicherte Position stellen.
2. Eine Patrone, wie oben erklärt, in das Patronenlager einführen.
3. Befindet sich die Patrone im Patronenlager, so muss nur die Sicherung in entsicherte Position gedrückt werden,
um die Flinte abfeuern zu können.
4. Wenn Sie zum Schießen bereit sind, entsichern Sie die Flinte, zielen und betätigen den Abzug.
5. Um weiter zu feuern, müssen Sie den Vorderschaft voll zurückziehen, bis die Patronenhülse aus dem
Auswurffenster ausgeworfen wird.
6. Dann den Vorderschaft vollständig nach vorn schieben und dabei eine neue Patrone aus dem Magazin in das
Patronenlager einführen.
Die SXP ist feuerbereit. Sie dann sofort durch Drücken der Sicherung sichern (die rote Warn-Umrandung darf
nicht mehr sichtbar sein) bis Sie wieder zum Schießen bereit sind.
ABBILDUNG 11
STREUUNG MIT
STREUUNG MIT
BLEISCHROT
STAHLSCHROT
VERLÄNGERT
EXTRAVOLL
**
I
VOLLCHOKE
*
II
DREIVIERTELCHOKE
VOLLCHOKE 1
III
HALBCHOKE
VOLLCHOKE 1
KERBEN AM ENDE
IIII
VIERTELCHOKE
HALBCHOKE
IIIII
SKEET
VIERTELCHOKE
KEINE KERBE
ZYLINDER
ZYLINDER
eine Kerbe
drei Kerben
fünf Kerben
zwei Kerben
vier Kerben
keine Kerbe
* Nicht mit Stahlschrot verwenden. Ein zu enger Choke erzeugt beim Verschießen von Stahlschrot ein wenig effizientes
Streumuster.
** Speziell verlängert mit Lüftungsöffnungen. Nicht mit Stahlschrot verwenden.
1
Sind für das Schießen mit Stahlschrot mehrere Chokes für gleiche Streuung gelistet, so ist für das Abfeuern sehr schneller
Patronen mit größerer Schrotkorngröße der am weitesten geöffnete Choke zu verwenden.
ENTLADEN DURCH BETÄTIGUNG DES VERRIEGELUNGSSYSTEMS
Zum Entladen der Patronen aus Patronenlager und Magazin aller SXP-Modelle folgendermaßen vorgehen.
1. Die Flinte sichern.
2. Durch Drücken des Entriegelungsknopfs das Verriegelungssystem lösen (Abbildung 6).
R I F L E S
a n d
s h o t g u n s
Deutsch
ABFEUERN
18
3. Den Vorderschaft voll nach vorn schieben und wieder zurückziehen, um eine Patrone in das Patronenlager
einzuführen und dann auszuwerfen, und diesen Vorgang so lange wiederholen bis alle Patronen aus der Flinte
ausgeworfen wurden.
4. Nachdem die letzte Patrone des Magazins in das Patronenlager eingeführt und dann aus dem Auswurffenster
ausgeworfen wurde das Verriegelungssystem offen lassen.
5. Mit dem Zeigefinger den Magazineingang abtasten, um sicherzustellen, dass keine Patrone im Magazin
verblieben ist.
ENTLADEN VOM MAGAZIN
Die Patronen können auch aus dem Magazin genommen werden, wozu folgendermaßen vorzugehen ist:
1. Die Flinte an ihrer Sicherung sichern, sich vergewissern, dass das Verriegelungssystem geschlossen ist und die
Mündung des Laufs in sichere Richtung halten.
2. Die Flinte umdrehen, so dass der Abzugsbügel nach oben zeigt, und dann den Zubringer so weit wie möglich
nach unten drücken.
3. Die Patronensperre eindrücken, um eine Patrone des Magazins freizugeben (Abbildung 10). Die Patronensperre
erneut drücken, um die folgende Patrone freizugeben. Die Patronensperre befindet sich auf der rechten
Innenseite des Auswurffensters. Befindet sich eine Patrone im Magazin, so liegt die Patronensperre auf dem
metallenen Teil der Patrone auf.
4. Die weiterhin gesicherte Waffe in ihre normale Schussposition umdrehen. Den Entriegelungsknopf drücken und
den Vorderschaft voll zurückziehen, um die Patrone aus dem Patronenlager zu entfernen.
WECHSELCHOKE-SYSTEM
Alle SXP-Flintenläufe (mit Ausnahme der Defender-Modelle) haben ein Gewinde zur Aufnahme des Choke-Systems
«Invector-PlusTM». Die Läufe WinChoke®, InvectorTM Standard oder Invector-Plus sind nicht austauschbar. Das ChokeSystem Ihrer Flinte ist auf der rechten Seite des Laufs ablesbar, wo die Spezifikationen und Choke-Markierungen
normalerweise eingetragen sind.
Der Wert der Choke-Verengung ist auf dem Choke an zwei Stellen angegeben, auf dessen Seite und mittels einer
Kerbencodierung an seinem oberen Rand. Der gelieferte Universalschlüssel dient zum Entfernen und Anbringen
der Chokes.
Der «Invector»-Standardchoke und der Choke «Invector-Plus» können mit Fabrikmunition, die nach den SAAMISpezifikationen gefertigt wurde, einschließlich Magnum mit Blei- und Stahlschrot, Treibspiegel- und anderen
Flintenlaufgeschossen, verwendet werden.
Andere Chokes und Schlüssel sind in Ihrem Winchester-Waffengeschäft oder bei der Kundenabteilung für WinchesterRepetierwaffen erhältlich. Zu Informationen zur Kontaktaufnahme siehe Seite 22.
WAHL DES CHOKES
Um Ihnen die Wahl des für die jeweiligen Situationen bei der Jagd oder beim Sportschießen geeigneten Chokes zu
erleichtern, sind alle «Invector-Plus»-Chokes auf ihrer Seite durch Angabe der von ihnen beim Verschießen von Blei
oder Stahl-Schrot erzeugten Streuung gekennzeichnet. Alle «Invector»-Chokes tragen zudem an ihrem oberen Ende
Kerben (Abbildung 11), mit deren Hilfe die Eigenschaften des auf dem Lauf installierten Chokes festgestellt werden
können. Diese Kerben beziehen sich besonders auf Bleischrot. Aus der Tabelle kann die Beziehung zwischen Blei
und Stahlschrot und die Eignung der Chokes für die verwendeten Munitionssorten und die jeweiligen Jagd- oder
Sportsituationen abgelesen werden. Mit jeder Flinte werden mehrere Chokes geliefert. Zudem sind die nachstehend
aufgelisteten Chokes als Zubehör verfügbar. Nicht vergessen, dass die Chokes «Winchoke», «Invector»-Standard und
«Invector-Plus» nicht austauschbar sind. Die «Invector-Plus»-Chokes sind nur für Winchester Flinten mit überbohrtem
Lauf bestimmt. Vor dem Entfernen oder Anbauen der Chokes und dem Ablesen der Kerben am Rand immer
sicherstellen, dass die Flinte vollständig entladen ist.
ENTFERNEN DES CHOKES
1. Die Flinte an ihrer Sicherung sichern. Dann das Verriegelungssystem öffnen und sicherstellen, dass die Flinte
vollständig entladen ist. Die Mündung immer in sicherer Richtung halten.
2. Zum Abnehmen des Chokes den Choke-Schlüssel ansetzen und im Gegenuhrzeigersinn drehen. Dann den Choke
endgültig per Hand aus dem Lauf schrauben.
EINBAU DES CHOKES
1. Die Flinte an ihrer Sicherung sichern. Immer das Verriegelungssystem öffnen und sicherstellen, dass die Flinte
vollständig entladen ist. Die Mündung immer in sicherer Richtung halten.
R I F L E S
a n d
s h o t g u n s
2. Vor dem Einbau eines Chokes sicherstellen, dass das Innengewinde an der Mündung des Laufs und das
Außengewinde des Chokes sauber sind. Die Gewinde mit feinem Waffenöl guter Qualität leicht schmieren.
3. Den geeigneten Choke per Hand mit seinem Gewinde in die Mündung des Laufs einschrauben, das gekerbte
Ende muss nach außen zeigen. Nachdem der Choke per Hand voll eingeschraubt ist, ihn mit dem gelieferten
Schlüssel fest anziehen.
ABBILDUNG 12
Choke
Laufhalter
Lauf
?????
Schlagbolzen
Schlagbolzenfeder
Verschluss
Verschlussschlitten
3-Schuss-Beschränkung
des Magazins
Magazinverschluss
Magazinboden
Röhrenmagazin
Gehäuse
Gleitstangen
Abzugsgruppe-Bolzen
Abzugsgruppe
Vorderschaft
ABBILDUNG 13
Nach Abziehen des
Bolzens den hinteren
Teil der Abzugsgruppe
zum Abnehmen nach
oben drücken.
VORSCHLÄGE FÜR REINIGUNG UND WARTUNG ACHTUNG !
BEACHTEN SIE VOR DER REINIGUNG IHRER FEUERWAFFE UNBEDINGT DIE FOLGENDEN MITTEILUNGEN.
REINIGUNG VON TEILEN MIT SPEZIELLER OBERFLÄCHENBEARBEITUNG
Bei der Reinigung von Waffen mit Tarnbeschichtung, Dura-Touch® oder anderen Spezialoberflächen ist äußerste
Sorgfalt geboten. Jegliche Behandlung dieser Flächen mit Reinigungslösungen, Scheuermitteln für den Lauf
oder anderen angreifenden Chemikalien ist zu vermeiden. Es ist vorzuziehen diese Flächen mit leichtem,
lösemittelfreiem Waffenöl zu reinigen oder auch mittels eines mit einem milden Geschirrwaschmittel getränkten
Lappens (dabei darauf achten, dass kein Wasser in das Verriegelungssystem eindringt). Beim Reinigen des Inneren
des Laufs oder des Verriegelungssystems sind die Außenflächen der Waffe zu schützen, um sicherzustellen, dass
sie nicht mit den verwendeten Mitteln in Berührung kommen. Auch jeder Kontakt dieser Flächen mit anderen
angreifenden Chemikalien, wie zum Beispiel Diethyltoluamid (DEET) enthaltenden Insektenabwehrmitteln oder
Sonnenschutzmitteln ist zu vermeiden. An den Tarn-, Dura-Touch- und anderen Beschichtungen durch Chemikalien
entstandene Schäden sind bleibend und können nicht behoben werden.
R I F L E S
a n d
s h o t g u n s
Deutsch
19
20
ABBILDUNG 14
Die Verschlussgruppe auf den Gleitstangen positionieren.
ABBILDUNG 15
Die Verschlussgruppe auf den Gleitstangen vorsichtig in das Gehäuse
einführen.
REINIGUNGSVERFAHREN
Bei richtiger Pflege und regelmäßiger Reinigung arbeitet die SXP besser und zuverlässiger und hält länger. Die
Flinte muss an allen Tagen, an denen sie geschossen wird, gereinigt werden, bei stärkerer Verschmutzung eventuell
noch öfters. Hierzu müssen nach jedem Schießen der Lauf gereinigt und das Verriegelungssystem abgerieben und
geschmiert werden. Zur normalen Instandhaltung (Ölen und Abwischen) kann der Lauf mit dem Gehäuse verbunden
bleiben. Zur gründlicheren Reinigung (des Laufs) muss der Lauf vom Gehäuse getrennt werden. Zur kompletten
Reinigung müssen Verschluss- und Abzugsgruppe abgebaut werden. Bei Funktionsproblemen (Schwergängigkeit
des Verriegelungssystems beim Hin- und Herbewegen des Vorderschafts) immer zunächst eine Komplettreinigung
vornehmen und erst danach, wenn diese nicht geholfen hat, mit dem nächsten Service-Center für WinchesterWaffen, der Winchester-Serviceabteilung oder einem kompetenten Waffenfachmann in Verbindung treten.
1. Die Flinte an ihrer Sicherung sichern. Dann das Verriegelungssystem öffnen und durch einen Blick auf
Patronenlager und Magazin sicherstellen, dass die Flinte vollständig entladen ist.
2. Den Lauf, wie im Abschnitt «Zerlegen».
3. Das Innere des Laufs an beiden Enden überprüfen, um sicherzustellen, dass keine Blei- oder Kunststoffablagerungen
vorhanden sind, die von Rückständen moderner Patronen herrühren und sich in Form von Längsstreifen zeigen,
die nahe der Mündung und kurz hinter dem Patronenlager am stärksten ausgeprägt sind. Geringe Ablagerungen
dieser beiden Rückstände sind normal und nicht weiter schlimm.
4. Nehmen die Ablagerungen überhand, so können Sie mit einer Messingbürste vom Innern des Laufs entfernt
werden. Zunächst die Bürste mit einem Pulver-Lösemittel tränken oder besprühen und solange durch den Lauf
ziehen bis dieser sauber ist. Um ein Ausreißen der Borsten der Bürste zu vermeiden, diese immer vollständig
durch den Lauf schieben und erst danach wieder zurückziehen.
5. Nach Entfernen aller Blei- und Kunststoffrückstände ein sauberes und trockenes Flanell (Patch) durch den Lauf
ziehen. Dann ein weiteres, leicht mit Öl getränktes Flanell durchziehen.
6. In Lauf und Patronenlager blicken, um sicher zu sein, dass dort kein Flanellstück verblieben ist. Alle eventuell
verbliebenen Stücke entfernen.
7. Die Flinte wieder zusammenbauen und alle sichtbaren Metallteile mit einem mit etwas Öl getränkten Lappen
abreiben. Dabei darauf achten, alle Fingerabdrücke zu entfernen, da sich an diesen Feuchtigkeit ansammeln
kann. Auch im Gehäuse getrocknetes überschüssiges Öl muss entfernt werden.
8. Die Feuerwaffe an den gezeigten Stellen schmieren. Leichtes und regelmäßiges Schmieren ist für eine bleibende
zuverlässige Funktion der Flinte von äußerster Bedeutung.
GRÜNDLICHERES ZERLEGEN
Einer der Vorteile der SXP besteht in der Möglichkeit, das Verriegelungssystem zur Reinigung zerlegen zu können. Bei
ungünstigen Witterungsbedingungen und in schmutziger Umgebung verleiht die Tatsache, dass alle Teile der Waffe
sauber und leicht geölt sind, Vertrauen und Zuversicht beim Schießen.
Zum Zerlegen zunächst sicherstellen, dass eine saubere Arbeitsfläche vorhanden ist, auf der die nacheinander
abgebauten Teile abgelegt werden können (Abbildung 12).
AUSBAU DES LAUFS
1. Den Magazinverschluss abschrauben und entfernen. Nicht vergessen die Mündung des Laufs in eine sichere
Richtung zu halten.
2. Den Lauf nach vorn gleiten lassen und ihn aus dem Gehäuse ziehen und den Laufhalter über das vordere Ende
des Röhrenmagazins abziehen.
3. Den Magazinverschluss sofort wieder um mindestens drei volle Umdrehungen auf dem Röhrenmagazin
aufschrauben.
R I F L E S
a n d
s h o t g u n s
21
Bei den Maßnahmen zur Instandhaltung der Flinte muss auch die Abzugsgruppe ausgebaut werden, was einfach ist
und gewisse, eventuell erforderliche weitere Pflege- und Reinigungsarbeiten ermöglicht. Nach dem Entfernen von
Abzugs- und Verschlussgruppe können im Gehäuse angesammelte Schmutz- und Feuchtigkeitsablagerungen leicht
entfernt werden. Die Verschlussgruppe kann erst abgenommen werden nachdem die Abzugsgruppe entfernt ist.
1. Sicherstellen, dass die Waffe vollständig entladen ist, wie dies zuvor in dieser Anleitung erklärt wurde.
2. Das Verriegelungssystem durch Zurück- und Wiedervorschieben des Vorderschafts betätigen. Der Schlaghahn
wird hierdurch in gespannte Position gebracht. Die Flinte an der Sicherung sichern.
3. Nach dem Entfernen der Lauf-Gruppe darauf achten, den Magazinverschluss wieder am Ende des Röhrenmagazins
anzubringen, um ein ungewolltes Lösen des Magazinbodens zu vermeiden.
4. Die Flinte mit dem Abzugsbügel nach oben auf einer ebenen, ihre Gehäuse- und Schaftoberfläche schonenden
Flache abstellen.
5. Den Abzugsgruppe-Bolzen auf der linken Gehäuseseite, das heißt, der dem Auswurffenster gegenüberliegenden
Seite herausziehen. Hierzu kann jeder feste Stab kleineren Durchmessers als der Bolzen verwendet werden, bei
dem keine Gefahr besteht, dass er die Oberfläche beschädigt. Beim Austreiben des Bolzens darauf achten das
Austreiberwerkzeug und die Flinte gut festzuhalten.
6. Den Bolzen weit genug austreiben, um ihn mit den Fingern ergreifen zu können. Dann versuchen ihn per
Hand auszuziehen. Ist dies nicht möglich, darauf achten, dass das Austreibwerkzeug einen hinreichend kleinen
Durchmessers hat, um den Bolzen vollständig, ohne Beschädigung der Bohrung austreiben zu können.
7. Nach Entfernen des Bolzens die Abzugsgruppe zur Entnahme aus dem Gehäuse anheben und nach hinten
ausziehen (Abbildung 13).
AUSBAU DER VERSCHLUSSGRUPPE
1. Den Lauf und die Abzugsgruppe, wie oben erklärt, abbauen, den Magazinverschluss jedoch nicht wieder anbringen.
2. Die mit den beiden Gleitstangen verbundene Verschlussgruppe nach vorn schieben und vorne aus dem Gehäuse
nehmen. Beim Durchgang der Verschlussgruppe durch das Auswurffenster kann an der Feder des Auswerfers ein
leichter Widerstand fühlbar sein, in welchem Fall sorgsam vorzugehen ist.
ENTFERNUNG DES SCHLAGBOLZENS
1. Wie oben erklärt, die Verschlussgruppe der Flinte ausbauen.
2. Die Verschlussgruppe umdrehen (flache Seite nach oben) und den hinteren Teil des Schlagbolzens mit dem
Zeigefinger nach vorn drücken. Den Schlagbolzen auf diese Weise festhalten und mit der anderen Hand den
vorderen Teil der beiden Gleitstangen anheben und diese leicht nach vorn schieben.
3. Die Gleitstangen anheben, um deren gekrümmten Ansatz aus der Nut des Schlagbolzens zu heben. Hierdurch
werden die Gleitstangen von der Verschlussgruppe gelöst.
4. Der Schlagbolzen steht unter Federspannung und springt aus der Verschlussgruppe, sobald er nicht mehr mit
dem Zeigefinger festgehalten wird. Beim Herausnehmen von Schlagbolzen und Feder darauf achten, dass diese
Teile nicht wegspringen.
Für Reinigungszwecke ist ein weiteres Zerlegen weder notwendig, noch empfehlenswert. Die SXP nicht in weitere
Einzelteile zerlegen, als die in der Abbildung 12, gezeigten. Andernfalls könnte die Garantie verfallen. Für Reparaturen,
die ein weiteres Zerlegen erfordern, treten Sie bitte mit dem nächsten Winchester-Service-Center oder mit einem
kompetenten Waffenfachmann in Verbindung, wie dies im Abschnitt «Teile, Service, Reparaturen und
Fragen».
WIEDEREINBAU DES SCHLAGBOLZENS UND DER VERSCHLUSSGRUPPE
1. Die Schlagbolzenfeder über den Schlagbolzen schieben. Die Feder kann beliebig orientiert werden.
2. Den Schlagbolzen mit seiner Feder mit dem Bolzen voraus in die hintere Öffnung der Verschlussgruppe einführen.
3. Zum Wiedereinsetzen der Verschlussgruppe auf die beiden Gleitstangen das runde Ende des Schlagbolzens weit
genug in die Bohrung des Schlittens drücken, so dass der Bereich zwischen geriffeltem Ende und Absatz des
Schlagbolzens in der runden Vertiefung des Schlittens richtig zentriert ist.
4. Den gekrümmten Ansatz der Gleitstangen in den Bereich zwischen rundem Ende und Absatz des Schlagbolzens
einführen und den Druck auf das Ende des Schlagbolzen langsam aufheben, um die gekrümmte Platte vom
Absatz des Schlagbolzens zum hinteren Teil der Verschlussgruppe ziehen zu lassen.
5. Den Magazinverschluss entfernen.
6. Die Gleitstangen und die Verschlussgruppe zusammenhalten (Abbildung 14). Den Vorderschaft auf das
Röhrenmagazin schieben.
R I F L E S
a n d
s h o t g u n s
Deutsch
AUSBAU DER ABZUGSGRUPPE
22
7. Die Gleitstangen und die Verschlussgruppe behutsam in den vorderen Teil des Gehäuses einschieben. Wenn die
Elemente in das Gehäuse eintreten, sie vollständig nach hinten drücken (Abbildung 15).
WIEDERANBAU DER ABZUGSGRUPPE
1. Die Verschlussgruppe, die Gleitstangen und der Vorderschaft müssen vor der Montage der Abzugsgruppe mit
dem Gehäuse verbunden sein.
2. Sicherstellen, dass der Schlaghahn gespannt ist - ihn hierzu gerade bis zum Anschlag nach hinten drücken - und
dass sich die Sicherung in gesicherter Position befindet.
3. Die Flinte umdrehen, so das der offene Teil des Gehäuses nach oben zu liegen kommt. Die Abzugsgruppe in einem
Winkel von ungefähr 45 Grad zum Gehäuse halten und dann die vorderen vorstehenden Teile der Abzugsgruppe
in die entsprechenden Vertiefungen der Magazinöffnung am vorderen Ende der Gehäuseöffnung einsetzen, wie
dies in Abbildung 13, gezeigt ist.
4. Sorgfältig den vorderen Teil der Abzugsgruppe in die Öffnung des Gehäuses einführen und dann ihren hinteren
Teil in der Gehäuseöffnung absenken bis sie parallel zum Gehäuse zu liegen kommt. Es kann sein, dass die
Position des Vorderschafts verschoben werden muss, um die Abzugsgruppe im Gehäuse richtig auszurichten.
Nach richtigem Einsetzen ist der Vorderschaft richtig platziert und auf die Bohrung für den Abzugsgruppe-Bolzen
ausgerichtet.
5. Die Abzugsgruppe auf die Bohrung des Gehäuses ausrichten, und den Abzugsgruppe-Bolzen durch das Gehäuse
schieben und seine beiden Enden auf beiden Seiten in gleiche Ebene mit der Gehäuseoberfläche bringen.
Der Bolzen muss sich leicht, ohne Krafteinsatz, einschieben lassen. Ist ein stärkerer Widerstand fühlbar, die
Abzugsgruppe wieder herausnehmen und erneut bei Schritt 1 beginnen.
Die Feuerwaffe ist nun vollständig zusammengebaut. Sofort überprüfen, dass die Sicherung auf gesicherter Position
steht. Dann alle Außenflächen abreiben und reinigen, wie dies im Abschnitt «Vorschläge für Reinigung und Wartung».
WEITERE VORSCHLÄGE ZUR REINIGUNG
Nach langdauernden Einsatzperioden sollte die Flinte einem qualifizierten Waffenfachmann zum Zerlegen des
Verriegelungssystems und zur Durchführung einer fachmännischen Reinigung und Schmierung überlassen werden.
TEILE, SERVICE, REPARATUREN UND FRAGEN
Sollten an Ihrer Winchester-Waffe Service- oder Reparaturarbeiten erforderlich sein, so ist es oft vorzuziehen sie
einem unserer zugelassenen Reparaturzentren zu überlassen. In gewissen Fällen ist es angebracht sich an unsere
Service-Abteilung für Winchester-Repetierwaffen zu wenden.
Eine Liste zugelassener Reparaturzentren wurde Ihnen mit Ihrer neuen Feuerwaffe geliefert. Gegebenenfalls können
Sie mit uns zwecks Erhalt einer neuen Liste in Verbindung treten. Wir können Ihnen dabei helfen den besten Ort zur
Durchführung von Servicearbeiten an Ihrer Feuerwaffe zu finden.
Besuchen Sie uns im Internet: www.winchesterint.com
R I F L E S
a n d
s h o t g u n s
23
Important instructions for the:
Winchester SXP
Pump-action shotgun
TM
Model. . . . . . . . . . . . . . . . . . . . . . . . . . . . . . . . . . . . . . . . . . . . . . . . . . . . . . . . . . . . . . . . . . . . . . . . . . . . . . . . . . . . . . . . . . . . . . . . . . . . . . . . . . . . . . . . . . . . . . . . . . . . . . . . . . . . . . . . . . . .
Serial Number. . . . . . . . . . . . . . . . . . . . . . . . . . . . . . . . . . . . . . . . . . . . . . . . . . . . . . . . . . . . . . . . . . . . . . . . . . . . . . . . . . . . . . . . . . . . . . . . . . . . . . . . . . . . . . . . . . . . . . . . . . . . . . . .
Purchased from. . . . . . . . . . . . . . . . . . . . . . . . . . . . . . . . . . . . . . . . . . . . . . . . . . . . . . . . . . . . . . . . . . . . . . . . . . . . . . . . . . . . . . . . . . . . . . . . . . . . . . . . . . . . . . . . . . . . . . . . . . . . .
Date of purchase. . . . . . . . . . . . . . . . . . . . . . . . . . . . . . . . . . . . . . . . . . . . . . . . . . . . . . . . . . . . . . . . . . . . . . . . . . . . . . . . . . . . . . . . . . . . . . . . . . . . . . . . . . . . . . . . . . . . . . . . . . . .
Winchester is a registered trademark of the Olin Corporation.
Contents
Page
You are responsible for firearms safety . . . . . . . . . . . . . . . . . . . . . . . . . . . . . . . . . . . . . . . . . . . . . . . . . . . . . . . . . . . . . . . . . . . . . . . . . . . . . . . . . . . . . . . . . . . . . . . . 3
General description and operation . . . . . . . . . . . . . . . . . . . . . . . . . . . . . . . . . . . . . . . . . . . . . . . . . . . . . . . . . . . . . . . . . . . . . . . . . . . . . . . . . . . . . . . . . . . . . . . . . . . . 24
Nomenclature . . . . . . . . . . . . . . . . . . . . . . . . . . . . . . . . . . . . . . . . . . . . . . . . . . . . . . . . . . . . . . . . . . . . . . . . . . . . . . . . . . . . . . . . . . . . . . . . . . . . . . . . . . . . . . . . . . . . . . . . . . . . . . . 24
Serial Number . . . . . . . . . . . . . . . . . . . . . . . . . . . . . . . . . . . . . . . . . . . . . . . . . . . . . . . . . . . . . . . . . . . . . . . . . . . . . . . . . . . . . . . . . . . . . . . . . . . . . . . . . . . . . . . . . . . . . . . . . . . . . . . 24
Initial cleaning and oiling . . . . . . . . . . . . . . . . . . . . . . . . . . . . . . . . . . . . . . . . . . . . . . . . . . . . . . . . . . . . . . . . . . . . . . . . . . . . . . . . . . . . . . . . . . . . . . . . . . . . . . . . . . . . . . . . 24
Operation of the safety catch . . . . . . . . . . . . . . . . . . . . . . . . . . . . . . . . . . . . . . . . . . . . . . . . . . . . . . . . . . . . . . . . . . . . . . . . . . . . . . . . . . . . . . . . . . . . . . . . . . . . . . . . . . . 25
Assembly. . . . . . . . . . . . . . . . . . . . . . . . . . . . . . . . . . . . . . . . . . . . . . . . . . . . . . . . . . . . . . . . . . . . . . . . . . . . . . . . . . . . . . . . . . . . . . . . . . . . . . . . . . . . . . . . . . . . . . . . . . . . . . . . . . . . . . 25
Dismantling . . . . . . . . . . . . . . . . . . . . . . . . . . . . . . . . . . . . . . . . . . . . . . . . . . . . . . . . . . . . . . . . . . . . . . . . . . . . . . . . . . . . . . . . . . . . . . . . . . . . . . . . . . . . . . . . . . . . . . . . . . . . . . . . . . 26
Magazine capacity . . . . . . . . . . . . . . . . . . . . . . . . . . . . . . . . . . . . . . . . . . . . . . . . . . . . . . . . . . . . . . . . . . . . . . . . . . . . . . . . . . . . . . . . . . . . . . . . . . . . . . . . . . . . . . . . . . . . . . . . . 27
Three-shot adaptor (plug) . . . . . . . . . . . . . . . . . . . . . . . . . . . . . . . . . . . . . . . . . . . . . . . . . . . . . . . . . . . . . . . . . . . . . . . . . . . . . . . . . . . . . . . . . . . . . . . . . . . . . . . . . . . . . . . 27
Loading. . . . . . . . . . . . . . . . . . . . . . . . . . . . . . . . . . . . . . . . . . . . . . . . . . . . . . . . . . . . . . . . . . . . . . . . . . . . . . . . . . . . . . . . . . . . . . . . . . . . . . . . . . . . . . . . . . . . . . . . . . . . . . . . . . . . . . . . 27
Firing. . . . . . . . . . . . . . . . . . . . . . . . . . . . . . . . . . . . . . . . . . . . . . . . . . . . . . . . . . . . . . . . . . . . . . . . . . . . . . . . . . . . . . . . . . . . . . . . . . . . . . . . . . . . . . . . . . . . . . . . . . . . . . . . . . . . . . . . . . . 28
Unloading . . . . . . . . . . . . . . . . . . . . . . . . . . . . . . . . . . . . . . . . . . . . . . . . . . . . . . . . . . . . . . . . . . . . . . . . . . . . . . . . . . . . . . . . . . . . . . . . . . . . . . . . . . . . . . . . . . . . . . . . . . . . . . . . . . . . 29
Interchangeable choke tube system . . . . . . . . . . . . . . . . . . . . . . . . . . . . . . . . . . . . . . . . . . . . . . . . . . . . . . . . . . . . . . . . . . . . . . . . . . . . . . . . . . . . . . . . . . . . . . . . . . 30
Cleaning and maintenance suggestions.
. . . . . . . . . . . . . . . . . . . . . . . . . . . . . . . . . . . . . . . . . . . . . . . . . . . . . . . . . . . . . . . . . . . . . . . . . . . . . . . . . . . . . . . . . . . . 31
Parts, service, repairs and questions. . . . . . . . . . . . . . . . . . . . . . . . . . . . . . . . . . . . . . . . . . . . . . . . . . . . . . . . . . . . . . . . . . . . . . . . . . . . . . . . . . . . . . . . . . . . . . . . . . . 34
Website information
. . . . . . . . . . . . . . . . . . . . . . . . . . . . . . . . . . . . . . . . . . . . . . . . . . . . . . . . . . . . . . . . . . . . . . . . . . . . . . . . . . . . . . . . . . . . . . . . . . . . . . . . . . . . . . . . . . . . . . 34
RR I I FF LL EE SS
aa nn dd
ss hh oo tt gg uu nn ss
English
If you have any questions or comments regarding your new firearm, please feel free to write or call
us. Use the space below to record information about your new firearm or www.winchesterint.com.
24
GENERAL DESCRIPTION AND OPERATION
GENERAL DESCRIPTION
No pump-action gun is faster than the Winchester SXP. Inertia from recoil forces assists the slide rearward, making
it much easier to begin the pumping action. You’ll discover the impressive speed of pump-loading; in just an
instant you’ve cycled a shell and are ready for a second shot. Speed like this makes a big difference, allowing you
to set up for a follow-up shot more quickly and concentrate on your target and not just on pumping the gun.
With the SXP’s rotary bolt design, the lugs engage directly in the recesses in the barrel extension.
This is a strong, consistent and reliable lockup design. Every design feature of the SXP works together to make
what many consider the most reliable pump shotgun available on the market today.
GENERAL OPERATION
The SXP is a pump-action shotgun that allows you to load a shell by cycling the action to eject the empty shell
and move an unfired shell from the loaded magazine into the chamber. This can be repeated until the magazine
is empty.
A single shell can also be inserted into the chamber manually.
CHARACTERISTICS
Prior to using live ammunition, familiarize yourself thoroughly with the operating instructions in this owner’s
manual. Get accustomed to the feel of your new firearm and know the forces required to operate the action.
Learn how to pull the trigger and, above all, know the location and operation of the safety catch. The dismantling
and operating procedures for the various components are explained below in the manual. Please read and study
them in detail.
NOMENCLATURE
In conventional gunsmith terminology, the position and movement of the different parts in a firearm are
described as they occur, with the firearm horizontal in the normal firing position: i.e., the muzzle is forward or in
front, the stock is rearward or at the back, the trigger is downward or underneath and the rib is upward or on top.
For the names of the main parts, please refer to Figure 1.
The SXP is also shown dismantled to the extent required for following all the instructions in the present manual
(Figure 12). Figure 2 covers general features and the benefits provided by the SXP’s design.
In the present operating manual, the term “action” refers to the mechanism of this firearm, which loads and
secures the shells in the chamber.
SERIAL NUMBER
The serial number is located on the left-hand side of the receiver, just above the trigger-guard. Mark this number
down at the beginning of the present owner’s manual for future reference.
INITIAL CLEANING AND OILING
WARNING! PLEASE TAKE NOTE OF THE FOLLOWING INFORMATION BEFORE CLEANING YOUR FIREARM.
CLEANING PARTS WITH SPECIAL FINISHES
Take the greatest care when cleaning guns with camouflage, Duratouch coating, or other special finishes. Make
certain that these surfaces do not come into contact with cleaning solvents, barrel cleaners or other strong
chemicals. It is preferable to clean these surfaces with light firearm oil, which contains no solvents, or by using
a damp cloth and mild washing-up liquid (make sure that no water gets inside the action). When cleaning your
gun’s bore or action, protect the outside finishes so that they do not come in contact with the chemicals used.
In addition, avoid all contact between outside finishes and any other strong chemicals such as those found in
DEET-containing insect repellents, or in sunscreens, etc. Any damage caused by chemicals to camouflage finishes,
Dura-touch and other finishes is irreversible and cannot be repaired.
R I F L E S
a n d
s h o t g u n s
25
Various metal parts on your new SXP shotgun have been coated with a rust-prevention compound in our works.
Before using your SXP, clean the anti-rust compound from inside the barrel, the receiver, the bolt assembly
and the action / chamber surfaces. High-quality light firearm oil is ideal for removing the compound and for
lubricating your firearm for the first time. Clean the barrel with a cleaning rod and a piece of flannel as explained
in the «Cleaning and maintenance suggestions» section of this manual.
Lugs
Firing Pin
Bolt
Magazine Tube
Ejector
Before you begin to assemble your SXP, wipe the
mechanism clean by applying a few drops of topquality oil on the surfaces indicated (Figure 3).
Avoid applying too much oil. Only a light film
is required. Any excess oil should be wiped off,
especially in cold weather.
Oil lightly at these points.
Oil lightly at these points.
OPERATING THE SAFETY CATCH
FIGURE 4FIGURE 5
The ’’safety’’ shown in the on safe position.
The ’’safety’’ shown in the off safe position.
The safety catch is formed by a cross-bolt, designed to prevent the trigger from being pulled when the safety
catch is in the “on” position. The safety catch is located at the front of the trigger guard (Figure 4). Whenever the
safety catch” is in the “off” position, a red warning band appears on the safety catch” button on the left of the
trigger guard. It is essential that you familiarize yourself with the feel, the look and the operation of the safety
catch system on this gun before attempting to load or fire it.
To put the gun in a safety catch “on” position, push the “safety catch” button to the right (Figure 4). To put the
safety catch” system in the “off” or firing position, push the safety catch” button to the left.
This last operation exposes a red warning band on the safety catch” button (Figure 5). When the “safety catch” is in
the “on” position, the trigger and the hammer are blocked and the shotgun cannot be fired. In the “off” position,
if your gun has a shell in the chamber, this shell can be fired just by pulling the trigger.
ASSEMBLY
The SXP shotgun is delivered in its box with the barrel removed and the forearm fitted to the magazine tube.
1. Remove the barrel and the receiver/stock assembly from the box and clean and lubricate them as explained.
2. Unscrew the magazine cap from the magazine tube.
3. Normally your gun should be delivered with the bolt assembly in the closed position (forwards) and the
trigger group already in place in the receiver. The barrel can be fitted with the action closed, but it is easier if
the action has been opened slightly.
4. Unlock and open the action by pushing on the disconnector release button behind the trigger guard (Figure
6) on the left and pull back on the forearm.
5. Take hold of the barrel in front of the barrel bracket.
6. Put the barrel in position on top of the magazine tube and line up together.
7. Slide the barrel backwards
8. Guide the barrel bracket over the magazine tube and the barrel extension into the receiver. Make sure that
R I F L E S
a n d
s h o t g u n s
English
FIGURE 3
26
the ejector is lined up with its slot in the barrel.
9. Insert the barrel, pushing it backwards into the receiver until it comes up against the rear stop.
10. Put the magazine cap back into place immediately. Tighten it by hand (at least three full turns) to make sure
that everything is correctly in place.
FIGURE 6
Push the disconnector release
button to unlock the action
DISMANTLING
1. Push on the disconnector release button located at the back of the trigger guard on the left (Figure 6) for
unlocking the action without releasing the hammer.
2. Open the action and put the safety catch in the “on” position. (The red warning band must be hidden).
3. With the muzzle pointed in a safe direction, unscrew the magazine cap and remove it.
4. Take hold of the barrel at the front of the barrel bracket with one hand, holding the stock with the other hand.
5. Pull the barrel forwards to disengage it from the receiver. Slide the barrel bracket off the magazine tube. Do not
use excessive force.
6. Put the magazine cap back in place immediately and tighten by hand with at least three full turns
FIGURE 7FIGURE 8
Push down on the magazine
spring retainer and rotate 90°.
Maintain control of the
magazine spring when you
remove the magazine spring
retainer.
FIGURE 9
Push the shell to the front
of the magazine as far as
possible.
R I F L E S
a n d
s h o t g u n s
The most certain way of bending or breaking a shotgun barrel is to load a shell of a smaller calibre in a chamber for
a larger calibre. The smaller calibre shell will not fall completely through the barrel; its rim will be held by the front of
the larger calibre chamber or the larger calibre choke. Your shotgun will misfire (with an apparently empty chamber).
In this case, it is possible to load a shell of the correct calibre behind a shell of smaller calibre.
If you then fire your shotgun, the result will be a so-called “12-20, 20-28 or 28-.410 burst”, which may seriously damage
your gun and cause serious injury to you and other persons nearby.
We cannot accept liability for any incidents that may occur due to using shells of non-standard dimensions or shells
that develop pressures higher than SAAMI (Sporting Arms and Ammunition Manufacturers’ Institute) standards.
All current SXP calibre 12 shotguns have a 3» chamber and are designed to fire all factory 2¾» and 3», field and target
loads. The barrel can safely handle both lead and steel shot. Choked tubes for rifled barrels are designed for firing
sabot-type slugs.
MAGAZINE CAPACITY
With the 3-shot magazine adaptor (plug) removed, your gun can hold up to four 2¾» shells or three 3» shells in the
magazine. SXP models with a high-capacity magazine can hold five 2¾» shells or four 3» shells in the magazine. At
a firing range or any other suitable location for shooting, load the magazine to full capacity to check the number of
shells.
Remember that “total” capacity includes an extra shell in the chamber in addition to a full magazine.
“THREE SHOT” ADAPTOR (PLUG)
The SXP shotgun is delivered with a “three-shot» adaptor (plug) fitted in the magazine, which limits its capacity to two
shells in compliance with American federal migratory bird regulations. If you do not wish to be limited to three shots,
when this is not a legal requirement, you remove the “three-shot” adaptor.
REMOVING THE “THREE-SHOT” ADAPTOR (PLUG)
1. Unscrew the magazine cap and remove it.
2. The “three-shot” magazine adaptor is located under the magazine spring retainer and is pushed upwards by
pressure from the magazine spring. Using your index finger or a large blade-type screwdriver, push the magazine
spring retainer down into the magazine by about 2.5 cm (1”) and rotate it 90° (Figure 7).
3. The magazine spring retainer is held under pressure by the magazine spring. Maintain the magazine spring
under control and carefully remove the magazine spring retainer (Figure 8).
Remove the “three-shot” adaptor (plug) and put the magazine spring retainer back in place.
4. Line up the full-length grooves on the magazine spring retainer with the protrusions inside the magazine tube.
5. Compress the magazine spring back into the magazine tube.
6. Put the magazine spring retainer back in position by pushing it down in the magazine tube by about 2.5 cm (1”)
and then turning it 90° to lock it into place. Make sure that the magazine spring retainer is locked into place.
7. Tighten up the magazine cap.
FITTING THE “THREE-SHOT” ADAPTER (PLUG)
If ever you need to re-fit the “three-shot” adaptor (plug) to limit your gun’s magazine capacity to two shells, perform
the following operation:
1. Unscrew the magazine cap and remove it.
2. Using your index finger or a large blade-type screwdriver, push the magazine spring retainer down into the
magazine by about 2.5 cm (1”) and rotate it by 90° (Figure 7).
3. The magazine spring retainer is held under pressure by the magazine spring. Keep the magazine spring under
control and carefully remove the retainer. Place the “three-shot” adaptor (plug) on top of the magazine spring and
put the magazine spring retainer back in position.
4. Line up the full-length grooves on the magazine spring retainer tube with the protrusions inside the magazine
tube.
5. Compress the magazine spring and “three-shot” adaptor back into the magazine tube.
6. Put the magazine spring retainer back in position by pushing it down in the magazine tube by about 2.5 cm (1”)
and then turning it 90° to lock it in place. Make sure that the magazine spring retainer is locked into place.
7. Tighten up the magazine cap.
LOADING
1. Put the safety catch in the “on” position and close the action.
R I F L E S
a n d
s h o t g u n s
English
27
28
FIGURE 10
Press down the shell stop to release the next shell from the magazine.
2. Press the shell carrier in the loading port down with the front of the shell (Figure 9).
3. By pushing on the base of the shell, push it into the magazine until it is retained by the shell stop.
4. Repeat the operation until the magazine is fully loaded.
LOADING THE CHAMBER FROM THE MAGAZINE
1. With the bolt assembly closed, push down the shell carrier with the front of the shell and, using your thumb, push
the shell into the magazine until it is held in place by the shell stop.
2. If desired, continue loading the magazine to full capacity, as explained above.
3. If firing is imminent, a shell can now be moved from the magazine to the chamber by pushing down the
disconnector release button located at the back of the trigger guard on the left and by cycling the forearm. A
shell will be fed automatically from the magazine to the chamber as the bolt closes. Another shell can now be
inserted into the magazine for loading up to full capacity.
LOADING THE CHAMBER THROUGH THE EJECTION PORT
1. Push the disconnector release button located behind the trigger-guard on the left. This will unlock the action
without releasing the hammer. Slide the forearm backwards as far as possible. Check the chamber, the feed
mechanism and the magazine to be absolutely sure that they are unloaded and clear of any obstructions.
2. Insert a shell of the proper calibre and length through the ejection port into the open breech.
3. Slide the forearm forwards as far as possible.
4. If desired, continue loading the magazine to full capacity as explained above.
FIRING
1. 2. 3. 4. 5. Put the safety catch in the “on” position.
Load a shell into the chamber as explained above.
With a shell in the chamber, you just have to push the safety catch to the “off” position to fire your shotgun.
When you are ready to fire, put the safety catch in the «off» position, aim and squeeze the trigger
If you wish to continue firing, slide the forearm backwards as far as possible until the fired shell is ejected out of
the ejection port.
6. Slide the forearm back forwards for transferring a new shell from the magazine to the chamber.
Your SXP is ready to fire. Put the safety catch” in the “on” position (i.e. with the red warning band hidden) until you
are ready to fire.
R I F L E S
a n d
s h o t g u n s
29
FIGURE 11
Three notches
Five notches
Two notches
Four notches
No notches
RIM NOTCHES
PATTERN WITH LEAD
SHOT
PATTERN WITH STEEL
SHOT
EXTENDED
EX-FULL
**
English
One notch
I
FULL
*
II
IMP. MODIFIED 3/4
FULL 1
III
MODIFIED 1/2
FULL 1
IIII
IMP. CYLINDER 1/4
MODIFIED 1/2
IIIII
SKEET
IMP. CYLINDER 1/4
NO NOTCHES
CYLINDER
CYLINDER
* Not for use with steel shot. Using an over-tight choke constriction with steel shot will produce an ineffective “blown” pattern.
** Extra full special, extended with ports. Not for use with steel shot.
1
When several choke tubes are listed for a given steel shot pattern, use the more open choke listed for high velocity, larger shot
size steel loads.
UNLOADING BY CYCLING THE ACTION
Proceed as follows for removing shells from the chamber and magazine on all SXP models.
1. Put the safety catch in the “on” position.
2. Push the disconnector release button to release the action (Figure 6).
3. Pump the forearm to-and-fro and repeat this process until all the shells have been transferred into the chamber
and then ejected from it.
4. After the last shell has been transferred into the chamber and ejected via the ejection port, leave the action open.
5. Using your index finger, feel the entry to the magazine to make sure that are no longer any shells in it.
UNLOADING FROM THE MAGAZINE
Shells can be removed from the magazine by proceeding as follows:
1. Put the safety catch in the “on» position, make sure that the action is closed and keep the muzzle pointing in a
safe direction.
2. Turn the gun over so that the trigger guard is facing upwards; then push the shell carrier down as far as possible.
3. Push the shell stop inwards to release a shell from the magazine (Figure 10). Press the shell stop down again to
R I F L E S
a n d
s h o t g u n s
30
release a second shell. The shell stop is located inside the ejection port on the right.
When there is a shell in the magazine, the shell stop is in contact with the metal part of the shell.
4. With the safety catch still in the “on” position, turn the gun over to its normal firing position.
Press on the disconnector release button, and slide the forearm back as far as possible to remove the shell in the
chamber.
INTERCHANGEABLE CHOKE TUBE SYSTEM
All SXP shotgun barrels, (except for Defender models) are threaded to accept the “Invector-plusTM” choke tube system.
WinChoke®, standard InvectorTM or “Invector – plus” chokes are not interchangeable. Check the choke system on your
gun by looking on the right-hand side of the barrel where the specifications are engraved, at the point where choke
markings are normally located.
The constriction of each choke is indicated in two points on the choke: on the side of the choke, and by means of a
notch code on the top rim of the choke. The choke screw-wrench provided is used for removing and fitting choke
tubes.
“Invector” standard and “Invector – plus” choke tubes are compatible with factory ammunition in compliance with
SAAMI specifications, including Magnum lead and steel shot, sabots and shotgun slug loads.
Replacement and additional chokes and wrenches are available from your Winchester Rifle and Shotguns dealer or
by contacting the Winchester Repeating Arms Customer Service Department. See page 34 for contact information.
CHOKE TUBE SELECTION
To help you select the correct choke for each field and target situation, all “Invector-plus» choke tubes are identified
on the side with the patterns they produce with both lead and steel shot. Every “Invector” choke also possesses
notches on the top rim of the choke. (Figure 11).
These notches form a code that allows you to determine the choke designation while the tub e is in place. Rim
notches refer specifically to lead shot. Use the charts to cross-reference from lead to steel and to determine the
appropriate chokes for your ammunition and hunting/shooting situation.
Several choke tubes are supplied with your shotgun. The choke tubes listed below are also available as accessories.
Remember: WinChoke®, Invector standard” or “Invector – plus” chokes are not interchangeable. “Invector – plus”
chokes are for Winchester guns with back-bored barrels only. Before removing or fitting chokes or reading the notch
code on the rim, make sure that your shotgun is completely unloaded.
CHOKE TUBE REMOVAL
1. Put the safety catch in the “on” position. Always open the action and check that your shotgun is completely
unloaded. Always keep the muzzle pointing in a safe direction.
2. Use the choke tube wrench for loosening the choke, turning it anti-clockwise. Then unscrew the choke with your
fingers to remove it completely.
CHOKE TUBE INSTALLATION
1. Put the safety catch in the “on” position. Always open the action and check that your shotgun is completely
unloaded. Always keep the muzzle pointing in a safe direction.
2. Before fitting a choke, check the internal choke threads inside the muzzle as well as the threads on the choke to
make sure that they are clean.
Lightly oil the threads with light high-quality firearm oil.
3. Screw the appropriate choke into the barrel muzzle with your fingers, the threaded end first, notched end
outwards. When the choke becomes finger-tight, use the choke tube wrench for tightening firmly.
R I F L E S
a n d
s h o t g u n s
31
FIGURE 12
Barrel Bracket
Barrel
Three-Shot
Adapter (Plug)
Choke Tube
Magazine Spring
Magazine Cap
Bolt
Firing Pin Spring
Magazine Three-shot
Adapter (Plug)
Bolt Slide
Magazine Spring Retainer
English
Firing Pin
Magazine Tube
Receiver
Slide Arms
Trigger Group Pin
Trigger Group
Forearm
FIGURE 13
After removing the pin,
tilt the rear of the
trigger guard group
up, then lift it out.
CLEANING AND MAINTENANCE SUGGESTIONS WARNING
PLEASE TAKE NOTE OF THE FOLLOWING INFORMATION BEFORE CLEANING YOUR FIREARM.
CLEANING PARTS WITH SPECIAL FINISHES
Take the greatest care when cleaning guns with camouflage, Duratouch coating or other special finishes. Make
certain that these surfaces do not come into contact with cleaning solvents, barrel cleaners or other strong chemicals.
It is preferable to clean these surfaces with light firearm oil that contains no solvents, or by using a damp cloth and
mild washing-up liquid (make sure that no water gets inside the action). When cleaning your gun’s bore or action,
protect the outside finishes so that they do not come in contact with the chemicals used. In addition, avoid all contact
between outside finishes and any other strong chemicals such as those found in DEET-containing insect repellents,
or in sunscreens, etc. Any damage caused by chemicals to camouflage finishes, Dura-touch and other finishes is
irreversible and cannot be repaired.
FIGURE 14FIGURE 15
Position the bolt assembly on the slide arms.
Carefully guide the bolt assembly - on the slide arms - into the
receiver.
R I F L E S
a n d
s h o t g u n s
32
CLEANING PROCEDURES
Your SXP will operate better and more reliably over a longer period of time if it is properly maintained and kept clean.
You should clean your shotgun after every day of shooting, or even more often if it has become excessively dirty. The
barrel should be cleaned and the mechanism wiped clean and oiled after every day’s use.
Normal maintenance can be carried out with the barrel attached to the receiver (oiling and brushing). More
meticulous cleaning requires for the barrel to be removed from the receiver. The bolt and trigger assemblies must
also be removed for really thorough cleaning.
If you encounter a problem in operating your shotgun (tight action when working the forearm), firstly clean it
thoroughly to see whether this solves the problem, before requesting assistance from the Winchester firearms service
centre closest to you, our Winchester service facility or a qualified gunsmith.
1. Put the safety catch in the “on” position. Open the action and inspect the chamber and the magazine to make sure
that there are no shells in them.
Keep the muzzle pointing in a safe direction.
2 Remove the barrel as explained in the “Dismantling” paragraph.
3. Inspect the bore at both ends for any lead and plastic residue that may often remain in barrel bores and which
comes from the wads used in modern shells. Lead and plastic residue appears in the form of lengthways streaks
and is usually more predominant close to the muzzle and just in front of the chamber. A normal quantity of either
of these two types of residue is normal and not serious in itself.
4. If you think that there is too much lead or plastic residue, it can be removed by brushing the bore with a brass
brush. First, soak the brush or spray the bore with powder solvent. Brush until clean.
To avoid any bristles being torn off, push the brush right through the barrel every time before pulling it back.
5. When all the lead and plastic residue has been removed, pass a piece of clean, dry patch of flannel through the
bore. Follow this with a final piece of lightly oiled flannel.
6. Inspect the barrel and the chamber to make sure that no bits of flannel have accidentally remained inside. If
necessary, remove any bits that remain.
7. Reassemble your gun and wipe all exposed metal parts with an oiled cloth, making sure to wipe away any finger
marks or traces of moisture. Any dry oil residue in the receiver should also be removed.
8. Lightly oil your firearm at the places. Regular light oiling is extremely important for your shotgun to operate
reliably over many years.
ADDITIONAL DISMANTLING
One of the SXP’s advantages is that its action can be dismantled for cleaning. In bad weather conditions and a dirty
environment, simply knowing that the parts of your gun are clean and correctly oiled will make you feel more selfconfident when firing.
Make sure that you have a clean work area available to put the components down as you dismantle them (Figure 12).
REMOVING THE BARREL
1. Unscrew the magazine cap and remove it. Remember to always keep the muzzle pointing in a safe direction.
2. Slide the barrel forwards withdrawing it from the receiver and disengaging the barrel bracket from the front end
of the magazine tube.
3. Screw the magazine cap back in place on the magazine tube straight away, giving it at least three full turns.
REMOVING THE TRIGGER GROUP
The trigger group must also be removed for carrying out thorough maintenance on your shotgun. It is easy to do and
removing the trigger group will enable you to thoroughly clean your firearm whenever required. After the trigger and
bolt assemblies have been removed, it is easy to clean any residue or moisture that may have collected in the receiver.
The trigger group must always be removed before the bolt assembly.
1. Make sure that your shotgun is completely unloaded as explained previously in the present manual.
2. Cycle the action by sliding the forearm backwards and forwards. This puts the hammer in a cocked position. Put
the safety catch in the “on” position.
3. If the barrel assembly has been removed, make sure to replace the magazine cap back on the end of the magazine
tube so that the magazine spring retainer cannot fall out by accident.
4. Place your gun on a suitable surface with the trigger guard facing upwards, to protect the finish on the receiver
and the stock.
5. Remove the trigger group pin by pushing out from the left-hand side of the receiver, i.e. the side opposite the
ejection port. Any sturdy tool can be used provided that it has a diameter smaller than the pin and does not risk
R I F L E S
a n d
s h o t g u n s
33
damaging finishes.
Make sure that you hold the pushing tool and the shotgun firmly when you push on the pin.
6. Push it out far enough to be able to take hold of it with your fingers. Then, pull it out completely by hand. If you
cannot manage to pull it out with your fingers, check that your tool or pin-drift is small enough to be able to push
the pin out completely without damaging the hole.
7. Once the pin has been removed, lift the trigger group out of the receiver by lifting it upwards and pulling it
backwards (Figure 13).
1. Remove the barrel and the trigger group as explained above, but do not replace the magazine cap.
2. With the bolt assembly attached to the slide-arm, slide both units forwards and take them out from the front of
the receiver. Note that you may feel a slight resistance when the bolt assembly passes the ejection port. This is
caused by the ejector spring. If you feel any resistance, work the unit past with the greatest care.
REMOVING THE FIRING-PIN
1. Remove the bolt assembly from the gun as explained above.
2. Turn the bolt assembly over (flat side on top) and push the back of the firing pin forwards with your forefinger.
Holding the firing pin in this position, lift the front of the slide-arm up with your other hand and move it slightly
forwards.
3. Raise the slide-arm to disengage the curved tongue on the slide-arm from the groove in the firing pin. This will
detach the slide-arm from the bolt assembly.
4. The firing pin is held under pressure by a spring; it will jump out of the bolt assembly when released by your
forefinger. Pay attention to the pin when removing the firing pin and spring.
As far as cleaning is concerned, no further dismantling operation is either recommended or necessary. Do not
dismantle your SXP beyond the point shown in the illustration in Figure 12. Doing so will cancel your guarantee. For
any repairs that require further dismantling, please contact your Winchester Firearms Authorised Service Centre or a
qualified gunsmith, as indicated in the chapter “Parts, service, repair and questions” .
REFITTING THE FIRING-PIN AND THE BOLT ASSEMBLY
1. Put the firing-pin spring back in place around the firing-pin. The spring can be put in place either way round.
2. Insert the firing-pin/ spring assembly into the rear opening on the bolt assembly, pin end first.
3. To replace the bolt assembly on the slide-arm, push the round end of the firing-pin far enough into the hole on
the bolt-slide so that the large space between the grooved knob and the flange on the firing-pin is correctly
centred in the round hole on the bolt-slide.
4. Place the curved tongue on the slide-arm in the space between the knob on the firing-pin and its flange and
slowly release pressure on the end of the firing-pin. Let the flange on the firing-pin pull the curved tongue
towards the back of the bolt assembly.
5. Remove the magazine cap.
6. Hold the slide-arms and the bolt/slide-arm assemblies together (Figure 14). Slide the forearm unit onto the
magazine tube.
7. Carefully guide the slide-arms and the bolt assembly into the front of the receiver. As the units enter the receiver,
push them backwards as far as possible (Figure 15).
RE-FITTING THE TRIGGER GROUP
1. The bolt assembly, slide-arms and forearm must be attached to the receiver before the trigger group can be
re-fitted.
2. Make sure that the hammer is cocked by pushing it straight back until it locks into place. Check that the safety
catch is “on”.
3. Turn the gun over with the open bottom of the receiver facing upwards. Hold the trigger group at an angle
to the receiver (about 45°) and engage the front tabs on the trigger group into the corresponding slots in the
magazine throat at the front end of the receiver opening as shown in Figure 13.
4. Carefully insert the front of the trigger group into the receiver opening; then lower the back into the receiver
opening until it is parallel to the receiver. It may be necessary to slide the forearm into different positions until
the trigger group fits flush into the receiver. When correctly installed, the forearm is in place and the trigger
group pin-hole is in line.
5. Align the trigger group with the hole in the receiver and push the trigger group pin through the receiver until
R I F L E S
a n d
s h o t g u n s
English
REMOVING THE BOLT ASSEMBLY
34
it is flush with both sides of the receiver.
The pin should go through easily, without being forced.
If any firm resistance is felt, remove the trigger group and repeat the operation beginning at stage 1.
Your firearm is now fully assembled. Immediately check that the safety catch is “on”. Take time to wipe down and
clean all the outside surfaces as explained under “Cleaning and Maintenance Suggestions”.
OTHER CLEANING SUGGESTIONS
After long periods of intensive use, your gun should be taken to a qualified gunsmith to have the action dismantled
for professional cleaning and lubrication.
PARTS, SERVICE, REPAIR AND QUESTIONS
If ever your Winchester firearm should require service or repair, it is often preferable to use one of our Authorised
Repair Centres.
In certain cases, you may even need to call on the Winchester Repeating Arms Service Centre.
A list of authorised repair centres was included with your new firearm. Should you require a new list, please contact
us. We will be able to help you determine the best place to service your shotgun.
Visit: www.winchesterint.com
R I F L E S
a n d
s h o t g u n s
35
Instructions importantes relatives au:
Fusil à pompe
Winchester SXP
TM
Browning International
Parc Industriel des Hauts Sarts, 3ème Avenue 25
4040 Herstal BELGIUM
Si vous avez la moindre question ou des commentaires au sujet de votre nouvelle arme à feu,
n’hésitez pas à nous écrire ou nous téléphoner. Veuillez utiliser l’espace prévu ci-dessous pour
enregistrer l’information concernant votre nouvelle arme à feu ou sur www.winchesterint.com.
. . . . . . . . . . . . . . . . . . . . . . . . . . . . . . . . . . . . . . . . . . . . . . . . . . . . . . . . . . . . . . . . . . . . . . . . . . . . . . . . . . . . . . . . . . . . . . . . . . . . . . . . . . . . . . . . . . . . . . . . . . . . . . . . . . . . . . . .
Numéro de série
. . . . . . . . . . . . . . . . . . . . . . . . . . . . . . . . . . . . . . . . . . . . . . . . . . . . . . . . . . . . . . . . . . . . . . . . . . . . . . . . . . . . . . . . . . . . . . . . . . . . . . . . . . . . . . . . . . . . . . . . . . .
Vendeur. . . . . . . . . . . . . . . . . . . . . . . . . . . . . . . . . . . . . . . . . . . . . . . . . . . . . . . . . . . . . . . . . . . . . . . . . . . . . . . . . . . . . . . . . . . . . . . . . . . . . . . . . . . . . . . . . . . . . . . . . . . . . . . . . . . . . . . . .
Date d’achat . . . . . . . . . . . . . . . . . . . . . . . . . . . . . . . . . . . . . . . . . . . . . . . . . . . . . . . . . . . . . . . . . . . . . . . . . . . . . . . . . . . . . . . . . . . . . . . . . . . . . . . . . . . . . . . . . . . . . . . . . . . . . . . . .
Winchester est une marque déposée d’Olin Corporation. AO1010/10406
Table des matières Page
C’est vous qui êtes responsable de la sécurité des armes à feu . . . . . . . . . . . . . . . . . . . . . . . . . . . . . . . . . . . . . . . . . . . . . . . . . . . . . . . . . . . . . . . . . 4
Description et fonctionnement
. . . . . . . . . . . . . . . . . . . . . . . . . . . . . . . . . . . . . . . . . . . . . . . . . . . . . . . . . . . . . . . . . . . . . . . . . . . . . . . . . . . . . . . . . . . . . . . . . . . . . . . 36
Nomenclature . . . . . . . . . . . . . . . . . . . . . . . . . . . . . . . . . . . . . . . . . . . . . . . . . . . . . . . . . . . . . . . . . . . . . . . . . . . . . . . . . . . . . . . . . . . . . . . . . . . . . . . . . . . . . . . . . . . . . . . . . . . . . . 36
Numéro de série
. . . . . . . . . . . . . . . . . . . . . . . . . . . . . . . . . . . . . . . . . . . . . . . . . . . . . . . . . . . . . . . . . . . . . . . . . . . . . . . . . . . . . . . . . . . . . . . . . . . . . . . . . . . . . . . . . . . . . . . . . . 36
Nettoyage initial et lubrification
Fonctionnement de la «sûreté»
. . . . . . . . . . . . . . . . . . . . . . . . . . . . . . . . . . . . . . . . . . . . . . . . . . . . . . . . . . . . . . . . . . . . . . . . . . . . . . . . . . . . . . . . . . . . . . . . . . . . . 36
. . . . . . . . . . . . . . . . . . . . . . . . . . . . . . . . . . . . . . . . . . . . . . . . . . . . . . . . . . . . . . . . . . . . . . . . . . . . . . . . . . . . . . . . . . . . . . . . . . . . . . . 37
Assemblage . . . . . . . . . . . . . . . . . . . . . . . . . . . . . . . . . . . . . . . . . . . . . . . . . . . . . . . . . . . . . . . . . . . . . . . . . . . . . . . . . . . . . . . . . . . . . . . . . . . . . . . . . . . . . . . . . . . . . . . . . . . . . . . . . 37
Désassemblage. . . . . . . . . . . . . . . . . . . . . . . . . . . . . . . . . . . . . . . . . . . . . . . . . . . . . . . . . . . . . . . . . . . . . . . . . . . . . . . . . . . . . . . . . . . . . . . . . . . . . . . . . . . . . . . . . . . . . . . . . . . . . 38
Capacité du magasin
. . . . . . . . . . . . . . . . . . . . . . . . . . . . . . . . . . . . . . . . . . . . . . . . . . . . . . . . . . . . . . . . . . . . . . . . . . . . . . . . . . . . . . . . . . . . . . . . . . . . . . . . . . . . . . . . . . . . 39
Adaptateur «trois coups» (réducteur)
. . . . . . . . . . . . . . . . . . . . . . . . . . . . . . . . . . . . . . . . . . . . . . . . . . . . . . . . . . . . . . . . . . . . . . . . . . . . . . . . . . . . . . . . . . . . . . . 39
Chargement. . . . . . . . . . . . . . . . . . . . . . . . . . . . . . . . . . . . . . . . . . . . . . . . . . . . . . . . . . . . . . . . . . . . . . . . . . . . . . . . . . . . . . . . . . . . . . . . . . . . . . . . . . . . . . . . . . . . . . . . . . . . . . . . . 40
Mise à feu
. . . . . . . . . . . . . . . . . . . . . . . . . . . . . . . . . . . . . . . . . . . . . . . . . . . . . . . . . . . . . . . . . . . . . . . . . . . . . . . . . . . . . . . . . . . . . . . . . . . . . . . . . . . . . . . . . . . . . . . . . . . . . . . . . . . 41
Déchargement . . . . . . . . . . . . . . . . . . . . . . . . . . . . . . . . . . . . . . . . . . . . . . . . . . . . . . . . . . . . . . . . . . . . . . . . . . . . . . . . . . . . . . . . . . . . . . . . . . . . . . . . . . . . . . . . . . . . . . . . . . . . . 42
Système de chokes interchangeables
. . . . . . . . . . . . . . . . . . . . . . . . . . . . . . . . . . . . . . . . . . . . . . . . . . . . . . . . . . . . . . . . . . . . . . . . . . . . . . . . . . . . . . . . . . . . . . . 42
Suggestions de nettoyage et d’entretien . . . . . . . . . . . . . . . . . . . . . . . . . . . . . . . . . . . . . . . . . . . . . . . . . . . . . . . . . . . . . . . . . . . . . . . . . . . . . . . . . . . . . . . . . . . 43
Pièces, entretien, réparations et questions . . . . . . . . . . . . . . . . . . . . . . . . . . . . . . . . . . . . . . . . . . . . . . . . . . . . . . . . . . . . . . . . . . . . . . . . . . . . . . . . . . . . . . . . . 46
Information sur le site Internet
. . . . . . . . . . . . . . . . . . . . . . . . . . . . . . . . . . . . . . . . . . . . . . . . . . . . . . . . . . . . . . . . . . . . . . . . . . . . . . . . . . . . . . . . . . . . . . . . . . . . . . . 46
R I F L E S
a n d
s h o t g u n s
Français
Modèle
36
DESCRIPTION ET FONCTIONNEMENT
DESCRIPTION
Aucun fusil à pompe n’est plus rapide que le fusil Winchester SXP. L’inertie due au recul contribue au mouvement
arrière de la glissière, facilitant par là le mouvement de va-et-vient du garde-main. Vous découvrirez la vitesse
impressionnante de l’armement à pompe ; en un instant vous aurez rechargé une cartouche dans la chambre
et serez prêt à tirer un second coup. Une telle vitesse fait toute la différence ; elle vous permet de tirer coup sur
coup rapidement tout en vous concentrant sur votre cible, et non pas sur le fait de réarmer votre fusil. Grâce
à la conception du verrou rotatif du SXP, les tenons du verrou s’engagent directement dans les logements de
l’extension du canon.
Il s’agit d’une conception de verrouillage solide, stable et fiable. Chacune des caractéristiques de la conception
du SXP se conjuguent les unes aux autres pour donner ce que beaucoup estiment être le fusil à pompe le plus
fiable qui est disponible sur le marché actuel.
FONCTIONNEMENT
Le SXP est un fusil à pompe qui vous permet de charger une cartouche en actionnant le mécanisme pour éjecter
la cartouche vide et déplacer une cartouche fraîche du magasin rempli vers la chambre.
La présente opération peut être répétée jusqu’à ce que le magasin soit vide. Une cartouche unique peut aussi
être insérée dans la chambre manuellement.
CARACTÉRISTIQUES DU FUSIL
Avant d’utiliser des munitions, familiarisez-vous complètement avec les instructions de fonctionnement
contenues dans le présent manuel. Il faut vous faire à votre nouvelle arme à feu et savoir l’effort requis pour
actionner le mécanisme. Apprenez comment actionner la détente, et par dessus tout, sachez où se trouve et
comment fonctionne la «sûreté». Les procédures de désassemblage et de fonctionnement des divers composants
sont expliquées ci-dessous dans le présent manuel. Veuillez les lire et les étudier à fond.
NOMENCLATURE
Dans la terminologie armurière classique, la position et le mouvement des pièces d’une arme à feu sont décrits
tels qu’ils se produisent, en tenant l’arme à feu horizontalement et dans une position de tir normale : ainsi, la
bouche du canon est devant ou se trouve à l’avant, la crosse est située derrière ou vers l’arrière, la détente est vers
le bas ou au-dessous ; la bande de visée est vers le haut ou au-dessus. Pour la nomenclature des pièces générales,
veuillez faire référence à la figure 1.
Le SXP est également montré désassemblé jusqu’au point nécessaire pour suivre les instructions contenues dans
le présent manuel (figure 12). La figure 2 couvre les caractéristiques générales et les avantages de la conception
du SXP.
Dans le présent manuel d’utilisation, le terme «mécanisme» fait référence au mécanisme du présent fusil qui
entraîne la cartouche dans la chambre et l’y maintient.
NUMÉRO DE SÉRIE
Le numéro de série est situé sur le côté gauche de la carcasse, juste au-dessus du pontet. Inscrivez ce numéro au
début du présent manuel d’utilisation à titre de référence ultérieure.
NETTOYAGE INITIAL ET LUBRIFICATION
ATTENTION ! VEUILLEZ S’IL VOUS PLAÎT PRENDRE NOTE DE L’INFORMATION SUIVANTE AVANT DE NETTOYER VOTRE ARME À FEU.
NETTOYAGE DES PIÈCES DOTÉES DE FINITIONS SPÉCIALES
Soyez extrêmement prudent en nettoyant des armes à feu dotées d’une finition camouflage, d’un revêtement
Dura-Touch® ainsi que d’autres finitions spéciales. Veillez toujours à ce que ces surfaces n’entrent pas en contact
avec des solvants de nettoyage, des dispositifs à récurer pour canon ou d’autres substances chimiques fortes. Il
est préférable de nettoyer lesdites surfaces à l’aide d’une huile légère pour armes à feu qui ne contient pas de
solvants, ou à l’aide d’un chiffon humide et d’un détergent de vaisselle doux (assurez-vous que l’eau ne pénètre
pas à l’intérieur du mécanisme). Lors du nettoyage de l’âme et du mécanisme de votre arme à feu, protégez les
finitions externes pour qu’elles n’entrent pas en contact avec les substances chimiques utilisées. Évitez également
R I F L E S
a n d
s h o t g u n s
37
tout contact entre les finitions externes et toute autre substance chimique forte telle que celle présente dans les
répulsifs contre les insectes ayant une teneur en diéthyltoluamide, les écrans solaires, etc. Le dommage provoqué
sur les finitions camouflage, Dura-Touch et toute autre finition par les substances chimiques est irréversible et
irréparable.
Diverses pièces métalliques de votre nouveau fusil SXP ont été revêtues d’un produit anti-corrosion à l’usine.
Avant de tirer avec votre fusil SXP, débarrassez l’intérieur du canon, de la carcasse, l’ensemble verrou-culasse
et les surfaces du mécanisme et de la chambre du produit anti-corrosion. Une huile légère pour armes à feu de
haute qualité est idéale pour ôter ce produit et pour donner à votre nouvelle arme à feu sa première lubrification.
Nettoyez le canon en utilisant une baguette de nettoyage et une flanelle tel qu’il est expliqué dans la section
«Suggestions de nettoyage et d’entretien».
Tenons
Percuteur
Verrou
éjecteur
Lubrifiez légèrement à ces points.
Tube-Magasin
Avant de procéder à l’assemblage de votre SXP, vous
devriez d’abord frotter le mécanisme en appliquant
quelques gouttes d’huile de qualité sur les surfaces
indiquées (figure 3).
Évitez d’appliquer une trop grande quantité d’huile.
Seul un fin film est nécessaire. L’huile superflue
devrait être frottée, surtout par temps froid.
FONCTIONNEMENT DE LA «SÛRETÉ»
FIGURE 4FIGURE 5
La «sûreté» montrée en position «sécuritaire».
La «sûreté» montrée en position «non sécuritaire».
La «sûreté», constituée d’un verrou transversal, est conçue pour empêcher la détente d’être actionnée quand
la «sûreté» est positionnée en position sécuritaire. La «sûreté» se trouve à l’avant du pontet (figure 4). Lorsque
la «sûreté» se trouve en position non sécuritaire, une bande rouge d’avertissement apparaît sur le bouton de la
«sûreté» sur le côté gauche du pontet. Il est crucial que vous vous familiarisiez avec le toucher, l’apparence et le
fonctionnement de la «sûreté» sur le présent fusil avant de tenter de le charger et de l’utiliser.
Pour positionner l’arme à feu en position sécuritaire, poussez le bouton de «sûreté» vers la droite (figure 4). Pour
déplacer la «sûreté» en position non sécuritaire, soit la position feu, poussez le bouton de «sûreté» vers la gauche.
Cette dernière opération laisse apparaître la bande rouge d’avertissement du bouton de «sûreté» (figure 5).
Quand la «sûreté» se trouve en position sécuritaire, la détente et le chien sont bloqués et on ne peut pas tirer avec
le fusil. Dans la position non sécuritaire, si votre arme à feu contient une cartouche dans la chambre, la cartouche
chambrée peut être mise à feu sur une simple pression sur la détente.
ASSEMBLAGE
Le fusil SXP est livré dans sa boîte avec le canon démonté et le garde-main monté sur le tube-magasin.
1. Enlevez le canon et l’ensemble carcasse/crosse de la boîte et procédez au nettoyage et à la lubrification des
deux moitiés.
2. Dévissez l’écrou d’assemblage du tube-magasin.
3. Votre fusil devrait normalement vous être livré avec l’ensemble verrou-culasse en position fermée (vers
l’avant) et l’ensemble détente déjà monté dans la carcasse. Le canon peut être monté lorsque le mécanisme
R I F L E S
a n d
s h o t g u n s
Français
FIGURE 3
38
est fermé ; toutefois, outrouvrir celui-ci facilite le montage.
4. Déverrouillez et ouvrez le mécanisme en poussant sur le levier de déverrouillage situé à l’arrière du pontet
(figure 6) sur le côté gauche et tirez le gardemain en arrière.
5. Saisissez le canon à l’avant de l’anneau de canon.
6. Placez le canon au-dessus du tube-magasin et alignez-le sur celui-ci.
7. Faites glisser le canon en arrière.
8. Guidez l’anneau de canon autour du tube-magasin et l’extension du canon dans la carcasse. Assurez-vous
que l’éjecteur est aligné sur son logement dans le canon.
9. Entrez le canon en le faisant reculer dans la carcasse jusqu’à sa butée arrière.
10. Replacez immédiatement l’écrou d’assemblage. Serrez-le à la main (au moins trois tours complets) pour
assurer sa bonne introduction.
FIGURE 6
Poussez sur le levier de déverrouillage
pour débloquer le mécanisme.
DÉSASSEMBLAGE
1. Poussez sur le levier de déverrouillage situé à l’arrière du pontet sur le côté gauche (figure 6) pour déverrouiller le
mécanisme sans libérer le chien.
2. Ouvrez le mécanisme et placez la «sûreté» en position sécuritaire. (La bande rouge d’avertissement doit être
cachée.)
3. La bouche du canon étant pointée dans une direction sécuritaire, dévissez l’écrou d’assemblage et enlevez-le.
4. Saisissez le canon à l’avant de l’anneau de canon tout en tenant la crosse de l’autre main.
5. Tirez le canon en avant pour le faire sortir de la carcasse. Faites sortir l’anneau de canon du tube-magasin. Il est
inutile de forcer.
6. Remettez immédiatement l’écrou d’assemblage et serrez à la main en effectuant au moins trois tours.
FIGURE 7FIGURE 8
Enfoncez le fond de
magasin et faites lui faire
un quart de tour.
Gardez le contrôle du
ressort de magasin au
moment où vous retirez
le fond de magasin
R I F L E S
a n d
s h o t g u n s
39
FIGURE 9
La façon la plus sûre de bomber ou de casser le canon d’un fusil est de faire partir une cartouche de calibre plus petit
dans une chambre dont le calibre est plus gros. La cartouche de calibre plus petit ne tombera pas complètement à
travers le canon ; son culot est pris par l’avant de la chambre de calibre plus gros ou par le choke de calibre plus gros.
Votre fusil effectuera une mauvaise mise à feu (avec une chambre en l’apparence vide). Il est alors possible de charger
une cartouche de calibre correct derrière une cartouche de calibre plus petit. Si vous faites alors feu avec le fusil, le
résultat obtenu sera ce qu’il est appelé «l’éclatement 12-20, 20-28 ou 28-.410» qui peut provoquer une détérioration
significative de votre fusil ainsi que de graves blessures possibles pour vous ou pour autrui.
Nous ne pouvons assumer aucune responsabilité pour des incidents survenant suite à l’utilisation de cartouches
de dimension hors norme ou de celles engendrant des pressions supérieures aux normes établies par le SAAMI
(Sporting Arms and Ammunition Manufacturers’ Institute).
Tous les fusils actuels SXP de calibre 12 possèdent une chambre de 3’’ (76mm) et sont conçus pour tirer toutes les
cartouches chargées en usine de 2¾’’ et 3’’, qu’elles soient destinées au tir sportif ou à la chasse. Le canon peut tirer
tout aussi bien des charges de plomb que d’acier en toute sécurité. Les chokes pour canons rayés sont conçus pour
le tir de cartouches à balles de type sabot.
CAPACITÉ DU MAGASIN
L’adaptateur (le réducteur) de magasin à trois coups étant enlevé, votre fusil peut contenir jusqu’à quatre cartouches
2¾’’ ou trois cartouches 3’’ dans le magasin. Le magasin haute capacité de certains modèles SXP peut contenir cinq
cartouches 2¾’’ ou quatre cartouches 3’’. Sur un pas de tir ou dans un autre endroit adapté pour le tir, remplissez votre
magasin à sa capacité totale pour vérifier le nombre de cartouches. Souvenez-vous, la capacité «totale» inclut une
cartouche supplémentaire qui peut être placée dans la chambre en plus d’un magasin rempli.
ADAPTATEUR «TROIS COUPS» (RÉDUCTEUR)
Le fusil SXP est livré avec l’adaptateur «trois coups» (réducteur) installé dans le magasin, limitant ainsi la capacité
du magasin à deux cartouches pour répondre aux réglementations fédérales américaines relatives aux oiseaux
migrateurs. Si vous désirez ne pas être limité à trois coups, quand ce n’est pas une exigence légale, vous pouvez
démonter l’adaptateur «trois coups».
DÉMONTAGE DE L’ADAPTATEUR «TROIS COUPS» (RÉDUCTEUR)
1. Dévissez l’écrou d’assemblage et enlevez-le.
2. L’adaptateur «trois coups» du magasin se trouve en dessous du fond de magasin et est soumis à la tension du
ressort de magasin. En vous servant de votre index ou d’un grand tournevis à lame, enfoncez le fond de magasin
d’environ 2,5 cm (1 po) dans le magasin et faites lui faire un quart de tour (figure 7).
3. Le fond de magasin est soumis à la tension du ressort de magasin. Gardez le ressort du magasin sous contrôle et
retirez soigneusement le fond de magasin (figure 8). Retirez l’adaptateur «trois coups» (réducteur) et replacez le
fond de magasin.
4. Alignez les rainures présentes sur toute la longueur du fond de magasin avec les bossages intérieurs du tubemagasin.
5. Recomprimez le ressort de magasin dans le tube-magasin.
6. Replacez le fond de magasin en l’enfonçant dans le tube-magasin d’environ 2,5 cm (1 po) et en lui faisant faire un
quart de tour pour le bloquer dans la bonne position. Assurez-vous que le fond de magasin est bloqué dans la
R I F L E S
a n d
s h o t g u n s
Français
Introduisez la cartouche à fond vers l’avant dans le magasin.
40
bonne position.
7. Vissez l’écrou d’assemblage.
MONTAGE DE L’ADAPTATEUR «TROIS COUPS» (RÉDUCTEUR)
Si vous avez besoin de remonter l’adaptateur «trois coups» (le réducteur) pour limiter la capacité du magasin de votre
fusil à deux cartouches, effectuez l’opération suivante :
1. Dévissez l’écrou d’assemblage et enlevez-le.
2. En vous servant de votre index ou d’un grand tournevis à lame, enfoncez le fond de magasin d’environ 2,5 cm (1
po) dans le magasin et faites lui faire un quart de tour (figure 7).
3. Le fond de magasin est soumis à la tension du ressort de magasin. Gardez le ressort du magasin sous contrôle et
retirez soigneusement le fond de magasin. Placez l’adaptateur «trois coups» (réducteur) au-dessus du ressort du
magasin et replacez le fond de magasin.
4. Alignez les rainures présentes sur toute la longueur du fond de magasin avec les bossages intérieurs du tubemagasin.
5. Recomprimez le ressort de magasin et l’adaptateur «trois coups» dans le tube-magasin.
6. Replacez le fond de magasin en l’enfonçant dans le tube-magasin d’environ 2,5 cm (1 po) et en lui faisant faire un
quart de tour pour le bloquer dans la bonne position. Assurez-vous que le fond de magasin est bloqué dans la
bonne position.
7. Vissez l’écrou d’assemblage.
CHARGEMENT
1. Placez la «sûreté» en position sécuritaire et fermez le mécanisme.
FIGURE 10
Enfoncez l’arrêtoir de cartouche pour libérer la cartouche suivante
du magasin.
2. Enfoncez le transporteur dans le trou de chargement avec l’avant d’une cartouche (figure 9).
3. En poussant sur le culot de la cartouche, enfoncez celle-ci à l’intérieur du magasin jusqu’à ce qu’elle soit
bloquée par l’arrêtoir de cartouche.
4. Répétez l’opération jusqu’à ce que le magasin soit complètement chargé.
CHARGEMENT DE LA CHAMBRE A PARTIR DU MAGASIN
1. L’ensemble verrou-culasse fermé, enfoncez le transporteur avec l’avant de la cartouche, et à l’aide de votre pouce,
enfoncez la cartouche dans le magasin jusqu’à ce que la cartouche soit maintenue en place par l’arrêtoir de
cartouche.
2. Si vous le souhaitez, continuez à remplir le magasin, comme expliqué ci-dessus, jusqu’à sa capacité totale.
3. Si le tir est imminent, une cartouche du magasin peut être chambrée en poussant sur le levier de déverrouillage
situé à l’arrière du pontet sur le côté gauche et en actionnant le garde-main. Une cartouche sera alimentée
automatiquement du magasin dans la chambre sur l’action de fermeture de l’ensemble verrou-culasse. Une autre
cartouche peut alors être introduite dans le magasin pour effectuer un chargement jusqu’à la capacité totale.
Chambrage d’une cartouche à partir de la fenêtre d’éjection
1. Poussez sur le levier de déverrouillage situé à l’arrière du pontet sur le côté gauche. Ceci débloquera le
mécanisme sans pour autant libérer le chien. Poussez le garde-main à fond en arrière. Effectuez une inspection
visuelle de la chambre, du mécanisme d’alimentation et du magasin afin d’être absolument certain qu’ils sont
déchargés et libres de toute obstruction.
R I F L E S
a n d
s h o t g u n s
41
2. Introduisez une cartouche de calibre et de longueur corrects par la fenêtre d’éjection dans la culasse ouverte.
3. Poussez le garde-main à fond en avant.
4. Si vous le souhaitez, continuez à remplir le magasin, comme expliqué ci-dessus, jusqu’à sa capacité totale.
MISE À FEU
1. Placez la «sûreté» en position sécuritaire.
2. Chargez une cartouche dans la chambre comme expliqué précédemment.
3. La cartouche se trouvant dans la chambre, il vous suffit simplement de repousser la «sûreté» vers la position non
sécuritaire pour faire feu avec le fusil.
4. Lorsque vous êtes prêt à tirer, déplacez la «sûreté» vers la position non sécuritaire, effectuez votre visée et pressez
la détente.
5. Si vous souhaitez continuer à faire feu, tirez le garde-main à fond en arrière jusqu’à ce que la cartouche percutée
soit éjectée par la fenêtre d’éjection.
6. Poussez le garde-main à fond en avant pour chambrer une cartouche fraîche du magasin.
FIGURE 11
une encoche
trois encoches
cinq encoches
deux encoches
quatre encoches
pas d’ encoche
ENCOCHES SUR
L’EXTREMITE
DISPERSION AVEC UN
TIR AU PLOMB
DISPERSION AVEC UN
TIR A L’ACIER
ALLONGE
EXTRA FULL
**
I
FULL
*
II
AMELIORE MODIFIE
3/4
FULL 1
III
MODIFIE 1/2
FULL 1
IIII
AMELIORE
CYLINDDRIQUE 1/4
MODIFIE 1/2
IIIII
SKEET
AMELIORE
CYLINDDRIQUE 1/4
PAS D’ENCOCHE
CYLINDRIQUE
CYLINDRIQUE
R I F L E S
a n d
s h o t g u n s
Français
Votre SXP est prêt à faire feu. Placez immédiatement la «sûreté» en position sécuritaire (c.-à-d. avec la bande rouge
cachée) jusqu’à ce que vous soyez prêt à tirer.
42
* Ne pas utiliser lors du tir à l’acier. L’utilisation d’un choke trop serré lors du tir à l’acier produira une dispersion «explosée» peu
efficace.
** Spécial extra Full, étendu avec des trous d’évent. Ne pas utiliser pour le tir à l’acier.
1
Lorsque plusieurs mentions de chokage sont répertoriées pour une dispersion donnée pour le tir à l’acier, utilisez l’étranglement
le plus ouvert répertorié pour des charges d’acier de taille plus grosse à grande vitesse.
DÉCHARGEMENT EN ACTIONNANT LE MÉCANISME
Suivez la procédure suivante pour décharger les cartouches de la chambre et du magasin sur tous les modèles SXP.
1. Placez la «sûreté» en position sécuritaire.
2. Poussez sur le levier de déverrouillage pour débloquer le mécanisme (figure 6).
3. Actionnez le garde-main en lui faisant faire un mouvement de va-et-vient et répétez cette opération jusqu’à ce
que toutes les cartouches du magasin aient été transférées dans la chambre pour être ensuite éjectées.
4. Lorsque la dernière cartouche du magasin a été transférée dans la chambre et éjectée par la fenêtre d’éjection,
laissez le mécanisme ouvert.
5. À l’aide de votre index, tâtez l’entrée du magasin pour vous assurer qu’aucune cartouche n’est restée dans le
magasin.
DÉCHARGEMENT À PARTIR DU MAGASIN
Les cartouches peuvent aussi être déchargées du magasin en suivant la procédure suivante :
1. Placez la «sûreté» en position sécuritaire, assurez-vous que le mécanisme est fermé et maintenez la bouche
du canon dans une direction sécuritaire.
2. Retournez le fusil afin que le pontet soit vers le haut, abaissez alors le transporteur aussi loin que possible.
3. Poussez l’arrêtoir de cartouche vers l’intérieur pour libérer une cartouche du magasin (figure 10). Appuyez à
nouveau sur l’arrêtoir de cartouche pour faire sortir la cartouche suivante. L’arrêtoir de cartouche est situé sur
le côté droit de la cavité de la fenêtre d’éjection. Lorsqu’une cartouche se trouve dans le magasin, l’arrêtoir de
cartouche repose sur la partie métallique de la cartouche.
4. Avec la «sûreté» toujours en position sécuritaire, retournez l’arme dans sa position de tir normale. Appuyez
sur le levier de déverrouillage et tirez le garde-main à fond en arrière pour retirer la cartouche de la chambre.
SYSTÈME DE CHOKES INTERCHANGEABLES
Tous les canons de fusils SXP (à l’exception des modèles Defender) ont été filetés pour accepter le système Choke
«Invector-plusTM». Les chokes WinChoke®, «InvectorTM» standard ou «Invector - plus» ne sont pas interchangeables.
Vérifiez le système choke de votre fusil en regardant sur le côté droit du canon où les spécifications sont inscrites, là
où les marquages d’étranglement se trouvent normalement.
Le rétrécissement de choke est indiqué à deux endroits sur le choke : sur le côté du choke, et indiqué au moyen d’un
code avec encoches sur l’extrémité supérieure du choke. La clé universelle fournie et destinée au choke est utilisée
pour enlever et installer les chokes.
Les chokes «Invector» standard et «Invector – plus» sont compatibles avec les munitions qui ont été chargées en
usine conformément aux spécifications SAAMI, y compris les charges de plomb Magnum et les charges d’acier, les
sabots et les balles pour fusils.
Des chokes et clés de rechange et supplémentaires sont disponibles chez votre négociant de carabines et fusils
Winchester.
SÉLECTION DU CHOKE
Afin de vous aider à choisir le choke approprié à chaque situation de chasse et de tir, tous les chokes «Invector –
plus» sont identifiés sur le côté avec les dispersions qu’ils produisent pour un tir au plomb et à l’acier. Chaque choke
«Invector» possède également des crans situés sur l’extrémité supérieure du choke (figure 11).
Lesdites encoches constituent un code qui vous permet de déterminer l’identification de l’étranglement une fois que
le choke est installé. Les encoches du pourtour réfèrent spécialement au tir au plomb. Utilisez les tables pour établir
la référence entre le plomb et l’acier et pour déterminer les chokes appropriés à vos munitions et votre situation de
chasse ou de tir. Plusieurs chokes sont fournis avec votre fusil. Les chokes répertoriés ci-dessous sont également
disponibles comme accessoires. Souvenez-vous, les chokes Winchoke, «Invector» standard ou «Invector – plus»
ne sont pas interchangeables. Les chokes «Invector – plus» sont destinés aux fusils Winchester équipés de canons
suralésés uniquement. Avant l’enlèvement ou l’installation de chokes, ou la lecture du code avec encoches sur le
pourtour, assurez-vous que votre fusil est entièrement déchargé.
ENLÈVEMENT DU CHOKE
1. Placez la «sûreté» en position sécuritaire. Ouvrez toujours le mécanisme et assurez-vous que votre fusil est
complètement déchargé. Maintenez toujours la bouche du canon pointée dans une direction sécuritaire.
R I F L E S
a n d
s h o t g u n s
43
2. Utilisez la clé du choke pour dévisser le choke, en la tournant dans le sens contraire des aiguilles d’une montre.
Finissez de dévisser le choke avec vos doigts pour le faire sortir du canon.
INSTALLATION DU CHOKE
1. Placez la «sûreté» en position sécuritaire. Ouvrez toujours le mécanisme et assurez-vous que votre fusil est
complètement déchargé. Maintenez toujours la bouche du canon pointée dans une direction sécuritaire.
2. Avant l’installation d’un choke, effectuez une vérification des filets internes du choke à l’intérieur de la bouche du
canon ainsi que des filets situés sur le choke pour vous assurer de leur propreté. Lubrifiez légèrement les filets à
l’aide d’une huile légère de haute qualité pour armes à feu.
3. Avec vos doigts, vissez le choke approprié dans la bouche du canon, en introduisant d’abord l’extrémité filetée,
l’extrémité encochée se trouvant vers l’extérieur. Quand le choke devient serré au toucher, utilisez la clé fournie
avec le choke pour l’asseoir fermement.
FIGURE 12
Ressort magasin
Verrou
Percuteur
Ressort de percuteur
Culasse
Ecrou d’assemblage
Adaptateur « trois coups» Fond de magasin
du magasin (réducteur)
Tube-magasin
Carcasse
Double barre d’armement
Ensemble détente
Broche de l’ensemble détente
Garde-main
FIGURE 13
Après avoir enlevé la
broche, appuyez sur
la partie arrière de
l’ensemble détente
vers le haut pour
pouvoir enlever
celui-ci.
SUGGESTIONS DE NETTOYAGE ET D’ENTRETIEN ATTENTION !
VEUILLEZ S’IL VOUS PLAIT PRENDRE NOTE DE L’INFORMATION SUIVANTE AVANT DE NETTOYER VOTRE ARME
A FEU.
NETTOYAGE DES PIÈCES DOTÉES DE FINITIONS SPÉCIALES
Soyez extrêmement prudent en nettoyant des armes à feu dotées d’une finition camouflage, d’un revêtement DuraTouch® ainsi que d’autres finitions spéciales. Veillez toujours à ce que ces surfaces n’entrent pas en contact avec des
solvants de nettoyage, des dispositifs à récurer pour canon ou d’autres substances chimiques fortes. Il est préférable
de nettoyer lesdites surfaces à l’aide d’une huile légère pour armes à feu qui ne contient pas de solvants, ou à l’aide
d’un chiffon humide et d’un détergent de vaisselle doux (assurez-vous que l’eau ne pénètre pas à l’intérieur du
mécanisme). Lors du nettoyage de l’âme et du mécanisme de votre arme à feu, protégez les finitions externes pour
qu’elles n’entrent pas en contact avec les substances chimiques utilisées. Évitez également tout contact entre les
R I F L E S
a n d
s h o t g u n s
Français
Choke
Anneau Canon
Canon
44
finitions externes et toute autre substance chimique forte telle que celle présente dans les répulsifs contre les insectes
ayant une teneur en diéthyltoluamide, les écrans solaires, etc. Le dommage provoqué sur les finitions camouflage,
Dura-Touch et toute autre finition par les substances chimiques est irréversible et irréparable.
FIGURE 14
Positionnez l’ensemble verrou-culasse sur la double barre
d’armement.
FIGURE 15
Guidez soigneusement l’ensemble verrou-culasse sur la
double barre d’armement à l’intérieur de la carcasse.
PROCÉDURES DE NETTOYAGE
Votre SXP vous apportera un meilleur fonctionnement et une plus grande fiabilité sur une plus longue période
de temps s’il est entretenu correctement et gardé propre. Vous devriez procéder au nettoyage de votre fusil tous
les jours où vous tirez, et plus souvent encore s’il devient excessivement sale. Le canon devrait être nettoyé et le
mécanisme frotté et lubrifié après chaque jour de tir. Un entretien normal peut être effectué en gardant le canon
attaché à la carcasse (lubrification et écouvillonnage). Un nettoyage plus soigneux nécessite le démontage du canon
de la carcasse (nettoyage du canon). Un nettoyage complet nécessite le démontage de l’ensemble verrou-culasse et
de l’ensemble détente.
Si vous rencontrez un problème fonctionnel (mécanisme dur lors du mouvement de va-et-vient du garde-main),
effectuez d’office un nettoyage complet pour voir si cela résout le problème avant de demander les services d’un
armurier compétent.
1. Placez la «sûreté» en position sécuritaire. Ouvrez le mécanisme et inspectez la chambre et le magasin pour
vous assurer qu’ils ne contiennent pas de cartouches. Maintenez la bouche du canon pointée dans une
direction sécuritaire.
2 Démontez le canon tel qu’expliqué dans le paragraphe «Désassemblage».
3. Inspectez l’âme aux deux extrémités pour vérifier la présence de résidus de plomb et de plastique qui
subsistent souvent dans les âmes des canons et qui proviennent des bourres des cartouches dans les
cartouches modernes. Les résidus de plomb et de plastique apparaîtront sous forme de stries longitudinales
et sont généralement prédominantes près de la bouche et juste à l’avant de la chambre. Une quantité
normale de l’un ou de l’autre de ces deux résidus est habituelle et n’est pas grave en soi.
4. Si les résidus de plomb ou de plastique vous semblent excessifs, vous pouvez les enlever en brossant l’âme
à l’aide d’une brosse en laiton. Imbibez la brosse ou pulvérisez l’âme avec un solvant pour poudre pour
commencer. Récurez jusqu’à ce que l’âme soit propre. Pour éviter que les poils ne s’arrachent, enfoncez la
brosse complètement à chaque fois avant de la retirer en arrière.
5. Quand tous les résidus en plomb et en plastique sont enlevés, faites passer une flanelle propre et sèche à
travers l’âme. Ensuite, faites passer une flanelle légèrement imbibée d’huile.
6. Inspectez le canon et la chambre pour être certain qu’aucune flanelle n’y est restée par inadvertance. Retirez
toutes celles qui pourraient encore s’y trouver.
7. Réassemblez le fusil et frottez toutes les parties métalliques apparentes avec un chiffon imbibé d’huile, en
vous assurant de nettoyer toute trace de doigt où l’humidité pourrait s’accumuler. Tout résidu d’huile séché
dans la carcasse doit être aussi enlevé.
8. Lubrifiez alors votre arme à feu aux points indiqués en Figure 3. Une lubrification légère et régulière est
extrêmement importante pour le fonctionnement durable et fiable de votre fusil.
DÉSASSEMBLAGE PLUS POUSSÉ
L’un des avantages du SXP réside dans la possibilité de démonter le mécanisme pour le nettoyer. Dans des conditions
météorologiques très défavorables et des environnements sales, le simple fait de savoir que les pièces sont propres
et légèrement lubrifiées vous rendra plus sûr de vous lorsque vous tirez.
Assurez-vous que vous disposez d’un espace de travail propre pour y déposer les pièces au fur et à mesure de leur
désassemblage.
R I F L E S
a n d
s h o t g u n s
45
DÉMONTAGE DU CANON
1. Dévissez et enlevez l’écrou d’assemblage. Souvenez-vous, maintenez toujours la bouche du canon pointée dans
une direction sécuritaire.
2. Faites glisser le canon vers l’avant pour l’extraire de la carcasse et faire sortir l’anneau de canon par l’extrémité
avant du tube-magasin.
3. Revissez immédiatement l’écrou d’assemblage sur le tube-magasin en effectuant au moins trois tours complets.
DÉMONTAGE DE L’ENSEMBLE DÉTENTE
1. Assurez-vous que votre arme à feu est complètement déchargée ainsi qu’expliqué précédemment dans le
présent manuel.
2. Actionnez le mécanisme en tirant le garde-main en arrière et puis en le poussant en avant. Le chien sera ainsi
placé dans la position armé. Placez la «sûreté» en position sécuritaire.
3. Si l’ensemble du canon a été démonté, veillez à bien replacer l’écrou d’assemblage sur l’extrémité du tubemagasin pour éviter que le fond de magasin ne se détache de manière accidentelle.
4. Placez votre fusil avec le pontet vers le haut sur une surface adaptée qui protègera la finition de la carcasse et
la crosse.
5. Enlevez la broche de l’ensemble détente en la faisant sortir par le côté gauche de la carcasse, soit le côté
opposé à la fenêtre d’éjection. Pour ce faire, tout outil solide de diamètre plus petit que celui de la broche
et qui ne risque pas d’abîmer la finition peut convenir. Assurez-vous d’avoir l’outil et votre fusil bien en main
lorsque vous poussez la broche.
6. Faites sortir celle-ci suffisamment pour pouvoir l’attraper avec vos doigts. Achevez de l’extraire à la main. Si
vous n’arrivez pas à la retirer à la main, assurezvous que votre outil ou votre chasse-goupille est de diamètre
suffisamment petit que pour pouvoir faire sortir la broche complètement à l’extérieur sans abîmer le trou.
7. Une fois la broche enlevée, faites sortir l’ensemble détente de la carcasse en le soulevant vers le haut et en
tirant en arrière (figure 13).
DÉASSEMBLAGE DE L’ENSEMBLE VERROU-CULASSE
1. Enlevez le canon et l’ensemble détente comme expliqué ci-dessus sans toutefois replacer l’écrou
d’assemblage.
2. L’ensemble verrou-culasse étant attaché à la double barre d’armement, faites glisser le tout en avant pour
le faire sortir par l’avant de la carcasse. Veuillez noter qu’au moment où l’ensemble verrou-culasse traverse
la fenêtre d’éjection, une petite résistance peut se faire sentir au niveau du ressort de l’éjecteur. Si ceci se
produit, faites preuve de précaution.
ENLÈVEMENT DU PERCUTEUR
1. Désassemblez l’ensemble verrou-culasse du fusil comme expliqué précédemment.
2. Retournez l’ensemble verrou-culasse (côté plat au-dessus) et poussez la partie arrière du percuteur en avant
avec votre index. En maintenant ainsi le percuteur, soulevez la partie avant de la double barre d’armement
avec votre autre main et déplacez-la légèrement en avant.
3. Soulevez la double barre d’armement pour désengager la patte courbée de celle-ci hors de la rainure du
percuteur. Ceci détachera la double barre d’armement de l’ensemble verrou-culasse.
4. Le percuteur est soumis à la tension d’un ressort ; celui s’échappera de l’ensemble verrou-culasse dès qu’il ne
sera plus retenu par votre index. Faites attention à l’axe en retirant le percuteur et le ressort.
En ce qui concerne le nettoyage, un désassemblage plus poussé n’est ni nécessaire ni recommandé. Ne désassemblez
pas votre SXP au-delà de l’illustration indiquée à la figure 12. Le faire pourrait annuler votre garantie. Pour des
réparations qui nécessitent un désassemblage plus poussé, veuillez contacter votre centre d’entretien pour armes
Winchester ou un armurier compétent.
REMONTAGE DU PERCUTEUR ET DE L’ENSEMBLE VERROU-CULASSE
1. Réinstallez le ressort du percuteur autour du percuteur. N’importe quelle extrémité du ressort peut être placée en
premier lieu.
R I F L E S
a n d
s h o t g u n s
Français
Le démontage de l’ensemble détente est une autre procédure qu’il convient d’effectuer au cours de l’entretien de
votre fusil. Ce démontage est facile et permet de procéder au nettoyage et à l’entretien de votre fusil le cas échéant.
Lorsque l’ensemble détente et l’ensemble verrou-culasse sont enlevés, il est facile de nettoyer tous résidus ou toute
humidité qui sont susceptibles de s’accumuler dans la carcasse.
L’ensemble détente doit être démonté avant d’essayer de démonter l’ensemble verrou-culasse.
46
2. Introduire l’ensemble du percuteur et de son ressort dans l’ouverture arrière de l’ensemble verrou-culasse, en
faisant d’abord entrer l’axe du percuteur.
3. Pour replacer l’ensemble verrou-culasse sur la double barre d’armement, enfoncez l’extrémité ronde du percuteur
suffisamment loin dans le trou de la culasse de façon à ce que le grand espace entre l’extrémité à rainure et
l’épaulement du percuteur soit bien positionné au centre du trou rond de la culasse.
4. Placez la patte courbée située sur la barre d’armement dans l’espace entre l’extrémité ronde et l’épaulement du
percuteur et relâchez lentement la pression sur l’extrémité du percuteur. Laissez l’épaulement du percuteur tirer
la patte courbée vers l’arrière de l’ensemble verrou-culasse.
5. Enlevez l’écrou d’assemblage.
6. Tenez la double barre d’armement et l’ensemble verrou-culasse ensemble (figure 14). Faites glisser l’ensemble du
garde-main sur le tube-magasin.
7. Guidez soigneusement la double barre d’armement et l’ensemble verrou-culasse dans la partie avant de la
carcasse. Au moment où les ensembles entrent dans la carcasse, faites les glisser à fond en arrière (figure 15).
REMONTAGE DE L’ENSEMBLE DÉTENTE
1. L’ensemble verrou-culasse, la double barre d’armement et le garde-main doivent être attachés à la carcasse
avant de remonter l’ensemble détente.
2. Assurez-vous que le chien se trouve dans la position armé en le poussant tout droit en arrière jusqu’à sa butée
et que la «sûreté» est en position sécuritaire.
3. Retournez le fusil de façon à ce que la partie ouverte de la carcasse se situe vers le haut. Maintenez l’ensemble
détente à un angle d’environ 45 degrés par rapport à la carcasse et engagez ensuite les parties avant en saillie
de l’ensemble détente dans les logements correspondants de la gorge du magasin à l’extrémité avant de
l’ouverture de la carcasse, comme indiqué à la figure 13.
4. Introduisez soigneusement la partie avant de l’ensemble détente dans l’ouverture de la carcasse, abaissez
ensuite l’arrière dans l’ouverture de la carcasse jusqu’à ce que l’ensemble détente soit parallèle à la carcasse.
Il peut être nécessaire de faire glisser le garde-main dans différentes positions jusqu’à ce que l’ensemble
détente soit bien aligné dans la carcasse. Avec une installation correcte, le garde-main est bien en place et le
trou de la broche de l’ensemble détente est aligné.
5. Alignez l’ensemble détente sur le trou de la carcasse et poussez la broche de l’ensemble détente à travers la
carcasse pour l’aligner des deux côtés de la carcasse. La broche doit passer au travers facilement sans forcer.
Si une résistance significative se fait sentir, retirez l’ensemble détente et recommencez à partir de l’étape 1.
Votre arme à feu est maintenant complètement assemblée. Vérifiez immédiatement que la «sûreté» est en
position sécuritaire. Prenez le temps de frotter et de nettoyer toutes les surfaces externes comme expliqué
dans la section «Suggestions de nettoyage et d’entretien».
AUTRES SUGGESTIONS DE NETTOYAGE
Après des périodes étendues de grande utilisation, votre arme à feu devrait être portée chez un armurier qualifié
pour désassembler le mécanisme en vue d’un nettoyage et d’une lubrification professionnels.
PIÈCES, ENTRETIEN, RÉPARATIONS ET QUESTIONS
Si votre arme à feu Winchester devait jamais nécessiter un entretien ou une réparation, il est souvent préférable
d’utiliser l’un de nos centres de réparation agréés.
Dans certains cas, il est approprié de recourir à notre Département d’entretien de Winchester Repeating Arms.
Une liste des centres de réparation agréés vous a été livrée avec votre nouvelle arme à feu. Si vous avez besoin d’une
nouvelle liste, contactez-nous. Nous pouvons vous aider à déterminer le meilleur endroit pour effectuer l’entretien
de votre arme à feu.
Visitez : www.winchesterint.com
R I F L E S
a n d
s h o t g u n s
47
Instrucciones importantes relativas a la:
Escopeta de bomba
Winchester SXP
TM
Si desea hacernos la más mínima pregunta o comentarios respecto a su nueva arma de fuego, no
dude en escribirnos o llamarnos por teléfono. Por favor, utilice el espacio previsto a continuación
para registrar la información relativa a su nueva arma de fuego o www.winchesterint.com.
Modelo. . . . . . . . . . . . . . . . . . . . . . . . . . . . . . . . . . . . . . . . . . . . . . . . . . . . . . . . . . . . . . . . . . . . . . . . . . . . . . . . . . . . . . . . . . . . . . . . . . . . . . . . . . . . . . . . . . . . . . . . . . . . . . . . . . . . . . . . . .
Número de serie
. . . . . . . . . . . . . . . . . . . . . . . . . . . . . . . . . . . . . . . . . . . . . . . . . . . . . . . . . . . . . . . . . . . . . . . . . . . . . . . . . . . . . . . . . . . . . . . . . . . . . . . . . . . . . . . . . . . . . . . . . . .
Vendedor . . . . . . . . . . . . . . . . . . . . . . . . . . . . . . . . . . . . . . . . . . . . . . . . . . . . . . . . . . . . . . . . . . . . . . . . . . . . . . . . . . . . . . . . . . . . . . . . . . . . . . . . . . . . . . . . . . . . . . . . . . . . . . . . . . . . . .
Fecha de compra . . . . . . . . . . . . . . . . . . . . . . . . . . . . . . . . . . . . . . . . . . . . . . . . . . . . . . . . . . . . . . . . . . . . . . . . . . . . . . . . . . . . . . . . . . . . . . . . . . . . . . . . . . . . . . . . . . . . . . . . . .
Winchester es una marca registrada de Olin Corporation.
Página
Usted es el responsable de la seguridad de las armas de fuego . . . . . . . . . . . . . . . . . . . . . . . . . . . . . . . . . . . . . . . . . . . . . . . . . . . . . . . . . . . . . . . . 4
Descripción y funcionamiento . . . . . . . . . . . . . . . . . . . . . . . . . . . . . . . . . . . . . . . . . . . . . . . . . . . . . . . . . . . . . . . . . . . . . . . . . . . . . . . . . . . . . . . . . . . . . . . . . . . . . . . . . . 48
Nomenclatura . . . . . . . . . . . . . . . . . . . . . . . . . . . . . . . . . . . . . . . . . . . . . . . . . . . . . . . . . . . . . . . . . . . . . . . . . . . . . . . . . . . . . . . . . . . . . . . . . . . . . . . . . . . . . . . . . . . . . . . . . . . . . . . 48
Número de serie . . . . . . . . . . . . . . . . . . . . . . . . . . . . . . . . . . . . . . . . . . . . . . . . . . . . . . . . . . . . . . . . . . . . . . . . . . . . . . . . . . . . . . . . . . . . . . . . . . . . . . . . . . . . . . . . . . . . . . . . . . . . 48
Limpieza inicial y lubricación
. . . . . . . . . . . . . . . . . . . . . . . . . . . . . . . . . . . . . . . . . . . . . . . . . . . . . . . . . . . . . . . . . . . . . . . . . . . . . . . . . . . . . . . . . . . . . . . . . . . . . . . . . . . 48
Funcionamiento del «seguro»
. . . . . . . . . . . . . . . . . . . . . . . . . . . . . . . . . . . . . . . . . . . . . . . . . . . . . . . . . . . . . . . . . . . . . . . . . . . . . . . . . . . . . . . . . . . . . . . . . . . . . . . . . . 49
Montaje . . . . . . . . . . . . . . . . . . . . . . . . . . . . . . . . . . . . . . . . . . . . . . . . . . . . . . . . . . . . . . . . . . . . . . . . . . . . . . . . . . . . . . . . . . . . . . . . . . . . . . . . . . . . . . . . . . . . . . . . . . . . . . . . . . . . . . . 49
Desmontaje . . . . . . . . . . . . . . . . . . . . . . . . . . . . . . . . . . . . . . . . . . . . . . . . . . . . . . . . . . . . . . . . . . . . . . . . . . . . . . . . . . . . . . . . . . . . . . . . . . . . . . . . . . . . . . . . . . . . . . . . . . . . . . . . . . 50
Capacidad del cargador . . . . . . . . . . . . . . . . . . . . . . . . . . . . . . . . . . . . . . . . . . . . . . . . . . . . . . . . . . . . . . . . . . . . . . . . . . . . . . . . . . . . . . . . . . . . . . . . . . . . . . . . . . . . . . . . . . 51
Adaptador “tres disparos” (reductor) . . . . . . . . . . . . . . . . . . . . . . . . . . . . . . . . . . . . . . . . . . . . . . . . . . . . . . . . . . . . . . . . . . . . . . . . . . . . . . . . . . . . . . . . . . . . . . . . . . 51
Carga. . . . . . . . . . . . . . . . . . . . . . . . . . . . . . . . . . . . . . . . . . . . . . . . . . . . . . . . . . . . . . . . . . . . . . . . . . . . . . . . . . . . . . . . . . . . . . . . . . . . . . . . . . . . . . . . . . . . . . . . . . . . . . . . . . . . . . . . . . . 52
Disparar . . . . . . . . . . . . . . . . . . . . . . . . . . . . . . . . . . . . . . . . . . . . . . . . . . . . . . . . . . . . . . . . . . . . . . . . . . . . . . . . . . . . . . . . . . . . . . . . . . . . . . . . . . . . . . . . . . . . . . . . . . . . . . . . . . . . . . . 52
Descarga . . . . . . . . . . . . . . . . . . . . . . . . . . . . . . . . . . . . . . . . . . . . . . . . . . . . . . . . . . . . . . . . . . . . . . . . . . . . . . . . . . . . . . . . . . . . . . . . . . . . . . . . . . . . . . . . . . . . . . . . . . . . . . . . . . . . . . 53
Sistema de chokes intercambiables . . . . . . . . . . . . . . . . . . . . . . . . . . . . . . . . . . . . . . . . . . . . . . . . . . . . . . . . . . . . . . . . . . . . . . . . . . . . . . . . . . . . . . . . . . . . . . . . . . . 54
Sugerencias de limpieza y mantenimiento. . . . . . . . . . . . . . . . . . . . . . . . . . . . . . . . . . . . . . . . . . . . . . . . . . . . . . . . . . . . . . . . . . . . . . . . . . . . . . . . . . . . . . . . . . 55
Piezas, mantenimiento, reparaciones y preguntas. . . . . . . . . . . . . . . . . . . . . . . . . . . . . . . . . . . . . . . . . . . . . . . . . . . . . . . . . . . . . . . . . . . . . . . . . . . . . . . . . 58
Información en el sitio Web
. . . . . . . . . . . . . . . . . . . . . . . . . . . . . . . . . . . . . . . . . . . . . . . . . . . . . . . . . . . . . . . . . . . . . . . . . . . . . . . . . . . . . . . . . . . . . . . . . . . . . . . . . . . . . 58
R I F L E S
a n d
s h o t g u n s
Español
Sumario
48
DESCRIPCIÓN Y FUNCIONAMIENTO
DESCRIPCIÓN
Ninguna otra escopeta de bomba es más rápida que la escopeta Winchester SXP. La inercia debida al
retroceso contribuye al movimiento posterior de la corredera, facilitando con ello el movimiento de vaivén del
guardamanos. Descubrirá la impresionante velocidad del armado de bomba; en un momento habrá recargado
un cartucho en la recámara y estará listo para disparar una segunda vez. Esta velocidad hace toda la diferencia; le
permite disparar en continuo rápidamente, concentrándose al mismo tiempo en su objetivo, y no en el hecho de
rearmar su escopeta. Gracias a la concepción del cerrojo rotatorio de la SXP, los tetones del cerrojo se introducen
directamente en los alojamientos de la extensión del cañón. Se trata de una concepción de bloqueo sólida,
estable y fiable. Cada una de las características de la concepción de la SXP se combinan entre sí para convertirla
en lo que muchos ya consideran, la escopeta de bomba más fiable que está disponible en el mercado actual.
FUNCIONAMIENTO
La SXP es una escopeta de bomba que le permite cargar un cartucho accionando el mecanismo para expulsar
el cartucho vacío y desplazar un cartucho fresco del cargador lleno hacia la recámara. Esta operación puede
repetirse hasta que el cargador quede vacío.
También puede insertarse manualmente en la recámara un cartucho único.
CARACTERÍSTICAS DE LA ESCOPETA
contenidas en el presente manual. Tiene que acostumbrarse a su nueva arma de fuego y conocer el esfuerzo que
se requiere para accionar el mecanismo. Aprenda cómo debe accionarse el disparador, y sobre todo, sepa dónde
se encuentra y como funciona el “seguro”. Los procedimientos de desmontaje y funcionamiento de los distintos
componentes se explican a continuación en este manual. Por favor, léalos y estúdielos a fondo.
NOMENCLATURA
En la terminología armera clásica, la posición y el movimiento de las piezas de un arma de fuego se describen
tal y como se producen, manteniendo el arma de fuego horizontalmente y en una posición de tiro normal:
de este modo, la boca del cañón está delante o hacia adelante, la culata está situada detrás o hacia atrás, el
disparador está hacia abajo o debajo; la banda de mira está hacia arriba o arriba. Para la nomenclatura de las
piezas generales, por favor consulte la figura 1.
La SXP también se muestra desmontada hasta el punto necesario para seguir las instrucciones contenidas en el
presente manual (figura 12). La figura 2 abarca las características generales y las ventajas de concepción de la
SXP. En el presente manual de utilización, el término “mecanismo” hace referencia al mecanismo de la presente
escopeta que arrastra el cartucho hasta la recámara y lo mantiene allí.
NÚMERO DE SERIE
El número de serie se encuentra en el lateral izquierdo de la carcasa, justo por encima del guardamontes. Inscriba
este número al principio del presente manual de utilización como referencia ulterior.
LIMPIEZA INICIAL Y LUBRICACIÓN
¡ATENCIÓN! POR FAVOR TOME NOTA DE LA SIGUIENTE INFORMACIÓN ANTES DE LIMPIAR SU ARMA DE
FUEGO.
LIMPIEZA DE LAS PIEZAS QUE TIENEN ACABADOS ESPECIALES
Sea extremadamente prudente cuando limpie las armas de fuego que poseen un acabado oculto, un revestimiento
Dura-Touch® así como otros acabados especiales. Tenga siempre cuidado con que estas superficies no entren en
contacto con disolventes de limpieza, dispositivos de frotar para cañón u otras sustancias químicas fuertes. Es
preferible limpiar dichas superficies con aceite ligero para armas de fuego que no contenga disolventes, o con un
paño húmedo y un detergente de vajilla suave (vele porque el agua no penetre dentro el mecanismo). Durante la
limpieza del ánima y del mecanismo de su arma de fuego, proteja los acabados externos para que no entren en
contacto con las sustancias químicas utilizadas. Evite igualmente cualquier tipo de contacto entre los acabados
externos y cualquier otra sustancia química fuerte, tal y como aquella que se encuentra en los repulsivos contra
los insectos, los cuales contienen dietiltoluamida, las pantallas solares, etc. El daño provocado en los acabados
camuflaje, Dura-Touch y cualquier otro acabado por sustancias químicas es irreversible e irreparable.
R I F L E S
a n d
s h o t g u n s
49
Las distintas piezas metálicas de su nueva escopeta SXP se han revestido con un producto anticorrosión en
fábrica. Antes de disparar con su escopeta SXP, elimine el producto anticorrosión del interior del cañón, la
carcasa, el conjunto cerrojo-culata y las superficies del mecanismo y de la recámara. Un aceite ligero para armas
de fuego de alta calidad es ideal para eliminar este producto y lubricar su nueva arma por primera vez. Limpie
el cañón utilizando una baqueta de limpieza y una franela, tal y como se explica en la sección “Sugerencias de
limpieza y de mantenimiento”.
FIGURA 3
Tetones
Percutor
Cerrojo
Tubo-Cargador
Eyector
Lubrique ligeramente estos puntos.
Antes de proceder al montaje de su SXP, debería
en primer lugar frotar el mecanismo aplicando unas
gotas de aceite de calidad sobre las superficies
indicadas (figura 3).
Evite aplicar una excesiva cantidad de aceite. Solo
es necesaria una fina película de aceite. El aceite
superfluo debería frotarse, sobre todo en días fríos.
FUNCIONAMIENTO DEL “SEGURO”
Español
FIGURA 4FIGURA 5
El “seguro” mostrado en posición “con seguridad”.
El “seguro” mostrado en posición “sin seguridad”.
El “seguro”, constituido por un cerrojo transversal, se ha concebido para impedir que se accione el disparador
cuando el “seguro” está colocado en posición de seguridad. El “seguro” se encuentra delante del guardamontes
(figura 4). Cuando el «seguro» se encuentra en posición de seguridad, una banda roja de advertencia aparece en
el botón del «seguro» en el lateral izquierdo del guardamontes. Es crucial que usted se familiarice con el tacto,
la apariencia y el funcionamiento del «seguro» y la presente escopeta antes de intentar cargarla y utilizarla. Para
colocar el arma de fuego en posición de seguridad, empuje el botón de “seguridad” hacia la derecha (figura 4).
Para desplazar el «seguro» en posición sin seguridad, es decir la posición fuego, empuje el botón de “seguridad”
hacia la izquierda. Esta última operación deja aparecer la banda roja de advertencia del botón de “seguridad”
(figura 5).
Cuando el «seguro» se encuentra en posición de seguridad, el disparador y el gatillo están bloqueados y no
se puede disparar con la escopeta. En la posición sin seguridad, si su arma de fuego tiene un cartucho en la
recámara, el cartucho alojado automáticamente en la recámara puede dispararse mediante una simple presión
en el disparador.
MONTAJE
La escopeta SXP se suministra en su caja con el cañón desmontado y el guardamanos montado en el tubo-cargador.
1. Retire el cañón y el conjunto carcasa/culata de la caja y limpie y lubrique las dos mitades tal y.
2. Destornille la tuerca de montaje del tubo-cargador.
3. Su escopeta se le debería suministrar normalmente con el conjunto cerrojo-culata en posición cerrada (hacia
adelante) y el conjunto disparador ya montado en la carcasa. El cañón puede montarse cuando el mecanismo
está cerrado; no obstante, si lo entreabre el montaje resultará más fácil.
4. Desbloquee y abra el mecanismo empujando la palanca de desbloqueo, situada en la parte posterior del
guardamontes (figura 6), contra el lado izquierdo y tire del guardamanos hacia atrás.
5. Coja el cañón por delante del anillo de cañón.
6. Coloque el cañón sobre el tubo-cargador y alinearlo sobre él.
R I F L E S
a n d
s h o t g u n s
50
7. Deslice el cañón hacia atrás.
8. Guíe el anillo de cañón alrededor del tubo-cargador y la extensión del cañón en la carcasa. Cerciórese de que
el eyector está ajustado en su alojamiento en el cañón.
9. Entre el cañón haciéndolo retroceder en la carcasa hasta su tope posterior.
10. Ponga de nuevo inmediatamente la tuerca de montaje. Apriétela a mano (al menos tres vueltas completas)
para cerciorarse de que queda bien introducida.
FIGURA 6
Empuje la palanca de desbloqueo
para desbloquear el mecanismo.
DESMONTAJE
1. Empuje la palanca de desbloqueo situada en la parte posterior del guardamontes hacia el lado izquierdo (figura 6)
para desbloquear el mecanismo sin liberar el gatillo.
2. Abra el mecanismo y coloque el «seguro» en posición seguridad. (La banda roja de advertencia debe quedar oculta.)
3. Puesto que la boca del cañón está apuntada hacia una dirección de seguridad, destornille la tuerca de montaje y
retírela.
4. Coja el cañón por la parte delantera del anillo de cañón manteniendo al mismo tiempo la culata con la otra mano.
5. Tire del cañón hacia adelante para sacarlo de la carcasa. Saque el anillo de cañón del tubo-cargador. Es inútil forzar.
6. Vuelva a poner inmediatamente la tuerca de montaje y apriétela a mano efectuando al menos tres vueltas.
FIGURA 7FIGURA 8
Inserte el fondo del
cargador y dele
un cuarto de vuelta.
Mantenga el control del
resorte del cargador en el
momento en que retira el
fondo de cargador
FIGURA 9
Introduzca el cartucho
a fondo hacia la parte
delantera del cargador.
R I F L E S
a n d
s h o t g u n s
51
La manera más segura de bombear o de romper el cañón de un escopeta consiste en introducir un cartucho de
calibre más pequeño en una recámara cuyo calibre sea más grande. El cartucho de calibre más pequeño no caerá
completamente a través del cañón; su culatín queda sujeto en la parte delantera de la recámara de calibre mayor o
con el choke de calibre mayor. La escopeta efectuará un disparo incorrecto (con una recámara en apariencia vacía).
Entonces cabe la posibilidad de cargar un cartucho de calibre correcto detrás de un cartucho de calibre más pequeño.
Si dispara con la escopeta, el resultado obtenido será lo que se llama “el estallido 12-20, 20-28 ó 28-.410” que puede
provocar un deterioro significativo de su escopeta así como graves heridas posibles para usted o para los demás.
No podemos asumir ninguna responsabilidad para incidentes que ocurriesen a raíz de la utilización de cartuchos de
dimensión fuera de la norma o de aquellos que generan presiones superiores a las normas establecidas por el SAAMI
(Sporting Arms and Ammunition Manufacturers’ Institute).
Todas las escopetas actuales SXP de calibre 12 poseen una recámara de 3 «y se han concebido para disparar todos los
cartuchos cargados en fábrica de 2 ¾ «y 3 «, ya estén destinados al tiro deportivo o la caza. El cañón puede disparar
tanto cargas de plomo como de acero en toda seguridad. Los chokes para cañones rayados se han concebido para
disparar cartuchos con balas de tipo taco.
CAPACIDAD DEL CARGADOR
Cuando el adaptador (el reductor) de cargador de tres disparos está quitado, la escopeta puede contener hasta
cuatro cartuchos 2 ¾ «o tres cartuchos 3 «en el cargador. El cargador de alta capacidad de algunos modelos SXP
puede contener cinco cartuchos 2 ¾ «o cuatro cartuchos 3». En un lugar de tiro o en otro lugar adaptado para el tiro,
llene el cargador hasta su capacidad total para comprobar el número de cartuchos. Recuerde, la capacidad “total”
incluye un cartucho suplementario que puede colocarse en la recámara además de un cargador lleno.
La escopeta SXP se suministra con el adaptador “tres disparos” (reductor) instalado en el cargador, lo que limita así
la capacidad del cargador a dos cartuchos para responder a reglamentaciones federales americanas relativas a los
pájaros migratorios. Si no desea estar limitado a tres disparos cuando no sea una exigencia legal, puede desmontar
el adaptador “tres disparos”.
DESMONTAJE DEL ADAPTADOR “TRES DISPAROS” (REDUCTOR)
1. Destornille la tuerca de montaje y retírela.
2. El adaptador “tres disparos” del cargador se encuentra debajo del fondo del cargador y está sujeto a la tensión del
resorte de cargador. Utilice su dedo índice o un destornillador grande de hoja, empuje el fondo de cargador de
unos 2,5 cm aproximadamente (1 po) en el cargador y dele un cuarto de vuelta (figura 7).
3. El fondo del cargador está sujeto a la tensión del resorte de cargador. Mantenga el resorte del cargador bajo
control y retire cuidadosamente el fondo de cargador (figura 8). Retire el adaptador “tres disparos” (reductor) y
vuelva a colorar el fondo de cargador.
4. Alinee las ranuras presentes a lo largo del fondo de cargador con los resaltes interiores de tubo-cargador.
5. Vuelva a comprimir el resorte de cargador en el tubo-cargador.
6. Ponga de nuevo el fondo de cargador introduciéndolo en el tubo-cargador de 2,5 cm aproximadamente (1 Po) y
dándole un cuarto de vuelta para bloquearlo en la buena posición. Cerciórese de que el fondo de cargador quede
bloqueado en la buena posición.
7. Atornille la tuerca de montaje.
MONTAJE DEL ADAPTADOR “TRES DISPAROS” (REDUCTOR)
Si necesita volver a montar el adaptador “tres disparos” (el reductor) para limitar la capacidad del cargador de su
escopeta de dos cartuchos, efectúe la siguiente operación:
1. Destornille la tuerca de montaje y retírela.
2. Utilizando su dedo índice o un destornillador grande de hoja, empuje el fondo de cargador de unos 2,5 cm
aproximadamente (1 po) en el cargador y dele un cuarto de vuelta (figura 7).
3. El fondo del cargador está sujeto a la tensión del resorte de cargador. Mantenga el resorte del cargador bajo
control y retire cuidadosamente el fondo de cargador. Coloque el adaptador “tres disparos” (reductor) por encima
del resorte del cargador y vuelva a colocar el fondo del cargador.
4. Alinee las ranuras presentes a lo largo del fondo de cargador con los resaltes interiores del tubo-cargador.
5. Vuelva a comprimir el resorte de cargador y el adaptador “tres disparos” en el tubo-cargador.
6. Ponga de nuevo el fondo de cargador introduciéndolo en el tubo-cargador de 2,5 cm aproximadamente (1 Po) y
dándole un cuarto de vuelta para bloquearlo en la buena posición. Cerciórese de que el fondo de cargador quede
bloqueado en la buena posición.
7. Atornille la tuerca de montaje.
R I F L E S
a n d
s h o t g u n s
Español
ADAPTADOR “TRES DISPAROS” (REDUCTOR)
52
CARGA DEL CARGADOR
1. Coloque el «seguro» en posición de seguridad y cierre el mecanismo.
2. Introduzca el elevador en el agujero de carga con la parte delantera del cartucho (figura 9).
3. Empuje el culatín del cartucho e introdúzcalo dentro del cargador hasta que quede bloqueado por el
nivelador de cartucho.
4. Repita la operación hasta que el cargador esté completamente cargado.
FIGURA 10
Empuje el nivelador de cartucho para
liberar el cartucho siguiente del cargador.
CARGA DE LA RECÁMARA DESDE EL CARGADOR
1. Una vez cerrado el conjunto cerrojo-culata, introduzca el elevador con la parte delantera del cartucho y con su
pulgar, empuje el cartucho en el cargador hasta que el cartucho quede mantenido en su sitio por el nivelador de
cartucho.
2. Si lo desea continúe llenando el cargador, tal y como se explica más arriba, hasta su capacidad total.
3. Si el tiro es inminente, el cartucho quedará alojado automáticamente en la recamara empujando la palanca de
desbloqueo situada en la parte posterior del guardamontes en el lateral izquierdo y accionado el guardamanos.
Un cartucho se alimentará automáticamente del cargador en la recámara bajo la acción de cierre del conjunto
cerrojo-culata. Entonces, puede introducirse otro cartucho en el cargador para efectuar una carga hasta la
capacidad total.
CARGA DE LA RECÁMARA A TRAVÉS DE LA VENTANA DE EYECCIÓN
1. Empuje la palanca de desbloqueo situada en la parte posterior del guardamontes en el lateral izquierdo.
Esto liberará el mecanismo, pero no por ello el gatillo. Empuje el guardamanos a fondo hacia atrás. Efectúe
una inspección visual de la recámara, del mecanismo de alimentación y del cargador con el fin de estar
absolutamente seguro que están descargados y libres de cualquier tipo de obstrucción.
2. Introduzca un cartucho de calibre y longitud correctos por la ventana de eyección en la culata abierta.
3. A continuación, empuje el guardamanos a fondo.
4. Si lo desea, continúe llenado el cargador, tal y como se explica más arriba, hasta su capacidad total.
DISPARAR
1. Coloque el «seguro» en posición de seguridad.
2. Cargue un cartucho en la recámara como se explicó anteriormente.
3. Puesto que el cartucho se encuentra en la recámara, basta simplemente con que empuje el seguro hacia la
posición sin seguridad para disparar con la escopeta.
4. Cuando está listo para disparar, desplace el «seguro» hacia la posición sin seguridad, apunte y presione el
disparador.
5. Si desea seguir disparando, tire el guardamanos a fondo hacia atrás hasta que el cartucho percutido sea
eyectado por la ventana de eyección.
6. Empuje el guardamanos a fondo hacia adelante para que el cartucho fresco del cargador quede alojado
automáticamente en la recámara.
Su SXP está lista para disparar. Coloque inmediatamente el “seguro” en posición de seguridad (es decir con la
banda roja oculta) hasta que usted esté listo para disparar.
R I F L E S
a n d
s h o t g u n s
53
una muesca
tres muescas
cinco muescas
dos muescas
cuatro muescas
sin muesca
MUESCAS EN LA
DISPERSIÓN CON UN TIRO
DISPERSIÓN CON UN TIRO
EXTREMIDAD
DE PLOMO
DE ACERO
ALARGA
EXTRA FULL
**
I
FULL
*
II
MEJORA MODIFICADA 3/4
FULL 1
III
MODIFICADA 1/2
FULL 1
IIII
MEJORA CILÍNDRICA 1/4
MODIFICADA 1/2
IIIII
SKEET
MEJORA CILÍNDRICA 1/4
SIN MUESCA
CILÍNDRICA
CILÍNDRICA
* No utilizar con tiros de acero. La utilización de un choke demasiado prieto en el momento del tiro de acero producirá una
dispersión “estallada” poco eficaz.
** Especial extra completo, extendido con agujeros de respiradero. No utilizar para el tiro de acero.
1
Cuando se han catalogado varias menciones de chokage para una dispersión dada para el tiro de acero, utilice el
estrangulamiento más abierto catalogado para cargas de acero de tamaño mayor a gran velocidad.
DESCARGA ACCIONANDO EL MECANISMO
Siga el procedimiento siguiente para descargar los cartuchos de la recámara y del cargador en todos los modelos SXP.
1. Coloque el «seguro» en posición de seguridad.
2. Empuje la palanca de desbloqueo para liberar el mecanismo (figura 6).
3. Accione el guardamanos efectuando un movimiento de vaivén y repita esta operación hasta que todos los
cartuchos del cargador hayan sido transferidos a la recámara para eyectarlos a continuación.
4. Cuando el último cartucho del cargador ha sido transferido a la recámara y expulsado por la ventana de eyección,
deje el mecanismo abierto.
5. Con ayuda de su dedo índice, toque la entrada del cargador para cerciorarse de que ningún cartucho permaneció
en el cargador.
DESCARGA A PARTIR DEL CARGADOR
Los cartuchos también pueden descargarse del cargador según el siguiente procedimiento:
1. Coloque el «seguro» en posición de seguridad, cerciórese de que el mecanismo está cerrado y mantenga la
boca del cañón en una dirección de seguridad.
R I F L E S
a n d
s h o t g u n s
Español
FIGURA 11
54
2. Dele la vuelta a la escopeta para que el guardamontes quede hacia arriba, luego baje el elevador tan lejos
como pueda.
3. Empuje el nivelador de cartucho hacia el interior para liberar un cartucho del cargador (figura 10). Pulse de
nuevo el nivelador de cartucho para sacar el cartucho siguiente. El nivelador de cartucho está situado en el
lado derecho de la cavidad de la ventana de eyección. Cuando un cartucho se encuentra en el cargador, el
nivelador de cartucho reposa en la parte metálica del cartucho.
4. Con el «seguro» siempre en posición de seguridad, dele la vuelta al arma hasta su posición de tiro normal.
Pulse la palanca de desbloqueo y tire el guardamanos a fondo hacia atrás para retirarlo del cartucho de la
recámara.
SISTEMA DE CHOKES INTERCAMBIABLES
Todos los cañones de escopetas SXP (con excepción de los modelos Defender) han sido aterrajados para
aceptar el sistema Choke “Invector-plusTM”. Los chokes WinChoke®, “InvectorTM” standard o “Invector - plus” no son
intercambiables. Compruebe el sistema choke de su escopeta mirando el lado derecho del cañón donde están
inscritas las especificaciones, allí donde se encuentran normalmente los marcados de estrangulamiento.
El estrechamiento de choke está indicado en dos lugares en el choke: en el lado del choke, e indicado por medio de
un código con muescas en el extremo superior del choke. La llave universal proporcionada y destinada al choke se
utiliza para retirar e instalar los chokes.
Los chokes “Invector” standard e “Invector - plus” son compatibles con las municiones que fueron cargadas en fábrica
de acuerdo con las especificaciones SAAMI, incluidas las cargas de plomo Magnum y las cargas de acero, los tacos y
las balas para escopetas.
Tubos y llaves de recambio suplementarios se encuentran disponibles en su minorista de rifles y escopetas
Winchester, o contactando al departamento clientela de Winchester Repeating Arms. Ver página 58 para la
información de contacto.
SELECCIÓN DEL CHOKE
Con el fin de ayudarle a elegir el choke adaptado a cada situación de caza y de tiro, todos los chokes “Invector - plus”
están identificados en el lateral con las dispersiones que producen para un tiro de plomo y de acero.
Cada choke “Invector” posee también muescas situadas en la extremidad superior del chokes (figura 11).
Dichas muescas constituyen un código que le permite determinar la identificación del estrangulamiento una vez
que se ha instalado el choke. Las muescas del perímetro se refieren especialmente al tiro de plomo. Utilice las tablas
para establecer la referencia entre el plomo y el acero y para determinar los chokes apropiados a sus municiones y
su situación de caza o tiro.
Se proporcionan varios chokes con su escopeta. Los chokes catalogados a continuación están disponibles igualmente
como accesorios. Recuerde que los chokes Winchoke, “Invector” standard o “Invector - plus” no son intercambiables.
Los chokes “Invector - plus” se destinan a las escopetas Winchester equipadas de cañones cromados únicamente.
Antes de quitar o instalar los chokes, o la lectura del código con muescas en el perímetro, cerciórese de que su
escopeta está completamente descargada.
QUITAR EL CHOKE
1. Coloque el «seguro» en posición de seguridad. Abra siempre el mecanismo y cerciórese de que su escopeta está
completamente descargada. Mantenga siempre la boca del cañón apuntada hacia una dirección de seguridad.
INSTALAR EL CHOKE
1. Coloque el «seguro» en posición de seguridad. Abra siempre el mecanismo y cerciórese de que su escopeta está
completamente descargada. Mantenga siempre la boca del cañón apuntada hacia una dirección de seguridad.
2. Antes de instalar un choke, compruebe las rayitas internas del choke dentro de la boca del cañón así como las
rayitas situadas en el choke para cerciorarse de que están limpias. Lubrique ligeramente las rayitas con un aceite
ligero de alta calidad para armas de fuego.
3. Con sus dedos, atornille el choke apropiado en la boca del cañón, introduciendo en primer lugar la extremidad
aterrajada, la extremidad con muesca se encuentra hacia el exterior. Cuando el choke resulta prieto al tacto,
utilice la llave proporcionada con el choke para asentarlo firmemente.
R I F L E S
a n d
s h o t g u n s
55
FIGURA 12
Choke
Anillo Cañón
Cañón
Resorte cargador
Cerrojo
Percutor
Culata
Resorte de percutor
Tuerca de montaje
Adaptador “tres disparos” delFondo de cargador
cargador (reductor)
Tubo-cargador
Carcasa
Doble barra de armar
Conjunto disparador
Pasador del conjunto
disparador
Guardamanos
FIGURA 13
Español
Después de haber
retirado el pasador,
pulse la parte posterior
del conjunto disparador
hacia arriba para
poder retirarlo.
SUGERENCIAS DE LIMPIEZA Y MANTENIMIENTO ¡ATENCIÓN!
POR FAVOR TOME NOTA DE LA SIGUIENTE INFORMACIÓN ANTES DE LIMPIAR SU ARMA DE FUEGO.
LIMPIEZA DE LAS PIEZAS QUE POSEEN ACABADOS ESPECIALES
Sea extremadamente prudente cuando limpie las armas de fuego que tienen un acabado versión camuflaje, con
un revestimiento Dura-Touch® así como otros acabados especiales. Vele siempre porque estas superficies no entren
en contacto con disolventes de limpieza, dispositivos de rascar para cañón u otras fuertes sustancias químicas. Es
preferible limpiar dichas superficies con un aceite ligero para armas de fuego que no contenga disolventes, o con
un paño húmedo y un detergente de vajilla suave (cerciórese de que el agua no penetre dentro del mecanismo).
Durante la limpieza del ánima y del mecanismo de su arma de fuego, proteja los acabados externos para que no
entren en contacto con las sustancias químicas utilizadas. Evite también todo tipo de contacto entre los acabados
externos y cualquier otra sustancia química fuerte tal y como la que se encuentra en los repulsivos contra los insectos,
los cuales contienen dietiltoluamida, las pantallas solares,
etc. El daño causado sobre los acabados camuflaje, Dura-Touch y cualquier otro acabado por las sustancias químicas
es irreversible e irreparable.
FIGURA 14 FIGURA 15
Coloque el conjunto cerrojo-culata en la doble barra de armado
R I F L E S
Guíe cuidadosamente el conjunto cerrojo-culata por la
doble barra de armar en el interior de la carcasa.
a n d
s h o t g u n s
56
PROCEDIMIENTOS DE LIMPIEZA
Su SXP le aportará un mejor funcionamiento y una mayor fiabilidad durante un largo período de tiempo si la mantiene
correctamente y la guarda limpia. Deberá limpiar la escopeta todos los días que la emplee, y más a menudo si se
ensucia excesivamente. Deberá limpiarse el cañón y frotarse y lubricarse el mecanismo después de cada día de tiro.
Un mantenimiento normal puede efectuarse guardando el cañón sujeto a la carcasa (lubricación y limpieza con un
escobillón). Una limpieza más meticulosa requiere que se desmonte el cañón de la carcasa (limpieza del cañón). Una
limpieza completa requiere que se desmonte el conjunto cerrojo-culata y el conjunto disparador.
Si se enfrenta con un problema funcional (mecanismo duro en el movimiento de vaivén del guardamanos), efectúe
sistemáticamente una limpieza completa para ver si eso soluciona el problema antes de solicitar los servicios
del centro de mantenimiento para armas Winchester más cercano de su domicilio, de nuestro departamento de
mantenimiento de Winchester o de un armero competente.
1. Coloque el «seguro» en posición de seguridad. Abra el mecanismo y examine la recámara y el cargador
para cerciorarse de que no contienen cartuchos. Mantenga la boca del cañón apuntada hacia una dirección
segura.
2. Desmonte el cañón como se explica en el apartado “Desmontaje ”.
3. Examine el ánima en ambas extremidades para comprobar si quedan residuos de plomo y de plástico que
subsisten a menudo en las ánimas de los cañones y que proceden de los tacos de los cartuchos modernos.
Los residuos de plomo y de plástico aparecerán en forma de estrías longitudinales y son generalmente
predominantes cerca de la boca y justo delante de la recámara. Una cantidad normal de uno u otro de estos
residuos es habitual y no es grave de por sí.
4. Si los residuos de plomo o plástico le parecen excesivos, puede retirarlos cepillando el ánima con un cepillo
de latón. Empape el cepillo o pulverice el ánima con un disolvente para polvo para comenzar. Friegue hasta
que el ánima quede limpia Para evitar que no se arranquen los filamentos, introducir cada vez el cepillo
completamente antes de retirarlo hacia atrás.
5. Cuando todos los residuos de plomo y de plástico se hayan retirado, pase una franela limpia y seca a través
del ánima. A continuación, pase una franela ligeramente empapada de aceite.
6. Examine el cañón y la recámara para cerciorarse de que no se quedó por descuido ninguna franela. Retire
todas aquellas que hubieran podido quedarse.
7. Vuelva a montar la escopeta y frote todas las piezas metálicas aparentes con un paño empapado de aceite,
cerciorándose de limpiar todas las huellas de los dedos donde la humedad hubiera podido acumularse.
Deberá retirarse igualmente todo residuo de aceite de la carcasa.
8. Lubrique entonces su arma de fuego en los puntos indicados. Una lubricación ligera y regular es
extremadamente importante para el funcionamiento duradero y fiable de su escopeta.
DESMONTAJE MÁS AVANZADO
Una de las ventajas de la SXP reside en la posibilidad de desmontar el mecanismo para limpiarlo. En condiciones
meteorológicas muy desfavorables y medio ambiente sucio, el simple hecho de saber que las piezas están limpias y
ligeramente lubricadas le aportará seguridad cuando dispare. Cerciórese de que dispone de un espacio de trabajo
limpio para depositar las piezas a medida que las va desmontando (figura 12).
DESMONTAJE DEL CAÑÓN
1. Destornille y retire la tuerca de montaje. Recuerde, mantenga siempre la boca del cañón apuntada hacia una
dirección segura.
2. Deslice el cañón hacia adelante para extraerlo de la carcasa y sacar el anillo de cañón por la extremidad anterior
del tubo-cargador.
3. Vuelva a atornillar inmediatamente la tuerca de montaje sobre el tubo-cargador efectuando al menos tres
vueltas completas.
DESMONTAJE DEL CONJUNTO DISPARADOR
El desmontaje del conjunto disparador es otro procedimiento que conviene efectuar durante el mantenimiento de
su escopeta. Este desmontaje es fácil y permite limpiar y mantener su escopeta cuando proceda. Cuando se retira el
conjunto disparador y el conjunto cerrojo-culata, resulta fácil limpiar todos los residuos o la humedad que hubiera
podido acumularse en la carcasa. El conjunto disparador debe desmontarse antes de intentar desmontar el conjunto
cerrojo-culata.
1. Cerciórese de que su arma de fuego está completamente descargada así como se explicó anteriormente en
el presente manual.
2. Accione el mecanismo tirando del guardamanos hacia atrás y luego pulsando hacia adelante. De este modo,
el gatillo se colocará así en posición armada. Coloque el «seguro» en posición de seguridad.
R I F L E S
a n d
s h o t g u n s
57
3. Si se desmontó el conjunto del cañón, vele por instalar de nuevo debidamente la tuerca de montaje en la
extremidad del tubo cargador para evitar que se suelte de manera accidental el fondo del cargador .
4. Coloque su escopeta con el guardamontes hacia arriba sobre una superficie adaptada que protegerá el
acabado de la carcasa y la culata.
5. Retire el pasador del conjunto disparador sacándolo por el lado izquierdo de la carcasa, es decir el lado
opuesto a la ventana de eyección. Para ello, puede convenir cualquier herramienta sólida con un diámetro
más pequeño que el del pasador y que no corre el riesgo de estropear el acabado. Cerciórese de sujetar
debidamente la herramienta y su escopeta cuando empuja el pasador.
6. Saque el pasador lo suficiente para poder cogerlo con sus dedos. Acabe extrayéndolo con la mano. Si no
consigue retirarlo con la mano, cerciórese de que se herramienta o su extractor de escobillón tengan el
diámetro suficientemente pequeño para poder sacar el pasador completamente al exterior sin estropear el
agujero.
7. Una vez que se haya retirado el pasador, saque el conjunto disparador de la carcasa levantándolo hacia arriba
y tirando hacia atrás (figura 13). ards and pulling it backwards (Figure 13).
DESMONTAJE DEL CONJUNTO CERROJO-CULATA
RETIRAR EL PERCUTOR
1. Desmonte el conjunto cerrojo-culata de la escopeta como se explicó anteriormente.
2. De la vuelta al conjunto cerrojo-culata (lado plano encima) y empuje seguidamente la parte posterior del
percutor con su dedo índice. Manteniendo así el percutor, levante la parte delantera de la doble barra de
armado con la otra mano y desplácela ligeramente hacia adelante.
3. Levante la doble barra de armado para liberar su brida curvada fuera de la ranura del percutor. Esto soltará la
doble barra de armado del conjunto cerrojo-culata.
4. El percutor está sujeto a la tensión de un resorte; éste se escapará del conjunto cerrojo-culata en cuanto ya
no esté retenido por su dedo índice. Tenga cuidado con el eje cuando retire el percutor y el resorte.
En lo que se refiere a la limpieza, no es necesario ni se recomienda desmontar más la escopeta. No desmonte su SXP
más de lo que se indica en la ilustración de la figura 12. Si lo hiciera, se podría cancelar su garantía. Para reparaciones
que necesitaran desmontarla más, contacte su centro de mantenimiento para armas Winchester o a un armero
competente, como se indica en el capítulo “Piezas, mantenimiento, reparaciones y preguntas” .
VOLVER A MONTAR EL PERCUTOR Y EL CONJUNTO CERROJO-CULATA
1. Reinstale el resorte del percutor alrededor del percutor. Puede colocarse en primer lugar cualquiera de las
extremidades del resorte.
2. Introducir el conjunto del percutor y de su resorte en la abertura posterior del conjunto cerrojo-culata,
introduciendo en primer lugar el eje del percutor.
3. Para colocar de nuevo el conjunto cerrojo-culata sobre la doble barra de armado, introducir la extremidad
redonda del percutor lo suficientemente lejos en el agujero de la culata, de modo que el gran espacio entre la
extremidad de surco y el saliente del percutor esté bien colocada en el centro del agujero redondo de la culata.
4. Coloque la brida curvada situada en la barra de armado en el espacio entre la extremidad redonda y el saliente
de percutor y suelte lentamente la presión en la extremidad del percutor. Deje que el saliente del percutor tire de
la brida curvada hacia atrás del conjunto cerrojo-culata.
5. Retire la tuerca de montaje.
6. Mantenga la doble barra de armado y el conjunto cerrojo-culata juntos (figura 14). Deslice el conjunto del
guardamanos sobre el tubo-cargador.
7. Guíe cuidadosamente la doble barra de armado y el conjunto cerrojo-culata hacia la parte delantera de la carcasa.
En el momento en que los conjuntos entran en la carcasa, deslícelos a fondo hacia atrás (figura 15).
VOLVER A MONTAR EL CONJUNTO DISPARADOR
1. El conjunto cerrojo-culata, la doble barra de armado y el guardamanos deben sujetarse a la carcasa antes de
volver a montar el conjunto disparador.
2. Cerciórese de que el gatillo se encuentra en la posición armada empujándolo recto hacia atrás hasta el tope
R I F L E S
a n d
s h o t g u n s
Español
1. Retire el cañón y el conjunto disparador como se explica más arriba sin por ello poner de nuevo la tuerca de
montaje.
2. Puesto que el conjunto cerrojo-culata está sujeto a la doble barra de armado, deslice todo ello hacia adelante
para sacarlo por la parte delantera de la carcasa. Sírvase tener en cuenta que en el momento en que el
conjunto cerrojo-culata atraviesa la ventana de eyección, puede producirse una pequeña resistencia a nivel
del resorte del eyector. Si esto se produce, sea prudente.
58
y que el “seguro” esté en posición de seguridad.
3. Dele la vuelta a la escopeta de modo que la parte abierta de la carcasa se sitúe hacia arriba. Mantenga el
conjunto disparador a un ángulo de 45 grados aproximadamente con relación a la carcasa e introduzca a
continuación las partes delanteras en saliente del conjunto disparador en los alojamientos correspondientes
de la ranura del cargador en la extremidad delantera de la abertura de la carcasa, tal y como se indica en la
figura 13.
4. Introduzca cuidadosamente la parte delantera del conjunto disparador en la abertura de la carcasa, a
continuación baje la parte posterior en la abertura de la carcasa hasta que el conjunto disparador quede
paralelo a la carcasa. Puede ser necesario deslizar el guardamanos en distintas posiciones hasta que el
conjunto disparador quede bien alineado en la carcasa. Con una instalación correcta, el guardamanos queda
bien en su sitio y el agujero del pasador del conjunto disparador está alineado.
5. Alinee el conjunto disparador en el agujero de la carcasa y empuje el pasador del conjunto disparador a
través de la carcasa para alinearlo por ambos lados de la carcasa.
El pasador debe pasar a través fácilmente sin forzar. Si se constatase una resistencia significativa, retire el
conjunto disparador y vuelva a comenzar a partir de la etapa 1.
Su arma de fuego ya está ahora completamente montada. Compruebe inmediatamente que el «seguro» esté
en posición de seguridad. Dedique un tiempo a frotar y limpiar todas las superficies externas tal y como se
explica en la sección “Sugerencias de limpieza y mantenimiento” .
OTRAS SUGERENCIAS DE LIMPIEZA
Después de amplios períodos de gran utilización, su arma de fuego debería llevarse a un armero cualificado para
desmontar el mecanismo con el fin de limpiarlo y lubricarlo de manera profesional.
PIEZAS, MANTENIMIENTO, REPARACIONES Y PREGUNTAS
Si su arma de fuego Winchester llegara a necesitar un mantenimiento o una reparación, a menudo es preferible
utilizar uno de nuestros centros de reparación homologados.
En algunos casos, es conveniente recurrir a nuestro Departamento de mantenimiento de Winchester Repeating Arms.
Con su nueva arma de fuego se le entregó una lista con los centros de reparación homologados. Si necesita una
nueva lista, contáctenos. Podemos ayudarle a determinar el mejor lugar para efectuar el mantenimiento de su arma
de fuego.
Visite: www.winchesterint.com
R I F L E S
a n d
s h o t g u n s
59
Importanti istruzioni relative al:
Fucile a pompa
Winchester SXP
TM
Se avete la minima domanda o dei commenti a proposito della vostra nuova arma da fuoco, non
esitate a scriverci o a telefonarci. Siete pregati di utilizzare lo spazio previsto qui sotto per registrare
l’informazione riguardante la vostra nuova arma da fuoco o www.winchesterint.com.
Modello. . . . . . . . . . . . . . . . . . . . . . . . . . . . . . . . . . . . . . . . . . . . . . . . . . . . . . . . . . . . . . . . . . . . . . . . . . . . . . . . . . . . . . . . . . . . . . . . . . . . . . . . . . . . . . . . . . . . . . . . . . . . . . . . . . . . . . . . .
Numero dì serie
. . . . . . . . . . . . . . . . . . . . . . . . . . . . . . . . . . . . . . . . . . . . . . . . . . . . . . . . . . . . . . . . . . . . . . . . . . . . . . . . . . . . . . . . . . . . . . . . . . . . . . . . . . . . . . . . . . . . . . . . . . . .
Venditore . . . . . . . . . . . . . . . . . . . . . . . . . . . . . . . . . . . . . . . . . . . . . . . . . . . . . . . . . . . . . . . . . . . . . . . . . . . . . . . . . . . . . . . . . . . . . . . . . . . . . . . . . . . . . . . . . . . . . . . . . . . . . . . . . . . . . .
Data d’acquisto . . . . . . . . . . . . . . . . . . . . . . . . . . . . . . . . . . . . . . . . . . . . . . . . . . . . . . . . . . . . . . . . . . . . . . . . . . . . . . . . . . . . . . . . . . . . . . . . . . . . . . . . . . . . . . . . . . . . . . . . . . . . .
Winchester è una marca depositata di Olin Corporation.
Indice Pagina
Siete il responsabile della sicurezza delle armi da fuoco
. . . . . . . . . . . . . . . . . . . . . . . . . . . . . . . . . . . . . . . . . . . . . . . . . . . . . . . . . . . . . . . . . . . . . . . 5
Descrizione e funzionamento . . . . . . . . . . . . . . . . . . . . . . . . . . . . . . . . . . . . . . . . . . . . . . . . . . . . . . . . . . . . . . . . . . . . . . . . . . . . . . . . . . . . . . . . . . . . . . . . . . . . . . . . . 60
Numero di serie . . . . . . . . . . . . . . . . . . . . . . . . . . . . . . . . . . . . . . . . . . . . . . . . . . . . . . . . . . . . . . . . . . . . . . . . . . . . . . . . . . . . . . . . . . . . . . . . . . . . . . . . . . . . . . . . . . . . . . . . . . . 60
Pulizia iniziale e lubrificazione . . . . . . . . . . . . . . . . . . . . . . . . . . . . . . . . . . . . . . . . . . . . . . . . . . . . . . . . . . . . . . . . . . . . . . . . . . . . . . . . . . . . . . . . . . . . . . . . . . . . . . . . 60
Funzionamento della “sicura”. . . . . . . . . . . . . . . . . . . . . . . . . . . . . . . . . . . . . . . . . . . . . . . . . . . . . . . . . . . . . . . . . . . . . . . . . . . . . . . . . . . . . . . . . . . . . . . . . . . . . . . . . . 61
Assemblaggio. . . . . . . . . . . . . . . . . . . . . . . . . . . . . . . . . . . . . . . . . . . . . . . . . . . . . . . . . . . . . . . . . . . . . . . . . . . . . . . . . . . . . . . . . . . . . . . . . . . . . . . . . . . . . . . . . . . . . . . . . . . . . 61
Smontaggio . . . . . . . . . . . . . . . . . . . . . . . . . . . . . . . . . . . . . . . . . . . . . . . . . . . . . . . . . . . . . . . . . . . . . . . . . . . . . . . . . . . . . . . . . . . . . . . . . . . . . . . . . . . . . . . . . . . . . . . . . . . . . . . 62
Capacità del serbatoio . . . . . . . . . . . . . . . . . . . . . . . . . . . . . . . . . . . . . . . . . . . . . . . . . . . . . . . . . . . . . . . . . . . . . . . . . . . . . . . . . . . . . . . . . . . . . . . . . . . . . . . . . . . . . . . . . . 63
Adattatore “tre colpi” (riduttore)
. . . . . . . . . . . . . . . . . . . . . . . . . . . . . . . . . . . . . . . . . . . . . . . . . . . . . . . . . . . . . . . . . . . . . . . . . . . . . . . . . . . . . . . . . . . . . . . . . . . . .
63
Caricamento . . . . . . . . . . . . . . . . . . . . . . . . . . . . . . . . . . . . . . . . . . . . . . . . . . . . . . . . . . . . . . . . . . . . . . . . . . . . . . . . . . . . . . . . . . . . . . . . . . . . . . . . . . . . . . . . . . . . . . . . . . . . . . . 64
Innesco
. . . . . . . . . . . . . . . . . . . . . . . . . . . . . . . . . . . . . . . . . . . . . . . . . . . . . . . . . . . . . . . . . . . . . . . . . . . . . . . . . . . . . . . . . . . . . . . . . . . . . . . . . . . . . . . . . . . . . . . . . . . . . . . . . . . . .
65
Scaricamento . . . . . . . . . . . . . . . . . . . . . . . . . . . . . . . . . . . . . . . . . . . . . . . . . . . . . . . . . . . . . . . . . . . . . . . . . . . . . . . . . . . . . . . . . . . . . . . . . . . . . . . . . . . . . . . . . . . . . . . . . . . . . . 66
Sistema di strozzatori intercambiabili
. . . . . . . . . . . . . . . . . . . . . . . . . . . . . . . . . . . . . . . . . . . . . . . . . . . . . . . . . . . . . . . . . . . . . . . . . . . . . . . . . . . . . . . . . . . . . .
Alcuni suggerimenti per la pulizia e la manutenzione
. . . . . . . . . . . . . . . . . . . . . . . . . . . . . . . . . . . . . . . . . . . . . . . . . . . . . . . . . . . . . . . . . . . . . . . . .
66
67
Pezzi, manutenzione, riparazioni e domande . . . . . . . . . . . . . . . . . . . . . . . . . . . . . . . . . . . . . . . . . . . . . . . . . . . . . . . . . . . . . . . . . . . . . . . . . . . . . . . . . . . . 70
Informazioni sul sito Internet . . . . . . . . . . . . . . . . . . . . . . . . . . . . . . . . . . . . . . . . . . . . . . . . . . . . . . . . . . . . . . . . . . . . . . . . . . . . . . . . . . . . . . . . . . . . . . . . . . . . . . . . . 70
R I F L E S
a n d
s h o t g u n s
Italiano
Nomenclatura . . . . . . . . . . . . . . . . . . . . . . . . . . . . . . . . . . . . . . . . . . . . . . . . . . . . . . . . . . . . . . . . . . . . . . . . . . . . . . . . . . . . . . . . . . . . . . . . . . . . . . . . . . . . . . . . . . . . . . . . . . . . . 60
60
DESCRIZIONE E FUNZIONAMENTO
DESCRIZIONE
Non esiste un fucile a pompa più rapido del fucile Winchester SXP. L’inerzia dovuta al rinculo contribuisce al
movimento all’indietro del carrello e facilita il movimento va e vieni dell’astina. Scoprirete la velocità straordinaria
dell’armamento a pompa; in un istante avrete ricaricato una cartuccia nella camera di scoppio e sarete pronti
a sparare un secondo colpo. Una tale velocità fa la differenza; essa vi permette, allo stesso tempo, di sparare
rapidamente colpo dopo colpo e di concentrarvi sul vostro bersaglio, senza dover pensare a riarmare il vostro
fucile.
Grazie alle caratteristiche dell’otturatore rotante del SXP, i tenoni dell’otturatore s’inseriscono direttamente negli
alloggiamenti dell’estensione della canna.
Si tratta di un sistema di chiusura solida, stabile ed affidabile. Le caratteristiche di progettazione del SXP si
coniugano tra loro per ottenere il fucile a pompa che molti considerano come il fucile più affidabile oggi
disponibile sul mercato.
FUNZIONAMENTO
Il SXP è un fucile a pompa che permette di caricare una cartuccia azionando il meccanismo per espellere la
cartuccia vuota e spostare una nuova cartuccia dal serbatoio pieno verso la camera di scoppio. La presente
operazione potrà essere ripetuta fino a quando il serbatoio sarà vuoto.
Si potrà inserire manualmente anche una sola cartuccia nella camera.
CARATTERISTICHE DEL FUCILE
Prima di usare munizioni non sparate, conviene familiarizzarsi completamente con le istruzioni di funzionamento
contenute nel presente manuale. Occorre abituarsi alla vostra nuova arma da fuoco e conoscere lo sforzo richiesto
per azionare il meccanismo. Imparare ad azionare il grilletto e soprattutto sapere dove si trova e come funziona
la “sicura”. Le procedure di smontaggio e di funzionamento dei vari componenti sono spiegate nel presente
manuale. Siete pregati di leggerle e di studiarle attentamente.
NOMENCLATURA
Nella terminologia classica delle armi, la posizione ed il movimento dei pezzi di un’arma da fuoco vengono
rappresentati tale quali, tenendo l’arma da fuoco orizzontalmente, in una posizione di tiro normale: in questo
modo, la bocca della canna è davanti o si trova all’avanti, il calcio si trova dietro o all’indietro, il grilletto verso il
basso o al di sotto; la bindella di mira verso l’alto o al di sopra.
Per la nomenclatura dei pezzi generali, si rimanda alla figura 1. Il fucile SXP viene inoltre rappresentato smontato
fino ad un dato punto per seguire poi le istruzioni contenute nel presente manuale (figura 12). La figura 2 vanta
le caratteristiche generali e i vantaggi della progettazione del SXP.
Nel presente manuale d’uso, il termine “meccanismo” si riferisce al meccanismo del presente fucile che trascina la
cartuccia nella camera di scoppio e la mantiene.
NUMERO DI SERIE
Il numero di serie è posto sul lato sinistro della carcassa, proprio sopra il ponticello. Iscrivere questo numero
all’inizio del presente manuale d’uso, a titolo di riferimento ulteriore.
PULIZIA INIZIALE E LUBRIFICAZIONE
ATTENZIONE! SI PREGA DI VOLER PRENDERE NOTA DELLA SEGUENTE INFORMAZIONE PRIMA DI PULIRE
LA VOSTRA ARMA DA FUOCO
PULIZIA DEI PEZZI DOTATI DI FINITURE SPECIALI
Occorre essere estremamente prudenti nel pulire le armi da fuoco dotate di una finitura camo, di un rivestimento
Dura-Touch® così come di altre finiture speciali. Attenzione: le suddette superfici non devono mai entrare a
contatto con solventi di pulizia, con dispositivi abrasivi per canne o con altre sostanze chimiche forti. Si consiglia
di pulire queste superfici con un olio leggero per armi da fuoco che non contenga solventi oppure
servendosi di un panno umido con detergente dolce per stoviglie (accertarsi che l’acqua non penetri all’interno
del meccanismo).
Durante la pulizia dell’anima e del meccanismo della vostra arma da fuoco, pensare a proteggere le finiture
esterne affinché non entrino a contatto con le sostanze chimiche utilizzate. Evitare inoltre qualsiasi contatto tra
R I F L E S
a n d
s h o t g u n s
61
le finiture esterne e ogni altra sostanza chimica forte come quella presente nei repellenti contro gli insetti a base
di dietiltoluamide, schermi solari, ecc. I danni provocati sulle finiture camo, Dura-Touch ed ogni altra finitura dalle
sostanze chimiche è irreversibile ed irreparabile.
Parecchie parti metalliche del vostro nuovo fucile SXP sono state rivestite con un prodotto anticorrosione. Prima
di sparare con il vostro fucile SXP, occorre rimuovere il prodotto anticorrosione dall’interno della canna, dalla
carcassa, dal gruppo otturatore-culatta e le superfici del meccanismo e dalla camera di scoppio. Si raccomanda
un olio leggero di alta qualità per armi da fuoco per rimuovere questo tipo di prodotto e per lubrificare la vostra
nuova arma da fuoco per la prima volta. Pulire la canna usando uno scovolo di tessuto come spiegato nella
sezione “Alcuni suggerimenti per la pulizia e la manutenzione” .
FIGURA 3
Tenoni
Percussore
Otturatore
Tubo-Serbatoio
estrattore
Lubrificare leggermente in questi punti.
Prima di procedere all’assemblaggio del vostro SXP,
occorrerà innanzitutto strofinare il meccanismo
applicando alcune gocce d’olio di qualità sulle superfici indicate (figura 3).
Evitare di applicare una quantità troppo elevata di
olio. È necessario soltanto un pellicola molto fine.
L’olio eccedente dovrà essere strofinato, soprattutto
con tempo freddo.
FUNZIONAMENTO DELLA “ SICURA”
Italiano
FIGURA 4FIGURA 5
La “sicura”rappresentata in posizione inserita.
La “sicura”rappresentata in posizione non inserita.
La “sicura”, costituita da un tassello trasversale, è concepita per impedire di azionare il grilletto quando la “sicura”
è inserita. La “sicura” si trova sul davanti del ponticello (figura 4). Quando la “sicura” non è inserita, una striscia
rossa d’avvertenza compare sul pulsante della “sicura” sul lato sinistro del ponticello. È indispensabile che vi
abituiate al tatto, all’apparenza e al funzionamento della “sicura” del presente fucile prima di provare a caricarlo
e ad utilizzarlo.
Per posizionare l’arma da fuoco in posizione di sicurezza, spingere il pulsante di “sicura” verso destra (figura 4).
Per spostare la “sicura” in posizione non inserita, ossia in posizione pronta per sparare, spingere il pulsante di
“sicura” verso sinistra.
Una striscia rossa d’avvertenza del pulsante di “sicura” appare dopo quest’ultima operazione (figura 5).
Quando la “sicura” si trova in posizione inserita, il grilletto e il cane sono bloccati e non si può sparare. In posizione
non inserita, con una cartuccia in camera, la cartuccia camerata potrebbe essere innescata con una semplice
pressione sul grilletto.
ASSEMBLAGGIO
Il fucile SXP è consegnato in una scatola con la canna smontata e l’astina montata sul tubo-serbatoio.
1. Togliere la canna e il gruppo carcassa/calcio dalla scatola e procedere alla pulizia e lubrificazione delle due
metà come spiegato.
2. Svitare il dado d’assemblaggio del tubo-serbatoio.
3. Il vostro fucile dovrebbe essere stato normalmente consegnato con il gruppo otturatore-culatta in posizione
chiusa (verso l’avanti) e il dispositivo di scatto già montato nella carcassa. La canna potrà essere montata
R I F L E S
a n d
s h o t g u n s
62
quando il meccanismo è chiuso ; tuttavia, il fatto di aprire quest’ultimo ne facilita il montaggio.
4. Sbloccare ed aprire il meccanismo spingendo la leva di sblocco situata sul retro del ponticello (figura 6) sul
lato sinistro e tirare l’astina all’indietro.
5. Afferrare la canna sul davanti dell’anello di canna.
6. Posizionare la canna sopra il tubo-serbatoio ed allinearla con quest’ultimo.
7. Far scivolare la canna all’indietro.
8. Posizionare l’anello di canna attorno al tubo-serbatoio e l’estensione della canna nella carcassa. Accertarsi
che l’estrattore sia allineato sul suo alloggiamento nella canna.
9. Entrare la canna facendola arretrare nella carcassa fino alla battuta posteriore.
10. Riposizionare immediatamente il dado di assemblaggio. Avvitarlo a mano (almeno tre giri completi) per
accertarsi della sua corretta introduzione.
FIGURA 6
Spingere sulla leva di sblocco
per sbloccare il meccanismo
SMONTAGGIO
1. Spingere sulla leva di sblocco situata sul retro del ponticello sul lato sinistro (figura 6) per sbloccare il meccanismo
senza liberare il cane.
2. Aprire il meccanismo ed inserire la “sicura”. (La striscia rossa d’avvertenza deve essere nascosta.)
3. Con la bocca della canna puntata in direzione non pericolosa, svitare il dado di assemblaggio e rimuoverlo.
4. Afferrare la canna sul davanti dell’anello di canna, tenendo il calcio con l’altra mano.
5. Tirare la canna in avanti per farla uscire dalla carcassa. Far uscire l’anello di canna dal tubo-serbatoio. Attenzione:
non forzare.
6. Rimettere immediatamente il dado di assemblaggio e stringere a mano eseguendo almeno tre giri.
FIGURA 7FIGURA 8
Spingere completamente il fondo
del serbatoio e fargli fare un
quarto di giro
Mantenere il controllo
della molla del serbatoio nel
momento in cui si rimuove
il fondo del serbatoio
R I F L E S
a n d
s h o t g u n s
63
FIGURA 9
Introdurre la cartuccia fino in fondo in avanti nel serbatoio.
CAPACITÀ DEL SERBATOIO
Con l’adattatore (riduttore) del serbatoio a tre colpi rimosso, il vostro fucile può contenere fino a quattro cartucce
2¾» o tre cartucce 3» nel serbatoio. Il serbatoio alta capacità di alcuni modelli SXP può contenere cinque cartucce
2¾» o quattro cartucce 3». Su una pedana da tiro o in un altro posto appropriato per il tiro, riempire il serbatoio fino
alla sua massima capacità onde verificare il numero di cartucce. Attenzione: la capacità “ totale” include una cartuccia
supplementare che può essere posta nella camera in più del serbatoio già pieno.
ADATTATORE «TRE COLPI» (RIDUTTORE)
Il fucile SXP viene consegnato con l’adattatore “tre colpi” (riduttore) già installato nel serbatoio, limitando così la
capacità del serbatoio a due cartucce e questo per rispondere alle normative federali americane sugli uccelli
migratori. Se si vuole non essere limitati a tre colpi, nel caso in cui non si tratti di una esigenza legale, si può smontare
l’adattatore “tre colpi”.
SMONTAGGIO DELL’ADATTATORE “TRE COLPI” (RIDUTTORE)
1. Svitare il dado di assemblaggio e toglierlo.
2. L’adattatore “tre colpi” del serbatoio si trova sotto il fondo del serbatoio ed è sottoposto alla tensione della molla
del serbatoio. Servendosi del vostro indice o di un grande cacciavite a lama, spingere il fondo del serbatoio di
circa 2,5 cm (1 po) nel serbatoio e fargli fare un quarto di giro (figura 7).
3. Il fondo del serbatoio è sottoposto alla tensione della molla del serbatoio. Mantenere la molla del serbatoio sotto
controllo e rimuovere accuratamente il fondo del serbatoio (figura 8). Ritirare l’adattatore “tre colpi” (riduttore) e
riposizionare il fondo del serbatoio.
4. Allineare le scanalature presenti su tutta la lunghezza del fondo del serbatoio con i rilievi interni del tuboserbatoio.
5. Comprimere di nuovo la molla del serbatoio nel tubo-serbatoio.
6. Riposizionare il fondo del serbatoio spingendolo nel tubo-serbatoio per circa 2,5 cm (1 po) e facendogli fare
un quarto di giro per bloccarlo nella posizione corretta. Accertarsi che il fondo del serbatoio sia bloccato nella
posizione corretta.
R I F L E S
a n d
s h o t g u n s
Italiano
Il modo più sicuro per incurvare o rompere la canna di un fucile è di sparare una cartuccia con un calibro più piccolo
in una camera di scoppio il cui calibro è più grosso. La cartuccia di calibro più piccolo non cadrà completamente
attraverso la canna; il fondello è preso dalla parte anteriore della camera del calibro più grosso o dallo strozzatore
del calibro più grosso. Il vostro fucile effettuerà un innesco non corretto (con una camera che sembra vuota) Si può
allora caricare una cartuccia con un calibro corretto dietro una cartuccia con un calibro più piccolo. Se si spara allora
con il fucile, si otterrà il risultato che viene chiamato «lo scoppio 12-20, 20-28 o 28-.410» che può provocare danni
significativi al vostro fucile e gravi ferite alla vostra persona o alle persone che vi circondano.
Non potremo essere ritenuti responsabili in caso di incidenti capitati a seguito dell’uso di cartucce aventi dimensioni
fuori norma o di quelle che generano delle pressioni superiori alle norme stabilite dal SAAMI (Sporting Arms and
Ammunition Manufacturers’ Institute). Tutti i fucili attuali SXP di calibro 12 vantano una camera da 3» e sono concepiti
per sparare tutte le cartucce caricate in fabbrica da 2¾» e 3», siano esse destinate al tiro sportivo o alla caccia. La
canna può sparare sia cariche di piombo che di acciaio, in tutta sicurezza. I strozzatori per canne rigate sono concepiti
per il tiro di cartucce a pallini del tipo sabot.
64
7. Avvitare il dado di assemblaggio.
MONTAGGIO DELL’ADATTATORE «TRE COLPI» (RIDUTTORE)
Se si deve rimontare l’adattatore “tre colpi” (riduttore) per limitare la capacità del serbatoio del vostro fucile a due
cartucce, effettuare la seguente operazione:
1. Svitare il dado di assemblaggio e toglierlo.
2. Servendosi del vostro indice o di un grande cacciavite a lama, spingere il fondo del serbatoio di circa 2,5 cm (1 po)
nel serbatoio e fargli fare un quarto di giro (figura 7).
3. Il fondo del serbatoio è sottoposto alla tensione della molla del serbatoio. Mantenere la molla del serbatoio sotto
controllo e rimuovere accuratamente il fondo del serbatoio. Posizionare l’adattatore “tre colpi” (riduttore) sopra la
molla del serbatoio e riporre il fondo del serbatoio.
4. Allineare le scanalature presenti su tutta la lunghezza del fondo del serbatoio con i rilievi interni del tuboserbatoio.
5. Comprimere di nuovo la molla del serbatoio e l’adattatore “tre colpi” nel tubo-serbatoio.
6. Riposizionare il fondo del serbatoio spingendolo nel tubo-serbatoio per circa 2,5 cm (1 po) e facendogli fare
un quarto di giro per bloccarlo nella posizione corretta. Accertarsi che il fondo del serbatoio sia bloccato nella
posizione corretta.
7. Avvitare il dado di assemblaggio.
FIGURA 10
Spingere il fermo cartuccia per rilasciare la cartuccia seguente
del serbatoio.
CARICAMENTO DEL SERBATOIO
1. Inserire la “sicura” e chiudere il meccanismo.
2. Spingere l’elevatore nel foro di caricamento con la parte anteriore di una cartuccia (figura 9).
3. Spingere sul fondello della cartuccia e inserirla all’interno del serbatoio finché rimanga bloccata dal fermo
cartuccia.
4. Ripetere l’operazione finché il serbatoio sia completamente carico.
CARICAMENTO DELLA CAMERA DAL SERBATOIO
1. Con il gruppo otturatore-culatta chiuso, spingere l’elevatore con la parte anteriore della cartuccia, e con il vostro
pollice spingere la cartuccia nel serbatoio finché la cartuccia venga mantenuta dal fermo cartuccia.
2. Se lo si desidera, riempire completamente il serbatoio come spiegato qui sopra.
3. In caso di tiro imminente, una cartuccia del serbatoio può essere camerata spingendo sulla leva di sblocco situata
sul retro del ponticello sul lato sinistro e azionando l’astina. Una cartuccia sarà alimentata automaticamente dal
serbatoio fino alla camera di scoppio dall’azione di chiusura del gruppo otturatore-culatta. Un’altra cartuccia può
essere allora introdotta nel serbatoio per effettuare un caricamento fino alla sua capacità totale.
CARICAMENTO DELLA CAMERA ATTRAVERSO LA FINESTRA DI ESPULSIONE
1. Spingere sulla leva di sblocco situata sul retro del ponticello sul lato sinistro. Questo avrà per effetto di sbloccare
il meccanismo senza per questo rilasciare il cane. Spingere l’astina a fondo all’indietro. Effettuare un’ispezione
visiva della camera, del meccanismo d’alimentazione e del serbatoio per essere assolutamente certi che siano
scarichi e liberi da ogni ostruzione.
2. Introdurre una cartuccia di calibro e lunghezza corretti nella culatta aperta attraverso la finestra d’espulsione.
3. Spingere l’astina a fondo in avanti.
4. Se lo si desidera, riempire completamente il serbatoio come spiegato qui sopra.
R I F L E S
a n d
s h o t g u n s
65
INNESCO
1. Inserire la “sicura”.
2. Caricare una cartuccia nella camera di scoppio come spiegato in precedenza.
3. Con la cartuccia in camera, occorrerà semplicemente respingere la “sicura” verso la posizione non inserita per far
fuoco.
4. Al momento di sparare, spostare la “sicura” verso la posizione non inserita, prendere la mira e premere sul
grilletto.
5. Se si vuole continuare a sparare, tirare l’astina a fondo all’indietro finché la cartuccia venga espulsa attraverso la
finestra d’espulsione.
6. Spingere l’astina a fondo in avanti per camerare una cartuccia nuovo dal serbatoio.
Il vostro SXP è pronto per sparare. Inserire immediatamente la “sicura” (ossia con la striscia rossa nascosta) finché
si è pronti per sparare.
una intacca
tre intacche
cinque intacche
due intacche
quattro intacche
nessuna intacca
INTACCHE ALL’
DISPERSIONE CON UN
DISPERSIONE CON UN
ESTREMITÀ
TIRO AL PIOMBO
TIRO ALL’ACCIAIO
ALLONGE
EXTRA FULL
**
I
FULL
*
II
MIGLIORATO MODIFICATO
FULL 1
3/4
III
MODIFICATO 1/2
FULL 1
IIII
MIGLIORATO CILINDRICO
MODIFICATO 1/2
1/4
IIIII
SKEET
CILINDRICO 1/4
NESSUNA INTACCA
CILINDRICO
CILINDRICO
* Non utilizzare per il tiro con pallini di acciaio. L’uso di uno choke troppo stretto provocherà allora una dispersione “esplosa”
poco efficace.
** Speciale extra completo, esteso con fori di ventilazione. Non usare per il tiro con pallini di acciaio.
1
Se sono menzionate più strozzature per una dispersione dovuta al tiro con pallini di acciaio, utilizzare la strozzatura più aperta
registrata per cariche di acciaio di dimensione più grossa a grande velocità.
R I F L E S
a n d
s h o t g u n s
Italiano
FIGURA 11
66
SCARICAMENTO AZIONANDO IL MECCANISMO
Seguire la seguente procedura per scaricare le cartucce dalla camera e dal serbatoio su tutti i modelli SXP.
1. Inserire la “sicura”.
2. Spingere sulla leva di sblocco per sbloccare il meccanismo (figura 6).
3. Azionare l’astina facendogli fare un movimento di va e vieni e ripetere quest’operazione finché tutte le
cartucce siano state trasferite dal serbatoio nella camera per essere poi espulse.
4. Quando l’ultima cartuccia sarà stata trasferita dal serbatoio nella camera ed espulsa attraverso la finestra di
espulsione, lasciare il meccanismo aperto.
5. Con l’indice, esplorare l’entrata del serbatoio per accertarsi che nessuna cartuccia sia rimasta nel serbatoio.
SCARICAMENTO A PARTIRE DAL SERBATOIO
Le cartucce possono essere scaricate anche dal serbatoio seguendo la procedura qui sotto:
1. Inserire la “sicura”, accertarsi che il meccanismo sia chiuso e mantenere la bocca della canna in direzione non
pericolosa.
2. Capovolgere il fucile affinché il ponticello sia rivolto verso l’alto, abbassare l’elevatore il più lontano possibile.
3. Spingere il fermo cartuccia verso l’interno per rilasciare una cartuccia dal serbatoio (figura 10). Premere di nuovo
sul fermo cartuccia per far uscire la cartuccia seguente. Il fermo cartuccia è situato sul lato destro della cavità
della finestra di espulsione. Quando la cartuccia si trova nel serbatoio, il fermo cartuccia poggia sulla parte
metallica della cartuccia.
4. Con la “sicura” inserita, girare l’arma in una posizione normale di tiro. Premere sulla leva di sblocco e tirare l’astina
a fondo all’indietro per ritirare la cartuccia dalla camera.
SISTEMA DI CHOKE INTERCAMBIABILI
Tutte le canne di fucile SXP (tranne i modelli Defender) sono stati filettati per poter ricevere il sistema Choke “InvectorplusTM”. I chokes WinChoke®, “InvectorTM” standard o “Invector – plus” nono sono intercambiabili. Verificare la choke del
vostro fucile guardando sul lato destro della canna dove sono menzionate le specifiche e le chokes.
La choke viene indicata in due punti sullo choke: sul lato dello chokes e, indicato tramite un codice con intacche,
sull’estremità superiore dello choke. La chiave universale fornita per lo choke serve per togliere ed installare gli choke.
Gli choke “Invector” standard ed “Invector – plus” sono compatibili con le munizioni caricate in fabbrica
conformemente alle specifiche SAAMI, comprese le cariche di piombo Magnum e le cariche d’acciaio, i sabot e le
palle per fucili.
Alcuni tubi e chiavi di ricambio supplementari sono disponibili presso il vostro rivenditore di carabine e fucili
Winchester, oppure contattando il dipartimento clientela di Winchester Repeating Arms.
SELEZIONE DELLO CHOKE
Per aiutarvi a scegliere la choke appropriata ad ogni situazione di caccia e di tiro, tutti gli choke “Invector – plus” sono
identificati sul lato con le dispersioni prodotte con un tiro con cartucce di piombo e di acciaio. Ogni chokes “Invector”
vanta delle tacche situate sull’estremità superiore del choke (figura 11).
Le suddette tacche costituiscono un codice per determinare l’identificazione della choke dopo che il choke sia stato
installato. Le tacche si riferiscono in particolare al tiro con cartucce di piombo. Utilizzare le tabelle per stabilire il
riferimento tra il piombo e l’acciaio e per determinare gli chokes appropriati alle vostre munizioni e alle situazioni
di caccia o di tiro.
Diversi chokes sono forniti con il vostro fucile. Gli chokes elencati sono anch’essi disponibili come accessori.
Attenzione: i choke Winchoke, “Invector” standard o “Invector – plus” non sono intercambiabili. I choke “Invector –
plus” sono destinati unicamente ai fucili Winchester dotati di canne sovralesate. Prima di rimuovere o di installare i
choke, o prima di leggere il codice con le intacche, accertarsi che il fucile sia completamente scarico.
RIMOZIONE DELLO CHOKE
1. Inserire la “sicura”. Aprire il meccanismo ed accertarsi che il fucile sia completamente scarico. Mantenere sempre
la bocca della canna in una direzione non pericolosa.
2. Utilizzare la chiave dello choke per svitare il tubo, girandola in senso antiorario. Finire di svitare lo choke con le
dita per farlo uscire dalla canna.
R I F L E S
a n d
s h o t g u n s
67
INSTALLAZIONE DELLO CHOKE
1. Inserire la “sicura”. Aprire il meccanismo ed accertarsi che il fucile sia completamente scarico. Mantenere sempre
la bocca della canna in una direzione non pericolosa.
2. Prima d’installare un tubo, effettuare una verifica della filettatura interna dello choke all’interno della bocca della
canna così come della filettatura dello choke per accertarsi della loro pulizia. Lubrificare leggermente la filettatura
con un olio leggero per armi da fuoco, di alta qualità.
3. Con le dita, avvitare il choke appropriato nella bocca della canna, introducendo per primo l’estremità filettata, e
tenendo l’estremità con intacche verso l’esterno. Quando il choke incomincia a restringersi, usare la chiave fornita
con lo choke per stringerlo saldamente
FIGURA 12
Choke
Anello Canna
Canna
Molla serbatoio
Culatta
Percussore
Otturatore
Molla del percussore
Adattatore “tre colpi”
del serbatoio (riduttore)
Dado di assemblaggio
Fondo del serbatoio
Tubo-serbatoio
Carcassa
Carrello
Gruppo scatto
Astina
FIGURA 13
Dopo aver rimosso la
spina, premere sulla
parte posteriore del
gruppo di scatto
verso l’alto per
poterlo togliere.
ALCUNI SUGGERIMENTI DI PULIZIA E DI MANUTENZIONE. ATTENZIONE!
SIETE PREGATI DI PRENDERE NOTA DELLA SEGUENTE INFORMAZIONE PRIMA DI PULIRE LA VOSTRA ARMA DA FUOCO.
PULIZIA DEI PEZZI DOTATI DI FINITURE SPECIALI
Occorre essere estremamente prudenti nel pulire le armi da fuoco dotate di una finitura camo, di un rivestimento
Dura-Touch® così come di altre finiture speciali. Attenzione: le suddette superfici non devono mai entrare a contatto
con solventi di pulizia, con dispositivi abrasivi per canne o con altre sostanze chimiche forti. Si consiglia di pulire
queste superfici con un olio leggero per armi da fuoco che non contenga solventi oppure servendosi di un panno
umido con detergente dolce per stoviglie (accertarsi che l’acqua non penetri all’interno del meccanismo). Durante
la pulizia dell’anima e del meccanismo della vostra arma da fuoco, pensare a proteggere le finiture esterne affinché
non entrino a contatto con le sostanze chimiche utilizzate. Evitare inoltre qualsiasi contatto tra le finiture esterne
ed ogni altra sostanza chimica forte come quella presente nei repellenti contro gli insetti a base di dietiltoluamide,
schermi solari, ecc. I danni provocati sulle finiture camo, Dura-Touch e ogni altra finitura dalle sostanze chimiche è
irreversibile ed irreparabile.
R I F L E S
a n d
s h o t g u n s
Italiano
Spina del gruppo di scatto
68
FIGURA 14
Posizionare il gruppo otturatore-culatta sul carrello
FIGURA 15
Inserire accuratamente il gruppo otturatore-culatta
sul carrello all’interno della carcassa
PROCEDURE DI PULIZIA
Il vostro SXP vi garantirà il miglior funzionamento e una migliore affidabilità su un lungo periodo se viene intrattenuto
e custodito correttamente. Per questo, occorre procedere alla pulizia del vostro fucile dopo ogni giorno di tiro e più
spesso ancora se il fucile diventa eccessivamente sporco. La canna deve essere pulita ed il meccanismo strofinato e
lubrificato dopo ogni giorno di tiro.
Effettuare la normale manutenzione tenendo la canna attaccata alla carcassa (lubrificazione e pulizia con scovolo).
Una pulizia più accurata richiede lo smontaggio della canna dalla carcassa (pulizia della canna). Una pulizia completa
richiede lo smontaggio del gruppo otturatore-culatta e del gruppo di scatto.
In caso di problema funzionale (meccanismo duro durante il movimento di va e vieni dell’astina), eseguire d’ufficio
una pulizia completa per cercare di risolvere il problema prima di chiedere i servizi del centro di manutenzione per
armi Winchester più vicino da casa vostra, del nostro dipartimento manutenzione di Winchester o di un armaiolo
qualificato.
1. Inserire la “sicura”. Aprire il meccanismo ed ispezionare la camera ed il serbatoio per accertarsi che non contengano
cartucce. Mantenere la bocca della canna puntata in una direzione non pericolosa.
2 Smontare la canna come spiegato nel paragrafo “Smontaggio”.
3. Ispezionare l’anima alle due estremità per verificare la presenza di residui di piombo e di plastica che rimangono
spesso nelle anime delle canne e che provengono dalle borre delle cartucce moderne. I residui di piombo e di
plastica compaiono sotto forma di striature longitudinali e sono generalmente importanti vicino alla bocca e sul
davanti della camera. Una quantità normale di uno dei due residui può essere naturale e non grave in se stesso.
4. Se i residui di piombo o di plastica vi sembrano eccessivi, questi potranno essere rimossi spazzolando l’anima con
una spazzola in ottone. Per prima cosa, imbevere la spazzola o polverizzare l’anima con un solvente per polvere.
Sfregare fino a quando l’anima sia pulita. Per evitare che i peli non si stacchino, inserire la spazzola fino in fondo
prima di ritirarla all’indietro.
5. Quando tutti i residui di piombo e di plastica saranno stati rimossi, introdurre un panno pulito ed asciutto
attraverso l’anima. Poi, introdurre un panno leggermente unto d’olio.
6. Ispezionare la canna e la camera per essere certi che nessun panno vi sia rimasto inavvertitamente. Ritirare tutti
quelli che potrebbero trovarsi al loro interno.
7. Rimontare il fucile e strofinare tutte le parti metalliche apparenti con un panno unto d’olio, accertandosi di
pulire tutte le tracce di dita dove l’umidità può accumularsi. Ogni residuo d’olio secco deve essere rimosso dalla
carcassa.
8. Lubrificare l’arma nei punti indicati. Una lubrificazione leggera e regolare è molto importante per il funzionamento
duraturo ed affidabile del vostro fucile.
SMONTAGGIO PIÙ COMPLETO
Uno dei vantaggi del SXP consiste nella possibilità di smontare il meccanismo per pulirlo. In condizioni meteorologiche
molto sfavorevoli e in ambienti sporchi, il semplice fatto di sapere che i pezzi sono puliti e leggermente lubrificati vi
darà maggior fiducia al momento di sparare.
Accertarsi di avere uno spazio di lavoro pulito per deporvi i pezzi che si sta smontando (figura 12)
SMONTAGGIO DELLA CANNA
1. Svitare e togliere il dado di assemblaggio. Attenzione: mantenere sempre la bocca della canna puntata in una
direzione non pericolosa.
2. Far scivolare la canna all’avanti per estrarla dalla carcassa e far uscire l’anello di canna dall’estremità anteriore del
tubo-serbatoio.
3. Riavvitare immediatamente il dado di assemblaggio sul tubo-serbatoio eseguendo almeno tre giri completi.
R I F L E S
a n d
s h o t g u n s
69
SMONTAGGIO DEL GRUPPO DI SCATTO
Lo smontaggio del gruppo di scatto è un’altra procedura che si consiglia di eseguire nel corso della manutenzione del
vostro fucile. Questo smontaggio è facile e permette di procedere, all’occorrenza, alla pulizia e alla manutenzione del
vostro fucile. Quando il gruppo di scatto e il gruppo otturatore-culatta sono rimossi, sarà facile pulire ogni residuo ed
umidità suscettibili di accumularsi nella carcassa.
Il gruppo di scatto deve essere smontato prima di provare di smontare il gruppo otturatore-culatta.
1. Accertarsi che l’arma sia completamente scarica così come è stato spiegato in precedenza nel presente manuale.
2. Azionare il meccanismo tirando l’astina all’indietro e spingendola poi in avanti. Il cane sarà così posto in posizione
armata. Inserire la “sicura”.
3. Se il gruppo canna è stato smontato, occorrerà rimettere il dado di assemblaggio all’estremità del tubo-serbatoio
per evitare che il fondo del serbatoio non si stacchi inavvertitamente.
4. Posizionare il vostro fucile con il ponticello verso l’alto, su una superficie adatta che proteggerà la finitura della
carcassa e il calcio.
5. Togliere la spina dal gruppo di scatto facendola uscire dal lato sinistro della carcassa, ossia dal lato opposto
alla finestra d’espulsione. Per questo, potrà essere utile qualsiasi solido strumento con un diametro più piccolo
rispetto a quello della spina e senza rischi di danneggiare la finitura. Afferrare bene il fucile e lo strumento e
spingere la spina.
6. Farla uscire sufficientemente per poterla afferrare con le dita. Estrarla poi a mano. Se non si riesce a rimuoverla
a mano, accertarsi che il vostro strumento o cacciaperni sia di diametro sufficientemente piccolo per poter far
uscire completamente la spina all’esterno senza danneggiare il foro.
7. Dopo aver rimosso la spina, far uscire il gruppo di scatto dalla carcassa alzandolo verso l’alto e tirando all’indietro
(figura 13).
SMONTAGGIO DEL GRUPPO OTTURATORE-CULATTA
RIMOZIONE DEL PERCUSSORE
1. Smontare il gruppo otturatore-culatta dal fucile come spiegato in precedenza.
2. Capovolgere il gruppo otturatore-culatta (lato piano al di sotto) e spingere la parte posteriore del percussore in
avanti con il vostro indice. Mantenendo così il percussore; alzare la parte anteriore del carrello con l’altra mano e
spostarlo leggermente in avanti.
3. Alzare il carrello e liberare la linguetta incurvata di quest’ultimo dalla scanalatura del percussore. Questo
staccherà il carrello dal gruppo otturatore-culatta.
4. Il percussore è sottoposto alla tensione di una molla e si staccherà dal gruppo otturatore-culatta non appena non
sarà più ritenuto dal vostro indice. Far attenzione all’asse nel ritirare il percussore e la molla.
Per pulire il fucile, non è necessario né richiesto uno smontaggio più completo. Smontare il vostro SXP fino
all’illustrazione indicata alla figura 12. In caso contrario, la garanzia sarebbe nulla. Per riparazioni che richiedono uno
smontaggio più completo, contattare il vostro centro manutenzione per armi Winchester o un armaiolo qualificato,
come indicato nel capitolo “Pezzi, manutenzione, riparazioni e domande”.
RIMONTAGGIO DEL PERCUSSORE E DEL GRUPPO OTTURATORE-CULATTA
1. Reinstallare la molla del percussore attorno al percussore. Qualunque estremità della molla potrà essere
posizionata per primo.
2. Introdurre il gruppo del percussore e della molla nell’apertura posteriore del gruppo otturatore-culatta, facendo
prima entrare l’asse del percussore.
3. Per riposizionare il gruppo otturatore-culatta sul carrello, spingere l’estremità rotonda del percussore
sufficientemente a fondo nel foro della culatta, in modo tale che il grande spazio tra l’estremità della scanalatura
e il perno del percussore sia correttamente posizionato al centro del foro rotondo della culatta.
4. Posizionare la linguetta incurvata situata sul carrello nello spazio tra l’estremità rotonda e il perno del percussore e
rilasciare lentamente la pressione all’estremità del percussore. Lasciare che il perno del percussore tiri la linguetta
incurvata all’indietro del gruppo otturatore-culatta.
5. Togliere il dado di assemblaggio.
6. Tenere il carrello e il gruppo otturatore-culatta insieme (figura 14). Far scivolare il gruppo dell’astina sul tubo-
R I F L E S
a n d
s h o t g u n s
Italiano
1. Togliere la canna e il gruppo di scatto come spiegato qui sopra senza tuttavia riposizionare il dado di assemblaggio.
2. Con il gruppo otturatore-culatta attaccato al carrello, far scivolare il tutto in avanti per farlo uscire dalla parte
anteriore della carcassa. Attenzione: nel momento in cui il gruppo otturatore-culatta attraversa la finestra di
espulsione, si potrà avvertire una piccola resistenza in corrispondenza della molla dell’estrattore. Se questo
dovesse capitare, occorre far prova di precauzione.
70
serbatoio.
7. Inserire accuratamente il carrello ed il gruppo otturatore-culatta nella parte anteriore della carcassa. Nel
momento in cui i gruppi entrano nella carcassa, farli scivolare fino in fondo all’indietro (figura 15).
RIMONTAGGIO DEL GRUPPO DI SCATTO
1. Il gruppo otturatore-culatta, il carrello e l’astina devono essere attaccati alla carcassa prima di rimontare il
gruppo di scatto.
2. Accertarsi che il cane si trovi in posizione armata, spingendolo tutto dritto fino alla battuta e che la “sicura” sia
inserita.
3. Capovolgere il fucile in modo tale che la parte aperta della carcassa si trovi rivolta verso l’alto. Mantenere il
gruppo di scatto con un angolo di circa 45 gradi rispetto alla carcassa e inserire poi le parti anteriori sporgenti
del gruppo di scatto nelle apposite sedi della gola del serbatoio all’estremità anteriore dell’apertura della
carcassa, come indicato sulla figura 13.
4. Introdurre accuratamente la parte anteriore del gruppo di scatto nell’apertura della carcassa, abbassare poi
il retro nell’apertura della carcassa fino a quando il gruppo di scatto sia parallelo alla carcassa. Sarà forse
necessario far scivolare l’astina in varie posizioni fino a quando il gruppo di scatto sia ben allineato nella
carcassa. Dopo una corretta installazione, l’astina è ben sistemata ed il foro della spina del gruppo di scatto è
allineato.
5. Allineare il gruppo di scatto sul foro della carcassa e spingere la spina del gruppo di scatto attraverso la
carcassa per allinearla sui due lati della carcassa. La spina deve potervi passare facilmente attraverso senza
forzare. In caso di resistenza importante, ritirare il gruppo di scatto e ricominciare dalla tappa n°1.
La vostra arma da fuoco è ora completamente assemblata. Verificare immediatamente che la “sicura” sia
inserita. Non dimenticare di strofinare e di pulire tutte le superfici esterne come spiegato nella sezione “Alcuni
suggerimenti per la pulizia e la manutenzione” .
ALTRI SUGGERIMENTI PER LA PULIZIA
Dopo un lungo periodo di utilizzazione intensa, la vostra arma da fuoco dovrebbe essere portata da un armaiolo
qualificato che smonterà il meccanismo, lo pulirà ed effettuerà una lubrificazione a regola d’arte.
PEZZI, MANUTENZIONE, RIPARAZIONI E DOMANDE
Se la vostra arma da fuoco Winchester dovesse un giorno richiedere una manutenzione o una riparazione, rivolgersi
di preferenza presso uno dei nostri centri di riparazione autorizzati. In alcuni casi, è raccomandato rivolgersi presso il
nostro Dipartimento di manutenzione Winchester Repeating Arms.
Una lista dei centri di riparazione autorizzati vi è stato consegnato con la vostra nuova arma da fuoco. Se avete
bisogno di una nuova lista, contattateci. Vi aiuteremo a determinare il miglior posto dove eseguire la manutenzione
della vostra arma da fuoco.
Visita: www.winchesterint.com
R I F L E S
a n d
s h o t g u n s
71
Инструкция, содержащая важные сведения о следующем изделии:
Помповое ружье
Winchester SXP™
Если у вас появились вопросы или комментарии по поводу вашего нового оружия,
пожалуйста, напишите или позвоните нам. Ниже впишите данные о своем новом оружии или
www.winchesterint.com.
Модель
. . . . . . . . . . . . . . . . . . . . . . . . . . . . . . . . . . . . . . . . . . . . . . . . . . . . . . . . . . . . . . . . . . . . . . . . . . . . . . . . . . . . . . . . . . . . . . . . . . . . . . . . . . . . . . . . . . . . . . . . . . . . . . . . . . . . . . . .
Серийный номер. . . . . . . . . . . . . . . . . . . . . . . . . . . . . . . . . . . . . . . . . . . . . . . . . . . . . . . . . . . . . . . . . . . . . . . . . . . . . . . . . . . . . . . . . . . . . . . . . . . . . . . . . . . . . . . . . . . . . . . . . .
Продавец . . . . . . . . . . . . . . . . . . . . . . . . . . . . . . . . . . . . . . . . . . . . . . . . . . . . . . . . . . . . . . . . . . . . . . . . . . . . . . . . . . . . . . . . . . . . . . . . . . . . . . . . . . . . . . . . . . . . . . . . . . . . . . . . . . . . .
Дата приобретения . . . . . . . . . . . . . . . . . . . . . . . . . . . . . . . . . . . . . . . . . . . . . . . . . . . . . . . . . . . . . . . . . . . . . . . . . . . . . . . . . . . . . . . . . . . . . . . . . . . . . . . . . . . . . . . . . . . . . .
Winchester является зарегистрированным товарным знаком Olin Corporation.
Содержание
Стр.
Вы отвечаете за безопасность своего огнестрельного оружия . . . . . . . . . . . . . . . . . . . . . . . . . . . . . . . . . . . . . . . . . . . . . . . . . . . . . . . . . . . . 5
Описание и принцип действия . . . . . . . . . . . . . . . . . . . . . . . . . . . . . . . . . . . . . . . . . . . . . . . . . . . . . . . . . . . . . . . . . . . . . . . . . . . . . . . . . . . . . . . . . . . . . . . . . . . . . . 72
Перечень основных деталей. . . . . . . . . . . . . . . . . . . . . . . . . . . . . . . . . . . . . . . . . . . . . . . . . . . . . . . . . . . . . . . . . . . . . . . . . . . . . . . . . . . . . . . . . . . . . . . . . . . . . . . . . . 72
Серийный номер . . . . . . . . . . . . . . . . . . . . . . . . . . . . . . . . . . . . . . . . . . . . . . . . . . . . . . . . . . . . . . . . . . . . . . . . . . . . . . . . . . . . . . . . . . . . . . . . . . . . . . . . . . . . . . . . . . . . . . . . . 72
Предохранитель
. . . . . . . . . . . . . . . . . . . . . . . . . . . . . . . . . . . . . . . . . . . . . . . . . . . . . . . . . . . . . . . . . . . . . . . . . . . . . . . . . . . . . . . . . . . . . . . . . . . . . . . . . . . . . . . . . . . . . . . . . 73
Сборка . . . . . . . . . . . . . . . . . . . . . . . . . . . . . . . . . . . . . . . . . . . . . . . . . . . . . . . . . . . . . . . . . . . . . . . . . . . . . . . . . . . . . . . . . . . . . . . . . . . . . . . . . . . . . . . . . . . . . . . . . . . . . . . . . . . . . . . 73
Разборка . . . . . . . . . . . . . . . . . . . . . . . . . . . . . . . . . . . . . . . . . . . . . . . . . . . . . . . . . . . . . . . . . . . . . . . . . . . . . . . . . . . . . . . . . . . . . . . . . . . . . . . . . . . . . . . . . . . . . . . . . . . . . . . . . . . . 74
Емкость магазина . . . . . . . . . . . . . . . . . . . . . . . . . . . . . . . . . . . . . . . . . . . . . . . . . . . . . . . . . . . . . . . . . . . . . . . . . . . . . . . . . . . . . . . . . . . . . . . . . . . . . . . . . . . . . . . . . . . . . . . . 75
Трехзарядная заглушка (ограничитель) . . . . . . . . . . . . . . . . . . . . . . . . . . . . . . . . . . . . . . . . . . . . . . . . . . . . . . . . . . . . . . . . . . . . . . . . . . . . . . . . . . . . . . . . . . 75
Заряжание . . . . . . . . . . . . . . . . . . . . . . . . . . . . . . . . . . . . . . . . . . . . . . . . . . . . . . . . . . . . . . . . . . . . . . . . . . . . . . . . . . . . . . . . . . . . . . . . . . . . . . . . . . . . . . . . . . . . . . . . . . . . . . . . . . 76
Производство выстрела. . . . . . . . . . . . . . . . . . . . . . . . . . . . . . . . . . . . . . . . . . . . . . . . . . . . . . . . . . . . . . . . . . . . . . . . . . . . . . . . . . . . . . . . . . . . . . . . . . . . . . . . . . . . . . . . 76
Разряжание. . . . . . . . . . . . . . . . . . . . . . . . . . . . . . . . . . . . . . . . . . . . . . . . . . . . . . . . . . . . . . . . . . . . . . . . . . . . . . . . . . . . . . . . . . . . . . . . . . . . . . . . . . . . . . . . . . . . . . . . . . . . . . . . . 77
Система сменных чоков
. . . . . . . . . . . . . . . . . . . . . . . . . . . . . . . . . . . . . . . . . . . . . . . . . . . . . . . . . . . . . . . . . . . . . . . . . . . . . . . . . . . . . . . . . . . . . . . . . . . . . . . . . . . . . . . 78
Рекомендации по чистке и уходу . . . . . . . . . . . . . . . . . . . . . . . . . . . . . . . . . . . . . . . . . . . . . . . . . . . . . . . . . . . . . . . . . . . . . . . . . . . . . . . . . . . . . . . . . . . . . . . . . . . 78
Детали, обслуживание, ремонт, вопросы. . . . . . . . . . . . . . . . . . . . . . . . . . . . . . . . . . . . . . . . . . . . . . . . . . . . . . . . . . . . . . . . . . . . . . . . . . . . . . . . . . . . . . . . . 82
Информация о веб-сайте
. . . . . . . . . . . . . . . . . . . . . . . . . . . . . . . . . . . . . . . . . . . . . . . . . . . . . . . . . . . . . . . . . . . . . . . . . . . . . . . . . . . . . . . . . . . . . . . . . . . . . . . . . . . . . 82
R I F L E S
a n d
s h o t g u n s
Русский язык
Первая чистка и смазка . . . . . . . . . . . . . . . . . . . . . . . . . . . . . . . . . . . . . . . . . . . . . . . . . . . . . . . . . . . . . . . . . . . . . . . . . . . . . . . . . . . . . . . . . . . . . . . . . . . . . . . . . . . . . . . . 72
72
ОПИСАНИЕ И ПРИНЦИП ДЕЙСТВИЯ
ОПИСАНИЕ
Winchester SXP — самое быстрое помповое ружье. Инерция, создаваемая отдачей, способствует отведению
назад скользящего цевья, что облегчает его дальнейшее передергивание. Вы сами убедитесь в том,
насколько быстро работает помповый механизм: достаточно буквально мгновения, чтобы дослать новый
патрон в патронник, и вы уже готовы к следующему выстрелу. Такая скорость позволит вам быстро делать
выстрел за выстрелом, сосредоточившись на цели, а не на перезаряжании ружья.
В модели SXP применяется вращающийся затвор, боевые упоры которого входят непосредственно в
отверстия хвостовика ствола.
Такая конструкция обеспечивает прочное, стабильное и надежное запирание. Благодаря удачному
сочетанию ряда конструктивных особенностей многие считают SXP самым надежным из помповых ружей,
представленных сегодня на рынке.
ПРИНЦИП ДЕЙСТВИЯ
Заряжание помпового ружья SXP осуществляется за счет приведения в действие механизма выброса
стреляной гильзы и досылания нового патрона из магазина в патронник. Это операция может повторяться
до опорожнения магазина.
Кроме того, один патрон можно дослать в патронник вручную.
ХАРАКТЕРИСТИКИ РУЖЬЯ
Перед использованием заряженных патронов изучите все инструкции в данном руководстве. Вам
необходимо привыкнуть к новому оружию и знать, какое усилие требуется для передергивания
его механизма. Научитесь нажимать на спусковой крючок и, что особенно важно, познакомьтесь с
расположением и функционированием предохранителя. Инструкции по разборке и использованию
различных компонентов приведены в данном руководстве ниже. Обязательно прочитайте и хорошо
изучите их.
ПЕРЕЧЕНЬ ОСНОВНЫХ ДЕТАЛЕЙ
В классической оружейной терминологии для описания положения и перемещения частей огнестрельного
оружия используют термины, соответствующие горизонтально направленному оружию в обычном
положении для стрельбы: таким образом, дуло находится спереди, приклад находится сзади, спусковой
крючок — внизу, прицельная планка — вверху.
Основные детали ружья указаны на рис. 1.
Ружье SXP показано также (рис. 12) в разобранном виде до той степени, которая необходима для
выполнения инструкций данного руководства. На рис. 2 представлены общие характеристики и
конструктивные преимущества SXP.
В данном руководстве применительно к описываемому ружью термин «механизм» используется для
обозначения того механизма, который досылает патрон в патронник и запирает затвор.
СЕРИЙНЫЙ НОМЕР
Серийный номер указан с левой стороны ствольной коробки над спусковой скобой. Впишите этот номер в
начало данного руководства, чтобы обращаться к нему в будущем.
ПЕРВАЯ ЧИСТКА И СМАЗКА
ВНИМАНИЕ! ПЕРЕД ЧИСТКОЙ СВОЕГО ОРУЖИЯ ОБРАТИТЕ ВНИМАНИЕ НА СЛЕДУЮЩЕЕ
ЧИСТКА ДЕТАЛЕЙ СО СПЕЦИАЛЬНЫМИ ПОКРЫТИЯМИ
Будьте предельно осторожны при чистке оружия с камуфляжным покрытием, покрытием Dura-Touch®
и другими специальными покрытиями. Постоянно следите за тем, чтобы эти поверхности не вступали в
контакт с растворителями, средствами для чистки ствола и другими химически активными веществами.
Предпочтительно очищать эти поверхности легким оружейным маслом, не содержащим растворителей,
или с помощью влажной ткани и мягкого средства для мытья посуды (следите, чтобы вода не проникала
внутрь механизма). Во время чистки канала ствола и механизма вашего ружья оберегайте наружные
покрытия от контактов с используемыми химическими веществами. Исключите любые контакты наружных
покрытий со всеми другими химически активными веществами, в том числе с репеллентами от насекомых,
содержащими диэтилтолуамид, солнцезащитными кремами и т.д. Повреждения камуфляжного покрытия,
R I F L E S
a n d
s h o t g u n s
73
Dura-Touch и других покрытий, вызываемые химикатами, носят необратимый характер и не поддаются
восстановлению.
Некоторые металлические части вашего нового ружья SXP были покрыты на заводе антикоррозийным
средством. Перед стрельбой удалите антикоррозийное средство изнутри ствола, со ствольной коробки,
с затворной группы, с поверхностей механизма и патронника. Для удаления этого средства и первого
смазывания нового ружья идеально подходит высококачественное легкое оружейное масло. Чистите ствол
с помощью шомпола и фланелевых лоскутов, как описано в разделе «Рекомендации по чистке и уходу».
Рис. 3
Ударник
Боевые
упоры
Затвор
Трубчатый
Экстрактор магазин
Прежде чем собирать ружье SXP, необходимо
предварительно протереть механизм, нанося
по несколько капель масла на указанные
поверхности (рис. 3).
Не следует наносить слишком много масла.
Необходима лишь тонкая пленка. Лишнее масло
следует снять, особенно в холодную погоду.
ПРЕДОХРАНИТЕЛЬ
Рис. 4Рис. 5
Предохранитель в безопасном положении.
Предохранитель представляет собой поперечную перемычку и предназначен для предотвращения
срабатывания спускового крючка при приведении этого предохранителя в безопасное положение.
Предохранитель располагается перед спусковой скобой (рис. 4). Когда предохранитель приведен
в положение «огонь», на кнопке предохранителя слева от спусковой скобы появляется красная
предупредительная полоска. Очень важно хорошо познакомиться с тем, как чувствуется на ощупь,
выглядит и работает предохранитель до того, как заряжать и использовать ружье.
Чтобы привести оружие в безопасное положение, сдвиньте кнопку предохранителя вправо (рис. 4). Чтобы
установить предохранитель в положение «огонь», сдвиньте кнопку предохранителя влево.
В результате этой последней операции станет видна красная предупредительная полоска (рис. 5).
Когда предохранитель находится в безопасном положении, спусковой крючок и курок заблокированы и
стрелять из ружья невозможно. Когда же предохранитель находится в положении «огонь» и в патроннике
ружья имеется патрон, для выстрела достаточно нажать на спусковой крючок.
СБОРКА
Ружье SXP поставляется в футляре со снятым стволом и с цевьем, установленным на трубчатый магазин.
1. Выньте из футляра ствол и группу ствольная коробка/приклад и выполните чистку и смазывание этих
двух частей.
2. Снимите с трубчатого магазина гайку-колпачок.
3. Обычно данное ружье поставляется с затворной группой в закрытом (вперед) состоянии и с уже
установленной в ствольную коробку группой спускового механизма. Установка ствола при закрытом
механизме возможна, тем не менее, она выполняется легче, если приоткрыть механизм.
R I F L E S
a n d
s h o t g u n s
Русский язык
Предохранитель в положении «огонь».
74
4. Чтобы разблокировать и открыть механизм, нажмите кнопку разблокировки, которая расположена с
левой стороны сзади от спусковой скобы (рис. 6), и потяните цевье назад.
5. Возьмитесь за ствол перед ствольным кольцом.
6. Установите ствол на трубчатый магазин и выровняйте его положение.
7. Сдвиньте ствол назад.
8. Наденьте ствольное кольцо на трубчатый магазин и направьте хвостовик ствола в ствольную коробку.
Убедитесь, что экстрактор правильно установился в своем гнезде в стволе.
9. Продвиньте ствол в ствольной коробке назад до упора.
10. Сразу же установите гайку-колпачок. Затяните ее вручную (по меньшей мере на три полных оборота) и
убедитесь в ее плотной посадке.
Рис. 6
Нажмите кнопку разблокировки,
чтобы разблокировать механизм.
РАЗБОРКА
1. Нажмите кнопку разблокировки, находящуюся с левой стороны сзади от спусковой скобы (рис. 6), чтобы
разблокировать механизм без спуска курка.
2. Откройте механизм и переведите предохранитель в безопасное положение. (При этом красная
предупредительная полоска не должна быть видна.)
3. Направив дуло в безопасную сторону, отверните гайку-колпачок и снимите ее.
4. Возьмитесь за ствол перед ствольным кольцом, придерживая другой рукой приклад.
5. Вытяните ствол из ствольной коробки вперед. Снимите ствольное кольцо с трубчатого магазина. Не
следует прикладывать чрезмерные усилия.
6. Сразу же установите гайку-колпачок и затяните ее вручную по меньшей мере на три оборота.
Рис. 7Рис. 8
Вдавите донце магазина и
поверните его на четверть оборота.
Отпуская донце магазина,
контролируйте
перемещения подающей
пружины.
Рис. 9
Вдавите донце
магазина и поверните
его на четверть
оборота.
R I F L E S
a n d
s h o t g u n s
75
Самый верный путь к раздутию или разрыву ствола ружья — это досылание патрона меньшего калибра в
патронник, рассчитанный на больший калибр. При этом патрон меньшего калибра не провалится в ствол
полностью: его донце застрянет в переходном конусе патронника или в чоке более крупного калибра. Ружье
даст осечку, после чего, посчитав, что патронник пуст, вы можете ошибочно дослать патрон нужного калибра
вслед за задержавшимся патроном меньшего калибра.
Если вы произведете выстрел из ружья в такой ситуации, произойдет характерный разрыв (так называемый
«разрыв 12-20, или 20-28, или 28-.410»), что может привести к значительным повреждениям вашего ружья и
нанести вам или другим людям серьезные травмы.
Мы не можем нести никакой ответственности за несчастные случаи, возникшие вследствие использования
патронов нестандартных размеров или создающих избыточные давления с точки зрения норм, установленных
SAAMI (Институт производителей спортивного оружия и боеприпасов, Sporting Arms and Ammunition
Manufacturers’ Institute).
Все производимые в настоящее время ружья SXP 12 калибра имеют патронник 3» и предназначены, как
при спортивной стрельбе, так и при охоте, для стрельбы патронами 2¾» и 3», заряженными на заводе.
Ствол одинаково безопасно стреляет как свинцовой, так и стальной дробью. Чоки для нарезных стволов
предназначены для стрельбы пулями типа «сабо».
ЕМКОСТЬ МАГАЗИНА
Если извлечь из магазина трехзарядную заглушку (ограничитель), в нем может находиться до четырех патронов
2¾» или до трех патронов 3». Магазин повышенной емкости в некоторых моделях SXP может содержать пять
патронов 2ѕ» или четыре патрона 3». На стрельбище или в другом месте, пригодном для стрельбы, зарядите
свой магазин на полную емкость, чтобы проверить, сколько в него входит патронов.
Помните, что «полная» емкость включает в себя, помимо снаряженного магазина, еще один дополнительный
патрон, который будет дослан в патронник.
ТРЕХЗАРЯДНАЯ ЗАГЛУШКА (ОГРАНИЧИТЕЛЬ)
Ружье SXP поставляется с трехзарядной заглушкой (ограничителем), установленным в магазине, что
ограничивает емкость магазина до двух патронов во исполнение федерального законодательства США об
охране перелетных птиц. Если вы не хотите ограничивать себя тремя выстрелами, когда это не противоречит
требованиям закона, вы можете извлечь трехзарядную заглушку.
1. Отверните гайку-колпачок и снимите ее.
2. Трехзарядная заглушка находится под донцем магазина и подпружинена подающей пружиной.
Указательным пальцем или большой шлицевой отверткой вдавите донце приблизительно на 2,5 см (1
дюйм) в магазин и поверните его на четверть оборота (рис. 7).
3. Донце магазина подпружинено подающей пружиной. Отпускайте донце магазина с осторожностью,
контролируя перемещения подающей пружины (рис. 8). Выньте трехзарядную заглушку (ограничитель) и
верните донце магазина на место.
4. Совместите пазы по всей длине донца магазина с выступами внутри трубчатого магазина.
5. Сожмите подающую пружину в трубчатом магазине.
6. Установите донце магазина, вдавив его в трубчатый магазин приблизительно на 2,5 см (1 дюйм) и
повернув на четверть оборота, чтобы зафиксировать в нужном положении. Убедитесь, что донце магазина
зафиксировано правильно.
7. Установите гайку-колпачок.
УСТАНОВКА ТРЕХЗАРЯДНОЙ ЗАГЛУШКИ (ОГРАНИЧИТЕЛЯ)
Если вам нужно снова установить трехзарядную заглушку (ограничитель), чтобы ограничить емкость магазина
вашего ружья двумя патронами, выполните следующие действия:
1. Отверните гайку-колпачок и снимите ее.
2. Указательным пальцем или большой шлицевой отверткой вдавите донце приблизительно на 2,5 см (1
дюйм) в магазин и поверните его на четверть оборота (рис. 7).
3. Донце магазина подпружинено подающей пружиной. Отпускайте донце магазина с осторожностью,
контролируя перемещения подающей пружины. Поместите трехзарядную заглушку (ограничитель) над
пружиной и верните донце магазина на место.
4. Совместите пазы по всей длине донца магазина с выступами внутри трубчатого магазина.
5. Сожмите подающую пружину и трехзарядную заглушку в трубчатом магазине.
6. Установите донце магазина, вдавив его в трубчатый магазин приблизительно на 2,5 см (1 дюйм) и
R I F L E S
a n d
s h o t g u n s
Русский язык
ИЗВЛЕЧЕНИЕ ТРЕХЗАРЯДНОЙ ЗАГЛУШКИ (ОГРАНИЧИТЕЛЯ)
76
повернув на четверть оборота, чтобы зафиксировать в нужном положении. Убедитесь, что донце магазина
зафиксировано правильно.
7. Установите гайку-колпачок.
ЗАРЯЖАНИЕ
СНАРЯЖЕНИЕ МАГАЗИНА
1. Переведите предохранитель в безопасное положение и закройте механизм.
Рис. 10
Нажмите на фиксатор патрона, чтобы извлечь
из магазина очередной патрон.
2. Вдавите подаватель внутрь зарядного окна передней частью патрона (рис. 9).
3. Надавливая на донце гильзы, введите ее внутрь магазина, чтобы она заблокировалась фиксатором
патрона.
4. Повторяйте операцию до полного снаряжения магазина.
ПОДАЧА ПАТРОНА В ПАТРОННИК ИЗ МАГАЗИНА
1. При закрытой затворной группе нажмите на подаватель передней частью патрона и вдавите большим
пальцем патрон в магазин, чтобы патрон заблокировался фиксатором патрона.
2. При желании можно продолжить заполнение магазина, как описано выше, до его полной емкости.
3. Когда требуется сделать выстрел, можно дослать патрон из магазина в патронник, нажав кнопку
разблокировки, находящуюся с левой стороны сзади от спусковой скобы, и передернув цевье. При
закрытии затворной группы патрон будет автоматически направлен из магазина в патронник. При этом в
магазин можно вставить еще один патрон, чтобы использовать его полную емкость.
ПОДАЧА ПАТРОНА В ПАТРОННИК ЧЕРЕЗ ЭКСТРАКЦИОННОЕ ОКНО
1. Нажмите кнопку разблокировки, находящуюся с левой стороны сзади от спусковой скобы. Это позволит
разблокировать механизм без спуска курка. Отведите цевье назад до упора. Осмотрите патронник,
механизм подачи и магазин, чтобы быть абсолютно уверенным, что в них нет патронов и посторонних
предметов.
2. Вставьте патрон соответствующего калибра и длины через экстракционное окно в открытую затворную
раму.
3. Отведите цевье вперед до упора.
4. При желании можно продолжить заполнение магазина, как описано выше, до его полной емкости.
ПРОИЗВОДСТВО ВЫСТРЕЛА
1. Переведите предохранитель в безопасное положение.
2. Дошлите патрон в патронник, как описано выше.
3. Когда патрон находится в патроннике, чтобы начать стрелять, достаточно сдвинуть предохранитель в
положение «огонь».
4. Когда вы будете готовы стрелять, переведите предохранитель в положение «огонь», прицельтесь и
нажмите на спусковой крючок.
5. Если вы хотите продолжить стрельбу, оттяните цевье назад до упора, чтобы выбросить стреляную гильзу
через экстракционное окно.
6. Отведите цевье до упора вперед, чтобы дослать в патронник новый патрон из магазина.
Ваше ружье SXP готово к стрельбе. Сразу же переведите предохранитель в безопасное положение (красная
полоска не видна), в котором он будет находиться до того момента, когда вы будете готовы выстрелить.
R I F L E S
a n d
s h o t g u n s
77
Рис. 11
одна засечка
три засечки
пять засечек
две засечки
четыре засечки
нет засечек
ОСЫПЬ ПРИ СТРЕЛЬБЕ
ОСЫПЬ ПРИ СТРЕЛЬБЕ
СВИНЦОВОЙ ДРОБЬЮ
СТАЛЬНОЙ ДРОБЬЮ
УДЛИНИТЕЛЬ СТВОЛА
СВЕРХПОЛНЫЙ
**
I
ПОЛНЫЙ
*
II
УЛУЧШЕННЫЙ
ПОЛНЫЙ 1
ЗАСЕЧКИ НА ТОРЦЕ
ИЗМЕНЕННЫЙ 3/4
III
ИЗМЕНЕННЫЙ 1/2
ПОЛНЫЙ 1
IIII
УЛУЧШЕННЫЙ ЦИЛИНДР
ИЗМЕНЕННЫЙ 1/2
IIIII
СКИТ
УЛУЧШЕННЫЙ ЦИЛИНДР
НЕТ ЗАСЕЧЕК
ЦИЛИНДР
ЦИЛИНДР
1/4
* Не использовать при стрельбе стальной дробью. Использование слишком строгого чока при стрельбе стальной дробью
дает малоэффективный «взрывной» сноп.
** Специальный сверхполный, снабжен газосбросными отверстиями. Не использовать при стрельбе стальной дробью.
1
Если для некоторого заданного типа осыпи при стрельбе стальной дробью указано несколько видов чоков, используйте
для стрельбы более крупной дробью с высокой скоростью более слабое сужение.
РАЗРЯЖАНИЕ С ПОМОЩЬЮ МЕХАНИЗМА
На всех моделях SXP для извлечения патронов из патронника и магазина применяйте следующую процедуру.
1. Переведите предохранитель в безопасное положение.
2. Нажмите кнопку разблокировки, чтобы разблокировать механизм (рис. 6).
3. Передерните цевье и повторяйте это движение до тех пор, пока все патроны не будут досланы в патронник
и вслед за этим выброшены.
4. Когда последний патрон из магазина будет передан в патронник и выброшен через экстракционное окно,
оставьте механизм открытым.
5. Указательным пальцем ощупайте вход в магазин, чтобы убедиться, что там не осталось патронов.
R I F L E S
a n d
s h o t g u n s
Русский язык
1/4
78
РАЗРЯЖАНИЕ МАГАЗИНА
Патроны могут быть извлечены из магазина также с помощью следующей процедуры.
1. Переведите предохранитель в безопасное положение, убедитесь, что механизм закрыт, и направьте
дуло в безопасную сторону.
2. Поверните ружье так, чтобы спусковая скоба оказалась вверху, и прижмите подаватель как можно
больше вниз.
3. Вдавите фиксатор патрона внутрь, чтобы извлечь из магазина один патрон (рис. 10). Снова нажмите
на фиксатор патрона, чтобы извлечь следующий патрон. Фиксатор патрона располагается внутри
экстракционного окна справа.
Когда патрон находится в магазине, фиксатор упирается в металлическую часть патрона.
4. Оставляя предохранитель в безопасном положении, переверните оружие в нормальное положение
для стрельбы.
Нажмите кнопку разблокировки и оттяните цевье назад до упора, чтобы извлечь патрон из патронника.
СИСТЕМА СМЕННЫХ ЧОКОВ
Все стволы ружей SXP (за исключением моделей Defender) имеют внутреннюю резьбу для установки чоков
«Invector-PlusTM». Чоковые трубки «WinChoke®», «InvectorTM» в стандартном исполнении и «Invector – plus» не
являются взаимозаменяемыми. Определите, на какую систему чоков рассчитано ваше ружье. Эти сведения
должны находиться с правой части ствола среди характеристик, где обычно указывается маркировка чоковых
сужений.
Степень сужения указана на чоке в двух местах: на боковой поверхности трубки, а также с помощью кодовых
засечек на верхнем конце чока. Прилагается универсальный ключ для снятия и установки чоков.
Стандартные чоки «Invector» и чоки «Invector – plus» совместимы с боеприпасами, заряженными на заводе
в соответствии с нормами SAAMI, в том числе свинцовой дробью «магнум», стальной дробью, пулями типа
«сабо» и другими пулями для гладкоствольного оружия.
Запасные и дополнительные чоковые трубки и ключи можно приобрести у своего дилера винтовок и ружей
Winchester, или обратившись в клиентскую службу Winchester Repeating Arms. Контактная информация
имеется на стр. 82.
ВЫБОР ЧОКА
Чтобы помочь вам в выборе нужного чока в условиях данной охоты или стрельб, на боковой поверхности
каждой трубки «Invector – plus» указаны параметры осыпи, получаемой при стрельбе свинцовой и стальной
дробью. На верхнем конце каждой трубки «Invector» имеются также маркировочные засечки (рис. 11).
По этим засечкам вы можете определить параметры сужения, когда трубка уже установлена. Засечки на торце
соответствуют стрельбе свинцовой дробью. С помощью таблицы можно установить соответствия между
свинцовой и стальной дробью и определить, какие чоки подходят для ваших боеприпасов и конкретных
условий охоты или стрельб.
В комплект с ружьем входит несколько чоков. Чоки, указанные ниже, могут быть также приобретены
как дополнительные принадлежности. Помните, что чоковые трубки Winchoke, «Invector» в стандартном
исполнении и «Invector – plus» не являются взаимозаменяемыми. Трубки «Invector – plus» предназначены
только для ружей Winchester со сверловкой ствола «Back Bore». Перед снятием и установкой чоков, а также
при считывании кодовых засечек на торце ствола убедитесь, что ружье полностью разряжено.
СНЯТИЕ ЧОКА
1. Переведите предохранитель в безопасное положение. Обязательно откройте механизм, чтобы убедиться,
что ружье полностью разряжено. Следите за тем, чтобы дуло ружья все время было направлено в
безопасную сторону.
2. С помощью ключа для чоков отверните трубку, поворачивая ее против часовой стрелки. Последние
обороты перед извлечением трубки из ствола выполняются пальцами.
УСТАНОВКА ЧОКА
1. Переведите предохранитель в безопасное положение. Обязательно откройте механизм, чтобы убедиться,
что ружье полностью разряжено. Следите за тем, чтобы дуло ружья все время было направлено в
безопасную сторону.
2. Перед установкой трубки осмотрите внутреннюю резьбу в стволе и резьбу на чоке, чтобы убедиться, что
они не загрязнены.
Нанесите на резьбу тонкий слой высококачественного легкого оружейного масла.
R I F L E S
a n d
s h o t g u n s
79
3. Пальцами ввинтите соответствующую трубку в дуло, так чтобы резьба оказалась внутри, и торец с
засечками — снаружи. Когда трубка начнет заворачиваться с усилиями, воспользуйтесь входящим в
комплект ключом для ее плотной посадки.
Рис. 12
Чоковая трубка
Ствольное кольцо
Ствол
Подающая пружина
Ударник
Затвор
Гайка-колпачок
Трехзарядная заглушка Донце магазина
Затворная рама
(ограничитель) магазина
Боевая пружина
Трубчатый магазин
Ствольная коробка
Направляющие затвора
Группа спускового механизма
Шпилька спускового
механизма
Цевье
Рис. 13
РЕКОМЕНДАЦИИ ПО ЧИСТКЕ И УХОДУ
ВНИМАНИЕ!
ПЕРЕД ЧИСТКОЙ СВОЕГО ОРУЖИЯ ОБРАТИТЕ ВНИМАНИЕ НА СЛЕДУЮЩИЕ ИНСТРУКЦИИ
ЧИСТКА ДЕТАЛЕЙ СО СПЕЦИАЛЬНЫМИ ПОКРЫТИЯМИ
Будьте предельно осторожны при чистке оружия с камуфляжным покрытием, покрытием Dura-Touch®
и другими специальными покрытиями. Постоянно следите за тем, чтобы эти поверхности не вступали в
контакт с растворителями, средствами для чистки ствола и другими химически активными веществами.
Предпочтительно очищать эти поверхности легким оружейным маслом, не содержащим растворителей, или
с помощью влажной ткани и мягкого средства для мытья посуды (следите, чтобы вода не проникала внутрь
механизма). Во время чистки канала ствола и механизма вашего ружья оберегайте наружные покрытия от
контактов с используемыми химическими веществами. Исключите любые контакты наружных покрытий со
всеми другими химически активными веществами, в том числе с репеллентами от насекомых, содержащими
диэтилтолуамид, солнцезащитными кремами и т.д. Повреждения камуфляжного покрытия, Dura-Touch и
других покрытий, вызываемые химикатами, носят необратимый характер и не поддаются восстановлению.
R I F L E S
a n d
s h o t g u n s
Русский язык
Вынув шпильку,
поднимите
заднюю часть
группы спускового
механизма, чтобы
извлечь его
80
Рис. 14
Рис. 15
Поместите затворную группу на направляющие затвора.
Осторожно введите затворную группу по направляющим
затвора внутрь ствольной коробки.
ПОРЯДОК ЧИСТКИ
При правильном уходе и хранении в чистом состоянии ваше SXP будет работать лучше, надежнее и в течение
более длительного времени. Чистку ружья необходимо выполнять каждый день, когда вы стреляете, и даже
чаще, если оно подвергается сильному загрязнению. В конце каждого дня, когда вы стреляли, необходимо
почистить ствол, протереть и смазать механизм.
Обычная процедура ухода может выполняться со стволом, прикрепленным к ствольной коробке (смазывание
и протирание). Для более тщательного ухода (чистка ствола) необходимо отделить ствол от ствольной
коробки. Для полной чистки необходимо снять затворную группу и группу спускового механизма.
Если у вас возникли проблемы в функционировании (тугой ход механизма при передергивании цевья),
выполните полную чистку ружья, чтобы посмотреть, не решает ли это проблему, прежде чем обращаться в
ближайший к вам сервисный центр для оружия Winchester, в наш отдел технического обслуживания Winchester
или к квалифицированному оружейному мастеру.
1. Переведите предохранитель в безопасное положение. Откройте механизм и осмотрите патронник и
магазин, чтобы убедиться, что там нет патронов.
Следите, чтобы дуло ружья было направлено в безопасную сторону.
2 Отделите ствол, как описано в разделе «Разборка».
3. Осмотрите канал ствола с обоих концов, чтобы выявить остатки свинца и пластика, которые часто
появляются от пыжей-контейнеров современных патронов. Остатки этих веществ имеют форму
продольных полосок и обычно обнаруживаются большей частью у дула и прямо перед патронником.
Наличие некоторого количества свинца или пластика нормально и не является проблемой.
4. Если вам кажется, что остатков свинца или пластика слишком много, их можно снять, протерев
канал ствола латунным ершиком. Сначала смочите ершик в растворителе для пороха или распылите
растворитель в канал ствола. Протирайте канал, пока он не станет чистым.
Чтобы избежать выпадения щетины на ершике, каждый раз проталкивайте его до конца ствола, прежде
чем вести обратно.
5. Когда все остатки свинца и пластика удалены, пропустите через канал чистой и сухой фланелевый
лоскут. Вслед за этим пропустите фланель, слегка смоченную в масле.
6. Осмотрите ствол и патронник, чтобы убедиться, что там случайно не остались кусочки фланели. Удалите
все обнаруженные кусочки.
7. Соберите ружье и протрите все видимые металлические поверхности тканью, слегка смоченной в
масле, удаляя все следы от пальцев, в которых может накапливаться влага. Все остатки засохшего масла
в патроннике также необходимо удалить.
8. Смажьте ружье в точках, указанных на рис.3. Регулярное смазывание небольшим количеством масла
чрезвычайно важно для долговечной и надежной работы вашего ружья.
ДАЛЬНЕЙШАЯ РАЗБОРКА
Одним из преимуществ SXP является возможность отсоединить его механизм для чистки. В суровых погодных
условиях и в загрязненной среде само осознание того факта, что детали ружья очищены и смазаны, придает
дополнительную уверенность при стрельбе.
Подготовьте чистую рабочую плоскость для выкладывания частей ружья по мере его разборки (рис. 12).
СНЯТИЕ СТВОЛА
1. Отверните гайку-колпачок и снимите ее. Не забывайте все время держать дуло ружья направленным в
безопасную сторону.
2. Сдвиньте ствол вперед, чтобы вывести его из ствольной коробки, и снимите ствольное кольцо с переднего
конца трубчатого магазина.
R I F L E S
a n d
s h o t g u n s
81
3. Сразу же заверните гайку-колпачок на трубчатом магазине, повернув ее по меньшей мере на три полных
оборота.
СНЯТИЕ ГРУППЫ СПУСКОВОГО МЕХАНИЗМА
Снятие группы спускового механизма также является частью процедуры ухода за ружьем. Эта несложная
операция необходима для выполнения определенных типов чистки и ухода за вашим ружьем. Когда группа
спускового механизма и затворная группа сняты, легче удалять частички мусора и влаги, которые могут
накапливаться в ствольной коробке.
Группу спускового механизма необходимо снять до того, как снимать затворную группу.
1. Убедитесь, что ваше оружие полностью разряжено, как описано в данном руководстве выше.
2. Передерните механизм, отведя цевье назад, а затем вперед. При этом будет взведен курок. Переведите
предохранитель в безопасное положение.
3. Если ствольная группа была демонтирована, обязательно установите гайку-колпачок на конец трубчатого
магазина, чтобы оттуда случайно не выпало донце магазина.
4. Положите свое ружье спусковой скобой вверх на поверхность, которая не может повредить покрытия
ствольной коробки и приклада.
5. Извлеките шпильку спускового механизма, выдвигая ее в левую сторону от ствольной коробки, то есть
в сторону, противоположную экстракционному окну. Для этого подойдет любой твердый инструмент,
диаметр которого меньше, чем у шпильки, и который не повредит покрытие.
Во время извлечения шпильки крепко держите инструмент и ружье.
6. Выдвиньте шпильку в достаточной степени для того, чтобы захватить пальцами, затем вытяните до конца
рукой. Если вручную извлечь шпильку не удается, убедитесь, что диаметр инструмента или выколотки,
которыми вы пользуетесь для удаления шпильки, достаточно мал, чтобы не повредить отверстие.
7. После извлечения шпильки выньте группу спускового механизма из ствольной коробки, подняв ее вверх и
потянув назад (рис. 13).
СНЯТИЕ ЗАТВОРНОЙ ГРУППЫ
1. Снимите ствол и группу спускового механизма, как описано выше, но не надевая гайку-колпачок.
2. Выдвиньте вперед затворную группу вместе с прикрепленными к ней направляющими затвора, чтобы
снять их через переднюю часть ствольной коробки. Обратите внимание, что, когда затворная группа будет
проходить мимо экстракционного окна, пружина экстрактора может оказать некоторое сопротивление. В
этом случае перемещайте детали с осторожностью.
1. Снимите затворную группу ружья, как описано выше.
2. Переверните затворную группу плоской стороной вверх и отожмите заднюю часть ударника вперед
указательным пальцем. Удерживая таким образом ударник, другой рукой поднимите переднюю часть
направляющих затвора и сдвиньте ее немного вперед.
3. Поднимите направляющие затвора, чтобы вывести их язычок из выемки в ударнике. Это позволит отделить
направляющие от затворной группы.
4. На ударник воздействует пружина, и, если вы не будете удерживать его указательным пальцем, он может
выскочить из затворной группы. Во время снятия ударника и пружины контролируйте перемещения
шпильки.
Дальнейшая разборка не является ни необходимой, ни рекомендуемой в целях чистки. Не разбирайте ваше
SXP больше, чем показано на рис. 12. Дополнительная разборка может привести к аннулированию гарантии.
Для выполнения ремонта, требующего дополнительной разборки, обращайтесь в сервисный центр для
оружия Winchester или к квалифицированному оружейному мастеру.
УСТАНОВКА УДАРНИКА И ЗАТВОРНОЙ ГРУППЫ
1. Наденьте пружину ударника на ударник.
Начинать можно с любого конца пружины.
2. Введите ударник с пружиной в отверстие в задней части затворной группы, вставив сначала шпильку
ударника.
3. Чтобы установить затворную группу на направляющие затвора, вдавите круглый конец ударника в
отверстие в затворной раме так, чтобы большой зазор между концом ударника с выемкой и его закраиной,
приходился на центр круглого отверстия в затворной раме.
R I F L E S
a n d
s h o t g u n s
Русский язык
СНЯТИЕ УДАРНИКА
82
4. Поместите язычок направляющих затвора в пространство между круглым концом и закраиной ударника
и медленно отпустите конец ударника. Закраина ударника должна оттянуть язычок к заднему краю
затворной группы.
5. Снимите гайку-колпачок.
6. Соедините направляющие затвора и затворную группу (рис. 14). Наденьте цевье в сборе на трубчатый
магазин.
7. Осторожно введите направляющие затвора и затворную группу в переднюю часть ствольной коробки.
Когда эти части войдут в ствольную коробку, сдвиньте их до упора назад (рис. 15).
УСТАНОВКА ГРУППЫ СПУСКОВОГО МЕХАНИЗМА
1. Перед установкой группы спускового механизма затворная группа, направляющие затвора и цевье
должно быть прикреплены к ствольной коробке.
2. Курок должен быть взведен, для чего следует нажать на него назад до фиксации; при этом
предохранитель должен находиться в безопасном положении.
3. Переверните ружье так, чтобы открытая часть ствольной коробки была обращена вверх. Удерживая
группу спускового механизма под углом около 45 градусов к ствольной коробке, зацепите верхние
выступы группы спускового механизма за соответствующие углубления на входе в магазин в переднем
конце отверстия ствольной коробки, как показано на рис. 13.
4. Осторожно введите переднюю часть группы спускового механизма в отверстие в ствольной коробке,
затем опустите ее заднюю часть в отверстие в ствольной коробке так, чтобы группа спускового
механизма встала параллельно ствольной коробке. Может возникнуть необходимость подвигать цевье
в разные положения, пока вся группа спускового механизма не поместится в ствольной коробке. При
правильной установке группы спускового механизма цевье будет также установлено правильно, и
отверстие для шпильки спускового механизма займет нужное место.
5. Выровняйте группу спускового механизма по отверстию ствольной коробки и проденьте шпильку
спускового механизма через ствольную коробку так, чтобы она не выступала с обеих сторон ствольной
коробки.
Шпилька должна проходить легко и без чрезмерных усилий. Если вы почувствуете существенное
сопротивление, снимите группу спускового механизма и повторите операцию, начиная с шага 1. Теперь
ваше ружье собрано полностью. Сразу же убедитесь, что предохранитель находится в безопасном
положении. Выделите время для того, чтобы протереть и почистить все наружные поверхности, как
описано в разделе «Рекомендации по чистке и обслуживанию».
ДРУГИЕ РЕКОМЕНДАЦИИ ПО ЧИСТКЕ
После продолжительных периодов интенсивного использования ружье следует отдать квалифицированному
оружейному мастеру, который разберет механизм, чтобы выполнить профессиональную чистку и смазку.
ДЕТАЛИ, ОБСЛУЖИВАНИЕ, РЕМОНТ, ВОПРОСЫ
Если вашему оружию Winchester когда-либо потребуется техническое обслуживание или ремонт, как правило,
следует обращаться в один из наших авторизованных сервисных центров. В некоторых случаях целесообразно
обращаться в наш отдел технического обслуживания Winchester Repeating Arms.
Список авторизованных сервисных центров прилагался к вашему новому оружию. Если вам нужен новый
список, свяжитесь с нами. Мы можем помочь вам найти оптимальное место для обслуживания вашего оружия.
Адрес сайта: www.winchesterint.com
R I F L E S
a n d
s h o t g u n s
83
R I F L E S
a n d
s h o t g u n s
Winchester© trademarks licensed from Olin Corporation
R I F L E S
a n d
s h o t g u n s
Browning International S.A.
Parc Industriel des Hauts-Sarts • 3ème Avenue, 25 • B - 4040 Herstal