1
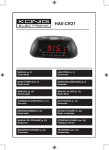
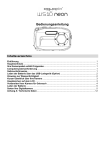
WT8097
NOISE CONTROLLED BACK-LIGHT PROJECTION CLOCK
GELUIDSGESTUURDE PROJECTIEKLOK
HORLOGE À PROJECTION À CAPTEUR SONORE
RELOJ CON PROYECCIÓN Y SENSOR SONORO
KLANGGESTEUERTE PROJEKTIONSUHR
PODŚWIETLANY ZEGAR Z PROJEKTOREM
USER MANUAL
GEBRUIKERSHANDLEIDING
NOTICE D’EMPLOI
MANUAL DEL USUARIO
BEDIENUNGSANLEITUNG
INSTRUKCJA OBSŁUGI
3
7
11
15
19
23
WT8097
Figure
1
00 (11/01/2010)
2
Velleman®
WT8097
USER MANUAL
1. Introduction
To all residents of the European Union
Important environmental information about this product
This symbol on the device or the package indicates that disposal of the
device after its lifecycle could harm the environment. Do not
dispose of the unit (or batteries) as unsorted municipal waste;
it should be taken to a specialized company for recycling.
This device should be returned to your distributor or to a local
recycling service. Respect the local environmental rules.
If in doubt, contact your local waste disposal authorities.
Thank you for choosing Velleman! Please read the manual thoroughly
before bringing this device into service. If the device was damaged in
transit, don't install or use it and contact your dealer.
2. Safety Instructions
Keep the device away from children and unauthorised users.
For indoor use only. Keep this device away from rain, moisture,
splashing and dripping liquids
•
•
•
Damage caused by disregard of certain guidelines in this manual is not
covered by the warranty and the dealer will not accept responsibility for
any ensuing defects or problems.
Note that damage caused by user modifications to the device is not
covered by the warranty.
There are no user-serviceable parts inside the device. Refer to an
authorized dealer for service and/or spare parts
3. General Guidelines
•
•
•
•
•
Protect this device from shocks and abuse. Avoid brute force when
operating the device.
Protect the device against extreme heat and dust.
Familiarise yourself with the functions of the device before actually
using it.
All modifications of the device are forbidden for safety reasons.
Only use the device for its intended purpose. Using the device in an
unauthorised way will void the warranty.
00 (11/01/2010)
3
Velleman®
WT8097
4. Features
•
•
•
functions: time, date , temperature, alarm (2x) with snooze, countdown,
clock projection
12/24h time format
noise/touch controlled backlight and projection
5. Overview
Refer to the illustration on page 2 of this manual.
projection clock
F mode button
A LCD
G set button
B projection lens
H up button
C projection part
I
D lens focus knob
J 12/24 button
E snooze button
K noise/touch control switch
down button
display icons
1
time icon
3
second alarm icon
2
first alarm icon
4
snooze icon
6. Setting
• Make sure batteries are present inside the device (see §8).
Main clock & date setting
• Set the 12/24h mode by pressing the 12/24 button [J].
• Press the mode button [F] once, the time icon [1] starts flashing.
• Press the set button [G] repeatedly to scroll through the settings:
hour – minutes – year – month/date or date/month order – month – day
– language of day – hour …
• To change a setting, use the up [H] or down [I] button. Press and hold
(±2s) for fast value up or down.
• There are 8 languages available for day display:
ENG-DEU-FRA-ITA-ESP-POR-TUR-NED
00 (11/01/2010)
4
Velleman®
WT8097
• The clock and date setup exits automatically after ±60 seconds.
Alarm 1
• Press the mode button [F] 2 times, the first alarm icon [2] starts
flashing.
• Press the set button [G] repeatedly to select hour and minutes setting
and modify with the up [H] or down [I] button.
• Press the mode button [F] 2 times to return to time display. The display
indicates the time icon [1] and the first alarm icon [2], indicating that the
alarm will be activated at set time.
Alarm 2
• Press the mode button [F] 3 times, the second alarm icon [3] starts
flashing.
• Press the set button [G] repeatedly to select hour and minutes setting
and modify with the up [H] or down [I] button.
• Press the mode button [F] once to return to time display. The display
indicates the time icon [1] and the second alarm icon [3], indicating that
the alarm will be activated at set time.
Temperature mode
• When in normal time display, press the set button [G] to select
between °Celsius or °Fahrenheit display.
7. Operation
•
•
•
•
•
•
The clock has a noise/touch control function. When noise (e.g.
clapping hands, a knock on the table) or a touch anywhere on the
body of the clock is detected, the backlight will switch on and the
time will be projected on a wall or ceiling for ±5s.
To activate the noise/touch control, set the noise/touch control
switch [K] to the ON-position. When switched to the OFF-position,
only the snooze button [E] will activate the backlight and projection
system.
Alter the projection direction by turning the projection part [C],
maximum angle ±60°.
Focus the projection lens by turning the lens focus knob [D].
To activate/deactivate alarm 1 press the up button [H]; to
activate/deactivate alarm 2, press the down button [I].
When an alarm sounds the corresponding icon will flash. Press the
snooze button [E] to enable snooze mode. The snooze icon [4] is
displayed and the alarm will sound again after 4 minutes. To exit
00 (11/01/2010)
5
Velleman®
WT8097
•
snooze mode, press any key other than the snooze button [E]. The
snooze function can be activated up to 5 times.
To stop the alarm completely use the up [H] button for alarm 1 and
the down [I] button for alarm 2.
8. Batteries
•
•
•
•
Open the battery cover at the bottom side of the clock.
Insert three new type AAA (LR03C) batteries with polarity as
indicated inside the battery casing. The clock beeps 3 times while all
characters on the display are shown.
Close the battery compartment.
Do not attempt to recharge non-rechargeable batteries and do not
throw batteries in fire as they might explode.
WARNING: handle batteries with care, observe
warnings on battery casing. Dispose of batteries in
accordance with local regulations.
Keep batteries away from children.
9. Technical Specification
temperature range
0°C~50°C (32°F~122°F)
power supply
3x 1.5V AAA LR03C batteries (not incl.)
dimensions
168 x 91 x 71mm
weight
200g
Use this device with original accessories only. Velleman nv cannot
be held responsible in the event of damage or injury resulted from
(incorrect) use of this device.
For more info concerning this product, please visit our website
www.velleman.eu.
The information in this manual is subject to change without prior
notice.
00 (11/01/2010)
6
Velleman®
WT8097
GEBRUIKERSHANDLEIDING
1. Inleiding
Aan alle ingezetenen van de Europese Unie
Belangrijke milieu-informatie betreffende dit product
Dit symbool op het toestel of de verpakking geeft aan dat,
als het na zijn levenscyclus wordt weggeworpen, dit toestel
schade kan toebrengen aan het milieu. Gooi dit toestel (en
eventuele batterijen) niet bij het gewone huishoudelijke afval;
het moet bij een gespecialiseerd bedrijf terechtkomen voor
recyclage. U moet dit toestel naar uw verdeler of naar een lokaal
recyclagepunt brengen. Respecteer de plaatselijke milieuwetgeving.
Hebt u vragen, contacteer dan de plaatselijke autoriteiten
betreffende de verwijdering.
Dank u voor uw aankoop! Lees deze handleiding grondig voor u het
toestel in gebruik neemt. Werd het toestel beschadigd tijdens het
transport, installeer het dan niet en raadpleeg uw dealer.
2. Veiligheidsinstructies
Houd buiten het bereik van kinderen en onbevoegden.
Enkel voor gebruik binnenshuis. Bescherm tegen regen,
vochtigheid, extreme temperaturen, stof en opspattende
vloeistoffen.
•
•
•
De garantie geldt niet voor schade door het negeren van bepaalde
richtlijnen in deze handleiding en uw dealer zal de
verantwoordelijkheid afwijzen voor defecten of problemen die hier
rechtstreeks verband mee houden.
Schade door wijzigingen die de gebruiker heeft aangebracht valt
niet onder de garantie.
U mag geen onderdelen vervangen. Bestel eventuele
reserveonderdelen bij uw dealer.
3. Algemene richtlijnen
•
Bescherm tegen schokken. Vermijd brute kracht tijdens de
bediening.
00 (11/01/2010)
7
Velleman®
WT8097
•
•
•
Leer eerst de functies van de klok kennen voor u haar gaat
gebruiken.
Om veiligheidsredenen mag u geen wijzigingen aanbrengen.
Gebruik de klok enkel waarvoor ze gemaakt is. Bij onoordeelkundig
gebruik vervalt de garantie.
4. Eigenschappen
•
•
•
functie: tijdsweergave, datum, temperatuur, alarm (2x) met
snoozefunctie, chronometer, projectieklok
12/24-uur tijdsweergave
sturing van de achtergrondverlichting et de projectie via geluid of
aanraking
5. Omschrijving
Raadpleeg de figuren op pagina 2 van deze handleiding.
projectieklok
F MODE
A lcd
G SET
B lens
H UP
C projector
I
D scherpstelling lens
J 12/24-uur
E snoozeknop
K aan-uitschakelaar geluidssturing
DOWN
symbolen
1
tijd
3
alarm 2
2
alarm 1
4
snooze
6. De klok instellen
• Plaats de batterijen in de klok (zie §8).
Instellen van het uur en de datum
• Schakel de 12/24-uurmodus in met de 12/24-uurknop [J].
• Druk eenmaal op MODE [F], de tijdsicoon [1] knippert.
00 (11/01/2010)
8
Velleman®
WT8097
•
Druk meermaals op SET [G] om door de instelmogelijkheden te
scrollen:
uur – minuten – jaar – maand/datum of datum/maand – maand – dag –
taal – uur…
• Wijzig de instelling met UP [H] of DOWN [I]. Houd gedurende ± 2
seconden ingedrukt om snel te wijzigen.
• Er zijn 8 beschikbare talen:
ENG-DEU-FRA-ITA-ESP-POR-TUR-NED
• De klok verlaat het instelmenu automatisch na ± 60 seconden.
Alarm 1
• Druk tweemaal op MODE [F], de icoon voor alarm 1 [2] knippert.
• Druk meermaals op SET [G] om het uur of de minuten te selecteren en
wijzig met UP [H] of DOWN [I].
• Druk tweemaal op MODE [F] om naar de uurweergave terug te keren.
Op de display verschijnt de tijdsicoon [1] of de icoon voor alarm 1 [2]
om aan te geven dat alarm 1 is ingeschakeld.
Alarm 2
• Druk driemaal op MODE [F], de icoon voor alarm 2 [3] knippert.
• Druk meermaals op SET [G] om het uur of de minuten te selecteren en
wijzig met UP [H] of DOWN [I].
• Druk eenmaal op MODE [F] om naar de uurweergave terug te keren.
Op de display verschijnt de tijdsicoon [1] of de icoon voor alarm 2 [3]
om aan te geven dat alarm 2 is ingeschakeld.
Temperatuur
• Druk op SET [G] om te selecteren tussen °Celsius/°Fahrenheit.
7. Gebruik
•
•
•
•
•
Deze klok is uitgerust met een geluidsturing. Klap in de handen of
tik lichtjes op de klok om gedurende ± 5 seconden de
achtergrondverlichting in te schakelen en het uur te projecteren.
Schakel de geluidssturing in met de aan-uitschakelaar [K]. Met de
schakelaar op OFF is de achtergrondverlichting en de projectie
enkel inschakelbaar met de snoozeknop [E].
Richt het geprojecteerde uur met de projector [C] (max. hoek van
± 60°).
Stel het geprojecteerde uur scherp van de focusregeling [D].
Schakel alarm 1 in/uit met UP [H]; schakel alarm 2 in/uit met DOWN
[I].
00 (11/01/2010)
9
Velleman®
WT8097
•
•
De overeenkomstige icoon knippert van zodra het alarm afgaat.
Druk op SNOOZE [E] om de snoozefunctie in te schakelen. De
snooze-icoon [4] verschijnt op de display en het alarm gaat opnieuw
af na 4 minuten. Verlaat de snoozefunctie met een druk op een
willekeurige knop behalve de snoozeknop [E]. De snoozefunctie kan
tot 5 keer herhaald worden.
Schakel het alarm 1 uit met UP [H] en alarm 2 met DOWN [I].
8. De batterijen
•
•
•
•
Open het batterijvak onderaan de klok.
Plaats drie nieuwe batterijen van het type AAA (LR03C) volgens de
polariteitaanduidingen. De klok piept drie keer en alle karakters
verschijnen op de display.
Sluit het batterijvak.
Herlaad geen alkalinebatterijen en gooi de batterijen nooit in het
vuur.
LET OP! Volg de instructies op de verpakking van de
batterijen. Houd de batterijen buiten het bereik van
kinderen.
9. Technische specificaties
temperatuurbereik
0 °C ~ 50 °C
voeding
3 x 1,5 V AAA-batterij (LR03C, niet meegelev.)
afmetingen
168 x 91 x 71 mm
gewicht
200 g
Gebruik dit toestel enkel met originele accessoires. Velleman nv is
niet aansprakelijk voor schade of kwetsuren bij (verkeerd) gebruik
van dit toestel. Voor meer informatie over dit product, zie
www.velleman.eu. De informatie in deze handleiding kan te allen
tijde worden gewijzigd zonder voorafgaande kennisgeving.
00 (11/01/2010)
10
Velleman®
WT8097
NOTICE D’EMPLOI
1. Introduction
Aux résidents de l'Union européenne
Des informations environnementales importantes concernant ce
produit
Ce symbole sur l'appareil ou l'emballage indique que l’élimination d’un
appareil en fin de vie peut polluer l'environnement. Ne
pas jeter un appareil électrique ou électronique (et des
piles éventuelles) parmi les déchets municipaux non
sujets au tri sélectif ; une déchèterie traitera l’appareil en
question. Renvoyer les équipements usagés à votre
fournisseur ou à un service de recyclage local. Il convient
de respecter la réglementation locale relative à la
protection de l’environnement.
En cas de questions, contacter les autorités locales pour
élimination.
Nous vous remercions de votre achat ! Lire la présente notice
attentivement avant la mise en service de l’appareil. Si l’appareil a été
endommagé pendant le transport, ne pas l’installer et consulter votre
revendeur.
2. Consignes de sécurité
Garder hors de la portée des enfants et des personnes non
autorisées.
Uniquement pour usage à l’intérieur. Protéger contre la pluie,
l’humidité, les températures extrêmes, la poussière et les
projections d’eau.
•
•
•
La garantie ne s’applique pas aux dommages survenus en
négligeant certaines directives de cette notice et votre revendeur
déclinera toute responsabilité pour les problèmes et les défauts qui
en résultent.
Les dommages occasionnés par des modifications par le client ne
tombent pas sous la garantie.
Il n’y a aucune pièce maintenable par l’utilisateur. Commander des
pièces de rechange éventuelles chez votre revendeur.
00 (11/01/2010)
11
Velleman®
WT8097
3. Directives générales
•
•
•
•
Protéger contre les chocs et le traiter avec circonspection pendant
l’opération.
Se familiariser avec le fonctionnement avant l’emploi.
Toute modification est interdite pour des raisons de sécurité.
N’utiliser qu’à sa fonction prévue. Un usage impropre annule d'office
la garantie.
4. Caractéristiques
•
•
•
fonctions : heure, date, température, alarme (2x) avec fonction de
répétition, compte à rebours, projection de l’heure
affichage de l’heure au format 12/24 h
retro-éclairage et projection de l’heure par capteur sonore
5. Description
Consulter les illustrations à la page 2 de cette notice.
horloge à projection
F MODE
A afficheur
G SET
B objectif
H UP
C projecteur
I
D réglage de la focalisation
J format 12/24 heures
E fonction de répétition
K fonction pilotage sonore
DOWN
icônes
1
heure
3
alarme 2
2
alarme 1
4
fonction de répétition
6. Configuration
• Insérer les piles dans l’horloge (voir §8).
Paramétrage de l’heure et de la date
• Activer l’affichage 12/24 heures avec le bouton 12/24 [J].
• Enfoncer MODE [F], l’icône pour l’heure [1] clignote.
00 (11/01/2010)
12
Velleman®
WT8097
•
Enfoncer SET [G] à plusieurs reprises pour défiler les possibilités de
configuration :
heure – minutes – année – mois/date ou date/mois – mois – jour –
langue – heure…
• Modifier avec UP [H] ou DOWN [I]. Maintenir enfoncé la touche
pendant ± 2 secondes pour modifier rapidement.
• L’horloge peut être configurée en 8 langues :
ENG-DEU-FRA-ITA-ESP-POR-TUR-NED
• L’horloge quitte automatiquement le menu de configuration après ± 60
secondes.
Alarme 1
• Enfoncer MODE [F] à deux reprises, l’icône pour l’alarme 1 [2]
clignote.
• Enfoncer SET [G] à plusieurs reprises pour sélectionner l’heure ou les
minutes, modifier avec UP [H] ou DOWN [I].
• Enfoncer MODE [F] à deux reprises pour revenir à l’affichage normal.
Les icônes pour l’heure [1] et pour l’alarme 1 [2] s’affichent, indiquant
que l’alarme est activée.
Alarme 2
• Enfoncer MODE [F] à trois reprises, l’icône pour l’alarme 2 [2] clignote.
• Enfoncer SET [G] à plusieurs reprises pour sélectionner l’heure ou les
minutes, modifier avec UP [H] ou DOWN [I].
• Enfoncer MODE [F] à deux reprises pour revenir à l’affichage normal.
Les icônes pour l’heure [1] et pour l’alarme 2 [3] s’affichent, indiquant
que l’alarme est activée.
Température
• En affichage normal, enfoncer SET [G] pour sélectionner entre
l’affichage en °Celsius ou en °Fahrenheit.
7. Emploi
•
•
•
Le rétro-éclairage et la projection (pendant ± 5 secondes) peuvent
être enclenchés par un claquement de doigts ou par une légère tape
sur l’horloge.
Activer le capteur sonore en plaçant l’interrupteur de pilotage sonore
[K] sur la position « ON ». En position « OFF », activer le rétroéclairage et la projection depuis la touche SNOOZE [E].
Orienter le faisceau de projection en tournant le projecteur [C]
(angle ± 60°).
00 (11/01/2010)
13
Velleman®
WT8097
•
•
•
•
Régler la focalisation avec le bouton de réglage [D].
Activer/désactiver l’alarme 1 avec UP [H] ; activer/désactiver
l’alarme 2 avec DOWN [I].
Lorsque l’alarme retentit, l’icône correspondant clignote. Enfoncer
SNOOZE [E] pour activer la fonction de répétition. L’icône de la
fonction de répétition [4] s’affiche et l’alarme retentit une deuxième
fois après 4 minutes. Enfoncer un bouton sauf la touche SNOOZE
[E] pour désactiver la fonction de répétition. L’alarme sera répétée
jusqu’à 5 fois.
Supprimer l’alarme 1 avec UP [H] ; supprimer l’alarme2 avec
DOWN [I].
8. Les piles
•
•
•
•
Ouvrir le compartiment des piles au bas de l’horloge.
Insérer trois nouvelles piles de type R03 (LR03C) selon les
indications de polarité. L’horloge émet 3 tonalités et tous les
caractères s’affichent.
Refermer le compartiment des piles.
Ne pas recharger des piles alcalines et ne jamais jeter des piles
usagées au feu.
ATTENTION ! Observer les consignes de sécurité sur
l’emballage des piles. Garder les piles hors de la
portée des enfants.
9. Spécifications techniques
plage de température 0 °C ~ 50 °C
alimentation
3 piles 1,5 V de type R03 (LR03C, non incl.)
dimensions
168 x 91 x 71 mm
poids
200 g
N’employer cet appareil qu’avec des accessoires d’origine. SA
Velleman ne sera aucunement responsable de dommages ou
lésions survenus à un usage (incorrect) de cet appareil. Pour plus
d’information concernant cet article, visitez notre site web
www.velleman.eu. Toutes les informations présentées dans cette
notice peuvent être modifiées sans notification préalable.
00 (11/01/2010)
14
Velleman®
WT8097
MANUAL DEL USUARIO
1. Introducción
A los ciudadanos de la Unión Europea
Importantes informaciones sobre el medio ambiente concerniente
a este producto
Este símbolo en este aparato o el embalaje indica que, si
tira las muestras inservibles, podrían dañar el medio
ambiente. No tire este aparato (ni las pilas, si las hubiera)
en la basura doméstica; debe ir a una empresa
especializada en reciclaje. Devuelva este aparato a su
distribuidor o a la unidad de reciclaje local. Respete las
leyes locales en relación con el medio ambiente.
Si tiene dudas, contacte con las autoridades locales para residuos.
¡Gracias por haber comprado el WT8097! Lea atentamente las
instrucciones del manual antes de usarlo. Si el aparato ha sufrido algún
daño en el transporte no lo instale y póngase en contacto con su
distribuidor.
2. Instrucciones de seguridad
Mantenga el aparato lejos del alcance de personas no
capacitadas y niños.
Sólo para el uso en interiores. No exponga este equipo a lluvia,
humedad, temperaturas extremas, polvo ni a ningún tipo de
salpicadura o goteo.
•
•
•
Los daños causados por descuido de las instrucciones de seguridad
de este manual invalidarán su garantía y su distribuidor no será
responsable de ningún daño u otros problemas resultantes.
Los daños causados por modificaciones no autorizadas, no están
cubiertos por la garantía.
El usuario no habrá de efectuar el mantenimiento de ninguna pieza.
Contacte con su distribuidor si necesita piezas de recambio.
3. Normas generales
•
No agite el aparato. Evite usar excesiva fuerza durante el manejo y
la instalación.
00 (11/01/2010)
15
Velleman®
WT8097
•
•
•
Familiarícese con el funcionamiento del aparato antes de utilizarlo.
Por razones de seguridad, las modificaciones no autorizadas del
aparato están prohibidas.
Utilice sólo el aparato para las aplicaciones descritas en este
manual. Su uso incorrecto anula la garantía completamente.
4. Características
•
•
•
hora, fecha, temperatura, alarma (2x) con función « snooze », cuenta
atrás, proyección de la hora
formato de 12 ó 24 horas seleccionable
retroiluminación y proyección de la hora por sensor sonoro o
contacto
5. Descripción
Véase la figura en la página 2 de este manual del usuario.
reloj con proyección
F MODE
A pantalla
G SET
B lente
H UP
C proyector
I
D ajuste del foco
J formato 12/24 horas
E función « snooze »
K función control sonoro
DOWN
iconos
1
hora
3
alarma 2
2
alarma 1
4
función « snooze »
6. Configuración
• Introduzca las pilas en el reloj (véase §8).
Ajustar la hora y la fecha
• Active la visualización 12/24 horas con el botón 12/24 [J].
• Pulse MODE [F], el icono para la hora [1] parpadea.
00 (11/01/2010)
16
Velleman®
WT8097
•
Pulse SET [G] varias veces para ver las diferentes posibilidades de
configuración:
hora – minutos – año – mes/fecha o fecha/mes – mes – día – idioma –
hora…
• Modifique con UP [H] o DOWN [I]. Mantenga pulsada la tecla durante
± 2 segundos para modificar de manera rápida.
• Es posible configurar el reloj en 8 idiomas:
ENG-DEU-FRA-ITA-ESP-POR-TUR-NED
• El reloj sale automáticamente el menú de configuración después de
± 60 segundos.
Alarma 1
• Pulse MODE [F] dos veces. El icono para la alarma 1 [2] parpadea.
• Pulse SET [G] varias veces para seleccionar la hora o los minutos.
Modifique con UP [H] o DOWN [I].
• Pulse MODE [F] dos veces para volver a la visualización normal. Los
iconos para la hora [1] y para la alarma 1 [2] se visualizan, indicando
que la alarma está activada.
Alarma 2
• Pulse MODE [F] tres veces. El icono para la alarma 2 [2] parpadea.
• Pulse SET [G] varias veces para seleccionar la hora o los minutos,
modifique con UP [H] o DOWN [I].
• Pulse MODE [F] dos veces para volver a la visualización normal. Los
iconos para la hora [1] y para la alarma 2 [3] se visualizan, indicando
que la alarma está activada.
Temperatura
• En la visualización normal, pulse SET [G] para seleccionar entre la
visualización en °Celsius o °Fahrenheit.
7. Uso
•
•
•
•
•
Es posible activar la retroiluminación y la proyección (durante ± 5
segundos) al dar palmadas o al dar un liger golpecito en el reloj.
Active el sensor sonoro al poner el iinterruptor de control sonoro [K]
en la posición « ON ». En la posición « OFF », active la
retroiluminación y la proyección con la tecla SNOOZE [E].
Dirija el haz de proyección al girar el proyector [C] (ángulo ± 60°).
Ajuste el foco con el botón de ajuste [D].
Active/desactive la alarma 1 con UP [H] ; active/desactive la alarma
2 con DOWN [I].
00 (11/01/2010)
17
Velleman®
WT8097
•
•
Si la alarma suena, el icono correspondiente parpadea. Pulse
SNOOZE [E] para activar la función « snooze ». El icono de la
función « snooze » [4] se visualiza y la alarma suena una segunda
vez después de 4 minutos. Pulse un botón salvo la tecla SNOOZE
[E] para desactivar la función « snooze ». La alarma se repetirá
hasta 5 veces.
Desactive la alarma 1 con UP [H]; Desactive la alarma2 con DOWN
[I].
8. Las pilas
•
•
•
•
Abra el compartimiento de pilas de la parte inferior del reloj.
Introduzca tres pilas nuevas del tipo AAA (LR03C). Respete la
polaridad. El reloj emite 3 tonos y todos los caracteres se visualizan.
Vuelva a cerrar el compartimiento de pilas.
Nunca recargue pilas alcalinas. No eche las pilas al fuego.
¡OJO!: Respete las advertencias del embalaje.
Mantenga las pilas lejos del alcance de niños.
9. Especificaciones
Rango de
temperatura
0 °C ~ 50 °C
alimentación
3 pilas AAA de 1,5 V (LR03C, no incl.)
dimensiones
168 x 91 x 71 mm
peso
200 g
Utilice este aparato sólo con los accesorios originales. Velleman
NV no será responsable de daños ni lesiones causados por un uso
(indebido) de este aparato. Para más información sobre este
producto, visite nuestra página web www.velleman.eu. Se pueden
modificar las especificaciones y el contenido de este manual sin
previo aviso.
00 (11/01/2010)
18
Velleman®
WT8097
BEDIENUNGSANLEITUNG
1. Einführung
An alle Einwohner der Europäischen Union
Wichtige Umweltinformationen über dieses Produkt
Dieses Symbol auf dem Produkt oder der Verpackung
zeigt an, dass die Entsorgung dieses Produktes nach
seinem Lebenszyklus der Umwelt Schaden zufügen kann.
Entsorgen Sie die Einheit (oder verwendeten Batterien)
nicht als unsortiertes Hausmüll; die Einheit oder
verwendeten Batterien müssen von einer spezialisierten
Firma zwecks Recycling entsorgt werden. Diese Einheit
muss an den Händler oder ein örtliches Recycling-Unternehmen
retourniert werden. Respektieren Sie die örtlichen Umweltvorschriften.
Falls Zweifel bestehen, wenden Sie sich für Entsorgungsrichtlinien
an Ihre örtliche Behörde.
Wir bedanken uns für den Kauf der WT8097! Lesen Sie diese
Bedienungsanleitung vor Inbetriebnahme sorgfältig durch. Überprüfen
Sie, ob Transportschäden vorliegen. Sollte dies der Fall sein,
verwenden Sie das Gerät nicht und wenden Sie sich an Ihren Händler.
2. Sicherheitshinweise
Halten Sie Kinder und Unbefugte vom Gerät fern.
Nur für die Anwendung im Innenbereich.
Schützen Sie das Gerät vor Regen und Feuchte, Staub und
extremen Temperaturen. Setzen Sie das Gerät keiner
Flüssigkeit wie z.B. Tropf- oder Spritzwasser, aus.
•
•
•
Bei Schäden, die durch Nichtbeachtung der Bedienungsanleitung
verursacht werden, erlischt der Garantieanspruch. Für daraus
resultierende Folgeschäden übernimmt der Hersteller keine
Haftung.
Bei Schäden verursacht durch eigenmächtige Änderungen erlischt
der Garantieanspruch.
Es gibt keine zu wartenden Teile. Bestellen Sie eventuelle
Ersatzteile bei Ihrem Fachhändler.
00 (11/01/2010)
19
Velleman®
WT8097
3. Allgemeine Richtlinien
•
•
•
•
Vermeiden Sie Erschütterungen. Vermeiden Sie rohe Gewalt
während der Installation und Bedienung des Gerätes.
Nehmen Sie das Gerät erst in Betrieb, nachdem Sie sich mit seinen
Funktionen vertraut gemacht haben.
Eigenmächtige Veränderungen sind aus Sicherheitsgründen
verboten.
Verwenden Sie das Gerät nur für Anwendungen beschrieben in
dieser Bedienungsanleitung sonst kann dies zu Schäden am
Produkt führen und erlischt der Garantieanspruch.
4. Eigenschaften
•
•
•
Zeitanzeige, Datum, Temperatur, Alarm (2x) mit Schlummerfunktion
(Snooze), Stoppuhr, Projektionsuhr
12/24-Stunden-Anzeige
Bedienung der Hintergrundbeleuchtung und der Projektionsuhr über
Ton oder Berührung
5. Umschreibung
Siehe Abbildung, Seite 2 dieser Bedienungsanleitung.
Projektionsuhr
F MODE
A LCD-Display
G SET
B Linse
H UP
C Projektor
I
D Scharfeinstellung der Linse
J 12/24-Std.
E Snooze-Taste
K EIN/AUS-Schalter Tonsteuerung
DOWN
Symbole
1
Uhrzeit
3
Alarm 2
2
Alarm 1
4
Snooze
00 (11/01/2010)
20
Velleman®
WT8097
6. Die Uhr einstellen
• Legen Sie die Batterien in die Uhr ein (siehe §8).
Die Uhrzeit und das Datum einstellen
• Schalten Sie den 12/24-Stundenmodus mit der 12/24-Std.-Taste [J]
ein.
• Drücken Sie ein Mal auf MODE [F], das Symbol der Uhrzeit [1] blinkt.
• Drücken Sie mehrmals auf SET [G] um durch die
Einstellungsmöglichkeiten zu scrollen:
Stunden – Minuten – Jahr – Monat/Datum oder Datum/Monat – Monat
– Tag – Sprache – Stunden…
• Ändern Sie die Einstellung mit UP [H] oder DOWN [I]. Halten Sie die
Taste ± 2 Sekunden gedrückt, um schnell zu ändern.
• Es gibt 8 Sprachen: ENG-DEU-FRA-ITA-ESP-POR-TUR-NED
• Die Uhr verlässt das Menü automatisch nach ± 60 Sekunden.
Alarm 1
• Drücken Sie zweimal auf MODE [F], das Symbol für Alarm 1 [2] blinkt.
• Drücken Sie mehrmals auf SET [G] um die Stunden oder die Minuten
auszuwählen und ändern Sie mit UP [H] oder DOWN [I].
• Drücken Sie zweimal auf MODE [F] um zur Uhrzeitanzeige
zurückzukehren. Im Display erscheint das Symbol der Uhrzeit [1] oder
das Symbol für Alarm 1 [2] um anzuzeigen, dass Alarm 1 eingeschaltet
ist.
Alarm 2
• Drücken Sie dreimal auf MODE [F], de Symbol für Alarm 2 [3] blinkt.
• Drücken Sie mehrmals auf SET [G] um die Stunden oder die Minuten
auszuwählen und ändern Sie mit UP [H] oder DOWN [I].
• Drücken Sie ein Mal auf MODE [F] um zur Uhrzeitanzeige
zurückzukehren. Im Display erscheint das Symbol der Uhrzeit [1] oder
das Symbol für Alarm 2 [3] um anzuzeigen, dass Alarm 2 eingeschaltet
ist.
Temperatur
• Drücken Sie auf SET [G] um °Celsius oder °Fahrenheit auszuwählen.
7. Anwendung
•
Diese Uhr verfügt über eine Tonsteuerung. Klatschen Sie in die
Hände oder klopfen Sie leicht auf die Uhr um die
Hintergrundbeleuchtung ± 5 Sekunden einzuschalten und die
Uhrzeit zu projektieren.
00 (11/01/2010)
21
Velleman®
WT8097
•
•
•
•
•
•
Schalten Sie die Tonsteuerung mit dem EIN/AUS-Schalter [K] ein.
Mit dem Schalter auf OFF sind die Hintergrundbeleuchtung und die
Projektion nur mit der Snooze-Taste [E] einschaltbar.
Richten Sie die projektierte Uhrzeit mit dem Projektor [C] (max.
Winkel von ± 60°).
Stellen Sie die projektierte Uhrzeit mit dem der Taste [D] scharf.
Schalten Sie Alarm 1 mit UP [H] ein/aus; schalten Sie Alarm 2 mit
DOWN [I] ein/aus.
Das entsprechende Symbol blinkt sobald der Alarm ertönt. Drücken
Sie auf SNOOZE [E] um die Schlummerfunktion einzuschalten. Das
Snooze-Symbol [4] erscheint im Display und der Alarm ertönt nach
4 Minuten wieder. Verlassen Sie die Schlummerfunktion mit einem
Druck auf eine beliebige Taste außer der Snooze-Taste [E]. Die
Schlummerfunktion kann bis zu 5 Mal wiederholt werden.
Schalten Sie den Alarm 1 mit UP [H] und Alarm 2 mit DOWN [I] aus.
8. Die Batterien
•
•
•
•
Öffnen Sie das Batteriefach auf der Unterseite der Uhr.
Legen Sie drei neue AAA-Batterien (LR03C) ein. Beachten Sie die
Polarität. Die Uhr piepst dreimal und alle Zeichen erscheinen im
Display.
Schließen Sie das Batteriefach.
Laden Sie keine Alkalinebatterien und Werfen Sie diese nie ins
Feuer.
ACHTUNG: Beachten Sie die Warnungen der
Verpackung. Halten Sie die Batterien von Kindern fern.
9. Technische Daten
Temperaturbereich
0 °C ~ 50 °C
Stromversorgung
3 x 1,5 V AAA-Batterie (LR03C, nicht mitgeliefert)
Abmessungen
168 x 91 x 71 mm
Gewicht
200 g
Verwenden Sie dieses Gerät nur mit originellen Zubehörteilen.
Velleman NV übernimmt keine Haftung für Schaden oder
Verletzungen bei (falscher) Anwendung dieses Gerätes. Für mehr
Informationen zu diesem Produkt, siehe www.velleman.eu. Alle
Änderungen ohne vorherige Ankündigung vorbehalten.
00 (11/01/2010)
22
Velleman®
WT8097
INSTRUKCJA OBSŁUGI
1.
Wstęp
Przeznaczona dla mieszkańców Unii Europejskiej.
Ważne informacje dotyczące środowiska.
Ten symbol umieszczony na urządzeniu bądź opakowaniu
wskazuje, że wyrzucenie produktu może być szkodliwe dla
środowiska i nie należy go traktować jako odpad komunalny.
Nie wyrzucaj urządzenia lub baterii do zbiorczego śmietnika,
tylko do specjalnie przeznaczonych do tego pojemników na
urządzenia elektroniczne lub skontaktuj się z firmą zajmującą się
recyklingiem. Urządzenie możesz oddać dystrybutorowi lub firmie
zajmującej się recyklingiem. Postępuj zgodnie z zasadami
bezpieczeństwa dotyczącymi środowiska. Jeśli masz wątpliwości
skontaktuj się z firmą zajmującą się utylizacją odpadów. Dziękujemy za
wybór produktu VELLEMAN. Prosimy o dokładne zapoznanie się z
instrukcją obsługi przed użyciem. Jeśli urządzenie zostało uszkodzone
podczas transportu prosimy o nie korzystanie z niego i skontaktowanie
się ze sprzedawcą.
2.
Instrukcje bezpieczeństwa, środki ostrożności.
Chronić przed dziećmi oraz użytkownikami nieautoryzowanymi.
Wyłącznie do użytku wewnętrznego. Chronić przed deszczem,
wilgocią, oblaniem oraz innym kontaktem z cieczami.
•
•
3.
•
•
•
Wszelkie szkody spowodowane użytkowaniem niezgodnym z
niniejszą instrukcją nie są objęte gwarancją, a sprzedawca nie
ponosi za nie odpowiedzialności.
Usterki wynikające z samodzielnych przeróbek nie są objęte
gwarancja.
Ogólne wytyczne.
Chroń urządzenie przed wstrząsami i wszelkimi udarami. Unikaj
nadmiernej siły podczas użytkowania produktu.
Chroń urządzenie przed nadmierna temperaturą oraz kurzem.
Zapoznaj się z instrukcją obsługi zanim zaczniesz używać produktu.
00 (11/01/2010)
23
Velleman®
WT8097
•
•
4.
•
•
•
5.
Ze względu bezpieczeństwa zabrania się modyfikacji produktu
Z produktu należy korzystać zgodnie z jego przeznaczeniem w
przeciwnym razie spowoduje to utratę gwarancji.
Charakterystyka produktu:
Funkcje: zegar, datownik, termometr, 2 alarmy z funkcją drzemka
(SNOOZE), minutnik, projektor czasu.
Możliwość wyboru prezentacji czasu w systemie 12/24 godzinnym.
Sterowanie podświetleniem LCD oraz wyświetlaniem czasu przy
pomocy funkcji kontroli dotyku.
Opis produktu.
Projektor zegarka
F
Przycisk wyboru trybu pracy
MODE
A Wyświetlacz LCD
G Przycisk zatwierdzania SET
B Obiektyw projektora
H
Przycisk zwiększania ustawianej
wartości UP.
I
Przycisk zmniejszania ustawianej
wartości DOWN
J
Wybór trybu prezentacji czasu
12/24 h
C
D
Obrotowa głowica
projektora czasu
Pokrętło regulacji ostrości.
E Przycisk drzemki (snooze)
K Włącznik funkcji kontroli dotyku
Symbole statusu zegarka
1
Symbol zegarka
3
Symbol drugiego alarmu
2
Symbol pierwszego
alarmu
4
Symbol drzemki (snooze)
6.
Ustawianie zegarka.
Upewnij się, że w zegarku znajdują się sprawne baterie.
• Ustawianie czasu i daty.
• Wybierz w jakim trybie chcesz, aby zegar prezentował czas 12/24h.
W tym celu naciśnij przycisk [J].
00 (11/01/2010)
24
Velleman®
WT8097
•
•
Naciśnij przycisk [F] zacznie pulsować ikona [1].
Naciskaj wielokrotnie przycisk [G], aby wybrać parametr czasu lub
daty, który chcesz ustawić. Po każdym naciśnięciu kolejno będą się
pojawiać nastawy w kolejności:
godzina (hour)-minuty (minutes)-rok (year)-data(month/date lub
date/month) w kolejności miesiąc(month)-dzień(day)język(language)...
• Aby ustawić właściwą wartość opcji użyj przycisków zwiększania UP
[H] lub zmniejszania DOWN [I] wartości. Przytrzymując przyciski UP
[H] lub DOWN [I] przez 2 sekundy zegarek przechodzi do szybkiego
zwiększania lub zmniejszania wartości.
• Zegarek posiada możliwość wyświetlania nazwy dnia tygodnia w
ośmiu językach: ENG-DEU-FRA-ITA-ESP-POR-NED .
• Gdy ustawisz czas i datę zegarek po upływie 60 sekund
automatycznie wyjdzie z trybu ustawiania od chwili ostatniego
naciśnięcia jakiegokolwiek przycisku regulacyjnego.
Ustawiania pierwszego alarmu ALARM 1.
• Naciśnij dwukrotnie przycisk [F]. Zacznie pulsować ikona [2].
• Naciskaj wielokrotnie przycisk [G], aby wybrać kolejno godzinę i
minuty, które chcesz ustawić.
• Aby ustawić właściwą wartość opcji użyj przycisków zwiększania UP
[H] lub zmniejszania DOWN [I] wartości.
• Aby zatwierdzić ustawiony czas alarmu i wyjść z trybu ustawiania
alarmu naciśnij dwukrotnie przycisk [F]. Obok ikony czasu (Time)
[1] pojawi się na stałe ikona [2]. Alarm 1 jest aktywny.
Ustawiania drugiego alarmu ALARM 2.
• Naciśnij trzykrotnie przycisk [F]. Zacznie pulsować ikona [3].
• Naciskaj wielokrotnie przycisk [G], aby wybrać kolejno godzinę i
minuty, które chcesz ustawić.
• Aby ustawić właściwą wartość opcji użyj przycisków zwiększania UP
[H] lub zmniejszania DOWN [I] wartość.
• Aby zatwierdzić ustawiony czas alarmu i wyjść z trybu ustawiania
alarmu naciśnij trzykrotnie przycisk [F]. Obok ikony czasu (Time) [1]
pojawi się na stałe ikona [3]. Alarm 2 jest aktywny.
Pomiar temperatury.
• Gdy zegarek pracuje w trybie wyświetlania czasu naciśnij przycisk
[G] aby dokonać wyboru jednostki pomiaru temperatury pomiędzy
°Celsius a °Fahrenheit.
00 (11/01/2010)
25
Velleman®
WT8097
7.
•
•
•
•
•
•
•
8.
•
•
Dodatkowe funkcje zegara.
Zegar posiada funkcje kontroli dotyku noise/touch . Oznacza to, że
pewnymi funkcjami można sterować bez używania przycisków
funkcyjnych zegara. Wystarczy dźwięk klaśnięcia w dłonie,
uderzenie o blat stołu bądź jakiekolwiek dotknięcie zegara,
natychmiast zegar to wykryje i podświetli wyświetlacz LCD oraz
włączy projekcję czasu na ścianę lub sufit w okresie 5 sekund.
Aby aktywować funkcję noise/touch przesuń przełącznik [K] w
pozycje ON. Gdy przełącznik [K] będzie ustawiony w pozycji OFF
tylko przycisk funkcji snooze [E] będzie uruchamiał podświetlenie
wyświetlacza LCD oraz jednocześnie projekcję czasu na ścianę lub
sufit w okresie 5 sekund.
Zmianę kierunku projekcji czasu można dokonać przez regulację
położenia obrotowej głowicy projektora czasu [C]. Możliwa jest
zmian kierunku w zakresie ±60°.
Regulację ostrości rzucanego obrazu przez projektor czasu [C]
uzyskujemy przez regulację manipulatorem ostrości [D].
Aby aktywować funkcję Alarm1 należy nacisnąć przycisk [H],
natomiast aktywacja funkcji Alarm2 odbywa się przez naciśnięcie
przycisku [I].
Gdy włączy się alarm dźwiękowy zaczyna pulsować odpowiednia
ikona [2] lub [3]. Naciśnięcie przycisku drzemki (SNOOZE) [E]
uaktywnia funkcję drzemki co jest sygnalizowane pulsowaniem
ikony SNOOZE [4]. Aktywowanie funkcji drzemki sprawi, że alarm
uruchomi się powtórnie po upływie 4 minut. Funkcja drzemki
SNOOZE może być kolejno aktywowana do pięciu razy. Aby wyjść z
funkcji drzemki wystarczy nacisnąć jakikolwiek przycisk funkcyjny
zegara oprócz przycisku SNOOZE [E].
Aby wyłączyć funkcję Alarm1 należy nacisnąć przycisk [H],
natomiast wyłączenie funkcji Alarm2 odbywa się przez naciśnięcie
przycisku [I].
Wymiana baterii.
Wymiana baterii.
Otworzyć pokrywkę komory baterii, która mieści się od spodu
zegara.
00 (11/01/2010)
26
Velleman®
WT8097
•
•
•
•
Umieścić trzy nowe baterie AAA (LR03C) zwracając szczególną
uwagę na właściwą polaryzację stosując się do wskazówek
graficznych wewnątrz komory baterii.
Założyć pokrywkę komory baterii.
Nie ładować zużytych baterii, nie wrzucać do ognia, gdyż grozi to ich
eksplozją.
Wymienić baterie gdy urządzenie nie było długo używane.
.OSTRZEŻENIE: Obchodzić się ostrożnie z bateriami.
Zwrócić szczególną uwagę na stan obudowy baterii.
Pozbądź się baterii zgodnie z lokalnymi przepisami.
Trzymaj baterie zdala od dzieci.
9.
Dane techniczne
Temperatura pracy
0°C~50°C (32°F~122°F)
Zasilanie
3x 1.5V AAA LR03C batteries (not incl.)
Wymiary
168 x 91 x 71mm
Waga
200g
Używaj tylko oryginalnych akcesoriów. Velleman Components N.V.
nie ponosi odpowiedzialności za uszkodzenie urządzenia lub
zranienie spowodowane złym korzystaniem z urządzenia.
Jeśli chcesz uzyskać więcej informacji o tym produkcie lub o
marce Velleman, wejdź na stronę: www.velleman.eu.
Informacje zawarte w niniejszej instrukcji obsługi mogą ulec
zmianie bez wcześniejszego powiadomienia. Aktualna wersja
instrukcji znajduje się na www.velleman.eu.
00 (11/01/2010)
27
Velleman®