1
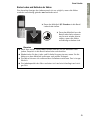
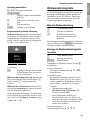
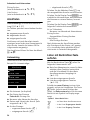
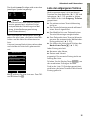
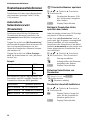
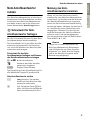
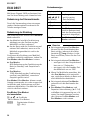
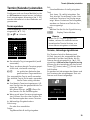
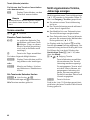
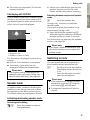
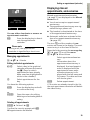
Gigaset S400 professional
Bedienungsanleitung
User Guide
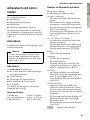
Ihr Telefon setzt neue Standards für Ihre Kommunikation.
Seine Beschaffenheit und Bedienoberfläche sind herausragend unter den
Schnurlostelefonen.
Es bietet erstklassige Sprachqualität beim Freisprechen und hohe Flexibilität
durch seine diversen Schnittstellen (Bluetooth, USB).
Dank des grossen TFT-Displays, der benutzerfreundlichen Tastatur und der
übersichtlichen Menuführung überzeugt es durch einfache Bedienbarkeit.
Ihr Telefon kann mehr:
u Kommunizieren Sie mittels Bluetooth™ schnurlos mit anderen Geräten (z. B.
Headsets), die ebenfalls diese Technik verwenden.
u Synchronisieren Sie die Adressbücher von Telefon, Mobiltelefon und PC über
BluetoothTM oder die USB-Schnittstelle mittels Gigaset QuickSync Software
(¢ S. 62).
u Speichern Sie Termine (¢ S. 39) und Jahrestage, z. B. Geburtstage
(¢ S. 32), in Ihrem Telefon – Ihr Telefon erinnert Sie rechtzeitig.
u Kennzeichnen Sie wichtige Gesprächspartner als VIP – so erkennen Sie wichtige Anrufe bereits am Klingelton (¢ S. 29).
u Weisen Sie Einträgen im Adressbuch ein Bild zu – zukünftig erscheint das
Bild bei jedem Anruf von dieser Nummer (¢ S. 29).
u Sie wollen keine Anrufe annehmen, bei denen der Anrufer die Rufnummernübertragung unterdrückt hat – kein Problem: Stellen Sie ein, dass Ihr
Mobilteil nur dann klingelt, wenn die Rufnummernübertragung nicht unterdrückt wurde (¢ S. 51).
u Sie wollen nicht gestört werden – durch eine Zeitsteuerung klingelt Ihr Telefon nur dann, wenn Sie es möchten (¢ S. 51). VIP-Anrufe werden durchgestellt.
u Belegen Sie die Tasten des Telefons mit wichtigen Nummern. Die Wahl der
Nummer erfolgt dann mit einem Tastendruck (¢ S. 47).
u Stellen Sie das Display auf Großschrift ein – Sie erhöhen damit die Lesbarkeit
in bestimmen für Sie wichtigen Situationen, z. B. im Adressbuch und in Listen (¢ S. 49).
u Stellen Sie die Menü-Ansicht nach Ihren Bedürfnissen so ein, dass nur die
wichtigsten Funktionen (Standard-Modus) oder alle Funktionen (ExpertenModus) angezeigt werden (¢ S. 24).
Viel Spaß mit Ihrem neuen Telefon!
1
English
Gigaset S400 professional – mehr als nur Telefonieren
Deutsch
Gigaset S400 professional – mehr als nur Telefonieren
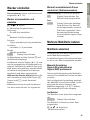
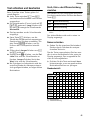
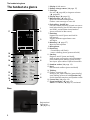
Kurzübersicht Mobilteil
Kurzübersicht Mobilteil
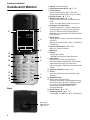
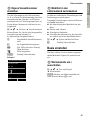
1 Display im Ruhezustand
2 Ladezustand des Akkus (
S. 15)
3 Seiten-Tasten
Gesprächslautstärke (
S. 50) oder
Klingeltonlautstärke (
S. 50) einstellen
4 Display-Tasten (
S. 19)
5 Nachrichten-Taste (
S. 34)
Zugriff auf die Anrufer- und Nachrichtenlisten;
blinkt: neue Nachricht oder neuer Anruf
6 Auflegen-, Ein-/Aus-Taste
Gespräch beenden; Funktion abbrechen;
eine Menüebene zurück (kurz drücken);
zurück in Ruhezustand (lang drücken);
Mobilteil ein-/ausschalten (im Ruhezustand
lang drücken)
7 Raute-Taste
Tastensperre ein/aus (im Ruhezustand lang
drücken);
Wechsel zwischen Groß-, Klein- und Ziffernschreibung
8 Stummschalte-Taste (
S. 28)
Mikrofon stumm schalten
9 Mikrofon
10 R-Taste
- Rückfrage (Flash)
- Wahlpause eingeben (lang drücken)
11 Stern-Taste
Klingeltöne ein/aus (lang drücken);
bei bestehender Verbindung: Umschalten
Impulswahl/Tonwahl (kurz drücken);
bei Texteingabe: Tabelle der Sonderzeichen
öffnen
S. 16)
12 Headset-Anschluss (
13 Taste 1
Netz-Anrufbeantworter anwählen (lang
drücken)
14 Abheben-Taste
15 blinkt: ankommender Ruf;
Gespräch annehmen; Wahlwiederholungsliste öffnen (kurz drücken); Wählen einleiten (lang drücken)Freisprech-Taste
Umschalten zwischen Hörer- und
Freisprechbetrieb
16 Steuer-Taste (
S. 18)
17 Empfangsstärke (
S. 15)
Farbe grün: Eco-Modus (
S. 38) aktiviert
¢
¢
¢
¢
¢
17
i
INT 1
V
1
2
07:15
14 Okt
3
Þ
¢
Kalender
4
16
15
5
14
6
13
¢
12
11
7
10
8
9
¢
Basis
Anmelde-/
Paging-Taste
(
S. 42)
¢
2
¢
¢
Deutsch
Displaysymbole
Displaysymbole
English
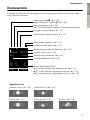
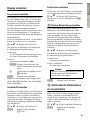
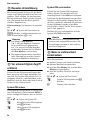
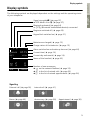
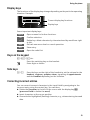
Folgende Symbole werden abhängig von den Einstellungen und vom Betriebszustand
Ihres Telefons angezeigt:
Empfangsstärke i (¢ S. 38)
oder Eco-Modus+ Symbol ¼ (¢ S. 38)
Bluetooth aktiviert (¢ S. 46)
oder ô/ õ(Bluetooth-Headset/-Datengerät) verbunden
Klingelton ausgeschaltet (¢ S. 51)
Tastatursperre eingeschaltet (¢ S. 21)
i
»
Akkus werden geladen (¢ S. 15)
Ladezustand der Akkus (¢ S. 15)
ó
Û 08:00
INT 1
Ã
02
Þ
˝
V
07:15
14 Okt
™
10
08
Kalender
Signalisieren von
Wecker eingeschaltet mit Weckzeit (¢ S. 41)
aktuelle Uhrzeit (¢ S. 14)
aktueller Tag und Monat (¢ S. 14)
Name des Mobilteils (¢ S. 44)
Anzahl Neuer Nachrichten:
u à auf dem (Netz-)Anrufbeantworter (¢ S. 34)
u ™ in der Liste der entgangenen Anrufe (¢ S. 34)
u in der Liste der entgangenen Termine (¢ S. 35)
externer Anruf (¢ S. 26)
interner Anruf (¢ S. 42)
Wecker (¢ S. 41)
Jahrestag (¢ S. 39)
Ø «Ú
ØìÚ
Ø åÚ
ØðÚ
Termine (¢ S. 39)
ØáÚ
3
Inhaltsverzeichnis
Inhaltsverzeichnis
Gigaset S400 professional – mehr als nur Telefonieren . . . . . . . 1
Kurzübersicht Mobilteil . . . . . . . . . . . . . . . . . . . . . . . . . . . . . . . . . . 2
Displaysymbole . . . . . . . . . . . . . . . . . . . . . . . . . . . . . . . . . . . . . . . . . 3
Sicherheitshinweise . . . . . . . . . . . . . . . . . . . . . . . . . . . . . . . . . . . . . 7
Erste Schritte . . . . . . . . . . . . . . . . . . . . . . . . . . . . . . . . . . . . . . . . . . 8
Verpackungsinhalt überprüfen . . . . . . . . . . . . . . . . . . . . . . . . . . . . . . . . . . . . 8
Basis und Ladeschale (falls im Lieferumfang) aufstellen . . . . . . . . . . . . . . . . 9
Basis anschließen . . . . . . . . . . . . . . . . . . . . . . . . . . . . . . . . . . . . . . . . . . . . . . . 9
Ladeschale (falls im Lieferumfang) anschließen . . . . . . . . . . . . . . . . . . . . . . 10
Mobilteil in Betrieb nehmen . . . . . . . . . . . . . . . . . . . . . . . . . . . . . . . . . . . . . 11
Datum und Uhrzeit einstellen . . . . . . . . . . . . . . . . . . . . . . . . . . . . . . . . . . . . 14
Headset anschließen . . . . . . . . . . . . . . . . . . . . . . . . . . . . . . . . . . . . . . . . . . . 16
USB Datenkabel anschließen . . . . . . . . . . . . . . . . . . . . . . . . . . . . . . . . . . . . . 16
Was möchten Sie als nächstes tun? . . . . . . . . . . . . . . . . . . . . . . . . . . . . . . . . 17
Telefon bedienen . . . . . . . . . . . . . . . . . . . . . . . . . . . . . . . . . . . . . . 18
Steuer-Taste . . . . . . . . . . . . . . . . . . . . . . . . . . . . . . . . . . . . . . . . . . . . . . . . . .
Display-Tasten . . . . . . . . . . . . . . . . . . . . . . . . . . . . . . . . . . . . . . . . . . . . . . . .
Tasten des Tastenfeldes . . . . . . . . . . . . . . . . . . . . . . . . . . . . . . . . . . . . . . . . .
Seiten-Tasten . . . . . . . . . . . . . . . . . . . . . . . . . . . . . . . . . . . . . . . . . . . . . . . . .
Korrektur von Falscheingaben . . . . . . . . . . . . . . . . . . . . . . . . . . . . . . . . . . . .
Menü-Führung . . . . . . . . . . . . . . . . . . . . . . . . . . . . . . . . . . . . . . . . . . . . . . . .
Mobilteil aus-/einschalten . . . . . . . . . . . . . . . . . . . . . . . . . . . . . . . . . . . . . . .
Tastensperre ein-/ausschalten . . . . . . . . . . . . . . . . . . . . . . . . . . . . . . . . . . . .
Darstellung der Bedienschritte in der Bedienungsanleitung . . . . . . . . . . . .
18
19
19
19
19
20
21
21
22
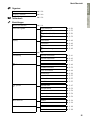
Menü-Übersicht . . . . . . . . . . . . . . . . . . . . . . . . . . . . . . . . . . . . . . . 24
Telefonieren . . . . . . . . . . . . . . . . . . . . . . . . . . . . . . . . . . . . . . . . . . 26
Extern anrufen . . . . . . . . . . . . . . . . . . . . . . . . . . . . . . . . . . . . . . . . . . . . . . . .
Gespräch beenden . . . . . . . . . . . . . . . . . . . . . . . . . . . . . . . . . . . . . . . . . . . . .
Anruf annehmen . . . . . . . . . . . . . . . . . . . . . . . . . . . . . . . . . . . . . . . . . . . . . .
Rufnummernübermittlung . . . . . . . . . . . . . . . . . . . . . . . . . . . . . . . . . . . . . .
Freisprechen . . . . . . . . . . . . . . . . . . . . . . . . . . . . . . . . . . . . . . . . . . . . . . . . .
Stumm schalten . . . . . . . . . . . . . . . . . . . . . . . . . . . . . . . . . . . . . . . . . . . . . . .
26
26
26
27
27
28
Adressbuch und Listen nutzen . . . . . . . . . . . . . . . . . . . . . . . . . . . 29
Adressbuch . . . . . . . . . . . . . . . . . . . . . . . . . . . . . . . . . . . . . . . . . . . . . . . . . .
Wahlwiederholungsliste . . . . . . . . . . . . . . . . . . . . . . . . . . . . . . . . . . . . . . . .
Anruflisten . . . . . . . . . . . . . . . . . . . . . . . . . . . . . . . . . . . . . . . . . . . . . . . . . . .
Listen mit Nachrichten-Taste aufrufen . . . . . . . . . . . . . . . . . . . . . . . . . . . . .
Liste der entgangenen Termine . . . . . . . . . . . . . . . . . . . . . . . . . . . . . . . . . .
29
33
34
34
35
Kostenbewusst telefonieren . . . . . . . . . . . . . . . . . . . . . . . . . . . . . 36
Automatische Netzanbietervorwahl (Preselection) . . . . . . . . . . . . . . . . . . . 36
4
Netz-Anrufbeantworter nutzen . . . . . . . . . . . . . . . . . . . . . . . . . . 37
Schnellwahl für Netz-Anrufbeantworter festlegen . . . . . . . . . . . . . . . . . . . . 37
Meldung des Netz-Anrufbeantworters ansehen . . . . . . . . . . . . . . . . . . . . . . 37
Deutsch
Inhaltsverzeichnis
Termin (Kalender) einstellen . . . . . . . . . . . . . . . . . . . . . . . . . . . . 39
Nicht angenommene Termine, Jahrestage anzeigen . . . . . . . . . . . . . . . . . . 40
Wecker einstellen . . . . . . . . . . . . . . . . . . . . . . . . . . . . . . . . . . . . . . 41
Mehrere Mobilteile nutzen . . . . . . . . . . . . . . . . . . . . . . . . . . . . . . 41
Mobilteile anmelden . . . . . . . . . . . . . . . . . . . . . . . . . . . . . . . . . . . . . . . . . . .
Mobilteile abmelden . . . . . . . . . . . . . . . . . . . . . . . . . . . . . . . . . . . . . . . . . . .
Mobilteil suchen („Paging“) . . . . . . . . . . . . . . . . . . . . . . . . . . . . . . . . . . . . . .
Basis wechseln . . . . . . . . . . . . . . . . . . . . . . . . . . . . . . . . . . . . . . . . . . . . . . . .
Intern anrufen . . . . . . . . . . . . . . . . . . . . . . . . . . . . . . . . . . . . . . . . . . . . . . . .
Zu externem Gespräch zuschalten . . . . . . . . . . . . . . . . . . . . . . . . . . . . . . . .
Namen eines Mobilteils ändern . . . . . . . . . . . . . . . . . . . . . . . . . . . . . . . . . .
Interne Nummer eines Mobilteils ändern . . . . . . . . . . . . . . . . . . . . . . . . . . .
41
42
42
42
42
44
44
45
Bluetooth-Geräte benutzen . . . . . . . . . . . . . . . . . . . . . . . . . . . . . 45
Mobilteil einstellen . . . . . . . . . . . . . . . . . . . . . . . . . . . . . . . . . . . . 47
Mobilteil-PIN . . . . . . . . . . . . . . . . . . . . . . . . . . . . . . . . . . . . . . . . . . . . . . . . .
Schnellzugriff auf Nummern und Funktionen . . . . . . . . . . . . . . . . . . . . . . .
Display-Sprache ändern . . . . . . . . . . . . . . . . . . . . . . . . . . . . . . . . . . . . . . . . .
Display einstellen . . . . . . . . . . . . . . . . . . . . . . . . . . . . . . . . . . . . . . . . . . . . . .
Automatische Rufannahme ein-/ausschalten . . . . . . . . . . . . . . . . . . . . . . . .
Freisprech-/Hörerlautstärke ändern . . . . . . . . . . . . . . . . . . . . . . . . . . . . . . . .
Klingeltöne ändern . . . . . . . . . . . . . . . . . . . . . . . . . . . . . . . . . . . . . . . . . . . .
Media-Pool . . . . . . . . . . . . . . . . . . . . . . . . . . . . . . . . . . . . . . . . . . . . . . . . . . .
Hinweistöne ein-/ausschalten . . . . . . . . . . . . . . . . . . . . . . . . . . . . . . . . . . . .
Eigene Vorwahlnummer einstellen . . . . . . . . . . . . . . . . . . . . . . . . . . . . . . . .
Mobilteil in den Lieferzustand zurücksetzen . . . . . . . . . . . . . . . . . . . . . . . .
47
47
48
49
49
50
50
51
52
53
53
Basis einstellen . . . . . . . . . . . . . . . . . . . . . . . . . . . . . . . . . . . . . . . . 53
Wartemelodie ein-/ausschalten . . . . . . . . . . . . . . . . . . . . . . . . . . . . . . . . . . .
Repeater-Unterstützung . . . . . . . . . . . . . . . . . . . . . . . . . . . . . . . . . . . . . . . .
Vor unberechtigtem Zugriff schützen . . . . . . . . . . . . . . . . . . . . . . . . . . . . . .
Basis in Lieferzustand zurücksetzen . . . . . . . . . . . . . . . . . . . . . . . . . . . . . . .
53
54
54
54
Basis an Telefonanlage anschließen . . . . . . . . . . . . . . . . . . . . . . 55
Wahlverfahren und Flash-Zeit . . . . . . . . . . . . . . . . . . . . . . . . . . . . . . . . . . . .
Vorwahlziffer (Amtskennziffer/AKZ) speichern . . . . . . . . . . . . . . . . . . . . . . .
Pausenzeiten einstellen . . . . . . . . . . . . . . . . . . . . . . . . . . . . . . . . . . . . . . . . .
Zeitweise auf Tonwahl (MFV) umschalten . . . . . . . . . . . . . . . . . . . . . . . . . .
Systembetreuung . . . . . . . . . . . . . . . . . . . . . . . . . . . . . . . . . . . . . . . . . . . . .
Fragen und Antworten . . . . . . . . . . . . . . . . . . . . . . . . . . . . . . . . . . . . . . . . .
Zulassung . . . . . . . . . . . . . . . . . . . . . . . . . . . . . . . . . . . . . . . . . . . . . . . . . . . .
55
55
56
56
57
57
58
5
English
ECO DECT . . . . . . . . . . . . . . . . . . . . . . . . . . . . . . . . . . . . . . . . . . . . . 38
Inhaltsverzeichnis
Umwelt . . . . . . . . . . . . . . . . . . . . . . . . . . . . . . . . . . . . . . . . . . . . . . 58
Anhang . . . . . . . . . . . . . . . . . . . . . . . . . . . . . . . . . . . . . . . . . . . . . . 59
Pflege . . . . . . . . . . . . . . . . . . . . . . . . . . . . . . . . . . . . . . . . . . . . . . . . . . . . . . .
Kontakt mit Flüssigkeit . . . . . . . . . . . . . . . . . . . . . . . . . . . . . . . . . . . . . . . . .
Technische Daten . . . . . . . . . . . . . . . . . . . . . . . . . . . . . . . . . . . . . . . . . . . . .
Text schreiben und bearbeiten . . . . . . . . . . . . . . . . . . . . . . . . . . . . . . . . . . .
59
59
59
61
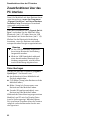
Zusatzfunktionen über das PC Interface . . . . . . . . . . . . . . . . . . . 62
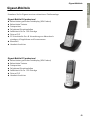
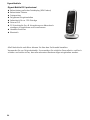
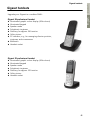
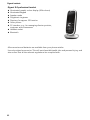
Gigaset-Mobilteile . . . . . . . . . . . . . . . . . . . . . . . . . . . . . . . . . . . . . . 63
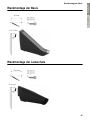
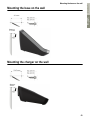
Wandmontage der Basis . . . . . . . . . . . . . . . . . . . . . . . . . . . . . . . . 65
Wandmontage der Ladeschale . . . . . . . . . . . . . . . . . . . . . . . . . . . 65
Stichwortverzeichnis . . . . . . . . . . . . . . . . . . . . . . . . . . . . . . . . . . . 66
6
Deutsch
Sicherheitshinweise
Sicherheitshinweise
Achtung
$
English
Lesen Sie vor Gebrauch die Sicherheitshinweise und die Bedienungsanleitung.
Klären Sie Ihre Kinder über deren Inhalt und über die Gefahren bei der Benutzung des
Telefons auf.
Verwenden Sie nur das mitgelieferte Steckernetzgerät, wie auf der Unterseite
der Basis angegeben.
Legen Sie nur aufladbare Akkus ein, die der Spezifikation auf S. 59 entsprechen, da sonst erhebliche Gesundheits- und Personenschäden nicht auszuschließen sind.
Medizinische Geräte können in ihrer Funktion beeinflusst werden. Beachten Sie
die technischen Bedingungen des jeweiligen Umfeldes, z.B. Arztpraxis.
Halten Sie das Mobilteil nicht mit der Geräterückseite an das Ohr, wenn es klingelt bzw. wenn Sie die Freisprechfunktion eingeschaltet haben. Sie können sich
sonst schwerwiegende, dauerhafte Gehörschäden zuziehen.
Ihr Gigaset verträgt sich mit den meisten am Markt befindlichen digitalen Hörgeräten. Eine einwandfreie Funktion mit jedem Hörgerät kann jedoch nicht
garantiert werden.
Das Mobilteil kann in Hörgeräten einen unangenehmen Brumm- oder Pfeifton
verursachen oder diese übersteuern. Kontaktieren Sie bei Problemen den Hörgeräteakustiker.
Stellen Sie Basis und Ladeschale nicht in Bädern oder Duschräumen auf. Basis
und Ladeschale sind nicht spritzwassergeschützt (¢ S. 59).
Nutzen Sie das Telefon nicht in explosionsgefährdeten Umgebungen,
z.B. Lackierereien.
ƒ
Geben Sie Ihr Gigaset nur mit der Bedienungsanleitung an Dritte weiter.
Bitte nehmen Sie defekte Basisstationen außer Betrieb oder lassen diese vom
Service reparieren, da diese ggf. andere Funkdienste stören könnten.
Hinweis
Nicht alle in dieser Bedienungsanleitung beschriebenen Funktionen sind in allen Ländern verfügbar.
7
Erste Schritte
Erste Schritte
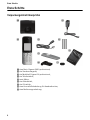
Verpackungsinhalt überprüfen
1
3
2
4
5
9
6
7
8
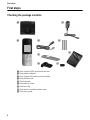
1 eine Basis Gigaset S400 professional,
2 ein Steckernetzgerät,
3 ein Mobilteil Gigaset S4 professional,
4 ein Telefonkabel,
5 zwei Akkus,
6 ein Akkudeckel,
7 ein Gürtelclip,
8 eine Kunststoffabdeckung für Headsetbuchse,
9 eine Bedienungsanleitung.
8
Basis und Ladeschale sind für den Betrieb in geschlossenen, trockenen Räumen
mit einem Temperaturbereich von +5 °C bis +45 °C ausgelegt.
¤ Stellen Sie Basis an einer zentralen Stelle der Wohnung oder des Hauses auf
einer ebenen, rutschfesten Unterlage auf oder montieren Sie die Basis oder
Ladeschale an die Wand ¢ S. 65.
Hinweis
Achten Sie auf die Reichweite der Basis.
Diese beträgt im freien Gelände bis zu 300 m, in Gebäuden bis zu 50 m.
Die Reichweite verringert sich bei eingeschaltetem Eco-Modus (¢ S. 38).
Normalerweise hinterlassen die Gerätefüße keine Spuren an der Aufstellfläche.
Angesichts der Vielfalt der bei Möbeln verwendeten Lacke und Polituren kann
es jedoch nicht ausgeschlossen werden, dass beim Kontakt Spuren auf der
Abstellfläche verursacht werden.
Bitte beachten Sie:
u Setzen Sie das Telefon nie den Einflüssen von Wärmequellen, von direkter
Sonneneinstrahlung und von anderen elektrischen Geräten aus.
u Schützen Sie Ihr Gigaset vor Nässe, Staub, aggressiven Flüssigkeiten und
Dämpfen.
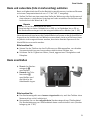
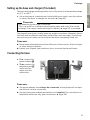
Basis anschließen
¤ Zuerst das Stecker¤
netzgerät 1
anschließen.
Danach den Telefonstecker 2
anschließen und
die Kabel in die
Kabelkanäle legen.
1
1
2
1
Bitte beachten Sie:
u Das Steckernetzgerät muss immer eingesteckt sein, weil das Telefon ohne
Netzanschluss nicht funktioniert.
u Verwenden Sie nur das mitgelieferte Steckernetzgerät und Telefonkabel.
Die Steckerbelegung von Telefonkabeln kann unterschiedlich sein (Steckerbelegung ¢ S. 60).
9
English
Basis und Ladeschale (falls im Lieferumfang) aufstellen
Deutsch
Erste Schritte
Erste Schritte
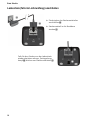
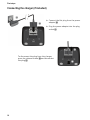
Ladeschale (falls im Lieferumfang) anschließen
2
¤ Flachstecker des Steckernetztteiles
1
anschließen 1.
¤ Steckernetzteil in die Steckdose
stecken 2.
2
Falls Sie den Stecker von der Ladeschale
wieder abziehen müssen, Entriegelungsknopf 1 drücken und Stecker abziehen 2.
10
1
Deutsch
Erste Schritte
Mobilteil in Betrieb nehmen
Display und Tastatur sind durch Folien geschützt.
Bitte Schutzfolien abziehen!
English
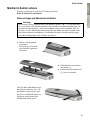
Akkus einlegen und Akkudeckel schließen
Achtung
Nur die von Unify empfohlenen aufladbaren Akkus (¢ S. 59) verwenden,
d.h. auf keinen Fall herkömmliche (nicht wieder aufladbare) Batterien, da
erhebliche Gesundheits- und Sachschäden nicht auszuschließen sind. Es
könnte z.B. der Mantel der Batterien oder der Akkus zerstört werden oder
die Akkus könnten explodieren. Außerdem könnten Funktionsstörungen
oder Beschädigungen des Gerätes auftreten.
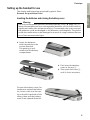
¤ Akkus richtig gepolt
einsetzen.
Die Polung ist im bzw.
am Akkufach gekennzeichnet.
¤ Akkudeckel zuerst oben
einsetzen a.
¤ Danach Deckel zudrücken
b, bis er einrastet.
Falls Sie den Akkudeckel wieder öffnen müssen, um z. B.
die Akkus zu wechseln, greifen Sie in die Mulde links am
Gehäuse und ziehen den
Akkudeckel nach oben.
11
Erste Schritte
¤ Mitgelieferte Kunststoffabdeckung für die
Headsetbuchse einsetzen, um einen optimalen Klang im Freisprechmodus zu
ermöglichen.
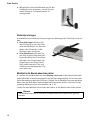
Gürtelclip anbringen
Am Mobilteil sind seitliche Aussparungen zur Montage des Gürtelclips vorhanden.
¤ Zum Anbringen drücken Sie
den Gürtelclip so auf der Rückseite des Mobilteils an, dass die
Nasen des Gürtelclips in die
Aussparungen einrasten.
¤ Zum Abnehmen drücken Sie
mit dem rechten Daumen kräftig auf die Mitte des Gürtelclips,
schieben den Fingernagel des
Zeigefingers der linken Hand
links oben zwischen Clip und
Gehäuse und nehmen den Clip
nach oben ab.
Mobilteil in die Basis/Ladeschale stellen
¤ Stellen Sie das Mobilteil mit dem Display nach vorn in die Basis/Ladeschale.
Jedes Mobilteil ist werksseitig bereits an der Basis angemeldet. Sie müssen also
keine Anmeldung mehr durchführen. Sollten Sie Ihr Mobilteil an einer anderen
Basis oder an Ihrer Basis weitere Mobilteile benutzen wollen, müssen Sie das
jeweilige Mobilteil manuell anmelden ¢ S. 41.
Lassen Sie das Mobilteil zum Laden der Akkus in der Basis/Ladeschale stehen.
Hinweis
Das Mobilteil darf nur in die dafür vorgesehene Basis/Ladeschale gestellt
werden.
12
Deutsch
Erste Schritte
Erstes Laden und Entladen der Akkus
English
Eine korrekte Anzeige des Ladezustands ist nur möglich, wenn die Akkus
zunächst vollständig geladen und entladen wird.
¤ Dazu das Mobilteil 8,5 Stunden in die Basis/
Ladeschale stellen.
¤ Dann das Mobilteil aus der
8,5 h
Basis/Ladeschale nehmen
und es erst wieder hineinstellen, wenn die Akkus
vollständig entladen sind.
Hinweise
u Nach dem ersten Laden und Entladen können Sie Ihr Mobilteil nach
jedem Gespräch in die Basis/Ladeschale zurückstellen.
u Wiederholen Sie den Lade- und Entlade-Vorgang immer, wenn Sie die
Akkus aus dem Mobilteil entfernen und wieder einlegen.
u Die Akkus können sich während des Aufladens erwärmen. Das ist ungefährlich.
u Die Ladekapazität der Akkus reduziert sich technisch bedingt nach einiger Zeit.
13
Erste Schritte
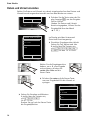
Datum und Uhrzeit einstellen
Stellen Sie Datum und Uhrzeit ein, damit eingehenden Anrufen Datum und
Uhrzeit korrekt zugeordnet werden und um den Wecker zu nutzen.
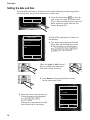
Þ
¤ Drücken Sie die Taste unter der Display-Anzeige §Zeit§, um das Eingabefeld zu öffnen.
(Haben Sie Datum und Uhrzeit
bereits eingegeben, öffnen Sie das
Eingabefeld über das Menü
¢ S. 25.)
Zeit
Datum und Uhrzeit
Im Display wird das Untermenü
Datum und Uhrzeit angezeigt.
¤ Die aktive Eingabeposition blinkt.
Geben Sie Tag, Monat und Jahr
8-stellig über die Tastatur ein,
z.B. 4
Q2Q
QO für den 14.10.2009.
Datum:
31.01.2009
Zeit:
00:00
Zurück
Sichern
Wollen Sie die Eingabeposition
ändern, um z. B. eine Eingabe
zu korrigieren, drücken Sie
rechts oder links auf die
Steuer-Taste.
¤ Drücken Sie unten auf die Steuer-Taste,
um zum Eingabefeld für die Uhrzeit zu
springen.
Datum und Uhrzeit
Datum:
¤ Geben Sie Stunden und Minuten
4-stellig über die Tastatur ein,
z.B. QM
5
für 07:15 Uhr.
Ändern Sie ggf. mit der Steuer-Taste
die Eingabeposition.
14
14.10.2009
Zeit:
00:00
Zurück
Sichern
Zurück
Sichern
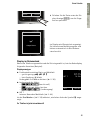
¤ Drücken Sie die Taste unter der Dis-
play-Anzeige §Sichern§, um die Eingaben zu speichern.
Datum und Uhrzeit
‰
Gespeichert
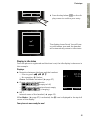
Im Display wird Gespeichert angezeigt.
Sie hören einen Bestätigungston und
kehren automatisch in den Ruhezustand zurück.
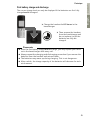
Display im Ruhezustand
Wenn das Telefon angemeldet und die Zeit eingestellt ist, hat das Ruhedisplay
folgendes Aussehen (Beispiel).
Displayanzeigen
u Funkkontakt zwischen Basis und Mobilteil:
i
V
07:15
– gut bis gering: Ð i Ñ Ò
INT
1
14 Okt
– kein Empfang: | blinkt
Farbe grün: Eco-Modus aktiviert (¢ S. 38)
u Ladezustand der Akkus:
– y y { { (leer bis voll)
– y blinkt rot: Akkus fast leer
Kalender
Þ
– xy x{ x{ (Ladevorgang)
u INT 1
Interner Name des Mobilteils (¢ S. 44)
Ist der Eco-Modus+ (¢ S. 38) aktiviert, wird oben links das Symbol ¼ angezeigt.
Ihr Telefon ist jetzt einsatzbereit!
15
English
Deutsch
Erste Schritte
Erste Schritte
Headset anschließen
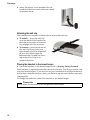
Nach Entfernen der Kunststoffabdeckung können Sie
ein Headset mit 2,5 mm Klinkenstecker an der linken
Seite Ihres Mobilteils anschließen.
Die Headset-Lautstärke entspricht der Einstellung der
Hörer-Lautstärke (¢ S. 50).
Setzten Sie nach Gebrauch des Headsets die Kunststoffabdeckung wieder ein, um einen optimalen Klang im
Freisprechmodus zu ermöglichen.
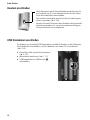
USB Datenkabel anschließen
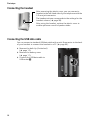
Sie können ein Standard USB Datenkabel mit Mini-B-Stecker an der Rückseite
Ihres Mobilteils anschließen, um Ihr Mobilteil mit einem PC zu verbinden
(¢ S. 62).
¤ Gürtelclip (falls montiert) abnehmen
(¢ S. 12).
¤ Akkudeckel abnehmen (¢ S. 11).
¤ USB Datenkabel an USB Buchse 1
anschließen.
1
16
Nachdem Sie Ihr Gigaset erfolgreich in Betrieb genommen haben, möchten Sie
es bestimmt nach Ihren individuellen Bedürfnissen anpassen. Benutzen Sie folgenden Wegweiser, um die wichtigsten Themen schnell zu finden.
Wenn Sie noch nicht mit der Bedienung von menügeführten Geräten wie z. B.
anderen Gigaset-Telefonen vertraut sind, lesen Sie zunächst den Abschnitt
„Telefon bedienen“ ¢ S. 18.
Informationen zu ...
Klingeltonmelodie und -lautstärke einstellen
Hörerlautstärke einstellen
Eco-Modus / Eco-Modus+ einstellen
Telefon an einer Telefonanlage betreiben
Vorhandene Gigaset-Mobilteile an Basis anmelden
Adressbucheinträge vorhandener Gigaset-Mobilteile an
neue(s) übertragen
Bluetooth-Geräte benutzen
Telefon mit PC verbinden
g S. 50
g S. 50
g S. 38
g S. 55
g S. 41
... finden Sie hier.
g S. 31
g S. 45
g S. 62
Treten beim Gebrauch Ihres Telefons Fragen auf, lesen Sie die Tipps zur
Fehlerbehebung (¢ S. 57) oder wenden Sie sich an unseren Kundenservice
(¢ S. 57).
17
English
Was möchten Sie als nächstes tun?
Deutsch
Erste Schritte
Telefon bedienen
Telefon bedienen
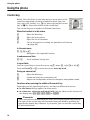
Steuer-Taste
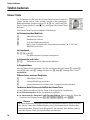
Im Folgenden ist die Seite der Steuer-Taste schwarz markiert
(oben, unten, rechts, links, mittig), die Sie in der jeweiligen
Bediensituation drücken müssen, z.B. v für „rechts auf die
Steuer-Taste drücken“ oder w für „mittig auf die Steuer-Taste
drücken“.
Die Steuer-Taste hat verschiedene Funktionen:
Im Ruhezustand des Mobilteils
s
v
u
t
Adressbuch öffnen.
Hauptmenü öffnen.
Liste der Mobilteile öffnen.
Menü zum Einstellen der Gesprächslautstärke (¢ S. 50) des
Mobilteils aufrufen.
Im Hauptmenü
t, s, v oder u
Zur gewünschten Funktion navigieren.
In Untermenüs und Listen
t/s
Zeilenweise nach oben/unten blättern.
In Eingabefeldern
Mit der Steuer-Taste bewegen Sie die Schreibmarke nach oben t, unten s,
rechts v oder links u. Lang drücken von v oder u bewegt den Cursor
wortweise.
Während eines externen Gesprächs
s
u
t
Adressbuch öffnen.
Interne Rückfrage einleiten.
Sprachlautstärke für Hörer- bzw. Freisprechmodus ändern.
Funktionen beim Klicken auf die Mitte der Steuer-Taste
Je nach Bediensituation hat die Taste unterschiedliche Funktionen.
u Im Ruhezustand wird das Hauptmenü geöffnet.
u In Untermenüs, Auswahl- und Eingabefeldern übernimmt die Taste die
Funktion der Display-Tasten §OK§, §Ja§, §Sichern§, §Auswahl§ oder §Ändern§ .
Hinweis
In dieser Anleitung wird das Öffnen des Hauptmenüs durch rechts Drücken
der Steuer-Taste und die Bestätigung von Funktionen durch Drücken der
entsprechenden Display-Taste dargestellt. Sie können statt dessen jedoch
auch die Steuer-Taste wie beschrieben verwenden.
18
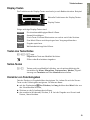
Die Funktionen der Display-Tasten wechseln je nach Bediensituation. Beispiel:
Zurück
Sichern
Aktuelle Funktionen der Display-Tasten.
Display-Tasten
Einige wichtige Display-Tasten sind:
Optionen
Ein situationsabhängiges Menü öffnen.
Auswahl bestätigen.
OK
Lösch-Taste: Zeichen-/Wortweise von rechts nach links löschen.
Û
Zurück
Eine Menü-Ebene zurückspringen bzw. Vorgang abbrechen.
Sichern
Eingabe speichern.
Þ
Wahlwiederholungsliste öffnen.
Tasten des Tastenfeldes
c / Q / * usw.
Abgebildete Taste am Mobilteil drücken.
~
Ziffern oder Buchstaben eingeben.
Seiten-Tasten
ø/÷
Tasten rechts am Mobilteil drücken, um situationsabhängig die
Lautstärke für Hörer, Klingelton, Freisprechen, Wecker, Signalisierung von Terminen und das Headset einzustellen.
Korrektur von Falscheingaben
Falsche Zeichen in Eingabefeldern korrigieren Sie, indem Sie mit der SteuerTaste zu der Fehleingabe navigieren. Sie können dann:
u mit der Displaytaste Ñ das Zeichen, bei lang drücken das Wort links von
der Schreibmarke löschen,
u Zeichen an der Schreibmarke einfügen,
u das markierte (blinkende) Zeichen, z. B. bei der Eingabe von Uhrzeit und
Datum, überschreiben.
19
English
Display-Tasten
Deutsch
Telefon bedienen
Telefon bedienen
Menü-Führung
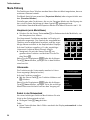
Die Funktionen Ihres Telefons werden Ihnen über ein Menü angeboten, das aus
mehreren Ebenen besteht.
Die Menü-Ansicht kann erweitert (Experten-Modus) oder eingeschränkt werden (Standard-Modus).
Einstellungen oder Funktionen, die nur im Experten-Modus zur Verfügung stehen, sind in dieser Anleitung mit dem Symbol • gekennzeichnet.
Umschalten Standard-Modus/Experten-Modus und Menü-Übersicht ¢ S. 24.
Hauptmenü (erste Menü-Ebene)
¤ Drücken Sie die Steuer-Taste rechts v im Ruhezustand des Mobilteils, um
das Hauptmenü zu öffnen.
Die Hauptmenü-Funktionen werden im Display mit
Symbolen angezeigt. Das Symbol der ausgewählten
Funktion wird orangefarben markiert und der zugehörige Name erscheint in der Kopfzeile des Displays.
Auf eine Funktion zugreifen, d.h. das zugehörige
Untermenü (nächste Menü-Ebene) öffnen:
¤ Navigieren Sie mit der Steuer-Taste p zur
gewünschten Funktion und drücken Sie die Display-Taste §OK§.
Wenn Sie die Displaytaste §Zurück§ oder die AuflegenTaste a kurz drücken, springen Sie in den Ruhezustand zurück.
Einstellungen
·
ì
á
ò
Ê
Â
É
Ì
Ï
Zurück
OK
Untermenüs
Die Funktionen der Untermenüs werden in Listenform angezeigt (Beispiel rechts).
Auf eine Funktion zugreifen:
¤ Mit der Steuer-Taste q zur Funktion blättern und
§OK§ drücken.
Wenn Sie die Displaytaste §Zurück§ oder die AuflegenTaste a kurz drücken, springen Sie in die vorherige
Menü-Ebene zurück bzw. brechen den Vorgang ab.
Einstellungen
Datum und Uhrzeit
Töne und Signale
Display
Sprache
Anmeldung
Zurück
OK
Zurück in den Ruhezustand
Von einer beliebigen Stelle im Menü kehren Sie wie
folgt in den Ruhezustand zurück:
¤ Auflegen-Taste a lang drücken.
Oder:
¤ Keine Taste drücken: Nach 2 Min. wechselt das Display automatisch in den
Ruhezustand.
20
Mobilteil aus-/einschalten
a
Im Ruhezustand Auflegen-Taste lang drücken (Bestätigungston),
um das Mobilteil auszuschalten.
Zum Wiedereinschalten Auflegen-Taste erneut lang drücken.
Hinweis
Beim Einschalten sehen Sie einige Sekunden lang eine Animation mit dem
Schriftzug Gigaset.
Tastensperre ein-/ausschalten
Die Tastensperre verhindert das ungewollte Bedienen des Telefons.
#
Raute-Taste im Ruhezustand lang drücken, um die Tastensperre
aus- oder einzuschalten. Sie hören den Bestätigungston.
Ist die Tastensperre eingeschaltet, sehen Sie bei Tastendruck einen Hinweis.
Die Tastensperre schaltet sich automatisch aus, wenn Sie angerufen werden.
Nach Gesprächsende schaltet sie sich wieder ein.
Hinweis
Bei eingeschalteter Tastensperre können auch Notrufnummern nicht
gewählt werden.
21
English
Einstellungen, die Sie nicht durch Drücken der Display-Tasten §OK§, §Ja§, §Sichern§
oder §Ändern§ bestätigt haben, werden verworfen.
Ein Beispiel für das Display im Ruhezustand ist auf S. 15 abgebildet.
Deutsch
Telefon bedienen
Telefon bedienen
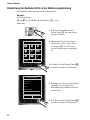
Darstellung der Bedienschritte in der Bedienungsanleitung
Die Bedienschritte werden verkürzt dargestellt.
Beispiel:
Die Darstellung:
v ¢ Ï ¢ Eco-Modus ¢ Eco-Modus+ (³ = ein)
bedeutet:
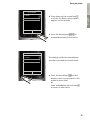
¤ Drücken Sie rechts auf die
Steuer-Taste v, um das Hauptmenü zu öffnen.
Einstellungen
·
ì
á
ò
Ê
Â
É
Ì
¤ Navigieren Sie mit der Steuer-
Taste nach rechts, links, oben
und unten p, bis das Untermenü Einstellungen ausgewählt
ist.
Ï
Zurück
OK
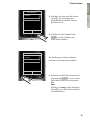
¤ Drücken Sie die Display-Taste §OK§,
um die Auswahl zu bestätigen.
Einstellungen
Anmeldung
¤ Drücken Sie unten auf die Steuer-
Telefonie
Taste s, bis im Display der
Menüpunkt Eco-Modus hervorgehoben wird.
System
Menü-Ansicht
Eco-Modus
Zurück
OK
¤ Drücken Sie die Display-Taste §OK§,
um die Auswahl zu bestätigen.
22
Deutsch
Telefon bedienen
Eco-Modus
Eco-Modus+
Zurück
¤ Drücken Sie unten auf die SteuerTaste s, bis im Display der
Menüpunkt Eco-Modus+ hervorgehoben wird.
English
³
´
Eco-Modus
Ändern
¤ Drücken Sie die Display-Taste
§Ändern§, um die Funktion ein-
oder auszuschalten.
Eco-Modus
Eco-Modus
Eco-Modus+
Zurück
³
³
Die Änderung ist sofort wirksam
und muss nicht bestätigt werden.
Ändern
¤ Drücken Sie die Taste unter der Display-Anzeige §Zurück§, um zur vorherigen Menü-Ebene zurückzuspringen
oder
drücken Sie lang auf die AuflegenTaste a, um in den Ruhezustand
zurückzukehren.
23
Menü-Übersicht
Menü-Übersicht
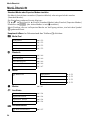
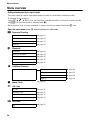
Standard-Modus oder Experten-Modus einstellen
Die Menü-Ansicht kann erweitert (Experten-Modus) oder eingeschränkt werden
(Standard-Modus).
Die Einstellung nehmen Sie wie folgt vor:
v ¢ Ï ¢ Menü-Ansicht ¢ Einfach (Standard-Modus) oder Erweitert (Experten-Modus)
markieren ¢ §Auswahl§ (der aktive Modus ist mit Ø markiert)
Menü-Einträge, die nur im Experten-Modus zur Verfügung stehen, sind mit dem Symbol
• gekennzeichnet.
Hauptmenü öffnen: Im Ruhezustand des Telefons v drücken.
· Media-Pool
Screensavers
CLIP-Bilder
Sounds
Speicherplatz
ò Bluetooth
Aktivierung
Suche Headset
Suche Datengerät
Bekannte Geräte
Eigenes Gerät
É Extras
• Media-Pool
¢ S. 52
¢ S. 52
¢ S. 52
¢ S. 52
¢ S. 46
¢ S. 46
¢ S. 46
¢ S. 46
¢ S. 47
Screensavers
CLIP-Bilder
Sounds
ì Wecker
Ê Anruflisten
¢ S. 41
Entgangene Anrufe
¢ S. 34
¢ S. 34
¢ S. 34
¢ S. 34
•
¢ S. 37
Alle Anrufe
Abgehende Anrufe
Angenomm. Anrufe
Ì Anrufbeantworter
24
Speicherplatz
Netz-Anrufbeantw.
¢ S. 52
¢ S. 52
¢ S. 52
¢ S. 52
Kalender
Entgang. Termine
 Telefonbuch
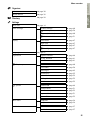
Ï Einstellungen
Datum und Uhrzeit
Töne und Signale
¢ S. 39
¢ S. 40
¢ S. 29
English
á Organizer
Deutsch
Menü-Übersicht
¢ S. 14
Gesprächslautst.
•
Hinweistöne
Klingeltöne (Mobilt)
•
Display
Wartemelodie
Screensaver
Großschrift
Farbschema
•
Sprache
Anmeldung
Beleuchtung
¢ S. 48
Mobilteil anmelden
Mobilteil abmelden
•
Basisauswahl
Telefonie
Auto-Rufannahm.
Vorwahlnummern
Intern zuschalten
Preselection
Vorwahlziffer
Wahlverfahren
•
Flash-Zeiten
System
Mobilteil-PIN
Mobilteil-Reset
Basis-Reset
Repeaterbetrieb
System-PIN
Menü-Ansicht
Einfach
Erweitert
Eco-Modus
Eco-Modus
Eco-Modus+
¢ S. 50
¢ S. 52
¢ S. 50
¢ S. 53
¢ S. 49
¢ S. 49
¢ S. 49
¢ S. 49
¢ S. 41
¢ S. 42
¢ S. 42
¢ S. 49
¢ S. 53
¢ S. 44
¢ S. 36
¢ S. 55
¢ S. 55
¢ S. 55
¢ S. 47
¢ S. 53
¢ S. 54
¢ S. 54
¢ S. 54
¢ S. 24
¢ S. 24
¢ S. 38
¢ S. 38
25
Telefonieren
Telefonieren
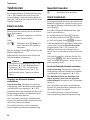
Bei ausgeschalteter Display-Beleuchtung
(¢ S. 49) schaltet der erste Druck auf
eine beliebige Taste die Display-Beleuchtung ein. Die Taste hat in diesem Fall keine
weitere Funktion.
Extern anrufen
Externe Anrufe sind Anrufe in das öffentliche Telefonnetz.
~c
Nummer eingeben und Abheben-Taste drücken.
Oder:
c~
Abheben-Taste c lang drücken und dann die Nummer
eingeben.
Mit der Auflegen-Taste a können Sie das
Wählen abbrechen.
Während des Gesprächs wird Ihnen die
Gesprächsdauer angezeigt.
Hinweis
Das Wählen mit Adressbuch (¢ S. 29),
Anrufliste (¢ S. 34) Wahlwiederholungsliste (¢ S. 33) und automatischer Wahlwiederholung (¢ S. 33)
spart wiederholtes Tippen von Nummern.
Gespräch am Bluetooth-Headset
weiterführen
Voraussetztung: Bluetooth ist aktiviert,
Verbindung zwischen Bluetooth-Headset
und Mobilteil ist aufgebaut (¢ S. 46).
Abheben-Taste des Headsets drücken; der
Verbindungsaufbau zum Mobilteil kann
bis zu 5 Sekunden dauern.
Die Lautstärke von Hörer und Mikrofon
können Sie während des Gesprächs über
die Seiten-Tasten einstellen.
Für weitere Details zu Ihrem Headset,
siehe zugehörige Bedienungsanleitung.
26
Gespräch beenden
a
Auflegen-Taste drücken.
Anruf annehmen
Ein ankommender Anruf wird dreifach am
Mobilteil signalisiert: durch Klingeln, eine
Anzeige im Display und Blinken der Abheben-Taste c.
Sie haben folgende Möglichkeiten, den
Anruf anzunehmen:
¤ Auf die Abheben-Taste c drücken.
¤ Auf die Freisprech-Taste d drücken.
¤ Auf die Display-Taste §Abheben§ drücken.
Steht das Mobilteil in der Basis/Ladeschale
und ist die Funktion Auto-Rufannahm.
eingeschaltet (¢ S. 49), nimmt das
Mobilteil einen Anruf automatisch an,
wenn Sie es aus der Basis/Ladeschale nehmen.
Stört der Klingelton, drücken Sie die Display-Taste §Ruf aus§. Den Anruf können Sie
noch so lange annehmen, wie er im Display angezeigt wird.
Anruf am Bluetooth-Headset annehmen
Voraussetztung: Bluetooth ist aktiviert,
Verbindung zwischen Bluetooth-Headset
und Mobilteil ist aufgebaut (¢ S. 46).
Die Abheben-Taste am Headset erst
dann drücken, wenn es am Headset
selbst klingelt (es kann bis zu 5 Sekunden
dauern).
Die Lautstärke von Hörer und Mikrofon
können Sie während des Gesprächs über
die Seiten-Tasten einstellen.
Für weitere Details zu Ihrem Headset,
siehe zugehörige Bedienungsanleitung.
Bei einem Anruf wird die Nummer des
Anrufers im Display angezeigt, wenn folgende Voraussetzungen erfüllt sind:
u Ihr Netzanbieter unterstützt CLIP, CLI.
– CLI (Calling Line Identification):
Nummer des Anrufers wird übertragen.
– CLIP (Calling Line Identification Presentation): Nummer des Anrufers
wird angezeigt.
u Sie haben bei Ihrem Netzanbieter CLIP
beauftragt.
u Der Anrufer hat beim Netzanbieter CLI
beauftragt.
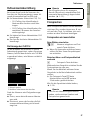
Ruf-Anzeige bei CLIP/CLI
Ist die Nummer des Anrufers in Ihrem
Adressbuch gespeichert, sehen Sie seinen
Namen, falls Sie dem Anrufer ein CLIP-Bild
zugeordnet haben, wird dieses zusätzlich
angezeigt.
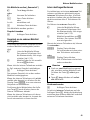
Ø«Ú
2
1234567890
Abheben
1
Ruf aus
1 Klingel-Symbol
2 Nummer oder Name des Anrufers
Statt der Nummer wird Folgendes angezeigt:
u Extern, wenn keine Nummer übertragen wird.
u Unbekannt, wenn der Anrufer die Rufnummernübermittlung nicht beauftragt hat.
Hinweis
Der Klingelton kann für anonyme
Anrufe (Anrufe mit unterdrückter Rufnummernübermittlung) abgeschaltet
werden (¢ S. 51).
English
Rufnummernübermittlung
Deutsch
Telefonieren
Freisprechen
Beim Freisprechen halten Sie das Mobilteil
nicht ans Ohr, sondern legen es z.B. vor
sich auf den Tisch. So können sich auch
andere an dem Telefonat beteiligen.
Freisprechen ein-/ausschalten
Beim Wählen einschalten
~d
¤
Nummer eingeben und Freisprech-Taste drücken.
Wenn Sie jemanden mithören lassen,
sollten Sie dies Ihrem Gesprächspartner mitteilen.
Zwischen Hörer- und Freisprechbetrieb
wechseln
d
Freisprech-Taste drücken.
Während eines Gesprächs schalten Sie das
Freisprechen ein oder aus.
Wenn Sie das Mobilteil während eines
Gesprächs in die Basis/Ladeschale stellen
wollen:
¤ Die Freisprech-Taste d beim
Hineinstellen und noch weitere
2 Sekunden gedrückt halten.
Wie Sie die Sprachlautstärke ändern,
¢ S. 50.
Hinweis
Falls Sie ein Headset angeschlossen
haben, wird zwischen Headset und
Freisprechen gewechselt.
27
Telefonieren
Stumm schalten
Sie können das Mikrofon Ihres Mobilteils
während eines externen Gesprächs ausschalten.
h
Taste drücken, um das
Mobilteil stumm zu schalten.
Im Display wird Mikrophon ist
aus angezeigt.
Taste erneut drücken, um die
Stummschaltung aufzuheben.
Hinweis
u Ist das Telefon stumm geschaltet,
sind alle Tasten mit Ausnahme der
Stummschalte-Taste h und der
Auflegen-Taste a funktionslos.
u Auch ein angeschlossenes Headset
wird stumm geschaltet.
28
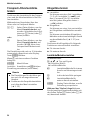
Zur Verfügung stehen:
u Adressbuch,
u Wahlwiederholungsliste,
u Anruflisten,
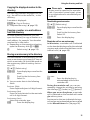
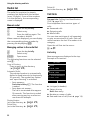
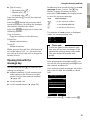
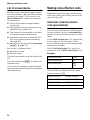
u Liste der entgangenen Termine.
Das Adressbuch erstellen Sie individuell
für Ihr Mobilteil. Sie können die Listen/Einträge jedoch an andere Mobilteile senden
(¢ S. 31).
Adressbuch
Im Adressbuch können Sie insgesamt 500
Einträge speichern.
Hinweis
Für den Schnellzugriff auf eine Nummer aus dem Adressbuch (Kurzwahl)
können Sie die Nummer auf eine Taste
legen (¢ S. 47).
Adressbuch
Im Adressbuch speichern Sie
u Bis zu drei Nummern und zugehörige
Vor- und Nachnamen,
u E-Mail-Adresse,
u Jahrestage mit Signalisierung,
u VIP-Klingelton mit VIP-Symbol,
u CLIP-Bilder.
Sie öffnen das Adressbuch im Ruhezustand mit der Taste s.
Länge der Einträge
3 Nummern:
Vor- und Nachname:
E-Mail-Adresse:
je max. 32 Ziffern
je max. 16 Zeichen
max. 64 Zeichen
Nummer im Adressbuch speichern
s ¢ <Neuer Eintrag>
¤ Mehrzeilige Eingabe ändern:
Vorname: / Nachname:
Vornamen und/oder Nachnamen eingeben.
Wird in keinem der Felder ein Name
eingegeben, so wird die Telefonnummer gleichzeitig als Nachname gespeichert und angezeigt.
(Die Anleitung zum Eingeben von Text
und Sonderzeichen erhalten Sie auf
¢ S. 61.)
Tel.: / Tel. (Büro): / Tel. (Mobil):
In mindestens einem der Felder eine
Nummer eingeben.
Die Einträge werden beim Blättern im
Adressbuch durch ein vorangestelltes
Symbol gekennzeichnet: ä/ k/ l.
E-Mail:
E-Mail-Adresse eingeben.
Jahrestag:
Ein oder Aus auswählen.
Bei Einstellung Ein:
Jahrestag (Datum) und Jahrestag (Zeit)
eingeben und Signalisierungsart auswählen: Jahrestag (Signal) ¢ S. 32.
CLIP-Bild:
Ggf. Bild auswählen, das bei einem
Anruf des Teilnehmers angezeigt werden soll (siehe Media-Pool, S. 51).
Voraussetzung: Rufnummernübermittlung (CLIP).
CLIP-Melodie (VIP):
Adressbuch-Eintrag als VIP (Very
Important Person) markieren, indem
Sie ihm einen bestimmten Klingelton
zuweisen. Sie erkennen VIP-Anrufe am
Klingelton.
VIP-Einträge werden beim Blättern im
Adressbuch durch das Symbol Æ
gekennzeichnet.
Voraussetzung: Rufnummernübermittlung (CLIP).
§Sichern§
Display-Taste drücken.
29
English
Adressbuch und Listen
nutzen
Deutsch
Adressbuch und Listen nutzen
Adressbuch und Listen nutzen
Reihenfolge der Adressbucheinträge
Adressbuch-Einträge verwalten
Die Adressbucheinträge werden generell
alphabetisch nach den Nachnamen sortiert. Leerzeichen und Ziffern haben dabei
erste Priorität. Wurde im Adressbuch nur
der Vorname eingegeben, so wird dieser
statt des Nachnamens in die Reihenfolge
eingegliedert.
Die Sortierreihenfolge ist wie folgt:
1. Leerzeichen
2. Ziffern (0–9)
3. Buchstaben (alphabetisch)
4. Restliche Zeichen
Wollen Sie die alphabetische Reihenfolge
der Einträge umgehen, fügen Sie vor dem
ersten Buchstaben des Nachnamens ein
Leerzeichen oder eine Ziffer ein. Diese
Einträge rücken dann an den Anfang des
Adressbuchs.
Eintrag ansehen
Adressbuch-Eintrag auswählen
s
Adressbuch öffnen.
Sie haben folgende Möglichkeiten:
u Mit s zum Eintrag blättern, bis der
gesuchte Name ausgewählt ist.
u Die ersten Buchstaben des Namens eingeben (max. 8), ggf. mit s zum Eintrag blättern.
Im Adressbuch wird der Nachname
durchsucht. Wenn kein Nachname eingetragen ist, wird der Vorname durchsucht.
Mit Adressbuch wählen
s ¢ s (Eintrag auswählen)
c
Abheben-Taste drücken.
(Sind mehreren Nummern eingetragen, gewünschte Nummer mit rauswählen und
Abheben-Taste c erneut drücken).
Nummer wird gewählt.
30
s ¢ s (Eintrag auswählen)
§Ansehen§
Display-Taste drücken. Eintrag
wird angezeigt.
§Optionen§
Display-Taste drücken.
Folgende Funktionen können Sie mit q
auswählen:
Nummer verwenden
Eine gespeicherte Nummer ändern,
ergänzen oder als neuen Eintrag
abspeichern; dazu nach der Anzeige
der Nummer Ó drücken.
Eintrag löschen
Ausgewählten Eintrag löschen.
Eintrag senden
an Intern: Einzelnen Eintrag an ein
Mobilteil senden (¢ S. 31).
vCard via Bluetooth: Einzelnen Eintrag im
vCard-Format über Bluetooth versenden.
Eintrag ändern
s ¢ s (Eintrag auswählen)
§Ansehen§ §Ändern§
¤
Display-Tasten nacheinander
drücken.
Änderungen ausführen und speichern.
s ¢ s (Eintrag auswählen)
¢ §Optionen§ (Menü öffnen)
Folgende Funktionen können Sie mit q
auswählen:
Nummer verwenden
Eine gespeicherte Nummer ändern
oder ergänzen und dann mit c wählen oder als neuen Eintrag abspeichern; dazu nach der Anzeige der Nummer Ó drücken.
Eintrag ändern
Ausgewählten Eintrag ändern.
Eintrag löschen
Ausgewählten Eintrag löschen.
Eintrag senden
an Intern: Einzelnen Eintrag an ein
Mobilteil senden (¢ S. 31).
vCard via Bluetooth: Einzelnen Eintrag im
vCard-Format über Bluetooth versenden.
Liste löschen
Alle Einträge im Adressbuch löschen.
Liste senden
an Intern: Komplette Liste an ein
Mobilteil senden (¢ S. 31).
vCard via Bluetooth: Komplette Liste im
vCard-Format über Bluetooth versenden.
Speicherplatz
Anzahl der noch freien Einträge im
Adressbuch (¢ S. 29) anzeigen lassen.
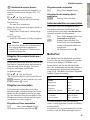
Adressbuch an ein anderes Mobilteil
übertragen
Voraussetzungen:
u Empfänger- und Sender-Mobilteil sind
an derselben Basis angemeldet.
u Das andere Mobilteil und die Basis kön-
nen Adressbuch-Einträge senden und
empfangen.
s ¢ s (Eintrag auswählen)
¢ §Optionen§ (Menü öffnen) ¢ Eintrag
senden / Liste senden ¢ an Intern
s
Interne Nummer des Empfänger-Mobilteils auswählen und
§OK§ drücken.
Sie können mehrere einzelne Einträge
nacheinander übertragen, indem Sie die
Abfrage Eintrag gesendet. Weiteren Eintrag
senden? mit §Ja§ beantworten.
Die erfolgreiche Übertragung wird mit
einer Meldung und mit dem Bestätigungston am Empfänger-Mobilteil bestätigt.
Bitte beachten Sie:
u Einträge mit identischen Nummern
werden beim Empfänger nicht überschrieben.
u Die Übertragung wird abgebrochen,
wenn das Telefon klingelt oder der
Speicher des Empfänger-Mobilteils voll
ist.
u Einträgen zugeordnete Bilder und
Sounds werden nicht übertragen.
Über Kurzwahl-Tasten wählen
¤ Die jeweilige Kurzwahl-Taste lang drücken (¢ S. 47).
31
English
Weitere Funktionen nutzen
Deutsch
Adressbuch und Listen nutzen
Adressbuch und Listen nutzen
Adressbuch mit Bluetooth als vCard
übertragen
Im Bluetooth-Modus (¢ S. 46) können
Sie Adressbucheinträge im vCard-Format
übertragen, z.B. zum Austauschen von
Einträgen mit Ihrem Handy.
s ¢ s (Eintrag auswählen)
¢ §Optionen§ (Menü öffnen) ¢ Eintrag
senden / Liste senden ¢ vCard via
Bluetooth
Die Liste der „Bekannte Geräte “ (¢ S. 46)
wird angezeigt.
s
Gerät auswählen und §OK§ drücken.
vCard mit Bluetooth empfangen
Sendet ein Gerät aus der Liste „Bekannte
Geräte “ (¢ S. 46) eine vCard an Ihr
Mobilteil, so geschieht dies automatisch.
Sie werden am Display darüber informiert.
Ist das sendende Gerät nicht in der Liste
aufgeführt, werden Sie am Display zur Eingabe der Geräte-PIN des sendenden
Geräts aufgefordert:
~
PIN des sendenden Bluetooth-Geräts eingeben und
§OK§ drücken.
Die übertragene vCard steht als Adressbucheintrag zur Verfügung.
Angezeigte Nummer ins Adressbuch
übernehmen
Sie können Nummern in das Adressbuch
übernehmen, die in einer Liste, z.B. der
Anrufliste oder der Wahlwiederholungsliste angezeigt werden.
Es wird eine Nummer angezeigt:
§Optionen§ ¢ Nr. ins Telefonbuch
¤ Den Eintrag vervollständigen ¢ S. 29.
32
Nummer oder E-Mail-Adresse aus
Adressbuch übernehmen
In einigen Bediensituationen können Sie
das Adressbuch öffnen, um z. B. eine
Nummer oder E-Mail-Adresse zu übernehmen. Ihr Mobilteil muss nicht im Ruhezustand sein.
¤ Je nach Bediensituation das Adressbuch mit s oder Ó öffnen.
q
Eintrag auswählen (¢ S. 30).
Jahrestag im Adressbuch speichern
Sie können zu jeder Nummer im Adressbuch einen Jahrestag speichern und eine
Zeit angeben, zu der am Jahrestag ein
Erinnerungsruf erfolgen soll (Lieferzustand: Jahrestag: Aus).
s ¢ s (Eintrag auswählen)
§Ansehen§ §Ändern§
s
v
Display-Tasten nacheinander
drücken.
In die Zeile Jahrestag: springen.
Ein auswählen.
¤ Mehrzeilige Eingabe ändern:
Jahrestag (Datum)
Tag/Monat/Jahr 8-stellig eingeben.
Jahrestag (Zeit)
Stunde/Minute für den Erinnerungsruf
4-stellig eingeben.
Jahrestag (Signal)
Art der Signalisierung auswählen.
§Sichern§
Display-Taste drücken.
Hinweis
Für einen Erinnerungsruf ist die Zeitangabe notwendig. Wenn Sie die optische Signalisierung gewählt haben, ist
die Zeitangabe nicht nötig und wird
automatisch auf 00:00 gesetzt.
s ¢ s (Eintrag auswählen)
§Ansehen§ §Ändern§
s
v
§Sichern§
Display-Tasten nacheinander
drücken.
In die Zeile Jahrestag: springen.
Aus auswählen.
Display-Taste drücken.
Erinnerungsruf an einem Jahrestag
Im Ruhezustand wird ein Erinnerungsruf
im Display des Mobilteils sowie mit dem
ausgewählten Klingelton und der Lautstärke, die für interne Anrufe eingestellt
ist (¢ S. 50), signalisiert.
ØðÚ
Miller,
Frank
Aus
Sie können:
Display-Taste drücken, um den
Erinnerungsruf zu quittieren
und zu beenden.
Während der Signalisierung können Sie
die Lautstärke mit den Seiten-Tasten ø
(lauter) oder ÷ (leiser) dauerhaft
ändern.
Während Sie telefonieren wird ein Erinnerungsruf einmalig mit einem Hinweiston am Mobilteil signalisiert.
Nicht quittierte Jahrestage, die während
eines Gesprächs signalisiert werden, werden in die Liste Entgang. Termine eingetragen (¢ S. 35).
§Aus§
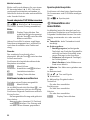
Wahlwiederholungsliste
In der Wahlwiederholungsliste stehen die
zwanzig am Mobilteil zuletzt gewählten
Nummern (max. 32 Ziffern). Steht eine
der Nummern im Adressbuch, wird der
zugehörige Name angezeigt.
Manuelle Wahlwiederholung
c
s
c
Taste kurz drücken.
Eintrag auswählen.
Abheben-Taste erneut
drücken. Nummer wird
gewählt.
Bei Anzeige eines Namens können Sie sich
mit der Display-Taste §Ansehen§ die dazugehörige Nummer anzeigen lassen.
Einträge der Wahlwiederholungsliste
verwalten
c
s
Taste kurz drücken.
Eintrag auswählen.
§Optionen§
Menü öffnen.
Folgende Funktionen können Sie mit q
auswählen:
Nr. ins Telefonbuch
Eintrag ins Adressbuch (¢ S. 29)
übernehmen.
Auto-Wahlwiederh.
Die gewählte Nummer wird in festen
Abständen (mind. alle 20 Sek.) automatisch gewählt. Dabei blinkt die Freisprech-Taste, „Lauthören“ ist eingeschaltet.
– Teilnehmer meldet sich:
Abheben-Taste cdrücken. Die
Funktion ist beendet.
– Kein Teilnehmer meldet sich:
Der Ruf bricht nach ca. 30 Sek. ab.
Nach Drücken einer beliebigen Taste
oder zehn erfolglosen Versuchen
endet die Funktion.
Nummer verwenden
(wie im Adressbuch ¢ S. 31)
33
English
Jahrestag ausschalten
Deutsch
Adressbuch und Listen nutzen
Adressbuch und Listen nutzen
Eintrag löschen
(wie im Adressbuch ¢
Liste löschen
(wie im Adressbuch ¢
S. 31)
S. 31)
Anruflisten
Voraussetzung: Rufnummernübermittlung (CLIP ¢ S. 27)
Ihr Telefon speichert verschieden Anrufarten:
u angenommene Anrufe
u abgehende Anrufe
u entgangene Anrufe
Sie können sich jede Anrufart einzeln
anzeigen lassen oder eine Gesamtansicht
aller Anrufe. Jeweils die letzten 20 Einträge werden angezeigt.
Die Anruflisten öffnen Sie über das Menü:
v¢Ê
Listeneintrag
Neue Nachrichten stehen oben.
Beispiel für Listeneinträge:
Alle Anrufe
™ Frank
14.10.09, 15:40
š 089563795
14.10.09, 15:32
™ ...0123727859362922
14.10.09, 15:07
Ansehen
Optionen
u Die Listenart (im Kopfteil)
u Der Status des Eintrags
Fettschrift: Eintrag neu
u Nummer oder Name des Anrufers
u Datum und Uhrzeit des Anrufs (falls
eingestellt ¢ S. 14)
u Art des Eintrags:
– angenommene Anrufe ( › )
– entgangene Anrufe ( ™ )
34
– abgehende Anrufe ( š )
Drücken Sie die Abheben-Taste c, um
den ausgewählten Anrufer zurückzurufen.
Drücken Sie die Display-Taste §Ansehen§, um
zusätzliche Informationen, beispielsweise
die Nummer zu einem Namen, anzuzeigen.
Drücken Sie die Display-Taste §Optionen§, um
folgende Funktionen auszuwählen:
Nr. ins Telefonbuch
Nummer ins Adressbuch übernehmen.
Eintrag löschen
Ausgewählten Eintrag löschen.
Liste löschen
Alle Einträge löschen.
Nach Verlassen der Anruflisten werden
alle Einträge auf den Status „alt“ gesetzt,
d. h. sie werden beim nächsten Aufruf
nicht mehr in Fettschrift dargestellt.
Listen mit Nachrichten-Taste
aufrufen
Mit der Nachrichten-Taste f rufen Sie
folgende Listenauswahl auf:
u Netz-Anrufbeantworter, wenn Ihr Netzanbieter diese Funktion unterstützt
und die Schnellwahl für den NetzAnrufbeantworter festgelegt ist
(¢ S. 37).
u Liste der entgangenen Anrufe
u Liste der entgangenen Termine
(¢ S. 35)
Sobald ein neuer Eintrag in einer Liste
eingeht, ertönt ein Hinweiston. Die Taste
f blinkt (erlischt nach Drücken der
Taste). Im Ruhezustand wird für die neue
Nachricht ein Symbol im Display angezeigt:
Symbol Neue Nachricht...
Ã
™
... auf dem Netz-Anrufbeantworter
... in der Liste Entgangene Anrufe
... in der Liste Entgang. Termine
œ
Ã
02
10
08
Hinweis
Sind Anrufe auf dem Netzanrufbeantworter gespeichert, erhalten Sie bei
entsprechender Einstellung eine Meldung (siehe Bedienungsanleitung
Ihres Netzanbieters).
Nach Drücken der Nachrichten-Taste f
sehen Sie alle Listen, die Nachrichten enthalten und die Netz-Anrufbeantworterliste.
Listen mit neuen Nachrichten stehen oben
und sind durch Fettschrift gekennzeichnet:
Nachrichten
Entg. Anrufe:
(3)
Entgang. Termine
(1)
Zurück
OK
Liste der entgangenen Termine
Nicht angenommene (nicht quittierte)
Termine aus dem Kalender (¢ S. 39) und
Jahrestage (¢ S. 32) werden in folgenden Fällen in der Liste Entgang. Termine
gespeichert:
u Sie nehmen einen Termin/Jahrestag
nicht an.
u Der Termin/Jahrestag wurde während
eines Anrufs signalisiert.
u Das Mobilteil ist zum Zeitpunkt eines
Termins/Jahrestages ausgeschaltet.
u Zum Zeitpunkt eines Termins/Jahrestages war die automatische Wahlwiederholung aktiviert (¢ S. 33).
u Sie öffnen die Liste durch Drücken der
Nachrichten-Taste f (¢ S. 34).
Jeder Eintrag wird mit
u Nummer oder Name,
u Datum und Uhrzeit
angezeigt. Der neueste Eintrag steht am
Anfang der Liste.
Drücken Sie die Display-Taste §Löschen§, um
den markierten Eintrag zu löschen.
Sind in der Liste 10 Einträge gespeichert,
wird beim nächsten Terminruf der älteste
Eintrag gelöscht.
Mit q wählen Sie eine Liste aus. Zum Öffnen drücken Sie §OK§.
35
English
Die Anzahl neuer Einträge wird unter dem
jeweiligen Symbol angezeigt.
Deutsch
Adressbuch und Listen nutzen
Kostenbewusst telefonieren
Kostenbewusst telefonieren
Telefonieren Sie über einen Netzanbieter,
der besonders günstige Tarife (Call-byCall) anbietet.
Automatische
Netzanbietervorwahl
(Preselection)
Preselection-Nr.
0999
Mit Preselection
08
Ohne Preselection
081
084
Alle Nummern, die mit 08 beginnen, mit
Ausnahme von 081 und 084, werden mit
Preselection-Nummer 0999 gewählt.
08912345678
08412345678
36
¢
¢
¢
Preselection-Nummer (Callby-Call-Nummer) eingeben
bzw. ändern.
Display-Taste drücken.
Einträge in Preselection-Listen
speichern bzw. ändern
Beispiel:
07112345678
~
§Sichern§
Sie können eine Call-by-Call-Nummer
(Preselection-Nummer) speichern, die
automatisch beim Wählen vorangestellt
wird.
Tragen Sie in die Liste „Mit Preselection“
die Vorwahl-Nummern bzw. die ersten Ziffern von Vorwahl-Nummern ein, bei
denen die Preselection-Nummer verwendet werden soll.
Tragen Sie in die Liste „Ohne Preselection“ die Ausnahmen zur Liste „Mit Preselection“ ein.
Rufnummer
• Preselection-Nummer speichern
v ¢ Ï ¢ Telefonie ¢ Preselection
¢ Preselection-Nr.
gewählte Nummer
07112345678
0999 08912345678
08412345678
Jede der beiden Listen kann 20 Einträge
mit jeweils 6 Ziffern enthalten.
In der Liste „mit Preselection“ sind, je
nach Land, ggf. Nummern voreingestellt.
Dadurch werden z.B. alle nationalen
Gespräche oder Gespräche in das Mobilfunknetz automatisch mit der vorher von
Ihnen gespeicherten Preselection-Nummer verknüpft.
v ¢ Ï ¢ Telefonie ¢ Preselection
¢ Mit Preselection / Ohne Preselection
s
Eintrag auswählen.
~
Anfangsziffern der Nummer
eingeben oder ändern.
§Sichern§
Display-Taste drücken.
Zeitweises Unterdrücken von
Preselection
c (lang drücken) ¢ §Optionen§
¢ Preselection aus
¢ ~ (Nummer wählen)
Preselection dauerhaft deaktivieren
v ¢ Ï ¢ Telefonie ¢ Preselection
¢ Preselection-Nr.
Ñ
Display-Taste so lange drücken, bis die PreselectionNummer gelöscht ist.
§Sichern§
Display-Taste drücken.
Der Netz-Anrufbeantworter ist der Anrufbeantworter Ihres Netzanbieters im Netz.
Sie können den Netz-Anrufbeantworter
erst dann nutzen, wenn Sie diesen bei
Ihrem Netzanbieter beauftragt haben.
• Schnellwahl für Netz-
Anrufbeantworter festlegen
Bei der Schnellwahl können Sie den NetzAnrufbeantworter direkt anwählen.
Die Schnellwahl ist für den Netz-Anrufbeantworter voreingestellt. Sie brauchen
nur noch die Nummer des Netz-Anrufbeantworters einzutragen.
Schnellwahl für den NetzAnrufbeantworter festlegen und Nummer
des Netz-Anrufbeantworters eintragen
v ¢ Ì ¢ Netz-Anrufbeantw.
Meldung des NetzAnrufbeantworters ansehen
Wenn für Sie eine Nachricht eintrifft,
erhalten Sie vom Netz-Anrufbeantworter
einen Anruf. Im Display wird die Nummer
des Netz-Anrufbeantworters angezeigt,
wenn Sie die Rufnummernübermittlung
beauftragt haben. Nehmen Sie den Anruf
an, werden die neuen Nachrichten wiedergegeben. Nehmen Sie ihn nicht an,
wird die Nummer des Netz-Anrufbeantworters in der Liste der entgangenen
Anrufe gespeichert und die NachrichtenTaste blinkt (¢ S. 34).
Hinweis
Tragen sie in ihrem Adressbuch die
Netz-Anrufbeantworter Rufnummer
und die Bezeichnung „Netz-Anrufbeantworter“ ein, dann wird im Display
und in der Anruferliste gleich diese
Bezeichnung angezeigt.
~
Nummer des Netz-Anrufbeantworters eingeben.
§Sichern§
Display-Taste drücken.
Die Einstellung für die Schnellwahl gilt für
alle Mobilteile Gigaset S4 professional.
Netz-Anrufbeantworter anrufen
d
Lang drücken. Sie werden
direkt mit dem Netz-Anrufbeantworter verbunden.
Ggf. Freisprech-Taste d drücken. Sie hören die Ansage des
Netz-Anrufbeantworter laut.
37
English
Netz-Anrufbeantworter
nutzen
Deutsch
Netz-Anrufbeantworter nutzen
ECO DECT
ECO DECT
Mit Ihrem Gigaset S400 professional leisten Sie Ihren Beitrag zum Umweltschutz.
Reduzierung des Stromverbrauchs
Durch die Verwendung eines stromsparenden Steckernetzteils verbraucht Ihr
Telefon weniger Strom.
Zustandsanzeigen
Displaysymbol
Ð i Ñ Ò
| (blinkt)
Ð weiss
Ð grün
¼ weiss
Reduzierung der Strahlung
Die Strahlung Ihres Telefons wird automatisch reduziert:
u Am Mobilteil wird die Funkleistung
abhängig von der Entfernung des
Mobilteils zur Basis reduziert.
u An der Basis wird die Funkleistung auf
nahezu Null reduziert, wenn nur ein
Mobilteil angemeldet ist und in der
Basis steht.
Sie können die Strahlung von Mobilteil
und Basis zusätzlich reduzieren, indem Sie
Eco-Modus oder Eco-Modus+ nutzen:
u Eco-Modus
80% Reduzierung der Funkleistung der
Basis im Standby- und Gesprächszustand.
u Eco-Modus+
100% Abschaltung der Funkleistung
von Basis und Mobilteil, wenn kein
Gespräch geführt wird.
Eco-Modus / Eco-Modus+ können unabhängig voneinander ein- oder ausgeschaltet werden und funktionieren auch bei
mehreren Mobilteilen. Das Mobilteil muss
nicht in der Basis stehen.
Eco-Modus / Eco-Modus+
ein-/ausschalten:
v ¢ Ï ¢ Eco-Modus
¢ Eco-Modus / Eco-Modus+
§Ändern§
Displaytaste drücken
(³ = ein).
38
¼ grün
Empfangsstärke:
– gut bis gering
– kein Empfang
Eco-Modus deaktiviert
Eco-Modus aktiviert
Eco-Modus+ aktiviert
(wird im Ruhezustand
statt des Empfangsstärkesymbols angezeigt)
Eco-Modus und EcoModus+ aktiviert
Hinweise
u Bei eingeschaltetem Eco-Modus+
u
u
u
u
können Sie die Erreichbarkeit der
Basis prüfen, indem sie die Abhebentaste c lang drücken. Ist die
Basis erreichbar, hören Sie das Freizeichen.
Bei eingeschaltetem Eco-Modus+:
– verzögert sich der Gesprächsaufbau um ca. 2 Sekunden.
– verringert sich die Standby-Zeit
des Mobilteils um ca. 50%.
Wenn Sie Mobilteile anmelden, die
den Eco-Modus+ nicht unterstützen, wird dieser Modus in Basis und
allen Mobilteilen deaktiviert.
Bei eingeschaltetem Eco-Modus
reduziert sich die Reichweite der
Basis.
Eco-Modus / Eco-Modus+ und
Repeater-Unterstützung (¢ S. 54)
schließen sich gegenseitig aus, d.h.
wenn Sie einen Repeater verwenden, können Sie Eco-Modus und
Eco-Modus+ nicht nutzen.
Sie können sich von Ihrem Mobilteil an bis
zu 30 Termine erinnern lassen. Im Adressbuch eingetragene Jahrestage (¢ S. 32)
werden automatisch in den Kalender aufgenommen.
Termin speichern
Voraussetzung: Datum und Uhrzeit sind
eingestellt (¢ S. 14).
v ¢ Í ¢ Kalender
Okt 2009
Mo
Di
Mi
Do
Fr
Sa
So
01
02
03
04
05
06
07
08
09
10
11
12
13
14
15
16
17
18
19
20
21
22
23
24
25
26
27
28
29
30
31
Zurück
Optionen
u Der aktuelle Tag ist ausgewählt (weiß
umrandet).
u Tage, an denen bereits Termine gespei-
chert sind, sind weiß unterlegt.
r/q
Im grafischen Kalender den
gewünschten Tag auswählen.
Der ausgewählte Tag ist weiß umrandet.
Der aktuelle Tag ist nicht mehr umrandet.
w
Steuer-Taste mittig drücken.
u Sind bereits Termine eingetragen, öffnen Sie die Liste der gespeicherten Termine des Tages.
Mit <Neuer Eintrag> ¢ §OK§ öffnen Sie
das Fenster für die Dateneingabe.
u Wenn noch keine Termine eingetragen
sind, öffnen Sie sofort das Fenster für
die Dateneingabe des neuen Termins.
¤ Mehrzeilige Eingabe ändern:
Aktivierung:
Ein oder Aus auswählen.
Datum:
Tag/Monat/Jahr 8-stellig eingeben.
Zeit:
Stunden/Minuten 4-stellig eingeben.
Text:
Text (max. 16-stellig) eingeben. Der
Text wird als Terminname in der Liste
und beim Terminruf im Display angezeigt. Wenn Sie keinen Text eingeben,
werden nur Datum und Zeit des Termins angezeigt.
Signal:
Wählen Sie die Art der Signalisierung.
§Sichern§
Display-Taste drücken.
Hinweis
Wenn Sie 30 Termine gespeichert
haben, müssen Sie zunächst einen
bestehenden Termin löschen, um
einen Neuen eingeben zu können.
Termine, Jahrestage signalisieren
Ein Terminruf wird im Ruhezustand
60 Sek. lang mit der ausgewählten Klingelmelodie und der Lautstärke, die für
interne Anrufe eingestellt ist (¢ S. 50),
signalisiert. Während der Signalisierung
können Sie die Lautstärke mit den SeitenTasten ø (lauter) oder ÷ (leiser) dauerhaft ändern.
Es werden bei Jahrestagen der Name und
bei Terminen der eingetragene Text mit
Datum und Uhrzeit angezeigt.
ØáÚ
Meeting
03.11.09 15:38
Aus
39
English
Termin (Kalender) einstellen
Deutsch
Termin (Kalender) einstellen
Termin (Kalender) einstellen
Sie können den Terminruf ausschalten
oder beantworten:
§§Aus§§
Display-Taste drücken, um den
Terminruf auszuschalten.
Hinweis
Während eines Anrufs wird ein Termin
nur durch einen kurzen Ton signalisiert.
Termine verwalten
v ¢ Í ¢ Kalender
Einzelnen Termin bearbeiten
r/q
Im grafischen Kalender Tag
auswählen und Steuer-Taste
wdrücken. (Tage, an denen
bereits Termine gespeichert
sind, sind im Kalender weiß
unterlegt.)
q
Termin des Tages auswählen.
Sie haben folgende Möglichkeiten:
§§Ansehen§§
Display-Taste drücken und Eintrag ändern oder bestätigen.
oder
§Optionen§
Menü zum Ändern, Löschen
und Aktivieren / Deaktivieren
öffnen.
Alle Termine des Kalenders löschen
§Optionen
¢ Liste löschen ¢ §OK§
Sicherheitsabfrage mit §Ja§ beantworten.
Alle Termine werden gelöscht.
40
Nicht angenommene Termine,
Jahrestage anzeigen
Nicht angenommene Termine/Jahrestage
(¢ S. 32) werden in folgenden Fällen in
der Liste Entgang. Termine gespeichert:
u Sie nehmen einen Termin/Jahrestag
nicht an.
u Der Termin/Jahrestag wurde während
eines Anrufs signalisiert.
u Das Mobilteil ist zum Zeitpunkt eines
Termins/Jahrestages ausgeschaltet.
u Zum Zeitpunkt eines Termins/Jahrestages war die automatische Wahlwiederholung aktiviert (¢ S. 33).
Im Display wird das Symbol n und die
Anzahl der neuen Einträge angezeigt. Der
neueste Eintrag steht am Anfang der Liste.
Sie öffnen die Liste duch Drücken der
Nachrichten-Taste f (¢ S. 34) oder
über das Menü:
v ¢ Í ¢ Entgang. Termine
Termin/Jahrestag auswählen.
Informationen zum Termin/
Jahrestag werden angezeigt.
Ein entgangener Termin wird
mit dem Termin-Namen, ein
entgangener Jahrestag mit
Name, Vorname angezeigt.
Zusätzlich werden Datum und
Uhrzeit angegeben.
§Löschen§
Termin löschen.
Sind in der Liste 10 Einträge gespeichert,
wird beim nächsten Terminruf der älteste
Eintrag gelöscht.
Weckruf ausschalten/nach Pause
wiederholen (Schlummermodus)
Voraussetzung: Datum und Uhrzeit sind
eingestellt (¢ S. 14).
Voraussetzung: Es ertönt ein Weckruf.
§Aus§
Display-Taste drücken. Der
Weckruf wird ausgeschaltet.
bzw.
§Snooze§
Display-Taste oder beliebige
Taste drücken. Der Weckruf
wird ausgeschaltet und nach
5 Minuten wiederholt. Nach
der zweiten Wiederholung
wird der Weckruf ganz ausgeschaltet.
Wecker ein-/ausschalten und
einstellen
v ¢ á ¢ Wecker
¤ Mehrzeilige Eingabe ändern:
Aktivierung:
Ein oder Aus auswählen.
Zeit:
Weckzeit 4-stellig eingeben.
Zeitraum:
Täglich oder Montag-Freitag auswählen.
Lautstärke:
Lautstärke (1–6) einstellen.
Melodie:
Melodie auswählen.
§Sichern§
Display-Taste drücken.
Im Ruhedisplay wird das Symbol ¼und
die Weckzeit angezeigt.
Ein Weckruf wird im Display (¢ S. 3) und
mit der ausgewählten Klingelmelodie signalisiert. Der Weckruf ertönt 60 Sek. lang.
Wird keine Taste gedrückt, wird der Weckruf zweimal nach jeweils fünf Minuten
wiederholt und dann ausgeschaltet.
Während der Wecker klingelt können Sie
die Lautstärke mit den Seiten-Tasten ø
(lauter) oder ÷ (leiser) dauerhaft
ändern.
Während eines Anrufs wird ein Weckruf
nur durch einen kurzen Ton signalisiert.
Mehrere Mobilteile nutzen
Mobilteile anmelden
Sie können an Ihrer Basis insgesamt bis zu
sechs Mobilteile anmelden.
Ein Mobilteil Gigaset S4 professional kann
an bis zu vier Basen angemeldet werden.
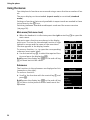
Manuelle Anmeldung
Gigaset S4 professional an
Gigaset S400 professional
Die manuelle Anmeldung des Mobilteils
müssen Sie am Mobilteil und an der Basis
einleiten.
Nach erfolgreicher Anmeldung wechselt
das Mobilteil in den Ruhezustand. Im Display wird die interne Nummer des
Mobilteils angezeigt, z.B. INT 1. Andernfalls wiederholen Sie den Vorgang.
Am Mobilteil
Das Mobilteil ist an keiner Basis angemeldet:
§Anmelden§ Display-Taste drücken.
Das Mobilteil ist bereits an einer Basis
angemeldet:
v ¢ Ï ¢ Anmeldung
¢ Mobilteil anmelden
41
English
Wecker einstellen
Deutsch
Wecker einstellen
Mehrere Mobilteile nutzen
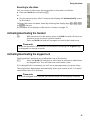
Falls das Mobilteil bereits an vier Basen
angemeldet ist:
s
Basis auswählen, z.B. Basis 3
und §OK§ drücken.
~
Falls abgefragt, System-PIN
der Basis eingeben und §OK§
drücken.
Im Display wird die Information angezeigt,
dass nach einer anmeldebereiten Basis
gesucht wird.
An der Basis
Innerhalb von 60 Sek. Anmelde-/PagingTaste an der Basis (¢ S. 2) lang
(ca. 3 Sek.) drücken.
Anmeldung anderer Mobilteile
Andere Gigaset-Mobilteile und Mobilteile
anderer GAP-fähiger Geräte melden Sie
wie folgt an.
Am Mobilteil
¤ Starten Sie die Anmeldung des
Mobilteils entsprechend der jeweiligen
Bedienungsanleitung.
An der Basis
Anmelde-/Paging-Taste an der Basis
(¢ S. 2) lang (ca. 3 Sek.) drücken.
Mobilteile abmelden
Sie können von jedem angemeldeten
Mobilteil Gigaset S4 professional jedes
andere angemeldete Mobilteil abmelden.
v ¢ Ï ¢ Anmeldung
¢ Mobilteil abmelden
s
Abzumeldenden Intern-Teilnehmer auswählenund §OK§
drücken.
(Das Mobilteil, das Sie gerade
bedienen, ist mit < markiert.)
~
Aktuelle System-PIN eingeben
und §Sichern§ drücken.
§Ja§
Display-Taste drücken.
42
Mobilteil suchen („Paging“)
Sie können Ihr Mobilteil mit Hilfe der Basis
suchen.
¤ Anmelde-/Paging-Taste an der Basis
(¢ S. 2) kurz drücken.
¤ Alle Mobilteile klingeln gleichzeitig
(„Paging“), auch wenn Klingeltöne ausgeschaltet sind.
Suche beenden
¤ Anmelde-/Paging-Taste an der Basis
kurz drücken oder Abheben-Taste c
am Mobilteil drücken.
Basis wechseln
Ist Ihr Mobilteil an mehreren Basen angemeldet, können Sie es auf eine bestimmte
Basis oder auf die Basis mit dem besten
Empfang (Beste Basis) einstellen.
v ¢ Ï ¢ Anmeldung ¢ Basisauswahl
s
Eine der angemeldeten Basen
oder Beste Basis auswählen
und §Auswahl§ drücken.
Intern anrufen
Interne Gespräche mit anderen, an derselben Basis angemeldeten Mobilteilen sind
kostenlos.
Ein bestimmtes Mobilteil anrufen
u
~
oder:
u
s
c
Internen Ruf einleiten.
Nummer des Mobilteils eingeben.
Internen Ruf einleiten.
Mobilteil auswählen.
Abheben-Taste drücken.
u
oder:
u
*
Taste lang drücken.
Internen Ruf einleiten.
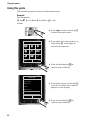
Stern-Taste drücken
oder
An alle
auswählen und
c
Abheben-Taste drücken.
Alle Mobilteile werden gerufen.
Gespräch beenden
a
Auflegen-Taste drücken.
Gespräch an ein anderes Mobilteil
weitergeben
Sie können ein externes Gespräch an ein
anderes Mobilteil weitergeben (verbinden).
u
Liste der Mobilteile öffnen.
Der externe Teilnehmer hört
die Wartemelodie, falls eingeschaltet (¢ S. 53).
s
Mobilteil oder An alle auswählen und §OK§ drücken.
Wenn sich der interne Teilnehmer meldet:
¤ Ggf. externes Gespräch ankündigen.
a
Auflegen-Taste drücken.
Das externe Gespräch ist an das andere
Mobilteil weitergegeben.
Wenn der interne Teilnehmer sich nicht
meldet oder besetzt ist, drücken Sie die
Display-Taste §Beenden§, um zum externen
Gespräch zurückzukehren.
Sie können beim Weiterleiten die Auflegen-Taste a auch drücken, bevor der
interne Teilnehmer abhebt.
Wenn der interne Teilnehmer sich dann
nicht meldet oder besetzt ist, kommt der
Anruf automatisch zu Ihnen zurück.
Intern rückfragen/Konferenz
Sie telefonieren mit einem externen Teilnehmer und können gleichzeitig einen
internen Teilnehmer anrufen, um Rücksprache zu halten oder ein Konferenzgespräch zwischen allen 3 Teilnehmern zu
führen.
Sie führen ein externes Gespräch:
u
Liste der Mobilteile öffnen.
Der externe Teilnehmer hört
die Wartemelodie, falls eingeschaltet (¢ S. 53).
s
Mobilteil auswählen und §OK§
drücken. Der interne Teilnehmer wird gerufen.
Nimmt der interne Teilnehmer ab, können
Sie entweder:
§Beenden§
Display-Taste drücken.
Sie sind wieder mit dem externen Teilnehmer verbunden.
oder:
§Konferenz§ Display-Taste drücken.
Alle 3 Teilnehmer sind miteinander verbunden.
Hinweise
u Sind nur zwei Mobilteiele angemel-
det, wird das andere Mobilteil nach
Drücken der Taste u sofort gerufen.
u Taste u lang drücken ruft sofort
alle Mobilteile.
Konferenz beenden
a
Auflegen-Taste drücken.
Drückt ein interner Teilnehmer auf die
Auflegen-Taste a, bleibt die Verbindung
zwischen dem anderen Mobilteil und dem
externen Teilnehmer bestehen.
43
English
Alle Mobilteile anrufen („Sammelruf“)
Deutsch
Mehrere Mobilteile nutzen
Mehrere Mobilteile nutzen
Anklopfen annehmen/abweisen
Intern zuschalten
Erhalten Sie während eines internen
Gesprächs einen externen Anruf, hören
Sie den Anklopfton (kurzer Ton). Bei Nummernübermittlung wird im Display die
Nummer des Anrufers angezeigt.
Die Leitung ist durch ein externes
Gespräch belegt. Ihr Display zeigt einen
entsprechenden Hinweis. Sie wollen sich
zu dem bestehenden Externgespräch
zuschalten.
c
Abheben-Taste lang drücken.
Sie werden zu dem Gespräch zugeschaltet. Alle Teilnehmer hören einen Signalton. Während dieser Zeit wird im Display
dieses Mobilteils die Meldung Konferenz
angezeigt und es kann von diesem
Mobilteil aus nicht gewählt werden.
Internen Anruf abbrechen, externen
annehmen
§Abheben§
Display-Taste drücken.
Das interne Gespräch wird beendet. Sie
sind mit dem externen Anrufer verbunden.
Externen Anruf abweisen
Display-Taste drücken.
Der Anklopfton wird abgeschaltet. Sie
bleiben mit dem internen Teilnehmer verbunden. Der Klingelton ist an weiteren
angemeldeten Mobilteilen noch zu hören.
§Abweisen§
Zu externem Gespräch
zuschalten
Voraussetzung: Die Funktion Intern
zuschalten ist eingeschaltet.
Sie führen ein externes Gespräch. Ein
interner Teilnehmer kann sich zu diesem
Gespräch zuschalten und mitsprechen.
Das Zuschalten wird bei allen Gesprächspartnern durch einen Signalton signalisiert.
• Intern zuschalten ein-/ausschalten
v ¢ Ï ¢ Telefonie ¢ Intern zuschalten
Funktion durch Drücken von §Ändern§ einoder ausschalten (³ = ein).
44
Zuschalten beenden
a
Auflegen-Taste drücken.
Alle Teilnehmer hören einen Signalton.
Drückt der erste interne Teilnehmer auf
die Auflegen-Taste a, bleibt die Verbindung zwischen dem zugeschalteten
Mobilteil und dem externen Teilnehmer
bestehen.
Namen eines Mobilteils ändern
Beim Anmelden werden automatisch die
Namen „INT 1“, „INT 2“ usw. vergeben. Sie
können diese Namen ändern. Der Name
darf max. 10-stellig sein. Der geänderte
Name wird in der Liste jedes Mobilteils
angezeigt.
u
Liste der Mobilteile öffnen.
Das eigene Mobilteil ist mit f
markiert.
s
Mobilteil auswählen.
§Optionen§
Menü öffnen.
Name ändern
~
Namen eingeben.
§Sichern§
Display-Taste drücken.
Ein Mobilteil erhält bei der Anmeldung
automatisch die niedrigste freie Nummer. Sind alle Plätze belegt, wird die Nummer 6 überschrieben, sofern sich dieses
Mobilteil im Ruhezustand befindet. Sie
können die interne Nummer aller angemeldeten Mobilteile (1–6) ändern.
u
Liste der Mobilteile öffnen.
Das eigene Mobilteil ist mit f
markiert.
§Optionen§
Menü öffnen.
Nummer ändern
Auswählen und §OK§ drücken.
r
Nummer auswählen. Es werden nur Nummern angezeigt,
die noch frei sind.
§Sichern§
Display-Taste drücken, um die
Eingabe zu speichern.
Bluetooth-Geräte benutzen
Ihr Mobilteil Gigaset S400 professional
kann mittels Bluetooth™ schnurlos mit
anderen Geräten kommunizieren, die
ebenfalls diese Technik verwenden.
Bevor Sie Ihre Bluetooth-Geräte verwenden können, müssen Sie zuerst Bluetooth
aktivieren und dann die Geräte am
Mobilteil anmelden.
Sie können 1 Bluetooth-Headset am
Mobilteil anmelden. Zusätzlich können Sie
bis zu 5 Datengeräte (PC, PDA) anmelden,
um Adressbucheinträge als vCard zu übermitteln und zu empfangen oder Daten mit
dem Rechner auszutauschen (¢ S. 62).
Zur weiteren Verwendung der Rufnummern müssen Vorwahlnummer (Länderund Ortsvorwahlnummer) im Telefon
gespeichert sein (¢ S. 53).
Die Beschreibung der Bedienung Ihrer
Bluetooth-Geräte finden Sie in den Bedienungsanleitungen dieser Geräte.
Hinweise
u Sie können Headsets an Ihrem
Mobilteil betreiben, die über das
Headset oder das Handsfree Profil
verfügen. Sind beide Profile verfügbar, wird über das Handsfree Profil
kommuniziert.
u Der Verbindungsaufbau zwischen
Ihrem Mobilteil und einem Bluetooth Headset kann bis zu
5 Sekunden dauern. Dieses gilt
sowohl bei Gesprächsannahme am
Headset und Übergabe an das
Headset, als auch bei Einleitung
einer Wahl vom Headset aus.
45
English
Interne Nummer eines Mobilteils
ändern
Deutsch
Bluetooth-Geräte benutzen
Bluetooth-Geräte benutzen
Bluetooth-Modus aktivieren/
deaktivieren
v ¢ ò ¢ Aktivierung
§Ändern§ drücken, um den Bluetooth-Modus
zu aktivieren oder zu deaktivieren
(³ = aktiviert).
Das Mobilteil zeigt im Ruhezustand den
aktivierten Bluetooth-Modus mit dem
Symbol ò an (¢ S. 3).
Bluetooth-Geräte anmelden
Die Entfernung zwischen dem Mobilteil im
Bluetooth-Modus und dem eingeschalteten Bluetooth-Gerät (Headset oder Datengerät) sollte max. 10 m betragen.
Hinweise
u Melden Sie ein Headset an, so über-
schreiben Sie damit ein evtl. angemeldetes Headset.
u Möchten Sie ein Headset an Ihrem
Mobilteil verwenden, das bereits an
einem anderen Gerät (z.B. an einem
Mobiltelefon) angemeldet ist,
deaktivieren Sie bitte diese Verbindung bevor Sie die Anmeldeprozedur starten.
v ¢ ò ¢ Suche Headset / Suche
Datengerät
Die Suche kann bis zu 30 Sekunden beanspruchen.
Nachdem das Gerät gefunden wurde, wird
dessen Name am Display angezeigt.
§Optionen§
Display-Taste drücken.
Gerät vertrauen
Auswählen und §OK§ drücken.
~
PIN des anzumeldenden
Bluetooth-Geräts eingeben
und §OK§ drücken.
Das Gerät wird in die Liste der bekannten
Geräte aufgenommen.
46
Laufende Suche abbrechen/wiederholen
Suche abbrechen:
§Abbruch§
Display-Taste drücken.
Suche ggf. wiederholen:
§Optionen§
Display-Taste drücken.
Suche wiederholen
Auswählen und §OK§ drücken.
Liste der bekannten (vertrauten)
Geräte bearbeiten
Liste öffnen
v ¢ ò ¢ Bekannte Geräte
In der angezeigten Liste befindet sich
neben dem jeweiligen Gerätenamen ein
entsprechendes Symbol:
Symbol
ô
õ
Bedeutung
Bluetooth-Headset
Bluetooth-Datengerät
Ist ein Gerät verbunden, so wird in der
Kopfzeile des Displays das entsprechende
Symbol anstelle von ò angezeigt.
Eintrag ansehen
Liste öffnen ¢ s (Eintrag auswählen)
§Optionen§
Display-Taste drücken.
Eintrag ansehen
Auswählen und §OK§ drücken.
Gerätename und Geräteadresse werden angezeigt.
Zurück mit §OK§.
Bluetooth-Geräte abmelden
Liste öffnen ¢ s (Eintrag auswählen)
§Optionen§
Display-Taste drücken.
Eintrag löschen
Auswählen und §OK§ drücken.
Hinweis
Melden Sie ein eingeschaltenes Bluetooth-Gerät ab, so versucht es möglicherweise, sich erneut als „nicht angemeldetes Gerät“ zu verbinden.
Liste öffnen ¢ s (Eintrag auswählen)
§Optionen§
Display-Taste drücken.
Name ändern
Auswählen und §OK§ drücken.
~
Name ändern.
§Sichern§
Display-Taste drücken
Nicht angemeldetes Bluetooth-Gerät
ablehnen/annehmen
Falls ein Bluetooth-Gerät, das nicht in der
Liste der bekannten Geräte registriert ist,
mit dem Mobilteil Verbindung aufzunehmen versucht, werden Sie am Display zur
Eingabe der PIN des Bluetooth-Geräts aufgefordert (Bonding).
u Ablehnen
a
Auflegen-Taste kurz drücken.
u Annehmen
~
PIN des anzunehmenden
Bluetooth-Geräts eingeben
und §OK§ drücken.
Haben Sie das Gerät angenommen,
können Sie es temporär verwenden
(d.h., solange es sich im Empfangsbereich befindet bzw. bis Sie das Mobilteil
ausschalten) oder in die Liste der
bekannten Geräte aufnehmen.
Nach der PIN-Bestätigung in die Liste
der bekannten Geräte aufnehmen:
– §Ja§ Display-Taste drücken.
– §Nein§ Display-Taste drücken:
temporär verwenden.
Bluetooth-Name des Mobilteils ändern
Sie können den Namen des Mobilteils
ändern, unter dem es ggf. an einem anderen Bluetooth-Gerät angezeit werden soll.
v ¢ ò ¢ Eigenes Gerät
§Ändern§
Display-Taste drücken
~
Name ändern.
§Sichern§
Display-Taste drücken
Mobilteil einstellen
Ihr Mobilteil ist voreingestellt. Sie können
die Einstellungen individuell ändern.
Mobilteil-PIN
Ihr Mobilteil ist durch eine PIN (Lieferzustand: 0000) gegen unbefugte Benutzung
geschützt. Bei jedem Einschalten wird die
PIN abgefragt. Sie können die PIN ändern:
v ¢ Ï ¢ System ¢ Mobilteil-PIN
~
Aktuelle Mobilteil-PIN eingeben und §OK§ drücken.
~
Neue Mobilteil-PIN eingeben
und §OK§ drücken.
Die Mobilteil-PIN ist geändert.
Schnellzugriff auf Nummern und
Funktionen
Die Ziffern-Tasten Q und 2 bis O
können Sie mit je einer Nummer aus dem
Adressbuch belegen.
Die linke und rechte Display-Taste ist mit
einer Funktion vorbelegt. Sie können die
Belegung ändern (¢ S. 48).
Die Wahl der Nummer bzw. der Start der
Funktion erfolgt dann mit einem Tastendruck.
Ziffern-Tasten belegen
Voraussetzung: Die Ziffern-Taste ist noch
nicht mit einer Nummer belegt.
¤ Ziffern-Taste lang drücken
oder
Ziffern-Taste kurz drücken und DisplayTaste §Kurzwahl§ drücken.
Das Adressbuch wird geöffnet.
¤ Einen Eintrag auswählen und §OK§ drücken.
Der Eintrag ist auf der entsprechenden Ziffern-Taste gespeichert.
47
English
Namen eines Bluetooth-Gerätes ändern
Deutsch
Mobilteil einstellen
Mobilteil einstellen
Hinweis
Löschen oder ändern Sie später den
Eintrag im Adressbuch, so wirkt sich
dies nicht auf die Belegung der ZiffernTaste aus.
Nummer wählen/Belegung ändern
Voraussetzung: Die Ziffern-Taste ist mit
einer Nummer belegt.
Im Ruhezustand des Mobilteils
¤ Ziffern-Taste lang drücken:
Die Nummer wird sofort gewählt.
oder
¤ Ziffern-Taste kurz drücken:
Display-Taste mit Nummer/Name (ggf.
abgekürzt) drücken, um die Nummer
zu wählen oder
Display-Taste §Ändern§ drücken, um die
Ziffern-Taste anders zu belegen oder
die Belegung zu löschen.
Belegung einer Display-Taste ändern
¤ Linke oder rechte Display-Taste lang
drücken.
Die Liste der möglichen Tastenbelegungen wird geöffnet. Folgendes steht zur
Auswahl:
Wecker
Taste mit dem Menü zum Einstellen
und Einschalten des Weckers belegen
(¢ S. 41).
Kalender
Grafischen Kalender anzeigen
(¢ S. 39).
Bluetooth
Taste mit dem Bluetooth-Menü belegen
(¢ S. 45).
Wahlwiederholung
Anzeigen der Wahlwiederholungsliste.
Mehr Funktionen...
Weitere Funktionen stehen zur Auswahl:
Anruflisten
Anruflisten anzeigen (¢ S. 34).
48
¤
INT
Intern anrufen (¢ S. 42).
Einen Eintrag auswählen und §OK§ drücken.
Display-Sprache ändern
Sie können sich die Display-Texte in verschiedenen Sprachen anzeigen lassen.
v ¢ Ï ¢ Sprache
Die aktuelle Sprache ist mit Ø markiert.
s
Sprache auswählen und
§Auswahl§ drücken.
Wenn Sie aus Versehen eine für Sie unverständliche Sprache eingestellt haben:
v ¢Ï¢ s¢ s¢ s
Tasten nacheinander drücken
und mit §OK§ bestätigen.
s
Die richtige Sprache auswählen und rechte Display-Taste
drücken.
Screensaver einstellen
Sie können sich im Ruhezustand ein Bild
aus dem Media-Pool (¢ S. 51) oder die
Uhrzeit als Screensaver anzeigen lassen.
Er ersetzt die Anzeige im Ruhezustand.
Dadurch können der Kalender, Datum,
Zeit und Name überdeckt werden.
Der Screensaver wird in bestimmten Situationen nicht angezeigt, z. B. während
eines Gesprächs oder wenn das Mobilteil
abgemeldet ist.
Ist ein Screensaver aktiviert, ist der Menüpunkt Screensaver mit μ markiert.
v ¢ Ï ¢ Display ¢ Screensaver
Die aktuelle Einstellung wird angezeigt.
¤ Mehrzeilige Eingabe ändern:
Aktivierung:
Ein (Screensaver wird angezeigt) oder
Aus (kein Screensaver) auswählen.
Auswahl :
Screensaver auswählen oder
§Ansehen§ Display-Taste drücken. Der
aktive Screensaver wird angezeigt.
s
Screensaver auswählen und
§OK§ drücken.
§Sichern§
Display-Taste drücken.
Wenn der Screensaver die Anzeige überdeckt, kurz a drücken, um das Ruhedisplay anzuzeigen.
Großschrift einstellen
Sie können sich die Schrift und Symbole in
Anruflisten und im Adressbuch vergrößert
darstellen lassen, um die Lesbarkeit zu
verbessern. Es wird dann nur noch ein Eintrag statt mehrerer Einträge pro Display
gleichzeitig angezeigt und Namen werden
ggf. abgekürzt.
v ¢ Ï ¢ Display ¢ Großschrift
§Ändern§
Display-Taste drücken
(³= ein).
Farbschema einstellen
Sie können sich das Display in verschiedenen Farbkombinationen anzeigen lassen.
v ¢ Ï ¢ Display ¢ Farbschema
Farbschema (1 bis 5) auswählen und §OK§
drücken.
•
Display-Beleuchtung einstellen
Sie können abhängig davon, ob das
Mobilteil in der Basis/Ladeschale steht
oder nicht, die Display-Beleuchtung einoder ausstellen. Ist sie eingeschaltet,
leuchtet das Display dauerhaft halbhell.
Bei ausgeschalteter Display-Beleuchtung
schaltet der erste Druck auf eine beliebige
Taste die Display-Beleuchtung ein. Die
Taste hat in diesem Fall keine weitere
Funktion.
v ¢ Ï ¢ Display ¢ Beleuchtung
Die aktuelle Einstellung wird angezeigt.
¤ Mehrzeilige Eingabe ändern:
In Ladeschale
Ein oder Aus auswählen.
Außerh. Ladeschale
Ein oder Aus auswählen.
Hinweis
Bei der Einstellung Ein kann sich die
Bereitschaftszeit des Mobilteils
beträchtlich verringern.
§Sichern§
Display-Taste drücken.
• Automatische Rufannahme
ein-/ausschalten
Wenn Sie diese Funktion eingeschaltet
haben, nehmen Sie das Mobilteil bei
einem Anruf einfach aus der Basis/Ladeschale, ohne die Abheben-Taste c drücken zu müssen.
v ¢ Ï ¢ Telefonie ¢ Auto-Rufannahm.
§Ändern§
Display-Taste drücken
(³= ein).
49
English
Display einstellen
Deutsch
Mobilteil einstellen
Mobilteil einstellen
Freisprech-/Hörerlautstärke
ändern
Klingeltöne ändern
Sie können die Lautstärke für das Freisprechen und die Hörerlautstärke in fünf Stufen einstellen.
Während eines Gespräches über den
Hörer oder im Freisprech-Modus:
ø/ ÷
Seiten-Taste drücken, um das
Menü Gesprächslautst. aufzurufen. Lautstärke durch Drücken von ø (lauter) oder ÷
(leiser) ändern.
oder
t
Steuer-Taste drücken, um das
Menü Gesprächslautst. aufzurufen. Mit r Hörer- bzw.
Freisprechlautstärke einstellen.
Die Einstellung wird nach ca. 3 Sekunden
automatisch gespeichert oder DisplayTaste §Sichern§ drücken.
Wenn t mit einer anderen Funktion
belegt ist:
§Optionen§
Menü öffnen.
Lautstärke Auswählen und §OK§ drücken.
Einstellung vornehmen (siehe oben).
Sie können zwischen fünf Lautstärken
(1–5; z.B. Lautstärke 3 = Š) und
dem „Crescendo“-Ruf (6; Lautstärke
wird mit jedem Klingelton lauter =
‡) wählen.
u Klingeltöne:
Sie können aus einer Liste vorinstallierter Klingeltöne und Melodien auswählen.
Sie können verschiedene Klingeltöne,
Melodien oder einen beliebigen Sound
aus dem Media-Pool (¢ S. 51) auswählen.
Sie können die Klingeltöne für folgende
Funktionen unterschiedlich einstellen:
u Für interne Anrufe
u Für externe Anrufe
Hinweis
u Die Einstellungen für den Hörer gel-
ten auch für ein angschlossenes
Headset.
u Sie können die Gesprächslautstärke
auch über das Menü einstellen
(¢ S. 25).
50
u Lautstärke:
Lautstärke/Melodie einstellen
Im Ruhezustand:
v ¢ Ï ¢ Töne und Signale
¢ Klingeltöne (Mobilt)
¢ Lautstärke/Melodien
r
Lautstärke/Melodie für interne
Anrufe und Jahrestage einstellen.
s
In die nächste Zeile springen.
r
Lautstärke/Melodie für
externe Anrufe einstellen.
§Sichern§
Display-Taste drücken, um die
Einstellung zu speichern.
Während das Telefon klingelt können
Sie die jeweilige Klingeltonlautstärke mit
den Seiten-Tasten ø (lauter) oder ÷ (leiser) dauerhaft ändern.
Sie können einen Zeitraum eingeben, in
dem Ihr Telefon nicht klingeln soll, z. B.
nachts.
v ¢ Ï ¢ Töne und Signale
¢ Klingeltöne (Mobilt) ¢ Zeitsteuerung
Zeitsteuerung:
Ein oder Aus auswählen.
Wenn die Zeitsteuerung eingeschaltet ist:
Nicht klingeln von:
Beginn des Zeitraums 4-stellig eingeben.
Nicht klingeln bis:
Ende des Zeitraums 4-stellig eingeben.
Hinweis
Bei Anrufern, denen Sie im Adressbuch
eine eigene Melodie zugewiesen
haben (VIP), klingelt Ihr Telefon auch
in diesem Zeitraum.
Klingelton für anonyme Anrufe aus-/
einschalten
Sie können einstellen, dass Ihr Telefon bei
Anrufen mit unterdrückter Rufnummernübermittlung nicht klingelt. Der Anruf
wird nur im Display signalisiert.
Im Ruhezustand:
v ¢ Ï ¢ Töne und Signale
¢ Klingeltöne (Mobilt) ¢ Anonym.Rufe aus
§Ändern§ drücken, um die Funktion ein- oder
auszuschalten (³= ein).
Klingelton aus-/einschalten
Sie können bei einem Anruf vor dem
Abheben oder im Ruhezustand an Ihrem
Mobilteil den Klingelton auf Dauer oder
für den aktuellen Anruf ausschalten. Das
Wiedereinschalten während eines externen Anrufs ist nicht möglich.
Klingelton auf Dauer ausschalten
*
Stern-Taste lang drücken.
Im Display erscheint das Symbol ó.
Deutsch
Zusätzlich für externe Anrufe:
Klingelton wieder einschalten
*
Stern-Taste lang drücken.
Klingelton für den aktuellen Anruf
ausschalten
§Ruf aus§
Display-Taste drücken.
Aufmerksamkeitston ein-/ausschalten
Sie können statt des Klingeltons einen
Aufmerksamkeitston einschalten. Bei
einem Anruf ertönt dann ein kurzer Ton
(„Beep“) anstelle des Klingeltons.
*
Stern-Taste lang drücken und
innerhalb von 3 Sek.:
§Beep§
Display-Taste drücken. Ein
Anruf wird nun durch einen
kurzen Aufmerksamkeitston
signalisiert.
Im Display erscheint ñ.
Media-Pool
Der Media-Pool des Mobilteils verwaltet
Sounds, die Sie als Klingelton verwenden
können und Bilder (CLIP-Bilder und
Screensaver), die Sie als Anruferbilder
bzw. als Screensaver verwenden können;
Voraussetzung: Rufnummernübermittlung (CLIP). Der Media-Pool kann folgende
Medien-Typen verwalten:
Typ
Format
Sound
Klingeltöne
intern
Monophon
intern
Polyphon
intern
importierte Sounds
WMA, MP3, WAV
Bild
– CLIP-Bild
– Screensaver
BMP, JPG, GIF
128 x 86 Pixel
128 x 160 Pixel
In Ihrem Mobilteil sind verschiedene
mono- und polyphone Sounds und Bilder
voreingestellt.
Sie können sich die vorhandenen Sounds
anhören und die Bilder anzeigen lassen.
51
English
•
Mobilteil einstellen
Mobilteil einstellen
Bilder und Sounds können Sie von einem
PC herunterladen (¢ S. 62). Falls nicht
genügend Speicherplatz vorhanden ist,
müssen Sie vorher ein oder mehrere Bilder
oder Sounds löschen.
Speicherplatz überprüfen
Sound abspielen/CLIP-Bilder ansehen
• Hinweistöne ein-/
v ¢ · ¢ Media-Pool ¢ Screensavers /
CLIP-Bilder / Sounds (Eintrag auswählen)
Bilder:
Display-Taste drücken. Das
markierte Bild wird angezeigt.
Mit der Taste q zwischen den
Bildern wechseln.
Haben Sie ein Bild in einem ungültigen
Dateiformat abgespeichert, erhalten Sie
nach dem Auswählen eine Fehlermeldung.
§Ansehen§
Sounds:
Der markierte Sound wird sofort
abgespielt. Mit der Taste q zwischen den
Sounds wechseln.
Sie können die Lautstärke während des
Abspielens einstellen:
§Optionen§
Menü öffnen.
Lautstärke Auswählen und §OK§ drücken.
r
Lautstärke einstellen.
§Sichern§
Display-Taste drücken.
Bild/Sound umbenennen/löschen
Sie haben einen Eintrag ausgewählt.
§Optionen§
Menü öffnen.
Ist ein Bild/Sound nicht löschbar (¯), stehen diese Optionen nicht zur Verfügung.
Sie können folgende Funktionen wählen:
Eintrag löschen
Der ausgewählte Eintrag wird gelöscht.
Name ändern
Namen ändern (maximal 16 Zeichen)
und §Sichern§ drücken. Der Eintrag wird
mit dem neuen Namen gespeichert.
52
Sie können sich den freien Speicherplatz
für Screensaver und CLIP-Bilder anzeigen
lassen.
v ¢ · ¢ Speicherplatz
ausschalten
Ihr Mobilteil weist Sie akustisch auf verschiedene Tätigkeiten und Zustände hin.
Folgende Hinweistöne können Sie unabhängig voneinander ein- oder ausschalten:
u Tastenklick: Jeder Tastendruck wird
bestätigt.
u Quittungstöne:
– Bestätigungston (aufsteigende
Tonfolge): am Ende der Eingabe/Einstellung und beim Eintreffen eines
neuen Eintrags in der Anrufliste
– Fehlerton (absteigende Tonfolge):
bei Fehleingaben
– Menü-Endeton: beim Blättern am
Ende eines Menüs
u Akkuton: Der Akku muss geladen werden.
Im Ruhezustand:
v ¢ Ï ¢ Töne und Signale
¢ Hinweistöne
¤ Mehrzeilige Eingabe ändern:
Tastenklick:
Ein oder Aus auswählen.
Bestätigungen:
Ein oder Aus auswählen.
Akkuton:
Ein oder Aus auswählen.
§Sichern§
Display-Taste drücken.
Deutsch
• Mobilteil in den
einstellen
Lieferzustand zurücksetzen
Für die Übertragung von Rufnummern
(z. B. in vCards) ist es notwendig, dass Ihre
Vorwahlnummer (Länder- und Ortsvorwahlnummer) im Telefon gespeichert ist.
Einige dieser Nummern sind bereits voreingestellt.
v ¢ Ï ¢ Telefonie ¢ Vorwahlnummern
Kontrollieren Sie, ob die (vor)eingestellte
Vorwahlnummer korrekt ist.
¤ Mehrzeilige Eingabe ändern:
q
Eingabefeld auswählen/wechseln.
r
Im Eingabefeld navigieren.
Ñ
Ggf. Ziffer löschen: DisplayTaste drücken.
~
Ziffer eingeben.
§Sichern§
Display-Taste drücken.
Beispiel:
Sie können individuelle Einstellungen und
Änderungen zurücksetzen.
Folgende Einstellungen sind vom Rücksetzen nicht betroffen:
u die Anmeldung des Mobilteils an der
Basis
u Datum und Uhrzeit
u Einträge im Kalender
u Einträge des Adressbuchs, der Anruflisten sowie der Inhalt des Media-Pools
v ¢ Ï ¢ System ¢ Mobilteil-Reset
§Ja§
Display-Taste drücken.
Vorwahlnummern
Landesvorwahl:
• Wartemelodie ein-/
v ¢ Ï ¢ Töne und Signale
¢ Wartemelodie
§Ändern§ drücken, um Wartemelodie einoder auszuschalten (³= ein).
Ortsvorwahl:
Û
Die Basis stellen Sie mit einem angemeldeten Mobilteil Gigaset S4 professional
ein.
ausschalten
00 - 49
0-[
Basis einstellen
]
Sichern
53
English
• Eigene Vorwahlnummer
Basis einstellen
Basis einstellen
• Repeater-Unterstützung
Mit einem Repeater können Sie die Reichweite und Empfangsstärke Ihrer Basis vergrößern. Dazu müssen Sie den RepeaterBetrieb aktivieren. Dabei werden Gespräche, die gerade über die Basis geführt
werden, abgebrochen.
Voraussetzung: Ein Repeater ist angemeldet.
v ¢ Ï ¢ System ¢ Repeaterbetrieb
§Ändern§ drücken, um Repeaterbetrieb einoder auszuschalten (³= ein).
Hinweise
u Eco-Modus / Eco-Modus+
(¢ S. 38) und Repeater-Unterstützung schließen sich gegenseitig
aus, d.h. wenn Sie einen Repeater
verwenden, können Sie Eco-Modus
und Eco-Modus+ nicht nutzen.
u Die werksseitig aktivierte verschlüsselte Übertragung wird bei Anmeldung eines Repeaters deaktiviert.
• Vor unberechtigtem Zugriff
schützen
Sichern Sie die Systemeinstellungen der
Basis mit einer nur Ihnen bekannten System-PIN. Die System-PIN müssen Sie u. a.
eingeben beim An- und Abmelden eines
Mobilteils von der Basis oder beim Zurücksetzen in den Lieferzustand.
System-PIN ändern
Sie können die eingestellte, 4-stellige System-PIN der Basis (Lieferzustand: 0000) in
eine 4-stellige PIN ändern, die nur Sie kennen.
v ¢ Ï ¢ System ¢ System-PIN
~
Aktuelle System-PIN eingeben
und §OK§ drücken.
~
Neue System-PIN eingeben
und §OK§ drücken.
54
System-PIN zurücksetzen
Sollten Sie die System-PIN vergessen
haben, können Sie die Basis auf den
ursprünglichen Code 0000 zurücksetzen:
Entfernen Sie das Netzkabel von der Basis.
Halten Sie die Anmelde-/Paging-Taste an
der Basis gedrückt, während Sie gleichzeitig das Netzkabel wieder an die Basis
anschließen. Halten Sie die Taste mindestens 5 Sek. gedrückt.
Die Basis ist nun zurückgesetzt und die
System-PIN 0000 eingestellt.
Hinweis
Alle Mobilteile sind abgemeldet und
müssen neu angemeldet werden. Alle
Einstellungen werden in den Lieferzustand zurückgesetzt.
• Basis in Lieferzustand
zurücksetzen
Beim Zurücksetzen
u bleiben Datum und Uhrzeit erhalten,
u bleiben Mobilteile angemeldet,
u wird der Eco-Modus ein- und der EcoModus+ ausgeschaltet,
u wird die System-PIN nicht zurückgesetzt.
v ¢ Ï ¢ System ¢ Basis-Reset
~
System-PIN eingeben und §OK§
drücken.
§Ja§
Display-Taste drücken.
Die folgenden Einstellungen sind nur
nötig, wenn Ihre Telefonanlage dies erfordert, siehe Bedienungsanleitung der Telefonanlage.
• Wahlverfahren und Flash-
Zeit
Die aktuelle Einstellung ist mit Ø markiert.
Wahlverfahren ändern
Sie haben folgende Möglichkeiten, das
Wahlverfahren einzustellen:
u Tonwahl (MFV),
u Impulswahl-Verfahren (IWV).
v ¢ Ï ¢ Telefonie ¢ Wahlverfahren
s
Wahlverfahren auswählen
und §Auswahl§ drücken
(Ø = ausgewählt).
• Vorwahlziffer
(Amtskennziffer/AKZ) speichern
Voraussetzung: Bei Ihrer Telefonanlage
müssen Sie ggf. für externe Gespräche vor
der Nummer eine Vorwahlziffer eingeben,
z.B. „0“.
v ¢ Ï ¢ Telefonie ¢ Vorwahlziffer
~
Vorwahlziffer max. 3-stellig
eingeben bzw. ändern.
§Sichern§
Display-Taste drücken.
Ist eine Vorwahlziffer gespeichert, gilt:
u Die Vorwahlziffer wird automatisch
vorangestellt bei Wahl aus den Anruflisten.
u Die Vorwahlziffer muss eingegeben
werden bei manueller Wahl und bei
manueller Eingabe von Adressbuch-,
Notruf-/Kurzwahlnummern.
u Eine vorhandene Vorwahlziffer löschen
Sie mit Ñ.
Flash-Zeit einstellen
Ihr Telefon ist im Lieferzustand für den
Betrieb am Hauptanschluss eingestellt.
Für den Betrieb an Telefonanlagen kann es
notwendig sein, diesen Wert zu ändern,
siehe Bedienungsanleitung Ihrer Telefonanlage.
v ¢ Ï ¢ Telefonie ¢ Flash-Zeiten
s
Flash-Zeit auswählen und
§Auswahl§ drücken
(Ø = eingestellter Wert).
Mögliche Werte sind:
80 ms, 100 ms, 120 ms,
180 ms, 250 ms, 300 ms,
400 ms, 600 ms, 800 ms.
55
English
Basis an Telefonanlage
anschließen
Deutsch
Basis an Telefonanlage anschließen
Basis an Telefonanlage anschließen
Pausenzeiten einstellen
Pause nach Leitungsbelegung ändern
Sie können die Länge der Pause einstellen,
die zwischen dem Drücken der AbhebenTaste c und Senden der Nummer eingefügt wird.
v
Hauptmenü öffnen.
*#Q5#
L
Tasten drücken.
~
Ziffer für die Pausenlänge eingeben (1 = 1 Sek.; 2 = 3 Sek.;
3 = 7 Sek.) und §OK§ drücken.
Pause nach R-Taste ändern
Sie können die Länge der Pause ändern,
wenn Ihre Telefonanlage dies erfordert
(s. Bedienungsanleitung der Telefonanlage).
v
Hauptmenü öffnen.
*#Q5#
2
Tasten drücken.
~
Ziffer für die Pausenlänge
eingeben (1 = 800 ms;
2 = 1600 ms; 3 = 3200 ms)
und §OK§ drücken.
Wahlpause (Pause nach Vorwahlziffer)
ändern
Voraussetzung: Sie haben eine Vorwahlziffer gespeichert (¢ S. 55).
v
Hauptmenü öffnen.
*#Q5#
Tasten drücken.
~
Ziffer für die Pausenlänge
(1 = 1 Sek.; 2 = 2 Sek.;
3 = 3 Sek.; 4 = 6 Sek.)
eingeben und §OK§ drücken.
Wahlpause einfügen: die Taste S
2 Sek. lang drücken. Im Display erscheint
ein P.
56
Zeitweise auf Tonwahl (MFV)
umschalten
Sollte Ihre Telefonanlage noch mit Impulswahl (IWV) arbeiten, das Tonwahl-Verfahren aber für eine Verbindung erforderlich
sein (z.B. zum Anhören des Netz-Anrufbeantworters), müssen Sie für das Gespräch
auf Tonwahl umstellen.
Voraussetzung: Sie führen gerade ein
Gespräch oder haben bereits eine externe
Nummer gewählt.
*
Stern-Taste drücken.
Nach Auflegen ist automatisch wieder
Impulswahl eingeschaltet.
Bei Störungen wenden Sie sich bitte an
Ihre Systembetreuung.
Bei Fragen zur Bedienung hilft Ihnen Ihr
Fachhändler weiter.
Hinweise:
– Fragen zum Telefonanschluss richten
Sie bitte an Ihren Netzanbieter.
1. Mobilteil ist außerhalb der Reichweite der
Basis.
Abstand Mobilteil/Basis verringern.
¥
2. Reichweite der Basis hat sich verringert,
weil der Eco-Modus eingeschaltet ist.
Eco-Modus ausschalten (
S. 38) oder
Abstand Mobilteil/Basis verringern.
¥
¢
3. Basis ist nicht eingeschaltet.
Steckernetzgerät der Basis kontrollieren
(
S. 9).
¥
¢
Im Display blinkt Bitte Mobilteil anmelden.
Bitte halten Sie Ihren Kaufbeleg bereit.
In Ländern, in denen unser Produkt nicht
durch autorisierte Händler verkauft wird,
werden keine Austausch- bzw. Reparaturleistungen angeboten.
Mobilteil ist noch nicht an Basis angemeldet
bzw. wurde abgemeldet.
Mobilteil anmelden (
S. 41).
Fragen und Antworten
2. Telefon klingelt nur, wenn die Rufnummer
übertragen wird.
Klingelton für anonyme Anrufe einschalten (
S. 51).
Außerdem sind in der folgenden Tabelle
häufig auftretende Probleme und mögliche Lösungen aufgelistet.
Anmelde- oder Verbindungsprobleme mit
einem Bluetooth Headset.
¥
¥
¥
Reset am Bluetooth Headset durchführen
(siehe Bedienungsanleitung Ihres Headsets).
Anmeldedaten im Mobilteil löschen, indem
Sie das Gerät abmelden (
S. 46).
Anmeldeprozedur wiederholen (
S. 46).
¢
Das Display zeigt nichts an.
¢
1. Mobilteil ist nicht eingeschaltet.
Auflegen-Taste a lang drücken.
¥
¥
¢
Das Mobilteil klingelt nicht.
1. Klingelton ist ausgeschaltet.
Klingelton einschalten (
¥
¥
¢ S. 51).
¢
Sie hören keinen Klingel-/Wählton vom
Festnetz.
Es wurde nicht das mitgelieferte Telefonkabel
verwendet bzw. dieses durch ein neues Kabel
mit falscher Steckerbelegung ersetzt.
Bitte immer das mitgelieferte Telefonkabel
verwenden bzw. beim Kauf im Fachhandel
auf die richtige Steckerbelegung achten
(
S. 9).
¥
¢
Fehlerton nach System-PIN Abfrage.
Die von Ihnen eingegebene System-PIN ist
falsch.
System-PIN auf 0000 zurücksetzen
(
S. 54).
¥
¢
2. Der Akku ist leer.
Akku laden bzw. austauschen
(
S. 11).
¥
Es werden nicht alle Menüpunkte angezeigt.
Ihr Gesprächspartner hört Sie nicht.
¥
¢
Die Menü-Ansicht ist eingeschränkt
(Standard-Modus).
Erweiterte Menü-Ansicht (ExpertenModus) einschalten (
S. 24).
¥
¢
System-PIN vergessen.
System-PIN auf 0000 zurücksetzen
(
S. 54).
¢
Sie haben die Stummschalten-Taste h
gedrückt. Das Mobilteil ist „stumm geschaltet“.
Mikrofon wieder einschalten (
S. 28).
¥
¢
Die Nummer des Anrufers wird trotz CLIP
nicht angezeigt.
Nummernübermittlung ist nicht freigegeben.
Anrufer sollte die Nummernübermittlung
(CLI) beim Netzanbieter freischalten lassen.
¥
57
Deutsch
Im Display blinkt Keine Basis.
English
Systembetreuung
Umwelt
Sie hören bei der Eingabe einen Fehlerton
(absteigende Tonfolge).
Aktion ist fehlgeschlagen/Eingabe ist fehlerhaft.
Vorgang wiederholen.
Beachten Sie dabei das Display und lesen
Sie ggf. in der Bedienungsanleitung nach.
¥
Sie können den Netz-Anrufbeantworter
nicht abhören.
Ihre Telefonanlage ist auf Impulswahl eingestellt.
Telefonanlage auf Tonwahl umstellen.
¥
Haftungsausschluss
Einige Displays können Pixel (Bildpunkte) enthalten, die aktiviert oder
deaktiviert bleiben. Da ein Pixel aus
drei Subpixeln (rot, grün, blau)
besteht, ist auch eine Farbabweichung
von Pixeln möglich.
Dies ist normal und kein Anzeichen für
eine Fehlfunktion.
Zulassung
Dieses Gerät ist für den analogen Telefonanschluss im deutschen und luxemburgischen Netz vorgesehen.
Länderspezifische Besonderheiten sind
berücksichtigt.
Hiermit erklären wir, dass dieses Gerät den
grundlegenden Anforderungen und
anderen relevanten Bestimmungen der
Richtlinie 1999/5/EC entspricht.
Bluetooth ò Qualified Design Identity
Für Ihr Gigaset S400 professional lautet
die Bluetooth QD ID: B015360.
58
Umwelt
Unser Umweltleitbild
Wir tragen gesellschaftliche Verantwortung und engagieren uns für eine bessere
Welt. Unsere Ideen, Technologien und
unser Handeln dienen den Menschen, der
Gesellschaft und der Umwelt. Ziel unserer
weltweiten Tätigkeit ist die dauerhafte
Sicherung der Lebensgrundlagen der
Menschen. Wir bekennen uns zu einer Produktverantwortung, die den ganzen
Lebensweg eines Produktes umfasst.
Bereits bei der Produkt- und Prozessplanung werden die Umweltwirkungen der
Produkte einschließlich Fertigung,
Beschaffung, Vertrieb, Nutzung, Service
und Entsorgung bewertet.
Umweltmanagementsystem
Unify GmbH & Co. KG ist nach
den internationalen Normen
EN 14001 und ISO 9001 zertifiziert.
Ökologischer Energieverbrauch
Der Einsatz von ECO DECT (¢ S. 38) spart
Energie und leistet damit einen aktiven
Beitrag zum Umweltschutz.
Akkus gehören nicht in den Hausmüll.
Beachten Sie hierzu die örtlichen Abfallbeseitigungsbestimmungen, die Sie bei Ihrer
Kommune erfragen können.
Alle Elektro- und Elektronikgeräte sind
getrennt vom allgemeinen Hausmüll über
dafür staatlich vorgesehene Stellen zu
entsorgen.
Wenn dieses Symbol
eines durchgestrichenen
Abfalleimers auf einem
Produkt angebracht ist,
unterliegt dieses Produkt
der europäischen Richtlinie 2002/96/EC.
Die sachgemäße Entsorgung und
getrennte Sammlung von Altgeräten dienen der Vorbeugung von potenziellen
Umwelt- und Gesundheitsschäden. Sie
sind eine Voraussetzung für die Wiederverwendung und das Recycling gebrauchter Elektro- und Elektronikgeräte.
Ausführlichere Informationen zur Entsorgung Ihrer Altgeräte erhalten Sie bei Ihrer
Kommune oder Ihrem Müllentsorgungsdienst.
Anhang
Pflege
Kontakt mit Flüssigkeit
!
Falls das Mobilteil mit Flüssigkeit in Kontakt gekommen ist:
1. Das Mobilteil ausschalten und sofort
den Akku entnehmen.
2. Die Flüssigkeit aus dem Mobilteil abtropfen lassen.
3. Alle Teile trocken tupfen und das Mobilteil anschließend mindestens
72 Stunden mit geöffnetem Akkufach
und mit der Tastatur nach unten an einem trockenen, warmen Ort lagern
(nicht: Mikrowelle, Backofen o. Ä.).
4. Das Mobilteil erst in trockenem Zustand wieder einschalten.
Nach vollständigem Austrocknen ist in vielen Fällen die Inbetriebnahme wieder
möglich.
Technische Daten
Akkus
Technologie:
Nickel-Metall-Hydrid (NiMH)
Größe:
AAA (Micro, HR03)
Spannung: 1,2 V
Kapazität: 550 - 1000 mAh
Das Gerät wird mit zwei zugelassenen
Akkus ausgeliefert.
¤ Basis, Ladeschale und Mobilteil mit
einem feuchten Tuch (keine Lösungsmittel) oder einem Antistatiktuch abwischen.
Nie ein trockenes Tuch verwenden. Es
besteht die Gefahr der statischen Aufladung.
59
English
Entsorgung
Deutsch
Anhang
Anhang
Betriebszeiten/Ladezeiten des
Mobilteils
Dieses Gigaset kann Akkus bis zu einer
Kapazität von 1000 mAh laden. Die Verwendung von speziellen Hochleistungsakkus oder von Akkus mit höheren Kapazitäten ist für Schnurlostelefone nicht sinnvoll.
Die Betriebszeit Ihres Gigaset ist von Akkukapazität, Alter der Akkus und Benutzerverhalten abhängig. (Alle Zeitangaben
sind Maximalangaben und gelten bei ausgeschalteter Display-Beleuchtung.)
Kapazität (mAh) ca.
550
700
800
1000
Bereitschaftszeit
(Stunden) *
550
700
800
1000
Gesprächszeit
(Stunden)
140/
50
165/
58
185/
67
230/
83
Betriebszeit bei
1,5 Std. Gespräch
pro Tag
(Stunden) **
11
12
14
17
Ladezeit in Basis
(Stunden)
85
95
110
135
Ladezeit in Ladeschale (Stunden)
7,5
8,5
10
12
* ohne/mit Display-Beleuchtung
** ohne Display-Beleuchtung
(Display-Beleuchtung einstellen
S. 49)
¢
Leistungsaufnahme der Basis
Im Bereitschaftszustand:
etwa 1,1 Watt
Während des Gesprächs:
etwa 1,0 Watt
Allgemeine technische Daten
DECT-Standard
wird unterstützt
GAP-Standard
wird unterstützt
Kanalzahl
60 Duplexkanäle
Funkfrequenzbereich 1880–1900 MHz
60
Duplexverfahren
Zeitmultiplex,
10 ms Rahmenlänge
Kanalraster
1728 kHz
Bitrate
1152 kbit/s
Modulation
GFSK
Sprachcodierung
32 kbit/s
Sendeleistung
10 mW, mittlere
Leistung pro Kanal
Reichweite
bis zu 300 m im Freien,
bis zu 50 m in Gebäuden
Stromversorgung
Basis
230 V ~/50 Hz
Umgebungsbedingun- +5 °C bis +45 °C;
gen im Betrieb
20 % bis 75 % relative
Luftfeuchtigkeit
Wahlverfahren
MFV (Tonwahl)/
IWV (Impulswahl)
Steckerbelegung des Telefonsteckers
3
2
1
4
5
6
1
2
3
4
5
6
frei
frei
a
b
frei
frei
Beim Erstellen eines Textes gelten folgende Regeln:
u Jeder Taste zwischen Q und O
sind mehrere Buchstaben und Zeichen
zugeordnet.
u Die Schreibmarke (Cursor) wird mit u
v t s gesteuert. Lang drücken von
u oder v bewegt die Schreibmarke
wortweise.
u Zeichen werden an der Schreibmarke
eingefügt.
u Stern-Taste * drücken, um die
Tabelle der Sonderzeichen anzuzeigen.
Gewünschtes Zeichen auswählen, Display-Taste §Einfügen§ drücken, um Zeichen an der Cursorposition einzufügen.
u Ziffern durch langes Drücken von Q
bis O einfügen.
u Display-Taste Ñ drücken, um das Zeichen links von der Schreibmarke zu
löschen. Langes Drücken löscht das
Wort links von der Schreibmarke.
u Bei Einträgen ins Adressbuch wird der
erste Buchstabe des Namens automatisch großgeschrieben, es folgen kleine
Buchstaben.
Groß-, Klein- oder Ziffernschreibung
einstellen
Den Modus für die Texteingabe wechseln
Sie durch wiederholtes Drücken der RauteTaste #.
123
Ziffernschreibung
Abc
Großschreibung *
abc
Kleinschreibung
* 1. Buchstabe großgeschrieben, alle weiteren
klein
Der aktive Modus wird rechts unten im
Display angezeigt.
Namen schreiben
¤ Geben Sie die einzelnen Buchstaben/
Zeichen durch Drücken der entsprechenden Taste ein.
Die der Taste zugeordneten Zeichen werden in einer Auswahlzeile links unten im
Display angezeigt. Das ausgewählte Zeichen ist hervorgehoben.
¤ Drücken Sie die Taste mehrmals kurz
hintereinander, um zum gewünschten
Buchstaben/Zeichen zu springen.
Standardschrift
2
3
4
5
L
M
N
O
Q
1x
2x
3x
4x
5x
6x
7x
8x
9x
10x
1)
2)
a
d
g
j
m
p
t
w
.
b
e
h
k
n
q
u
x
,
1
c
f
i
l
o
r
v
y
?
2
3
4
5
6
s
8
z
!
ä
ë
ï
á
é
í
à
è
ì
â
ê
î
ã
ç
ö ñ ó ò ô õ
7 ß
ü ú ù û
9 ÿ ý æ ø å
0
1) Leerzeichen
2) Zeilenschaltung
61
English
Text schreiben und bearbeiten
Deutsch
Anhang
Zusatzfunktionen über das PC Interface
Zusatzfunktionen über das
PC Interface
Damit Ihr Mobilteil mit dem Rechner kommunizieren kann, muss das Programm
„Gigaset QuickSync“ auf Ihrem Rechner
installiert sein (kostenloser Download
unter wiki.unify.com/wiki/
DECT_Handset_accessory).
Nach der Installation von „Gigaset QuickSync“ verbinden Sie das Mobilteil über
Bluetooth (¢ S. 45) oder über ein USB
Datenkabel mit Ihrem Rechner (¢ S. 16).
Wollen Sie die Bluetooth Verbindung
benutzen, muss Ihr Rechner mit einem
entsprechenden Dongle ausgestattet sein.
Hinweise
u Ist das USB Datenkabel angesteckt,
kann keine Bluetooth Verbindung
hergestellt werden.
u Wird ein USB Datenkabel während
einer bestehenden Bluetooth Verbindung angesteckt, wird die Bluetooth Verbindung abgebrochen.
Daten übertragen
Starten Sie das das Programm „Gigaset
QuickSync“. Sie können nun
u das Adressbuch Ihres Mobilteils mit
Outlook abgleichen,
u CLIP-Bilder (.bmp) vom Rechner auf das
Mobilteil laden,
u Bilder (.bmp) als Screensaver vom
Rechner auf das Mobilteil laden.
u Sounds (Klingeltonmelodien) vom
Rechner auf das Mobilteil laden.
Während der Datenübertragung zwischen
Mobilteil und PC wird im Display Datentransfer läuft angezeigt. Während dieser
Zeit sind keine Eingaben über die Tastatur
möglich und ankommende Anrufe werden ignoriert.
62
Deutsch
Gigaset-Mobilteile
Gigaset-Mobilteile
English
Erweitern Sie Ihr Gigaset zu einer schnurlosen Telefonanlage:
Gigaset-Mobilteil S4 professional
u
u
u
u
u
u
u
Beleuchtetes grafisches Farbdisplay (65k Farben)
Beleuchtete Tastatur
Freisprechen
Polyphone Klingelmelodien
Adressbuch für ca. 500 Einträge
Picture-CLIP
PC-Schnittstelle für z.B. Verwaltung von Adressbucheinträgen, Klingeltönen und Screensavern
u Bluetooth
u Headset-Anschluss
Gigaset-Mobilteil S3 professional
u
u
u
u
u
u
u
Beleuchtetes grafisches Farbdisplay (65k Farben)
Beleuchtete Tastatur
Freisprechen
Polyphone Klingelmelodien
Adressbuch für ca. 250 Einträge
Picture-CLIP
Headset-Anschluss
63
Gigaset-Mobilteile
Gigaset-Mobilteil SL3 professional
u
u
u
u
u
u
u
Beleuchtetes grafisches Farbdisplay (65k Farben)
Beleuchtete Tastatur
Freisprechen
Polyphone Klingelmelodien
Adressbuch für ca. 250 Einträge
Picture-CLIP
PC-Schnittstelle für z.B. Verwaltung von Adressbucheinträgen, Klingeltönen und Screensavern
u Headset-Anschluss
u Bluetooth
Alle Zubehörteile und Akkus können Sie über den Fachhandel bestellen.
Verwenden Sie nur Originalzubehör. So vermeiden Sie mögliche Gesundheits- und Sachschäden und stellen sicher, dass alle relevanten Bestimmungen eingehalten werden.
64
Deutsch
Wandmontage der Basis
Wandmontage der Basis
English
41 mm
ca. 5,5 mm
Wandmontage der Ladeschale
23,5 mm
ca. 4 mm
65
Stichwortverzeichnis
Stichwortverzeichnis
A
Abheben-Taste . . . . . . . . . . . . . . . . 2, 26
Abmelden (Mobilteil) . . . . . . . . . . . . . 42
Adressbuch . . . . . . . . . . . . . . . . . . . . 29
bei Nummerneingabe nutzen . . . . . 32
Eintrag speichern . . . . . . . . . . . . . . 29
Eintrag/Liste senden an Mobilteil . . . 31
Einträge verwalten . . . . . . . . . . . . . 30
Jahrestag speichern . . . . . . . . . . . . 32
Nummer aus Text übernehmen . . . . 32
öffnen . . . . . . . . . . . . . . . . . . . . . . 18
Reihenfolge der Einträge . . . . . . . . . 30
vCard übertragen (Bluetooth) . . . . . 32
Akku
Anzeige . . . . . . . . . . . . . . . . . . . . 2, 3
einlegen . . . . . . . . . . . . . . . . . . . . . 11
laden . . . . . . . . . . . . . . . . . . . 2, 3, 13
Symbol. . . . . . . . . . . . . . . . . . . . . 2, 3
Ton . . . . . . . . . . . . . . . . . . . . . . . . 52
AKZ (Amtskennziffer) . . . . . . . . . . . . . 55
Ändern
Display-Sprache . . . . . . . . . . . . . . . 48
Freisprechlautstärke . . . . . . . . . . . . 50
Hörerlautstärke . . . . . . . . . . . . . . . . 50
interne Nummer eines Mobilteils . . . 45
Klingelton . . . . . . . . . . . . . . . . . . . 50
Namen eines Mobilteils . . . . . . . . . . 44
Pausenzeiten . . . . . . . . . . . . . . . . . 56
System-PIN . . . . . . . . . . . . . . . . . . . 54
Wahlverfahren . . . . . . . . . . . . . . . . 55
Anklopfen
internes Gespräch . . . . . . . . . . . . . . 44
Anmelden (Mobilteil) . . . . . . . . . . . . . 41
Anmelde-Taste . . . . . . . . . . . . . . . . . . . 2
Anonyme Anrufe aus . . . . . . . . . . . . . 51
Anruf
annehmen . . . . . . . . . . . . . . . . . . . 26
annehmen (Bluetooth) . . . . . . . . . . 26
Anrufen
extern . . . . . . . . . . . . . . . . . . . . . . 26
intern . . . . . . . . . . . . . . . . . . . . . . . 42
Anruflisten . . . . . . . . . . . . . . . . . . . . 34
Anschließen, Basis an Telefonanlage . . 55
Anzeige
Netz-Anrufbeantworter Meldung . . . 37
nicht angenommene Jahrestage . . . 35
66
nicht angenommene
Termine/Jahrestage . . . . . . . . . 40
Nummer (CLI/CLIP). . . . . . . . . . . . . 27
Speicherplatz (Media-Pool) . . . . . . . 52
Speicherplatz Adressbuch . . . . . . . . 31
Auflegen-Taste . . . . . . . . . . . . . . . 2, 26
Aufmerksamkeitston . . . . . . . . . . . . . 51
Aufstellen, Basis . . . . . . . . . . . . . . . . . 9
Ausschalten
Hinweistöne . . . . . . . . . . . . . . . . . 52
intern zuschalten . . . . . . . . . . . . . . 44
Mobilteil . . . . . . . . . . . . . . . . . . . . 21
Rufannahme . . . . . . . . . . . . . . . . . 49
Tastensperre . . . . . . . . . . . . . . . . . 21
Termin . . . . . . . . . . . . . . . . . . . . . 39
Automatische
Netzanbietervorwahl . . . . . . . . . . . 36
Rufannahme . . . . . . . . . . . . . . 26, 49
Wahlwiederholung. . . . . . . . . . . . . 33
B
Basis
anschließen . . . . . . . . . . . . . . . . . . . 9
anschließen an Telefonanlage. . . . . 55
aufstellen . . . . . . . . . . . . . . . . . . . . 9
einstellen . . . . . . . . . . . . . . . . . . . 53
in Lieferzustand zurücksetzen. . . . . 54
System-PIN . . . . . . . . . . . . . . . . . . 54
wechseln . . . . . . . . . . . . . . . . . . . . 42
Beenden, Gespräch . . . . . . . . . . . . . . 26
Bestätigungston . . . . . . . . . . . . . . . . 52
Beste Basis . . . . . . . . . . . . . . . . . . . . 42
Bild
löschen . . . . . . . . . . . . . . . . . . . . . 52
umbenennen . . . . . . . . . . . . . . . . . 52
Bluetooth
Adressbuch übertragen (vCard) . . . 32
aktivieren . . . . . . . . . . . . . . . . . . . 46
Anruf annehmen . . . . . . . . . . . . . . 26
Geräte abmelden . . . . . . . . . . . . . . 46
Geräte anmelden . . . . . . . . . . . . . . 46
Gerätenamen ändern . . . . . . . . . . . 47
Liste bekannter Geräte . . . . . . . . . . 46
C
Call-by-Call . . . . . . . . . . . . . . . . . . . . 36
CLI, CLIP . . . . . . . . . . . . . . . . . . . . . . 27
CLIP-Bild . . . . . . . . . . . . . . . . . . . 29, 51
D
Gerätenamen ändern (Bluetooth) . . . 47
Gespräch
beenden . . . . . . . . . . . . . . . . . . . . 26
extern . . . . . . . . . . . . . . . . . . . . . . 26
intern . . . . . . . . . . . . . . . . . . . . . . 42
Teilnehmer zuschalten . . . . . . . . . . 44
weitergeben (verbinden) . . . . . 43, 44
Gesprächsdauer . . . . . . . . . . . . . . . . 26
Großschrift . . . . . . . . . . . . . . . . . . . . 49
E
Headset (Bluetooth) . . . . . . . . . . . . . 45
Headset anschließen . . . . . . . . . . . . . 16
Headsetbuchse . . . . . . . . . . . . . . . . . 16
Hilfe . . . . . . . . . . . . . . . . . . . . . . . . . 57
Hinweistöne . . . . . . . . . . . . . . . . . . . 52
Hörerbetrieb . . . . . . . . . . . . . . . . . . . 27
Hörerlautstärke . . . . . . . . . . . . . . . . . 50
Hörgeräte . . . . . . . . . . . . . . . . . . . . . . 7
ECO DECT . . . . . . . . . . . . . . . . . . . . . 38
Eco-Modus . . . . . . . . . . . . . . . . . . . . 38
Eco-Modus+ . . . . . . . . . . . . . . . . . . . 38
Ein-/Aus-Taste . . . . . . . . . . . . . . . . . . . 2
Einschalten
Hinweistöne . . . . . . . . . . . . . . . . . . 52
intern zuschalten . . . . . . . . . . . . . . 44
Mobilteil. . . . . . . . . . . . . . . . . . . . . 21
Rufannahme. . . . . . . . . . . . . . . . . . 49
Tastensperre . . . . . . . . . . . . . . . . . . 21
Termin . . . . . . . . . . . . . . . . . . . . . . 39
Eintrag
aus Telefonb. auswählen . . . . . . . . . 30
speichern (Netz-Anrufbeantworter) . 37
speichern, ändern (Preselection) . . . 36
E-Mail-Adresse
aus dem Adressbuch
übernehmen . . . . . . . . . . . . . . 32
Empfangsverstärker s. Repeater
Entgangener Anruf . . . . . . . . . . . . . . 34
Entsorgung . . . . . . . . . . . . . . . . . . . . 59
Erinnerungsruf . . . . . . . . . . . . . . . . . 33
Experten-Modus . . . . . . . . . . . . . 24, 57
F
Falscheingaben (Korrektur). . . . . . . . . 19
Farbschema . . . . . . . . . . . . . . . . . . . . 49
Fehlerbehebung allg. . . . . . . . . . . . . . 57
Fehlerton . . . . . . . . . . . . . . . . . . . . . 52
Flash-Zeit . . . . . . . . . . . . . . . . . . . . . 55
Fragen und Antworten . . . . . . . . . . . . 57
Freisprechen . . . . . . . . . . . . . . . . . . . 27
Taste . . . . . . . . . . . . . . . . . . . . . . . . 2
G
Geburtstag s. Jahrestag
Gerät anmelden (Bluetooth) . . . . . . . . 46
Geräte abmelden (Bluetooth) . . . . . . . 46
H
I
Impulswahl-Verfahren . . . . . . . . . . . .
In Betrieb nehmen
Mobilteil . . . . . . . . . . . . . . . . . . . .
Intern
Konferenz . . . . . . . . . . . . . . . . . . .
rückfragen. . . . . . . . . . . . . . . . . . .
telefonieren . . . . . . . . . . . . . . . . . .
zuschalten . . . . . . . . . . . . . . . . . . .
Internes Gespräch . . . . . . . . . . . . . . .
anklopfen . . . . . . . . . . . . . . . . . . .
IWV (Impulswahl-Verfahren) . . . . . . .
55
11
43
43
42
44
42
44
55
J
Jahrestag . . . . . . . . . . . . . . . . . . . . .
ausschalten . . . . . . . . . . . . . . . . . .
im Adressbuch speichern . . . . . . . .
nicht angenommen . . . . . . . . . . . .
nicht annehmen . . . . . . . . . . . . . .
32
33
32
35
40
K
Kalender . . . . . . . . . . . . . . . . . . . . . . 39
Klingelton
ändern . . . . . . . . . . . . . . . . . . . . . 50
Lautstärke einstellen . . . . . . . . . . . 50
Konferenz
intern . . . . . . . . . . . . . . . . . . . . . . 43
Korrektur von Falscheingaben . . . . . . 19
Kostenbewusst telefonieren. . . . . . . . 36
Kundenservice . . . . . . . . . . . . . . . . . 57
Kurzwahl . . . . . . . . . . . . . . . . . . 29, 47
67
English
Datum einstellen . . . . . . . . . . . . . 14, 25
Display
Beleuchtung . . . . . . . . . . . . . . . . . . 49
Display-Sprache ändern. . . . . . . . . . 48
einstellen . . . . . . . . . . . . . . . . . . . . 49
Farbschema . . . . . . . . . . . . . . . . . . 49
im Ruhezustand . . . . . . . . . . . . 15, 20
Screensaver . . . . . . . . . . . . . . . . . . 49
Display-Tasten . . . . . . . . . . . . . . . . 2, 19
belegen . . . . . . . . . . . . . . . . . . . . . 47
Deutsch
Stichwortverzeichnis
Stichwortverzeichnis
L
Ladezustandsanzeige . . . . . . . . . . . . 2, 3
Lautstärke
Freisprechlautstärke Mobilteil . . . . . 50
Hörer . . . . . . . . . . . . . . . . . . . . . . . 50
Klingelton . . . . . . . . . . . . . . . . . . . 50
Lautsprecher . . . . . . . . . . . . . . . . . 50
Leistungsaufnahme . . . . . . . . . . . . . . 60
Liste
Anruflisten . . . . . . . . . . . . . . . . . . . 34
Bekannte Geräte (Bluetooth) . . . . . . 46
entgangene Anrufe . . . . . . . . . . . . . 34
Mobilteile . . . . . . . . . . . . . . . . . . . . 18
Netz-Anrufbeantworter . . . . . . . . . . 34
Löschen
Zeichen . . . . . . . . . . . . . . . . . . . . . 19
Lösch-Taste . . . . . . . . . . . . . . . . . . . . 19
M
Manuelle Wahlwiederholung . . . . . . . 33
Media-Pool . . . . . . . . . . . . . . . . . . . . 51
Medizinische Geräte . . . . . . . . . . . . . . . 7
Meldung des Netz-Anrufb. ansehen . . 37
Menü
Endeton . . . . . . . . . . . . . . . . . . . . . 52
Führung . . . . . . . . . . . . . . . . . . . . . 20
öffnen . . . . . . . . . . . . . . . . . . . . . . 18
Übersicht . . . . . . . . . . . . . . . . . . . . 24
Menü-Ansicht
Experten-Modus . . . . . . . . . . . . 24, 57
Standard-Modus . . . . . . . . . . . . 24, 57
Mikrofon . . . . . . . . . . . . . . . . . . . . . . . 2
Mobilteil
abmelden . . . . . . . . . . . . . . . . . 41, 42
an weiterer Basis anmelden . . . . . . . 42
anmelden . . . . . . . . . . . . . . . . . . . . 41
Display-Beleuchtung . . . . . . . . . . . . 49
Display-Sprache . . . . . . . . . . . . . . . 48
ein-/ausschalten . . . . . . . . . . . . . . . 21
einstellen . . . . . . . . . . . . . . . . . . . . 47
Farbschema . . . . . . . . . . . . . . . . . . 49
Freisprechlautstärke . . . . . . . . . . . . 50
Gespräch weitergeben . . . . . . . . . . 43
Großschrift . . . . . . . . . . . . . . . . . . . 49
Hinweistöne . . . . . . . . . . . . . . . . . . 52
Hörerlautstärke . . . . . . . . . . . . . . . . 50
in Betrieb nehmen . . . . . . . . . . . . . 11
in Lieferzustand zurücksetzen . . . . . 53
interne Nummer ändern . . . . . . . . . 45
Kontakt mit Flüssigkeit . . . . . . . . . . 59
68
Liste . . . . . . . . . . . . . . . . . . . . . . .
mehrere nutzen . . . . . . . . . . . . . . .
Namen ändern . . . . . . . . . . . . . . .
Nummer ändern . . . . . . . . . . . . . .
Paging. . . . . . . . . . . . . . . . . . . . . .
Ruhezustand . . . . . . . . . . . . . . . . .
Screensaver . . . . . . . . . . . . . . . . . .
stumm schalten . . . . . . . . . . . . . . .
suchen . . . . . . . . . . . . . . . . . . . . .
Wechsel zu bestem Empfang . . . . .
Wechsel zu einer anderen Basis . . .
18
41
44
45
42
20
49
28
42
42
42
N
Nachrichten
Taste . . . . . . . . . . . . . . . . . . . . . . . . 2
Nachrichten-Taste
Listen aufrufen . . . . . . . . . . . . . . . 34
Name
eines Mobilteils . . . . . . . . . . . . . . . 44
Netzanbietervorwahl,
automatische . . . . . . . . . . . . . . . 36
Netz-Anrufbeantworter . . . . . . . . . . . 37
Nicht angenommen
Jahrestag. . . . . . . . . . . . . . . . . . . . 40
Termin . . . . . . . . . . . . . . . . . . . . . 40
Nummer
aus dem Adressbuch übernehmen . 32
des Anrufers anzeigen (CLIP) . . . . . 27
des Netz-Anrufb. eintragen . . . . . . 37
Eingabe mit Adressbuch . . . . . . . . . 32
im Adressbuch speichern . . . . . . . . 29
ins Adressbuch übernehmen . . . . . 32
P
Paging . . . . . . . . . . . . . . . . . . . . . . . 42
Paging-Taste . . . . . . . . . . . . . . . . . . . . 2
Pause
nach Leitungsbelegung . . . . . . . . . 56
nach R-Taste . . . . . . . . . . . . . . . . . 56
nach Vorwahlziffer. . . . . . . . . . . . . 56
PC Interface . . . . . . . . . . . . . . . . . . . 62
Pflege des Telefons . . . . . . . . . . . . . . 59
Picture-CLIP . . . . . . . . . . . . . . . . 29, 51
PIN ändern
System-PIN . . . . . . . . . . . . . . . . . . 54
Preselection . . . . . . . . . . . . . . . . . . . 36
unterdrücken . . . . . . . . . . . . . . . . . 36
Q
Quittungstöne . . . . . . . . . . . . . . . . . 52
Raute-Taste . . . . . . . . . . . . . . . . . . 2, 21
Reichweite . . . . . . . . . . . . . . . . . . . . . . 9
Reihenfolge im Adressbuch . . . . . . . . 30
Repeater . . . . . . . . . . . . . . . . . . . . . . 54
R-Taste . . . . . . . . . . . . . . . . . . . . . 2, 56
Rückfrage
intern . . . . . . . . . . . . . . . . . . . . . . . 43
Rufannahme . . . . . . . . . . . . . . . . . . . 49
Rufnummernübermittlung . . . . . . . . . 27
Ruhezustand (Display) . . . . . . . . . 15, 20
Ruhezustand, zurückkehren in den . . . 20
S
Sammelruf . . . . . . . . . . . . . . . . . . . . 43
Schlummermodus . . . . . . . . . . . . . . . 41
Schnellwahl
Netz-Anrufbeantworter . . . . . . . . . . 37
Screensaver . . . . . . . . . . . . . . . . . . . . 49
Seiten-Tasten . . . . . . . . . . . . . . . . . . . . 2
Senden
Adressbucheintrag an Mobilteil . . . . 31
Signalton s. Hinweistöne
Sonderfunktionen . . . . . . . . . . . . . . . 55
Sound s. Klingelton
Speichern (Vorwahlziffer) . . . . . . . . . . 55
Speicherplatz
Adressbuch . . . . . . . . . . . . . . . . . . 31
Media-Pool . . . . . . . . . . . . . . . . . . . 52
Sperre
Tastensperre ein-/ausschalten . . . . . 21
Sprache, Display . . . . . . . . . . . . . . . . 48
Standard-Modus . . . . . . . . . . . . . 24, 57
Steckerbelegung . . . . . . . . . . . . . . . . 60
Steckernetzgerät . . . . . . . . . . . . . . . . . 7
Stern-Taste. . . . . . . . . . . . . . . . . . . . . . 2
Steuer-Taste . . . . . . . . . . . . . . . . . . 2, 18
Stumm schalten des Mobilteils . . . . . . 28
Stummschalte-Taste . . . . . . . . . . . . . . . 2
Suchen im Adressbuch . . . . . . . . . . . . 30
Suchen, Mobilteil . . . . . . . . . . . . . . . . 42
Symbol
bei neuen Nachrichten . . . . . . . . . . 34
Klingelton . . . . . . . . . . . . . . . . . . . 51
Tastensperre . . . . . . . . . . . . . . . . . . 21
Wecker . . . . . . . . . . . . . . . . . . . . . . 41
Systemeinstellungen . . . . . . . . . . . . . 54
System-PIN ändern. . . . . . . . . . . . . . . 54
T
Taste
mit Funktion oder Nummer
belegen . . . . . . . . . . . . . . . . . 47
Taste 1 (Schnellwahl) . . . . . . . . . . . . . 2
Tasten
Abheben-Taste . . . . . . . . . . . . . . 2, 26
Auflegen-Taste . . . . . . . . . . . . . . 2, 26
Display-Tasten . . . . . . . . . . . . . . 2, 19
Ein-/Aus-Taste . . . . . . . . . . . . . . . . . 2
Freisprechen-Taste . . . . . . . . . . . . . . 2
Kurzwahl . . . . . . . . . . . . . . . . . . . . 31
Lösch-Taste . . . . . . . . . . . . . . . . . . 19
Nachrichten-Taste . . . . . . . . . . . . . . 2
Raute-Taste . . . . . . . . . . . . . . . . 2, 21
R-Taste . . . . . . . . . . . . . . . . . . . . . . 2
Schnellwahl . . . . . . . . . . . . . . . . . . . 2
Seiten-Tasten . . . . . . . . . . . . . . . . . . 2
Stern-Taste . . . . . . . . . . . . . . . . . . . 2
Steuer-Taste . . . . . . . . . . . . . . . . 2, 18
Stummschalte-Taste . . . . . . . . . . . . . 2
Tastensperre . . . . . . . . . . . . . . . . . . . 21
Technische Daten . . . . . . . . . . . . . . . 59
Telefon vor Zugriff schützen . . . . . . . 54
Telefonanlage
auf Tonwahl umschalten . . . . . . . . 56
Basis anschließen . . . . . . . . . . . . . . 55
Flash-Zeit einstellen . . . . . . . . . . . . 55
Pausenzeiten . . . . . . . . . . . . . . . . . 56
Vorwahlziffer speichern . . . . . . . . . 55
Wahlverfahren einstellen . . . . . . . . 55
Telefonieren
Anruf annehmen . . . . . . . . . . . . . . 26
extern . . . . . . . . . . . . . . . . . . . . . . 26
intern . . . . . . . . . . . . . . . . . . . . . . 42
Telefonstecker, Steckerbelegung . . . . 60
Termin . . . . . . . . . . . . . . . . . . . . . . . 39
Termin/Jahrestag
nicht angenommenen anzeigen . . . 40
Termine
aktivieren/deaktivieren . . . . . . . . . . 40
löschen . . . . . . . . . . . . . . . . . . . . . 40
verwalten . . . . . . . . . . . . . . . . . . . 40
Text schreiben und bearbeiten . . . . . . 61
Tonwahl . . . . . . . . . . . . . . . . . . . 55, 56
U
Uhrzeit einstellen . . . . . . . . . . . . 14, 25
Umwelt . . . . . . . . . . . . . . . . . . . . . . 58
Unterdrücken
Preselection . . . . . . . . . . . . . . . . . . 36
69
English
R
Deutsch
Stichwortverzeichnis
Stichwortverzeichnis
USB Anschluss . . . . . . . . . . . . . . . . . . 16
V
Verpackungsinhalt . . . . . . . . . . . . . . . . 8
Vorwahlnummer
eigene Vorwahl einstellen . . . . . . . . 53
Vorwahlziffer
bei einer Telefonanlage . . . . . . . . . . 55
W
Wählen
mit Adressbuch . . . . . . . . . . . . . . . . 30
mit Kurzwahl . . . . . . . . . . . . . . 31, 47
Wahlpause. . . . . . . . . . . . . . . . . . . . . 56
Wahlverfahren . . . . . . . . . . . . . . . . . . 55
Wahlwiederholung . . . . . . . . . . . . . . . 33
Warnton s. Hinweistöne
Wartemelodie . . . . . . . . . . . . . . . . . . 53
Wecker . . . . . . . . . . . . . . . . . . . . . . . 41
Z
Zeichensatz . . . . . . . . . . . . . . . . . . . . 61
Ziffern-Taste belegen . . . . . . . . . . . . . 47
Zubehör . . . . . . . . . . . . . . . . . . . . . . 63
Zugriffschutz . . . . . . . . . . . . . . . . . . . 54
Zulassung . . . . . . . . . . . . . . . . . . . . . 58
Zuschalten zu einem Gespräch . . . . . . 44
70
Gigaset S400 professional – more than just a
telephone
Your telephone sets new standards for the way you communicate.
The configuration and user interface of the cordless phone are excellent.
It provides you with first-class voice quality in speaker mode, while the various
ports (Bluetooth, USB) offer you high flexibility.
The large TFT display, user-friendly keypad and clearly laid out menu are very
simple to use.
Your phone can do a whole lot more:
u You can use Bluetooth™ for wireless communication with other devices
(e.g., headsets) that also use this technology.
u You can synchronise your directories on your telephone, mobile phone and
PC via BluetoothTM or the USB port using the Gigaset QuickSync software
(¢ page 60).
u You can save appointments (¢ page 38) and anniversaries, e.g., birthdays
(¢ page 31), in your phone and it will remind you of them in advance.
u You can designate important people as VIPs to identify important calls from
the ringtone (¢ page 28).
u You can assign a picture to entries in the directory – in future the picture will
appear every time you receive a call from this number (¢ page 28).
u If you do not want to take calls where the caller has withheld their number,
just set your handset to only ring if Calling Line Identification has not been
withheld (¢ page 49).
u If you do not wish to be disturbed, you can simply set up a time control so
that your phone will only ring when it is convenient (¢ page 48). VIP calls
are still connected.
u You can assign important numbers to the number keys on your phone.
The number is then dialled by simply pressing a key (¢ page 46).
u You can set the display to large font to increase readability in particularly
important situations (e.g., the directory and lists) (¢ page 47).
u You can adapt the menu display to suit your individual requirements so that
only the most important functions (standard mode) or all functions (expert
mode) are displayed (¢ page 24).
Have fun using your new phone!
1
English
Deutsch
Gigaset S400 professional – more than just a telephone
The handset at a glance
The handset at a glance
1 Display in idle status
2 Battery charge status (
page 15)
3 Side keys
Set call (
page 48) or ringtone volume
(
page 48)
4 Display keys (
page 19)
5 Message key (
page 33)
Access to call and message lists;
Flashes: new message or new call
6 End call key, On/Off key
End call, cancel function, go back one menu
level (press briefly), back to idle status (press
and hold), activate/deactivate handset
(press and hold in idle status)
7 Hash key
Keypad lock on/off (press and hold in
idle status);
toggles between upper/lower case
and digits
8 Mute key (
page 27)
Mute the microphone
9 Microphone
10 Recall key
- Consultation call (flash)
- Insert a dialling pause (press and hold)
11 Star key
Ringtone on/off (press and hold);
with an open connection: switch between
pulse dialling/tone dialling (press briefly);
text input: open table of special characters
page 16)
12 Headset socket (
13 Key 1
Dial network mailbox (press and hold)
14 Talk key
15 Flashes: incoming call;
Accept a call; open redial list (press briefly);
start dialling (press and hold)Speaker key
Switch between earpiece and speaker mode
page 18)
16 Control key (
17 Signal strength (
page 15)
Green: Eco Mode (
page 37) activated
¢
17
i
INT 1
V
1
2
07:15
14 Oct
3
Þ
Calendar
4
16
15
5
14
6
13
12
11
7
10
8
9
Base
Registration/
Paging key
(
page 41)
¢
2
¢
¢
¢
¢
¢
¢
¢
¢
¢
Deutsch
Display symbols
Display symbols
English
The following symbols are displayed dependent on the settings and the operating status
of your telephone:
Signal strength i (¢ page 37)
or ECO Mode+ icon ¼ (¢ page 37)
Bluetooth activated (¢ page 44)
or ô/ õ (Bluetooth headset/data device) connected
Ringtone switched off (¢ page 49)
Keypad lock switched on (¢ page 21)
i
»
Batteries are charged (¢ page 15)
Charge status of the batteries (¢ page 15)
ó
Û 08:00
INT 1
Ã
02
Þ
˝
V
07:15
14 Oct
™
10
08
Calendar
Signalling
Alarm switched on and wake-up time set (¢ page 40)
Current time (¢ page 14)
Current day and month (¢ page 14)
Name of the handset (¢ page 43)
Number of new messages:
u à on the network mailbox (¢ page 33)
u ™ in the list of missed calls (¢ page 33)
u in the list of missed appointments (¢ page 34)
External call (¢ page 26)
Internal call (¢ page 41)
Alarm (¢ page 40)
Anniversary (¢ page 38)
Ø «Ú
ØìÚ
Ø åÚ
ØðÚ
Appointment (¢ page 38)
ØáÚ
3
Contents
Contents
Gigaset S400 professional – more than just a telephone . . . . . . 1
The handset at a glance . . . . . . . . . . . . . . . . . . . . . . . . . . . . . . . . . 2
Display symbols . . . . . . . . . . . . . . . . . . . . . . . . . . . . . . . . . . . . . . . . . 3
Safety precautions . . . . . . . . . . . . . . . . . . . . . . . . . . . . . . . . . . . . . . 7
First steps . . . . . . . . . . . . . . . . . . . . . . . . . . . . . . . . . . . . . . . . . . . . . 8
Checking the package contents . . . . . . . . . . . . . . . . . . . . . . . . . . . . . . . . . . . 8
Setting up the base and charger (if included) . . . . . . . . . . . . . . . . . . . . . . . . 9
Connecting the base . . . . . . . . . . . . . . . . . . . . . . . . . . . . . . . . . . . . . . . . . . . . 9
Connecting the charger (if included) . . . . . . . . . . . . . . . . . . . . . . . . . . . . . . 10
Setting up the handset for use . . . . . . . . . . . . . . . . . . . . . . . . . . . . . . . . . . . 11
Setting the date and time . . . . . . . . . . . . . . . . . . . . . . . . . . . . . . . . . . . . . . . 14
Connecting the headset . . . . . . . . . . . . . . . . . . . . . . . . . . . . . . . . . . . . . . . . 16
Connecting the USB data cable . . . . . . . . . . . . . . . . . . . . . . . . . . . . . . . . . . . 16
What would you like to do next? . . . . . . . . . . . . . . . . . . . . . . . . . . . . . . . . . . 17
Using the phone . . . . . . . . . . . . . . . . . . . . . . . . . . . . . . . . . . . . . . . 18
Control key . . . . . . . . . . . . . . . . . . . . . . . . . . . . . . . . . . . . . . . . . . . . . . . . . . .
Display keys . . . . . . . . . . . . . . . . . . . . . . . . . . . . . . . . . . . . . . . . . . . . . . . . . .
Keys on the keypad . . . . . . . . . . . . . . . . . . . . . . . . . . . . . . . . . . . . . . . . . . . .
Side keys . . . . . . . . . . . . . . . . . . . . . . . . . . . . . . . . . . . . . . . . . . . . . . . . . . . .
Correcting incorrect entries . . . . . . . . . . . . . . . . . . . . . . . . . . . . . . . . . . . . . .
Using the menus . . . . . . . . . . . . . . . . . . . . . . . . . . . . . . . . . . . . . . . . . . . . . .
Activating/deactivating the handset . . . . . . . . . . . . . . . . . . . . . . . . . . . . . . .
Activating/deactivating the keypad lock . . . . . . . . . . . . . . . . . . . . . . . . . . . .
Using this guide . . . . . . . . . . . . . . . . . . . . . . . . . . . . . . . . . . . . . . . . . . . . . . .
18
19
19
19
19
20
21
21
22
Menu overview . . . . . . . . . . . . . . . . . . . . . . . . . . . . . . . . . . . . . . . . 24
Making calls . . . . . . . . . . . . . . . . . . . . . . . . . . . . . . . . . . . . . . . . . . 26
Making an external call . . . . . . . . . . . . . . . . . . . . . . . . . . . . . . . . . . . . . . . . .
Ending a call . . . . . . . . . . . . . . . . . . . . . . . . . . . . . . . . . . . . . . . . . . . . . . . . .
Accepting a call . . . . . . . . . . . . . . . . . . . . . . . . . . . . . . . . . . . . . . . . . . . . . . .
Calling Line Identification . . . . . . . . . . . . . . . . . . . . . . . . . . . . . . . . . . . . . . .
Speaker mode . . . . . . . . . . . . . . . . . . . . . . . . . . . . . . . . . . . . . . . . . . . . . . . .
Switching to mute . . . . . . . . . . . . . . . . . . . . . . . . . . . . . . . . . . . . . . . . . . . . .
26
26
26
26
27
27
Using the directory and lists . . . . . . . . . . . . . . . . . . . . . . . . . . . . . 28
Directory . . . . . . . . . . . . . . . . . . . . . . . . . . . . . . . . . . . . . . . . . . . . . . . . . . . .
Redial list . . . . . . . . . . . . . . . . . . . . . . . . . . . . . . . . . . . . . . . . . . . . . . . . . . . .
Call lists . . . . . . . . . . . . . . . . . . . . . . . . . . . . . . . . . . . . . . . . . . . . . . . . . . . . .
Opening lists with the message key . . . . . . . . . . . . . . . . . . . . . . . . . . . . . . .
List of missed alarms . . . . . . . . . . . . . . . . . . . . . . . . . . . . . . . . . . . . . . . . . . .
28
32
32
33
34
Making cost-effective calls . . . . . . . . . . . . . . . . . . . . . . . . . . . . . . 34
Automatic network provider code (preselection) . . . . . . . . . . . . . . . . . . . . . 34
4
Using the network mailbox . . . . . . . . . . . . . . . . . . . . . . . . . . . . . . 36
Configuring fast access for the network mailbox . . . . . . . . . . . . . . . . . . . . . 36
Viewing the network mailbox message . . . . . . . . . . . . . . . . . . . . . . . . . . . . 36
Deutsch
Contents
Setting an appointment (calendar) . . . . . . . . . . . . . . . . . . . . . . . 38
Displaying missed appointments, anniversaries . . . . . . . . . . . . . . . . . . . . . . 39
Setting the alarm clock . . . . . . . . . . . . . . . . . . . . . . . . . . . . . . . . . 40
Using multiple handsets . . . . . . . . . . . . . . . . . . . . . . . . . . . . . . . . 40
Registering handsets . . . . . . . . . . . . . . . . . . . . . . . . . . . . . . . . . . . . . . . . . . .
De-registering handsets . . . . . . . . . . . . . . . . . . . . . . . . . . . . . . . . . . . . . . . .
Locating a handset ("Paging") . . . . . . . . . . . . . . . . . . . . . . . . . . . . . . . . . . . .
Changing the base . . . . . . . . . . . . . . . . . . . . . . . . . . . . . . . . . . . . . . . . . . . . .
Making internal calls . . . . . . . . . . . . . . . . . . . . . . . . . . . . . . . . . . . . . . . . . . .
Listening in to an external call . . . . . . . . . . . . . . . . . . . . . . . . . . . . . . . . . . .
Changing the name of a handset . . . . . . . . . . . . . . . . . . . . . . . . . . . . . . . . .
Changing a handset's internal number . . . . . . . . . . . . . . . . . . . . . . . . . . . . .
40
41
41
41
41
43
43
43
Using Bluetooth devices . . . . . . . . . . . . . . . . . . . . . . . . . . . . . . . . 44
Handset settings . . . . . . . . . . . . . . . . . . . . . . . . . . . . . . . . . . . . . . 46
Handset PIN . . . . . . . . . . . . . . . . . . . . . . . . . . . . . . . . . . . . . . . . . . . . . . . . . .
Quick access to numbers and functions . . . . . . . . . . . . . . . . . . . . . . . . . . . .
Changing the display language . . . . . . . . . . . . . . . . . . . . . . . . . . . . . . . . . . .
Setting the display . . . . . . . . . . . . . . . . . . . . . . . . . . . . . . . . . . . . . . . . . . . . .
Activating/deactivating auto answer . . . . . . . . . . . . . . . . . . . . . . . . . . . . . . .
Changing the speaker/earpiece volume . . . . . . . . . . . . . . . . . . . . . . . . . . . .
Changing ringtones . . . . . . . . . . . . . . . . . . . . . . . . . . . . . . . . . . . . . . . . . . . .
Media-Pool . . . . . . . . . . . . . . . . . . . . . . . . . . . . . . . . . . . . . . . . . . . . . . . . . . .
Activating/deactivating advisory tones . . . . . . . . . . . . . . . . . . . . . . . . . . . . .
Setting your own area code . . . . . . . . . . . . . . . . . . . . . . . . . . . . . . . . . . . . .
Restoring the handset default settings . . . . . . . . . . . . . . . . . . . . . . . . . . . . .
46
46
47
47
48
48
48
49
50
50
51
Setting the base . . . . . . . . . . . . . . . . . . . . . . . . . . . . . . . . . . . . . . . 51
Activating/deactivating music on hold . . . . . . . . . . . . . . . . . . . . . . . . . . . . .
Repeater support . . . . . . . . . . . . . . . . . . . . . . . . . . . . . . . . . . . . . . . . . . . . . .
Protecting against unauthorised access . . . . . . . . . . . . . . . . . . . . . . . . . . . .
Resetting the base to the factory settings . . . . . . . . . . . . . . . . . . . . . . . . . . .
51
51
52
52
Connecting the base to the PABX . . . . . . . . . . . . . . . . . . . . . . . . . 53
Dialling modes and recall . . . . . . . . . . . . . . . . . . . . . . . . . . . . . . . . . . . . . . .
Saving an access code (outside line code) . . . . . . . . . . . . . . . . . . . . . . . . . .
Setting pauses . . . . . . . . . . . . . . . . . . . . . . . . . . . . . . . . . . . . . . . . . . . . . . . .
Switching temporarily to tone dialling (DTMF) . . . . . . . . . . . . . . . . . . . . . . .
System support . . . . . . . . . . . . . . . . . . . . . . . . . . . . . . . . . . . . . . . . . . . . . . .
Questions and answers . . . . . . . . . . . . . . . . . . . . . . . . . . . . . . . . . . . . . . . . .
Authorisation . . . . . . . . . . . . . . . . . . . . . . . . . . . . . . . . . . . . . . . . . . . . . . . . .
53
53
54
54
55
55
56
5
English
ECO DECT . . . . . . . . . . . . . . . . . . . . . . . . . . . . . . . . . . . . . . . . . . . . . 37
Contents
Protecting our environment . . . . . . . . . . . . . . . . . . . . . . . . . . . . . 56
Appendix . . . . . . . . . . . . . . . . . . . . . . . . . . . . . . . . . . . . . . . . . . . . . 57
Caring for your telephone . . . . . . . . . . . . . . . . . . . . . . . . . . . . . . . . . . . . . . .
Contact with liquid . . . . . . . . . . . . . . . . . . . . . . . . . . . . . . . . . . . . . . . . . . . .
Specifications . . . . . . . . . . . . . . . . . . . . . . . . . . . . . . . . . . . . . . . . . . . . . . . . .
Writing and editing text . . . . . . . . . . . . . . . . . . . . . . . . . . . . . . . . . . . . . . . . .
57
57
58
59
Additional functions via the PC interface . . . . . . . . . . . . . . . . . . 60
Gigaset handsets . . . . . . . . . . . . . . . . . . . . . . . . . . . . . . . . . . . . . . . 61
Mounting the base on the wall . . . . . . . . . . . . . . . . . . . . . . . . . . . 63
Mounting the charger on the wall . . . . . . . . . . . . . . . . . . . . . . . . 63
Index . . . . . . . . . . . . . . . . . . . . . . . . . . . . . . . . . . . . . . . . . . . . . . . . 64
6
Deutsch
Safety precautions
Safety precautions
Warning
$
English
Be sure to read this user guide and the safety precautions before using your telephone
Explain their content and the potential hazards associated with using the telephone to
your children.
Use only the power adapter supplied, as indicated on the underside of the base.
Use only rechargeable batteries that correspond to the specification provided on page 58, as this could otherwise result in significant health risks and
personal injury.
Using your telephone may affect nearby medical equipment. Be aware of the
technical conditions in your particular environment, e.g., doctor's surgery.
Do not hold the rear of the handset to your ear when it is ringing or when
speaker mode is activated. Otherwise you risk serious and permanent damage
to your hearing.
Your Gigaset is compatible with the majority of digital hearing aids on the market. However, perfect function with all hearing aids cannot be guaranteed.
The handset may cause an unpleasant humming or whistling noise in hearing
aids or cause them to overload. If you require assistance, please contact the
hearing aid supplier.
Do not install the base or charger in bathrooms or shower rooms. The base and
charger are not splashproof (¢ page 57).
Do not use your phone in environments with a potential explosion hazard
(e.g., paint shops).
ƒ
If you give your Gigaset to a third party, make sure you also give them the user
guide.
Remove faulty bases from use or have them repaired by our Service department,
as they could interfere with other wireless services.
Please note
Not all of the functions described in this user guide are available in all countries.
7
First steps
First steps
Checking the package contents
1
3
2
4
5
9
6
7
1 One Gigaset S400 professional base
2 One power adapter
3 One Gigaset S4 professional handset
4 One phone cord
5 Two batteries
6 One battery cover
7 One belt clip
8 One plastic headset socket cover
9 One user guide
8
8
The base and charger are designed for use in dry rooms in a temperature range
of +5°C to +45°C.
¤ Set up the base at a central point in the building on a level, non-slip surface
or mount the base or charger on the wall (¢ page 63).
Please note
Pay attention to the range of the base.
This is up to 300 m in unobstructed outdoor areas and up to 50 m inside
buildings. The range is reduced when Eco Mode (¢ page 37) is activated.
The phone's feet do not usually leave any marks on surfaces. However, due to
the multitude of different varnishes and polishes used on today's furnishings,
the occurrence of marks on the surfaces cannot be completely ruled out.
Please note:
u Never expose the telephone to the influence of heat sources, direct sunlight
or other electrical devices.
u Protect your Gigaset from moisture, dust, corrosive liquids and fumes.
Connecting the base
¤ First connect the
¤
power adapter 1.
Then connect the
telephone jack 2
and insert the
cables into the
cable ducts.
1
1
2
1
Please note:
u The power adapter must always be connected, as the phone will not oper-
ate without a mains connection.
u Use only the power adapter and phone cord supplied. Pin connections on
telephone cables can vary (pin connections ¢ page 58).
9
English
Setting up the base and charger (if included)
Deutsch
First steps
First steps
Connecting the charger (if included)
2
¤ Connect the flat plug from the power
1
adapter 1.
¤ Plug the power adapter into the plug
socket 2.
2
To disconnect the plug from the charger,
press the release button 1 and disconnect
the plug 2.
10
1
Setting up the handset for use
The display and keypad are protected by plastic films.
Remove the protective films!
Inserting the batteries and closing the battery cover
Warning
Use only rechargeable batteries recommended by Unify (¢ page 58), i.e.,
Never use conventional (non-rechargeable) batteries, as this could result in
significant health risks and personal injury. For example, the outer casing of
the batteries could be damaged or the batteries could explode. The phone
could also malfunction or be damaged as a result of using batteries that are
not of the recommended type.
¤ Insert the batteries
with the polarity in the
correct direction.
The polarity is indicated in/on the battery
compartment.
¤ First insert the battery
cover at the top a.
¤ Then press the cover b
until it clicks into place.
To open the battery cover, for
instance to replace the batteries, insert a coin into the cavity on the left-hand side of the
casing, then pull the battery
cover in an upward direction.
11
English
Deutsch
First steps
First steps
¤ Insert the plastic cover provided for the
headset socket to ensure optimum sound
in speaker mode.
Attaching the belt clip
The handset has notches on each side to attach the belt clip.
¤ To attach – press the belt clip
onto the back of the handset so
that the protrusions on the belt
clip engage with the notches.
¤ To remove – press the centre of
the belt clip firmly with your
right thumb, push the fingernail
of your left index finger up
between the clip and the housing and pull the clip in an
upward direction.
Placing the handset in the base/charger
¤ Place the handset in the base/charger with its display facing forward.
Each handset is registered with the base at the factory. You do not need to register the handset again. If you wish to use your handset with a different base or
use further handsets with your base, you have to register the handset manually
(¢ page 40).
To charge the batteries, leave the handset in the base/charger.
Please note
Only place the handset in the designated base/charger.
12
Deutsch
First steps
First battery charge and discharge
English
The correct charge level can only be displayed if the batteries are first fully
charged and discharged.
¤ Charge the handset for 8.5 hours in the
base/charger.
¤ Then remove the handset
8.5 h
from the base/charger and
do not replace it until the
batteries are fully discharged.
Please note
u After the first battery charge and discharge, you may replace your hand-
set in the base/charger after every call.
u Always repeat the charging and discharging procedure if you remove the
batteries from the handset and reinsert them.
u The batteries may warm up during charging. This is not dangerous.
u After a while, the charge capacity of the batteries will decrease for technical reasons.
13
First steps
Setting the date and time
Set the date and time so that the correct date and time can be assigned to
incoming calls, and so that the alarm can be used.
Þ
¤ Press the key below §Time§ on the dis-
play screen to open the input field.
(If you have already set the time and
date, open the input field via the
menu ¢ page 25.)
Time
Date/Time
The Date/Time submenu is shown on
the display.
¤ The active input position flashes.
Enter day, month and year as an
8-digit number via the keypad,
e.g., 4
Q2Q
QO for 14/10/2009.
Date:
31.01.2009
Time:
00:00
Back
Save
Press the right or left control
key to change the input position and correct an entry.
¤ Press down on the control key to switch
to the time input field.
Date/Time
Date:
¤ Enter the hours and minutes in
4-digit format via the keypad,
e.g., QM
5
for 07:15 am.
Change the input position with
the control key if necessary.
14
14.10.2009
Time:
00:00
Back
Save
Back
Save
¤ Press the key below §Save§ on the display screen to confirm your entry.
Date/Time
‰
Saved
The display shows Saved. You will hear
a confirmation tone and the handset
will automatically return to idle status.
Display in idle status
Once the phone is registered and the time is set, the idle display is shown as in
this example.
Displays
u Reception between the base and the handset:
i
V
07:15
– Poor to good: Ð i Ñ Ò
INT
1
14 Oct
– No reception: | flashes
Green: Eco Mode activated (¢ page 37)
u Charge status of the batteries:
– y y { { (empty to full)
– y flashes red: batteries almost empty
Calendar
Þ
– xy x{ x{ (charging)
u INT 1
Internal name of the handset (¢ page 43)
If Eco Mode+ (¢ page 37) is activated, the ¼ icon is displayed in the top left
corner of the display.
Your phone is now ready for use!
15
English
Deutsch
First steps
First steps
Connecting the headset
After removing the plastic cover, you can connect a
headset to the left-hand side of your telephone with the
2.5 mm jack connector.
The headset volume corresponds to the settings for the
handset volume (¢ page 48).
After using the headset, replace the plastic cover to
enable optimum sound in speaker mode.
Connecting the USB data cable
You can connect a standard USB data cable with a mini-B connector to the back
of your handset to connect the handset to a PC (¢ page 60).
¤ Remove the belt clip (if attached)
(¢ page 12).
¤ Remove the battery cover
(¢ page 11).
¤ Connect the USB data cable to
USB socket 1.
16
1
Now you have successfully set up your Gigaset, you will certainly want to adapt
it to your personal requirements. Use the following guide to quickly locate the
most important topics.
If you are unfamiliar with menu-driven devices such as other Gigaset telephones, read the section entitled "Using the phone" (¢ page 18) first.
Information on ...
Setting the ringtone and volume
Setting the earpiece volume
Setting Eco Mode / Eco Mode+
Operating the telephone on a PABX
Registering existing Gigaset handsets to a base
Transferring directory entries from existing Gigaset
handsets to new handset(s)
Using Bluetooth devices
Connecting the phone to the PC
g page 48
g page 48
g page 37
g page 53
g page 40
... is located here.
g page 30
g page 44
g page 60
If you have any questions about using your phone, please read the tips on
troubleshooting (¢ page 55) or contact our Customer Care team (¢ page 55).
17
English
What would you like to do next?
Deutsch
First steps
Using the phone
Using the phone
Control key
Below, the side of the control key that you must press in the
respective operating situation is marked in black (top, bottom, right, left, centre), e.g., v for "press right on the control
key" or w for "press the centre of the control key".
The control key has a number of different functions:
When the handset is in idle status
s
v
u
t
Open the directory.
Open the main menu.
Open the list of handsets.
Call up the menu for setting the handset's call volume
(¢ page 48).
In the main menu
t, s, v or u
Navigate to the required function.
In submenus and lists
t/s
Scroll up/down line by line.
In input fields
Use the control key to move the cursor up t, down s, right v or left u.
Press and hold v or u to move the cursor word by word.
During an external call
s
u
t
Open the directory.
Initiate an internal consultation call.
Adjust the loudspeaker volume for earpiece and speaker mode.
Functions when pressing the middle of the control key
Depending on the operating situation, the key has different functions.
u In idle status the key opens the main menu.
u In submenus, selection and input fields, the key takes on the function of
the display keys §OK§, §Yes§, §Save§, §Select§ or §Change§ .
Please note
These instructions demonstrate the main menu being opened by pressing
the right of the control key and functions being actuated by pressing the
appropriate display key. However, if you prefer, you can use the control key
as described above.
18
Display keys
Back
Save
English
The functions of the display keys change depending on the particular operating
situation. Example:
Current display key functions.
Display keys
Some important display keys:
Options
Open a menu for further functions.
Confirm selection.
OK
Delete key: delete character by character/word by word from right
Û
to left.
Back
Go back one menu level or cancel operation.
Save
Store entry.
Þ
Open the redial list.
Keys on the keypad
c / Q / * etc.
Press the matching key on the handset.
~
Enter digits or letters.
Side keys
ø/÷
Deutsch
Using the phone
Press the keys on the right of the handset to set the volume for the
handset, ringtone, speaker, alarm, signalling of appointments
and the headset depending on the situation.
Correcting incorrect entries
You can correct incorrect characters in the input fields by navigating to the
incorrect entry using the control key. You can then:
u Delete the character to the left of the cursor with the display key Ñ
(press and hold to delete the word)
u Insert characters at the cursor position
u Overwrite the highlighted (flashing) character, e.g., when entering time and
date.
19
Using the phone
Using the menus
Your telephone's functions are accessed using a menu that has a number of levels.
The menu display can be extended (expert mode) or restricted (standard
mode).
Settings or functions that are only available in expert mode are marked in these
instructions by the • icon.
Switching between standard mode/expert mode and the menu overview
(¢ page 24).
Main menu (first menu level)
¤ When the handset is in idle status press the right control key v to open the
main menu.
The main menu functions are shown in the display
with icons. The icon for the selected function is highlighted in orange and the name of the associated
function appears in the display header.
To access a function, i.e., to open the corresponding
submenu (next menu level):
¤ Use the control key p to select the required function and press the display key §OK§.
Briefly press the display key §Back§ or the end call key
a to revert back to idle status.
·
Settings
ò
Ê
ì
á
Â
Back
É
Ì
Ï
OK
Submenus
The functions in the submenus are displayed as lists
(example on the right).
To access a function:
¤ Scroll to the function with the control key q and
press §OK§.
Briefly press the display key §Back§ or the end call key
a to return to the previous menu level/cancel the
operation.
Settings
Date/Time
Audio Settings
Display
Language
Registration
Back
20
OK
You can revert to idle status from anywhere in the menu as follows:
¤ Press and hold the end call key a.
or:
¤ Do not press any key: after 2 minutes the display will automatically revert
to idle status.
Settings that have not been saved by selecting the display keys §OK§, §Yes§, §Save§
or §Change§ are lost.
An example of the display in idle status is shown on page 15.
Activating/deactivating the handset
a
With the phone in idle status, press and hold the end call key (confirmation tone) to switch off the handset.
Press and hold the end call key again to switch the handset on.
Please note
When the handset is switched on, an animation showing the Gigaset logo
is displayed for several seconds.
Activating/deactivating the keypad lock
The keypad lock prevents any inadvertent use of the phone.
#
Press and hold the hash key in idle status to activate or deactivate
the keypad lock. You will hear the confirmation tone.
If the keypad lock is activated, you will see a message when you press a key.
The keypad lock deactivates automatically when you receive a call. It is reactivated when the call is finished.
Please note
When the keypad lock is active, you cannot even call emergency numbers.
21
English
Reverting to idle status
Deutsch
Using the phone
Using the phone
Using this guide
The operating steps are shown in abbreviated form.
Example:
The illustration:
v ¢ Ï ¢ Eco Mode ¢ Eco Mode+ (³ = on)
means:
¤ Press right on the control key v
to open the main menu.
·
Settings
ò
Ê
ì
á
Â
Back
É
¤ Press right, left, down and up on
control key p to navigate to
the Settings submenu.
Ì
Ï
OK
¤ Press the display key §OK§ to
confirm your selection.
Settings
Registration
¤ Press down on the control key s
Telephony
until the Eco Mode menu option
appears on the display.
System
Menu View
Eco Mode
Back
OK
¤ Press the display key §OK§ to
confirm your selection.
22
Deutsch
Using the phone
Eco Mode
Eco Mode+
Back
¤ Press down on the control key s
until the Eco Mode+ menu option
appears on the display.
English
³
´
Eco Mode
Change
¤ Press the display key §Change§ to
activate/deactivate the function.
Eco Mode
Eco Mode
Eco Mode+
Back
³
³
The change is effective immediately
and does not need to be confirmed.
Change
¤ Press the key below §Back§ on the
display screen to jump back to the
previous menu level.
or
Press and hold the end call key a
to return to idle status.
23
Menu overview
Menu overview
Setting standard mode or expert mode
The menu display can be extended (expert mode) or restricted (standard mode).
To change these settings:
Select v ¢ Ï ¢ Menu View ¢ Simplified (standard mode) or Complete (expert mode)
¢ §Select§ (the active mode is marked with Ø)
Menu options that are only available in expert mode are marked with the • icon.
Open the main menu: press v when the phone is in idle mode.
· Resource Directory
Screensavers
Caller Pictures
Sounds
Capacity
ò Bluetooth
Activation
Search for Headset
Search Data Device
Known Devices
Own Device
É Additional Features
Resource Directory
¢ page 50
¢ page 50
¢ page 50
¢ page 50
¢ page 44
¢ page 44
¢ page 44
¢ page 45
¢ page 45
Screensavers
Caller Pictures
Sounds
ì Alarm Clock
Ê Call Lists
¢ page 40
Missed Calls
¢ page 32
¢ page 32
¢ page 32
¢ page 32
•
¢ page 36
All Calls
Outgoing Calls
Accepted Calls
Ì Voice Mail
24
Capacity
Network Mailbox
¢ page 50
¢ page 50
¢ page 50
¢ page 50
Calendar
Missed Alarms
 Directory
Ï Settings
Date/Time
Audio Settings
¢ page 38
¢ page 39
¢ page 28
¢ page 14
Handset Volume
•
Advisory Tones
Ringtones(Handset)
•
Display
Music on hold
Screensaver
Large Font
Colour Schemes
•
Language
Registration
Backlight
¢ page 47
Register Handset
De-reg. Handset
•
Select Base
Telephony
Auto Answer
Area Codes
Listening In
Preselection
Access Code
Dialling Mode
•
Recall
System
Handset PIN
Handset Reset
Base Reset
Repeater Mode
System PIN
Menu View
Simplified
Complete
Eco Mode
Eco Mode
Eco Mode+
English
á Organizer
Deutsch
Menu overview
¢ page 48
¢ page 50
¢ page 48
¢ page 51
¢ page 47
¢ page 47
¢ page 47
¢ page 47
¢ page 40
¢ page 41
¢ page 41
¢ page 48
¢ page 50
¢ page 43
¢ page 35
¢ page 53
¢ page 53
¢ page 53
¢ page 46
¢ page 51
¢ page 52
¢ page 51
¢ page 52
¢ page 24
¢ page 24
¢ page 37
¢ page 37
25
Making calls
Making calls
Accepting a call
If the backlight is deactivated (¢ page 47)
it is switched on by pressing any key. In
this case the pressed key has no other
function.
The handset indicates an incoming call in
three ways: by ringing, by a display on the
screen and by the flashing talk key c.
Accept the call by:
¤ Pressing the talk key c.
¤ Pressing the speaker key d.
¤ press the display key §Accept§.
Making an external call
External calls are calls using the public telephone network.
~c
Enter the number and press
the talk key.
or:
c~
Press and hold the talk key c
and then enter the number.
You can cancel the dialling operation with
the end call key a.
You are shown the duration of the call
while the call is in progress.
Please note
Dialling with the directory
(¢ page 28), call list (¢ page 32),
redial list (¢ page 32) and automatic
redial (¢ page 32) saves you from
repeatedly keying in phone numbers.
Continuing a call on a Bluetooth headset
Prerequisite: Bluetooth is activated; a
connection has been established between
the Bluetooth headset and the handset
(¢ page 44).
Press the talk key on the headset; it may
take up to 5 seconds to establish a connection to the handset.
You can set the earpiece and microphone
volume during the call using the side keys.
For further details about your headset, see
the accompanying user guide.
Ending a call
a
26
Press the end call key.
If the handset is in the base/charger and
the Auto Answer function is activated
(¢ page 48), the handset automatically
answers the call when you remove it from
the base/charger.
To deactivate the ringtone, press the
§Silence§ display key. You can accept the call
as long as it is displayed on the screen.
Accepting a call on a Bluetooth headset
Prerequisite: Bluetooth is activated; a
connection has been established between
the Bluetooth headset and the handset
(¢ page 44).
Only press the talk key on the headset
when the headset rings; it can take up to
5 seconds.
You can set the earpiece and microphone
volume during the call using the side keys.
For further details about your headset, see
the accompanying user guide.
Calling Line Identification
When you receive a call, the caller's
number is displayed on the screen if the
following conditions are met:
u Your network provider supports CLIP,
CLI.
– CLI (Calling Line Identification): the
caller's number is transmitted.
– CLIP (Calling Line Identification Presentation): the caller's number is displayed.
u You have requested CLIP from your network provider.
network provider.
Call display with CLIP/CLI
If the number of the caller is saved in your
directory, you will see their name, and if
you have assigned a caller picture to that
caller, this will also be displayed.
Ø«Ú
1
2
1234567890
¤ Inform your caller before you use the
speaker function so that the caller
knows a third party may be listening.
Switching between earpiece and speaker
mode
d
Press the speaker key.
During a call , activate or deactivate
speaker mode.
If you wish to place the handset in the
base/charger during a call:
¤ Press and hold the speaker key d
while placing the handset in the base/
charger and for a further 2 seconds.
For instructions on adjusting the speaker
volume (¢ page 48).
Please note
Accept
Silence
1 Ringtone icon
2 Number or name of caller
The following is displayed in place of the
number:
u External, if no number is transmitted.
u Unavailable, if the caller has not
arranged Calling Line Identification.
Please note
The ringtone can be switched off for
unknown calls (calls with Calling Line
Identification withheld) (¢ page 49).
Speaker mode
In speaker mode, instead of holding the
handset to your ear you can put it down,
for example on the table in front of you.
This allows others to participate in the call.
If you have a headset connected, you
can switch between the headset and
speaker mode.
Switching to mute
You can deactivate the microphone in
your handset during an external call.
h
Press key to mute the handset.
The display shows Microphone
is off.
Press the key again to reactivate the microphone.
Please note
u If the telephone is muted, all keys
except the mute key h and the
end-call key a will not work.
u A connected headset will also be
muted.
Activating/deactivating speaker mode
Activating while dialling
~d
Enter the number and press
the speaker key.
27
English
u The caller has requested CLI from the
Deutsch
Making calls
Using the directory and lists
Using the directory and lists
The options are:
u Directory
u Redial list
u Call lists
u List of missed appointments
You can create a personalised directory for
your own handset. You can also send lists/
entries to other handsets (¢ page 30).
Directory
You can save up to 500 entries in the directory.
Please note
To quickly access a number from the
directory (quick dial), you can assign
the number to a key (¢ page 46).
Directory
In the directory, you can save:
u Up to three numbers and associated
first names and surnames
u E-mail addresses
u Anniversaries with reminder
u VIP ringtone with VIP icon
u Caller pictures.
You open the directory in idle status using
the s key.
Length of the entries
3 numbers:
each max. 32 digits
First name and surname:
each max. 16 characters
E-mail address:
max. 64 characters
28
Saving a number in the directory
s ¢ <New Entry>
¤ You can enter data in the following
fields:
First Name:/Surname:
Enter first names and/or surnames.
If you do not enter a name in either of
the fields, the phone number is saved
and displayed in place of a surname.
(For instructions on entering text and
special characters, please see
¢ page 59.)
Phone (Home): / Phone (Office): /
Phone (Mobile):
Enter a number in at least one of the
fields.
When scrolling through the directory,
the entries are highlighted by a prefixed symbol: ä/ k/ l.
E-mail:
Enter the e-mail address.
Anniversary:
Select On or Off.
With setting On:
Enter Annivers. (Date) and Anniversary
(time) and select reminder type:
Anniversary (tone) ¢ page 31.
Caller Picture:
If required, select a picture to be
displayed when this person calls
(see "Resource Directory", page 49).
Prerequisite: Calling Line Identification
(CLIP).
Caller Melody (VIP):
Mark a directory entry as a VIP
(Very Important Person) by assigning
a specific ringtone to it. VIP calls are
recognised by the ringtone.
When scrolling through the directory,
VIP entries are highlighted by the
Æ icon.
Prerequisite: Calling Line Identification
(CLIP).
§Save§
Press the display key.
Managing directory entries
Directory entries are generally sorted
alphabetically by surname. Spaces and
digits take first priority. If only the first
name was entered in the directory, this is
incorporated into the sort order instead of
the surname.
The sort order is as follows:
1. Space
2. Digits (0–9)
3. Letters (alphabetical)
4. Other characters
To get round the alphabetical order of the
entries, insert a space or a digit in front of
the first letter of the surname. These
entries will then move to the beginning of
the directory.
Viewing entries
Select a directory entry
s
Open the directory.
You have the following options:
u Use s to scroll through the entries
until the required name is selected.
u Enter the first letters of the name (max.
8), if necessary scroll to the entry with
the s key.
The directory searches for the surname.
If a surname has not been entered, the
directory searches for the first name.
Select from the directory
s ¢ s (Select entry)
c
Press the talk key.
(If several numbers are
entered, select the required
number by pressing r and
press the talk key c again).
The number is dialled.
s ¢ s (Select entry)
§View§
Press the display key.
The entry is displayed.
§Options§
Press the display key.
The following functions can be selected
with q:
Display Number
To edit or add to a saved number, or to
save it as a new entry, press Ó after
the number is displayed.
Delete Entry
Delete selected entry.
Copy Entry
to Internal: Send a single entry to a
handset (¢ page 30).
vCard via Bluetooth: Send a single entry
in vCard format via Bluetooth.
Editing entries
s ¢ s (Select entry)
§View§ §Edit§ Press display keys one after the
other.
¤ Carry out changes and save.
Using other functions
s ¢ s (Select entry)
¢ §Options§ (Open menu)
The following functions can be selected
with q:
Display Number
Edit or add to a saved number and then
dial with c or save as a new entry; to
do so, press Ó after the number is
displayed.
Edit Entry
Edit selected entry.
Delete Entry
Delete selected entry.
29
English
Order of directory entries
Deutsch
Using the directory and lists
Using the directory and lists
Copy Entry
to Internal: Send a single entry to a
handset (¢ page 30).
vCard via Bluetooth: Send a single entry
in vCard format via Bluetooth.
Delete All
Delete all entries in the directory.
Copy All
to Internal: Send the complete list to a
handset (¢ page 30).
vCard via Bluetooth: Send the complete
list in vCard format via Bluetooth.
Available Memory
Display the number of entries that are
still available in the directory
(¢ page 28).
Using quick dial keys
¤ Press and hold the required quick dial
key (¢ page 46).
Transferring the directory to another
handset
Prerequisites:
u The sending and receiving handsets
must both be registered to the same
base.
u The other handset and the base can
send and receive directory entries.
s ¢ s (Select entry)
¢ §Options§ (Open menu) ¢ Copy Entry /
Copy All ¢ to Internal
s
Select the internal number of
the receiving handset and
press §OK§.
You can transfer several individual entries
one after the other by responding to the
Entry copied - Copy next entry? prompt with
§Yes§.
A successful transfer is confirmed by a
message and confirmation tone on the
receiving handset.
30
Please note:
u Entries with identical numbers are not
overwritten on the receiving handset.
u The transfer is cancelled if the phone
rings or if the memory of the receiving
handset is full.
u Pictures and sounds assigned to entries
are not transferred.
Transferring the directory as a vCard
with Bluetooth
In Bluetooth mode (¢ page 44), you can
transfer directory entries in vCard format,
e.g., to exchange entries with your mobile
phone.
s ¢ s (Select entry) ¢ §Options§
(Open menu) ¢ Copy Entry / Copy All
¢ vCard via Bluetooth
The list of "Known Devices " (¢ page 45)
is displayed.
s
Select device and press §OK§.
Receiving a vCard with Bluetooth
If a device from the "Known Devices " list
(¢ page 45) sends a vCard to your handset, this occurs automatically. You are
informed about it via the display.
If the sending device does not appear in
the list, you will be asked on the display to
enter the device PIN for the sending
device:
~
Enter the PIN for the sending
Bluetooth device and
press §OK§.
The transferred vCard is available as a
directory entry.
You can copy numbers displayed in a list,
e.g., the call list or the redial list, to the
directory.
A number is displayed:
§Options§ ¢ Copy to Directory
¤ Complete the entry (¢ page 28).
Copying a number or e-mail address
from the directory
In some operating situations, you can
open the directory to copy a number or email address, for example. Your handset
need not be in idle status.
¤ Depending on the operating situation,
open the directory with s or Ó.
q
Select entry (¢ page 29).
Please note
A time must be specified for reminder
calls. If you select a visual signal, a time
is not required and is automatically set
to 00.00.
Deactivating anniversaries
s ¢ s (Select entry)
§View§ §Edit§ Press display keys one after the
other.
s
Scroll to the Anniversary line.
v
Select Off.
§Save§
Press the display key.
Reminder call on an anniversary
In idle status, a reminder call is indicated
on the handset display and by the selected
ringtone and volume that has been set for
internal calls (¢ page 48).
ØðÚ
Storing an anniversary in the directory
For each number in the directory, you can
save an anniversary and specify a time at
which a reminder call should be made on
the anniversary (default setting: Anniversary: Off).
s ¢ s (Select entry)
§View§ §Edit§ Press display keys one after the
other.
s
Scroll to the Anniversary line.
v
Select On.
¤ You can enter data in the following
fields:
Annivers. (Date)
Enter day/month/year in 8-digit format.
Anniversary (time)
Enter the hour/minute for the reminder
call in 4-digit format.
Anniversary (tone)
Select the reminder type.
§Save§
Press the display key.
Miller,
Frank
Off
You can:
Press the display key to
acknowledge and end the
reminder call.
During the reminder call, you can permanently change the volume by pressing
the side keys ø (louder) or ÷ (quieter).
When you are on the phone, a reminder
call is indicated on the handset with a single advisory tone.
Anniversaries that are indicated during a
call and are not acknowledged are entered
in the Missed Alarms list (¢ page 34).
§Off§
31
English
Copying the displayed number to the
directory
Deutsch
Using the directory and lists
Using the directory and lists
Redial list
The redial list contains the twenty
numbers last dialled with the handset
(max. 32 digits). If one of the numbers
is in the directory, the corresponding
name is displayed.
Manual redial
c
s
c
Press the key briefly.
Select entry.
Press the talk key again. The
number is dialled.
When a name is displayed, you can display
the corresponding phone number by
pressing the display key §View§.
Managing entries in the redial list
c
s
Press the key briefly.
Select entry.
§Options§
Open menu.
The following functions can be selected
with q:
Copy to Directory
Copy an entry to the directory
(¢ page 28).
Automatic Redial
The selected number is automatically
dialled at fixed intervals (at least every
20 seconds). The speaker key flashes
and "open listening" is activated.
– Party answers:
Press the talk key c. The function
is ended.
– Party does not answer:
The call is terminated after approx.
30 seconds. The function is ended
after pressing any key or after ten
unsuccessful attempts.
Display Number
(as in the directory ¢ page 29)
Delete Entry
(as in the directory ¢ page 29)
32
Delete All
(as in the directory ¢
page 30)
Call lists
Prerequisite: Calling Line Identification
(CLIP ¢ page 26)
Your telephone stores various types of
calls:
u Answered calls
u Outgoing calls
u Missed calls
You can view each type of call separately
or gain an overview of all calls. Each call
record contains the last 20 numbers in its
category.
Open the call lists via the menu:
v¢Ê
List entry
New messages are displayed at the top.
Example of list entries:
All Calls
™ Frank
14.10.09, 15:40
š 089563795
14.10.09, 15:32
™ ...0123727859362922
14.10.09, 15:07
View
Options
u List type (in header)
u Status of entry
Bold: New entry
u Number or name of caller
u Date and time of call (if set ¢ page 14)
u Type of entry:
An advisory tone sounds as soon as a new
message arrives in a list. The f key
flashes (it goes off when the key is
pressed). In idle status, the display shows
an icon for the new message:
Opening lists with the
message key
After pressing the message key f, you
can see all lists containing messages and
the network mailbox list.
Lists containing new messages are at the
top of the list and are marked in a bold
font.
Use the message key f to open the following list selection:
u network mailbox, if your network provider supports this function and fast
access is set for the network mailbox
(¢ page 36).
u List of missed calls
u List of missed alarms (¢ page 34)
Icon
Ã
™
English
– Accepted calls ( › )
– Missed calls ( ™ )
– Outgoing calls ( š )
Press the talk key c to call the selected
caller back.
Press the §View§ display key to access additional information, including for example
the number linked to the name.
Select the §Options§ display key to select the
following options:
Copy to Directory
Copy the number to the directory.
Delete Entry
Delete selected entry.
Delete All
Delete all entries.
When you quit the call lists, all entries are
set to the status "old", i.e., the next time
you call up the list, they will no longer be
shown in bold.
New message...
...on the network mailbox
... in the missed calls list
... in the Missed Alarms list:
The number of new entries is displayed
under the corresponding icon.
Ã
02
œ
10
08
Please note
If calls are saved in the network mailbox, you will receive a message if the
appropriate settings have been made
(see your network provider user
guide).
Messages & Calls
Calls:
(3)
Missed Alarms
(1)
Back
OK
Deutsch
Using the directory and lists
Select a list with q. To open, press §OK§.
33
Making cost-effective calls
List of missed alarms
Missed (unacknowledged) appointments
from the calendar (¢ page 38) and anniversaries (¢ page 31) are saved in the
Missed Alarms list under the following
circumstances:
u You do not accept an appointment/
anniversary.
u The appointment/anniversary was signalled during a phone call.
u The handset is deactivated at the time
of the appointment/anniversary.
u Automatic redial was activated at the
time of an appointment/anniversary
(¢ page 32).
u Open the list by pressing the message
key f (¢ page 33).
Each entry is displayed with:
u Number or name
u Date and time
The most recent entry is at the head of the
list.
Press the display key §Delete§, to delete the
selected entry.
If 10 entries are already stored in the list,
the next appointment reminder will delete
the oldest entry.
Making cost-effective calls
Make phone calls through a network provider who offers particularly low-cost call
rates (call-by-call).
Automatic network provider
code (preselection)
You can store a call-by-call number (preselection number), which is automatically
placed in front of numbers when you dial
them.
In the "With Preselection" list, specify the
access codes or the first digits of the
access codes that you wish to assign to the
preselection number.
In the "No Preselection" list, enter the
exceptions to the "With Preselection" list.
Example:
Preselection No.
With Preselection
08
No Preselection
081
084
All numbers that start with 08, except for
081 and 084, are dialled with the preselection number 0999.
Phone number
07112345678
08912345678
08412345678
34
0999
¢
¢
¢
Dialled number
07112345678
0999 08912345678
08412345678
§Save§
Enter or change the preselection number (call-by-call
number).
Press the display key.
English
~
Deutsch
• Saving preselection numbers
v ¢ Ï ¢ Telephony ¢ Preselection
¢ Preselection No.
Making cost-effective calls
Save or change entries in the
preselection lists
Each of the two lists can contain 20
entries, each with 6 digits.
Numbers may be prefixed according to the
country in the "With Preselection" list.
This means, for example, that all national
calls or calls to the mobile network are
automatically linked to the preselection
number you have saved previously.
v ¢ Ï ¢ Telephony ¢ Preselection
¢ With Preselection / No Preselection
s
Select entry.
~
Enter or edit the first digits of
the number.
§Save§
Press the display key.
Temporarily cancelling preselection
c (press and hold) ¢ §Options§
¢ Preselection off ¢ ~ (dial number)
Permanently deactivating preselection
v ¢ Ï ¢ Telephony ¢ Preselection
¢ Preselection No.
Ñ
Press and hold the display key
until the preselection number
is deleted.
§Save§
Press the display key.
35
Using the network mailbox
Using the network mailbox
Calling the network mailbox
The network mailbox is your network provider's answering machine within the network. You cannot use the network mailbox unless you have requested it from
your network provider.
d
• Configuring fast access for
the network mailbox
With fast access, you can dial the network
mailbox directly.
Fast access is preset for the network mailbox. You only need to enter the number of
the network mailbox.
Configuring fast access for the network
mailbox and entering the network mailbox
number
v ¢ Ì ¢ Network Mailbox
~
Enter the number for the network mailbox.
§Save§
Press the display key.
The setting for fast access applies to all
Gigaset S4 professional handsets.
36
Press and hold. You are connected straight to the network
mailbox.
Press speaker key d if
required. You will hear the network mailbox announcement.
Viewing the network mailbox
message
When a message is recorded, you receive
a call from the network mailbox. If you
have requested Calling Line Identification,
the network mailbox number is displayed.
If you accept the call, the new messages
are played back. If you do not accept the
call, the network mailbox number is saved
in the missed call list and the message key
flashes (¢ page 33).
Please note
Enter the network mailbox phone
number into your directory along with
the designation "Network mailbox";
the display and the call list will then
show this designation.
You are helping to protect the environment with your Gigaset S400 professional.
Status displays
Display icon
Reducing energy consumption
Ð i Ñ Ò
| (flashes)
By using a power-saving adapter plug,
your telephone consumes less power.
Ð green
Reducing radiation
The radiation from your telephone is
reduced automatically:
u The handset's transmission power is
reduced depending on the distance to
the base.
u The transmission power on the base is
reduced to virtually zero when only one
handset is registered and the handset is
placed in the base.
You can reduce the radiation from the
handset and base even more by using Eco
Mode or Eco Mode+.
u Eco Mode
reduces the base's transmission power
by 80% in standby and talk mode.
u Eco Mode+
reduces the base and handset's transmission power by 100% when the
phone is not being used to make or
receive a call.
Eco Mode / Eco Mode+ can be activated/
deactivated independently of one another
and can also be used with multiple handsets. The handset must not be placed in
the base.
Activate/deactivate Eco Mode /Eco Mode+:
v ¢ Ï ¢ Eco Mode
¢ Eco Mode / Eco Mode+
§Change§
Press the display key
(³ = on).
Ð white
¼ white
¼ green
Signal strength:
– good to poor
– no signal
English
ECO DECT
Deutsch
ECO DECT
Eco Mode deactivated
Eco Mode activated
Eco Mode+ activated
(displayed instead of the
reception strength icon
when in idle status)
Eco Mode and Eco
Mode+ activated
Please note
u With Eco Mode+ activated, press
u
u
u
u
and hold the talk key c to check
that the base can be reached. You
will hear the dialling tone if the base
can be reached.
When Eco Mode+ is activated:
– Call setup is delayed by approx.
two seconds.
– Handset standby time is reduced
by approx. 50%.
Registering handsets that do not
support Eco Mode+ will cause the
mode to be deactivated on the base
and all other handsets.
Activating Eco Mode reduces the
range of the base.
Eco Mode / Eco Mode+ and
repeater support (¢ page 51) cancel each other out, i.e., if you use a
repeater, you cannot use Eco Mode
or Eco Mode+.
37
Setting an appointment (calendar)
Setting an appointment
(calendar)
You can use your handset to remind yourself of up to 30 appointments. Anniversaries (¢ page 31) entered in the directory
are automatically recorded in the calendar.
Saving an appointment.
Prerequisite: The date and time have
already been set (¢ page 14).
v ¢ Í ¢ Calendar
Oct 2009
Mo
Tu
We
Th
Fr
Sa
Su
01
02
03
04
05
06
07
08
09
10
11
12
13
14
15
16
17
18
19
20
21
22
23
24
25
26
27
28
29
30
31
Back
Options
u The current day is selected (highlighted
in white).
u Days on which appointments have
already been saved are highlighted in
white.
r/q
Select the required day in the
graphical calendar.
The selected day is highlighted in white.
The current day is no longer highlighted.
w
Press the centre of the control
key.
u If appointments have already been
entered, this will open the list of saved
appointments on that day.
Select <New Entry> ¢ §OK§ to open the
data input window.
u If no appointments have been entered,
the data input window will open immediately to add the new appointment.
38
¤ You can enter data in the following
fields:
Activation:
Select On or Off.
Date:
Enter day/month/year in 8-digit format.
Time:
Enter hours/minutes in 4-digit format.
Text:
Enter text (max. of 16 characters). The
text appears as the appointment name
in the list and is displayed on the screen
during the appointment reminder. If
you do not enter any text, only the date
and time of the appointment are displayed.
Signal:
Select the reminder type.
§Save§
Press the display key.
Please note
If you have already saved thirty
appointments, you will have to first
delete an existing appointment before
adding a new one.
Signalling appointments and
anniversaries
An appointment reminder is signalled in
idle status for 60 seconds with the
selected ringtone at the volume that has
been set for internal calls (¢ page 48).
During the reminder call, you can permanently change the volume by pressing
the side keys ø (louder) or ÷ (quieter).
The name is displayed for anniversaries,
while the entered text is displayed for
appointments along with the date and
time.
Meeting
03.11.09 15:38
Off
You can either deactivate or answer an
appointment reminder:
§§Off§§
Press the display key to deactivate the appointment
reminder.
Please note
During a call, the appointment
reminder is signalled by a short tone.
Managing appointments
v ¢ Í ¢ Calendar
Editing individual appointments
r/q
Select a day in the graphical
calendar and press the control
key w. (Days on which
appointments have already
been saved are highlighted in
white in the calendar).
q
Select appointment for the
day.
You have the following options:
§§View§§
Press the display key and edit
or confirm the entry.
or
§Options§
Open the menu for editing,
deleting and activating/deactivating.
Displaying missed
appointments, anniversaries
Missed appointments/anniversaries
(¢ page 31) are displayed in the Missed
Alarms list if:
u You do not accept an appointment/
anniversary.
u The appointment/anniversary was signalled during a phone call.
u The handset is deactivated at the time
of the appointment/anniversary.
u Automatic redial was activated at the
time of an appointment/anniversary
(¢ page 32).
The icon n and the number of new
entries are shown in the display. The most
recent entry is at the head of the list.
Open the list by pressing the message key
f (¢ page 33) or via the menu:
v ¢ Í ¢ Missed Alarms
Select appointment/anniversary.
Information about the
appointment/anniversary is
displayed. A missed appointment is displayed with the
appointment name and a
missed anniversary is displayed with the last name and
first name. The date and time
will also be given.
§Delete§
Delete appointment.
If 10 entries are already stored in the list,
the next appointment reminder will delete
the oldest entry.
Deleting all appointments
§Options
¢ Delete all ¢ §OK§
Confirm the security prompt with §Yes§.
All appointments are deleted.
39
English
ØáÚ
Deutsch
Setting an appointment (calendar)
Setting the alarm clock
Setting the alarm clock
or
§Snooze§
Prerequisite: The date and time have
already been set (¢ page 14).
Activating/deactivating and setting the
alarm clock
v ¢ á ¢ Alarm Clock
¤ You can enter data in the following
fields:
Activation:
Select On or Off.
Time:
Enter the wake-up time in 4-digit format.
How often:
Select Daily or Monday-Friday.
Volume:
Set the volume (1–6).
Melody:
Select melody.
§Save§
Press the display key.
In idle status, the ¼ icon and wake-up
time are displayed.
A wake-up call is signalled on the display
and with the selected ringtone
(¢ page 3). The wake-up call sounds for
60 seconds. If no key is pressed, the wakeup call is repeated twice at five minute
intervals and then switched off.
While the wake-up call sounds, you can
permanently change the volume by pressing the side keys ø (louder) or ÷ (quieter).
During a call, the wake-up call is only signalled by a short tone.
Deactivating the wake-up call/
repeating after a pause (snooze mode)
Prerequisite: A wake-up call is sounding.
§OFF§
Press the display key. The
wake-up call is deactivated.
40
Press the display key or any
key. The wake-up call is deactivated and then repeated after
5 minutes. After the second
repetition the wake-up call is
deactivated completely.
Using multiple handsets
Registering handsets
You can register up to six handsets to your
base.
A Gigaset S4 professional handset can be
registered on up to four bases.
Manually registering a
Gigaset S4 professional an
Gigaset S400 professional
You must activate manual registration of
the handset on both the handset and the
base.
When the registration process has completed successfully, the handset returns to
idle status. The handset's internal number
is shown in the display e.g., INT 1. If not,
repeat the procedure.
On the handset
The handset is not registered to a base.
§Register§
Press the display key.
The handset is already registered to a
base:
v ¢ Ï ¢ Registration
¢ Register Handset
If the handset is already registered to four
bases:
s
~
Select base, e.g., Base 3 and
press §OK§.
If required, enter the system
PIN for the base and press §OK§.
On the base
Within 60 seconds press and hold the registration/paging key on the base
(¢ page 2) (approx. 3 seconds).
Registering other handsets
You can register other Gigaset handsets
and handsets for other devices with GAP
functionality as follows.
On the handset
¤ Start to register the handset as
described in its user guide.
On the base
Press and hold the registration/paging key
on the base (¢ page 2) (approx. 3 sec.).
De-registering handsets
You can de-register any other registered
handset from any registered
Gigaset S4 professional handset.
v ¢ Ï ¢ Registration
¢ De-reg. Handset
s
Select the internal subscriber
you wish to de-register and
press §OK§.
(The handset you are currently
using is highlighted with <).
~
Enter the current system PIN
and press §Save§.
§Yes§
Press the display key.
Locating a handset ("Paging")
You can locate your handset using the
base.
¤ Briefly press the registration/paging
key on the base (¢ page 2).
¤ All handsets will ring simultaneously
("paging"), even if the ringtones are
deactivated.
Ending paging
¤ Briefly press the registration/paging
key on the base or press the talk key c
on the handset.
Changing the base
If your handset is registered to more than
one base, you can set it to a particular
base or to the base that has the best
reception (Best Base).
v ¢ Ï ¢ Registration ¢ Select Base
s
Select one of the registered
bases or Best Base and press
§Select§.
Making internal calls
Internal calls to other handsets registered
on the same base are free.
Calling a specific handset
u
~
or:
u
s
c
Initiate internal call.
Enter the number of the handset.
Initiate internal call.
Select handset.
Press the talk key.
Calling all handsets ("group call")
u
or:
u
*
Press and hold.
Initiate internal call.
Press the star key.
or
Call All
Select
c
Press the talk key.
All handsets are called.
Ending a call
a
Press the end call key.
41
English
A message appears stating that the handset is searching for a base that is ready for
registration.
Deutsch
Using multiple handsets
Using multiple handsets
Transferring a call to another handset
You can transfer an external call to
another handset (connect).
u
Open the list of handsets.
The external participant hears
music on hold, if activated
(¢ page 51).
s
Select a handset or Call All and
press §OK§.
When the internal participant answers:
¤ If necessary, announce the external
call.
a
Press the end call key.
The external call is transferred to the other
handset.
If the internal participant does not answer
or the line is busy, press the display key
§End§ to return to the external call.
When transferring a call, you can also
press the end call key a before the internal participant answers.
Then, if the internal participant does not
answer or the line is busy, the call will
automatically return to you.
Internal consultation/conference calls
When you are conducting an external
call, you can call an internal participant at
the same time for consultation or hold a
conference call between all 3 participants.
You are conducting an external call:
u
Open the list of handsets.
The external participant hears
music on hold, if activated
(¢ page 51).
s
Select handset and press §OK§.
The internal participant is
called.
42
If the participant picks up, you can either:
§End§
Press the display key.
You are reconnected with the
external participant.
or:
§Conference§ Press the display key.
All 3 participants are connected with each other.
Please note
u If only two handsets are registered,
the other handset is called immediately by pressing the u key.
u Pressing and holding the u key
calls all handsets immediately.
Ending a conference call
a
Press the end call key.
If an internal participant presses the end
call key a, the other handset remains
connected to the external participant.
Accepting/rejecting call waiting
If you receive an external call during an
internal call, you will hear the call waiting
tone (short tone). With Calling Line Identification, the caller's number will appear in
the display.
Ending an internal call, accepting an
external call
Press the display key.
The internal call is ended. You are connected to the external caller.
§Accept§
Rejecting the external call
§Reject§
Press the display key.
The call waiting tone is turned off. You
remain connected to the internal participant. The ringtone can still be heard on
other registered handsets.
Changing the name of a handset
Prerequisite: The Listening In function
must be activated.
You are conducting an external call. An
internal participant can listen in on this
call and take part in the conversation. All
the participants are made aware of additional listeners by a signal tone.
The names "INT 1", "INT 2" etc. are
assigned automatically on registration.
You can change these names. The name
must be no more than 10 characters. The
changed name is displayed in every handset's list.
u
Open the list of handsets. Your
own handset is indicated by f.
• Activating/deactivating
listening in
v ¢ Ï ¢ Telephony ¢ Listening In
Press §Change§ to activate/deactivate the
function (³ = on).
Internal listening in
The line is engaged with an external call.
Your screen will display information to
that effect. To listen in to the external call.
c
Press and hold the talk key.
You can listen in to the call. All participants
hear a signal tone. During this time, this
handset displays the Conference message
and it is not possible to dial another
number from this handset.
Ending listening in
a
Press the end call key.
All participants hear a signal tone.
If the first internal participant presses the
end call key a, the handset that has "listened in" remains connected to the external participant.
s
§Options§
Rename
~
§Save§
Select handset.
Open menu.
Enter name.
Press the display key.
Changing a handset's internal
number
A handset is automatically assigned the
lowest free number when it is registered.
If all slots are occupied, number 6 is overwritten if this handset is in idle status. You
can change the internal number of all registered handsets (1–6).
u
Open the list of handsets. Your
own handset is indicated by f.
§Options§
Open menu.
Assign Handset No.
Select and press §OK§.
r
Select number. Only numbers
that have not been assigned
are displayed.
§Save§
Press the display key to save
the input.
43
English
Listening in to an external call
Deutsch
Using multiple handsets
Using Bluetooth devices
Using Bluetooth devices
Your handset Gigaset S400 professional
can communicate wirelessly via Bluetooth™ with other devices using this technology.
Before you can use your Bluetooth
devices, you must first activate Bluetooth
and then register the devices to the
handset.
You can register 1 Bluetooth headset to
the handset. You can also register up to
5 data devices (PC, PDA) to send and
receive directory entries as vCards or
exchange data with the computer
(¢ page 60).
To use the phone numbers, dialling codes
(country and area code) must be stored in
the directory (¢ page 50).
You will find a description of how to operate your Bluetooth devices in the user
guides for these devices.
Please note
u You can operate headsets on your
handset that have the headset or
handsfree profile. If both profiles
are available, the handsfree profile
is used to communicate.
u It can take up to 5 seconds to establish a connection between your
handset and a Bluetooth headset.
This applies both when a call is
accepted using the headset or
transferred to the headset, and
when a number is dialled from the
headset.
Activating/deactivating Bluetooth
mode
v ¢ ò ¢ Activation
Press §Change§ to activate or deactivate Bluetooth mode (³ = activated).
In idle status, the ò icon on the handset
shows that Bluetooth mode is activated
(¢ page 3).
44
Registering Bluetooth devices
The distance between the handset in Bluetooth mode and the activated Bluetooth
device (headset or data device) should be
no more than 10 m.
Please note
u If you register a headset, any head-
set that is already registered is overwritten.
u If you would like to use a headset
with your handset that is already
registered to another device (e.g.,
to a mobile phone), please deactivate this connection before you
start the registration process.
v ¢ ò ¢ Search for Headset /
Search Data Device
The search can take up to 30 seconds.
Once the device has been found, its name
is shown on the display.
§Options§
Press the display key.
Trust Device
Select and press §OK§.
~
Enter the PIN for the Bluetooth
device you want to register
and press §OK§.
The device is saved in the list of known
devices.
Cancelling/repeating current search
To cancel search:
§Cancel§
Press the display key.
Repeat search if necessary:
§Options§
Press the display key.
Repeat Search
Select and press §OK§.
Rejecting/accepting an unregistered
Bluetooth device
Open list
If a Bluetooth device that is not registered
in the list of known devices tries to connect with the handset, you will be
prompted on the display to enter the PIN
for the Bluetooth device (bonding).
u Reject
a
Briefly press the end call key.
u Accept
~
Enter the PIN for the Bluetooth
device you want to accept
and press §OK§.
If you have accepted the device, you
can use it temporarily (i.e., as long as it
is within receiving range or until you
deactivate the handset) or save it to the
list of known devices.
Once the PIN has been confirmed, save
to the list of known devices:
– §Yes§ Press the display key.
– §No§ Press the display key:
Use temporarily.
v ¢ ò ¢ Known Devices
A corresponding icon appears next to each
device name in the list displayed:
Icon
ô
õ
Meaning
Bluetooth headset
Bluetooth data device
If a device is connected, the corresponding icon is shown in the header of the display instead of ò.
Viewing entries
Open list ¢ s (select entry)
§Options§
Press the display key.
View Entry Select and press §OK§.
Device name and address are
displayed.
Go back with §OK§.
Deregistering Bluetooth devices
Open list ¢ s (select entry)
§Options§
Press the display key.
Delete Entry Select and press §OK§.
Please note
If you deregister an activated Bluetooth device, it may try to reconnect as
an "unregistered device".
Changing the name of a Bluetooth device
Changing the Bluetooth name of the
handset
You can change the handset name used to
identify it on the display of another Bluetooth device.
v ¢ ò ¢ Own Device
§Change§
Press the display key.
~
Change the name.
§Save§
Press the display key.
Open list ¢ s (select entry)
§Options§
Press the display key.
Edit Name Select and press §OK§.
~
Change the name.
§Save§
Press the display key
45
English
Editing the list of known (trusted)
devices
Deutsch
Using Bluetooth devices
Handset settings
Handset settings
Your handset is preconfigured, but you
can change the settings to suit your individual requirements.
Please note
If you delete or edit the entry in the
directory at a later date, this will not
affect the assignment to the number
key.
Handset PIN
Selecting numbers/changing an
assignment
Your handset is protected against unauthorised access with a PIN (default setting:
0000). Each time you switch it on you are
asked for the PIN. You can change the PIN:
v ¢ Ï ¢ System ¢ Handset PIN
~
Enter current handset PIN and
press §OK§.
~
Enter new handset PIN and
press §OK§.
The handset PIN is changed.
Prerequisite: The digit key already has a
number assigned to it.
When the handset is in idle status
¤ Press and hold the digit key:
The number is dialled immediately.
or
¤ Briefly press the digit key.
Press the display key with the number/
name (abbreviated if necessary) to
select the number or
press the display key §Change§ to change
the assignment or to delete the assignment.
Quick access to numbers and
functions
You can assign a number from the directory to each of the digit keys Q and
2 to O.
The left and right display keys have a
default function. You can change the
assignment (¢ page 46).
The number is then dialled or the function
started by simply pressing a key.
Assigning digit keys
Prerequisite: You have not yet assigned a
number to the digit key.
¤ Press and hold the digit key
or
Press the digit key briefly and press the
display key §QuickDial§.
The directory opens.
¤ Select an entry and press §OK§.
The entry is saved to the corresponding
digit key.
46
Changing display key assignments
¤ Press and hold the left or right side of
the display key.
The list of possible key assignments is
opened. The following can be selected:
Alarm Clock
Assign menu for setting and activating
the alarm clock to a key (¢ page 40).
Calendar
Display graphical calendar
(¢ page 38).
Bluetooth
Assign the Bluetooth menu to a key
(¢ page 44).
Redial
Display the redial list.
More Functions...
More features are available:
Call Lists
Display call lists (¢ page 32).
INT
Internal calls (¢ page 41).
¤ Select an entry and press §OK§.
You can view the display texts in different
languages.
v ¢ Ï ¢ Language
The current language is indicated by a Ø.
s
Select language and
press §Select§.
If you accidentally choose a language you
do not understand:
v
s
¢Ï¢
s¢ s¢ s
Press keys in sequence and
confirm by selecting §OK§.
Select the correct language
and press the right display
key.
Setting the display
Setting the screensaver
You can set a picture from the Resource
Directory (¢ page 49) or the time to be
displayed as a screensaver when the handset is in idle status. This will replace the
idle status display. It may conceal the calendar, date, time and name.
The screensaver is not displayed in certain
situations, e.g., during a call or if the
handset is de-registered.
If a screensaver is activated, the Screensaver menu option is marked with μ.
v ¢ Ï ¢ Display ¢ Screensaver
The current setting is displayed.
¤ You can enter data in the following
fields:
Activation:
Select On (screensaver is displayed) or
Off (no screensaver).
Selection :
Select screensaver or
§View§
Press the display key. The
active screensaver is displayed.
s
Select screensaver and press
§OK§.
Press the display key.
If the screensaver conceals the display,
briefly press a to show the idle display.
§Save§
Setting large font
You can increase the font size of print and
symbols in call lists and in the directory to
improve readability. Only one entry is
shown at a time on the display instead of
several entries and names are abbreviated
if necessary.
v ¢ Ï ¢ Display ¢ Large Font
§Change§
Press display key (³= on).
Setting the colour scheme
You can set the display to be shown in various colour combinations.
v ¢ Ï ¢ Display ¢ Colour Schemes
Select Colour Scheme (1 to 5) and press
§OK§.
•
Setting the display Backlight
Depending on whether or not the handset
is in the base/charger, you can activate or
deactivate the backlight. If it is activated,
the display is permanently dimmed. If the
backlight is deactivated it is switched on by
pressing any key. In this case the pressed
key has no other function.
v ¢ Ï ¢ Display ¢ Backlight
The current setting is displayed.
¤ You can enter data in the following
fields:
In Charger
Select On or Off.
Out of Charger
Select On or Off.
Please note
With the On setting, the standby
time of the handset can be significantly reduced.
47
English
Changing the display language
Deutsch
Handset settings
Handset settings
Press the display key.
§Save§
• Activating/deactivating auto
answer
If you activate this function, when you
receive a call you can simply lift the handset out of the base/charger without having
to press the talk key c.
v ¢ Ï ¢ Telephony ¢ Auto Answer
§Change§
Press display key (³= on).
Changing the speaker/earpiece
volume
You can set the loudspeaker volume for
speaker mode and the earpiece volume to
five different levels.
During a conversation via the earpiece or
in speaker mode:
ø/ ÷
Press the side key to call up the
Handset Volume menu.
Change the volume by pressing ø (louder) or ÷ (quieter).
or
t
Press the control key to call up
the Handset Volume menu.
Set the earpiece or speaker
volume by pressing r.
The setting will automatically be saved
after approximately 3 seconds, if not then
press the display key §Save§.
If t is assigned to another function:
§Options§
Open menu.
Volume
Select and press §OK§.
Configure setting (see above).
Please note
u The settings for the earpiece also
apply to a connected headset.
u You can also set the call volume
using the menu (¢ page 25).
48
Changing ringtones
u Volume:
You can choose between five volumes
(1–5; e.g., volume 3 = Š) and the
"crescendo" ringtone (6; volume
increases with each ring = ‡).
u Ringtones:
You can select a ringtone from a list of
pre-loaded melodies.
You can select various ringtones, melodies or any sound from the Resource
Directory (¢ page 49).
You can set different ringtones for the following functions:
u Int. Calls
u Extern. Calls
Setting volume/melodies
In idle status:
v ¢ Ï ¢ Audio Settings
¢ Ringtones(Handset) ¢ Volume/Melodies
r
Setting volume/melodies for
internal calls and anniversaries.
s
Scroll to the next line.
r
Setting volumes/melodies for
external calls.
§Save§
Press the display key to save
the setting.
While the phone is ringing, you can permanently change the volume by pressing
the side keys ø (louder) or ÷ (quieter).
•
Additionally for external calls:
You can specify a time period when you do
not want the telephone to ring, e.g., during the night.
v ¢ Ï ¢ Audio Settings
¢ Ringtones(Handset) ¢ Time Control
Time Control:
Select On or Off.
Suspend ring. until:
Enter the end of the period in 4-digit
format.
Please note
During this period, you will continue to
receive calls from numbers to which
you have assigned a personalised melody in the directory (VIP).
Activating/deactivating the ringtone
for unknown calls.
You can set your phone not to ring for calls
where Calling Line Identification has been
withheld. The call will only be signalled on
the display.
In idle status:
v ¢ Ï ¢ Audio Settings
¢ Ringtones(Handset) ¢ Anon. Calls Silent
Press §Change§ to activate or deactivate the
function (³= on).
Activating/deactivating the alert tone
In place of the ringtone, you can activate
an alert tone. When you receive a call, you
will hear a short tone ("Beep") instead of
the ringtone.
*
Press and hold the star key
and within 3 seconds:
§Beep§
Press the display key. A call will
now be signalled by one short
alert tone.
ñ appears in the display.
Resource Directory
The resource directory on the handset
manages sounds, which you can use as
ringtones, and pictures, which you can
use as caller pictures or as screensavers.
Prerequisite: Calling Line Identification
(CLIP). The resource directory can manage
the following media types:
Type
Format
Sound
Ringtones
Internal
Monophonic
Internal
Activating/deactivating the ringtone
Polyphonic
Internal
You can deactivate the ringtone on your
handset before you answer a call or when
the handset is in idle status; the ringtone
can be deactivated permanently or just for
the current call. The ringtone cannot be
re-activated while an external call is in
progress.
Imported sounds
WMA, MP3, WAV
Picture
– Caller picture
– Screensaver
BMP, JPG, GIF
128 x 86 pixels
128 x 160 pixels
Deactivating the ringtone permanently
*
Press and hold the star key.
The ó icon appears in the display.
Reactivating the ringtone
*
Press and hold the star key.
Various mono and polyphonic sounds and
pictures are preconfigured on your handset.
You can listen to the available sounds and
view the pictures.
You can download pictures and sounds
from a PC (¢ page 60). If there is not
enough memory available, you must first
delete one or more pictures or sounds.
Deactivating the ringtone for the current
call
§Silence§
Press the display key.
49
English
If the time control is activated:
Suspend ring. from:
Enter the start of the period in 4-digit
format.
Deutsch
Handset settings
Handset settings
Playing back sounds/viewing caller
pictures
v ¢ · ¢ Resource Directory
¢ Screensavers / Caller Pictures /
Sounds (select entry)
Pictures:
Press the display key. The
selected picture is displayed.
Switch between pictures using
the q key.
If you have saved a picture in an invalid file
format, you will see an error message
after selecting the entry.
§View§
Sounds:
The selected sound is played back immediately. Switch between the sounds using
the q key.
You can set the volume during playback.
§Options§
Open menu.
Volume
Select and press §OK§.
r
Set volume.
§Save§
Press the display key.
Deleting/renaming a picture/sound
You have selected an entry.
§Options§
Open menu.
If a picture/sound cannot be deleted (¯),
these options are not available. You can
select the following functions:
Delete Entry
The selected entry is deleted.
Rename
Change the name (max. 16 characters)
and press §Save§. The entry is stored with
the new name.
Checking the memory
You can check how much memory is available for screensavers and caller pictures.
v ¢ · ¢ Capacity
50
• Activating/deactivating
advisory tones
Your handset uses advisory tones to tell
you about different activities and statuses.
The following advisory tones can be activated/deactivated independently of each
other:
u Key tone: every key press is confirmed.
u Acknowledge tones:
– Confirmation tone (ascending tone
sequence): at the end of an entry/
setting and when a new entry
arrives in or call list
– Error tone (descending tone
sequence): when you make an
incorrect entry
– Menu end tone: when scrolling to
the end of a menu
u Battery low beep: the battery needs
charging.
In idle status:
v ¢ Ï ¢ Audio Settings
¢ Advisory Tones
¤ You can enter data in the following
fields:
Key Tones:
Select On or Off.
Confirmation:
Select On or Off.
Battery:
Select On or Off.
§Save§
Press the display key.
• Setting your own area code
To transfer phone numbers (e.g., in
vCards), it is essential that your area code
(international and local area code) is
saved on the phone.
Some of these numbers are already preset.
v ¢ Ï ¢ Telephony ¢ Area Codes
Check that the (pre)set area code is correct.
Setting the base
q
r
Ñ
The base settings are carried out using
a registered Gigaset S4 professional
handset.
fields:
Select/change input field.
Navigate in the input field.
If necessary, delete number:
press the display key.
Enter number.
Press the display key.
~
§Save§
Area Codes
International code:
00 - 49
music on hold
• Repeater support
Local area code:
Û
• Activating/deactivating
v ¢ Ï ¢ Audio Settings
¢ Music on hold
Press §Change§ to activate or deactivate the
music on hold (³ = on).
Example:
0-[
English
¤ You can enter data in the following
Deutsch
Setting the base
]
Save
• Restoring the handset
default settings
You can reset individual settings and
changes that you have made.
The following settings are not affected by
a reset:
u Registration to the base
u Date and time
u Entries in the calendar
u Entries in the directory, the call lists and
the content of the resource directory
v ¢ Ï ¢ System ¢ Handset Reset
§Yes§
Press the display key.
With a repeater, you can increase the
range and signal strength of your base.
You will need to activate repeater mode.
This will terminate any calls that are in
progress at the time.
Prerequisite: A repeater is registered.
v ¢ Ï ¢ System ¢ Repeater Mode
Press §Change§ to activate or deactivate
repeater mode (³= on).
Please note
u Eco Mode / Eco Mode+
(¢ page 37) and repeater support
cancel each other out, i.e., if you
use a repeater, you cannot use Eco
Mode or Eco Mode+.
u Encrypted transmission activated at
the factory is deactivated when a
repeater is registered.
51
Setting the base
• Protecting against
• Resetting the base to the
unauthorised access
factory settings
Protect the system settings of the base
with a PIN known only to yourself. The system PIN must be entered when, for example, registering/de-registering a handset
to/from the base or when restoring the
default settings.
When the settings are restored:
u Date and time are retained
u Handsets are still registered
u Eco Mode is activated and Eco Mode+
is deactivated,
u The system PIN is not reset.
Changing the system PIN
You can change the 4-digit system PIN set
on the base (default setting: 0000) to a 4digit PIN known only by you.
v ¢ Ï ¢ System ¢ System PIN
~
Enter the current system PIN
and press §OK§.
~
Enter your new system PIN
and press §OK§.
Resetting the system PIN
If you have forgotten your system PIN, you
can reset the base to the original code
0000:
Disconnect the power cable from the
base. Hold down the registration/paging
key on the base while reconnecting the
power cable to the base. Hold down the
key for at least 5 seconds.
The base has now been reset and the system PIN set to 0000.
Please note
All handsets are de-registered and
must be re-registered. All settings are
reset to the factory settings.
52
v ¢ Ï ¢ System ¢ Base Reset
~
Enter the system PIN and
press §OK§.
§Yes§
Press the display key.
Connecting the base to the PABX
The following settings are only necessary
if your PABX requires them; see the PABX
user guide.
• Dialling modes and recall
The current setting is indicated by Ø.
Changing the dialling mode
The following dialling modes can be
selected:
u Tone dialling (DTMF)
u Pulse dialling (PD)
v ¢ Ï ¢ Telephony ¢ Dialling Mode
s
Select dialling mode and press
§Select§ (Ø = selected).
Deutsch
• Saving an access code
(outside line code)
Prerequisite: You may have to enter an
access code in front of the number for
external calls in your PABX, e.g., "0".
v ¢ Ï ¢ Telephony ¢ Access Code
~
Enter or change access code,
max. 3 digits.
§Save§
Press the display key.
If an access code has been saved:
u The access code is prefixed automatically when you dial a number from the
, call lists or .
u The access code must be entered when
dialling manually and when manually
entering directory, emergency/quick
dial numbers .
u An existing access code is deleted
using Ñ.
Setting recall
Your phone is preset at the factory for
operation on the main connection. For
operation on a PABX, you may have to
change this value. Please refer to the user
guide for your PABX.
v ¢ Ï ¢ Telephony ¢ Recall
s
Select recall and press §Select§
(Ø = set value).
Possible values are:
80 ms, 100 ms, 120 ms,
180 ms, 250 ms, 300 ms,
400 ms, 600 ms, 800 ms.
53
English
Connecting the base to the
PABX
Connecting the base to the PABX
Setting pauses
Changing the pause after line seizure
You can change the length of the pause
that is inserted between pressing the talk
key c and sending the number.
v
Open the main menu.
*#Q5#
L
Press keys.
~
Enter number for the length of
the pause (1 = 1 sec.;
2 = 3 secs.; 3 = 7 secs.) and
press §OK§.
Change pause after recall key
You can change the length of the pause if
your PABX requires this (refer to the user
guide for your PABX).
v
Open the main menu.
*#Q5#
2
Press keys.
~
Enter a number for the length
of the pause (1 = 800 ms;
2 = 1600 ms; 3 = 3200 ms)
and press §OK§.
Changing a dialling pause (pause after
access code)
Prerequisite: You have saved an access
code (¢ page 53).
v
Open the main menu.
*#Q5#
Press keys.
~
Enter number for the length of
the pause (1 = 1 sec.;
2 = 2 secs.; 3 = 3 secs.;
4 = 6 secs.) and press §OK§.
To insert a dialling pause: press and hold
S for 2 seconds. A P appears in the display.
54
Switching temporarily to tone
dialling (DTMF)
If your PABX still operates with pulse dialling (PD), but you need tone dialling for a
connection (e.g., to listen to the network
mailbox), you must switch to tone dialling
for the call.
Prerequisite: You are conducting a call or
have already dialled an external number.
*
Press the star key.
After the call ends, pulse dialling is automatically activated again.
Please note
Please address any questions about the
phone line to your network provider.
Deutsch
Please contact the system support service
in the event of faults.
Your specialist dealer will be able to help
you with any questions about operating
your device.
No Base flashes on the display.
1. The handset is outside the range of the
base.
Move the handset closer to the base.
¥
2. The base's range is reduced because
Eco Mode is activated.
Deactivate Eco Mode (
page 37) or
reduce the distance between the handset and the base.
¥
¢
3. The base is not switched on.
Check the base power adapter
(
page 9).
¥
¢
Please register handset flashes on the display.
Please have your proof of purchase ready
when calling.
Replacement or repair services are not
offered in countries where our product is
not sold by authorised dealers.
Questions and answers
The table below contains a list of common
problems and possible solutions.
Registration or connection problems with
a Bluetooth headset.
¥
¥
Reset the Bluetooth headset (see the user
guide for your headset).
Delete registration data from the handset
when deregistering the device
(
page 45).
Repeat the registration process
(
page 44).
¢
¥
¢
The display is blank.
1. The handset is not switched on.
Press and hold the end call key a.
¥
2. The battery is empty.
Charge the battery or replace it
(
page 11).
¥
¢
Not all menu items are displayed.
The menu display is restricted (standard
mode).
Activate extended menu display
(expert mode) (
page 24).
¥
¢
Handset has not been registered with the base
or has been deregistered.
Register the handset (
page 40).
¥
Handset does not ring.
¢
1. The ringtone is deactivated.
Activate the ringtone (
page 49).
¥
¢
2. The phone only rings if the phone number
has been transferred.
Switch on the ringtone for unknown
calls (
page 49).
¥
¢
You cannot hear a ringtone/dialling tone
from the fixed line network.
The phone cord supplied has not been used or
has been replaced by a new cord with the
wrong pin connections.
Please always use the phone cord supplied
or ensure that the pin connections are correct when purchasing from a retailer
(
page 9).
¥
¢
Error tone sounds after system PIN prompt.
You have entered the wrong system PIN.
Reset the system PIN to 0000 (
page 52).
¥
¢
Forgotten the system PIN.
¥
Reset the system PIN to 0000 (
¢ page 52).
The other party cannot hear you.
You have pressed the mute button h. The
handset is "muted".
Reactivate the microphone (
page 27).
¥
¢
The number of the caller is not displayed
despite CLIP.
Calling Line Identification is not enabled.
The caller should ask the network provider
to enable Calling Line Identification (CLI).
¥
55
English
System support
Protecting our environment
You hear an error tone when keying an
input (a descending tone sequence).
Action has failed/invalid input.
Repeat the operation.
Watch the display and refer to the user
guide if necessary.
¥
You cannot listen to messages on the network mailbox.
Your PABX is set for pulse dialling.
Set your PABX to tone dialling.
¥
Exclusion of liability
Some displays may contain pixels
(picture elements), which remain activated or deactivated. As a pixel is made
up of three sub-pixels (red, green,
blue), it is possible that pixel colours
may vary.
This is completely normal and does not
indicate an error.
Authorisation
This device is intended for analogue
phone lines in your network.
Country-specific requirements have been
taken into consideration.
We declare that this device meets the
essential requirements and other
relevant regulations laid down in
Directive 1999/5/EC.
Bluetooth ò Qualified Design Identity
The Bluetooth QD ID for your Gigaset S400
professional is B015360.
56
Protecting our environment
Our environmental mission statement
We bear social responsibility and are
actively committed to a better world. Our
ideas, technologies and actions serve people, society and the environment. The aim
of our global activity is to secure sustainable life resources for humanity. We are
committed to a responsibility for our products that comprises their entire life cycle.
The environmental impact of products,
including their manufacture, procurement, distribution, use, service and disposal, are already evaluated during product and process design.
Environmental management system
Unify GmbH & Co. KG is certified pursuant to the international standards EN 14001 and
ISO 9001.
Ecological energy consumption
The use of ECO DECT (¢ page 37) saves
energy and makes an active contribution
towards protecting the environment.
Batteries should not be disposed of in general household waste. Observe the local
waste disposal regulations, details of
which can be obtained from your local
authority.
All electrical and electronic equipment
must be disposed of separately from general household waste using the sites designated by local authorities.
If a product displays this
symbol of a crossed-out
rubbish bin, the product is
subject to European Directive 2002/96/EC.
The appropriate disposal
and separate collection of
used equipment serve to prevent potential
harm to the environment and to health.
They are a prerequisite for the re-use and
recycling of used electrical and electronic
equipment.
For further information on disposing of
your used equipment, please contact your
local authority or your refuse collection
service.
Appendix
Caring for your telephone
¤ Wipe the base, charger and handset
with a damp cloth (do not use solvent)
or an antistatic cloth.
Never use a dry cloth as this can cause
static.
Contact with liquid
!
If the handset should come into contact
with liquid:
1. Switch the handset off and remove
the battery immediately.
2. Allow the liquid to drain from the handset.
3. Pat all parts dry, then place the handset
with the battery compartment open
and the keypad facing down in a dry,
warm place for at least 72 hours (not
in a microwave, oven etc.).
4. Do not switch on the handset again
until it is completely dry.
When it has fully dried out, you will usually be able to use it again.
57
English
Disposal
Deutsch
Appendix
Appendix
Specifications
Base power consumption
Batteries
In standby mode:
approx. 1.1 watt
During the conversation:
approx. 1.0 watt
Technology:
Nickel-metal-hydride (NiMH)
Size:
AAA (Micro, HR03)
Voltage: 1.2 V
Capacity: 550 - 1000 mAh
The device is supplied with two approved
batteries.
Handset operating times/charging
times
Capacity (mAh) approx.
550
700
800
1000
140/
50
165/
58
185/
67
230/
83
Talktime (hours)
11
12
14
17
Operating time for
1.5 hrs of calls per
day (hours)**
85
95
110
135
Charging time in
base (hours)
7.5
8.5
10
12
Charging time in
charger (hours)
6.5
7.5
8.5
10.5
* with/without display backlight
** without display backlight
(Setting the display Backlight
page 47)
¢
58
DECT standard
Is supported
GAP standard
Is supported
No. of channels
60 duplex channels
Radio frequency range 1880–1900 MHz
This Gigaset can charge batteries up to a
capacity of 1000 mAh. The use of special
high-performance batteries or batteries
with high capacities is not recommended
for cordless phones.
The operating time of your Gigaset
depends on the capacity and age of the
batteries and the way they are used.
(All times are maximum possible times).
Standby time
(hours)*
General specifications
Duplex method
Time multiplex,
10 ms frame length
Channel grid
1728 kHz
Bit rate
1152 kbit/s
Modulation
GFSK
Language code
32 kbit/s
Transmission power
10 mW, average power
per channel
Range
Up to 300 m outdoors,
up to 50 m indoors
Base power supply
230 V ~/50 Hz
Environmental condi- +5°C to +45°C, 20% to
tions in operation
75% relative humidity
Dialling mode
DTMF (tone dialling)/
PD (pulse dialling)
Pin connections on the telephone jack
3
2
1
4
5
6
1
2
3
4
5
6
unused
unused
a
b
unused
unused
The following rules apply when writing
text:
u Each key between Q and O is
assigned several letters and characters.
u Control the cursor with u v t s.
Press and hold u or v to move the
cursor word by word.
u Characters are inserted at the cursor
position.
u Press the star key * to display the
table of special characters. Select the
required character and press the display key §Insert§ to insert the character at
the cursor position.
u Press and hold Q to O to enter
digits.
u Press display key Ñ to delete the character to the left of the cursor. Press and
hold to delete the word to the left of
the cursor.
u The first letter of the name of directory
entries is automatically capitalised, followed by lower case letters.
Setting upper/lower case or digits
Writing names
¤ Enter the individual letters/characters
by pressing the corresponding key.
The characters assigned to the key are
shown in a selection line at the bottom left
of the screen. The selected character is
highlighted.
¤ Briefly press the key several times in
succession to select the required letter/
character.
Standard characters
2
3
4
5
L
M
N
O
Q
1x
2x
3x
4x
5x
6x
7x
8x
9x
10x
1)
2)
a
d
g
j
m
p
t
w
.
b
e
h
k
n
q
u
x
,
1
c
f
i
l
o
r
v
y
?
2
3
4
5
6
s
8
z
!
ä
ë
ï
á
é
í
à
è
ì
â
ê
î
ã
ç
ö ñ ó ò ô õ
7 ß
ü ú ù û
9 ÿ ý æ ø å
0
1) Space
2) Line break
Repeatedly press the hash key # to
change the text input mode.
123
Writing digits
Abc
Upper case *
abc
Lower case
* First letter in capitals, all others in lower case
The active mode is indicated at the bottom
right of the screen.
59
English
Writing and editing text
Deutsch
Appendix
Additional functions via the PC interface
Additional functions via the
PC interface
To enable your handset to communicate
with the PC, the "Gigaset QuickSync"
program must be installed on your PC
(free to download at wiki.unify.com/wiki/
DECT_Handset_accessory).
After installing "Gigaset QuickSync", connect the handset to your computer using
Bluetooth (¢ page 44) or USB data cable
(¢ page 16). To use the Bluetooth connection, your computer must be equipped
with a suitable dongle.
Please note
u If the USB data cable is plugged in,
a Bluetooth connection cannot be
established.
u If a USB data cable is plugged in
during an existing Bluetooth connection, the Bluetooth connection
is cancelled.
Transferring data
Start the "Gigaset QuickSync" program.
You can now:
u Synchronise your handset directory
with Outlook
u Download caller pictures (.bmp) from
the computer to the handset,
u Download pictures (.bmp) as a screensaver from the computer to the handset.
u Download sounds (ringtones) from the
computer to the handset.
During the transfer of data between handset and PC, you will see Data transfer in
progress on the display. During this time
the keypad is disabled, and incoming calls
will be ignored.
60
Deutsch
Gigaset handsets
Gigaset handsets
English
Upgrade your Gigaset to a cordless PABX:
Gigaset S4 professional handset
u
u
u
u
u
u
u
Illuminated graphic colour display (65k colours)
Illuminated keypad
Speaker mode
Polyphonic ringtones
Directory for approx. 500 entries
Caller picture
PC interface, e.g., for managing directory entries,
ringtones and screensavers
u Bluetooth
u Headset socket
Gigaset S3 professional handset
u
u
u
u
u
u
u
Illuminated graphic colour display (65k colours)
Illuminated keypad
Speaker mode
Polyphonic ringtones
Directory for approx. 250 entries
Caller picture
Headset socket
61
Gigaset handsets
Gigaset SL3 professional handset
u
u
u
u
u
u
u
Illuminated graphic colour display (65k colours)
Illuminated keypad
Speaker mode
Polyphonic ringtones
Directory for approx. 250 entries
Caller picture
PC interface, e.g., for managing directory entries,
ringtones and screensavers
u Headset socket
u Bluetooth
All accessories and batteries are available from your phone retailer.
Use only original accessories. This will avoid possible health risks and personal injury, and
also ensure that all the relevant regulations are complied with.
62
Deutsch
Mounting the base on the wall
Mounting the base on the wall
English
41 mm
Approx.
5.5 mm
Mounting the charger on the wall
23.5 mm
Approx.
4 mm
63
Index
Index
A
Access code . . . . . . . . . . . . . . . . . . . . 53
for a PABX . . . . . . . . . . . . . . . . . . . 53
Access protection . . . . . . . . . . . . . . . . 52
Accessories . . . . . . . . . . . . . . . . . . . . 61
Acknowledge tones . . . . . . . . . . . . . . 50
Activating
advisory tones . . . . . . . . . . . . . . . . 50
appointment . . . . . . . . . . . . . . . . . 38
handset . . . . . . . . . . . . . . . . . . . . . 21
keypad lock . . . . . . . . . . . . . . . . . . 21
listening in . . . . . . . . . . . . . . . . . . . 43
ring delay . . . . . . . . . . . . . . . . . . . . 48
Advisory tones . . . . . . . . . . . . . . . . . . 50
Alarm clock . . . . . . . . . . . . . . . . . . . . 40
Alert tone . . . . . . . . . . . . . . . . . . . . . 49
Anniversary . . . . . . . . . . . . . . . . . . . . 31
deactivating . . . . . . . . . . . . . . . . . . 31
missed . . . . . . . . . . . . . . . . . . . 34, 39
saving in the directory. . . . . . . . . . . 31
Appointment . . . . . . . . . . . . . . . . . . . 38
Appointment/anniversary
display missed . . . . . . . . . . . . . . . . 39
Appointments
activating/deactivating . . . . . . . . . . 39
deleting . . . . . . . . . . . . . . . . . . . . . 39
managing. . . . . . . . . . . . . . . . . . . . 39
Area code
setting own area code . . . . . . . . . . . 50
Assigning a number key . . . . . . . . . . . 46
Authorisation. . . . . . . . . . . . . . . . . . . 56
Automatic
network provider preselection . . . . . 34
redial . . . . . . . . . . . . . . . . . . . . . . . 32
ring delay . . . . . . . . . . . . . . . . . 26, 48
B
Base
changing . . . . . . . . . . . . . . . . . . . . 41
connecting . . . . . . . . . . . . . . . . . . . . 9
connecting to PABX. . . . . . . . . . . . . 53
restoring to factory settings. . . . . . . 52
setting up . . . . . . . . . . . . . . . . . . . . . 9
settings . . . . . . . . . . . . . . . . . . . . . 51
system PIN . . . . . . . . . . . . . . . . . . . 52
Battery
charging. . . . . . . . . . . . . . . . . 2, 3, 13
64
display . . . . . . . . . . . . . . . . . . . . 2, 3
icon . . . . . . . . . . . . . . . . . . . . . . 2, 3
inserting . . . . . . . . . . . . . . . . . . . . 11
tone . . . . . . . . . . . . . . . . . . . . . . . 50
Best base . . . . . . . . . . . . . . . . . . . . . 41
Birthday, see Anniversary
Bluetooth
accepting a call . . . . . . . . . . . . . . . 26
activate . . . . . . . . . . . . . . . . . . . . . 44
changing device name . . . . . . . . . . 45
deregistering devices . . . . . . . . . . . 45
list of known devices . . . . . . . . . . . 45
registering devices . . . . . . . . . . . . . 44
transferring directory (vCard) . . . . . 30
C
Calendar . . . . . . . . . . . . . . . . . . . . . . 38
Call
accepting . . . . . . . . . . . . . . . . . . . 26
accepting (Bluetooth). . . . . . . . . . . 26
connect participant . . . . . . . . . . . . 43
ending . . . . . . . . . . . . . . . . . . . . . 26
external . . . . . . . . . . . . . . . . . . . . . 26
internal . . . . . . . . . . . . . . . . . . . . . 41
transferring (connecting) . . . . . 42, 43
Call duration . . . . . . . . . . . . . . . . . . . 26
Call lists . . . . . . . . . . . . . . . . . . . . . . 32
Call waiting
internal call . . . . . . . . . . . . . . . . . . 42
Call-by-call . . . . . . . . . . . . . . . . . . . . 34
Caller Picture. . . . . . . . . . . . . . . . 28, 49
Calling
external . . . . . . . . . . . . . . . . . . . . . 26
internal . . . . . . . . . . . . . . . . . . . . . 41
Calling Line Identification . . . . . . . . . 26
Cancelling preselection . . . . . . . . . . . 35
Caring for your telephone . . . . . . . . . 57
Changing
dialling mode . . . . . . . . . . . . . . . . 53
display language . . . . . . . . . . . . . . 47
earpiece volume . . . . . . . . . . . . . . 48
internal number of a handset . . . . . 43
name of a handset . . . . . . . . . . . . . 43
pauses . . . . . . . . . . . . . . . . . . . . . 54
ringtone . . . . . . . . . . . . . . . . . . . . 48
speaker volume . . . . . . . . . . . . . . . 48
system PIN . . . . . . . . . . . . . . . . . . 52
Changing device name
(Bluetooth) . . . . . . . . . . . . . . . . . 45
Character set . . . . . . . . . . . . . . . . . . 59
D
Deactivating
advisory tones . . . . . . . . . . . . . . . . 50
appointment . . . . . . . . . . . . . . . . . 38
handset . . . . . . . . . . . . . . . . . . . . . 21
keypad lock . . . . . . . . . . . . . . . . . . 21
listening in . . . . . . . . . . . . . . . . . . . 43
ring delay . . . . . . . . . . . . . . . . . . . . 48
Delete key . . . . . . . . . . . . . . . . . . . . . 19
Deleting
characters . . . . . . . . . . . . . . . . . . . 19
De-registering (handset). . . . . . . . . . . 41
Deregistering devices (Bluetooth) . . . . 45
Dialling
using quick dial. . . . . . . . . . . . . 30, 46
using the directory . . . . . . . . . . . . . 29
Dialling mode . . . . . . . . . . . . . . . . . . 53
Dialling pause . . . . . . . . . . . . . . . . . . 54
Directory . . . . . . . . . . . . . . . . . . . . . . 28
copying number from text . . . . . . . . 31
managing entries . . . . . . . . . . . . . . 29
opening . . . . . . . . . . . . . . . . . . . . . 18
order of entries . . . . . . . . . . . . . . . . 29
saving anniversary . . . . . . . . . . . . . 31
saving entry . . . . . . . . . . . . . . . . . . 28
sending entry/list to handset . . . . . . 30
transferring a vCard (Bluetooth) . . . 30
using to enter numbers . . . . . . . . . . 31
Display
backlight . . . . . . . . . . . . . . . . . . . . 47
changing display language . . . . . . . 47
colour scheme . . . . . . . . . . . . . . . . 47
directory memory . . . . . . . . . . . . . . 30
in idle status . . . . . . . . . . . . . . . 15, 21
memory (resource directory) . . . . . . 50
missed anniversaries . . . . . . . . . . . 34
missed appointments/
anniversaries . . . . . . . . . . . . . . 39
network mailbox message . . . . . . . 36
number (CLI/CLIP) . . . . . . . . . . . . . 26
screensaver . . . . . . . . . . . . . . . . . . 47
setting . . . . . . . . . . . . . . . . . . . . . 47
Display keys . . . . . . . . . . . . . . . . . 2, 19
assigning . . . . . . . . . . . . . . . . . . . . 46
Disposal . . . . . . . . . . . . . . . . . . . . . . 57
E
Earpiece volume . . . . . . . . . . . . . . . . 48
ECO DECT . . . . . . . . . . . . . . . . . . . . . 37
Eco mode . . . . . . . . . . . . . . . . . . . . . 37
Eco mode+ . . . . . . . . . . . . . . . . . . . . 37
E-mail address
copying from the directory . . . . . . . 31
End call key. . . . . . . . . . . . . . . . . . 2, 26
Ending, call . . . . . . . . . . . . . . . . . . . . 26
Entry
saving (network mailbox) . . . . . . . . 36
saving, changing (preselection) . . . 35
selecting from directory . . . . . . . . . 29
Environment . . . . . . . . . . . . . . . . . . . 56
Error tone . . . . . . . . . . . . . . . . . . . . . 50
Expert mode . . . . . . . . . . . . . . . . 24, 55
F
Fast access
network mailbox . . . . . . . . . . . . . . 36
G
General troubleshooting . . . . . . . . . . 55
Group call . . . . . . . . . . . . . . . . . . . . . 41
H
Handset
activating/deactivating . . . . . . . . . . 21
advisory tones . . . . . . . . . . . . . . . . 50
changing internal number . . . . . . . 43
changing name . . . . . . . . . . . . . . . 43
changing the number . . . . . . . . . . 43
changing to a different base . . . . . . 41
changing to best reception . . . . . . . 41
colour scheme . . . . . . . . . . . . . . . . 47
contact with liquid . . . . . . . . . . . . . 57
de-registering . . . . . . . . . . . . . 40, 41
display backlight . . . . . . . . . . . . . . 47
display language . . . . . . . . . . . . . . 47
earpiece volume . . . . . . . . . . . . . . 48
65
English
Charge status display . . . . . . . . . . . . 2, 3
CLI, CLIP . . . . . . . . . . . . . . . . . . . . . . 26
Colour scheme . . . . . . . . . . . . . . . . . . 47
Conference
internal . . . . . . . . . . . . . . . . . . . . . 42
Confirmation tone . . . . . . . . . . . . . . . 50
Connecting
base to PABX . . . . . . . . . . . . . . . . . 53
headset . . . . . . . . . . . . . . . . . . . . . 16
Consultation call
internal . . . . . . . . . . . . . . . . . . . . . 42
Control key . . . . . . . . . . . . . . . . . . 2, 18
Correcting incorrect entries . . . . . . . . 19
Customer Care . . . . . . . . . . . . . . . . . . 55
Deutsch
Index
Index
idle status . . . . . . . . . . . . . . . . . . . 21
large font . . . . . . . . . . . . . . . . . . . . 47
list . . . . . . . . . . . . . . . . . . . . . . . . . 18
locating . . . . . . . . . . . . . . . . . . . . . 41
muting . . . . . . . . . . . . . . . . . . . . . . 27
paging . . . . . . . . . . . . . . . . . . . . . . 41
registering . . . . . . . . . . . . . . . . . . . 40
registering to a different base . . . . . 41
restoring to factory settings. . . . . . . 51
screensaver . . . . . . . . . . . . . . . . . . 47
set up for use . . . . . . . . . . . . . . . . . 11
setting . . . . . . . . . . . . . . . . . . . . . . 46
speaker volume . . . . . . . . . . . . . . . 48
transferring a call . . . . . . . . . . . . . . 42
using multiple . . . . . . . . . . . . . . . . 40
Handset mode . . . . . . . . . . . . . . . . . . 27
Hash key . . . . . . . . . . . . . . . . . . . . 2, 21
Headset (Bluetooth) . . . . . . . . . . . . . . 44
Headset socket. . . . . . . . . . . . . . . . . . 16
Hearing aids . . . . . . . . . . . . . . . . . . . . 7
Help . . . . . . . . . . . . . . . . . . . . . . . . . 55
I
Icon
alarm clock . . . . . . . . . . . . . . . . . . . 40
for new messages . . . . . . . . . . . . . . 33
keypad lock . . . . . . . . . . . . . . . . . . 21
ringtone . . . . . . . . . . . . . . . . . . . . . 49
Idle status (display) . . . . . . . . . . . 15, 21
Idle status, returning to . . . . . . . . . . . 21
Incorrect entries (correction) . . . . . . . 19
Installing, base . . . . . . . . . . . . . . . . . . 9
Internal
conference . . . . . . . . . . . . . . . . . . . 42
consulting . . . . . . . . . . . . . . . . . . . 42
listening in . . . . . . . . . . . . . . . . . . . 43
making calls . . . . . . . . . . . . . . . . . . 41
Internal call . . . . . . . . . . . . . . . . . . . . 41
call waiting . . . . . . . . . . . . . . . . . . . 42
K
Key
assigning to a function or
number . . . . . . . . . . . . . . . . . . 46
Key 1 (fast access) . . . . . . . . . . . . . . . . 2
Keypad lock . . . . . . . . . . . . . . . . . . . . 21
Keys
control key . . . . . . . . . . . . . . . . . 2, 18
delete key . . . . . . . . . . . . . . . . . . . . 19
display keys . . . . . . . . . . . . . . . . 2, 19
66
end call key . . . . . . . . . . . . . . . . 2, 26
fast access . . . . . . . . . . . . . . . . . . . . 2
hash key . . . . . . . . . . . . . . . . . . 2, 21
message key . . . . . . . . . . . . . . . . . . 2
mute key . . . . . . . . . . . . . . . . . . . . . 2
on/off key . . . . . . . . . . . . . . . . . . . . 2
quick dial . . . . . . . . . . . . . . . . . . . . 30
recall key . . . . . . . . . . . . . . . . . . . . . 2
side keys . . . . . . . . . . . . . . . . . . . . . 2
speaker key . . . . . . . . . . . . . . . . . . . 2
star key . . . . . . . . . . . . . . . . . . . . . . 2
talk key . . . . . . . . . . . . . . . . . . . 2, 26
L
Language, display . . . . . . . . . . . . . . .
Large font . . . . . . . . . . . . . . . . . . . . .
List
call lists . . . . . . . . . . . . . . . . . . . . .
handsets . . . . . . . . . . . . . . . . . . . .
known devices (Bluetooth) . . . . . . .
missed calls . . . . . . . . . . . . . . . . . .
network mailbox . . . . . . . . . . . . . .
Listening in to a call . . . . . . . . . . . . .
Locating, handset . . . . . . . . . . . . . . .
Lock
activating/deactivating keypad lock .
47
47
32
18
45
32
33
43
41
21
M
Making calls
accepting a call . . . . . . . . . . . . . . . 26
cost-effective calls . . . . . . . . . . . . . 34
external . . . . . . . . . . . . . . . . . . . . . 26
internal . . . . . . . . . . . . . . . . . . . . . 41
Manual redial . . . . . . . . . . . . . . . . . . 32
Medical equipment . . . . . . . . . . . . . . . 7
Memory
directory . . . . . . . . . . . . . . . . . . . . 30
resource directory . . . . . . . . . . . . . 50
Menu
end tone . . . . . . . . . . . . . . . . . . . . 50
opening . . . . . . . . . . . . . . . . . . . . 18
overview . . . . . . . . . . . . . . . . . . . . 24
using. . . . . . . . . . . . . . . . . . . . . . . 20
Menu display
expert mode . . . . . . . . . . . . . . 24, 55
standard mode . . . . . . . . . . . . 24, 55
Message key
opening lists . . . . . . . . . . . . . . . . . 33
Messages
key . . . . . . . . . . . . . . . . . . . . . . . . . 2
system PIN . . . . . . . . . . . . . . . . . . 52
Pin connections . . . . . . . . . . . . . . . . 58
Power adapter . . . . . . . . . . . . . . . . . . 7
Power consumption . . . . . . . . . . . . . 58
Preselection . . . . . . . . . . . . . . . . . . . 34
cancelling . . . . . . . . . . . . . . . . . . . 35
Protecting the phone against access . . 52
Pulse dialling . . . . . . . . . . . . . . . . . . 53
N
Questions and answers . . . . . . . . . . . 55
Quick dial . . . . . . . . . . . . . . . . . . 28, 46
Name
of a handset . . . . . . . . . . . . . . . . . . 43
Network mailbox . . . . . . . . . . . . . . . . 36
Network provider preselection,
automatic . . . . . . . . . . . . . . . . . . 34
Number
copying from directory . . . . . . . . . . 31
copying to the directory . . . . . . . . . 31
displaying caller's number (CLIP) . . . 26
entering network mailbox number. . 36
entering with directory . . . . . . . . . . 31
saving in directory . . . . . . . . . . . . . 28
O
On/Off key . . . . . . . . . . . . . . . . . . . . . . 2
Order in directory. . . . . . . . . . . . . . . . 29
P
PABX
connecting base . . . . . . . . . . . . . . . 53
pauses . . . . . . . . . . . . . . . . . . . . . . 54
saving access code . . . . . . . . . . . . . 53
setting dialling mode . . . . . . . . . . . 53
setting recall. . . . . . . . . . . . . . . . . . 53
switching to tone dialling . . . . . . . . 54
Package contents . . . . . . . . . . . . . . . . . 8
Paging . . . . . . . . . . . . . . . . . . . . . . . . 41
Paging key . . . . . . . . . . . . . . . . . . . . . . 2
Pause
after access code . . . . . . . . . . . . . . 54
after line seizure . . . . . . . . . . . . . . . 54
after recall key . . . . . . . . . . . . . . . . 54
PC interface . . . . . . . . . . . . . . . . . . . . 60
PD (pulse dialling) . . . . . . . . . . . . . . . 53
Picture
Caller . . . . . . . . . . . . . . . . . . . . 28, 49
deleting . . . . . . . . . . . . . . . . . . . . . 50
renaming . . . . . . . . . . . . . . . . . . . . 50
PIN change
Q
R
Range . . . . . . . . . . . . . . . . . . . . . . . . . 9
Recall . . . . . . . . . . . . . . . . . . . . . . . . 53
Recall key . . . . . . . . . . . . . . . . . . . 2, 54
Reception booster, see Repeater
Redial . . . . . . . . . . . . . . . . . . . . . . . . 32
Registering (handset) . . . . . . . . . . . . 40
Registering devices (Bluetooth) . . . . . 44
Registration key . . . . . . . . . . . . . . . . . 2
Reminder call . . . . . . . . . . . . . . . . . . 31
Repeater . . . . . . . . . . . . . . . . . . . . . . 51
Resource directory . . . . . . . . . . . . . . 49
Ring delay . . . . . . . . . . . . . . . . . . . . . 48
Ringtone
changing . . . . . . . . . . . . . . . . . . . . 48
setting volume . . . . . . . . . . . . . . . 48
Ringtone deactivated for unknown
call . . . . . . . . . . . . . . . . . . . . . . 49
S
Saving (access code) . . . . . . . . . . . . . 53
Screensaver . . . . . . . . . . . . . . . . . . . 47
Search directory . . . . . . . . . . . . . . . . 29
Sending
directory entry to handset . . . . . . . 30
Setting the date . . . . . . . . . . . . . 14, 25
Setting the time . . . . . . . . . . . . . 14, 25
Setting up
handset . . . . . . . . . . . . . . . . . . . . . 11
Side keys . . . . . . . . . . . . . . . . . . . . . . 2
Signal tone, see Advisory tones
Snooze mode . . . . . . . . . . . . . . . . . . 40
Sound, see Ringtone
Speaker
key . . . . . . . . . . . . . . . . . . . . . . . . . 2
mode . . . . . . . . . . . . . . . . . . . . . . 27
Special functions . . . . . . . . . . . . . . . . 53
67
English
Microphone . . . . . . . . . . . . . . . . . . . . . 2
Missed
anniversary . . . . . . . . . . . . . . . . . . 39
appointment . . . . . . . . . . . . . . . . . 39
Missed calls . . . . . . . . . . . . . . . . . . . . 32
Music on hold . . . . . . . . . . . . . . . . . . 51
Mute key . . . . . . . . . . . . . . . . . . . . . . . 2
Muting
handset . . . . . . . . . . . . . . . . . . . . . 27
Deutsch
Index
Index
Specifications . . . . . . . . . . . . . . . . . . 58
Standard mode . . . . . . . . . . . . . . 24, 55
Star key . . . . . . . . . . . . . . . . . . . . . . . . 2
System settings . . . . . . . . . . . . . . . . . 52
T
Talk key . . . . . . . . . . . . . . . . . . . . . 2, 26
Telephone jack, pin connections . . . . . 58
Tone dialling . . . . . . . . . . . . . . . . 53, 54
U
USB connection . . . . . . . . . . . . . . . . . 16
V
Viewing the network mailbox
message . . . . . . . . . . . . . . . . . . . 36
Volume
earpiece . . . . . . . . . . . . . . . . . . . . . 48
handset speaker volume . . . . . . . . . 48
loudspeaker . . . . . . . . . . . . . . . . . . 48
ringtone . . . . . . . . . . . . . . . . . . . . . 48
W
Warning tone, see Advisory tones
Writing and editing text . . . . . . . . . . . 59
68
English
Deutsch
Index
69
A31003-G2100-U112-4-7419
Copyright © Unify GmbH & Co. KG 03/2014
Hofmannstr. 51, 81379 Munich/Germany
All rights reserved.
Reference No.: A31003-G2100-U112-4-7419
The information provided in this document contains merely general descriptions or
characteristics of performance which in case of actual use do not always apply as
described or which may change as a result of further development of the products.
An obligation to provide the respective characteristics shall only exist if expressly agreed in
the terms of contract.
Availability and technical specifications are subject to change without notice.
Unify, OpenScape, OpenStage and HiPath are registered trademarks of Unify GmbH & Co. KG.
All other company, brand, product and service names are trademarks or registered trademarks
of their respective holders.
unify.com