1
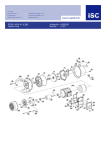
FBLB 33 A1 (LB3)
Artikel-Nr.: 3436062
Petrol Shoulder Blower
Ident-Nr.:
11012
Komponenten / Ersatzteile
Position
Artikel-Nr.
Beschreibung
1
343604001001
M6 Nut M6
2
343604001002
Washer 6
3
343604001003
Tragegurt
4
343604001004
Blower Pipe C2
9
343606001009
Fan guard (Green Pantone 361) für Lüfterrad (Florabest)
10
343604001010
Shock Absorption
12
343606001012
Rear fan cover (Pantone 361) Florabest
16
343604001016
Flywheel
18
343606001018
Front fan cover (Pantone 361) Florabest
21
343604001021
washer
22
343604001022
locknut M6
23
343606001023
Shield (Green Pantone 361) Florabest
24
343604001024
Seilzugstarter
26
343604001026
Bend Pipe
28
343604001028
Hose
29
343604001029
Blower Pipe A
30
343604001030
Blower Pipe B
31
343604001031
Blower Pipe C1
34
343606001034
Left control handle (Pant.361) Florabest
37
343606001037
Stop switch (Red RAL 3001) (Rot)
42
343606001042
Right control handle(Pant.361) Florabest
43
343606001043
Throttle lever (RAL 3001) (Rot)
44
343606001044
Retainer lever (RAL 3001) (Rot)
50
343604001050
Throttle wire
51
343604001051
Threaded pipe 10
52
343604001052
Lead wire
56
343604001056
American hose clip
58
343606001058
engine 0,9 KW/1,22 PS;33 ccm (Florab.
0
343604001059
accessory
engine
Artikel-Nr.: 343604001058
0,9 KW / 1,22 PS; 33 ccm
Ident-Nr.:
Komponenten / Ersatzteile
Position
Artikel-Nr.
Beschreibung
3
343604001103
Rotor
4
343604001104
Spark plug RCJ6Y
7
343604001107
Cylinder
8
343604001108
Gasket,cylinder
9
343604001109
Ring,piston
10
343604001110
Piston
11
343604001111
Pin,piston 9X31
12
343604001112
Ring, snap
17
343604001117
Gasket,crankcase
21
343604001121
Starter pulley comp
22
343604001122
Clip , pipe für Benzinfilter
23
343604001123
Fuel filter comp
31
343604001131
Muffler assy
32
343604001132
Heat shield
33
343604001133
Bolt M5X55 M5 x 55
37
343604001137
Ignition coil comp
42
343604001142
Fule tank
43
343604001143
Chock handle
46
343604001146
Gasket,insulator
49
343604001149
Gasket,carburetor
50
343604001150
Carburetor comp
51
343604001151
Gasket,carburetor
53
343604001153
Pipe
56
343604001156
choke
57
343604001157
Base, cleaner für Luftfilter
58
343604001158
Primer pump assy
59
343604001159
Air filter element
60
343604001160
Bolt assy M5X60 M5 x 60
61
343604001161
Cover, cleaner
62
343604001162
Knob,cover M4 x 32
901
343604001901
fuel tank cap
Petrol Leaf Blower FBLB 33 A1
KO
Petrol Leaf Blower
FAC
Benzin-Laubbläser
Operation and Safety Notes
Original operating instructions
Bedienungs- und Sicherheitshinweise
Originalbetriebsanleitung
IAN 76160
Anleitung_3436062_LB3.indb 1
KO
01.06.12 12:52
KO
Before reading, unfold the page containing the illustrations and familiarise yourself with all functions of
the device.
FAC
Klappen Sie vor dem Lesen die Seite mit den Abbildungen aus und machen Sie sich anschließend mit
allen Funktionen des Gerätes vertraut.
GB/IE
Operation and Safety Notes
Page
7
DE/AT/CH
Bedienungs- und Sicherheitshinweise
Seite
17
-2-
Anleitung_3436062_LB3.indb 2
01.06.12 12:52
1
1
2
3
4
20
5
6
19
7
10
18
16
9
8
15
17
11
14
13
2
12
2a
12
A
-3-
Anleitung_3436062_LB3.indb 3
01.06.12 12:52
2b
2c
13
D
C
1
1
12
3
B
13
3a
12
13
14
E
4a
2
3
4
4b
1
7
8
10
-4-
Anleitung_3436062_LB3.indb 4
01.06.12 12:53
5
6
7a
7b
8a
8b
-5-
Anleitung_3436062_LB3.indb 5
01.06.12 12:53
9
1
2
3
4
6
7
8
9
5
-6-
Anleitung_3436062_LB3.indb 6
01.06.12 12:53
GB/IE
Table of contents
1.
2.
3.
4.
5.
6.
7.
8.
Introduction.................................................................................................................................................. 8
Safety regulations ....................................................................................................................................... 8
Layout and items supplied .......................................................................................................................... 9
Proper use ..................................................................................................................................................10
Technical data ...........................................................................................................................................10
Before starting the equipment ..................................................................................................................10
Operation ...................................................................................................................................................11
Cleaning, maintenance, storage, starting again after storage,
transport and ordering of spare parts ..................................................................................................... 12
9. Disposal and recycling ............................................................................................................................. 13
10. Troubleshooting guide .............................................................................................................................. 14
11. Declaration of conformity......................................................................................................................... 15
12. Warranty certificate .................................................................................................................................. 16
The reprinting or reproduction by any other means, in whole or in part, of documentation and papers
accompanying products is permitted only with the express consent of the iSC GmbH.
Subject to technical changes
-7-
Anleitung_3436062_LB3.indb 7
01.06.12 12:53
GB/IE
1. Introduction
shoes, strong gloves, a safety helmet, a face
mask, safety goggles to protect your eyes and
ear plugs or similar to protect your hearing.
2. Fill in fuel in a safe place. Open the fuel tank
cap carefully so that any existing pressure can
escape slowly and no fuel splashes out. Before starting the engine, clean the equipment
of any fuel or oil residues. Start the engine at
least 3m away from the fueling point.
3. Always switch off the engine when put the
equipment down and before you carry out
any work on the equipment.
4. Check that all the screws and fasteners are secure. The equipment may be used only when
it is safe to operate. Never use the equipment
if it has not been properly adjusted or has not
been fully or safely assembled.
5. Keep the handles dry, clean and free of fuel
mix.
6. Store the equipment and accessories in a safe
place protected from naked flames and heat/
spark sources such as gas geyser heaters,
tumble driers, oil stoves or portable radiators,
etc.
7. Keep the engine free of dirt.
8. Only adequately trained people and adults
may use, adjust and maintain the equipment.
9. A high-quality dust mask must always be
worn by users with breathing problems and
by everyone who works with the equipment in
a very dusty environment . Paper dust masks
are available from general stores where you
can buy paint and household goods.
10. Use the equipment only at reasonable times
of the day. Do not use early in the morning or
late in the evening when people could feel
disturbed. Pay attention to your local noise
control regulations.
11. Allow the equipment to run at the lowest possible engine speed required to carry out the
work.
12. Before you start work, use a brush and scraper to remove all dirt from the equipment.
13. In case of dusty conditions, moisten the surface a little.
14. Use the full-length blower nozzle extension
so that the air current can work near to the
ground.
Congratulations on your new purchase.
You have decided in favor of a high-quality product. The operating instructions are a part of this
product. They contain information of importance
for your safety, for the use of the product and for
its disposal. Before you use the product, acquaint
yourself with all the information concerning its
operation and safety. Use the product only as
described and only for the listed areas of application. If you hand on the product to other people,
give them all the documentation as well.
2. Safety regulations
Caution!
Read all safety regulations and instructions.
Any errors made in following the safety regulations and instructions may result in an electric
shock, fire and/or serious injury.
Keep all safety regulations and instructions in a safe place for future use.
Explanation of the warning signs on the
equipment (see Fig. 9)
1. Read the operating instructions before you
use the equipment.
2. Wear safety goggles to protect your eyes
Wear ear plugs to protect yourself from the
noise.
3. Warning! Hazard!
4. Keep other people away!
5. Warning! Hot surface
6. Fuel pump
7. Never work if people – especially children or animals are in the danger area.
8. Sound power level with EC Directive
2000/14/EC.
9. After the unit is switched off, the motor continues to run for a short while.
1. Wear tight-fitting, sturdy work clothes/ protective clothes, which should be practical
and must not impede your movements (long
trousers or overalls). Wear also safety work
-8-
Anleitung_3436062_LB3.indb 8
01.06.12 12:53
GB/IE
3. Layout and items supplied
15. Watch out for children, pets, open windows
etc. and blow the dirt safely away from them.
16. Do not smoke while refueling or using the
equipment.
17. Never use the equipment without a silencer
and a correctly installed exhaust guard.
18. Keep your hands and other parts of the body
away from the exhaust pipe and the ignition
cable.
19. The equipment produces toxic exhaust fumes
as soon as the engine is started. Never work
in enclosed rooms or in rooms with poor ventilation.
20. Never blow in the direction of other persons,
animals, buildings, vehicles or windows, etc.
! The equipment can throw up small objects at
high velocity.
21. To prevent contact with the blower, never
operate the equipment without the blower
tube guard.
22. Do not put down the hot engine near inflammable objects/ materials.
23. Do not use the equipment over a lengthy period of time, take regular breaks.
24. Never use the equipment when under the influence of alcohol or drugs.
WARNING: Modifying the equipment and adding parts or removing parts may place your personal safety at risk and cause the manufacturer’s
warranty to be voided.
25. Never use the equipment near inflammable liquids or gases, whether in enclosed rooms or
outdoors. Explosions and/or fire may result.
26. Do not wear any clothing, scarves, neck-ties
or jewelry which could get into the air intake
opening. Tie up and secure long hair (e.g.
with a head-scarf, cap, helmet, etc.).
27. Never refuel when the engine is running or
hot.
28. Never allow children under 14 years of age
to use the equipment.
3.1 Layout (Fig. 1)
1. Handle
2. Throttle lever
3. Throttle lever catch
4. On/Off switch
5. Spark boot plug
6. Air filter cover
7. Choke lever
8. Starter handle (starter cable)
9. Petrol tank
10. Fuel pump (primer)
11. Engine unit
12. Flexible blower hose
13. Top blower tube
14. Bottom blower tube
15. Blower nozzle (large opening)
16. Blower nozzle (small opening)
17. Spark plug wrench
18. Petrol/ oil mix bottle
19. Hexagonal wrench
20. Open-ended wrench
3.2 Items supplied
• Open the packaging and take out the equipment with care.
• Remove the packaging material and any
packaging and/or transportation braces (if
available).
• Check to see if all items are supplied.
• Inspect the equipment and accessories for
transport damage.
• If possible, please keep the packaging until
the end of the guarantee period.
Important!
The equipment and packaging material
are not toys. Do not let children play with
plastic bags, foils or small parts. There is
a danger of swallowing or suffocating!
Keep this safety information in a safe
place.
-9-
Anleitung_3436062_LB3.indb 9
01.06.12 12:53
GB/IE
4. Proper use
Sound and vibration values were measured in
accordance with 2000/14/EC.
This equipment is designed for cleaning walkways, drives and other paths. Any other use, e.g.
inflating objects, is not permitted.
Sound and vibration values were measured at the
highest speed.
The equipment may be used only for its intended
purpose. Any other use is deemed to be a case of
misuse. The user/operator and not the manufacturer will be liable for any damage or injuries of any
kind resulting from such misuse.
Please note that our equipment has not been designed for use in commercial, trade or industrial
applications. Our warranty will be voided if the
equipment is used in commercial, trade or industrial businesses or for equivalent purposes.
5. Technical data
Engine type ............... 2-stroke engine; air-cooled
Engine power (max.) ..................0.9 kW/ 1.22 hp
Displacement ............................................... 33 ccm
Max. engine speed ..............................8500 min-1
Ignition ...................................................... Electronic
Weight (with empty tank) .............................6.3 kg
Tank capacity .............................................. 650 ml
Spark plug .................................................... RCJ6Y
Maximum air speed ...............................250 km/h
Sound and vibration
LpA sound pressure level ........................... 97 dB(A)
KpA uncertainty ............................................. 1.5 dB
LWA sound power level ........................... 111 dB(A)
KWA uncertainty ............................................ 1.5 dB
Wear ear-muffs.
The impact of noise can cause damage to hearing.
Operation
Vibration emission value ah = 3.87 m/s2
K uncertainty = 1.5 m/s2
Keep the noise emissions and vibrations
to a minimum.
• Only use appliances which are in perfect
working order.
• Service and clean the appliance regularly.
• Adapt your working style to suit the appliance.
• Do not overload the appliance.
• Have the appliance serviced whenever necessary.
• Switch the appliance off when it is not in use.
• Wear protective gloves.
6. Before starting the
equipment
6.1 Fitting the blower tube (Fig. 2-3)
The equipment must be assembled as follows before it is put into operation.
• Before the equipment is used for the first time,
the cardboard transport guard must be removed as shown in Figure 2.
• Push the flexible blower hose (Fig. 2a/ Item
12) over the connection on the engine unit
and tighten the hose clip (Fig. 2a/Item A).
• Now push the handle (Fig. 2b/Item 1) over
the top blower tube (Fig. 2b/Item. 13).
• Align the handle (Fig. 2c/Item 1) and the
stop (Fig. 2c/Item B) as shown in Figure 2c
and screw the handle tight.
• Move the flexible ring (Fig. 2c/Item C) into
center position so that its distance from the
stop B is the same when rotated to the left and
to the right.
• Now push the top blower tube (Fig. 2c/ Item
13) into the flexible blower hose (Fig. 2c/
Item 12) and secure with the hose clip (Fig.
2c/Item D).
• Use the long clip (Fig. 3/Item E) to secure the
cable conduit to the flexible blower hose (Fig.
3/Item 12).
- 10 -
Anleitung_3436062_LB3.indb 10
01.06.12 12:53
GB/IE
• Push the bottom blower tube (Fig. 3a/ Item
•
handle.
6. Pull the starter cable (8) out a short way until
you feel resistance. It must be pulled evenly
and quickly to start the engine. When the engine is running, set the choke lever to „ „.
7. Allow the engine to warm up for approx. 10
seconds.
Note: If the engine fails to start after repeated
attempts, proceed as described in the section
„Troubleshooting guide“.
14) over the top blower tube (Fig. 3a/Item
13) and lock by turning clockwise.
The blower nozzle with either the large or
small opening can be fitted. Push the blower
nozzles over the blower tube and lock by
turning clockwise.
6.2 Fuel and oil
Use only a mixture of unleaded petrol and special
2-stroke engine oil. Mix the fuel mixture as indicated in the fuel mixing table.
Important: Do not use a fuel mixture which has
been stored for longer than 90 days.
Important: Never use 2-stroke oil with a recommended mixing ratio of 100:1. The manufacturer’s
warranty will be voided in case of engine damage due to inadequate lubrication.
Important: Only use containers designed and
approved for the purpose to transport and store
fuel.
Pour the correct quantities of petrol and 2-stroke
oil into the attached mixing bottle (see scale printed on the bottle). Then shake the bottle well.
Note: Always pull out the starter cable in a
straight line. If it is pulled out at an angle, the
cable will rub against the eyelet. This friction will
cause fraying and therefore greater wear on the
starter cable. Always hold the starter handle securely when the cable is retracted. Take care not
to let the cable snap back after it has been pulled
out. This could cause the cable to catch/become
worn and/or might damage the starter housing.
7.2 Warm starts (engine off for no longer
than 15- 20 minutes)
1. Set the On/Off switch (Figure 1 / Item 4) to
„ON“ and pull the starter cable (Fig. 1/Item
8). The engine should start after one or two
pulls. If the engine does not start after 6 pulls,
repeat steps 2 to 6 (see the section „Cold
starts“).
2. If the engine fails to start, or if it starts and
stops again after several pulls, follow the instructions in the section „Cold starts“.
6.3 Fuel mixture table
Mixing procedure: 40 parts petrol to 1 part oil
Petrol
2-stroke oil
1 liter
25 ml
5 liters
125 ml
7.3 Switching off the engine
Emergency Stop procedure:
If it becomes necessary to stop the blower immediately (in an emergency), set the ignition switch
(Fig. 1/Item 4) to „OFF“.
7. Operation
Please note that the statutory regulations governing noise abatement may differ from one location to another.
Normal procedure:
To switch off the engine, push back the throttle
lever catch so that the engine runs in idle mode.
Then move the On/Off switch (Fig. 1/Pos. 4) to
„OFF“.
7.1 Cold starts (4a-4b)
Fill the tank with the required amount of oil/petrol
mix. See also „Fuel and oil“.
1. Place the equipment safely and securely on
the ground.
2. Set the On/Off switch (4) to „ON“ (Fig. 4a)
3. Press the fuel pump (10) (Fig. 4b) 10 times.
4. Set the choke lever (7) to „ „.
5. Hold the equipment firmly by the holding
- 11 -
Anleitung_3436062_LB3.indb 11
01.06.12 12:53
GB/IE
7.4 Blower mode
Your leaf blower is designed for blow-cleaning
terraces, walkways, lawns, shrubs and many
hard-to-reach areas where dirt and debris can
collect.
For your own personal safety, please read again
all the safety information and directions for use in
these operating instructions before you operate
the equipment.
Do not use the equipment if other people or
animals are in the immediate vicinity. Keep a
minimum distance of 10m from other persons or
animals.
When working in a very dusty environment, wear
a dust mask or breathing mask.
For better control of the blowing direction, always
keep a suitable distance from the material you
want to blow away. Never blow in the direction of
persons in the immediate vicinity.
Before you use the equipment, use a rake or
broom to dislodge and remove foreign bodies
from the area you want to clean. This will help to
prevent injuries.
Control the air velocity by adjusting the throttle lever between the idle and full throttle settings. Test
different throttle lever settings in order to find the
optimum air velocity for the particular task.
Important: Always wear safety goggles or a
face mask for protection against objects which are
whirled up or catapulted away.
Important: Always carry the equipment so that
the hot exhaust gases do not come into contact
with your clothes and damage them and so that
the fumes are not inhaled.
To operate the equipment:
Follow the instructions for starting the engine as
described in section 7.1 and 7.2.
Let the engine run in idle mode and put on the
equipment as shown in Fig. 5. Make sure that
nothing covers the exhaust pipe as it becomes hot.
Hold the handle tightly in your right hand (Fig. 6)
and swing the blower tube back and forth so that
the required area is cleared of dirt and debris.
Integrated in the handle (Fig. 4a/Item 1) are the
throttle lever (Fig. 4a/Item 2) and the On/Off
switch (Fig. 4a/Item 4).
The throttle lever catch (Fig. 4a/Item 3) can be
used to lock the engine in the full throttle setting
without having to keep pressing the throttle lever.
Important: Before you switch off the equipment,
reset the throttle lever catch to the standard throttle
setting.
8. Cleaning, maintenance,
storage, starting again
after storage, transport and
ordering of spare parts
Always switch off the equipment and pull out the
spark plug boot before carrying out any maintenance work.
8.1 Cleaning
• Keep all safety devices, air vents and the
motor housing free of dirt and dust as far as
possible. Wipe the equipment with a clean
cloth or blow it down with compressed air at
low pressure.
• We recommend that you clean the equipment
immediately after you use it.
• Clean the equipment regularly with a damp
cloth and some soft soap. Do not use cleaning
agents or solvents; these may be aggressive
to the plastic parts in the equipment. Ensure
that no water can get into the interior of the
equipment.
8.2 Maintenance
Servicing the air filter (Fig. 7a-7b)
Soiled air filters reduce the engine output by
supplying too little air to the carburetor. Regular
checks are therefore essential. The air filter should
be checked after every 25 hours of use and cleaned if necessary. If the air contains a lot of dust,
the air filter should be checked more frequently.
1. Remove the air filter cover (Fig. 7a).
2. Remove the filter element (Fig. 7b).
3. Clean the filter element by tapping it or
blowing it.
4. Assemble in reverse order.
Important: Never clean the air filter with petrol
or inflammable solvents.
- 12 -
Anleitung_3436062_LB3.indb 12
01.06.12 12:53
GB/IE
8.4 Starting again after storage
1. Remove the spark plug.
2. Pull the starter cable several times to clean the
oil residue out of the combustion chamber.
3. Clean the spark plug contacts or fit a new
spark plug.
4. Fill the tank. See the section “Fuel and oil”.
5. Complete steps 1-7 described in the section
“Cold starts”.
Servicing the spark plug (Fig. 8a-8b)
Spark plug sparking gap = 0.6 mm. Tighten the
spark plug with a torque of 12 to 15 Nm. Check
the spark plug for dirt and grime after 10 hours of
operation and if necessary clean it with a copper
wire brush. Thereafter service the spark plug after
every 50 hours of operation.
1. Pull off the spark plug boot (Fig. 8a) by twisting.
2. Remove the spark plug (Fig. 8b) with the supplied spark plug wrench.
3. Assemble in reverse order.
8.3 Storage
Important: If you fail to follow these instructions
correctly, deposits may form on the interior of the
carburetor which may result in the engine being
more difficult to start or the equipment suffering
permanent damage.
1. Carry out all the general maintenance work
that is described in the section “Maintenance”
in the operating instructions.
2. Drain the fuel out of the tank (use a conventional plastic petrol pump for this purpose).
3. When the fuel has been drained, start the
equipment.
4. Allow the equipment to run at idling speed
until it stops. This will clean the remainder of
the fuel out of the carburetor.
5. Let the equipment cool down. (approx. 5 minutes)
6. Remove the spark plug.
7. Place a teaspoon full of 2-stroke engine oil
into the combustion chamber. Pull the starter
cable several times carefully to wet the internal components with the oil. Fit the spark plug
again.
8. Clean the exterior housing of the equipment.
9. Store the equipment in a cold, dry place where it is out of the reach of ignition sources and
inflammable substances. Fertilizers and other
chemical garden products often contain substances that accelerate the rate of corrosion of
metals. Do not store the equipment on or near
fertilizers or other chemicals.
8.5 Transport
To transport the equipment, empty the petrol tank
as described in the section “Storage”. Clean
coarse dirt off the equipment with a brush or hand
brush.
8.6 Ordering spare parts
Please provide the following information on all
orders for spare parts:
• Model/type of the equipment
• Article number of the equipment
• ID number of the equipment
For our latest prices and information please go to:
www.isc-gmbh.info
9. Disposal and recycling
The unit is supplied in packaging to prevent its
being damaged in transit. This packaging is raw
material and can therefore be reused or can be
returned to the raw material system.
The unit and its accessories are made of various
types of material, such as metal and plastic. Defective components must be disposed of as special waste. Ask your dealer or your local council.
- 13 -
Anleitung_3436062_LB3.indb 13
01.06.12 12:53
GB/IE
10.Troubleshooting guide
Fault
Possible cause
Remedy
The equipment does
not start.
- Correct starting procedure not follo- - Follow the instructions for starting.
wed.
- Sooted or damp spark plug.
- Clean the spark plug or replace it
with a new one (see section 8.2).
- Incorrect carburetor setting.
- Contact an authorized customer
service outlet or send the equipment
to ISC GmbH.
The equipment starts
but does not develop its full power.
- Incorrect choke lever setting.
The engine does not
run smoothly.
- Incorrect electrode gap on the
spark plug.
- Soiled air filter.
- Incorrect carburetor setting.
- Incorrect carburetor setting.
Engine smokes excessively.
- Incorrect fuel mix.
- Incorrect carburetor setting.
- Set the choke lever (Fig. 1/Item 7)
to “ ”.
- Clean the air filter (see section 8.2).
- Contact an authorized customer
service outlet or send the equipment
to ISC GmbH.
- Clean the spark plug and adjust the
electrode gap, or fit a new spark
plug (see section 8.2).
- Contact an authorized customer
service outlet or send the equipment
to ISC GmbH.
- Use the correct fuel mix (see the fuel
mixing table).
- Contact an authorized customer
service outlet or send the equipment
to ISC GmbH.
- 14 -
Anleitung_3436062_LB3.indb 14
01.06.12 12:53
GB/IE
11. Declaration of conformity
Einhell Germany AG · Wiesenweg 22 · D-94405 Landau/Isar
Konformitätserklärung
D
erklärt folgende Konformität gemäß EU-Richtlinie und
Normen für Artikel
GB explains the following conformity according to EU directives and norms for the following product
F
déclare la conformité suivante selon la directive CE et les
normes concernant l’article
I
dichiara la seguente conformità secondo la direttiva UE e
le norme per l’articolo
NL verklaart de volgende overeenstemming conform EU
richtlijn en normen voor het product
E
declara la siguiente conformidad a tenor de la directiva y
normas de la UE para el artículo
P
declara a seguinte conformidade, de acordo com a
directiva CE e normas para o artigo
DK attesterer følgende overensstemmelse i medfør af
EU-direktiv samt standarder for artikel
S
förklarar följande överensstämmelse enl. EU-direktiv och
standarder för artikeln
FIN vakuuttaa, että tuote täyttää EU-direktiivin ja standardien
vaatimukset
EE tõendab toote vastavust EL direktiivile ja standarditele
CZ vydává následující prohlášení o shodě podle směrnice EU
a norem pro výrobek
SLO potrjuje sledečo skladnost s smernico EU in standardi za
izdelek
SK vydáva nasledujúce prehlásenie o zhode podľa smernice
EÚ a noriem pre výrobok
H
a cikkekhez az EU-irányvonal és Normák szerint a
következő konformitást jelenti ki
PL deklaruje zgodność wymienionego poniżej artykułu z
następującymi normami na podstawie dyrektywy WE.
BG декларира съответното съответствие съгласно
Директива на ЕС и норми за артикул
LV paskaidro šādu atbilstību ES direktīvai un standartiem
LT apibūdina šį atitikimą EU reikalavimams ir prekės normoms
RO declară următoarea conformitate conform directivei UE şi
normelor pentru articolul
GR δηλώνει την ακόλουθη συμμόρφωση σύμφωνα με την
Οδηγία ΕΚ και τα πρότυπα για το προϊόν
HR potvrđuje sljedeću usklađenost prema smjernicama EU i
normama za artikl
Izjava o sukladnosti za ovaj proizvod dostupna je na
internet stranici www.lidl.hr.
BIH potvrđuje sljedeću usklađenost prema smjernicama EU i
normama za artikl
RS potvrđuje sledeću usklađenost prema smernicama EZ i
normama za artikal
RUS следующим удостоверяется, что следующие продукты
соответствуют директивам и нормам ЕС
UKR проголошує про зазначену нижче відповідність виробу
директивам та стандартам ЄС на виріб
MK ја изјавува следната сообрзност согласно
ЕУ-директивата и нормите за артикли
TR Ürünü ile ilgili AB direktifleri ve normları gereğince aşağıda
açıklanan uygunluğu belirtir
N
erklærer følgende samsvar i henhold til EU-direktivet og
standarder for artikkel
IS Lýsir uppfyllingu EU-reglna og annarra staðla vöru
Benzin-Rückenlaubbläser FBLB 33 A1 (Florabest)
87/404/EC_2009/105/EC
X 2006/42/EC
Annex IV
2005/32/EC_2009/125/EC
Notified Body:
Notified Body No.:
Reg. No.:
2006/95/EC
2006/28/EC
X 2000/14/EC_2005/88/EC
X Annex V
X 2004/108/EC
2004/22/EC
Annex VI
1999/5/EC
Noise measured: LWA = 107 dB (A); guaranteed LWA = 111 dB (A)
P = 0,9 KW; L/Ø = cm
Notified Body:
97/23/EC
90/396/EC_2009/142/EC
X 2006/28/EC
Emission No.: e11*97/68SA*2004/26*0643*00
89/686/EC_96/58/EC
2011/65/EC
Standard references: EN 15503; EN 14982
Landau/Isar, den 24.05.2012
Weichselgartner/General-Manager
First CE: 12
Art.-No.: 34.360.62
I.-No.: 11012
Subject to change without notice
Sun/Product-Management
Archive-File/Record: NAPR005898
Documents registrar: Robert Mayn
Wiesenweg 22, D-94405 Landau/Isar
- 15 -
Anleitung_3436062_LB3.indb 15
01.06.12 12:53
GB/IE
12. Warranty certificate
Dear Customer,
All of our products undergo strict quality checks to ensure that they reach you in perfect condition. In the unlikely event
that your device develops a fault, please contact our service department at the address shown on this guarantee card.
Of course, if you would prefer to call us then we are also happy to offer our assistance under the service number printed below. Please note the following terms under which guarantee claims can be made:
1.
These guarantee terms cover additional guarantee rights and do not affect your statutory warranty rights. We do
not charge you for this guarantee.
2. Our guarantee only covers problems caused by material or manufacturing defects, and it is restricted to the rectification of these defects or replacement of the device. Please note that our devices have not been designed for
use in commercial, trade or industrial applications. Consequently, the guarantee is invalidated if the equipment
is used in commercial, trade or industrial applications or for other equivalent activities. The following are also
excluded from our guarantee: compensation for transport damage, damage caused by failure to comply with
the installation/assembly instructions or damage caused by unprofessional installation, failure to comply with the
operating instructions (e.g. connection to the wrong mains voltage or current type), misuse or inappropriate use
(such as overloading of the device or use of non-approved tools or accessories), failure to comply with the maintenance and safety regulations, ingress of foreign bodies into the device (e.g. sand, stones or dust), effects of
force or external influences (e.g. damage caused by the device being dropped) and normal wear resulting from
proper operation of the device. This applies in particular to rechargeable batteries for which we nevertheless
issue a guarantee period of 12 months. The guarantee is rendered null and void if any attempt is made to tamper
with the device.
3. The guarantee is valid for a period of 3 years starting from the purchase date of the device. Guarantee claims
should be submitted before the end of the guarantee period within two weeks of the defect being noticed. No
guarantee claims will be accepted after the end of the guarantee period. The original guarantee period remains
applicable to the device even if repairs are carried out or parts are replaced. In such cases, the work performed
or parts fitted will not result in an extension of the guarantee period, and no new guarantee will become active
for the work performed or parts fitted. This also applies when an on-site service is used.
4. In order to assert your guarantee claim, please send your defective device postage-free to the address shown
below. Please enclose either the original or a copy of your sales receipt or another dated proof of purchase.
Please keep your sales receipt in a safe place, as it is your proof of purchase. It would help us if you could describe the nature of the problem in as much detail as possible. If the defect is covered by our guarantee then your
device will either be repaired immediately and returned to you, or we will send you a new device.
Of course, we are also happy offer a chargeable repair service for any defects which are not covered by the scope
of this guarantee or for units which are no longer covered. To take advantage of this service, please send the device
to our service address.
Einhell UK Ltd
Morpeth Wharf
Twelve Quays
Birkenhead, Wirral
CH41 1LF
Tel. 0151 6491500, Fax 0151 6491501
IAN 76160
- 16 -
Anleitung_3436062_LB3.indb 16
01.06.12 12:53
DE/AT/CH
Inhaltsverzeichnis
1. Einleitung ................................................................................................................................................... 18
2. Sicherheitshinweise .................................................................................................................................. 18
3. Gerätebeschreibung und Lieferumfang .................................................................................................. 19
4. Bestimmungsgemäße Verwendung .........................................................................................................20
5. Technische Daten ......................................................................................................................................20
6. Vor Inbetriebnahme .................................................................................................................................. 21
7. Bedienung ................................................................................................................................................. 21
8. Reinigung, Wartung, Lagerung, Wiederinbetriebnahme, Transport und Ersatzteilbestellung ...........23
9. Entsorgung und Wiederverwertung ........................................................................................................24
10. Fehlersuchplan ..........................................................................................................................................25
11. Konformitätserklärung ..............................................................................................................................26
12. Garantieurkunde .......................................................................................................................................27
Der Nachdruck oder sonstige Vervielfältigung von Dokumentation und Begleitpapieren der Produkte,
auch auszugsweise, ist nur mit ausdrücklicher Zustimmung der iSC GmbH zulässig.
Technische Änderungen vorbehalten
- 17 -
Anleitung_3436062_LB3.indb 17
01.06.12 12:53
DE/AT/CH
1. Einleitung
Herzlichen Glückwunsch zum Kauf Ihres neuen
Gerätes.
Sie haben sich damit für ein hochwertiges Produkt
entschieden. Die Bedienungsanleitung ist Bestandteil dieses Produkts. Sie enthält wichtige Hinweise
für Sicherheit, Gebrauch und Entsorgung. Machen Sie sich vor der Benutzung des Produkts mit
allen Bedien- und Sicherheitshinweisen vertraut.
Benutzen Sie das Produkt nur wie beschrieben
und für die angegebenen Einsatzbereiche. Händigen Sie alle Unterlagen bei Weitergabe des
Produkts an Dritte mit aus.
2. Sicherheitshinweise
Warnung
Lesen Sie alle Sicherheitshinweise und
Anweisungen. Versäumnisse bei der Einhaltung
der Sicherheitshinweise und Anweisungen können
elektrischen Schlag, Brand und/oder schwere
Verletzungen verursachen. Bewahren Sie alle
Sicherheitshinweise und Anweisungen
für die Zukunft auf.
Erklärung der Hinweisschilder auf dem
Gerät (siehe Bild 9)
1. Bedienungsanleitung vor Gebrauch des Gerätes lesen
2. Schutzbrille tragen, um Augen zu schützen
Ohrschützer zum Schutz gegen Lärm tragen
3. Warnung! Gefahr!
4. Halten Sie Umstehende fern!
5. Warnung! Heisse Oberfläche
6. Kraftstoffpumpe
7. Arbeiten Sie nie, während Leute, besonders
Kinder oder Tiere, sich im Gefahrenbereich
aufhalten.
8. Schallleistungspegel entsprechend der Richtlinie 2000/14/EC.
9. Der Motor dreht nach Ausschalten des Gerätes noch nach.
1. Tragen Sie enganliegende, strapazierfähige
Arbeitskleidung/ Sicherheitskleidung, diese
sollte zweckmäßig sein und darf nicht behindern (lange Hose oder Kombianzug). Tragen
Sie des Weiteren Sicherheitsarbeitsschuhe,
feste Handschuhe, Schutzhelm, Gesichtsschutz und Schutzbrille zum Schutz der Augen
und Gehörschutzstöpsel oder ähnlichen Gehörschutz.
2. Kraftstoff auffüllen an einem sicheren Ort.
Tankverschluss vorsichtig öffnen, damit bestehender Überdruck sich langsam abbauen
kann und kein Kraftstoff herausspritzt. Vor
dem Starten des Motors säubern Sie das
Motorgerät von eventuellen Kraftstoff- oder
Ölrückständen. Starten Sie den Motor mindestens 3m vom Ort des Tankens entfernt.
3. Schalten Sie den Motor des Geräts stets aus,
wenn Sie es abstellen und bevor Sie Arbeiten
am Gerät durchführen.
4. Überprüfen Sie den festen Sitz aller Schrauben und Verschlüsse. Das Gerät darf nur in
betriebsicherem Zustand benutzt werden. Benutzen Sie das Gerät niemals, wenn es nicht
ordnungsgemäß eingestellt und komplett und
sicher zusammengebaut ist.
5. Halten Sie die Griffe trocken, sauber und frei
von Kraftstoffmischung.
6. Lagern Sie das Gerät und Zubehör sicher und
geschützt vor offenen Flammen und Hitze-/
Funkenquellen, wie Gasdurchlauferhitzer,
Wäschetrockner, Ölöfen oder tragbare Radiatoren, etc..
7. Halten Sie den Motor frei von Schmutz.
8. Nur ausreichend geschulte Personen und
Erwachsene dürfen das Gerät bedienen, einstellen und warten.
9. Bedienpersonal mit Atemwegsproblemen und
Personen, die in einer sehr staubigen Umgebung arbeiten, sollten stets eine hochwertige
Staubmaske tragen. Papierstaubmasken sind
erhältlich in gängigen Farb- und Haushaltswarengeschäften.
10. Arbeiten Sie mit dem Gerät nur zu angemessenen Zeiten. Nicht früh morgens oder spät
abends, wenn Leute gestört werden könnten.
Beachten Sie die örtlichen Lärmschutzverordnungen.
- 18 -
Anleitung_3436062_LB3.indb 18
01.06.12 12:53
DE/AT/CH
11. Lassen Sie das Gerät mit der niedrigst möglichen Motordrehzahl laufen, um die Arbeit zu
erledigen.
12. Befreien Sie das Gerät vor dem Arbeiten mit
Besen und Kratzeisen vor Verunreinigungen.
13. Bei staubigen Bedingungen befeuchten Sie
die Oberfläche etwas.
14. Verwenden Sie die volle Gebläsedüseverlängerung, so dass der Luftstrom nah am Boden
arbeiten kann.
15. Schauen Sie nach Kindern, Haustieren, offenen Fenstern etc. und blasen Sie den Schmutz
sicher weg.
16. Nicht rauchen, wenn Sie den Kraftstoff auffüllen oder das Gerät bedienen.
17. Bedienen Sie das Gerät niemals ohne Schalldämpfer und ordnungsgemäß installierter
Auspuffschutzhaube.
18. Halten Sie Ihre Hände oder Körperteile fern
von Auspuff und Zündkabel.
19. Das Motorgerät erzeugt giftige Abgase, sobald der Motor läuft. Arbeiten Sie niemals in
geschlossenen oder schlecht belüfteten Räumen.
20. Niemals in Richtung anderer Personen, Tiere,
Gebäude, Fahrzeuge oder Fenster, etc. blasen! Das Motorgerät kann kleine Gegenstände mit großer Geschwindigkeit hochschleudern.
21. Bedienen Sie das Gerät niemals ohne Blasrohrschutz, um einen Kontakt mit dem Gebläse zu vermeiden.
22. Setzen Sie den heißen Motor nicht in der
Nähe von leicht entflammbaren Gegenständen/ Materialien ab.
23. Benutzen Sie das Gerät nicht über einen
längeren Zeitraum, machen Sie regelmäßig
Pause.
24. Benutzen Sie das Gerät niemals unter Alkohol- oder Drogeneinfluss.
WARNUNG: Jegliche Veränderungen, Zusätze
oder Entfernungen an dem Gerät können die
persönliche Sicherheit gefährden und lassen die
Lieferantengarantie verfallen.
25. Benutzen Sie das Gerät niemals in der Nähe
von leicht entflammbaren Flüssigkeiten oder
Gasen, weder in geschlossenen Räumen noch
Außen. Explosionen und/ oder Brand können
die Folge sein.
26. Tragen Sie keine Kleidung, keinen Schal,
keine Krawatte, keinen Schmuck, die in die
Luftansaugöffnung gelangen können. Lange
Haare zusammenbinden und sichern (z.B.
Kopftuch, Mütze, Helm etc.).
27. Tanken Sie niemals bei laufendem oder heißem Motor.
28. Erlauben Sie niemals Kindern unter 14 Jahren
das Gerät zu bedienen.
Bewahren Sie die Sicherheitshinweise gut
auf.
3. Gerätebeschreibung und
Lieferumfang
3.1 Gerätebeschreibung (Bild 1)
1. Handgriff
2. Gashebel
3. Gashebelarretierung
4. Ein- / Ausschalter
5. Zündkerzenstecker
6. Luftfilterdeckel
7. Choke – Hebel
8. Startergriff (Starterseil)
9. Benzintank
10. Kraftstoffpumpe (Primer)
11. Motoreinheit
12. flexibler Blasschlauch
13. oberes Blasrohr
14. unteres Blasrohr
15. Blasdüse (große Öffnung)
16. Blasdüse (kleine Öffnung)
17. Zündkerzenschlüssel
18. Benzin-/ Ölmischflasche
19. Sechskantschlüssel
20. Gabelschlüssel
- 19 -
Anleitung_3436062_LB3.indb 19
01.06.12 12:53
DE/AT/CH
3.2 Lieferumfang
• Öffnen Sie die Verpackung und nehmen Sie
das Gerät vorsichtig aus der Verpackung.
• Entfernen Sie das Verpackungsmaterial sowie
Verpackungs-/ und Transportsicherungen
(falls vorhanden).
• Überprüfen Sie, ob der Lieferumfang vollständig ist.
• Kontrollieren Sie das Gerät und die Zubehörteile auf Transportschäden.
• Bewahren Sie die Verpackung nach Möglichkeit bis zum Ablauf der Garantiezeit auf.
5. Technische Daten
Achtung!
Gerät und Verpackungsmaterial sind
kein Kinderspielzeug! Kinder dürfen nicht
mit Kunststoffbeuteln, Folien und Kleinteilen spielen! Es besteht Verschluckungsund Erstickungsgefahr!
Geräusch und Vibration
Schalldruckpegel LpA ................................ 97 dB(A)
Unsicherheit KpA ............................................ 1,5 dB
Schallleistungspegel LWA.......................... 111 dB(A)
Unsicherheit KWA ........................................... 1,5 dB
4. Bestimmungsgemäße
Verwendung
Das Gerät ist zur Reinigung von Gehwegen,
Hofeinfahrten und sonstigen Wegen geeignet.
Eine anderweitige Verwendung, wie z.B. das Aufblasen von Gegenständen ist nicht erlaubt.
Das Gerät darf nur nach dessen Bestimmung verwendet werden. Jede weitere darüber hinausgehende Verwendung ist nicht bestimmungsgemäß.
Für daraus hervorgerufene Schäden oder Verletzungen aller Art haftet der Benutzer/Bediener
und nicht der Hersteller.
Bitte beachten Sie, dass unsere Geräte bestimmungsgemäß nicht für den gewerblichen, handwerklichen oder industriellen Einsatz konstruiert
wurden. Wir übernehmen keine Gewährleistung,
wenn das Gerät in Gewerbe-, Handwerks- oder
Industriebetrieben sowie bei gleichzusetzenden
Tätigkeiten eingesetzt wird.
Motortyp .........................2-Takt-Motor; luftgekühlt
Motorleistung (max.) ..................0,9 kW/1,22 PS
Hubraum ...................................................... 33 ccm
Max. Drehzahl Motor ...........................8500 min-1
Zündung.................................................elektronisch
Gewicht (leerer Tank) .................................. 6,3 kg
Tankinhalt ..................................................... 650 ml
Zündkerze...................................................... RCJ6Y
Maximale Luftgeschwindigkeit ..............250 km/h
Tragen Sie einen Gehörschutz.
Die Einwirkung von Lärm kann Gehörverlust bewirken.
Betrieb
Schwingungsemissionswert ah = 3,87 m/s2
Unsicherheit K = 1,5 m/s2
Die Geräusch- und Vibrationswerte wurden entsprechend 2000/14/EC ermittelt.
Die Geräusch- und Vibrationswerte wurden bei
Höchstdrehzahl ermittelt.
Beschränken Sie die Geräuschentwicklung und Vibration auf ein Minimum!
• Verwenden Sie nur einwandfreie Geräte.
• Warten und reinigen Sie das Gerät regelmäßig.
• Passen Sie Ihre Arbeitsweise dem Gerät an.
• Überlasten Sie das Gerät nicht.
• Lassen Sie das Gerät gegebenenfalls überprüfen.
• Schalten Sie das Gerät aus, wenn es nicht
benutzt wird.
• Tragen Sie Handschuhe.
- 20 -
Anleitung_3436062_LB3.indb 20
01.06.12 12:53
DE/AT/CH
6. Vor Inbetriebnahme
6.1 Blasrohrmontage (Abb. 2-3)
Vor Erstinbetriebnahme muss das Gerät wie folgt
zusammengebaut werden:
• Vor Erstinbetriebnahme den Pappe- Transportschutz, wie in Abbildung 2 zu sehen
entfernen.
• Den flexiblen Blasschlauch (Abb. 2a/ Pos.
12) über den Anschluss an der Motoreinheit
schieben und die Schlauchschelle (Abb. 2a/
Pos. A) fest anziehen.
• Nun den Handgriff (Abb. 2b/Pos. 1) über
das obere Blasrohr (Abb. 2b/Pos. 13) schieben.
• Den Handgriff (Abb. 2c/Pos. 1) und den Anschlag (Abb. 2c/Pos. B) wie in Abbildung 2c
zu sehen gleich ausrichten und den Handgriff
festschrauben.
• Den flexiblen Ring ( Abb. 2c/Pos. C) in Mittelstellung bringen, so dass dieser in Drehrichtung links und rechts gleich viel Abstand zum
Anschlag B hat.
• Nun das obere Blasrohr (Abb. 2c/ Pos. 13) in
den flexiblen Blasschlauch (Abb. 2c/ Pos. 12)
schieben und mit der Schlauchschelle (Abb.
2c/ Pos. D) fixieren.
• Den Kabelschlauch mit dem Haltebügel (Abb.
3/Pos. E) an dem flexiblen Blasschlauch
(Abb. 3/Pos. 12) fixieren.
• Das untere Blasrohr (Abb. 3a/ Pos. 14)
über das obere Blasrohr (Abb. 3a/Pos. 13)
schieben und durch Drehen im Uhrzeigersinn
arretieren.
• Es kann entweder die Blasdüse mit großer
oder kleiner Öffnung montiert werden. Die
Blasdüsen über das Blasrohr schieben und
durch Drehen im Uhrzeigersinn arretieren.
6.2 Treibstoff und Öl
Benutzen Sie nur ein Gemisch aus bleifreiem
Benzin und speziellem 2-Takt-Motoröl. Mischen
Sie das Treibstoffgemisch nach der TreibstoffMischtabelle an.
Achtung: Verwenden Sie kein Treibstoffgemisch,
das mehr als 90 Tage lang gelagert wurde.
Achtung: Verwenden Sie kein 2-Takt-Öl das ein
Mischverhältnis von 100:1 empfiehlt. Bei Moto-
renschäden auf Grund ungenügender Schmierung
entfällt die Motorgarantie des Herstellers.
Achtung: Verwenden Sie zum Transport und zur
Lagerung von Kraftstoff nur dafür vorgesehene
und zugelassene Behälter.
Geben Sie jeweils die richtige Menge Benzin und
2-Takt-Öl in die beiliegende Mischflasche (siehe
aufgedruckte Skala). Schütteln Sie anschließend
den Behälter gut durch.
6.3 Treibstoff-Misch-Tabelle
Mischverfahren: 40 Teile Benzin auf 1 Teil Öl
Benzin
2-Takt-Öl
1 Liter
25 ml
5 Liter
125 ml
7. Bedienung
Beachten Sie bitte die gesetzlichen Bestimmungen
zur Lärmschutzverordnung, die örtlich unterschiedlich sein können.
7.1 Kaltstart (4a-4b)
Füllen Sie den Tank mit einer angemessenen Menge Benzin-/Ölgemisch. Siehe auch „Treibstoff
und Öl.“
1. Gerät sicher und fest auf den Boden stellen.
2. Ein-/ Ausschalter (4) auf „ON“ stellen (Abb.
4a)
3. Kraftstoffpumpe (10) 10x drücken (Abb. 4b).
4. Chokehebel (7) auf „ “stellen.
5. Gerät am Haltegriff gut festhalten.
6. Starterseil (8) ein kurzes Stück herausziehen,
bis Sie einen Widerstand spüren. Ein gleichmäßiges, schnelles Ziehen ist erforderlich um
den Motor zu starten. Läuft der Motor, den
Chokehebel auf „ “ stellen.
7. Den Motor zum Aufwärmen für ca. 10 Sekunden laufen lassen.
Hinweis: Startet der Motor nach wiederholten
Versuchen nicht, verfahren Sie bitte wie in Kapitel
“Fehlersuchplan“.
Hinweis: Ziehen Sie das Starterseil immer gerade heraus. Bei schrägem Herausziehen reibt
das Seil an der Öse. Diese Reibung verursacht
- 21 -
Anleitung_3436062_LB3.indb 21
01.06.12 12:53
DE/AT/CH
Um die Blasrichtung besser zu steuern, halten
Sie stets einen ausreichenden Abstand von dem
wegzublasenden Material. Blasen Sie niemals in
Richtung Umherstehender.
Bevor Sie das Gerät verwenden, lösen bzw.
entfernen Sie von der zu reinigenden Fläche
Fremdkörper mit einem Rechen oder Besen um,
Verletzungen auszuschließen.
Steuern Sie die Luftstromgeschwindigkeit durch
Bedienen des Gashebels zwischen Leerlauf- und
Vollgasstellung. Testen Sie unterschiedliche Gashebelstellungen, um die optimale Luftstromgeschwindigkeit für die jeweiligen Anwendungen zu
finden.
Achtung: Zum Schutz vor aufgewirbelten oder
weg geschleuderten Gegenständen tragen Sie
stets eine Schutzbrille oder einen Gesichtsschutz.
ein Aufspleissen des Fadens und somit höheren
Verschleiß. Halten Sie den Startergriff immer fest,
wenn das Seil zurückgezogen wird. Achten Sie
darauf, dass das Seil nicht zurückschnellt wenn es
herausgezogen war. Dies könnte ein Verhaken/
höheren Verschleiß des Seils und/ oder einen
Schaden am Startergehäuse hervorrufen.
7.2 Warmstart (Motor abgestellt für nicht
mehr als 15- 20 Minuten)
1. Stellen Sie den Ein-/Ausschalter (Abb. 1/
Pos. 4) auf „On“ und ziehen Sie am Starterseil (Abb.1/Pos. 8). Der Motor sollte mit ein
oder zwei Zügen starten. Startet der Motor
nach 6-maligem Ziehen nicht, wiederholen
Sie die Schritte 2 bis 6 siehe Kapitel „Kaltstart“.
2. Wenn der Motor nicht startet, oder startet und
nach mehreren Zügen wieder stoppt, folgen
Sie den Anweisungen im Kapitel „Kaltstart“.
7.3 Motor abstellen
Not-Aus Schrittfolge:
Wenn es notwendig ist das Blasgerät unmittelbar
zu stoppen (Notfall!), schalten Sie den Zündschalter (Abb. 1/Pos. 4) auf „OFF“.
Normale Schrittfolge:
Zum Abstellen des Motors, die Gashebelarretierung zurückschieben, so dass der Motor im Leerlauf läuft. Anschließend den Ein-/Aussschalter
(Abb. 1/Pos. 4) auf „OFF“ stellen.
7.4 Blasbetrieb
Ihr Laubblasgerät ist geeignet zum Freiblasen von
Terrassen, Gehwegen, Rasen, Sträuchern und
vielen schwer zugänglichen Flächen, wo sich
Schmutz ansammeln kann.
Bevor Sie das Gerät bedienen, lesen Sie zu Ihrer
eigenen Sicherheit bitte noch mal alle Sicherheitshinweise und Gebrauchsanweisungen der vorliegenden Bedienungsanleitung durch.
Benutzen Sie das Gerät nicht, wenn Umherstehende oder Tiere sich in unmittelbarer Nähe befinden. Halten Sie einen Mindestabstand von 10m
zu anderen Personen oder Tieren.
Tragen Sie bei Arbeiten in einer sehr staubigen
Umgebung eine Staub-/Atemmaske.
Achtung: Führen Sie das Gerät stets so, dass die
heißen Abgase nicht in Kontakt mit Ihrer Kleidung
kommen und diese beschädigen oder vom Benutzer eingeatmet werden.
Um das Gerät zu Bedienen:
Folgen Sie den Motorstartanweisungen wie im
Kapitel 7.1 bzw. 7.2 beschrieben.
Lassen Sie den Motor im Leerlauf laufen und legen Sie das Gerät wie in Abbildung 5 zu sehen
an. Achten sie darauf, dass nichts den Auspuff
verdeckt, da dieser Hitze erzeugt.
Halten Sie den Handgriff mit der rechten Hand
fest (Abb. 6) und schwingen Sie das Blasrohr hin
und her, so dass die gewünschte Fläche von Verunreinigung befreit wird.
Im Handgriff (Abb. 4a/Pos. 1) sind der Gashebel
(Abb. 4a/Pos. 2) und der Ein- /Ausschalter (Abb.
4a/Pos. 4) integriert.
Mit der Gashebelarretierung (Abb. 4a/Pos. 3)
kann der Motor auf Vollgas arretiert werden ohne
ständig den Gashebel zu drücken.
Achtung: Vor dem Ausschalten des Geräts die
Gashebelarretierung auf Standgas zurück schieben.
- 22 -
Anleitung_3436062_LB3.indb 22
01.06.12 12:53
DE/AT/CH
8. Reinigung,
Wartung, Lagerung,
Wiederinbetriebnahme,
Transport und
Ersatzteilbestellung
Wartung der Zündkerze (Abb. 8a-8b)
Zündkerzenfunkenstrecke = 0,6 mm. Ziehen Sie
die Zündkerze mit 12 bis 15 Nm an. Überprüfen
Sie die Zündkerze erstmals nach 10 Betriebsstunden auf Verschmutzung und reinigen Sie diese gegebenenfalls mit einer Kupferdrahtbürste. Danach
die Zündkerze alle 50 Betriebsstunden warten.
1. Ziehen Sie den Zündkerzenstecker (Abb. 8a)
mit einer Drehbewegung ab.
2. Entfernen Sie die Zündkerze (Abb. 8b) mit
dem beiliegenden Zündkerzenschlüssel.
3. Der Zusammenbau erfolgt in umgekehrter Reihenfolge.
Schalten Sie das Gerät vor Wartungsarbeiten
immer aus und ziehen Sie den Zündkerzenstecker
ab.
8.1 Reinigung
• Halten Sie Schutzvorrichtungen, Luftschlitze
und Motorengehäuse so staub- und schmutzfrei wie möglich. Reiben Sie das Gerät mit
einem sauberen Tuch ab oder blasen Sie es
mit Druckluft bei niedrigem Druck aus.
• Wir empfehlen, dass Sie das Gerät direkt
nach jeder Benutzung reinigen.
• Reinigen Sie das Gerät regelmäßig mit einem
feuchten Tuch und etwas Schmierseife. Verwenden Sie keine Reinigungs- oder Lösungsmittel; diese könnten die Kunststoffteile des
Gerätes angreifen. Achten Sie darauf, dass
kein Wasser in das Geräteinnere gelangen
kann.
8.2 Wartung
Wartung des Luftfilters (Abb. 7a-7b)
Verschmutzte Luftfilter verringern die Motorleistung durch zu geringe Luftzufuhr zum Vergaser.
Regelmäßige Kontrolle ist daher unerlässlich. Der
Luftfilter sollte alle 25 Betriebsstunden kontrolliert
werden und bei Bedarf gereinigt werden. Bei sehr
staubiger Luft ist der Luftfilter häufiger zu überprüfen.
1. Entfernen Sie den Luftfilterdeckel (Abb. 7a)
2. Entnehmen Sie das Filterelement (Abb. 7b)
3. Reinigen Sie das Filterelement durch Ausklopfen oder Ausblasen.
4. Der Zusammenbau erfolgt in umgekehrter Reihenfolge.
Achtung: Luftfilter nie mit Benzin oder brennbaren Lösungsmitteln reinigen.
8.3 Lagerung
Achtung: Ein Fehler bei der Befolgung dieser
Schritte kann zur Folge haben, dass sich Ablagerungen an der Vergaserinnenwand bilden, was
ein erschwertes Anlassen oder einen dauerhaften
Schaden an dem Gerät zur Folge haben kann.
1. Führen Sie alle allgemeinen Wartungsarbeiten durch, welche im Abschnitt „Wartung“ in
der Bedienungsanleitung stehen.
2. Lassen Sie den Treibstoff aus dem Tank ab
(Benutzen Sie hierzu eine handelsübliche
Kunststoff-Benzinpumpe).
3. Nachdem der Treibstoff abgelassen ist, starten Sie das Gerät.
4. Lassen Sie das Gerät im Leerlauf weiterlaufen
bis sie stoppt. Das reinigt den Vergaser vom
restlichen Treibstoff.
5. Lassen Sie das Gerät abkühlen. (ca. 5 Minuten)
6. Entfernen Sie die Zündkerze.
7. Füllen Sie eine Teelöffel große Menge 2-TaktMotoröl in den Verbrennungsraum. Ziehen
Sie einige Male vorsichtig den Startseilzug
heraus, um die inneren Bauteile mit dem Öl zu
benetzen. Setzen Sie die Zündkerze wieder
ein.
8. Säubern Sie das äußere Gehäuse des Geräts.
9. Bewahren Sie das Gerät an einem kalten,
trockenen Platz außerhalb der Reichweite von
Zündquellen und brennbaren Substanzen auf.
Düngemittel oder andere chemische Gartenprodukte beinhalten häufig Substanzen,
welche die Korrosion von Metallen beschleunigen. Lagern Sie das Gerät nicht auf oder
- 23 -
Anleitung_3436062_LB3.indb 23
01.06.12 12:53
DE/AT/CH
in der Nähe von Düngmittel oder anderen
Chemikalien.
8.4 Wiederinbetriebnahme
1. Entfernen Sie die Zündkerze.
2. Ziehen Sie den Startseilzug mehrmals heraus,
um den Verbrennungsraum von Ölrückständen zu reinigen.
3. Säubern Sie die Zündkerzenkontakte oder
setzen Sie eine neue Zündkerze ein.
4. Füllen Sie den Tank. Siehe Abschnitt „Treibstoff und Öl“.
5. Führen Sie die Schritte 1-7 unter Punkt „Kaltstart“ durch.
8.5 Transport
Wenn Sie das Gerät transportieren möchten, entleeren Sie den Benzintank wie im Kapitel
„Lagerung“ erklärt. Reinigen Sie das Gerät mit
einer Bürste oder einem Handfeger von grobem
Schmutz.
8.6 Ersatzteilbestellung:
Bei der Ersatzteilbestellung sollten folgende Angaben gemacht werden:
• Typ des Gerätes
• Artikelnummer des Gerätes
• Ident-Nummer des Gerätes
Aktuelle Preise und Infos finden Sie unter:
www.isc-gmbh.info
9. Entsorgung und
Wiederverwertung
Das Gerät befindet sich in einer Verpackung,
um Transportschäden zu verhindern. Diese
Verpackung ist Rohstoff und ist somit wieder
verwendbar oder kann dem Rohstoffkreislauf
zurückgeführt werden. Das Gerät und dessen
Zubehör bestehen aus verschiedenen Materialien,
wie z.B. Metall und Kunststoffe. Führen Sie defekte
Bauteile der Sondermüllentsorgung zu. Fragen Sie
im Fachgeschäft oder in der Gemeindeverwaltung
nach!
- 24 -
Anleitung_3436062_LB3.indb 24
01.06.12 12:53
DE/AT/CH
10. Fehlersuchplan
Störung
Das Gerät springt
nicht an.
Mögliche Ursache
- Fehlerhaftes Vorgehen beim Starten.
- Verrußte oder feuchte Zündkerze.
- Falsche Vergasereinstellung.
Störungsbehebung
- Folgen Sie den Anweisungen zum
Starten.
- Zündkerze reinigen oder durch
neue ersetzen. (siehe Kapitel 8.2)
- Autorisierten Kundendienst aufsuchen, oder das Gerät an die ISCGmbH senden.
Das Gerät springt
an, hat aber nicht
die volle Leistung.
- Falsche Einstellung des Chokehebels.
- Verschmutzter Luftfilter.
- Falsche Vergasereinstellung.
- Chokehebel (Abb. 1/Pos. 7) auf
„ “ stellen.
- Luftfilter reinigen. (siehe Kapitel 8.2)
- Autorisierten Kundendienst aufsuchen, oder das Gerät an die ISCGmbH senden.
Der Motor läuft unregelmäßig.
- Falscher Elektrodenabstand der
Zündkerze.
- Zündkerze reinigen und Elektrodenabstand einstellen oder neue Zündkerze einsetzen. (siehe Kapitel 8.2)
- Autorisierten Kundendienst aufsuchen, oder das Gerät an die ISCGmbH senden.
- Falsche Vergasereinstellung.
Motor raucht übermäßig.
- Falsche Treibstoffmischung.
- Falsche Vergasereinstellung.
- Richtige Treibstoffmischung verwenden (siehe Treibstoff-Misch-Tabelle).
- Autorisierten Kundendienst aufsuchen, oder das Gerät an die ISCGmbH senden.
- 25 -
Anleitung_3436062_LB3.indb 25
01.06.12 12:53
DE/AT/CH
11. Konformitätserklärung
Einhell Germany AG · Wiesenweg 22 · D-94405 Landau/Isar
Konformitätserklärung
D
GB
F
I
NL
E
P
DK
S
FIN
EE
CZ
SLO
SK
H
erklärt folgende Konformität gemäß EU-Richtlinie und
Normen für Artikel
explains the following conformity according to EU directives and norms for the following product
déclare la conformité suivante selon la directive CE et les
normes concernant l’article
dichiara la seguente conformità secondo la direttiva UE e
le norme per l’articolo
verklaart de volgende overeenstemming conform EU
richtlijn en normen voor het product
declara la siguiente conformidad a tenor de la directiva y
normas de la UE para el artículo
declara a seguinte conformidade, de acordo com a
directiva CE e normas para o artigo
attesterer følgende overensstemmelse i medfør af
EU-direktiv samt standarder for artikel
förklarar följande överensstämmelse enl. EU-direktiv och
standarder för artikeln
vakuuttaa, että tuote täyttää EU-direktiivin ja standardien
vaatimukset
tõendab toote vastavust EL direktiivile ja standarditele
vydává následující prohlášení o shodě podle směrnice EU
a norem pro výrobek
potrjuje sledečo skladnost s smernico EU in standardi za
izdelek
vydáva nasledujúce prehlásenie o zhode podľa smernice
EÚ a noriem pre výrobok
a cikkekhez az EU-irányvonal és Normák szerint a
következő konformitást jelenti ki
PL
deklaruje zgodność wymienionego poniżej artykułu z
następującymi normami na podstawie dyrektywy WE.
BG декларира съответното съответствие съгласно
Директива на ЕС и норми за артикул
LV paskaidro šādu atbilstību ES direktīvai un standartiem
LT apibūdina šį atitikimą EU reikalavimams ir prekės normoms
RO declară următoarea conformitate conform directivei UE şi
normelor pentru articolul
GR δηλώνει την ακόλουθη συμμόρφωση σύμφωνα με την
Οδηγία ΕΚ και τα πρότυπα για το προϊόν
HR potvrđuje sljedeću usklađenost prema smjernicama EU i
normama za artikl
Izjava o sukladnosti za ovaj proizvod dostupna je na
internet stranici www.lidl.hr.
BIH potvrđuje sljedeću usklađenost prema smjernicama EU i
normama za artikl
RS potvrđuje sledeću usklađenost prema smernicama EZ i
normama za artikal
RUS следующим удостоверяется, что следующие продукты
соответствуют директивам и нормам ЕС
UKR проголошує про зазначену нижче відповідність виробу
директивам та стандартам ЄС на виріб
MK ја изјавува следната сообрзност согласно
ЕУ-директивата и нормите за артикли
TR Ürünü ile ilgili AB direktifleri ve normları gereğince aşağıda
açıklanan uygunluğu belirtir
N
erklærer følgende samsvar i henhold til EU-direktivet og
standarder for artikkel
IS Lýsir uppfyllingu EU-reglna og annarra staðla vöru
Benzin-Rückenlaubbläser FBLB 33 A1 (Florabest)
87/404/EC_2009/105/EC
X 2006/42/EC
Annex IV
2005/32/EC_2009/125/EC
Notified Body:
Notified Body No.:
Reg. No.:
2006/95/EC
2006/28/EC
X 2000/14/EC_2005/88/EC
X Annex V
X 2004/108/EC
2004/22/EC
Annex VI
1999/5/EC
Noise measured: LWA = 107 dB (A); guaranteed LWA = 111 dB (A)
P = 0,9 KW; L/Ø = cm
Notified Body:
97/23/EC
90/396/EC_2009/142/EC
X 2006/28/EC
Emission No.: e11*97/68SA*2004/26*0643*00
89/686/EC_96/58/EC
2011/65/EC
Standard references: EN 15503; EN 14982
Landau/Isar, den 24.05.2012
Weichselgartner/General-Manager
First CE: 12
Art.-No.: 34.360.62
I.-No.: 11012
Subject to change without notice
Sun/Product-Management
Archive-File/Record: NAPR005898
Documents registrar: Robert Mayn
Wiesenweg 22, D-94405 Landau/Isar
- 26 -
Anleitung_3436062_LB3.indb 26
01.06.12 12:53
DE/AT/CH
12. Garantieurkunde
Sehr geehrte Kundin, sehr geehrter Kunde,
unsere Produkte unterliegen einer strengen Qualitätskontrolle. Sollte dieses Gerät dennoch einmal nicht einwandfrei
funktionieren, bedauern wir dies sehr und bitten Sie, sich an unseren Servicedienst unter der auf dieser Garantiekarte
angegebenen Adresse zu wenden. Gern stehen wir Ihnen auch telefonisch über die unten angegebene Servicerufnummer zur Verfügung. Für die Geltendmachung von Garantieansprüchen gilt folgendes:
1. Diese Garantiebedingungen regeln zusätzliche Garantieleistungen. Ihre gesetzlichen Gewährleistungsansprüche
werden von dieser Garantie nicht berührt. Unsere Garantieleistung ist für Sie kostenlos.
2. Die Garantieleistung erstreckt sich ausschließlich auf Mängel, die auf Material- oder Herstellungsfehler zurückzuführen sind und ist auf die Behebung dieser Mängel bzw. den Austausch des Gerätes beschränkt. Bitte beachten Sie, dass unsere Geräte bestimmungsgemäß nicht für den gewerblichen, handwerklichen oder industriellen
Einsatz konstruiert wurden. Ein Garantievertrag kommt daher nicht zustande, wenn das Gerät in Gewerbe-,
Handwerks- oder Industriebetrieben sowie bei gleichzusetzenden Tätigkeiten eingesetzt wird. Von unserer
Garantie sind ferner Ersatzleistungen für Transportschäden, Schäden durch Nichtbeachtung der Montageanleitung oder aufgrund nicht fachgerechter Installation, Nichtbeachtung der Gebrauchsanleitung (wie durch z.B.
Anschluss an eine falsche Netzspannung oder Stromart), missbräuchliche oder unsachgemäße Anwendungen
(wie z.B. Überlastung des Gerätes oder Verwendung von nicht zugelassenen Einsatzwerkzeugen oder Zubehör),
Nichtbeachtung der Wartungs- und Sicherheitsbestimmungen, Eindringen von Fremdkörpern in das Gerät (wie
z.B. Sand, Steine oder Staub), Gewaltanwendung oder Fremdeinwirkungen (wie z. B. Schäden durch Herunterfallen) sowie durch verwendungsgemäßen, üblichen Verschleiß ausgeschlossen. Dies gilt insbesondere für Akkus,
auf die wir dennoch eine Garantiezeit von 12 Monaten gewähren. Der Garantieanspruch erlischt, wenn an dem
Gerät bereits Eingriffe vorgenommen wurden.
3. Die Garantiezeit beträgt 3 Jahre und beginnt mit dem Kaufdatum des Gerätes. Garantieansprüche sind vor Ablauf der Garantiezeit innerhalb von zwei Wochen, nachdem Sie den Defekt erkannt haben, geltend zu machen.
Die Geltendmachung von Garantieansprüchen nach Ablauf der Garantiezeit ist ausgeschlossen. Die Reparatur
oder der Austausch des Gerätes führt weder zu einer Verlängerung der Garantiezeit noch wird eine neue Garantiezeit durch diese Leistung für das Gerät oder für etwaige eingebaute Ersatzteile in Gang gesetzt. Dies gilt
auch bei Einsatz eines Vor-Ort-Services.
4. Für die Geltendmachung Ihres Garantieanspruches übersenden Sie bitte das defekte Gerät portofrei an die unten
angegebene Adresse. Fügen Sie den Verkaufsbeleg im Original oder einen sonstigen datierten Kaufnachweis
bei. Bitte bewahren Sie deshalb den Kassenbon als Nachweis gut auf! Beschreiben Sie uns bitte den Reklamationsgrund möglichst genau. Ist der Defekt des Gerätes von unserer Garantieleistung erfasst, erhalten Sie umgehend ein repariertes oder neues Gerät zurück.
Selbstverständlich beheben wir gegen Erstattung der Kosten auch gerne Defekte am Gerät, die vom Garantieumfang
nicht oder nicht mehr erfasst sind. Dazu senden Sie das Gerät bitte an unsere Serviceadresse.
IAN 76160
- 27 -
Anleitung_3436062_LB3.indb 27
01.06.12 12:53
- 28 -
Anleitung_3436062_LB3.indb 28
01.06.12 12:53
- 29 -
Anleitung_3436062_LB3.indb 29
01.06.12 12:53
IAN: 76160 FBLB 33 A1
Einhell Germany AG
Wiesenweg 22
D-94405 Landau/Isar
Last Information Update · Stand der Informationen:
06/2012 · Ident.-No.: 34.360.62 062012 - 3
IAN 76160
Anleitung_3436062_LB3.indb 30
3
01.06.12 12:53