1
Bedienungsanleitung
User Manual
Mode d'emploi
Manual de instrucciones
Gebruiksaanwijzing
Руководство по эксплуатации
Elements of Lifestyle
Cucinetta
Fire & Sun
Infrarot-Ofen
Infrared oven
Four infrarouge
Horno de infrarrojos
Infrarood- oven
Инфракрасная печь
Technische Daten - Technical data - Caractéristiques techniques Datos técnicos - Technische gegevens - Технические параметры
Modell - Model - Modèle - Modelo - Model - Модель
Typnummer - Type number - Numéro de type N.º de tipo - Typenummer - Номер типа
Abmessungen (L x B x H) - Dimensions (L x W x H) Dimensions (L x l x H) - Dimensiones (F x A x A) Afmetingen (L x B x H) - Размеры (Д х Ш х В)
Gewicht - Weight - Poids - Peso - Gewicht - Вес
Infrarot-Ofen
Infrared oven
Four infrarouge
Horno de infrarrojos
Infrarood- oven
Инфракрасная печь
Cucinetta
B25.001
380 x 450 x 270 mm
8,77 kg
Betriebsspannung - Operating voltage - Tension de service - Tensión de servicio - Bedrijfsspanning - Рабочее
напряжение
220 - 240 V~
Netzfrequenz - Mains frequency - Fréquence secteur Frecuencia de red - Netfrequentie - Частота сети
50Hz
Leistung - Power - Puissance - Potencia - Prestaties Мощность
1300 W
Schutzklasse - Protection class - Classe de protection Categoría de protección - Beschermingsklasse - Класс
защиты
I
Ersatzteile und Zubehör - Spare parts and accessories - Pièces de rechange et
accessoires - Piezas de repuesto y accesorios - Reserveonderdelen en
accessoires - Запасные части и принадлежности
Ersatzteile und Zubehör erhalten Sie über unsere Homepage oder auf Anfrage bei unserem
Kundenservice.
Spare parts and accessories are available on our homepage or on request from our customer
service.
Vous pouvez obtenir les accessoires et les pièces de rechange via notre site Web ou sur demande auprès de notre service après-vente.
Los repuestos y accesorios los puede adquirir en nuestra página web a petición en nuestro
servicio técnico autorizado.
Onderdelen en toebehoren zijn verkrijgbaar via onze homepage of op aanvraag bij onze klantenservice.
Запасные части и принадлежности можно приобрести на нашем сайте в Интернете или
по запросу в нашей сервисной службе.
BEEM - Elements of Lifestyle
1
3
4
5
14
6
7
8
9
10
12
11
2
22
24
20
21
18
19
16
15
5
6
7
23
17
3
8
9
10
4
DE
Urheberrecht
Dieses Dokument ist urheberrechtlich geschützt. Jede Vervielfältigung bzw. jeder
Nachdruck, auch auszugsweise, sowie die
Wiedergabe der Abbildungen, auch im veränderten Zustand, ist nur mit schriftlicher Zustimmung des Herstellers gestattet.
EN
Copyright
This document is copyrighted. Any duplication or reprinting, in whole or in part, and the
reproduction of the illustrations, even in modified form, is only permitted with the written approval of the manufacturer.
FR
Droits d’auteur
Ce document est soumis à la protection des
droits d’auteur. Toute reproduction ou impression ultérieure, même partielle, ainsi que la
retranscription d’illustrations, même modifiée,
est seulement possible sur autorisation écrite
du fabricant.
ES
Derechos de autor
Este documento está protegido por las leyes
de derechos de autor. Queda prohibida la reproducción y reimpresión total o parcial del
manual, así como la copia de sus ilustraciones, con o sin modificaciones, sin la autorización por escrito del fabricante.
NL
Auteursrecht
Dit document is auteursrechtelijk beschermd.
Iedere vermenigvuldiging resp. iedere herdruk, ook gedeeltelijk, alsmede de weergave
van de afbeeldingen, ook in gewijzigde vorm,
is uitsluitend met schriftelijke toestemming
van de fabrikant toegestaan.
RU
Авторское право
Настоящий документ защищен авторским
правом. Тиражирование или перепечатка, в
том числе частичная, а также воспроизведение
рисунков, в том числе в измененном виде, допускаются только с письменного согласия изготовителя.
BEEM - Elements of Lifestyle
Inhalt
Sicherheitshinweise . . . . . . . . . . . . . . . . . 1
Inbetriebnahme . . . . . . . . . . . . . . . . . . . . . 4
Gerätebeschreibung. . . . . . . . . . . . . . . . . 5
Bedienfeld . . . . . . . . . . . . . . . . . . . . . . . . . 5
Funktionen des Ofens. . . . . . . . . . . . . . . . 6
Bedienung und Betrieb. . . . . . . . . . . . . . . 7
Reinigung und Pflege. . . . . . . . . . . . . . . 10
Lagerung . . . . . . . . . . . . . . . . . . . . . . . . . 11
Allgemeines. . . . . . . . . . . . . . . . . . . . . . . 11
Störungsbehebung. . . . . . . . . . . . . . . . . 12
Sehr geehrter Kunde,
lesen Sie vor Verwendung des Gerätes die in
dieser Bedienungsanleitung enthaltenen Hinweise zu Inbetriebnahme, Sicherheit, bestimmungsgemäßem Gebrauch sowie Reinigung
und Pflege.
Schlagen Sie die Ausklappseiten am Anfang
und Ende der Bedienungsanleitung heraus,
um die Abbildungen während des Lesens sehen zu können.
Bewahren Sie diese Bedienungsanleitung für
den späteren Gebrauch auf und geben Sie
diese mit dem Gerät an Nachbesitzer weiter.
Sicherheitshinweise
Kontrollieren Sie das Gerät vor der
Verwendung auf äußere sichtbare Schäden. Nehmen Sie ein beschädigtes Gerät nicht in Betrieb.
Kinder dürfen nicht mit dem Gerät
spielen.
Reinigung und Benutzer-Wartung
dürfen nicht durch Kinder durchgeführt
werden, es sei denn, sie sind älter als 8
Jahre und beaufsichtigt.
Kinder jünger als 8 Jahre sind vom
Gerät und der Anschlussleitung fernzuhalten.
DE 1
Dieses Gerät kann von Kindern ab
8 Jahren sowie von Personen mit reduzierten physischen, sensorischen oder
mentalen Fähigkeiten oder Mangel an
Erfahrung und/oder Wissen benutzt
werden, wenn sie beaufsichtigt oder
bezüglich des sicheren Gebrauchs des
Gerätes unterwiesen wurden und die
daraus resultierenden Gefahren verstanden haben.
Lassen Sie Reparaturen am Gerät
nur von autorisierten Fachhändlern oder
vom Werkskundendienst durchführen.
Dies gilt insbesondere für den Austausch
einer beschädigten Anschlussleitung.
Durch unsachgemäße Reparaturen können erhebliche Gefahren für den Benutzer entstehen. Zudem erlischt der Gewährleistungs- oder Garantieanspruch.
Verwenden Sie dieses Gerät nicht zusammen mit einer externen Zeitschaltuhr
oder einem separaten Fernwirksystem.
Eine Reparatur des Gerätes während
der Gewährleistungs- oder Garantiezeit
darf nur von einem vom Hersteller autorisierten Kundendienst vorgenommen
werden, sonst besteht bei Beschädigungen und nachfolgenden Störungen
kein Gewährleistungs- oder Garantieanspruch mehr.
Defekte Bauteile dürfen nur gegen
Original-Ersatzteile ausgetauscht werden. Nur bei diesen Teilen ist gewährleistet, dass die Sicherheitsanforderungen erfüllt werden.
Bei Stromausfall trennen Sie das
Gerät vom Netz, um ein unbeabsichtigtes Wiedereinschalten des Gerätes zu
vermeiden.
Betreiben Sie das Gerät nicht im
Dunkeln.
2 DE
GEFAHR
Gefahr durch elektrischen Strom!
►► Benutzen Sie das Gerät nicht,
wenn die Netzleitung oder der Netzstecker beschädigt sind.
►► Öffnen Sie auf keinen Fall das
Gehäuse des Gerätes. Werden spannungsführende Anschlüsse berührt
und der elektrische und mechanische
Aufbau verändert, besteht Stromschlaggefahr.
►► Tauchen Sie das Gerät oder den
Netzstecker niemals in Wasser oder
andere Flüssigkeiten.
►► Fassen Sie das Netzkabel nicht mit
nassen Händen an, wenn Sie das Gerät von der Stromversorgung trennen.
►► Ziehen Sie den Netzstecker aus
der Steckdose,
–– wenn Sie das Gerät nicht benutzen,
–– wenn während des Betriebes eine
Störung auftritt,
–– bevor Sie das Gerät reinigen.
Erstickungsgefahr!
►► Verpackungsmaterialien dürfen
nicht zum Spielen verwendet werden.
Es besteht Erstickungsgefahr.
WARNUNG
Verbrennungsgefahr!
►► Während des Betriebs des Gerätes
kann die Temperatur der berührbaren
Oberflächen sehr hoch sein.
►► Fassen Sie das Gerät während des
Betriebes nur am Griff oder an den
Bedienelementen an.
►► Benutzen Sie Topflappen oder Küchenhandschuhe zum Entnehmen von
heißen Behältern aus dem Ofen.
►► Tragen oder bewegen Sie das Gerät nicht im Betrieb.
BEEM - Elements of Lifestyle
►► Verwenden Sie die mitgelieferten
Greifer, um den Grillrost, das Backund Fettauffangblech, den Drehspieß
sowie den Frittierkorb zu entnehmen.
►► Gießen Sie keine Flüssigkeiten
auf das heiße Backblech. Wenn die
Flüssigkeit in Berührung mit der heißen Oberfläche kommt, verdampft sie
sehr schnell und spritzt und kann so zu
Verletzungen führen.
►► Vorsicht beim Grillen von stark
fetthaltigen Lebensmitteln. Heißes Fett
kann spritzen und zu Verbrennungen
führen.
►► Lassen Sie das Gerät vor jeder
Reinigung abkühlen.
Brandgefahr
►► Verwenden Sie das Gerät nie in der
Nähe oder unterhalb von brennbaren
Materialien, wie z. B. Gardinen.
►► Verwenden Sie nur hitzebeständige Formen und Behälter aus Glas,
Keramik oder Metall zur Zubereitung
der Speisen.
►► Stellen Sie die Formen und Behälter immer auf den Bratrost, niemals
direkt auf die Heizelemente.
►► Verwenden Sie keinen Bratschlauch.
►► Stellen oder legen Sie nichts auf
das Gerät.
►► Decken Sie das Gerät im Betrieb
nicht ab.
►► Das Gerät ist nur zur Zubereitung
von Lebensmitteln geeignet. Lassen Sie
keine anderen Gegenstände im Gerät
liegen.
BEEM - Elements of Lifestyle
ACHTUNG
►► Ziehen Sie die Anschlussleitung im-
mer am Netzstecker aus der Steckdose,
nicht an der Netzleitung selbst.
►► Tragen, heben oder bewegen Sie
das Gerät niemals am Netzkabel.
►► Halten Sie mit den Zubehörteilen
und dem Gargut einen Mindestabstand
von 3 cm zu den Heizelementen ein.
►► Verwenden Sie zum Reinigen des
Gerätes keine scharfen Gegenstände
oder scheuernde Reinigungsmittel.
Bestimmungsgemäße Verwendung
Dieses Gerät ist nur zum Toasten, Backen,
Grillen, Braten und Auftauen von Lebensmitteln für die Verwendung im Haushalt oder
ähnlichen, nicht gewerblichen Bereichen
bestimmt, wie zum Beispiel Personalküchen
in Läden, Cafés, Büros oder einem anderen beruflichen Umfeld; landwirtschaftliche
Anwesen; Nutzung durch Gäste in Hotels,
Motels oder anderen Wohnanlagen; Bed and
Breakfast-Gasthäuser.
Eine andere oder darüber hinausgehende
Benutzung gilt als nicht bestimmungsgemäß.
WARNUNG
Von dem Gerät können bei nicht bestimmungsgemäßer Verwendung und/oder andersartiger Nutzung Gefahren ausgehen.
►► Das Gerät ausschließlich bestimmungsgemäß verwenden.
►► Die in dieser Bedienungsanleitung beschriebenen Vorgehensweisen einhalten.
Ansprüche jeglicher Art wegen Schäden aus
nicht bestimmungsgemäßer Verwendung
sind ausgeschlossen.
Das Risiko trägt allein der Betreiber.
Anforderungen an den Aufstellort
Für einen sicheren und fehlerfreien Betrieb
des Gerätes muss der Aufstellort folgende
Voraussetzungen erfüllen:
Stellen Sie das Gerät auf eine stabile,
ebene, wärmebeständige und gegen Fettsprit
zer unempfindliche Unterlage.
DE 3
Die Oberflächen von Möbeln enthalten
möglicherweise Bestandteile, die die Standfüße des Gerätes angreifen und aufweichen
können. Legen Sie gegebenenfalls eine Unterlage unter die Standfüße des Gerätes.
Stellen Sie das Gerät nicht in einer heißen, nassen oder sehr feuchten Umgebung
oder in der Nähe von brennbarem Material
auf. Der Abstand zu Wänden, Möbeln und
anderen Gegenständen muss mindestens
15 cm betragen.
Stellen Sie das Gerät nicht unter einen
Hängeschrank.
Die Steckdose muss leicht zugänglich
sein, so dass die Netzverbindung schnell getrennt werden kann.
Legen Sie keine Tischdecke, Tücher oder
Servietten unter die Stellfüße des Gerätes,
damit es nicht wegrutscht.
Stellen Sie das Gerät nicht an die Kante
der Abstellfläche, es könnte herunterfallen.
Das Gerät darf nicht im Freien betrieben
und gelagert werden.
Elektrischer Anschluss
Für einen sicheren und fehlerfreien Betrieb
des Gerätes sind beim elektrischen Anschluss folgende Hinweise zu beachten:
Vergleichen Sie vor dem Anschließen des
Gerätes die Anschlussdaten (Spannung und
Frequenz) auf dem Typenschild mit denen
Ihres Elektronetzes. Diese Daten müssen
übereinstimmen, damit keine Schäden am
Gerät auftreten. Im Zweifelsfall fragen Sie
Ihren Elektrofachhändler.
Die Steckdose muss mindestens über
eine 16A-Sicherung abgesichert sein.
Vergewissern Sie sich, dass die Netzleitung unbeschädigt ist und nicht über heiße
Oberflächen und/oder scharfe Kanten verlegt
wird.
Die Anschlussleitung darf nicht straff
gespannt sein, geknickt, gequetscht oder
verknotet werden oder in Kontakt mit heißen
Oberflächen kommen.
Wickeln Sie die Anschlussleitung immer
vollständig ab, bevor Sie das Gerät an die
Steckdose anschließen.
BEEM - Elements of Lifestyle
4 DE
Soll das Gerät über ein Verlängerungskabel angeschlossen werden, muss der Kabelquerschnitt mindestens 1,5 mm² betragen.
Die elektrische Sicherheit des Gerätes ist
nur dann gewährleistet, wenn es an ein vorschriftsmäßig installiertes Schutzleitersystem
angeschlossen wird. Der Betrieb an einer
Steckdose ohne Schutzleiter ist verboten.
Lassen Sie im Zweifelsfall die Hausinstallation durch eine Elektrofachkraft überprüfen.
Der Hersteller übernimmt keine Verantwortung für Schäden, die durch einen fehlenden
oder unterbrochenen Schutzleiter verursacht
werden.
Verlegen Sie die Anschlussleitung so,
dass keine Stolpergefahr besteht.
Verwendete Symbole
GEFAHR
Wird verwendet für eine unmittelbar drohende Gefahr, die zu schweren Körperverletzungen oder zum Tod führt.
►► Zur Vermeidung der Gefahr die hier
aufgeführten Anweisungen befolgen.
WARNUNG
Wird verwendet für eine möglicherweise
gefährliche Situation, die zu schweren
Körperverletzungen oder zum Tod führen
könnte.
►► Zur Vermeidung der Gefahr die hier
aufgeführten Anweisungen befolgen.
ACHTUNG
Wird verwendet für eine möglicherweise
gefährliche Situation, die zu leichten Verletzungen oder zu Sachschäden führen kann.
►► Zur Vermeidung der Gefahr die hier
aufgeführten Anweisungen befolgen.
HINWEIS
►► Ein Hinweis kennzeichnet zusätzliche
Informationen, die den Umgang mit dem
Gerät erleichtern.
Inbetriebnahme
Auspacken
1. Entnehmen Sie das Gerät, alle Zubehörteile und die Bedienungsanleitung aus dem
Karton.
2. Entfernen Sie vor dem Erstgebrauch alle
Verpackungsmaterialien und Schutzfolien
vom Gerät und den Zubehörteilen.
3. Prüfen Sie den Inhalt auf Vollständigkeit
und auf sichtbare Schäden.
HINWEIS
►► Entfernen Sie niemals das Typenschild
und eventuelle Warnhinweise.
►► Bewahren Sie die Originalverpackung
während der Gewährleistungs- bzw. Garantiezeit des Gerätes auf, um das Gerät im
Gewährleistungs- bzw. Garantiefall ordnungsgemäß verpacken zu können. Transportschäden führen zum Erlöschen des
Gewährleistungs- bzw. Garantieanspruchs.
Vor dem ersten Gebrauch
Heizen Sie das Gerät vor dem ersten Gebrauch für ca. 10 Minuten auf, um evtl. Montagerückstände (Fette) zu beseitigen.
Gehen Sie hierzu wie folgt vor:
1. Wählen Sie die Einstellung Umluft und
stellen Sie, wie im Kapitel Temperatur einstellen (S. 6) beschrieben, die höchste
Temperatur ein.
2. Stellen Sie die Garzeit, wie im Kapitel
Garzeit einstellen (S. 6) beschrieben,
auf 10 min ein.
(10).
3. Drücken Sie die Taste
4. Öffnen Sie nach Funktionsende die Ofentür und lassen Sie das Gerät auslüften.
5. Lassen Sie das Gerät vollständig abkühlen.
6. Ziehen Sie den Netzstecker aus der
Steckdose.
7. Reinigen Sie das Gerät, wie im Kapitel
Reinigung und Pflege (S. 10) beschrieben.
BEEM - Elements of Lifestyle
HINWEIS
►► Bei der ersten Inbetriebnahme können
durch produktionsbedingte Zusätze, wie
z. B. Fette, Geruch oder leichter Rauch
entstehen. Dies ist völlig normal! Sorgen
Sie daher für ausreichende Belüftung.
Gerätebeschreibung
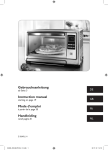
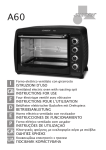
Lieferumfang/Geräteübersicht
(Abbildungen siehe Ausklappseite)
1
2
3
4
5
6
7
8
9
10
11
12
13
14
15
16
17
18
19
20
21
22
23
24
25
Gehäuse
Türgriff
Display
Funktionsanzeige
(Funktion)
Taste MODE
Taste Temperatureinstellung °C
Taste Zeiteinstellung
Tasten
Taste Pause/Cancel
Taste Start
Standfüße
Ofentür
Abstandhalter Rückseite
(ohne Abbildung)
Grillrost
Backblech
Drehspießgreifer
Greifer Grillrost und Backblech
Drehspieß
Halteklammern Drehspieß
Schaschlik-Spieße (8 Stck.)
Träger Schaschlik-Spieße
Frittierkorb
Pizzastein
Fettauffangblech
Bedienungsanleitung
(ohne Abbildung)
DE 5
Bedienfeld
Im Display (3) wird angezeigt, welche Garzeit, Temperatur und Funktion eingestellt ist.
Die gewählte Funktion wird durch ein rotes
Dreieck markiert. Während der Einstellung
der Garzeit und der Temperatur blinkt die entsprechende Zahl.
HINWEIS
►► Jeder Tastendruck wird mit einem
Signalton quittiert.
Ein-/Ausschalten
Zum Einschalten des Gerätes drücken Sie
(10). Auf dem Display leuchten
die Taste
die Funktionen auf. Durch Drücken der Taste
MODE
(5) wählen Sie die gewünschte
Funktion aus. Nochmaliges Drücken der Tasstartet die gewählte Funktion.
te
HINWEIS
►► Stellen Sie vor dem Funktionsstart
die Temperatur und Garzeit ein, wie im
Kapitel Temperatur einstellen (S. 6)
und Kapitel Garzeit einstellen (S. 6)
beschrieben.
Pausetaste/Cancel
1. Drücken Sie 1 x die Taste Pause/Cancel
(9), um die laufende Funktion anzuhalten. Sie können den Garvorgang prüfen oder
Einstellungen ändern.
2. Drücken Sie die Taste Start
(10) , um
den Garvorgang fortzusetzen.
3. Drücken Sie 2 x die Taste Pause/Cancel
(9), um alle Funktionen zu beenden und
die Einstellungen zurückzusetzten. Das Gerät schaltet sich nach ca. einer Minute automatisch aus.
BEEM - Elements of Lifestyle
6 DE
Funktionen des Ofens
Drücken Sie zunächst die Taste , um die Taste MODE
MODE
(5) stellen Sie die einzelnen Funktionen ein.
Umluftgebläse
zu aktivieren. Mit der Taste
Funktion
Oberhitze
Unterhitze
Rotation
Toasten
–
–
Drehspieß
–
–
Umluft
–
Auftauen
–
(ca. 50 °C)
–
Braten
–
–
–
Grundeinstellung
Die zuletzt verwendete Einstellung blinkt.
Temperatur blinkt bei
200 C°.
Temperatur blinkt bei
215 C°.
Zeitanzeige blinkt bei
1 min 00 sec.
Temperatur blinkt bei
175 C°.
HINWEIS
►► Der Wechsel zwischen den Funktionen ist nur möglich, wenn keine Funktion in Betrieb
ist.
Temperatur einstellen
1. Drücken Sie die Taste °C (6).
2. Wählen Sie mit den Tasten
und
(8) die gewünschte Temperatur.
Die Temperatureinstellung wird im Display
angezeigt (3).
Die Temperatur lässt sich jederzeit während
des Garvorganges ändern.
Funktion
Temperaturbereich
Toasten
Grundeinstellung
nicht veränderbar
Drehspieß
100 °C – 230 °C
Umluft
100 °C – 230 °C
Auftauen
50 °C
Braten
100 °C – 230 °C
HINWEIS
►► Die veränderbaren Temperaturbereiche
lassen sich mit den Tasten
und
in
5 °C–Schritten erhöhen oder verringern.
Garzeit einstellen
1. Drücken Sie die Taste Zeiteinstellung
(7).
und
2. Wählen Sie mit den Tasten
(8) die gewünschte Garzeit aus.
Die eingestellte Garzeit wird im Display (3)
angezeigt.
Die Garzeit lässt sich auch während des Garvorganges verändern.
Nach Ablauf der Garzeit ertönt ein akustisches Signal. Im Display blinkt END und das
Gerät schaltet sich nach ca. einer Minute
automatisch aus.
BEEM - Elements of Lifestyle
Funktion
Toasten
Drehspieß
Umluft
Auftauen
Braten
Zeiteinstellung
Stufenlos von leicht braun
(„light“ 2 min 30 sec) bis dunkel
(„dark“ 6 min 10 sec.) in 30Sekunden-Schritten.
1 min bis 30 min in 1-MinutenSchritten.
30 min bis 3 h in 5-MinutenSchritten.
1 min bis 30 min in 1-MinutenSchritten.
30 min bis 3 h in 5-MinutenSchritten.
1 min bis 30 min in 1-MinutenSchritten.
30 min bis 3 h in 5-MinutenSchritten.
1 min bis 30 min in 1-MinutenSchritten.
30 min bis 3 h in 5-MinutenSchritten.
Bei der Zubereitung von Toast beeinflussen
Sie die Zeit indirekt. Durch die Wahl der
Bräunungsstufe wird die Zeit vom Programm
„Toasten“ automatisch vorgegeben. Siehe
Kapitel Zubereitung - Toasten (S. 8).
Bedienung und Betrieb
Fettauffangblech einsetzen
Legen Sie das Fettauffangblech (24) von vorne zwischen die unteren Heizelemente.
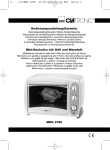
Verwendung der Greifer
(Bilder A1-A3)
Zum Entnehmen des Fettauffangblechs benötigen Sie den Drehspießgreifer (16):
1. Stecken Sie die Aufnahmehaken des
Greifers von oben in die Löcher des Fettauffangblechs.
2. Bringen Sie den Griff des Greifers in eine
waagrechte Position, um das Fettauffangblech nach oben und nach vorne zu heben.
Zum Entfernen des Drehspießes (18) benötigen Sie ebenfalls den Drehspießgreifer (16).
DE 7
1. Führen Sie den Greifer für den Drehspieß
(16) so in das Gerät, dass die Aufnahmehaken des Greifers sich unter den dafür vorgesehenen Absätzen des Grillspießes befinden
(Bild A1).
2. Hängen Sie den Drehspieß durch leichtes
Anheben auf der linken Seite zuerst aus.
3. Ziehen Sie den Drehspieß vorsichtig heraus, so dass sich das in der Drehvorrichtung
eingesteckte Ende lösen kann.
4. Entnehmen Sie den kompletten Drehspieß.
Um das Backblech bzw. den Grillrost zu entnehmen, benötigen Sie den kleinen Greifer
(17):
1. Führen Sie ihn in einem leichten Winkel
von oben an das Backblech heran (Bild A2).
2. Stecken Sie den Greifer so ein, dass die
größeren Haken oberhalb und die Abstützung
unterhalb des Backblechs sind.
3. Bringen Sie den Greifer in eine waagerechte Position.
4. Heben Sie während des Ausziehens das
Backblech leicht an, um ein Lösen des Greifers zu vermeiden.
5. Entnehmen Sie das Backblech.
6. Um den Grillrost zu entfernen, gehen Sie
wie bei bei dem Backblech vor. Beachten Sie
aber, dass die kleineren Haken des Greifers
in den Grillrost eingehängt sind (Bild A3).
HINWEIS
►► Legen Sie wenn möglich den Drehspieß bei der Entnahme auf das Backblech, um vom Grillgut heruntertropfendes
Fett aufzufangen.
►► Halten Sie das Backblech waagerecht,
damit kein heißes Fett ausläuft.
►► Benutzen Sie Küchenhandschuhe, um
sich nicht am heißen Fett zu verbrennen.
►► Legen Sie eine hitzebeständige Unterlage zum Ablegen der heißen Teile bereit.
Allgemeine Hinweise
Die Speisen sollten Raumtemperatur
haben, da gefrorene Speisen eine längere
Garzeit benötigen und dadurch austrocknen
können.
BEEM - Elements of Lifestyle
8 DE
Um besonders gute Ergebnisse zu erzielen, heizen Sie das Gerät kurz vor. Beobachten Sie den Garvorgang aufmerksam
und regulieren Sie die Temperatur – wenn es
nötig ist.
Mit dem Gerät können Sie die unterschiedlichsten Speisen zubereiten, z. B.
Würstchen, Steaks, Braten, Geflügel, Rollbraten, Gemüse, Aufläufe, Toast, Pizza, Kuchen etc.
Das Gerät ist besonders geeignet für die
schnelle und fettarme Zubereitung von Speisen. Die Garzeit im Infrarotofen ist im Vergleich zum herkömmlichen Backofen kürzer.
3. Stellen Sie den gewünschten Bräunungsgrad mit den Tasten
und
(8) ein:
–– „light“ steht für helles Ergebnis,
–– „dark“ steht für dunkles Ergebnis.
4. Die vom Programm vorgegebene Zeit
wird im Display angezeigt.
(10).
5. Drücken Sie die Taste
HINWEIS
►► Während des Garvorganges kann es zu
Kondensbildung an der Ofentür kommen.
Drehspieß (Bild B1–B4)
Mit dieser Funktion (Oberhitze) können Sie
ein ganzes Hähnchen oder einen Rollbraten
grillen. Ferner ist die Funktion zum Garen
von Schaschlik-Spießen sowie zum Garen
von Gemüse oder Pommes Frites im Frittierkorb geeignet.
Hähnchen
1. Setzen Sie ggf. das Fettauffangblech ein.
2. Frisches bzw. aufgetautes ganzes Hähnchen waschen und Innereien entfernen.
3. Eine Halteklammer (19) von der Spitze
aus auf den Drehspieß schieben und mit Hilfe der Flügelschraube fixieren (Bild B1).
4. Das Hähnchen auf den Drehspieß schieben und mit der zweiten Halteklammer in der
Mitte des Drehspießes fixieren (Bild B2).
5. Das Hähnchen nach Geschmack würzen
(z. B. Salz, gemahlene rote Paprika, Pfeffer
und Curry) und mit Öl beträufeln.
6. Beine und Flügel mit Rouladennadeln
oder Bratenschnur fixieren.
7. Drehspieß mit dem Hähnchen in das
Gerät einsetzen, indem Sie zuerst das spitze
Ende in den Drehantrieb (Bild B3) einstecken. Legen Sie dann den Bund auf der anderen Seite des Drehspießes in die Lagerung
auf der linken Seite des Gerätes (Bild B4).
8. Wählen Sie mit der Taste Mode
die
Funktion „Drehspieß“.
9. Stellen Sie die Garzeit und die Gartemperatur ein.
10.Drücken Sie die Taste
(10).
Gerät betreiben
1. Setzen Sie ggf. das Fettauffangblech ein.
2. Drücken Sie die Taste Start , um die
Funktionen des Ofens zu aktivieren.
3. Wählen Sie die geeignete Funktion, siehe
Tabelle Funktionen des Ofens (S. 6).
4. Stellen Sie die Gartemperatur ein, siehe
Temperatur einstellen (S. 6).
5. Stellen Sie die Garzeit ein, wie im Kapitel
Garzeit einstellen (S. 6) beschrieben.
(10).
6. Drücken Sie die Taste Start
HINWEIS
►► Die Temperatur- und Garzeiteinstellungen können Sie während des Garvorganges jederzeit ändern.
►► Das Gerät quittiert jede Ihrer Eingaben
mit einem Tonsignal.
Zubereitung
Toasten
Mit dieser Funktion können Sie Toasts zubereiten sowie Brötchen, Baguettes und Brezeln aufbacken.
1. Schieben Sie den Grillrost in die mittlere
Schiene.
2. Wählen Sie mit der Taste Mode
die
Funktion „Toasten“.
HINWEIS
►► Korrigieren Sie ggf. die Einstellung,
wenn Sie mehrere Portionen Toast nacheinander zubereiten.
►► Ein Vorwärmen des Ofens ist nicht
erforderlich.
BEEM - Elements of Lifestyle
11.Entnehmen Sie das fertige Hähnchen mit
dem Drehspießgreifer, wie im Kapitel Verwendung der Greifer (S. 7) beschrieben.
HINWEIS
►► Verwenden Sie nur Hähnchen bis max.
1000 g Gewicht.
►► Ein Vorwärmen des Ofens ist nicht
erforderlich.
Schaschlikspieße (Bilder C1-C3)
1. Bestücken Sie die Schaschlik-Spieße (20)
nach Wunsch mit Fleischwürfeln (ca, 1,5 x
1,5 cm), Wurststückchen, Paprikastreifen,
Zwiebeln, Speck etc.
2. Spieße nach Geschmack würzen und mit
Öl beträufeln.
3. Setzen Sie die einzelnen Spieße (20) auf
den Träger (21). Dabei wird das gebogene
Ende der Spieße auf der einen Seite in die
Aussparung des Trägers (21) geklemmt (Bild
C1), auf der anderen Seite wird das spitze
Ende des Spießes durch das Loch des Trägers gesteckt (Bild C2). Schieben Sie den
Drehspieß (18) mittig durch den Schaschlikspieß-Träger (21) und fixieren Sie ihn rechts
und links mit den Halteklammern (Bild C3).
4. Setzen Sie ggf. das Fettauffangblech ein.
5. Setzen Sie den Drehspieß mit den
Schalschlikspießen ein.
6. Wählen Sie mit der Taste MODE
die
Funktion „Drehspieß“.
7. Stellen Sie die Garzeit und die Gartemperatur ein.
8. Drücken Sie die Taste
(10).
9. Entnehmen Sie die fertigen Drehspieße
mit dem Drehspießgreifer (16).
Frittierkorb (Bilder D1-D2)
1. Schieben Sie den Drehspieß (18) mittig
durch den Frittierkorb (22) und fixieren Sie
ihn rechts und links mit den Halteklammern
(Bild D1).
2. Öffnen Sie den Frittierkorb und befüllen
Sie ihn mit Pommes Frites, Kroketten, Kartoffelecken, Chicken Nuggets, Garnelen, etc.
3. Überfüllen Sie den Korb nicht, damit das
Gargut beim Drehen des Drahtkorbs gewendet wird.
4. Setzen Sie ggf. das Fettauffangblech ein.
5. Setzen Sie den Drehspieß mit den Frit-
DE 9
tierkorb ein (Bild D2).
6. Wählen Sie mit der Taste MODE
die
Funktion „Drehspieß“.
7. Stellen Sie die Garzeit und die Gartemperatur ein.
(10).
8. Drücken Sie die Taste
9. Entnehmen Sie den heißen Frittierkorb
mit dem Drehspießgreifer.
Umluft
Mit dieser Funktion starten Sie Ober- und Unterhitze sowie das Umluftgebläse. Dadurch
erreichen Sie eine intensive und gleichmäßige Wärmeverteilung innerhalb des Gerätes,
so dass die Gartemperatur und Garzeit verringert werden kann. Die Funktion Umluft ist
für verschiedenste Anwendungen, wie z. B.
Braten, Schmoren von Fleisch, Backen von
Brot, Kuchen, Pizza und Plätzchen, Zubereitung von Fischgerichten, Aufläufen und
Gratins geeignet.
1. Schieben Sie den Grillrost auf die unterste Schiene in das Gerät. Füllen Sie die
Speisen in eine feuerfeste Form aus Glas,
Keramik oder Metall und stellen Sie diese
dann auf den Grillrost.
(10).
2. Drücken Sie die Taste
3. Wählen Sie mit der Taste Mode
die
Funktion „Umluft“.
4. Stellen Sie die Garzeit und Gartemperatur ein, wie in den Kapiteln Temperatur
einstellen (S. 6) und Garzeit einstellen
(S. 6) beschrieben.
(10).
5. Drücken Sie die Taste
6. Entnehmen Sie die Speisen mit Hilfe von
Küchenhandschuhen oder Topflappen, den
Grillrost mit dem Greifer.
HINWEIS
►► Prüfen Sie, ob Ihre Kuchen-/Backform
in das Gerät passt.
►► Achten Sie darauf, dass der Teig für
Kuchen oder Brot, wenn er beim Backen
aufgeht, nicht an die Innenwände und
Heizelemente des Gerätes gelangt.
►► Heizen Sie den Ofen ca. 4-5 min vor.
10 DE
Pizza (Bild E1)
1. Schieben Sie den Grillrost auf die unterste Schiene.
2. Legen Sie den Pizzastein auf den Grillrost.
3. Geben Sie die Pizza auf den Pizzastein.
4. Garen Sie die Pizza mit der Funktion
„Umluft“ wie oben beschrieben.
Auftauen
Die Funktion „Auftauen“ lässt programmbedingt keine Temperaturänderung zu. Die Auftautemperatur ist auf ca. 50 C° voreingestellt.
1. Geben Sie das gefrorene Lebensmittel
auf das Backblech.
2. Schieben Sie das Backblech in die gewünschte Position des Ofens ein.
3. Wählen Sie mit der Taste Mode
die
Funktion „Auftauen“.
4. Stellen Sie die Auftauzeit wie im Kapitel
Garzeit einstellen (S. 6) ein.
5. Drücken Sie die Taste
(10).
6. Entnehmen Sie die aufgetauten Speisen
mit Hilfe von Küchenhandschuhen oder Topflappen.
HINWEIS
►► Beachten Sie, dass die Auftauzeit je
nach Produkt sehr unterschiedlich sein
kann.
Braten
Mit dieser Funktion (Oberhitze) haben Sie
eine ideale Grillfunktion, um Steaks, Fisch,
Würstchen, Hamburger usw. zuzubereiten.
1. Setzen Sie ggf. das Fettauffangblech ein.
2. Würzen Sie die Speisen nach Geschmack und legen Sie diese auf den Grillrost.
3. Schieben Sie den Grillrost – je nach
Dicke des Grillgutes – auf die mittlere bzw.
höchste Schiene in das Gerät.
4. Wählen Sie mit der Taste Mode
die
Funktion „Braten“.
5. Stellen Sie die Garzeit und die Gartemperatur ein, wie in den Kapiteln Temperatur
einstellen (S. 6) und Garzeit einstellen
(S. 6) beschrieben.
6. Drücken Sie die Taste
(10).
BEEM - Elements of Lifestyle
7. Entnehmen Sie den heißen Grillrost mit
dem Greifer.
HINWEIS
►► Beachten Sie, dass Sie das Grillgut bei
dieser Funktion wenden müssen, da das
Gerät bei dieser Funktion nur mit Oberhitze
grillt.
Nach dem Gebrauch
1. Durch Drücken der Taste
(9) halten
Sie die laufende Funktion an.
2. Durch zweimaliges Drücken werden alle
Funktionen beendet und die Einstellungen
zurückgesetzt.
3. Ziehen Sie den Netzstecker aus der
Steckdose.
4. Lassen Sie das Gerät abkühlen und reinigen Sie das Gerät, wie im Kapitel Reinigung
und Pflege (S. 10) beschrieben.
Reinigung und Pflege
Beachten Sie vor Beginn der Arbeiten die
Sicherheitshinweise im Kapitel Sicherheitshinweise (S. 1)!
Das Gerät muss nach jedem Gebrauch
gereinigt werden.
Reinigen Sie das Gerät nach der Verwendung, sobald es abgekühlt ist. Zu langes
Warten erschwert die Reinigung unnötig.
ACHTUNG
►► Keine Gegenstände in die Heizelemente einführen. Diese können dadurch
beschädigt werden.
Gehäuse
Wischen Sie das Gehäuse innen und aussen
mit einem feuchten Tuch ab.
Verwenden Sie ggf. handelsübliches Spülmittel.
Zubehörteile
Nehmen Sie die Zubehörteile heraus und reinigen Sie sie mit warmem Spülwasser oder
in der Spülmaschine.
Bei hartnäckigen Verschmutzungen weichen Sie die Zubehörteile vor dem Reinigen
10 min in warmem Spülwasser ein.
BEEM - Elements of Lifestyle
Trocknen Sie die Teile vor dem Einsetzen
gut ab.
HINWEIS
►► Verwenden Sie keinen Metall-/Scheuerschwamm zum Reinigen des Gerätes.
►► Benutzen Sie für die Innenreinigung
kein Backofenspray.
►► Alle herausnehmbaren Teile, außer dem
Pizzastein, sind spülmaschinengeeignet.
Pizzastein
Lassen Sie den Pizzastein abkühlen.
Entfernen Sie leichte Verunreinigungen
mit einem feuchten Tuch.
Hartnäckige Flecken können mit einem
Topfreiniger abgekratzt werden. Wischen Sie
mit einem feuchten Tuch nach.
HINWEIS
►► Der Pizzastein ist NICHT spülmaschinen geeignet.
►► Reinigen Sie den Pizzastein ohne Spülmittel nur mit Wasser.
Lagerung
Sollten Sie das Gerät längere Zeit nicht benötigen, reinigen Sie es, wie im Kapitel Reinigung und Pflege (S. 10) beschrieben.
Bewahren Sie das Gerät und alle Zubehörteile an einem trockenen, sauberen und
frostfreien Ort auf, an dem es vor direktem
Sonnenlicht geschützt ist.
Allgemeines
Garantie
Neben der gesetzlichen Gewährleistungspflicht übernimmt BEEM bei einigen Produkten zusätzlich eine erweiterte Herstellergarantie. Sofern diese gewährt ist, finden Sie
entsprechende Angaben entweder auf der
produktspezifischen Verpackung, den Werbematerialien oder auf der BEEM Website beim
jeweiligen Produkt. Auf unserer Webseite
www.beem.de finden Sie die ausführlichen
Garantiebedingungen, erhältliches Zubehör
und Ersatzteile sowie Bedienungsanleitungen in verschiedenen Sprachen.
DE 11
Haftungsbeschränkungen
Wir übernehmen keine Haftung bei Schäden
oder Folgeschäden bei:
Nichtbeachtung der Bedienungsanleitung,
nicht bestimmungsgemäßer Verwendung,
unsachgemäßer oder ungeeigneter Behandlung, nicht sachgemäß durchgeführten
Reparaturen, unerlaubten Veränderungen,
Verwendung von fremden Teilen bzw. Ersatzteilen, Verwendung von ungeeigneten Ergänzungs- oder Zubehörteilen.
Konformitätserklärung
Hiermit erklärt die Firma BEEM, dass sich
dieses Gerät in Übereinstimmung mit den
grundlegenden Anforderungen und den übrigen einschlägigen Bestimmungen der Richtlinien 2004/108/EG, 2006/95/EG, 2009/125/
EG und 2011/65/EU befindet.
BEEM - Elements of Lifestyle
12 DE
Störungsbehebung
Die nachfolgende Tabelle hilft bei der Lokalisierung und Behebung kleinerer Störungen. Wenn
Sie mit den nachstehend genannten Schritten das Problem nicht lösen können, wenden Sie
sich bitte an den Kundenservice.
Fehler
Mögliche Ursache
Behebung
Sicherung im Sicherungskasten abgeschaltet.
Sicherung einschalten.
Kontrollanzeige defekt.
Kundenservice benachrichtigen.
Zu viele Geräte im selben
Stromkreis angeschlossen.
Anzahl der Geräte im Stromkreis reduzieren.
Kein Fehler feststellbar.
Kundenservice benachrichtigen.
Display geht nicht an.
Die Sicherung im
Sicherungskasten wird
ausgelöst.
BEEM - Elements of Lifestyle
Contents:
Safety precautions . . . . . . . . . . . . . . . . . 13
Startup . . . . . . . . . . . . . . . . . . . . . . . . . . . 16
Appliance description. . . . . . . . . . . . . . . 16
Operating panel. . . . . . . . . . . . . . . . . . . . 17
Oven functions . . . . . . . . . . . . . . . . . . . . 17
Operation and use. . . . . . . . . . . . . . . . . . 18
Cleaning and maintenance. . . . . . . . . . . 21
Storage. . . . . . . . . . . . . . . . . . . . . . . . . . . 22
General. . . . . . . . . . . . . . . . . . . . . . . . . . . 22
Troubleshooting . . . . . . . . . . . . . . . . . . . 23
Dear Customer,
Before using the appliance, please read the
instructions contained in this user manual on
startup, safety, intended use as well as cleaning and care.
Open the fold-out page at the beginning and
end of the user manual in order to view the
illustrations during reading.
Keep this user manual in a safe place and
pass it on to any future owners together with
the appliance.
Safety precautions
Inspect the appliance for visible signs
of damage before use. Do not use a
damaged appliance.
Children may not play with the appliance.
Cleaning and user maintenance may
not be carried out by children under the
age of 8 years unless they are supervised.
Children under the age of 8 years
must be kept away from the appliance
and the connecting cable.
EN 13
This appliance may only be used by
children aged 8 years or more and by
persons with reduced physical, sensory
or mental abilities or lack of experience
and/or knowledge if they are supervised
or were instructed on using the appliance and have understood the possible
dangers..
Repairs to the appliance must only
be carried out by an authorised specialist or by the works customer service.
This particularly applies to replacing a
damaged connection cable. Unqualified
repairs can lead to considerable danger
for the user. This will also invalidate the
warranty or guarantee.
Do not use this appliance together
with an external timer or a separate remote control system.
Repairs to the appliance during the
guarantee period may only be carried
out by service centres authorised by the
manufacturer otherwise the warranty
or guarantee will become invalid in the
event of damage or subsequent damage.
Defective parts may only be replaced
with original spare parts. Only original
spare parts guarantee that the safety requirements are met.
In the event of a power failure, disconnect the appliance from the mains
to prevent the appliance from switching
itself on again unintentionally.
Do not operate the appliance in the
dark.
14 EN
DANGER
Danger of electric current!
►► Do not use the appliance if the
mains cable or plug is damaged.
►► Do not open the housing of the appliance. Danger from electric current
if live connections are touched and/or
the electrical and mechanical configuration is changed.
►► Never immerse the appliance or the
plug in water or other liquids.
►► Do not touch the connecting cable
with wet hands when disconnecting
the appliance from the mains supply.
►► Pull the plug out of the mains
socket,
–– if you are not using the appliance,
–– if a malfunction occurs during operation,
–– before you clean the appliance.
Risk of suffocation!
►► Never play with packaging material.
Risk of suffocation.
WARNING
Danger of burns!
►► The temperature of the touchable
surfaces can become very hot during
operation of the appliance.
►► During operation, only touch the
handles or control elements of the appliance.
►► Use pot holders or kitchen gloves
for removing hot containers out of the
oven.
►► Do not carry or move the appliance
during operation.
►► Use the grip supplied to remove
the grill grate, the baking and grease
drip tray, the rotary spit and the frying
basket.
BEEM - Elements of Lifestyle
►► Do not pour liquid onto the hot
baking tray. If liquid comes into contact with hot surfaces, it splashes and
evaporates very quickly which can
lead to injuries.
►► Be careful when grilling food containing high levels of fat. Hot fat can
splash and cause scalding.
►► Before cleaning, allow the appliance to cool down.
Fire risk
►► Never use the appliance in the
vicinity of or underneath flammable
materials such as curtains.
►► Only use heat-resistant moulds and
containers made of glass, ceramic or
metal for preparing the food.
►► Always put the moulds and containers onto the grill, never directly onto
the heating element.
►► Do not use an oven bag.
►► Do not put or lay anything on the
appliance.
►► Do not cover the appliance during
operation.
►► The appliance is only suitable for
preparing food. Do not allow other objects to be in the appliance.
ATTENTION
►► Do not pull the connecting cable
to remove the plug from the mains
socket.
►► Never lift or move the appliance
with the mains cable.
►► Keep a distance of at least 3 cm
between heating elements, food and
the accessory parts.
►► Do not use sharp objects or abrasive cleaning agents to clean the
appliance.
BEEM - Elements of Lifestyle
Intended use
This appliance is only intended to be used for
toasting, baking, grilling and defrosting food
in the household or similar, non-commercial
establishments such as staff kitchens in
shops, cafés, offices or other business surroundings; agricultural establishments; use
by guests in hotels, motels or other residential facilities; bed and breakfast establishments.
Any use other than previously stated is considered as improper use.
WARNING
If not used for its intended purpose and/or
used in any other way, the appliance may
be or become a source of danger.
►► Use the appliance only for its intended
purpose.
►► Observe the procedures described in
this user manual.
No claims of any kind will be accepted for
damage resulting from use of the system for
other than its intended purpose.
The risk must be borne solely by the user.
Requirements for the place of
operation
For safe and trouble-free operation of the appliance, the installation location must satisfy
the following requirements:
Place the appliance on a stable, level,
heat resistant surface that is also resistant to
splashing fat.
The surface finishes on furniture may
contain substances that can be detrimental to
the feet of the appliance. If necessary, place
a mat under the feet of the appliance.
Do not place the appliance in a hot, wet
or very humid environment or in the vicinity of
inflammable materials. There must be a gap
of at least 15 cm between the appliance and
any walls, furniture or other objects.
Do not install the appliance under a wall
cabinet.
The mains socket must be easily accessible and allow fast disconnection in the event
of an emergency.
EN 15
Top prevent the appliance from slipping
away, do not lay tablecloths, cloths or serviettes under the feet of the appliance.
Do not place the appliance on the edge of
the rest, it could fall down.
The appliance may not be used or stored
outdoors.
Electrical connection
For safe and trouble-free operation of the
appliance, the following instructions on the
electrical connection must be observed:
Before connecting the appliance, compare the connection data (voltage and
frequency) on the rating plate with those of
your mains power supply. This data must
correspond in order to avoid damage to the
appliance. If in doubt, ask your electrical appliance retailer.
The mains socket must be protected by at
least a 16 A fuse.
Ensure that the mains cable is undamaged and is not laid over hot surfaces or
sharp edges.
The mains cable must not be pulled
tightly, bent, crushed or knotted or come into
contact with hot surfaces.
Always unwind the mains lead completely
before connecting the appliance to the plug
socket.
If the appliance is to be connected to the
power supply via an extension lead, the cable
cross-section must be at least 1.5 mm².
The electrical safety of the appliance is
only assured when it is connected to a properly installed protective earth (PE) conductor
system. Connection to a mains socket without PE conductor is forbidden. If in doubt, the
electrical system must be checked by a qualified electrician. The manufacturer assumes
no liability for injury or damage caused by a
missing or interrupted protective earth conductor.
Route the mains cable to prevent risk of
tripping.
BEEM - Elements of Lifestyle
16 EN
Symbols used
DANGER
This indicates an imminent hazardous situation, which could lead to severe physical
injury or death.
►► Follow these instructions to avoid
danger.
WARNING
This indicates a possible hazardous situation, which could lead to severe physical
injury or death.
►► Follow these instructions to avoid
danger.
ATTENTION
This indicates a potentially hazardous situation, which could lead to minor injuries or
material damage.
►► Follow these instructions to avoid
danger.
NOTE
►► A note contains additional information
to simplify the use of the appliance.
Startup
Before using for the first time
Before using the appliance for the first time,
heat it up once for approx. 10 minutes to remove any production residue (grease): Proceed as follows:
1. Select the convector setting as described
in the section Setting the temperature
(page 18) and set the the highest temperature.
2. Set the cooking time as described in
the section Setting the cooking time
(page 18) to 10 min.
button (10).
3. Press the
4. After the function has completed, open
the oven door and allow the appliance to air.
5. Allow the appliance to cool down completely.
6. Pull the plug out of the mains socket.
7. Clean the appliance as described in
the section Cleaning and maintenance
(page 21).
NOTE
►► When using for the first time, it is
possible that production-related additives
such as grease could cause slight odour or
smoke. This is completely normal. Ensure
sufficient ventilation.
Appliance description
Unpacking
1. Remove the appliance, all accessory
parts and the user manual from the box.
2. Remove all packaging materials and protective foils from the product and the accessories before using it for the first time.
3. Check for visible signs of damage or
missing items.
NOTE
►► Never remove the rating plate or any
warning signs on the appliance.
►► Keep the original packaging during the
guarantee period in order to pack the appliance properly in the event of a guarantee
or warranty claim. Transport damage will
invalidate the warranty or guarantee.
Overview / Delivery contents
(See illustration on the fold-out page)
1
2
3
4
5
6
7
8
9
10
11
12
13
14
Housing
Door handle
Display
Function display
(Function)
MODE button
Temperature setting button °C
Timer setting button
Buttons
Pause/Cancel button
Start button
Feet
Oven door
Spacer, rear side (not illustrated)
Grill grate
BEEM - Elements of Lifestyle
15
16
17
18
19
20
21
22
23
24
25
EN 17
Baking tray
Rotary spit grip
Grill grate grip and baking tray
Rotary spit
Rotary spit retaining clips
Shish kebab skewers (8 pcs.)
Shish kebab skewer holders
Frying basket
Pizza stone
Grease drip tray
User manual (not illustrated)
Switching on and off
To switch on the appliance press the
(10).
The functions light up on the display. Press
the MODE button
(5) to select the debutton again to
sired function. Press the
start the selected function.
NOTE
►► Before starting the function, set the
temperature and cooking time as described
in the sections Setting the temperature
(page 18) and Setting the cooking
time (page 18).
Operating panel
The display (3) shows which cooking time,
temperature and function is set. The selected
function is indicated by a red triangle. The
corresponding cooking time and temperature
digits flash during setting.
NOTE
►► Each push of a button is acknowledged
by a signal tone.
Pause button/Cancel
1. Press the Pause/Cancel button
(9)
once to stop the running function. You can
check the cooking process or change settings.
(10) to continue
2. Press the Start button
cooking.
3. Press the Pause/Cancel button
(9)
twice to stop all functions and reset the settings. The appliance switches itself off automatically after approx. one minute.
Oven functions
First press the
button to activate the MODE
set the individual functions.
Air circulating fan
Rotation
–
–
–
–
Convector
–
(Defrost)
–
(approx.
50 °C)
–
Roasting
–
–
–
Function
Upper heat
Toasting
Rotary spit
Lower
heat
button. Press the MODE button
(5) to
Basic setting
The last-used setting
is flashing
Temperature flashes
at 200 C°.
Temperature flashes
at 215 C°.
Timer display flashes
at 1 min 00 sec.
Temperature flashes
at 175 C°.
NOTE
►► It is only possible to change a function when no function is in operation.
BEEM - Elements of Lifestyle
18 EN
Setting the temperature
1. Press the °C (6).
2. Set the
and the
desired temperature.
(8) buttons to the
The temperature setting is indicated in the
display (3).
The temperature can be changed at any time
during the cooking process.
Function
Temperature range
Toasting
Basic setting
cannot be changed
Rotary spit
100 °C – 230 °C
Convector
100 °C – 230 °C
Defrost
50 °C
Roasting
100 °C – 230 °C
NOTE
►► The variable temperature ranges can
be increased or decreased in 5 °C steps
with the
and
buttons .
Setting the cooking time
1. Press the timer button
(7).
2. Set the
and the
buttons (8) to the
desired cooking time.
The set cooking time is indicated in the display (3).
The cooking time can also be changed during the cooking process.
An acoustic signal is emitted after the cooking time has elapsed. END flashes in the
display and the appliance switches itself off
automatically after approx. one minute.
Function
Timer setting
Continuous from light brown
("light" 2 min 30 sec) to dark
Toasting
("dark" 6 min 10 sec.) in 30second steps.
1 min to 30 min in 1-minute
Rotary
steps.
spit
30 min to 3 h in 5-minute steps.
1 min to 30 min in 1-minute
Convecsteps.
tor
30 min to 3 h in 5-minute steps.
1 min to 30 min in 1-minute
(Defrost)
steps.
30 min to 3 h in 5-minute steps.
1 min to 30 min in 1-minute
Roasting
steps.
30 min to 3 h in 5-minute steps.
When making toast, the time is influenced
indirectly. Selecting the browning level automatically specifies the time for the "Toasting"
programme. See the section Preparation Toasting (page 19).
Operation and use
Inserting the grease drip tray
Lay the grease drip tray (24) from the front
between the lower heating elements.
Using the grip
(images A1-A3)
A rotary spit grip (16) is required to remove
the grease drip tray:
1. Push the retaining hooks of the grip from
above into the holes of the grease drip tray.
2. Position the handle of the grip horizontally
in order to lift the grease drip tray upwards
and forwards.
A rotary spit (16) is also required for removing the rotary spit (18).
1. Push the grip for the rotary spit (16) into
the appliance so that the retaining hooks of
the grip are situated under the respective recesses of the grill skewer (image A1).
2. Take the rotary spit out by lifting it slightly
on the left side.
BEEM - Elements of Lifestyle
3. Pull out the rotary spit carefully so that
the end inserted in the turning gear is released.
4. Remove the entire rotary spit.
The small grip (17) is required for removing
the baking tray or grill grate:
1. Guide the grip to the baking tray at a
slight angle from above (image A2).
2. Push in the grip so that the larger hooks
are above and the support is below the baking tray.
3. Bring the grip to an horizontal position.
4. While pulling out, lift the baking tray
slightly in order to avoid loosening the grip.
5. Remove the baking tray.
6. To remove the grill grate, proceed in the
same way as the baking tray. However, make
sure that the smaller hooks of the grip are
hung into the grill grate (image A3).
NOTE
►► If possible, place the rotary spit onto
the baking tray after removal in order to
collect fat dripping from the cooked food.
►► Keep the baking tray level to prevent
hot fat from running off.
►► Use kitchen gloves to prevent burning
with hot fat.
►► Lay out a heat-resistant pad ready for
placing hot parts.
General instructions
The food should be at room temperature
since frozen food requires longer to cook and
can also dry out.
To achieve particularly good results, preheat the appliance briefly. Pay good attention
to the cooking process and regulate the temperature – if necessary.
You can use the appliance to prepare various different food, e. g., sausages, steaks,
roasts, poultry, roast pork, vegetables, casseroles, toast, pizza, cakes etc.
The appliance is particularly suitable for
quick and fat-free preparation of food. The
cooking time in the infrared oven is shorter
than in conventional ovens.
EN 19
NOTE
►► Condensation can occur on the oven
door during the cooking process.
Using the appliance
1. If required, inset the grease drip dray.
2. Press the Start button , to activate the
functions of the oven.
3. Select the suitable function, see table
Oven functions (page 17).
4. Set the cooking temperature, see Setting
the temperature (page 18).
5. Set the cooking time as described in
the section Setting the cooking time
(page 18).
6. Press the Start button
(10).
NOTE
►► The temperature and cooking time
settings can be changed at any time during
cooking.
►► The appliance acknowledges every
input with a tone signal.
Preparation
Toasting
This function allows you to make toast as
well as bake rolls, baguettes and pretzels.
1. Push the grill grate onto the middle rail.
2. Press the Mode button to select the
"Toasting" function.
3. Set the desired browning level using the
and the
buttons (8):
–– "light" is lightly browned,
–– "dark" is strongly browned.
4. The specified time for each programme is
indicated in the display.
5. Press the
button (10).
NOTE
►► If necessary, correct the setting if you
wish to successively toast several portions.
►► It is not necessary to preheat the oven.
Rotary spit (image B1–B4)
This function (upper heat) allows you to grill a
whole chicken or roast pork. The function is also
suitable for preparing shish kebab skewers as
well as cooking vegetables or chips in the frying
basket.
20 EN
Chicken
1. If required, inset the grease drip dray.
2. Wash a fresh or defrosted whole chicken
and remove the innards.
3. Push the point of a retaining clip (19) onto
the rotary spit and fix with the help of a butterfly screw (image B1).
4. Push the chicken onto the rotary spit and
fix it to the middle of the rotary spit with the
help of the second retaining clip (image B2).
5. Season the chicken to taste (e. g. salt,
ground red pepper, pepper and curry) and
sprinkle with oil.
6. Secure the legs and wings with roulade
pins or roasting string.
7. Put the rotary spit with the chicken into
the appliance by inserting the pointed end
into the rotary drive (image B3). Then put the
stud on the other side of the rotary spit into
the mounting on the left side of the appliance
(image B4).
8. Press the Mode button to select the
"rotary spit" function.
9. Set the cooking time and temperature.
10.Press the
button (10).
11.Remove the cooked chicken from the
rotary spit grip as described in the section
Using the grip (page 18).
NOTE
►► Only use chickens with a weight up to
max. 1000 g.
►► It is not necessary to preheat the oven.
Shish kebab skewers (images C1-C3)
1. Put the desired meat pieces (approx. 1.5
x 1.5 cm) pieces of sausage, strips of pepper, onions, bacon etc. onto the shish kebab
skewers (20).
2. Season the skewered food to taste and
sprinkle with oil.
3. Put the individual skewers (20) onto the
holder (21). The curved end of the skewer is
clamped into the recess on the holder (21)
(image C1) on the one side and the pointed
end on the other side is inserted into the hole
on the holder (image C2). Push the rotary
spit (18) through the middle of the shish kebab skewer holder (21) and fix it on the right
and left with the retaining clips (image C3).
BEEM - Elements of Lifestyle
4. If required, inset the grease drip dray.
5. Insert the rotary spit with the kebab skewers.
6. Press the MODE button to select the
"rotary spit" function.
7. Set the cooking time and temperature.
button (10).
8. Press the
9. Remove the skewers using the skewer
grip (16).
Frying basket (images D1-D2)
1. Push the rotary spit (18) into the middle of
the frying basket (22) and secure on the left
and right with the retaining clips (image D1).
2. Open the frying basket and fill it with
chips, croquettes, potato wedges, chicken
nuggets, shrimps, etc.
3. In order to allow the food to be turned
when the wire basket is turned, do not overfill
the basket.
4. If required, insert the grease drip dray.
5. Insert the rotary spit with the frying basket
(image D2).
6. Press the MODE button to select the
"rotary spit" function.
7. Set the cooking time and temperature.
8. Press the
button (10).
9. Remove the hot frying basket using the
rotary spit grip.
Convector
This function starts upper and lower heating
as well as the convector fan. This achieves
an intensive and even heat distribution within
the appliance so that the cooking temperature and time can be decreased. The convector function is suitable for various different
applications such as roasting and stewing
meat, baking bread, cake, pizza and biscuits,
preparing fish dishes, casseroles and gratin.
1. Push the grill grate onto the lowest rail in
the appliance. Fill a fire-proof mould made of
glass, ceramic or metal with food and put this
on the grill grate.
button (10).
2. Press the
3. Press the MODE button to select the
"Convector" function.
BEEM - Elements of Lifestyle
4. Set the cooking time and temperature as
described in the sections Setting the temperature (page 18) and Setting the cooking time (page 18).
button (10).
5. Press the
6. Remove the food with the help of kitchen
gloves or pot holders and the grill grate with
the grip.
NOTE
►► Check that your cake/baking mould fits
into the appliance.
►► Make sure that the dough for the cake
or bread does not brim over when rising
during baking and come into contact with
the inner walls and heating elements of the
appliance.
►► Preheat the oven for approx. 4-5 min.
Pizza (image E1)
1. Push the grill grate onto the lowest rail.
2. Lay the pizza stone onto the grill grate.
3. Put the pizza onto the pizza stone.
4. Bake the pizza using the "Convector"
function.
(Defrost)
The "Defrost" function does not allow changes of temperature. The defrost temperature is
preset to approx. 50 °C.
1. Put the frozen food onto the baking tray.
2. Push the baking tray into the desired position in the oven.
3. Press the Mode button to select the
"Defrost" function.
4. Set the defrost time as described in
the section Setting the cooking time
(page 18).
5. Press the
button (10).
6. Remove the defrosted food with the help
of kitchen gloves or pot holders and the grill
grate with the grip.
NOTE
►► Be aware that defrosting times depend
on the product.
EN 21
Roasting
This function (upper heat) is ideal for grilling
steaks, fish, sausages, hamburgers etc.
1. If required, insert the grease drip dray.
2. Season the food to taste and place it onto
the grill grate.
3. Push the grill grate – depending on the
thickness of the food grilled – onto the middle
or highest rail in the appliance.
4. Press the Mode button to select the
"Roasting" function.
5. Set the cooking time and temperature as
described in the sections Setting the temperature (page 18) and Setting the cooking time (page 18).
6. Press the
button (10).
7. Remove the hot grill grate using the grip.
NOTE
►► When using this function, make sure
that you turn the food because only the upper heat function is used.
After using
1. Pressing the
(9) stops the running
function.
2. Pressing twice stops all functions and resets the settings.
3. Pull the plug out of the mains socket.
4. Allow the appliance to cool down and
clean it as described in the section Cleaning
and maintenance (page 21).
Cleaning and maintenance
Before beginning any work, pay attention to
the safety instructions in the section Safety
precautions (page 13)!
The appliance must be cleaned after
each use.
Clean the appliance as soon as it has
cooled down. Waiting too long makes cleaning unnecessarily difficult.
ATTENTION
►► Do not insert any objects into the heating elements. They could be damaged.
BEEM - Elements of Lifestyle
22 EN
Housing
Wipe the inside and outside of the housing
with a damp cloth.
If necessary, use commercially-available
washing-up liquid.
Accessory parts
Take out the accessory parts and clean them
with warm dishwater or in the dishwasher.
In the case of stubborn stains, soak the
accessory parts in warm dishwater for 10
minutes before cleaning.
Dry the parts thoroughly before reinserting.
NOTE
►► Do not use metal/scouring pads to
clean the appliance.
►► Do not use oven spray to clean the
inside.
►► All removable parts except the pizza
stone can be cleaned in the dishwasher.
Pizza stone
Allow the pizza stone to cool down.
Remove light soiling with a damp cloth.
Stubborn stains can be scoured with a
scouring pad. Wipe down afterwards with a
damp cloth.
NOTE
►► The pizza stone is NOT suitable for
dishwashers.
►► Clean the pizza stone only with water.
Storage
If you do not intend to use the appliance for a
longer period of time, clean it as described in
the section Cleaning and care Cleaning and
maintenance (page 21).
Store the appliance and all accessory parts
at a dry, clean and frost-free location which is
protected against direct sunlight.
General
Guarantee
In addition to the statutory warranty obligation, BEEM also grants an extended manufacturer's guarantee for some products. If
this guarantee applies, you will find the
corresponding information either on the
product-specific packaging, in the advertising
materials or on the BEEM web page for the
respective product. Please visit our website
to obtain more information on comprehensive
guarantee conditions, available accessories
and spare parts as well as user manuals in
various languages.
Limitation of liability
We assume no liability for damage or followup damage in the case of:
failure to observe the operating instructions, improper use, improper or unsuitable
handling, incorrectly performed repairs, unauthorized modifications, use of third-party
parts or replacement parts, use of unsuitable
supplementary or accessory parts.
Declaration of Conformity
BEEM hereby declares that this appliance
complies with the fundamental requirements
and other relevant provisions of 2004/108/
EC, 2006/95/EC, 2009/125/EC und 2011/65/
EU directives.
BEEM - Elements of Lifestyle
EN 23
Troubleshooting
The following table helps in localising and remedying minor faults. If you cannot resolve the
problem with the following steps, please contact customer service.
Fault
Display does not switch
on.
The fuse in the
fuse box was tripped.
Possible cause
Remedy
Circuit breaker in fuse box
switched off.
Switch on fuse.
Control indicator defective.
Contact customer service.
Too many appliances connected to the same power
circuit.
Reduce the number of appliances on the power circuit.
No fault detected.
Contact customer service.
BEEM - Elements of Lifestyle
24 FR
Sommaire
Consignes de sécurité . . . . . . . . . . . . . . 24
Mise en service . . . . . . . . . . . . . . . . . . . . 27
Description de l’appareil. . . . . . . . . . . . . 28
Panneau de commande . . . . . . . . . . . . . 28
Fonctions du four . . . . . . . . . . . . . . . . . . 29
Utilisation et fonctionnement. . . . . . . . . 30
Nettoyage et entretien. . . . . . . . . . . . . . . 33
Entreposage. . . . . . . . . . . . . . . . . . . . . . . 34
Généralités. . . . . . . . . . . . . . . . . . . . . . . . 34
Élimination des dysfonctionnements. . 34
Cher client,
Avant d'utiliser l'appareil, veuillez lire les instructions relatives à la mise en service, à la
sécurité, à l'utilisation conforme ainsi qu'au
nettoyage et à l'entretien contenues dans la
présente notice d'utilisation.
Ouvrir les pages dépliantes qui se trouvent
au début et à la fin de la notice d’utilisation
pour pouvoir voir les figures pendant la lecture de celle-ci.
Conserver la présente notice d’utilisation
pour une utilisation ultérieure et la remettre
avec l’appareil au propriétaire suivant.
Consignes de sécurité
Avant d'utiliser l’appareil, le contrô-
ler pour vérifier qu'il ne présente aucun
dommage apparent. Ne pas mettre en
service un appareil endommagé.
Les enfants ne doivent pas jouer
avec l'appareil.
Le nettoyage et l'entretien utilisateur sont interdits aux enfants, hormis
s'ils ont plus de 8 ans et sont supervisés.
Les enfants de moins de 8 ans doivent être maintenus à distance de l'appareil et du câble d’alimentation.
Cet appareil peut être utilisé par des
enfants de 8 ans et plus ainsi que par
des personnes avec des capacités physiques, sensorielles ou mentales réduites ou manquant d'expérience et/ou de
connaissances s'ils sont sous supervision ou s'ils ont été formés à l'utilisation
sûre de l'appareil et ont compris les dangers en résultant.
Faire effectuer les réparations uniquement par des revendeurs spécialisés
ou le service client de l’usine. Ceci vaut
en particulier pour le remplacement du
câble d'alimentation s'il est endommagé.
Des réparations inappropriées peuvent
entraîner des risques considérables pour
l’utilisateur. En outre, le droit à la garantie perd toute validité.
Ne pas utiliser cet appareil avec une
minuterie externe ou un système de téléactionnement séparé.
Pendant la période de garantie, toute
réparation de l’appareil doit uniquement
être effectuée par un service aprèsvente autorisé par le fabricant, faute de
quoi les droits de garantie perdent leur
validité en cas de dommages et de dysfonctionnements qui en résultent.
Les composants défectueux doivent
uniquement être remplacés par des pièces de rechange originales. Le respect
des exigences de sécurité est uniquement garanti avec ces pièces.
En cas de coupure de courant, débrancher l'appareil du secteur pour éviter
une remise en service involontaire de
l'appareil.
Ne pas faire fonctionner l'appareil
dans l'obscurité.
BEEM - Elements of Lifestyle
DANGER
Risque lié au courant électrique !
►► Ne pas utiliser l'appareil lorsque le
câble d'alimentation ou la fiche sont
endommagés.
►► N'ouvrir en aucun cas le boîtier de
l'appareil. Toucher à des pièces sous
tension et modifier le montage électrique et mécanique entraînent un risque
d'électrocution.
►► Ne jamais immerger l'appareil ou
la fiche secteur dans de l'eau ou dans
d'autres liquides.
►► Ne pas saisir le câble d'alimentation avec les mains mouillées pour
débrancher l'appareil de l'alimentation
électrique.
►► Débrancher la fiche secteur de la
prise :
–– lorsque l'appareil n'est pas utilisé,
–– lorsqu’une panne survient en cours
de fonctionnement ;
–– avant de nettoyer l’appareil.
Risque d’étouffement !
►► Les matériaux d’emballage ne
doivent pas être utilisés pour jouer. Il y
a risque d’étouffement.
AVERTISSEMENT
Risque de brûlures !
►► Pendant le fonctionnement de
l'appareil, la température des surfaces
pouvant être touchées peut être très
élevée.
►► Pendant le fonctionnement, ne
toucher l'appareil que par la poignée
ou les éléments de commande.
►► Utiliser des maniques ou des gants
de cuisine pour retirer les récipients
chauds du four.
►► Ne pas transporter l’appareil
lorsqu’il fonctionne.
FR 25
►► Utiliser les pinces fournies pour
sortir la grille, la plaque de cuisson ou
la tôle collectrice de graisse, la broche
rotative ainsi que le panier à friture.
►► Ne pas verser de liquide sur la plaque de cuisson chaude. Lorsque le liquide entre en contact avec la surface
chaude, il éclabousse et s’évapore très
rapidement et peut ainsi provoquer
des blessures.
►► Faire attention lors de la grillade
de denrées alimentaires grasses. La
graisse chaude peut être projetée et
causer des brûlures.
►► Laisser refroidir l’appareil avant
chaque nettoyage.
Risque d’incendie
►► Ne jamais utiliser l’appareil à
proximité ou en dessous de matériaux
inflammables tels que des rideaux.
►► Utiliser uniquement des moules
et des récipients thermorésistants en
verre, en céramique ou en métal pour
préparer les aliments.
►► Placer toujours les moules et récipients sur la grille de cuisson, jamais
sur les résistances.
►► Ne pas utiliser de sacs à cuisson.
►► Ne rien placer sur l'appareil.
►► Ne pas couvrir l'appareil en fonctionnement.
►► L'appareil est uniquement destiné à
la préparation de denrées alimentaires.
Ne pas mettre d'autres objets dans
l'appareil.
26 FR
ATTENTION
►► Débrancher toujours le câble
d'alimentation en tirant sur la surface
de préhension de la fiche et non sur le
câble électrique lui-même.
►► Ne jamais porter, soulever ou déplacer l'appareil par son câble d'alimentation.
►► Respecter toujours un écart minimum de 3 cm entre les résistances et
les accessoires ainsi que les aliments
à cuire.
►► Pour nettoyer l'appareil, ne pas
utiliser d'objets tranchants ou de détergents à récurer.
Utilisation conforme à sa destination
Le présent appareil est uniquement destiné
toaster, cuire, griller, frire et dégeler des
denrées alimentaires dans le cadre d'une
utilisation domestique ou dans les secteurs
similaires et non professionnels, comme par
exemple les cuisines du personnel dans les
magasins, les cafés, les bureaux ou tout
autre environnement professionnel ; les exploitations agricoles ; l'utilisation par des hôtes dans des hôtels, des motels ou d'autres
complexes d'habitation ; les maisons d'hôtes
Bed and Breakfast.
Toute autre utilisation ou toute utilisation dépassant ce cadre est considérée comme non
conforme.
AVERTISSEMENT
En cas d'utilisation non conforme, et/
ou autre, l'appareil peut présenter des
dangers.
►► L’appareil doit être utilisé uniquement
de manière conforme.
►► Respecter les procédures décrites dans
la présente notice d’utilisation.
Toutes réclamations pour cause de dommages survenus suite à une utilisation non
conforme sont exclues.
Seul l’utilisateur en assume les risques.
BEEM - Elements of Lifestyle
Conditions requises sur le lieu de
montage
Afin que l'appareil fonctionne de manière
sûre et sans défaut, le lieu de montage doit
satisfaire aux conditions suivantes :
Poser l'appareil sur une base plane,
stable et résistant à la chaleur et aux éclaboussures de graisse.
Les surfaces des meubles peuvent présenter des composants susceptibles d’attaquer les pieds de l’appareil et de les ramollir.
Le cas échéant, poser un support sous les
pieds de l’appareil.
Ne pas placer l'appareil dans un environnement très chaud, humide, mouillé ou
à proximité de matières inflammables. L'espace entre l'appareil et les murs, les meubles
ou d'autres objets doit être d'au moins 15 cm.
Ne pas placer l'appareil en dessous
d'un placard suspendu.
La prise doit être facile d’accès afin de
pouvoir débrancher rapidement l’appareil.
Ne pas mettre de nappe, de chiffons ou
de serviettes en dessous des pieds de l'appareil pour ne pas qu'il glisse.
Ne pas mettre l'appareil au bord de
la surface où il est posé pour éviter qu'il ne
tombe.
Il est interdit d’utiliser et d'entreposer
l’appareil en plein air.
Branchement électrique
Afin que l’appareil fonctionne de manière
sûre et sans défaut, il convient de respecter
les consignes suivantes lors du branchement
électrique :
Avant de brancher l'appareil, comparer les données d'alimentation (tension et
fréquence) sur la plaque signalétique avec
celles du réseau électrique. Ces données
doivent concorder afin qu’aucun dommage
ne se produise sur l’appareil. En cas de
doute, consulter son vendeur d'appareils
électriques.
La prise de courant doit être protégée
au moins par un coupe-circuit automatique
de 16 A.
S'assurer que le câble d'alimentation
ne soit ni endommagé, ni posé sur des surfaces très chaudes et/ou des arêtes vives.
BEEM - Elements of Lifestyle
Il est interdit de tendre le câble d’alimentation, de le plier, de le pincer, de faire
des nœuds avec ou de le mettre en contact
avec des surfaces très chaudes.
Toujours dérouler le câble d'alimentation complètement avant de brancher l'appareil sur la prise.
Si l'appareil doit être branché sur un
câble à rallonge, la section de câble doit être
d'au moins 1,5 mm².
La sécurité électrique de l’appareil
est uniquement garantie lorsque celui-ci
est branché à un conducteur de protection
installé de manière réglementaire. Le fonctionnement sur une prise de courant sans
conducteur de protection est interdit. En cas
de doute, faire contrôler l'installation domestique par un électricien. Le fabricant décline
toute responsabilité en cas de dommages
occasionnés par l’absence ou le non-branchement d’un conducteur de protection.
Poser le câble d'alimentation de manière que personne ne risque de trébucher
dessus.
Pictogrammes utilisés
DANGER
Est utilisé pour un danger imminent et
pouvant occasionner des blessures graves
voire mortelles.
►► Pour prévenir ce risque, suivre les
instructions indiquées ici.
AVERTISSEMENT
Est utilisé pour une situation potentiellement dangereuse pouvant occasionner des
blessures graves ou mortelles.
►► Pour prévenir ce risque, suivre les
instructions indiquées ici.
ATTENTION
Est utilisé pour une situation potentiellement dangereuse pouvant occasionner
des blessures légères ou des dommages
matériels.
►► Pour prévenir ce risque, suivre les
instructions indiquées ici.
FR 27
REMARQUE
►► Une indication désigne les informations
supplémentaires facilitant le maniement de
l’appareil.
Mise en service
Déballage
1. Retirer l’appareil, tous les accessoires et
la notice d’utilisation du carton.
2. Avant la première utilisation, retirer de
l’appareil et des accessoires tous les matériaux d’emballage et films de protection.
3. Contrôler le contenu pour en vérifier l’intégralité et l’absence de dommages visibles.
REMARQUE
►► Ne jamais retirer la plaque signalétique
ou les éventuels avertissements.
►► Conserver l'emballage d'origine pendant la période de garantie de l'appareil
afin de pouvoir l'emballer de manière
conforme en cas de garantie. Les dommages dus au transport entraînent l’invalidation du droit à la garantie.
Avant la première utilisation
Faire chauffer l'appareil pendant env. 10 minutes pour éliminer des résidus éventuels du
montage (graisses). Pour ce faire, procéder
comme suit :
1. Sélectionner le réglage Chaleur tournante et régler la température la plus élevée
comme décrit au chapitre Réglage de la
température (p. 29).
2. Régler la durée de cuisson sur 10 min
comme décrit au chapitre Réglage de la
durée de cuisson (p. 29).
(10).
3. Appuyer sur la touche
4. Une fois la fonction terminée, ouvrir la
porte du four et laisser l'appareil refroidir.
5. Laisser refroidir complètement l'appareil.
6. Débrancher la fiche secteur de la prise.
7. Nettoyer l'appareil comme décrit au chapitre Nettoyage et entretien (p. 33).
BEEM - Elements of Lifestyle
28 FR
REMARQUE
►► Lors de la première mise en service,
de la fumée ou une odeur peuvent être
générées du fait d’additifs requis pour la
production, comme par ex. des graisses.
Ceci est tout à fait normal. Veiller alors à
aérer suffisamment.
Description de l’appareil
Volume de livraison/vue d'ensemble
de l'appareil
(voir les figures sur la page dépliante)
1
2
3
4
5
6
7
8
9
10
11
12
13
14
15
16
17
18
19
20
21
22
23
24
25
Boîtier
Poignée de la porte
Écran
Affichage des fonctions
(fonction)
Touche MODE
Touche de réglage de la température
°C
Touche Minuterie
Touches
Touche Pause/Cancel
Touche Start
Pieds
Porte du four
Écarteur arrière (non représenté)
Grille
Plaque de cuisson
Pince pour tournebroche
Poignée pour grille et plaque de cuisson
Tournebroche
Crochets du tournebroche
Brochettes à chachlik (8 pièces)
Support pour brochettes à chachlik
Panier à friture
Pierre à pizza
Tôle collectrice de graisse
Mode d'emploi (non représenté)
Panneau de commande
Sur l'écran (3) s'affichent la durée de cuisson, la température et la fonction réglées. La
fonction choisie est indiquée par un triangle
rouge. Pendant le réglage de la durée de
cuisson et de la température, le chiffre correspondant clignote.
REMARQUE
►► Chaque pression sur une touche est
confirmée par un bip.
Allumage/extinction
Pour allumer l'appareil, appuyer sur la touche
(10). Les fonctions s'affichent sur l'écran.
Une pression sur la touche MODE
(5)
permet de sélectionner la fonction souhaitée.
déUne nouvelle pression sur la touche
marre la fonction sélectionné.
REMARQUE
►► Avant de démarrer la fonction, régler
la température et la durée de cuisson de
la façon décrite au chapitre Réglage de la
température (p. 29) et au chapitre Réglage de la durée de cuisson (p. 29).
Touche pause/annuler
1. Appuyer 1x sur la touche pause/annuler
(Pause/Cancel)
(9) pour arrêter la fonction en cours. Il est alors possible de vérifier
la cuisson ou de modifier les réglages.
2. Appuyer sur la touche Start
(10) pour
poursuivre la cuisson.
3. Appuyer 2x sur la touche pause/annuler
(9) pour terminer toutes les fonctions et
réinitialiser les paramètres. L'appareil se met
automatiquement hors service au bout d'une
minute environ.
BEEM - Elements of Lifestyle
FR 29
Fonctions du four
Tout d'abord, appuyer sur la touche
pour activer la touche MODE
(5) permet de régler les fonctions individuelles.
VentilaChaleur de teur de
sole
circulation d'air
Fonction
Chaleur
de voûte
Griller du pain
–
–
Tournebroche
–
–
Chaleur tournante
–
Décongeler
–
(env. 50 °C)
–
Cuire
–
–
–
Rotation
. La touche MODE
Réglage de base
Le dernier réglage
clignote.
La température clignote
à 200 °C.
La température clignote
à 215 °C.
La durée affichée clignote à 1 mn 00 s.
La température clignote
à 175 °C.
REMARQUE
►► Il est possible de changer de fonction uniquement lorsqu'aucune fonction n'est en cours.
Réglage de la température
Réglage de la durée de cuisson
1. Appuyer sur la touche °C (6).
2. À l'aide des touches
et
(8), sélectionner la température souhaitée.
1. Appuyer sur la touche Minuterie
(7).
et
(8), sélec2. À l'aide des touches
tionner la durée de cuisson souhaité.
Le réglage de la température s'affiche à
l'écran (3).
Il est possible de modifier la température à
tout moment au cours de la cuisson.
La durée de cuisson définie s'affiche à l'écran
(3).
Il est possible de modifier la durée de cuisson même en cours de cuisson.
Une fois la durée de cuisson écoulée, un
signal sonore se fait entendre. END clignote
sur l'écran et l'appareil s'éteint automatiquement au bout d'une minute environ.
Fonction
Plage de température
Griller du pain
Réglage de base
non modifiable
Tournebroche
100 °C – 230 °C
Chaleur tournante
100 °C – 230 °C
Décongeler
50 °C
Cuire
100 °C – 230 °C
REMARQUE
►► Il est possible d'augmenter ou de réduire les plages de température réglables
à l'aide des touches
et
par pas de
5 °C.
Fonction
Minuterie
Réglage par pas de 30 s de
Griller du
légèrement grillé ("light" 2 mn 30
pain
s) à très grillé ("dark" 6 mn 10 s).
Tourne- 1 mn à 30 mn par pas d'1 minute
broche 30 mn à 3 h par pas de 5 minutes.
Chaleur 1 mn à 30 mn par pas d'1 minute
tournante 30 mn à 3 h par pas de 5 minutes.
Décon- 1 mn à 30 mn par pas d'1 minute
geler
30 mn à 3 h par pas de 5 minutes.
1 mn à 30 mn par pas d'1 minute
Cuire
30 mn à 3 h par pas de 5 minutes.
BEEM - Elements of Lifestyle
30 FR
Pour la préparation des toasts, on peut influer indirectement sur la durée. La sélection
du degré de brunissage sélectionne automatiquement la durée du programme « Toast ».
Voir le chapitre Préparation - Griller du pain
(p. 31).
Utilisation et fonctionnement
Mettre en place la tôle collectrice de
graisse
Insérer la tôle collectrice de graisse (24) par
devant entre les éléments chauffants.
Utilisation des poignées
(figures A1 à A3)
Pour retirer la tôle collectrice de graisse, une
pince pour tournebroche (16) est nécessaire :
1. Enficher le crochet de réception de la
pince par le haut dans les trous de la tôle collectrice de graisse.
2. Amener la pince de tournebroche en position horizontale pour soulever la tôle collectrice de graisse vers le haut et vers l'avant.
Pour retirer le tournebroche (18), une pince
pour tournebroche (16) est également nécessaire.
1. Insérer la pince pour le tournebroche (16)
dans l'appareil de telle sorte que les crochets
de préhension de la pince se placent sous
les épaulements du tournebroche prévus à
cet effet (figure A1).
2. Décrocher le tournebroche en soulevant
légèrement le côté gauche en premier.
3. Sortir le tournebroche avec précaution
pour que l'extrémité enfichée dans le mécanisme de rotation puisse se défaire.
4. Retirer le tournebroche complet.
Pour retirer la plaque de cuisson ou la grille,
une petite pince (17) est nécessaire :
1. L'introduire avec un léger angle par le
haut dans la plaque de cuisson (figure A2).
2. Enficher la pince de telle manière que le
crochet le plus grand soit au-dessus de la
tôle de cuisson, et le support en dessous.
3. Amener la poignée à l'horizontale.
4. En sortant la plaque de cuisson, la soulever légèrement pour éviter que la pince ne se
défasse.
5. Retirer la plaque de cuisson.
6. Pour retirer la grille, procéder comme
avec la plaque de cuisson. Veiller bien que
les petits crochets de la poignée s'enclenchent dans la grille (figure A3).
REMARQUE
►► Si possible, poser le tournebroche sur
la plaque de cuisson en le sortant afin
de recueillir la graisse qui s'égoutte des
aliments.
►► Maintenir la plaque de cuisson à l'horizontale pour éviter que la graisse chaude
s'écoule.
►► Utiliser des gants de cuisine pour ne
pas se brûler avec la graisse chaude.
►► Placer un support résistant à la chaleur
pour déposer les parties brûlantes.
Remarques générales
Les aliments doivent être à température
ambiante car les aliments congelés exigent
une durée de cuisson plus long et peuvent
par conséquent se dessécher.
Pour obtenir des résultats particulièrement satisfaisants, préchauffer brièvement
l'appareil. Surveiller attentivement la cuisson
et régler la température en cas de besoin.
Cet appareil vous permet de préparer
les plats les plus variés tels que saucisses,
steaks, rôtis, volaille, roulades, légumes,
soufflés, toasts, pizzas, gâteaux, etc.
Cet appareil convient particulièrement
à la préparation rapide et pauvre en matières
grasses des aliments. La durée de cuisson
dans un four infrarouge est plus courte que
dans un four conventionnel.
REMARQUE
►► Pendant la cuisson, de la condensation
peut se former sur la porte du four.
Fonctionnement de l'appareil
1. Insérer le cas échéant la tôle collectrice
de graisse.
2. Appuyer sur la touche Start
pour activer les fonctions du four.
BEEM - Elements of Lifestyle
3. Sélectionner la fonction appropriée, voir
le tableau Fonctions du four (p. 29).
4. Régler la température de cuisson, consulter le chapitre Réglage de la température
(p. 29).
5. Régler la durée de cuisson comme décrit
au chapitre Réglage de la durée de cuisson
(p. 29).
(10).
6. Appuyer sur la touche Start
REMARQUE
►► Il est possible de modifier la température et la durée de cuisson à tout moment
au cours de la cuisson.
►► L'appareil confirme chaque saisie par
un bip.
Préparation
Griller du pain
Cette fonction vous permet de préparer des
toasts et de faire dorer des petits pains, des
baguettes et des bretzels.
1. Insérer la grille sur le rail du milieu.
2. À l'aide de la touche Mode
, sélectionner la fonction « Toast ».
3. Régler le degré de brunissement souhaité
à l'aide des touches
et
(8) :
–– « light » pour un léger brunissement,
–– « dark » pour un brunissement plus foncé.
4. La durée préconfigurée par le programme
s'affiche à l'écran.
5. Appuyer sur la touche
(10).
REMARQUE
►► Le cas échéant, le réglage peut être corrigé pour préparer plusieurs toasts à la suite.
►► Il n'est pas nécessaire de préchauffer le
four.
Tournebroche (figures B1 à B4)
Cette fonction (chaleur de voûte) vous permet de griller tout un poulet ou un rôti. En
outre, cette fonction convient pour cuire
des brochettes chachlik ou pour cuire des
légumes ou des frites dans le panier à friture.
Poulet
1. Insérer le cas échéant la tôle collectrice
de graisse.
2. Laver le poulet frais ou décongelé et le
vider.
FR 31
3. Insérer un crochet (19), pointes en avant,
sur le tournebroche et le fixer en place à
l'aide de la vis à ailettes (figure B1).
4. Pousser le poulet sur le tournebroche et
le fixer avec la seconde agrafe de maintien
au centre du tournebroche (figure B2).
5. Assaisonner le poulet à son goût (p. ex.
sel, paprika, poivre et curry) et l'asperger
d'huile.
6. Fixer les cuisses et les ailes à l'aide des
pics à roulades ou d'un cordon à griller.
7. Mettre en place le tournebroche avec le
poulet dans l'appareil en enfichant en premier l'extrémité pointée dans l'entraînement
rotatif (figure B3). Placer l'embase de l'autre
côté du tournebroche dans le logement situé
à gauche dans l'appareil (figure B4).
8. À l'aide de la touche Mode
, sélectionner la fonction « Tournebroche ».
9. Régler la durée et la température de cuisson.
(10).
10.Appuyer sur la touche
11.Sortir le poulet cuit à l'aide de la poignée
pour tournebroche comme décrit au chapitre
Utilisation des poignées (p. 30).
REMARQUE
►► Le poids du poulet ne doit pas dépasser 1000 g.
►► Il n'est pas nécessaire de préchauffer
le four.
Brochettes à chachlik (figures C1 à C3)
1. Garnir les brochettes à chachlik (20) selon ses goûts avec des dés de viande (d'environ 1,5 x 1,5 cm), des morceaux de saucisse, des lanières de poivron, des oignons,
du lard, etc.
2. Assaisonner les brochettes à son goût et
les asperger d'huile.
3. Placer les brochettes (20) une par une
sur le support (21). Pour ce faire, coincer
l'extrémité arrondie des brochettes dans les
logements du support (21 ; figure C1) et insérer l'extrémité pointue des brochettes dans
les trous du support (figure C2). Introduire le
tournebroche (18) au milieu du support pour
brochettes à chachlik (21) et le fixer à droite
et à gauche par les crochets (figure C3).
32 FR
4. Insérer le cas échéant la tôle collectrice
de graisse.
5. Mettre en place le tournebroche avec les
pics à brochettes.
6. À l'aide de la touche MODE
, sélectionner la fonction « Tournebroche ».
7. Régler la durée et la température de cuisson.
(10).
8. Appuyer sur la touche
9. Retirer les brochettes cuites à l'aide de la
pince pour tournebroche (16).
Panier à friture (figures D1 et D2)
1. Introduire le tournebroche (18) au milieu
du panier à friture (22) et le fixer à droite et à
gauche par les crochets (figure D1).
2. Ouvrir le panier à friture et le remplir de
frites, de croquettes, de pommes dauphine,
de nuggets de poulet, de crevettes etc.
3. Ne pas trop remplir le panier afin de permettre aux aliments de se retourner pendant
la rotation du panier.
4. Insérer le cas échéant la tôle collectrice
de graisse.
5. Mettre en place le tournebroche avec le
panier à friture (fig. D2).
, sélec6. À l'aide de la touche MODE
tionner la fonction « Tournebroche ».
7. Régler la durée et la température de cuisson.
8. Appuyer sur la touche
(10).
9. Retirer le panier à friture chaud à l'aide de
la poignée pour tournebroche.
Chaleur tournante
Cette fonction vous permet de démarrer la
chaleur de voûte et la chaleur de sole ainsi
que le ventilateur de circulation d'air. Elle
permet de répartir de manière plus intense
et plus homogène la chaleur dans l'appareil
et de réduire ainsi la température et la durée
de cuisson. La fonction Chaleur tournante
convient pour un grand nombre d'utilisations,
comme rôtir, la cuisson à l'étuvée de viande,
la cuisson des pains, des gâteaux, des pizzas et des petits gâteaux, la préparation de
plats à base de poisson, les soufflés et les
gratins.
BEEM - Elements of Lifestyle
1. Insérer la grille sur le rail le plus bas dans
l'appareil. Placer les aliments dans un moule
résistant à la chaleur en verre, céramique ou
métal, et le mettre sur la grille.
2. Appuyer sur la touche
(10).
3. Sélectionner avec la touche Mode
la
fonction « Chaleur tournante ».
4. Régler la durée et la température de cuisson comme décrit aux chapitres Réglage de
la température (p. 29) et Réglage de la
durée de cuisson (p. 29).
(10).
5. Appuyer sur la touche
6. Retirer les aliments à l'aide de gants de
cuisine ou de maniques et la grille à l'aide de
la pince.
REMARQUE
►► Vérifier que le moule rentre dans l'appareil.
►► Veiller que la pâte des gâteaux ou des
pains ne puisse pas toucher les parois
intérieures et les résistances de l'appareil
lorsqu'elle monte.
►► Préchauffer le four pendant env. 4 à 5
minutes.
Pizza (figure E1)
1. Insérer la grille sur le rail le plus bas.
2. Placer la pierre à pizza sur la grille.
3. Placer la pizza sur la pierre.
4. Faire cuire la pizza avec la fonction
« Chaleur tournante » comme décrit plus
haut.
Décongeler
La fonction « Décongeler » ne permet pas de
modifier la température du programme.
1. Placer les aliments congelés sur la plaque de cuisson.
2. Insérer la plaque de cuisson à la hauteur
souhaitée dans le four.
3. À l'aide de la touche Mode
, sélectionner la fonction « Décongeler ».
4. Régler la durée de décongélation comme
décrit au chapitre Réglage de la durée de
cuisson (p. 29).
5. Appuyer sur la touche
(10).
6. Retirer les aliments décongelés à l'aide
de gants de cuisine ou de maniques.
BEEM - Elements of Lifestyle
REMARQUE
►► À noter que la durée de décongélation
peut varier considérablement en fonction
de l'aliment.
Cuire
Cette fonction (chaleur de voûte) vous permet de griller les steaks, les poissons, les
saucisses, les hamburgers etc.
1. Insérer le cas échéant la tôle collectrice
de graisse.
2. Assaisonner les aliments selon ses goûts
et les disposer sur la grille.
3. Insérer la grille sur le rail du milieu ou le
plus haut de l'appareil, en fonction de l'épaisseur des aliments à cuire.
4. À l'aide de la touche Mode
, sélectionner la fonction « Rôtir ».
5. Régler la durée et la température de cuisson comme décrit aux chapitres Réglage de
la température (p. 29) et Réglage de la
durée de cuisson (p. 29).
6. Appuyer sur la touche
(10).
7. Retirer la grille chaude à l'aide de la poignée.
REMARQUE
►► À noter qu'avec cette fonction, il faut
retourner les aliments qui cuisent car elle
chauffe uniquement en chaleur supérieure.
Après l'utilisation
1. Une pression sur la touche
(9) permet d'arrêter la fonction en cours.
2. Une pression double met fin à toutes les
fonctions et réinitialise tous les réglages.
3. Débrancher la fiche secteur de la prise.
4. Laisser refroidir l'appareil et le nettoyer de
la manière décrite au chapitre Nettoyage et
entretien (p. 33).
Nettoyage et entretien
Avant de commencer les opérations, observer les consignes de sécurité du chapitre
Consignes de sécurité (p. 24) !
L'appareil doit être nettoyé après chaque utilisation.
FR 33
Nettoyer l'appareil après l'utilisation,
dès qu'il est refroidi. Attendre trop longtemps
n'en rendra le nettoyage que plus difficile.
ATTENTION
►► Ne pas introduire d'objets dans les
résistances. Cela risquerait de les endommager.
Boîtier
Essuyer l'intérieur et l'extérieur du boîtier à
l'aide d'un chiffon humide.
Le cas échéant, utiliser du liquide vaisselle
du commerce.
Accessoires
Retirer les accessoires et les nettoyer à l'eau
chaude additionnée de liquide vaisselle ou
dans le lave-vaisselle.
Pour les salissures tenaces, faire tremper les accessoires pendant 10 mn dans de
l'eau savonneuse chaude avant de les laver.
Sécher soigneusement les pièces
avant de les mettre en place.
REMARQUE
►► Ne pas utiliser d'éponge en métal/à
récurer pour nettoyer l'appareil.
►► Ne pas utiliser de spray pour fours pour
nettoyer l'intérieur.
►► Toutes les pièces amovibles passent au
lave-vaisselle, sauf la pierre à pizza.
Pierre à pizza
Laisser la pierre à pizza refroidir.
Retirer les salissures légères à l'aide
d'un chiffon humide.
Pour retirer les taches tenaces, utiliser
un grattoir à casseroles. Ensuite, essuyer
avec un chiffon humide.
REMARQUE
►► La pierre à pizza ne passe PAS au
lave-vaisselle.
►► Nettoyer la pierre à pizza sans produit
vaisselle, uniquement avec de l'eau.
BEEM - Elements of Lifestyle
34 FR
Entreposage
Si l'appareil ne doit pas être utilisé pendant
une période prolongée, le nettoyer l'appareil comme décrit au chapitre Nettoyage et
entretien (p. 33).
Ranger l’appareil et tous les accessoires
dans un endroit sec, propre et à l’abri du gel,
où il ne sera pas exposé directement aux
rayons du soleil.
Généralités
Limite de responsabilité
Nous n'assumons aucune responsabilité
pour les dégâts ou dommages consécutifs en
cas de :
non-respect des instructions de service,
d'utilisation non-conforme, de traitement incorrect ou inapproprié, de réparations qui ne
sont pas exécutées dans les règles de l'art,
de modifications non autorisées, d'utilisation
de pièces ou de pièces de rechange d'une
autre origine, d'utilisation de pièces complémentaires ou d'accessoires inappropriés.
Garantie
Déclaration de conformité
Outre l'obligation de garantie légale, BEEM
accorde une garantie fabricant étendue sur
certains produits. Dans la mesure où celle-ci
s‘applique, les indications correspondantes
se trouvent soit sur l‘emballage spécifique
du produit, soit sur nos prospectus soit sur
le site Web BEEM sous le produit concerné.
Sur notre site Internet www.beem.de sont
détaillés les conditions de garantie, les
accessoires et les pièces de rechange disponibles ainsi que les notices d’utilisation en
différentes langues.
Par la présente, la société BEEM déclare que
cet appareil est conforme aux exigences fondamentales et aux autres dispositions applicables des directives 2004/108/CE, 2006/95/
CE et 2009/125/CE et 2011/65/UE.
Élimination des dysfonctionnements
Le tableau suivant aide à localiser et à remédier aux petites perturbations. Si les actions mentionnées ci-dessous ne résolvent pas le problème, s'adresser au service après-vente.
Défaut
L'écran n'affiche rien.
Le fusible s’est déclenché
dans la boîte à fusibles.
Cause possible
Résolution
Fusible coupé dans le coffret de fusibles.
Enclencher le fusible.
Le voyant de contrôle est
défectueux.
Informer le service après-vente.
Trop d’appareils raccordés
au même circuit électrique.
Réduire le nombre des appareils
dans le circuit électrique.
Aucune erreur déterminable. Informer le service après-vente.
BEEM - Elements of Lifestyle
Contenido
Indicaciones de seguridad. . . . . . . . . . . 35
Puesta en marcha . . . . . . . . . . . . . . . . . . 38
Descripción del aparato . . . . . . . . . . . . . 39
Panel de operación. . . . . . . . . . . . . . . . . 39
Funciones del horno. . . . . . . . . . . . . . . . 40
Operación y funcionamiento . . . . . . . . . 41
Limpieza y cuidados. . . . . . . . . . . . . . . . 44
Almacenamiento . . . . . . . . . . . . . . . . . . . 45
Generalidades . . . . . . . . . . . . . . . . . . . . . 45
Solución de problemas. . . . . . . . . . . . . . 46
Estimado cliente:
Antes de usar el aparato, lea las indicaciones
contenidas en este manual de instrucciones
acerca de la puesta en marcha, seguridad,
uso conforme al previsto así como su limpieza
y cuidado.
Abra las páginas desplegables al principio y
al final del manual de instrucciones, de este
modo podrá observar las figuras durante la
lectura.
Guarde debidamente este manual de instrucciones para su uso posterior y entréguelo junto
al aparato en caso de transferencia a otra
persona.
Indicaciones de seguridad
Antes de utilizar el aparato, revise
que el aparato no presente daños externos. No encienda nunca el aparato si
está dañado.
Los niños no deben jugar con el aparato.
Los trabajos de limpieza y de usuario
en el aparato no pueden ser realizados
por niños excepto que tengan como mínimo 8 años y estén bajo vigilancia.
Los niños menores de 8 años han de
mantenerse alejados del aparato y del
cable de conexión.
ES 35
Este aparato puede ser utilizado por
niños mayores de 8 años y por personas
cuyas limitaciones físicas, psíquicas o
sensoriales, así como su falta de experiencia y/o de conocimientos, no les permitan saber cómo funciona el aparato,
siempre bajo la vigilancia o las instrucciones de una persona responsable que
les indique cómo utilizar el aparato de
forma segura así como asegurándose
de que comprenden los peligros derivados del uso del aparato.
Encargue las reparaciones del aparato siempre a un distribuidor autorizado o
al servicio técnico de fábrica. Esto tiene
especial importancia si se tiene que
sustituir un cable de conexión dañado.
Una reparación indebida puede provocar
situaciones graves de peligro para el
usuario. Además, la garantía quedará
invalidada.
No utilice este aparato en combinación con un temporizador externo o un
sistema de mando a distancia separado.
Las reparaciones del aparato dentro
del periodo de garantía deberán ser realizadas únicamente por un servicio técnico autorizado por el fabricante, ya que
de lo contrario cualquier daño o avería
derivada del mismo quedará excluido de
la garantía.
Los componentes defectuosos se
deberán sustituir únicamente por piezas
de repuesto originales. Esta es la única
forma de garantizar que se cumplan los
requisitos de seguridad.
En caso de fallo de corriente y con el
fin de evitar una reconexión involuntaria
del aparato, separe el aparato de la red
eléctrica.
No utilice el aparato en la oscuridad.
36 ES
PELIGRO
¡Peligros relacionados con la electricidad!
►► No utilice el aparato si el cable de
alimentación o la clavija de red están
dañados.
►► No abra la carcasa del aparato
bajo ningún concepto. Si se tocan las
conexiones eléctricas o se altera la
estructura eléctrica y mecánica del
aparato, existe peligro de descarga
eléctrica.
►► Nunca sumerja en agua u otros
líquidos el aparato o la clavija de red.
►► No toque el cable de red con las
manos mojadas cuando separe el aparato de la alimentación eléctrica.
►► Desenchufe la clavija de red de la
toma de corriente,
–– cuando no esté utilizando el aparato,
–– si se produce algún fallo durante el
funcionamiento,
–– antes de limpiar el aparato.
¡Peligro de asfixia!
El material de embalaje no debe
utilizarse para jugar. Existe peligro de
asfixia.
ADVERTENCIA
¡Peligro de quemaduras!
►► Durante el funcionamiento del
aparato las superficies a tocar pueden
alcanzar temperaturas muy altas.
►► Cuando el aparato esté encendido,
cójalo únicamente por el asa o los
elementos de mando.
►► Utilice manoplas o guantes de
cocina para extraer los recipientes
calientes del horno.
►► No mueva ni cambie de lugar
nunca el aparato mientras esté en
marcha.
BEEM - Elements of Lifestyle
►► Use el asidero suministrado para
retirar la rejilla o bien la bandeja para
horno y recoge grasa, así como para
extraer el pincho giratorio y la cesta de
freírs.
►► No vierta líquidos sobre la bandeja
de horno caliente. Al entrar en contacto el líquido con la superficie caliente,
salpica y se evapora con rapidez, con
el consiguiente riesgo de heridas.
►► Preste atención al asar a la parrilla
alimentos con un alto contenido en
grasa. La grasa caliente puede salpicar
y producir quemaduras.
►► Antes de limpiar el aparato, déjelo
enfriar.
Peligro de incendio
►► No utilice el aparato cerca ni debajo
de materiales inflamables, como p.ej.
cortinas.
►► Utilice solo moldes termorresistentes y recipientes de vidrio, cerámica
o metal para la preparación de los
alimentos.
►► Coloque los moldes y los recipientes siempre sobre la parrilla y nunca
directamente sobre los elementos
calefactores.
►► No utilice una bolsa para asar tipo
tubo.
►► No coloque o ponga ningún objeto
sobre el aparato.
►► No tape el aparato durante el funcionamiento.
►► El aparato solo es apto para cocinar
alimentos. No deje ningún otro objeto
dentro del aparato.
BEEM - Elements of Lifestyle
ATENCIÓN
►► Para desenchufar el cable de
conexión de la toma de corriente, tire
siempre cogiéndolo por la clavija de
red y nunca por el propio cable de
alimentación.
►► No utilice nunca el cable de red
para transportar, levantar o mover el
aparato.
►► Mantenga separado los accesorios
y los alimentos a una distancia mínima de 3 cm respecto a los elementos
calefactores.
►► No limpie el aparato con objetos afilados o productos de limpieza abrasivos.
Uso conforme a lo previsto
Este aparato está previsto para tostar, hornear, asar a la parrilla y descongelar alimentos
para el uso doméstico privado o similar, no comercial, tales como p. ej como en las cocinas
del personal en tiendas, cafés, oficinas y otros
entornos de trabajo; casas agrícolas; uso por
huéspedes en hoteles, moteles y zonas residenciales similares; pensiones de alojamiento
y desayuno.
Cualquier uso diferente o excesivo se considerará no conforme al previsto.
ADVERTENCIA
Si el aparato no se utiliza de la forma
prevista y/o si se utiliza con otra finalidad
pueden producirse situaciones de peligro.
►► Utilice el equipo únicamente conforme
a su uso previsto.
►► Cumpla los procedimientos que se describen en este manual de instrucciones.
Las reclamaciones por daños derivados del
uso no conforme al previsto quedarán invalidadas de forma inmediata.
El riesgo es responsabilidad única del usuario.
Requisitos al lugar de colocación
A fin de que el aparato funcione de forma
segura y sin problemas, debe colocarse en un
lugar que cumpla con los siguientes requisitos:
ES 37
Coloque el aparato sobre una superficie
estable, plana, resistente al calor y resistente
a las salpicaduras de grasa.
En algunos casos, las superficies de los
muebles contienen compuestos que pueden
agredir o ablandar los pies de apoyo del aparato. Si fuera necesario, coloque una base
debajo de los pies de apoyo del aparato.
No coloque el aparato en lugares calientes, mojados o demasiado húmedos ni cerca
de materiales inflamables. El aparato debe
estar separado, como mínimo, 15 cm de paredes, muebles u otros objetos.
No coloque el aparato debajo de un armario colgante.
La toma de corriente debe encontrarse en
un lugar de fácil acceso y que permita separar
rápidamente el aparato de la red eléctrica.
No coloque ningún mantel, paños o servilletas debajo de los apoyos del aparato, para
que no pueda deslizarse.
No coloque el aparato en el borde de la
superficie de apoyo, podría desprenderse.
El aparato no debe utilizarse ni guardarse
en el exterior.
Conexión eléctrica
Para que el aparato funcione de forma segura
y sin problemas, deben respetarse las siguientes indicaciones en relación a la instalación
eléctrica:
Antes de conectar el aparato, compare los
datos de conexión (tensión y frecuencia) de
la placa de características con los de la red
eléctrica. Para que el aparato no resulte dañado, ambos datos deben coincidir. En caso de
duda, consulte a un técnico electricista.
La toma de corriente debe estar protegida
como mínimo por medio de un interruptor automático de 16 A.
Asegúrese de que el cable de alimentación
esté en perfecto estado y de que no quede colocado sobre superficies calientes y/o bordes
afilados.
La línea de conexión no debe tenderse tirante, doblada o anudada ni entrar en contacto
con superficies calientes.
Antes de conectar el aparato a la toma de
corriente, desenrolle completamente el cable
de conexión.
BEEM - Elements of Lifestyle
38 ES
Si fuera necesario utilizar un cable alargador, éste deberá tener una sección de como
mínimo 1,5 mm².
La seguridad eléctrica del aparato únicamente se puede garantizar si se conecta a
una instalación eléctrica que disponga de una
toma de tierra instalada de acuerdo con la
normativa. Queda prohibido utilizar una toma
de corriente sin toma de tierra. En caso de
duda encargue la revisión de la instalación de
la casa a un técnico electricista autorizado. El
fabricante no se hace responsable de los daños provocados por la ausencia o por un fallo
en la toma de tierra.
Coloque el cable de conexión de forma
que nadie pueda tropezar.
Símbolos utilizados
PELIGRO
Se utiliza cuando exista una situación de
peligro inminente que pueda conllevar
lesiones corporales graves o incluso la
muerte.
►► Para evitar el peligro siga fielmente
estas instrucciones.
ADVERTENCIA
Se utiliza cuando exista una situación
potencial de peligro que pueda conllevar
lesiones corporales graves o incluso la
muerte.
►► Para evitar el peligro siga fielmente
estas instrucciones.
ATENCIÓN
Se utiliza cuando exista una situación
potencial de peligro que pueda conllevar
lesiones leves o daños materiales.
►► Para evitar el peligro siga fielmente
estas instrucciones.
INDICACIÓN
►► Una indicación contiene información
adicional para facilitar el uso del aparato.
Puesta en marcha
Desembalaje
1. Extraiga de la caja el aparato, todos los
accesorios y el manual de instrucciones.
2. Antes de utilizar el aparato por primera
vez, retire todos los materiales de embalaje y
todos los plásticos de protección del aparato y
los accesorios.
3. Compruebe que el contenido esté completo y que no presente daños visibles.
INDICACIÓN
►► No retire nunca la placa de características ni las posibles advertencias.
►► Guarde el embalaje original durante
todo el plazo de garantía del aparato para
poderlo embalar y enviar correctamente en
caso de aplicación de la garantía. Los daños de transporte provocarán la anulación
de la garantía legal o comercial.
Antes de utilizar por primera vez
Antes de utilizar el aparato por primera vez,
caliéntelo durante unos 10 minutos para eliminar los posibles restos de montaje (grasas).
Proceda del modo siguiente:
1. Seleccione el ajuste recirculación y ajuste
la temperatura máxima según lo descrito en el
capítulo Ajustar la temperatura (pág. 40).
2. Ajuste el tiempo de cocción a 10 min. tal
como se explica en el capítulo Ajustar el
tiempo de cocción (pág. 40).
(10).
3. Pulse el botón
4. Abra después dé finalizar la función la
puerta del horno y deje que se ventile el aparato.
5. Deje que el aparato se enfríe completamente.
6. Desenchufe la clavija de red de la toma de
corriente.
7. Limpie el aparato de acuerdo con las instrucciones del capítulo Limpieza y cuidados
(pág. 44).
BEEM - Elements of Lifestyle
INDICACIÓN
►► Durante la primera puesta en marcha
se pueden producir olores o ligero humo,
condicionados por los aditivos usados
durante la producción como p.ej. grasas.
¡Esto es normal! Asegúrese de que haya
suficiente ventilación.
Descripción del aparato
Suministro/sinóptico de aparato
(Véanse las ilustraciones en la página desplegable)
1
2
3
4
5
6
7
8
9
10
11
12
13
14
15
16
17
18
19
20
21
22
23
24
25
Carcasa
Maneta de la puerta
Pantalla
Indicación de función
(función)
Tecla MODE
Tecla ajuste de temperatura °C
Tecla ajuste del tiempo
Teclas
Tecla pausa/cancel
Tecla inicio
Pies de apoyo
Puerta del horno
Distanciador parte posterior (no ilustrado)
Parrilla
Bandeja de horno
Mango de sujeción para espetón
Mango de sujeción para parrilla y bandeja de horno
Asador
Pinzas de sujeción espetón
Pinchos para brochetas (8 uds.)
Soporte pinchos para brochetas
Cesta de freír
Piedra para pizzas
Bandeja recoge grasa
Manual de instrucciones (no ilustrado)
ES 39
Panel de operación
En la pantalla (3) se muestra que tiempo de
cocción, temperatura y función se ha ajustado. Con un triángulo rojo queda marcada la
función seleccionada. Durante el ajuste del
tiempo de cocción y la temperatura parpadea
la cifra correspondiente.
INDICACIÓN
►► Cada pulsación de botón se confirma
con una señal acústica.
Encendido/apagado
Para encender el aparato pulse el botón
(10). En la pantalla se iluminan las funciones.
Pulsando la tecla MODE
(5) seleccione la
función deseada. Pulsando de nuevo el botón
se inicia la función elegida.
INDICACIÓN
►► Antes de iniciar la función ajuste la
temperatura y el tiempo de cocción tal
como se describe en el capítulo Ajustar
la temperatura (pág. 40) y el capítulo
Ajustar el tiempo de cocción
(pág. 40).
Tecla Pausa/Cancel
1. Pulse 1 x la tecla Pausa/Cancel
(9)
para detener la función en curso. Puede comprobar el proceso de cocción o cambiar los
ajustes.
2. Pulse la tecla Start
(10) para continuar
con el proceso de cocción.
3. Pulse 2 x la tecla Pausa/Cancel
(9)
para finalizar todas las funciones y restablecer
los ajustes. El aparato se apaga de modo automático transcurrido un minuto aprox..
BEEM - Elements of Lifestyle
40 ES
Funciones del horno
Pulse primero el botón , para activar la tecla MODE
cada una de las funciones.
. Con la tecla MODE
Ventilador de
Rotación
recirculación
Función
Calor superior
Calor inferior
Tostar
–
–
Asador
–
–
Recirculación
–
Descongelar
–
(aprox.
50 °C)
–
Asar
–
–
–
(5) ajuste
Ajuste básico
El ajuste último parpadea.
La temperatura parpadea a 200 C°.
La temperatura parpadea a 215 C°.
La indicación del
tiempo parpadea a
1 min 00 sec.
La temperatura parpadea a 175 C°.
INDICACIÓN
►► Sólo puede cambiar entre funciones si no se encuentra una función activa.
Ajustar el tiempo de cocción
Ajustar la temperatura
1. Pulse el botón °C (6).
2. Seleccione con los botones
temperatura deseada.
y
(8) la
En la pantalla (3) se visualiza el ajuste de temperatura.
Durante el proceso de cocción se puede modificar en todo momento la temperatura.
Función
Rango de temperatura
Tostar
Ajuste básico
no modificable
Asador
100 °C – 230 °C
Recirculación
100 °C – 230 °C
Descongelar
50 °C
Asar
100 °C – 230 °C
INDICACIÓN
►► Los rangos de temperatura modificables pueden aumentarse o disminuirse con
los botones
y
en pasos de 5°C.
1. Pulse la tecla de ajuste del tiempo
y
2. Seleccione con los botones
tiempo de cocción deseado.
(7).
(8) el
En la pantalla (3) se visualiza el tiempo de
cocción ajustado.
Durante el proceso de cocción se puede modificar en todo momento el tiempo de cocción.
Transcurrido el tiempo de cocción suena una
señal acústica. En la pantalla parpadea END y
el aparato se desconecta de modo automático
transcurrido un minuto aprox..
BEEM - Elements of Lifestyle
Función
Ajuste del tiempo
De modo continuo de dorado
ligero („light“ 2 min 30 s) hasta
Tostar
oscuro („dark“ 6 min 10 s) en
pasos de 30 segundos.
1 min hasta 30 min en pasos de
1 minuto.
Asador
30 min hasta 3 h en pasos de 5
minutos.
1 min hasta 30 min en pasos de
1 minuto.
Recircu30 min hasta 3 h en pasos de 5
lación
minutos.
1 min hasta 30 min en pasos de
Descon1 minuto.
gelar
30 min hasta 3 h en pasos de 5
minutos.
1 min hasta 30 min en pasos de
1 minuto.
Asar
30 min hasta 3 h en pasos de 5
minutos.
Durante la preparación de tostadas influye el
tiempo indirectamente. Eligiendo el grado de
tueste se prefija automáticamente el tiempo
del programa "Tostar". Véase capítulo Preparación - Tostar (pág. 42).
Operación y funcionamiento
Insertar la bandeja recoge grasa
Coloque la bandeja recoge grasa (24) desde
la parte anterior entre los elementos calefactores inferiores.
Utilización de las garras
(figuras A1-A3)
Para extraer la bandeja recoge grasa necesitará el mango de sujeción para espetón (16):
1. Inserte los ganchos de recepción del
mango desde arriba en los agujeros de la
bandeja recoje grasa.
2. Coloque la asa del mango en posición
horizontal, para levantar la bandeja recoje
grasa hacia arriba y hacia delante.
Para retirar el espetón (18) se precisa también
el mango de sujeción para espetón (16).
ES 41
1. Introduzca el mango de sujeción para el
espetón (16) en el aparato de modo que los
ganchos de recepción del mango se encuentren debajo de los escalones previstos del
espetón (figura A1).
2. Descuelgue el espetón, levantándolo ligeramente primero del lado izquierdo.
3. Extraiga con precaución el espetón de
modo que se pueda soltar el dispositivo giratorio del extremo insertado.
4. Extraiga el espetón por completo.
Para retirar la bandeja de horno o bien la parrilla necesita el pequeño asidero (17):
1. Introdúzcalo en un ligero ángulo desde
arriba en la bandeja de horno (figura A2).
2. Encaje el mango de sujeción, de manera
que el gancho grande quede encima de la
bandeja de horno y el apoyo debajo.
3. Coloque el mango de sujeción en una posición horizontal.
4. Levante un poco la bandeja de horno durante la extracción, así evitará que se suelte el
mango de sujeción.
5. Extraiga la bandeja de horno.
6. Para extraer la parrilla, proceda de igual
modo que para la bandeja de horno. Sin embargo, debe prestar atención a que los ganchos pequeños del mango de sujeción estén
enganchados en la parrilla (figura A3).
INDICACIÓN
►► Al extraer el espetón colóquelo dentro
de lo posible sobre la bandeja de horno,
con el fin de recoger la grasa que gotee.
►► Para evitar que se derrame la grasa
caliente, mantenga la bandeja de horno en
posición horizontal.
►► Para no quemarse con la grasa utilice
guantes de cocina.
►► Para depositar las piezas calientes,
coloque una base termorresistente debajo.
Indicaciones generales
Los alimentos deben estar a temperatura
ambiente, ya que los alimentos congelados
tardan más tiempo en asarse y podrían quedar
secos.
Para lograr los mejores resultados, precaliente el aparato durante un rato. Observe el
BEEM - Elements of Lifestyle
42 ES
proceso de cocción con atención y regule la
temperatura según sea necesario..
El aparato permite preparar alimentos de
toda clase, como p.ej. salchichas, filetes, asados, ave, rollos de carne, verdura, gratinados,
tostadas, pizzas, bizcochos etc.
El aparato es especialmente apto para la
preparación de alimentos rápidamente y sin
apenas grasa. El tiempo de cocción con un
horno de infrarrojos es comparativamente más
corto que un horno tradicional.
INDICACIÓN
►► Durante el proceso de cocción se
puede formar condensación en la puerta
del horno.
Uso del aparato
1. Inserte en su caso la bandeja recoge grasa.
2. Pulse el botón inicio , para activar las
funciones del horno.
3. Seleccione la función apropiada, véase tabla Funciones del horno (pág. 40).
4. Ajuste la temperatura de cocción, véase
Ajustar la temperatura (pág. 40).
5. Ajuste el tiempo de cocción tal como se
explica en el capítulo Ajustar el tiempo de
cocción (pág. 40).
6. Pulse el botón inicio
(10).
INDICACIÓN
►► Durante el proceso de cocción se puede modificar en todo momento los ajustes
de temperatura y de tiempo de cocción.
►► El aparato acusa cada entrada de
datos con una señal acústica.
Preparación
Tostar
Con esta función puede preparar tanto tostadas como panecillos, baguetes y pretzel.
1. Deslice la parrilla en el carril del centro.
2. Seleccione con el botón Mode
la función „Tostar“.
3. Ajuste el grado de tostado deseado con
los botones
y
(8):
–– „light“ para obtener un resultado claro,
–– „dark“ para obtener un resultado oscuro.
4. En la pantalla se muestra el tiempo prefijado por el programa.
5. Pulse el botón
(10).
INDICACIÓN
►► Corrija en su caso los ajustes si desea
preparar varias porciones de tostadas
consecutivamente.
►► No es necesario precalentar el horno.
Espetón (figura B1–B4)
Con esta función (calor superior), puede asar
un pollo entero o un rollo de carne. Además la
función es apta para la cocción de brochetas
así como para la cocción de verdura o patatas
fritas en la cesta de freírs.
Pollo
1. Inserte en su caso la bandeja recoge grasa.
2. Lavar el pollo fresco o bien descongelado
y retirar los menudillos.
3. Deslice una pinza de sujeción (19) desde
la punta sobre el espetón y fíjela con la ayuda
de un tornillo de orejetas (figura B1).
4. Inserte el pollo sobre el espetón y fíjelo
con la segunda pinza de sujeción en el centro
del espetón (figura B2).
5. Condimentar a su gusto el pollo (p. ej. sal,
pimentón molido, pimienta y curry), y rociarlo
con un poco de aceite.
6. Fijar las patas y las alas con agujas para
carne en rollo o bien cuerda para asar.
7. Coloque el espetón giratorio con el pollo
en el aparato, insertando primero el extremo
puntiagudo en el accionamiento giratorio (figura B3). Coloque a continuación el collarin en el
otro lado del pincho giratorio dentro del soporte del lado izquierdo del aparato (figura B4).
8. Seleccione con el botón Mode
la función "Asador“.
9. Ajuste el tiempo y la temperatura de cocción.
10.Pulse el botón
(10).
11.Retire el pollo terminado con el mango
de sujeción del espetón, tal como se describe en el capítulo Utilización de las garras
(pág. 41).
BEEM - Elements of Lifestyle
INDICACIÓN
►► Utilice sólo pollos con un peso máximo
de 1000 g.
►► No es necesario precalentar el horno.
Brochetas (figuras C1-C3)
1. Coloque a su gusto en las brochetas (20)
dados de carne (aprox. 1,5 x 1,5 cm), trocitos
de salchichas, tiras de pimienta, cebolla y tocino etc.
2. Condimente al gusto y rocíelo con un poco
de aceite.
3. Coloque cada uno de los espetones (20)
sobre el soporte (21). En este proceso se fija
el extremo del espetón en un lado del hueco
del soporte (21) (figura C1), en el otro lado se
inserta la punta del espetón en el orificio del
soporte (figura C2). Deslice el espetón (18)
en el centro de del soporte de espetón para
pinchos morunos (21) y fijelo a la derecha y a
la izquierda con las pinzas de sujeción (figura
C3).
4. Inserte en su caso la bandeja recoge grasa.
5. Inserte el espetón giratorio con los pinchos
morunos.
6. Seleccione con el botón MODE
la función "Asador“.
7. Ajuste el tiempo y la temperatura de cocción.
(10).
8. Pulse el botón
9. Extraiga los espetónes terminados con el
mango de sujeción (16).
Cesta de freír (figuras D1-D2)
1. Deslice el espetón (18) en el centro de la
cesta de freírs (22) y fíjelo a la derecha y a la
izquierda con las pinzas de sujeción (figura
D1).
2. Abra la cesta de freírs y llénela con patatas fritas, croquetas, triángulos de patatas,
nuggets de pollo, gambas, etc.
3. No llene la cesta en exceso con el fin que
pueda darse la vuelta los alimentos en la cesta
de alambre.
4. Inserte en su caso la bandeja recoge grasa.
5. Inserte el espetón giratorio con la cesta de
freírs (figura D2).
ES 43
6. Seleccione con el botón MODE
la función "Asador“.
7. Ajuste el tiempo y la temperatura de cocción.
(10).
8. Pulse el botón
9. Extraiga la cesta de freírs caliente con el
mango de sujeción para espetón.
Recirculación
Con esta función inicia el calor superior e inferior así como el ventilador de recirculación. De
este modo logra una distribución térmica uniforme dentro del aparato, de modo que puede
acortar la temperatura y tiempo de cocción. La
función recirculación es la adecuada para un
sinfín de aplicaciones tales como p. ej. asar,
gratinar carne, hornear pan, bizcochos, pizzas
y galletas, preparación de platos de pescado y
gratinados.
1. Deslice la parrilla en el último carril inferior
del aparato. Llene los alimentos en un molde
termorresistente de cristal, cerámica o metal y
colóquelo sobre la parrilla.
(10).
2. Pulse el botón
3. Seleccione con el botón Mode
la función „Recirculación“.
4. Ajuste el tiempo y la temperatura de cocción según lo descrito en los capítulos Ajustar
la temperatura (pág. 40) y Ajustar el tiempo de cocción (pág. 40).
(10).
5. Pulse el botón
6. Extraiga los alimentos con la ayuda de
unos guantes o manoplas y la parrilla usando
el mango de sujeción.
INDICACIÓN
►► Compruebe si tiene suficiente espacio
para el molde de bizcochos/para horno en
el aparato.
►► Preste atención que la masa para el
bizcocho o bien el pan, al subir no toque
las paredes interiores ni los elementos
calefactores del aparato.
►► Precaliente el horno aprox. 4-5 min.
Pizza (figura E1)
1. Deslice la parrilla en el último carril inferior.
2. Coloque la piedra para pizza sobre la parrilla.
3. Introduzca la pizza sobre la piedra para
pizzas.
44 ES
4. Realice la cocción de la pizza con la función "Recirculación" tal como se describe más
arriba.
Descongelar
La función "Descongelar" condicionado por el
programa no deja cambiar la temperatura. La
temperatura de descongelar viene prefijada a
aprox. 50 C°.
1. Coloque el alimento congelado en la bandeja de horno.
2. Introduzca la bandeja de horno en la posición deseada del horno.
3. Seleccione con el botón Mode
la función „Descongelar“.
4. Ajuste el tiempo de descongelar tal como
se explica en el capítulo Ajustar el tiempo de
cocción (pág. 40).
5. Pulse el botón
(10).
6. Extraiga los alimentos descongelados la
ayuda de unos guantes o manoplas.
INDICACIÓN
►► Tenga en cuenta que el tiempo de
descongelación puede diferir según el
producto.
Asar
Con esta función (calor superior), dispone de
una función de grill ideal para bistec, pescado,
salchichas, hamburguesas, etc.
1. Inserte en su caso la bandeja recoge grasa.
2. Condimente los alimentos al gusto y colóquelos sobre la parrilla.
3. Introduzca la parrilla en el carril central o
superior del aparato, según el grosor de los
alimentos.
4. Seleccione con el botón Mode
la función „Asar“.
5. Ajuste el tiempo y la temperatura de cocción según lo descrito en los capítulos Ajustar
la temperatura (pág. 40) y Ajustar el tiempo de cocción (pág. 40).
6. Pulse el botón
(10).
7. Extraiga la parrilla caliente con el mango
de sujeción.
BEEM - Elements of Lifestyle
INDICACIÓN
►► Tenga en cuenta que con esta función
tiene que darle la vuelta a los alimentos
debido a que está función se asa solo con
calor superior.
Después de utilizar
1. Pulsando el botón
(9) para detener la
función en curso.
2. Pulsando dos veces finalizan todas la funciones y resetea los ajustes.
3. Desenchufe la clavija de red de la toma de
corriente.
4. Deje enfriar el aparato y límpielo tal como
se explica en el capítulo Limpieza y cuidados
(pág. 44).
Limpieza y cuidados
¡Antes de iniciar las tareas, preste atención a
las indicaciones de seguridad en el capítulo
Indicaciones de seguridad (pág. 35)!
El aparato debe limpiarse siempre después de terminar de utilizarlo.
Limpie el aparato cuando termine de utilizarlo y se haya enfriado. Esperar demasiado
solo dificultará la limpieza de forma innecesaria.
ATENCIÓN
►► No introducir ningún objeto en los
elementos calefactores. De lo contrario los
podría dañar.
Carcasa
Limpie la carcasa en su interior y exterior con
un paño ligeramente húmedo.
Utilice en su caso un lavavajillas de uso
comercial.
Accesorios
Extraiga los accesorios y lávelos con agua
tibia y detergente o en el lavavajillas.
En caso de suciedad persistente deje que
se ablande la suciedad de los accesorios antes de su limpieza durante 10 minutos en agua
jabonosa templada.
Seque bien las piezas antes de volver a
utilizarlas.
BEEM - Elements of Lifestyle
INDICACIÓN
►► No utilice esponjas de metal/fregar
para limpiar el aparato.
►► No utilice aerosoles para hornos para
la limpieza del interior.
►► Todas las piezas extraíbles exceptuando la piedra para pizzas, son aptas para
lavar en un lavavajillas.
Piedra para pizzas
Deje enfriar la piedra para pizzas.
Elimine la suciedad ligera con un paño
húmedo.
Las manchas persistentes pueden rasparse con un limpiador para ollas. Pásele a continuación un paño húmedo.
INDICACIÓN
►► La piedra para pizzas NO es apta para
el lavavajillas.
►► Limpie la piedra para pizzas sin detergente lavavajillas, solo con agua.
Almacenamiento
Si no tiene previsto utilizar el aparato durante
un periodo prolongado, límpielo de acuerdo
con las instrucciones del capítulo Limpieza y
cuidados (pág. 44).
Guarde el aparato y todos los accesorios en
un lugar limpio y protegido contra el frío y contra la luz directa del sol.
Generalidades
Garantía
Además de la garantía legal obligatoria, BEEM
también ofrece una garantía del fabricante
ampliada para algunos productos. En caso de
estar cubierto por la garantía, puede encontrar
la información correspondiente en el embalaje
del producto, el material publicitario o el sitio
web de BEEM para el producto en cuestión.
En nuestra página web www.beem.de encontrará las condiciones de garantía detalladas,
accesorios y repuestos que puede adquirir, así
como los manuales de instrucciones en idiomas diferentes.
ES 45
Exenciones de responsabilidad
No nos hacemos responsables de los daños
directos o indirectos derivados de:
derivados del incumplimiento del manual
de instrucciones, el uso no conforme a lo
previsto, la manipulación incorrecta o inadecuada, las reparaciones mal realizadas, las
modificaciones no permitidas, el uso de piezas
o recambios ajenos o el uso de accesorios o
complementos inadecuados.
Declaración de conformidad
Mediante la presente, BEEM declara que este
aparato cumple con los requisitos básicos y
las demás disposiciones relevantes de las directivas 2004/108/CE, 2006/95/CE, 2009/125/
CE y 2011/65/UE.
BEEM - Elements of Lifestyle
46 ES
Solución de problemas
El contenido de la siguiente tabla le ayudará a localizar y solucionar pequeños problemas. Si no
logra solucionar el problema con estas acciones, póngase en contacto con el servicio de atención al cliente.
Problema
La pantalla no se enciende.
En el cuadro de protección se ha disparado el
interruptor automático
(fusible).
Causa posible
Solución
Un fusible de la caja de fusibles está desconectado.
Conecte el fusible.
El indicador de control está
averiado.
Informe al servicio de atención
al cliente.
Hay demasiados aparatos
conectados al mismo circuito eléctrico.
Reduzca el número de aparatos
conectados al circuito eléctrico.
No se encuentra ningún
fallo.
Informe al servicio de atención
al cliente.
BEEM - Elements of Lifestyle
Inhoud
Veiligheidsinstructies. . . . . . . . . . . . . . . 47
Inbedrijfstelling . . . . . . . . . . . . . . . . . . . . 50
Beschrijving van het apparaat. . . . . . . . 51
Knop. . . . . . . . . . . . . . . . . . . . . . . . . . . . . 51
Functies van de oven . . . . . . . . . . . . . . . 52
Bediening en gebruik . . . . . . . . . . . . . . . 53
Reiniging en verzorging. . . . . . . . . . . . . 56
Opslag . . . . . . . . . . . . . . . . . . . . . . . . . . . 57
Algemeen. . . . . . . . . . . . . . . . . . . . . . . . . 57
Storingsopheffing. . . . . . . . . . . . . . . . . . 58
Geachte klant,
Lees vóór het gebruik van het apparaat de
in deze gebruiksaanwijzing vermelde aanwijzingen voor de inbedrijfstelling, de veiligheid,
het gebruik volgens de voorschriften, de reiniging en verzorging door.
Sla de uitklappagina´s aan het begin en het
einde van de gebruiksaanwijzing open om
de afbeeldingen tijdens het lezen te kunnen
zien.
Bewaar deze gebruiksaanwijzing voor later
gebruik en geef haar met het apparaat door
aan een volgende eigenaar.
Veiligheidsinstructies
Controleer het apparaat vóór gebruik
op zichtbare externe schade. Neem een
beschadigd apparaat niet in gebruik.
Kinderen mogen niet met het apparaat spelen.
Reiniging en gebruikersonderhoud
mogen niet worden verricht door kinderen, tenzij die 8 jaar of ouder zijn en
onder toezicht staan.
Kinderen die jonger zijn dan 8 jaar,
dienen bij het apparaat en het netsnoer
vandaan gehouden te worden.
NL 47
Dit apparaat kan worden gebruikt
door kinderen vanaf 8 jaar oud en door
personen met beperkte psychische, zintuiglijke of geestelijke vermogens of met
een gebrek aan ervaring en/of kennis,
mits zij onder toezicht staan of geïnstrueerd zijn in het veilige gebruik van het
apparaat en de daarvan uitgaande gevaren begrepen hebben.
Laat reparaties aan het apparaat alleen door hiervoor geautoriseerde handelaars of door de klantenservice uitvoeren. Dit geldt vooral voor de vervanging
van een beschadigde voedingskabel.
Door ondeskundige reparaties kunnen er
aanzienlijke gevaren voor de gebruiker
ontstaan. Bovendien vervalt daardoor de
garantie resp. garantiedekking.
Gebruik dit apparaat niet in combinatie met een externe tijdschakelklok of
een afzonderlijk afstandsbedieningssysteem.
Een reparatie van het apparaat gedurende de garantieperiode mag alleen
door een door de fabrikant hiervoor
geautoriseerde klantenservice worden
uitgevoerd, anders wordt er in geval van
beschadigingen en daaruit resulterende
storingen geen garantie of garantiedekking meer geboden.
Defecte onderdelen mogen alleen
door originele reserveonderdelen worden vervangen. Alleen bij deze onderdelen is gewaarborgd dat aan de veiligheidseisen is voldaan.
In geval van een stroomuitval scheidt
u het apparaat van het stroomnet om
een ongewenste herinschakeling van het
apparaat te vermijden.
Gebruik het apparaat niet in het donker.
48 NL
GEVAAR
Gevaar door elektrische stroom!
►► Gebruik het apparaat niet, wanneer de voedingskabel of de stekker
beschadigd zijn.
►► Open in geen geval de behuizing
van het apparaat. Wanneer er onder
spanning staande aansluitingen worden aangeraakt en de elektrische en
mechanische opbouw worden gewijzigd, bestaat er een verhoogd risico op
elektrische schokken.
►► Dompel het apparaat of de netstekker nooit in water of andere vloeistoffen.
►► Pak de netkabel niet vast met natte
handen, wanneer u het apparaat van
de stroomvoorziening scheidt.
►► Trek de stekker uit het stopcontact,
–– wanneer u het apparaat niet gebruikt,
–– wanneer tijdens het gebruik een storing optreedt,
–– voordat u het apparaat reinigt.
Gevaar voor verstikking!
►► Verpakkingsmateriaal mag niet als
speelgoed worden gebruikt. Kinderen
kunnen erin stikken.
WAARSCHUWING
Verbrandingsgevaar
►► Tijdens het bedrijf van het apparaat
kan de temperatuur van aan te raken
oppervlakken zeer hoog zijn.
►► Pak het apparaat tijdens het gebruik alleen aan het handvat of aan de
bedieningselementen vast.
►► Gebruik pannenlappen of keukenhandschoenen om hete kommen,
schalen en bakjes uit de oven te pakken.
BEEM - Elements of Lifestyle
►► Draag of verplaats het apparaat
niet, terwijl het in gebruik is.
►► Gebruik de meegeleverde grijpers
om het grilrooster, vetschaal, de draaispies en de frituurmand uit te nemen.
►► Giet geen vloeistoffen op de hete
bakplaat. Wanneer de vloeistof met
het hete oppervlak in aanraking komt,
spettert hij en verdampt hij zeer snel
en kan zo letsels veroorzaken.
►► Wees voorzichtig bij het grillen van
levensmiddelen die veel vet bevatten.
Heet vet kan spatten en brandwonden
veroorzaken.
►► Laat het apparaat vóór iedere reiniging afkoelen.
Brandgevaar
►► Gebruik het apparaat nooit in de
buurt van of onder brandbare materialen zoals bijv. gordijnen of vitrage.
►► Gebruik alleen vuurvaste vormen
en schalen van glas, keramiek of metaal om de gerechten te bereiden.
►► Plaats de vormen en schalen altijd
op het rooster, nooit direct op de verwarmingselementen.
►► Gebruik geen braadzak.
►► Zet of leg niets op het apparaat.
►► Dek het apparaat tijdens de werking niet af.
►► Het apparaat is alleen geschikt voor
de bereiding van levensmiddelen. Laat
geen andere voorwerpen in het apparaat liggen.
BEEM - Elements of Lifestyle
LET OP
►► Trek de aansluitkabel altijd aan de
stekker uit het stopcontact, niet aan de
voedingskabel zelf.
►► Het apparaat mag niet aan de netkabel gedragen, opgetild of verplaatst
worden.
►► Blijf met de accessoires en de te
bereiden levensmiddelen ten minste
3 cm van de verwarmingselementen
vandaan.
►► Gebruik voor het reinigen van het
apparaat geen scherpe voorwerpen of
schurende schoonmaakmiddelen.
Gebruik volgens voorschriften
Dit apparaat is uitsluitend bestemd voor het
toasten, bakken, grillen, braden en ontdooien
van levensmiddelen in huishoudelijke of
vergelijkbare, niet commerciële omgevingen,
zoals bijv. personeelskeukens in winkels,
horeca-zaken, kantoren of andere werkomgevingen, agrarische bedrijven, gebruik door
gasten in hotels, motels of andere accommodaties en bed & breakfast-pensions.
Een ander of daar bovenuit gaand gebruik
geldt als oneigenlijk, niet toegelaten gebruik.
WAARSCHUWING
In geval van oneigenlijk gebruik en/of niet
voorzien gebruik van het apparaat kunnen
van het apparaat gevaren uitgaan.
►► Het apparaat mag uitsluitend voor het
beoogde, toegelaten gebruiksdoel worden
gebruikt.
►► Leef de in deze gebruiksaanwijzing
beschreven voorschriften na.
Claims en reclamaties van welke aard dan
ook, die te herleiden zijn tot verkeerd of oneigenlijk gebruik, worden niet aanvaard.
Het risico berust dan uitsluitend bij de gebruiker.
Eisen aan de opstellingsplek
Voor een veilige en probleemloze werking
van het apparaat moet de opstellingsplek
aan de volgende eisen voldoen:
NL 49
Plaats het apparaat op een stabiele,
vlakke, hittebestendige en voor vetspetters
ongevoelige ondergrond.
De oppervlakken van meubels bevatten
mogelijk stoffen die de pootjes van het apparaat kunnen aantasten en week maken.
Leg indien nodig een onderlegger onder de
pootjes van het apparaat.
Plaats het apparaat niet in een hete, natte
of zeer vochtige omgeving of in de buurt van
brandbaar materiaal. De afstand ten opzichte
van muren, meubelen en andere voorwerpen
moet ten minste 15 cm bedragen.
Plaats het apparaat niet onder een hangkast.
Het stopcontact moet goed toegankelijk
zijn, zodat de spanningstoevoer snel onderbroken kan worden.
Leg geen tafellaken, doeken of servetten
onder de stelvoeten van het apparaat, zodat
het niet kan wegglijden.
Zet het apparaat niet bij de rand van het
opstellingsvlak, het zou eraf kunnen vallen.
Het apparaat mag niet in de buitenlucht
gebruikt of opgeslagen worden.
Elektrische aansluiting
Voor een veilige en probleemloze werking
van het apparaat moeten bij de elektrische
aansluiting de volgende instructies in acht
worden genomen:
Vergelijk vóór het aansluiten van het apparaat de aansluitgegevens (spanning en
frequentie) op het typeplaatje met die van uw
stroomvoorziening. Deze gegevens moeten
met elkaar in overeenstemming zijn, zodat er
geen schade aan het apparaat kan optreden.
Raadpleeg in geval van twijfel uw dealer.
Het stopcontact moet ten minste met een
16A-zekering zijn beveiligd.
Ga na of de voedingskabel onbeschadigd is en niet over hete oppervlakken en/of
scherpe randen wordt gelegd.
De aansluitkabel mag niet strak gespannen, geknikt of bekneld worden, in een knoop
getrokken worden of in aanraking komen met
hete oppervlakken.
Wikkel de voedingskabel altijd helemaal
af voordat u het apparaat op het stopcontact
aansluit.
BEEM - Elements of Lifestyle
50 NL
Wanneer het apparaat aan een verlengkabel moet worden aangesloten moet de kabeldoorsnede ten minste 1,5 mm² bedragen.
De elektrische veiligheid van het apparaat is alleen gewaarborgd, wanneer het op
een correct geïnstalleerd randaardesysteem
wordt aangesloten. Het gebruik via een stopcontact zonder randaarde is verboden. Laat
in geval van twijfel de installatie van het huis
door een elektricien controleren. De fabrikant
aanvaardt geen verantwoordelijkheid voor
schade die door een ontbrekende of onderbroken randaarde wordt veroorzaakt.
Positioneer de aansluitkabel zodanig dat
er niemand overheen struikelt.
Gebruikte symbolen
GEVAAR
Wordt gebruikt voor een onmiddellijk
dreigend gevaar dat ernstig of dodelijk
lichamelijk letsel tot gevolg kan hebben.
►► Ter voorkoming van het gevaar moeten
de hier vermelde instructies worden nageleefd.
WAARSCHUWING
Wordt gebruikt voor een mogelijk gevaarlijke situatie die ernstig of dodelijk lichamelijk
letsel zou kunnen veroorzaken.
►► Ter voorkoming van het gevaar moeten
de hier vermelde instructies worden nageleefd.
LET OP
Wordt gebruikt voor een mogelijk gevaarlijke situatie die lichte lichamelijke letsels of
materiële schade kan veroorzaken.
►► Ter voorkoming van het gevaar moeten
de hier vermelde instructies worden nageleefd.
AANWIJZING
►► Een opmerking bevat verdere informatie die de omgang met het apparaat
eenvoudiger kan maken.
Inbedrijfstelling
Uitpakken
1. Haal het apparaat, alle accessoires en de
gebruiksaanwijzing uit de doos.
2. Verwijder vóór het eerste gebruik al het
verpakkingsmateriaal en de beschermfolies
van het apparaat en de accessoires.
3. Controleer de inhoud op volledigheid en
op zichtbare schade.
AANWIJZING
►► Verwijder nooit het typeplaatje en eventuele waarschuwingen.
►► Bewaar de originele verpakking gedurende de garantieperiode van het apparaat
om het in geval van een garantieclaim
correct te kunnen verpakken. In geval van
transportschade vervalt de aanspraak op
garantie resp. garantiedekking.
Vóór het eerste gebruik
Verwarm het apparaat vóór het eerste gebruik gedurende ca. 10 minuten om evt.
montagerestanten (vet) te verwijderen. Ga
hiervoor als volgt te werk:
1. Selecteer de instelling circulatielucht
en stel de hoogste temperatuur in zoals
beschreven in het hoofdstuk Temperatuur
instellen (pag. 52).
2. Stel de gaartijd op 10 min. in zoals beschreven in het hoofdstuk Gaartijd instellen
(pag. 52).
(10).
3. Druk op de toets
4. Open na het einde van de functie de
ovendeur en laat het apparaat uitluchten.
5. Laat het apparaat volledig afkoelen.
6. Trek de stekker uit het stopcontact.
7. Reinig het apparaat zoals beschreven
in het hoofdstuk Reiniging en verzorging
(pag. 56).
AANWIJZING
►► Bij de eerste inbedrijfstelling kunnen
door bij de productie gebruikte stoffen,
zoals bijv. vetten, geur- en lichte rookvorming optreden. Dat is heel normaal! Zorg
daarom voor voldoende ventilatie.
BEEM - Elements of Lifestyle
Beschrijving van het apparaat
Inhoud van de levering/apparaatoverzicht
(zie voor afbeeldingen de uitklappagina)
1
2
3
4
5
6
7
8
9
10
11
12
13
14
15
16
17
18
19
20
21
22
23
24
25
Huis
Deurhandgreep
Display
Functiedisplay
(functie)
Toets MODE
Toets temperatuurinstelling °C
Toets tijdinstelling
Toetsen
Toets pauze/cancel
Toets start
Pootjes
Ovendeur
Afstandhouder achterkant (zonder afbeelding)
Grillrooster
Bakplaat
Draaispiesgrijper
Grijper grillrooster en bakplaat
Draaispies
Borgklemmen draaispies
Sjasliekstokjes (8 stuks)
Drager sjasliekstokjes
Frituurmand
Pizzasteen
Vetopvangplaat
Gebruiksaanwijzing (zonder afbeelding)
Knop
Op het display (3) wordt aangegeven welke
gaartijd, temperatuur en functie is ingesteld.
De geselecteerde functie wordt met een rood
driehoekje gemarkeerd. Tijdens de instelling
van de gaartijd en van de temperatuur knippert het betreffende getal.
AANWIJZING
►► Iedere druk op de toets wordt met een
signaaltoon bevestigd.
NL 51
In-/uitschakelen
Druk op de toets om het apparaat in te
schakelen
(10). Op het display gaan de
functies branden. Door op de toets MODE
te drukken
(5) selecteert u de gewenste
functie. Door nog een keer op de toets te
drukken
start de geselecteerde functie.
AANWIJZING
►► Stel vóór het starten van de functie de
temperatuur en de gaartijd in als beschreven in het hoofdstuk Temperatuur instellen (pag. 52) en hoofdstuk Gaartijd
instellen (pag. 52).
Pauzetoets/Cancel
1. Druk 1x op de toets Pause/Cancel
(9) om de lopende functie te stoppen. U kunt
het gaarproces controleren en instellingen
wijzigen.
2. Druk op de Start-toets
(10) om het
gaarproces voort te zetten.
3. Druk 2x op de toets Pause/Cancel
(9)
om alle functies te beëindigen en de instellingen te resetten. Het apparaat schakelt na ca.
één minuut automatisch uit.
BEEM - Elements of Lifestyle
52 NL
Functies van de oven
Druk eerst op toets om de toets MODE
de individuele functies in.
Onderwarmte
te activeren. Met de toets MODE
CirculatieluchtRotatie
ventilator
Functie
Bovenwarmte
Roosteren
–
–
Draaispies
–
–
Circulatielucht
–
Ontdooien
–
(ca. 50 °C)
–
Bakken/braden
–
–
–
(5) stelt u
Basisinstelling
De als laatste
gebruikte instelling
knippert.
Temperatuur knippert
bij 200 C°.
Temperatuur knippert
bij 215 C°.
Tijdweergave knippert
bij 1 min 00 sec.
Temperatuur knippert
bij 175 C°.
AANWIJZING
►► Het wisselen van de functies is alleen mogelijk als er geen functie in werking is.
Temperatuur instellen
1. Druk op de toets °C (6).
2. Selecteer met de toetsen
de gewenste temperatuur.
en
(8)
De temperatuurinstelling wordt op het display
(3) aangegeven.
De temperatuur kan tijdens het gaarproces
altijd gewijzigd worden.
Functie
Temperatuurbereik
Roosteren
Basisinstelling
niet veranderbaar
Draaispies
100 °C – 230 °C
Circulatielucht
100 °C – 230 °C
Ontdooien
50 °C
Bakken/braden
100 °C – 230 °C
AANWIJZING
►► De veranderbare temnperatuurbereiken kunnen met de toetsen
en
in
stappen van 5 °C verhoogd of verlaagd
worden.
Gaartijd instellen
1. Druk op de toets Tijdinstelling
(7).
2. Selecteer met de toetsen
en
(8)
de gewenste gaartijd.
De ingestelde gaartijd wordt op het display
(3) aangegeven.
De gaartijd kan ook tijdens het gaarproces
gewijzigd worden.
Na afloop van de gaartijd wordt er een
akoestisch signaal gegeven. Op het display
knippert END en het apparaat schakelt na
ca. één minuut automatisch uit.
BEEM - Elements of Lifestyle
Functie
Tijdinstelling
Traploos van licht bruin („light“ 2
min 30 sec) tot donker („dark“ 6
min 10 sec.) in stappen van 30
seconden.
1 min tot 30 min in stappen van
Draai1 minuut.
spies
30 min tot 3 uur in stappen van
5 minuten.
1 min tot 30 min in stappen van
1 minuut.
Circula30 min tot 3 uur in stappen van
tielucht
5 minuten.
1 min tot 30 min in stappen van
Ontdooi1 minuut.
en
30 min tot 3 uur in stappen van
5 minuten.
1 min tot 30 min in stappen van
Bakken/
1 minuut.
braden
30 min tot 3 uur in stappen van
5 minuten.
Roosteren
Bij de bereiding van geroosterd brood heeft
u indirect invloed op de tijd. Door de selectie
van de bruinheidsgraad wordt de tijd door
het programma „Toasten“ automatisch ingesteld. Zie hoofdstuk Bereiding - Roosteren
(pag. 54).
Bediening en gebruik
Vetopvangplaat plaatsen
Leg de vetopvangplaat (24) van voren tussen
de onderste verwarmingselementen.
Gebruik van de grijpers
(afbeeldingen A1-A3)
Om de vetopvangplaat te verwijderen, heeft
u de draaispiesgrijper (16) nodig.
1. Steek de opnamehaak van de grijper van
boven in de gaten van de vetopvangplaat.
2. Breng de greep van de grijper in een horizontale positie om de vetopvangplaat naar
boven en naar voren te tillen.
Voor verwijdering van de draaispies (18)
heeft u eveneens de draaispiesgrijper (16)
nodig.
NL 53
1. Doe de grijper van de draaispies (16) zodanig in het apparaat dat de borghaken van
de grijper zich onder de hiervoor bedoelde
punten van de draaispies bevinden (afbeelding A1).
2. Haak de draaispies eerst aan de linkerkant uit door hem iets op te tillen.
3. Trek de draaispies voorzichtig naar buiten, zodat het in de draaivoorziening gestoken uiteinde los kan komen.
4. Neem de hele draaispies uit de oven.
Om de bakplaat of het grilrooster te verwijderen, heeft u de kleine grijper (17) nodig:
1. Voer de grijper in een lichte hoek van boven naar de bakplaat toe (afbeelding A2).
2. Steek de grijper zodanig in dat de grotere
haken boven en de steun onder de bakplaat
zijn.
3. Beweeg de grijper in een horizontale positie.
4. Til de bakplaat tijdens het uittrekken iets
omhoog om loskomen van de grijper te vermijden.
5. Verwijder de bakplaat.
6. Om het grillrooster te verwijderen gaat
u net zo te werk als bij de bakplaat. Let er
echter wel op dat de kleinere haken van de
grijper in het grillrooster ingehaakt zijn (afbeelding A3).
AANWIJZING
►► Leg indien mogelijk de draaispies bij
het uitnemen op de bakplaat om van de
bereide gerechten druppelend vet op te
vangen.
►► Houd de bakplaat horizontaal zodat er
geen heet vet afdruppelt.
►► Gebruik keukenhandschoenen om zich
niet aan het hete vet te branden.
►► Leg een vuurvast treefje klaar om de
hete onderdelen op te plaatsen.
Algemene aanwijzingen
De levensmiddelen moeten kamertemperatuur hebben, omdat bevroren levensmiddelen langer nodig hebben om gaar te worden
en daardoor uit kunnen drogen.
Om bijzonder goede resultaten te verkrijgen, verwarmt u het apparaat even voor.
BEEM - Elements of Lifestyle
54 NL
Houd het gaarproces goed in de gaten en
regel de temperatuur bij indien nodig.
Met het apparaat kunt u verschillende
levensmiddelen bereiden, bijv. worstjes,
steaks, vleesstukken, gevogelte, rollades,
groenten, ovenschotels, toast, pizza, cake
enz.
Het apparaat is bij uitstek geschikt voor
de snelle en vetarme bereiding van gerechten. De gaartijd in de infrarood oven is in vergelijking tot gebruikelijke ovens korter.
AANWIJZING
►► Tijdens het gaarproces kan er aan de
ovendeur condenswater neerslaan.
Apparaat gebruiken
1. Plaats eventueel de vetopvangplaat.
2. Druk op de toets start om de functies
van de oven te activeren.
3. Selecteer de juiste functie, zie tabel
Functies van de oven (pag. 52).
4. Stel de gaartemperatuur in, zie Temperatuur instellen (pag. 52).
5. Stel de gaartijd in zoals beschreven in het
hoofdstuk Gaartijd instellen (pag. 52).
(10).
6. Druk op de toets start
AANWIJZING
►► De temperatuur- en gaartijdinstellingen
kunnen tijdens het gaarproces altijd gewijzigd worden.
►► Het apparaat bevestigt iedere invoer
met een akoestisch signaal.
Bereiding
Roosteren
Met deze functie kunt u tosti´s bereiden en
broodjes, stokbrood en pretsels.
1. Schuif het grillrooster in de middelste rail.
2. Selecteer met de toets Mode
de functie "Roosteren".
3. Stel de gewenste bruinheidsgraad met de
toetsen
en
(8) in:
–– „light“ betekent een licht resultaat,
–– „dark“ betekent een donker resultaat.
4. De door het programma ingestelde tijd
wordt op het display aangegeven.
5. Druk op de toets
(10).
AANWIJZING
►► Corrigeer indien nodig de instelling
als u meerdere porties tosti´s na elkaar
bereidt.
►► De oven hoeft niet voorverwarmd te
worden.
Draaispies (afbeelding B1–B4)
Met deze functie (bovenwarmte) kunt u een
hele kip of een gerold stuk vlees grillen.
Bovendien is de functie geschikt voor het bereiden van sjasliekstokjes of van groenten of
patat in de frituurmand.
Kip
1. Plaats eventueel de vetopvangplaat.
2. Verse of ontdooide kip wassen en de ingewanden verwijderen.
3. Schuif een borgklem (19) vanaf de punt
op de draaispies en fixeer deze met behulp
van de vleugelschroef (afb. B1).
4. Schuif de kip op de draaispies en fixeer
deze met de tweede borgklem in het midden
van de draaispies (afb. B2).
5. De kip naar eigen smaak kruiden (bijv.
zout, gemalen rode paprika, peper en curry)
en iets olie erover doen.
6. Fixeer pootjes en vleugels met rolladenaalden of braadkoord.
7. Draaispies met de kip in het apparaat
plaatsen door eerst het puntige uiteinde in de
draaiaandrijving (afbeelding B3) te steken.
Leg vervolgens de kraag aan de andere kant
van de draaispies in de lagering aan de linkerkant van het apparaat (afbeelding B4).
8. Selecteer met de toets Mode
de functie "Draaispies".
9. Stel de gaartijd en de gaartemperatuur in.
10.Druk op de toets
(10).
11.Verwijder de bereide kip met de draaispiesgrijper zoals beschreven in het hoofdstuk Gebruik van de grijpers (pag. 53).
AANWIJZING
►► Neem alleen kippen tot een gewicht
van max. 1000 g.
►► De oven hoeft niet voorverwarmd te
worden.
BEEM - Elements of Lifestyle
Sjasliekstokjes (afbeelding C1-C3)
1. Rijg naar wens stukjes vlees (ca. 1,5 x
1,5 cm), stukjes worst, stukjes paprika, uien,
spek enz. op de sjasliekstokjes (20).
2. Spies naar eigen smaak kruiden en iets
olie erover doen.
3. Plaats de individuele spiezen (20) op de
drager (21). Daarbij wordt het gebogen einde
van de stokjes aan de ene kant in de opening
van de drager (21) geklemd (afbeelding C1),
aan de andere kant wordt het puntige uiteinde van het stokje door het gat van de drager
gestoken (afbeelding C2). Schuif de draaispies (18) in het midden door de sjasliekstokjesdrager (21) en zet hem rechts en links met
de borgklemmen vast (afbeelding C3).
4. Plaats eventueel de vetopvangplaat.
5. Plaats de draaispies met de sjaslikspiezen.
6. Selecteer met de toets Mode
de functie "Draaispies".
7. Stel de gaartijd en de gaartemperatuur in.
(10).
8. Druk op de toets
9. Haal de bereide stokjes met de draaispiesgrijper (16) uit het apparaat.
Frituurmand (afbeelding D1-D2)
1. Schuif de draaispies (18) in het midden
door de frituurmand (22) en zet hem rechts
en links met de borgklemmen vast (afbeelding D1).
2. Open de frituurmand en vul hem met patat, kroketten, aardappelhoekjes, kipnuggets,
garnalen enz.
3. Overvul de mand niet, zodat het te garen
gericht bij het draaien van de mand omgekeerd wordt.
4. Plaats eventueel de vetopvangplaat.
5. Plaats de draaispies met het groentenmandje (afb. D2).
de func6. Selecteer met de toets Mode
tie "Draaispies".
7. Stel de gaartijd en de gaartemperatuur in.
8. Druk op de toets
(10).
9. Haal de warme frituurmand met de draaispiesgrijper uit het apparaat.
NL 55
Circulatielucht
Met deze functie start u boven- en onderwarmte en de ventilator. Daardoor verkrijgt u
een intensieve en gelijkmatige warmteverdeling onder het apparaat zodat de gaartemperatuur en de gaartijd kan worden gereduceerd. De functie circulatielucht is geschikt
voor verschillende toepassingen als bijv.
braden of sudderen van grote stukken vlees,
bakken van brood, cake, pizza en koekjes,
de bereiding van visgerechten, ovenschotels
en gratins.
1. Schuif het grillrooster in de onderste rail
van het apparaat. Doe de levensmiddelen
in een vuurvaste vorm van glas, keramiek of
metaal en zet hem op het grillrooster.
(10).
2. Druk op de toets
3. Selecteer met de toets Mode
de functie „Luchtcirculatie“.
4. Stel de gaartijd en de gaartemperatuur in
zoals beschreven in de hoofdstukken Temperatuur instellen (pag. 52) en Gaartijd
instellen (pag. 52).
(10).
5. Druk op de toets
6. Haal de levensmiddelen met behulp van
keukenhandschoenen of pannenlappen uit
de oven, het grillrooster met de grijper.
AANWIJZING
►► Controleer of uw cake-/springvorm in
het apparaat past.
►► Let er op dat het deeg voor cake of
brood bij het rijzen tijdens het bakken de
binnenwanden en verwarmingselementen
van het apparaat niet raakt.
►► Verwarm de oven ca. 4-5 min. voor.
Pizza (afbeelding E1)
1. Schuif het grillrooster in de onderste rail
van het apparaat.
2. Leg de pizzasteen op het grillrooster.
3. Leg de pizza op de pizzasteen.
4. Bereid de pizza als beschreven bij de
functie "Circulatielucht".
Ontdooien
De functie „Ontdooien“ laat programmainherent geen temperatuurwijziging toe. De
ontdooitemperatuur is op ca. 50 C° vooringesteld.
BEEM - Elements of Lifestyle
56 NL
1. Doe de diepvries levensmiddelen op de
bakplaat.
2. Schuif de bakplaat in de gewenste stand
van de oven.
3. Selecteer met de toets Mode
de functie "Ontdooien".
4. Stel de ontdooitijd in als beschreven in
het hoofdstuk Gaartijd instellen (pag. 52).
5. Druk op de toets
(10).
6. Haal de ontdooide levensmiddelen met
behulp van keukenhandschoenen of pannenlappen uit de oven.
AANWIJZING
►► Houd er rekening mee dat de ontdooitijd afhankelijk van het product erg kan
verschillen.
Bakken/braden
Met deze functie (bovenwarmte) heeft u een
ideale grillfunctie om steaks, vis, worstjes,
hamburgers enz. te bereiden.
1. Plaats eventueel de vetopvangplaat.
2. Kruid de levensmiddelen naar eigen
smaak en leg ze op het grillrooster.
3. Schuif het grillrooster – afhankelijk van de
dikte van de levensmiddelen – in de middelste of hoogste rail in het apparaat.
4. Selecteer met de toets Mode
de functie "Braden".
5. Stel de gaartijd en de gaartemperatuur in
zoals beschreven in de hoofdstukken Temperatuur instellen (pag. 52) en Gaartijd
instellen (pag. 52)
6. Druk op de toets
(10).
7. Haal het warme grillrooster met de grijper
uit het apparaat.
AANWIJZING
►► Houd er rekening mee dat u de producten bij deze functie moet omdraaien, omdat
het apparaat bij deze functie alleen met
bovenwarmte werkt.
Na gebruik
1. Door op de toets
(9) te drukken, stopt
u de lopende functie.
2. Door er twee keer op te drukken, worden
alle functies beëindigd en de instellingen
gereset.
3. Trek de stekker uit het stopcontact.
4. Laat het apparaat afkoelen en reinig het
als beschreven in het hoofdstuk Reiniging
en verzorging (pag. 56).
Reiniging en verzorging
Neem vóór het begin van de werkzaamheden de veiligheidsinstructies in het hoofdstuk
Veiligheidsinstructies (pag. 47) in acht!
Het apparaat moet na ieder gebruik worden gereinigd
Reinig het apparaat na gebruik zodra het
is afgekoeld. Door te lang te wachten wordt
het reinigen lastiger.
LET OP
►► Schuif geen voorwerpen in de verwarmingselementen. Die kunnen daardoor
beschadigd raken.
Huis
Veeg het huis van binnen en van buiten met
een vochtige doek af.
Gebruik indien nodig een gebruikelijk afwasmiddel.
Hulpstukken
Neem de hulpstukken uit en was ze met
warm afwaswater of in de vaatwasser af.
Bij hardnekkige vervuilingen laat u de
hulpstukken vóór het afwasen 10 min. in
warm afwaswater weken.
Droog alle delen grondig af alvorens ze te
plaatsen.
AANWIJZING
►► Gebruik geen metalen spons of schuurspons om het apparaat te reinigen.
►► Gebruik voor de reiniging van binnen
geen ovenspray.
►► Alle uitneembare onderdelen zijn geschikt voor de vaatwasser met uitzondering
van de pizzasteen.
Pizzasteen
Laat de pizzasteen afkoelen.
Verwijder lichte verontreinigingen met een
vochtige doek.
BEEM - Elements of Lifestyle
Hardnekkige vlekken kunnen met een
pannensponsje verwijderd worden. Veeg de
steen met een vochtige doek af.
AANWIJZING
►► De pizzasteen is NIET geschikt voor de
vaatwasser.
►► Reinig de pizzasteen alleen met water
zonder afwasmiddel.
Opslag
Wanneer u het apparaat gedurende een langere periode niet nodig heeft, moet het zoals
beschreven in het hoofdstuk Reiniging en
verzorging (pag. 56) worden gereinigd.
Bewaar het apparaat en alle accessoires op
een droge, schone en vorstvrije plek, waar
het beschermd is tegen direct zonlicht.
Algemeen
Garantie
Naast de wettelijk verplichte garantie biedt
BEEM voor enkele producten bovendien nog
een uitgebreide fabrieksgarantie. Voor zover
deze toegestaan is, vindt u overeenkomstige
gegevens ofwel op de productspecifieke verpakking, op de reclamematerialen ofwel op
de BEEM website bij het betreffende product.
Op onze website www.beem.de vindt u de
uitvoerige garantiebepalingen, verkrijgbare
accessoires en reserveonderdelen alsmede
gebruiksaanwijzingen in verschillende talen.
Beperking van de aansprakelijkheid
Wij aanvaarden geen aansprakelijkheid voor
schades of vervolgschades die te herleiden
zijn tot:
niet naleven van de bedieningshandleiding, oneigenlijk gebruik, een foutieve of
onjuiste behandeling, verkeerd uitgevoerd reparaties, niet toegelaten modificaties, gebruik
van onderdelen van derden of het gebruik
van ongeschikte toevoegingen, toebehoren
of accessoires.
NL 57
Conformiteitsverklaring
Bij deze verklaart BEEM dat dit apparaat aan
de principiële eisen en de overige van toepassing zijnde bepalingen van de richtlijnen
2004/108/EG, 2006/95/EG en 2009/125/EG
en 2011/65/EU voldoet.
BEEM - Elements of Lifestyle
58 NL
Storingsopheffing
De volgende tabel is behulpzaam bij het opsporen en verhelpen van kleinere storingen. Neem
contact op met de klantenservice, wanneer u met de hieronder beschreven stappen het probleem niet kunt oplossen.
Fout
Mogelijke oorzaak
Oplossing
Zekering in de zekeringenkast uitgeschakeld.
Zekering inschakelen.
Controlelampje defect.
Klantenservice waarschuwen.
Te veel apparaten op hetzelfde stroomcircuit aangesloten.
Aantal apparaten op het stroomcircuit reduceren.
Geen storing vaststelbaar.
Klantenservice waarschuwen.
Display gaat niet aan.
De zekering in de
zekeringenkast heeft
gereageerd.
BEEM – Elements of Lifestyle
Содержание
Указания по безопасности. . . . . . . . . . 59
Ввод в эксплуатацию . . . . . . . . . . . . . . 62
Описание прибора. . . . . . . . . . . . . . . . . 63
Панель управления. . . . . . . . . . . . . . . . 63
Функции печи. . . . . . . . . . . . . . . . . . . . . 64
Управление и эксплуатация. . . . . . . . . 65
Чистка и уход. . . . . . . . . . . . . . . . . . . . . 68
Хранение. . . . . . . . . . . . . . . . . . . . . . . . . 69
Общая информация . . . . . . . . . . . . . . . 69
Устранение неисправностей. . . . . . . . 70
Уважаемый покупатель!
Прежде чем пользоваться прибором, прочитайте содержащиеся в данном руководстве по эксплуатации указания по вводу
в эксплуатацию, технике безопасности,
использованию по назначению, а также
чистке и уходу.
Разверните раскладные страницы в начале и конце руководства по эксплуатации,
чтобы сверяться с иллюстрациями во время чтения.
Сохраните это руководство по эксплуатации для последующего использования и
передайте его вместе с прибором следующему владельцу.
Указания по безопасности
Перед использованием проверьте
прибор на наличие внешних видимых
повреждений. Не эксплуатируйте поврежденный прибор.
Детям запрещается играть с прибором.
Работы по чистке и техобслуживанию,
которые должны проводиться пользователем, запрещается выполнять детям,
за исключением тех, которые достигли
8-летнего возраста и работают под присмотром.
Храните прибор и шнур питания в месте, недоступном для детей младше
8 лет.
RU 59
Настоящий прибор может эксплуа-
тироваться детьми в возрасте 8 лет и
старше, а также лицами с ограниченными физическими, сенсорными и умственными способностями либо недостаточным опытом и недостаточными
знаниями, только при условии, что они
работают под надзором или прошли
инструктаж по вопросам безопасного
пользования прибором и осознают сопряженные с прибором опасности.
Передавайте прибор для ремонта
только авторизированным дилерам
или сервисной службе заводаизготовителя. Это особенно относится
к случаям замены поврежденного
шнура питания. Ненадлежащее проведение ремонта может создать значительную опасность для пользователя.
Кроме того, действие гарантии прекращается и гарантийное обслуживание не производится.
Не используйте этот прибор с
внешним таймером или с отдельной
системой дистанционного управления.
Ремонт прибора в течение гарантийного срока может производиться
только уполномоченной изготовителем сервисной службой, в противном
случае претензии по гарантии за повреждения и сопряженные с ними
неисправности не принимаются, а
гарантийное обслуживание не производится.
Неисправные узлы разрешается
заменять только на оригинальные запасные части. Использование только
таких частей гарантирует выполнение
требований безопасности.
В случае сбоя электропитания отсоедините прибор от сети, чтобы не
допустить непредвиденного повторного включения прибора.
Не эксплуатируйте прибор в темноте.
60 RU
ОПАСНОСТЬ!
Опасность поражения электрическим током!
►► Не используйте прибор, если шнур
питания или вилка повреждены.
►► Ни в коем случае не открывайте корпус прибора. При контакте с
находящимися под напряжением
деталями и при изменении электрической и механической конструкции
прибора существует опасность поражения током.
►► Ни в коем случае не погружайте
прибор или электрическую вилку в
воду или другие жидкости.
►► Отсоединяя прибор от электросети, не беритесь за шнур питания
влажными руками.
►► Выньте вилку из розетки
–– на время перерыва в пользовании
прибором,
–– в случае выявления неисправности при эксплуатации прибора,
–– перед чисткой прибора.
Опасность удушения!
►► Детям запрещается играть с упаковочным материалом. Существует
опасность удушения.
ПРЕДУПРЕЖДЕНИЕ!
Опасность ожога!
►► Во время работы прибора доступ-
ные поверхности могут нагреваться
до очень высокой температуры.
►► Во время работы прибора разрешается прикасаться только к его
ручке или элементам управления.
►► Для извлечения горячей посуды
из печи используйте кухонные рукавицы или прихватки.
►► Не переносите и не передвигайте
прибор во время работы.
BEEM – Elements of Lifestyle
►► Для извлечения решетки, противня и поддона для сбора жира,
вертела и корзины для жарки во
фритюре используйте прилагаемые
в комплекте захваты.
►► Не наливайте жидкости на
горячий противень. При контакте
жидкости с горячей поверхностью
происходит очень быстрое испарение и разбрызгивание жидкости, что
может повлечь за собой травмы.
►► Соблюдайте осторожность при
приготовлении особо жирных продуктов на гриле. Брызги горячего жира
могут вызвать ожоги.
►► Перед каждой чисткой дождитесь
остывания прибора.
Опасность пожара
►► Ни в коем случае не эксплуа-
тируйте прибор вблизи или под
предметами из горючих материалов
(например, шторы).
►► Для приготовления пищи используйте только жаропрочную посуду
и емкости из стекла, керамики или
металла.
►► Всегда ставьте посуду и емкости
на решетку, а не непосредственно
на нагревательные элементы.
►► Запрещается использовать рукав
для запекания.
►► Не ставьте и не складывайте
какие-либо предметы на корпусе
прибора.
►► Не накрывайте прибор во время
работы.
►► Прибор предназначен только для
приготовления пищевых продуктов.
Не кладите какие-либо другие предметы внутрь прибора.
BEEM – Elements of Lifestyle
ВНИМАНИЕ!
►► При отсоединении шнура питания
от розетки всегда держитесь за вилку,
а не за кабель.
►► Ни в коем случае не используйте
шнур питания для переноски, подъема или перемещения прибора.
►► Принадлежности и запекаемые
продукты должны находиться на
расстоянии не менее 3 см от нагревательных элементов.
►► Для чистки прибора запрещается
использовать твердые предметы или
абразивные чистящие средства.
Применение по назначению
Прибор предназначен только для обжаривания, выпечки, приготовления на гриле,
жарки и оттаивания продуктов питания в
домашних или аналогичных домашним
условиях, например, в кухнях для персонала в магазинах, кафе, офисах и прочих
местах работы, в сельскохозяйственных
владениях, а также для использования
постояльцами в гостиницах, мотелях, пансионах и прочих коллективных средствах
размещения.
Любое иное или выходящее за рамки данного использование считается использованием не по назначению.
ПРЕДУПРЕЖДЕНИЕ!
В случае использования прибора не
по назначению или для иных целей он
может представлять собой опасность
для окружающих.
►► Используйте прибор исключительно
в предусмотренных целях.
►► Соблюдайте указания, приведенные
в настоящем руководстве по эксплуатации.
Какие-либо претензии на возмещение
убытков, возникших вследствие использования не по назначению, не принимаются.
Риск возлагается исключительно на пользователя.
RU 61
Требования к месту установки
Для безопасной и безукоризненной эксплуатации прибора место установки
должно отвечать следующим условиям.
Установите прибор на прочную, ровную, теплостойкую и невосприимчивую к
брызгам жира поверхность.
Поверхности мебели могут содержать
компоненты, способные агрессивно воздействовать на опорные ножки прибора и
приводить к их размягчению. При необходимости уложите под опорные ножки прибора подкладку.
Не устанавливайте прибор в горячих,
сырых или очень влажных условиях либо
вблизи горючего материала. Расстояние
до стен, мебели и других предметов должно составлять не менее 15 см.
Не устанавливайте прибор под навесным шкафом.
Розетка должна быть легко доступна,
чтобы в экстренном случае можно было
быстро отсоединить шнур питания от
электросети.
Не подкладывайте под опорные ножки
прибора скатерти, полотенца или салфетки, так как прибор может соскользнуть.
Не устанавливайте прибор на край
опорной поверхности, так как он может
упасть.
Запрещается эксплуатировать и хранить прибор вне помещения.
Электрическое подключение
Для безопасной и безукоризненной эксплуатации прибора при подключении к
электросети необходимо соблюдать
следующие указания.
Перед подключением прибора сравните электрические параметры (напряжение
и частота) на заводской табличке с параметрами электросети. Эти данные должны
совпадать во избежание повреждений
прибора. В случае сомнений обратитесь
в специализированный магазин электроприборов.
Для защиты розетки следует применять предохранитель, рассчитанный на ток
16 А и более.
BEEM – Elements of Lifestyle
62 RU
Убедитесь в том, что шнур питания не
имеет повреждений и не проложен по горячим поверхностям и/или острым краям.
Не допускается сильное натяжение
шнура питания, а также наличие изгибов,
защемлений, узлов или точек соприкосновения с горячими поверхностями.
Перед включением прибора в розетку
всегда полностью разматывайте шнур питания.
Если для подключения прибора требуется удлинительный кабель, поперечное
сечение этого кабеля должно быть не менее 1,5 мм².
Электрическая безопасность прибора
гарантирована только в том случае, если
он подключен к установленной согласно
предписаниям системе с защитным проводом. Работа от розетки без защитного
провода запрещена. В случае сомнения
вызовите специалиста-электрика для проверки домашней сети. Изготовитель не
несет ответственности за ущерб, вызванный отсутствием или обрывом защитного
провода.
Прокладывайте шнур питания таким
образом, чтобы опасность спотыкания
была исключена.
Используемые символы
ОПАСНОСТЬ!
Используется для обозначения непосредственно грозящей опасности,
которая приводит к тяжким телесным
повреждениям или смертельному исходу.
►► Во избежание опасности следует
соблюдать приведенные в этом пункте
инструкции.
ПРЕДУПРЕЖДЕНИЕ!
Используется для обозначения возможной опасной ситуации, которая может
привести к тяжким телесным повреждениям или смертельному исходу.
►► Во избежание опасности следует
соблюдать приведенные в этом пункте
инструкции.
ВНИМАНИЕ!
Используется для обозначения возможной опасной ситуации, которая
может привести к легким травмам или
материальному ущербу.
►► Во избежание опасности следует
соблюдать приведенные в этом пункте
инструкции.
УКАЗАНИЕ
Указание обозначает дополнительную
информацию, позволяющую облегчить
обращение с прибором.
Ввод в эксплуатацию
Распаковка
1. Извлеките из коробки прибор, все принадлежности и руководство по эксплуатации.
2. До начала использования следует
снять с прибора и принадлежностей все
упаковочные материалы и защитную пленку.
3. Проверьте целостность комплекта поставки и убедитесь в отсутствии видимых
повреждений.
УКАЗАНИЕ
►► Ни в коем случае не удаляйте заводскую табличку и имеющиеся предупреждающие указания.
►► Храните оригинальную упаковку
прибора в течение гарантийного срока
(срока гарантийного обслуживания), чтобы в гарантийном случае или в случае
гарантийного обслуживания прибор можно было отправить обратно изготовителю в надлежащей упаковке. Транспортные повреждения являются основанием
для прекращения гарантии и неоказания
гарантийных услуг.
Перед первым использованием
Перед первым использованием требуется
прогревание прибора в течение ок. 10 минут в целях удаления остатков производственных материалов (смазка). Выполните
следующие действия:
BEEM – Elements of Lifestyle
1. Выберите настройку «Циркуляция» и
задайте максимальную температуру, как
описано в разделе Настройка температуры (cmp. 64) .
2. Задайте время термообработки 10
минут, как описано в разделе Настройка
времени термообработки (cmp. 64).
(10).
3. Нажмите кнопку
4. По истечении заданного времени откройте дверцу и выпустите воздух из печи.
5. Дождитесь полного остывания прибора.
6. Выньте вилку из розетки.
7. Выполните чистку прибора, как описано в разделе Чистка и уход (cmp. 68).
УКАЗАНИЕ
При первом включении прибора из-за
наличия добавок, используемых на производстве (например, жиров) может
появиться запах или легкий дымок. Это
считается нормальным явлением! Позаботьтесь о достаточном проветривании.
Описание прибора
Объем поставки, описание
прибора
(иллюстрации см. раскладную страницу)
1
2
3
4
5
6
7
8
9
10
11
12
13
14
15
16
17
18
Корпус
Дверная ручка
Дисплей
Индикатор функции
(функция)
Кнопка РЕЖИМ
Кнопка настройки температуры °C
Кнопка настройки времени
Кнопки
Кнопка ПАУЗА/ОТМЕНА
Кнопка ПУСК
Опорные ножки
Дверца печи
Распорка с обратной стороны (на рис.
не показана)
Решетка для гриля
Противень
Захват для вертела
Захват для решетки и противня
Вертел
RU 63
19
20
21
22
23
24
25
Зажимы вертела
Шампуры для шашлыка (8 шт.)
Подставка для шампуров
Корзина для жарки во фритюре
Каменный противень для пиццы
Поддон для сбора жира
Руководство по эксплуатации (на рис.
не показано)
Панель управления
На дисплее (3) отображаются время термообработки, температура и функция согласно
заданным значениям. Выбранная функция
выделена красным треугольником. Во время
настройки времени термообработки и температуры мигает соответствующее число.
УКАЗАНИЕ
►► При каждом нажатии кнопки раздается
подтверждающий звуковой сигнал.
Включение и выключение
Для включения прибора нажмите на кнопку
(10). На дисплее загораются функции. На(5) выберите
жатием на кнопку РЕЖИМ
нужную функцию. Повторное нажатие на
кнопку
означает запуск выбранной функции.
УКАЗАНИЕ
►► Перед запуском функции выберите
требуемую температуру и время термообработки, как описано в разделах Настройка температуры (cmp. 64) и
Настройка времени термообработки
(cmp. 64).
Кнопка ПАУЗА/ОТМЕНА
1. 1 раз нажмите на кнопку ПАУЗА/ОТМЕНА
(9), чтобы прервать выполнение текущей
функции. Вы можете проверить готовность
продукта или изменить настройки.
2. Нажмите на кнопку ПУСК
(10), чтобы
продолжить приготовление пищи.
3. 2 раза нажмите на кнопку ПАУЗА/ОТМЕНА
(9), чтобы завершить выполнение всех
функций и сбросить настройки. Прибор автоматически выключается через одну минуту.
BEEM – Elements of Lifestyle
64 RU
Функции печи
Сначала нажмите на кнопку , чтобы активировать кнопку РЕЖИМ
кнопки РЕЖИМ
(5) задайте отдельные функции.
Нижний
жар
Циркуляция
воздуха
Вращение
Функция
Верхний
жар
Обжаривание
–
–
Вертел
–
–
Циркуляция
–
Оттаивание
–
(ок. 50°C)
–
Жарка
–
–
–
. С помощью
Исходная настройка
Мигает последняя используемая настройка.
Температура мигает
при 200°C.
Температура мигает
при 215°C.
Время мигает при
1 мин 00 сек.
Температура мигает
при 175°C.
УКАЗАНИЕ
►► Изменение функций возможно только при условии, если не выполняется какаялибо функция.
Настройка температуры
1. Нажмите кнопку °C (6).
и
2. С помощью кнопок
необходимую температуру.
(8) задайте
Значение температуры отображается на
дисплее (3).
Настройку температуры можно в любой
момент изменять в процессе приготовления пищи.
Функция
Диапазон температур
Обжаривание
Исходная настройка не
изменяется
Вертел
100 – 230°C
Циркуляция
100 – 230°C
Оттаивание
50°C
Жарка
100 – 230°C
УКАЗАНИЕ
►► Изменяемые диапазоны температуры с помощью кнопок
и
можно увеличивать или уменьшать с шагом 5°C.
Настройка времени термообработки
1. Нажмите кнопку настройки времени
(7).
2. С помощью кнопок
и
(8) задайте
требуемое время термообработки.
Время термообработки отображается на
дисплее (3).
Настройку времени термообработки можно изменять в процессе приготовления
пищи.
По истечении времени термообработки
раздается звуковой сигнал. На дисплее
мигает сообщение END (КОНЕЦ), прибор
автоматически выключается через одну
минуту.
BEEM – Elements of Lifestyle
Функция
Настройка времени
плавно от легкой румяности (light
2 мин. 30 сек.) до темной корочки
(dark 6 мин. 10 сек.) с шагом 30 сек.
от 1 мин. до 30 мин. с шагом 1 мин.
Вертел
от 30 мин. до 3 часов с шагом 5 мин.
Циркуля- от 1 мин. до 30 мин. с шагом 1 мин.
ция
от 30 мин. до 3 часов с шагом 5 мин.
Оттаива- от 1 мин. до 30 мин. с шагом 1 мин.
ние
от 30 мин. до 3 часов с шагом 5 мин.
от 1 мин. до 30 мин. с шагом 1 мин.
Жарка
от 30 мин. до 3 часов с шагом 5 мин.
Обжаривание
При приготовлении тостов вы косвенно
влияете на время термообработки. При
выборе степени румяности автоматически
задается время в программе «Обжаривание». См. раздел Приготовление
пищи – Обжаривание (cmp. 66).
Управление и эксплуатация
Установить поддон для сбора
жира
Вставьте поддон для сбора жира (24) спереди между нижними нагревательными
элементами.
Использование захватов
(рис. A1-A3)
Для извлечения поддона для сбора жира
требуется захват вертела (16).
1. Вставьте крюки захвата сверху в отверстия поддона для сбора жира.
2. Переведите рукоятку захвата в горизонтальное положение, приподнимите
поддон и извлеките его из печи.
Для извлечения вертела (18) также требуется захват вертела (16).
1. Введите захват вертела (16) в прибор
таким образом, чтобы крюки захвата находились под соответствующими выступами
на вертеле (рис. А1).
2. Слегка приподнимите вертел с левой
стороны, чтобы снять его с крепления.
3. Затем осторожно потяните вертел на
себя и отсоедините конец вертела, вставленный в поворотный механизм.
RU 65
4. Полностью извлеките вертел.
Для извлечения решетки или противня
требуется малый захват (17).
1. Подведите захват под небольшим
углом сверху к противню (см. рис. А2).
2. Зафиксируйте захват таким образом,
чтобы большие крюки захвата были
расположены над противнем, а опорная
часть – под противнем.
3. Переведите захват в горизонтальное
положение.
4. Во время извлечения из печи слегка
приподнимите противень, чтобы не допустить отсоединения захвата.
5. Извлеките противень.
6. Извлечение решетки для гриля выполняется по аналогии с извлечением противня. При этом необходимо навесить малые
крюки захвата на решетку (см. рис. А3).
УКАЗАНИЕ
►► Перед извлечением вертела следует
по возможности положить вертел на
противень, чтобы собрать в противень
стекающее с готового продукта масло.
►► Удерживайте противень в горизонтальном положении, чтобы не разлить
горячий жир.
►► Во избежание ожогов при контакте
с горячим жиром используйте кухонные
рукавицы.
►► Горячие предметы следует размещать на жаропрочной поверхности.
Общие указания
Продукты должны иметь комнатную
температуру, поскольку для приготовления
замороженных продуктов требуется больше времени, вследствие чего они могут
пересохнуть.
Для получения наилучших результатов
кратко прогрейте прибор. Внимательно
наблюдайте за процессом приготовления
пищи и регулируйте температуру по мере
необходимости.
С помощью этого прибора можно готовить различные блюда, например, колбаски, стейки, мясо, птицу, овощи, запеканки,
тосты, пиццу, пироги и многое другое.
BEEM – Elements of Lifestyle
66 RU
Прибор особенно подходит для быстрого и нежирного приготовления пищи.
Инфракрасная печь отличается уменьшенным временем термообработки по сравнению с традиционными видами печей.
УКАЗАНИЕ
►► В процессе приготовления пищи
возможно образование конденсата на
дверце печи.
Эксплуатация прибора
1. При необходимости установите поддон
для сбора жира.
2. Нажмите на кнопку ПУСК , чтобы активировать функции печи.
3. Выберите необходимые функции, см.
таблицу Функции печи (cmp. 64).
4. Задайте температуру, см. раздел Настройка температуры (cmp. 64).
5. Задайте время термообработки, см.
раздел Настройка времени термообработки (cmp. 64).
(10).
6. Нажмите на кнопку ПУСК
УКАЗАНИЕ
►► Настройки температуры и времени
термообработки можно в любой момент
изменять в процессе приготовления
пищи.
►► При вводе любого значения печи раздается звуковой сигнал.
Приготовление пищи
Обжаривание
Используя данную функцию, в печи можно
обжаривать тосты и разогревать хлебобулочные изделия.
1. Установите решетку на средний уровень.
2. С помощью кнопки РЕЖИМ
выберите функцию «Обжаривание».
3. Задайте требуемую румяность с помощью кнопок
и
(8):
–– «light» для светлого продукта,
–– «dark» для образования румяной корочки.
4. Заданное в программе время отображается на дисплее.
5. Нажмите кнопку
(10).
УКАЗАНИЕ
►► При необходимости измените настройки, если вы желаете поочередно
приготовить несколько тостов.
►► Предварительное прогревание печи
не требуется.
Вертел (рис. B1–B4)
Используя эту функцию (верхний жар),
можно жарить на гриле целую курицу или
кусок мяса. Функция также предназначена
для приготовления шашлыков и термообработки овощей или картофеля фри в
корзине для овощей.
Курица
1. При необходимости установите поддон
для сбора жира.
2. Вымойте свежую или размороженную
курицу и удалите внутренности.
3. Установите зажим (19) с острого конца
вертела и зафиксируйте его с помощью
барашковой гайки (рис. В1).
4. Насадите курицу на вертел и зафиксируйте ее по центру вертела с помощью
второго зажима (рис. В2).
5. Посыпьте курицу приправами по вкусу
(например, соль, молотый красный перец,
черный перец и карри) и слегка полейте
растительным маслом.
6. Закрепите ножки и крылышки с помощью шпилек для мясного рулета или
шнура.
7. Установите вертел с курицей в печь,
для этого сначала вставьте острый конец
вертела в поворотный механизм (рис. В3).
Затем вставьте противоположный конец
вертела в опору с левой стороны прибора
(рис. В4).
8. С помощью кнопки РЕЖИМ
выберите функцию «Вертел».
9. Задайте время термообработки и температуру.
10.Нажмите кнопку
(10).
11.Извлеките готовую курицу с помощью захвата вертела, как описано в разделе
Использование захватов (cmp. 65).
BEEM – Elements of Lifestyle
УКАЗАНИЕ
►► Используйте курицу весом не более
1000 грамм.
►► Предварительное прогревание печи не
требуется.
Шашлыки (рис. C1-C3)
1. Нанизайте на шампуры (20) кусочки мяса
(ок. 1,5 х 1,5 см), сосисок, болгарского перца, лука и пр. ингредиентов по желанию.
2. Посыпьте шашлыки приправами по вкусу
и слегка полейте растительным маслом.
3. Установите отдельные шампуры (20) на
подставку (21). При этом изогнутый конец
шампуров с одной стороны фиксируется
в выемке подставки (21), как показано на
рис. С1, а с другой стороны острый конец
шампура вставляется в отверстие подставки
(рис. С2). Вставьте вертел (18) по центру
подставки для шампуров (21) и зафиксируйте его слева и справа с помощью зажимов
(рис. C3).
4. При необходимости установите поддон
для сбора жира.
5. Установите вертел с шампурами.
выбери6. С помощью кнопки РЕЖИМ
те функцию «Вертел».
7. Задайте время термообработки и температуру.
8. Нажмите кнопку
(10).
9. Для извлечения готовых шашлыков используйте захват вертела (16).
Корзина для жарки во фритюре (рис.
D1-D2)
1. Вставьте вертел (18) по центру корзины
для жарки во фритюре (22) и зафиксируйте его слева и справа с помощью зажимов
(рис. D1).
2. Откройте корзину для овощей и заполните ее картофелем фри, крокетами, картофельными дольками, куриными ломтиками,
креветками и пр.
3. Не переполняйте корзину, чтобы не
препятствовать переворачиванию продуктов при повороте корзины.
4. При необходимости установите поддон
для сбора жира.
5. Установите вертел с корзиной для овощей (рис. D2).
RU 67
выбе6. С помощью кнопки РЕЖИМ
рите функцию «Вертел».
7. Задайте время термообработки и температуру.
(10).
8. Нажмите кнопку
9. Для извлечения горячей корзины для
жарки во фритюре используйте захват
вертела.
Циркуляция
Эта функция означает включение верхнего
и нижнего жара, а также вентилятора для
циркуляции воздуха. Таким образом обеспечивается интенсивное и равномерное
распределение тепла внутри прибора, что
позволяет уменьшить температуру и время термообработки. Функцию циркуляции
можно использовать для решения самых
разнообразных задач, например, жарки
и тушения мяса, выпечки хлеба, пирогов,
пиццы и печенья, приготовления рыбных
блюд и запеканок.
1. Установите решетку для гриля на нижний уровень печи. Поместите продукты в
жаропрочную форму из стекла, керамики
или металла и установите заполненную
форму на решетку.
(10).
2. Нажмите кнопку
3. С помощью кнопки РЕЖИМ
выберите функцию «Циркуляция».
4. Задайте время термообработки и
температуру, как описано в разделах Настройка температуры (cmp. 64) и
Настройка времени термообработки
(cmp. 64).
(10).
5. Нажмите кнопку
6. Для извлечения формы из печи используйте кухонные рукавицы или прихватки. Удерживайте решетку для гриля с
помощью захвата.
УКАЗАНИЕ
►► Заранее проверьте, помещается ли
форма для выпечки в прибор.
►► Обратите внимание на то, чтобы тесто
для пирога или хлеба, подходящее во время выпечки, не попадало на внутренние
стенки и нагревательные элементы печи.
►► Предварительно прогрейте печь в
течение 4 – 5 минут.
68 RU
Пицца (рис. Е1)
1. Установите решетку для гриля на нижний уровень.
2. Положите каменный противень для
пиццы на решетку.
3. Положите пиццу на каменный противень.
4. Готовьте пиццу с помощью функции
«Циркуляция», как описано выше.
Оттаивание
Для функции «Оттаивание» невозможно
изменение температуры в программе.
Температура оттаивания установлена на
ок. 50°C.
1. Положите замороженный продукт на
противень.
2. Установите противень на нужный уровень печи.
3. С помощью кнопки РЕЖИМ
выберите функцию «Оттаивание».
4. Задайте время оттаивания, как описано в разделе Настройка времени термообработки (cmp. 64).
5. Нажмите кнопку
(10).
6. Для извлечения размороженных продуктов из печи используйте кухонные рукавицы или прихватки.
УКАЗАНИЕ
►► Время оттаивания может быть различным в зависимости от продукта.
Жарка
Данная функция (верхний жар) идеально
подходит для приготовления тонких кусков
мяса, рыбы, колбасок, гамбургеров и т.д.
1. При необходимости установите поддон
для сбора жира.
2. Посыпьте продукты приправами по вкусу и положите их на решетку для гриля.
3. В зависимости от толщины продуктов,
установите решетку на средний или верхний уровень.
4. С помощью кнопки РЕЖИМ
выберите функцию «Жарка».
5. Задайте время термообработки и
температуру, как описано в разделах Настройка температуры (cmp. 64) и
BEEM – Elements of Lifestyle
Настройка времени термообработки
(cmp. 64).
6. Нажмите кнопку
(10).
7. Для извлечения горячей решетки из
печи используйте захват.
УКАЗАНИЕ
►► В данном режиме необходимо переворачивать продукты во время приготовления, т.к. включен только верхний жар.
После использования
1. Нажатием кнопки
(9) прервите выполнение текущей функции.
2. Повторное нажатие на кнопку приводит
к завершению всех функций и сбросу настроек.
3. Выньте вилку из розетки.
4. Дождитесь остывания прибора и выполните чистку, как описано в разделе
Чистка и уход (cmp. 68).
Чистка и уход
Перед началом работ ознакомьтесь с
указаниями по технике безопасности в
разделе Указания по безопасности
(cmp. 59)!
После каждого использования необходимо проводить чистку прибора.
Дождитесь охлаждения прибора и затем выполните очистку. Слишком долгое
ожидание затрудняет чистку.
ВНИМАНИЕ!
►► Запрещается вставлять какие-либо
предметы в нагревательные элементы.
Это может привести к повреждениям
прибора.
Корпус
Протрите корпус внутри и снаружи влажной салфеткой.
При необходимости используйте бытовое
средство для мытья посуды.
Принадлежности
Извлеките принадлежности и промойте их
теплой водой или в посудомоечной машине.
BEEM – Elements of Lifestyle
1. Для удаления въевшихся загрязнений
замочите принадлежности на 10 минут в
теплой воде с добавлением средства для
мытья посуды.
2. Перед повторной установкой тщательно высушите эти принадлежности.
УКАЗАНИЕ
►► Для чистки прибора запрещается использовать металлическую или абразивную губку.
►► Запрещается обрабатывать внутренние поверхности аэрозолем для чистки
духовки.
►► Все съемные детали, за исключением каменного противня для пиццы,
пригодны для чистки в посудомоечной
машине.
RU 69
Общая информация
Гарантия
Кроме предусмотренной законом обязательной гарантии, компания BEEM
для некоторых изделий дополнительно
предоставляет расширенную гарантию
изготовителя. Если такая гарантия предоставляется, соответствующие данные
указаны на упаковке конкретного изделия,
в рекламных материалах или на сайте
ВЕЕМ для конкретного изделия. На нашем
сайте www.beem.de приведены подробные
условия гарантии, сведения об имеющихся принадлежностях и запасных частях, а
также руководства по эксплуатации на различных языках.
Каменный противень для пиццы
Ограничение ответственности
1. Дождитесь остывания каменного противня для пиццы.
2. С помощью влажной салфетки удалите
легкие загрязнения.
3. Въевшиеся пятна можно соскрести с
помощью губки для кастрюль. Затем протрите противень влажной салфеткой.
Мы не несем ответственности за ущерб
или косвенные убытки в следующих случаях:
несоблюдение указаний в руководстве
по эксплуатации, применение не назначению, ненадлежащая или неправильная
эксплуатация, неправильное проведение
ремонтных работ, внесение недопустимых
изменений в конструкцию прибора, использование деталей и запчастей сторонних производителей, использование недопустимых дополнительных деталей или
принадлежностей.
УКАЗАНИЕ
►► Каменный противень для пиццы НЕ
пригоден для чистки в посудомоечной
машине.
►► Для чистки каменного противня для
пиццы можно использовать только воду
без добавления средства для мытья
посуды.
Хранение
Если прибор не используется в течение
продолжительного времени, выполните
чистку, как описано в разделе Чистка и
уход (cmp. 68).
Храните прибор и все принадлежности к
нему в сухом чистом месте, защищенном
от заморозков и прямых солнечных лучей.
Декларация о соответствии
нормам ЕС
Настоящим компания BEEM заявляет, что
данный прибор полностью соответствует
основополагающим требованиям и прочим
действующим положениям Директив ЕС
2004/108/EG, 2006/95/EG, 2009/125/EG и
2011/65/EU.
BEEM – Elements of Lifestyle
70 RU
Устранение неисправностей
Следующая таблица помогает в поиске и устранении мелких неисправностей. Если вам
не удалось устранить неисправность путем выполнения указанных действий, обратитесь в сервисную службу.
Неисправность
Возможная причина
Устранение
Выключен предохранитель
Включить предохранитель.
в коробке предохранителей.
Дисплей не загорается.
Сработал предохранитель в коробке предохранителей.
Неисправность дисплея.
Обратиться в сервисную
службу.
Слишком много приборов
подключено к одной
электрической цепи.
Уменьшить количество приборов в электрической цепи.
Ошибка не обнаружена.
Обратиться в сервисную
службу.
DE
Hinweise zum Umweltschutz
Die verwendeten Verpackungsmaterialien sind recyclebar. Entsorgen Sie nicht
mehr benötigte Verpackungsmaterialien gemäß den örtlich geltenden Vorschriften.
Dieses Produkt darf innerhalb der Europäischen Union nicht im normalen
Hausmüll entsorgt werden. Entsorgen
Sie das Gerät über die kommunalen Sammelstellen.
Notes on environmental
protection
The packaging materials used can be recycled. When no longer required, dispose of the packaging materials according to
local environmental regulations.
This product may not be disposed of in
the domestic refuse within the European Union. Dispose of the appliance via
communal collection points.
EN
Indications relatives à la protection de l’environnement
Les matériaux d’emballage utilisés sont
recyclables. Éliminer les matériaux
d’emballage non nécessaires conformément
aux directives locales en vigueur.
A l’intérieur de l’Union européenne, il
est interdit de mettre ce produit aux ordures ménagères normales. Éliminer
l’appareil par l’intermédiaire des points de collecte communaux.
FR
Indicaciones acerca de la
protección medioambiental
Los materiales de embalaje utilizados
son reciclables. Elimine los materiales
de embalaje que no necesite de acuerdo con
la normativa en vigor.
En la Unión Europea no está permitido
eliminar este aparato junto con la basura doméstica. El aparato debe desecharse a través de los centros de recogida
municipales.
ES
Instructies inzake milieubescherming
Het gebruikte verpakkingsmateriaal is
herbruikbaar. Voer niet meer benodigd
verpakkingsmateriaal volgens de plaatselijk
geldende voorschriften af.
Dit product mag binnen de Europese
Unie niet met het gewone huisvuil worden meegegeven. Breng het apparaat
naar de plaatselijke inzamelpunten.
NL
Указания по защите
окружающей среды
Используемые упаковочные материалы подлежат утилизации. Утилизируйте ненужные упаковочные материалы в соответствии с действующими местными
предписаниями.
На территории Европейского Союза
запрещено выбрасывать данный прибор вместе с бытовыми отходами.
Необходимо сдать прибор в один из коммунальных пунктов приема отходов.
RU
A1
A2
A3
B1
B2
B3
B4
C1
C2
C3
D1
D2
E1
Kundendienststelle:
Customer service:
Bureau de service après-ventes:
Centros de atención al cliente:
Klantenservice:
Сервисные центры:
Elements of Lifestyle
BEEM Blitz-Elektro-Erzeugnisse
Manufaktur Handels-GmbH
Abt. Kundenservice
Dieselstraße 19-21
61191 Rosbach v.d.H.
Germany
Fon +49 (0)60 03-91 13 88 88
Fax +49 (0)60 03-91 13 99 99
(Kosten laut Konditionen des Vertragspartners für Festnetzanschlüsse oder
Mobilfunkanschlüsse)
© 2014 by BEEM
Druckfehler vorbehalten.
Subject to printing error.
Sous réserve d‘erreurs d‘impression.
Queda reservado el derecho por errores de impresión.
Drukfouten voorbehouden.
Возможны опечатки.
Technische Änderungen vorbehalten.
Subject to technical modifications.
Sous réserve de modifications techniques.
Reservado el derecho a realizar modificaciones técnicas.
Technische wijzigingen voorbehouden.
Возможны технические изменения.
Für Kundenservicestellen in anderen Ländern kontaktieren Sie bitte Ihren Händler.
For service in other countries contact your local dealer.
Pour les bureaux de service après-vente dans d‘autres pays, veuillez contacter votre vendeur.
Para obtener información sobre los centros de atención al cliente en otros países, póngase en
contacto con su distribuidor.
Neem voor klantenservice in andere landen contact op met uw dealer.
Адреса центров сервисного обслуживания в других странах можно получить у местного
торгового представителя.
BA_B25.001_2014-05-06_A4
E-Mail: [email protected]
Homepage: www.beem.de