1
jtX`Y`hl|TWYZ[`iluUGGwGXGGt SGq GY_SGYWW_GGYaW_Gwt
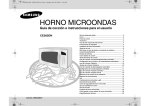
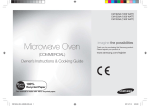
MICROWAVE OVEN
(COMMERCIAL)
Owner’s Instructions and Cooking Guide
CM1929A (1850 Watt)
CM1629A (1600 Watt)
CM1329A (1300 Watt)
P
1
2
3
4
5
6
7
8
9
+ 20sec
Code No. : DE68-02349B
0
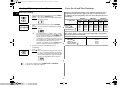
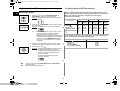
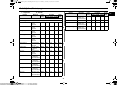
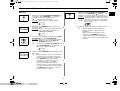
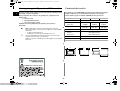
Oven .......................................................................................................2
Control Panel .........................................................................................2
Using this Instruction Booklet.................................................................3
Safety Precautiones ...............................................................................3
Installing Your Microwave Oven.............................................................4
Cooking / Reheating...............................................................................5
Power Levels and Time Variations.........................................................6
Stopping the Cooking .............................................................................7
Repeat Feature ......................................................................................7
Using +20sec Pad ..................................................................................8
Using the Defrost Feature ......................................................................8
Memory Pads Programming ..................................................................9
How to Operate Memory Cooking........................................................11
Double Quantity Pad Programming .....................................................11
How to Operate Double Quantity Pad..................................................12
Programming Air Filter Clean Time......................................................13
Controlling Beep Tone..........................................................................13
Error Codes ..........................................................................................14
Hidden Keys .........................................................................................15
Care of Your Microwave Oven .............................................................15
Installation Instructions for Stacking.....................................................17
Replacement of Lamp ..........................................................................17
Cookware Guide...................................................................................18
Cooking Guide......................................................................................19
Cleaning Your Microwave Oven...........................................................21
Storing and Repairing Your Microwave Oven......................................22
Technical Specifications.......................................................................22
jtX`Y`hl|TWYZ[`iluUGGwGYGGt SGq GY_SGYWW_GGYaW_Gwt
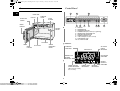
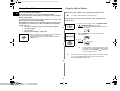
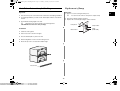
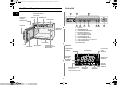
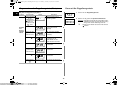
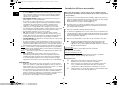
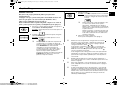
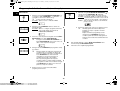
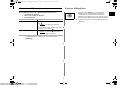
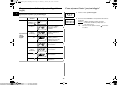
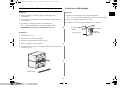
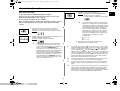
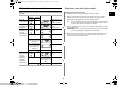
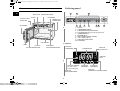
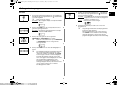
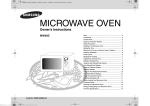
Oven
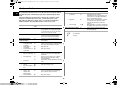
Control Panel
1
EN
2
4
OVEN LAMP
OVEN LAMP
COVER
CONTROL
PANEL
DISPLAY
DOOR
HANDLE
P
START
BUTTON
1
2
3
4
5
6
7
8
9
3
0
+ 20sec
1.
2.
3.
4.
5.
6.
7.
8.
9.
10.
CEILING
COVER
AIR FILTER
DOOR
LATCHES
2
3
4
5
6
7
8
9
0
+ 20sec
P
DOOR
1
PLATE TRAY
5
6
7
8
9
10
DISPLAY
PROGRAM PAD
PROGRAM LOCK PAD
NUMBER PADS(Time, Memory Programming)
POWER LEVEL SELECTOR PAD
DEFROST SELECTOR PAD
DOUBLE QUANTITY PAD
+20sec PAD (One Touch Cook Pad)
STOP/CANCEL PAD
10. START BUTTON
DISPLAY
SAFETY
INTERLOCK
HOLES
PROGRAM
INDICATOR
TIME DISPLAY
AIR FILTER
CHECK
INDICATOR
DATA CHECK
INDICATOR
MEMORY PAD
NUMBER
INDICATOR
DOUBLE
QUANTITY
INDICATOR
POWER SOURCE
CHECK INDICATOR
(When it shows, heating
does not work)
2
POWER LEVEL
INDICATORS
DEFROST
INDICATORS
jtX`Y`hl|TWYZ[`iluUGGwGZGGt SGq GY_SGYWW_GGYaW_Gwt
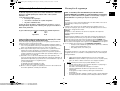
Using this Instruction Booklet
Safety Precautiones
You have just purchased a SAMSUNG microwave oven. Your Owner’s
Instructions contain valuable information on cooking with your
microwave oven:
• Safety precautions
• Suitable accessories and cookware
• Useful cooking tips
At the front of the booklet you will find illustrations of the oven, and
more importantly the control panel, so that you can find the buttons
more easily.
IMPORTANT SAFETY INSTRUCTIONS READ CAREFULLY AND EN
KEEP FOR FUTURE REFERENCE.
Before cooking food or liquids in your microwave oven, please check
that the following safety precautions are taken.
WARNING:
If the door or door seals are damaged, the oven must not be operated until it has
been repaired by a competent person.
WARNING:
It is hazardous for anyone other than a competent person to carry out any service
or repair operation that involves the removal of a cover which gives protection
against exposure to microwave energy.
The step-by-step reocedures use two different symbols.
Important
Note
WARNING:
Liquids and other foods must not be heated in sealed containers since they are
liable to explode.
WARNING:
Microwave heating of beverages can result in delayed eruptive boiling, therefore
care must be taken when handling the container; To prevent this situation
ALWAYS allow a standing time of at least 20 seconds after the oven has been
switched off so that the temperature can equalize.
Stir during heating, if necessary, and ALWAYS stir after heating.
In the event of scalding, follow these FIRST AID instructions:
* Immerse the scalded area in cold water for at least 10 minutes.
* Cover with a clean, dry dressing.
* Do not apply any creams, oils or lotions.
PRECAUTIONS TO AVOID POSSIBLE EXPOSURE TO
EXCESSIVE MICROWAVE ENERGY
Failure to observe the following safety precautions may result in harmful
exposure to microwave energy.
(a) Under no circumstances should any attempt be made to operate the oven with
the door open or to tamper with the safety interlocks (door latches) or to insert
anything into the safety interlock holes.
(b) Do not place any object between the oven door and front face or allow food or
cleaner residues to accumulate on sealing surfaces. Ensure that the door and
door sealing surfaces are kept clean by wiping after use first with a damp cloth
and then with a soft dry cloth.
(c) Do not operate the oven if it is damaged until it has been repaired by a
qualified microwave service technician trained by the manufacturer. It is
particularly important that the oven door closes properly and that there is no
damage to the:
(1) Door (bent)
(2) Door hinges (broken or loose)
(3) door seals and sealing surfaces
(d) The oven should not be adjusted or repaired by anyone other than a properly
qualified microwave service technician trained by the manufacturer.
WARNING:
The contents of feeding bottles and baby food jars must be stirred or shaken and
the temperature checked before consumption, in order to avoid burns.
•
Only use utensils that are suitable for use in microwave ovens;
DO NOT use any metallic containers, Dinnerware with gold or silver
trimmings, Skewers, forks, etc. Remove wire twist ties from paper or
plastic bags.
Reason: Electric arcing or sparking may occur and may damage the oven.
• When heating food in plastic or paper containers, keep an eye on the oven
due to the possibility of ignition.
Do not use your microwave oven to dry papers or clothes.
• Small amounts of food require shorter cooking or heating time.
If normal times are allowed they may overheat and burn.
• If smoke is observed, switch off or unplug the appliance and keep the door
closed in order to stifle any flames.
• NEVER fill the container to the top and choose a container that is wider at
the top than at the bottom to prevent the liquid from boiling over. Bottles
with narrow necks may also explode if overheated.
3
jtX`Y`hl|TWYZ[`iluUGGwG[GGt SGq GY_SGYWW_GGYaW_Gwt
Safety Precautiones (continued)
EN
Installing Your Microwave Oven
This microwave oven can be placed almost anywhere (kitchen work
surface or shelf, movable trolley, table).
•
NEVER heat a babys bottle with the teat on, as the bottle may explode if
overheated.
• Eggs in their shell and whole hard-boiled eggs should not be heated in
microwave ovens since they may explode, even after microwave heating
has ended.
Also do not heat airtight or vacuum-sealed bottles, jars, containers, nuts in
shells, tomatoes etc.
• The oven should be cleaned regularly and any food deposits removed.
• Failure to maintain the oven in a clean condition could lead to deterioration
of the surface that could adversely affect the life of the appliance and
possibly result in a hazardous situation.
• The appliance should not be cleaned with a water jet.
• DO NOT cover the ventilation slots with cloths or paper. They may catch
fire as hot air is evacuated from the oven.
The oven may overheat and automatically switch itself off. It will remain
inoperable until it has cooled sufficiently.
• ALWAYS use oven gloves when removing a dish from the oven to avoid
unintentional burn.
• Do not immerse the power cable or plug in water and keep the power
cable away from heated surfaces.
Do not operate this appliance if it has a damaged power cable or plug.
• Stand at arms length from the oven when opening the door.
Reason: The hot air or steam released may cause scalding.
• You may notice a Clicking sound during operation(especially when the
oven is defrosting).
Reason: This sound is normal when the electrical power output is changing.
• DO NOT operate the microwave oven when it is empty. the power will be
cut off automatically for safety. You can operate normally after letting it
stand for over 30 minutes.
It is best to leave a glass of water inside the oven at all times.The water
will absorb the microwaves energy if the oven accidently started.
1. Install the oven on a flat, level, stable surface. Make sure there is adequate
ventilation for your oven by leaving at least 10cm(four inches) of space
behind, on the sides of the oven and 20cm(eight inches) of above.
(For stacking see page 17.)
2. Never block the air vents as the oven may overheat and automatically switch itself
off. It will remain inoperable until it has cooled sufficiently.
3. Remove all packing materials inside the oven.
4. For your personal safety, plug the cable into a 3-pin, 230 Volt, 50Hz, AC earthed
socket. If the power cable of this appliance is damaged, it must be replaced by the
manufacturer or its service agent or a similarly qualified person in order to avoid a
hazard.
5. This microwave oven has to be positioned so that plug is accessible.
Outdoor Use
This microwave oven is not designed for outdoor use.
You should use it indoors only.
During Air Cooling
Do not turn power off while the cooling fan is automatically air-cooling for 1min.
Recommendations
IMPORTANT
•
•
•
Be sure to remove the protective film from outer case. The
protective film is on the outer case to prevent scratches. When
installing or before using, be sure to remove it.
Young children should NEVER be allowed to use or play with the
microwave oven. Nor should they be left unattended near the microwave
oven when it is in use. Items of interest to children should not be stored or
hidden just above the oven.
This appliance is not intended for use by persons (including children) with
reduced physical, sensory or mental capabilities, or lack of experience
and knowledge, unless they have been given supervision or instruction
concerning use of the appliance by a person responsible for their safety.
Children should be supervised to ensure that they do not play with the
appliance.
4
DO NOT install the microwave oven in hot or damp surroundings.
Example: Next to a traditional oven or radiator.
The power supply specifications of the oven must be respected and
any extension cable used must be of the same standard as the power
cable supplied with the oven.
Wipe the interior and the door seal with a damp cloth before using
your microwave oven for the first time.
jtX`Y`hl|TWYZ[`iluUGGwG\GGt SGq GY_SGYWW_GGYaW_Gwt
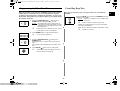
Cooking / Reheating
One-stage cooking
This oven is preset at the factory for automatic operation.
Make sure the oven is plugged into a properly earthed electrical outlet
and “ON” appears in the display window.
Open the door(The oven lamp will be turned on.).
Put the food into a suitable container, place it in the centre of the oven
and then close the door securely (The oven lamp will go off.).
4. Open the door and take the food out.
Close the door. The oven lamp will go off.
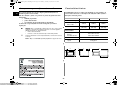
1. Select the desired power level by pressing the Power
Level Selector pad.
Result : The selected power level will be displayed in
the display window.
2. Set the desired heating time by pressing the NUMBER
pads.
Result : The selected time is displayed in the display
window.
The maximum time according to each cooking
power level can be referred to in the title “Power
Levels ans Time Variations” on page 6. The
NUMBER pads will not operate or respond when
you press a cooking time exceeding the
maximum value. It is not possible to set a cooking
time for longer than the maximum time allowed
on the chosen program. It is advisable to press
CANCEL and to enter a new power level and
cooking time.
3. Press
button:
Result : The oven lamp and cooling fan will be turned
on. Heating will start.
The time on digital display will count down.
When all time is elapsed, the end of cycle Beep
Tone will sound 4 times and all heating will stop.
The oven lamp will go off. For 1 min, the display
shows ‘0‘ and the cooling fan will keep working in
order to cool down the interior parts.
During the time, the fan will not stop even when
you open the door. 1 min later it will stop. Food
may be removed from oven whilst the fan is still
running.
5
Whilst in a heating cycle, one press on
pad stops the oven. At this
time, the Power Check Indicator “ON” starts blinking and goes off
when the
pad or
button is pressed again.
You can restart it by pressing the
button or a second press on
pad will cancel the selected program. While NOT in a heating cycle,
one tap on
pad cancels the selected program.
You can press +20sec pad one or more times in order to add the
cooking time by 20 seconds. But you can not exceed the maximum
time per power level allowed for power level selected.
When you first plug in the power cord, the oven beeps once and all
the indicators show for 5 sec in the display window.
When heating cycle is completed and you open the door, the oven
lamp automatically turns on and goes off 1 min later.
When you open the door whilst in a heating cycle, the oven stops
operating and the oven lamp automatically turns on for 1 min and
goes off 1 min later. If you leave the oven door open for more than 1
min, the oven beeps once every minute and after 5 min the power
source check indicator ‘ON’ appears in the display window.
EN
jtX`Y`hl|TWYZ[`iluUGGwG]GGt SGq GY_SGYWW_GGYaW_Gwt
EN
Cooking / Reheating (continued)
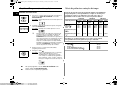
Power Levels and Time Variations
Multi-stage cooking
The power level function enables you to adapt the amount of energy
dissipated and thus the time required to cook or reheat your food,
according to its type and quantity. You can choose between the power
levels below.
1. Select the desired power level by pressing the POWER
LEVEL Selector pad or DEFROST pad.
Result : The selected power level will be displayed in
the display window.
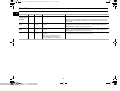
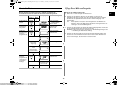
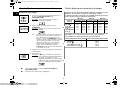
CM1929A
Power Level
HIGH ( )
MEDIUM ( )
LOW ( )
HIGH DEFROST (
LOW DEFROST (
2. Set the desired heating time by pressing the NUMBER
pads.
Result : The selected time is displayed in the display
window.
CM1329A
Percen- Output Percen- Output Percen- Output
tage
tage
tage
)
)
100 %
70 %
50 %
20 %
10 %
1850 W
1295 W
925 W
370 W
185 W
100 %
70 %
50 %
25 %
13 %
1600 W
1120 W
800 W
400 W
208 W
100 %
70 %
50 %
30 %
15 %
1300 W
910 W
650 W
390 W
195 W
The cooking times given in recipes and in this booklet correspond to
the specific power level indicated.
The maximum time according to each cooking
power level can be referred to in the title “Power
Levels ans Time Variations”. The NUMBER pads
will not operate or respond when you press a
cooking time exceeding the maximum value. It is
not possible to set a cooking time for longer than
the maximum time allowed on the chosen
program. It is advisable to press CANCEL and to
enter a new power level and cooking time.
Power Level
HIGH ( )
MEDIUM ( )
LOW ( )
HIGH DEFROST (
LOW DEFROST (
3. Repeat steps 1 and 2 for II or III stage memory
programming.
4. Press
button:
Result : The oven lamp and cooling fan will be turned
on. The oven will automatically start heating
according to pre-programed cooking time and
power level.(I stage II stage III stage).
The time on digital display will count down.
CM1629A
You can not set up the same POWER LEVEL or DEFROST.
It operates as setting up sequence.
6
Max. Time
)
)
25 min.
40 min.
40 min.
50 min.
50 min.
jtX`Y`hl|TWYZ[`iluUGGwG^GGt SGq GY_SGYWW_GGYaW_Gwt
Stopping the Cooking
Repeat Feature
1. You can repeat the previous cooking setting (regardless
of manual or automatic memory heating) by pressing the EN
START( ) button. The oven starts with exactly the
same heating time and power level that were used in the
last operation.
You can stop cooking at any time so that you can:
• Check the food
• Turn the food over or stir it
• Leave it to stand
To stop the cooking...
Temporarily
Then...
2. The repeat feature will be cancelled once the power source
is cut off.
Open the door or press
pad once.
Result : Cooking stops.
To resume cooking, close the door and press
again.
Completely
Press the
pad twice.
Result : The cooking settings are
cancelled.
If you want to cancel any cooking settings before starting cooking,
simply press CANCEL( ) once.
7
jtX`Y`hl|TWYZ[`iluUGGwG_GGt SGq GY_SGYWW_GGYaW_Gwt
EN
Using +20sec Pad
Using the Defrost Feature
This is a ONE TOUCH COOK pad.
By touching the pad once, you can start heating instantly.
You can increase the cooking time by pressing the +20sec pad while
heating is being done.
A cooking time increases by 20 seconds at each press on +20sec pad.
But it can not exceed the maximum time.
Like traditional cooking, you may find that, depending on the food’s
characteristics or your tastes, you have to adjust the cooking times
slightly. You can:
• Check how cooking is progressing at any time simply by
• opening the door
• Close the door
• Increase the remaining cooking time
The Defrost feature enables you to defrost meat, poultry or fish.
Use only containers that are microwave-safe.
Open the door. Place the frozen food in the centre of the plate tray.
Close the door.
1. Press the Defrost selector pad to set DEFROST HIGH
( ) or DEFROST LOW ( ) as you wish.
Result : The selected DEFROST indicator appears in
the display.
2. Press the NUMBER pads to set the defrosting time.
(Max. 50 min)
Before operating the oven, times can be increased/decreased
using either the time pads or +20sec button
During the operating, time may only be added by using the
+20sec button.
button.
3. Press
Result : Defrosting begins.
8
It is not possible to set a defrosting time for longer
than 50min. The defrost indicator will flash and it
is advisable to press CANCEL( ) and enter a
new defrost level and time.
When the oven was operating for longer than 25 min under Defrosting
cycle, you can NOT change the power level from Defrosting to
Heating(Cooking/Reheating) mode.
jtX`Y`hl|TWYZ[`iluUGGwG`GGt SGq GY_SGYWW_GGYaW_Gwt
Memory Pads Programming
One-stage
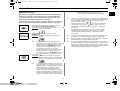
5. Hold down PROGRAM LOCK( ) and then press
EN
PROGRAM( ) pad. Hold together for 2 sec once again.
Result : PROG indicator and memory number indicator
blink 3 times in the digital display with a beep
sound. And then the display goes blank.
Caution: Be sure to press the pads firmly in the right
position.
1. Hold down PROGRAM LOCK( ) and then press
PROGRAM( ) pad. Hold together for 2 sec.
Result :
Be sure to press the pads firmly.
PROG indicator appears in the digital display.
2. Press appropriate NUMBER pad for the desired memory
number.
Result : Selected memory program code appears
below the PROGRAM indicator.
6. When you want to program more, repeat the procedures
above again.
3. Select power level by pressing the POWER LEVEL pad or
DEFROST pad.
Result : Default power level HIGH appears in the
display at first press of the POWER LEVEL
pad.
Press the POWER LEVEL pad or DEFROST
pad one or more times until you get the desired
power level.
4. Press NUMBER pads to set the cooking time.
The maximum time according to each cooking
power level can be referred to in the title “Power
Levels and Time Variations” on page 6. The
NUMBER pads will not operate or respond when
you press a cooking time exceeding the
maximum value.
It is not possible to set a cooking time for longer
than the maximum time allowed on the chosen
program. It is advisable to press CANCEL and to
enter a new power level and cooking time.
9
Memory programs are available up to 30 items.
Make sure the unit is properly programmed.
After programming is finished, all you have to do
for memory cooking is to press the NUMBER
pad. Then the selected memory program
automatically starts cooking.
jtX`Y`hl|TWYZ[`iluUGGwGXWGGt SGq GY_SGYWW_GGYaW_Gwt
Memory Pads Programming (continued)
EN
Multi-stage
6. Hold down PROGRAM LOCK( ) and then press
PROGRAM( ) pad. Hold together for 2 sec once again.
Result : PROG indicator and memory number indicator
blink 3 times in the digital display with a beep
sound. And then the display goes blank.
Caution: Be sure to press the pads firmly in the right
position.
1. Hold down PROGRAM LOCK( ) and then press
PROGRAM( ) pad. Hold together for 2 sec.
Result :
Be sure to press the pads firmly.
PROG indicator appears in the digital display.
2. Press appropriate NUMBER pad for the desired memory
number.
Result : Selected memory program code appears
below the PROGRAM indicator.
7. When you want to program more, repeat the procedures
above again.
3. Select power level by pressing the POWER LEVEL pad or
DEFROST pad.
Press the POWER LEVEL pad and DEFROST
pad one or more times until you get the desired
power level.
4. Press NUMBER pads to set the cooking time.
The maximum time according to each cooking
power level can be referred to in the title “Power
Levels and Time Variations” on page 6. The
NUMBER pads will not operate or respond when
you press a cooking time exceeding the
maximum value.
It is not possible to set a cooking time for longer
than the maximum time allowed on the chosen
program. It is advisable to press CANCEL and
to enter a new power level and cooking time.
5. Repeat steps 3 and 4 for II or III stage memory
programming.
10
Memory programs are available up to 30 items.
Make sure the unit is properly programmed.
After programming is finished, all you have to do
for memory cooking is to press the NUMBER
pad. Then the selected memory program
automatically starts cooking.
You can not set up the same POWER LEVEL or DEFROST.
It operates as setting up sequence.
jtX`Y`hl|TWYZ[`iluUGGwGXXGGt SGq GY_SGYWW_GGYaW_Gwt
How to Operate Memory Cooking
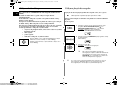
Double Quantity Pad Programming
1. Hold down
and then press
for 2 seconds.
After having finished memory programming, just press the NUMBER
pad of the memory number you want to select. The oven will
automatically start heating according to the pre-programmed cooking
time and power level.
pad. Hold together
2. Select desired program code by using NUMBER pads.
1. Make sure the oven is plugged into a properly earthed
electrical outlet and “ON” appears in the display window.
2. Open the door.
The oven lamp will be turned on.
3. Press NUMBER pads to set the magnification factor within
the range from 1.00 to 9.99.
3. Put the food into a suitable container, place it in the centre of
the oven and then close the door securely.
Result : The oven lamp will go off.
4. Press NUMBER pad.
Result : The selected memory program automatically
starts heating. But, NUMBER pad 1, 2, 3
operate after 2 seconds.
4. Press
11
Default factor is 1.65 preset from the
manufacturer for increasing the cooking time.
Make sure that you set a correct factor between
1.00 and 9.99 for each memory code number.
button.
Press pad to exit the programming mode.
Though you can successfully set a double quantity factor whose
setting might result in excess of the maximum time allowed for each
power level, the oven does not operate exceeding the maximum time.
EN
jtX`Y`hl|TWYZ[`iluUGGwGXYGGt SGq GY_SGYWW_GGYaW_Gwt
Double Quantity Pad Programming (continued)
EN
How to Operate Double Quantity Pad
1. Press the Double Quantity pad.
Double Quantity Factor Editing
Feature
Key Entry
Display
Hold down for 2 sec.
Hold down
CANCEL( ) and
then
pad.
Code No.
START(
)
If you don’t want to change
more, press CANCEL to exit the
editing mode.
Skip this step if not necessary.
(Input desired
factor value.)
Skip this step if not necessary.
CANCEL(
1.00 ~ 9.99 available (Change
the factor if required.)
New Code No.
START(
2. Press the desired memory NUMBER pad.
Result : Cooking time which was multiplied by the
preset factor appears in the display and
cooking starts with time digits counting down.
After 1 sec, default value shows
in the display window.
(Input desired
factor value.)
Double
Quantity
Factor
Edit
Remark
)
Skip this step if not necessary.
)
(Mode cancel)
This exits the editing mode.
12
You don’t need to press
heating.
button to start
jtX`Y`hl|TWYZ[`iluUGGwGXZGGt SGq GY_SGYWW_GGYaW_Gwt
Programming Air Filter Clean Time
Controlling Beep Tone
When the air filter check indicator (FILTER) appears in the display
window after a certain time of use, you should clean the air filter
according to the instructions “Cleaning the Air Filter” on page 16 in
this booklet. Then follow the procedure as below if you want to change
the air filter clean time.
You can select the beep tone you require. There are 4 sound levels
available.
Hold down CANCEL( ) and then press NUMBER 0 pad. Hold
together for 2 seconds.
Result : Beep tone is changed to one level higher than
current one.
1. Hold down PROGRAM LOCK( ) and then press
NUMBER 3 pad. Hold together for 2 seconds.
Result : The display will show the length of time in
hours between cleaning the air filter you have
programmed in or the original time preset by
the manufacturer.
Settings are circulating whenever you press the hidden
keys in the following order.
Snd 0 Snd 1 Snd 2 Snd 3 Snd 0 (No sound)
Default clean time is 500 hours in terms of pure
oscillating time, not the continuity time.
2. Press NUMBER pads to set the desired clean time.
You can set up to 999 hours.
3. Hold down PROGRAM LOCK( ) and then press
NUMBER 3 pad.
Hold together for 2 seconds in order to save the new
value.
This completes the programming of the air filter clean
time.
4. Press CANCEL(
Beep tone 0 does not make beep sound.
) pad to return to cooking mode.
.After the clean time has expired, you should
clean the air filter. See page 16.
13
Default tone is Snd 2.
EN
jtX`Y`hl|TWYZ[`iluUGGwGX[GGt SGq GY_SGYWW_GGYaW_Gwt
Error Codes
EN
Erroe Items
Code
Power
frequency Error
(50/60Hz)
E1
Error Beep
HVT-I Power
Error
E41
One long beep
for 2 sec
The circuitry inside the oven is not working Unplug the power cord and wait for 10 seconds.
correctly.
Plug the power cord in again and check if the error code “E41” appears again. If the
symptom persists, contact the nearest service centre.
HVT-II Power
Error
E42
One long beep
for 2 sec
The circuitry inside the oven is not working Unplug the power cord and wait for 10 seconds.
correctly.
Plug the power cord in again and check if the error code “E42” appears again. If the
symptom persists, contact the nearest service centre.
EEPROM Error
E5
One long beep
for 2 sec
Memory IC (EEPROM IC) is not working
correctly.
In this case, other features except for
memory function work properly.
(You can operate the oven manually)
-
Cause
Remedy
Power frequency is other than 50 Hz.
Unplug the power cord plug and check if the power frequency is 50 Hz.
Plug the power cord in 50 Hz power source and see If “E1” appears. If the error code is
displayed again even after the correct power source is provided, contact the nearest
service centre.
Press CANCEL pad one or more times and try to start a memory heating. If the error
code “E5” persists, contact your nearest service centre.
14
jtX`Y`hl|TWYZ[`iluUGGwGX\GGt SGq GY_SGYWW_GGYaW_Gwt
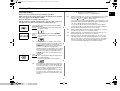
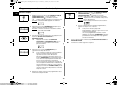
Hidden Keys
Care of Your Microwave Oven
Note: Press Key 1 and then the next one. Hold for 2 secs.
Feature
Key Entry
Display
Cleaning the Microwave Oven
1. Unplug the oven from the electrical socket before cleaning.
Remark
Key 1
Next
Continuity time
total
CANCEL
( )
1
Hold together for 2 sec.
Unit: 10 hrs.
Magnetron
oscillating time
total
CANCEL
( )
2
Hold together for 2 sec.
Unit: 1 hr.
Number of times
of use by
memory
program code
CANCEL
( )
Start
Hold together for 2 sec.
2. Clean the inside of the oven. Wipe up all spills with a damp cloth. Kitchen
detergent solution may be used if the oven gets too dirty. Do not use harsh
detergents or abrasives.
3. Clean the outside of the oven with soap and water, then dry with a soft cloth.
Caution: Make sure that water does not get into the back ventilation or
control panel opening.
Code No.
4. When you clean the window of the door, be sure to use a soft cloth after washing
with very mild soap and water. Do not use window cleaner as the front door can be
scratched by harsh soap or cleaners.
(Data display after
2 sec.)
739 times of use
(New code can be
set after data
display)
CANCEL (
Heating time per
memory
program code
(Automatic
sequential
display)
CANCEL
( )
)
(Mode Cancel)
P
Hold together for 2 sec.
(Sequentially
displays for 3 sec
from 1 to 30)
CANCEL (
If food remnant or spilled liquids stick to the oven walls, or between
door seal and door surface, they will absorb microwaves possibly
resulting in arcing or sparks.
)
(Mode Cancel)
15
EN
jtX`Y`hl|TWYZ[`iluUGGwGX]GGt SGq GY_SGYWW_GGYaW_Gwt
Care of Your Microwave Oven (continued)
EN
Cleaning the Ceiling Cover
Cleaning the Air Filter
1. Hold side stoppers of ceiling cover with both hands and pull them in and down.
Then take the ceiling cover out of the oven cavity.
Clean the Air Filter regularly according to the following instructions.
2. Rinse ceiling cover in soapy water or Food Sanitizer Solution.
The oven may have problems when the Air Filter becomes clogged with
dust.
3. Be sure to replace the ceiling cover before using the oven.
1. Remove the bolt at both ends of the Air Filter.
2. Lift the Air Filter off the post carefully.
Caution : Ceiling cover must be in place securely when you use the oven.
When you removed the Ceiling Cover for the purpose of cleaning,
be sure to be extremely careful about the exposed inside
components on the top of the oven cavity. If any of them are
deformed, abnormal symptom can happen such as arcing or sparks
during operation. In case of such problem, contact the nearest
after-sales service centre.
3. Wash this filter in warm soapy water.
4. Be sure to replace the Air Filter before using the oven.
If the Air Filter becomes clogged with debris, this will cause an
overheating problem on the oven.
If the want to change the air filter clean time, refer to “Programming Air
Filter Clean Time” in page 13.
Ceiling Cover
Bolt
16
jtX`Y`hl|TWYZ[`iluUGGwGX^GGt SGq GY_SGYWW_GGYaW_Gwt
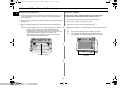
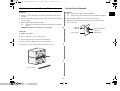
Installation Instructions for Stacking
Replacement of Lamp
Important
Important
EN
1. Remove a screw securing the lamp cover.
1. Disconnect the power cord from the wall socket before attempting installation.
2. For stacking installation, you must use the “bracket plate” which is enclosed with
this unit.
You don’t need to remove outer panel to replace lamp.
2. Remove the lamp by rotating it clockwise.
3. Replace with a new lamp by rotating it counter-clockwise.
3. The maximum stacking height is two units.
Stacking the two units is limited to the following models.
CAUTION: Be sure the oven cavity is empty.
Lamp Cover
Lamp Holder
Installation
Outer Panel
1. Stack two units together.
2. Remove 6 screws as shown in the figure.
3. Place the Bracket-plate to join the two units.
4. Attach and tighten 6 screws as shown in the figure here.
5. Ensure the top oven is at a safe and workable height.
Screw
Bracket-Plate
17
Lamp
(230V 25W)
jtX`Y`hl|TWYZ[`iluUGGwGX_GGt SGq GY_SGYWW_GGYaW_Gwt
Cookware Guide
EN
To cook food in the microwave oven, the microwaves must be able to
penetrate the food, without being reflected or absorbed by the dish
used.
Care must therefore be taken when choosing the cookware. If the
cookware is marked microwave-safe, you do not need to worry.
The following table lists various types of cookware and indicates
whether and how they should be used in a microwave oven.
Cookware
Microwave- Comments
Safe
Aluminium foil
Porcelain, pottery, glazed earthenware
and bone china are usually suitable,
unless deco-rated with a metal trim.
Disposable polyester
cardboard dishes
Some frozen foods are packaged in
these dishes.
Can be used to warm food. Overheating
may cause the polystyrene to melt.
May catch fire.
May cause arcing.
Can be used, unless decorated with a
metal trim.
Can be used to warm foods or liquids.
Delicate glass may break or crack if
heated suddenly.
Must remove the lid. Suitable for warming
only.
Glassware
• Oven-to-table ware
•
Fine glassware
•
Glass jars
Metal
•
•
Paper
•
•
Dishes
Freezer bag twist
ties
Plates, cups,
napkins and
Kitchen paper
Recycled paper
May cause arcing or fire.
For short cooking times and warming.
Also to absorb excess moisture.
May cause arcing.
Cling film
•
Freezer bags
18
•
Wax or grease-proof paper
Can be used in small quantities to protect
areas against overcooking. Arcing can
occur if the foil is too close to the oven
wall or if too much foil is used.
China and earthenware
Fast-food packaging
• Polystyrene cups
containers
• Paper bags or
newspaper
• Recycled paper or
metal trims
Plastic
• Containers
: Recommended
: Use Caution
: Unsafe
Particularly if heat-resistant
thermoplastic. Some other plastics may
warp or discolour at high temperatures.
Do not use Melamine plastic.
Can be used to retain moisture. Should
not touch the food. Take care when
removing the film as hot steam will
escape.
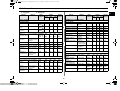
Only if boilable or oven-proof. Should not
be airtight. Prick with a fork, if necessary.
Can be used to retain moisture and
prevent spattering.
jtX`Y`hl|TWYZ[`iluUGGwGX`GGt SGq GY_SGYWW_GGYaW_Gwt
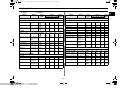
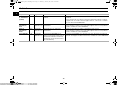
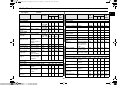
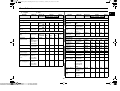
Cooking Guide
F : Frozen
Recipe
C : Chilled
Method
Power
Level
EN
Timing
Stand
1850W 1600W 1300W Time
Recipe
BREAD & PASTRIES
Method
Power
Timing
Stand
Level 1850W 1600W 1300W Time
SNACK & STARTERS
To Defrost
To Reheat
Vienna Baton 9" F
DEFROST 0'45"
1( )
0'50"
0'50"
5 mins
Sausages Cumberland Place on plate MED
F
Vienna Baton 9" X 2
F
DEFROST 1'10"
1( )
1'15"
1'20"
5 mins
Full breakfast C
Gateaux, ind. Slice F Place on plate DEFROST 2'30"
2( )
2'40"
2'50"
5 mins
To warm
Quiche 11" sliced
136g
Place on plate DEFROST 3'00"
1( )
HIGH
0'40"
2'10"
2'20"
2 mins
MED
2'30"
2'40"
2'50"
1 min
Beefburgers F
HIGH
0'55"
1'05"
1'10"
1 min
Chickenburger F
HIGH
0'55"
1'05"
1'10"
1 min
Donner kebab 162g F
HIGH
1'00"
1'10"
1'20"
1 min
Hot Dog F
HIGH
1'00"
1'10"
1'20"
1 min
3'00"
3'00"
1 min
Place on plate LOW
2'30"
2'45"
3'00"
2 mins
0'45"
0'50"
1 min
Chargrilled ribs 200g F Place on plate MED
3'30"
3'45"
4'00"
1 min
0'15"
1 min
Wings of fire X 6 F
Arrange on
HIGH
plate, thin
parts to center
2'00"
2'15"
2'30"
1 min
Baked Beans 500g
Cover and Stir HIGH
half way
2'00"
2'10"
2'20"
2 mins
Cover and Stir HIGH
half way
1'00"
1'05"
1'10"
2 mins
Pizza 190g F
Mince pies ind. X 2 F Remove from HIGH
tin foil Place on
plate
0'10"
0'15"
Fruit pie F
Place on plate HIGH
0'40"
0'45"
0'45"
1 min
Croissant X 2 F
Place on plate HIGH
0'05"
0'10"
0'10"
1 min
Pastry, baked 227g
C
Place on plate HIGH
0'45"
0'55"
1'00"
1 min
Baked Beans 250g
Chicken &
Remove foil.
HIGH
mushroom pie X 2 C Place on plate
0'45"
0'55"
1'00"
1 min
DESSERTS
Chicken &
mushroom pie C
0'30"
0'40"
0'45"
1 min
Place on plate, HIGH
remove foil
Cover
2'00"
To warm
SNACK & STARTERS
To cook
Apple Crumble 200g F Cover in dish
HIGH
1'20"
1'30"
1'40"
2 mins
Christmas Pudding
150g C
HIGH
0'20"
0'25"
0'30"
2 mins
2 mins
Place in bowl
Jam Roly Poly 80g F
On a plate
HIGH
1'00"
1'05"
1'10"
Bacon, rasher C
Place on rack
HIGH
1'30"
1'40"
1'50"
1 min
Crepes Suzette 2 F
Pierce film
HIGH
0'50"
1'00"
1'10"
1 min
Eggs, poached X 2
C
Place in
ramekins
HIGH
0'30"
0'40"
0'45"
1 min
Suet Sponge pudding
F
X2
X1
HIGH
HIGH
0'35"
0'40"
1'05"
0'50"
1'30"
1'00"
2 mins
2 mins
Sponge pudding F
X2
X1
HIGH
HIGH
0'35"
0'40"
1'05"
0'45"
1'30"
0'45"
2 mins
2 mins
Eggs, scrambled X2 Beat eggs and HIGH
C
place in bowl
25"-30" 30"-40" 35"-45" 1 min
Sausages X 2 Thick Pierce
C
1'00"
MED
1'10"
1'20"
2 mins
19
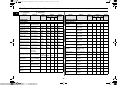
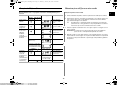
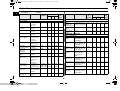
jtX`Y`hl|TWYZ[`iluUGGwGYWGGt SGq GY_SGYWW_GGYaW_Gwt
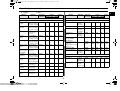
Cooking Guide (continued)
EN
F : Frozen
Recipe
C : Chilled
Method
Power
Level
Timing
Stand
1850W 1600W 1300W Time
Recipe
RECIPE DISH ENTREES
Method
Power
Timing
Stand
Level 1850W 1600W 1300W Time
FRESH VEGETABLES
To Reheat
To cook 500g
Amorini & Stilton
bake C
Place in
microwave
safe dish
HIGH
3'30"
3'40"
3'50"
1 min
Chicken Tikka
masala F
Pierce film
HIGH
3'20"
3'30"
3'40"
2 mins
Thai Green Chicken Pierce film
curry F
HIGH
3'00"
3'15"
3'30"
2 mins
Chilli con Carne F
HIGH
3'30"
3'45"
4'00"
2 mins
Chicken cooked 1/ Place in m/w in MED
4'30"
5'00"
5'30"
Pierce film
Beans, green sliced
60ml/4tbsps
water cover
HIGH
3'00"
3'15"
3'30"
2 mins
Brocolli, florets
60ml/4tbsps
water cover
HIGH
3'00"
3'15"
3'30"
2 mins
Cabbage, shredded
10tbsps water HIGH
cover
5'00"
5'30"
6'00"
2 mins
Carrots, sliced
60ml/4tbsps
water cover
HIGH
3'30"
3'45"
4'00"
2 mins
2 mins
Cauliflower, florets
60ml/4tbsps
water cover
HIGH
3'30"
3'45"
4'00"
2 mins
Whole Green beans
60ml/4tbsps
water cover
HIGH
3'30"
3'45"
4'00"
2 mins
2 Chilled
pierced bag
Lasagne 192g
Place in
microwave
safe dish
MED
4'00"
4'15"
4'30"
2 mins
Potatoes, jacket
Turn half way
HIGH
10'00”
11'00”
12'00”
5 mins
Moules Marinieres
466g F
Pierce bag
HIGH
2'30"
2'45"
3'00"
2 mins
Sprouts
60ml/4tbsps
water cover
HIGH
4'30"
4'45"
5'00"
2 mins
Salmon & Avacodo
Paupiette C
Pierce bag
HIGH
2'30"
2'45"
3'00"
2 mins
Beans, green sliced
3'00"
3'15"
3'30"
2 mins
Shepherd's pie 300g Place in oven
C
and cover
MED
3'00"
3'15"
3'30"
2 mins
Cover, stir half HIGH
way through
cooking
Beans, whole
4'15"
4'30"
2 mins
Cover - place
upright on
microwave
safe plate
LOW
4'00"
4'20"
4'40"
2 mins
Cover, stir half HIGH
way
4'00"
Suet puddings
chilled
Brocolli Florets
Cover, stir half HIGH
way
4'00"
4'15"
4'30"
2 mins
Supreme of chicken
in red pesto 312g F
Pierce bag
DEFROST 5'00"
place on plate 1( )
HIGH
3'30"
Cabbage, shredded
Cover, stir half HIGH
way
4'00"
4'15"
4'30"
2 mins
Carrot batons
Cover, stir half HIGH
way
4'00"
4'15"
4'30"
2 mins
Cauliflower, florets
Cover, stir half HIGH
way
4'00"
4'15"
4'30"
2 mins
Corn on the Cob
Cover
HIGH
4'00"
4'30"
5'00"
2 mins
Corn, whole baby
Cover, stir half HIGH
way
5'00"
5'15"
5'30"
2 mins
Mushrooms, whole
Cover, stir half HIGH
way
3'00"
3'15"
3'30"
2 mins
5'00"
5'00"
3'45"
4'00"
1 min
Tagliatelle carbonara Pierce film,
HIGH
C
place on plate
1'40"
2'00"
2'20"
1 min
Tortellini formaggio
C
2'00"
2'15"
2'30"
1 min
Place in dish
and cover
HIGH
Vegetable
Cumberland Pie C
Place in
microwave
safe dish
HIGH
3'20"
3'35"
3'50"
1 min
Plated Meal 350g C
Covered
HIGH
2'00"
2'15"
2'30"
1 min
Plated Meal 700g C
Covered
HIGH
3'00"
3'15"
3'30"
1 min
20
jtX`Y`hl|TWYZ[`iluUGGwGYXGGt SGq GY_SGYWW_GGYaW_Gwt
Cooking Guide (continued)
F : Frozen
Recipe
Cleaning Your Microwave Oven
The following parts of your microwave oven should be cleaned
regularly to prevent grease and food particles from building up:
C : Chilled
Method
Power
Level
Timing
Stand
1850W 1600W 1300W Time
•
•
•
FRESH VEGETABLES
To cook 500g
Potatoes, jacket
230~290g X 1
HIGH
3'00"
4'00"
4'30"
2 mins
Potatoes, Mashed X 2
Potatoes, Mashed X 4
HIGH
HIGH
6'00"
10'00"
6'30"
11'15"
7'00"
12'30"
2 mins
2 mins
Ratatouille 500g
HIGH
3'30"
4'00"
4'30"
2 mins
Cover, stir
half way
HIGH
3'00"
3'30"
4'00"
2 mins
Rice, boiled F
Cover, stir
half way
HIGH
3'00"
3'15"
3'30"
2 mins
Rice, Pilau F
Cover, stir
half way
HIGH
3'00"
3'15"
3'30"
2 mins
Sprouts
Inside and outside surfaces
Door and door seals
Plate tray
ALWAYS ensure that the door seals are clean and the door
closes properly.
Failure to maintain the oven in a clean condition could lead to
deterioration of the surface that could adversely affect the of the
appliance and possibly result in a hazardous situation.
1. Clean the outside surfaces with a soft cloth and warm, soapy water.
Rinse and dry.
RICE, 500g
To Reheat
2. Remove any splashes or stains on the inside surfaces with a soapy cloth.
Rinse and dry.
3. To loosen hardened food particles and remove smells, place a cup of diluted
lemon juice on the plate tray and heat for three minutes at maximum power.
DO NOT spill water in the vents.
NEVER use any abrasive products or chemical solvents.
Take particular care when cleaning the door seals to ensure that no
particles:
•
•
21
Accumulate
Prevent the door from closing correctly
Clean the microwave oven cavity right after each use with a mild
detergent solution, but let the microwave oven cool down before
cleaning in order to avoid injury .
EN
jtX`Y`hl|TWYZ[`iluUGGwGYYGGt SGq GY_SGYWW_GGYaW_Gwt
Technical Specifications
A few simple precautions should be taken when storing or having your
microwave oven serviced.
The oven must not be used if the door or door seals are damaged:
• Broken hinge
• Deteriorated seals
• Distorted or bent oven casing
Only a qualified microwave service technician should perform repairs.
SAMSUNG strives to improve its products at all times. Both the design
specifications and these user instructions are thus subject to change
without notice.
Model
CM1629A
Output power
Unplug it from the wall socket
Contact the nearest after-sales service centre
3200 W
3000 W
2600 W
1850 W
(IEC-705)
1600W
(IEC-705)
1300W
(IEC-705)
Operating frequency
If you wish to store your oven away temporarily, choose a dry, dustfree place.
Reason: Dust and damp may adversely affect the working parts in
2, 450 MHz
Dimensions (W x H x D)
Outside
Oven cavity
the oven.
464 x 368 x 557 mm
370 x 190 x 370 mm
Volume
26 litre
Weight
Net
32 Kg approx.
464
CM1329A
230 V ~ 50 Hz
Power consumption
Microwave
NEVER remove the outer casing from the oven. If the oven is
faulty and needs servicing or you are in doubt about its condition:
•
•
CM1929A
Power source
43
557
530
26
1000
368
EN
Storing and Repairing Your Microwave Oven
10
22
444
486
514
jtX`Y`hl|TWYZ[`iluUGGwGYZGGt SGq GY_SGYWW_GGYaW_Gwt
Note
EN
23
jtX`Y`hl|TWYZ[`iluUGGwGY[GGt SGq GY_SGYWW_GGYaW_Gwt
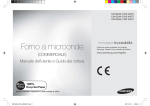
jtX`Y`hl|TWYZ[`iklUGGwGXGGt SGq GY_SGYWW_GGYaW`Gwt
MIKROWELLENGERÄT
(HANDEL)
Bedienungsanleitung und Kochleitfaden
CM1929A (1850 Watt)
CM1629A (1600 Watt)
CM1329A (1300 Watt)
P
1
2
3
4
5
6
7
8
9
+ 20sec
Kode Nr. : DE68-02349B
0
Das Mikrowellengerät.............................................................................2
Bedienfeld ............................................................................................2
Verwendung dieser Bedienungsanleitung .............................................3
Sicherheitshinweise................................................................................3
Installation Ihres Mikrowellengeräts .......................................................4
Aufwärmen/Garen ..................................................................................5
Leistungsstufen und Zeitvariationen ......................................................6
Den Garvorgang unterbrechen ..............................................................7
Wiederholfunktion...................................................................................7
Benutzen der +20sec Taste ...................................................................8
Die Funktion Auftauen............................................................................8
Programmieren der Speichertasten .......................................................9
Garen mit dem Speicher ......................................................................11
Programmieren der Doppelmengentaste.............................................11
Garen mit der Doppelmengentaste ....................................................12
Programmieren des Luftfilter-Reinigungsintervalls ..............................13
Einstellen des akustischen Signals ......................................................13
Fehlerkode ...........................................................................................14
Versteckte Tasten ................................................................................15
Pflege Ihres Mikrowellengeräts ............................................................15
Installationsanweisungen für Stapeln...................................................17
Auswechseln der Lampe......................................................................17
Leitfaden für Kochgeschirr ...................................................................18
Kochleitfaden........................................................................................19
Reinigung Ihres Mikrowellengeräts ......................................................22
Lagerung und Reparatur Ihres Mikrowellengeräts...............................23
Technische Daten ................................................................................23
jtX`Y`hl|TWYZ[`iklUGGwGYGGt SGq GY_SGYWW_GGYaW`Gwt
Das Mikrowellengerät
DE
Bedienfeld
1
GARRAUM-LAMPE
(230V 25W)
GARRAUMLAMPENABDECKUNG
2
BEDIENFELD
DISPLAY
P
2
3
4
5
6
7
8
9
0
+ 20sec
P
1
2
3
4
5
6
7
8
9
3
0
+ 20sec
1.
2.
3.
4.
DECKENABDECKUNG
5.
6.
7.
8.
9.
10.
LUFTFILTER
TÜRRIEGEL
1
STARTTASTE
TÜRGRIFF
TÜR
4
TELLERROST
SICHERHEITSVERRIEGELUNGSÖFFNUNGEN
5
6
7
8
9
10
DISPLAY
PROGRAMMTASTE
PROGRAMMSPERRTASTE
ZIFFERNTASTEN (Zeit,
Speicherprogrammierung)
LEISTUNGSWAHLTASTE
AUFTAUWAHLTASTE
DOPPELMENGENTASTE
+20sec TASTE (One-Touch Gartaste)
STOP-/LÖSCHTASTE
STARTTASTE
DISPLAY
PROGRAMMANZEIGE
LUFTFILTERPRÜF
ANZEIGE
ZEITANZEIGE
SPEICHERTASTENNUMMERN
ANZEIGE
DATENPRÜF
ANZEIGE
DOPPELMENGEN
ANZEIGE
NETZPRÜFANZEIGE
(Erscheint sie,
funktioniert Garen nicht)
2
LEISTUNGSANZEIGEN
AUFTAUANZEIGEN
jtX`Y`hl|TWYZ[`iklUGGwGZGGt SGq GY_SGYWW_GGYaW`Gwt
Verwendung dieser Bedienungsanleitung
Sicherheitshinweise
Sie haben soeben ein SAMSUNG-Mikrowellengerät erworben. Ihre
Bedienungsanleitung enthält wertvolle Informationen über das Garen
mit Ihrer Mikrowelle:
• Sicherheitshinweise
• Geeignetes Zubehör und Kochgeschirr
• Nützliche Küchentips
Vorne in Ihrem Bedienungsheft finden Sie Abbildungen Ihres
Mikrowellengeräts und, was noch wichtiger ist, das Bedienfeld, damit
Sie die entsprechenden Tasten schneller finden.
WICHTIGE HINWEISE ZUR SICHERHEIT! LESEN SIE DIE
FOLGENDEN HINWEISE AUFMERKSAM DURCH, UND BEWAHREN
SIE SIE SO AUF, DASS SIE SIE SPÄTER SCHNELL WIEDERFINDEN.
Stellen Sie vor dem Erhitzen von Nahrungsmitteln oder Flüssigkeiten
im Mikrowellenherd sicher, dass die folgenden Sicherheitshinweise
beachtet wurden.
WARNUNG:
Wenn die Herdtür oder die Türscharniere beschädigt sind, darf der Mikrowellenherd
bis zur Reparatur durch sachkundiges Fachpersonal nicht verwendet werden.
WARNUNG:
Wartungs- oder Reparaturarbeiten, für die eine Schutzabdeckung gegen
Mikrowellenstrahlung entfernt werden muss, dürfen nur von sachkundigem
Fachpersonal ausgeführt werden.
Die Schritt-für-Schritt-Verfahren verwenden zwei verschiedene
Symbole:
Wichtig
Bemerkung
WARNUNG:
Flüssigkeiten und andere Nahrungsmittel dürfen nicht in luftdicht verschlossenen
Behältnissen erhitzt werden, da diese explodieren können.
WARNUNG:
Beim Erhitzen von Getränken im Mikrowellenherd kann es zu verzögertem
Sieden und damit verbundenem Spritzen kommen. Halten Sie deshalb nach dem
Ausschalten des Mikrowellenherds IMMER eine Ruhezeit von mindestens
20 Sekunden ein, damit ein Temperaturausgleich stattfinden kann.
Rühren Sie die Nahrungsmittel bei Bedarf während des Erhitzens, jedoch IMMER
nach dem Erhitzen um.
Befolgen Sie bei Verbrühungen die nachstehenden ERSTE HILFE-Anweisungen:
* Halten Sie die verbrühte Körperstelle mindestens 10 Minuten unter
kaltes Wasser.
* Bedecken Sie die Wunde mit einem sauberen, trockenen Verband.
* Tragen Sie keine Cremes, Öle oder Lotionen auf.
SICHERHEITSHINWEISE ZUR VERMEIDUNG DES KONTAKTS
MIT MIKROWELLENSTRAHLUNG
Die Nichtbeachtung der folgenden Sicherheitshinweise führt möglicherweise
dazu, dass Sie schädlicher Mikrowellenstrahlung ausgesetzt sind.
(a) Es darf unter keinen Umständen versucht werden, den Mikrowellenherd bei
geöffneter Tür zu betreiben, eigenmächtige Änderungen an der
Sicherheitsverriegelung (oder den Türriegeln) vorzunehmen oder
Gegenstände in die Vertiefungen der Sicherheitsverriegelung einzuführen.
(b) Sorgen Sie dafür, dass sich keine Gegenstände zwischen Gerätevorderseite
und Herdtür befinden. Die Dichtungsflächen der Herdtür dürfen nicht mit
Essensresten oder Reinigungsmittelrückständen verschmutzt sein. Stellen Sie
sicher, dass die Herdtür und die entsprechenden Dichtungsflächen sauber
sind, indem Sie sie nach der Benutzung des Mikrowellenherds zuerst mit
einem feuchten und anschließend mit einem trockenen, weichen Lappen
abwischen.
(c) Bei Beschädigung des Mikrowellenherds darf dieser bis zur Reparatur durch
Fachpersonal vom Kundendienst für Mikrowellen nicht in Betrieb genommen
werden. Es ist besonders wichtig, dass die Herdtür ordnungsgemäß schließt
und folgende Teile nicht beschädigt sind:
(1) Tür (verbogen)
(2) Türscharniere (nicht beschädigt oder locker)
(3) Türverriegelungen und Dichtungsflächen
(d) Die Reparatur des Mikrowellenherds darf nur von entsprechend geschultem
Fachpersonal vom Kundendienst für Mikrowellen ausgeführt werden.
WARNUNG:
Babynahrung in Flaschen und Gläsern muss vor dem Füttern gut geschüttelt
bzw. durchgerührt und auf Temperaturverträglichkeit kontrolliert werden, um
Verbrennungen zu vermeiden.
• Verwenden Sie nur Kochzubehör, das für den Einsatz im Innern von
Mikrowellenherden geeignet ist;
NICHT VERWENDEN: Metallbehälter, Essgeschirr mit Gold- oder
Silberrand, Spieße, Gabeln usw. Entfernen Sie Drahtverschlüsse von
Papier- oder Plastiktüten.
Grund:
Es kann zu einer elektrischen Funkenbildung kommen, wodurch
der Mikrowellenherd unter Umständen beschädigt wird.
• Lassen Sie die Mikrowelle nicht unbeaufsichtigt, wenn Sie Nahrungsmittel
in Plastik- oder Papierbehältern erhitzen, da die Gefahr besteht, dass sich
die Behälter entzünden. Verwenden Sie den Mikrowellenherd nicht zum
Trocknen von Zeitungen oder Kleidung.
• Bei kleineren Nahrungsmengen nehmen auch die Koch- bzw. Aufwärmzeiten
ab. Wenn Sie die normalen Zeiten anwenden, kann es zu Überhitzung und
Verbrennung kommen.
• Bei Rauchentwicklung im Gerät halten Sie die Herdtür geschlossen und
schalten das Gerät aus bzw. unterbrechen die Stromversorgung.
• Füllen Sie das Behältnis NIEMALS bis zum Rand, und verwenden Sie ein
Behältnis, das oben breiter ist als unten, damit Flüssigkeiten nicht überkochen.
Auch Flaschen mit engen Flaschenhälsen können bei Überhitzung explodieren.
3
DE
jtX`Y`hl|TWYZ[`iklUGGwG[GGt SGq GY_SGYWW_GGYaW`Gwt
Sicherheitshinweise (Fortsetzung)
DE
Installation Ihres Mikrowellengeräts
Dieses Mikrowellengerät kann praktisch überall aufgestellt werden
(Küchenarbeitsfläche oder Küchenregal, Teewagen, Tisch).
•
Erhitzen Sie eine Babyflasche NIEMALS, solange der Sauger darauf
befestigt ist, da die Flasche sonst bei Überhitzung explodieren kann.
• Kochen Sie Eier nie in der Schale, und wärmen Sie hart gekochte Eier
niemals in der Schale auf. Sie könnten anderenfalls explodieren, selbst
nachdem das Wärmen in der Mikrowelle abgeschlossen ist.
Luftdichte oder vakuumversiegelte Flaschen, Gläser und Behälter sowie
Nüsse mit Schale, Tomaten usw. dürfen nicht erwärmt werden.
• Der Ofen sollte regelmäßig gereinigt und eventuelle Essensrückstände
entfernt werden.
• Wenn der Mikrowellenherd nicht sauber gehalten wird, kann die Oberfläche
beschädigt werden. Dies wirkt sich unter Umständen nachteilig auf die
Funktionsteile des Mikrowellenherds aus und verursacht Gefahren.
• Das Gerät darf nicht mit einem Wasserstrahl gereinigt werden.
• Bedecken Sie die hinteren Belüftungsschlitze NICHT mit Stoff oder Papier. Sie
könnten Feuer fangen, da heiße Luft aus dem Herd nach außen geleitet wird.
Anderenfalls kann es zu einer Überhitzung des Mikrowellenherds kommen,
sodass dieser sich dann automatisch abschaltet. Der Mikrowellenherd kann
danach nicht mehr in Betrieb genommen werden, bis er ausreichend abgekühlt ist.
• Um versehentliche Verbrennungen zu verweiden, verwenden Sie IMMER
Ofenhandschuhe, wenn Sie ein Gefäß aus dem Mikrowellenherd nehmen.
• Das Netzkabel darf nicht mit Wasser oder heißen Flächen in Berührung
kommen. Nehmen Sie dieses Gerät nicht in Betrieb, wenn das Netzkabel
oder der Netzstecker beschädigt ist.
• Stehen Sie beim Öffnen des Mikrowellenherds eine Armlänge entfernt.
Grund:
Die entweichende heiße Luft oder der heiße Dampf kann zu
Verbrühungen führen.
• Beim Betrieb des Mikrowellenofens sind möglicherweise klickende
Geräusche zu hören (insbesondere beim Auftauen).
Grund:
Diese Geräusche sind bei elektrischen Änderungen der
Leistungsstufe nicht ungewöhnlich.
• NIEMALS den Mikrowellenherd bei leerem Garraum einschalten. In diesem
Fall wird die Stromversorgung aus Sicherheitsgründen abgeschaltet. Nach
einer Ruhezeit von mehr als 30 Minuten kann das Gerät wieder normal in
Betrieb genommen werden. Am besten lassen Sie immer ein Glas Wasser im
Mikrowellenherd stehen. Das Wasser absorbiert die Mikrowellenenergie, falls
Sie den Herd versehentlich einschalten.
1. Stellen Sie das Gerät auf einer flachen, ebenen stabilen Oberfläche auf.
Wenn Sie Ihr Mikrowellengerät installieren, überzeugen Sie sich, dass das
Gerät ausreichend Luftzufuhr hat, indem Sie nach hinten und zu beiden
Seiten mindestens 10 cm Freiraum und nach oben mindestens 20 cm
Freiraum lassen.
(Für das Stapeln, siehe Seite 17.)
2. Verstopfen Sie niemals die Lüftungsöffnungen, da sich das Gerät sonst
überhitzen kann und sich automatisch ausschaltet. Es läßt sich erst wieder in
Betrieb nehmen, wenn es genügend abgekühlt ist.
3. Entnehmen Sie alles Verpackungsmaterial aus dem Gerät.
4. Schließen Sie das Kabel an eine 3-polige geerdete Steckdose an. Wenn das
Netzkabel dieses Geräts beschädigt ist, muß es durch ein Spezialkabel ersetzt
werden. Wenden Sie sich zum Austausch des Kabels an Ihren Fachhändler oder
einen vergleichbaren Fachmann.
5. Stellen Sie das Mikrowellengerät so, dass der Stecker frei zugänglich ist.
•
•
Entfernen Sie die Schutzfolie außen am Gehäuse. Die Schutzfolie dient
der Verhinderung von Kratzern. Die Schutzfolie muss vor der Installation
oder Benutzung unbedingt entfernt werden.
Benutzung im Freien
Dieses Mikrowellengerät ist nicht für eine Benutzung im Freien geeignet.
Sie dürfen das Gerät nur innerhalb von Räumen benutzen.
WICHTIG
•
Für Ihre persönliche Sicherheit muss das Gerät:
• Korrekt geerdet sein (3-Stift Stecker)
• An eine geerdete Standardsteckdose 230 Volt, 50 Hz,
Wechselstrom angeschlossen werden
Während des Abkühlens
Trennen Sie das Gerät nicht vom Netz, während das Kühlgebläse zum Abkühlen
automatisch 1 Minute läuft.
Kleine Kinder dürfen NIEMALS den Mikrowellenherd einschalten oder mit
diesem spielen. Darüber hinaus sollten Kleinkinder nie ohne Aufsicht
Erwachsener in der Nähe des Geräts bleiben, wenn dieses in Betrieb ist.
Legen Sie Spielzeug oder ähnliche Dinge von Interesse für Kinder
niemals auf dem Mikrowellenherd oder in seiner Nähe ab.
Dieses Gerät sollte nicht von Personen (auch Kindern) mit verminderten
körperlichen, sensorischen oder geistigen Fähigkeiten oder einem Mangel
an Erfahrung und Wissen bedient werden. Von dieser Regel darf nur
abgewichen werden, wenn diese Personen unter Aufsicht stehen oder
durch eine für ihre Sicherheit verantwortliche Person eine Unterweisung
zur Bedienung des Geräts erhalten haben.
Kinder müssen beaufsichtigt werden, damit sie nicht mit dem Gerät
spielen können.
Empfehlungen
4
Installieren Sie das Mikrowellengerät nicht in heißer oder feuchter
Umgebung.
Beispiel: Neben einem Backofen oder Heizkörper.
Die Netzanschlußdaten des Geräts müssen beachtet werden, jedes
Verlängerungskabel muß denselben Standard aufweisen wie das mit dem
Gerät gelieferte Netzkabel.
Wischen Sie Garraum und Türdichtung mit einem feuchten Tuch ab,
bevor Sie Ihr Mikrowellengerät erstmals in Betrieb nehmen.
jtX`Y`hl|TWYZ[`iklUGGwG\GGt SGq GY_SGYWW_GGYaW`Gwt
Aufwärmen/Garen
Einstufiges Kochen
Dieses Gerät wurde im Werk auf automatischen Betrieb eingestellt.
Vergewissern Sie sich, dass das Gerät an eine korrekt geerdete
Steckdose angeschlossen ist und das Display "ON" anzeigt.
Öffnen Sie die Tür (die Beleuchtung schaltet sich ein).
Geben Sie das Gargut in ein geeignetes Behältnis, stellen Sie es in die
Mitte des Garraums, und schließen Sie die Tür (die Beleuchtung
erlischt)
3. Drücken Sie die Taste
:
Ergebnis: Die Beleuchtung und das Kühlgebläse schalten
sich ein. Das Garen beginnt.
Der Ablauf der Zeit wird in der Digitalanzeige
angezeigt.
1. Wählen Sie die gewünschte Leistungsstufe durch
Drücken der Leistungswahltaste.
Ergebnis: Die gewählte Leistungsstufe wird im Display
angezeigt.
2. Stellen Sie die gewünschte Garzeit durch Drücken der
ZIFFERNTASTEN ein.
Ergebnis: Die gewählte Zeit wird im Display angezeigt.
Nach Ablauf der Zeit, ertönt viermal das akustische
Signal und der Garvorgang ist beendet. Die
Beleuchtung erlischt. Im Display wird für 1 Minute ‘0‘
angezeigt, und das Kühlgebläse läuft, um die
Innenteile abzukühlen.
Während dieses Zeitraums läuft das Gebläse auch,
wenn Sie die Tür öffnen. Nach Ablauf 1 Minute
stoppt es und im Display wird wieder "ON"
angezeigt. Das Gargut kann bei laufendem Gebläse
aus dem Garraum entnommen werden.
4. Öffnen Sie die Tür, und entnehmen Sie das Gargut.
Schließen Sie die Tür. Die Beleuchtung erlischt.
Die NUMMERN-Tasten reagieren nicht, wenn die
von Ihnen eingegebene Zeit den Höchstwert
übersteigt. Es ist nicht möglich, eine Zeit
einzustellen, die die vorgegebene Höchstdauer des
gewählten Programms überschreitet. Es wird daher
empfohlen, die Taste ABBRECHEN zu betätigen
und eine neue Leistungsstufe mit neuer Garzeit
einzugeben.
5
Während des Garvorgangs schaltet ein Druck auf die
Taste den
Betrieb des Geräts aus. Die Netzanzeige "ON" beginnt zu blinken und
erlischt, sobald die
Taste oder die
Taste gedrückt wird.
Sie können den Garvorgang fortsetzen, indem Sie die
Taste drücken.
Drücken Sie ein zweites Mal die
Taste, wird das gewählte Programm
gelöscht. Ist das Gerät NICHT in Betrieb, löscht ein einmaliges Drücken
der
Taste das gewählte Programm.
Sie können die Taste +20sec einmal oder mehrere Male drücken, um die
Garzeit um jeweils 20 Sekunden zu erhöhen. Sie können jedoch nicht die
für die gewählte Leistungsstufe zulässige Höchstzeit überschreiten.
Beim ersten Einstecken des Netzkabels ertönt das akustische Signal und
alle Anzeigen werden für 5 Sekunden im Display angezeigt.
Öffnen Sie nach Ablauf des Garvorgangs die Tür, schaltet sich
automatisch die Beleuchtung ein und erlischt nach 1 Minute.
Öffnen Sie die Tür während eines Garvorgangs, wird der Betrieb des
Geräts unterbrochen, und die Beleuchtung schaltet sich automatisch ein
und erlischt nach 1 Minute. Lassen Sie die Tür des Geräts länger als 1
Minute geöffnet, ertönt jede Minute ein akustisches Signal und nach 5
Minuten wird im Display die Netzanzeige "ON" angezeigt.
DE
jtX`Y`hl|TWYZ[`iklUGGwG]GGt SGq GY_SGYWW_GGYaW`Gwt
DE
Aufwärmen/Garen(Fortsetzung)
Leistungsstufen und Zeitvariationen
Mehrstufiges Kochen
Mit der Leistungsstufenfunktion können Sie die Energiemenge und
somit die für das Garen oder Aufwärmen erforderliche Zeit an Art und
Menge des Garguts anzupassen. Sie können zwischen fünf
Leistungsstufen wählen:
1. Wählen Sie mit der Taste LEISTUNGSSTUFE oder
AUFTAUEN die gewünschte Leistungsstufe.
Ergebnis: Die gewählte Leistungsstufe erscheint auf dem
Display.
CM1929A
Leistungsstufe
2. Stellen Sie mit den NUMMERN-Tasten die gewünschte Garbzw. Auftauzeit ein.
Ergebnis: Die gewählte Zeit erscheint auf dem Display.
HOCH ( )
MITTEL ( )
NIEDRIG ( )
AUFTAUEN HOCH
( )
AUFTAUEN NIEDRIG
( )
Die NUMMERN-Tasten reagieren nicht, wenn die
von Ihnen eingegebene Zeit den Höchstwert
übersteigt. Es ist nicht möglich, eine Zeit
einzustellen, die die vorgegebene Höchstdauer des
gewählten Programms überschreitet. Es wird daher
empfohlen, die Taste ABBRECHEN zu betätigen
und eine neue Leistungsstufe mit neuer Garzeit
einzugeben.
CM1329A
Prozen- Ausgab- Prozen- Ausgab- Prozen- Ausgabtsatz
eleistung
tsatz eleistung tsatz eleistung
100 %
70 %
50 %
20 %
1850 W
1295 W
925 W
370 W
100 %
70 %
50 %
25 %
1600 W
1120 W
800 W
400 W
100 %
70 %
50 %
30 %
1300 W
910 W
650 W
390 W
10 %
185 W
13 %
208 W
15 %
195 W
Die in den Rezepten und in dieser Broschüre angegebenen Garzeiten
gelten für die jeweils angeführte Leistungsstufe.
Leistungsstufe
HOCH ( )
MITTEL ( )
NIEDRIG ( )
AUFTAUEN HOCH ( )
AUFTAUEN NIEDRIG ( )
3. Wiederholen Sie den ersten und zweiten Schritt für das
Programmieren der Speicherfunktion der Stufe II oder III.
4. Drücken Sie die Taste:
:
Ergebnis: Ofenlampe und Kühlgebläse beginnen zu laufen.
Der Ofen beginnt entsprechend der zuvor
festgelegten Erwärmzeit und Leistungsstufe
automatisch mit dem Aufwärmen (Stufe I –
Stufe II – Stufe III).
Die Zeit auf der Digitalanzeige beginnt
rückwärts zu zählen.
CM1629A
Es können nicht glechzeitig LEISTUNGSSTUFE und AUFTAUEN
eingestellt werden.
Dies funktioniert als Einstellsequenz.
6
Max. Zeit
25 Min.
40 Min.
40 Min.
50 Min.
50 Min.
jtX`Y`hl|TWYZ[`iklUGGwG^GGt SGq GY_SGYWW_GGYaW`Gwt
Den Garvorgang unterbrechen
Wiederholfunktion
1. Sie können die vorherige Gareinstellung (ungeachtet
dessen, ob manuelles oder automatisches Garen mit
Speicher) durch Drücken der STARTTASTE ( )
wiederholen. Das Gerät startet mit exakt der gleichen
Garzeit und Leistungsstufe, die im letzten Garvorgang
benutzt wurden.
Sie können den Garvorgang jederzeit unterbrechen, damit Sie:
• Das Gargut prüfen können
• Das Gargut wenden oder umrühren können
• Das Garen beenden können um zu Nachgaren
Um den Garvorgang...
Dann...
kurzzeitig zu unterbrechen:
Öffnen Sie die Tür.oder drücken Sie die Taste
einmal.
Ergebnis: Der Garvorgang wird unterbrochen.
2. Die Wiederholfunktion wird gelöscht, sobald das Gerät vom
Netz getrennt wird.
Um ihn fortzusetzen, schließen Sie die Tür
und drücken Sie nochmals die Taste
.
zu beenden:
Drücken Sie zweimal die Taste
.
Ergebnis: Die Gareinstellungen werden
gelöscht.
Wollen Sie vor dem Garen eventuell vorhandene Gareinstellungen
löschen, drücken Sie einfach einmal die LÖSCHTASTE.( ) .
7
DE
jtX`Y`hl|TWYZ[`iklUGGwG_GGt SGq GY_SGYWW_GGYaW`Gwt
DE
Benutzen der +20sec Taste
Die Funktion Auftauen
Dies ist eine ONE-TOUCH Gartaste.
Sie können den Garvorgang durch einmaliges Drücken der Taste
sofort starten.
Sie können die Garzeit während des Garvorgangs durch Drücken der
+20sec Taste erhöhen.
Jedes Drücken der +20sec Taste erhöht die Garzeit um 20 Sekunden.
Sie können jedoch nicht die Höchstzeit überschreiten.
• Sie können den Fortschritt des Garens jederzeit durch
Öffnen der Tür prüfen
• Schließen Sie die Tür
• Erhöhen Sie die verbleibende Garzeit
Mit dieser Funktion können Sie Fleisch, Geflügel und Fisch auftauen.
Verwenden Sie nur mikrowellengeeignetes Geschirr.
Öffnen Sie die Tür. Geben Sie das Gefriergut in die Mitte des Tellers.
Schließen Sie die Tür.
1. Drücken Sie die Auftauwahltaste, um AUFTAUEN
HOCH ( ) oder AUFTAUEN NIEDRIG ( )
einzustellen, wie Sie wünschen.
Ergebnis: Die gewählte Auftaustufe wird im Display
angezeigt.
Vor Betrieb des Gerätes können die Zeiten mit den
Zeiteingabetasten oder der +20sec Taste erhöht bzw. verringert
werden. Während des Betriebs kann die Zeit nur mit der +20sec
Taste erhöht werden.
2. Stellen Sie die Auftauzeit mit den ZIFFERNTASTEN ein.
(Max. 50 Minuten)
3. Drücken Sie die Taste
.
Ergebnis: Der Auftauvorgang beginnt.
8
Sie können keine längere Auftauzeit als 50 Minuten
einstellen. Die Auftauanzeige beginnt zu blinken,
und es ist ratsam, die LÖSCHTASTE ( ) zu
drücken und eine neue Auftaustufe und
-zeit einzugeben.
War das Gerät länger als 25 Minuten im Auftauzyklus in Betrieb, können
Sie die Leistungsstufe NICHT von Auftauen in Garen ändern.
jtX`Y`hl|TWYZ[`iklUGGwG`GGt SGq GY_SGYWW_GGYaW`Gwt
Programmieren der Speichertasten
Einstufiges
5. Drücken und halten Sie die Taste
PROGRAMMSPERRTASTE ( ) gedrückt und drücken
Sie anschließend die Taste PROGRAMM ( ). Halten Sie
beide Tasten 2 Sekunden gedrückt.
Ergebnis: Die Anzeige PROG und die Speichernummer
blinken dreimal und ein akustisches Signal
ertönt. Anschließend wird das Display leer.
Achtung: Drücken Sie beide Tasten fest an der richtigen
Stelle.
1. Drücken und halten Sie die PROGRAMMSPERRTASTE
( ) gedrückt und drücken Sie anschließend die
PROGRAMMTASTE ( ) Halten Sie beide Tasten 2
Sekunde gedrückt.
Drücken Sie dabei die Tasten fest.
Ergebnis: Im Display wird die Anzeige PROG angezeigt.
6. Wollen Sie weiter programmieren, wiederholen Sie das
vorhergehende Verfahren.
2. Drücken Sie eine ZIFFERNTASTE entsprechend der
gewünschten Speichernummer.
Ergebnis: Unter der PROG Anzeige wird der gewählte
Programmkode angezeigt.
3. Wählen Sie die Leistungsstufe durch Drücken der
LEISTUNGSWAHLTASTE und AUFTAUEN.
Ergebnis: Im Display wird beim ersten Drücken der
LEISTUNGSWAHLTASTE die Leistungsstufe
HOCH angezeigt.
Drücken Sie die LEISTUNGSWAHLTASTE erneut,
bis die gewünschte Leistungsstufe angezeigt wird.
4. Stellen Sie die Garzeit durch Drücken der
ZIFFERNTASTEN ein.
Die für jede Leistungsstufe zulässige Höchstzeit
entnehmen Sie bitte dem Absatz mit dem Titel
"Leistungsstufen und Zeitvariationen" auf Seite 7.
Die ZIFFERNTASTEN haben keine Funktion, wenn
Sie eine Garzeit eingeben, die die zulässige
Höchstzeit überschreitet.
Sie können keine längere Garzeit als die für das
gewählte Programm zulässige Höchstzeit
einstellen. Die Netzanzeige beginnt zu blinken, und
es ist ratsam, die LÖSCHTASTE zu drücken und
eine neue Leistungsstufe und Garzeit einzugeben.
9
Sie können bis zu 30 Programme speichern.
Überprüfen Sie die Programmierung Ihres Geräts.
Nach dem Programmieren brauchen Sie zum
Garen mit Speicher lediglich die relevante
ZIFFERNTASTE zu drücken. Das gewählte
Speicherprogramm startet automatisch.
DE
jtX`Y`hl|TWYZ[`iklUGGwGXWGGt SGq GY_SGYWW_GGYaW`Gwt
Programmieren der Speichertasten (Fortsetzung)
DE
Mehrstufiges
6. Drücken und halten Sie die Taste
PROGRAMMSPERRTASTE ( ) gedrückt und drücken
Sie anschließend die Taste PROGRAMM ( ). Halten Sie
beide Tasten 2 Sekunden gedrückt.
Ergebnis: Die Anzeige PROG und die Speichernummer
blinken dreimal und ein akustisches Signal
ertönt. Anschließend wird das Display leer.
Achtung: Drücken Sie beide Tasten fest an der richtigen
Stelle.
1. Drücken und halten Sie die PROGRAMMSPERRTASTE
( ) gedrückt und drücken Sie anschließend die
PROGRAMMTASTE ( ) Halten Sie beide Tasten 2
Sekunde gedrückt.
Drücken Sie dabei die Tasten fest.
Ergebnis: Im Display wird die Anzeige PROG angezeigt.
7. Wollen Sie weiter programmieren, wiederholen Sie das
vorhergehende Verfahren.
2. Drücken Sie eine ZIFFERNTASTE entsprechend der
gewünschten Speichernummer.
Ergebnis: Unter der PROG Anzeige wird der gewählte
Programmkode angezeigt.
3. Wählen Sie die Leistungsstufe durch Drücken der
LEISTUNGSWAHLTASTE und AUFTAUEN.
Drücken Sie die LEISTUNGSWAHLTASTE erneut,
bis die gewünschte Leistungsstufe angezeigt wird.
4. Stellen Sie die Garzeit durch Drücken der
ZIFFERNTASTEN ein.
Die für jede Leistungsstufe zulässige Höchstzeit
entnehmen Sie bitte dem Absatz mit dem Titel
"Leistungsstufen und Zeitvariationen" auf Seite 7.
Die ZIFFERNTASTEN haben keine Funktion, wenn
Sie eine Garzeit eingeben, die die zulässige
Höchstzeit überschreitet.
Sie können keine längere Garzeit als die für das
gewählte Programm zulässige Höchstzeit
einstellen. Die Netzanzeige beginnt zu blinken, und
es ist ratsam, die LÖSCHTASTE zu drücken und
eine neue Leistungsstufe und Garzeit einzugeben.
5. Wiederholen Sie die Schritte 3 und 4 für das Programmieren
der Speicherfunktion der Stufe II oder III.
10
Sie können bis zu 30 Programme speichern.
Überprüfen Sie die Programmierung Ihres Geräts.
Nach dem Programmieren brauchen Sie zum
Garen mit Speicher lediglich die relevante
ZIFFERNTASTE zu drücken. Das gewählte
Speicherprogramm startet automatisch.
Es können nicht glechzeitig LEISTUNGSSTUFE und AUFTAUEN
eingestellt werden.
Dies funktioniert als Einstellsequenz.
jtX`Y`hl|TWYZ[`iklUGGwGXXGGt SGq GY_SGYWW_GGYaW`Gwt
Garen mit dem Speicher
Programmieren der Doppelmengentaste
1. Drücken und halten Sie
gedrückt und drücken Sie
anschließend die
Taste. Halten Sie beide Tasten 2
Sekunden gedrückt.
Haben Sie das Programmieren des Speichers abgeschlossen, geben
Sie mit den ZIFFERNTASTEN einfach die Nummer des gewünschten
Programms ein. Das Gerät startet nach einer kurzen Verzögerung
(5 Sek) automatisch das Garen mit der programmierten Garzeit und
Leistungsstufe.
2. Wählen Sie mit den ZIFFERNTASTEN den gewünschten
Programmkode.
1. Vergewissern Sie sich, dass das Gerät an eine korrekt
geerdete Steckdose angeschlossen ist und im Display
"ON" angezeigt wird.
2. Öffnen Sie die Tür.
Die Garraumbeleuchtung schaltet sich ein.
3. Geben Sie mit den ZIFFERNTASTEN den gewünschten
Multiplikationsfaktor im Bereich von 1.00 bis 9.99 ein.
3. Geben Sie das Gargut in ein geeignetes Behältnis, und
platzieren Sie dieses in der Mitte des Garraums. Schließen
Sie die Tür.
Ergebnis: Die Beleuchtung erlischt.
4. Drücken Sie die NUMMERN-Taste.
Ergebnis: Das gewählte Speicherprogramm beginnt
automatisch mit dem Erwärmen. Die
NUMMERN-Tasten 1, 2, 3 laufen allerdings erst
nach 2 Sekunden an.
Der vorgegebene Multiplikationsfaktor von 1.65
wurde vom Hersteller für die Erhöhung der Garzeit
eingestellt. Vergewissern Sie sich, dass Sie für jede
Speicherkodenummer einen korrekten Faktor
zwischen 1.00 und 9.99 einstellen.
4. Drücken Sie die Taste
11
.
Möglicherweise haben Sie erfolgreich einen Doppelmengenfaktor
eingestellt, der in einem Überschreiten der für jede Leistungsstufe
zulässigen Höchstzeit resultiert, doch bleibt das Gerät dennoch nicht über
die zulässige Höchstzeit in Betrieb.
DE
jtX`Y`hl|TWYZ[`iklUGGwGXYGGt SGq GY_SGYWW_GGYaW`Gwt
Programmieren der Doppelmengetaste (Forts.)
DE
Garen mit der Doppelmengentaste
1. Drücken Sie die Doppelmengentaste.
Eingabe des Doppelmengenfaktors
Funktion
Tasteneingabe
Display
Drücken und halten
Sie die
LÖSCHTASTE
( ) gedrückt und
drücken Sie
anschließend die
Taste.
Halten Sie beide Tasten 2
Sekunden gedrückt.
Nach 1 Sekunde wird im Display
der vorgegebene Wert
angezeigt.
(Geben Sie den
gewünschten
Faktorwert ein.)
START(
1.00 ~ 9.99 sind verfügbar
(Ändern Sie den Faktor, falls
erforderlich.)
)
Drücken Sie nach Durchführung
aller Änderungen die
LÖSCHTASTE, um den
Eingabemodus zu beenden.
Neue Kode-Nr.
Überspringen Sie bei Bedarf
diesen Schritt.
(Geben Sie den
gewünschten
Faktorwert ein.)
Überspringen Sie bei Bedarf
diesen Schritt.
START(
2. Drücken Sie die gewünschte Speichernummerntaste.
Ergebnis: Im Display wird die mit dem eingestellten Faktor
multiplizierte Garzeit angezeigt. Der Garvorgang
wird gestartet und die Zeitanzeige läuft ab.
Kode-Nr.
Eingabe
des
Doppelmengen
faktors
Anmerkung
)
LÖSCHTASTE
( )
Überspringen Sie bei Bedarf
diesen Schritt.
(Modus Löschen,)
Beendet den Eingabemodus.
12
Sie müssen zum Starten des Garens nicht die Taste
drücken.
jtX`Y`hl|TWYZ[`iklUGGwGXZGGt SGq GY_SGYWW_GGYaW`Gwt
Programmieren des Luftfilter-Reinigungsintervalls
Einstellen des akustischen Signals
Zeigt das Display nach einer bestimmten Nutzungszeit des Geräts die
Filterprüfanzeige (FILTER) an, müssen Sie den Luftfilter gemäß den
Anweisungen unter "Reinigen des Luftfilters" auf Seite 16 dieser
Broschüre reinigen. Wollen Sie anschließend das Reinigungsintervall
des Luftfilters ändern, gehen Sie wie folgt vor:
Sie können die Lautstärke des Signaltons Ihren Wünschen anpassen.
Es stehen 4 verschiedene Lautstärken des Signaltons zur Verfügung.
Drücken und halten Sie die LÖSCHTASTE ( ) gedrückt und
drücken Sie die ZIFFERNTASTE 0. Halten Sie beide Tasten 2
Sekunden gedrückt.
Ergebnis: Die Lautstärke des Signaltons ändert sich um
eine Lautstärkenstufe höher als die aktuell
eingestellte.
1. Drücken und halten Sie die PROGRAMMSPERRTASTE
( ) gedrückt und drücken Sie Anschließend die
ZIFFERNTASTE 3. Halten Sie beide Tasten 2 Sekunden
gedrückt.
Ergebnis: Im Display wird das von Ihnen programmierte
oder werkseitig eingestellte LuftfilterReinigungsintervall in Stunden angezeigt. Das
werkseitig eingestellte Intervall beträgt 500
Betriebsstunden.
Die Einstellung ändert sich bei jedem Drücken der
versteckten Tasten in folgender Reihenfolge.
*
Snd 0 Snd 1 Snd 2 Snd 3 Snd 0 (Kein
Das werkseitig eingestellte Intervall beträgt 500
Stunden Schwingungszeit, nicht Kontinuitätszeit.
2. Geben Sie mit den ZIFFERNTASTEN das gewünschten
Reinigungsintervall ein.
Sie können bis zu 999 Stunden eingeben.
3. Drücken und halten Sie die PROGRAMMSPERRTASTE
( ) gedrückt und drücken Sie anschließend die
ZIFFERNTASTE 3.
Halten Sie beide Tasten 2 Sekunden gedrückt, um den
neuen Wert zu speichern.
Damit ist das Programmieren des LuftfilterReinigungsintervalls abgeschlossen.
4. Drücken Sie die LÖSCHTASTE (
zurückzukehren.
Signalton 0 bedeutet kein akustisches Signal.
), um in den Garmodus
Nach Ablauf des Reinigungsintervalls müssen Sie
den Luftfilter reinigen. Siehe Seite 16 .
13
Signalton)
Vorgegebener Signalton ist Snd 2.
DE
jtX`Y`hl|TWYZ[`iklUGGwGX[GGt SGq GY_SGYWW_GGYaW`Gwt
Fehlerkode
DE
Fehlerposten
Kode
Stromfrequenzfehler (50/60Hz)
E1
Fehlersignalton
-
Ursache
Korrektur
Die Stromfrequenz beträgt nicht 50 Hz.
Trennen Sie das Netzkabel und prüfen Sie, ob die Netzfrequenz 50 Hz ist.
Schließen Sie das Netzkabel an die 50 Hz Stromquelle an und prüfen Sie, ob "E1"
angezeigt wird. Wird der Fehlerkode auch nach Anschließen an eine korrekte
Stromquelle angezeigt, wenden Sie sich bitte an das nächste Kundendienstzentrum.
HVT-I
Stromfehler
E41
Ein langer
Signalton für 2
Sek.
Die Schaltkreise im Gerät arbeiten nicht
korrekt.
Trennen Sie das Netzkabel und warten Sie mindestens 10 Sekunden.
Stecken Sie das Netzkabel wieder ein und prüfen Sie, ob der Fehlerkode "E41" erneut
angezeigt wird. Bleibt das Symptom bestehen, wenden Sie sich bitte an das nächste
Kundendienstzentrum.
HVT-II
Stromfehler
E42
Ein langer
Signalton für 2
Sek.
Die Schaltkreise im Gerät arbeiten nicht
korrekt.
Trennen Sie das Netzkabel und warten Sie mindestens 10 Sekunden.
Stecken Sie das Netzkabel wieder ein und prüfen Sie, ob der Fehlerkode "E42" erneut
angezeigt wird. Bleibt das Symptom bestehen, wenden Sie sich bitte an das nächste
Kundendienstzentrum.
EEPROM Fehler
E5
Ein langer
Signalton für 2
Sek.
In diesem Fall funktionieren alle anderen
Drücken Sie die LÖSCHTASTE ein- oder mehrmals, und versuchen Sie ein
Funktionen mit Ausnahme der
gespeichertes Programm auszuführen. Wird weiterhin der Fehlerkode "E5" angezeigt,
Speicherfunktion korrekt.
wenden Sie sich bitte an das nächste Kundendienstzentrum.
(Sie können das Gerät manuell bedienen.)
14
jtX`Y`hl|TWYZ[`iklUGGwGX\GGt SGq GY_SGYWW_GGYaW`Gwt
Versteckte Tasten
Pflege Ihres Mikrowellengeräts
Beachte: Drücken und halten Sie Taste 1 gedrückt und drücken Sie
anschließend die nächste. Halten Sie die Tasten 2 Sekunden gedrückt.
Funktion
Tasteneingabe
Display
Reinigen des Mikrowellengeräts
1. Ziehen Sie vor dem Reinigen den Netzstecker.
Anmerkung
Taste 1
Näch
ste
Kontinuitätszeit
gesamt
LÖSCHTASTE
( )
1
Beide 2 Sekunden
gedrückt halten.
Einheit: 10 Std.
Magnetron
Schwingungszeit gesamt
LÖSCHTASTE
( )
2
Beide 2 Sekunden
gedrückt halten.
Einheit: 1 Std.
Anzahl der
Benutzung per
Speicherprogrammkode
LÖSCHTASTE
( )
Start
2. Reinigen Sie den Garraum. Wischen Sie alle Spritzer von Speisen der
Flüssigkeiten mit einem feuchten Tuch ab. Ist der Garraum stark verschmutzt,
benutzen Sie ein Spülmittel. Benutzen Sie keine starken Reinigungs- oder
Scheuermittel.
3. Reinigen Sie das Gehäuse des Geräts mit mildem Reinigungsmittel, und wischen
Sie es anschließend mit einem weichen Tuch trocken.
Achtung: Achten Sie darauf, dass kein Wasser in die Entlüftungsöffnungen oder
die Öffnung des Bedienfelds eindringt
Beide 2 Sekunden
gedrückt halten.
4. Reinigen Sie die Glasscheibe der Tür mit einem milden Reinigungsmittel, und
wischen Sie sie anschließend mit einem weichen Tuch trocken. Benutzen Sie
keinen Fensterreiniger, da dies Kratzer verursachen kann.
Kode-Nr.
(Daten werden
nach 2 Sek.
angezeigt)
739 Benutzungen
(Neuer Kode kann
nach
Datenanzeige
gesetzt werden)
LÖSCHTASTE
( )
Garzeit pro
Speicherprogrammkode
(automatische,
sequentielle
Anzeige)
LÖSCHTASTE
( )
Haften Spritzer von Speisen oder Flüssigkeiten an den Wänden des
Garraums, können Sie Mikrowellen absorbieren und möglicherweise zu
Lichtbogen- oder Funkenbildung führen.
(Modus Löschen)
Beide 2 Sekunden
gedrückt halten.
P
(Sequentielle
Anzeigen für 3 Sek
von 1 bis 30)
LÖSCHTASTE
( )
(Modus Löschen)
15
DE
jtX`Y`hl|TWYZ[`iklUGGwGX]GGt SGq GY_SGYWW_GGYaW`Gwt
Reinigen des Mikrowellengeräts (Fortsetzung)
DE
Reinigen der Deckenabdeckung
Reinigen des Luftfilters
1. Die Seitenanschläge der Deckenabdeckung mit beiden Händen greifen, nach
innen ziehen und nach unten drücken. Nehmen Sie die Deckenabdeckung
aus dem Garraum.
Reinigen Sie den Luftfilter regelmäßig gemäß der folgenden Anweisungen.
Das Gerät arbeitet nicht einwandfrei, wenn der Luftfilter verstopft ist.
1. Entfernen Sie die Schrauben auf beiden Seiten des Luftfilters.
2. Spülen Sie die Deckenabdeckung in milder Spülmittellösung oder NahrungsmittelSanitärlösung.
2. Heben Sie den Luftfilter vorsichtig vom Pfosten ab.
3. Setzen Sie die Deckenabdeckung vor Benutzung des Geräts unbedingt wieder
ein.
3. Spülen Sie den Filter in warmer Reinigungsmittellösung.
4. Setzen Sie den Luftfilter vor erneutem Benutzen des Geräts unbedingt wieder
ein.
Achtung : Die Deckenabdeckung muss bei Benutzung des Ofens fest an ihrem
Platz gesichert sein. Haben Sie die Deckenabdeckung zwecks
Reinigung entfernt, achten Sie besonders auf die frei liegenden
Innenkomponenten des Garraums. Werden Sie verformt, können beim
späteren Betrieb Funktionsstörungen wie Lichtbogen- oder
Funkenbildung auftreten. Wenden Sie sich bei solchen Problemen
bitte an das nächste Kundendienstzentrum.
Deckenverkleidung
Ein verstopfter Luftfilter bewirkt ein Überhitzen des Geräts.
Zur Änderungen des Luftfilter-Reinigungsintervalls siehe bitte
"Programmieren des Luftfilter-Reinigungsintervalls" auf Seite 13.
BOLZEN
16
jtX`Y`hl|TWYZ[`iklUGGwGX^GGt SGq GY_SGYWW_GGYaW`Gwt
Installationsanweisungen für Stapeln
Auswechseln der Lampe
Wichtig
Wichtig
1. Trennen Sie vor der Installation den Netzstecker.
1. Entfernen Sie die Schraube, die die Lampenabdeckung hält.
2. Für eine Stapelinstallation müssen Sie die zusammen mit dem Gerät gelieferte
"Stützplatte" benutzen.
DE
Sie müssen für das Wechseln der Lampe nicht das Gehäusepaneel
entfernen.
2. Entfernen Sie die Lampe durch Drehen im Uhrzeigersinn.
3. Setzen Sie eine neue Lampe durch Drehen gegen den Uhrzeigersinn ein.
3. Sie können maximal zwei Geräte stapeln.
Das Stapeln der zwei Geräte ist auf folgende Modelle beschränkt:
ACHTUNG: Vergewissern Sie sich, dass der Garraum leer ist.
Lampenabdeckung
Installation
Lampenhalterung
Lampe
(230 V 25 W)
1. Stellen Sie beide Geräte aufeinander.
2. Entfernen Sie die 6 Schrauben gemäß der Abbildung.
3. Platzieren Sie die Stützplatte, um beide Geräte miteinander zu verbinden.
4. Setzen Sie die 6 Schrauben gemäß der Abbildung ein und ziehen Sie diese fest.
5. Vergewissern Sie sich, dass sich das obere Gerät in einer sicheren Arbeitshöhe
befindet.
Schraube
Klammerplatte
17
jtX`Y`hl|TWYZ[`iklUGGwGX_GGt SGq GY_SGYWW_GGYaW`Gwt
Leitfaden für Kochgeschirr
DE
Um Lebensmittel im Mikrowellengerät garen zu können, müssen die
Mikrowellen das Lebensmittel durchdringen können, ohne vom
verwendeten Geschirr reflektiert oder absorbiert zu werden.
Aus diesem Grund muss geeignetes Geschirr ausgewählt werden. Ist
das Geschirr als mikrowellengeeignet markiert, brauchen Sie sich
keine Sorgen zu machen.
Die folgende Tabelle enthält verschiedene Geschirrtypen mit Angabe,
ob und wie es in einem Mikrowellengerät benutzt werden muss.
Geschirr
Mikrowellen Anmerkungen
geeignet
Aluminiumfolie
Porzellan, Töpferware, glasiertes
Steingut und feines Porzellan sind in der
Regel geeignet, sofern sie keine
Metallverzierungen aufweisen.
Einweggeschirr aus
Kunststoff
Pappgeschirr
Einige Tiefkühlgerichte werden in dieser
Verpackung geliefert.
Kann zum Erwärmen von Lebensmitteln
benutzt werden. Überhitzen kann ein
Schmelzen des Polystyrols verursachen.
Kann sich entzünden.
Kann Funkenbildung verursachen.
Kann benutzt werden, wenn nicht mit
einem Metallrand verziert.
Kann zum Erwärmen von warmen
Lebensmitteln oder Flüssigkeiten benutzt
werden. Dünnes Glas kann bei plötzlicher
Erwärmung zerbrechen oder reißen.
Deckel entfernen. Nur zum Erwärmen.
•
•
Papierbetel oder
Zeitungspapier
Recycling-Papier
oder
Metallausrüstung
Glasware
• Feuerfestes
Glasgeschirr
• Dünne Glasware
•
Metall
•
•
Glaskrüge
Geschirr
Gefrierbeutel-Clips
Kunststoff
• Behälter
Kann in kleineren Mengen verwendet
werden, um bestimmte Bereiche vor
Überhitzung zu schützen. Wenn sich die
Aluminiumfolie zu dicht an den
Innenwänden befindet oder zu viel Folie
verwendet wird, kann es zu
Lichtbogenbildung kommen.
Porzellan und Steingut
Fast-Food Verpackung
• Polystyrol Tassen
und Behälter
Papier
• Teller, Tassen,
Servietten und
Küchenpapier
• Recycling-Papier
Folie
•
Gefrierbeutel
: Empfohlen
: Vorsicht
: Unsicher
18
•
Wachspapier
Kann Funkenbildung oder Feuer
verursachen.
Für kurze Garzeiten und Erwärmen. Auch
zum Absorbieren überschüssiger
Feuchtigkeit.
Kann Funkenbildung verursachen.
Vor allem, wenn aus wärme-beständigen
Thermoplastik. Einige andere Kunststoffe
können sich bei hoher Temperatur
verformen oder verfärben. Keinen
Melamin-Kunststoff verwenden.
Kann zum Erhalt der Feuchtigkeit benutzt
werden. Sollte Lebensmittel nicht
berühren. Die Folie vorsichtig entfernen,
das heiber Dampf entweicht.
Nur wenn siede- oder ofenfest. Darf nicht
luftdicht sein. Bei Bedarf mit einer Gabel
Luftlöcher einstechen.
Kann zum Erhalt der Feuchtigkeit und
Vermeidung von Spritzen benutzt
werden.
jtX`Y`hl|TWYZ[`iklUGGwGX`GGt SGq GY_SGYWW_GGYaW`Gwt
Kochleitfaden
T : Tiefgekühlt
Rezept
G : Gekühlt
Methode
Leistung
Rezept
Ruhe1850W 1600W 1300W zeit
Methode
Leistung
Kochzeit
Würstchen X 2 dick G
BROT & BACKWERK
Folie
MITTEL
durchstechen
1850W 1600W 1300W
Kochzeit
Ruhezeit
1’00"
2 Min.
1’10"
1’20"
Auftauen
Vienna Baton 9" T
AUFTA- 0’45"
UEN1( )
0’50"
0’50"
5 Min.
Vienna Baton 9" X 2 T
AUFTA- 1’10"
UEN1( )
1’15"
1’20"
5 Min.
Auf Teller
geben
AUFTA- 2’30"
UEN2( )
2’40"
2’50"
5 Min.
Quiche 11" in Stücke
geschnitten 136g
Auf Teller
geben
AUFTA- 3’00"
UEN1( ) 0’40"
HOCH
3’00"
0’45"
3’00"
0’50"
1 Min.
1 Min.
Minzekuchen X 2 T
Aus der
HOCH
Alufolie
entfernen. Auf
Teller geben
0’10"
0’15"
0’15"
1 Min.
Obstkuchen T
Auf Teller
geben
HOCH
0’40"
0’45"
0’45"
1 Min.
Pizza 190g T
Auf Teller
geben
Croissant X 2 T
Auf Teller
geben
HOCH
0’05"
0’10"
0’10"
1 Min.
Gegrillte Rippchen
200g T
Auf Teller
geben
MITTEL
Backwerk, gebacken
227g G
Auf Teller
geben
HOCH
0’45"
0’55"
1’00"
1 Min.
Wings of fire X 6 T
Hühnchen &
Champignon Pastete
X2 G
Aus Folie
entfernen.
Auf Teller
geben
HOCH
0’45"
0’55"
1’00"
1 Min.
Auf Teller
anordnen,
dünne Enden
zur Mitte
Gebackene Bohnen
500g
Gebackene Bohnen
250g
Torte, Stück T
Rezept
HOCH
0’40"
0’45"
Cumberland Würstchen Place on plate MITTEL
T
2’00"
2’10"
2’20"
2 Min.
Komplettes Frühstück
G
MITTEL
2’30"
2’40"
2’50"
1 Min.
Beefburger T
HOCH
0’55"
1’05"
1’10"
1 Min.
Hühnerburger T
HOCH
0’55"
1’05"
1’10"
1 Min.
Döner kebab 162g T
HOCH
1’00"
1’10"
1’20"
1 Min.
HOCH
1’00"
1’10"
1’20"
1 Min.
NIEDRIG 2’30"
2’45"
3’00"
2 Min.
3’30"
3’45"
4’00"
1 Min.
HOCH
2’00"
2’15"
2’30"
1 Min.
Abdecken,
nach der
Hälfte der
Garzeit
umrühren
HOCH
2’00"
2’10"
2’20"
2 Min.
Abdecken,
nach der
Hälfte der
Garzeit
umrühren
HOCH
1’00"
1’05"
1’10"
2 Min.
1 Min.
SNACKS & VORSPEISEN
Garen
Speck, Scheibe G
Auf Rost
legen
HOCH
1’30"
1’40"
1’50"
1 Min.
Eier, pochiert X 2 G
In Auflaufförmchen
geben
HOCH
0’30"
0’40"
0’45"
1 Min.
Rühreier X2 G
Eier schlagen HOCH
und in Schale
geben
Kochzeit
Ruhe
1850W 1600W 1300W -zeit
Aufwärmen
Abdecken
Hot Dog T
0’30"
Leistung
SNACKS & VORSPEISEN
Aufwärmen
Hühnchen &
Auf Teller
Champignon Pastete G geben. Aus
der Alufolie
entfernen.
Methode
25"-30" 30"-40" 35"-45" 1 Min.
19
DE
jtX`Y`hl|TWYZ[`iklUGGwGYWGGt SGq GY_SGYWW_GGYaW`Gwt
Kochleitfaden (Fortsetzung)
DE
T : Tiefgekühlt
Rezept
G : Gekühlt
Methode
Leistung
Rezept
Ruhe1850W 1600W 1300W zeit
1850W 1600W 1300W
Ruhezeit
HOCH
2’30"
2’45"
3’00"
2 Min.
MITTEL
3’00"
3’15"
3’30"
2 Min.
NIEDRIG
4’00"
4’20"
4’40"
2 Min.
Hähnchendelikatessen In
AUFTA5’00"
in rotem Pesto 312g T durchstoche- UEN1( ) 3’30"
nen Beutel in HOCH
Mikrowelle
geben
5’00"
3’45"
5’00"
4’00"
1 Min.
Tagliatelle Carbonara
G
In
HOCH
durchstochenen Beutel in
Mikrowelle
geben
1’40"
2’00"
2’20"
1 Min.
Tortellini Formaggio G
Auf Teller
geben und
abdekcen
HOCH
2’00"
2’15"
2’30"
1 Min.
Gemüsepastete
Cumberland T
In
mikrowellengeeignetes
Geschirr
geben
HOCH
3’20"
3’35"
3’50"
1 Min.
Tellergericht 350g G
Abgedeckt
HOCH
2’00"
2’15"
2’30"
1 Min.
Tellergericht 700g G
Abgedeckt
HOCH
3’00"
3’15"
3’30"
1 Min.
Lachs & Avocado
Paupiette G
DESSERTS
Abdecken in
Schale
HOCH
Weinachtspudding
150g G
In Schale
geben
HOCH
0’20"
0’25"
0’30"
2 Min.
Englischer
Mameladenpudding
80g T
Auf Teller
geben
HOCH
1’00"
1’05"
1’10"
2 Min.
Crepes Suzette 2 T
Folie
HOCH
durchstechen
0’50"
1’00"
1’10"
1 Min.
Mit Nierenfett
zubereiteter
Mehlpudding T
X2
X1
HOCH
HOCH
0’35"
0’40"
1’05"
0’50"
1’30"
1’00"
2 Min.
2 Min.
Mehlpudding T
X2
X1
HOCH
HOCH
0’35"
0’40"
1’05"
0’45"
1’30"
0’45"
2 Min.
2 Min.
1’20"
1’30"
1’40"
Mit Nierenfett zubereiteter Abdecken Mehlpudding G
aufrecht auf
mikrowellengeeigneten
Teller stellen
Aufwärmen
In
mikrowellengeeignetes
Geschirr
geben
HOCH
Leistung
3’30"
3’40"
3’50"
1 Min.
Hühner Tikka Masala T Folie
HOCH
durchstechen
3’20"
3’30"
3’40"
2 Min.
Thai Hühner-Curry T
Folie
HOCH
durchstechen
3’00"
3’15"
3’30"
2 Min.
Chilli con Carne T
Folie
HOCH
durchstechen
3’30"
3’45"
4’00"
2 Min.
Gekochtes Hühnchen1/ In durch2G
stochenen
Beutel in
Mikrowelle
geben
MITTEL
4’30"
5’00"
5’30"
2 Min.
Lasagne 192g
In
mikrowellengeeignetes
Geschirr
geben
MITTEL
4’00"
4’15"
4’30"
2 Min.
Moules Marinieres
466g T
Beutel
einstechen
HOCH
2’30"
2’45"
3’00"
2 Min.
Kochzeit
abdecken
2 Min.
VORSPEISEN
Amorini und Stilton
Speisen G
Beutel
einstechen
Auflauf aus Hackfleisch In Garraum
und Kartoffelbrei 300g G geben und
Aufwärmen
Apfelstreusel 200g T
Methode
Kochzeit
20
jtX`Y`hl|TWYZ[`iklUGGwGYXGGt SGq GY_SGYWW_GGYaW`Gwt
Kochleitfaden (Fortsetzung)
T : Tiefgekühlt
Rezept
G : Gekühlt
Methode
Rezept
LeistKochzeit
Ruheung 1850W 1600W 1300W zeit
FRISCHES GEMÜSE
Garen 500g
Methode
LeistKochzeit
Ruheung 1850W 1600W 1300W zeit
Blumenkohl, Röschen Abdecken, nach HOCH 4’00"
der Hälfte der
Garzeit umrühren
4’15"
4’30"
2 Min.
Maiskolben
Abdecken
HOCH 4’00"
4’30"
5’00"
2 Min.
Grüne Schnittbohnen 60ml/4 Esslöffel
Wasser,
abdecken
HOCH 3’00"
3’15"
3’30"
2 Min.
Baby Maiskolben
Abdecken, nach HOCH 5’00"
der Hälfte der
Garzeit umrühren
5’15"
5’30"
2 Min.
Brokkoli, Röschen
60ml/4 Esslöffel
Wasser,
abdecken
HOCH 3’00"
3’15"
3’30"
2 Min.
Champignons, ganze Abdecken, nach HOCH 3’00"
der Hälfte der
Garzeit umrühren
3’15"
3’30"
2 Min.
Kohl, gehobelt
10 Esslöffel
Wasser,
abdecken
HOCH 5’00"
5’30"
6’00"
2 Min.
Möhren, geschnitten
60ml/4 Esslöffel
Wasser,
abdecken
HOCH 3’30"
3’45"
4’00"
2 Min.
Blumenkohl, Röschen 60ml/4 Esslöffel
Wasser,
abdecken
HOCH 3’30"
3’45"
4’00"
2 Min.
Grüne Bohnen
60ml/4 Esslöffel
Wasser,
abdecken
HOCH 3’30"
3’45"
4’00"
2 Min.
Salzkartoffeln
Nach der Hälfte
der Garzeit
drehen
HOCH 10’00”
11’00”
12’00”
5 Min.
Sprossen
60ml/4 Esslöffel
Wasser,
abdecken
HOCH 4’30"
4’45"
5’00"
2 Min.
Grüne Schnittbohnen Abdecken, nach HOCH 3’00"
der Hälfte der
Garzeit umrühren
3’15"
3’30"
2 Min.
Bohnen
Abdecken, nach HOCH 4’00"
der Hälfte der
Garzeit umrühren
4’15"
4’30"
2 Min.
Brokkoli, Röschen
Abdecken, nach HOCH 4’00"
der Hälfte der
Garzeit umrühren
4’15"
4’30"
2 Min.
Kohl, gehobelt
Abdecken, nach HOCH 4’00"
der Hälfte der
Garzeit umrühren
4’15"
4’30"
2 Min.
Möhrchen
Abdecken, nach HOCH 4’00"
der Hälfte der
Garzeit umrühren
4’15"
4’30"
2 Min.
21
DE
jtX`Y`hl|TWYZ[`iklUGGwGYYGGt SGq GY_SGYWW_GGYaW`Gwt
Kochleitfaden (Fortsetzung)
DE
T : Tiefgekühlt
Rezept
Reinigung Ihres Mikrowellengeräts
Die hier angeführten Teile Ihres Mikrowellengeräts sollten
regelmäßig gereinigt werden, um die Anreicherung von Fett- und
Essensresten zu vermeiden:
G : Gekühlt
Methode
Leistung
1850W 1600W 1300W
Kochzeit
Ruhezeit
•
•
•
FRISCHES GEMÜSE
Garen 500g
Kartoffeln in die Schale
230~290g X 1
HOCH
3’00"
4’00"
4’30"
2 Min.
Kartoffelbrei X 2
Kartoffelbrei X 4
HOCH
HOCH
6’00"
10’00"
6’30"
11’15"
7’00"
12’30"
2 Min.
2 Min.
Ratatouille 500g
Sprossen
Abdecken,
nach der
Hälfte der
Garzeit
umrühren
HOCH
3’30"
4’00"
4’30"
2 Min.
HOCH
3’00"
3’30"
4’00"
2 Min.
die inneren oder äußeren Oberflächen
die Tür und die Türverschlüsse
der Teller
Achten Sie darauf, dass die Türdichtungen IMMER sauber sind und
die Tür ordnungsgemäß geschlossen werden kann.
Wenn der Mikrowellenherd nicht sauber gehalten wird, kann die
Oberfläche beschädigt werden. Dies wirkt sich unter Umständen
nachteilig auf die Funktionsteile des Mikrowellenherds aus und
verursacht Gefahren.
1. Reinigen Sie die äußeren Oberflächen mit einem weichen Lappen und
warmem Seifenwasser. Klarspülen und trocknen.
REIS, 500g
2. Etwaige Spritzer oder Flecken an den inneren Oberflächen oder an den Rollringen
mit einem seifigen Lappen entfernen. Klarspülen und trocknen.
Aufwärmen
Reis, gekocht T
Abdecken,
nach der
Hälfte der
Garzeit
umrühren
HOCH
3’00"
3’15"
3’30"
2 Min.
Reis, Pilau T
Abdecken,
nach der
Hälfte der
Garzeit
umrühren
HOCH
3’00"
3’15"
3’30"
2 Min.
3. Um hart gewordene Essensreste zu lösen und Gerüche zu beseitigen, eine Tasse
mit verdünntem Zitronensaft auf den Teller stellen und drei Minuten bei
Höchstleistung erhitzen.
22
Achten Sie darauf, dass KEIN Wasser in die Luftlöcher kommt.
NIEMALS abreibende Reinigungsmittel oder chemische Lösungsmittel
verwenden.
Gehen Sie insbesondere beim Reinigen der Türverschlüsse gewissenhaft
vor, um sicherzustellen, daß sich keine Partikel abgesetzt haben:
• Die Anhäufung von Partikel führt dazu, dass die Tür nicht
richtig schließt.
Reinigen Sie den Garraum nach jeder Benutzung mit mildem
Reinigungsmittel, lassen Sie das Mikrowellengerät jedoch vor dem
Reinigen abkühlen, um Verletzungen zu vermeiden.
jtX`Y`hl|TWYZ[`iklUGGwGYZGGt SGq GY_SGYWW_GGYaW`Gwt
Lagerung und Reparatur Ihres Mikrowellengeräts
Technische Daten
Einige einfache Vorsichtsmaßnahmen sollten beachtet werden, wenn
Sie Ihren Mikrowellenherd lagern oder reparieren lassen.
Der Herd darf nicht benutzt werden, wenn die Tür oder die
Türverschlüsse beschädigt sind:
• beschädigtes Scharnier
• defekte Türverschlüsse
• verzogenes oder verbogenes Gehäuse
Die Reparatur sollte nur von einem in der Wartung von
Mikrowellenherden qualifizierten Techniker vorgenommen werden.
SAMSUNG strebt ständig danach, ihre Produkte zu verbessern. Aus
diesem Grund sind die technischen Daten und diese
Bedienungsanweisungen Gegenstand von Änderungen ohne
Ankündigung.
CM1929A
CM1629A
Netzspannung
230 V ~ 50 Hz
Leistungsaufnahme
Mikrowelle
NIEMALS das Außengehäuse vom Mikrowellengerät entfernen. Wenn
das Mikrowellengerät fehlerhaft funktioniert und repariert werden muß,
oder Sie Zweifel hinsichtlich seines Betriebszustandes haben:
• Ziehen Sie den Stecker aus der Steckdose.
• Setzen Sie sich mit der nächstgelegenen Kundendienststelle in
Kontakt.
Ausgangsleistung
3200 W
3000 W
2600 W
1850 W
(IEC-705)
1600 W
(IEC-705)
1300 W
(IEC-705)
Stromfrequenz
2, 450 MHz
Abmessungen (B x H x T)
Außenseite
Garraum
Wenn Sie den Mikrowellenherd zeitweilig nicht verwenden möchten,
lagern Sie ihn an einem trockenen, staubfreien Ort.
Grund: Staub und Feuchtigkeit wirken sich unter Umständen
nachteilig auf die Funktionsteile des Mikrowellenherds aus.
464 x 368 x 557 mm
370 x 190 x 370 mm
Volumen
26 Liter
Gewicht
Netto
zirka 32 kg
464
CM1329A
43
557
530
26
1000
368
Modell
10
23
444
486
514
DE
jtX`Y`hl|TWYZ[`iklUGGwGY[GGt SGq GY_SGYWW_GGYaW`Gwt
jtX`Y`hl|TWYZ[`ilzUGGwGXGGt SGq GY_SGYWW_GGYaX[Gwt
HORNO MICROONDAS
(COMERCIAL)
Guía de cocción e instrucciones para el usuario
CM1929A(1850 vatios)
CM1629A(1600 vatios)
CM1329A(1300 vatios)
P
1
2
3
4
5
6
7
8
9
+ 20sec
N.º de código: DE68-02349B
0
Horno......................................................................................................2
Panel de control .....................................................................................2
Uso de este manual de instrucciones ....................................................3
Precauciones de seguridad....................................................................3
Instalación del horno microondas ..........................................................4
Cocción/Recalentamiento ......................................................................5
Niveles de potencia y variaciones de tiempo .........................................6
Cómo detener la cocción .......................................................................7
Función de repetición .............................................................................7
Uso del botón +20sec ............................................................................8
Uso de la función de descongelar..........................................................8
Programación de los botones de memoria ............................................9
Funcionamiento de la cocción programada .........................................11
Programación del botón de cantidad doble .........................................11
Funcionamiento del botón de cantidad doble ......................................12
Programación del tiempo de limpieza del filtro del aire .......................13
Control del tono de la alarma ...............................................................13
Códigos de error...................................................................................14
Teclas ocultas ......................................................................................15
Cuidados del horno microondas ..........................................................15
Instrucciones para la instalación en columna ......................................17
Sustitución de la lámpara .....................................................................17
Guía de utensilios de cocina ................................................................18
Guía de cocción ...................................................................................19
Limpieza del horno microondas ...........................................................21
Conservación y mantenimiento del horno microondas ........................22
Especificaciones técnicas ....................................................................22
jtX`Y`hl|TWYZ[`ilzUGGwGYGGt SGq GY_SGYWW_GGYaX[Gwt
Horno
Panel de control
1
ES
2
4
LÁMPARA DEL HORNO
CUBIERTA DE
LA LÁMPARA
DEL HORNO
PANTALLA
TIRADOR DE LA
PUERTA
PANEL DE CONTROL
BOTÓN DE INICIO
P
P
1
2
3
4
5
6
7
8
9
3
0
+ 20sec
1.
2.
3.
4.
5.
6.
7.
8.
9.
10.
FILTRO DE AIRE
PESTILLOS DE LA
PUERTA
2
3
4
5
6
7
8
9
0
+ 20sec
CUBIERTA
DEL TECHO
PUERTA
1
BANDEJA
5
6
7
8
9
10
PANTALLA
BOTÓN PROGRAMAS
BOTÓN BLOQUEO DE PROGRAMAS
BOTONES NUMÉRICOS (hora, programación de la memoria)
BOTÓN SELECCIÓN DEL NIVEL DE POTENCIA
BOTÓN DESCONGELACIÓN
BOTÓN CANTIDAD DOBLE
BOTÓN +20sec (botón de cocción por sensor de toque)
BOTÓN DETENER/CANCELAR
10. BOTÓN INICIO
PANTALLA
ORIFICIOS DE LAS
TRABAS DE SEGURIDAD
INDICADOR DEL
PROGRAMA
VISUALIZACIÓN DEL TIEMPO
INDICADOR
DEL
NÚMERO
DEL
BOTÓN DE
MEMORIA
INDICADOR DE
COMPROBACIÓN DE
ALIMENTACIÓN
(cuando aparece, el
horno no está en
funcionamiento)
2
INDICADOR DE
COMPROBACIÓN
DEL FILTRO DEL
AIRE
INDICADOR DE
COMPROBACIÓN
DE DATOS
INDICADORES INDICADORES DE
DE NIVEL DE DESCONGELACIÓN
POTENCIA
INDICADOR DE
CANTIDAD
DOBLE
jtX`Y`hl|TWYZ[`ilzUGGwGZGGt SGq GY_SGYWW_GGYaX[Gwt
Uso de este manual de instrucciones
Precauciones de seguridad
Acaba de adquirir un horno microondas SAMSUNG. El manual de
usuario
contiene información importante acerca de la cocción en este
horno microondas:
• Precauciones de seguridad
• Accesorios adecuados y utensilios de cocina
• Consejos de cocina útiles
En la parte frontal del manual encontrará ilustraciones del horno y, lo
que es más importante, del panel de control, para que pueda buscar los
botones más fácilmente.
LEA ATENTAMENTE LAS PRECAUCIONES DE SEGURIDAD Y
ES
CONSÉRVELAS PARA POSTERIORES CONSULTAS.
Antes de cocer sólidos o líquidos en su horno microondas, compruebe que
se hayan tomado las siguientes precauciones de seguridad.
Los procedimientos paso a paso usan dos símbolos diferentes.
ADVERTENCIA:
Importante
Nota
ADVERTENCIA:
Si la puerta o los cierres de ésta están dañados no se debe usar el horno hasta
que no lo haya reparado la persona competente.
ADVERTENCIA:
Es arriesgado que otra persona que no sea la adecuada realice la reparación, ya
que ésta entraña la retirada de una cubierta que protege contra la exposición a la
energía de las microondas.
Los líquidos y otros alimentos no deben calentarse en recipientes cerrados, ya
que tienen tendencia a explotar.
ADVERTENCIA:
Durante el calentamiento de bebidas en el microondas pueden producirse
ebulliciones eruptivas con retraso, por lo que debe tener cuidado al manejar el
recipiente. Para evitarlo, deje SIEMPRE que pase un tiempo de al menos
20 segundos después de apagar el horno para que se iguale la temperatura.
Remueva durante el calentamiento, si es necesario, y SIEMPRE remueva
después de calentar.
En caso de quemaduras, siga estas instrucciones de PRIMEROS AUXILIOS:
* Sumerja la zona quemada en agua fría durante al menos 10 minutos.
* Cúbrala con una gasa seca y limpia.
* No aplique cremas, aceites ni lociones.
PRECAUCIONES PARA EVITAR UN POSIBLE EXCESO DE
EXPOSICIÓN A LA ENERGÍA DE LAS MICROONDAS
Si no tiene en cuenta las siguientes precauciones de seguridad puede sufrir una
exposición a la energía de las microondas perjudicial para su salud.
(a) Bajo ningún concepto intente hacer funcionar el horno con la puerta abierta,
trate de forzar las trabas de seguridad (los pestillos de la puerta) ni inserte
nada en los orificios de las trabas de seguridad.
(b) No coloque ningún objeto entre la puerta del horno y la parte delantera, ni
permita que se acumulen restos de comida o de productos de limpieza en las
superficies de contacto. Asegúrese de que la puerta y las superficies de
contacto de la puerta estén limpias pasándoles primero un trapo húmedo y
luego un trapo suave y seco tras cada uso.
(c) Si el horno está dañado, no lo haga funcionar hasta que no lo haya reparado
un técnico cualificado por el fabricante. Es especialmente importante que la
puerta del horno cierre correctamente y que no se produzcan daños en:
(1) La puerta (curvada)
(2) Las bisagras de la puerta (rotas o flojas)
(3) Los cierres y las superficies de cierre
(d) Sólo el personal cualificado del servicio técnico de microondas, formado por
el fabricante, debe reparar y ajustar el horno.
ADVERTENCIA:
El contenido de los biberones y de los tarros de papilla debe agitarse o removerse
y comprobar su temperatura antes de dárselo al niño para evitar que se queme.
•
Utilice sólo utensilios que sean aptos para el microondas;
NO utilice recipientes metálicos, vajillas con adornos dorados o
plateados, pinchos, tenedores, etc. Retire los cierres metalizados de las
bolsas de papel o de plástico.
Motivo: Se pueden producir chispas o arcos eléctricos que dañen el horno.
• Cuando caliente alimentos en recipientes de papel o plástico, vigile el
horno ya que existe un riesgo de incendio.
No utilice el horno microondas para secar papeles ni tejidos.
• Las cantidades pequeñas de alimentos requieren un tiempo de cocción o
calentamiento más corto.
Si se sobrepasa el tiempo permitido se pueden sobrecalentar o quemar.
• Si nota humo, apague o desenchufe el aparato y mantenga la puerta
cerrada para sofocar las llamas.
3
jtX`Y`hl|TWYZ[`ilzUGGwG[GGt SGq GY_SGYWW_GGYaX[Gwt
Precauciones de seguridad (continuación)
ES
Instalación del horno microondas
Este horno microondas se puede colocar casi en cualquier sitio (en
una superficie de trabajo, en una estantería de la cocina, en una mesa
o en un carrito).
•
No rellene NUNCA el recipiente hasta el borde y elija uno que sea más
ancho en la parte superior que en la inferior, para evitar que el líquido
rebose al hervir. Las botellas con cuellos estrechos también pueden
explotar si se sobrecalientan.
• NO CALIENTE NUNCA un biberón con la tetina puesta, puesto que
puede explotar si se calienta demasiado.
• No caliente en el microondas los huevos con la cáscara ni los huevos
cocidos, ya que podrían explotar aun después de finalizar el tiempo de
calentamiento. No caliente tampoco recipientes, botellas ni tarros
herméticos o sellados al vacío, nueces con cáscara, tomates, etc.
• Limpie el horno con regularidad y retire cualquier resto de comida.
• Si no mantiene el horno limpio puede que se dañe la superficie, lo que podría
restar efectividad a la vida del aparato y provocar riesgos innecesarios.
• No debe limpiar el aparato con un chorro de agua.
• NO cubra las ranuras de ventilación con papel o trapos. Podrían
incendiarse al contacto con el aire caliente que sale del horno por esas
ranuras. El horno puede sobrecalentarse y apagarse automáticamente.
Se quedará sin funcionar hasta que se haya enfriado lo suficiente.
• UTILICE SIEMPRE manoplas para sacar un plato del horno a fin de evitar
quemaduras accidentales.
• No sumerja en agua ni el cable de alimentación eléctrica ni el enchufe, y
mantenga el cable alejado de superficies calientes. No haga funcionar el
aparato si el cable de alimentación eléctrica o el enchufe están dañados.
• Al abrir la puerta, manténgase a una distancia de medio metro del aparato.
Motivo: El aire caliente y el vapor liberados pueden provocar quemaduras.
• Puede que oiga un chasquido durante el funcionamiento (especialmente
si el horno está descongelando).
Motivo: Este sonido es normal cuando la salida de potencia eléctrica está
cambiando.
• NO ponga en marcha el microondas si está vacío. La corriente se
desactivará automáticamente por motivos de seguridad. Puede usarlo
normalmente después de dejarlo reposar durante al menos 30 minutos.
Se recomienda dejar siempre un vaso con agua en el interior. El agua
absorberá las microondas si se pone en marcha el horno accidentalmente.
1. Instale el horno sobre una superficie plana, nivelada y estable. Para que el horno
tenga una ventilación adecuada, deje por lo menos un espacio de 10 cm (4 pulg.)
detrás y a cada lado del horno, y de 20 cm (8 pulg.) encima.
(Para instalación en columna consulte la página 17.)
2. No bloquee nunca los conductos de ventilación de aire, ya que el horno puede
sobrecalentarse y apagarse automáticamente. Se quedará sin funcionar hasta
que se haya enfriado lo suficiente.
3. Retire todo el material de embalaje del interior del horno.
4. Por motivos de seguridad personal, conecte el cable a una toma de CA de tierra,
3 clavijas, 230 voltios y 50 Hz. Si se daña el cable de alimentación de este aparato
y para evitar incidentes, deberá sustituirlo el fabricante, su técnico de reparación o
una persona igualmente cualificada.
5. Este horno microondas debe colocarse de modo que el enchufe sea accesible.
Uso al aire libre
Este horno microondas no está diseñado para usarse al aire libre.
Sólo debe usarse en un interior.
Durante la refrigeración por aire
El ventilador se pone en marcha automáticamente para enfriar el aire durante
1 minuto. No apague el aparato mientras dure este proceso.
Recomendaciones
IMPORTANTE
•
•
•
Asegúrese de quitar el film protector de la parte exterior del
aparato. Este film tiene la función de evitar arañazos en la
superficie. Es necesario quitarlo al instalar el aparato o antes de
ponerlo en funcionamiento.
NUNCA se debe permitir a los niños que jueguen con el microondas ni
que lo usen. Tampoco se debe dejar de vigilar a los niños si están cerca
del microondas en uso. Los objetos que interesen a los niños no se deben
almacenar ni ocultar encima o dentro del microondas.
Este electrodoméstico no está pensado para que lo usen personas (incluidos
los niños) con las capacidades físicas, sensoriales o mentales reducidas, o
faltas de conocimiento y experiencia, sin la supervisión o las indicaciones de
una persona responsable que garantice un uso seguro del aparato.
No deje que los niños jueguen con el electrodoméstico.
4
NO instale el microondas en entornos húmedos o calientes.
Ejemplo: Cerca de un horno tradicional o un radiador.
Deben respetarse las especificaciones de suministro eléctrico del
horno, y cualquier prolongación del cable debe ser del mismo
estándar que el cable de alimentación suministrado con el horno.
Limpie el interior y los cierres de la puerta con un paño húmedo antes
de utilizar el horno microondas por primera vez.
jtX`Y`hl|TWYZ[`ilzUGGwG\GGt SGq GY_SGYWW_GGYaX[Gwt
Cocción/Recalentamiento
Cocción en una etapa
Este horno está configurado de fábrica para funcionar automáticamente.
Asegúrese de enchufar el horno a una toma de corriente debidamente
conectada a tierra y de que en la ventana aparezca la indicación “ON”.
Abra la puerta (la lámpara del horno se encenderá).
Ponga los alimentos en un recipiente adecuado, colóquelo en el centro del
horno y cierre la puerta firmemente (la lámpara del horno se apagará).
4. Abra la puerta del horno y saque los alimentos.
Cierre la puerta. La lámpara del horno se apaga.
1. Seleccione el nivel de potencia deseado pulsando el
botón de selección del nivel de potencia.
Resultado: El nivel de potencia seleccionado se
mostrará en la pantalla.
2. Ajuste el tiempo de cocción girando los botones
NUMÉRICOS.
Resultado: El tiempo seleccionado se muestra en la
pantalla.
El tiempo máximo adecuado para cada nivel de
potencia de cocción se puede consultar en el título
"Niveles de potencia y variaciones de tiempo" en la
página 6. Los botones NUMÉRICOS no estarán
operativos cuando se pulse un tiempo de cocción
que exceda el valor máximo. No es posible
establecer un tiempo de cocción superior al tiempo
máximo permitido por el programa elegido. Es
aconsejable pulsar el botón CANCELAR y elegir un
nuevo nivel de potencia y otro tiempo de cocción.
3. Pulse el botón
:
Resultado: La lámpara y el ventilador se encienden.
Empieza la función del horno. El tiempo que
aparece en la pantalla inicia la cuenta atrás.
Una vez transcurrido el tiempo, suena 4 veces el
pitido de final de ciclo, se detiene la función y La
lámpara del horno se apaga. Durante 1 minuto la
pantalla muestra “0” y el ventilador sigue en
funcionamiento para enfriar la zona interior.
Durante este tiempo, el ventilador no se detiene
aunque se abra la puerta. Se detendrá un minuto
más tarde. La comida se puede retirar del horno
cuando el ventilador aún está en funcionamiento.
5
Durante un ciclo de calentamiento, si se pulsa una vez el botón
, el
horno se detiene. En este momento el indicador de comprobación de
la potencia "ON" comienza a parpadear y se apaga cuando se
vuelven a pulsar los botones
o
.
Para que siga funcionando, pulse
; para cancelar el programa
seleccionado, vuelva a pulsar
. Si NO se está en un ciclo de
calentamiento, una pulsación del botón
cancela el programa
seleccionado.
Se puede pulsar el botón +20sec una o más veces para añadir
20 segundos al tiempo de cocción. Sin embargo, no se puede
exceder el tiempo máximo permitido por el nivel de potencia
seleccionado.
Cuando se enciende por primera vez, el horno emite un pitido y todos
los indicadores se muestran durante 5 segundos en la pantalla.
Si se abre la puerta una vez finalizado el ciclo, la lámpara se enciende
automáticamente y se apaga 1 minuto más tarde.
Si se abre la puerta durante un ciclo de calentamiento, el horno deja de
funcionar y la lámpara se enciende automáticamente y se apaga 1 minuto
más tarde. Si se deja la puerta abierta durante más de 1 minuto, el horno
emite un pitido cada minuto y después de 5 minutos el indicador “ON” de
comprobación de alimentación aparece en la pantalla.
ES
jtX`Y`hl|TWYZ[`ilzUGGwG]GGt SGq GY_SGYWW_GGYaX[Gwt
ES
Cocción/Recalentamiento (continuación)
Niveles de potencia y variaciones de tiempo
Cocción en varias etapas
La función de nivel de potencia permite adaptar la cantidad de energía
disipada y, de esta forma, el tiempo necesario para cocinar o
recalentar la comida, según el tipo y la cantidad. Puede elegir entre los
niveles de potencia que se indican a continuación.
1. Seleccione el nivel de potencia deseado pulsando los
botones de NIVEL DE POTENCIAGo de
DESCONGELACIÓN.
Resultado: El nivel de potencia seleccionado se
mostrará en la pantalla.
CM1929A
Nivel de
potencia
ALTO ( )
MEDIO ( )
BAJO ( )
DESCONGELAR
ALTO ( )
DESCONGELAR
BAJO ( )
2. Ajuste el tiempo de cocción girando los botones
NUMÉRICOS.
Resultado: El tiempo seleccionado se muestra en la
pantalla.
El tiempo máximo adecuado para cada nivel de
potencia de cocción se puede consultar en el
título "Niveles de potencia y variaciones de
tiempo" . Los botones NUMÉRICOS no estarán
operativos cuando se pulse un tiempo de cocción
que exceda el valor máximo. No es posible
establecer un tiempo de cocción superior al
tiempo máximo permitido por el programa
elegido. Es aconsejable pulsar el botón
CANCELAR y elegir un nuevo nivel de potencia
y otro tiempo de cocción.
Porcentaje Salida Porcentaje Salida Porcentaje Salida
100 %
70 %
50 %
20 %
1850 W
1295 W
925 W
370 W
100 %
70 %
50 %
25 %
1600 W
1120 W
800 W
400 W
100 %
70 %
50 %
30 %
1300 W
910 W
650 W
390 W
10 %
185 W
13 %
208 W
15 %
195 W
Nivel de potencia
ALTO ( )
MEDIO ( )
BAJO ( )
DESCONGELAR ALTO (
DESCONGELAR BAJO (
4. Pulse el botón
:
Resultado: La lámpara y el ventilador se encienden. El
horno comenzará a calentar automáticamente
de acuerdo con el tiempo de cocción
programado previamente y el nivel de potencia.
(I etapa II etapa III etapa). El tiempo que
aparece en la pantalla inicia la cuenta atrás.
CM1329A
Los tiempos de cocción que ofrecen las recetas y este manual se
corresponden con el nivel de potencia específico indicado.
3. Repita los pasos 1 y 2 para la programación de la memoria
en II o III etapas.
CM1629A
No se puede establecer el mismo NIVEL DE POTENCIA o
DESCONGELACIÓN.
Funcionan en secuencias de configuración.
6
Tiempo máximo
)
)
25 min
40 min
40 min
50 min
50 min
jtX`Y`hl|TWYZ[`ilzUGGwG^GGt SGq GY_SGYWW_GGYaX[Gwt
Cómo detener la cocción
Función de repetición
1. Se puede repetir la configuración de cocción previa
(independientemente del calentamiento manual o
programado automáticamente) pulsando el botón
INICIOG( ). El horno comienza con exactamente el
mismo tiempo de calentamiento y el mismo nivel de
potencia que se usaron en la última operación.
Puede detener la cocción en cualquier momento para poder:
• Controlar la comida
• Dar la vuelta a la comida o removerla
• Dejar reposar
Para detener la cocción...
Temporalmente
Debe...
2. La función de repetición se cancela una vez desconectada
la fuente de alimentación.
Abrir la puerta o pulsar una vez el botón
.
Resultado: La cocción se detendrá.
Para reanudar la cocción cierre la puerta y pulse de
nuevo
.
Completamente
Pulsar dos veces el botón
.
Resultado: Se cancelan los ajustes de
cocción.
Si desea cancelar cualquiera de los ajustes antes de empezar la
cocción, pulse una vez CANCELARG( ).
7
ES
jtX`Y`hl|TWYZ[`ilzUGGwG_GGt SGq GY_SGYWW_GGYaX[Gwt
ES
Uso del botón +20sec
Uso de la función de descongelar
Este es un botón de COCCIÓN DE UNA SOLA PULSACIÓN.
Si se pulsa una vez, el horno empieza a funcionar inmediatamente.
Se puede aumentar el tiempo de cocción pulsando el botón +20sec)
durante el ciclo de funcionamiento.
El tiempo de cocción aumenta 20 segundos con cada pulsación del
botón +20sec. Pero no se puede superar el tiempo máximo.
Como con la cocina tradicional, puede que, dependiendo de las
características de la comida o de sus gustos, tenga que ajustar
ligeramente los tiempos de cocción. Puede:
• Comprobar en cualquier momento cómo progresa la cocción
simplemente
• abriendo la puerta
• Cerrar la puerta
• Aumentar el tiempo restante de cocción
La función de descongelar permite descongelar carne, aves o pescado.
Utilice sólo recipientes que sean aptos para microondas.
Abra la puerta. Coloque la comida congelada en el centro de la
bandeja.
Cierre la puerta.
1. Pulse el botón de descongelación para ajustar
DESCONGELAR ALTO ( ) o
DESCONGELAR BAJO ( ) como se desee.
Resultado: En la pantalla aparece el indicador de
descongelación seleccionado.
Antes de poner el horno en funcionamiento, se puede aumentar/
disminuir los tiempos mediante los botones de tiempo o de
+20sec.
Durante el funcionamiento, sólo se puede añadir tiempo
mediante el botón +20sec.
2. Pulse los botones NUMÉRICOS para introducir el tiempo
de descongelación.
(Máximo 50 minutos)
.
3. Pulse el botón
Resultado: La descongelación dará comienzo.
8
No se puede establecer un tiempo de
descongelación superior a los 50 minutos. El
indicador de descongelación parpadea y es
aconsejable pulsar el botón CANCELAR( ) e
introducir un nivel y un tiempo de congelación
nuevos.
Cuando el horno está funcionando durante más de 25 minutos en el
ciclo de descongelación, NO se puede cambiar el nivel de potencia de
descongelación al modo de calentamiento (cocción/recalentamiento)
jtX`Y`hl|TWYZ[`ilzUGGwG`GGt SGq GY_SGYWW_GGYaX[Gwt
Programación de los botones de memoria
Una etapa
5. Mantenga pulsado el botón
ES
BLOQUEO DE PROGRAMASG( ) y después pulse el
botón PROGRAMASG( ). Mantenga pulsados ambos
durante 2 segundos.
Resultado: Los indicadores PROG y del número de
memoria parpadean tres veces en la pantalla
digital y suena la alarma. A continuación la
pantalla se queda en blanco.
Precaución: Debe pulsar los botones firmemente en la
posición correcta.
1. Mantenga pulsado el botón BLOQUEO DE
PROGRAMASG( ) y después pulse el botón
PROGRAMASG( ). Mantenga pulsados ambos durante
2 segundos.
Debe pulsar los botones con firmeza.
Resultado: El indicador PROG se muestra en la pantalla
digital.
2. Pulse el botón NUMÉRICO apropiado según el número de
memoria deseado.
Resultado: El código del programa de memoria
seleccionado aparece debajo del indicador
del PROGRAMA.
6. Cuando desee realizar más programaciones, repita el
proceso anterior.
3. Seleccione el nivel de potencia pulsando los botones de
NIVEL DE POTENCIA o de DESCONGELACIÓN.
Resultado: En la pantalla aparece el nivel de potencia
predeterminado ALTO cuando se pulsa por
primera vez el botón NIVEL DE POTENCIA.
Pulse los botones NIVEL DE POTENCIA o
DESCONGELACIÓN una o más veces hasta
conseguir el nivel de potencia deseado.
4. Pulse los botones NUMÉRICOS para introducir el tiempo
de cocción.
El tiempo máximo adecuado para cada nivel de
potencia de cocción se puede consultar en el
título "Niveles de potencia y variaciones de
tiempo" en la página 6. Los botones
NUMÉRICOS no estarán operativos cuando se
pulse un tiempo de cocción que exceda el valor
máximo.
No es posible establecer un tiempo de cocción
superior al tiempo máximo permitido por el
programa elegido. Es aconsejable pulsar el
botón CANCELAR y elegir un nuevo nivel de
potencia y otro tiempo de cocción.
9
Los programas de memoria tienen hasta
30 opciones. Debe asegurarse de que la unidad
esté adecuadamente programada.
Una vez completada la programación, para
realizar la cocción programada basta con pulsar
el botón NUMÉRICO. El programa de memoria
seleccionado inicia automáticamente la cocción.
jtX`Y`hl|TWYZ[`ilzUGGwGXWGGt SGq GY_SGYWW_GGYaX[Gwt
Programación de los botones de memoria (continuación)
ES
Varias etapas
6. Mantenga pulsado el botón BLOQUEO DE PROGRAMASG
( ) y después pulse el botón PROGRAMASG( ).
Mantenga pulsados ambos durante 2 segundos.
Resultado: Los indicadores PROG y del número de
memoria parpadean tres veces en la pantalla
digital y suena la alarma. A continuación la
pantalla se queda en blanco.
Precaución: Debe pulsar los botones firmemente en la
posición correcta.
1. Mantenga pulsado el botón BLOQUEO DE
PROGRAMASG( ) y después pulse el botón
PROGRAMASG( ). Mantenga pulsados ambos durante
2 segundos.
Debe pulsar los botones con firmeza.
Resultado: El indicador PROG se muestra en la pantalla
digital.
7. Cuando desee realizar más programaciones, repita el
proceso anterior.
2. Pulse el botón NUMÉRICO apropiado según el número de
memoria deseado.
Resultado: El código del programa de memoria
seleccionado aparece debajo del indicador
del PROGRAMA.
3. Seleccione el nivel de potencia deseado pulsando los
botones de NIVEL DE POTENCIA o de
DESCONGELACIÓN.
Pulse los botones de NIVEL DE POTENCIA y de
DESCONGELACIÓN una o más veces hasta
conseguir el nivel de potencia deseado.
4. Pulse los botones NUMÉRICOS para introducir el tiempo
de cocción.
El tiempo máximo adecuado para cada nivel de
potencia de cocción se puede consultar en el
título "Niveles de potencia y variaciones de
tiempo" en la página 6. Los botones
NUMÉRICOS no estarán operativos cuando se
pulse un tiempo de cocción que exceda el valor
máximo.
No es posible establecer un tiempo de cocción
superior al tiempo máximo permitido por el
programa elegido. Es aconsejable pulsar el
botón CANCELAR y elegir un nuevo nivel de
potencia y otro tiempo de cocción.
5. Repita los pasos 3 y 4 para la programación de la memoria
en II o III etapas.
10
Los programas de memoria tienen hasta
30 opciones. Debe asegurarse de que la unidad
esté adecuadamente programada.
Una vez completada la programación, para
realizar la cocción programada basta con pulsar
el botón NUMÉRICO. El programa de memoria
seleccionado inicia automáticamente la cocción.
No se puede establecer el mismo NIVEL DE POTENCIA o
DESCONGELACIÓN.
Funcionan en secuencias de configuración.
jtX`Y`hl|TWYZ[`ilzUGGwGXXGGt SGq GY_SGYWW_GGYaX[Gwt
Funcionamiento de la cocción programada
Programación del botón de cantidad doble
1. Mantenga pulsado
y, a continuación, pulse el botón
. Mantenga pulsados ambos durante 2 segundos.
Una vez realizada la programación de memoria, basta con pulsar el
botón NUMÉRICO del número de memoria que se desee seleccionar.
El horno iniciará automáticamente la función de acuerdo con el
tiempo de cocción programado y el nivel de potencia.
2. Seleccione el programa deseado con los botones
NUMÉRICOS.
1. Asegúrese de enchufar el horno a una toma de corriente
debidamente conectada a tierra y de que en la ventana
aparezca la indicación “ON”.
2. Abra la puerta.
La lámpara del horno se enciende.
3. Pulse los botones NUMÉRICOS para establecer el factor
de incremento entre 1,00 y 9,99.
3. Ponga los alimentos en un recipiente adecuado, colóquelo
en el centro del horno y cierre la puerta firmemente.
Resultado: La lámpara del horno se apaga.
4. Pulse el botón NUMÉRICO.
Resultado: El programa de memoria seleccionado inicia
automáticamente la cocción. Sin embargo, el
botón NUMÉRICO 1, 2, 3 funciona después
de 2 segundos.
El factor predeterminado de incremento del
tiempo de cocción configurado de fábrica es
1,65.
Debe establecer el factor correcto entre 1,00 y
9,99 para cada número de código de memoria.
4. Pulse el botón
11
.
Pulse el botón para salir del modo de programación.
Aunque se puede establecer un factor de cantidad doble cuyo valor
sobrepase el tiempo máximo permitido para cada nivel de potencia, el
horno no funcionará si se sobrepasa el tiempo máximo.
ES
jtX`Y`hl|TWYZ[`ilzUGGwGXYGGt SGq GY_SGYWW_GGYaX[Gwt
Programación del botón de cantidad doble
(continuación)
Funcionamiento del botón de cantidad doble
1. Pulse el botón Cantidad doble.
ES
Edición del factor de cantidad doble
Función Entrada de clave
Pantalla
Mantenga pulsado
CANCELAR ( )
y, a continuación,
el botón
.
N.º código
Observación
Mantenga pulsados
2 segundos.
1,00 ~ 9,99 disponibles
(cambie el factor si es
necesario.)
Si no desea realizar más
cambios, pulse CANCELAR
para salir del modo de edición.
Nuevo n.º código
Sáltese este paso si no lo
necesita.
(Valor del factor de
entrada deseado)
Sáltese este paso si no lo
necesita.
CANCELAR (
Después de 1 segundo, el valor
predeterminado se muestra en
la pantalla.
Edición
del
(Valor del factor de
factor
entrada deseado)
de
cantidad
doble
INICIOG( )
INICIOG(
2. Pulse el botón NUMÉRICO de memoria deseado.
Resultado: En la pantalla aparece el tiempo de cocción
multiplicado por el factor preseleccionado y
se inicia la cocción; el conteo del tiempo de
cocción desciende.
)
Sáltese este paso si no lo
necesita.
) (Modo de
cancelar)
Se sale del modo de edición.
12
Para iniciar la cocción no es necesario pulsar el
botón
.
jtX`Y`hl|TWYZ[`ilzUGGwGXZGGt SGq GY_SGYWW_GGYaX[Gwt
Programación del tiempo de limpieza del filtro del
aire
Control del tono de la alarma
Se puede seleccionar el tono de alarma que se desee. Hay 4 niveles de
sonido disponibles.
Cuando el indicador de comprobación del filtro del aire (FILTRO)
aparece en la pantalla después de cierto tiempo de utilización del
horno, se debe limpiar el filtro siguiendo las instrucciones de
"Limpieza del filtro de aire" en la página 16 de este manual. Si desea
cambiar el tiempo de limpieza del filtro del aire siga el procedimiento
que se explica más abajo.
Mantenga pulsado el botón CANCELARG( ) y después pulse
el botón NUMÉRICO 0. Mantenga pulsados ambos durante
2 segundos.
Resultado: El tono de la alarma cambia a un nivel más
alto que el actual.
1. Mantenga pulsado el botón
BLOQUEO DE PROGRAMASG( ) y después pulse el
botón NUMÉRICO 3. Mantenga pulsados ambos
durante 2 segundos
Resultado: La pantalla muestra en horas el tiempo entre
limpiezas del filtro del aire que se ha
programado o el tiempo original de fábrica.
Los valores cambian según se van pulsando las teclas
ocultas en el siguiente orden.
Snd 0 Snd 1 Snd 2 Snd 3 Snd 0 (sin sonido)
El tiempo predeterminado es de 500 horas en
términos de tiempo de uso, no en tiempo
continuo.
2. Pulse los botones NUMÉRICOS para introducir el tiempo
de limpieza deseado.
Se pueden establecer hasta 999 horas.
3. Mantenga pulsado el botón
BLOQUEO DE PROGRAMASG( ) y después pulse el
botón NUMÉRICO 3.
Mantenga pulsados ambos durante 2 segundos para
guardar el nuevo valor.
Así se completa la programación del tiempo de limpieza
del filtro del aire.
4. Pulse el botón CANCELARG(
cocción.
El tomo de alarma 0 no activa ningún sonido.
) para volver al modo de
Una vez cumplido el tiempo de limpieza se debe
proceder a la limpieza del filtro. Consulte la
página 16.
13
El tono predeterminado es Snd 2.
ES
jtX`Y`hl|TWYZ[`ilzUGGwGX[GGt SGq GY_SGYWW_GGYaX[Gwt
Códigos de error
ES
Tipo de error
Error en frecuencia de
alimentación (50/60Hz)
Código
E1
Señal acústica
-
Causa
Solución
La frecuencia de alimentación no es 50 Hz.
Desenchufe el cable de alimentación y compruebe si la frecuencia
de alimentación es 50 Hz.
Enchufe el cable en una fuente de alimentación y compruebe si
aparece “E1”. Si el código de error aparece de nuevo aún
después de proporcionar la fuente de alimentación correcta,
póngase en contacto con el centro de servicio técnico más
cercano.
Error de alimentación HVT-I
E41
Un pitido largo
El circuito del interior del horno no funciona
durante 2 segundos correctamente.
Desenchufe el cable de alimentación y espere 10 segundos.
Vuelva a enchufar el cable de alimentación y compruebe si
aparece de nuevo el código de error “E41”. Si los síntomas
continúan, póngase en contacto con el centro de servicio técnico
más cercano.
Error de alimentación HVT-II
E42
Un pitido largo
El circuito del interior del horno no funciona
durante 2 segundos correctamente.
Desenchufe el cable de alimentación y espere 10 segundos.
Vuelva a enchufar el cable de alimentación y compruebe si
aparece de nuevo el código de error “E42”. Si los síntomas
continúan, póngase en contacto con el centro de servicio técnico
más cercano.
Error EEPROM
E5
Un pitido largo
IC de memoria (EEPROM IC) no funciona
durante 2 segundos correctamente.
En este caso, otras funciones excepto la
función de memoria funcionan
correctamente.
(Se puede hacer funcionar el horno
normalmente.)
Pulse el botón CANCELAR una o más veces e intente iniciar un
calentamiento programado. Si el código de error "E5" persiste,
póngase en contacto con el centro de servicio técnico más
cercano.
14
jtX`Y`hl|TWYZ[`ilzUGGwGX\GGt SGq GY_SGYWW_GGYaX[Gwt
Teclas ocultas
Cuidados del horno microondas
Nota: Pulse la tecla 1 y a continuación la siguiente. Mantenga la pulsación
durante 2 segundos
Función
Tiempo total
en continuidad
Entrada de clave
Tecla 1
Siguie
nte
CANCELAR
( )
1
Tiempo total
de oscilación
de magnetrón
CANCELAR
( )
Número de
veces de uso
del código del
programa de
memoria
CANCELAR
( )
Pantalla
Limpieza del horno microondas
1. Desenchufe el horno de la toma de corriente antes de la limpieza.
Observación
2. Limpie el interior del horno. Limpie las salpicaduras con un paño húmedo. Si el
horno está muy sucio, se puede utilizar un detergente para cocinas. No utilice
detergentes agresivos ni abrasivos.
Mantenga pulsados
ambos durante
2 segundos.
Unidad: 10 horas.
2
3. Limpie el exterior del horno con agua y jabón y seque con un paño suave.
Precaución: No permita que entre agua por las aberturas de la ventilación
posterior o del panel de control.
Mantenga pulsados
ambos durante
2 segundos
Unidad: 1 hora.
Inicio
4. Para limpiar la ventana de la puerta, lave con agua y un jabón muy suave y seque
con un paño suave. No use limpiadores ásperos o abrasivos para no causar
arañazos en la puerta.
Mantenga pulsados
ambos durante
2 segundos
N.º código
(Pantalla de datos
después de
2 segundos)
739 veces de uso
(El nuevo código se
puede establecer
después de la pantalla
de datos)
CANCELAR (
Tiempo de
calentamiento
por código de
programa de
memoria
(visualización
secuencial
automática)
CANCELAR
( )
)
(Modo de cancelar)
P
Mantenga pulsados
ambos durante
2 segundos
(Visualización
secuencial durante
3 segundos desde
1 a 30)
CANCELAR (
)
Los restos de comida o líquidos adheridos a las paredes del horno o
entre los cierres y la superficie de la puerta absorben microondas, lo
que puede causar chispas o arcos eléctricos.
(Modo de cancelar)
15
ES
jtX`Y`hl|TWYZ[`ilzUGGwGX]GGt SGq GY_SGYWW_GGYaX[Gwt
Cuidados del horno microondas (continuación)
ES
Limpieza de la cubierta del techo
Limpieza del filtro de aire
1. Con las dos manos, empuje los topes de la cubierta del techo hacia adentro y
luego hacia abajo. A continuación extraiga la cubierta de la cavidad del horno.
Limpie el filtro de aire regularmente siguiendo las instrucciones que figuran
a continuación.
2. Lave la cubierta del techo con agua jabonosa o solución desinfectante para
cocina.
Cuando el filtro de aire está obturado por el polvo, el horno puede presentar
problemas.
3. Vuelva a colocar la cubierta del techo antes de utilizar el horno.
1. Quite los tornillos de los dos lados del filtro de aire.
2. Extraiga el filtro de aire con cuidado.
Precaución : La cubierta del techo debe estar sujeta firmemente en su sitio
cuando se utiliza el horno.
Cuando haya retirado la cubierta del techo para proceder a su
limpieza, tenga mucho cuidado con los componentes interiores
de la parte superior de la cavidad del horno que han quedado
expuestos. Si alguno de ellos está deformado, pueden
ocasionarse síntomas anormales como arcos eléctricos o
chispas cuando el horno está en funcionamiento. En ese caso,
póngase en contacto con el centro de reparaciones posventa
más cercano.
3. Lave el filtro con agua jabonosa tibia.
4. Vuelva a colocar el filtro de aire antes de utilizar el horno.
Si el filtro de aire está obstruido por residuos, se producirá un
sobrecalentamiento en el horno.
Si desea cambiar el tiempo de limpieza del filtro del aire, consulte
“Programación del tiempo de limpieza del filtro del aire” en la página 13.
Tapa superior
Perno
16
jtX`Y`hl|TWYZ[`ilzUGGwGX^GGt SGq GY_SGYWW_GGYaX[Gwt
Instrucciones para la instalación en columna
Sustitución de la lámpara
Importante
Importante
ES
1. Quite el tornillo de la cubierta de la lámpara.
1. Antes de empezar con la instalación, desenchufe el cable de alimentación de
la toma de pared.
Para cambiar la lámpara, no es necesario retirar el panel externo.
2. Desenrosque la lámpara girando hacia la derecha.
2. Para la instalación en columna, se debe usar la placa de soporte proporcionada
con la unidad.
3. Reemplácela por una lámpara nueva girando hacia la izquierda.
3. La altura máxima de apilamiento es de dos unidades.
El apilamiento de dos unidades está limitado a los modelos
siguientes.
PRECAUCIÓN: La cavidad del horno debe estar vacía.
Instalación
Cubierta de la
lámpara
Portalámparas
Panel exterior
(230 V 25 W)
Lámpara
1. Apile las dos unidades.
2. Quite los 6 tornillos, como se muestra en la ilustración.
3. Coloque la placa de soporte para trabar las dos unidades.
4. Ponga los 6 tornillos y apriételos, como se muestra en la ilustración.
5. El horno superior debe estar a una altura segura y accesible.
Tornillo
Placa del soporte
17
jtX`Y`hl|TWYZ[`ilzUGGwGX_GGt SGq GY_SGYWW_GGYaX[Gwt
Guía de utensilios de cocina
ES
Para cocinar alimentos en el horno microondas, las microondas deben
poder penetrar en la comida, sin que sean absorbidas por el plato
utilizado.
Por lo tanto, debe tener cuidado al elegir los utensilios de cocina. Si
éstos están marcados como seguros para microondas, no deberá
preocuparse.
En la siguiente tabla se detallan diversos tipos de utensilios de cocina y
se indica si deben o no utilizarse en un horno microondas y cómo
hacerlo.
Utensilios de cocina
Seguro para Comentarios
microondas
Papel de aluminio
Porcelana y barro cocido
Platos de cartón
de poliéster desechables
Envoltorios de comida
rápida
• Recipientes y vasos
de poliestireno
•
•
Bolsas de papel o
periódicos
Papel reciclado o
con adornos
metálicos
Cristal
• Vajillas que pueden
llevarse del horno a
la mesa
• Cristalería fina
•
Metal
•
•
Se puede utilizar en pequeñas
cantidades para evitar que determinadas
áreas se cuezan demasiado. Si el papel
de aluminio está demasiado cerca de las
paredes del horno, o si se utiliza en
grandes cantidades, pueden producirse
arcos eléctricos.
Papel
•
•
La porcelana, la cerámica, el barro
cocido vidrioso y la porcelana fina son
normalmente adecuados, a menos que
estén decorados con adornos metálicos.
Puede provocar arcos eléctricos.
Platos
Cierres metálicos
de las bolsas para
congelados
Platos, tazas,
servilletas y papel
de cocina
Papel reciclado
Plástico
• Recipientes
Algunos alimentos congelados vienen
empaquetados en estas bandejas.
Se pueden utilizar para calentar comida.
Una cocción excesiva puede hacer que
el poliestireno se funda.
Pueden arder.
Tarros de cristal
•
Film transparente
•
Bolsas para
congelados
Papel encerado o a prueba
de grasa
18
Se pueden utilizar, a menos que estén
decoradas con adornos de metal.
Se puede utilizar para calentar alimentos
o líquidos. El cristal delicado se puede
romper o resquebrajar si se calienta
repentinamente.
Debe quitarse la tapa. Adecuados sólo
para calentar.
Pueden producir arcos eléctricos o fuego.
Para tiempos de cocción cortos y para
calentar. También para absorber el
exceso de humedad.
Puede provocar arcos eléctricos.
: Especificaciones
: Usar con precaución
: Inseguro
Especialmente si se trata de
termoplástico resistente al calor. Otros
plásticos pueden combarse o
decolorarse a altas temperaturas. No use
platos de melamina.
Se puede utilizar para retener la
humedad. No debe tocar los alimentos.
Tenga cuidado al quitar el envoltorio ya
que puede escaparse vapor.
Sólo si pueden hervir o son resistentes al
horno. No deben estar selladas
herméticamente. Si es necesario,
pínchelas con un tenedor.
Se puede utilizar para retener la
humedad y evitar salpicaduras.
jtX`Y`hl|TWYZ[`ilzUGGwGX`GGt SGq GY_SGYWW_GGYaX[Gwt
Guía de cocción
C : Congelado
Receta
R : Refrigerado
Método
NivelG
potencia
ES
Tiempo
1850
W
1600
W
Tiempo
1300 reposo
W
Receta
PAN Y PASTAS
Método
APERITIVOS Y ENTRANTES
Para descongelar
Para recalentar
Barrita Viena 9"
C
DESCONG 0'45"
ELAR 1
0'50"
0'50"
5 min
Salchichas grandes C
Poner en
bandeja
Barrita Viena 9"
X2C
DESCONG 1'10"
ELAR 1
1'15"
1'20"
5 min
Desayuno completo R
Cubrir
Poner en bandeja DESCONG 2'30"
ELAR 2( )
2'40"
Quiche 11"
Poner en bandeja DESCONG 3'00"
porciones 136 g
ELAR 1
ALTO
0'40"
3'00"
3'00"
1 min
0'45"
0'50"
1 min
Pastelillo relleno Quitar papel
ALTO
ind. X 2 C
aluminio Poner en
bandeja
0'10"
0'15"
0'15"
1 min
Tarta frutas C
Poner en bandeja ALTO
0'40"
0'45"
0'45"
1 min
Croissant X 2 C Poner en bandeja ALTO
0'05"
0'10"
0'10"
1 min
Bollería 227 g R Poner en bandeja ALTO
0'45"
0'55"
1'00"
1 min
Tarta pollo y
Quitar envoltorio. ALTO
champiñones X Poner en bandeja
2R
0'45"
0'55"
1'00"
1 min
Tarta pollo y
Poner en
champiñones R bandeja, quitar
envoltorio.
0'30"
0'40"
0'45"
1 min
Pastel, ind.
Porción C
Hamburguesas buey C
2'50"
5 min
Para calentar
ALTO
2'00" 2'10" 2'20" 2 min
MED
2'30" 2'40" 2'50" 1 min
ALTO
0'55" 1'05" 1'10" 1 min
ALTO
0'55" 1'05" 1'10" 1 min
Donner kebab 162 g C
ALTO
1'00" 1'10" 1'20" 1 min
ALTO
1'00" 1'10" 1'20" 1 min
Pizza 190 g C
Poner en
bandeja
BAJO
2'30" 2'45" 3'00" 2 min
Costillas barbacoa
200 g C
Poner en
bandeja
MED
3'30" 3'45" 4'00" 1 min
Alitas picantes X 6 C
Poner en
ALTO
bandeja, partes
finas en el centro
2'00" 2'15" 2'30" 1 min
Alubias cocidas 500 g
Cubrir y remover ALTO
a la mitad
2'00" 2'10" 2'20" 2 min
Alubias cocidas 250 g
Cubrir y remover ALTO
a la mitad
1'00" 1'05" 1'10" 2 min
Crumble de manzana
200 g C
Plato cubierto
ALTO
1'20" 1'30" 1'40" 2 min
Pudín de Navidad
150 g R
Poner en bol
ALTO
0'20" 0'25" 0'30" 2 min
Bizcocho de
mermelada 80 g C
En una bandeja ALTO
1'00" 1'05" 1'10" 2 min
Crepes Suzette 2 C
Perforar film
ALTO
0'50" 1'00" 1'10" 1 min
X2
X1
ALTO
ALTO
0'35" 1'05" 1'30" 2 min
0'40" 0'50" 1'00" 2 min
X2
X1
ALTO
ALTO
0'35" 1'05" 1'30" 2 min
0'40" 0'45" 0'45" 2 min
POSTRES
Para calentar
Para cocinar
Huevos,
escalfados X 2
R
MED
Hamburguesas pollo C
Perrito caliente C
APERITIVOS Y ENTRANTES
Bacon, loncha R Poner en parrilla
Nivel
Tiempo
Tiempo
potencia 1850 1600 1300 reposo
W
W
W
ALTO
1'30"
1'40"
1'50"
1 min
Poner en tarrinas ALTO
0'30"
0'40"
0'45"
1 min
Huevos,
revueltos X 2 R
Batir los huevos y ALTO
poner en bol
25"-30" 30"-40" 35"-45" 1 min
Pudín a base de sebo
C
Salchichas X 2
Gruesas R
Perforar
1'00"
Pudín de bizcocho C
MED
1'10"
1'20"
2 min
19
jtX`Y`hl|TWYZ[`ilzUGGwGYWGGt SGq GY_SGYWW_GGYaX[Gwt
Guía de cocción (continuación)
ES
C : Congelado
Receta
R : Refrigerado
Método
NivelG
Tiempo
Tiempo
potencia 1850 1600 1300 reposo
W
W
W
Receta
ENTRANTES
NivelG
Tiempo
Tiempo
potencia 1850 1600 1300 reposo
W
W
W
VERDURA FRESCA
Para recalentar
Espirales con salsa
de queso R
Método
Para cocinar 500 g
Poner en plato
apto microondas
ALTO
3'30" 3'40" 3'50" 1 min
Judías verdes
cortadas
60 ml/4 cucharadas ALTO
agua cubrir
3'00" 3'15"
3'30"
2 min
Pollo tikka masala C Perforar film
ALTO
3'20" 3'30" 3'40" 2 min
Brécol, cabezuelas
3'30"
2 min
Perforar film
ALTO
3'00" 3'15" 3'30" 2 min
60 ml/4 cucharadas ALTO
agua cubrir
3'00" 3'15"
Pollo al curry verde
tailandés C
Col, cortada
5'00" 5'30"
6'00"
2 min
Perforar film
ALTO
3'30" 3'45" 4'00" 2 min
10 cucharadas
agua cubrir
ALTO
Chile con carne C
Pollo cocido 1/2
Refrigerado
Poner en bolsa
perforada
MED
4'30" 5'00" 5'30" 2 min
Zanahoria, rodajas
60 ml/4 cucharadas ALTO
agua cubrir
3'30" 3'45"
4'00"
2 min
Lasaña 192 g
Poner en plato
apto microondas
MED
4'00" 4'15" 4'30" 2 min
Coliflor, cabezuelas
60 ml/4 cucharadas ALTO
agua cubrir
3'30" 3'45"
4'00"
2 min
Mejillones marinera Perforar bolsa
466 g C
ALTO
2'30" 2'45" 3'00" 2 min
Judías verdes
enteras
60 ml/4 cucharadas ALTO
agua cubrir
3'30" 3'45"
4'00"
2 min
Paupetón de salmón Perforar bolsa
y aguacate R
ALTO
2'30" 2'45" 3'00" 2 min
Patatas con piel
Dar la vuelta a la
mitad
10'00” 11'00” 12'00” 5 min
3'00" 3'15" 3'30" 2 min
Coles de Bruselas
60 ml/4 cucharadas ALTO
agua cubrir
4'30" 4'45"
5'00"
2 min
4'00" 4'20" 4'40" 2 min
Judías verdes
cortadas
Cubrir, remover a
partir de media
cocción
ALTO
3'00" 3'15"
3'30"
2 min
Judías enteras
Cubrir, remover a
la mitad
ALTO
4'00" 4'15"
4'30"
2 min
Cabezuelas de
brécol
Cubrir, remover a
la mitad
ALTO
4'00" 4'15"
4'30"
2 min
1'40" 2'00" 2'20" 1 min
Col, cortada
Cubrir, remover a
la mitad
ALTO
4'00" 4'15"
4'30"
2 min
Pastel de carne con Poner en el horno MED
patatas 300 g R
y cubrir
Pudín a base de
sebo congelado
Cubrir - poner
vertical en plato
apto para
microondas.
BAJO
Suprema de pollo
Perforar bolsa,
DESCONG 5'00" 5'00" 5'00" 1 min
con pesto rojo 312 g poner en bandeja ELAR 1
C
ALTO
3'30" 3'45" 4'00"
Tallarines a la
carbonara R
Perforar bolsa,
ALTO
poner en bandeja
ALTO
Tortellini al queso R Poner en plato y
cubrir
ALTO
2'00" 2'15" 2'30" 1 min
Bastoncitos
zanahoria
Cubrir, remover a
la mitad
ALTO
4'00" 4'15"
4'30"
2 min
Pastel de verduras
R
Poner en plato
apto microondas
ALTO
3'20" 3'35" 3'50" 1 min
Coliflor, cabezuelas
Cubrir, remover a
la mitad
ALTO
4'00" 4'15"
4'30"
2 min
Comida preparada
350 g R
Cubierto
ALTO
2'00" 2'15" 2'30" 1 min
Mazorca de maíz
Cubrir
ALTO
4'00" 4'30"
5'00"
2 min
Maíz, mazorquitas
ALTO
5'00" 5'15"
5'30"
2 min
Comida preparada
700 g R
Cubierto
Cubrir, remover a
la mitad
Champiñones,
enteros
Cubrir, remover a
la mitad
ALTO
3'00" 3'15"
3'30"
2 min
ALTO
3'00" 3'15" 3'30" 1 min
20
jtX`Y`hl|TWYZ[`ilzUGGwGYXGGt SGq GY_SGYWW_GGYaX[Gwt
Guía de cocción (continuación)
C : Congelado
Receta
Limpieza del horno microondas
Las siguientes partes del horno microondas deben limpiarse
regularmente para evitar que las partículas de comida y la grase se
incrusten en él:
R : Refrigerado
Método
Nivel
potencia
Tiempo
1850
W
1600
W
1300
W
Tiempo
reposo
•
•
•
VERDURA FRESCA
Para cocinar 500 g
Patatas, piel
230~290 g X 1
ALTO
3'00"
4'00"
4'30"
2 min
Patatas, puré X 2
Patatas, puré X 4
ALTO
ALTO
6'00"
10'00"
6'30"
11'15"
7'00"
12'30"
2 min
2 min
Pisto 500 g
ALTO
3'30"
4'00"
4'30"
2 min
Coles de Bruselas Cubrir, remover
a la mitad
ALTO
3'00"
3'30"
4'00"
2 min
Superficies internas y externas
Puerta y cierres de la puerta
Bandeja
Los cierres de la puerta deben estar SIEMPRE limpios y la puerta
debe cerrar correctamente.
Si no mantiene el horno limpio puede que se dañe la superficie, lo
que podría restar efectividad al aparato y provocar riesgos
innecesarios.
1. Limpie las superficies externas con un paño suave y templado mojado en
agua con jabón.
Enjuáguelas y séquelas.
ARROZ, 500 g
Para recalentar
Arroz, hervido C
Cubrir, remover
a la mitad
ALTO
3'00"
3'15"
3'30"
2 min
Arroz, pilaf C
Cubrir, remover
a la mitad
ALTO
3'00"
3'15"
3'30"
2 min
2. Elimine cualquier marcha o salpicadura de las superficies internas con un paño
jabonoso.
Enjuáguelas y séquelas.
3. Para quitar las partículas de comida más duras y eliminar manchas, coloque un
vaso de zumo de limón exprimido en la bandeja y caliéntelo durante 10 minutos a
la máxima potencia.
NO derrame agua en las rejillas de ventilación.
NUNCA utilice productos abrasivos ni disolventes químicos.
Tenga especial cuidado al limpiar los cierres de la puerta para
asegurarse de que las partículas no:
•
•
21
se acumulen
impidan que la puerta se cierre correctamente
Limpie la cavidad del horno microondas después de cada uso con un
detergente suave. Para evitar daños, deje que el microondas se
enfríe antes de limpiarlo.
ES
jtX`Y`hl|TWYZ[`ilzUGGwGYYGGt SGq GY_SGYWW_GGYaX[Gwt
Conservación y mantenimiento del horno
microondas
Especificaciones técnicas
SAMSUNG se esfuerza continuamente por mejorar sus productos.
Tanto las especificaciones del diseño como estas instrucciones del
usuario están sujetas a modificaciones sin previo aviso.
ES
Debe tomar algunas precauciones sencillas al guardar o utilizar su
horno microondas.
No debe utilizar el horno si la puerta o los cierres de la puerta están
dañados:
• Bisagras rotas
• Cierres deteriorados
• Cubierta del horno abollada o torcida
Sólo un experto del servicio técnico debe realizar reparaciones en el
microondas.
Potencia de salida
3000 W
2600 W
1850 W
(IEC-705)
1600 W
(IEC-705)
1300 W
(IEC-705)
2450 MHz
Dimensiones (An. x Al. x Pr.)
Exterior
Interior del horno
Si desea guardar el horno temporalmente, elija un lugar seco y sin
polvo.
Motivo: El polvo y la humedad pueden afectar a las piezas
CM1329A
3200 W
Frecuencia de funcionamiento
Desconéctelo del enchufe de la pared
Póngase en contacto con el centro de reparaciones posventa
más cercano.
CM1629A
230 V ~ 50 Hz
Consumo de energía
Microondas
No quite NUNCA la cubierta externa del horno. Si el horno es
defectuoso y necesita ser reparado o duda de su estado:
•
•
CM1929A
Fuente de energía
464 x 368 x 557 mm
370 x 190 x 370 mm
Volumen
26 litros
Peso
Neto
32 kg aprox.
responsables del funcionamiento del horno.
464
43
557
530
26
1000
368
Modelo
10
22
444
486
514
jtX`Y`hl|TWYZ[`ilzUGGwGYZGGt SGq GY_SGYWW_GGYaX[Gwt
Nota
ES
23
jtX`Y`hl|TWYZ[`ilzUGGwGY[GGt SGq GY_SGYWW_GGYaX[Gwt
jtX`Y`hl|TWYZ[`iw{UGGwGXGGt SGq GY_SGYWW_GGYaX^Gwt
FORNO MICRO-ONDAS
(COMERCIAL)
Manual de instruções e guia de confecção de alimentos
CM1929A (1850 Watt)
CM1629A (1600 Watt)
CM1329A (1300 Watt)
P
1
2
3
4
5
6
7
8
9
+ 20sec
Nº de código: DE68-02349B
0
Forno ......................................................................................................2
Painel de controlo ..................................................................................2
Utilizar este folheto de instruções ..........................................................3
Precauções de segurança .....................................................................3
Instalar o forno micro-ondas ..................................................................4
Cozinhar/Reaquecer ..............................................................................5
Níveis de potência e variações de tempo ..............................................6
Interromper a cozedura ..........................................................................7
Função de repetição...............................................................................7
Utilizar o botão +20seg ..........................................................................8
Utilizar a função descongelar.................................................................8
Programação de botões de memória.....................................................9
Como utilizar a cozedura a partir da memória .....................................11
Programação do botão Quantidade dupla (Double Quantity)..............11
Como utilizar o botão Quantidade dupla
(Double Quantity) .................................................................................12
Programar os intervalos de tempo de limpeza do filtro de ar ..............13
Controlar o tom do sinal sonoro ...........................................................13
Códigos de erro....................................................................................14
Teclas ocultas ......................................................................................15
Cuidados a ter com o micro-ondas ......................................................15
Instruções para instalação em pilha.....................................................17
Substituição da lâmpada ......................................................................17
Guia de utensílios de cozinha ..............................................................18
Guia de confecção de alimentos..........................................................19
Limpar o forno micro-ondas .................................................................21
Armazenar e reparar o forno micro-ondas ...........................................22
Características técnicas .......................................................................22
jtX`Y`hl|TWYZ[`iw{UGGwGYGGt SGq GY_SGYWW_GGYaX^Gwt
Forno
Painel de controlo
1
PT
2
4
LÂMPADA DO FORNO
VISOR
TAMPA DA
LÂMPADA DO
FORNO
PUXADOR DA
PORTA
PAINEL DE CONTROLO
BOTÃO INICIAR
P
1
2
3
4
5
6
7
8
9
0
+ 20sec
P
1
2
3
4
5
6
7
8
9
3
0
+ 20sec
COBERTURA
DO TECTO
1.
2.
3.
4.
5.
6.
7.
8.
9.
10.
FILTRO DE AR
PORTA
TABULEIRO DO PRATO
ORIFÍCIOS DO FECHO
TRINCOS DA PORTA
DE SEGURANÇA
5
6
7
8
9
10
VISOR
BOTÃO PROGRAMAR (PROGRAM)
BOTÃO BLOQUEIO DE PROGRAMA (PROGRAM LOCK)
TECLAS NUMÉRICAS (Programação de memória, tempo)
BOTÃO SELECTOR DO NÍVEL DE POTÊNCIA (POWER LEVEL)
BOTÃO SELECTOR DE DESCONGELAÇÃO (DEFROST)
BOTÃO QUANTIDADE DUPLA (DOUBLE QUANTITY)
BOTÃO +20seg (Botão de cozedura com um toque)
BOTÃO PARAR/CANCELAR (STOP/CANCEL)
10. BOTÃO INICIAR (START)
VISOR
INDICADOR DO
PROGRAMA
VISOR DO TEMPO
INDICADOR DE
VERIFICAÇÃO DO
FILTRO DE AR
INDICADOR
DO NÚMERO
DO BOTÃO
DE
MEMÓRIA
INDICADOR DE
INDICADORES INDICADORES DE
VERIFICAÇÃO DA FONTE DOS NÍVEIS DE DESCONGELAÇÃO
DE ALIMENTAÇÃO
POTÊNCIA
(Se aparecer é porque o
aquecimento não funciona)
2
INDICADOR DE
VERIFICAÇÃO
DE DADOS
INDICADOR
DE
QUANTIDADE
DUPLA
jtX`Y`hl|TWYZ[`iw{UGGwGZGGt SGq GY_SGYWW_GGYaX^Gwt
Utilizar este folheto de instruções
Precauções de segurança
Acabou de adquirir um forno micro-ondas SAMSUNG. O Manual de
instruções contém informações valiosas sobre como cozinhar
alimentos com
o seu forno micro-ondas:
• Precauções de segurança
• Acessórios e utensílios de cozinha adequados
• Sugestões culinárias úteis
A parte da frente do folheto contém ilustrações do forno e, o que é
mais importante, do painel de controlo, para que possa encontrar os
botões mais facilmente.
LEIA AS INSTRUÇÕES DE SEGURANÇA IMPORTANTES
ATENTAMENTE E GUARDE-AS PARA FUTURAS CONSULTAS.
Antes de cozinhar alimentos ou líquidos no microondas, verifique se
foram tomadas as seguintes precauções de segurança.
Os procedimentos passo-a-passo utilizam dois símbolos diferentes.
AVISO:
Importante
Nota
AVISO:
Se a porta ou os fechos estiverem danificados, não deve utilizar o forno até ter
sido reparado por uma pessoa competente.
AVISO:
É perigoso que outra pessoa não qualificada efectue qualquer serviço ou
operação de reparação, que envolva a remoção da tampa protectora contra a
exposição à energia de microondas.
Os líquidos e outros alimentos não devem ser aquecidos em recipientes
fechados, porque podem explodir.
AVISO:
O aquecimento de bebidas no microondas pode resultar numa ebulição que
venha a explodir posteriormente, pelo que deve ter cuidado quando retirar o
recipiente do microondas; para evitar esta situação aguarde SEMPRE, pelo
menos, 20 segundos depois de o forno desligar para que a temperatura equilibre.
Se necessário, mexa enquanto está a aquecer e mexa SEMPRE depois de aquecer.
Se se escaldar, siga estas instruções de PRIMEIROS SOCORROS:
* Coloque a zona escaldada em água fria durante, pelo menos, 10 minutos.
* Cubra com uma ligadura limpa e seca.
* Não aplique cremes, óleos nem loções.
PRECAUÇÕES PARA EVITAR EVENTUAL EXPOSIÇÃO A UM
EXCESSO DE ENERGIA DE MICROONDAS
A não observação das seguintes precauções de segurança pode resultar em
exposição nociva à energia de microondas.
(a) Em nenhuma circunstância deverá ser feita qualquer tentativa de utilizar o
forno com a porta aberta ou de forçar os bloqueios de segurança (trincos da
porta) ou de introduzir qualquer objecto nos orifícios de segurança.
(b) Não coloque nenhum objecto entre a porta do forno e a parte frontal, nem
permita que resíduos de alimentos ou de detergente se acumulem nas
superfícies isolantes. Mantenha limpa a porta e as respectivas superfícies
isolantes, limpando-as com um pano húmido após a primeira utilização e com
um pano macio seco a partir daí.
(c) Não utilize o forno se ele estiver danificado até ter sido reparado por um
técnico de assistência de microondas qualificado, formado pelo fabricante. É
particularmente importante que a porta do forno feche devidamente e que não
existam quaisquer danos nos seguintes pontos:
(1) Porta (empenada)
(2) Dobradiças da porta (partidas ou soltas)
(3) Fechos das portas e superfícies isolantes
(d) O forno só deve ser regulado ou reparado por um técnico de assistência de
microondas qualificado, formado pelo fabricante.
AVISO:
O conteúdo dos biberões e dos boiões de comida para bebés deve ser mexido
ou agitado antes de ser consumido e a temperatura tem de ser verificada para
evitar queimaduras.
•
Utilize apenas utensílios adequados para uso nos fornos microondas;
NÃO utilize recipientes metálicos, loiça com frisos de ouro ou prata, espetos,
garfos, etc. Retire os atilhos de arame dos sacos de papel ou plástico.
Motivo: Podem provocar faíscas que podem danificar o forno.
•
•
•
3
Quando aquecer alimentos em recipientes de plástico ou papel, vigie o
forno uma vez que pode pegar fogo.
Não utilize o microondas para secar papel ou vestuário.
Pequenas quantidades de alimentos requerem menos tempo de
aquecimento.
Se programar os tempos normais, podem aquecer demasiado e
queimarem-se.
Se observar algum fumo, desligue o aparelho ou retire o cabo de alimentação
da tomada de parede e mantenha a porta fechada para abafar as chamas.
PT
jtX`Y`hl|TWYZ[`iw{UGGwG[GGt SGq GY_SGYWW_GGYaX^Gwt
Precauções de segurança (continuação)
PT
Instalar o forno micro-ondas
Este micro-ondas pode ser colocado em qualquer lado (bancada ou
prateleira da cozinha, carrinho, mesa).
•
NUNCA encha totalmente o recipiente e escolha um que seja mais largo no
cimo do que no fundo para evitar que o líquido ferva até deitar por fora. As
garrafas com gargalos estreitos podem explodir se forem sobreaquecidas.
• NUNCA aqueça um biberão com a tetina, uma vez que este pode explodir
se sobreaquecido.
• Os ovos com casca e os ovos cozidos inteiros não devem ser aquecidos nos
fornos microondas porque podem explodir, mesmo depois do aquecimento
do microondas terminar. Não aqueça garrafas, frascos, recipientes fechados
hermeticamente ou em vácuo, nozes com casca, tomates, etc.
• O forno deve ser limpo regularmente e deve remover todos os resíduos
de alimentos.
• Se não mantiver o forno limpo, a superfície pode deteriorar-se e afectar o
aparelho, resultando em situações de perigo.
• Não limpe o aparelho com um jacto de água.
• NÃO tape as aberturas de ventilação traseiras com panos ou papel. Estes
podem incendiar-se quando o ar quente é evacuado do forno.
O forno pode sobreaquecer e desligar-se automaticamente. Permanece
inoperativo até ter arrefecido o suficiente.
• USE SEMPRE luvas para retirar um prato do forno para evitar
queimaduras acidentais.
• Não mergulhe o cabo de alimentação ou a ficha em água e afaste o cabo
de superfícies quentes. Não utilize este aparelho se o cabo de
alimentação ou a ficha estiverem danificados.
• Mantenha-se à distância de um braço do forno quando abrir a porta.
Motivo: O ar quente ou o vapor libertados podem provocar queimaduras.
• Pode ouvir estalidos durante o funcionamento do forno (especialmente
durante a descongelação).
Motivo: Este som é normal quando a saída de energia eléctrica está a mudar.
• NÃO ligue o forno microondas quando está vazio, a energia é
automaticamente cortada por questões de segurança. Pode voltar a
utilizá-lo normalmente depois de esperar cerca de 30 minutos.
Deve deixar sempre um copo com água dentro do forno. A água absorve
a energia do microondas se este se ligar acidentalmente.
1. Instale o forno numa superfície plana, nivelada e estável. Certifique-se de que
há ventilação adequada para o forno, deixando pelo menos 10cm de espaço
atrás e nos dois lados do forno, e 20cm por cima.
(Para empilhar, consulte página 17.)
2. Nunca bloqueie as aberturas de ventilação, uma vez que o forno pode
sobreaquecer e desligar-se automaticamente. Permanece inoperativo até ter
arrefecido o suficiente.
3. Retire todos os materiais de embalagem de dentro do forno.
4. Para sua segurança, ligue a ficha a uma tomada de CA com ligação à terra, de
50 Hz, 230 Volts e com 3 pinos. Se o cabo de alimentação deste aparelho estiver
danificado, deve ser substituído pelo fabricante, pelo representante de assistência
ou por uma pessoa com habilitações equiparadas, para não correr riscos.
5. Este forno micro-ondas deve ser instalado de modo a que a ficha esteja acessível.
Utilização no exterior
Este forno micro-ondas não se destina a uso no exterior.
Só deve ser utilizado em interiores.
Durante o arrefecimento do ar
Não desligue o micro-ondas durante o arrefecimento automático do ar da ventoinha
que demora 1min.
Recomendações
IMPORTANTE
•
•
•
Não se esqueça de remover a película de protecção da caixa
exterior. A película de protecção impede que a caixa exterior
fique riscada. Retire-a, quando instalar ou antes de utilizar.
NUNCA deixe que as crianças utilizem ou brinquem com o forno
microondas. Nem as deixe sozinhas perto do forno microondas quando
ele estiver a funcionar. Não guarde nem esconda brinquedos ou objectos
que despertem o interesse das crianças mesmo por cima do forno.
Este aparelho não é indicado para ser utilizado por pessoas (incluindo
crianças) com capacidades físicas, sensoriais ou mentais reduzidas, ou falta
de experiência e conhecimento, excepto com vigilância e instruções relativas
à utilização do aparelho por uma pessoa responsável pela sua segurança.
As crianças devem ser vigiadas para assegurar que não brincam com o aparelho.
4
NÃO instale o micro-ondas em ambientes quentes ou húmidos.
Exemplo: junto de um forno tradicional ou um radiador.
As especificações relativas à fonte de alimentação do forno devem
ser respeitadas e qualquer extensão utilizada deve ter a mesma
norma do cabo de alimentação fornecido com o forno.
Limpe o interior e o fecho da porta com um pano húmido antes de
utilizar o forno micro-ondas pela primeira vez.
jtX`Y`hl|TWYZ[`iw{UGGwG\GGt SGq GY_SGYWW_GGYaX^Gwt
Cozinhar/Reaquecer
Cozinhar numa fase
Este forno vem pré-programado de fábrica para funcionar
automaticamente.
Certifique-se de que o forno está ligado a uma tomada eléctrica com
terra e de que aparece no visor a indicação LIGADO (“ON”).
Abra a porta (a lâmpada do forno acende-se).
Deite os alimentos num recipiente adequado, coloque-o no centro do
forno e feche a porta com segurança (a lâmpada do forno apaga-se).
3. Carregue no botão
:
PT
Resultado: Acende-se a lâmpada do forno e a ventoinha
começa a funcionar. Começa o aquecimento.
Começa a contagem decrescente do tempo
no visor.
Depois de decorrido o tempo programado, ouvese o sinal sonoro de fim de ciclo e pára o
aquecimento. A lâmpada do forno apaga-se.
Durante 1 min, o visor mostra ‘0‘ e a ventoinha de
arrefecimento continua a funcionar para arrefecer
as partes interiores.
Durante esse tempo, a ventoinha não pára, nem
mesmo quando abrir a porta. 1 min depois, pára.
Pode retirar os alimentos do forno ainda com a
ventoinha a funcionar.
4. Abra a porta e retire os alimentos.
Feche a porta. A lâmpada do forno apaga-se.
1. Seleccione o nível de potência desejado carregando no
botão Selector do Nível de potência.
Resultado: O nível de potência seleccionado aparece no
visor.
2. Programe o tempo de aquecimento desejado, carregando
nas teclas NUMÉRICAS .
Resultado: O tempo seleccionado aparece no visor.
O tempo máximo de cada nível de potência de
cozedura pode ser consultado em “Níveis de
potência e variações de tempo” na página 6. As
teclas NUMÉRICAS não funcionam nem
respondem se seleccionar um tempo de
cozedura que exceda o valor máximo. Não é
possível programar um tempo de cozedura
superior ao tempo máximo permitido no
programa escolhido. É aconselhável carregar em
CANCELAR e introduzir novos valores de
potência e tempo de cozedura.
5
Durante um ciclo de aquecimento, carregue uma vez no botão
para parar o forno. Nessa altura, o indicador de verificação de
potência “LIGADO” (ON) começa a piscar e apaga-se quando
carregar novamente no botão
ou
.
Pode reiniciá-lo carregando no botão
ou, se carregar uma
segunda vez no botão
, cancela o programa seleccionado. Se
NÃO estiver num ciclo de aquecimento, um toque no botão
cancela o programa seleccionado.
Pode carregar no botão +20seg uma ou mais vezes para adicionar
20 segundos de cada vez ao tempo de cozedura. No entanto, não
pode exceder o tempo máximo permitido para o nível de potência
seleccionado.
Quando ligar pela primeira vez a ficha do cabo de alimentação, o
forno emite um sinal sonoro e todos os indicadores aparecem no visor
durante 5 segundos.
Após estar completado o ciclo de aquecimento e ter sido aberta a
porta, a lâmpada do forno acende-se automaticamente e apaga-se
1 min depois.
Se abrir a porta durante um ciclo de aquecimento, o forno pára de
funcionar e a lâmpada acende-se automaticamente durante 1 min,
apagando-se em seguida. Se deixar a porta do forno aberta durante
mais de 1 min, ouve-se um sinal sonoro de minuto a minuto e, 5 min
depois, aparece no visor o indicador de verificação da fonte de
alimentação LIGADO (‘ON’).
jtX`Y`hl|TWYZ[`iw{UGGwG]GGt SGq GY_SGYWW_GGYaX^Gwt
PT
Cozinhar / Reaquecer (continuação)
Níveis de potência e variações de tempo
Cozinhar em várias fases
A função de nível de potência permite-lhe adaptar a quantidade de
energia dissipada e, consequentemente, o tempo necessário para
cozinhar ou reaquecer os alimentos, de acordo com o tipo e a
quantidade. Pode escolher entre os níveis de potência abaixo.
1. Seleccione o nível de potência desejado carregando no
botão selector NÍVEL DE POTÊNCIA ou no botão
DESCONGELAR.
Resultado: O nível de potência seleccionado aparece no
visor.
CM1929A
Nível de potência
ALTA ( )
MÉDIA ( )
BAIXA ( )
ALTA
DESCONGELAÇÃO
( )
BAIXA
DESCONGELAÇÃO
( )
2. Programe o tempo de aquecimento desejado, carregando
nas teclas NUMÉRICAS .
Resultado: O tempo seleccionado aparece no visor.
O tempo máximo de cada nível de potência de
cozedura pode ser consultado em “Níveis de
potência e variações de tempo”. As teclas
NUMÉRICAS não funcionam nem respondem se
seleccionar um tempo de cozedura que exceda o
valor máximo. Não é possível programar um
tempo de cozedura superior ao tempo máximo
permitido no programa escolhido. É aconselhável
carregar em CANCELAR e introduzir novos
valores de potência e tempo de cozedura.
Saída
Percenta
gem
Saída
100 %
70 %
50 %
20 %
1850 W
1295 W
925 W
370 W
100 %
70 %
50 %
25 %
1600 W
1120 W
800 W
400 W
100 %
70 %
50 %
30 %
1300 W
910 W
650 W
390 W
10 %
185 W
13 %
208 W
15 %
195 W
Nível de potência
ALTA ( )
MÉDIA ( )
BAIXA ( )
ALTA DESCONGELAÇÃO ( )
BAIXA DESCONGELAÇÃO ( )
4. Carregue no botão
:
Resultado: Acende-se a lâmpada do forno e a ventoinha
começa a funcionar. O forno começa
automaticamente o aquecimento de acordo
com o tempo de cozedura pré-programado e o
nível de potência.G(I fase II fase III fase).
Começa a contagem decrescente do tempo no
visor.
Saída Percenta
gem
CM1329A
Os tempos de cozedura indicados nas receitas e neste folheto
correspondem ao nível de potência específico indicado.
3. Repita os passos 1 e 2 para as fases II ou III da
programação da memória.
Percenta
gem
CM1629A
Não pode programar o mesmo NÍVEL DE POTÊNCIA nem o
mesmo tempo de DESCONGELAÇÃO.
Funciona como sequência programada.
6
Tempo máximo
25 min.
40 min.
40 min.
50 min.
50 min.
jtX`Y`hl|TWYZ[`iw{UGGwG^GGt SGq GY_SGYWW_GGYaX^Gwt
Interromper a cozedura
Função de repetição
1. Pode repetir a programação da cozedura anterior
PT
(independentemente de ser aquecimento manual ou
automático através da memória), carregando no botão
INICIAR ( ). O forno começa a funcionar exactamente
com o mesmo tempo de aquecimento e nível de potência
utilizados na última operação.
Pode interromper a cozedura em qualquer momento, para poder:
• verificar os alimentos
• voltar os alimentos ou mexê-los
• deixá-los em espera
Para interromper a
cozedura...
Temporariamente
Faça o seguinte...
2. A função de repetição é cancelada quando desligar a fonte
de alimentação.
Abra a porta ou carregue no botão
uma vez.
Resultado: A cozedura é interrompida.
Para retomar a cozedura, feche a porta e carregue
novamente no botão
.
Completamente
Carregue duas vezes no botão
.
Resultado: As programações da cozedura
são canceladas.
Se quiser cancelar alguma programação de cozedura antes de a
iniciar, basta carregar uma vez em CANCELAR ( ).
7
jtX`Y`hl|TWYZ[`iw{UGGwG_GGt SGq GY_SGYWW_GGYaX^Gwt
PT
Utilizar o botão +20seg
Utilizar a função descongelar
Este é um botão de COZEDURA DE UM TOQUE (ONE TOUCH
COOK).
Tocando no botão uma vez, pode começar o aquecimento
instantaneamente.
Pode aumentar o tempo de cozedura carregando no botão +20seg
durante o aquecimento.
O tempo de cozedura aumenta 20 segundos de cada vez que carregar
no botão +20seg. Mas não pode exceder o tempo máximo.
Tal como na cozinha tradicional, pode aperceber-se de que, consoante
as características ou sabores dos alimentos, pode ser necessário
acertar ligeiramente o tempo de cozedura. Pode:
• verificar, em qualquer altura, como está a evoluir a cozedura,
bastando para tal
• abrir a porta
• fechar a porta
• aumentar o tempo de cozedura restante
A função de descongelação permite descongelar carne, aves e peixe.
Utilize apenas recipientes próprios para micro-ondas.
Abra a porta. Coloque os alimentos congelados no centro do tabuleiro
do prato.
Feche a porta.
1. Carregue no botão selector de descongelação para
programar ALTA DESCONGELAÇÃO ( ) ou
BAIXA DESCONGELAÇÃO ( ), como preferir.
Resultado: Aparece no visor o indicador
DESCONGELAR seleccionado.
2. Carregue nas teclas NUMÉRICAS para programar o tempo
de descongelação.
(Máx. 50 min)
Antes de utilizar o forno, pode aumentar/diminuir os tempos
utilizando os botões de tempo ou o botão +20seg.
Durante o funcionamento, só pode aumentar o tempo com o
botão +20seg.
.
3. Carregue no botão
Resultado: Inicia-se a descongelação.
8
Não é possível programar um tempo de
descongelação superior a 50min. O indicador de
descongelação pisca; deve então carregar em
CANCELAR ( ) e introduzir novos valores de
nível e de tempo de descongelação.
Se o forno esteve a funcionar durante mais de 25 min no ciclo de
descongelação, NÃO pode alterar o nível de potência do modo
Descongelar para o modo AquecerG(Cozinhar/Reaquecer).
jtX`Y`hl|TWYZ[`iw{UGGwG`GGt SGq GY_SGYWW_GGYaX^Gwt
Programação de botões de memória
Uma fase
1. Mantenha carregado BLOQUEIO DE PROGRAMA (
e carregue no botão PROGRAMA ( ). Mantenha
carregados os dois botões durante 2 seg.
5. Mantenha carregado BLOQUEIO DE PROGRAMA ( ) e PT
carregue no botão PROGRAMA ( ). Mantenha
carregados os dois botões durante 2 seg mais uma vez.
Resultado: O indicador PROG e o indicador do número
de memória piscam 3 vezes no visor com um
sinal sonoro. Em seguida, o visor apaga-se.
Cuidado: Tem de carregar nos botões com firmeza na
posição correcta.
)
Tem de carregar com firmeza.
Resultado: Aparece no visor o indicador PROG.
2. Carregue na tecla NUMÉRICA relativa ao número de
memória desejado.
Resultado: Aparece o código do programa de memória
seleccionado abaixo do indicador do
PROGRAMA (PROGRAM).
6. Se quiser programar mais, repita os procedimentos acima.
3. Seleccione o nível de potência carregando no botão NÍVEL
DE POTÊNCIA ou no botão DESCONGELAR.
Resultado: Aparece no visor o nível de potência ALTA
quando carregar no botão NÍVEL DE
POTÊNCIA pela primeira vez.
Carregue no botão NÍVEL DE POTÊNCIA ou no
botão DESCONGELAR uma ou mais vezes, até
obter o nível de potência desejado.
4. Carregue nas teclas NUMÉRICAS para programar o tempo
de cozedura.
O tempo máximo de cada nível de potência de
cozedura pode ser consultado em “Níveis de
potência e variações de tempo” na página 6. As
teclas NUMÉRICAS não funcionam nem
respondem se seleccionar um tempo de
cozedura que exceda o valor máximo.
Não é possível programar um tempo de
cozedura superior ao tempo máximo permitido
no programa escolhido. É aconselhável carregar
em CANCELAR e introduzir novos valores de
potência e tempo de cozedura.
9
Há 30 programas de memória disponíveis.
Certifique-se de que o aparelho está bem
programado.
Depois de terminar a programação, basta
carregar na tecla NUMÉRICA para fazer a
cozedura a partir da memória. O programa de
memória seleccionado inicia automaticamente a
cozedura.
jtX`Y`hl|TWYZ[`iw{UGGwGXWGGt SGq GY_SGYWW_GGYaX^Gwt
Programação de botões de memória (continuação)
PT
Várias fases
1. Mantenha carregado BLOQUEIO DE PROGRAMA (
e carregue no botão PROGRAMA ( ). Mantenha
carregados os dois botões durante 2 seg.
6. Mantenha carregado BLOQUEIO DE PROGRAMA ( ) e
carregue no botão PROGRAMAG( ). Mantenha
carregados os dois botões durante 2 seg mais uma vez.
Resultado: O indicador PROG e o indicador do número
de memória piscam 3 vezes no visor com um
sinal sonoro. Em seguida, o visor apaga-se.
Cuidado: Tem de carregar nos botões com firmeza na
posição correcta.
)
Tem de carregar com firmeza.
Resultado: Aparece no visor o indicador PROG.
2. Carregue na tecla NUMÉRICA relativa ao número de
memória desejado.
Resultado: Aparece o código do programa de memória
seleccionado abaixo do indicador do
PROGRAMA (PROGRAM).
7. Se quiser programar mais, repita os procedimentos acima.
3. Seleccione o nível de potência carregando no botão NÍVEL
DE POTÊNCIA ou no botão DESCONGELAR.
Carregue no botão NÍVEL DE POTÊNCIA e no
botão DESCONGELAR uma ou mais vezes, até
obter o nível de potência desejado.
4. Carregue nas teclas NUMÉRICAS para programar o tempo
de cozedura.
O tempo máximo de cada nível de potência de
cozedura pode ser consultado em “Níveis de
potência e variações de tempo” na página 6. As
teclas NUMÉRICAS não funcionam nem
respondem se seleccionar um tempo de
cozedura que exceda o valor máximo.
Não é possível programar um tempo de
cozedura superior ao tempo máximo permitido
no programa escolhido. É aconselhável carregar
em CANCELAR e introduzir novos valores de
potência e tempo de cozedura.
5. Repita os passos 3 e 4 para as fases II ou III da
programação da memória.
10
Há 30 programas de memória disponíveis.
Certifique-se de que o aparelho está bem
programado.
Depois de terminar a programação, basta
carregar na tecla NUMÉRICA para fazer a
cozedura a partir da memória. O programa de
memória seleccionado inicia automaticamente a
cozedura.
Não pode programar o mesmo NÍVEL DE POTÊNCIA nem o
mesmo tempo de DESCONGELAÇÃO.
Funciona como sequência programada.
jtX`Y`hl|TWYZ[`iw{UGGwGXXGGt SGq GY_SGYWW_GGYaX^Gwt
Como utilizar a cozedura a partir da memória
Programação do botão Quantidade dupla
(Double Quantity)
Depois de terminar a programação da memória, basta carregar na
tecla NUMÉRICA correspondente ao número de memória que quer
seleccionar. O forno inicia automaticamente o aquecimento de acordo
com o tempo de cozedura e o nível de potência pré-programados.
PT
1. Mantenha carregado
e carregue no botão
.
Mantenha carregados os dois botões durante 2 segundos.
1. Certifique-se de que o forno está ligado a uma tomada
eléctrica com terra e de que aparece no visor a indicação
LIGADO (“ON”).
2. Seleccione o código do programa desejado com as teclas
NUMÉRICAS.
2. Abra a porta.
A lâmpada do forno acende-se.
3. Carregue nas teclas NUMÉRICAS para programar o factor
de ampliação num intervalo de 1,00 a 9,99.
3. Deite os alimentos num recipiente adequado, coloque-o no
centro do forno e feche a porta com segurança.
Resultado: A lâmpada do forno apaga-se.
4. Carregue na tecla NUMÉRICA.
Resultado: O programa de memória seleccionado inicia
automaticamente o aquecimento. Mas as
teclas NUMÉRICAS 1, 2 e 3 só funcionam
2 segundos depois.
O factor pré-programado pelo fabricante para
aumentar o tempo de cozedura é 1,65.
Tem de programar um factor correcto entre 1,00
e 9,99 para cada número de código de memória.
4. Carregue no botão
11
.
Carregue no botão para sair do modo de programação.
Embora possa programar com sucesso um factor de quantidade
dupla, cuja programação exceda o tempo máximo permitido para
cada nível de potência, o forno não funciona excedendo o tempo
máximo.
jtX`Y`hl|TWYZ[`iw{UGGwGXYGGt SGq GY_SGYWW_GGYaX^Gwt
Programação do botão Quantidade dupla
(Double Quantity) (continuação)
Como utilizar o botão Quantidade dupla
(Double Quantity)
PT
1. Carregue no botão Quantidade dupla.
Edição do factor de quantidade dupla
Função
Tecla
Visor
Observação
Mantenha
carregado
CANCELAR ( )
e carregue no
botão
.
Mantenha carregados os dois
botões durante 2 seg.
Nº de código
1 seg depois, aparece no
visor o valor pré-programado.
Edição do
factor de
(Introduza o valor
quantidade
do factor
dupla
desejado.)
INICIAR (
)
Se não quiser alterar mais
nada, carregue em
CANCELAR para sair do
modo de edição.
Ignore este passo se não for
necessário.
(Introduza o valor
do factor
desejado.)
Ignore este passo se não for
necessário.
CANCELAR (
)
Intervalo de 1,00 ~ 9,99
(Altere o factor, se for
necessário.)
Novo nº de código
INICIAR (
2. Carregue na tecla NUMÉRICA do programa de memória
desejado.
Resultado: Aparece no visor o tempo de cozedura
multiplicado pelo factor pré-programado, a
cozedura começa e é iniciada a contagem
decrescente dos dígitos do tempo.
Ignore este passo se não for
necessário.
) (Cancelamento do Sai do modo de edição.
modo)
12
Não tem de carregar no botão
aquecimento.
para iniciar o
jtX`Y`hl|TWYZ[`iw{UGGwGXZGGt SGq GY_SGYWW_GGYaX^Gwt
Programar os intervalos de tempo de limpeza do
filtro de ar
Controlar o tom do sinal sonoro
Pode seleccionar o tom de sinal sonoro que quiser. Há 4 níveis de som PT
disponíveis.
Se o indicador de verificação do filtro de ar (FILTRO) aparecer no
visor após um certo tempo de utilização, deve limpar o filtro de ar de
acordo com as instruções em “Limpar o filtro de ar” na página 16
neste folheto. Em seguida, execute o procedimento abaixo se quiser
alterar os intervalos de tempo de limpeza do filtro de ar.
Mantenha carregado CANCELAR ( ) e carregue na tecla
NUMÉRICA 0. Mantenha carregados os dois botões durante
2 segundos.
Resultado: O tom do sinal sonoro é alterado para um
nível superior ao actual.
1. Mantenha carregado BLOQUEIO DE PROGRAMA ( )
e carregue na tecla NUMÉRICA 3. Mantenha carregados
os dois botões durante 2 segundos.
Resultado: O visor mostra o intervalo de tempo em
horas entre limpezas do filtro de ar que
programou ou o tempo original préprogramado pelo fabricante.
As programações circulam sempre que carregar nas
teclas ocultas, da seguinte maneira.
Snd 0 Snd 1 Snd 2 Snd 3 Snd 0 (Sem som)
O intervalo de tempo de limpeza préprogramado é de 500 horas, em termos de
tempo de oscilação pura e não em tempo de
continuidade.
2. Carregue nas teclas NUMÉRICAS para programar o
intervalo de tempo de limpeza desejado.
Pode programar até 999 horas.
3. Mantenha carregado BLOQUEIO DE PROGRAMA ( ) e
carregue na tecla NUMÉRICA 3.
Mantenha carregados os dois botões durante 2 segundos
para guardar o novo valor.
Isso completa a programação do intervalo de tempo de
limpeza do filtro de ar.
4. Carregue no botão CANCELAR (
de cozedura.
O nível 0 do sinal sonoro não emite som.
) para voltar ao modo
Depois de ter expirado o intervalo de tempo de
limpeza, deve limpar o filtro de ar. Consulte a
página 16.
13
O tom pré-programado é Snd 2.
jtX`Y`hl|TWYZ[`iw{UGGwGX[GGt SGq GY_SGYWW_GGYaX^Gwt
Códigos de erro
PT
Itens com erro
Erro de frequência da
potência (50/60 Hz)
Código Sinal sonoro
do erro
E1
-
Motivo
Solução
A frequência da potência é inferior a 50 Hz. Desligue a ficha do cabo de alimentação e verifique se a frequência da potência
é 50 Hz.
Ligue o cabo a uma fonte de alimentação de 50 Hz e verifique se aparece a
indicação “E1”. Se o código de erro voltar a aparecer, mesmo depois de estar a
utilizar uma fonte de alimentação correcta, contacte o centro de assistência
local.
Erro de potência HVT-I
E41
Um sinal
sonoro longo
durante 2 seg
Os circuitos dentro do forno não estão a
funcionar correctamente.
Desligue o cabo de alimentação e aguarde 10 segundos.
Ligue o cabo novamente e verifique se o código de erro “E41” volta a aparecer.
Se o sintoma persistir, contacte o centro de assistência local.
Erro de potência HVT-II
E42
Um sinal
sonoro longo
durante 2 seg
Os circuitos dentro do forno não estão a
funcionar correctamente.
Desligue o cabo de alimentação e aguarde 10 segundos.
Ligue o cabo novamente e verifique se o código de erro “E42” volta a aparecer.
Se o sintoma persistir, contacte o centro de assistência local.
Erro EEPROM
E5
Um sinal
sonoro longo
durante 2 seg
O IC da memória (EEPROM IC) não está a Carregue no botão CANCELAR uma ou mais vezes e tente iniciar o
aquecimento a partir da memória. Se o código de erro “E5” persistir, contacte o
funcionar correctamente.
centro de assistência local.
Neste caso, funcionam correctamente
todas as outras funções, excepto a função
de memória.
(Pode utilizar o forno manualmente)
14
jtX`Y`hl|TWYZ[`iw{UGGwGX\GGt SGq GY_SGYWW_GGYaX^Gwt
Teclas ocultas
Cuidados a ter com o micro-ondas
Nota: Carregue na tecla 1 e depois na seguinte. Mantenha carregada durante
2 segundos.
Função
Tecla
Tecla 1
Visor
Limpar o forno micro-ondas
1. Desligue o forno da tomada de parede antes de o limpar.
Observação
2. Limpe o interior do forno. Limpe todos os salpicos com um pano húmido. Pode
utilizar uma solução de detergente de cozinha se o forno estiver muito sujo. Não
utilize detergentes fortes ou abrasivos.
Seguinte
Total de tempo CANCELAR
de
( )
continuidade
1
Mantenha
carregados os dois
botões durante
2 seg.
Unidade: 10 hrs.
Total do tempo CANCELAR
( )
de oscilação
do magnetrom
2
Mantenha
carregados os dois
botões durante
2 seg.
Unidade: 1 hr.
CANCELAR Iniciar
Numero de
( )
utilizações
pelo código do
programa de
memória
Nº de código
3. Limpe o exterior do forno com água e detergente e depois seque-o com um pano
macio.
Cuidado: Certifique-se de que a água não entra na ventilação traseira nem
na abertura do painel de controlo.
4. Limpe o vidro da porta com um pano macio depois de o lavar com água e um
detergente muito suave. Não utilize um limpa-vidros porque o vidro da porta pode
ficar riscado se usar detergentes ou produtos de limpeza fortes.
Mantenha carregados
os dois botões
durante 2 seg.
(Os dados aparecem 2
seg. depois)
739 utilizações
(Pode programar o
novo código depois da
visualização dos
dados)
CANCELAR (
Tempo de
CANCELAR
aquecimento
( )
por código de
programa de
memória (visor
sequencial
automático)
CANCELAR (
)
(Cancelamento do
modo)
P
Mantenha carregados
os dois botões
durante 2 seg.
(Aparece
sequencialmente
durante 3 seg., de
1 a 30)
)
Se houver restos de alimentos ou salpicos de líquidos nas paredes do
forno ou entre o fecho e a superfície da porta, esses restos absorvem
as micro-ondas e podem provocar faíscas.
(Cancelamento do
modo)
15
PT
jtX`Y`hl|TWYZ[`iw{UGGwGX]GGt SGq GY_SGYWW_GGYaX^Gwt
Cuidados a ter com o micro-ondas (continuação)
PT
Limpar a cobertura do tecto
Limpar o filtro de ar
1. Agarre os bloqueadores laterais da cobertura do tecto com ambas as mãos e
puxe-os para dentro e para baixo. Em seguida, retire a cobertura do tecto
para fora da cavidade do forno.
Limpe o filtro de ar com regularidade, de acordo com as seguintes
instruções.
2. Lave a cobertura do tecto com água e detergente ou com uma solução de
esterilização de alimentos.
1. Retire os parafusos nas duas extremidades do filtro de ar.
3. Volte a colocar a cobertura do tecto antes de usar o forno.
2. Retire o filtro de ar do suporte com cuidado.
O forno pode ter problemas se o filtro de ar ficar entupido com pó.
3. Lave o filtro com água quente e detergente.
Cuidado :A cobertura do tecto tem de estar bem colocada quando utilizar o
forno.
Quando retirar a cobertura do tecto para limpar, tenha um cuidado
extremo com os componentes interiores que ficam expostos na
parte superior da cavidade do forno. Se algum deles estiver
deformado, podem surgir sintomas anormais, como faíscas,
durante o funcionamento. Se isso acontecer, contacte o centro de
assistência após-venda local.
4. Volte a colocar o filtro de ar antes de usar o forno.
Se o filtro de ar ficar entupido com detritos, o forno pode
sobreaquecer.
Se quiser alterar o intervalo de tempo de limpeza do filtro de ar,
consulte “Programar os intervalos de tempo de limpeza do filtro de ar”
na página 13.
Cobertura superior
Parafuso
16
jtX`Y`hl|TWYZ[`iw{UGGwGX^GGt SGq GY_SGYWW_GGYaX^Gwt
Instruções para instalação em pilha
Substituição da lâmpada
Importante
Importante
1. Retire o parafuso que segura a tampa da lâmpada.
1. Desligue o cabo de alimentação da tomada de parede antes de proceder à
instalação.
Não precisa de retirar o painel exterior para substituir a lâmpada.
2. Retire a lâmpada rodando-a no sentido dos ponteiros do relógio.
2. Para fazer uma instalação em pilha, tem de utilizar a “placa de suporte” incluída
com este aparelho.
3. Substitua-a por uma lâmpada nova rodando-a no sentido contrário ao dos
ponteiros do relógio.
3. A altura máxima da pilha é de duas unidades.
A instalação em pilha de duas unidades está limitada aos modelos a
seguir.
CUIDADO: Verifique se a cavidade do forno está vazia.
Tampa da
lâmpada
Instalação
Painel exterior
1. Empilhe duas unidades.
2. Retire os 6 parafusos, como se mostra na figura.
3. Coloque a placa de suporte para juntar as duas unidades.
4. Coloque e aperte os 6 parafusos, como se mostra na figura.
5. Verifique se o forno de cima está a uma altura segura e funcional.
Parafuso
Placa de suporte
17
Suporte da lâmpada
Lâmpada
(230 V 25 W)
PT
jtX`Y`hl|TWYZ[`iw{UGGwGX_GGt SGq GY_SGYWW_GGYaX^Gwt
Guia de utensílios de cozinha
PT
Para cozinhar alimentos no forno micro-ondas, as micro-ondas têm de
penetrar nos alimentos, sem serem reflectidas ou absorvidas pelo
recipiente utilizado.
Por isso, tem de ter cuidado quando escolhe os utensílios. Se os
utensílios estiverem identificados como próprios para micro-ondas,
não precisa de se preocupar.
A tabela a seguir mostra vários tipos de utensílios, indica se podem ou
não ser usados e como utilizá-los num forno micro-ondas.
Utensílios
Folha de alumínio
Porcelana, cerâmica vidrada e loiça de
barro são normalmente adequadas, a
menos que sejam decoradas com metal.
Recipientes descartáveis
em poliéster
Alguns alimentos congelados são
embalados nestes recipientes.
Pode utilizar para aquecer alimentos. O
sobreaquecimento pode fazer com que o
poliestireno derreta.
Pode provocar um incêndio.
Pode provocar faíscas.
Pode utilizar, a menos que tenham
decorações em metal.
Pode utilizar para aquecer alimentos ou
líquidos. O vidro delicado pode partir-se ou
estalar, se for aquecido repentinamente.
Tem de retirar a tampa. Serve apenas para
aquecer.
•
Sacos de papel
ou jornal
Papel reciclado
ou decorações
em metal
Utensílios de vidro
• Loiça de mesa
para ir ao forno
• Objectos de vidro
frágeis
•
Jarros de vidro
•
Recipientes
Atilhos de arame
dos sacos de
congelamento
Pratos, chávenas,
guardanapos e
papel de cozinha
Papel reciclado
Plástico
• Recipientes
Pode utilizar em quantidades pequenas
para que algumas áreas dos alimentos não
fiquem demasiadamente cozinhadas. Se a
folha de alumínio estiver muito perto da
parede do forno ou se utilizar em grande
quantidade, pode provocar faíscas.
•
Papel
•
Comentários
Próprios
para microondas
Porcelana e loiça de barro
Embalagens de comida
de preparação rápida
• Recipientes de
poliestireno
Metal
•
•
•
Película aderente
•
Sacos de
congelamento
Papel de cera ou para
embalagem
18
Podem provocar faíscas ou um incêndio.
Para tempos de cozedura e aquecimento
curtos. Também para absorver humidade
em excesso.
Pode provocar faíscas.
: Recomendado
: Com cuidado
: Não seguro
Principalmente se for termoplástico
resistente ao calor. Alguns materiais de
plástico podem ficar danificados ou sem cor
a altas temperaturas. Não utilize melamina.
Pode utilizar para manter a humidade. Não
deve entrar em contacto com os alimentos.
Tenha cuidado ao retirar a película, porque
pode sair vapor quente.
Só se forem resistentes a fervura ou
próprios para forno. Não devem estar
hermeticamente fechados. Pique com um
garfo, se for necessário.
Pode utilizar para manter a humidade e
evitar salpicos.
jtX`Y`hl|TWYZ[`iw{UGGwGX`GGt SGq GY_SGYWW_GGYaX^Gwt
Guia de confecção de alimentos
F : Congelado
Receita
C : Frio
Método
PotênciaG
Nível
PT
Tempo
1850
W
1600
W
Tempo
de
1300
espera
W
Receita
PÃO E PASTELARIA
Método
Potên
ciaG
Nível
Tempo
1850
W
1600
W
Tempo
de
1300
espera
W
REFEIÇÕES LIGEIRAS E ENTRADAS
Para descongelar
Para reaquecer
Cacete vienense
9" F
DESCONG 0'45"
ELAR 1( )
0'50"
0'50"
5 mins
Salsichas
Cumberland F
Coloque no prato MÉDIA 2'00"
2'10"
2'20"
2 mins
Cacete vienense
9" X 2 F
DESCONG 1'10"
ELAR 1( )
1'15"
1'20"
5 mins
Pequeno-almoço
completo C
Tape
2'40"
2'50"
1 min
Bolo, ind. à fatia Coloque no prato DESCONG 2'30"
F
ELARG2( )
2'40"
2'50"
5 mins
Beefburgers F
ALTA
0'55"
1'05"
1'10"
1 min
Chickenburger F
ALTA
0'55"
1'05"
1'10"
1 min
Para aquecer
Quiche 11" em
fatias de 136 g
Coloque no prato DESCONG 3'00"
ELAR G1( )
ALTA
0'40"
MÉDIA 2'30"
Donner kebab 162 g F
ALTA
1'00"
1'10"
1'20"
1 min
3'00"
3'00"
1 min
Cachorro F
ALTA
1'00"
1'10"
1'20"
1 min
0'45"
0'50"
1 min
Pizza 190 g F
Coloque no prato BAIXA 2'30"
2'45"
3'00"
2 mins
Entrecosto grelhado
200 g F
Coloque no prato MÉDIA 3'30"
3'45"
4'00"
1 min
Wings of fire X 6 F
Arranje-os no
prato, as partes
finas no centro
ALTA
2'00"
2'15"
2'30"
1 min
Tartes de carne Retire a folha de ALTA
picada
alumínio Coloque
individuais X 2 F no prato
0'10"
0'15"
0'15"
1 min
Tarte de fruta F
Coloque no prato ALTA
0'40"
0'45"
0'45"
1 min
Croissant X 2 F
Coloque no prato ALTA
0'05"
0'10"
0'10"
1 min
Pastelaria, de
forno 227 g C
Coloque no prato ALTA
0'45"
0'55"
1'00"
1 min
Feijão cozido com
tomate 500 g
Tape e mexa a
ALTA
meio da cozedura
2'00"
2'10"
2'20"
2 mins
Tarte de frango e Retire a película. ALTA
cogumelos X 2 C Coloque no prato
0'45"
0'55"
1'00"
1 min
Feijão cozido com
tomate 250 g
Tape e mexa a
ALTA
meio da cozedura
1'00"
1'05"
1'10"
2 mins
Tarte de frango e Coloque no
cogumelos C
prato, retire a
película
0'30"
0'40"
0'45"
1 min
ALTA
1'20"
1'30"
1'40"
2 mins
Coloque na tijela ALTA
0'20"
0'25"
0'30"
2 mins
1'00"
1'05"
1'10"
2 mins
ALTA
SOBREMESAS
Para aquecer
Puré de maçã 200 g F Tape no prato
REFEIÇÕES LIGEIRAS E ENTRADAS
‘Christmas Pudding’
150 g C
Para cozinhar
Bacon, fatias
finas C
Coloque no
recipiente
Ovos,
Coloque em
escalfados X 2 C formas próprias
ALTA
1'30"
1'40"
1'50"
1 min
‘Jam Roly Poly’ 80 g F Coloque num
prato
ALTA
0'30"
0'40"
0'45"
1 min
‘Crèpes Suzette’ 2 F
Pique a película
ALTA
0'50"
1'00"
1'10"
1 min
‘Suet Sponge
pudding’ F
X2
X1
ALTA
ALTA
0'35"
0'40"
1'05"
0'50"
1'30"
1'00"
2 mins
2 mins
Pudim de esponja F
X2
X1
ALTA
ALTA
0'35"
0'40"
1'05"
0'45"
1'30"
0'45"
2 mins
2 mins
Ovos, mexidos X Bata os ovos e
ALTA
2C
coloque-os numa
tijela
25"-30" 30"-40" 35"-45" 1 min
Salsichas X 2
Grossas C
1'00"
Pique-as
MÉDIA
1'10"
1'20"
2 mins
19
ALTA
jtX`Y`hl|TWYZ[`iw{UGGwGYWGGt SGq GY_SGYWW_GGYaX^Gwt
Guia de confecção de alimentos (continuação)
PT
F : Congelado
Receita
C : Frio
Método
PotênciaG
Tempo
Tempo
Nível
de
1850 1600 1300
W
W
W espera
Receita
RECEITAS DE ENTRADAS
Método
Potência
Tempo
Tempo
Nível
de
1850 1600 1300
W
W
W espera
VEGETAIS FRESCOS
Para reaquecer
Para cozinhar 500 g
Pasta Amorini com
molho de queijo
Stilton C
Coloque num prato ALTA
próprio para microondas
3'30" 3'40" 3'50" 1 min
‘Chicken Tikka
masala’ F
Pique a película
ALTA
3'20" 3'30" 3'40" 2 mins
‘Green Chicken curry’ Pique a película
tailandês F
ALTA
3'00" 3'15" 3'30" 2 mins
Chilli com carne F
ALTA
3'30" 3'45" 4'00" 2 mins
Pique a película
Feijão, verde cortado 60 ml/4tbsps
cobertas de água
ALTA
3'00" 3'15" 3'30" 2 mins
Bróculos, flor
60 ml/4tbsps
cobertas de água
ALTA
3'00" 3'15" 3'30" 2 mins
Couve, migada
10tbsps coberta de
água
ALTA
5'00" 5'30" 6'00" 2 mins
Cenouras, cortadas
60 ml/4tbsps
cobertas de água
ALTA
3'30" 3'45" 4'00" 2 mins
Frango cozinhado Coloque no forno
MÉDIA
num saco perfurado
1/2 Frio
4'30" 5'00" 5'30" 2 mins
Couve-flor, flores
60 ml/4tbsps
cobertas de água
ALTA
3'30" 3'45" 4'00" 2 mins
Lasanha 192 g
4'00" 4'15" 4'30" 2 mins
Feijão verde inteiro
60 ml/4tbsps
cobertas de água
ALTA
3'30" 3'45" 4'00" 2 mins
Batatas, com pele
Dê-lhes meia volta
ALTA
10'00 11'00 12'00 5 mins
”
”
”
Couves de Bruxelas
60 ml/4tbsps
cobertas de água
ALTA
4'30" 4'45" 5'00" 2 mins
Feijão, verde cortado Tape, mexa a meio ALTA
da cozedura
3'00" 3'15" 3'30" 2 mins
Feijão, inteiro
Tape e mexa a meio ALTA
da cozedura
4'00" 4'15" 4'30" 2 mins
Flores de bróculos
Tape e mexa a meio ALTA
da cozedura
4'00" 4'15" 4'30" 2 mins
Couve, migada
Tape e mexa a meio ALTA
da cozedura
4'00" 4'15" 4'30" 2 mins
Tiras de cenouras
Tape e mexa a meio ALTA
da cozedura
4'00" 4'15" 4'30" 2 mins
Couve-flor, flores
Tape e mexa a meio ALTA
da cozedura
4'00" 4'15" 4'30" 2 mins
Maçaroca de milho
Tape
ALTA
4'00" 4'30" 5'00" 2 mins
Milho, miúdo inteiro
Tape e mexa a meio ALTA
da cozedura
5'00" 5'15" 5'30" 2 mins
Cogumelos, inteiros
Tape e mexa a meio ALTA
da cozedura
3'00" 3'15" 3'30" 2 mins
Coloque num prato MÉDIA
próprio para microondas
Mexilhões marinados Pique o saco
466 g F
ALTA
2'30" 2'45" 3'00" 2 mins
‘Salmon & Avacodo
Paupiette’ C
ALTA
2'30" 2'45" 3'00" 2 mins
Tarte Shepherd 300 g Coloque no forno
C
com tampa
MÉDIA
3'00" 3'15" 3'30" 2 mins
‘Suet puddings’ frio
Tape – coloque na
vertical num prato
próprio para microondas
BAIXA
4'00" 4'20" 4'40" 2 mins
Pique o saco e
coloque num prato
DESCONG 5'00" 5'00" 5'00" 1 min
ELAR 1( )
ALTA
3'30" 3'45" 4'00"
Supremo de frango
em pesto vermelho
312 g F
Pique o saco
Tagliatelle carbonara Pique a película,
C
coloque num prato
Tortellini de queijo C
ALTA
1'40" 2'00" 2'20" 1 min
Coloque num prato ALTA
e tape
2'00" 2'15" 2'30" 1 min
Tarte de vegetais
Cumberland C
Coloque num prato ALTA
próprio para microondas
3'20" 3'35" 3'50" 1 min
Refeição em
embalagem 350 g C
Tapada
ALTA
2'00" 2'15" 2'30" 1 min
Refeição em
embalagem 700 g C
Tapada
ALTA
3'00" 3'15" 3'30" 1 min
20
jtX`Y`hl|TWYZ[`iw{UGGwGYXGGt SGq GY_SGYWW_GGYaX^Gwt
Guia de confecção de alimentos (continuação)
F : Congelado
Receita
Limpar o forno micro-ondas
Deve limpar regularmente as seguintes peças do forno micro-ondas
para evitar a acumulação de gorduras e pedaços de alimentos:
C : Frio
Método
PotênciaG
Tempo
Nível
1850 1600 1300
W
W
W
Tempo
de
espera
Batatas, com pele
230~290 g X 1
ALTA
3'00"
2 mins
Batatas, puré X 2
Batatas, puré X 4
ALTA
ALTA
6'00" 6'30" 7'00" 2 mins
10'00" 11'15" 12'30" 2 mins
•
•
•
VEGETAIS FRESCOS
Para cozinhar 500 g
Ratatouille 500 g
Couves de Bruxelas
4'00"
4'30"
ALTA
3'30"
4'00"
4'30"
2 mins
Tape e mexa a ALTA
meio da
cozedura
3'00"
3'30"
4'00"
2 mins
2. Limpe todos os salpicos ou manchas das superfícies interiores com um pano
embebido em água e detergente.
Enxagúe e seque.
Para reaquecer
Arroz, pilau F
Certifique-se SEMPRE de que os fechos da porta estão limpos e
a porta fecha correctamente.
Se não mantiver o forno limpo, a superfície pode deteriorar-se e
afectar o aparelho, resultando em situações de perigo.
1. Limpe as superfícies exteriores com um pano macio e humedecido em água
morna e detergente.
Enxagúe e seque.
ARROZ, 500 g
Arroz, cozido F
Superfícies interiores e exteriores
Porta e fechos da porta
Tabuleiro do prato
Tape e mexa a ALTA
meio da
cozedura
3'00"
Tape e mexa a ALTA
meio da
cozedura
3'00"
3'15"
3'15"
3'30"
3'30"
2 mins
3. Para retirar pedaços de alimentos endurecidos e eliminar cheiros, coloque uma
chávena de sumo de limão no tabuleiro do prato e aqueça durante três minutos na
potência máxima.
2 mins
NÃO molhe as aberturas de ventilação.
NUNCA utilize produtos abrasivos nem solventes químicos.
Tenha muito cuidado ao limpar os fechos da porta para garantir que
nenhum pedaço:
•
•
21
fique acumulado
impeça a porta de fechar correctamente
Limpe a cavidade direita do forno micro-ondas após cada utilização
com uma solução de detergente suave, mas deixe o micro-ondas
arrefecer antes de o limpar, para evitar acidentes.
PT
jtX`Y`hl|TWYZ[`iw{UGGwGYYGGt SGq GY_SGYWW_GGYaX^Gwt
Características técnicas
Deve tomar algumas precauções simples quando armazenar ou
mandar reparar o micro-ondas.
Não deve utilizar o forno se a porta ou os fechos da porta estiverem
danificados:
• dobradiças partidas
• fechos deteriorados
• revestimento do forno amolgado ou deformado
Só um técnico especializado em micro-ondas pode efectuar as
reparações.
A SAMSUNG esforça-se sempre por melhorar os seus produtos. As
características técnicas e as instruções do utilizador estão sujeitas a
alterações sem aviso prévio.
Modelo
CM1629A
Potência de saída
3200 W
3000 W
2600 W
1850 W
(IEC-705)
1600 W
(IEC-705)
1300 W
(IEC-705)
Frequência de
funcionamento
retire a ficha da tomada
contacte o centro de assistência pós-venda mais próximo
2, 450 MHz
Dimensões (L x A x P)
Exterior
Cavidade do forno
Se quiser armazenar o forno temporariamente, escolha um local seco
e sem pó.
Motivo: O pó e a humidade podem prejudicar as peças do forno.
CM1329A
230 V ~ 50 Hz
Consumo de energia
Micro-ondas
NUNCA retire o revestimento exterior do forno. Se o forno estiver
avariado e precisar de assistência técnica ou se tiver alguma
dúvida em relação ao funcionamento:
•
•
CM1929A
Fonte de alimentação
464 x 368 x 557 mm
370 x 190 x 370 mm
Volume
26 litros
Peso
Líquido
464
32 Kg aprox.
43
557
530
26
1000
368
PT
Armazenar e reparar o forno micro-ondas
10
22
444
486
514
jtX`Y`hl|TWYZ[`iw{UGGwGYZGGt SGq GY_SGYWW_GGYaX^Gwt
Nota
PT
23
jtX`Y`hl|TWYZ[`iw{UGGwGY[GGt SGq GY_SGYWW_GGYaX^Gwt
jtX`Y`hl|TWYZ[`ip{UGGwGXGGt SGq GY_SGYWW_GGYaYYGwt
FORNO A MICROONDE
(COMMERCIALE)
Istruzioni per l’utente e guida alla cottura
CM1929A (1850 Watt)
CM1629A (1600 Watt)
CM1329A (1300 Watt)
P
1
2
3
4
5
6
7
8
9
+ 20sec
Code No. : DE68-02349B
0
Forno ......................................................................................................2
Pannello di controllo ..............................................................................2
Uso di questa guida di istruzioni ............................................................3
Precauzioni di sicurezza.........................................................................3
Installazione del forno a microonde .......................................................4
Cottura/Riscaldamento...........................................................................5
Livelli di potenza e variazione del tempo di cottura................................6
Interruzione della cottura........................................................................7
Funzione di Ripetizione ..........................................................................7
Uso del tasto +20sec..............................................................................8
Uso della funzione di scongelamento ....................................................8
Programmazione di un ciclo di cottura ...................................................9
Come avviare il ciclo di cottura memorizzato.......................................11
Programmazione del tasto “porzioni doppie” .......................................11
Come azionare il tasto “porzioni doppie”..............................................12
Come impostare la segnalazione di pulizia del filtro dell’aria...............13
Controllo del segnale acustico .............................................................13
Codici di errore .....................................................................................14
Funzioni addizionali..............................................................................15
Manutenzione del forno a microonde...................................................15
Istruzioni per l’installazione sovrapposta..............................................17
Sostituzione della lampada ..................................................................17
Guida agli utensili .................................................................................18
Guida alla cottura .................................................................................19
Pulizia del vostro Microonde ................................................................21
Immagazzinaggio e Riparazione del Microonde ..................................22
Caratteristiche tecniche........................................................................22
jtX`Y`hl|TWYZ[`ip{UGGwGYGGt SGq GY_SGYWW_GGYaYYGwt
Forno
Pannello di controllo
1
IT
LAMPADA FORNO
COPERCHIO
LAMPADA
ANNELLO DI
CONTROLLO
DISPLAY
2
RIVESTIMENTO
SUPERIORE
P
1
2
3
4
5
6
7
TASTO START
P
1
2
3
4
5
MANIGLIA
6
7
8
9
3
0
+ 20sec
FILTRO DELL’ARIA
VANO COTTURA
GANCI DI CHIUSURA
SPORTELLO
8
9
0
+ 20sec
1.
2.
3.
4.
5.
6.
7.
8.
9.
10.
SPORTELLO
4
5
6
7
8
9
10
DISPLAY
TASTO PROGRAMMA
TASTO BLOCCO PROGRAMMA
TASTI NUMERICI (Programmazione tempo, memoria)
TASTO SELETTORE LIVELLO POTENZA
TASTO SELETTORE SCONGELAMENTO
TASTO PORZIONI DOPPIE
TASTO +20sec (Tasto cottura automatica)
TASTO STOP/CANCEL
TASTO START
DISPLAY
FORI PER I GANCI
DI CHIUSURA
SPORTELLO
INDICATORE
PROGRAMMA
INDICATORI TEMPO
INDICATORE
NUMERO DI
TASTO IN
MEMORIA
INDICATORE
INDICATORI
DONTROLLO
LIVELLO DI
ALIMENTAZIONE (Quando POTENZA
appare, il riscaldamento
non funziona)
2
INDICATORE
CONTROLLO
FILTRO
DELL’ARIA
INDICATORE
SONTROLLO
DATI
INDICATORE
PORZIONI
DOPPIE
INDICATORI
SCONGELAMENTO
jtX`Y`hl|TWYZ[`ip{UGGwGZGGt SGq GY_SGYWW_GGYaYYGwt
Uso di questa guida di istruzioni
Precauzioni di sicurezza
Congratulazioni per l’acquisto di un forno a microonde SAMSUNG.
Le istruzioni per l’uso contengono molte informazioni e consigli sulla
cottura a microonde, in particolare:
• Precauzioni di sicurezza
• Accessori ed utensili che possono essere usati
• Consigli pratici per la cottura
All’inizio del manuale sono riportate le illustrazioni del forno e
soprattutto del pannello di controllo corrispondenti al modello del
forno da voi acquistato in modo da poter individuare più facilmente i
tasti.
LEGGERE ATTENTAMENTE QUESTE IMPORTANTI ISTRUZIONI IT
DI SICUREZZA E CONSERVARLE COME RIFERIMENTO FUTURO.
Quando si cucinano alimenti o liquidi nel forno a microonde, adottare le
seguenti precauzioni.
ATTENZIONE:
Se lo sportello o le guarnizioni dello sportello sono danneggiate, il forno non deve
essere messo in funzione. L'apparecchiatura potrà essere nuovamente utilizzata
solo dopo che un tecnico specializzato avrà apportato le riparazioni necessarie.
ATTENZIONE:
Ogni operazione o riparazione che implica la rimozione del coperchio che
protegge dall'esposizione all'energia a microonde è pericolosa e deve essere
effettuata da personale specializzato.
Le procedure passo-passo usano i simboli riportati di seguito:.
ATTENZIONE:
Importante
Nota
ATTENZIONE:
I liquidi e gli alimenti non devono essere riscaldati all'interno di contenitori sigillati
poiché potrebbero esplodere.
Il riscaldamento di bevande nel microonde può causare una bollitura ritardata,
prestare quindi attenzione quando si maneggia il contenitore; per evitare tale
situazione, dopo lo spegnimento del forno attendere SEMPRE almeno
20 secondi per consentire alla temperatura di stabilizzarsi.
Mescolare durante il riscaldamento, se necessario, e SEMPRE dopo il
riscaldamento.
In caso di ustioni, seguire queste misure di PRIMO SOCCORSO:
* Immergere la zona ustionata in acqua fredda per almeno 10 minuti.
* Coprire con un panno pulito e asciutto.
* Non applicare creme, oli o lozioni.
PRECAUZIONI PER EVITARE L’EVENTUALE ESPOSIZIONE A
UNA QUANTITA' ECCESSIVA DI ENERGIA A MICROONDE
La mancata osservanza delle seguenti precauzioni può comportare
un'esposizione dannosa all'energia a microonde.
(a) Non utilizzare mai il forno quando lo sportello è aperto. Non manomettere i
circuiti di sicurezza (chiusure dello sportello) e non inserire alcun oggetto nei
fori dei circuiti di sicurezza.
(b) Non collocare oggetti tra lo sportello e la parte frontale del forno. Evitare
l’accumulo di residui di cibo o detergente sulle superfici di tenuta. Assicurarsi
che lo sportello e le relative superfici di tenuta siano puliti. Dopo avere
utilizzato l’apparecchiatura, pulire queste superfici con un panno umido, quindi
asciugarle con un panno morbido e asciutto.
(c) Se il forno è danneggiato, non utilizzarlo finché non sarà stato riparato da un
tecnico specializzato. E' molto importante verificare che lo sportello del forno
si chiuda correttamente e che i seguenti elementi non siano danneggiati:
(1) Sportello (piegato)
(2) Cardini dello sportello (rotti o allentati)
(3) Guarnizioni dello sportello e superfici di tenuta
(d) Il forno deve essere regolato o riparato solo da personale specializzato e
addestrato dal produttore.
ATTENZIONE:
Per evitare scottature, prima della somministrazione il contenuto di biberon e
vasetti di alimenti per bambini deve essere agitato o mescolato e la temperatura
controllata.
•
Utilizzare solo utensili adatti al microonde;
NON Utilizzare recipienti metallici, servizi da tavola con finiture in oro e
argento, spiedi, forchette, ecc.; rimuovere i lacci in carta o plastica dalle
buste.
Motivo: Potrebbero generare scintille o archi elettrici in grado di danneggiare il
forno.
• In caso di cottura di cibi in contenitori di plastica o carta, sorvegliare il
forno per evitare possibili principi di incendio del contenitore.
Non utilizzare il forno a microonde per asciugare giornali o indumenti
• Porzioni di piccole dimensioni richiedono un minore tempo di cottura o di
riscaldamento.
E’ possibile che, impostando il tempo sul minimo, il calore sia comunque
eccessivo provocando il surriscaldamento o la bruciatura dei cibi.
• In caso di fumo, spegnere o scollegare l’apparecchiatura dalla rete
elettrica e tenere chiuso lo sportello del forno per evitare di far propagare
eventuali fiamme.
3
jtX`Y`hl|TWYZ[`ip{UGGwG[GGt SGq GY_SGYWW_GGYaYYGwt
Precauzioni di sicurezza (continua)
IT
Installazione del forno a microonde
Questo forno a microonde può essere collocato quasi ovunque (piano
di lavoro della cucina o ripiano, carrello mobile, tavolo).
•
Non riempire MAI il contenitore fino all'orlo. Scegliere un contenitore con
la parte superiore più larga di quella inferiore per evitare la fuoriuscita del
liquido durante la bollitura. Le bottiglie a collo stretto potrebbero
esplodere, se riscaldate eccessivamente.
• Non riscaldare MAI il biberon con la tettarella inserita. La bottiglia
potrebbe esplodere a causa del surriscaldamento.
• Non cuocere mai le uova con il guscio e non scaldare mai le uova sode
con il guscio; potrebbero esplodere, perfino al termine del riscaldamento
nel microonde. Inoltre, non riscaldare bottiglie, barattoli e contenitori sotto
vuoto o sigillati, noci in guscio, pomodori ecc.
• Pulire il forno regolarmente facendo attenzione a rimuovere ogni residuo
di cibo.
• Se il forno non viene mantenuto in condizioni di pulizia ottimali, la
superficie potrebbe deteriorarsi danneggiando l’apparecchiatura,
provocando eventuali situazioni pericolose.
• Non pulire l’apparecchiatura usando getti d’acqua.
• NON coprire le aperture di ventilazione con panno o carta. Potrebbero
incendiarsi a causa dell’aria calda che fuoriesce dal forno.
Il forno può surriscaldarsi e di conseguenza spegnersi automaticamente.
Una volta spento, è necessario attendere che il forno si raffreddi prima di
poterlo riutilizzare.
• Per evitare scottature, utilizzare SEMPRE i guanti da forno per estrarre i
piatti dal forno.
• Non immergere il cavo di alimentazione o la spina nell’acqua e tenerli
lontano dalle superfici riscaldate. Non utilizzare l'apparecchiatura se la
spina o il cavo di alimentazione sono danneggiati.
• Quando si apre lo sportello del forno, tenersi alla distanza di un braccio.
Motivo: La fuoriuscita di aria o vapore caldo potrebbe causare ustioni.
• Durante il funzionamento (specialmente quando il forno sta scongelando)
è possibile udire degli scricchiolii.
Motivo: Questo suono è normale quando si modifica il livello di potenza
elettrica.
• NON accendere il forno a microonde quando è vuoto. L'alimentazione
viene disattivata automaticamente per sicurezza. E’ possibile utilizzarlo
normalmente dopo averlo lasciato spento per oltre 30 minuti. Lasciare
sempre un bicchiere d’acqua all’interno del forno. Se si accende per
errore il forno quando è vuoto, l’acqua assorbirà le microonde.
Per ragioni di sicurezza, questo apparecchio deve essere:
•
•
Correttamente messo a terra (spina a 3-conduttori)
Collegato ad una presa di corrente munita di messa a terra a 230
Volt AC, 50 Hz.
1. Collocare il forno su una superficie piana, orizzontale e stabile. Mantenere
una zona libera di almeno 10 cm. dietro e ai lati del forno e di 20 cm. sopra al
forno per la corretta ventilazione dell’apparecchio.
(Per l’installazione sovrapposta vedere pagina 17.)
2. Non otturare le fessure per l’aerazione in quanto il forno può surriscaldarsi e
spegnersi automaticamente. Rimarrà non operativo sino a che non si sarà
sufficientemente raffreddato.
3. Togliere tutto il materiale di imballaggio all’interno del forno.
4. Connettere il cavo di alimentazione ad una presa a 3 conduttori (messa a
terra). Nel caso il cavo risultasse danneggiato, sostituirlo con un cavo
specifico fornito da un centro di assistenza SAMSUNG.
5. Rimuovere la pellicola di protezione sull’esterno del forno.
Tale pellicola di protezione serve ad evitare eventuali graffiature
sulla superficie esterna del forno. Non dimenticare di rimuoverla
prima di installare o di utilizzare il forno.
Uso esterno
Questo forno a microonde non può essere utilizzato all’aperto per cui se ne
raccomanda il solo utilizzo domestico.
Durante il raffreddamento ad aria
Evitare di spegnere il forno durante il funzionamento della ventola di
raffreddamento che si aziona e si arresta automaticamente dopo 1 minuto.
IMPORTANTE
•
•
•
I bambini non devono MAI utilizzare il forno a microonde o giocare con
esso, né devono essere lasciati senza sorveglianza vicino a un forno a
microonde in funzione. Gli oggetti che possono catturare l'interesse dei
bambini non devono essere conservati o nascosti appena sopra il forno.
Questa apparecchiatura non è adatta all’uso, senza supervisione, da
parte di persone (bambini inclusi) che dispongono di ridotte capacità
fisiche, sensoriali o mentali, oppure senza esperienza, conoscenza o che
siano date loro istruzioni per l’uso dell’apparecchiatura da una persona
responsabile della loro sicurezza.
Controllare che i bambini non giochino con questa apparecchiatura.
Raccomandazioni
4
NON installare il forno a microonde in prossimità di calore eccessivo o
di umidità.
Esempio:Vicino ad un forno tradizio-nale o ad un calorifero.
Le specifiche dell’alimentazione del forno devono essere rispettate ed
eventuali prolunghe del cavo di alimentazione devono avere le stesse
caratteristiche del cavo in dotazione al forno.
Prima di utilizzare il forno a microonde per la prima volta, pulire la
cavità interna e lo sportello con un panno umido.
jtX`Y`hl|TWYZ[`ip{UGGwG\GGt SGq GY_SGYWW_GGYaYYGwt
Cottura/Riscaldamento
Cottura ad uno stadio
Questo forno è preimpostato in fabbrica per un funzionamento
automatico.
Accertarsi che la spina del forno sia inserita in una presa
correttamente collegata a terra e che la scritta “ON” sia visualizzata
sul display.
Aprire lo sportello. (La lampada del forno si accende.)
Mettere il cibo in un contenitore adatto, posizionare il contenitore al
centro del forno e poi chiudere lo sportello fermamente. (La lampada
si spegne.)
3. Premere il tasto
.
Risultato: La lampada del forno e la ventola di
raffreddamento si accendono. Inizia il ciclo di
cottura. Il display visualizza il conto alla
rovescia del tempo selezionato.
1. Selezionare il livello di potenza desiderato premendo il
tasto SELEZIONE LIVELLO POTENZA.
Risultato: Il livello di potenza selezionato viene
visualizzato sul dispay.
Quando il tempo scade, il Segnale Acustico di
fine-ciclo emette 4 bip e la cottura si arresta. La
lampada del forno si spegne. Per 1 minuto, il
display visualizza il segnale “ ” e la ventola di
raffreddamento continua a funzionare al fine di
raffreddare le parti interne del forno. Durante
questa fase, la ventola non si arresta anche
quando viene aperto lo sportello. Gli alimenti
possono essere asportati dal forno anche se la
ventola è ancora in funzione.
4. Aprire lo sportello e prendere il contenitore.
Chiudere lo sportello. La lampada del forno si spegne.
2. Impostare il tempo di cottura desiderato con i tasti
NUMERICI.
Risultato: Il tempo selezionato viene visualizzato sul
display.
Il tempo massimo di cottura relativo a ciascun
livello di potenza è indicato nel paragrafo “Livelli
di potenza e variazioni del tempo di cottura” a
pagina 6. I tasti NUMERICI non funzionano
quando si desidera impostare un tempo di cottura
superiore al valore massimo.
Non è possibile impostare un tempo di cottura
superiore al tempo massimo consentito dal
programma scelto. In tal caso, l’indicatore del
livello di potenza comincia a lampeggiare ed è
opportuno premere il tasto CANCEL per
reimpostare il tempo di cottura e il livello di
potenza.
5
Per spegnere il forno durante la cottura occorre premere il tasto
.A
questo punto la scritta “ON” dell’Indicatore di Controllo Alimenta-zione
comincia a lampeggiare e si arresta solo quando viene premu-to
nuovamente il tasto
o
. Il forno si riaccende con il tasto
mentre premendo due volte il tasto
viene cancellato il program-ma
selezionato. Se il forno NON ha ancora avviato un ciclo di cottura è
sufficiente premere il tasto
una sola volta per cancellare il
programma selezionato. E’ possibile premere il tasto +20sec tante
volte quanto si vuole aumentare il tempo di cottura evitando di
superare il tempo massimo relativo al livello di potenza selezionato.
Quando si inserisce il cavo dell’alimentazione, il forno emette un solo
segnale acustico e tutte le spie vengono visualizzate per 5 secondi sul
display.
Quando, a ciclo di cottura completato, si apre lo sportello, la lampada
del forno si accende automaticamente e si spegne 1 minuto dopo.
Quando si apre lo sportello durante il ciclo di cottura, il forno si arresta
e la lampada del forno si accende automaticamente per 1 minuto e si
spegne 1 minuto dopo. Se si lascia aperta la porta del forno per più di
1 minuto, il forno emette un segnale acustico al minuto e, dopo 5
minuti, la spia di controllo dell’alimentazione visualizza la scritta ‘ON’
sul display.
IT
jtX`Y`hl|TWYZ[`ip{UGGwG]GGt SGq GY_SGYWW_GGYaYYGwt
IT
Cottura/Riscaldamento (segue)
Livelli di potenza e variazione del tempo di cottura
Cottura a più stadi
La funzione “livello di potenza” consente di definire la quantità di
energia dissipata e pertanto il tempo necessario per la cottura o il
riscaldamento del cibo, in base alla tipologia ed alla quantità
dell’alimento. I livelli di potenza che possono essere selezionati sono
riportati di seguito.
1. Selezionare il livello di potenza desiderato premendo il
tasto di selezione LIVELLO DI POTENZA o il tasto
SCONGELAMENTO.
Risultato: Il livello di potenza selezionato verrà
visualizzato nella finestra del display.
CM1929A
Livello di potenza
2. Impostare il tempo di riscaldamento desiderato premendo
i tasti NUMERICI.
Risultato: Il tempo selezionato verrà visualizzato nella
finestra del display.
ALTA ( )
MEDIA ( )
BASSA ( )
SCONG.VELOCE ( )
SCONG.LENTO ( )
Per il tempo massimo relativo ad ogni livello di
potenza della cottura si può fare riferimento al
paragrafo “Livelli di potenza e impostazioni del
tempo”. I tasti NUMERICI non si attiveranno o
non risponderanno quando premete un tempo di
cottura che supera il valore massimo. Non è
possibile impostare un tempo di cottura superiore
a quello massimo consentito dal programma
scelto. Si consiglia di premere CANCEL e di
inserire un nuovo livello di potenza e un nuovo
tempo di cottura.
100 %
70 %
50 %
20 %
10 %
LIvello potenza
ALTA ( )
MEDIA ( )
BASSA ( )
SCONG.VELOCE ( )
SCONG.LENTO ( )
4. Premere il pulsante
.
Risultato: La luce del forno e il ventilatore di
raffreddamento verranno attivati. Il forno
avvierà automaticamente il riscaldamento in
base al tempo di cottura e al livello di potenza
pre-programmati (stadio I stadio II stadio III ).
Il tempo visualizzato sul display digitale
procederà con il conto alla rovescia.
CM1329A
1850 W
1295 W
925 W
370 W
185 W
100 %
70 %
50 %
25 %
13 %
1600 W
1120 W
800 W
400 W
208 W
100 %
70 %
50 %
30 %
15 %
I tempi di cottura specificati nelle ricette ed in questa guida
corrispondono al livello di potenza specificato.
3. Ripetere i passaggi 1 e 2 per programmare gli stadi di
memoria II o III.
CM1629A
Percen- Poten- Percen- Poten- Percen- Potentuale
za
tuale
za
tuale
za
Non è possibile impostare lo stesso LIVELLO DI POTENZA e
SCONGELAMENTO simultaneamente.
Funziona come sequenza impostata.
6
Tempo max.
25 min.
40 min.
40 min.
50 min.
50 min.
1300 W
910 W
650 W
390 W
195 W
jtX`Y`hl|TWYZ[`ip{UGGwG^GGt SGq GY_SGYWW_GGYaYYGwt
Interruzione della cottura
Funzione di Ripetizione
E’ possibile interrompere la cottura in qualsiasi momento per:
• Controllare gli alimenti
• Girare o mescolare gli alimenti
• Lasciarli riposare
1. Premendo il tasto START( ) è possibile ripetere
l’impostazione di cottura precedente (non tiene in
considerazione la cottura in memoria automatica o
manuale). Il forno riparte con lo stesso tempo di cottura e
livello di potenza utilizzati durante l’ultimo funzionamento.
Per interrompere la cottura...
2. La funzione di ripetizione viene cancellata quando il forno
è disattivato.
Temporaneamente
Allora ...
Aprire lo sportello oppure premere una volta il
tasto
.
Risultato: La cottura viene interrotta.
Per riprendere la cottura, chiudere lo sportello
e premere di nuovo il tast o .
Completamente
Premere due volte il tasto
.
Risultato: Le impostazioni della cottura
vengono cancellate.
In caso si vogliano cancellare tutte le impostazioni prima di
cominciare la cottura, è sufficiente premere una volta il tasto
CANCEL( ).
7
IT
jtX`Y`hl|TWYZ[`ip{UGGwG_GGt SGq GY_SGYWW_GGYaYYGwt
IT
Uso del tasto +20sec
Uso della funzione di scongelamento
E’ un tasto per la COTTURA AUTOMATICA.
Basta premere questo tasto una sola volta per avviare la cottura
immediatamente.
E’ possibile aumentare il tempo di cottura premendo il tasto +20sec a
ciclo di cottura iniziato.
Il tempo di cottura aumenta di 20 secondi ogni volta che viene premuto
il tasto +20sec, ma non può superare il tempo massimo consentito dal
livello di potenza selezionato.
Come per la cottura tradizionale è possibile che, in base al gusto e alle
caratteristiche del cibo, si voglia modificare leggermente il tempo di
cottura. Pertanto:
• Aprire lo sportello tutte le volte che si vuole controllare la
cottura
• Chiudere lo sportello
• Aumentare il tempo di cottura rimanente
La funzione di scongelamento consente di scongelare carne, pollame e
pesce.
Utilizzare solo contenitori per microonde.
Aprire lo sportello. Sistemare l’alimento surgelato al centro del vano
cottura. Chiudere lo sportello.
1. Premere il tasto Selezione scongelamento e impostare
su SCONGELAMENTO VELOCE ( ) o
SCONGELAMENTO LENTO ( ).
Risultato: Lo SCONGELAMENTO selezionato viene
visualizzato sul display.
2. Impostare il tempo di scongelamento con i tasti
NUMERICI. (Massimo 50 minuti)
Prima di mettere in funzione il forno, il tempo può essere
aumentato/diminuito utilizzando i tasti NUMERICI per
l’impostazione del tempo di cottura o il tasto +20sec.
Durante il funzionamento, è possibile aumentare il tempo
solo attraverso l’uso del tasto +20sec.
3. Premere il tasto
.
Risultato: Inizio scongelamento.
8
Non è possible impostare un tempo di
scongelamento superiore a 50 minuti altrimenti
l’indicatore SCONGELAMENTO comincia a
lampeggiare e diventa necessario premere il
tasto CANCEL( ) per impostare nuovamente il
livello di potenza e il tempo di cottura.
Quando il forno è in funzione da oltre 25 minuti nel ciclo di
Scongelamento, NON è possibile cambiare il livello di potenza dalla
modalità di Scongelamento a quella di Cottura (Cottura/
Riscaldamento).
jtX`Y`hl|TWYZ[`ip{UGGwG`GGt SGq GY_SGYWW_GGYaYYGwt
Programmazione di un ciclo di cottura
Cottura ad uno stadio
5. Premere il tasto BLOCCO PROGRAMMA( ) e
successivamente il tasto PROGRAMMA( ). Tenere i
due tasti contemporaneamente premuti per 2 secondi.
Risultato: L’indicatore PROG e il numero del tasto
memoria lampeggiano 3 volte emettendo un
segnale acustico. Successivamente il display
si azzera.
Attenzione: Accertarsi di premere i tasti correttamente.
1. Premere il tasto BLOCCO PROGRAMMA( ) e
successivamente il tasto PROGRAMMA( ). Tenere i
due tasti contemporaneamente premuti per 2 secondi.
Accertarsi di premere i tasti correttamente.
Risultato: L’indicatore PROG viene visualizzato sul
display.
6. Per programmare altri tasti, ripetere il procedimento
sopra riportato.
2. Premere il tasto numerico su cui si vuole effettuare la
memorizzazione.
Risultato: Il codice del programma di memoria
selezionato viene visualizzato sotto l’indicatore
PROGRAMMA.
3. Selezionare il livello di potenza premendo il tasto
LIVELLO DI POTENZA e SCONGELAMENTO.
Risultato: Il livello di potenza predefinito su ALTA viene
visualizzato quando si preme il tasto LIVELLO
DI POTENZA.
Premere il tasto LIVELLO DI POTENZA e
SCONGELAMENTO una o più volte per ottenere
il livello di potenza desiderato.
4. Premere i tasti NUMERICI per impostare il tempo di
cottura.
Il tempo massimo di cottura relativo a ciascun
livello di potenza è indicato nel paragrafo “Livelli
di potenza e variazioni del tempo di cottura” a
pagina 6. I tasti NUMERICI non funzionano
quando si desidera impostare un tempo di
cottura superiore al valore massimo.
Non è possibile impostare un tempo di cottura
superiore al tempo massimo consentito dal
programma scelto. In tal caso, l’indicatore del
livello di potenza comincia a lampeggiare ed è
opportuno premere il tasto CANCEL per
reimpostare il tempo di cottura e il livello di
potenza.
9
E’ disponibile un numero massimo di 30
programmi memoria. Accertarsi che il forno sia
programmato correttamente.
Quando la programmazione è ultimata, basta
premere un tasto numerico per selezionare il
programma in memoria e avviare la cottura.
IT
jtX`Y`hl|TWYZ[`ip{UGGwGXWGGt SGq GY_SGYWW_GGYaYYGwt
Programmazione di un ciclo di cottura (segue)
IT
Cottura a più stadi
5. Repeat steps 3 and 4 for II or III stage memory
programming.
1. Premere il tasto BLOCCO PROGRAMMA( ) e
successivamente il tasto PROGRAMMA( ). Tenere i
due tasti contemporaneamente premuti per 2 secondi.
6. Premere il tasto BLOCCO PROGRAMMA( ) e
successivamente il tasto PROGRAMMA( ). Tenere i
due tasti contemporaneamente premuti per 2 secondi.
Risultato: L’indicatore PROG e il numero del tasto
memoria lampeggiano 3 volte emettendo un
segnale acustico. Successivamente il display
si azzera.
Attenzione: Accertarsi di premere i tasti correttamente.
Accertarsi di premere i tasti correttamente.
Risultato: L’indicatore PROG viene visualizzato sul
display.
2. Premere il tasto NUMERICI su cui si vuole effettuare la
memorizzazione.
Risultato: Il codice del programma di memoria
selezionato viene visualizzato sotto l’indicatore
PROGRAMMA.
7. Per programmare altri tasti, ripetere il procedimento
sopra riportato.
3. Selezionare il livello di potenza premendo il tasto
LIVELLO DI POTENZA e SCONGELAMENTO.
Risultato: Il livello di potenza predefinito su ALTA viene
visualizzato quando si preme il tasto LIVELLO
DI POTENZA.
Premere il tasto LIVELLO DI POTENZA e
SCONGELAMENTO una o più volte per ottenere
il livello di potenza desiderato.
4. Premere i tasti NUMERICI per impostare il tempo di
cottura.
Il tempo massimo di cottura relativo a ciascun
livello di potenza è indicato nel paragrafo “Livelli
di potenza e variazioni del tempo di cottura” a
pagina 6. I tasti NUMERICI non funzionano
quando si desidera impostare un tempo di
cottura superiore al valore massimo.
Non è possibile impostare un tempo di cottura
superiore al tempo massimo consentito dal
programma scelto. In tal caso, l’indicatore del
livello di potenza comincia a lampeggiare ed è
opportuno premere il tasto CANCEL per
reimpostare il tempo di cottura e il livello di
potenza.
10
E’ disponibile un numero massimo di 30
programmi memoria. Accertarsi che il forno sia
programmato correttamente.
Quando la programmazione è ultimata, basta
premere un tasto numerico per selezionare il
programma in memoria e avviare la cottura.
Non è possibile impostare lo stesso LIVELLO DI POTENZA e
SCONGELAMENTO simultaneamente.
Funziona come sequenza impostata.
jtX`Y`hl|TWYZ[`ip{UGGwGXXGGt SGq GY_SGYWW_GGYaYYGwt
Come avviare il ciclo di cottura memorizzato
Programmazione del tasto “porzioni doppie”
1. Premere il tasto
e successivamente il tasto
.
Tenere i due tasti contemporaneamente premuti per 2
secondi.
Quando la programmazione della memoria è terminata, basta premere
il tasto numerico relativo alla cottura in memoria che si desidera
selezionare. Dopo una breve pausa (5 secondi), Il forno avvia il ciclo di
cottura automaticamente in base al tempo di cottura e al livello di
potenza pre-programmati.
2. Selezionare il codice del programma desiderato
utilizzando i tasti NUMERICI.
1. Controllare che la spina del forno sia inserita in una presa
correttamente collegata a terra e che la scritta “ON” sia
visualizzata sul display.
3. Premere i tasti NUMERICI per impostare il fattore di
incremento in un valore compreso tra 1.00 e 9.99.
2. Aprire lo sportello.
La lampada del forno si accende.
3. Dopo aver messo l’alimento in un contenitore idoneo,
posizionarlo al centro del forno e chiudere lo sportello .
Risultato: La lampada del forno si spegne.
4. Premere il tasto NUMERICO.
Risultato: Il programma di memoria selezionato avvia
automaticamente il riscaldamento. Tuttavia i
tasti NUMERICI 1, 2, 3 funzionano dopo 2
secondi.
Il fattore predefinito è di 1.65 ed è già impostato
in fabbrica per aumentare il tempo di cottura.
Si raccomanda di impostare un fattore corretto
compreso tra 1.00 e 9.99 per ogni numero di
codice in memoria.
4. Premere il tasto
11
Premere il tasto
.
per uscire dal modo programmazione.
IT
jtX`Y`hl|TWYZ[`ip{UGGwGXYGGt SGq GY_SGYWW_GGYaYYGwt
Programmazione del tasto “porzioni doppie”
(segue)
Come azionare il tasto “porzioni doppie”
1. Premere il tasto “porzioni doppie”.
IT
Impostazione del fattore per quantità doppie
Funzione
Chiave di
accesso
Display
Commento
Premere per 2 secondi
Premere
CANCEL ( ) e
poi il tasto
Codice n.
Da 1.00 ~ 9.99
(Cambiare il fattore se
necessario)
Se non si apportano altre
modifiche, premere
CANCEL per uscire dal
modo impostazione.
doppie
Nuovo codice n.
Saltare questo passo se
non necessario.
(Inserire valore
fattore
desiderato)
Saltare questo passo se
non necessario.
CANCEL(
Dopo 1 sec, il display
visualizza il valore
predefinito.
(Inserire valore
fattore
Impostazione
desiderato)
fattore
START( )
quantità
START(
2. 2Premere il tasto numerico corrispondente alla memoria
desiderata.
Risultato: Il display visualizza il tempo di cottura
incrementato dal fattore preimpostato e il
conto alla rovescia.
Saltare questo passo se
non necessario.
)
)
(Modo cancel)
Per uscire dal modo
impostazione.
12
Non è necessario premere il tasto
la cottura.
per avviare
jtX`Y`hl|TWYZ[`ip{UGGwGXZGGt SGq GY_SGYWW_GGYaYYGwt
Come impostare la segnalazione di pulizia del
filtro dell’aria
Controllo del segnale acustico
E’ possibile selezionare il segnale acustico tra 4 diversi suoni
disponibili.
Quando, dopo aver utilizzato il forno per un certo periodo, il display
visualizza l’indicatore di controllo del filtro dell’aria (FILTER), è
necessario pulire il filtro dell’aria seguendo le istruzioni contenute nel
capitolo “Pulizia del filtro dell’aria” alla pagina 22 di questa guida.
Successivamente, in caso si desideri modificare la durata del tempo tra
una pulizia del filtro e l’altra, seguire il procedimento riportato di
seguito.
Premere il tasto CANCEL( ) e successivamente premere il
tasto numerico 0. Tenere i due tasti contemporaneamente
premuti per 2 secondi.
Risultato: Il segnale acustico viene modificato su un
livello più alto di quello corrente.
1. Premere il tasto BLOCCO PROGRAMMA( ) e
successivamente il tasto numerico 3. Tenere i due tasti
contemporanramente premuti per 2 secondi.
Risultato: Il display visualizza la frequenza di tempo in
ore tra una pulizia del filtro e l’altra e può
essere programmato dall’utente o
preimpostato in fabbrica.
A partire da qualsiasi livello, le impostazioni rispettano il
seguente criterio di rotazione:
Snd 0 Snd 1 Snd 2 Snd 3 Snd 0 (Nessun
suono)
Il tempo di pulizia predefinito è pari a 500 ore di
funzionamento effettivo dell’apparecchio.
2. Premere i tasti NUMERICI per impostare il tempo di
pulizia desiderato.
E’ possibile impostare fino a 999 ore.
3. Premere il tasto BLOCCO PROGRAMMA( ) e
successivamente il tasto numerico 3.
Tenere i due tasti contemporaneamente premuti per 2
secondi al fine di memorizzare il nuovo valore.
La programmazione del tempo di pulizia del filtro dell’aria
è terminata.
4. Premere il tastoCANCEL(
cottura.
Il segnale acustico 0 non emette suoni.
) per ritornare in modalità
Quando scade il tempo di pulizia bisogna
provvedere alla pulizia del filtro dell’aria. Vedere
a pagina 16.
13
Il segnale predefinito è Snd 2.
IT
jtX`Y`hl|TWYZ[`ip{UGGwGX[GGt SGq GY_SGYWW_GGYaYYGwt
Codici di errore
IT
Tipo di errore
Codice Segnalazione
Causa
Rimedio
Errore frequenza
di alimentazione
(50/60Hz)
E1
-
La frequenza di alimentazione è diversa Estrarre la spina del cavo elettrico e controllare se la frequenza di alimentazione
da 50 Hz.
è di 50 Hz.
Inserire la spina del cavo elettrico in una presa alimentata a 50 Hz e verificare
se appare “E1”. Se il codice di errore appare di nuovo, è necessario contattare
un centro di assistenza SAMSUNG.
Errore di
alimentazione
HVT-I
E41
Un bip della
I circuiti del forno non funzionano
durata di 2 sec correttamente.
Estrarre la spina del cavo elettrico e attendere per 10 secondi.
Inserire la spina e verificare se il codice “E41” appare di nuovo. Se il problema
persiste, contattare un centro SAMSUNG.
Errore di
alimentazione
HVT-II
E42
Un bip della
I circuiti del forno non funzionano
durata di 2 sec correttamente.
Estrarre la spina del cavo elettrico e attendere per 10 secondi.
Inserire la spina e verificare se il codice “E42” appare di nuovo. Se il problema
persiste, contattare un centro SAMSUNG.
Errore EEPROM
E5
Un bip della
La memoria IC (EEPROM IC) non
durata di 2 sec funziona corret-tamente mentre tutte le
altre funzioni continuano a funzionare
regolarmente. (Si può far funzionare il
forno manualmente)
Premere il tasto CANCEL una o più volte e pro-vare ad avviare una cottura in
memoria. Se riap-pare il codice di errore “E5”, contattare un centro SAMSUNG.
14
jtX`Y`hl|TWYZ[`ip{UGGwGX\GGt SGq GY_SGYWW_GGYaYYGwt
Funzioni addizionali
Manutenzione del forno a microonde
Nota: Premere il Tasto 1 e poi quello successivo. Tenere premuto per 2
secondi.
Funzione
Immissione tasti
Display
Pulizia del forno a microonde
1. Prima di effettuare la pulizia, estrarre la spina del forno dalla presa elettrica.
Commento
Tasto 1 Successivo
Totale tempo
effettivo
CANCEL
( )
1
Tenere premuto
per 2 sec. Unità:
10 ore
Tempo totale
oscillazione
magnetron
CANCEL
( )
2
Tenere premuto
per 2 sec. Unità: 1
ora
Start
Numero di volte CANCEL
( )
in cui viene
utilizzato
mediante
Codice N.
codice di
programma in
memoria
(Visualizzazione dati
dopo 2 sec.)
2. Pulire l’interno del forno. Asciugare accuratamente con un panno umido. Se il
forno è molto sporco può essere utilizzato un detersivo da cucina. Evitare
l’uso di detersivi troppo forti o abrasivi.
3. Pulire la superficie esterna del forno con acqua e sapone e asciugare con un
panno morbido.
Avvertenza: Accertarsi che non entri acqua nelle fessure di ventilazione
poste sul retro o nell’apertura del pannello di controllo.
Tenere premuto
contemporaneame
nte per 2 sec.
4. Quando si pulisce il vetro dello sportello si raccomanda di lavare con acqua e
sapone delicato e di asciugare con un panno morbido. Evitare l’uso di prodotti
specifici per i vetri poiché detersivi o saponi troppo forti potrebbero graffiarne
la superficie.
739 volte
(Il nuovo codice può
essere impostato dopo
la visualizzazione dati)
CANCEL (
Tempo di
cottura per
codice di
programma in
memoria
(Visualizzazion
e sequenziale
automatica)
CANCEL
( )
)
(Modo Cancel)
P
Tenere premuto
contemporaneame
nte per 2 sec.
(Visualizzazione
in sequenza per 3
sec da 1 a 30)
CANCEL (
)
Residui di cibo o schizzi di bevande che rimangono incrostati sulle
pareti del forno o tra la guarnizione e la porta potrebbero assorbire le
microonde e provocare la formazione di archi e scintille.
(Modo Cancel)
15
IT
jtX`Y`hl|TWYZ[`ip{UGGwGX]GGt SGq GY_SGYWW_GGYaYYGwt
Manutenzione del forno a microonde (segue)
IT
Pulizia del rivestimento superiore interno
Pulizia del filtro dell’aria
1. Tenere i fermi laterali del rivestimento superiore e, con entrambe le mani,
spingerli all’interno verso il basso. Estrarre quindi il rivestimento superiore
dalla cavità del forno.
Si raccomanda di pulire il filtro dell’aria regolarmente rispettando le
seguenti istruzioni. Il forno potrebbe avere problemi quando il filtro dell’aria
comincia ad essere ostruito dalla polvere.
2. Lavare il rivestimento in acqua insaponata o con un prodotto sterilizzante.
1. Estrarre i bullone posti sulle estremità del filtro dell’aria.
3. Rimettere a posto il rivestimento prima di utilizzare il forno.
2. Sollevare delicatamente il filtro dalla sua sede.
Avvertenza: Il rivestimento deve essere saldamente in posizione prima di
usare il forno.
Quando si toglie il rivestimento per effettuarne la pulizia, si
raccomanda di prestare estrema attenzione ai componenti
interni situati nella parte superiore del forno. Eventuali
deformazioni possono determinare un funzionamento anormale
e provocare la formazione di archi e scintille. In tal caso è
necessario contattare un centro di assistenza SAMSUNG.
3. Lavare il filtro in acqua calda insaponata.
4. Rimettere a posto il filtro prima di utilizzare il forno.
Se il filtro dell’aria dovesse otturarsi, potrebbe generare problemi di
surriscaldamento.
Se si desidera modificare la durata del tempo per la pulizia del filtro
dell’aria, fare riferimento al capitolo “Come impostare la segnalazione
di pulizia del filtro dell’aria” a pagina 13.
Rivestimento superiore interno
bullone
16
jtX`Y`hl|TWYZ[`ip{UGGwGX^GGt SGq GY_SGYWW_GGYaYYGwt
Istruzioni per l’installazione sovrapposta
Sostituzione della lampada
Importante
Importante
1. Estrarre la spina del cavo elettrico dalla presa prima di procedere
all’installazione.
1. Rimuovere la vite di fissaggio del coperchio della lampada.
2. Per l’installazione sovrapposta è necessario utilizzare una “staffa metallica”
fornita con il forno.
Non occorre rimuovere il pannello esterno per sostituire la lampada.
2. Rimuovere la lampada svitando in senso orario.
3. Sostituire con una nuova lampada avvitando in senso anti-orario.
3. E’ possibile la sovrapposizione di non oltre due apparecchi.
IT
Questo tipo di installazione è limitata ai seguenti modelli.
ATTENZIONE: Controllare che la cavità del forno sia vuota.
Installazione
1. Sovrapporre i due forni.
2. Svitare le 6 viti come indicato nella figura.
3. Posizionare la staffa metallica per unire i due forni.
4. Avvitare e stringere le 6 viti nuovamente.
5. Accertarsi che il forno superiore sia sistemato ad un’altezza che garantisce un
uso pratico e sicuro.
Viti
Staffa metallica
17
Coperchio della
lampada
Porta lampada
Pannello esterno
Lampada
(230V 25W)
jtX`Y`hl|TWYZ[`ip{UGGwGX_GGt SGq GY_SGYWW_GGYaYYGwt
Guida agli utensili
IT
Per cuocere i cibi, le microonde devono poter penetrare negli alimenti
senza essere riflesse o assorbite dai recipienti che li contengono.
E’ quindi importante fare attenzione al tipo di utensile che viene
utilizzato. Se il recipiente è marcato come idoneo alle microonde non
c’è motivo di preoccuparsi.
La tabella seguente elenca i vari tipi di utensili ed indica se o come
devono essere impiegati per la cottura in un forno a microonde.
Utensile
Idoneo alle
microonde
Commenti
Foglio di alluminio
Da usare in piccole quantità per
limitare la cottura di parti di cibo. Può
provocare scintille se il foglio è troppo
grande o troppo vicino alle pareti del
forno.
Porcellana e terracotta
Alcuni cibi surgelati sono confezionati
in questi contenitori.
Contenitori fast-food
• Tazze e contenitori
in polistirene
Sacchetti di carta o
giornali
Carta riciclata o
decorazioni in
metallo
Utili per riscaldare i cibi. Il
surriscaldamento può sciogliere il
polistirene.
Potrebbero prendere fuoco.
Potrebbe provocare scintille.
Pirex
•
Vetro fine
•
Vasetti di vetro
Può essere usato, purché non sia
decorato in metallo.
Può essere usato per riscaldare cibi o
liquidi. Il vetro delicato potrebbe
rompersi o creparsi se riscaldato con
rapidità.
Occorre togliere il coperchio. Idonei
solo per riscaldare.
•
Vetro
•
•
Carta
•
•
Piatti, tazze,
tovaglioli e carta
da cucina
Carta riciclata
•
Pellicola in plastica
•
Sacchetti per
congelatore
Carta da forno
: Raccomandato
: Fate Attenzione
: Non sicuro
18
Legacci per
sacchetti da
congelatore
Plastica
• Contenitori
Porcellana, ceramiche, terracotte
smaltate o porcellana cinese sono
generalmente adatte, a patto che non
abbiano decorazioni in metallo.
Piatti di carta o di plastica
•
Metallo
• Piatti
Potrebbero provocare scintille o
incendi.
Per tempi di cottura minimi ed a
temperatura media. Inoltre assorbono
eccessiva umidità.
E’ possibile la formazione di archi.
In particolare se di termoplastica
resistente al calore. Alcune plastiche
potrebbero deformarsi o scolorirsi a
temperature elevate. Non usare
melanina.
Può essere usata per conservare
l’umidità. Non deve toccare il cibo.
Fare attenzione alla fuoriuscita di
vapore bollente mentre viene tolta la
pellicola.
Solo se idonei alla bollitura e per forno.
Non devono essere ermetici. Se
necessario, bucarli con una forchetta.
Da usare per trattenere l’umidità ed
evitare gli schizzi.
jtX`Y`hl|TWYZ[`ip{UGGwGX`GGt SGq GY_SGYWW_GGYaYYGwt
Guida alla cottura
C:Congelato
Ricetta
F:Freddo
Procedura
IT
Livello de
Tempi(W)
Tempo
potenza 1850 1600 1300
de
attesa
Ricetta
PANE E DOLCI
Procedura
Livello
Tempi(W)
Tempo
de
de
1850 1600 1300
potenza
attesa
SPUNTINI E ANTIPASTI
Per scongelare
Per riscaldare
Vienna Baton 9″ C
Scongela- 0'45" 0'50" 0'50" 5 min.
mento1( )
Salsicce Cumberland Mettere sul piatto MEDIO
C
2'00" 2'10" 2'20" 2 min.
Vienna Baton 9″ X
2C
Scongela- 1'10" 1'15" 1'20" 5 min.
mento1( )
Colazione completa F Coprire
MEDIO
2'30" 2'40" 2'50" 1 min.
Hamburger di manzo
C
ALTO
0'55" 1'05" 1'10" 1 min.
Hamburger di pollo C
ALTO
0'55" 1'05" 1'10" 1 min.
Spiedini di carne e
verdura 162g C
ALTO
1'00" 1'10" 1'20" 1 min.
Gateaux, ind.
Fetta C
Mettere sul piatto
Scongela- 2'30" 2'40" 2'50" 5 min.
mento2( )
Per riscaldare
Quiche 11″ a
fetta136g
Mettere sul piatto
Scongela- 3'00" 3'00" 3'00" 1 min.
mento1( )
ALTO
0'40" 0'45" 0'50" 1 min.
Pastixxio di carne Togliere dal vassoil ALTO
tritata ind. X 2 C
di foglio di
alluminio. Mettere
sul piatto
Hot Dog C
Pizza 190g C
0'10" 0'15" 0'15" 1 min.
ALTO
Mettere sul piatto LOW
Costolette alla griglia Mettere sul piatto MEDIO
200g
1'00" 1'10" 1'20" 1 min.
2'30" 2'45" 3'00" 2 min.
3'30" 3'45" 4'00" 1 min.
Ali6 X 6 C
Disporre sul piatto ALTO
con le estremità
più sottili verso il
centro
2'00" 2'15" 2'30" 1 min.
Torta di frutta C
Mettere sul piatto
ALTO
0'40" 0'45" 0'45" 1 min.
Crossant X 2 C
Mettere sul piatto
ALTO
0'05" 0'10" 0'10" 1 min.
Dolci, cotto 227g
F
Mettere sul piatto
ALTO
0'45" 0'55" 1'00" 1 min.
Fagioli cotti 500g
Cover and Stir
half way cottura
ALTO
2'00" 2'10" 2'20" 2 min.
Pollo e torta di
funghi X 2F
Rimuovere il foglio
di alluminio.
Mettere sul piatto
ALTO
0'45" 0'55" 1'00" 1 min.
Fagioli cotti 250g
Coprire e mescol- ALTO
are a metà cottura
1'00" 1'05" 1'10" 2 min.
Pollo e torta di
funghi F
Mettere sul piatto,
rimuovere il foglio
di alluminio
ALTO
0'30" 0'40" 0'45" 1 min.
Dolce di mele 200g C Mettere sul piatto ALTO
e coprire
1'20" 1'30" 1'40" 2 min.
Dolce di Natale 150g Mettere in una
F
scodella
ALTO
0'20" 0'25" 0'30" 2 min.
Rotolo di marmellata
80g C
Mettere sul piatto ALTO
1'00" 1'05" 1'10" 2 min.
Crepes Suzette 2 C
Bucherellare la
pellicola
ALTO
0'50" 1'00" 1'10" 1 min.
Pudding di grasso di
rognone C
X2
X1
ALTO
ALTO
0'35" 1'05" 1'30" 2 min.
0'40" 0'50" 1'00" 2 min.
Budino leggero C
X2
X1
ALTO
ALTO
0'35" 1'05" 1'30" 2 min.
0'40" 0'45" 0'45" 2 min.
DESSERT
Per riscaldare
SPUNTINI E ANTIPASTI
Per cuocere
Bacon, fetta F
Mettere sulla griglia ALTO
1'30" 1'40" 1'50" 1 min.
Uova, in camicia
X2F
Mettere nei
tegamini
ALTO
0'30" 0'40" 0'45" 1 min.
Uova, strapazzate Battere le uova e
X2F
mettere in una
scodella
ALTO
25"30"
Salsicce X 2
Grosse F
MEDIO
Punzecchiare
30"40"
35"45"
1 min.
1'00" 1'10" 1'20" 2 min.
19
jtX`Y`hl|TWYZ[`ip{UGGwGYWGGt SGq GY_SGYWW_GGYaYYGwt
Guida alla cottura (segue)
IT
C:Congelato
Ricetta
F:Freddo
Procedura
Livello de
potenza
Tempi(W)
1850 1600 1300
Tempo
de
attesa
Ricetta
PIATTI
Procedura
Livello
Tempi(W)
Tempo
de
de
potenza 1850 1600 1300 attesa
PIATTI
Per riscaldare
Per riscaldare
Amorini e Stilton F Porre su un piatto ALTO
per forno a
microonde
3'30" 3'40" 3'50" 1 min.
Mettere su un piatto ALTO
Pizza di
per forno a microonde
verdura del
Cumberland F
3'20"
3'35"
3'50"
1 min.
Pollo Tikka
masala C
Bucherellare la
pellicola
ALTO
3'20" 3'30" 3'40" 2 min.
Pasto pronto
350g F
Coperto
ALTO
2'00"
2'15"
2'30"
1 min.
Pollo Thai al curry Bucherellare la
C
pellicola
ALTO
3'00" 3'15" 3'30" 2 min.
Pasto pronto
700g F
Coperto
ALTO
3'00"
3'15"
3'30"
1 min.
Chilli con carne C Bucherellare la
pellicola
ALTO
3'30" 3'45" 4'00" 2 min.
VERDURE FRESCHE
Fagioli, freschi Aggiungere 60ml o 4
affettati
cucchiai da tavola di
acqua-Coprire
ALTO
3'00"
3'15"
3'30"
2 min.
Broccoli, divisi Aggiungere 60ml o 4
in fiori
cucchiai da tavola di
acqua-Coprire
ALTO
3'00"
3'15"
3'30"
2 min.
Cavolo,
Aggiungere con 10
tagliato a pezzi cucchiai da tavola di
acqua-Coprire
ALTO
5'00"
5'30"
6'00"
2 min.
Carote,
affettate
Aggiungere con 60ml ALTO
o 4 cucc-hiai da
tavota di acquaCoprire
3'30"
3'45"
4'00"
2 min.
Cavolfiori,
diviso in fiori
Aggiungere 60ml o 4
cucchiai da tavola di
acqua-Coprire
ALTO
3'30"
3'45"
4'00"
2 min.
Fagiolini interi
Aggiungere 60ml o 4 ALTO
cucchiai da tavola di
acqua-Coprire
3'30"
3'45"
4'00"
2 min.
Patate, non
sbucciate
Girare a metà cottura ALTO
10'00” 11'00” 12'00” 5 min.
Cavoletti di
Bruxelles
Aggiungere 60ml o 4
cucchiai da tavola di
acqua-Coprire
Pollo cotto
mezzo gelato
Mettere nel forno MEDIO
a microonde in
sacchetto
bucherellato
4'30" 5'00" 5'30" 2 min.
Lasagne 192g
Mettere su un
piatto per forno
MEDIO
4'00" 4'15" 4'30" 2 min.
Cozze alla
marinara 466g C
Bucherellare il
sacchetto
ALTO
2'30" 2'45" 3'00" 2 min.
Involtino di
Salmone &
Avocado F
Bucherellare il
sacchetto
ALTO
2'30" 2'45" 3'00" 2 min.
Pasticcio di carne
300g F
Mettere nel forno MEDIO
e coprire
3'00" 3'15" 3'30" 2 min.
Budino freddo di
rognone di bue
Coprire-mettere
verticalmente su
un piatto per
forno a
microonde
BASSO
4'00" 4'20" 4'40" 2 min.
Pollo in pesto
rosso 312g C
Scongela- 5'00" 5'00" 5'00" 1 min.
Bucherellare il
mento1( )
sacchetto e
3'30" 3'45" 4'00"
mettere sul piatto ALTO
Tagliatelle alla
carbonara F
ALTO
Bucherellare il
pellicola, mettere
sul piatto
1'40" 2'00" 2'20" 1 min.
Tortellini al
formaggio F
Mettere sul piatto ALTO
e coprire
2'00" 2'15" 2'30" 1 min.
Per cucinare 500 g
20
ALTO
4'30"
4'45"
5'00"
2 min.
jtX`Y`hl|TWYZ[`ip{UGGwGYXGGt SGq GY_SGYWW_GGYaYYGwt
Guida alla cottura (segue)
C:Congelato
Pulizia del vostro Microonde
Le parti di seguito elencate del vostro microonde devono essere pulite
con frequenza per prevenire che il grasso e le particole di cibo si
accumulino:
F:Freddo
Ricetta
Procedura
Livello
Tempi(W)
Tempo
de
de
1850 1600 1300
potenza
attesa
•
•
VERDURE FRESCHE
Per cucinare 500 g
Fagioli, freschi
affettati
Coprire, mescolare ALTO
ogni tanto durante
la cottura
3'00"
3'15"
3'30"
2 min.
Fagioli, interi
Coprire, mescolare ALTO
a metà cottura
4'00"
4'15"
4'30"
2 min.
Broccoli, divisi in
fiori
Coprire, mescolare ALTO
a metà cottura
4'00"
4'15"
4'30"
2 min.
Cavolo, tagliato a Coprire, mescolare ALTO
pezzi
a metà cottura
4'00"
4'15"
4'30"
2 min.
Carote intere
Coprire, mescolare ALTO
a metà cottura
4'00"
4'15"
4'30"
2 min.
Cavolfiore, diviso Coprire, mescolare ALTO
in fiori
a metà cottura
4'00"
4'15"
4'30"
2 min.
Pannocchie di
mais
Coprire
ALTO
4'00"
4'30"
5'00"
2 min.
Mais, a chicchi
Coprire, mescolare ALTO
a metà cottura
5'00"
5'15"
5'30"
2 min.
Funghi, interi
Coprire, mescolare ALTO
a metà cottura
3'00"
3'15"
3'30"
2 min.
Patate, non
sbucciate
230~290g X 1
ALTO
3'00"
4'00"
4'30"
2 min.
Patate, passate
X2
X4
ALTO
ALTO
6'00" 6'30" 7'00" 2 min.
10'00" 11'15" 12'30" 2 min.
Ratatouille 500 g
ALTO
3'30"
4'00"
4'30"
2 min.
Coprire, mescolare ALTO
a metà cottura
3'00"
3'30"
4'00"
2 min.
Riso, bollito C
Coprire, mescolare ALTO
a metà cottura
3'00"
3'15"
3'30"
2 min.
Riso, pilaf C
Coprire, mescolare ALTO
a metà cotturay
3'00"
3'15"
3'30"
2 min.
Cavoletti di
Bruxelles
superfici interne ed esterne
sportello e guarnizione dello sportello
Assicurarsi SEMPRE che le guarnizioni dello sportello siano pulite e che
lo sportello si chiuda correttamente.
Se il forno non viene mantenuto pulito, ciò potrebbe portare a un
deterioramento della superficie che potrebbe danneggiare
l’apparecchiatura e provocare eventuali situazioni pericolose.
1. Pulite le superfici esterne con un panno soffice e con acqua calda e
saponosa. Sciacquare ed asciugare
2. Togliere schizzi o chiazze dalle superfici interne con un panno insaponato.
3. Per sciogliere particole indurite di cibo e per togliere gli odori, mettete una
brocca d’acqua e spremuta di limone nel piatto ceramico e scaldare durante
10 minuti a massima potenza.
4. Non pulite questo utensile con acqua.
RISO, 500g
Per riscaldare
21
NON versate acqua nei condotti di sfiato.
NON impiegate prodotti abrasivi o diluenti chimici.
Prestate particolare attenzione quando pulite le guarnizioni dello
sportello per assicurarvi che non ci siano particole:
• che si accumulino
• che evitino che lo sportello chiuda correttamente
Pulite l’interno del microonde dopo ogni uso con un detersivo soave,
ma lasciate raffreddare il microonde prima di pulirlo per evitare
scottature.
IT
jtX`Y`hl|TWYZ[`ip{UGGwGYYGGt SGq GY_SGYWW_GGYaYYGwt
Caratteristiche tecniche
Bisogna prendere delle semplici precauzioni quando s’immagazzina il
microonde o si porta a riparare.
Il microonde non deve usarsi se lo sportello o le guarnizioni sono
danneggiate:
• Cerniere rotte
• Guarnizioni deteriorate
• Carcassa piegata o storta
Soltanto un tecnico qualificato può riparare questo forno a
microonde.
La costante ricerca SAMSUNG tesa ad un perfezionamento dei propri
prodotti comporta che le caratteristiche del design e le guide per
l’utente siano soggette a continui cambiamenti senza preavviso.
CM1929A
CM1629A
Alimentazione
La potenza di uscita
3, 200 W
3, 000 W
2, 600 W
1, 850 W
(IEC-705)
1, 600W
(IEC-705)
1, 300W
(IEC-705)
Frequenza funzionamento
2, 450 MHz
Dimensioni (L x A x P)
Esterne
Cavità forno
Togliete la spina dalla presa.
Contattate con il centro post vendita più vicino a voi.
Se volete immagazzinare temporaneamente il vostro microonde,
scegliete un posto asciutto e senza polvere.
Ragione: La polvere e l’umidità possono danneggiare alcune parti del
microonde.
CM1329A
230 V ~ 50 Hz
Consumo
Microonde
NON togliete mai la carcassa esterna del microonde. Se il
microonde è guasto è necessita essere riparato o siete in dubbio
sul da farsi:
•
•
Modello
464 x 368 x 557 mm
370 x 190 x 370 mm
Volume
26 litri
Peso netto
464
32 Kg circa
43
557
530
26
1000
368
IT
Immagazzinaggio e Riparazione del Microonde
10
22
444
486
514
jtX`Y`hl|TWYZ[`ip{UGGwGYZGGt SGq GY_SGYWW_GGYaYYGwt
Nota
IT
23
jtX`Y`hl|TWYZ[`ip{UGGwGY[GGt SGq GY_SGYWW_GGYaYYGwt
jtX`Y`hl|TWYZ[`imyUGGwGXGGt SGq GY_SGYWW_GGYaW^Gwt
FOUR À MICRO-ONDES
(PROFESSIONNELS)
Mode d’emploi et conseils de cuisson
CM1929A (1850 Watts)
CM1629A (1600 Watts)
CM1329A (1300 Watts)
P
1
2
3
4
5
6
7
8
9
+ 20sec
Code No. : DE68-02349B
0
Four ........................................................................................................2
Panneau de commande ........................................................................2
Utilisez ce mode d’emploi.......................................................................3
Précautions d’emploi ..............................................................................3
Installez votre four à micro-ondes ..........................................................4
Cuisez/réchauffez un plat.......................................................................5
Niveaux de puissance et variations de temps........................................6
Arrêtez la cuisson...................................................................................7
Utilisez la fonction de répétition..............................................................7
Utilisez le bouton +20sec .......................................................................8
Utilisez la fonction de décongélation......................................................8
Programmez une cuisson en mémoire ..................................................9
Utilisez un programme de cuisson mémorisé ......................................11
Programmez une quantité double ........................................................11
Utilisez le bouton de quantité double ...................................................12
Programmez la fréquence de nettoyage du filtre à air .........................13
Sélectionnez le bip sonore ...................................................................13
Codes erreur ........................................................................................14
Utilisez des combinaisons de boutons .................................................15
Entretenez votre four à micro-ondes....................................................15
Superposez un four sur un autre..........................................................17
Remplacez la lampe.............................................................................17
Guide des récipients.............................................................................18
Conseils de cuisson .............................................................................19
Nettoyez votre four à micro-ondes .......................................................22
Rangez ou réparez votre four à micro-ondes ......................................22
Spécifications techniques.....................................................................23
jtX`Y`hl|TWYZ[`imyUGGwGYGGt SGq GY_SGYWW_GGYaW^Gwt
Four
Panneau de commande
1
FR
2
4
LAMPE
PANNEAU DE
COMMANDE BOUTON DE
DÉMARRAGE
AFFICHEUR
PROTECTION
DE LA LAMPE
1
2
3
4
5
6
7
8
9
3
0
+ 20sec
1.
2.
3.
4.
5.
6.
7.
8.
9.
10.
PANNEAU DE
PROTECTION
DE LA VOUTE
PLATEAU EN
VERRE
FILTRE DE
CROCHETS DE
SORTIE D’AIR
VERROUILLAGE
DE LA PORTE
PORTE
1
2
3
4
5
6
7
8
9
0
+ 20sec
P
POIGNÉE
P
ORIFICES DE
VERROUILLAGE
5
6
7
8
9
10
AFFICHEUR
BOUTON DE PROGRAMMATION
BOUTON DE VERROUILLAGE DE PROGRAMMATION
TOUCHES NUMÉRIQUES (réglage du temps, programmation mémorisée)
BOUTON DE SÉLECTION DU NIVEAU DE PUISSANCE
BOUTON DE SÉLECTION DU MODE DÉCONGÉLATION
BOUTON DE QUANTITÉ DOUBLE
BOUTON +20sec (bouton d’accès direct au mode cuisson)
BOUTON D’ARRÊT/ANNULATION
BOUTON DE DÉMARRAGE
AFFICHEUR
INDICATEUR DE
PROGRAMMATION
INDICATEUR DE
TEMPS DE CUISSON
INDICATEUR DE
CONTRÔLE DU
FILTRE À AIR
INDICATEUR
DE CONTRÔLE
DES DONNÉES
INDICATEUR
DU NUMÉRO
DE MÉMOIRE
INDICATEUR DE
QUANTITÉ
DOUBLE
INDICATEUR
D’ALIMENTATION
(lorsque “ON” est affiché,
le four ne fonctionne pas)
2
INDICATEURS
DE NIVEAU DE
PUISSANCE
INDICATEURS
DE DÉLATION
jtX`Y`hl|TWYZ[`imyUGGwGZGGt SGq GY_SGYWW_GGYaW^Gwt
Utilisez ce mode d’emploi
Précautions d’emploi
Vous venez d’acquérir un four à micro-ondes professionnel
SAMSUNG. Ce mode d’emploi contient de nombreux conseils et
instructions d’utilisation :
• précautions d’emploi,
• guide des récipients et ustensiles recommandés,
• conseils de cuisson utiles.
Au début du mode d’emploi, vous trouverez des illustrations du four et
plus particulièrement du panneau de commande afin de vous
permettre de mieux localiser les différents boutons.
CONSIGNES DE SECURITE IMPORTANTES – A LIRE
ATTENTIVEMENT ET A CONSERVER PRECIEUSEMENT EN
VUE D'UNE CONSULTATION ULTERIEURE.
Avant de faire cuire des aliments ou des liquides dans votre four à
micro-ondes, prenez les précautions suivantes :
AVERTISSEMENT :
si la porte ou les joints de la porte sont endommagés, le four ne doit pas être
utilisé tant que ces pièces n'ont pas été réparées par une personne qualifiée.
AVERTISSEMENT :
il est très dangereux pour toute personne non habilitée d'effectuer des manipulations ou des
réparations impliquant le démontage de l'habillage de protection contre les micro-ondes.
AVERTISSEMENT :
Les procédures par étapes emploient les symboles suivants :
les liquides et autres aliments ne doivent pas être réchauffés dans des récipients
fermés car ils risquent d'exploser.
Important
Remarque
si vous faites réchauffer des liquides au four à micro-ondes, l’ébullition peut
survenir à retardement. Faites donc bien attention lorsque vous sortez le
récipient du four. Pour éviter cette situation, laissez-les TOUJOURS reposer au
moins une vingtaine de secondes une fois le four éteint, ceci afin de permettre à
la température de s’homogénéiser.
Remuez SYSTEMATIQUEMENT le contenu une fois le temps de cuisson écoulé
(et pendant la cuisson si nécessaire).
En cas d'accident, effectuez les gestes de PREMIERS SECOURS suivants :
* immergez la zone brûlée dans de l'eau froide pendant au moins 10 minutes ;
* recouvrez-la d'un tissu propre et sec ;
* n'appliquez aucune crème, huile ou lotion.
AVERTISSEMENT :
CONSIGNES PERMETTANT D'EVITER UNE EXPOSITION
EXCESSIVE AUX MICRO-ONDES
La non observation des consignes de sécurité suivantes peut se traduire par une
exposition dangereuse à l'énergie des micro-ondes.
(a) Ne tentez jamais d'utiliser le four avec la porte ouverte, de modifier les
systèmes de verrouillage (loquets) ou d'insérer un objet dans les orifices de
verrouillage de sécurité.
(b) Ne placez aucun objet entre la façade du four et la porte et ne laissez aucune
salissure ni aucun reste de produit d'entretien s'accumuler sur les surfaces
assurant l'étanchéité. Maintenez la porte et les joints d'étanchéité propres en
permanence : après chaque utilisation du four, essuyez-les d'abord avec un
chiffon humide, puis avec un chiffon doux et sec.
(c) Si le four est endommagé, ne l'utilisez pas tant qu'il n'a pas été réparé par un
technicien micro-ondes qualifié formé par le fabricant. Il est impératif que la
porte du four ferme correctement et que les éléments suivants ne soient pas
endommagés :
(1) porte (déformée)
(2) charnières de porte (cassées ou lâches)
(3) joints de la porte et surfaces d'étanchéité
(d) Le four doit être réglé ou réparé exclusivement par un technicien micro-ondes
qualifié formé par le fabricant.
AVERTISSEMENT :
avant de consommer le contenu des biberons et des petits pots pour bébé,
vérifiez-en toujours la température pour éviter tout risque de brûlure ; pour ce
faire, mélangez-en le contenu ou secouez-les.
• Utilisez uniquement des ustensiles adaptés à la cuisson au four à micro-ondes.
N'utilisez JAMAIS de récipients métalliques, de vaisselle comportant des
ornements dorés ou argentés, de pics à brochette, de fourchettes, etc. Retirez
les attaches métalliques des sacs en papier ou en plastique.
Pourquoi ? Des arcs électriques ou des étincelles risqueraient de se former et
d’endommager les parois du four.
• Lorsque vous faites réchauffer des aliments dans des récipients en plastique
ou en papier, veillez à ce que ces derniers ne s'enflamment pas. N’utilisez pas
votre four à micro-ondes pour faire sécher des papiers ou des vêtements.
• Les petites quantités d'aliments nécessitent un temps de cuisson ou de
chauffe plus court. Même en appliquant les temps de cuisson indiqués, ces
aliments sont susceptibles de surchauffer et de brûler.
• Si de la fumée s'échappe de l'appareil, laissez la porte de celui-ci fermée afin
d'étouffer les flammes et éteignez-le ou débranchez-le de la prise murale.
• NE remplissez JAMAIS le récipient à ras bord. Choisissez un récipient
évasé afin de prévenir tout débordement éventuel. Les bouteilles à goulot
étroit peuvent exploser en cas de surchauffe.
3
FR
jtX`Y`hl|TWYZ[`imyUGGwG[GGt SGq GY_SGYWW_GGYaW^Gwt
Précautions d’emploi (suite)
FR
Installez votre four à micro-ondes
Ce four à micro-ondes peut être installé à l’endroit de votre choix
(plan de travail de cuisine, chariot, table).
•
NE faites JAMAIS chauffer un biberon encore muni de sa tétine ; il
risquerait d'exploser en cas de surchauffe.
• Ne faites jamais réchauffer d'œufs (frais ou durs) dans leur coquille car ils
risquent d'exploser, et ce même une fois le cycle de cuisson terminé.
Ne faites jamais réchauffer de bouteilles, de pots ou de récipients fermés
hermétiquement ou emballés sous vide. Il en va de même pour les noix
dans leur coquille ou encore les tomates.
• Le four doit être nettoyé régulièrement afin d'en retirer tout reste de nourriture.
• En négligeant la propreté de votre four, vous risquez d'en détériorer les
surfaces et par conséquent de réduire la durée de vie de l'appareil et de
créer des situations dangereuses.
• Ne tentez jamais de nettoyer le four au jet d'eau.
• N'obstruez JAMAIS les orifices de ventilation du four avec une pièce de
tissu ou un morceau de papier. Le tissu ou le papier risque de
s'enflammer lorsque l'air chaud est évacué du four.
Le four peut alors surchauffer et s'éteindre automatiquement. Il restera
inutilisable tant qu'il n'aura pas suffisamment refroidi.
• Utilisez TOUJOURS des maniques pour retirer un plat du four afin d'éviter
toute brûlure accidentelle.
• Evitez que le câble électrique ou la prise n'entre en contact avec de l'eau
ou une surface chauffante.
N'utilisez pas l'appareil si le cordon ou la fiche est endommagé(e).
• Lorsque vous ouvrez la porte du four, maintenez une certaine distance
entre vous et l'appareil (env. 50 cm).
Pourquoi ? L'air ou la vapeur s'échappant du four à ce moment précis risque
de vous brûler.
• Un cliquetis peut se faire entendre pendant le fonctionnement du four, et
plus particulièrement pendant la décongélation.
Pourquoi ? Ces bruits sont normaux lorsque la puissance de l'alimentation
électrique est modifiée.
• NE faites JAMAIS fonctionner le four à micro-ondes à vide. Le cas échéant,
il serait automatiquement mis hors tension pour des raisons de sécurité. Le
four fonctionnera à nouveau normalement après une période de repos d'au
moins 30 minutes. Nous vous recommandons de laisser en permanence un
verre d'eau à l'intérieur du four ; ainsi, si vous mettez le four en marche par
inadvertance alors qu'il est vide, l'eau absorbera les micro-ondes.
•
•
•
•
nurale à 3 broches,
délivrant une tension de 230Volts/50 Hz CA .
1. Installez le four sur une surface plane, horizontale et stable. Prévoyez un
dégagement d’au moins 10 cm autour du four et de 20 cm au-dessus pour
faciliter la ventilation. (Si vous souhaitez superposer un four sur un autre,
reportez-vous à la page page 17.)
2. N’obstruez jamais les orifices d’aération, car le four risquerait de surchauffer
et de s’arrêter automatiquement. Vous devrez alors attendre qu’il ait
suffisamment refroidi pour le réutiliser.
3. Retirez tout élément d’emballage de l’intérieur du four.
4. Branchez le cordon d’alimentation sur une prise appropriée. Si le cordon de
l’appareil est endommagé, il devra être remplacé par un cordon spécial Faites
effectuer le remplacement du cordon auprès d’un service après-vente agréé
par la marque.
Veillez à retirer le film de protection recouvrant le capot extérieur
du four. Ce film protège votre four contre les griffures et autres
rayures. Assurez-vous que le film est retiré avant d’installer ou
d’utiliser le four.
Utilisation du four en plein air
Ce four à micro-ondes ne peut pas être utilisé à l’extérieur.
Utilisez-le uniquement à l’intérieur.
Consignes lors de la ventilation
Ne débranchez pas le four de la prise électrique lorsque le ventilateur fonctionne
automatiquement pendant une minute.
Recommandations
IMPORTANT
•
Pour votre sécurité personnelle, cet appareil doit être branché sur
une prise:
Cet appareil N'EST PAS conçu pour être utilisé par des jeunes enfants non
assistés par un adulte responsable ; Ne les laissez jamais sans surveillance à
proximité du four lorsque celui-ci est en marche. De même, évitez d'entreposer
ou de cacher tout objet suscitant l'intérêt des enfants au-dessus du four.
Cet appareil n'est pas conçu pour être utilisé par des personnes (y
compris les enfants) inexpérimentées ou dont les capacités physiques,
sensorielles ou mentales sont réduites, sauf si celles-ci sont sous la
surveillance ou ont reçu les instructions d'utilisation appropriées de la
personne responsable de leur sécurité.
Les enfants ne doivent pas utiliser l'appareil sans la surveillance d'un adulte.
4
N’installez PAS le four dans un environnement chaud ou humide.
Exemple: à côté d’un radiateur ou d’un four traditionnel.
La tension d’alimentation doit être respectée. Toute rallonge utilisée
doit être conforme aux spécifications du cordon d’alimentation
d’origine.
Avant d’utiliser votre four pour la première fois, nettoyez les
surfaces intérieures et les joints d’étanchéité à l’aide d’une éponge
humide.
jtX`Y`hl|TWYZ[`imyUGGwG\GGt SGq GY_SGYWW_GGYaW^Gwt
Cuisez/réchauffez un plat
Cuisson en une étape
Ce four fonctionne en mode automatique par défaut.
Assurez-vous que le four est branché sur une prise de terre et que
l’indicateur d’alimentation ”ON” s’affiche.
Ouvrez la porte (La lampe du four s’allume.).
Placez les aliments dans un plat garanti ”four à micro-ondes”, posez le
plat au centre du plateau en verre, puis fermez la porte (La lampe
s’éteint.)
3. Appuyez sur le bouton de démarrage
:
Résultat: la lampe du four s’allume et le ventilateur
démarre. La cuisson commence.
Le temps indiqué sur l’afficheur est décompté.
1. Sélectionnez le niveau de puissance souhaité en
appuyant sur le bouton du niveau de puissance.
Résultat: le niveau de puissance sélectionné s’affiche.
2. Réglez le temps de cuisson souhaité en appuyant sur les
touches numériques appropriées.
Résultat: le temps sélectionné s’affiche.
Une fois la cuisson terminée, un signal retentit
quatre fois et la lampe du four s’éteint. Pendant
une minute, ‘0’ s’affiche et le ventilateur continue
automatiquement de fonctionner afin de refroidir
les composants internes du four. Pendant ce
temps, il est impossible d’arrêter le ventilateur,
par exemple en ouvrant la porte. Le ventilateur
l’indication ”ON” s’affichera alors de nouveau.
Vous pouvez cependant retirer les aliments du
four avant que le ventilateur ne s’arrête
complètement.
4. Ouvrez la porte et retirez les aliments du four.
Refermez la porte. La lampe s’éteint.
Le temps maximum selon chaque niveau de
puissance de cuisson peut être vérifié dans
l’ouvrage “Niveaux de puissance et variations du
temps”. Les touches NUMÉRIQUES.ne
fonctionneront, ni ne répondront lorsque vous
appuierez sur un temps de cuisson dépassant la
valeur maximum. Vous ne pouvez régler un
temps de cuisson supérieur au temps maximum
autorisé par le programme choisi. Il vous est
conseillé d’appuyer sur ANNULER et ensuite
d’entrer un nouveau niveau de puissance ainsi
qu’un autre temps de cuisson.
5
Si vous appuyez une fois sur
en cours de cuisson, le four s’arrête.
L’indicateur d’alimentation “ON” se met alors à clignoter, puis s’éteint
lorsque vous appuyez de nouveau sur
ou
. Pour redémarrer la
cuisson, appuyez sur
. Pour annuler le programme sélectionné,
appuyez une seconde fois sur
Lorsque le four ne fonctionne PAS
encore, il suffit d’appuyer une fois sur
pour annuler le programme.
Vous pouvez appuyer sur le bouton +20sec une ou plusieurs fois afin
d’ajouter du temps par incréments de 20 secondes, dans les limites
fixées pour le niveau de puissance sélectionné.
Lorsque vous branchez le cordon d’alimentation pour la première fois,
le four émet un bip sonore et tous les indicateurs apparaiss
Lorsque le cycle de cuisson est terminé et que vous ouvrez la porte
du four, la lampe s’allume automatiquement et s’éteint une minute
après.
Lorsque vous ouvrez la porte en cours de cuisson, le four s’arrête et la
lampe s’allume automatiquement pendant une minute puis s’éteint
une minute plus tard. Si vous laissez la porte ouverte pendant plus
d’une minute, le four émet un signal sonore chaque minute et, au bout
de cinq minutes, l’indicateur d’alimentation ”ON” s’affiche.
FR
jtX`Y`hl|TWYZ[`imyUGGwG]GGt SGq GY_SGYWW_GGYaW^Gwt
FR
Cuisez/réchauffez un plat (suite)
Niveaux de puissance et variations de temps
Cuisson en plusieurs étapes
Le niveau de puissance vous permet de moduler la quantité d’énergie
dissipée et donc le temps nécessaire pour réchauffer ou cuire vos
aliments, d’après leur type et leur quantité. Vous pouvez choisir entre
cinq niveaux de puissance.
1. Sélectionnez le niveau de puissance désiré en appuyant
sur la touche sélectrice NIVEAU DE PUISSANCE ou sur
la touche DÉCONGÉLATION.
Résultat: Le niveau de puissance sélectionné s’affichera
sur la fenêtre de visualisation.
CM1929A
CM1629A
CM1329A
Niveau de puissance Pource- Puiss- Pource- Puiss- Pource- Puissntage
ance
ntage
ance
ntage
ance
ÉLEVÉ ( )
MOYEN ( )
BAS ( )
DÉCONGÉLATION
ÉLEVÉE ( )
DÉCONGÉLATION
BASSE ( )
2. Réglez le temps de cuisson désiré en appuyant sur les
touches NUMÉRIQUES.
Résultat: Le temps de cuisson sélectionné s’affichera
sur la fenêtre de visualisation.
Le temps maximum selon chaque niveau de
puissance de cuisson peut être vérifié dans
l’ouvrage “Niveaux de puissance et variations du
temps”. Les touches NUMÉRIQUES.ne
fonctionneront, ni ne répondront lorsque vous
appuierez sur un temps de cuisson dépassant la
valeur maximum. Vous ne pouvez régler un
temps de cuisson supérieur au temps maximum
autorisé par le programme choisi. Il vous est
conseillé d’appuyer sur ANNULER et ensuite
d’entrer un nouveau niveau de puissance ainsi
qu’un autre temps de cuisson.
100 %
70 %
50 %
1600 W
1120 W
800 W
100 %
70 %
50 %
1300 W
910 W
650 W
20 %
370 W
25 %
400 W
30 %
390 W
10 %
185 W
13 %
208 W
15 %
195 W
Niveau de puissance
ÉLEVÉ ( )
MOYEN ( )
BAS ( )
DÉCONGÉLATION ÉLEVÉE ( )
DÉCONGÉLATION BASSE ( )
4. Appuyez sur le bouton
.
Résultat: La lampe du four et le ventilateur de
refroidissement se mettront en marche. Le
four commencera automatiquement à chauffer
selon le temps de cuisson et le niveau de
puissance préprogrammés (étape I étape
II étape III ).
Le temps sur l’affichage digital fera le compte
à rebours.
1850 W
1295 W
925 W
Les temps de cuisson donnés dans vos recettes et dans ce mode
d’emploi correspondent aux niveaux de puissance indiqués.
3. Répétez les étapes 1 et 2 pour la programmation de la
mémoire des étapes II ou III.
100 %
70 %
50 %
Vous ne pouvez régler en même temps NIVEAU DE PUISSANCE ou
DÉCONGÉLATION.
Il fonctionne comme régler une séquence.
6
Temps maximal de cuisson
25 min.
40 min.
40 min.
50 min.
50 min.
jtX`Y`hl|TWYZ[`imyUGGwG^GGt SGq GY_SGYWW_GGYaW^Gwt
Arrêtez la cuisson
Utilisez la fonction de répétition
1. Vous pouvez conserver les réglages de cuisson
précédemment utilisés (en mode cuisson automatique
avec mémorisation ou manuel) en appuyant sur le
bouton de DÉMARRAGE ( ). Le four fonctionne ainsi
pendant la même durée et avec le même niveau de
puissance que lors de sa dernière utilisation.
Vous pouvez arrêter la cuisson à tout moment afin:
• d’examiner les aliments,
• de retourner ou de remuer les aliments,
• de les laisser reposer.
Pour arrêter la cuisson...
temporairement,
alors...
ouvrez la porte ou appuyez une fois sur
Résultat: la cuisson s’arrête.
2. La fonction de répétition s’annule lorsque vous
débranchez le four.
.
Pour redémarrer la cuisson, refermez la porte et
appuyez sur
.
complètement,
appuyez deux fois sur
.
Résultat: es réglages de cuisson sont
annulés.
Pour annuler des réglages avant le début de la cuisson, il vous suffit
d’appuyer une fois sur le bouton d’ANNULATION ( ).
7
FR
jtX`Y`hl|TWYZ[`imyUGGwG_GGt SGq GY_SGYWW_GGYaW^Gwt
FR
Utilisez le bouton +20sec
Utilisez la fonction de décongélation
En appuyant une fois sur le bouton d’accès direct +20sec, la cuisson
des aliments commence instantanément.
Le bouton +20sec vous permet également d’augmenter le temps en
cours de cuisson.
Le temps de cuisson augmente par incréments de 20 secondes à
chaque pression du bouton +20sec dans les limites fixées pour le
niveau de puissance sélectionné.
Comme avec la cuisson traditionnelle, il se peut que vous ajustiez
légèrement les temps de cuisson selon les caractéristiques des aliments
ou selon vos goûts. Vous pouvez suivre la progression de la cuisson à
tout moment simplement en ouvrant la porte, fermer la porte et
augmenter le temps de cuisson restant.
La fonction de décongélation vous permet de décongeler des aliments,
tels que de la viande, de la volaille, du poisson, des plats préparés, etc...
N’utilisez que des récipients garantis micro-ondes.
Ouvrez la porte. Placez les aliments congelés au centre du plateau en
verre. Fermez la porte.
1. Appuyez sur le bouton de sélection du mode
décongélation pour sélectionner DÉCONGÉLATION
ÉLEVÉE ( ) ou DÉCONGÉLATION BASSE ( ) selon
votre choix.
Résultat: l’indicateur de DÉCONGÉLATION s’affiche.
Avant utilisation du four, vous pouvez augmenter ou
diminuer le temps à l’aide du bouton de sélection approprié
ou du bouton +20sec. En cours d’utilisation, vous pouvez
ajouter du temps à l’aide du bouton +20sec.
2. Appuyez sur les touches numériques pour sélectionner le
temps de décongélation (50 minutes au maximum).
3. Appuyez sur le bouton de DÉMARRAGE
Résultat: la décongélation commence.
8
.
Vous ne pouvez pas sélectionner un temps de
décongélation supérieur à 50 minutes.
L’indicateur de décongélation clignote, et il est
conseillé d’appuyer sur le bouton
d’ANNULATION ( ) puis d’entrer un autre
niveau de puissance et un autre temps.
Lorsque le four a fonctionné pendant plus de 25 minutes en mode
Décongélation, vous ne pouvez PAS passer en mode Cuisson/
réchauffage.
jtX`Y`hl|TWYZ[`imyUGGwG`GGt SGq GY_SGYWW_GGYaW^Gwt
Programmez une cuisson en mémoire
une étape
5. Maintenez enfoncé le bouton de VERROUILLAGE DE
PROGRAMMATION ( ) puis le bouton de
PROGRAMMATION ( ) pendant 2 secondes.
Résultat: l’indicateur PROG et le numéro de mémoire
clignotent trois fois en émettant un bip sonore,
puis ils disparaissent.
Attention: veillez à appuyer fermement sur les boutons.
1. Maintenez enfoncé le bouton de VERROUILLAGE DE
PROGRAMMATION ( ) puis le bouton de
PROGRAMMATION ( ). pendant 2 secondes.
Veillez à appuyer fermement sur chaque bouton.
Résultat: l’indicateur PROG apparaît sur l’afficheur.
6. Si vous souhaitez effectuer d’autres programmations,
répétez les étapes 1 à 5 ci-dessus.
2. Appuyez sur la touche NUMÉRIQUE appropriée pour
entrer le numéro de mémoire souhaité.
Résultat: le numéro de mémoire sélectionné s’affiche
sous l’indicateur PROG.
3. Sélectionnez le niveau de puissance en appuyant sur le
bouton de NIVEAU DE PUISSANCE ou
DÉCONGÉLATION.
Appuyez sur le bouton de NIVEAU DE
PUISSANCE ou DÉCONGÉLATION une ou
plusieurs fois jusqu’à obtenir le niveau de
puissance désiré.
4. Appuyez sur les touches NUMÉRIQUES pour
sélectionner le temps de cuisson.
Pour connaître les temps de cuisson maximum
fixés pour chaque niveau de puissance,
reportez-vous à la section “Niveaux de
puissance et variations de temps” page 6. Les
touches NUMÉRIQUES ne fonctionneront pas si
vous entrez un temps dépassant la limite fixée
pour le niveau de puissance sélectionné.
Vous ne pouvez pas sélectionner un temps de
cuisson supérieur à la limite fixée. L’indicateur de
niveau de puissance clignote, et il est conseillé
d’appuyer sur le bouton d’ANNULATION puis de
choisir un autre niveau de puissance et un autre
temps de cuisson.
9
Vous pouvez effectuer jusqu’à 30
programmations. Veillez à ce que votre four soit
correctement programmé.
Une fois la programmation terminée, il suffit
d’appuyer sur la touche NUMÉRIQUE souhaitée
pour démarrer automatiquement le programme
de cuisson mémorisé.
FR
jtX`Y`hl|TWYZ[`imyUGGwGXWGGt SGq GY_SGYWW_GGYaW^Gwt
Programmez une cuisson en mémoire (suite)
FR
plusieurs étapes
6. Maintenez enfoncé le bouton de VERROUILLAGE DE
PROGRAMMATION ( ) puis le bouton de
PROGRAMMATION ( ) pendant 2 secondes.
Résultat: l’indicateur PROG et le numéro de mémoire
clignotent trois fois en émettant un bip sonore,
puis ils disparaissent.
Attention: veillez à appuyer fermement sur les boutons.
1. Maintenez enfoncé le bouton de VERROUILLAGE DE
PROGRAMMATION ( ) puis le bouton de
PROGRAMMATION ( ). pendant 2 secondes.
Veillez à appuyer fermement sur chaque bouton.
Résultat: l’indicateur PROG apparaît sur l’afficheur.
7. Si vous souhaitez effectuer d’autres programmations,
répétez les étapes 1 à 5 ci-dessus.
2. Appuyez sur la touche NUMÉRIQUE appropriée pour
entrer le numéro de mémoire souhaité.
Résultat: le numéro de mémoire sélectionné s’affiche
sous l’indicateur PROG.
3. Sélectionnez le niveau de puissance en appuyant sur le
bouton de NIVEAU DE PUISSANCE ou
DÉCONGÉLATION.
Appuyez sur le bouton de NIVEAU DE
PUISSANCE ou DÉCONGÉLATION une ou
plusieurs fois jusqu’à obtenir le niveau de
puissance désiré.
4. Appuyez sur les touches NUMÉRIQUES pour
sélectionner le temps de cuisson.
Pour connaître les temps de cuisson maximum
fixés pour chaque niveau de puissance,
reportez-vous à la section “Niveaux de
puissance et variations de temps” page 6. Les
touches NUMÉRIQUES ne fonctionneront pas si
vous entrez un temps dépassant la limite fixée
pour le niveau de puissance sélectionné.
Vous ne pouvez pas sélectionner un temps de
cuisson supérieur à la limite fixée. L’indicateur de
niveau de puissance clignote, et il est conseillé
d’appuyer sur le bouton d’ANNULATION puis de
choisir un autre niveau de puissance et un autre
temps de cuisson.
5. Répétez les étapes 3 et 4 pour la programmation de la
mémoire des étapes II ou III.
10
Vous pouvez effectuer jusqu’à 30
programmations. Veillez à ce que votre four soit
correctement programmé.
Une fois la programmation terminée, il suffit
d’appuyer sur la touche NUMÉRIQUE souhaitée
pour démarrer automatiquement le programme
de cuisson mémorisé.
Vous ne pouvez régler en même temps NIVEAU DE PUISSANCE ou
DÉCONGÉLATION.
Il fonctionne comme régler une séquence.
jtX`Y`hl|TWYZ[`imyUGGwGXXGGt SGq GY_SGYWW_GGYaW^Gwt
Utilisez un programme de cuisson mémorisé
Programmez une quantité double
1. Maintenez enfoncé le bouton
deux secondes.
Une fois la mémorisation terminée, il suffit d’appuyer sur la touche
NUMÉRIQUE correspondant au programme de votre choix. Le four
commence à fonctionner après environ 5 secondes conformément aux
réglages de niveaux de puissance et de temps de cuisson
préprogrammés antérieurement.
puis
pendant
2. Sélectionnez le programme souhaité à l’aide des touches
NUMÉRIQUES.
1. Assurez-vous que le four est branché sur une prise de
terre et que l’indicateur d’alimentation “ON” s’affiche.
2. Ouvrez la porte.
La lampe s’allume.
3. Appuyez sur les touches NUMÉRIQUES afin d’entrer le
coefficient multiplicateur souhaité (entre 1,00 et 9,99).
3. Disposez les aliments dans un récipient ”garanti four à
micro-ondes”, posez ce dernier au centre du plateau en
verre, puis fermez la porte du four.
Résultat: la lampe s’éteint.
4. Appuyez sur la touche NUMÉRIQUE.
Résultat: Le programme mémorisé commencera à
chauffer automatiquement. Cependant, les
touches NUMÉRIQUES 1, 2, 3 fonctionnent
après 2 secondes. .
Le coefficient multiplicateur du temps de cuisson
est fixé initialement à 1,65 par le fabricant.
Veillez à entrer un coefficient situé entre 1,00 et
9,99 pour chaque numéro de mémoire.
4. Appuyez sur le bouton
11
.
Appuyez sur le bouton
pour sortir du mode de programmation.
Bien que la programmation d’une quantité double vous permette de
sélectionner en temps de cuisson supérieur au maximum fixé pour le
niveau de puissance choisi, ce maximum ne sera cependant pas
dépassé lors de la cuisson.
FR
jtX`Y`hl|TWYZ[`imyUGGwGXYGGt SGq GY_SGYWW_GGYaW^Gwt
Programmez une quantité double (suite)
FR
Utilisez le bouton de quantité double
1. Appuyez sur le bouton de quantité double.
Modifiez les paramètres de quantité double
Fonction
Bouton
Afficheur
Maintenez
enfoncé ( ) et
appuyez sur
Remarque
Maintenez enfoncé
pendant 2 secondes.
Numéro de code
La valeur par défaut
s’affiche au bout d’une
seconde.
(valeur d’entrée
souhaitée)
valeur située entre 1,00 et
9,99 (modifiez-la si
nécessaire)
Modification
des
Appuyez sur (
paramètres
de quantité
double
)
2. Appuyez sur la touche numérique correspondant au
numéro de mémoire souhaité.
Résultat: le temps de cuisson multiplié par le coefficient
par défaut (1,65) s’affiche, la cuisson démarre
et le temps est décompté.
Si la valeur vous convient,
appuyez sur le bouton
d’ANNULATION pour sortir
du mode de modification.
Nouveau numéro
de code
Passez cette étape si
nécessaire.
(valeur d’entrée
souhaitée)
Passez cette étape si
nécessaire.
Appuyez sur (
)
Passez cette étape si
nécessaire.
Appuyez sur (
) (Mode
ANNULATION)
Vous sortez du mode de
modification.
12
Il n’est pas nécessaire d’appuyer sur
démarrer la cuisson.
pour
jtX`Y`hl|TWYZ[`imyUGGwGXZGGt SGq GY_SGYWW_GGYaW^Gwt
Programmez la fréquence de nettoyage du filtre à
air
Sélectionnez le bip sonore
Vous pouvez choisir entre 4 signaux sonores.
Lorsque l’indicateur de contrôle du filtre à air s’affiche (FILTER),
vous devez nettoyer le filtre en suivant les instructions de la
section ci-dessus “Nettoyage du filtre à air”. Suivez ensuite la
procédure ci-dessous si vous souhaitez augmenter ou réduire la
fréquence des nettoyages.
Maintenez enfoncé le bouton ( ) puis la touche NUMÉRIQUE
0 pendant deux secondes.
Résultat: le bip sonore augmente d’une tonalité par
rapport au bip actuel.
1. Maintenez enfoncé le bouton de VERROUILLAGE DE
PROGRAMMATION ( ) puis la touche NUMÉRIQUE
3 pendant deux secondes.
Résultat: la durée (en heures) configurée en usine ou
programmée par vous-même entre chaque
nettoyage du filtre à air s’affiche.
A chaque pression des boutons indiqués ci-dessus, le bip
sonore est modifié dans l’ordre suivant.
Niveau 0 Niveau 1 Niveau 2 Niveau 3 Niveau 0 (absence de bip sonore)
La durée est fixée initialement à 500 heures (il
s’agit de la durée entre chaque nettoyage et non
pas la durée réelle du nettoyage du filtre à air).
2. Appuyez sur les touches NUMÉRIQUES afin de
sélectionner la durée.
Vous pouvez choisir une valeur allant jusqu’à
999.
3. Maintenez enfoncé le bouton de VERROUILLAGE DE
PROGRAMMATION ( ) puis la touche NUMÉRIQUE 3
pendant deux secondes afin de sauvegarder la valeur
entrée.
La procédure de programmation du filtre à air est
terminée.
4. Appuyez sur le bouton d’ANNULATION (
retourner en mode Cuisson.
Le niveau 0 correspond à une absence de bip
sonore.
) pour
Lorsque la durée est expirée, nettoyez le filtre à
air. Pour de plus amples renseignements,
reportez-vous ci-dessus.
13
Le niveau par défaut est 2.
FR
jtX`Y`hl|TWYZ[`imyUGGwGX[GGt SGq GY_SGYWW_GGYaW^Gwt
Codes erreur
FR
Type d’erreur
Code
Signal sonore
-
Cause
Solution
Erreur de
fréquence
(50/60 Hz)
E1
La fréquence n’est pas de 50 Hz.
Débranchez le cordon d’alimentation et vérifiez si la fréquence est de 50 Hz.
Erreur
d’alimentation
HVT-I
E41
un bip long
Le circuit électrique interne du four est
pendant 2 sec. défectueux.
Débranchez le cordon d’alimentation, attendez 10 secondes, puis rebranchez-le.
Vérifiez si le code erreur “E41” est toujours affiché. Si le problème persiste,
contactez le service technique le plus proche.
Erreur
d’alimentation
HVT-II
E42
un bip long
Le circuit électrique interne du four est
pendant 2 sec. défectueux.
Débranchez le cordon d’alimentation, attendez 10 secondes, puis rebranchez-le.
Vérifiez si le code erreur “E42” est toujours affiché. Si le problème persiste,
contactez le service technique le plus proche.
Erreur EEPROM
E5
Appuyez sur le bouton d’ANNULATION une ou plusieurs fois puis tentez d’activer
un bip long
La mémoire IC (EEPROM IC) ne
un programme de cuisson mémorisé. Si le code erreur “E5” est toujours affiché,
pendant 2 sec. fonctionne pas convenablement.
Dans ce cas, les autres fonctions du four contactez le service technique le plus proche.
fonctionnent correctement, hormis la
mémoire. (Vous pouvez utiliser le four
manuellement.)
Branchez le cordon d’alimentation sur une prise délivrant une fréquence de 50
Hz. Si “E1” est toujours affiché, et ce malgré une alimentation appropriée de
l’appareil, contactez le service technique le plus proche.
14
jtX`Y`hl|TWYZ[`imyUGGwGX\GGt SGq GY_SGYWW_GGYaW^Gwt
Utilisez des combinaisons de boutons
Entretenez votre four à micro-ondes
Remarque: appuyez sur le premier puis sur le second bouton pendant deux
secondes.
Fonction
Bouton
Afficheur
Premier
second
Durée de
fonctionnement
ANNULATION
( )
1
Durée
d’oscillation du
magnétron
ANNULATION
( )
2
Nombre
d’utilisation des
codes de
programmation
de la mémoire
ANNUL- DÉMARRAGE
ATION
( )
Nettoyage du four à micro-ondes
1. Débranchez le four de la prise électrique avant de le nettoyer.
Remarque
2. Nettoyez l’intérieur du four. Essuyez toute éclaboussure avec un chiffon
humide. Si le four est trop sale, vous pouvez utiliser un détergent doux.
N’utilisez pas de détergents trop forts ni de produits abrasifs.
Maintenez enfoncé
2 sec.
Unité : 10 heures
Maintenez enfoncé
2 sec.
Unité : 1 heure
3. Nettoyez l’extérieur du four avec de l’eau savonneuse tiède. Rincez et séchez
avec un chiffon doux.
ATTENTION: veillez à ce que l’eau n’entre pas dans les orifices de ventilation
à l’arrière de l’appareil ou du panneau de commande.
Maintenez enfoncé
2 sec.
4. Nettoyez la vitre de la porte avec une solution savonneuse très diluée, puis
rincez et séchez avec un chiffon doux. N’utilisez pas de raclette pour les
carreaux car la vitre pourrait être rayée.
Numéro de code
739 utilisations
(Affichage des
données 2 secondes
plus tard)
(Le nouveau code
peut être entré après
l’affichage des
données)
ANNULATION (
Durée
d’utilisation par
code de
programme
mémorisé
(Affichage
séquentiel
automatique)
ANNULATION
( )
)
(Mode Annulation)
P
Maintenez enfoncé
2 sec.
(Affichage
séquentiel pendant
3 secondes de 1 à
30)
ANNULATION (
)
Des résidus alimentaires ou des gouttes de graisse collés aux parois
du four ou dans le joint de porte peuvent absorber les micro-ondes et
provoquer ainsi des arcs électriques ou étincelles.
(Mode Annulation)
15
FR
jtX`Y`hl|TWYZ[`imyUGGwGX]GGt SGq GY_SGYWW_GGYaW^Gwt
Entretenez votre four à micro-ondes (suite)
FR
Nettoyage du panneau de protection de la voûte
Nettoyage du filtre à air
1. Appuyez sur les taquets latéraux du panneau de protection et poussez-les
vers l’intérieur, puis vers le bas. Retirez ensuite le panneau de la voûte.
Nettoyez le filtre à air régulièrement conformément aux instructions
suivantes.
2. Rincez le panneau dans de l’eau savonneuse ou dans une solution
désinfectante non toxique.
Un filtre à air obstrué risque de nuire au bon fonctionnement du four.
1. Oter le systéme de fixation situé des deux côté du filtre à air.
3. N’oubliez pas de réinstaller le panneau de protection avant d’utiliser le four.
2. Dégagez le filtre à air en le soulevant délicatement.
ATTENTION :lors de l’utilisation du four, le panneau de protection de la voûte
doit toujours être solidement attaché. Faites attention à ne pas
endommager les composants internes du four qui sont
particulièrement exposés une fois le panneau de protection retiré. Si
l’un d’entre eux était déformé, cela pourrait provoquer des arcs
électriques ou des étincelles. Dans ce cas, contactez le centre
technique le plus proche.
3. Nettoyez le filtre dans de l’eau savonneuse tiède.
4. N’oubliez pas de réinstaller le filtre à air avant d’utiliser le four.
Un filtre à air obstrué entraîne une surchauffe du four.
Si vous souhaitez changer la durée entre chaque nettoyage,
reportez-vous à la section ci-dessous “Programmez la fréquence de
nettoyage du filtre à air”.
Panneau
de protection
Ceiling
Cover
de la voûte
Boulon
Bolt
16
jtX`Y`hl|TWYZ[`imyUGGwGX^GGt SGq GY_SGYWW_GGYaW^Gwt
Superposez un four sur un autre
Remplacez la lampe
Important
Important
1. Débranchez le cordon d’alimentation de la prise murale avant de superposer
un four sur un autre.
1. Retirez la vis fixant la protection de la lampe.
2. Pour la superposition, utilisez la plaque-support fournie avec votre appareil.
Il n’est pas nécessaire de retirer le panneau extérieur pour remplacer
la lampe.
2. Dévissez la lampe en la tournant dans le sens des aiguilles d’une montre.
3. Vous pouvez superposer un four au maximum.
FR
La superposition est limitée aux modèles suivants.
3. Positionnez la nouvelle lampe en la tournant dans le sens inverse des
aiguilles d’une montre.
ATTENTION: Assurez-vous que les fours sont vides.
Installation
Protection
de
Lamp
la lampeCover
1. Empilez les deux appareils.
Panneau
Outer
Panel
extérieur
2. Retirez les 6 vis comme illustré sur la figure ci-dessous.
3. Placez la plaque-support permettant d’assembler les deux appareils.
4. Insérez les 6 vis dans leur emplacement puis serrez-les.
5. Veillez à ce que le four du haut soit à une hauteur raisonnable afin qu’il puisse
être utilisé sans danger et de manière optimale.
visScrew
Plaque-support
Bracket-Plate
17
Support
de la lampe
Lamp Holder
Lamp (230 V - 25 W)
Lampe
(230V 25W)
jtX`Y`hl|TWYZ[`imyUGGwGX_GGt SGq GY_SGYWW_GGYaW^Gwt
Guide des récipients
FR
Pour cuire des aliments dans le four à micro-ondes, ces dernières
doivent pénétrer la nourriture sans être réfléchies ou absorbées par le
plat utilisé.
Veillez donc à choisir des récipients garantis four à micro-ondes.
Le tableau suivant énumère différents types de récipients et de plats de
cuisson, en indiquant si et comment ils peuvent être utilisés en mode
micro-ondes.
Récipients
Garantis
Commentaires
micro-ondes
Papier d’aluminium
Céramique et porcelaine
Cartons plastifiés jetables
Emballage “fast-food”
• Gobelets et
barquettes en
polystyrène
• Sachets en papier
ou journaux
• Papier recyclé ou
décorations
métalliques
Permettent de réchauffer des
aliments, mais risquent de se
déformer en cas de surchauffe.
Risquent de brûler.
•
Bocaux
Plats et attaches
pour sacs de
congélation
Risquent de provoquer des arcs
électriques (étincelles) ou du feu.
Pour réchauffer ou cuire avec des
temps de cuisson courts. Permet
d’absorber un excès d’humidité.
Risquent de provoquer des arcs
électriques (étincelles).
Surtout les thermoplastiques résistant
à la chaleur. D’autres plastiques
peuvent se déformer ou se décolorer
à hautes températures. N’utilisez pas
de plastique mélaminé.
Permet de conserver l’humidité. Ne
doit pas toucher les aliments. Faites
attention de ne pas vous faire brûler
par la vapeur lorsque vous retirez le
film.
Uniquement des sacs spéciaux pour
cuisson au bain-marie ou au four. Ne
doivent pas être fermés
hermétiquement. Piquez avec une
fourchette, si nécessaire.
Papier
• Assiettes,
gobelets,
serviettes et
Papier absorbant
• Papier recyclé
Les récipients en céramique, en terre
cuite et en porcelaine sont
habituellement adaptés à la cuisine
au four à micro-ondes, à condition de
ne pas présenter de décorations
métalliques
Certains plats surgelés sont
conditionnés dans ce type
d’emballage.
•
Résistant à la
chaleur
Verres de table
Métal
•
Peut être utilisé en petites quantités
pour empêcher la surcuisson de
certaines parties. Risque de
provoquer des arcs électriques
(étincelles) si placé trop près des
parois du four ou utilisé en trop
grande quantité.
Verre
•
Plastique
• Barquettes
Risquent de provoquer des arcs
électriques (étincelles).
•
Film plastique
•
Sacs de
congélation
Papier sulfurisé ou
paraffiné
18
: Recommandé
: Faire attention
: Peu sûr
Utilisable, à condition de ne pas
présenter de décorations métalliques.
Utilisables pour réchauffer des
aliments ou des liquides. Du verre fin
peut cependant être fêlé ou brisé par
un changement soudain de
température.
Retirez le couvercle et utilisez
uniquement pour réchauffer.
Permet de conserver l’humidité et
d’éviter des éclaboussures.
jtX`Y`hl|TWYZ[`imyUGGwGX`GGt SGq GY_SGYWW_GGYaW^Gwt
Conseils de cuisson
C : congelé
Recette
F : frais
Méthode
FR
Niveau de
Temps
Repos
puissance 1850W 1600W 1300W
Recette
PAIN ET PÂTISSERIES
Méthode
Niveau de
Temps
Repos
puissance 1850W 1600W 1300W
EN-CAS ET ENTRÉES
Décongélation
Cuisson
Pain viennois 9" C
DÉCON- 0'45"
GÉL1 ( )
0'50"
0'50"
5 mins
Bacon, en
tranches F
Placez sur une ÉLEVÉ
grille
1'30"
1'40"
1'50"
1 min
Pain viennois 9" X
2C
DÉCON- 1'10"
GÉL1 ( )
1'15"
1'20"
5 mins
Oeufs, pochés X Placez dans
ÉLEVÉ
2F
des ramequins
0'30"
0'40"
0'45"
1 min
Placez dans
une assiette
DÉCON- 2'30"
GÉL2 ( )
2'40"
2'50"
5 mins
Oeufs, brouillés
X2 F
Battez les œufs ÉLEVÉ
et placez dans
un bol
25"-30" 30"-40" 35"-45" 1 min
Quiche 11" part
136g
Placez dans
une assiette
DÉCON- 3'00"
GÉL1 ( )
ÉLEVÉ
0'40"
3'00"
3'00"
1 min
1 min
Saucisses X 2
épaisses F
Percez les
saucisses
MOYEN
1'00"
1'10"
1'20"
2 mins
Tartelettes
sucrées X 2 C
ÉLEVÉ
Retirez le
papier
d’aluminium et
placez dans
une assiette
0'10"
Placez dans
une assiette
0'40"
Gâteaux, part
indiv C
Réchauffage
Tarte aux fruits C
ÉLEVÉ
0'45"
0'50"
0'15"
0'15"
0'45"
0'45"
EN-CAS ET ENTRÉES
1 min
Réchauffage
1 min
Saucisses de
Toulouse C
Placez dans
une assiette
MOYEN
2'00"
2'10"
2'20"
2 mins
Petit déjeuner
complet F
Couvrez
MOYEN
2'30"
2'40"
2'50"
1 min
Steaks (bœuf) C
ÉLEVÉ
0'55"
1'05"
1'10"
1 min
ÉLEVÉ
0'55"
1'05"
1'10"
1 min
1 min
Croissant X 2 C
Placez dans
une assiette
ÉLEVÉ
0'05"
0'10"
0'10"
1 min
Escalopes
(poulet) C
Pâtisseries
maison 227g F
Placez dans
une assiette
ÉLEVÉ
0'45"
0'55"
1'00"
1 min
Kebab 162g C
ÉLEVÉ
1'00"
1'10"
1'20"
Hot Dog C
ÉLEVÉ
1'00"
1'10"
1'20"
1 min
Tarte au poulet et Retirez le
aux champignons moule et
placez dans
X2F
une assiette
ÉLEVÉ
Tarte au poulet et Retirez le
aux champignons moule et
placez dans
F
une assiette
ÉLEVÉ
0'45"
0'30"
0'55"
0'40"
1'00"
0'45"
1 min
1 min
Pizza 190g C
Placez dans
une assiette
BAS
2'30"
2'45"
3'00"
2 mins
Côtelettes
grillées 200g C
Placez dans
une assiette
MOYEN
3'30"
3'45"
4'00"
1 min
ÉLEVÉ
2'00"
2'15"
2'30"
1 min
Haricots blancs
500g
ÉLEVÉ
Couvrez-les,
mélangez à miparcours
2'00"
2'10"
2'20"
2 mins
Haricots blancs
250g
ÉLEVÉ
Couvrez-les,
mélangez à miparcours
1'00"
1'05"
1'10"
2 mins
Ailes de poulet X Placez dans
6C
une assiette,
les plus petits
morceaux au
centre
19
jtX`Y`hl|TWYZ[`imyUGGwGYWGGt SGq GY_SGYWW_GGYaW^Gwt
Conseils de cuisson (suite)
FR
C : congelé
Recette
F : frais
Méthode
Recette
Niveau de
Temps
Repos
puissance 1850W 1600W 1300W
Méthode
DESSERTS
PLATS DE RÉSISTANCE
Réchauffage
Réchauffage
Crumble aux
pommes 200g C
Disposez
dans un plat
et couvrez
ÉLEVÉ
1'20"
1'30"
1'40"
2 mins
Pouding 150g F
Placez dans
un bo
ÉLEVÉ
0'20"
0'25"
0'30"
2 mins
Gâteau à la
confiture 80g C
Placez dans
une assiette
ÉLEVÉ
1'00"
1'05"
1'10"
2 mins
Crêpes Suzette 2
C
Percez le film ÉLEVÉ
0'50"
1'00"
1'10"
1 min
Génoise C
X2
X1
ÉLEVÉ
ÉLEVÉ
0'35"
0'40"
1'05"
0'50"
1'30"
1'00"
2 mins
2 mins
Génoise légère C X 2
X1
ÉLEVÉ
ÉLEVÉ
0'35"
0'40"
1'05"
0'45"
1'30"
0'45"
2 mins
2 mins
4'00"
4'20"
4'40"
2 mins
Percez le sac DÉCONGÉL1 ( )
et placez
ÉLEVÉ
dans une
assiette
5'00"
5'00"
5'00"
1 min
3'30"
3'45"
4'00"
Tagliatelles à la
carbonara F
Percez le sac ÉLEVÉ
et placez
dans une
assiette
1'40"
2'00"
2'20"
1 min
Tortellini au
fromage F
Disposez
dans un plat
et couvrez
ÉLEVÉ
2'00"
2'15"
2'30"
1 min
Tourte
Cumberland aux
légumes F
Placez dans
un plat m/o
ÉLEVÉ
3'20"
3'35"
3'50"
1 min
Plat garni 350g F
Couvrez
ÉLEVÉ
2'00"
2'15"
2'30"
1 min
Plat garni 700g F
Couvrez
ÉLEVÉ
3'00"
3'15"
3'30"
1 min
Pouding à la
graisse de boeuf
Couvrez placez droit
dans un plat
m/o
Suprême de
volaille à la sauce
rouge 312g C
PLATS DE RÉSISTANCE
Réchauffage
Gratin au fromage Placez dans
F
un plat m/o
ÉLEVÉ
3'30"
3'40"
3'50"
1 min
Chicken Tikka
masala C
Percez le film ÉLEVÉ
3'20"
3'30"
3'40"
2 mins
Poulet thaï au
curry C
Percez le film ÉLEVÉ
3'00"
3'15"
3'30"
2 mins
Chilli con carne C Percez le film ÉLEVÉ
3'30"
3'45"
4'00"
2 mins
Poulet 1/2
Placez dans
un sac percé
MOYEN
4'30"
5'00"
5'30"
2 mins
Lasagne 192g
Placez dans
un plat m/o
MOYEN
4'00"
4'15"
4'30"
2 mins
Moules marinières Percez le sac ÉLEVÉ
466g C
2'30"
2'45"
3'00"
2 mins
Percez le sac ÉLEVÉ
2'30"
2'45"
3'00"
2 mins
3'00"
3'15"
3'30"
2 mins
Paupiettes de
saumon et
d’avocat F
Hachis Parmentier Placez dans
300g F
le four et
couvrez
MOYEN
20
Niveau de
Temps
Repos
puissance 1850W 1600W 1300W
BAS
jtX`Y`hl|TWYZ[`imyUGGwGYXGGt SGq GY_SGYWW_GGYaW^Gwt
Conseils de cuisson (suite)
C : congelé
Recette
F : frais
Méthode
FR
Niveau de
Temps
Repos
puissance 1850W 1600W 1300W
Recette
LÉGUMES FRAIS
Méthode
Niveau de
Temps
Repos
puissance 1850W 1600W 1300W
FRESH VEGETABLES
Cuisson 500g
Cuisson 500g
Haricots verts,
coupés
ÉLEVÉ
Ajouter 60 ml
d’eau (4 cuillères
à soupe), couvrez
3'00"
3'15"
3'30"
2 mins
Chou-fleur
Brocoli, en
bouquets
ÉLEVÉ
Ajouter 60 ml
d’eau (4 cuillères
à soupe), couvrez
3'00"
3'15"
3'30"
2 mins
Epi de maïs
Couvrez
ÉLEVÉ
4'00"
4'30"
5'00"
2 mins
Maïs, petits épis
ÉLEVÉ
5'00"
5'15"
5'30"
2 mins
Chou, râpé
Ajouter 10 c. à
soupe d’eau,
couvrez
ÉLEVÉ
5'00"
Couvrez,
remuez à
mi-cuisson
Champignons,
entiers
Couvrez,
remuez à
mi-cuisson
ÉLEVÉ
3'00"
3'15"
3'30"
2 mins
Pommes de terre, en
robe de chambre
230~290g X 1
ÉLEVÉ
3'00"
4'00"
4'30"
2 mins
Pommes de terre, en
purée X 2
Pommes de terre, en
purée X 4
ÉLEVÉ
ÉLEVÉ
6'00" 6'30" 7'00" 2 mins
10'00" 11'15" 12'30" 2 mins
5'30"
ÉLEVÉ
Ajouter 60 ml
d’eau (4 cuillères
à soupe), couvrez
3'30"
Chou-fleur
ÉLEVÉ
Ajouter 60 ml
d’eau (4 cuillères
à soupe), couvrez
3'30"
Haricots verts,
entiers
ÉLEVÉ
Ajouter 60 ml
d’eau (4 cuillères
à soupe), couvrez
3'30"
Pommes de
terre, en robe
de chambre
Retournez à micuisson
10'00” 11'00” 12'00” 5 mins
Choux de Bruxelles
Choux de
Bruxelles
ÉLEVÉ
Ajouter 60 ml
d’eau (4 cuillères
à soupe), couvrez
4'30"
RIZ, 500g
Haricots verts,
coupés
Couvrez, remuez ÉLEVÉ
à mi-cuisson et
plus si nécessaire
3'00"
3'15"
3'30"
2 mins
Haricots,
entiers
Couvrez, remuez ÉLEVÉ
à mi-cuisson
4'00"
4'15"
4'30"
2 mins
Brocoli, en
bouquets
Couvrez, remuez ÉLEVÉ
à mi-cuisson
4'00"
4'15"
4'30"
2 mins
Chou, râpé
Couvrez, remuez ÉLEVÉ
à mi-cuisson
4'00"
4'15"
4'30"
2 mins
Carottes, en
bâtons
Couvrez, remuez ÉLEVÉ
à mi-cuisson
4'00"
4'15"
4'30"
2 mins
3'45"
3'45"
4'00"
2 mins
Carottes,
râpées
ÉLEVÉ
3'45"
6'00"
4'00"
4'00"
2 mins
2 mins
2 mins
Couvrez,
remuez à
mi-cuisson
Ratatouille 500g
4'45"
5'00"
2 mins
ÉLEVÉ
4'00"
4'15"
4'30"
4'30"
ÉLEVÉ
3'30"
4'00"
4'30"
2 mins
ÉLEVÉ
3'00"
3'30"
4'00"
2 mins
Riz, cuit F
ÉLEVÉ
Couvrez,
remuez à
mi-parcours
3'00"
3'15"
3'30"
2 mins
Riz, pilaf F
ÉLEVÉ
Couvrez,
remuez à
mi-parcours
3'00"
3'15"
3'30"
2 mins
Couvrez,
remuez à
mi-cuisson
Réchauffage
21
jtX`Y`hl|TWYZ[`imyUGGwGYYGGt SGq GY_SGYWW_GGYaW^Gwt
FR
Nettoyez votre four à micro-ondes
Rangez ou réparez votre four à micro-ondes
Pour empêcher l’accumulation de graisses et de particules d’aliments,
vous devez nettoyer régulièrement les éléments suivants du four à
micro-ondes:
Pour le rangement ou le dépannage de votre four à micro-ondes, vous
devez respecter quelques précautions.
N’utilisez pas le four si la porte ou ses joints sont endommagés:
• charnière cassée,
• joints détériorés,
• châssis déformé ou embouti.
Seul un technicien spécialisé en micro-ondes peut effectuer les
réparations.
•
•
•
l’intérieur et l’extérieur,
la porte et les joints d’étanchéité,
Plateau de plat
Vérifiez TOUJOURS que les joints de porte sont propres et que
la porte ferme correctement.
•
•
Ne pas maintenir le four dans un état de propreté satisfaisant peut
entraîner la détérioration des parois et éventuellement empêcher
le four de fonctionner correctement, ce qui représenterait un
danger.
1. Nettoyez l’extérieur avec un chiffon doux et de l’eau savonneuse tiède. Rincez
et séchez.
2. Retirez les éclaboussures ou autres traces tenaces sur les parois ou sur
l’anneau de guidage à l’aide d’une éponge savonneuse. Rincez et séchez.
3. Si votre four est très sale ou si une odeur désagréable se dégage du four,
placez une tasse d’eau citronné sur le plateau et faites-la chauffer pendant dix
minutes à puissance maximale.
Ne laissez JAMAIS couler d’eau dans les orifices de ventilation.
N’utilisez JAMAIS de produits abrasifs ou de solvants chimiques.
Nettoyez avec un soin tout particulier les joints de la porte, afin
qu’aucune particule:
•
•
Ne retirez JAMAIS l’habillage du four. Si le four est en panne ou
nécessite une intervention technique:
ne s’accumule,
ne nuise à l’étanchéité de la porte.
Nettoyez l’intérieur du four après tout usage avec un produit de
nettoyage doux. Attendez jusqu'au four se soit refroidi, afin d’’eviter
des brûlures.
22
débranchez-le de la prise de courant,
appelez le service après-vente SAMSUNG le plus proche.
Si vous souhaitez ranger votre four sans l’utiliser pendant un certain
temps, rangez-le dans un endroit sec et exempt de poussière.
Raison : La poussière et l’humidité peuvent avoir un effet défavorable
sur les parties ouvrières du four.
jtX`Y`hl|TWYZ[`imyUGGwGYZGGt SGq GY_SGYWW_GGYaW^Gwt
Spécifications techniques
Notes
Les descriptions et caractéristiques figurant dans ce mode d’emploi
sont données à titre d’information et sans engagement. Soucieux de la
qualité de ses produits, SAMSUNG se réserve le droit d’effectuer des
modifications sans préavis.
Modèle
CM1929A
CM1629A
Source d’alimentation
CM1329A
230 V ~ 50 Hz
Consommation
Micro-ondes
Puissance restituée en
micro-ondes
3200 W
3000 W
2600 W
1850 W
(IEC-705)
1600W
(IEC-705)
1300W
(IEC-705)
Fréquence de
fonctionnement
2, 450 MHz
Dimensions
(Long. x Haut. x Prof.)
Extérieures
Cavité du four
464 x 368 x 557 mm
370 x 190 x 370 mm
Capacité
26 litres
Poids
Net
32 Kg approx.
43
557
530
26
1000
368
464
FR
10
444
486
514
23
jtX`Y`hl|TWYZ[`imyUGGwGY[GGt SGq GY_SGYWW_GGYaW^Gwt
jtX`Y`hl|TWYZ[`iusUGGwGXGGz SGt GXWSGYWW_GGXWa[XGht
MAGNETRONOVEN
(COMMERCIEEL)
Gebruikershandleiding en bereidingstips
CM1929 (1850 Watt)
CM1629 (1600 Watt)
CM1329 (1300 Watt)
Oven ......................................................................................................2
Bedieningspaneel .................................................................................2
Indeling van deze handleiding ...............................................................3
Denk aan uw veiligheid .........................................................................3
Magnetronoven installeren ....................................................................5
Koken/opwarmen ..................................................................................5
Vermogen en tijden ...............................................................................7
Bereiding stoppen .................................................................................7
Herhaalfunctie .......................................................................................8
P
1
2
3
4
5
6
7
8
9
+ 20sec
0
+20sec-toets gebruiken .........................................................................8
Ontdooifunctie gebruiken ......................................................................8
Geheugentoetsen programmeren .........................................................9
Gerechten vanuit geheugen bereiden .................................................11
Langere bereidingstijd voor dubbele porties programmeren ..............11
Dubbele porties vanuit geheugen bereiden ........................................12
Schoonmaaktijd luchtfilter programmeren ...........................................13
Pieptoon kiezen ...................................................................................13
Foutcodes ............................................................................................14
Combinatietoetsen ..............................................................................15
Onderhoud van uw magnetronoven ....................................................15
Installatieinstructies voor het op elkaar plaatsen van 2 ovens ............17
Lamp vervangen ..................................................................................17
Geschikt kookgerei ..............................................................................18
Bereidingstips ......................................................................................19
Magnetronoven schoonmaken ............................................................21
Magnetronoven opbergen en repareren .............................................22
Technische gegevens .........................................................................22
Code No. : DE68-02349B
jtX`Y`hl|TWYZ[`iusUGGwGYGGz SGt GXWSGYWW_GGXWa[XGht
Oven
Bedieningspaneel
1
NL
OVEN LAMP
2
STARTKNOP
DISPLAY
AFDEKPLAATJE
OVENLAMP
P
BOVENPLAAT
OVENRUIMTE
P
1
2
DEURGREEP
3
4
5
6
7
8
9
3
0
+ 20sec
LUCHTFILTER
PLATEAU
DEURVERGRENDELING
1
2
3
4
5
6
7
8
9
0
+ 20sec
1.
2.
3.
4.
5.
6.
7.
8.
9.
10.
DEUR
4
BEDIENINGSPANEEL
5
6
7
8
9
10
DISPLAY
PROGRAMMEERTOETS
PROGRAMMABEVEILIGINGSTOETS
CIJFERTOETSEN (tijd, geheugen programmeren)
VERMOGENTOETS
ONTDOOITOETS
TOETS VOOR DUBBELE PORTIES
+20sec-TOETS (tiptoets)
STOP/ANNULEREN-TOETS
STARTKNOP
DISPLAY
OPENINGEN
DEURVERGRENDELING
INDICATIE
PROGRAMMA
TIJDWEERGAVE
INDICATIE
LUCHTFILTER
INDICATIE
DATA
INDICATIE VOEDING
(als deze te zien is,
werkt verhitting niet)
INDICATIE
GEHEUGENNUMMER
2
INDICATIES
VERMOGEN
INDICATIES
ONTDOOIEN
INDICATIE
VERMENIGVULDIGINGSFACTOR
jtX`Y`hl|TWYZ[`iusUGGwGZGGz SGt GXWSGYWW_GGXWa[XGht
Over deze gebruiksaanwijzing
Veiligheidsvoorschriften
U hebt zojuist een nieuwe SAMSUNG-magnetronoven aangeschaft.
Deze gebruiksaanwijzing
bevat veel waardevolle informatie over het gebruik van deze
magnetronoven.
• Veiligheidsvoorschriften
• Geschikte accessoires en kookmaterialen
• Handige kooktips
Voorin dit boekje vindt u afbeeldingen van de oven en het
bedieningspaneel, zodat u de toetsen gemakkelijk kunt vinden.
Lees de aanwijzingen zorgvuldig door en bewaar deze voor
raadpleging in de toekomst.
Voordat u gerechten of vloeistoffen in de magnetron gaat bereiden, moet u
controleren of de volgende voorzorgsmaatregelen zijn genomen.
In de stapsgewijze procedures worden twee verschillende symbolen
gebruikt.
Waarschuwing:
u
Belangrijk
Opmerking:
Waarschuwing:
Als de deur of de afsluitstrippen zijn beschadigd, mag u de oven niet gebruiken voordat
deze is gerepareerd door een gekwalificeerde monteur.
Waarschuwing:
Onderhoud en reparaties waarbij de behuizing, die bescherming biedt tegen blootstelling
aan microgolven, wordt verwijderd, mogen alleen worden uitgevoerd door een
gekwalificeerde monteur. Voor anderen is dit levensgevaarlijk.
Vloeistoffen en andere gerechten mogen niet worden verwarmd in een afgesloten
verpakking, aangezien deze kan exploderen.
Waarschuwing:
Omdat gerechten en vloeistoffen die u met de magnetron hebt verwarmd buiten de
magnetron alsnog plotseling aan de kook kunnen raken en naar buiten spatten, moet u
bijzonder voorzichtig zijn wanneer u ze uit de magnetron haalt. Om dit te voorkomen, moet
u ALTIJD en nagaartijd van ten minste 20 seconden aanhouden nadat de oven is
uitgeschakeld, zodat de warmte zich kan verdelen.
Roer zo nodig tijdens het verwarmen en roer ALTIJD na het verwarmen.
Bij brandwonden de volgende aanwijzingen voor het verlenen van EERSTE HULP
opvolgen:
* De brandplek minimaal 10 minuten ondergedompeld houden in koud water.
* Afdekken met droog, schoon verband.
* Breng geen zalf, olie of lotion aan op de brandwond.
Maatregelen ter voorkoming van mogelijke blootstelling aan
overmatige magnetronstraling
Het niet navolgen van de volgende veiligheidsvoorschriften kan leiden tot
blootstelling aan schadelijke magnetronstraling.
(a) Probeer in geen geval de oven te gebruiken met de deur open. Laat de
vergrendelingspallen in de deur intact en steek niets in de gaten van de
deurvergrendeling.
(b) Plaats geen enkel voorwerp tussen de deur en de voorplaat. Voorkom dat
resten van voedsel of reinigingsmiddelen zich verzamelen op de
afsluitstrippen. Zorg ervoor dat de deur en de afsluitstrippen altijd schoon zijn
door deze na gebruik te reinigen, eerst met een vochtige doek en daarna met
een droge doek.
(c) Als de oven is beschadigd, gebruik deze dan niet voordat deze is gerepareerd
door een gekwalificeerde magnetronservicetechnicus die door de fabrikant is
opgeleid. Het is vooral belangrijk dat de ovendeur goed sluit en dat er geen
beschadigingen zijn aan:
(1) deur (gebogen)
(2) de scharnieren (los of gebroken)
(3) de afsluitstrippen en de afdichtoppervlakken
(d) De oven mag uitsluitend worden bijgesteld of gerepareerd door een
gekwalificeerde magnetronservicetechnicus die is opgeleid door de fabrikant.
Waarschuwing:
De inhoud van zuigflessen en potjes met babyvoeding moeten worden geroerd of
geschud, en de temperatuur moet voor gebruik worden gecontroleerd om brandwonden te
voorkomen.
• Gebruik alleen kookmaterialen die geschikt zijn voor gebruik in magnetrons.
GEEN metalen verpakkingen, bestek met gouden of zilveren sierranden,
vleespennen, vorken, enzovoort, gebruiken. Het metalen binddraadje van
papieren of plastic zakken verwijderen.
Reden: er kunnen elektrische vonken ontstaan die de oven kunnen
beschadigen.
• Omwille van het risico op ontbranding, raden wij u aan de oven in het oog te
houden wanneer u voedsel verwarmt dat in plastic of papier is verpakt.
De magnetron niet gebruiken voor het drogen van kranten of kleren.
• Voor kleine hoeveelheden voedsel is een kortere bereidings- of opwarmingstijd
nodig.
Als de normale tijden worden aangehouden, kan het eten aanbranden.
• Als u rook ziet, schakelt u het apparaat uit of haalt u de stekker uit het stopcontact,
en laat u de deur dicht om eventuele vlammen te doven.
• NOOIT een kom of schaal tot de rand vullen. Gebruik een schaal die aan de
bovenkant breder is dan aan de onderkant om overkoken van de vloeistof te
voorkomen. Flessen met een nauwe hals kunnen exploderen als deze oververhit
raken..
3
NL
jtX`Y`hl|TWYZ[`iusUGGwG[GGz SGt GXWSGYWW_GGXWa[XGht
Denk aan uw veiligheid (vervolg)
NL
Magnetronoven installeren
Deze magnetronoven kunt u bijna overal plaatsen (aanrecht,
keukenplank, verrijdbaar keukenblok, tafel).
•
NOOIT een melkfles met de speen erop verwarmen. De fles kan
exploderen als deze oververhit raakt.
• Eieren in schaal en hele hardgekookte eieren mogen niet in de magnetron
worden verwarmd, omdat ze kunnen exploderen, zelfs nadat de
magnetron niet meer verwarmt.
Luchtdichte of vacuüm flessen, potten, verpakkingen, noten in de dop,
tomaten, enzovoort, niet verwarmen.
• U moet de oven regelmatig reinigen en voedselresten verwijderen.
• Als de oven niet schoon gehouden wordt, kan het oppervlak beschadigd
raken. Hierdoor kan de levensduur van het apparaat nadelig beïnvloed
worden en kunnen mogelijk gevaarlijke situaties ontstaan;
• Het apparaat mag niet te nat worden schoongemaakt.
• NOOIT de ventilatieopeningen bedekken met textiel of papier. Deze
kunnen vlam vatten door de hete lucht die door de oven wordt uitgestoten.
De oven kan oververhit raken en zichzelf automatisch uitschakelen. U
kunt de oven pas weer gebruiken nadat deze voldoende is afgekoeld.
• ALTIJD ovenwanten gebruiken om brandwonden te voorkomen wanneer
u een schotel uit de oven haalt.
• Dompel de voedingskabel en stekker niet in water onder en houd de
voedingskabel uit de buurt van hete oppervlakken.
Gebruik de oven niet met een beschadigde voedingskabel of stekker.
• Ga tijdens het openen van de ovendeur op armlengte afstand van de oven
staan.
Reden: de hete lucht en stoom die vrijkomen kunnen brandwonden
veroorzaken.
• Tijdens de werking van de oven kunt u een klikkend geluid horen (met
name tijdens ontdooien).
Reden: dit geluid is normaal en wordt veroorzaakt door het schakelen van het
elektrisch vermogen.
• NOOIT de magnetronoven starten wanneer deze leeg is. De voeding
wordt veiligheidshalve automatisch uitgeschakeld. U kunt de oven weer
gewoon gebruiken nadat u deze 30 minuten hebt laten staan.
U kunt het beste altijd een glas water in de oven laten staan. Het water
absorbeert de energie van de microgolven als de oven per ongeluk wordt
ingeschakeld.
•
•
•
goed geaard te zijn,
aangesloten te worden op een geaard stopcontact van 230 Volt,
50 Hz, wisselspanning.
1. Zet de oven op een egaal, stabiel en waterpas werkvlak. Stel de oven zo op
dat er voldoende ventilatieruimte blijft. Aan de achterzijde en aan weerszijden
moet dat minimaal 10 cm zijn en aan de bovenzijde minimaal 20 cm. (Zie
pagina 10. voor informatie over op elkaar plaatsen van twee ovens.)
2. Blokkeer nooit de ventilatieopeningen, want dan kan oververhitting optreden.
Dan schakelt de oven automatisch uit en doet niets tot hij voldoende is
afgekoeld.
3. Verwijder al het verpakkingsmateriaal uit de oven.
4. Steek de netkabel in een geaard stopcontact. Als de netkabel van het
apparaat beschadigd is, neem dan contact op met uw leverancier voor het
monteren van een nieuwe kabel van het juiste type.
Verwijder de beschermfolie aan de buitenkant. Deze folie is
aangebracht om het apparaat tegen krassen te beschermen.
Verwijder het voor installatie of voordat u de oven gaat gebruiken.
Gebruik in de buitenlucht
Deze magnetronoven is niet geschikt voor gebruik in de buitenlucht. Hij mag
alleen binnen worden gebruikt.
Tijdens het afkoelen
Zet het apparaat niet uit als de ventilator automatisch 1 minuut draait.
Aanbevelingen
BELANGRIJK
•
Voor uw veiligheid dient het apparaat:
Laat NOOIT jonge kinderen de magnetronoven bedienen of met de
magnetronoven spelen. Laat kinderen ook nooit zonder toezicht achter in
de buurt van de magnetronoven wanneer deze in gebruik is. Nooit
voorwerpen die kinderen aantrekken boven de oven bewaren of
verbergen.
Dit apparaat is niet bedoeld om te worden gebruikt door personen
(waaronder kinderen) met een verminderd fysiek, zintuiglijk of mentaal
vermogen, of gebruik aan ervaring en kennis, tenzij zij onder toezicht
staan of instructies krijgen over het gebruik van een persoon die
verantwoordelijk is voor hun veiligheid.
4
Zet de magnetronoven NIET op een plek waar het heet of vochtig kan
zijn.
Voorbeld: Niet bij een gewone gasoven of een radiator.
Let op het opgenomen vermogen van de magnetronoven. Kies
bijvoorbeeld een verlengkabel die minimaal dezelfde specificaties als
de bijgeleverde netkabel heeft.
Reinig de binnenkant van de magnetronoven en de deurrubbers even
met een klamme doek als u de nieuwe oven in gebruik neemt.
jtX`Y`hl|TWYZ[`iusUGGwG\GGz SGt GXWSGYWW_GGXWa[XGht
Koken/opwarmen
Bereiding in één fase
Deze oven is in de fabriek ingesteld voor automatisch bereiden.
Controleer of de oven op een geaard stopcontact is aangesloten en of
“ON” op het display verschijnt.
Open de deur. (De lamp in de ovenruimte gaat aan.)
Doe het voedsel in een schaal die geschikt is voor een magnetron,
plaats deze midden in de oven en duw de deur stevig dicht.(De lamp in
de ovenruimte gaat uit.)
NL
3. Druk op de knop .
Resultaat: De lamp en de ventilator gaan aan.
Het verhitten begint.
De tijd op het digitale display loopt terug.
1. Stel het juiste vermogen in door het herhaald indrukken
van de vermogentoets.
Resultaat: Het gekozen vermogen veschijnt op het
display.
2. Stel met de CIJFER toetsen de gewenste bereidingstijd
in.
Resultaat: De gekozen tijd verschijnt op het display.
Als de tijd verstreken is, hoort u 4 keer een
pieptoon en het verhitten stopt. De lamp gaat uit.
Op het display staat 1 minuut lang “” en de
ventilator blijft draaien om de onderdelen in de
oven af te koelen. De ventilator blijft draaien, ook
als u de deur opent. U kunt voedsel uit de oven
halen terwijl de ventilator draait.
4. Open de deur en haal het voedsel uit de oven.
Sluit de deur. De lamp in de ovenruimte gaat uit.
De maximale tijd die bij een bepaald vermogen
kan worden ingesteld is aangegeven onder
“Vermogen en tijden” op pagina 6. De CIJFER
toetsen reageren niet als u een bereidingstijd
instelt die de maximale waarde overschrijdt.
Het is onmogelijk een bereidingstijd in te stellen
die de maximale bereidingstijd voor dat
programma overschrijdt. De indicatie voor
vermogen knippert. Druk op de annuleren-toets
om een ander vermogen en een andere
bereidingstijd in te stellen.
5
Tijdens het verhitten kunt u de oven stoppen met één druk op de toets
. Nu knippert de indicatie “ON”. Deze gaat uit als u weer op de
toets
of de knop
drukt. U kunt weer met verhitten beginnen
door op de knop
te drukken, of het programma annuleren door
nogmaals op de toets
te drukken. Als de oven NIET bezig was met
verhitten, kan het gekozen programma met één druk op de toets
geannuleerd worden. U kunt één of meerdere keren op de +20sectoets drukken om de bereidingstijd steeds met 20 seconden te
verlengen. U kunt echter de maximale tijd die bij een gekozen
vermogen hoort niet overschrijden.
Als u de netkabel voor het eerst in het stopcontact steekt, piept de
oven één keer en alle indicaties verschijnen 5 seconden op het
display.
Als u na het verhitten de deur opent, gaat de lamp automatisch aan en
1 minuut later weer uit.
Als u de deur tijdens het verhitten opent, stopt de oven en de lamp
gaat automatisch aan en 1 minuut later weer uit. Als u de deur méér
dan 1 minuut open laat staan, piept de oven iedere minuut en na 5
minuten verschijnt de indicatie “ON” op het display.
jtX`Y`hl|TWYZ[`iusUGGwG]GGz SGt GXWSGYWW_GGXWa[XGht
NL
Koken/opwarmen(vervolg)
Vermogen en tijden
Bereiding in meerdere fasen
Met de functie vermogen kunt u de hoeveelheid energie aanpassen en
daarmee de benodigde tijd voor het bereiden en opwarmen van
voedsel. Dit is afhankelijk van het soort voedsel en de hoeveelheid.
U kunt uit de hieronder aangegeven vermogens kiezen.
1. Kies het gewenste vermogen door op de toets voor het
kiezen van het VERMOGEN of ONTDOOIEN te
drukken.
Resultaat: Het gekozen vermogen wordt in het display
getoond.
CM1929
Niveau
HOOG( )
MIDDELLAAG( )
LAAG ( )
HOOG
ONTDOOIEN( )
LAAG
ONTDOOIEN( )
2. Kies met de CIJFER toetsen de gewenste bereidingstijd.
Resultaat: De gekozen bereidingstijd wordt in het
display getoond.
De maximale bereidingstijd bij de diverse
vermogensstanden kunt u vinden in het gedeelte
getiteld: “Vermogensstanden en tijdseenheden”.
De CIJFER toetsen werken of reageren niet
wanneer u een bereidingstijd instelt die hoger ligt
dan deze maximumwaarde. U kunt ook geen
bereidingstijd instellen die hoger ligt dan de voor
het betreffende programma geldende
maximumtijd. Heeft u dat wel gedaan, druk dan
op de toets ANNULEREN en stel opnieuw het
vermogen en de bereidingstijd in.
CM1329
Percen- Vermo- Percen- Vermo- Percen- Vermotage
gen
tage
gen
tage
gen
100 %
70 %
50 %
1850 W
1295 W
925 W
100 %
70 %
50 %
1600 W
1120 W
800 W
100 %
70 %
50 %
1300 W
910 W
650 W
20 %
370 W
25 %
400 W
30 %
390 W
10 %
185 W
13 %
208 W
15 %
195 W
De bereidingstijden in de recepten en in deze handleiding komen
overeen met het aangeven vermogen.
Niveau
HOOG ( )
MIDDELLAAG ( )
LAAG ( )
HOOG ONTDOOIEN ( )
LAAG ONTDOOIEN ( )
3. Herhaal de stappen 1 en 2 voor het instellen van de
fasen II en III.
4. Druk op de toets
:
Resultaat: De verlichting van de magnetron en de
ventilator gaan aan. De magnetron start
automatisch volgens de ingestelde
bereidingstijd en vermogen (fase I fase II
stage fase III).
De tijd in het display telt af.
CM1629
U kunt niet tegelijkertijd VERMOGEN en ONTDOOIEN instellen.
In dit geval worden deze standen na elkaar gekozen.
6
Max. tijd
25 min.
40 min.
40 min.
50 min.
50 min.
jtX`Y`hl|TWYZ[`iusUGGwG^GGz SGt GXWSGYWW_GGXWa[XGht
Bereiding stoppen
Herhaalfunctie
U kunt de bereiding op elk moment onderbreken, zodat u:
• kunt controleren of het voedsel gaar is,
• het voedsel kunt omdraaien of doorroeren,
• het voedsel kunt laten nawarmen.
1. Met de startknop kunt u de laatst gebruikte
bereidingsinstelling herhalen (hierbij maakt het niet uit of NL
u handmatig of vanuit het geheugen werkt). De oven
kiest dan precies dezelfde tijd en hetzelfde vermogen als
bij de laatste instelling.
Om de bereiding te
stoppen...
2. De herhaalfunctie wordt geannuleerd als de stroom
uitvalt.
Tijdelijk
Doe het volgende...
Open de deur of druk één keer op de toets
Resultaat: Programma stopt.
.
Als u de bereiding wilt voortzetten, sluit de deur en
druk nogmaals op de knop
.
Definitief
Druk twee keer op de toet
.
Resultaat: De bereidingsinstellingen worden
geannuleerd.
Als u de bereidingsinstellingen vóór de bereiding wilt annuleren drukt
u één keer op de annuleren-toets ( ).
7
jtX`Y`hl|TWYZ[`iusUGGwG_GGz SGt GXWSGYWW_GGXWa[XGht
NL
+20sec-toets gebruiken
Ontdooifunctie gebruiken
Dit is een tiptoets. Met één druk op deze toets wordt het verhitten
meteen gestart.
Tijdens het verhitten kunt u de bereidingstijd verlengen met de +20sectoets.
Bij iedere druk op de +20sec-toets wordt de bereidingstijd verlengd. De
maximale tijd kan niet worden overschreden.
Net als bij normaal koken kan het voorkomen dat u de bereidingstijd
wilt aanpassen aan uw eigen smaak of het soort voedsel. U kunt:
• op ieder gewenst moment de deur openen en kijken hoe de
bereiding verloopt,
• de deur sluiten,
• de resterende bereidingstijd verlengen.
Met de ontdooifunctie kunt u vlees, gevogelte of vis ontdooien.
Gebruik alleen schalen die geschikt zijn voor de magnetron.
Open de deur. Leg het bevroven voedsel midden op het plateau. Sluit
de deur.
1. Druk op de ontdooitoets om HOOG ONTDOOIEN (
LAAG ONTDOOIEN ( ) in te stellen.
Resultaat: De gekozen indicatie voor ontdooien
verschijnt op het display.
Voordat u de oven aanzet, kunt u de tijden verlengen/
verkorten met de tijdtoetsen of de +20sec-toets. Tijdens de
bereiding mag de tijd alléén worden verlengd met de
+20sec-toets.
) of
2. Druk op de CIJFER toetsen om de ontdooitijd in te stellen
(max. 50 min.).
3. Druk op de knop
.
Resultaat: Het ontdooien begint.
8
Het is niet mogelijk een langere ontdooitijd in te
stellen dan 50 min. De indicatie voor ontdooien
knippert. Druk op de annuleren-toets en stel een
nieuwe ontdooitijd in. ( )
Als de oven al 25 minuten bezig is met ontdooien, kunt u NIET
overstappen van ontdooien naar verhitten (koken/opwarmen).
jtX`Y`hl|TWYZ[`iusUGGwG`GGz SGt GXWSGYWW_GGXWa[XGht
Geheugentoetsen programmeren
één fase
1. Houd de programmabeveiligingstoets(
druk daarna op de programmeertoets(
seconden ingedrukt.
5. Houd de programmabeveiligingstoets( ) ingedrukt en
NL
druk daarna op de programmeertoets( ). Houd beide
weer 2 seconden ingedrukt.
Resultaat: De PROG-indicatie en het geheugennummer
knipperen 3 keer en u hoort een piepgeluid.
Daarna is het display leeg.
Let op:
Druk de juiste toetsen stevig in.
) ingedrukt en
). Houd beide 2
Druk de toetsen stevig in.
Resultaat: Op het digitale display verschijnt de PROGindicatie.
6. Herhaal bovenstaande procedures als u meer wilt
programmeren.
2. Druk op de CIJFER toets die correspondeert met het
gewenste geheugennummer.
Resultaat: Het gekozen geheugennummer verschijnt
onder de PROG-indicatie.
3. Druk op de vermogentoets om het gewenste
VERMOGEN of ONTDOOIEN in te stellen.
Druk één of meerdere keren op de VERMOGEN
of ONTDOOIEN toets tot u het gewenste
vermogen bereikt.
4. Druk op de CIJFER toetsen om de bereidingstijd in te
stellen.
De maximale tijd die bij een bepaald vermogen
kan worden ingesteld is aangegeven onder
“Vermogen en tijden” op pagina 6. De CIJFER
toetsen reageren niet als u een bereidingstijd
instelt die de maximale waarde overschrijdt.
Het is onmogelijk een bereidingstijd in te stellen
die de maximale bereidingstijd voor dat
programma overschrijdt. De indicatie voor
vermogen knippert. Druk op de annuleren-toets
om een ander vermogen en een andere
bereidingstijd in te stellen.
9
Het geheugen biedt ruimte aan 30 programma’s.
Controleer elk programma.
Na het programmeren hoeft u alleen maar op
een CIJFER toets te drukken om de bereiding
vanuit het geheugen te starten. Het gekozen
programma begint automatisch met de bereiding.
jtX`Y`hl|TWYZ[`iusUGGwGXWGGz SGt GXWSGYWW_GGXWa[XGht
Geheugentoetsen programmeren (vervolg)
NL
meerdere fasen
1. Houd de programmabeveiligingstoets(
druk daarna op de programmeertoets(
seconden ingedrukt.
6. Houd de programmabeveiligingstoets( ) ingedrukt en
druk daarna op de programmeertoets( ). Houd beide
weer 2 seconden ingedrukt.
Resultaat: De PROG-indicatie en het geheugennummer
knipperen 3 keer en u hoort een piepgeluid.
Daarna is het display leeg.
Let op:
Druk de juiste toetsen stevig in.
) ingedrukt en
). Houd beide 2
Druk de toetsen stevig in.
Resultaat: Op het digitale display verschijnt de PROGindicatie.
7. Herhaal bovenstaande procedures als u meer wilt
programmeren.
2. Druk op de CIJFER toets die correspondeert met het
gewenste geheugennummer.
Resultaat: Het gekozen geheugennummer verschijnt
onder de PROG-indicatie.
3. Druk op de vermogentoets om het gewenste
VERMOGEN of ONTDOOIEN in te stellen.
Resultaat: Na de eerste keer indrukken van de
vermogentoets verschijnt het
standaardvermogen HOOG op het display.
Druk één of meerdere keren op de VERMOGEN
of ONTDOOIEN toets tot u het gewenste
vermogen bereikt.
4. Druk op de CIJFER toetsen om de bereidingstijd in te
stellen.
De maximale tijd die bij een bepaald vermogen
kan worden ingesteld is aangegeven onder
“Vermogen en tijden” op pagina 6. De CIJFER
toetsen reageren niet als u een bereidingstijd
instelt die de maximale waarde overschrijdt.
Het is onmogelijk een bereidingstijd in te stellen
die de maximale bereidingstijd voor dat
programma overschrijdt. De indicatie voor
vermogen knippert. Druk op de annuleren-toets
om een ander vermogen en een andere
bereidingstijd in te stellen.
5. Herhaal de stappen 3 en 4 voor het instellen van de
fasen II en III,
10
Het geheugen biedt ruimte aan 30 programma’s.
Controleer elk programma.
Na het programmeren hoeft u alleen maar op
een CIJFER toets te drukken om de bereiding
vanuit het geheugen te starten. Het gekozen
programma begint automatisch met de bereiding.
U kunt niet tegelijkertijd VERMOGEN en ONTDOOIEN instellen.
In dit geval worden deze standen na elkaar gekozen.
jtX`Y`hl|TWYZ[`iusUGGwGXXGGz SGt GXWSGYWW_GGXWa[XGht
Gerechten vanuit geheugen bereiden
Langere bereidingstijd voor dubbele porties
programmeren
Na het programmeren hoeft u alleen op het gewenste
geheugennummer te drukken. Dan begint de oven automatisch met
verhitten en gebruikt de bereidingstijd en het vermogen dat is
voorgeprogrammeerd.
NL
1. Houd
ingedrukt en druk op
seconden ingedrukt.
1. Controleer of de oven is aangesloten op een geaard
stopcontact en of “ON” op het display staat.
. Houd beide 2
2. Met de CIJFER toetsen kunt u het gewenste
programmanummer kiezen.
2. Open de deur.
De lamp in de ovenruimte gaat aan.
3. Doe het voedsel in een schaal die geschikt is voor een
magnetron, plaats deze midden in de oven en duw de
deur stevig dicht.
Resultaat: De lamp in de ovenruimte gaat uit.
3. Druk op CIJFER toetsen om een
vermenigvuldingingsfactor tussen 1,00 tot 9,99 in te
stellen.
4. Druk op de CIJFER toets.
Resultaat: Het gekozen geheugenprogramma wordt
gestart. De CIJFER toetsen 1, 2, 3 werken
pas na 2 seconden.
De verlenging van de bereidingstijd is standaard
ingesteld 1,65.
Zorg dat u per geheugennummer de juiste factor
tussen 1,00 en 9,99 instelt.
4. Druk op de knop
11
.
Druk op de toets
om de programmeermodus te verlaten.
U kunt weliswaar een vermenigvuldigingsfactor instellen die hoger is
dan de bij het gegeven vermogen geldende maximale tijd, maar de
oven zal die maximale tijd nooit overschrijden.
jtX`Y`hl|TWYZ[`iusUGGwGXYGGz SGt GXWSGYWW_GGXWa[XGht
Langere bereidingstijd voor dubbele porties
programmeren (vervolg)
Dubbele porties vanuit geheugen bereiden
1. Druk op de toets voor dubbele porties.
NL
Vermenigvuldigingsfactor voor dubbele porties wijzigen
Functie
Toets
Opmerking
Houd ingedrukt 2 seconden.
Codenummer
Na 1 seconde verschijnt de
standaardwaarde op het
display.
(Geef gewenste
factor in)
Wijziging
vermenigvuldiging
sfactor
Display
Houd
ingedrukt en
druk op
Druk op
Als u niets meer wilt
veranderen, drukt u op om de
wijzigings-modus te verlaten.
Sla deze stap over als hij niet
noodzakelijk is.
(Geef gewenste
factor in)
Sla deze stap over als hij niet
noodzakelijk is.
Druk op
1,00 ~ 9,99 beschikbaar
(verander de factor indien
gewenst).
Nieuw
codenummer
Druk op
2. Druk op het gewenste geheugennummer.
Resultaat: De bereidingstijd, vermenigvuldigd met de
ingestelde factor, verschijnt op het display en
de bereiding start, waarbij de tijd terug loopt.
Sla deze stap over als hij niet
noodzakelijk is.
(Annulerensmodus) Hiermee verlaat u de
wijzigingsmodus.
12
U hoeft niet op de knop
te drukken om met
het verhitten te beginnen.
jtX`Y`hl|TWYZ[`iusUGGwGXZGGz SGt GXWSGYWW_GGXWa[XGht
Schoonmaaktijd luchtfilter programmeren
Pieptoon kiezen
Als de indicatie voor luchtfilter (FILTER) op het display verschijnt,
moet u het filter schoonmaken. Volg hierbij de instructies onder
"Luchtfilter schoonmaken", hierboven. Volg de onderstaande
procedure als u de schoonmaaktijd van het luchtfilter wilt veranderen.
U kunt de pieptoon kiezen. Er zijn 4 geluidsniveaus beschikbaar.
Houd
ingedrukt en druk op cijfertoets 0. Houd beide 2
seconden ingedrukt.
Resultaat: Pieptoon gaat een niveau hoger.
1. Houd de programmabeveiligingstoets( ) ingedrukt en
druk op cijfertoets 3. Houd beide 2 seconden ingedrukt.
Resultaat: Op het display verschijnt de schoonmaaktijd
die u hebt ingesteld en die de fabrikant heeft
ingesteld.
Als u de twee hierboven aangegeven toetsen indrukt,
verschijnen de instellingen in deze volgorde:
Geluid 0 Geluid 1 Geluid 2 Geluid 3 Geluid 0
(geen geluid)
Standaard is ingesteld dat het filter moet worden
schoongemaakt als de oven in totaal 500 uur
heeft gewerkt.
2. Druk op cifertoetsen om de gewenste schoonmaaktijd in
te stellen.
U kunt tot 999 uur instellen.
3. Houd de programmabeveiligingstoets( ) ingedrukt en
druk op cijfertoets 3.
Houd beide 2 seconden ingedrukt om de nieuwe waarde
op te slaan.
Het programmeren van de schoonmaaktijd van het
luchtfilter is voltooid.
4. Druk op de annuleren-toets om terug te keren naar de
bereidingsmodus.( ).
Pieptoon 0 maakt geen geluid.
Als de geprogrammeerde periode is verstreken,
moet u het filter schoonmaken. Zie pagina 16.
13
Standaardtoon is geluid 2.
NL
jtX`Y`hl|TWYZ[`iusUGGwGX[GGz SGt GXWSGYWW_GGXWa[XGht
Foutcodes
NL
Fouttype
Code
Pieptoon
Oorzaak
Oplossing
Een lange
pieptoon
2 seconden
De netfrequentie is hoger of lager dan
50Hz.
E41
Een lange
pieptoon
2 seconden
De elektrische schakelingen in de oven
werken niet correct.
Trek de netkabel uit het stopcontact en wacht minimaal 10 seconden. Steek de
netkabel in het stopcontact en controleer of “E41” opnieuw verschijnt. Als het
probleem blijft optreden, neem dan contact op met de dichtstbijzijnde servicedienst.
Voeding HVT-II
werkt niet
E42
Een lange
pieptoon
2 seconden
De elektrische schakelingen in de oven
werken niet correct.
Trek de netkabel uit het stopcontact en wacht minimaal 10 seconden. Steek de
netkabel in het stopcontact en controleer of “E42” opnieuw verschijnt. Als het
probleem blijft optreden, neem dan contact op met de dichtstbijzijnde servicedienst.
EEPROM werkt
niet
E5
Een lange
pieptoon
2 seconden
Geheugen-IC (EEPROM-IC) werkt niet Druk op een of meerdere keren op de annuleren-toets om een
correct. Bij deze conditie zijn alle functies geheugenprogramma te activeren. Als foutcode “E5” blijft optreden, neem dan
contact op met de dichtstbijzijnde service-dienst.
van de oven in orde, uitgezonderd het
geheugen. (U kunt de oven handmatig
bedienen)
Verkeerde
netfrequentie
(50/60 Hz)
E1
Voeding HVT-I
werkt niet
Trek de netkabel uit het stopcontact en controleer de netfrequentie.
Steek de stekker in het stopcontact van 50 Hz. Controleer of "E1" verschijnt. Als
de foutcode opnieuw verschijnt, neem dan contact op met de dichtstbijzijnde
service-dienst.
14
jtX`Y`hl|TWYZ[`iusUGGwGX\GGz SGt GXWSGYWW_GGXWa[XGht
Combinatietoetsen
Onderhoud van uw magnetronoven
Opmerking: Druk op toets 1 en daarna op de volgende toets.
Houd beide 2 seconden ingedrukt.
Functie
Toetsingave
Toets 1
Display
Magnetronoven schoonmaken
1. Haal voor het schoonmaken van de oven de netkabel uit het stopcontact.
Opmerking
Volgende
Annuleren
Totale
( )
aaneengesloten periode
1
Houd beide 2
seconden ingedrukt.
Eenheid: 10 uur
Totale
werkingsduur
magnetron
Annuleren
( )
2
Houd beide 2
seconden ingedrukt.
Eenheid: 1 uur
Gebruik
geheugenprogramma
(aantal keer)
Annuleren
( )
Start
Houd beide 2
seconden ingedrukt.
2. Maak de binnenkant van de oven schoon. Verwijder alle voedselresten met
een vochtige doek. U kunt een mild schoonmaakmiddel gebruiken als de oven
erg vuil is. Gebruik geen agressieve schoonmaakmiddelen of
schuurmiddelen.
Voedselresten of vocht op de ovenwanden of tussen de deur en de
deurrubbers kunnen microgolven absorberen. Hierdoor kunnen er
vonken onstaan.
3. Maak de buitenkant van de oven schoon met een sopje en maak hem daarna
droog met een zachte doek.
LET OP: Zorg dat er geen water in de ventilatieopeningen (aan de
achterzijde) en het bedieningspaneel komt.
Codenummer
(Data display na
2 seconden)
4. Maak de ruit van de deur schoon met een zeer mild schoonmaakmiddel en
water. Daarna droogmaken met een zachte doek. Gebruik geen speciale
ruitenreiniger omdat er dan krassen op de deur kunnen komen.
739 keer gebruikt.
(Nieuwe code kan
worden ingegeven na
datadisplay)
Annuleren (
Verhittingstijd Annuleren
( )
per geheugenprogramma
(automatisch
sequentieel
display)
Annuleren (
)
(Annulerensmodus)
P
Houd beide 2
seconden ingedrukt.
(Sequentiële
weergave
3 seconden
van 1 tot 30)
)
(Annulerensmodus)
15
NL
jtX`Y`hl|TWYZ[`iusUGGwGX]GGz SGt GXWSGYWW_GGXWa[XGht
Onderhoud van uw magnetronoven (vervolg)
NL
Bovenplaat ovenruimte schoonmaken
Luchtfilter schoonmaken
1. Duw de borgingen van de bovenplaat met twee handen naar binnen en trek ze
daarna naar beneden. Neem dan de bovenplaat uit de oven.
Maak het luchtfilter regelmatig schoon volgens deze instructies. Er kunnen
problemen ontstaan als er zich stof in het luchtfilter ophoopt.
2. Spoel de bovenplaat af in een sopje of een speciaal reinigingsmiddel voor het
hygiënisch verwijderen van voedselresten.
1. Verwijder de boutjes aan bijde zijde van het luchtfilter.
2. Verwijder het luchtfilter voorzichtig.
3. Plaats de bovenplaat weer terug voordat u de oven weer gaat gebruiken.
3. Spoel het filter af in een warm sopje.
LET OP: De bovenplaat moet stevig vastzitten als u de oven gaat gebruiken.
Als u de bovenplaat heeft verwijderd om deze schoon te maken,
moet u voorzichtig zijn met de onderdelen die dan onbeschermd
boven in de oven zitten. Zorg dat deze niet vervormd raken.
Hierdoor kunnen er vonken optreden tijdens het bereiden. Neem in
zo'n geval contact op met de dichtstbijzijnde service-dienst.
4. Voordat u de oven weer gaat gebruiken moet u het luchtfilter terugplaatsen.
If the Air Filter becomes clogged with debris, this will cause an
overheating problem on the oven.
Als er zich vuil ophoopt in het luchtfilter kan de oven oververhit raken.
Voor het veranderen van de schoonmaaktijd van het luchtfilter, zie
“Schoonmaaktijd luchtfilter programmeren”, Zie pagina 13.
Bovenplaat ovenruimte
Boutjes
16
jtX`Y`hl|TWYZ[`iusUGGwGX^GGz SGt GXWSGYWW_GGXWa[XGht
Installatieinstructies voor het op elkaar plaatsen
van 2 ovens
Lamp vervangen
Let op:
Let op:
NL
1. Verwijder de schroef van het afdekplaatje van de lamp.
1. Haal voor installatie de netkabel uit het stopcontact.
U hoeft de zijwand van de oven niet te verwijderen om de lamp te
kunnen vervangen.
2. Gebruik het meegeleverde verbindingsstuk als u twee ovens op elkaar wilt
plaatsen.
2. Verwijder de lamp door deze rechtsom te draaien.
3. U kunt maximaal twee ovens op elkaar plaatsen.
3. De nieuwe lamp draait u er linksom in.
Let op:
Alleen deze modellen mogen op elkaar geplaatst worden.
Zorg dat de oven leeg is.
Afdekplaatje
van de lamp
Lamphouder
Lamp (230 V - 25 W)
Installatie
Zijwand
1. Zet de ovens op elkaar.
2. Verwijder 6 schroeven zoals in de afbeelding is aangegeven.
3. Zet de ovens aan elkaar vast met het verbindingsstuk.
4. Bevestig de 6 schroeven zoals in de afbeelding is aangegeven. Draai ze
stevig vast.
5. Zorg dat de bovenste oven op een veilige en praktische hoogte staat.
Schroeven
Verbindingsstuk
17
jtX`Y`hl|TWYZ[`iusUGGwGX_GGz SGt GXWSGYWW_GGXWa[XGht
Geschikt kookgerei
NL
De microgolven van de magnetron moeten in het gerecht kunnen
doordringen zonder dat zij door het serviesgoed of wat anders worden
weerkaatst of geabsorbeerd.
Daarom moet vooral serviesgoed zorgvuldig worden gekozen.
Materialen met een aanduiding die duidt op geschiktheid voor een
magnetron zijn probleemloos te gebruiken.
Hieronder volgt een overzicht van diverse typen kookgerei en is
aangegeven of en hoe zij in een magnetronoven gebruikt kunnen
worden.
Materiaal
Aluminiumfolie
Geschikt
voor
magnetron
Opmerkingen
Kan beperkt worden gebruikt als
bescherming tegen oververhitting. Als
veel folie wordt gebruikt of als het te
dicht bij de wanden komt, kunnen
echter vonken optreden.
Bruinplateau
Niet langer dan 8 minuten
voorverwarmen.
Servies en aardewerk
Porselein, aardewerk en glas zijn
meestal bruikbaar, behalve als het een
metaalhoudende sieropdruk bevat.
Weggooiverpakkingen van
polyester en karton
Sommige diepvriesmaaltijden zijn in
deze materialen verpakt.
Bruikbaar om een gerecht op te
warmen, maar polystyreen kan door
oververhitting smelten.
Kunnen in brand vliegen.
Kan leiden tot vonkvorming.
Verpakkingen van fast-food
• Polystyrenen
bekers en bakjes
•
•
Glas
•
•
•
Papier of kranten
Recycle-papier of
metalen randjes
Vuurvaste
ovenschalen
Dun glaswerk
Glazen bekers of
kommen
Metaal
• Schotels of borden
• Sluitingen voor
diepvriesverpakkin
gen
Papier
• Borden, bekers,
zakdoekjes en
keukenrol
• Recycle-papier
Plastic
• Bakjes
Alleen voor opvangen van overmatig
vocht en voor korte bereidingstijd.
Kan tot vonken leiden.
Vooral hittebestendig thermoplastic.
Andere plastics kunnen bij hoge
temperaturen vervormen of van kleur
veranderen. Gebruik geen melamineplastics.
Bruikbaar om vocht vast te houden,
maar mag niet met voedsel in contact
komen. Verwijder deze folie
voorzichtig, want er kan stoom
vrijkomen.
Alleen indien kookbestendig of
ovenbestendig. Mag niet luchtdicht
blijven, dus prik er vooraf gaatjes in.
Plasticfolie
•
Diepvrieszakken
18
Kunnen vonken of brand veroorzaken.
•
Was- of vetvrij papier
Bruikbaar, behalve als zij zijn versierd
met metaalhoudende opdruk.
Bruikbaar voor opwarmen van voedsel
of dranken. Erg dun glas kan breken of
springen als het plotseling sterk wordt
verhit.
Deksel verwijderen. Alleen geschikt
voor opwarmen.
: geschikt
: onzeker
: ongeschikt
Bruikbaar om vocht vast te houden en
spatten te verhinderen.
jtX`Y`hl|TWYZ[`iusUGGwGX`GGz SGt GXWSGYWW_GGXWa[XGht
Bereidingstips
D: diepvries
K: koud
Recept
Methode
Vermogen
Recept
Nawa1850W 1600W 1300W rmtijd
Methode
Tijd
VermoTijd
Nawagen 1850W 1600W 1300W rmtijd
HAPJES & VOORGERECHTEN
BROOD & GEBAK
Opwarmen
Ontdooien
Worstjes D
Op bord
MIDDE- 2'00"
LLAAG
2'10"
2'20"
2 min.
Engels ontbijt K
Afdekken
MIDDE- 2'30"
LLAAG
2'40"
2'50"
1 min.
Baguette 22 cm D
ONTDOO- 0'45"
IEN 1 ( )
0'50"
0'50"
5 min.
Baguette 22 cm X 2
D
ONTDOO- 1'10"
IEN 1 ( )
1'15"
1'20"
5 min.
Gebak, 1 punt D
Op bord
ONTDOO- 2'30"
IEN 2 ( )
2'40"
2'50"
5 min.
Opwarmen
Quiche 28 cm, 1
punt 136g
Op bord
ONTDOO- 3'00"
IEN 1 ( )
HOOG
0'40"
3'00"
3'00"
1 min.
0'45"
0'50"
1 min.
Hamburger D
HOOG
0'55"
1'05"
1'10"
1 min.
Kipburger D
HOOG
0'55"
1'05"
1'10"
1 min.
Kebab 162 g D
HOOG
1'00"
1'10"
1'20"
1 min.
Hot Dog D
HOOG
1'00"
1'10"
1'20"
1 min.
Pizza 190 g D
Op bord
LOW
2'30"
2'45"
3'00"
2 min.
Spareribs 200 g D
Op bord
MIDDE- 3'30"
LLAAG
3'45"
4'00"
1 min.
Pasteitjes X 2 D
Verwijder
aluminiumfolie Op bord
HOOG
0'10"
0'15"
0'15"
1 min.
Kipkluifjes X 6 D
Op bord, dun- HOOG
ne delen naar
het midden
2'00"
2'15"
2'30"
1 min.
Vruchtentaart D
Op bord
HOOG
0'40"
0'45"
0'45"
1 min.
2'20"
2 min.
HOOG
0'05"
0'10"
0'10"
1 min.
Bladerdeeggerechten 227g K
Op bord
HOOG
0'45"
0'55"
1'00"
1 min.
Afdekken en HOOG
halverwege de
bereidingstijd
doorroeren
2'10"
Op bord
Witte bonen in
tomatensaus 500 g
2'00"
Croissant X 2 D
Verwijder
Hartige taart met
aluminiumfkip en
champignons X 2 K olie Op bord
HOOG
0'45"
0'55"
1'00"
1 min.
Witte bonen in
tomatensaus 250 g
1'00"
1'05"
1'10"
2 min.
Op bord,
Verwijder
aluminiumfolie
HOOG
0'30"
0'40"
0'45"
1 min.
Afdekken en HOOG
halverwege de
bereidingstijd
doorroeren
In schaal
afdekken
HOOG
1'20"
1'30"
1'40"
2 min.
Kerstpudding 150 g K In schaal
HOOG
0'20"
0'25"
0'30"
2 min.
Cakerol met jam 80g Op bord
D
HOOG
1'00"
1'05"
1'10"
2 min.
Flensjes 2 D
Prik plastic
folie in
HOOG
0'50"
1'00"
1'10"
1 min.
Biscuitgebak D
X2
X1
HOOG
HOOG
0'35"
0'40"
1'05"
0'50"
1'30"
1'00"
2 min.
2 min.
Biscuitgebak D
X2
X1
HOOG
HOOG
0'35"
0'40"
1'05"
0'45"
1'30"
0'45"
2 min.
2 min.
Hartige taart met
kip en
champignons K
NAGERECHTEN
Opwarmen
Appelkruimeltaart
200 g D
HAPJES & VOORGERECHTEN
Bereiden
Bacon, plakje K
Op rooster
HOOG
1'30"
1'40"
1'50"
1 min.
Eieren,
gepocheerd X 2 K
In schaaltje
HOOG
0'30"
0'40"
0'45"
1 min.
Eieren, roerei X 2 K Kluts eieren
en doe in
schaal
HOOG
25"30"
30"40"
35"45"
1 min.
Worstjes X 2, dik K Inprikken
MIDDELL- 1'00"
AAG
1'10"
1'20"
2 min.
19
NL
jtX`Y`hl|TWYZ[`iusUGGwGYWGGz SGt GXWSGYWW_GGXWa[XGht
Bereidingstips (vervolg)
D: diepvries
NL
Recept
K: koud
Methode
VermogTijd
Nawaen
1850W 1600W 1300W rmtijd
Recept
GERECHTEN VOLGENS RECEPT
Methode
VermTijd
Nawaogen 1850W 1600W 1300W rmtijd
VERSE GROENTEN
Opwarmen
Koken 500 g
Kaasgratin K
In schaal geschikt HOOG
voor magnetron
3'30"
3'40"
3'50"
1 min.
Snijbonen
60ml/4 eetlepels HOOG 3'00"
water Dek af
3'15"
3'30"
2 min.
Kip Tikka
masala D
Prik plastic folie in HOOG
3'20"
3'30"
3'40"
2 min.
Broccoli, roosjes
60ml/4 eetlepels HOOG 3'00"
water Dek af
3'15"
3'30"
2 min.
Thaise groene Prik plastic folie in HOOG
curry met kip D
3'00"
3'15"
3'30"
2 min.
Kool, gesneden
10 eetlepels
water Dek af
HOOG 5'00"
5'30"
6'00"
2 min.
Chilli con carne Prik plastic folie in HOOG
D
3'30"
3'45"
4'00"
2 min.
Wortels, gesneden
60ml/4 eetlepels HOOG 3'30"
water Dek af
3'45"
4'00"
2 min.
MIDDELL- 4'30"
AAG
5'00"
5'30"
2 min.
Bloemkool, roosjes
60ml/4 eetlepels HOOG 3'30"
water Dek af
3'45"
4'00"
2 min.
Lasagna 192 g In schaal geschikt MIDDELL- 4'00"
voor magnetron
AAG
4'15"
4'30"
2 min.
Sperziebonen
60ml/4 eetlepels HOOG 3'30"
water Dek af
3'45"
4'00"
2 min.
Mosselen 466g Prik in zak
D
HOOG
2'45"
3'00"
2 min.
Aardappels, in schil Turn half way
Zalm & advoca- Prik in zak
dorolletje K
HOOG
2'30"
2'45"
3'00"
2 min.
Dek af
Gehakt met
aardappelpuree
300g K
MIDDELL- 3'00"
AAG
3'15"
3'30"
2 min.
4'20"
4'40"
2 min.
Gekookte kip In ingeprikte
magnetronzak
½K
LAAG
Niervetpudding Dek af - zet
K
rechtop op schaal
geschikt voor
magnetron
Kip in rode
pesto 312g D
Prik in zak, op
bord
2'30"
4'00"
ONTDOO- 5'00"
IEN 1( )
HOOG
3'30"
5'00"
5'00"
3'45"
4'00"
60ml/4 eetlepels HOOG 4'30"
water Dek af
4'45"
5'00"
2 min.
Snijbonen
Dek af,
halverwege
omdraaien
HOOG 3'00"
3'15"
3'30"
2 min.
Sperziebonen
Dek af,
halverwege
omdraaien
HOOG 4'00"
4'15"
4'30"
2 min.
Broccoli, roosjes
Dek af,
halverwege
omdraaien
HOOG 4'00"
4'15"
4'30"
2 min.
Kool, gesneden
Dek af,
halverwege
omdraaien
HOOG 4'00"
4'15"
4'30"
2 min.
1 min.
Tagliatelle
carbonara K
Prik plastic folie
in, op bord
HOOG
1'40"
2'00"
2'20"
1 min.
Tortellini
formaggio K
Afgedekt in
schaal
HOOG
2'00"
2'15"
2'30"
1 min.
Groententaart
K
In schaal geschikt HOOG
voor magnetron
3'20"
3'35"
3'50"
1 min.
Kant-en-klaar
Afgedekt
maaltijd 350g K
HOOG
2'00"
2'15"
2'30"
1 min.
Kant-en-klaar
Afgedekt
maaltijd 700g K
HOOG
3'00"
3'15"
3'30"
1 min.
20
HOOG 10'00” 11'00” 12'00” 5 min.
Spruitjes
jtX`Y`hl|TWYZ[`iusUGGwGYXGGz SGt GXWSGYWW_GGXWa[XGht
Bereidingstips (vervolg)
D: diepvries
De magnetronoven reinigen
De volgende onderdelen van de magnetronoven moeten regelmatig
worden gereinigd om vastzetten van veten
voedselresten te voorkomen:
K: koud
Recept
Methode
Vermogen
Tijd
Nawa1850W 1600W 1300W rmtijd
VERSE GROENTEN
•
•
•
Koken 500g
Wortels
Dek af,
halverwege
omdraaien
HOOG
4'00"
4'15"
4'30"
2 min.
Bloemkool, roosjes
Dek af,
halverwege
omdraaien
HOOG
4'00"
4'15"
4'30"
2 min.
Maïskolf
Dek af
HOOG
4'00"
4'30"
5'00"
2 min.
Babymaïs
Dek af,
halverwege
omdraaien
HOOG
5'00"
5'15"
5'30"
2 min.
Dek af,
halverwege
omdraaien
HOOG
Champignons,
ongesneden
3'00"
3'15"
Aardappels, puree X 2
Aardappels, puree X 4
HOOG
HOOG
6'00" 6'30" 7'00" 2 min.
10'00" 11'15" 12'30" 2 min.
4'30"
2. Verwijder alle spatten of vlekken van de oppervlakken aan de binnenkant met
een doekje met zeepsop. Verwijder de zeepresten en maak het apparaat
droog.
2 min.
HOOG
3'30"
4'00"
4'30"
2 min.
HOOG
3'00"
3'30"
4'00"
2 min.
3. Plaats een kopje verdund citroensap op de onderplaat en schakel de
magnetron tien minuten lang op maximaal vermogen in om geurtjes en
vastzittende voedselresten te verwijderen.
RIJST, 500 g
Opwarmen
Rijst, gekookt D
Rijst, pilav D
Als de oven niet goed wordt schoongehouden, kan het oppervlak
beschadigd raken. Hierdoor kan de werking van het apparaat
nadelig worden beïnvloed en kunnen gevaarlijke situaties
ontstaan.
2 min.
3'00"
Dek af,
halverwege
omdraaien
4'00"
3'30"
HOOG
Spruitjes
Controleer ALTIJD of de afsluitstrippen schoon zijn en de deur goed
sluit.
1. Reinig de buitenkant met een zachte doek en een warm sopje. Verwijder de
zeepresten en maak het apparaat droog.
Aardappels, in schil
230 ~ 290 g X 1
Ratatouille 500 g
Binnen- en buitenwanden
Deur en afsluitstrippen
Onderplaat
Dek af,
halverwege
omdraaien
HOOG
Dek af,
halverwege
omdraaien
HOOG
3'00"
3'15"
3'30"
3'15"
3'30"
Gebruik NOOIT schuurmiddelen of chemische oplosmiddelen.
Let bij het reinigen van de afsluitstrips vooral goed op het volgende:
• Dat zich geen vuilresten ophopen
•
2 min.
3'00"
Zorg ervoor dat er GEEN water in de ventilatieopeningen terecht
komt.
2 min.
21
Dat de deur goed sluit
Reinig de binnenkant van de magnetronoven direct na elk gebruik
met een licht sopje, maar laat de magnetronoven eerst afkoelen om
verwondingen te voorkomen.
NL
jtX`Y`hl|TWYZ[`iusUGGwGYYGGz SGt GXWSGYWW_GGXWa[XGht
Technische gegevens
Bij het uitvoeren van onderhoud aan of het opbergen van de
magnetronoven moet u enkele eenvoudige voorzorgsmaatregelen
nemen.
De oven mag niet worden gebruikt bij beschadigingen aan de deur of
afsluitstrippen:
• Gebroken scharnier
• Versleten afsluitstrippen
• Beschadigde of verbogen ovenbehuizing
SAMSUNG streeft continu naar produktverbetering. Zowel de
technische gegevens als de inhoud van deze handleiding kan daarom
zonder voorafgaande kennisgeving worden gewijzigd.
Reparaties mogen uitsluitend worden uitgevoerd door een
gekwalificeerde onderhoudstechnicus.
Afgegeven vermogen
CM1929
Netspanning
CM1629
3200 W
3000 W
2600 W
1850 W
(IEC-705)
1600W
(IEC-705)
1300W
(IEC-705)
Operating frequency
2450 MHz
Afmetingen (B x D x H)
Buitenmaten
Ovenruimte
Haal de stekker uit het stopcontact.
Neem contact op met het dichtstbijzijnde servicecentrum
CM1329
230 V ~ 50 Hz
Opgenomen vermogen
Microgolffunctie
Verwijder NOOIT de behuizing van de oven. Als de oven niet
goed werkt of u twijfelt over de conditie van het apparaat:
•
Model
464 x 368 x 557 mm
370 x 190 x 370 mm
Inhoud
26 litre
Gewicht
Netto
464
ong. 32 Kg
43
557
530
26
1000
368
NL
De magnetronoven opbergen of laten repareren
10
22
444
486
514
jtX`Y`hl|TWYZ[`iusUGGwGYZGGz SGt GXWSGYWW_GGXWa[XGht
Opmerking
NL
23
jtX`Y`hl|TWYZ[`iusUGGwGY[GGz SGt GXWSGYWW_GGXWa[XGht