1
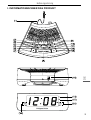
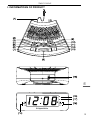
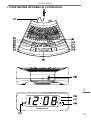
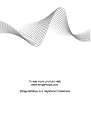
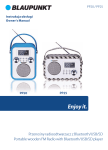
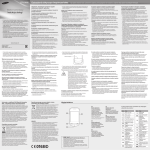
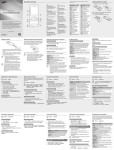
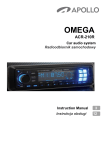
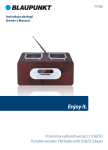
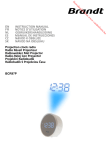
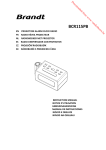
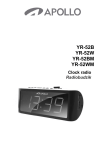
DIGITALE RADIO-UHR MIT ALARM
CYFROWY RADIOBUDZIK
RADIO CU ALARMA DIGITAL
DIGITÁLNY RÁDIOBUDÍK
KM0813
SK RO PL EN DE
DIGITAL RADIO ALARM
Bedienungsanleitung
DE
I. INFORMATIONEN ÜBER DAS PRODUKT
3
Bedienungsanleitung
DE
1.
2.
3.
4.
5.
6.
7.
8.
9.
10.
11.
12.
13.
14.
15.
16.
17.
18.
AUX-IN Kabel
Taste ALARM 2
Taste ALARM 1
Taste UHRZEIT
Taste EIN/AUS
Taste MODUS
Taste FREQUENZ ERHÖHEN
Taste DÖSEN/DIMMER
Taste STUNDE/VOLTaste MINUTE/VOL+
Taste SCHLAFEN
Taste STATIONSSPEICHER
Taste FREQUENZ VERRINGERN
ALARM 1 RADIO/SUMMER Anzeige
DC Kabelsteckplatz
FM Anzeige
AM Anzeige
ALARM 2 RADIO/SUMMER Anzeige
1. Anschluss an das Stromnetz:
Stecken Sie das Netzgerät in eine 220-240 AC, 50/60 Hz Steckdose
und das andere Kabelende in den DC Kabelsteckplatz (DC6V) an der
Rückseite des Gerätes.
Hinweis: Wenn Sie vorhaben, das Gerat für längere Zeit nicht zu
benutzen, ziehen Sie das Netzkabel aus der Steckdose und entfernen
Sie die Batterien.
2. Einlegen der Backup Batterien:
Bei Stromausfall, wird die Uhrzeit, Weckzeit und die gesamte
Speicher Einstellung beibehalten aufgrund der DC-Stromversorgung
von den Batterien 2 x AAA/ LR03 (Nicht im Lieferumfang).
1. Batteriefach an der Rückseite des Gerätes öffnen, indem Sie auf
den Verschluss drücken und die Abdeckung entfernen,
2. 2 x AAA/ LR03 Alkali-Batterien in das Batteriefach einlegen, unter
Beachtung der korrekten Polarität wie es auf dem Diagramm im
inneren des Batteriefachs angezeigt ist.
3. Abdeckung wieder einfügen.
4
Bedienungsanleitung
II. EINSTELLEN DER UHR- UND ALARMZEIT
1. Einstellen der Uhrzeit:
1. Im Uhrmodus, drucken und halten der Taste UHRZEIT.
2. Bei gedrückter Taste UHRZEIT drücken Sie die Taste STUNDE zum
einstellen der korrekten Stunde.
3. Danach, während die Taste UHRZEIT noch immer gedrückt ist,
drücken Sie die Taste MINUTE zum einstellen der korrekten Minute.
4. Taste UHRZEIT loslassen wenn die korrekte Uhrzeit im Display
angezeigt wird.
3. Benutzen der Alarmfunktion:
1. Um die Alarmfunktion zu aktivieren, benutzen Sie die Tasten
ALARM 1/2 zur Auswahl von Summer oder Radio. Der
ausgewählte Alarmmodus leuchtet auf.
2. An der eingestellten Zeit ertönt der Summer oder das Radio.
3. AUm den Alarm zu beenden, drücken Sie die Taste EIN/AUS.
Der Alarm ertönt erneut am nächsten Tag.
DE
2. Einstellen der Alarmzeit:
1. Im Uhrmodus, drücken und halten der Taste ALARM 1/2.
2. Bei gedrückter Taste ALARM 1/2 drücken Sie die Taste STUNDE
zum einstellen der korrekten Stunde.
3. Danach, während die Taste ALARM 1/2 noch immer gedrückt ist,
drücken Sie die Taste MINUTE zum einstellen der korrekten Minute.
4. Taste ALARM 1/2 loslassen wenn die korrekte Uhrzeit im Display
angezeigt wird.
Hinweis: Während die Summer-Alarmlautstärke festgelegt ist und
nicht geändert werden kann, kann die Radio-Alarmlautstärke auf den
gewünschten Pegel mit den Tasten LAUTSTÄRKE eingestellt werden.
4. Funktion Dösen:
Wenn der Alarm ertönt, drücken Sie die Taste DÖSEN. Die
Alarmmodus-Anzeige blinkt und der Alarm ertönt erneut nach 9
Minuten. Um die Funktion DÖSEN abzubrechen und den Alarm am
nächsten Tag zu wiederholen, drücken Sie die Taste EIN/AUS.
5
Bedienungsanleitung
5. Funktion Einschlafen:
Mit dieser Funktion, können Sie Radio bis zu 90 Minuten hören,
nachdem sich das Radio automatisch abschaltet.
Bei eingeschaltetem Radio, drücken Sie wiederholt die Taste
SCHLAFEN, zum einstellen der Dauer: 90, 60, 30 Minuten oder AUS.
1. Am Ende der eingestellten Zeitdauer schaltet sich das Radio
automatisch aus.
2. Um die Funktion SCHLAFEN, vor dem ende der eingestellten
Zeitdauer abzubrechen, drücken Sie die Taste EIN/AUS um das
Radio sofort auszuschalten.
DE
6. Dimmer Funktion:
Drücken Sie die Taste DIMMER zum Einstellen der LED
Displayhelligkeit.
7. Radiofunktion:
1. Drücken Sie die Taste EIN/AUS um das Radio einzuschalten und
danach die Taste MODUS zur Auswahl von FM oder AM Modus.
• Drücken und halten eine der Tasten FREQUENZ ERHÖHEN/
VERRINGERN, um die automatische Sendersuche aufwärts/
abwärts zu starten und die Taste loslassen.
• Das Radio wird automatisch anhalten, wenn es den ersten
verfügbaren Radiosender findet. Um nach einem anderen
Sender zu suchen, wiederholen Sie den Vorgang, bis der
gewünschte Sender erreicht ist.
• Zur manuellen Feinabstimmung, die Tasten kurz drücken,
um die Frequenz schrittweise zu verstellen.
2. Drücken Sie die Taste EIN/AUS um das Radio auszuschalten.
8. Für optimalen Empfang:
Im FM Modus, entfalten Sie die FM-Antenne zu ihrer vollen Länge
und verändern die Richtung, um das stärkste Signal zu erfassen.
Im AM Modus, drehen Sie das Gerät, bis der Empfang optimal ist.
6
Hinweis: Die aktuelle Uhrzeit wird immer angezeigt. Wenn Sie in
den Radio-Modus wechseln, wird die Frequenz 5 Sekunden lang
angezeigt, und dann wird das Gerät wieder auf die Zeitanzeige
umschalten.
Bedienungsanleitung
9. Radio Stationsspeicher:
Sie können bis zu 10 FM Sender und bis zu 10 AM Sender speichern:
1. Drücken eine der Tasten FREQUENZ ERHÖHEN/VERRINGERN,
um einen Sender zu suchen. Drücken und halten der Taste
STATIONSSPEICHER um den Sender zu speichern. Es blinkt
eine Speicher-Nummer, die dem Sender zugeordnet wird.
2. Drücken eine der Tasten FREQUENZ ERHÖHEN/VERRINGERN,
um die Nummer zu ändern.
3. Erneutes drücken der Taste STATIONSSPEICHER bestätigt die
Einstellung.
4. OWiederholen Sie die oberen Schritte um einen anderen Sender
zu speichern.
10. Anhören eines Stationsspeichers:
Im Radiomodus, drücken der Taste STATIONSSPEICHER um einen
Speicher auszuwählen.
III. TECHNISCHE DATEN:
• 1,2” blaues Display
• Speicherstationen
• Dual Alarm
• Funktion einschlafen und dösen
• Digitale Lautstärkekontrolle
• Aux-in (Noninterchangeable)
• AC Netzgerät 220-240 V, 50/60 Hz
• Verbrauch: 3 W
• Lautsprecher: 57 mm, 8 Ω, 0,4 W
• Frequenzbereich:FM 87,5 – 108 MHz
AM 522 – 1620 KHz
• Abmessungen: 58 (H) x 169 (B) x 120 (L) mm
DE
11. AUX-IN, anschließen eines externen Gerätes:
1. Verbinden Sie das Aux-in Kabel mit dem 3,5mm Buchse des
Musikgerätes, z.B. MP3 Player.
2. Drücken Sie die Taste EIN/AUS um das Radio einzuschalten und
drücken die Taste MODUS um den AUX.
3. Modus auszuwählen und mit dem Abspielen des Musikgerätes zu
beginnen.
7
Bedienungsanleitung
Die Spezifikationen können ohne Ankündigung geändert werden.
Hiermit erklär die Firma Lechpol dass sich das Gerät KM0813
im Einklang mit den grundlegenden Anforderungen und anderen
relevanten Bestimmungen der Richtlinie 1999/5/EG befindet.
Konformitätserklärung zum Download auf www.lechpol.eu.
DE
Deutsch
Korrekte Entsorgung dieses Produkts
(Elektromüll)
8
(Anzuwenden in den Ländern der Europäischen Union und anderen europäischen
Ländern mit einem separaten Sammelsystem)
Die Kennzeichnung auf dem Produkt bzw. auf der dazugehörigen Literatur
gibt an, dass es nach seiner Lebensdauer nicht zusammen mit dam normalen
Haushaltsmüll entsorgt werden darf. Entsorgen Sie dieses Gerät bitte getrennt
von anderen Abfällen, um der Umwelt bzw. der menschilchen Gesundheit nicht
durch unkontrollierte Müllbeseitigung zu schaden. Recyceln Sie das Gerät, um die
nachhaltige Wiederverwertung von stofflichen Ressourcen zu fördern.
Private Nutzer sollten den Händler, bei dem das Produkt gekauft wurde, oder die
zuständigen Behörden kontaktieren, um in Erfahrung zu bringen, wie sie das Gerät
auf umweltfreundliche Weise recyceln können.
Gewerbliche Nutzer sollten sich an Ihren Lieferanten wenden und die Bedingungen
des Verkaufsvertrags konsultieren. Dieses Produkt darf nicht zusammen mit anderem
Gewerbemüll entsorgt werden.
Vertrieben durch LECHPOL Electronics BV, Nijverheidsweg 15 4311RT Bruinisse,
Niederlande.
Owner’s manual
EN
I. INFORMATIONS OF PRODUCT
9
Owner’s manual
1.
2.
3.
4.
5.
6.
7.
8.
9.
10.
11.
12.
13.
14.
15.
16.
17.
18.
AUX-in cable
ALARM 2 button
ALARM 1 button
TIME button
POWER button
MODE button
TUNING UP button
SNOOZE/DIMMER button
HOUR/VOL- button
MIN/VOL+ button
SLEEP button
PRESET button
TUNING DOWN button
ALARM 1 RADIO/BUZZ indicator
AC cord socket
FM indicator
AM indicator
ALARM 2 RADIO/BUZZ indicator
1. Connecting to the power supply:
Insert the AC adapter into a 220-240 V, 50/60 Hz mains socket and
the other end of the cord into the AC cord socket (DC6V) placed on
the back of the unit..
EN
Note: Disconnect the radio from power supply if not in use for a longer
period of time.
10
2. Installing the back up batteries:
The clock time can be maintained during a power failure by 2 x AAA /
LR03 batteries (not supplied).
1. Open the battery compartment at the back of the unit by pressing
on the catch and removing the cover.
2. Insert 2 x AAA / LR03 alkaline batteries into the battery
compartment, accordingly to the polarity shown on the diagram
inside the compartment. Replace the battery compartment cover.
Owner’s manual
II. SETTING THE CLOCK AND ALARM
1. Setting the clock:
1. In clock mode, press and hold the TIME button down.
2. While holding down the TIME button, press the HOUR button to
advance to the correct hour.
3. Then, still holding down the TIME button, press the MIN button to
advance to the correct minute.
4. Release the TIME button when the correct time is shown on the display.
2. Setting the alarm:
1. In clock mode, press and hold the ALARM 1/2 button down.
2. While holding down the ALARM 1/2 button, press the HOUR
button to advance to the correct hour.
3. Then, still holding down the ALARM 1/2 button, press the MIN
button to advance to the correct minute.
4. Release the ALARM 1/2 button when the correct time is shown
on the display.
Note: While the buzzer alarm volume is fixed and cannot be adjusted, the
radio alarm volume can be adjusted to your desired level using the VOL
buttons.
EN
3. Using the alarm function:
1. To enable the alarm function, use the ALARM 1/2 buttons to select
buzzer or radio. The selected alarm mode indicator will light up.
2. The buzzer or radio will come on at the set time.
3. To stop the alarm, press the POWER button. The alarm will sound
again the next day.
4. Snooze function:
When the alarm rings, press the SNOOZE button. The alarm mode
indicator will flash and the alarm will sound again after 9 minutes. To
cancel the SNOOZE function and repeat the alarm the next day, press
the POWER button.
5. Sleep function:
With this function, you can listen to the radio for up to 90 minutes, after
which it will turn off automatically.
11
Owner’s manual
1. When the unit is switched on, press the SLEEP button repeatedly
to select the duration: 90, 60, 30 minutes or OFF.
2. At the end of the set time, the radio turns off automatically.
3. To cancel the sleep function before the end of the set time, press
the POWER button to turn off the radio immediately.
6. Dimmer function:
Press the DIMMER button to select the brightness of the LED display.
7. Radio function:
1. Press the POWER button to turn on the radio and press MODE
button to select FM or AM mode.
2. Press and hold one of the TUNING buttons to start automatic
tuning up / down and release the button. The radio will automatically
stop when it finds first available radio station. To scan for other stations,
repeat the process, till desired station has been reached. For manual
fine-tuning, press it briefly to adjust the frequency step by step.
3. Press the POWER button to turn off the radio.
8. For optimum reception:
In FM mode, extend and position the FM antenna to achieve optimum
reception.In AM mode, orientate the unit to achieve optimum reception.
EN
Note: The current time is always displayed. When you change to
Radio mode, the frequency will be displayed for 5 seconds and then
the unit will go back to displaying the time.
12
9. Radio preset function:
You can store up to 10 FM stations and up to 10 AM stations.
1. Use the TUNING buttons to search for a station. Press and
hold the PRESET button to store the station and a number to be
assigned for the preset will flash.
2. Press the TUNING buttons to change the number.
3. Press the PRESET button again to confirm the setting.
4. Repeat above steps to store other stations.
10. Listening to a preset station:
While listening to the radio, press the PRESET button to select a
preset station.
Owner’s manual
11. AUX-IN, connecting with external devices:
1. Connect the Aux-in cable to the 3.5mm jack of the music device
e.g. MP3 player.
2. Press the POWER button to turn on the radio and press MODE
button to select AU mode and start playing the music device.
III. TECHNICAL SPECIFICATIONS:
• 1,2” Blue LED Display
• Preset Stations memory
• Dual Alarm
• Sleep & Snooze Function
• Digital Volume Control
• Aux-in (line in cable)
• AC Adaptor AC 220-240 V, 50/60 Hz
• Power consumption: 3 W
• Speaker: 57 mm, 8 Ω, 0,4 W
• Built-in AM and FM antenna
• Tuning range: FM 87.5 – 108 MHz
AM 522 – 1620 KHz
• Dimensions: 58 (H) x 169 (W) x 120 (D) mm
The Lechpol company declares that product KM0813 is consistent
with the essential requirements and other relevant provisions of
directive 1999/5/EC. The proper declaration for download from www.
lechpol.eu
EN
Specifications are subject to change without notice.
13
Bedienungsanleitung
DE
English
Correct Disposal of This Product
(Waste Electrical & Electronic Equipment)
(Applicable in the European Union and other European countries with separate
collection systems) This marking shown on the product or Its literature, indicates that
It should not be disposed with other household wastes at the end of its working life.
To prevent possible harm lo the environment or human health from uncontrolled
waste disposal, please separate this from other types of wastes and recycle it
responsibly to promote the sustainable reuse of material resources. Household
users should contact either the retailer where they purchased this product, or their
local government office, for details of where and how they can take this item for
environmentally safe recycling. Business users should contact their supplier and
check the terms and conditions of the purchase contract This product should not be
mixed with other commercial wastes for disposal.
Made in China for LECHPOL Zbigniew Leszek, Miętne, 1 Garwolińska Street,
08-400 Garwolin.
14
Instrukcja obsługi
PL
I. PODSTAWOWE INFORMACJE O PRODUKCIE:
15
Instrukcja obsługi
1.
2.
3.
4.
5.
6.
7.
8.
9.
10.
11.
12.
13.
14.
15.
16.
17.
18.
Kabel AUX-in
ALARM 2
ALARM 1
TIME – ustawienia godziny
POWER – przycisk zasilania
MODE – zmiana trybu
TUNING UP – strojenie (wyższe częstotliwości)
SNOOZE/DIMMER – drzemka/kontroli jasności
HOUR/VOL- – godzina/zwiększenie głośności
MIN/VOL+ – minuta/zmniejszenie głośności
SLEEP – wyłącznik czasowy
PRESET – zapisane stacje radiowe
TUNING DOWN – strojenie (niższe częstotliwości)
ALARM 1 RADIO/BUZZ – budzenie radiem/dzwonkiem
AC cord socket – gniazdo przewodu zasilającego
FM – kontrolka FM
AM – kontrolka AM
ALARM 2 RADIO/BUZZ – budzenie radiem / dzwonkiem
1. Zasilanie sieciowe:
Aby podłączyć urządzenie do zasilania sieciowego, należy
podłączyć zasilacz (załączony w zestawie) do gniazda sieciowego
(220-240 V, 50/60 Hz) oraz do gniazda przewodu zasilającego
(DC6V), znajdującego się z tyłu urządzenia.
PL
Uwaga: Urządzenie należy odłączyć od źródła zasilania jeśli nie jest
używane przez dłuższy czas.
16
2. Zasilanie awaryjne:
Aby zachować ustawienia zegara w przypadku przerwy w dostawie
prądu, należy umieścić w urządzeniu dwie baterie AAA / LR03.
Aby zainstalować baterie, należy:
1. Otworzyć klapkę gniazda baterii.
2. Umieścić w środku dwie baterie AAA / LR03 zgodnie ze wskazaną
polaryzacją.
3. Zamknąć klapkę gniazda baterii.
Instrukcja obsługi
II. USTAWIENIA ZEGARA I BUDZIKA
1. Ustawienia zegara:
1. W trybie zegara, należy nacisnąć i przytrzymać przycisk TIME.
2. Przy wciśniętym przycisku TIME, należy kilkukrotnie nacisnąć
przycisk HOUR aż na ekranie wyświetli się wybrana godzina.
3. Nie zwalniając przycisku TIME, należy kilkukrotnie nacisnąć
przycisk MIN aż do uzyskania wybranej wartości.
4. Po ustawieniu godziny, należy zwolnić przycisk TIME.
3. Włączanie budzika:
1. Aby włączyć budzik, należy nacisnąć przycisk ALARM 1/2.
Domyślnie, urządzenie ustawione jest na budzenie dzwonkiem.
Aby ustawić budzenie radiem, należy ponownie nacisnąć przycisk
ALARM 1/2. Na ekranie wyświetli się kontrolka wskazująca
wybraną opcję.
2. Budzik włączy się o wybranej godzinie, w wybranym trybie.
3. Aby zdezaktywować budzik, należy ponownie nacisnąć przycisk
ALARM 1/2 (a kontrolka alarmu przestanie świecić).
4. Aby wyłączyć budzik (po jego załączeniu), należy nacisnąć
przycisk POWER. Budzik ponownie włączy się następnego dnia.
PL
2. Ustawienia budzika:
1. W trybie zegara, należy nacisnąć i przytrzymać przycisk ALARM 1/2.
2. Przy wciśniętym przycisku ALARM 1/2, należy kilkukrotnie nacisnąć
przycisk HOUR aż na ekranie wyświetli się wybrana godzina.
3. Nie zwalniając przycisku ALARM 1/2, należy kilkukrotnie nacisnąć
przycisk MIN aż do uzyskania wybranej wartości.
4. Po wybraniu właściwej godziny, należy zwolnić przycisk ALARM 1/2.
Uwaga: Głośność dzwonka jest domyślna i nie można jej zmienić.
Głośność budzenia radiem jest regulowana i można ją dostosować za
pomocą przycisków VOL.
4. Opcja drzemki:
Aby skorzystać z funkcji drzemki, po załączeniu się budzika, należy
nacisnąć przycisk SNOOZE. Kontrolka danego alarmu zacznie migać,
a budzik zostanie odłożony na 9 minut. Po upływie tego czasu, budzik
17
Instrukcja obsługi
zadzwoni ponownie. Aby wyłączyć budzik, należy nacisnąć przycisk
POWER - budzik włączy się ponownie następnego dnia.
5. Sleep / Wyłącznik czasowy:
Funkcja daje możliwość ustawienia czasu po którym urządzenie
wyłączy się automatycznie.
Aby włączyć tę funkcję, należy:
1. Nacisnąć przycisk SLEEP. Ekran wyświetli pierwszy dostępny czas
wyłącznika: 90 min. Aby zmniejszyć ten czas, należy kilkukrotnie
nacisnąć przycisk SLEEP, aż do uzyskania pożądanego czasu.
Dostępne długości to 90, 60, 30 minut.
2. Po upływie wyznaczonego czasu, urządzenie wyłączy się
automatycznie.
3. Aby wyłączyć funkcję, należy nacisnąć przycisk POWER.
Urządzenie również się wyłączy.
PL
6. Kontrola jasności wyświetlacza:
Aby zmienić poziom jasności wyświetlacza, należy nacisnąć przycisk
DIMMER.
7. Funkcja radio:
1. Aby włączyć radio, należy nacisnąć przycisk POWER, a następnie
przycisk MODE aby wybrać tryb FM / AM.
2. Aby wyszukać stację:
• strojenie automatyczne: należy nacisnąć i przez chwilę
TUNING . Urządzenie
przytrzymać jeden z przycisków
zatrzyma się na pierwszej wyszukanej stacji. Aby wyszukać
kolejne stacje, należy powtarzać proces, aż do wyszukania
pożądanej stacji.
• strojenie ręczne: należy kilkakrotnie nacisnąć jeden z przycisków
TUNING , aż do uzyskania właściwej częstotliwości.
3. Aby wyłączyć urządzenie, należy nacisnąć przycisk POWER.
8. Jakość odbioru:
Aby uzyskać najlepszą możliwą jakość odbioru, należy:
• W trybie FM, rozciągnąć i umiejscowić antenę w dogodnej pozycji.
• W trybie AM, ustawić urządzenie w odpowiedniej pozycji
18
Instrukcja obsługi
Uwaga: Na ekranie urządzenia wyświetlana jest godzina. Przy
zmianie trybu radia, ekran przez 5 sekund będzie wyświetlał odbieraną
częstotliwość, a następnie powtórnie czas.
9. Zapis ulubionych stacji:
Urządzenie pozwala na zapis 20 ulubionych stacji radiowych
(10 FM i 10 AM). Aby zapisać stację, należy:
1. Wyszukać stację za pomocą przycisków TUNING .
2. Nacisnąć i przytrzymać przycisk PRESET w celu zapisania
wybranej częstotliwości.
3. Na ekranie wyświetli się numer zapisu. Za pomocą przycisków
TUNING , należy wybrać numer.
4. Oraz ponownie nacisnąć przycisk PRESET aby zatwierdzić.
5. Należy powtórzyć powyższe kroki w celu zapisania kolejnych stacji.
10. Przejście do zapisanej stacji:
Przy włączonym radiu, należy kilkukrotnie nacisnąć przycisk PRESET
aż na ekranie wyświetli się numer pod którym zapisana została
żądana stacja.
III. SPECYFIKACJA TECHNICZNA:
Zakres częstotliwości:
FM 87.5 – 108 MHz
AM 522 – 1620 KHz
Antena AM / FM
• Wbudowany kabel Aux-in
• Zasilacz sieciowy 220-240 V, 50/60 Hz
• Pobór mocy: 3 W
• Głośnik: 57 mm, 8 Ω, 0.4 W
• Wbudowana antena AM i FM
• Wymiary: 58 (W) x 169 (S) x 120 (D) mm
PL
11. AUX-IN, odtwarzanie z urządzeń zewnętrznych:
1. Aby odtworzyć nagrania zapisane na urządzeniach zewnętrznych (np.
mp3), należy podłączyć kabel Aux-in do gniazda 3.5mm tego urządzenia.
2. Włączyć radio, i przyciskiem MODE wybrać tryb AU.
3. Włączyć odtwarzanie na urządzeniu zewnętrznym.
19
Instrukcja obsługi
Specyfikacja produktu może ulec zmianie bez powiadomienia.
Niniejszym firma Lechpol oświadcza, że urządzenie KM0813 jest
zgodne z zasadniczymi wymaganiami oraz innymi stosownymi
postanowieniami dyrektywy 1999/5/WE. Właściwa deklaracja do
pobrania na stronie www.lechpol.eu.
PL
Poland
Prawidłowe usuwanie produktu
(zużyty sprzęt elektryczny i elektroniczny)
20
Oznaczenie umieszczone na produkcie lub w odnoszących się do niego tekstach
wskazuje, że po upływie okresu użytkowania nie należy usuwać z innymi
odpadami pochodzącymi z gospodarstw domowych. Aby uniknąć szkodliwego
wpływu na środowisko naturalne i zdrowie ludzi wskutek niekontrolowanego
usuwania odpadów, prosimy o oddzielenie produktu od innego typu odpadów
oraz odpowiedzialny recykling w celu promowania ponownego użycia zasobów
materialnych jako stałej praktyki. W celu uzyskania informacji na temat miejsca
i sposobu bezpiecznego dla środowiska recyklingu tego produktu użytkownicy
w gospodarstwach domowych powinni skontaktować się z punktem sprzedaży
detalicznej, w którym dokonali zakupu produkt, lub z organem władz lokalnych
Użytkownicy w firmach powinni skontaktować się ze swoim dostawcą i sprawdzić
warunki umowy zakupu. Produkt nie należy usuwać razem z innymi odpadami
komercyjnymi.
Wyprodukowano w CHRL dla LECHPOL Zbigniew Leszek, Miętne ul. Garwolińska 1,
08-400 Garwolin.
Návod na obsluhu
SK
I. INFORMÁCIE O PRODUKTE:
21
Návod na obsluhu
1.
2.
3.
4.
5.
6.
7.
8.
9.
10.
11.
12.
13.
14.
15.
16.
17.
18.
19.
AUX - vstup kábel
ALARM 2 tlačidlo
ALARM 1 tlačidlo
ČAS tlačidlo
VYP/ZAP tlačidlo
REŽIM tlačidlo
LADENIE HORE tlačidlo
Režim spánok / STMIEVAČ tlačidlo
Hodiny / Hlasitosť DOLE tlačidlo
MINÚTY / HLASITOSŤ HORE tlačidlo
SPÁNOK tlačidlo
FUNKCIE tlačidlo
LADENIE DOLE tlačidlo
PM indikátor
ALARM 1 RÁDIO / TÓN indikátor
Konektor napájania
FM indikátor
AM indikátor
ALARM 2 RÁDIO / TÓN indikátor
1. Pripojenie napájania:
Pripojte napájací adaptér do elektrickej zásuvky 220-240 V, 50/60 Hz
a druhý koniec adaptéra pripojte do konektora napájania (DC 6V) na
zadnej strane zariadenia.
SK
Poznámka: Odpojte zariadenie z elektrickej siete ak sa dlhodobo
nepoužíva.
22
2. Vloženie záložných batérií:
V prípade výpadku elektrickej energie, nastavenie času môže byť
udržiavané pomocou batérií 2 x AAA/ LR03 (nie sú v balení).
1. Otvorte kryt pre batérie na zadnej strane zariadenia
2. Vložte 2 x AAA/ LR03 alkalické batérie, dbajte na správnu polaritu
ktorá je vyznačená na mieste vkladania batérií.
3. Zatvorte kryt pre batérie.
Návod na obsluhu
II. NASTAVENIE HODÍN A ALARMU
1. Nastavenie hodín:
1. V režime hodiny podržte tlačidlo TIME.
2. Počas držania tlačidla TIME, stláčajte tlačidlo HOUR pre
požadované nastavenie hodiny.
3. Potom, počas držania tlačidla TIME, stláčajte tlačidlo MIN pre
požadované nastavenie minúty.
4. Pusťte tlačidlo TIME, ak sa zobrazuje správne nastavený čas.
2. Nastavenie alarmu ( budenie ):
1. V režime hodiny podržte tlačidlo ALARM 1, alebo 2.
2. Počas držania tlačidla ALARM 1/2, stláčajte tlačidlo HOUR pre
požadované nastavenie hodiny budenia.
3. Potom, počas držania tlačidla ALARM 1/2, stláčajte tlačidlo MIN
pre požadované nastavenie minúty budenia.
4. Pusťte tlačidlo ALARM 1/2 ak sa zobrazuje požadovaný čas
budenia.
3. Používanie funkcie alarm ( budenie ):
1. Na spustenie tejto funkcie stlačte tlačidlo ALARM 1/2 a vyberte
druh budenia (pípanie alebo rádio). Vybraný druh budenia bude
zobrazený rozsvieteným indikátorom na displeji.
2. Pípanie alebo rádio sa spustí podľa nastaveného času.
3. Pre vypnutie alarmu stlačte tlačidlo POWER. Alarm sa opäť spustí
na ďalší deň v taký istý čas.
4. Odloženie budenia / funkcia spánok:
Ak je spustený alarm, stlačte tlačidlo SNOOZE. Indikátor alarmu bude
blikať a alarm sa opäť spustí až po
9 minútach. Pre vypnutie tejto funkcie a opätovné budenie až v
nasledujúci deň stlačte tlačidlo POWER.
SK
Poznámka: Aj keď má toto zariadenie pevne nastavenú hlasitosť
budenia, pri budení rádiom je možné nastaviť požadovanú hlasitosť
pomocou tlačidiel VOL +/- .
23
Návod na obsluhu
5. Funkcia spánok:
Pomocou tejto funkcie môžete počúvať rádio až 90 min., potom sa
rádio automaticky vypne.
1. Ak je rádio spustené, pomocou opakovaného stláčania tlačidla
SLEEP vyberte požadovaný čas kedy sa má rádio automaticky
vypnúť: 90, 60, 30 min.
2. Ak prejde nastavený čas rádio sa automaticky vypne.
3. Pre vypnutie tejto funkcie stlačte tlačidlo POWER a rádio sa ihneď vypne.
6. Funkcia stmievania:
Stlačte tlačidlo DIMMER pre nastavenie intenzity svietenia LED displeja.
7. Funkcia rádio:
1. Stlačte tlačidlo POWER pre spustenie rádia, stlačte tlačidlo MODE
pre výber režimu FM alebo AM.
2. Podržte tlačidlo TUNING alebo TUNING pre automatické
spustenie vyhľadávania staníc. Vyhľadávanie sa automaticky
zastaví ak bude nájdená prvá rádiostanica. Na vyhľadanie
ďalšej stanice zopakujte rovnaký postup. Ak chcete zadať
frekvenciu stanice manuálne, stláčajte tlačidlá TUNING alebo
TUNING kým nedosiahnete požadovanú frekvenciu.
3. Stlačte tlačidlo POWER pre vypnutie rádia.
8. Pre optimálny príjem:
Roztiahnite anténu a umiestnite ju tak, aby ste dosiahli čo najlepší
príjem.
Ak je príjem slabý, pokúste sa umiestniť zariadenie na iné miesto s
lepším dosahom signálu.
SK
Poznámka: aktuálny čas je zobrazený vždy. Po prepnutí do režimu
Rádio, sa na 5 sekúnd zobrazí frekvencia a potom prístroj opäť
zobrazí čas.
24
9. Ukladanie rádiostaníc do pamäte:
Môžete uložiť 10 AM a 10 FM rádiostaníc do pamäte zariadenia.
1. Použite tlačidlá
TUNING
pre vyhľadanie stanice. Podržte
tlačidlo PRESET pre uloženie stanice, číslo miesta uloženia začne
blikať.
Návod na obsluhu
2. Pomocou tlačidiel TUNING zmeňte číslo uloženia.
3. Stlačte tlačidlo PRESET pre potvrdenie uloženia.
4. Zopakujte tento postup pri ukladaní ďalších staníc.
10. Počúvanie uloženej stanice:
Ak máte spustené rádio stlačte tlačidlo PRESET pre výber uloženej stanice.
11. AUX-IN, pripojenie externého zariadenia:
1. Pripojte Aux-in kábel do zariadenia s výstupom Jack 3,5 mm napr.
MP3 prehrávač, mobilný telefón atď.W
2. Stlačte tlačidlo POWER pre spustenie zariadenia a následne
stlačte tlačidlo MODE pre výber AU módu, spustí sa prenos zvuku
z Vášho externého zariadenia.
III. TECHNICKÉ PARAMETRE:
• 1,2” modrý LED displej
• Pamäť obľúbených rádiostaníc
• Dvojité budenie
• Časovač vypnutia / režim spánok
• Digitálna regulácia hlasitosti
• Vstup AUX
• Sieťový adaptér 220-240 V, 50/60 Hz
• Spotreba energie: 3W
• Reproduktor: 57 mm, 8 Ω, 0.4 W
• Zabudovaná anténa AM / FM
• Rozsah frekvencie rádiostaníc: FM 87.5 – 108 MHz
AM 522 – 1620 KHz
• Rozmery: 58 (V) x 169 (Š) x 120 (D) mm
Firma Lechpol tímto prohlašuje, že zařízení KM0813 odpovídá
podstatným požadavkům a ostatním příslušným ustanovením směrnice 1999/5/ES. Příslušné prohlášení je přístupné ke stažení na
stránkách www.lechpol.eu
SK
Specifikace výrobku se může změnit bez uvědomění.
25
Návod na obsluhu
SK
Slovensko
Správna likvidácia tohto produktu
(O odpade z elektronických zariadení a ich príslušenstva)
Platí v Európskej únii a v ostatných európskych krajinách so systémom triedeného
odpadu) Toto označenie na výrobku alebo v dokumentácii znamená, že by nemal byť
likvidovaný s inými domácimi zariadeniami po skončení svojho funkčného obdobia.
Aby sa zabránilo možnému znečisteniu životného prostredia alebo poškodeniu
ľudského zdravia nekontrolovanou likvidáciou odpadu, oddeľte ich prosíme od
ďalších typov odpadov a recyklujte ich zodpovedne a podporte opätovné využitie
materiálnych zdrojov. Domáci spotrebitelia by sa mali informovať u predajcu kde
tento výrobok zakúpili ako ho správne recyklovať alebo kde by ho mohli odovzdať k
recyklácii. Priemyselní používatelia by mali kontaktovať svojho dodávateľa a preveriť
podmienky kúpnej zmluvy. Tento výrobok by sa nemal miešať s inými komerčnými
produktmi, určenými na likvidáciu.
Vyrobené v Číne pre LECHPOL Zbigniew Leszek, Miętne, ul. Garwolińska 1,
08-400 Garwolin.
26