1
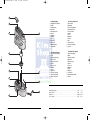
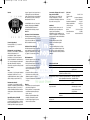
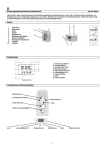
BDA_Ultrasonic.qxd
7.7.2005
17:14 Uhr
Seite UG1
SOLIS Ultrasonic
Typ/Type/Tipo/Type 715
Bedienungsanleitung
Mode d’emploi
Modo d’uso
User’s manual
BDA_Ultrasonic.qxd
7.7.2005
17:14 Uhr
Seite UG2
1
3
4
2
12
13
8
5
6
1.
2.
3.
4.
5.
6.
7.
8.
9.
10.
11.
12.
13.
Gerätebeschreibung
Dampfaustritt Düse (drehbar)
Traggriff
Verneblerkammer
Wassertank
Wasserstands-Sensor
Reservoir
Netzleitung
Membrane
Pinsel
Bodenschale
Bedien-Panel
Entkalkungspatrone
Drehverschluss
1.
2.
3.
4.
5.
6.
7.
8.
9.
10.
11.
12.
13.
Descrizione dell'apparecchio
Ugello (rotante)
Impugnatura
Camera del nebulizzatore
Recipiente dell'acqua
Sensore del livello
Serbatoio
Spina
Membrana
Pennello
Base
Pannello comandi
Cartuccia decalcificante
Coperchio
1.
2.
3.
4.
5.
6.
7.
8.
9.
10.
11.
12.
13.
Description de l'appareil
Bouche de diffusion (rotative)
Poignée
Chambre de vaporisation
Réservoir d'eau
Palpeur de niveau d'eau
Réservoir
Prise au secteur
Membrane
Pinceau
Bac de fond
Tableau de commande
Cartouche décalcifiante
Couvercle du réservoir
1.
2.
3.
4.
5.
6.
7.
8.
9.
10.
11.
12.
13.
Description of the appliance
Vapour outlet (rotating)
Handle
Evaporation chamber
Water tank
Water-level sensor
Reservoir
Power cord
Membrane
Brush
Main body
Control panel
Demineralization cartridge
Turn lock
9
10
7
11
2
Bedienungsanleitung . . . . . . . . . . . . . . . . . . . . . . . . . . . . . . . . . . . . . . . . . . . . . . . . . . Seite
4– 7
Mode d'emploi . . . . . . . . . . . . . . . . . . . . . . . . . . . . . . . . . . . . . . . . . . . . . . . . . . . . . . Page
8–11
Modo d'uso . . . . . . . . . . . . . . . . . . . . . . . . . . . . . . . . . . . . . . . . . . . . . . . . . . . . . . . . . Pagina 12–15
User's manual . . . . . . . . . . . . . . . . . . . . . . . . . . . . . . . . . . . . . . . . . . . . . . . . . . . . . . . Page 16–19
3
BDA_Ultrasonic.qxd
7.7.2005
17:14 Uhr
Seite 4
Liebe Kundin/Lieber Kunde
Herzlichen Glückwunsch, dass Sie sich für den
SOLIS Ultrasonic Vernebler entschieden haben.
Das körperliche Wohlbefinden von Mensch und
Tier hängt von vielen Einflüssen ab. Einer davon
ist die richtig befeuchtete Raumluft. Während der
Heizperiode wird die kalte und trockene Aussenluft, die durch Fenster in die Wohnräume einströmt, erwärmt. Dies hat ein massives Absinken
der relativen Luftfeuchtigkeit zur Folge. Für
Mensch, Tier und Pflanzen ein ungünstiges Klima.
Man fühlt sich unwohl und wird in verstärktem
Masse anfällig auf Erkältungskrankheiten.
Luftbefeuchtung nach dem UltraschallPrinzip:
Bei dieser sehr wirkungsvollen Technologie in
der Luftbefeuchtung wird das Wasser mit Hochfrequenzschwingungen in mikrofeinen Nebel
umgewandelt, der dann durch ein Gebläse an die
Raumluft abgegeben wird, wo er sofort verdunstet.
Ultraschall-Luftbefeuchter brauchen wenig Strom.
Eine auswechselbare Entkalkerpatrone sorgt für
hygienisch reinen Wassernebel ohne Kalk- und
Mineralienrückstände. Ultraschall-Luftbefeuchter
haben einen eingebauten Hygrostaten und einen
zusätzlichen Leistungsregler.
Allgemeines:
Angenehm ist das Raumklima in der Regel dann,
wenn die relative Luftfeuchtigkeit zwischen 40–
60 % beträgt. Ihr Luftbefeuchter kontrolliert
die von Ihnen gewünschte und eingestellte Luftfeuchtigkeit automatisch. Ist es zu trocken,
schaltet er automatisch ein.
Ist die gewünschte Luftfeuchtigkeit erreicht,
schaltet er automatisch aus.
Sicherheitshinweise:
• Gebrauchsanweisung vor der Inbetriebnahme
vollständig durchlesen und zum späteren
Nachschlagen gut aufbewahren.
4
• Das Gerät nur an Wechselstrom anschliessen –
mit Spannung gemäss dem Typenschild am
Gerät.
• Den Luftbefeuchter nur in Wohnräumen und
innerhalb der spezifizierten technischen Daten
verwenden. Ein nicht bestimmungsgemässer
Gebrauch kann Gesundheit und Leben
gefährden.
• Kinder können die Gefahren beim Umgang mit
Elektrogeräten nicht erkennen. Deshalb Kinder
immer beaufsichtigen, wenn sie sich in der
Umgebung des Luftbefeuchters aufhalten.
• Personen, die mit der Gebrauchsanweisung
nicht vertraut sind, sowie Kinder und Personen
unter Medikamenten-, Alkohol- oder Drogeneinfluss, dürfen das Gerät nicht oder nur unter
Aufsicht bedienen.
• Den Luftbefeuchter nie in Betrieb nehmen,
wenn ein Kabel oder Stecker beschädigt ist,
nach Fehlfunktionen des Gerätes, wenn dieses
herunter gefallen ist oder auf eine andere Art
beschädigt wurde.
• Der Luftbefeuchter darf nur in komplett zusammengebautem Zustand in Betrieb genommen
werden.
• Reparaturen an Elektrogeräten dürfen nur von
Fachkräften durchgeführt werden. Durch unsachgemässe Reparaturen können erhebliche
Gefahren für den Benutzer entstehen.
• Der Netzstecker ist bei jedem Füllen/Entleeren
des Wassertanks, vor jeder Reinigung, vor jeder
Montage/Demontage einzelner Teile, vor jeder
Umplatzierung aus der Steckdose zu ziehen.
• Niemals den Netzstecker am Kabel oder mit
nassen Händen aus der Steckdose ziehen.
• Den Luftbefeuchter nur auf eine ebene,
trockene Fläche stellen.
• Gerät nicht direkt auf den Boden oder neben
eine Heizung stellen.
• Keinesfalls Wasser durch die Düsenöffnung
einfüllen.
• Dem Wasser niemals Zusätze (z.B. Duftstoffe,
ätherische Öle, Wasserfrischhaltemittel, etc.)
beigeben.
• Bodenschale nie in Wasser oder andere
Flüssigkeiten tauchen.
Inbetriebnahme:
• Der beste Standort für Ihren Luftbefeuchter ist:
– Einen etwas erhöhten Standort,
ca. 30–50 cm ab Boden.
• Des weiteren ist zu beachten:
– Gerät nicht direkt auf den Boden oder neben
eine Heizung stellen
– Die Düse soll nicht direkt auf Pflanzen oder
Gegenstände gerichtet sein
• Vergewissern Sie sich, dass sich keine fremden
Gegenstände im Wassertank befinden.
• Füllen Sie den Wassertank mit sauberem,
kaltem Leitungswasser (Wasser nicht wärmer
als 40°C) und drehen Sie den Drehverschluss
gut zu. Dem Wasser keine zusätzlichen Reinhaltemittel beigeben.
• Die Entkalkungspatrone vor Gebrauch ein paar
Stunden in Wasser einlegen.
• Die Entkalkungspatrone sollten Sie alle 2–3
Monate wechseln.
• Stellen Sie den Wassertank auf die Bodenschale und setzen Sie die Düse ein.
• Schliessen Sie das Netzkabel am Netz an und
schalten Sie das Gerät mit der O/I-Taste ein.
• Etwa 10–15 Minuten nachdem Sie das Gerät
eingeschaltet haben, erreicht das Gerät seine
volle Leistung.
Austausch Entkalkungspatrone:
Drehen Sie den Tank um und öffnen Sie den
Drehverschluss. Die Entkalkungspatrone befindet
sich auf der Innenseite des Drehverschlusses.
Schrauben Sie die Entkalkungspatrone im
Gegenuhrzeigersinn vom Deckel und ersetzen Sie
diese durch eine neue Patrone.
Achtung:
• Der Wassertank ist mit einer Entkalkungspatrone ausgerüstet. Diese Entkalkungspatrone
muss alle 2–3 Monate ersetzt werden.
• Bei hartem Wasser kann ein Wechsel der
Patrone bereits früher nötig sein.
• Bei einer Wasserhärte von über 25 fH
empfehlen wir den Einsatz des Ultrasonic
Verneblers nicht!
• Weisser Staub rund um das Gerät ist ein
sicheres Zeichen, dass die Entkalkungspatrone
verbraucht ist.
• Bildet sich trotz neuer Patrone weisser Niederschlag um das Gerät, so prüfen Sie bitte, ob
das verwendete Wasser wirklich unbehandelt
ist. (ohne Zusätze)
• Fliesst das Wasser vor der Verwendung im Luftbefeuchter durch eine Hausentkalkungsanlage,
so wird sich Salz rund um das Gerät niederschlagen.
5
BDA_Ultrasonic.qxd
7.7.2005
17:14 Uhr
Seite 6
Bedienung
Gerät Ein-/Ausschalten
Drücken Sie die O/I-Taste ( 1 ) um den Vernebler
ein- resp. auszuschalten
Betrieb mit Vorheizung
Mit der Taste ( 2 ) wird die Vorheizung ein – bezw.
ausgeschaltet. Bei eingeschalteter Vorheizung
wird das Wasser vor dem Eintreten in den
Verneblerraum auf ca. 80°C vorgeheizt. Der Nebel
tritt jetzt mit angenehmen 40°C aus. Dies hat den
Vorteil, dass die Raumtemperatur nicht absinkt
und sich ausserdem die Wasserreinhaltung
entscheidend verbessert (Bakterien werden
abgetötet).
Timer
Über den eingebauten Timer ( 3 ) kann die
Einschaltdauer zwischen 1 und 9 Stunden resp.
auf Dauerbetrieb eingestellt werden (Das Symbol
( E ) erscheint auf dem Display)
Automatischer Betrieb
Mit der Automatik-Taste ( 4 ) kann der
Automatikbetrieb aktiviert werden. Wenn der
Automatikbetrieb aktiviert ist, wird die ideale
Luftfeuchtigkeit in Relation zur Raumtemperatur
und der gewählten Verneblerstufe
aufrechterhalten. Das Symbol ( D ) mit «Auto»
erscheint auf dem Display.
Hygrostat/Feuchtigkeit einstellen
Mit der Hygrostat-Taste ( 5 ) wird die gewünschte
Luftfeuchtigkeit eingestellt. Empfehlenswert ist
eine relative Luftfeuchtigkeit zwischen 40–60 %.
Überschreitet die Feuchtigkeit die gewünschte
Einstellung, schaltet das Gerät automatisch ab.
Das Gerät schaltet nicht ab, wenn die Funktion auf
Dauerbetrieb eingestellt ist.
Während der Wahl der gewünschten relativen
Luftfeuchtigkeit wird dieser auf dem Display
angezeigt. Nach einigen Sekunden zeigt das
Display den aktuellen Wert an.
Symbol B auf dem Display bedeutet, dass die
gewählte Luftfeuchtigkeit noch nicht erreicht ist.
Symbol C auf dem Display bedeutet, dass die
gewählte Luftfeuchtigkeit erreicht ist.
Achtung:
• Achten Sie darauf, dass kein Wasser in den
Geräteunterteil gelangt.
• Reinigen Sie die Innenteile mit einem weichen
Tuch und verwenden Sie auf keinen Fall Benzin,
Fensterputzmittel und Lösungsmittel.
• Benützen Sie zur wöchentlichen Reinigung der
Membrane ausschliesslich den Pinsel.
• Wechseln Sie das Wasser im Wassertank
mindestens 1x pro Woche.
Lagerung bei längerem Nichtgebrauch
Gerät wie beschrieben reinigen, vollständig austrocknen lassen und vorzugsweise in der
Originalverpackung an einem trockenen, nicht zu
heissen Ort aufbewahren.
Verneblerstufen
Durch wiederholtes Drücken der Verneblertaste
( 6 ), können verschiedene Verneblerstufen
eingestellt werden. Wenn der Pfeil ( F ) auf dem
Display vollständig angezeigt wird, haben Sie
die höchste Stufe gewählt.
Wasserstandsanzeige
Der Wasservorrat ist durch den transparenten
Wassertank leicht zu erkennen. Zusätzlich
erscheint bei leerem Wassertank auf dem Display
ein Symbol ( G ) und fordert Sie auf Wasser
nachzufüllen.
Reinigung/Wartung
• Schalten Sie das Gerät aus und ziehen Sie den
Netzstecker aus der Steckdose, bevor Sie das
Gerät reinigen.
• Reinigen Sie den Wassertank und das Reservoir
regelmässig 1x pro Woche (nur mit Wasser,
ohne Spülmittel). Bei Betrieb mit Vorheizung alle
2 Wochen.
• Bitte entkalken Sie die Membrane regelmässig
mit handelsüblichem Entkalkungsmittel.
Spülen Sie das Entkalkungsmittel mit viel
Wasser gut aus.
Störungen beheben
Problem
Gerät funktioniert nicht
Kein Nebelausstoss
Zu geringer Nebelausstoss
Weisser Niederschlag
rund um das Gerät
6
Entsorgen
Ausgediente Geräte müssen unbrauchbar gemacht
werden. Ziehen Sie den Stecker aus der
Steckdose und trennen Sie das Netzkabel vom
Gerät. Übergeben Sie den ausgedienten
Luftbefeuchter Ihrem Händler zur fachgerechten
Entsorgung.
Weitere Entsorgungsmöglichkeiten erfahren Sie
von Ihrer Gemeinde oder Stadtverwaltung.
Elektrogeräte gehören nicht in den Hausmüll. Die
Stiftung Entsorgung Schweiz (S.EN.S) sorgt für
eine umweltgerechte Entsorgung.
Technische Daten
Spannung:
Leistungsaufnahme:
45 Watt
120–130 Watt
Befeuchtungsleistung:
Geeignet für Räume bis
Wasserinhalt:
Gewicht leer:
Masse:
Betriebsgeräusch:
Zubehör:
Mögliche Ursache
Netzstecker nicht eingesteckt
Kein Wasser im Wassertank
(Leer-Anzeige leuchtet auf)
Luftfeuchtigkeitseinstellung ist
geringer als Raumluftfeuchtigkeit
Spülmittelrückstände
Wassertemperatur zu niedrig
Kalkablagerung auf der Membrane
Entkalkungspatrone verbraucht
230 Volt / 50 Hz
(ohne Vorheizung)
(mit Vorheizung)
400g/Std.
60m2/150m3
5,7 Liter
3,0 Kg
397 x 220 x 340 mm
< 25 dB(A)
Entkalkungspatrone
Was tun
Netzstecker an Steckdose
anschliessen
Wasser nachfüllen
Luftfeuchtigkeitseinstellung
erhöhen
Gerät mit klarem Wasser reinigen
Nebelausstoss auf Stufe Maximum
stellen, nach10 Min.
arbeitet Gerät wieder einwandfrei
Membrane reinigen
Entkalkungspatrone wechseln
7
BDA_Ultrasonic.qxd
7.7.2005
17:14 Uhr
Seite 8
Chère cliente, Cher client,
Félicitations, avec le SOLIS Vaporisateur
Ultrasonic , vous avez choisi le bon produit!
Le bien-être corporel de l'être humain et des
animaux dépend de nombreuses influences
extérieures. L'une d'entre elles est l'air ambiant
qui doit être humidifié de manière équilibrée.
Durant la mauvaise saison, l'air froid et sec qui
s'infltre dans les pièces par la fenêtre est
artificiellement chauffé, ce qui provoque une
chute massive de l'humidité relative. Pour l'être
humain et pour l'animal domestique, mais aussi
pour les plantes, ce climat n'est pas favorable.
On se sent peu à l'aise et plus sensible aux
refroidissements.
Humidification de l'air grâce au principe
ultra son:
Par cette technologie d'humidification efficace,
l'eau est transformée par des oscillations à haute
fréquence en un nuage d'une extrême finesse qui
ensuite est nébulisé dans l'air ambiant par un
ventilateur.
Les humidificateurs ultra son consomment peux
d'électricité. Une cartouche anticalcaire
échangeable permet d'obtenir un nuage d'eau
hygiéniquement pur, déminéralisé et sans résidus
calcaires. Les humidificateurs ultra son sont
équipés d'un hygrostat et d'un régulateur de
puissance supplémentaire.
Remarques générales
Le climat ambiant est agréable quand l'humidité
relative de l'air est entre 40% et 60 %. Votre
humidificateur contrôle automatiquement
l'humidité désirée que vous avez prédéterminée.
Quand l'air est trop sec, il démarre
automatiquement. Quand le degré d'humidité
désiré est atteint, il s'arrête automatiquement.
8
Indications de sécurité
• Etudiez les instructions de service complètes
avant la mise en service, et gardez-les bien
pour des consultations ultérieures.
• Ne branchez l'appareil qu'au courant alternatif
– la tension doit correspondre à celle indiquée
sur la plaque signalétique de l'appareil.
• N'utilisez le vaporisateur que dans des locaux
d'habitation et dans les conditions précisées
dans les spécifications techniques.
• Une utilisation non-conforme aux spécifications
peut mettre en danger la santé et la vie.
• Les enfants ne peuvent pas encore connaître
les dangers résultant de la manipulation
d'appareils électriques. Ne laissez pas les
enfants sans surveillance lorsqu'ils sont à
proximité d'un vaporisateur.
• Les personnes qui ne sont pas familiarisées
avec le mode d'emploi, de même que les
enfants ou les personnes sous l'influence de
médicaments, d'alcool ou de drogues, ne
doivent en aucun cas manipuler l'appareil ci ce
n'est sous surveillance.
• Ne mettez jamais l'appareil en service quand
un câble ou une prise est détérioré, ni après
des malfonctionnements ou après une chute ou
autre dommage quelconque.
• Le vaporisateur ne doit être mis en service
qu'entièrement assemblé.
• Les réparations d'appareils électriques ne
doivent être executées que par des experts
autorisés. Des réparations non-professionnelles
peuvent causer des dangers considérables pour
l'utilisateur.
• La prise au secteur doit être débranchée lors
de chaque remplissage/vidage du réservoir
d'eau, avant chaque nettoyage, avant chaque
montage/démontage de pièces particulières et
avant chaque déplacement de l'appareil.
• Ne débranchez jamais la prise au secteur en
tirant sur le câble ou lorsque vos mains sont
mouillées.
• Ne posez le vaporisateur que sur une surface
sèche et plane.
• Ne posez pas l'appareil directement sur le sol
ni à côté du chauffage.
• Ne remplissez en aucun cas de l'eau par les
bouches de diffusion.
• N'ajoutez jamais des additifs à l'eau (comme
p. ex. matières aromatiques, huiles essentielles,
préservateurs, etc.).
• Ne plongez jamais le bac de fond dans de l'eau
ou d'autres liquides.
Mise en service
• Le meilleur emplacement de votre vaporisateur:
– Un emplacement légèrement surélevé, env.
30 à 50 cm du sol.
• Prêtez attention à ce que:
– Ne posez pas l'appareil directement sur le
sol ni à côté du chauffage.
– Veillez à ce que la bouche de diffusion ne
soit pas orientée en direction de plantes ou
d'objet.
• Assurez-vous, qu'aucun objet étranger ne se
trouve dans le réservoir d'eau.
• Remplissez le réservoir d'eau avec de l'eau
pure et froide (la température ne doit pas être
au-dessus de 40°C), et fermez bien le
couvercle du réservoir en le vissant. Ne rajoutez
pas de produit destiné à conserver à l'eau sa
pureté.
• Laissez tremper la cartouche décalcifiant
dans l'eau quelques heures avant de l'utiliser.
• La cartouche décalcifiant doit être remplacé
tous les 2 à 3 mois.
• Installez le réservoir d'eau à la partie inférieure
et posez la buse.
• Branchez le câble et démarrez l'appareil en
appuyant sur le bouton Marche/arrêt.
• Environ 10 à 15 minutes après la mise sous
tension, l'appareil atteint son plein régime de
fonctionnement.
• La formation d'un dépôt blanc autour de
l'appareil alors que la cartouche est neuve peut
signifier que votre eau est déjà traitée.
• Si l'eau de l'humidificateur est déjà adoucie par
une installation domestique, du sel se déposera
autour de l'appareil.
Remplacement de la cartouche décalcifiant
Faites pivoter le réservoir et dévissez le couvercle
du réservoir. La cartouche décalcifiant se trouve
sur la surface interne du couvercle du réservoir.
Enlevez la cartouche décalcifiant du couvercle en
la tournant dans le sens inverse des aiguilles
d'une montre, et remplacez-le par un nouveau
filtre.
Attention!
• Le réservoir d'eau est équipé d'une cartouche
décalcifiant. Cette cartouche doit être remplacé
tous les deux à trois mois.
• Si votre eau est très dure, vous risquez d'avoir
à remplacer plus tôt la cartouche.
• Pour une dureté d'eau supérieure à 25 fH, nous
ne recommandons pas l'utilisation du
vaporisateur Ultrasonic!
• La présence de poussière blanche autour de
l'appareil est un signe indubitable de l'usure de
la cartouche.
9
BDA_Ultrasonic.qxd
7.7.2005
17:14 Uhr
Seite 10
Emploi
Hygrostat/réglage de l'humidité
Pour régler en % le taux d'humidité souhaitée,
appuyez sur le bouton ( 5 ). Une humidité relative
de l'ordre de 40 à 60% est généralement
recommandée. Si l'humidité dépasse la valeur
réglée, l'appareil se met hors tension. L'appareil
ne se met pas hors tension si vous avez
sélectionné la fonction continue.
Lors de la sélection, la valeur précédente
s'affiche. Elle ne change automatiquement
qu'après quelques secondes pour prendre la
valeur courante.
Le symbole B s'affiche à l'écran lorsque
l'humidité sélectionnée n'est pas encore atteinte.
Marche/arrêt
Appuyez sur le bouton ( 1 ) pour mettre
l'humidificateur sous ou hors tension.
Avec préchauffage
Le bouton ( 2 ) met en service le préchauffage
ou le coupe. Lorsqu'il fonctionne, l'eau est
préchauffée à 80°C avant d'entrer dans la
chambre de vaporisation. Le brouillard sort à
l'agréable température de 40°C. Quel intérêt ?
La réponse est simple: vous ne faites pas baisser
la température ambiante et la teneur de l'air en
eau s'améliore de façon décisive (les bactéries
n'y survivent pas).
Minuterie
Le bouton ( 3 ) vous permet de déterminer la
durée de fonctionnement – entre 1 et 9 heures ou
fonctionnement permanent. Lorsque la minuterie
est en service, le symbole ( E ) s'affiche à l'écran.
Auto
Appuyez sur le bouton ( 4 ) pour activer le mode
automatique. Lorsque vous activez le
fonctionnement automatique (affichage du
symbole ( D ) avec «Auto» à l'écran), l'appareil
maintient l'humidité optimale de l'air en fonction
de la température. La régulation fonctionne à
partir du débit et de la valeur imposée.
Le symbole C s'affiche à l'écran lorsque
l'humidité sélectionnée est atteinte.
Attention
• Veillez à ce qu'il n'y ait pas d'eau dans le fond
de l'appareil.
• Nettoyez les parties intérieures avec un chiffon
doux et n'utilisez en aucun cas d'essence, des
produits pour nettoyer des vitres ou des
détergents.
• N'utilisez que le pinceau pour le nettoyage
hebdomadaire de la membrane.
• Changez l'eau du réservoir au moins une fois
par semaine.
Conservation en cas de non-utilisation
prolongée
Nettoyez l'appareil de la manière décrite plus
haut, séchez-le entièrement et conservez-le, de
préférence dans son emballage original, dans un
endroit sec et frais.
Réglage du débit de brouillard, puissance de
vaporisation
En appuyant plusieurs fois sur le bouton ( 6 ),
vous pouvez régler le débit de brouillard.
L'affichage de barres rouges ( F ) vous indique
que vous avez sélectionné la puissance de
vaporisation la plus élevée.
Affichage du niveau d'eau
Le niveau d'eau reste bien visible dans le
réservoir d'eau transparent. L'appareil vous
prévient de plus à l'écran ( G ) lorsqu'il manque
d'eau et que vous devez recharger.
Nettoyage/entretien
• Mettez l'appareil hors service et débranchez
la prise au secteur avant le nettoyage de
l'appareil.
• Nettoyez régulièrement le réservoir et le
réservoir amovible une fois par semaine (de
l'eau seulement, sans produit de vaisselle).
Une fois toutes les deux semaines en cas
d'utilisation du préchauffage.
• Détartrez régulièrement la membrane de
pulvérisation avec un détartrant usuel. Rincez
bien le produit détartrant avec beaucoup d'eau.
Que faire en cas de panne?
Problème
L'appareil ne fonctionne pas
Le témoin «vide» s'allume
Aucun débit de vapeur
Débit de vapeur trop faible
Précipitations blanches autour
de l'appareil
10
Evacuation
Retournez le vaporisateur usé à votre commerçant
pour une évacuation conforme aux règles.
Renseignez-vous sur d'autres possibilités
d'évacuation auprès de votre administration
municipale.
Spécifications techniques
Tension
230 Volt / 50 Hz
Puissance absorbée
45 W
(sans préchauffage)
120–130 W
(avec préchauffage)
Capacité d'humidification
400 g/heure
Approprié pour des locaux pouvant aller
jusqu'à
60m2/150m3
Volume de remplissage d'eau
5,7 litres
Poids (vide)
3,0 kg
Dimensions
397 x 220 x 340 mm
Bruit en service
< 25 dB(A)
Accessoires:
cartouche détartrante
Cause
La prise n'est pas branchée
Réservoir vide
L'humidité prédéterminée est
inférieure à l'humidité de l'air
ambiant
Résidus de produits de
nettoyage
Température de l'eau est trop
faible
Dépôts de calcaire sur la
membrane
Cartouche détartrante usée
Que faire
Branchez la prise
Remplissez le réservoir
Augmentez le degré d'humidité
Nettoyez l'appareil avec de l'eau
claire
Réglez le débit de vapeur au
maximum, au bout de 10 minutes,
l'appareil fonctionnera de nouveau
sans défaut
Nettoyez la membrane
Remplacez la cartouche
détartrante
11
BDA_Ultrasonic.qxd
7.7.2005
17:14 Uhr
Seite 12
Stimato Cliente
Complimenti per avere scelto il nebulizzatore
SOLIS Ultrasonic!
Il benessere delle persone e degli animali dipende
da molti fattori. Uno di essi è il giusto grado di
umidità nell'aria dei locali. Durante il periodo
invernale l'aira fredda e secca, che penetra nei
locali attraverso le finestre, viene scaldata. Ciò
comporta una forte riduzione dell'umidità relativa.
Un clima tutt'altro che ideale per persone, animale
e piante. Non ci si sente a proprio agio e aumenta
la predisposizione per i raffreddori e altre malattie.
L'umidità dell'aria secondo il principio
ultrasuono
Con quest'efficace tecnologia d'umidificazione,
l'acqua si trasforma in finissima nebbia tramite
vibrazioni ad alta frequenza. Questo vapore
fuoriesce da una soffieria e viene così consegnato
all'aria dell'ambiente, dove evapora
immediatamente.
Umidificatori ad ultrasuono hanno bisogno di poca
corrente. Una cartuccia intercambiabile garantisce
un vapore d'acqua igienicamente pulito – senza
residui di calcio e minerali. Umidificatori ad
ultrasuono hanno un idrostato all'interno e in più
un regolatore di potenza supplementare.
Note generali
In generale il clima ambientale è regolare quando
l'umidità relativa oscilla tra il 40 e il 60 %.
L'umidificatore controlla automaticamente
l'umidità dell'aria da Voi desiderata ed impostata.
Quando l'aria è troppo secca, l'umidificatore si
avvia automaticamente. Una volta che viene
raggiunto il livello desiderato di umidità dell'aria,
l'umidificatore si disinserisce automaticamente.
12
Avvertenze sulla sicurezza
• Si prega di leggere interamente le istruzioni per
l'uso prima della messa in funzione e di
conservarle accuratamente per future
consultazioni.
• Collegare l'apparecchio soltanto ad una presa
di corrente alternata – dopo essersi assicurati
che la tensione corrisponde a quella indicata
sulla targhetta dati dell'apparecchio.
• Utilizzare l'umidificatore soltanto in ambienti
abitati e nel rispetto dei dati tecnici specificati.
Un uso improprio può mettere a rischio la
salute e la vita.
• I bambini non sono in grado di conoscere i
rischi provocati dalla manipolazione di
apparecchi elettrici. Per questo motivo non si
devono mai perdere di vista i bambini quando
si trattengono in prossimità dell'umidificatore.
• Le persone che non sono a conoscenza delle
istruzioni per l'uso, come pure i bambini e le
persone sotto l'effetto di farmaci, alcol o droga,
non possono usare l'apparecchio, oppure
possono usarlo soltanto sotto vigilanza.
• Non mettere mai in funzione l'umidificatore
quando un cavo o una spina sono danneggiati,
dopo difetti di funzionamento dell'apparecchio,
oppure se l'apparecchio stesso è caduto o è
stato danneggiato in altro modo.
• L'umidificatore può essere messo in funzione
soltanto dopo essere stato completamente
assemblato.
• Le riparazioni di apparecchi elettrici debbono
essere eseguite soltanto da personale
specializzato. Se le riparazioni non vengono
eseguite a regola d'arte possono determinarsi
gravi rischi per l'utente.
• Occorre staccare la spina dalla presa dopo ogni
carica/vuotamento del recipiente dell'acqua,
prima di ogni pulizia, prima del montaggio/
smontaggio di singole parti, prima di ogni
spostamento.
• Non estrarre mai la spina dalla presa tirando il
cavo o afferrando la spina con le mani bagnate.
• Sistemare l'umidificatore soltanto su una
superficie piana ed asciutta. Non collocare
l'apparecchiatura direttamente sul pavimento o
nelle vicinanze di fonti di calore.
• Non caricare in nessun caso l'acqua attraverso
l'apertura dell'ugello.
• Non aggiungere mai additivi all'acqua (come,
per esempio, sostanze odoranti, oli eterei,
sostanze per mantenere l'acqua fresca, ecc.).
• Non immergere mai la base in acqua o in altri
liquidi.
Messa in funzione
• Il miglior luogo di installazione per il Vostro
umidificatore è:
– Una posizione elevata, ca. 30–50 cm da
terrra.
• Inoltre è da tener conto quanto segue:
– Non collocare l'apparecchiatura direttamente
sul pavimento o nelle vicinanze di fonti di
calore.
– L'ugello non deve mai essere orientato
direttamente su piante o oggetti.
• Accertatevi che non vi siano oggetti estranei
nel recipiente dell'acqua.
• Riempite il recipiente dell'acqua con acqua
corrente pulita e fredda (la temperatura
dell'acqua non deve superare i 40°C) e serrate
bene la chiusura del recipiente. Non aggiungere
sostanze antinquinanti all'acqua.
• Immergere la cartuccia nell'acqua per alcune
ore prima dell'uso.
• La cartuccia decalcisicante deve essere
sostituito ogni 2/3 mesi.
• Appoggiate il serbatoio sulla base inferiore ed
inserite l'ugello.
• Allacciate il cavo alla rete e collegate
l'apparecchio all pulsante Accensione/
Spegnimento.
• Trascorreranno circa 10–15 minuti dalla sua
accensione, prima che l'apparecchio raggiunga
il pieno rendimento.
• La polvere bianca intorno all'apparecchiatura
costituisce un'indicazione sicura del fatto che la
cartuccia sia consumata.
• Qualora, nonostante la nuova cartuccia, si formi
del sedimento bianco intorno all'apparecchiatura, controllare che l'acqua utilizzata sia
effettivamente non trattata.
• Qualora l'acqua, prima dell'uso, scorra
nell'umidificatore dell'aria attraverso un
impianto domestico di decalcificazione, del sale
si sedimenterà intorno all'apparecchiatura.
Sostituzione del filtro anticalcare
Capovolgete il serbatoio ed svitate il tappo. Il
filtro anticalcare si trova sul lato esterno del
coperchio del recipiente. Svitate il filtro anticalcare
dal coperchio, ruotando in senso antiorario, e
sostituitelo con un filtro nuovo.
Attenzione!
• Il recipiente dell'acqua è dotato di una
cartuccia decalcisicante.
• Questa cartuccia deve essere sostituito ogni
2–3 mesi. In presenza di acqua molto dura, può
essere necessario sostituire la cartuccia prima
del previsto.
• Si sconsiglia l'impiego del nebulizzatore Solis
Ultrasonic con acqua di durezza superiore a
25 fH!
13
BDA_Ultrasonic.qxd
7.7.2005
17:14 Uhr
Seite 14
Istruzioni
si spegne. L'apparecchio non si spegne invece se
è stata impostata l'opzione di funzionamento
continuo. Durante la selezione viene visualizzato il
valore nominale. Dopo alcuni secondi compare
automaticamente il valore reale.
Se l'umidità dell'aria scelta non è ancora stata
raggiunta, sul display appare il simbolo B.
Se l'umidità desiderata dell'aria invece è
stata raggiunta, allora sul display compare il
simbolo C.
Accensione/Spegnimento
Premendo il pulsante 0/I ( 1 ), si accende o si
spegne l'apparecchio.
Funzionamento con preriscaldamento
Il pulsante ( 2 ) serve ad attivare o disattivare la
funzione di preriscaldamento. Se il
preriscaldamento è attivato, l'acqua viene
preriscaldata a ca. 80°C prima di entrare nel
serbatoio di nebulizzazione. La nebbia fuoriesce a
40°C. Questo ha il vantaggio di non abbassare la
temperatura dell'ambiente e di migliorare
decisamente la composizione dell'acqua (i batteri
vengono eliminati).
Timer
Con il pulsante ( 3 ) si può impostare la durata del
funzionamento, regolabile da 1 a 9 ore o la
modalità di funzionamento continuo. (Con il timer
attivato, sul display compare il simbolo ( E )).
Funzionamento automatico
Con il pulsante ( 4 ) si può attivare la modalità
automatica. Con la funzione automatica attiva (sul
display compare il simbolo ( D ) con «auto»), si
mantiene un'umidità dell'aria ideale in relazione
alla temperatura e al livello della nebulizzazione
scelto.
Hygrostat/Regolazione dell'umidità
Premendo il pulsante ( 5 ) è possibile impostare la
percentuale di umidità desiderata. Si consiglia di
impostare l'umidità relativa tra il 40 e il 60%. Se
l'umidità supera il livello impostato, l'apparecchio
14
Regolazione del livello di nebulizzazione
Premendo ripetutamente il pulsante ( 6 ) si può
regolare il livello di nebulizzazione. Se sul display
compare la freccia, significa che è stato impostato
il livello di nebulizzazione massimo.
Indicazione del livello dell'acqua
Il serbatoio trasparente dell'acqua consente di
vedere chiaramente la quantità d'acqua presente.
L'apparecchio segnala inoltre anche sul display
( G ), quando è necessario rabboccare l'acqua.
Pulizia/manutenzione
• Disinserite l'apparecchio e staccate la spina
dalla presa prima di pulire l'apparecchio.
• Pulite regolarmente il recipiente dell'acqua e il
serbatoio una volta alla settimana (solo con
acqua, senza detersivo). Nel caso di funzionamento con preriscaldamento, solo ogni due
settimane.
• Si prega di decalcificare regolarmente
la membrana con decalcificatore del tipo
abitualmente reperibile in commercio.
Sciacquare abbondantemente il decalcificatore
con acqua.
Attenzione
• Fate attenzione che non penetri acqua nella
parte inferiore dell'apparecchio.
• Pulite le parti interne con un panno morbido,
non utilizzando mai benzina, detersivi per
finestre e solventi.
• Utilizzate per la pulizia settimanale della
membrana, esclusivamente il pennello.
• Sostituite l'acqua nell'apposito recipiente
almeno una volta la settimana.
Conservazione dell'apparecchio in caso di
lungo periodo di inattività
Pulire l'apparecchio come descritto, farlo
asciugare completamente e conservare
preferibilmente nell'imballaggio originale in un
luogo asciutto e non troppo caldo.
Smaltimento
Gli apparecchi fuori uso devono essere resi
inutilizzabili. Staccate la spina dalla presa e
separate il cavo di alimentazione
dall'umidificatore. Portate l'umidificatore in un
centro di raccolta pubblico o al vostro rivenditore.
Gli elettrodomestici non vanno eliminati insieme
con i rifiuti domestici.
La Stiftung Entsorgung Schweiz (S.EN.S)
garantisce un'elementazione rispettosa
dell'ambiente.
Consegnate l'umidificatore fuori uso al Vostro
fornitore per uno smaltimento adeguato. Potete
informarVi presso la Vostra autorità comunale o
cittadina competente circa ulteriori possibilità di
smaltimento.
Eliminazione dei disturbi
Problema
L'apparecchio non funziona
Dati tecnici
Tensione
230 VAC / 50 Hz
Potenza assorbita
45 W
(senza preriscaldamento)
120–130 W
(con preriscaldamento)
Rendimento di umidificazione
400 g/ora
Adatto per ambienti fino a
60m2/150m3
Contenuto di acqua
5,7 litri
Peso (a vuoto)
3,0 kg
Misure
397 x 220 x 340 mm
Rumorosità in funzione
< 25 dB(A)
Accessori:
cartuccia decalcificante
Possibile causa
Spina di rete non inserita
Intervento correttivo
Collegare la spina di rete alla
apposita presa
Rabboccare acqua
Manca acqua nell'apposito recipiente
(si illumina la segnalazione di vuoto)
Nessuna fuoriuscita di nebbia L'impostazione dell'umidità dell'aria è Aumentare l'impostazione
inferiore all'umidità dell'aria ambiente dell'umidità dell'aria
Residui di detersivo
Pulire l'apparecchio con acqua
pulita
Fuoriuscita della nebbia
Temperatura dell'acqua troppo bassa Mettere al massimo la fuoriuscita
troppo bassa a livello
della nebbia; dopo 10 minuti
l'apparecchio lavora di nuovo
ineccepibilmente
Sedimentazione di calcio sulla
Pulire la membrana
membrana
Deposito biancastro intorno
Cartuccia decalcificante consumata
Sostituire cartuccia decalcificante
all'apparecchio
15
BDA_Ultrasonic.qxd
7.7.2005
17:14 Uhr
Seite 16
Dear Customer
Congratulations on your choice of the
SOLIS Ultrasonic Nebulizer!
The physical well-being of people and animals is
influenced by numerous factors, one of which is
the right humidity level of room air. During heating
periods, cold and dry outside air flows into rooms
through the windows, where its temperature rises.
This leads to a massive drop in relative room
air humidity, creating an unfavourable climate for
people, animals and plants. Your well-being
suffers, you become more vunnerable to cold an
flu germs.
Humidification by Ultrasonics:
A highly efficient technology allowing controlled
humidification. High frequency oscillations
transform the water into a microfine mist which is
then passed into the room where it immediately
evaporates.
Ultrasonic humidifiers have a low power
consumption. A replaceable demineralisation
cartridge cleans the water from minerals and
other waterborne residues thus providing a
pure mist. Ultrasonic humidifiers are equipped
with an integrated hygrostat and output control.
General Information
A comfortable atmosphere indoors is reached with
a relative humidity level between 40 and 60%.
Your humidifier controls automatically the
humidity level according to desired setting. If the
air is too dry, the humidifier will automatically
switch on. As soon as the desired humidity level is
reached, it will switch off.
16
Safety instructions:
• Read the operating instructions carefully before
using the humidifier and keep them for later
reference.
• Connect the unit only to alternating current
with voltage according to the rating label.
• Only use the humidifier indoors and within the
specified technical data. If used for a purpose
for which it is not intended it could cause
serious danger to health and life.
• Children cannot recognise the hazards
associated with the usage of electrical
appliances. For this reason, always supervise
children when they are near the humidifier.
• Persons who are not familiar with the operating
instructions, as well as children and persons
under the influence of medication, alcohol, or
drugs are not permitted to operate the
appliance, or are only permitted to operate it
under supervision.
• Never use the appliance if there is any damage
to the appliance or cable, after malfunction,
after the appliance has been dropped or
damaged in any other way.
• Only operate the humidifier when it is
completely assembled.
• Repairs of electrical appliances are only to be
made by qualified service engineers. Improper
repair work can cause considerable danger to
the user.
• Disconnect the appliance from the mains power
before filling/emptying the water tank, before
cleaning/ maintenance, assembling/
dismantling of individual parts and before
moving the appliance.
• Place the humidifier on a dry, level surface. Do
not place the device directly on the floor or next
to heating.
• Do not pour water into the vapour outlet of the
humidifier.
• Do not put any additives in the water (e.g.
fragrances, essential oils, water fresheners,
etc.)
• Do not submerse the main body in water or
other liquids.
Putting into operation
• Finding the ideal location for your humidifier:
– A slightly heightened place, approx. 30 to
50 cm above the floor.
• Please note that:
– Do not place the device directly on the floor
or next to heating.
– The vapour outlet must not be pointed
directly at plants or other objects.
• Make sure that no foreign objects are in the
water tank.
• Fill the tank with clean, cold water from the
tap (water no hotter than 40°C). Close the cap
of the water tank properly. Do not add any
conditioners to the water.
• Soak the cartridge in water for a few hours
before using it.
• The demineralization cartridge should be
replaced every 2–3 months.
• Place the water tank on the base and insert
the vapour outlet.
• Insert the plug into the socket and switch on
the appliance using the on/off switch.
• About 10 to 15 minutes after having been
switched on the device will reach is full power.
Replacement of the demineralization
cartridge
Turn around the tank and open the turn-lock. The
demineralization cartridge is attached to the
inside of the cap. Unscrew the cartridge turning it
anti-clockwise and replace it with
a new one.
Attention!
• The water tank is equipped with a
demineralization cartridge. This cartridge has
to be replaced every 2–3 months.
• If the water is very hard, it may be necessary
to replace the cartridge earlier.
• We do not recommend the use of this
Ultrasonic Nebulizer if your water is harder
than 25 fH!
• White dust around the device is a sure sign
that the cartridge is empty.
• If white precipitate still forms around the device
after a new cartridge has been inserted, please
make sure that the water you are using is really
untreated. (no conditioner)
• If the water flows through a decalcification
system in the building before it is used in the
humidifier, salt will precipitate around the
device.
17
BDA_Ultrasonic.qxd
7.7.2005
17:14 Uhr
Seite 18
Operating
Hygrostat/Set humidity
Set the desired humidity in % by pressing button
( 5 ). We recommend a relative humidity between
40% and 60%. The appliance can be regulated
from 40% to 75%. If the humidity exceeds the
desired setting, the appliance turns itself off. The
appliance does not turn itself off, if it has been set
for continuous operation. The desired value is
shown while you are making the selection. After a
few seconds, the display automatically switches
to the current value.
Symbol B on the display indicates that the set
humidity has not been reached yet.
On-Off
Press button ( 1 ) to turn the air humidifier on
and off.
Operating with preheating
Button ( 2 ) is used to turn the pre-heating on
(symbol A apperars on the display) to off. When it
is on, the water is pre-heated to 80°C before it
enters the fogging chamber. The fog is now at a
confortable 40°C when it is emitted from the
appliance. This is advantageous as it does not
cause the room temperature to fall, in addition
there is substantial improvement in maintaining
the purity of the water (bacteria are killed).
Timer
You can use button ( 3 ) to determine the
operating time. It can be regulated between 1 and
9 hours or for continuous operation. If the timer
has been activated, the symbol ( E ) appears on
the display.
Auto
Pressing button ( 4 ) activates the automatic
mode. If the automatic function has been added
symbol ( D ) with “Auto” appears on the display.
The ideal humidity in relation to temperature and
evaporation rate is maintained.
18
Attention
• Make sure that no water gets into the lower
part of the main body.
• Clean the inner parts with a soft cloth. Do not
use any solvents or aggressive cleaning agents
to clean the appliance.
• Only use the brush to clean the membrane.
This should be done once a week.
• Change the water in the tank at least once a
week.
Disposal
Appliance that have reached the end of their
service life must be rendered inoperable.
Disconnect the appliance from mains power and
separate mains cable and appliance. Deposit the
appliance at an appropriate waste collection point
or return it to your dealer. Electric appliances
should not be disposed of as houshold waste.
You can obtain information on other ways to
dispose of the humidifier from your local council.
Storing the appliance
Clean the humidifier as described earlier and dry
it thoroughly. Preferably store the appliance in its
original box. Avoid high temperatures.
Technical data
Input voltage:
230 Volt / 50 Hz
Power consumption:
45 W
(without pre-heating)
120–130 W
(with pre-heating)
Humidification performance:
400 g/h
Suitable for rooms up to
60m2/150m3
Water capacity:
5,7 Liter
Weight (empty):
3,0 kg
Dimensions:
397 x 220 x 340 mm
Operating noise
< 25 dB(A)
Accessories:
demineralization cartridge
Symbol C on the display indicates that the
desired humidity has been reached.
Regulating evaporation rate
You can regulate the evaporation rate by pressing
button ( 6 ) several times. If the arrow ( F ) is fully
displayed, you have selected the highest
evaporation rate.
Water level display
The transparent water tank makes it easy to see
how much water is in the appliance. In addition
the symbol ( G ) is displayed when water must be
refilled.
Cleaning/Maintenance
• Switch of the appliance and unplug it from the
socket before cleaning it.
• Clean the water tank and the reservoir regularly
once a week (Use water only, no detergents).
When operating with pre-heating every two
weeks.
• Use decalcification agents found in stores
everywhere to remove deposits from
the membrane regularly. Rinse out the
decalcification agent thoroughly with plenty
of water.
Trouble shooting
Problem
Humidifier does not operate
Week vapour output
Possible cause
Power cable not plugged in
No water in the tank
(Empty-light flashing)
Desired humidity level lower
than actual
Residues of washing-up liquid
Water temperature too low
White dust around the
humidifier
Mineral deposits on membrane
Demineralisation cartridge
exhausted
No vapour output
What to do
Plug in power cable
Fill tank with water
Increase desired setting
Rinse with clear water
Set vapour output to maximum,
after 10 min. the humidifier
will work properly again
Clean membrane
Replace cartridge
19
BDA_Ultrasonic.qxd
7.7.2005
17:14 Uhr
Seite 20
Nr. 003.12
Schweiz
SOLIS AG
Solis-Haus
Europastrasse 11
8152 Glattbrugg
Tel. 044 874 64 64
Fax 044 874 64 99
E-Mail: [email protected]
Internet: www.solis.ch