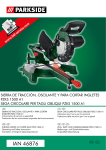
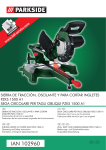
1
Fax +32 030 9904733
Copies of the I/B. Please reproduce them without any
changes except under special instruction from Bimar
(Italy). The pages must be reproduced and folded in
order to obtain a booklet A5 (+/- 148.5 mm width x 210
mm height). When folding, make sure you keep the good
numbering when you turn the pages of the I/B. Don’t
change the page numbering. Keep the language
integrity.
LIBRETTO ISTRUZIONI
NOTICE D'INSTRUCTIONS
INSTRUCTION BOOKLET
BEDIENUNGSANLEITUNG
STUFA A GAS PER ESTERNI
POÊLE À GAZ POUR EXTÉRIEUR
OUTDOOR GAS HEATER
TERRASSENSTRAHLER
mod.K105
1/40
Assembly page 1/40
Fax +32 030 9904733
Copies of the I/B. Please reproduce them without any
changes except under special instruction from Bimar
(Italy). The pages must be reproduced and folded in
order to obtain a booklet A5 (+/- 148.5 mm width x 210
mm height). When folding, make sure you keep the good
numbering when you turn the pages of the I/B. Don’t
change the page numbering. Keep the language
integrity.
Vi invitiamo a leggere attentamente queste istruzioni prima dell’uso dell’apparecchio, ed
eventualmente informare terzi, se necessario. Conservare il libretto per ulteriori consultazioni.
Gentile Signora, Egregio Signore,
ci complimentiamo con Lei per aver acquistato termofungo.
La sua scelta sarà premiata e termofungo si rivelerà indispensabile per prolungare la sua estate.
La ns. azienda, specializzata nella produzione di articoli da riscaldamento, vanta un’esperienza di
oltre 60 anni ed è quindi in grado di assicurare la massima affidabilità.
Tutti i ns. prodotti sono costruiti conformità alle vigenti norme europee di sicurezza ed i centri
assistenza di cui troverà elenco in allegato, saranno in grado di garantirLe interventi per la
manutenzione e riparazione.
In questo manuale troverà tutti i consigli per poter utilizzare termofungo nel modo migliore.
La ringraziamo ancora per la sua preferenza.
CARATTERISTICHE TECNICHE DELLA STUFA
Tipo di apparecchio
Stufa per spazi aperti, rimovibile, con dispositivo di
sicurezza.
Modello
K105
Potenza (butano)
Max 11kW
Consumo di gas
790gr/h
Gas Categoria
I3+(28-30/37)
Tipo Gas/Pressione
Butano/28-30 mbar
Propano/37 mbar
Capacità bombola
15Kg
Diametro bombola
36cm
Sistema di accensione
piezoelettrico
Dispositivo anti-ribaltamento
Blocco erogazione del gas oltre un’inclinazione di 30°
Norme di riferimento
Direttiva 90/396/EEC
0123
AVVERTENZE GENERALI
La stufa deve essere installata come descritto nel paragrafo “Installazione”; tenendo conto inoltre
delle seguenti avvertenze:
1)
2)
3)
4)
5)
L’apparecchio deve essere utilizzato solo per riscaldare ambienti all’aperto, o ambienti ampi o
molto aerati. Per ambiente molto aerato, si intende con almeno il 25% della superficie
perimetrale aperta (vedi fig. B).
L’apparecchio non è destinato a questi usi: per riscaldare ambienti domestici, per riscaldare
ambienti chiusi, per riscaldare seminterrati o interrati.
La stufa deve essere posizionata ad 1 metro di distanza dalle pareti e ad almeno 100cm dal
soffitto: qualora la stufa sia posizionata sotto un patio, verificare che la copertura del patio non
possa venire danneggiata o possa incendiarsi per il calore emesso (vedi fig. A).
La stufa deve essere posizionata su una superficie stabile e piana, quando si sposta la stufa, il
rubinetto della bombola deve essere chiuso.
La stufa non deve essere posizionata e neppure utilizzata o in prossimità di finestre, grate,
bocche di lupo, o altre aperture comunicanti con altri locali, per evitare che i gas della bombola o
2/40
Assembly page 2/40
Fax +32 030 9904733
Copies of the I/B. Please reproduce them without any
changes except under special instruction from Bimar
(Italy). The pages must be reproduced and folded in
order to obtain a booklet A5 (+/- 148.5 mm width x 210
mm height). When folding, make sure you keep the good
numbering when you turn the pages of the I/B. Don’t
change the page numbering. Keep the language
integrity.
di combustione passino nel locale sottostante o adiacente. Posizionare la stufa lontano da tessuti,
tende e altri materiali infiammabili o quant’altro che in nessun modo possa venire a contatto con
la parte radiante e/o la parabola.
6) E’ indispensabile che nell’ambiente in cui è installata la stufa, possa affluire tanta aria quanto ne
necessita per la regolare combustione.
7) Non utilizzare l’apparecchio per asciugare vestiti.
8) Non utilizzare la stufa senza la parabola riflettente, l’apparecchio deve essere completamente
assemblato. La stufa deve essere utilizzata unicamente con la bombola da 15Kg inserita nel
proprio vano.
9) Tenere la stufa lontano da materiale infiammabile, bombole o altro per evitare rischio incendio.
10) Devono essere prese particolari precauzioni se la stufa si trova in locali dove può essere
facilmente spostata se urtata da bambini o cani ecc…
11) La stufa è dotata di un dispositivo di sicurezza che interrompe il flusso del gas in caso di
spegnimento accidentale della fiamma pilota o in caso di ribaltamento.
Fig.B
Fig.A
12) I gas di combustione devono evacuare liberamente: verificare che non entrino in locali adiacenti
o sovrastanti.
13) Non spostare mai la stufa quando è in funzione o, se appena spenta, sino a quando non si è
completamente raffredata.
14) Per spegnere la stufa ruotare la manopola nella posizione “Off” e chiudere il rubinetto della
bombola.
3/40
Assembly page 3/40
Fax +32 030 9904733
Copies of the I/B. Please reproduce them without any
changes except under special instruction from Bimar
(Italy). The pages must be reproduced and folded in
order to obtain a booklet A5 (+/- 148.5 mm width x 210
mm height). When folding, make sure you keep the good
numbering when you turn the pages of the I/B. Don’t
change the page numbering. Keep the language
integrity.
15) In caso di vento la stufa non deve essere utilizzata per evitare il rischio di ribaltamento, ma deve
essere messa in sicurezza.
16) La stufa deve essere dotata di regolatore e tubo, controllare che siano in dotazione. Il tubo
flessibile deve essere controllato periodicamente ad ogni sostituzione della bombola, verificando
che non abbia graffi, scalfiture, che sia perfetto in buono stato, e comunque sostituito entro la
data di scadenza impressa sul tubo stesso.
17) Il tubo flessibile in gomma deve essere conforme alla norma UNI-CIG 7140, con diametro
interno di 8mm e lungo 120cm.
18) Se si sospetta una perdita di gas:
chiudere immediatamente il rubinetto della bombola e creare circolo d’aria per evacuare i gas
nell’ambiente
spegnere tutte le luci
non disconnettere il regolatore
controllare che tutte le connessioni e raccordi siano correttamente inseriti e ben serrati ed aprire
lentamente il rubinetto della bombola
per rilevare perdite di gas preparare dell’acqua saponata e con un pennellino passare sopra tutti
raccordi e le connessioni del circuito del gas. In caso di perdita si formeranno delle bollicine; in
questo caso chiudere il rubinetto della bombola e serrare bene il raccordo e/o calzare maggiormente
la connessione. Riaprire il rubinetto della bombola e verificare nuovamente la tenuta del gas: se si
rivelano ancora perdite di gas, chiudere il rubinetto della bombola e rivolgersi a personale
professionalmente qualificato.
Attenzione: non verificare le perdite di gas quando l’apparecchio è caldo, ma attendere che si sia
raffredato.
19) L’apparecchio deve essere ispezionato prima dell’uso almeno una volta all’anno da personale
professionalmente qualificato. La pulizia potrebbe essere necessaria più frequentemente: deve
essere controllata la parte adiacente al bruciatore, al rubinetto al fine di garantire la sufficiente
circolazione di aria al bruciatore.
20) L’apparecchio non è destinato a essere usato da persone (bambini compresi) le cui capacità
fisiche, sensoriali o mentali siano ridotte, oppure con mancanza di esperienza o di conoscenza, a
meno che esse abbiano potuto beneficiare, attraverso l’intermediazione di una persona
responsabile della loro sicurezza, di una sorveglianza o di istruzioni riguardanti l’uso
dell’apparecchio. I bambini devono essere sorvegliati per sincerarsi che non giochino con
l’apparecchio.
21) L’apparecchio deve essere mantenuto fuori dalla portata di bambini.
ATTENZIONE:
Chiudere immediatamente il rubinetto della bombola e controllare immediatamente
l’apparecchio in caso di:
a) odore di gas e/o fiamma di colore giallo
b) la stufa non raggiunge la normale temperatura. Temperatura ambiente inferiore a 5°C, causa
una diminuizione della resa termica e la stufa non lavora correttamente
c) all’accensione il bruciatore emette rumori (scoppietta)
d) alcune parti della stufa diventano molto calde, tenere a debita distanza i bambini
e) bambini e adulti debbano fare attenzione alle parti calde della stufa, pertanto devono
rimanere a debita distanza onde evitare bruciature, ustioni, e che parti di indumenti possano
bruciare
f) bambini e animali domestici devono essere attentamente sorvegliati da una persona adulta
quando stazionano nei passaggi della stufa.
g) tessuti o materiali infiammabili o combustibili o piante, devono essere mantenuti a debita
distanza dalla stufa (almeno 1 metro)
h) non ustruire i fori di aerazione della stufa, in particolare quelli praticati in prossimità del
bruciatore e del rubinetto.
4/40
Assembly page 4/40
Fax +32 030 9904733
Copies of the I/B. Please reproduce them without any
changes except under special instruction from Bimar
(Italy). The pages must be reproduced and folded in
order to obtain a booklet A5 (+/- 148.5 mm width x 210
mm height). When folding, make sure you keep the good
numbering when you turn the pages of the I/B. Don’t
change the page numbering. Keep the language
integrity.
INSTALLAZIONE
Dopo aver tolto l’imballaggio, assicurarsi dell’integrità dell’apparecchio; in caso di dubbio non
utilizzarlo e rivolgersi a personale professionalmente qualificato. Gli elementi d’imballaggio
(sacchetti di plastica, polistirolo espanso, chiodi, ecc.) non devono essere lasciati alla portata di mano
di bambini in quanto potenziali fonti di pericolo.
1: Rimuovere ogni componente dall’imballo.
2: Fissare il vano bombola al basamento
mediante 5 viti M5X10 e 5 rosette.
3: Fissare il coperchio sopra al vano bombola con
5 viti M5x10 e 5 rosette.
4: Innestare la colonna al coperchio con 4 viti
M5x10 e 4 rosette, poi inserire la protezione in
plastica della colonna.
5/40
Assembly page 5/40
Fax +32 030 9904733
Copies of the I/B. Please reproduce them without any
changes except under special instruction from Bimar
(Italy). The pages must be reproduced and folded in
order to obtain a booklet A5 (+/- 148.5 mm width x 210
mm height). When folding, make sure you keep the good
numbering when you turn the pages of the I/B. Don’t
change the page numbering. Keep the language
integrity.
5: Avvitare i 3 distanziali 5a: Collocare la parabola 6: Collegare il tubo gas al bruciatore e serrare
sul bruciatore prima di riflettente al bruciatore con 3 bene il raccordo. Completare il condotto gas,
fissare la parabola.
collegando il tubo flessibile al regolatore.
dadi esagonali e 3 rosette.
7: Controllo della tenuta del gas senza accendere il bruciatore:
Attenzione: evitare rigorosamente di utilizzare una fiamma per rilevare eventuali fughe.
• Innanzitutto preparare una soluzione di acqua saponata (1 parte di detergente liquido e 3 parti di acqua).
• Posizionare l’elemento riscaldante già assemblato come in figura e collegare all’estremità del tubo gas il
tubo flessibile in gomma e questo al regolatore di pressione (30mbar). Regolare il rubinetto in posizione di
spento (Off) e aprire il rubinetto della bombola.
• Con un pennello cospargere la soluzione di acqua saponata sui punti di raccordo. Verificare che il condotto
gas (tubi, raccordi, ecc..) non abbia perdite: qualora ve ne fossero queste saranno evidenziate dalla
formazione di bolle di sapone.
Se si evidenziano delle perdite, chiudere il rubinetto
della bombola, serrare maggiormente le connessioni,
aprire il gas e controllare nuovamente. Se non si è in
grado di eliminare la perdita, chiudere il rubinetto
della
bombola
e
rivolgersi
a
personale
professionalmente qualificato.
• Scollegare il tubo flessibile dal regolatore di
pressione
6/40
Assembly page 6/40
Copies of the I/B. Please reproduce them without any
changes except under special instruction from Bimar
(Italy). The pages must be reproduced and folded in
order to obtain a booklet A5 (+/- 148.5 mm width x 210
mm height). When folding, make sure you keep the good
numbering when you turn the pages of the I/B. Don’t
change the page numbering. Keep the language
integrity.
Fax +32 030 9904733
8: Inserire il tubo gas attraverso la colonna,
facendo attenzione a non deformarlo e
danneggiarlo; fissare il bruciatore con 3 viti
M5x10 e 3 rosette.
Nota: nel caso in cui il termofungo sia accessoriato dal tavolo,
assemblare il tavolo sulla colonna prima del tubo gas. Per
l’assemblaggio si prenda come riferimento le figure:
- fissare il supporto del tavolo con le due viti ed inserire la
ghiera in plastica sulla colonna
- accoppiare i due gusci (destro e sinistro)
- assicurare il bloccaggio avvitando la ghiera e chiudendo i
ganci posti nella parte posteriore dei gusci
Note: qualora il termofungo sia corredato di piastrine fissaggio
a pavimento, collocare le piastrine al basamento con 6 viti
M5x10 e 6 rosette. Per fissare il basamento a terra, usare dei
dei bulloni o dei chiodi.
9: Collocare lo sportello al vano bombola
Note: nel caso in cui il termofungo sia corredato di
ruote per spostamento, fissarle al basamento mediante
2 viti e 2 rosette.
7/40
Assembly page 7/40
Copies of the I/B. Please reproduce them without any
changes except under special instruction from Bimar
(Italy). The pages must be reproduced and folded in
order to obtain a booklet A5 (+/- 148.5 mm width x 210
mm height). When folding, make sure you keep the good
numbering when you turn the pages of the I/B. Don’t
change the page numbering. Keep the language
integrity.
Fax +32 030 9904733
10: COLLEGAMENTO DELLA BOMBOLA
1) L’apparecchio è predisposto per l’utilizzo di gas GPL in bombola da 15Kg.
2) Aprire lo sportello, collegare alla bombola del gas il regolatore di pressione nel modo seguente:
Prima di eseguire la connessione della bombola, accertarsi che nelle vicinanze non vi siano altre fonti di
calore o bruciatori a fiamma.
A) Assicurarsi che la guarnizione sia
correttamente inserita sull’attacco del
regolatore. Controllare periodicamente la
guarnizione e nel caso in cui essa sia
danneggiata o compressa in modo
irregolare, effettuare la sostituzione.
B)
Avvitare il dado del regolatore sulla valvola della bombola girandola in senso antiorario (filettatura
sinistra) mediante l’ausilio di una chiave.
N.B La posizione del regolatore dopo il seraggio del dado NON è importante, NON cercare di
posizionarlo orizzontalmente.
C)
Posizionare la bombola nel relativo contenitore in modo che il
regolatore sia rivolto verso l’interno.
3) Utilizzare regolatore di pressione IMQ omologato
(con pressione di uscita di 28 mbar per gas butano,
con consumo massimo di 1Kg/h di Gpl) e tubo
flessibile in gomma IMQ omologato non più lungo
di 1,2 m. Assicurare la tenuta del tubo flessibile alle
giunzioni con fascetta stringi tubo metallica.
Controllare che il tubo non si attorcigli o subisca
strozzature. Aprire il rubinetto lentamente e
verificare che non vi siano perdite di gas. NON
UTILIZZARE FIAMMIFERI, ma operare come
descritto nel paragrafo “Avvertenze generali” al
capoverso “sospetta perdita di gas”. Posizionare la
bombola nel suo alloggiamento e chiudere lo
sportello.
Non usare mai la bombola con rovinato il corpo, valvola, collare ed il basamento.
Non connettere l’apparecchio senza il regolatore di gas.
Quando l’apparecchio non viene utilizzato chiudere il rubinetto della bombola.
Rivolgersi al Vs. fornitore di gas per ricevere informazionid’uso per la bombola del gas.
La bombola del gas deve essere sempre utilizzata in posizione verticale.
Come sostituire la bombola
1) Quando si sostituisce la bombola verificare che nelle vicinanze non vi siano altre fonti di calore.
2) Prima di operare chiudere il rubinetto della bombola; accertarsi che la stufa sia spenta nella pos.“Off”
e sia raffreddata e togliere la bombola dalla stufa.
3) Svitare il regolatore di pressione della bombola (ruotare in senso antiorario).
4) Per collegare una nuova bombola seguire le istruzioni riportate nel paragrafo precedente.
8/40
Assembly page 8/40
Fax +32 030 9904733
Copies of the I/B. Please reproduce them without any
changes except under special instruction from Bimar
(Italy). The pages must be reproduced and folded in
order to obtain a booklet A5 (+/- 148.5 mm width x 210
mm height). When folding, make sure you keep the good
numbering when you turn the pages of the I/B. Don’t
change the page numbering. Keep the language
integrity.
ISTRUZIONI PER L’USO
Accensione:
• Aprire il rubinetto della bombola attraverso l’apertura
presente nel copri bombola.
• Premere e ruotare in senso antiorario la manopola di
Pilot”.
regolazione nella posizione “
• Tenendo premuto la manopola contemporaneamente
premere il pulsante piezoelettrico, innescando così
l’accensione della fiamma pilota; per far si che la
fiamma rimanga accesa è necessario tenere premuta la
manopola per 20 secondi dopo l’accensione.
• Se il pilota non si accende, ripetere l’operazione
dall’inizio. (Per le nuove installazioni o cambio della
bombola si potrebbe aver bisogno di effettuare lo
spurgo dell’aria all’interno delle tubazioni mantenendo
premuta la “manopola di controllo” fino a 2÷3 minuti).
Verificare l’accensione della fiamma pilota attraverso la griglia della parte radiante.
Se ciò non si verificasse ripetere l’operazione di accensione.
Regolazione riscaldamento
Per regolare la “valvola di controllo” nelle posizioni indicate, ruotarle la manopola mantenendola
premuta a metà corsa fino allo stato corrispondente alla massima potenza “
Per ridurre la potenza girare la manopola nella posizione “ Low”.
Per aumentare la potenza girare la manopola nella posizione “
High”.
High”.
Se si desidera spegnere la stufa per un breve periodo, girare la manopola nella posizione di “
Spegnimento della stufa
pilot”.
Off” e chiudere il rubinetto della bombola. Allo
Girare la manopola di controllo sulla posizione “
spegnimento del bruciatore o della fiamma pilota, un leggero schiocco è da considerarsi normale.
Riaccensione
Dopo aver spento la stufa, la riaccensione della fiamma pilota è possibile solo dopo un raffredamento
della stufa di almeno 15 minuti.
Note: se la fiamma pilota non si innesca, è possibile accendere
il termofungo inserendo un fiammifero accesso, utilizzando
l’apposito supporto fiammifero in dotazione, attraverso un
qualsiasi foro del bruciatore, per far si che la fiamma del
bruciatore rimanga accesa è necessario tenere premuta la
manopola per 10 secondi dopo l’accensione nella posizione
“
Pilot”. Se ciò si verificasse ancora (la fiamma pilota non si
dovesse accendere), chiudere il rubinetto della bombola e
rivolgersi a personale professionalmente qualificato.
9/40
Assembly page 9/40
Fax +32 030 9904733
Copies of the I/B. Please reproduce them without any
changes except under special instruction from Bimar
(Italy). The pages must be reproduced and folded in
order to obtain a booklet A5 (+/- 148.5 mm width x 210
mm height). When folding, make sure you keep the good
numbering when you turn the pages of the I/B. Don’t
change the page numbering. Keep the language
integrity.
PULIZIA
Attenzione: prima di pulire l’apparecchio spegnerlo (ruotando la manopola nella posizione “Off” e
chiudere il rubinetto della bombola) ed attendere che sia completamente raffredato.
Per pulire la parte esterna della stufa utilizzare un panno morbido imbevuto in acqua e detergente
liquido.
Non utilizzare pagliette metalliche o prodotti abrasivi.
Non usare combustibili o pulitori abrasivi.
Non lavare con getto d’acqua il bruciatore e la parte sottostante con rubinetto e accenditore.
Asciugare completamente la stufa prima di utilizzarla.
Assicurarsi periodicamente che i fori dell’elemento radiante e del bruciatore non risultino ostruiti da
polvere, lanugine o sfilacci, impiegare eventualmente l’aspirapolvere per rimuoverli.
SCHEDA RICERCA GUASTI
Tipo inconveniente
Causa
La fiamma pilota
Alimentazione gas chiusa
non si accende
Presenza di aria nella tubazione
dopo un periodo di non utilizzo
La fiamma pilota si
accende, ma si
spegne quando la
manopola di
controllo è rilasciata
dopo 15 secondi.
Il bruciatore
principale si
accende, ma
l’emissione del
calore è
insufficiente.
Fiamma gialla
Ostruzione della tubatura di
miscelazione del pilota.
Ostruzione dell’iniettore del
pilota.
Accensione piezoelettrica o
elettrodo bagnato.
Cavo di accensione scollegato.
Rottura o difetto dell’elettrodo.
La fiamma pilota non investe la
termocoppia.
Valvola gas difettosa.
Bassa pressione del gas di
alimentazione. Bombola quasi
vuota o vicina al congelamento.
Condizioni molto ventose.
Rimedio
Aprire il gas (bombola)
Premere la “manopola valvola controllo”
nella posizione pilota per alcuni minuti per
effettuare lo spurgo dell’aria.
Ricerca ed eliminazione dell’ostruzione e
pulizia.
Tentare di pulire con aria compressa ed
effettuare la sostituzione iniettore.
Effettuare l’accensione con un fiammifero.
Ricollegare.
Sostituire.
Sostituire il gruppo (termocoppia pilota,
candela)
Sostituire la valvola gas.
Controllo della pressione di alimentazione e
del regolatore.
Non usare la stufa in condizioni molto
venose.
Ostruzione dei fori del
Pulire la polvere, lanugine e sfilacci,
bruciatore.
utilizzando un aspirapolvere.
Le operazioni di riparazioni devono essere eseguite solamente da professionale
professionalmente qualificato.
MANUTENZIONE
Attenzione: controllare regolarmente il buono stato del tubo flessibile in gomma e sostituirlo se
deteriorato, logorato o danneggiato e in ogni caso entro la data di scadenza indicato. Utilizzare solo
tubo flessibile omologato IMQ.
Se non utilizzate l’apparecchio per un certo periodo, scollegare la stufa dalla bombola, coprila e
riporla nell’imballo originale in un luogo asciutto senza polvere. Verificare, prima dell’utilizzo, il
buono stato della guarnizione di tenuta del regolatore di pressione. Ogni intervento di manutenzione
10/40
Assembly page 10/40
Fax +32 030 9904733
Copies of the I/B. Please reproduce them without any
changes except under special instruction from Bimar
(Italy). The pages must be reproduced and folded in
order to obtain a booklet A5 (+/- 148.5 mm width x 210
mm height). When folding, make sure you keep the good
numbering when you turn the pages of the I/B. Don’t
change the page numbering. Keep the language
integrity.
deve essere effettuato da personale professionalmente qualificato o da un centro assistenza consigliato
dal rivenditore.
Si raccomanda che la stufa sia controllata ogni anno da personale autorizzato.
La stufa può essere immagazzinata in locali, se la bombola viene scollegata e tolta dal proprio vano.
Prima di scollegare la bombola verificare che il rubinetto sia ben chiuso, e riporla all’esterno, in una
zona sicura e adeguata, la bombola non deve essere immagazzinata in ambienti chiusi o seminterrati o
interrati.
Se si decide di non utilizzare più l’apparecchio, si raccomanda di scollegare la bombola (per lo
stoccaggio seguire le indicazioni), renderlo inoperante tagliando il tubo flessibile in gomma, e di
rendere innocue quelle parti che sono pericolose qualora utilizzate per gioco dai bambini.
Non disperdere nell’ambiente prodotti non biodegradabili, ma smaltirli nel rispetto delle norme
vigenti. Alla fine della sua vita utile il prodotto non deve essere smaltito insieme ai rifiuti urbani. Può
essere consegnato presso gli appositi centri di raccolta differenziata predisposti dalle amministrazioni
comunali, oppure presso i rivenditori che forniscono questo servizio. Smaltire separatamente una
stufa consente di evitare possibili conseguenze negative per l’ambiente e per la salute derivanti da un
suo smaltimento inadeguato e permette di recuperare i materiali di cui è composto al fine di ottenere
un importante risparmio di energia e risporse. Per rimarcare l’obbligo di smaltire separatamente gli
apparecchi, sul prodotto è riportato il marchio del contenitore di spazzatura mobile barrato. Si tenga
presente di questi elementi:
-ferro: mobile della stufa, corpo del bruciatore, minuterie (viti, ecc.)
-alluminio, tubi condotta gas
-ottone: rubinetto analizzatore d’atmosfera
-plastica: ruote, accenditore piezoelettrico
-rame rivestito con guaina in gomma: filo accenditore piezoelettrico,
termocoppia.
11/40
Assembly page 11/40
Fax +32 030 9904733
Copies of the I/B. Please reproduce them without any
changes except under special instruction from Bimar
(Italy). The pages must be reproduced and folded in
order to obtain a booklet A5 (+/- 148.5 mm width x 210
mm height). When folding, make sure you keep the good
numbering when you turn the pages of the I/B. Don’t
change the page numbering. Keep the language
integrity.
Nous vous prions de lire attentivement ces instructions avant d’utiliser l'appareil et de les divulguer à
toutes les personnes qui pourraient en avoir besoin. Gardez-les à portée de main.
Madame, Monsieur,
nous vous félicitons d’avoir acheté cette poêle à gaz pour extérieur.
Votre choix vous donnera entière satisfaction et la poêle à gaz se révèlera un instrument indispensable
pour prolonger votre été.
Notre entreprise, spécialisée dans la fabrication d’articles de chauffage, possède plus de 60 ans
d’expérience qui lui permettent d’assurer la fiabilité totale de ses produits.
Tous nos produits sont construits dans le respect des normes européennes en vigueur en matière de
sécurité et les centres d’assistance dont vous trouverez la liste ci-joint assureront les activités
d’entretien et de réparation.
Vous trouverez dans ce manuel tous les conseils pour utiliser votre poêle à gaz pour extérieur de la
meilleure façon possible.
Merci encore de votre choix.
CARACTÉRISTIQUES TECHNIQUES DE LA POÊLE
Type d’appareil
Poêle pour espaces ouverts, mobile, avec dispositif de
sûreté.
Modèle
K105
Puissance (butane)
Maxi. 11 kW
Consommation de gaz
790gr/h
Gaz Catégorie
I3+(28-30/37)
Type de Gaz/Pression
Butane/28-30 mbars
Propane/37 mbars
Capacité de la bouteille
15 kg
Diamètre de la bouteille
36 cm
Système d’allumage
piézoélectrique
Dispositif anti-basculement
Blocage du débit de gaz pour une inclinaison supérieure à
30°
Normes de référence
Directive 90/396/EEC
0123
AVERTISSEMENTS GÉNÉRAUX
Le poêle doit être installé conformément aux indications de la section « Installation » en tenant
compte également des avertissements ci-dessous :
1) L’appareil est destiné uniquement au chauffage d’ambiances à l’air libre, de grands espaces ou
d’espaces très aérés. Cela signifie qu’au moins 25 % de la surface périmétrale est ouverte (voir
fig. B).
2) L’appareil n'est pas destiné aux emplois suivants : chauffage de milieux domestiques, chauffage
de milieux fermés ou chauffage de sous-sols.
3) Le poêle doit être placé à 1 mètre de distance des murs et au moins à 100 cm du plafond: dans
les cas où le poêle sera placé sous un patio, vérifier que la couverture du patio ne puisse pas se
détériorer ou prendre feu par l’effet de la chaleur émise (voir fig. A).
4) Le poêle doit être positionné sur une surface stable et plane. Avant de le déplacer, bien refermer
le robinet de la bouteille de gaz.
12/40
Assembly page 12/40
Fax +32 030 9904733
Copies of the I/B. Please reproduce them without any
changes except under special instruction from Bimar
(Italy). The pages must be reproduced and folded in
order to obtain a booklet A5 (+/- 148.5 mm width x 210
mm height). When folding, make sure you keep the good
numbering when you turn the pages of the I/B. Don’t
change the page numbering. Keep the language
integrity.
5)
Ne pas placer ou utiliser le poêle à proximité de fenêtres, de grilles, de vasistas ou de toute autre
ouverture communiquant avec d'autres pièces, pour éviter que les gaz de la bouteille ou les gaz
de combustion ne finissent dans la pièce à l’étage au-dessous ou adjacente. Positionnez l’appareil
à l’écart de tissus, rideaux et autres matières inflammables ou tout autre élément susceptible
d’entrer en contact avec la partie radiante ou la parabole.
6) L’endroit où est installé le poêle doit avoir un afflux d'air suffisant pour une bonne combustion.
7) Non pas utiliser l’appareil pour sécher des vêtements.
8) Ne pas utiliser le poêle sans la parabole réfléchissante ; l’appareil doit être assemblé dans sa
totalité. Le poêle doit être utilisé uniquement avec la bouteille de gaz de 15 kg placée dans son
logement.
9) Tenir le poêle éloigné de matières inflammables, de bouteilles de gaz ou autre afin d’éviter tout
risque d’incendie.
10) Il faut faire particulièrement attention si le radiateur se trouve sur une surface sur laquelle
l’appareil peut facilement bouger ou tourner sur ses roués si par hasard il devait être basculé par
un enfant ou par un chien etc.
Fig.B
Fig.A
10) Les gaz de combustion doivent pouvoir s'échapper librement : s'assurer qu'ils ne finissent pas
dans des pièces adjacentes ou à l’étage au-dessus.
11) Ne jamais déplacer le poêle lorsqu'il est en marche ou, après l'avoir éteint, tant qu'il n'est pas
complètement froid.
12) Pour éteindre le poêle, tourner le bouton sur la position “Off” et fermer le robinet de la bouteille.
13/40
Assembly page 13/40
Fax +32 030 9904733
Copies of the I/B. Please reproduce them without any
changes except under special instruction from Bimar
(Italy). The pages must be reproduced and folded in
order to obtain a booklet A5 (+/- 148.5 mm width x 210
mm height). When folding, make sure you keep the good
numbering when you turn the pages of the I/B. Don’t
change the page numbering. Keep the language
integrity.
13) S'il y a du vent, le poêle ne doit pas être utilisé, car il risquerait de se renverser. Il doit être mis
en sécurité.
14) Le poêle doit être équipé d'un régulateur et d'un tuyau ; s'assurer qu'ils sont fournis. Le tuyau
flexible doit être contrôlé périodiquement chaque fois que la bouteille de gaz est remplacée,
après s'être assuré qu'il ne présente aucune griffure, éraflure ou autre et qu'il est en parfait état ; il
doit dans tous les cas être remplacé avant la date d'échéance indiquée.
15) Le tuyau flexible en caoutchouc doit être conforme à la norme UNI-CIG 7140, avec un diamètre
interne de 8 mm et une longueur de 120 cm.
16) Si vous redoutez une fuite de gaz :
refermer immédiatement le robinet de la bouteille de gaz et faire circuler l’air pour que les gaz
puissent s’échapper
éteignez toutes les lumières (s’il y en a à proximité du poêle).
ne déconnectez pas le régulateur.
vérifiez que toutes les connexions et les raccords sont enclenchés correctement et bien serrés
et ouvrez lentement le robinet de la bouteille.
Pour dépister les pertes de gaz, préparez de l’eau savonneuse et passez-la à l’aide d’un pinceau sur
tous les raccords et les connexions du circuit du gaz. S’il y a fuite, des bulles se forment. Si c’est le
cas, fermez le robinet de la bouteille et serrez à fond le raccord et/ou enfoncez mieux la connexion.
Rouvrez le robinet de la bouteille et vérifiez à nouveau l’étanchéité au gaz : si vous détectez encore
des fuites de gaz, fermez le robinet de la bouteille et adressez-vous à un technicien professionnel
qualifié.
Attention: ne pas vérifier les pertes de gaz quand l’appareil est chaud ; attendre qu'il ait refroidi.
17) L’appareil doit être inspecté avant toute utilisation au moins une fois par an par du personnel
qualifié. Le nettoyage pourrait s’avérer plus souvent nécessaire : contrôler la partie adjacente au
brûleur et au robinet afin de garantir une circulation d'air suffisante au brûleur.
18) Ce produit n’est pas prévu pour être utilisé par des personnes (y compris les enfants) possédant
des capacités physiques, sensorielles ou mentales réduites ou bien une expérience et
connaissance insuffisante, à moins qu’elles ne se trouvent sous la surveillance de quelqu’un ou
qu’elles n’aient reçu des instructions concernant l’utilisation de l’appareil de la part des
personnes responsables de leur sécurité. Il convient de surveiller les enfants pour s’assurer qu’ils
ne jouent pas avec l’appareil.
19) Tenir hors de portée des enfants.
ATTENTION :
Refermer immédiatement le robinet de la bouteille de gaz et contrôler l’appareil :
a) s’il y a une odeur de gaz et/ou une flamme de couleur jaune
b) le poêle n'atteint pas la température normale. Une température ambiante inférieure à 5°C entraîne
une diminution du rendement thermique, le poêle ne marche donc pas correctement
c) lors de l’allumage le brûleur émet des bruits (crépitement)
d) certaines parties du poêle deviennent très chaudes ; ne pas laisser approcher les enfants
e) les enfants et les adultes doivent faire attention aux parties chaudes du poêle. Ils doivent donc
rester à distance pour éviter de se brûler ou de mettre le feu à leurs vêtements
f) les enfants et les animaux domestiques doivent être surveillés avec soin par un adulte lorsqu'ils
se trouvent à proximité du poêle.
g) ne pas placer de tissus, matières inflammables, carburants ou plantes à moins d'un mètre du
poêle
h) ne pas obstruer les ouvertures d'aération du poêle, en particulier celles qui se trouvent à
proximité du brûleur et du robinet.
INSTALLATION
Après avoir retiré l’emballage, assurez-vous de l’intégrité de l’appareil ; en cas de doute, ne l’utilisez
pas et adressez-vous à un professionnel qualifié. Les éléments de l’emballage (sachets en plastique,
14/40
Assembly page 14/40
Fax +32 030 9904733
Copies of the I/B. Please reproduce them without any
changes except under special instruction from Bimar
(Italy). The pages must be reproduced and folded in
order to obtain a booklet A5 (+/- 148.5 mm width x 210
mm height). When folding, make sure you keep the good
numbering when you turn the pages of the I/B. Don’t
change the page numbering. Keep the language
integrity.
polystyrène expansé, clous, etc.) doivent être tenus hors de portée des enfants car ils représentent des
sources potentielles de danger.
1: Sortir tous les composants de l’emballage.
2: Fixer le compartiment de la bouteille de gaz
au socle au moyen de 5 vis M5X10 et 5
rondelles.
3: Fixer le couvercle sur le compartiment de la bouteille de 4: Insérer la colonne dans le couvercle avec 4
gaz avec 5 vis M5x10 et 5 rondelles.
vis M5x10 et 4 rondelles, puis insérer la
protection en plastique de la colonne.
5: Visser les 3 entretoises 5a: Placer la parabole
sur le brûleur avant de réfléchissante au brûleur avec
fixer la parabole.
3 écrous hexagonaux et 3
rondelles.
6: Brancher le tube à gaz métallique au brûleur
et serrer à fond le raccord. Compléter la
conduite de gaz en branchant le tube flexible au
régulateur.
15/40
Assembly page 15/40
Fax +32 030 9904733
Copies of the I/B. Please reproduce them without any
changes except under special instruction from Bimar
(Italy). The pages must be reproduced and folded in
order to obtain a booklet A5 (+/- 148.5 mm width x 210
mm height). When folding, make sure you keep the good
numbering when you turn the pages of the I/B. Don’t
change the page numbering. Keep the language
integrity.
7: Vérifier l’étanchéité au gaz sans allumer le brûleur :
Attention : éviter soigneusement d'utiliser une flamme pour détecter des fuites.
• Tout d’abord, préparer une solution d’eau savonneuse (1 part de savon liquide pour 3 parts d’eau).
• Placer l’élément chauffant déjà assemblé comme le montre la figure et brancher à l’extrémité du tube à
gaz métallique le tube flexible en caoutchouc, et celui-ci au régulateur de pression (30 mbars). Tourner
le robinet sur la position éteinte (Off) et ouvrir le robinet de la bouteille.
À l’aide d’un pinceau, appliquer la solution d’eau savonneuse sur les points de raccordement. Vérifier que
la conduite de gaz (tube, raccord, etc.) ne présente pas de fuite : les fuites éventuelles seront révélées par la
formation de bulles de savon.
Si le contrôle révèle l’existence de fuites, fermer le
robinet de la bouteille, serrer les connexions plus à
fond, ouvrir le gaz et contrôler à nouveau. Si vous
n’êtes pas en mesure d’éliminer la fuite, fermez le
robinet de la bouteille et adressez-vous à un
technicien professionnel qualifié.
• Débrancher le tube flexible du régulateur de
pression.
8: Introduire le tube à gaz à Note : si l'équipement du radiateur prévoit une table, assembler la table sur la
travers la colonne en
colonne avant le tuyau du gaz. Pour l'assemblage, se référer aux figures :
veillant à ne pas le
fixer le support de la table avec les deux vis et enfiler le collier en
déformer ou
plastique sur la colonne.
l’endommager; fixer le
accoupler les deux moitiés de coquille (droite et gauche).
brûleur avec : 3 vis M5x10 bloquer à fond en vissant le collier et fermer les crochets situés dans la
et 3 rondelles.
partie supérieure des demi-coquilles.
9: Placer la petite porte au Remarque: si le champignon chauffant est équipé de plaquettes
compartiment de la bouteille de gaz. de fixage au plancher, placer les plaquettes à la base avec 6 vis
M5x10 et 6 rondelles. Pour fixer la base à terre, utiliser des
boulons et des clous.
16/40
Assembly page 16/40
Copies of the I/B. Please reproduce them without any
changes except under special instruction from Bimar
(Italy). The pages must be reproduced and folded in
order to obtain a booklet A5 (+/- 148.5 mm width x 210
mm height). When folding, make sure you keep the good
numbering when you turn the pages of the I/B. Don’t
change the page numbering. Keep the language
integrity.
Fax +32 030 9904733
Remarque: si le champignon
chauffant est équipé de roues pour
pouvoir le déplacer, le fixer à la base
au moyen de 2 vis et deux rondelles.
10: BRANCHEMENT DE LA BOUTEILLE
1)
2)
L’appareil est préparé pour l’utilisation de gaz GPL en bouteille de 15 kg.
Ouvrir la portière, et brancher le régulateur de pression à la bouteille de gaz en procédant de la manière
suivante:
Avant de réaliser le branchement de la bouteille, s’assurer qu’il n’y a aucune autre source de chaleur ni de
brûleur à flamme à proximité.
A) S’assurer que le joint est engagé
correctement sur l’enclenchement du
régulateur. Vérifier périodiquement le
joint ; s’il est endommagé ou comprimé
de façon irrégulière, le remplacer.
B) Visser l’écrou du régulateur sur la soupape de la bouteille en la tournant dans le sens anti-horaire (filet à
gauche) à l’aide d’une clé.
N.B. La position du régulateur après le serrage de l’écrou n’est PAS importante, NE PAS essayer de le
positionner à l’horizontale.
C) Placer la bouteille dans l’enveloppe prévue à cet effet en veillant à ce
que le régulateur soit tourné vers l’intérieur.
17/40
Assembly page 17/40
Fax +32 030 9904733
Copies of the I/B. Please reproduce them without any
changes except under special instruction from Bimar
(Italy). The pages must be reproduced and folded in
order to obtain a booklet A5 (+/- 148.5 mm width x 210
mm height). When folding, make sure you keep the good
numbering when you turn the pages of the I/B. Don’t
change the page numbering. Keep the language
integrity.
Utiliser le régulateur IMQ homologué (pression de
sortie de 28 mbars pour gaz butane, avec une
consommation maximale de 1 kg/h) de Gpl) et le tube
flexible en caoutchouc IMQ homologué de longueur ne
dépassant pas 1 m. S’assurer de l’herméticité du tube
flexible aux jonctions avec un collier métallique serretube. Vérifier que le tube ne s’entortille pas et ne
subisse pas d’étranglement. Ouvrir lentement le robinet
et vérifier qu’il n’y a pas de fuite de gaz. NE PAS
UTILISER D’ALLUMETTES, mais opérer de la façon
décrite au paragraphe « Avertissements généraux » au
point « Si vous redoutez une fuite de gaz ».
Positionner la bouteille dans son logement et fermer le
volet.
Ne jamais utiliser une bouteille de gaz dont le corps, la valve, le collier ou le socle sont abîmés.
Ne pas brancher l’appareil sans le régulateur de gaz.
Lorsque l’appareil n'est pas utilisé, refermer le robinet de la bouteille de gaz.
Adressez-vous à votre fournisseur de gaz pour tout renseignement sur l'utilisation de la bouteille de gaz.
La bouteille de gaz doit toujours être utilisée en position verticale.
Comment changer la bouteille
1) Quand on remplace la bouteille, vérifier qu’il n’y ait pas d’autre source de chaleur à proximité.
2) Avant d’opérer, fermer le robinet de la bouteille ; s’assurer que le poêle est éteint dans la position
“Off” et refroidi avant de sortir la bouteille du poêle.
3) Dévisser le régulateur de pression de la bouteille.
Pour connecter une nouvelle bouteille, suivre les instructions indiquées au paragraphe précédent.
MODE D’EMPLOI
Allumage :
• Ouvrir le robinet de la bouteille de gaz à travers
l’ouverture présente sur le cache-bouteille.
• Appuyer et tourner dans le sens contraire des aiguilles
d'une montre le bouton de réglage en position «
Pilot ».
• Appuyer sur la touche piézoélectrique tout en gardant le
bouton enfoncé pour allumer la flamme pilote ; pour que
la flamme reste allumée, le bouton doit rester enfoncé
pendant 20 secondes après l’allumage.
• Si le pilote ne s'allume pas, répéter l’opération depuis le
début. (Pour les nouvelles installations ou pour changer
la bouteille de gaz, il pourrait être nécessaire de purger
l'air à l’intérieur des tuyauteries en gardant le « bouton
de contrôle » enfoncé pendant 2÷3 minutes).
18/40
Assembly page 18/40
Fax +32 030 9904733
Copies of the I/B. Please reproduce them without any
changes except under special instruction from Bimar
(Italy). The pages must be reproduced and folded in
order to obtain a booklet A5 (+/- 148.5 mm width x 210
mm height). When folding, make sure you keep the good
numbering when you turn the pages of the I/B. Don’t
change the page numbering. Keep the language
integrity.
Vérifier que la flamme pilote est allumée à travers les orifices du brûleur.
Si cela n’arrive pas, répéter l’opération d’allumage.
Remarque: si la flamme pilote ne s’amorce pas, il est possibile
d’allumer le champignon chauffant en insérant une allumette allumée,
tout en utilisant le support d’allumette en dotation, à travers n’importe
quel orifice du brûleur ; pour
que la flamme du brûleur reste allumée, il faut appuyer sur la poignée
pendant 10 secondes après l’allumage dans la position “
Pilot”. Si,
ancore une fois, la flamme pilote ne s’allume pas, fermer le robinet de la
bouteille et s’adresser à un personnel qualifié.
Réglage du chauffage
Pour régler le bouton de contrôle dans les positions indiquées, le tourner et le maintenir pressé à moitié
de la course jusqu’à l’état correspondant à la puissance maxi.
Pour diminuer la puissance, tourner le bouton sur la position “ Low”.
Pour augmenter la puissance, tourner le bouton sur la position “ High”.
Si l’on souhaite éteindre le poêle pendant une courte période, tourner le bouton sur la position
“ pilot”.
Comment éteindre le poêle
Tourner le bouton de contrôle sur la position “
Off” et fermer le robinet de la bouteille. Quand le
brûleur ou la flamme pilote s’éteignent, un léger claquement doit être considéré comme normal.
Pour rallumer le poêle :
Après avoir éteint le poêle, il n’est possible de rallumer la flamme pilote qu’après avoir laissé
refroidir le poêle au moins 15 minutes.
NETTOYAGE
Attention: avant de nettoyer l’appareil, l’éteindre (tourner le bouton sur la position “Off” et fermer le
robinet de la bouteille) et attendre qu’il soit complètement refroidi.
Pour nettoyer l’extérieur du poêle, utiliser un chiffon doux imbibé d’eau et de savon liquide.
Ne pas utiliser de paille de fer ou de produit abrasif.
Ne pas utiliser de combustible ou de nettoyeur abrasif.
Ne pas laver le brûleur et la partie sous le robinet et l’allumeur au jet d’eau.
Sécher parfaitement le poêle avant de l’utiliser.
Vérifier périodiquement que les orifices de l’élément radiant et du brûleur ne sont pas obstrués par
des résidus de poussière, de duvet ou de fils ; le cas échéant, se servir d’un aspirateur pour les enlever.
FICHE DE LOCALISATION DES PANNES
Type de problème
Cause
Alimentation de gaz fermée.
Présence d’air dans le tube après une
période d’inutilisation.
La flamme pilote ne
s’allume pas
Solution
Ouvrir le gaz (bouteille).
Appuyer sur le bouton de contrôle dans la
position pilote pendant quelques minutes
pour effectuer la purge de l’air.
Obstruction de la tuyauterie de mélange du Recherche et élimination de l’obstruction
pilote.
et décrassage.
Obstruction de l’injecteur du pilote.
Essayer de décrasser à l’air comprimé et
remplacer l’injecteur.
Allumage piézoélectrique ou électrode
Allumer avec une allumette.
mouillée.
Câble d’allumage débranché.
Rebrancher.
19/40
Assembly page 19/40
Fax +32 030 9904733
Copies of the I/B. Please reproduce them without any
changes except under special instruction from Bimar
(Italy). The pages must be reproduced and folded in
order to obtain a booklet A5 (+/- 148.5 mm width x 210
mm height). When folding, make sure you keep the good
numbering when you turn the pages of the I/B. Don’t
change the page numbering. Keep the language
integrity.
La flamme pilote
s’allume mais
s’éteint quand on
relâche le bouton de
contrôle après 15
secondes.
Le brûleur principal
s’allume, mais
l’émission de chaleur
est insuffisante.
Cassure ou défaut de l’électrode.
La flamme pilote n’intéresse pas le
thermocouple.
Soupape gaz défectueuse.
Remplacer.
Remplacer le groupe (thermocouple
pilote, bougie).
Remplacer la soupape gaz.
Basse pression du gaz d’alimentation.
Bouteille presque vide ou proche de la
congélation.
Conditions très venteuses
Contrôle de la pression d’alimentation et
du régulateur.
Flamme jaune
Obstruction des trous du brûleur.
Ne pas utiliser le poêle dans des
conditions de vent fort.
Nettoyer les résidus de poussière, duvet et
fil à l’aide d’un aspirateur.
Les réparations doivent être réalisées exclusivement par un professionnel qualifié.
ENTRETIEN
Attention: vérifier régulièrement le bon état du tube flexible en caoutchouc et le remplacer s’il est
détérioré, usé ou endommagé, et dans tous les cas avant la date d’expiration indiquée. Utiliser
uniquement un tube flexible homologué IMQ.
Si vous n’utilisez pas l’appareil pendant une période déterminée, débranchez le poêle de la bouteille,
couvrez-le et rangez-le dans son emballage original dans un endroit sec dépourvu de poussière.
Avant l’utilisation, vérifier le bon état du joint d’étanchéité du régulateur de pression. Toutes les
activités d’entretien doivent être réalisées par un professionnel qualifié ou par un centre d’assistance
agréé par le revendeur.
Il est recommandé de faire réviser le poêle une fois par an par un technicien agréé.
Le poêle peut être stocké à condition de débrancher la bouteille de gaz et de la sortir de son logement.
Avant de débrancher la bouteille de gaz, s'assurer que le robinet est bien fermé, puis la placer à
l’extérieur, dans un lieu sûr et adéquat ; la bouteille de gaz ne doit pas être stockée dans un endroit
fermé ou au sous-sol.
Si vous décidez de ne plus utiliser l'appareil, il est recommandé de débrancher la bouteille (pour le
stockage, suivre les indications ci-dessous), de le rendre inopérant en coupant le tuyaux flexible en
caoutchouc et de rendre inoffensives les parties qui sont dangereuses si des enfants devaient s'en
servir pour jouer.
Ne pas déverser dans l'environnement des produits qui ne sont pas biodégradables, mais les éliminer
dans le respect des réglementations en vigueur. Au terme de son utilisation, le produit ne doit pas ĕtre
ĕliminé avec les déchets urbains. Le produit doit ĕtre remis à l’un des centres de collecte sélective
prévus par l’administration communale ou auprĕs des revendeus assurant ce service. Éliminier
séparément un poele à gaz pour extérieur permet d’éviter les retombées négatives pour
l’environnement et la santé dérivant d’une élimination incorrecte, et permet de récupérer les
matériaux qui le composent dans le but d’une économie importante en termes d’énergie et de
ressources. Pour rappeler l’obligation d’éliminer séparément les appareils électroménagers, le produit
porte le symbole d’un caisson à ordures barré. Tenir compte du fait que le poêle est composé des
matériaux suivants:
- fer: meuble de support du poêle, corps du brûleur, menuiserie (vis, etc.),
- aluminium: tuyaux gaz,
- laiton: robinet analyseur d’atmosphère,
- plastique: roues, allumeur piézoélectrique,
-cuivre recouvert de gaine en caoutchouc : fil allumeur piézoélectrique, thermocouple.
20/40
Assembly page 20/40
Fax +32 030 9904733
Copies of the I/B. Please reproduce them without any
changes except under special instruction from Bimar
(Italy). The pages must be reproduced and folded in
order to obtain a booklet A5 (+/- 148.5 mm width x 210
mm height). When folding, make sure you keep the good
numbering when you turn the pages of the I/B. Don’t
change the page numbering. Keep the language
integrity.
Please read these instructions carefully before using the appliance, and instruct other persons using it,
too, when necessary. Keep booklet handy for further use.
Dear Sir or Madam:
Thank you for purchasing the outdoor gas heater.
You choice will be rewarded when the outdoor gas heater performs its indispensable function of
extending your summers.
Our company has specialized in the production of heaters for over 60 years and is in a position to
guarantee the greatest degree of reliability.
All our products conform to European safety standards and the service centers that are listed in the
attachment will perform any maintenance and repair you require.
This short manual will provide all the advice you will need to make the best use of the outdoor gas
heater.
Thanks again for choosing us.
HEATER TECHNICAL FEATURES
Type of device
Model
Power (butane)
Gas consumption
Gas category
Gas Type/Pressure
Cylinder capacity
Cylinder diameter
Ignition systems
Anti-tip-over device
Reference standards
Movable outdoor heater with safety devices.
K105
Max 11 kW
790 gr/h
I3+(28-30/37)
Butane/28-30 mbar
Propane/37 mbar
15 Kg
36 cm
piezoelectric
Blocks gas dispensing at an inclination greater than 30°
Directive 90/396/EEC
0123
GENERAL INSTRUCTIONS
The heater must be installed as described in the “Installation” paragraph; please keep the following
warnings in mind:
1)
2)
3)
4)
5)
The appliance must only be used for heating outside areas, or large or well-ventilated areas. For
a well-ventilated area we intend with at least 25% of its perimeter open to the air (see fig. B).
The appliance must not be used to heat rooms in the home, closed environments, basements or
cellars.
The heater must be positioned 1 meter away from the walls and at least 100 cm below any
ceiling: if the heater is located under a patio, make sure that the patio roof will not be damaged
or catch fire from the heat (see fig. A).
The heater must be placed on a flat, stable surface, and when the heater is moved, the cylinder
valve must be closed.
The heater must not be placed nor must it be used close to windows, grids, vents or other
openings comunicating with other rooms in order to prevent the gas from the cylinder or from
combustion from reaching adjacent rooms or those below. Position the appliance far from
21/40
Assembly page 21/40
Fax +32 030 9904733
Copies of the I/B. Please reproduce them without any
changes except under special instruction from Bimar
(Italy). The pages must be reproduced and folded in
order to obtain a booklet A5 (+/- 148.5 mm width x 210
mm height). When folding, make sure you keep the good
numbering when you turn the pages of the I/B. Don’t
change the page numbering. Keep the language
integrity.
6)
7)
8)
9)
fabrics, curtains and other inflammable materials or anything else that could touch the radiant
parts and/or the parabolic reflector.
In the area where the heater is installed, there must be a sufficient air flow to guarantee regular
combustion.
Never use the appliance to dry clothes.
Never use the heater without the parabolic reflector. The appliance must be completely
assembled and must be used only with the 15 Kg cylinder inserted in the compartment.
Keep the heater away from inflammable materials, gas cylinders or anything else to avoid the
risk of fire.
Fig.B
Fig.A
10) The combustion gases must be free to escape: make sure they do not enter adjacent or upper
rooms.
11) Never move the heater when it is working or, if just switched off, until it has cooled down
completely.
12) To turn the heater off, turn the knob to “Off” and close the valve on the cylinder.
13) The heater must not be used when windy, but secured to avoid the risk of tipping over.
14) The heater must be provided with a regulator and hose: make sure they are included in the
supply. The flexible hose must be checked regularly whenever the cylinder is replaced to be sure
it has no scratches or cuts and that it is in a perfect state. It must be replaced in any case before
the expiry date stamped on the hose itself.
15) The flexible rubber hose must comply with the UNI-CIG 7140 standard, with an internal
diameter of 8mm and a length of 120cm.
16) If you think there's a gas leak:
22/40
Assembly page 22/40
Fax +32 030 9904733
Copies of the I/B. Please reproduce them without any
changes except under special instruction from Bimar
(Italy). The pages must be reproduced and folded in
order to obtain a booklet A5 (+/- 148.5 mm width x 210
mm height). When folding, make sure you keep the good
numbering when you turn the pages of the I/B. Don’t
change the page numbering. Keep the language
integrity.
-
immediately close the cylinder valve and create a circulation of air to disperse the gas in the
surroundings.
turn off all the lights (if near the heater).
do not disconnect the regulator
check that all the connections and fittings are correct and tight and slowly open the cylinder
valve
to find the gas leak, brush soapy water on all the fittings and connections of the gas circuit. If there's
a leak, you will see bubbles; if you find one, close the value on the cylinder and tighten the fitting
and/or push the connection together better. Open the gas cylinder valve and check for leaks again: if
there are still leaks, close the cylinder valve and request professionally qualified assistance.
Warning: do not check for gas leaks when the appliance is hot, but wait until it is cold.
17) The appliance must be inspected before use at least once a year by a professional expert.
Cleaning may be necessary more often, especially in the area around the burner and the valve to
ensure sufficient air flow to the burner.
18) This appliance is not intended for use by persons (including children) with reduced
physical, sensory or mental capabilities, or lack of experience and knowledge, unless they
have been given supervision or instruction concerning use of the appliance by a person
responsible for their safety. Children should be supervised to ensure that they do not play
with the appliance.
19) The appliance must be kept out of children’s reach.
20) Special care should be taken if the heater is on a surface where it can move or twist on its
wheels or castors if knocked by a child or dog, etc.
WARNING:
- Immediately close the cylinder valve and carefully check the appliance in the case of:
a) smell of gas and/or yellow flame
b) the heater does not reach its normal temperature. A surrounding temperature of less than 5°C
causes a reduction of heating capacity and the heater will not function correctly
c) the heater makes a noise (splutters) when switched on
d) some parts of the heater become very hot, children must be kept at a safe distance
e) both children and adults must beware of the heater’s hot parts and must remain at a safe distance
to avoid burns to the skin or setting clothing on fire
f) children and pets must be carefully supervised by an adult when in the vicinity of the heater.
g) inflammable or combustible fabrics or materials, including plants, must be kept at a safe distance
from the heater (at least 1 metre)
h) never obstruct the air vents on the heater, especially those close to the burner and the valve.
INSTALLATION
After removing the packaging, check for damage; if you are unsure, do not use the appliance and
contact qualified service personnel. The packing materials (plastic bags, polystyrene foam, staples,
etc.) should not be left within the reach of children.
23/40
Assembly page 23/40
Fax +32 030 9904733
Copies of the I/B. Please reproduce them without any
changes except under special instruction from Bimar
(Italy). The pages must be reproduced and folded in
order to obtain a booklet A5 (+/- 148.5 mm width x 210
mm height). When folding, make sure you keep the good
numbering when you turn the pages of the I/B. Don’t
change the page numbering. Keep the language
integrity.
1: Remove each component from the packaging
2: Fit the cylinder compartment to the base
using 5 M5X10 screws and 5 washers.
3: Fit the top above the cylinder compartment with 5 4: Mount the column on the top with 4 M5x10
M5x10 screws and 5 washers.
screws and 4 washers; now insert the plastic
column protection.
5: Screw the 3 spacers 5a: Secure the reflecting dish to 6: Connect the metal gas tube to the burner and
onto the burner before the burner with 3 hexagonal nuts tighten the fitting well. Complete the gas
fitting the dish.
and 3 washers.
circuit, connecting the flexible hose to the
regulator.
24/40
Assembly page 24/40
Fax +32 030 9904733
Copies of the I/B. Please reproduce them without any
changes except under special instruction from Bimar
(Italy). The pages must be reproduced and folded in
order to obtain a booklet A5 (+/- 148.5 mm width x 210
mm height). When folding, make sure you keep the good
numbering when you turn the pages of the I/B. Don’t
change the page numbering. Keep the language
integrity.
7: Check the gas seal without lighting the burner:
Warning: NEVER use a flame to detect any leaks.
• First, prepare a solution of soap and water (1 part liquid detergent and 3 parts water).
• Position the pre-assembled heating element as shown in the figure and connect the flexible rubber tube to
the end of the metal gas tube and this to the pressure regulator (30 mbar). Turn the fitting to off and open
the cylinder valve.
• Use a brush to spread soapy water on the
connection points. Make sure that the gas circuit
(tubes, fittings, etc.) has no leaks: if there were
leaks, you would see soap bubbles. If there are
leaks, close the gas cylinder valve, tighten the
connections more and then turn on the gas and
check again. If you are unable to eliminate the
leak, close the gas cylinder valve and request
professionally-qualified assistance.
• Disconnect the flexible tube from the pressure
regulator.
8: Insert the gas tube through the Note: if the heater is configured for the table, assemble the column
column, taking care not to deform before the gas pipe. For assembly use the figures as a guide:
or damage it burner with: 3 M5x10 secure the support to the table using the two screws and fit the
bolts and 3 washers.
plastic lock-ring onto the column
couple the two shells (right and left)
ensure blocking by tightening the lock-ring and by closing the
hooks in the rear part of the shells.
25/40
Assembly page 25/40
Copies of the I/B. Please reproduce them without any
changes except under special instruction from Bimar
(Italy). The pages must be reproduced and folded in
order to obtain a booklet A5 (+/- 148.5 mm width x 210
mm height). When folding, make sure you keep the good
numbering when you turn the pages of the I/B. Don’t
change the page numbering. Keep the language
integrity.
Fax +32 030 9904733
9: Fit the door to the cylinder compartment
Notes: if the outdoor gas heater is combined with
base stand, fit the base stand to base using 6 screws
M5X10 and 2 washers. To fix the base to earth, use
the screws or the nail.
Notes: if the outdoor gas heater is combined with a
table, fit the base using 2 screws and 2 washers.
10: CONNECTING THE CYLINDER
1) The appliance is prepared to use LPG gas in a 15 Kg cylinder.
2) Open the door, connect the pressure regulator to the gas cylinder as follows:
Before connecting the cylinder, make sure there are no other sources of heat or open-flame burners
nearby.
A) Make sure that the gasket is correctly
inserted in the regulator connector.
Periodically check the gasket and, if
damaged or irregularly compressed,
replace it.
B)
Screw the regulator nut to the cylinder valve by turning counterclockwise (left hand threading)
with the aid of a wrench.
N.B. The position of the regulator after tightening the nut is NOT important, DO NOT try to position
it horizontally.
26/40
Assembly page 26/40
Copies of the I/B. Please reproduce them without any
changes except under special instruction from Bimar
(Italy). The pages must be reproduced and folded in
order to obtain a booklet A5 (+/- 148.5 mm width x 210
mm height). When folding, make sure you keep the good
numbering when you turn the pages of the I/B. Don’t
change the page numbering. Keep the language
integrity.
Fax +32 030 9904733
C)
Position the cylinder in its container so that the regulator is
facing the inside.
Use the IMQ-approved regulator (with output pressure
of 28 mbar for butane gas, and with a maximum
consumption of 1Kg/h for LPG) and an IMQ-approved
flexible rubber tube no longer than 1 m. Ensure the
tightness of the flexible tube to the junction with a
metal tube clamp. Check that the tube is not twisted or
have bottle-necks. Slowly open the valve and check for
gas leaks. DO NOT USE MATCHES, but proceed as
described in the paragraph “General Instructions”
under “if you think there's a gas leak.”
Place the cylinder in its seat and close the door.
Never use a cylinder if its body, valve, collar or base are damaged.
Never connect the appliance without the gas regulator.
When the appliance is not in use, close the cylinder valve.
Apply to your gas supplier for information concerning use of the base cylinder.
The gas cylinder must always be used in a vertical position.
How to replace the cylinder
1) When you replace the cylinder, make sure there are no other sources of heat nearby.
2) First, close the valve on the gas cylinder before doing anything else; make sure that the heater
knob is turned to “Off” and cool; then remove the cylinder from the heater.
3) Unscrew the pressure regulator from the cylinder.
To connect a new cylinder, follow the instructions in the preceding paragraph.
USAGE INSTRUCTIONS
Switching on:
• Open the cylinder valve through the opening in the
cylinder cover.
• Press and turn anti-clockwise the adjustment knob to
the “
Pilot” position.
• While holding down the knob, at the same time press
the piezoelectric button to light the pilot flame; to keep
the flame alight, the knob must be held down for 20
seconds after switching on.
• If the pilot flame does not light, repeat the whole
operation. (For new installations or when changing the
cylinder, it may be necessary to evacuate the air inside
the pipes by holding down the “control knob” for 2÷3
minutes).
Check that the pilot is lit by looking through the burner holes.
Check that the pilot stays lit. If not, repeat again.
27/40
Assembly page 27/40
Fax +32 030 9904733
Copies of the I/B. Please reproduce them without any
changes except under special instruction from Bimar
(Italy). The pages must be reproduced and folded in
order to obtain a booklet A5 (+/- 148.5 mm width x 210
mm height). When folding, make sure you keep the good
numbering when you turn the pages of the I/B. Don’t
change the page numbering. Keep the language
integrity.
Note: if the pilot does not light, it is possible to light the
appliance by inserting a lit match, using the match holder
supplied through any burner hole; to ensure that the burner
flame remains alight it is necessary to hold down the knob for
10 seconds after ignition in the “
Pilot” position. If this
happens again, (the pilot flame does not light) contact
professionally qualified personnel.
Regulating heating
To adjust the “valve control knob” to the indicated positions, turn it while holding it pressed halfwaydown until reaching the maximum power position.
To lower the power, turn the knob to the “ Low” position.
To increase the power, turn the knob to the “
High” position.
If you want to turn heater off briefly, turn the knob to the “
Turning off the heater
pilot” position.
Turn the control knob to the “
Off” position and close the gas cylinder valve. When the burner or
pilot light goes off, a light pop is normal.
Relighting
After turning off the heater, you cannot relight the pilot until the heater has cooled for at least 15
minutes.
CLEANING
Attention: before cleaning the heater, turn it off (by turning the knob to “Off” and closing the gas
cylinder valve) and wait for it to cool completely.
To clean the outside of the heater, use a soft cloth soaked with water and a liquid detergent.
Do not use scouring pads or abrasive products.
Do not use inflammable or abrasive cleaners.
Do not wash the burner, or the cylinder valve and ignition below it, with a water spray.
Dry the heater completely before using it.
Periodically check that the holes of the radiant element and burner are free of dust, lint or threads and
use a vacuum cleaner, if necessary, to remove them.
TROUBLESHOOTING CARD
Type of Problem
Pilot doesn't light
Cause
Gas valve closed
Air in the tube after a period of
disuse
Pilot mixing tube obstructed.
Pilot injector obstructed.
Piezoelectric ignition or
electrode wet.
Ignition wire disconnected.
Electrode broken or defective.
Remedy
Open the gas cylinder valve
Press the “valve control knob” to the pilot
position for several minutes to purge the
air.
Find and remove the obstruction and clean.
Try to clean with compressed air and
replace injector.
Light with a match.
28/40
Assembly page 28/40
Reconnect it.
Replace.
Fax +32 030 9904733
Copies of the I/B. Please reproduce them without any
changes except under special instruction from Bimar
(Italy). The pages must be reproduced and folded in
order to obtain a booklet A5 (+/- 148.5 mm width x 210
mm height). When folding, make sure you keep the good
numbering when you turn the pages of the I/B. Don’t
change the page numbering. Keep the language
integrity.
The pilot lights but
goes out when the
control knob is
released after 15
seconds.
The main burner
lights but there's not
enough heat.
Yellow flame
The pilot flame is not hitting
the thermocouple.
Gas valve defective.
Replace the unit (pilot thermocouple, spark
plug)
Replace gas valve.
Low gas supply pressure.
Cylinder almost empty or close
to freezing.
Very windy conditions.
Burner holes obstructed.
Check the supply pressure and regulator.
Do not use the heater when very windy.
Clean dust, lint and threads with a vacuum
cleaner.
Repairs may only be made by a professional expert.
MAINTENANCE
Attention: regularly check the condition of the flexible rubber and replace it if deteriorated, worn or
damaged and, in any case, before the indicated expiration date. Use only IMQ-approved flexible
tubes.
If the heater isn't going to be used for a while, disconnect the gas cylinder, cover it and put it back in
its original packaging in a dry, dust-free location. Before using it again, check the condition of the
gasket seal on the pressure regulator. All maintenance must be performed by professionally qualified
personnel or a service center recommended by the reseller.
The heater needs to be checked by an authorized technician every year.
The heater can be stored in a room if the cylinder is detached and removed from its compartment.
Before disconnecting the cylinder, make sure the valve is closed properly. The cylinder must be
stored outside in a safe place and never in a closed room, basement or cellar.
If you decide not to use the appliance any more, we recommend that you disconnect the cylinder
(follow the above instructions for storage), make it inoperable by cutting the flexible rubber tube and,
if children are playing with it, make the dangerous parts harmless.
Do not dispose of non-biodegradable products in the environment but dispose of them in accordance
with current law. At the end of its working life, the product must not be disposed of as urban waste. It
must be taken to a special local authority differentiated waste collection centre or to a dealer
providing this service. Disposing of an outdoor gas heater separately avoids possible negative
consequences for the environment and health deriving from inappropriate disposal and enables the
constituent materials to be recovered to obtain significant savings in energy and resources. As a
reminder of the need to dispose of household appliances separately, the product is marked with a
crossed-out wheeled dustbin. Keep in mind that the heater is made of the following materials:
- iron: heater cabinet, burner body, small hardware (screws, etc.)
- aluminum, gas tubes
- brass: tap, atmosphere analyzer
- plastic: wheels, piezoelectric igniter
-copper covered with rubber: piezoelectric igniter wire, thermocouple.
29/40
Assembly page 29/40
Fax +32 030 9904733
Copies of the I/B. Please reproduce them without any
changes except under special instruction from Bimar
(Italy). The pages must be reproduced and folded in
order to obtain a booklet A5 (+/- 148.5 mm width x 210
mm height). When folding, make sure you keep the good
numbering when you turn the pages of the I/B. Don’t
change the page numbering. Keep the language
integrity.
Bitte lesen Sie vor der Benutzung des Gerätes sorgfältig diese Anleitungen und setzen Sie
gegebenenfalls Dritte darüber in Kenntnis. Gebrauchsanleitung zum weitren Nachschlagen
aufbewahren.
Sehr geehrte Kundin, sehr geehrter Kunde
wir beglückwünschen Sie zum Kauf Ihres Terrassenstrahlers.
Sie werden Ihre Wahl nicht bereuen, denn der Terrassenstrahler verlängert Ihren Sommer.
Unser Unternehmen ist auf die Herstellung von Heizelementen spezialisiert und kann auf eine über
sechzigjährige Erfahrung zurückblicken und damit ein Höchstmaß an Zuverlässigkeit garantieren.
Alle unsere Produkte entsprechen den geltenden europäischen Sicherheitsvorschriften. In unseren
Kundendienstcentern, deren Adressen Sie in der Anlage finden, können Sie ihr Gerät warten und
reparieren lassen.
In der vorliegenden Bedienungsanleitung finden Sie alle Empfehlungen, um Ihren Terrassenstrahler
bestmöglich nutzen zu können.
Wir danken Ihnen nochmals, dass Sie sich für unser Produkt entschieden haben.
TECHNISCHE MERKMALE DES HEIZGERÄTS
Gerätetyp
Heizgerät für draußen, nicht ortsfest, einschließlich
Sicherheitseinrichtung.
Modell
K105
Leistung (Butan)
max. 11 kW
Gasverbrauch
790 r/h
Gaskategorie
I3+(28-30/37)
Gastyp/Druck
Butan/28-30 mbar
Propan/37 mbar
Inhalt Gasflasche
15 kg
Gasflaschendurchmesser
36 cm
Zündung
Piezozündung
Kippsicherung
Sicherheitsabschaltung bei mehr als 30° Neigungswinkel
Bezugsnormen
Richtlinie 90/396/EWG
0123
ALLGEMEINE HINWEISE
Das Heizgerät muss wie im Abschnitt „Installation“ beschrieben installiert werden. Dabei ist auf
Folgendes zu achten:
1) Das Gerät darf nur zum Heizen im Freien oder in großen, gut belüfteten Räumen verwendet
werden. Gut belüftete Räume sind Räumlichkeiten, deren Fläche rundherum mindestens 25%
offen ist (siehe Abb. B).
2) Das Geräte darf nicht verwendet werden zum: Heizen von Wohnräumen, geschlossenen
Räumen, Halbsouterrain und Souterrain.
3) Das Heizgerät muss in einem Abstand von 1 Meter zu den Wänden und mindestens 100 cm zur
Decke aufgestellt werden. Sollte das Heizgerät unter einem Patio betrieben werden,
vergewissern Sie sich, dass die Decke des Patio nicht beschädigt wird und durch die abgegebene
Wärme nicht in Brand gesetzt werden kann (siehe Abb. A).
4) Das Heizgerät muss auf einer stabilen, ebenen Fläche aufgestellt werden, beim
Bewegen/Transportieren des Heizgeräts muss der Hahn an der Gasflasche geschlossen sein.
30/40
Assembly page 30/40
Fax +32 030 9904733
Copies of the I/B. Please reproduce them without any
changes except under special instruction from Bimar
(Italy). The pages must be reproduced and folded in
order to obtain a booklet A5 (+/- 148.5 mm width x 210
mm height). When folding, make sure you keep the good
numbering when you turn the pages of the I/B. Don’t
change the page numbering. Keep the language
integrity.
5)
6)
7)
8)
9)
Das Heizgerät darf in der Nähe von Fenstern, Gittern, Luftschächten oder sonstigen Öffnungen,
die mit anderen Räumen in Verbindung sind, weder aufgestellt noch betrieben werden. Dies um
zu vermeiden, dass das Gas der Gasflasche oder das Verbrennungsgas in den unten- oder
anliegenden Raum eindringt. Platzieren Sie das Gerät in ausreichender Entfernung zu Stoffen,
Vorhängen und anderem brennbarem Material sowie all dessen, was mit dem Heizteil bzw. dem
Reflektor in Berührung kommen könnte.
Es ist unbedingt erforderlich, dass in dem Raum, in dem das Heizgerät installiert ist, die
Luftmenge eindringen kann, die zur regulären Verbrennung benötigt wird.
Das Gerät darf nicht zum Trocknen von Bekleidungsstücken verwendet werden.
Bitte benutzen Sie das Heizgeärt nicht ohne den Reflektor, das Gerät muss komplett
zusammengebaut sein. Das Heizgerät darf ausschließlich mit der 15-kg-Glasflasche betrieben
werden, die an dem dafür vorgesehenen Platz untergebracht ist.
Halten Sie das Heizgerät in ausreichendem Abstand zu brennbarem Material, Gasflaschen oder
anderem, um Brandgefahr zu vermeiden.
Fig.B
Fig.A
10) Das Verbrennungsgas muss frei abgeführt werden können: Stellen Sie bitte sicher, dass es nicht
in die anliegenden oder darüber liegenden Räume eindringt.
11) Bewegen/Transportieren Sie das Heizgerät nie während des Betriebs bzw. direkt nach dem
Abschalten, solange es noch nicht ganz abgekühlt ist.
12) Zum Abschalten des Heizgeräts drehen Sie den Griff in die Stellung “Off” und schließen den
Hahn an der Gasflasche.
13) Bei Wind das Heizgerät nicht benutzen, um ein Umkippen zu vermeiden. Bei Wind das Gerät
sichern.
14) Das Heizgerät sollte mit Regler und Rohr ausgestattet sein, bitte prüfen Sie, ob diese Teile zum
Lieferumfang gehören. Der Schlauch wird regelmäßig bei jedem Gasflaschenwechsel
31/40
Assembly page 31/40
Fax +32 030 9904733
Copies of the I/B. Please reproduce them without any
changes except under special instruction from Bimar
(Italy). The pages must be reproduced and folded in
order to obtain a booklet A5 (+/- 148.5 mm width x 210
mm height). When folding, make sure you keep the good
numbering when you turn the pages of the I/B. Don’t
change the page numbering. Keep the language
integrity.
kontrolliert. Bitte stellen Sie dabei sicher, dass er keine Kratzer und Ritzen hat und dass er sich
in einem einwandfreien Zustand befindet. Auf jeden Fall ist der Schlauch bis zum darauf
aufgestempelten Datum auszutauschen.
15) Der Gummischlauch muss ein Schlauch nach der Norm UNI-CIG 7140 sein, Innendurchmesser
8 mm, Länge 120 cm.
16) Falls Sie vermuten, dass Gas austritt:
Drehen Sie den Hahn der Gasflasche sofort zu und sorgen Sie dafür, dass die Luft zirkuliert,
damit der Raum vom Gas befreit wird
Schalten Sie alle Lampen aus (sofern Sie sich in der Nähe des Heizgeräts befinden)
Klemmen Sie den Regler nicht ab
Kontrollieren Sie, dass alle Verbindungen und Anschlüsse korrekt eingesteckt und gut
angezogen sind. Öffnen Sie dann langsam den Hahn an der Gasflasche.
Um einen Gasaustritt festzustellen, bereiten Sie etwas Seifenwasser vor und streichen es mit einem
kleinen Pinsel
über alle Anschlüsse und Verbindungen des Gaskreislaufs. Im Falle eines Gasaustritts bilden sich
kleine Blasen. In diesem Fall schließen Sie den Hahn an der Gasflasche und ziehen den Anschluss
gut an bzw. stecken die Verbindungsstücke tiefer ineinander. Öffnen Sie dann wieder den Hahn an
der Gasflasche und überprüfen Sie erneut die Dichtigkeit: Sollte immer noch Gas austreten,
schließen Sie den Hahn an der Gasflasche und wenden sich an qualifiziertes Fachpersonal.
Achtung: Wenn das Heizgerät warm ist, nicht nach Leckstellen suchen, sondern dazu abwarten,
dass es abgekühlt ist.
17) Das Heizgerät muss vor dem Gebrauch mindestens 1x im Jahr durch qualifiziertes Fachpersonal
geprüft werden. Die Reinigung sollte öfters erforderlich sein: Die Kontrolle muss den Bereich
um den Brenner und um den Hahn herum umfassen. Damit wird gewährleistet, dass genügend
Luft zum Brenner gelangt.
18) Das Produkt darf von Personen (einschließlich Kindern) mit physischer, sensorialer, geistiger
Behinderung oder mit unzureichender Kenntnis und Erfahrung nur unter Aufsicht und nach
eingehender Unterrichtung über den Gebrauch des Gerätes durch Personen, die für ihre
Sicherheit verantwortlich sind, benutzt werden. Kinder sollten beaufsichtigt werden, um
sicherzustellen, dass sie nicht mit dem Gerät spielen.
19) Das Gerät für Kinder unzulänglich aufbewahren.
ACHTUNG:
- Bitte schließen Sie sofort den Hahn der Gasflasche und prüfen Sie das Gerät sofort, falls folgende
Bedingungen eintreten:
a) Gasgeruch und/oder gelbe Flamme
b) Das Heizgerät erreicht nicht die normale Temperatur Die Umgebungstemperatur unter 5°C
reduziert die Heizleistung und das Heizgerät arbeitet nicht ordnungsgemäß
c) Beim Einschalten kommen Geräusche vom Brenner (Knistergeräusch)
d) Einige Teile des Heizgeräts werden heiß, bitte auf genügenden Abstand bei Kindern achten
e) Kinder und Erwachsene sollten auf die heißen Teile des Heizgeräts achten, daher ist auf nötigen
Abstand zu achten. Somit werden Brandwunden und Verbrennungen vermieden. Vermieden
wird ebenfalls, dass Teile von Kleidungsstücken verbrennen
f) Kinder und Haustiere sollen aufmerksam von Erwachsenen beaufsichtigt werden, wenn sie sich
in der Nähe des Heizgeräts aufhalten oder dort vorbeigehen.
g) Stoffe, entzündbares oder verbrennbares Material oder Pflanzen müssen wenigstens 1 Meter
Abstand zum Heizgerät einhalten
h) Belüftungsöffnungen des Heizgeräts nicht benutzen, insbesondere die, die in der Nähe des
Brenners oder des Hahns sind
INSTALLATION
Nachdem Sie die Verpackung entfernt haben, vergewissern Sie sich, dass das Gerät sich in einwandfreiem
Zustand befindet. Sollten Sie Zweifel daran haben, benutzen Sie das Gerät nicht, sondern wenden sich an
32/40
Assembly page 32/40
Copies of the I/B. Please reproduce them without any
changes except under special instruction from Bimar
(Italy). The pages must be reproduced and folded in
order to obtain a booklet A5 (+/- 148.5 mm width x 210
mm height). When folding, make sure you keep the good
numbering when you turn the pages of the I/B. Don’t
change the page numbering. Keep the language
integrity.
Fax +32 030 9904733
qualifiziertes Fachpersonal. Die Verpackungsbestandteile (Plastikbeutel, Styropor, Nägel usw.) müssen sich
außerhalb der Reichweite von Kindern befinden, da es sich um potentielle Gefahrenquellen handelt.
1: Entfernen Sie alle Teile der Verpackung
2: Befestigen Sie die Seitenwände am Boden des
Gasflaschenfachs mit 5 Schrauben M5X10 und 5
Unterlegscheiben.
3: Befestigen Sie die Abdeckung auf dem
Gasflaschenfach mit 5 Schrauben M5X10 und 5
Unterlegscheiben .
4: Setzen Sie das Standrohr mit 4 Schrauben
M5X10 und 4 Unterlegscheiben in die Abdeckung
ein, bringen Sie dann den Kunststoffschutz am
Standrohr an.
5: Schrauben Sie 3
Abstandhalter auf den
Brenner, bevor Sie den
Parabolspiegel
befestigen.
6: Schließen Sie das Metallgasrohr am Brenner an
und ziehen Sie den Anschluss gut an;
vervollständigen Sie die Gasleitung, indem Sie
den Schlauch an den Regler anschließen.
5a: Bringen Sie den
Parabolspiegel mit 3
Sechskantschrauben und 3
Unterlegscheiben an.
33/40
Assembly page 33/40
Fax +32 030 9904733
Copies of the I/B. Please reproduce them without any
changes except under special instruction from Bimar
(Italy). The pages must be reproduced and folded in
order to obtain a booklet A5 (+/- 148.5 mm width x 210
mm height). When folding, make sure you keep the good
numbering when you turn the pages of the I/B. Don’t
change the page numbering. Keep the language
integrity.
7: Kontrolle auf Gasdichtigkeit ohne Anzünden des Brenners:
Achtung: Es ist absolut zu vermeiden, dass zum Feststellen einer eventuellen Leckage eine Flamme
benutzt wird.
• Zunächst bereiten Sie eine Seifenlauge vor (1 Flüssigreiniger und 3 Teile Wasser).
• Platzieren Sie das bereits zusammengebaute Heizgerät wie in der Abbildung gezeigt und schließen
Sie am Ende des Metallgasrohres den Gummischlauch und diesen dann wieder an den Druckregler
(30 mbar) an. Stellen Sie den Hahn in die abgeschaltete Stellung (Off) und öffnen Sie den Hahn an
der Gasflasche.
• Mit Hilfe eines kleinen Pinsels tragen Sie die Seifenlösung auf die Anschlussstellen auf. Überprüfen
Sie, ob die Gasleitung (Leitungen, Anschlüsse usw.) dicht ist.
Im Falle einer Blasenbildung tritt Gas aus. Bei
Gasaustritt schließen Sie den Hahn an der
Gasflasche. Dann ziehen Sie die Verbindungen
besser an, öffnen das Gas und kontrollieren erneut.
Sollte der Gasaustritt nicht beseitigt werden können,
schließen Sie den Hahn an der Gasflasche und
wenden sich an qualifiziertes Fachpersonal.
• Klemmen Sie den Schlauch vom Druckregler
ab.
8: Führen Sie das Gasrohr durch
das Standrohr ein und achten Sie
darauf, es weder zu verformen
noch zu beschädigen; befestigen
Sie den Brenner mit Hilfe von 3
Schrauben M5x10 und 3
Unterlegscheiben
Hinweis: Falls der Terrassenstrahler mit Tisch ausgerüstet ist, den
Tisch am Standrohr vor dem Anbringen der Gasleitung montieren.
Halten Sie sich beim Zusammenbau an die folgende Abbildung:
Die Tischhalterungen mit zwei Schrauben befestigen und die
Nutmutter aus Kunststoff auf dem Standrohr anbringen
Die beiden Halbschalen (rechts und links) zusammensetzen
Durch Festziehen der Nutmutter blockieren und die Haken auf
der Rückseite der Halbschalen schließen
34/40
Assembly page 34/40
Fax +32 030 9904733
Copies of the I/B. Please reproduce them without any
changes except under special instruction from Bimar
(Italy). The pages must be reproduced and folded in
order to obtain a booklet A5 (+/- 148.5 mm width x 210
mm height). When folding, make sure you keep the good
numbering when you turn the pages of the I/B. Don’t
change the page numbering. Keep the language
integrity.
9: Bringen Sie die Tür des
Gasflaschenfachs an.
Hinweis: sollte der Terrassenstrahler mit Platten zur
Befestigung am Boden ausgestattet sein, die Platten mit 6
Schrauben M5X10 und 6 Unterlegscheiben am Sockel
anschrauben und mit Bolzen oder Nägeln am Boden befestigen.
Hinweis: falls der Terrassenstrahler mit Rädern
geliefert wird, dieselben mit 2 Schrauben und 2
Unterlegscheiben am Sockel befestigen.
10: ANSCHLIESSEN DER GASFLASCHE
1) Das Gerät ist für den Betrieb mit Flüssiggas in einer 15-kg-Gasflasche vorgesehen.
2) Öffnen Sie das Schott, entfernen Sie die Kette und schließen Sie den Druckregler
folgendermaßen an die Gasflasche an:
Bevor Sie die Gasflasche anschließen, vergewissern Sie sich, dass sich keine weiteren Wärmequellen
oder Brenner mit Flamme in der Nähe befinden.
A) Vergewissern Sie sich, dass die Dichtung
korrekt am Anschluss des Reglers einliegt.
Kontrollieren Sie die Dichtung in
regelmäßigen Abständen. Sollte Sie
beschädigt oder unregelmäßig
zusammengedrückt sein, wechseln Sie sie
aus.
B)
Schrauben Sie die Mutter des Reglers am Ventil der Gasflasche an und drehen Sie dabei mit dem
Schlüssel entgegen dem Uhrzeigersinn (linksgängiges Gewinde).
Anm.: Die Stellung des Reglers nach dem Anziehen der Mutter ist NICHT von Bedeutung. Versuchen
Sie NICHT, ihn waagerecht zu stellen.
35/40
Assembly page 35/40
Fax +32 030 9904733
Copies of the I/B. Please reproduce them without any
changes except under special instruction from Bimar
(Italy). The pages must be reproduced and folded in
order to obtain a booklet A5 (+/- 148.5 mm width x 210
mm height). When folding, make sure you keep the good
numbering when you turn the pages of the I/B. Don’t
change the page numbering. Keep the language
integrity.
C) Platzieren Sie die Gasflasche im Behältermantel so, dass der Regler
nach innen zeigt.
Verwenden Sie den zugelassenen IMQ Regler (mit
Ausgangsdruck 28 mbar für Butangas, max. Verbrauch
1kg/h Flüssiggas) und zugelassenem IMQ Gummischlauch
von höchstens 1 m Länge. Sorgen Sie für die Dichtigkeit
des Schlauchs an den Anschlüssen mit Hilfe einer
Bandschelle aus Metall. Kontrollieren Sie, dass der
Schlauch sich nicht verwindet oder gequetscht wird.Öffnen
Sie langsam den Hahn und überprüfen Sie, dass kein Gas
austritt. VERWENDEN SIE KEINESFALLS
STREICHHÖLZER, sondern gehen Sie wie im Abschnitt
“Allgemeine Hinweise” im Absatz “Verdacht auf
Gasaustritt” vor.
Platzieren Sie die Gasflasche im Behältermantel und
schließen Sie das Schott.
Nie eine Gasflasche benutzen, wenn Flaschenkörper, Ventil, Bund und Basis beschäftigt sind.
Das Heizgerät nicht ohne Gasregler anschließen.
Bei Nichtbenutzung des Heizgeräts den Hahn der Gasflasche schließen.
Bitte wenden Sie sich an Ihren Lieferanten, um nähere Informationen über den Gebrauch der
Gasflasche zu erhalten.
Die Gasflasche wird immer senkrecht benutzt.
Auswechseln der Gasflasche
1) Wenn Sie die Gasflasche wechseln, vergewissern Sie sich, dass sich keine anderen Wärmequellen
in der Nähe befinden.
2) Bevor Sie die Gasflasche wechseln, schließen Sie den Hahn an der Gasflasche; vergewissern Sie
sich, dass das Heizelement auf „Off“ steht und abgeschaltet sowie abgekühlt ist. Nehmen Sie dann
die Gasflasche aus dem Heizgerät.
3) Schrauben Sie den Druckregler von der Gasflasche.
Zum Anschließen der neuen Gasflasche befolgen Sie die Anweisungen im vorherigen Abschnitt.
36/40
Assembly page 36/40
Fax +32 030 9904733
Copies of the I/B. Please reproduce them without any
changes except under special instruction from Bimar
(Italy). The pages must be reproduced and folded in
order to obtain a booklet A5 (+/- 148.5 mm width x 210
mm height). When folding, make sure you keep the good
numbering when you turn the pages of the I/B. Don’t
change the page numbering. Keep the language
integrity.
BEDIENUNGSANLEITUNG
Zündung:
• Öffnen Sie den Hahn der Gasflasche durch die Öffnung
der Gasflaschenabdeckung.
• Den Griff drücken und gegen den Uhrzeigersinn auf
“ Pilot” drehen.
• Den Griff gedrückt halten und gleichzeitig die
Piezotaste drücken. Damit wird die Zündung der
Pilotflamme ausgelöst. Den Griff 20 Sekunden nach
dem Zünden gedrückt halten, damit die Flamme nach
dem Loslassen anbleibt.
• Zündet die Pilotflamme nicht, den Vorgang von Anfang
an wiederholen. (Bei Neuinstallationen oder
Gasflaschenwechsel könnte eine Entlüftung der
Leitungen erforderlich sein. Dazu den "Kontrollgriff"
bis 2÷3 Minuten gedrückt halten).
Überprüfen Sie durch die Öffnung, ob die Vorsteuerflamme den Brenner gezündet hat.
Überprüfen Sie, ob die Vorsteuerflamme weiterbrennt.
Falls dies nicht der Fall ist, wiederholen Sie den Zündvorgang.
Hinweis: sollte die Pilotflamme nicht zünden, kann der Terrassenstrahler mit einem Streichholz
gezündet werden; dazu den mitgelieferten Streichholzhalter verwenden und
durch eine beliebige Öffnung des Brenners einführen; damit der
Brenner nicht erlischt, muss der Wahlschalter für 10 Sekunden
nach der Zündung in der Position “
Pilot” niedergedrückt
werden. Falls sich die Störung wiederholt (d. h. falls die
Pilotflamme erneut nicht zündet), schließen Sie den Gashahn
und wenden Sie sich an einen Fachmann.
Regulierung der Heizung
Um den „Steuerventil-Griff“ auf die angegebenen Stellungen einzustellen, drehen Sie ihn bis in die
Stellung für maximale Leistung und halten ihn dabei bis zur Hälfte gedrückt.
Um die Leistung zu verringern, drehen Sie den Griff in die Stellung “ Low”.
Um die Leistung zu erhöhen, drehen Sie den Griff in die Stellung “ High”.
Sollten Sie das Heizgerät kurzfristig abschalten wollen, drehen Sie den Griff in die Stellung
“ pilot”.
Abschalten des Heizgeräts
Drehen Sie den Griff in die Stellung “
Off” und schließen Sie den Hahn an der Gasflasche. Beim
Abschalten des Brenners oder der Vorsteuerflamme ist ein leichter Knall als normal zu erachten.
Erneutes Einschalten
Nachdem Sie das Heizgerät abgeschaltet haben, kann die Vorsteuerflamme erst nach dem Abkühlen
des Heizgeräts, wozu mindestens 15 Minuten erforderlich sind, erneut gezündet werde
37/40
Assembly page 37/40
Fax +32 030 9904733
Copies of the I/B. Please reproduce them without any
changes except under special instruction from Bimar
(Italy). The pages must be reproduced and folded in
order to obtain a booklet A5 (+/- 148.5 mm width x 210
mm height). When folding, make sure you keep the good
numbering when you turn the pages of the I/B. Don’t
change the page numbering. Keep the language
integrity.
REINIGUNG
Bevor Sie das Gerät reinigen, schalten Sie es ab, indem Sie den Griff in die Stellung “Off” bringen
und den Hahn an der Gasflasche schließen. Warten Sie dann, bis das Gerät vollständig abgekühlt ist.
Zum Reinigen des äußeren Bereichs des Heizgeräts verwenden Sie ein weiches, in Wasser und
Flüssigreiniger getränktes Tuch.
Verwenden Sie keinesfalls Scheuerschwämmchen aus Metall oder Scheuermittel.
Verwenden Sie keinesfalls Brennstoffe oder Scheuerreiniger.
Waschen Sie den Brenner und den darunter befindlichen Bereich einschließlich Hahn und Zünder
keinesfalls mit dem Wasserstrahl.
Trocknen Sie das Heizgerät vollständig ab, bevor Sie es benutzen.
Vergewissern Sie sich regelmäßig, dass die Bohrungen am Heizteil und am Brenner nicht durch
Staub, Flaum oder ausgefranste Fäden verstopft sind. Benutzen Sie ggf. einen Staubsauger, um sie zu
entfernen.
FEHLERSUCHE
Störung
Die Vorsteuerflamme
zündet nicht
Die Vorsteuerflamme
zündet zwar, geht aber
aus, wenn der Griff
nach 15 Sekunden
losgelassen wird.
Der Hauptbrenner
zündet, doch die
Wärmeleistung ist
unzureichend.
Gelbe Flamme
Ursache
Gaszufuhr geschlossen
Luft in der Leitung nach längerer
Stilllegung des Geräts
Behebung
Gas öffnen (Gasflasche)
Halten Sie den „Kontrollgriff“ in
der Stellung Vorsteuerflamme
einige Minuten lang gedrückt, um
die Luft entweichen zu lassen.
Mischleitung der Vorsteuerflamme
Verstopfung suchen, beseitigen
verstopft
und reinigen.
Einspritzer der Vorsteuerflamme verstopft.
Mit Druckluft zu reinigen
versuchen und den Einspritzer
auswechseln.
Piezozündung oder Elektrode feucht.
Mit einem Streichholz anzünden.
Zündkabel nicht angeschlossen.
Erneut anschließen.
Elektrode beschädigt oder defekt.
Auswechseln.
Die Vorsteuerflamme trifft das
Die Gruppe ersetzen
Thermoelement nicht.
(Thermoelement Vorsteuerflamme,
Kerze)
Defektes Gasventil.
Gasventil ersetzen.
Niedriger Gasdruck an der Zufuhr.
Gasflasche fast leer oder fast vereist.
Sehr starker Wind.
Kontrolle des Gasdrucks an der
Zufuhr und des Reglers.
Das Heizgerät nicht bei starkem
Wind benutzen.
Bohrungen am Brenner verstopft.
Staub, Flaum und ausgefranste
Fäden mit einem Staubsauger
entfernen.
Reparaturen dürfen ausschließlich von qualifiziertem Fachpersonal durchgeführt werden.
PFLEGE
Kotrollieren Sie in regelmäßigen Abständen den einwandfreien Zustand des Gummischlauchs und
ersetzen Sie ihn, wenn er abgenutzt, verschmutzt oder beschädigt ist oder aber das angegebene
Verfalldatum überschritten ist. Verwenden Sie ausschließlich zugelassene IMQ Schläuche.
Falls Sie das Gerät für einen bestimmten Zeitraum nicht benutzen, klemmen Sie das Heizgerät von
der Gasflasche ab, decken Sie es ab und verstauen Sie es in der Originalverpackung an einem
trockenen, staubfreien Ort. Vor dem Gebrauch überprüfen Sie den einwandfreien Zustand der
38/40
Assembly page 38/40
Fax +32 030 9904733
Copies of the I/B. Please reproduce them without any
changes except under special instruction from Bimar
(Italy). The pages must be reproduced and folded in
order to obtain a booklet A5 (+/- 148.5 mm width x 210
mm height). When folding, make sure you keep the good
numbering when you turn the pages of the I/B. Don’t
change the page numbering. Keep the language
integrity.
Dichtung des Druckreglers. Jede Art von Wartung darf nur von qualifiziertem Fachpersonal oder in
einem vom Händler empfohlenen Kundendienstcenter durchgeführt werden.
Das Heizgerät sollte einmal im Jahr durch autorisiertes Personal kontrolliert werden.
Das Heizgerät darf in Räumen gelagert werden, wenn vorher die Gasflasche getrennt und aus dem
dafür vorgesehen Platz entfernt wird. Bevor die Gasflasche getrennt wird, stellen Sie bitte sicher, dass
der Hahn gut geschlossen ist. Die Gasflasche im Außenbereich in einem sicheren und angemessenen
Platz lagern, sie darf nicht in geschlossenen Räumen bzw. in Räumen im Halbsouterrain oder im
Souterrain gelagert werden.
Wenn Sie vorhaben, das Gerät nicht mehr zu verwenden, müssen Sie die Gasflasche ausbauen (für die
Lagerung siehe die oben stehenden Anweisungen) und das Gerät unbrauchbar machen, indem Sie den
Gummischlauch durchschneiden Außerdem müssen Sie dafür sorgen, dass die Teile des Geräts, die
eine Gefahr darstellen können, wenn sie von Kindern zum Spielen benutzt werden, keinen Schaden
anrichten können.
Belasten Sie die Umwelt nicht mit Produkten, die biologisch nicht abbaubar sind, sondern entsorgen
Sie dieselben im Einklang mit den gültigen Vorschriften. Am Ende seiner Nutzzeit darf das Produkt
NICHT zusammen mit dem Siedlungsabfall beseitigt werden. En kannzu den eigens von den
städtischen Behőrden eingerichteten Sammelstellen oder zu den Fachhändlern, die einen
Rűcknahmeservice anbieten, gebracht werden. Die getrennteEntsorgung eines Haushaltsgerätes
vermeidet mőgliche negative Auswirkungen auf die Umwelt und die menschliche gesundheit, die
durch eine nicht vorschriftsmäßige Entsorgung bedingt sind.
Zudem ermőglicht wird die Wiederverwertung der Material, aus denen sich das Gerät zusammensetzt,
was wiederm eine bedeutende Einsparung an Energie und Ressourcen mit sich bright. Zur Erinnerung
an die Verpflichtung,die Elektrohaushaltsgeräte getrennt zu beseitigen, ist das Produkt mit einer
Műlltonne, die durchgestrichen ist, gekennzeichnet. Folgendes ist zu beachten: Entsorgen Sie nicht
biologisch abbaubare Produkte umweltgerecht entsprechend der geltenden Gesetzgebung.
Berücksichtigen Sie dabei Folgendes:
- Eisen: Gehäuse des Infrarotofens, Körper des Brenners, Kleinteile (Schrauben
usw.)
- Aluminium: Gasleitungen
- Messing: Hahn der Sauerstoffmangelsicherung
- Kunststoff: Räder, Piezozündung
- Kupfer mit Gummimantel: Draht der Piezozündung, Thermoelement.
39/40
Assembly page 39/40
Fax +32 030 9904733
Copies of the I/B. Please reproduce them without any
changes except under special instruction from Bimar
(Italy). The pages must be reproduced and folded in
order to obtain a booklet A5 (+/- 148.5 mm width x 210
mm height). When folding, make sure you keep the good
numbering when you turn the pages of the I/B. Don’t
change the page numbering. Keep the language
integrity.
Via G.Amendola, 16/18
25019 Sirmione (BS) – ITALY
Tel. 030 9904555 r.a. Fax. 030 9904733
www.bimar-spa.it e-mail: [email protected]
40/40
Assembly page 40/40