1
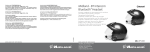
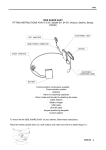
Bedienungs- und Einbauanleitung
Operating and installation instructions
®
Bluetooth ®- Stealth - Helmset
Bluetooth Stealth helmet set
201 / 201i / 201 BM / 201i BM
& Stealth - Intercom - Set 200
Nutzen Sie unsere Service-Hotline!
Use our service hotline!
Für Anfragen aus Deutschland:
[email protected]
Telefon: 07021 55 0 44
Aktuelle Bedienungsanleitung als PDF:
Actual operating instructions as PDF:
www.ake.info - Technical support
DEUTSCH
Herzlichen Glückwunsch!
Nun sind auch Sie im Besitz eines hochwertigen
Gerätes aus unserer Spezialentwicklung. Dieses
®
Helmset in Bluetooth -Funk-Technologie wurde bei
uns nach neuesten Erkenntnissen der Technik
konzipiert, gefertigt und bis ins Detail geprüft.
Sicher möchten Sie die technischen Möglichkeiten
®
Ihres Bluetooth - Helmsets voll ausschöpfen,
beachten Sie deshalb in Ihrem eigenen Interesse bitte
genau die Bedienungs- und Einbauanleitung.
Die notwendigen Handgriffe sind nicht kompliziert.
Sollten Sie dennoch Fragen haben, so wenden Sie
sich bitte an Ihren Fachhändler oder direkt an uns.
Wir beraten Sie gern.
Ihr AKE-Team
Nutzen Sie unsere Service-Hotline!
[email protected]
Telefon: 07021 55 0 44
Detailierte Bedienungsanleitung als PDF:
www.ake.info - Technical Support
2
DEUTSCH
Inhalt
Illustration 1 . . . . . . . . . . . . . . . . . . . . . . . . . . . . . . . . . . . 4
Einfacher Einbau der Elektronik-Box . . . . . . . . . . . . . . . . . . . 5
Einbau der Helmlautsprecher . . . . . . . . . . . . . . . . . . . . . . . 5
Die Anordnung des Helmmikrofons . . . . . . . . . . . . . . . . . . . 6
Unterbringung und Auswechseln des Akkus . . . . . . . . . . . . . 7
Aufladen des Akkus. . . . . . . . . . . . . . . . . . . . . . . . . . . . . . . 7
Anwendungsbeispiele . . . . . . . . . . . . . . . . . . . . . . . . . . . . . 8
Ein- und Ausschalten . . . . . . . . . . . . . . . . . . . . . . . . . . . . . 9
Der Paarungsvorgang. . . . . . . . . . . . . . . . . . . . . . . . . . . . . 9
Besonderheiten beim Paaren einiger Geräte . . . . . . . . . . . . . 9
Betrieb mit Navigationssystemen . . . . . . . . . . . . . . . . . . . . . 9
Bedienfunktionen bei Betrieb mit Handy . . . . . . . . . . . . . . . 10
Sprechverbindung direkt von Helm zu Helm (Interkom) . . . . 10
Komfort-Entertainmentbetrieb mit Motorradsprechanlagen. . 11
Was beim Paaren mit mehreren Geräten zu beachten ist . . . 11
Betrieb mit mehreren Geräten im Multipoint-Modus . . . . . . 11
Mögliche Fehlfunktionen und Ihre Ursache . . . . . . . . . . . . . 12
Wichtige Hinweise für Ihre Sicherheit . . . . . . . . . . . . . . . . . 12
Technische Daten . . . . . . . . . . . . . . . . . . . . . . . . . . . . . . . 13
Garantie und Sonstiges . . . . . . . . . . . . . . . . . . . . . . . . . . 14
Optionales Zubehör . . . . . . . . . . . . . . . . . . . . . . . . . . . . . 15
3
DEUTSCH
3
1
1
2
5
4
6a 6b 6c
7
8
9
10
Illustration
1
2
3
4
5
6
7
8
9
10
4
Helmlautsprecher
Helmmikrofon
Miniatur-Litium-Ionen-Polymer-Akku
Verpolungssichere Miniatursteckverbinder
Bluetooth- und Verstärker-Box
Funktionsanzeige
Ladebuchse
Multifunktionstaste, Ein, Aus, Paaren, Verbinden
Lautstärke minus
Lautstärke plus
Einfacher Einbau der Elektronik-Box
Diese Bluetooth-Einheit arbeitet mit geringer
Sendeleistung (Klasse 2) und ist deshalb auch
bei Einbau in den Helm gesundheitlich
unbedenklich. Das ergonomisch gestaltete
Gehäuse im Stealth-Design lässt sich bei
Helmen mit Nackenpolster völlig unsichtbar
und wettergeschützt ganz einfach auf der
linken Seite in den Schlitz zwischen
Nackenpolster und Helmpolster integrieren.
Eine weitere Befestigung ist dann nicht
erforderlich.
Für die Befestigung an Helmen ohne Nackenpolster kann die Elektronikbox mit dem beiliegenden Klettband oder mit der im Zubehör
lieferbaren Schutztasche (siehe Seite 15) auf die
Helmunterseite montiert werden. Auf Wunsch
kann die Elektronikbox auch von einer Fachwerkstatt in die Polsterung integriert werden.
Alle externen Komponenten sind zur einfachen
Montage abnehmbar und farblich gekennzeichnet. Abb. links: Beispiel einer Montage mit
Schutztasche.
Achtung
Montieren Sie die Komponenten niemals so, dass bei einem möglichen
Unfall die Schutzwirkung des Helmes eingeschränkt ist!
Wenn Sie sich nicht sicher sind, fragen Sie eine unserer autorisierten
Servicebetriebe oder kontaktieren Sie uns.
Einbau der Helmlautsprecher
Der Einbau richtet sich nach der Bauart des Helmes. Sehen Sie sich zuerst an, wie
der Helm im Ohrbereich gepolstert ist. Je näher die Lautsprecher an den
Ohren sitzen, umso besser ist die Sprechverständigung!
Allerdings werden wegen dem Tragekomfort die Lautsprecher gern unter die
5
DEUTSCH
Wichtig! Bevor Sie mit der Montage beginnen, lesen Sie bitte diese Zeilen genau
durch und beachten Sie die jeweiligen Sicherheitshinweise!
DEUTSCH
Schaumstoffpolsterung montiert. Besonders bei dick gepolsterten Helmen ist es
dann wichtig, die Polsterung davor ausreichend zu perforieren.
Kennzeichnen Sie sich am Helm die Stelle genau, wo Ihr Ohrloch sitzt. Dazu
können Sie wie folgt vorgehen: Schneiden Sie sich ein kleines Stückchen
Isolierband und kleben Sie es dort in den Helm, wo Sie Ihr Ohrloch vermuten.
Setzen Sie dann den Helm auf und fühlen Sie mit dem Zeigefinger, ob die
Markierung richtig sitzt. Geben Sie sich erst zufrieden, wenn Sie die genaue Stelle
getroffen haben. Nur so können Sie die Qualität der Komponenten voll ausnutzen!
Entfernen Sie das Papier auf den Lautsprecherrückseiten (Klebeschicht) und setzen
durch gleichmäßigen Druck auf den Hörerrand die Lautsprecher genau unter den
Markierungen in den Helm ein. Die Klebestelle muss sauber und glatt sein.
Nun noch das Kabel verlegen und den Stecker mit dem entsprechenden gelben
Anschluss der Elektronik-Box verbinden ( R für Rechts bzw. L für links ).
Falls Sie die Stecker wieder auftrennen müssen, bitte keinesfalls am Kabel ziehen,
um Beschädigungen zu vermeiden!
Die Anordnung des Helmmikrofons
Um die Fahrgeräusche möglichst wirksam
zu unterdrücken, ist in das Helmmikrofon
(PMM) eine spezielle “Nahbesprechungskapsel” eingebaut.
Um die Vorteile dieser Technik nutzen zu
können, sollte das Mikrofon möglichst
nah vor dem Mund angeordnet sein.
Bei Helmen mit viel Platz vor dem Mund,
sollten Sie das Mikrofon auf ein zusätzliches Schaumpolster etc. setzen!
Markieren Sie sich im Helm den gewählten
Platz für das Mikrofon und reinigen Sie
gründlich die Polsterung im Bereich der
Klebestellen, entfernen Sie dann das
Schutzpapier auf der Klebefläche des
Mikrofons und drücken sie dieses fest an.
Nun noch das Kabel verlegen und den Stecker
mit dem blauen Anschluss der Elektronik-Box
verbinden.
Für offene Helme sind hochwertige Bügelmikrofone (PBM) lieferbar, siehe Zubehör Seite 15.
6
DEUTSCH
DEUTSCH
Da Bügelmikrofone allgemein den Nachteil
haben, dass Sie beim Aufsetzen des Helmes
immer korrigiert werden müssen, empfehlen
wir für Klapphelme ebenfalls das PMM und
dazu ein elastisches Mikrofonspiralkabel zu
verwenden (Zubehör Seite 15).
Dieses können Sie so verlegen, dass die
elastische Spirale die Verbindung zwischen
den beweglichen Helmteilen herstellt,
fixieren Sie dabei die Spirale so, dass das
Kabel bei geschlossenem Helm nicht gequetscht wird.
Unterbringung und Auswechseln des Akkus
Der Akku ist nicht fest integriert, sondern über Kabel und Stecker (rot) mit der ElektronikBox verbunden. Das hat für Sie mehrere Vorteile:
1. defekte Akkus können leicht erneuert werden (beim Trennen nicht am Kabel ziehen)
2. leere Akkus können auf Tour gegen geladene Akkus ausgetauscht werden
3. alternativ können auch leistungsstärkere Akkus angeschlossen werden.
Der hochwertige Lithium-Polymer-Akku ist sehr klein und leicht und kann so einfach
unter die Polsterung gelegt werden. Tragen Sie den Akku niemals direkt auf der Haut!
Bitte beachten Sie folgende Sicherheitshinweise:
Verwenden Sie nur von uns zugelassene Original-Akkus und laden Sie den Akku
grundsätzlich nur mit dem von uns dafür zugelassenen Ladegerät.
Schließen Sie niemals das Ladegerät an, wenn der Akku nicht vorschriftsmäßig mit der Elektronik-Box verbunden ist. Ohne Akku oder mit falschem Akku
kann das Gerät zerstört werden!
Tragen Sie den Helm mit eingebautem Akku
niemals während des Ladevorgangs!
Der Akku muss vor großer Hitze geschützt werden und darf weder verbogen
noch beschädigt werden. (Brand- und Explosionsgefahr)! Sollte der Akku
einmal heiß werden, muss dieser sofort ausgewechselt werden!
Aufladen des Akkus
Vergessen Sie nicht vor der Benutzung den Akku zu laden.
Stealth-Bluetooth-Helmset 201: Die Funktionsanzeige (siehe Illustration 6b) leuchtet
während des Ladevorgangs rot auf und wechselt automatisch auf Erhaltungsladung,
wenn der Akku voll ist.
7
DEUTSCH
Interkomset BT-HS201i: Die Funktionsanzeige leuchtet während des Ladevorgangs
rot auf und wechselt automatisch auf Erhaltungsladung, wenn der Akku voll ist.
Wenn der Akku längere Zeit nicht geladen wurde, ist es möglich, dass die Ladeelektronik nicht gleich anspringt. Das Stealth-Bluetooth-Helmset versucht tiefentladene Akkus wieder zu regenerieren, die Ladekontrolle blinkt dann so lange, bis der
Akku wieder ladebereit ist.
30 Minuten = Mindestaufladung
2 Stunden = Vollständige Aufladung
Diese Werte gelten nur für den Standard-Akku. Die Ladezeiten für andere Akkus
entnehmen Sie bitte den zugehörigen Datenblättern. Für eine optimale Leistung
sollte das Helmset vollständig aufgeladen sein.
Anwendungsbeispiele
Mit welchen Geräten können die Helmsets gekoppelt werden?
Interkom
BT-HS201
BT-HS201 i
BT-HS201
BT-HS201
Bluetooth
Interkomset
Handy
Navi
PowerCom
Audio
Radio
Handy
Funk
MP3
Navi
BlueCom
BT-HS201
BT-HS201
AUX in
in/out
Das Stealth-Bluetooth-Helmset 201 kann mit allen Bluetooth-Geräten betrieben
werden, die das A2DP, das Handsfree- oder das Headsetprofil unterstützen, z.B. mit
Bluetoothfähigen Handys, Navigationsgeräten, MP3-Playern sowie mit dem AKE
BlueCom Taschenrepeater und allen Motorradkommunikationssystemen und Freisprecheinrichtungen der AKE PowerCom - Serie mit Bluetooth-Helmconnector.
Das Bluetooth-Helmset 201i (Bluetooth Interkomset) kann mit dem Stealth Bluetooth
Helmset 201 oder mit jedem kompatiblen Bluetooth Helmset verbunden werden.
8
Ein- und Ausschalten
Halten Sie die Multifunktionstaste (8) ca. 3 Sekunden gedrückt, bis sich das Bluetooth
Helmset einschaltet. Die Funktionsanzeige leuchtet blau und blinkt dann, um die
Betriebsbereitschaft anzuzeigen. Halten Sie die Multifunktionstaste ca. 3 Sekunden
lang gedrückt, um das Gerät wieder auszuschalten. Der Ausschaltvorgang wird
durch Leuchten der Funktionsanzeige kenntlich gemacht. PowerCom-Version:
Kontrollton für Kommunikation (Duplex) ein: tief hoch
, aus: hoch tief
Der Paarungsvorgang
Bevor Sie das Bluetooth Helmset zum ersten Mal verwenden können, müssen Sie es
mit dem gewünschten Bluetooth-Gerät paaren. Anleitungen zum Paaren der
anderen Bluetooth-Geräten finden Sie im Handbuch des jeweiligen Geräts.
Beginnen Sie mit dem ausgeschalteten Bluetooth-Helmset. Schalten Sie auch alle
anderen für das Paaren nicht benötigten Bluetooth-Geräte in der Umgebung aus.
1. Halten Sie die Multifunktionstaste (8) ca. 3 Sekunden lang gedrückt. Lassen Sie
die Taste los, wenn die Leuchtanzeige abwechselnd blau und rot blinkt. Das
Helmset kann jetzt mit jedem komptiblen Bluetooth-Gerät gepaart werden.
2. Bringen Sie das zu verbindende Bluetoothgerät ebenfalls in den Paarungsmodus.
Nur für BT-HS 201: Bei Handys und Navigationssystemen mit Menüführung
finden Sie in der Regel die Option “Nach Bluetooth-Geräten in der Nähe suchen”.
Wenn Sie diese Funktion wählen sollte anschließend “AKE Stealth Helmet Set 201”
zum Paaren angezeigt werden.
3. Wenn Sie nach dem Bestätigen noch nach einem Passwort gefragt werden, geben
Sie 0000 ein. Das BT-Helmset leuchtet bei einer erfolgreichen Paarung blau auf.
Besonderheiten beim Paaren einiger Geräte
Bluetooth wurde als weltweit einheitlicher Standard geschaffen. Leider halten sich
aber nicht alle Hersteller von Navigationssystemen, etc. an die Vorschriften.
Dadurch kann es zu Inkompatiblitäten kommen. Näheres hierzu finden sie in
unseren FAQs im Internet.
Betrieb mit Navigationssystemen
Das Stealth-Bluetooth-Helmset 201 funktioniert an allen Navigationssystemen, die
das Handsfree- oder das A2DP Profil unterstützen. Wenn die aktive Verbindung
einmal unterbrochen wurde, kann diese durch Drücken der Multifunktionstaste
wieder eingeschaltet werden (Kontrollton abwarten).
Wenn das Navi zuletzt eingeschaltet wird, verbinden sich nicht alle Typen automatisch mit dem Bluetooth-Helmset, die Verbindung dann über das Menü aktivieren.
9
DEUTSCH
Somit kann ein schnurloses Helm zu Helm Interkom-System realisiert werden.
DEUTSCH
Navigationssysteme mit Handyanbindung. Die Handybedienung über den Navibildschirm ist zwar verlockend, leider ist aber die Sprachübertragung vom Handy
übers Navi häufig nicht besonders gut. Für den Test das Handy einmal einfach
direkt mit dem Bluetooth-Helmset paaren und die Sprachqualität von einem
Gesprächspartner am Festnetztelefon vergleichen lassen.
Bedienfunktionen bei Betrieb mit Handy
Rufsignalisierung: Stellen Sie Ihr Handy so ein, dass der Klingelton im Helm zu hören ist. Für die automatische Rufannahme sollte die Rufmelodie nicht zu kurz eingestellt werden, da beim Einschalten aus Stand By der Signalanfang verloren geht.
Anruf annehmen: Drücken Sie kurz die Multifunktionstaste. Bei vielen Handys
können Sie auch die automatische Rufannahme einschalten, dann wird der
Bedienaufwand auf ein Minimum reduziert.
Ablehnen eines Anrufs per Doppelklick: Drücken Sie bei einem eingehenden
Anruf 2 x kurz auf die Multifunktionstaste, um den Anruf abzulehnen.
Anruf beenden: Drücken Sie kurz die Multifunktionstaste oder warten Sie, bis
der Gesprächspartner aufgelegt hat, die Verbindung wird automatisch beendet.
Anrufen: Wenn Sie selbst anrufen möchten müssen Sie gewünschte Nummer
in Ihr Telefon eingeben.
Wahlwiederholung: Doppelklick, drücken Sie zum Anrufen der zuletzt gewählten
Nummer zwei mal kurz die Multifunktionstaste.
Sprachaktiviertes Wählen (nicht bei allen Handys verfügbar): Drücken Sie 4 Sek.
auf die Multifunktionstaste um das sprachaktivierte Wählen zu starten.
Weiterleiten eines Anrufs vom Bluetooth-Helmset auf das Telefon und umgekehrt
Um bei einen aktiven Anruf zwischen Bluetooth-Helmset und Telefon zu wechseln,
siehe Handybedienung oder einmal die Multifunktionstaste drücken.
Lautstärke: Die Lautstärke kann sowohl am Bluetooth-Helmset, als auch am Handy
eingestellt werden. Bei Erreichen der höchsten bzw. niedrigsten Lautstärke erklingt ein
entsprechender Hinweiston.
Autoconnect: Nicht alle Handys verbinden sich beim Einschalten automatisch mit
dem Bluetooth-Helmset, die Verb. kann dann über das Handymenü aktiviert werden.
Rückfrage bei Multipoint-Betrieb mit Interkom und Handy: Doppelklick auf die
Multifunktionstaste wechselt zwischen den Gesprächspartnern hin und her.
Für die Multifunktionstaste kann optional auch eine externe Taste verwendet werden.
Beachten bitte den Abschnitt “Wichtige Hinweise für Ihre Sicherheit” weiter unten.
Sprechverbindung direkt von Helm zu Helm (Interkom)
Dazu benötigen Sie ein Stealth-Bluetooth-Helmset 201 und ein Stealth-Bluetooth10
Stealth-Bluetooth-Helmset 201i mit Helmeinbaumikrofon Art-Nr.: 31362.
Lieferbar auch im Komplettset: Stealth-Interkomset 200 Art-Nr.: 31363.
Komfort-Entertainmentbetrieb mit Motorradsprechanlagen
Genießen Sie den Komfort unseres High-Quality PowerCom Motorrad
Kommunikationssystems, ohne auf die schnurlose Freiheit verzichten zu müssen.
Das Stealth-Bluetooth-Helmset 201 funktioniert an allen Motorradsprechanlagen, die
mit einer Bluetoothschnittstelle, wie z.B. dem AKE Bluetooth-Helmconnector ausgerüstet sind. Komfortmerkmale der PowerCom-Anlage, wie GALA (geräuschabhängige Lautstärkeanpassung), Prioritätssteuerung, bedarfsabhängige Mikrofonaktivierung, etc. können so auch mit Bluetooth-Helmen genutzt werden.
Wenn eine mobile Lösung gewünscht wird, empfehlen wir als “kleine” BluetoothHelmsprechanlage unseren Taschenrepeater BlueCom 102. Einzelheiten entnehmen Sie bitte der Beschreibung des Taschenrepeaters, lieferbar im Komplettset
BlueCom for 2 Art-Nr.: 39401
Was beim Paaren mit mehreren Geräten zu beachten ist
Schalten Sie zum Paaren des zweiten Gerätes das bereits gepaarte Gerät aus.
Wenn Sie nach erfolgreichem Paaren alle Geräte einschalten, sollte die Interkom Verbindung automatisch hergestellt werden.
Manche Handys / Navis sind störrisch beim Betrieb mit mehreren Geräten oder
lassen sich paaren, verbinden sich dann aber nicht richtig. In solchen Fällen hat es
sich bewährt, alle vorhandenen Paarungen zu löschen, dann alle Geräte auszuschalten und anschließend neu zu paaren. Mit Interkom-Set Reihenfolge beachten:
Immer zuerst das Interkom-Set paaren!
Bluetooth Helmset: Zum Löschen aller Paarungen im Paarungsmodus Doppelklick auf
Multifunktionstaste, (bzw. beim 201i +/- Taste gleichzeitig). Ein tiefer Doppelton
signalisiert, dass alle Einträge gelöscht sind.
Das Stealth-Bluetooth-Helmset 201 lässt sich auch mit zwei Bluetooth Geräten mit
verschiedenen Profilen paaren und ermöglicht so z.B. Musik hören in Stereo und
automatisches Umschalten aufs Handy oder aufs Navigationsgerät.
Betrieb mit mehreren Geräten im Multipoint-Modus
Die neue Firmware unterstützt jetzt auch das automatische Umschalten zwischen
Interkom und Navi bzw. Handy per Multipoint.
Bei Bluetooth konnte bisher immer nur ein Master mit mehreren Slave verbunden
11
DEUTSCH
Helmset 201i (Interkomset). Die für den Betrieb im Helm ausgelegten Systeme sind
durch ihren Strahlungsarmen Betrieb gesundheitlich unbedenklich und haben
dabei eine Reichweite bis 250 m (Freifeld). So ist es z.B. auch möglich eine
Sprechverbindung zwischen zwei Motorrädern herzustellen.
DEUTSCH
werden. Beim neuen Multipoint- Betrieb, Lizenz CSR® (Cambridge Silicon Radio) ist
es jetzt möglich einen Slave mit mehreren Mastern zu verbinden.
Es können z.Zt. maximal 2 Mastergeräte mit dem Multipoint Headset gepaart werden. Das können 2 Handys, ein Navi und ein Handy oder ein Interkomset 201i und
ein Handy/Navi sein. Während einer Navi-Durchsage oder einem Handy-gespräch ist
die Interkomverbindung zum zweiten Helm gesperrt. Nach Beenden des Gespräches
bzw. der Durchsage wird diese automatisch wieder hergestellt. Voraussetzung ist
allerdings, dass auch die verbundenen Geräte zum Multipoint komptibel sind.
Achtung
Bei einigen Systemen kann es beim Multipointbetrieb noch zu Problemen
kommen! Bei welchen Geräten Probleme bekannt sind, erfahren Sie über
unsere FAQ’s oder über unsere Kundenhotline.
Mögliche Fehlfunktionen und Ihre Ursache
Störungen und Unterbrechungen: Funkwellen im Bluetooth-Frequenzbereich (2,4
GHz) reflektieren sehr stark an Gebäuden etc. und es kommt während der Fahrt zu
ständigen Interferenzen und damit zu Feldstärkeschwankungen. Dadurch sind
Störungen und Abbrüche möglich.
Startton ist zu hören, aber Gerät bleibt dann stumm: Bluetooth-Helmset ist auf
StandBy, Multifunktionstaste einmal drücken.
Sprache ist zu leise: Überprüfen Sie die Mikrofon- und Lautsprecheranordnung.
Bei unerklärlichen Fehlfunktionen: Systemreset, die Verbindung zum Akku kurz
unterbrechen und dann das Bluetooth-Helmset neu einschalten.
Wichtige Hinweise für Ihre Sicherheit
Für Vieltelefonierer empfehlen wir die Vewendung unserer motorradtauglichen
Handy-Freisprecheinrichtung CONNECT 10, oder den Einsatz eines unserer hochwertigen PowerCom - Motorradkommunikationssysteme in denen u.a. ebenfalls
unsere motorradtauglichen Handy-Freisprecheinrichtungen integriert sind.
Bedienen Sie als Fahrer das Helmset nicht während der Fahrt!
Telefonieren Sie nur mit Freisprecheinrichtung und benutzen Sie die
automatische Rufannahme ihres Mobiltelefones,
wenn Sie während der Fahrt erreichbar sein möchten.
Verzichten Sie unbedingt auf eine höhere Lautstärke als nötig!
Ihr Gehör kann durch eine zu hohe Lautstärke geschädigt werden,
außerdem ist dann für den Fahrer eine aktive Teilnahme
am Straßenverkehr nicht mehr gewährleistet.
12
Technische Daten
Bluetoothsystem:
Version: 2.0+EDR
Profile: Handsfree, Headset und A2DP
Reichweite: Freifeld bis 250 m
Stromversorgung (Ladegerät) 5V DC, 300 mA
Akku:
Lithium-Ionen/Polymer 3,75 V, 240 mAh
Ladezeit: 2 Stunden
Navi-Sprachdurchsage: Ca. 19 Stunden*
Dauerbetrieb Musikübertragung: Bis zu 6 ½ Stunden*
Standby-Zeit: 3 Tage
*)Dauer kann je nach Betriebsart stark unterschiedlich sein
Ladegerät:
Leistung: 5V DC, 300 mA
Helmmikrofon:
Typ: Geräuschkompensierte Electret-Nahbesprechungskapsel
Eingangsempfindlichkeit: -49 dB (0dB=1V/µBar)
Helmlautsprechersatz:
Anschlusswert: 2 x 32 Ohm
Ausgangsleistung: 2 x 0,2 Watt
Verstärker:
Maximale Ausgangsleistung an 8 Ohm bei UBatt=3,6V: 0,72 Watt
Zulässige Lastimpedanz: 3 Ohm
Übertragungsbereich: 20 Hz bis 20 Khz
Ruhestromaufnahme: 5 mA
Standby Stromaufnahme: < 1 µA
Wake Up Time nach Standby: < 27 ms
Anschluss für externes Bedienteil:
R-Codierung für On/Off/Paaren/Vol+/Vol-/Handy-Rem.
13
DEUTSCH
Garantie und Sonstiges
Gewährleistung
Auf dieses Gerät gewähren wir dem Endverbraucher eine Garantie im Rahmen der
zweijährigen Gewährleistung nach deutschem Recht. Übergeben Sie das defekte
Gerät ungeöffnet mit einer ausführlichen Fehlerbeschreibung Ihrem Fachhändler,
oder schicken Sie es mit Ihrem Kaufbeleg direkt an unsere Serviceabteilung, bei
Fremdeingriff erlischt jeder Garantieanspruch!
Konformität
Dieses Gerät wurde nach den neuesten technischen Anforderungen
hergestellt und geprüft. Ausführliche Informationen hinsichtlich der CEKennzeichnung bei AKE Elektronik, 73230 Kirchheim.
Hinweise zum Recycling nach dem Elektrogerätegesetz
Dieses Gerät entspricht der neuen europäischen ROHS Richtlinie. Sollte
es eines Tages nicht mehr gebraucht werden, darf es nicht über den
Hausmüll entsorgt werden, sondern muss bei den extra für
Elektronikschrott eingerichteten kommunalen Sammelstellen abgegeben werden (für Endverbraucher kostenfrei), Sie unterstützen uns damit
beim Recycling wertvoller Rohstoffe und leisten gleichzeitig einen Beitrag zum
Umweltschutz!
14
DEUTSCH
Optionales Zubehör
Biegsames Bügelmikrofon
PBM-1 für offene
Helme und Klapphelme,
Art-Nr.: 32351
Minispiralkabel die bessere Lösung für
Klapphelme, ermöglicht eine elastische
Mikrofon-Kabelverbindung zum
Kinnschutz, Art-Nr.: 32330
Leistungsstarker Li-Plm Ersatzakku für
lange Betriebszeiten ohne Nachladen
400 mAh, 25x40x6 mm, Art-Nr: 73098
900 mAh, 35x50x6 mm, Art-Nr: 73088
Externe Multifunktionstaste, passend für
Bluetooth Helmset 201 und 201i
Art-Nr: 39318
12V Normstecker - USB Ladegerät für
unterwegs, Aufladen des Helmsets über
die Motorradbatterie
Art.-Nr. 73099
Schutztasche für Stealth-BluetoothHelmset 201 / 201i mit
Klettbefestigung,
Art.-Nr. 39311
BlueCom 102 Taschenrepeater,
ermöglicht die direkte Verbindung von
zwei Bluetooth Helmsets und die Einspeisung von 2 Signalen für beide
Helme, Art.-Nr. 30401
Bluetooth Helmset 201i, gepaart mit
einem Bluetooth Helmset 201 einsetzbar als kabellose Vollduplex Sprechanlage von Helm zu Helm bis 250 m
Art.-Nr. 31362
Weiteres Zubehör finden Sie bei Ihrem
Händler oder im Internet unter:
www.motorradsprechanlagen.de
15
DEUTSCH
Notizen
16
ENGLISH
17
ENGLISH
Congratulations!
Now you are a proud owner of a high-quality product
out of our specialty developments. This Helmet Set
®
with Bluetooth technology was designed, manufactured and tested into the detail by us regarding the
latest technical knowledgement.
Surely you want to exploit the full technical potential of
®
your helmet set with Bluetooth technology. Therefore
please follow this operating and installation
instructions exactly for your own interest.
The necessary mounting steps are not complicated. If
you still have questions, please ask your specialized
dealer or contact us directly.
We will be glad to give you the information you are
looking for.
Your AKE team
Use our service hotline!
[email protected]
Phone: +49 7021 95 95 85
Detailed operating instructions as PDF:
www.ake.info - Technical Support
18
Illustration . . . . . . . . . . . . . . . . . . . . . . . . . . . . . . . . . . . . 20
Easy installation of the electronic box . . . . . . . . . . . . . . . . . 21
Assembly of the helmet loudspeakers . . . . . . . . . . . . . . . . . 21
Assembly of the helmet microphone. . . . . . . . . . . . . . . . . . 22
Placing and replacing of rechargeable battery . . . . . . . . . . 23
Charging of battery. . . . . . . . . . . . . . . . . . . . . . . . . . . . . . 23
Sample applications . . . . . . . . . . . . . . . . . . . . . . . . . . . . . 24
Switch-on and switch-off . . . . . . . . . . . . . . . . . . . . . . . . . . 25
Pairing . . . . . . . . . . . . . . . . . . . . . . . . . . . . . . . . . . . . . . 25
Specific information for pairing with some devices. . . . . . . . 25
Using a navigation system. . . . . . . . . . . . . . . . . . . . . . . . . 25
Operating functions when using a mobile phone . . . . . . . . 26
Talking directly from helmet to helmet (intercom). . . . . . . . . 26
Comfort Entertainment when using a Motorbike
Communication System. . . . . . . . . . . . . . . . . . . . . . . . . . . 27
Considerations for pairing with multiple devices . . . . . . . . . 27
Using with multiple devices in Multipoint mode . . . . . . . . . . 27
Possible malfunctions and there cause . . . . . . . . . . . . . . . . 28
Important safety advices . . . . . . . . . . . . . . . . . . . . . . . . . . 28
Technical data . . . . . . . . . . . . . . . . . . . . . . . . . . . . . . . . . 29
Warranty and miscellaneous . . . . . . . . . . . . . . . . . . . . . . . 30
Optionally available accessories . . . . . . . . . . . . . . . . . . . . 31
19
ENGLISH
Contents
ENGLISH
3
1
1
2
5
4
6a 6b 6c
7
8
9
Illustration
1
2
3
4
5
6
7
8
9
10
20
Helmet loudspeakers
Helmet microphone
Miniature litium-ionen/polymer battery
Polarity safe mini patch plugs
Bluetooth and booster box
Display
Plug socket for charging
Multifunction button, on, off, pairing, connect
Volume down
Volume up
10
Before you start the installation, please read the following lines
carefully and mind safety advices!
Easy installation of electronic box
This Bluetooth device is working with low power
(class 2) and therefore represents no health
hazards regarding radiation when being
installed into the helmet. The ergonomic
housing in Stealth-design allows at helmets
with neck guard to invisibly and weatherproof
install the electronic box on the left side
between neck guard and helmet padding. An
additional fixing will not be necessary.
When using helmets without neck guard, the
electronic
box could
be affixed to
the reverse side of the helmet with the enclosed
velcro fastener or with the in accessory available
protective bag (see on page 29).
The electronic box could also be integrated in
the upholstering by a qualified service shop, if
recuested.
All external components can be removed for the
installation and have color coded plugs. Left
picture: Example of fixing with protective bag.
Attention
Never install components in such a way that the protective effect of
the helmet is limited!
If you are not sure, please ask your authorized
AKE dealer or contact us directly.
Assembly of the helmet loudspeakers
The assembly is according to the type of helmets used. First, check the padding in
the area of the ears. The closer the loudspeakers are to the ears the better is the
quality of the sound!
Most of the time the loudspeakers are placed under the foam padding for better
21
ENGLISH
Important!
ENGLISH
wearing comfort. It is very important that thick padded helmets have their padding
perforated in this area.
Mark in your helmet the place where your earlap is located. Then you can proceed
as follows: Take a piece of insulating tape and put it where you think your earlap is
located. Then put on the helmet and prove with your finger if the marking is at the
exact place. Don’t settle for less than the exact spot. This is the only way to get the
full advantage of all components!
Remove the protective paper on the back of the loudspeakers (self-adhesive) and
put them exactly below the markings in the helmet (connector pointing towards the
chosen side for the helmet connection) by putting a smooth pressure on the edge of
the earpieces. The bonding surface has to be clean and even.
Now lay the cable and connect the yellow plug marked “R” and “L” with the
matching connection of the electronic box.
If you need to disconnect the plug again, please do not pull the cord to avoid
damage!
Assembly of the helmet microphone
The microphone is provided with a special
“close talking capsule” to efficiently
compensate the driving noise.
You can only take advantage of this
technique when installing the microphone
centrically in front of the mouth. In Helmets
that have a lot of space in front of the
mouth the microphone should be put on
an additional foam padding!
Mark in your helmet the selected place for the
microphone and clean the padding in the area
of the bonding surface, remove the protective
paper and press the microphone firmly onto
the helmet. For some plastic material you need
a special adhesive.
Now lay the cable and connect to the blue
marked connection of the electronic box.
For open helmets there are high quality boom
microphones available, please refer to
accessories on page 29.
22
ENGLISH
For flip-up helmets we offer a flexible
microphone cable (with boom microphone
you have the disatvantage that you have to
adjust the microphone every time you put on
the helmet), please refer to accessories on
page 29.
Please lay this cable so that the flexible part
provides a connection between the movable
parts of the helmet. Make sure that the
minispiral cord can not get squeezed when
closing the helmet.
Placing and replacing of rechargeable battery
The battery is not fixed integrated but connected with cable and plug (red) to the
electronic box. This gives you several advantages:
1. defective batteries can easily be replaced (don’t pull the cord when disconnecting)
2. on tours the empty batteries can be replaced by recharged exchange batteries
3. alternatively, more powerful batteries can be used.
The high quality Litium-Ionen/Polymer battery is very small and light and can easily
be put between or under the padding. Never put batteries directly onto your skin!
Please mind the following savety advices:
Only use AKE-approved original batteries and charger provided by AKE.
Never connect the charger if the battery is not connected to the electronic box.
Without a battery or with a wrong battery, the equipment might get damaged!
Never wear the helmet with the installed battery
when charging!
The battery has to be protected against too much heat and should never be
bent or damaged. (Risk of fire or explosion!) The battery should be replaced
immediately, if it gets hot!
Charging of battery
Do not forget to charge the battery before using it.
Stealth Bluetooth Helmet Set 201: The display (see illustration 6b) will show a red light
while charging and will automatically change to trickle charging, if the battery is full.
Intercom Set BT-HS201i: The display (see illustration 6b) show a red light while
charging and will automatically change to trickle charging, if the battery is full.
23
ENGLISH
If the battery had not been charged for a longer time, the electronics for charging
might not start immediately. The Stealth Bluetooth Helmet Set will then try to regenerate the battery and the charging control light will flash until the battery can start
charging.
30 minutes = minimum charging
2 hours
= total charging
These parameters are for the standard battery only. For charging times of other
batteries please refer to the respective data sheets. The helmet set should be fully
charged for an optimum performance.
Sample applications
Which devices can be connected to the helmet sets?
Intercom
BT-HS201
BT-HS201 i
BT-HS201
BT-HS201
Bluetooth
Intercom Set
Mobile
phone
Navigation
PowerCom
Audio
Mobile
phone
Car
radio
MP3 /
iPod
2-way
radio
Navigation
BlueCom
BT-HS201
BT-HS201
AUX in
in/out
The Stealth Bluetooth Helmet Set 201 can be used with all Bluetooth devices that
are compatible to A2DP, hands-free or headset profile, e.g. Bluetooth mobile
phones, navigation systems, MP3 as well as with the AKE BlueCom pocket
repeater and all other motorbike communication systems of the AKE PowerCom
series with Bluetooth helmet connector.
The Bluetooth Helmet Set 201i (Bluetooth Interkom Set) can be connected with the
Stealth Bluetooth Helmet Set 201 or with any compatible Bluetooth headset.
Therefore, a wireless helmet-to-helmet intercom system can be realized.
24
Control tone for communication (Duplex ) on: low high
, off: high low
Pairing
Before using your Bluetooth Helmet Set for the first time, you have to pair it with
your Bluetooth device. For instructions on setting up and pairing of other Bluetooth
devices, please refer to the respective user manuals.
Please start with a switched-off Bluetooth helmet set. Turn off all other Bluetooth
devices not needed for the pairing.
1. Press multifunctional button (8) for approx. 3 seconds. Release button when
indicator light flashes red and blue. The Bluetooth helmet set is now ready to
pair with any compatible Bluetooth device.
2. Now put the respective Bluetooth device into pairing mode.
Only for BT-HS 201: At mobile phone or navigation systems you usually find this
option in the menue “searching for Bluetooth devices in the area”. If using this
option, please select the “AKE Helmet Set 201” for pairing.
3. When asked for a code word, please enter 0000. The Bluetooth helmet set
flashes blue when it is paired successfully. The Bluetooth helmet set will show a
blue light after a successfull pairing.
Specific information for pairing with some devices
Bluetooth originally was made as a worldwide uniform standard. Unfortunately,
some producers of GPS, etc. do not comply to regulations. Therefore it might lead
to imcompatibilities. For further information please check our FAQs on our website.
Using a navigation system
The Stealth Bluetooth Helmet Set 201 is compatible with all navigation systems that
work with a headset profile or A2DP profile. If the connection is interrupted, it can be
activated by pressing the multifunctional button (wait for control tone).
Not all GPS will automatically connect with the Bluetooth Helmet Set, if they are turned
on last. The connection has than to be activated by using the GPS menue.
Navigation systems with connected mobile phone: To operate the mobile phone
through the navigation screen might be tempting but the voice transmission through
the navigation system is often not very good. To test, pair the mobile phone directly with
25
ENGLISH
Switch-on and switch-off
Press the multifunctional button (8) for approx. 3 sec. to turn on the Bluetooth
helmet set. The function display will flash blue to indicate availability. Press the
multifunctional button for approx. 3 sec. to turn off the Bluetooth helmet set. When
switching off, a light will show in the display.
ENGLISH
the Bluetooth helmet set and ask your partner to test the voice quality on a landline
phone. For further information please refer to the manual of the navigation system.
Operating functions when using a mobile phone
Calling tone: Adjust your mobile phone in such a way that the ring tone in the
helmet is heard. For automatic call acceptance the ring melodie should not
adjust to shortly, the start of signal will be lost when audio is in stand by mode.
Accept phone calls: Press one time short the multifunction key. At many mobile
phones it is possible to activate the automatic call acceptance. This would
reduce the handling to a minimum.
Reject incoming phone calls with double klick: Press the multifunctional key
shortly twice to reject a incoming phone call.
End phone calls: Short klick at the multifunctional key or just wait until your
calling partner hangs up, the connection will automatically end.
Making phone calls: If you make phone calls, you have to enter the phone number at your mobile phone.
Redialling: If you like to redial the last number, please press the multifunctional key shortly twice.
Voice dialling (not at all mobile phones available): Press the multifunctional
button approx. 4 sec. to start the voice dialling.
Switching a call from phone to the Bluetooth helmet set and vice versa
To switch an active call between your phone and Bluetooth helmet set, refer to
mobile phone menu or press the multifunctional button one time.
Volume: The volume can be changed on the Bluetooth helmet set and on the
mobile. When reaching the maximum or minimum volume it will be indicated with
an adequate acoustic signal.
Autoconnect: Not all mobile phone automatically get connected with the Bluetooth
hel-met set when being turned on. The connection can be made through the
mobile phone.
Call Back by multipoint operation with intercom and phone: Double click on
multifunction button switches between the partners back and forth.
For the multifunctional key optionally, an external button can be used. Please
refer to the section “Important safety advices” below.
Talking directly from helmet to helmet (intercom)
For this you need a Stealth Bluetooth Helmet Set 201 and a Stealth Bluetooth Helmet
Set 201i (Intercom set). As the systems used are with low radiation they cause no
26
Stealth Bluetooth Helmet Set 201i with helmet microphone, P/N: 31362.
Also available as complete set: Stealth Intercom Set 200, P/N: 31363.
Comfort Entertainment when using a Motorbike Communication System
Enjoy the comfort of our high quality PowerCom Motorbike Communication Systems and still use your Bluetooth helmet set. The Stealth Bluetooth
Helmet Set 201 can be used at all motorbike communication systems that are
equipped with an Bluetooth-interface, how e.g. the AKE Bluetooth helmet connector. Of course, you will still experience the full comfort of a PowerCom system, e.g.
GALA (noise dependent volume adjustment), priority management, microphone
activation when needed, etc.
If you are looking for a more mobile solution like a “small” Bluetooth communication system, we recommend our pocket repeater BlueCom 102.
For more details please refer to the description of the pocket repeater. Available as
complete set BlueCom for 2, P/N: 39401.
Considerations for pairing with multiple devices
To pair the second device please turn off the already paired device. After a successful pairing please switch on all devices, the intercom should automatically get
connected.
Some mobile phones / GPS might act stubborn when using multiple devices or
after pairing they do not connect properly. In such cases it was proven and tested
to delete the pairings at all devices, then turn off all devices and afterwards pair
them again. With Intercom Set please mind the order of pairing:
Always pair Intercom Set first!
Bluetooth Helmet Set: To delete all pairings double klick the multifunction button
in pairing mode (201i: push +/- button together). A dual tone indicates that all
entries are now deleted.
The Stealth Bluetooth Helmet Set 201can be paired with two Bluetooth devices with
different profiles and makes it possible to listen to music in stereo and to automatically switch to a mobile phone or to a navigation system.
Using with multiple devices in Multipoint mode
The new firmware now supports also the automatic switching between Intercom
and GPS or mobile phone with Multipoint technology.
So far when using Bluetooth it was only possible to connect one master with more
27
ENGLISH
health hazards. Nevertheless they provide a range of up to 250 m (free field).
Therefore it is possible to get a communication from bike to bike.
ENGLISH
than one slave. With the new Multipoint technology, license CSR® (Cambridge
Silicon Radio) it is now possible to connect one slave with more than one master.
Right now it it possible to pair max. two master devices with the Multipoint Headset.
This could be two mobile phones, one GPS and one mobile phone, or Intercom Set
201i and mobile phone/GPS. During a GPS announcement or a phone conversation the intercom connection to the second helmet is blocked. After GPS or phone
call is finished, the intercom connection will automatically be re-established.
It is a precondition, however, that the connected equipment are compatible with
Multipoint technology.
Please note:
Some systems might still have problems with the Multipoint technology!
Refer to our FAQ’s or our customer hotline to find equipment where problems
are already known.
Possible malfunctions and there cause
Interferences and interruptions: Radio waves of the Bluetooth frequency (2,4 GHz)
are sometimes highly reflected by buildings and this might lead to a fluctuation of
field intensity. Interferences or interruptions might be possible.
Start-up signal can be heard but device is not starting: Bluetooth helmet set is on
standby, please press multifunctional button once.
Volume is too low: Check microphone and loudspeaker assembly (correct
position).
Inexplicable malfunctions: Reset system, shortly interrupt the connection to the
battery and restart the Bluetooth helmet set.
Important safety advices
For frequent mobile phone users we recommend to use our fit-for-motorbike
hands-free kits CONNECT 10 or one of our high-quality PowerCom - motorbike communication systems, where amongst others the fit-for-motorbike handsfree kits are integrated.
Driver should not operate the device while driving!
Call only with hands-free kit and use the automatic call acceptance of your
mobile phone if you want to answer calls while driving.
Absolutely do not use a higher volume than necessary!
With a high volume your hearing can get damaged. Additionally, the driver’s
concentration on the traffic is not ensured any more!
28
ENGLISH
Technical data
Bluetooth s ystem:
Version: 2.0+EDR
Profile: Hands-free, headset and A2DP
Range: Open field up to 250 m
Power supply (charger) 5V DC, 300 mA
Battery:
Type: Lithium-Ionen/Polymer 3,75 V
Capacity: 240 mAh
Charging time: 2 hours
Navigation voice announcement: Ca. 19 hours*
Continous duty music transmission: Up to 6 ½ hours*
Stand-by: 3 days
*) Operating time is strongly depending on operating mode
Charger:
Power: 5V DC, 300 mA
Helmet microphone:
Type: Noise compensated Electret close talking capsule
Input sensitivity: -49 dB (0dB=1V/µBar)
Helmet loudspeaker set:
Signal input: 2 x 32 Ohm
Output power: 2 x 0,2 Watt
Booster:
Maximum output power 8 Ohm at UBatt=3,6V: 0,72 Watt
Permissible output impedance: 3 Ohm
Frequency range: 20 Hz to 20 KHz
Signal/noise suppression (SNR): 105 dB
Quiescent current: 5 mA, Stand-by current: < 1 µA
Wake-up time after stand-by: < 27 ms
Connector for external operating device:
R-Coding for On/Off/Pairing/Vol+/Vol-/Phone remote
29
ENGLISH
Warranty and miscellaneous
For this equipment the manufacturer grants a warranty to the final consumer in the
context of the two-year implied warranty according to German laws. Hand over the
defective equipment unopened with a detailed error description to your specialist
dealer or send it directly to our service department together with the sales receipt.
Unauthorized handling will lead to the expiration of guarantee!
Conformity
This product has been manufactured and tested according to the
newest technical requirements. Detailed information regarding the CEmarking contact AKE Elektronik, D-73230 Kirchheim.
References to the recycling after the electrical appliance law
This equipment complies with the new European ROHS guideline. If it
should not be used any longer, it must not be disposed with regular
household garbage but must be turned in at collecting points for
electronic waste (free of charge for consumers). This would help us with
the recycling of valuable raw materials and at the same time provide a
contribution to environmental protection!
30
ENGLISH
Optionally available accessories
Flexible gooseneck (boom)
microphone UBM-1 for
jet helmets and flip-up helmets,
P/N: 32355
Mini spiral cord, the better solution for
flip-up helmets, flexible connection to
chin-cup with elastic microphone
cable, P/N: 32330
Powerful Li-Plmreplacement battery for
long operating hours without charging,
400 mAh, 25x40x6 mm, P/N: 73098
900 mAh, 35x50x6 mm, P/N: 73088
External multifunction key, fit for
Bluetooth Helmet Set 201 and 201i
P/N: 39318
12V norm plug - USB charger for easy
charging of the helmet set with onboard power supply,
P/N: 73099
Protective bag with vrelcro fastener for
Stealth Bluetooth Helmet Set 201 /
201i,
P/N: 39311
BlueCom 102 pocket repeater, makes
it possible to directly connect two
Bluetooth helmet sets and feed-in two
signals each for both helmets
P/N: 30401
Stealth Bluetooth Helmet Set 201i,
paired with one Stealth BT Helmet Set
201, to be used as wireless full-duplex
communication system from helmet to
helmet up to 250 m, P/N: 31362
For more additional accessories please
ask your dealer or visit our website
motorbike-communication.com
31
AKE Elektronik · Willi-Bleicher-Str. 6 · D 73230 Kirchheim
www.motorradsprechanlagen.de
www.motorbike-communication.com
0612