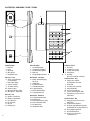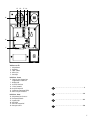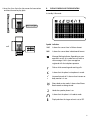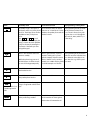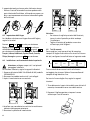
1
Telephone 50 Corded DECT User Manual Bedienungsanleitung Manuel d’utilisation Instruzioni per l’uso ACCESsories / Zubehör und Verpackungsinhalt / ACCESSOIRES ET MATÉRIEL LIVRÉ / ACCESSORI E CONTENUTO DELL’IMBALLAGGIO The following items are included in the package of JACOB JENSENTM Telephone 50, with country adaptor (optional): 1. 2. 3. 4. 5. 6. 7. 8. 9. 10. 1. 2. Corded handset Base station Table stand Screws and plugs Power supply unit Combo jack Combo cord Line cord Handset coiled cord Printing paper (silver) for the memory keys Die folgenden Produkte sind in der Verpackung von JACOB JENSENTM Telefon 50 enthalten: 1. 2. 3. 4. 5. 6. 7. 8. 9. 10. Hörer mit Kabel Basisstation Fuß für Tischaufbau Schrauben und Dübel Netzstecker Buchse/ Weiche Kombinationskabel Netzkabel Spiralkabel Einlage für Tastenbeschriftung 3. 4. 5. 6. Les produits suivants sont contenus dans la livraison du téléphone 50 JACOB JENSENTM: 1. 2. 3. 4. 5. 6. 7. 8. 9. 10. Téléphone filaire Station de base Portant Boulons et vis Connecteur réseau Prise/Duplexeur Câble à deux têtes Câble réseau Câble téléphonique torsadé Papier à imprimer argenté pour les touches raccourcis 7. L´imballaggio del Telefono 50 JACOB JENSENTM contiene le seguenti unità: 1. 2. 3. 4. 5. 6. 7. 8. 9. 10. Telefono con filo Base Supporto da tavolo Viti e tasselli Presa per alimentazione Presa/Duplex Cavo modulare Cavo di rete Cavo elicoidale per il ricevitore Carta argentata da stampare per i tasti di memoria 10. 8. 9. Main feature list ÉQUIPeMENT • • • • • • • • • • • • • LCD type, 14 lignes x 3 lignes + symboles • Temps du flash 80-800 ms • Caller ID type 1 & 2 (reconnaissance du numéro), DTMF et FSK • Liste d’appels • Mode mains libres • Réglage du volume pour le haut-parleur et la sonnerie • Répertoire (mémorisation de 100 numéros et noms au maximum) • Appel d’urgence et rappels de date • Fonction muet • 8 sonneries midi/polyphoniques • Equalizer • Pays d’origine LCD type, 14 digit X 3 line + icons Flash selectable 80-800 ms Caller ID Type 1&2, DTMF and FSK Call Log List Hands-free Speaker and ringer volume 100 phone book memory locations Alarm call and date reminder Mute function 8 midi/polyphonic ringing tones Equalizer Country setting With cordless handsets: • HS intercom • 3-Party conference • Call Transfer between HS • Baby monitor • Indoor range 50 m • Outdoor range 300 m • Low radiation Pour les combinés sans fil supplémentaires: • HS Intercom - et transfert d’appel • Conférences à 3 • Transfert d’appel entre les combinés • Baby interphones • Portée à l’intérieur: 50 m • Portée en plein air: 300 m • Low radiation (radiation faible) Ausstattung DOTAZIONE • • • • • • • • • • • • • • • • • • • • LCD Typ 14 Zeilen x 3 Linien + Symbole Flashzeit 80 – 800 ms Caller ID Type 1 & 2, DTMF und FSK Anruferliste Freisprechen Lautstärkeregler für Lautsprecher und klingeln Telefonbuch (Speicherung von bis zu 100 Nummern und Namen) Notruf und Datumserinnerung Stummschaltung (Mute) 8 polyphone Klingeltöne Equalizer Ländereinstellung Mit drahtlosen Mobilteilen: • Interkom – und Rufweiterleitung am Mobilteil • 3 Konferenz • Rufweiterleitung zwischen den Mobilteilen • Babyüberwachung • Reichweite in Gebäuden 50 m • Reichweite außerhalb 300 m • Low radiation (geringe Strahlung) • • • • Display LCD a 14x3 linee e simboli Intervallo del flash 80-800 ms Riconoscimento ID di tipo 1 & 2, DTMF e FSK Lista chiamate Modalità vivavoce Regolazione volume altoparlante e suoneria Rubrica (memoria fino a 100 voci) Chiamate d’urgenza e promemoria per appuntamenti Funzione “Mute” 8 suonerie polifoniche Equalizzatore Selezione del Paese Con ricevitore cordless opzionale: • Intercom e trasferimento chiamate • Chiamata in conferenza a 3 • Trasferimento di chiamata • Monitor bimbo • Portata negli edifici (max 50 m) • Portata all’aperto (max 300 m) • Radiazione minima ILLUSTRATION / abbildung / FIGURE / FIGURA 6. 1. . 7. 8. 3. 9. 10. 4. 5. Corded handset 1. Earpiece 2. Hook 3. Mute key 4. Microphone 5. RJ9 handset jack Hörer mit Kabel 1. Hörerlautsprecher 2. Aussparung für Gabel 3. Stummschaltungstaste 4. Mikrofon 5. RJ9 Spiralkabelanschluss 11. Base unit - front 6. Switch off and hanger for the handset 7. LCD screen display 8. 8 functional keys 9. 12 numerical keys 10. 8 memory keys 11. Message indicator (LED) 12. Microphone - hands-free Basisstation - Frontseite 6. Gabel und Aufhängung für Hörer 7. LCD Display 8. 8 Funktionstasten 9. 12 Nummerntasten 10. 8 Speichertasten 11. Nachrichtenindikator 12. Freisprechmikrofon Base unit - rear 13. Speaker - hands-free 14. Battery compartment 15. RJ11 data port 16. RJ11 line jack 17. DC jack 18. Headset jack Basisstation - Rückseite 13. Freisprechlautsprecher 14. Batteriefach 15. RJ11 Datenanschluss (aux) 16. RJ11 Telekomanschluss 17. Stromanschluss 18. Headsetanschluss Téléphone filaire 1. Ecouteur 2. Système d’accroche 3. Touche muet (mute) 4. Microphone 1. 5. Prise RJ9 (prise fil torsadé du combiné) Station de base - Face 6. Support du combiné et permet de raccrocher 7. Ecran LCD 8. 8 touches fonctionnelles 9. Pavé numérique 10. 8 raccourcis mémoire 11. Témoin de messagerie (LED) 12. Microphone pour la fonction Main Libre. Station de base - Dos 13. Haut parleur pour la fonction Main Libre 14. Compartiment batterie 15. Pris RJ11 supplémentaire (permet de brancher un fax, répondeur etc.) 16. Prise téléphonique RJ11 17. Prise d’alimentation 18. Prise pour le casque de communication. 15. 16. 17. 18. 13. 14. 5. Telefono con filo 1. Altoparlante 2. Aggancio 3. Tasto “Mute” 4. Microfono 5. Presa Rj9 Unità base - Fronte 6. Supporto per riagganciare e appendere il ricevitore 7. Display LCD 8. 8 tasti di funzione 9. 12 tasti numerici 10. 8 tasti di memoria 11. Indicatore di messaggi (LED) 12. Microfono per viviavoce Unità base - Retro 13. Altoparlanti per vivavoce 14. Comparto batteria 15. Ingresso Rj11 16. Presa Rj11 17. Presa di corrente DC 18. Presa per cuffia UK . . . . . . . . . . . . . . . . . . . . . . . . . . . . . . . . . . . . . . . . . 6 DE . . . . . . . . . . . . . . . . . . . . . . . . . . . . . . . . . . . . . . . . 24 FR . . . . . . . . . . . . . . . . . . . . . . . . . . . . . . . . . . . . . . . . 42 IT . . . . . . . . . . . . . . . . . . . . . . . . . . . . . . . . . . . . . . . . 60 UK A.Installation and start-up . . . . . . . . . . . . . . . . . . . . . 6 B.Display symbols and their indication . . . . . . . . . . 9 C.Buttons and their functions . . . . . . . . . . . . . . . . . 10 D.Preparation before use . . . . . . . . . . . . . . . . . . . . . . . 12 E.Normal operation . . . . . . . . . . . . . . . . . . . . . . . . . . . 13 F.Phone book and memory keys . . . . . . . . . . . . . . . . 16 G. Caller identification memory (CALLER ID) . . . . . . 18 H.Personalizing your phone . . . . . . . . . . . . . . . . . . . . 18 I. Advanced operation . . . . . . . . . . . . . . . . . . . . . . . . . 19 J.Reverting to factory default setting . . . . . . . . . 21 K. Maintenance . . . . . . . . . . . . . . . . . . . . . . . . . . . . . . . . . 21 L.Troubleshooting . . . . . . . . . . . . . . . . . . . . . . . . . . . . 21 M.safety instructions . . . . . . . . . . . . . . . . . . . . . . . . . . 22 N. Environmental concerns and disposal . . . . . . . 23 O.ec declaration of conformity . . . . . . . . . . . . . . . 23 Congratulations on your new JACOB JENSENTM Telephone 50. The telephone is designed in Denmark by Jacob Jensen, whose products have gained international recognition for their original, simple and classic design. It is a state of art device created with consideration of form and function. The telephone is designed for both desktop and wall mounting and a wall mounting bracket is included in the gift box. The JACOB JENSENTM Telephone 50 is powered with the latest digital technology – DECT system (Digitally Enhanced Cordless Telecommunication). It brings you digital sound, penetrating range and user-friendly menu-driven functions. According to the DECT system standard (GAP compatible), six different handsets can be registered to a single base unit to perform function of a mini-PABX system which offers you functions of intercom and call transfer between handsets. In addition, its built-in Caller ID decoder, Phone Book, Redial List and Caller ID memory provide you great convenience to manage your phone calls. The JACOB JENSENTM Telephone 50 is equipped with a low radiation feature. It works intelligently by detecting and adjusting the strength of the radio frequency signal (RF) depending on the distance between the cordless handsets and the base as well as the number of handsets attached. This is done automatically so that the system will always adjust the strength of the RF-signal to the lowest possible. Note: You may expand your Telephone 50 by adding more Telephone 10 cordless handsets with charger. Up to six handsets can be connected. These can be purchased separately from the retailer where you purchased this product. A.Installation and start-up IMPORTANT: It is imperative that you follow these steps in sequence for proper installation of the telephone and note the following: This DECT telephone can only work under constant main power supply to the base station. It is advisable that another corded phone (works without main power supply) is connected to your phone system for emergency call purpose in case of power failure. OPTION: The telephone can be equipped with a SANIK 2.4V 650mAh Ni-MH battery, model 2SN-AAA65H-S-J1, which enables the telephone to operate for a short period in case of power failure. The battery is optional and not included. Caution • Risk of explosion if the battery is replaced by an incorrect type. Use only the SANIK 2.4V 650mAh Ni-MH rechargeable battery pack, model 2SN-AAA65H-S-J1. Contact your local supplier for the back-up rechargeable battery. • You must disconnect the power supply unit and the telephone line cord before installing the back-up battery. • Do not dispose of the battery in fire. It may explode. Dispose of used batteries according to the instructions. • Use only the Ktec Model KSLFB0750035W1EU (for the European market except UK) / KSLFB0750035W1UK (for the UK market) power adaptor with red RJ11 plug that came with the unit. Using other power adaptors may damage the unit and invalidate your warranty. • Plug the adaptor to a socket outlet that is close to the equipment and easily accessible. 1.Install the back-up battery (optional) following the procedure in section A.4. 2.Connect one end of the coiled cord to the handset and plug the other end into the RJ9 jack of the base station. Note: If desktop placement is preferred, please mount the table stand first. A.1. Wall mounting 1.Pull the Combo cord downwards through the groove (as shown above) in order to let it out at the bottom and connect it to the Combo jack. 2.Mount the base station by the enclosed screws and plugs for 6 mm drill. A.2.Desktop placement - table stand Slide the canals of the table stand into the tracks of the back side on the base station. The table stand is mounted when you hear a click. 3.Connect the combo cord to the RJ45 jack of the combo jack. Connect the line jack to the RJ11 line jack on the base (16) and connect the DC jack to the base (17). 4.Plug the power supply unit into the main wall outlet and connect the other end to the RED jack of the combo jack. 5.Connect one end of the telephone line cord to the BLACK jack of the combo jack; connect the other end of the telephone line cord to the country telephone plug adaptor (optional). The table stand can easily be removed again: - Push the button inside the square hole at the bottom of the base station, using a pen or a finger, and pull the bracket away from the base station at the same time. 6.Connect the country telephone plug adaptor to the wall outlet for telephone. A.3. Setting language If you would like to choose another language than the preset English, please do as follows: Press and press three times to select Display press press twice to select Select Lang. Press press to select your desired language: English, Deutsch, Français, Italiano, Nederlands, Español, Dansk, Svenska, Türkçe, Norwegian and press . A.4.Installation and replacement of optional battery CAUTION: Always disconnect all phone cords from the wall outlets before installation or replacement of the battery. To install the battery, please follow the instructions below: 1.Prepare one piece of optional back-up rechargeable battery, SANIK 2.4V 650mAH Ni-MH, model 2SN-AAA65HS-J. 2.Remove the table stand, the power supply unit and the telephone line cord from the base station. 3.Unscrew the battery compartment door with a screwdriver and lift up the battery compartment door. Important Notice • To obtain the best battery performance, the back-up battery pack should be charged for 10 hours after first time installation. • Remove the back-up battery pack from this product if storing over 30 days. A.5. Memory keys You can design your own memory keys and print them on the enclosed silver paper. To fit under the key plate, please set up the box/text by following this example: 66 mm 10 mm Text Text Text Text Text or symbols should be placed within the dotted windows measuring 14 x 8 mm each. We recommend to make a test print on white paper. To take off the memory key plate and insert the silver paper, follow the instructions below: 1.Gently pull the left side recess area of the memory key plate and remove the memory key plate from the base station. 2.Prepare the silver paper from your package and print out your own designed memory key text. 4.Install a new or replace the old battery pack as indicated on the diagram below. 5.Mount the battery compartment door again. 3.Use a pair of scissors to cut off the paper slip along the solid line (66 x 10 mm). 4.Insert the silver slip to the slot area on the base station and close the memory key plate. B.Display symbols and their indication In standby / Idle mode: 123 123 123 123 123 123 123 123 SymbolIndication 14:05 It shows the current time in 24-hour format. 123 123 123 123 123 123 123 123 20/01 It shows the current date in date/month format. Message Waiting Indicator. Depending on your operator’s service, this symbol turns on when a voice message is left in your message box registered with the telephone operator. Flashes while connecting and receiving calls. It shows that the phone’s microphone is muted. Intercom/internal call. It shows when intercom or baby monitor is in use. Phone book review mode. It shows when Phone Book records are being viewed. Hands-free speaker phone is on. It shows that the phone is in headset mode. Displayed when the ringer volume is set to OFF. C.Buttons and their functions Before going through the following keypad functions, it is a good idea to understand that multiple functions may be assigned to a single button in order to reduce buttons cluster. On some buttons, short and long push on one button gives you different functions in different modes. Pay attention to the following description regarding long and short push. Short push means push and release immediately. Long push means push and hold for approximately two seconds. Button In standby mode In conversation mode In programming / viewing mode On the handset unit Push and hold this button to access the MUTE function. Release the key to unmute. On the base station Push this button to access the menus. To enter: Mute, Internal call, Sound Enhancer, Flash, Redial. In programming mode, press this button to confirm a setting. To enter digit 0-9. To enter digit 0-9. To enter digit 0-9 or to enter alphabet characters. In standby mode, a short push to this button will bring you redial function. Last 10 called numbers will be kept in the redial memory. Numbers stored in the redial list can be up to 24 digits long. Use and to select the desired number. Pick up the In conversation mode, this button functions as ”volume up” for the handset, the speaker phone and the headset volume. In programming & memory review mode, this button functions as ”scroll up” when a short push is given. Use to scroll through the phone book, menu, redial list, or caller ID log. handset or press or to dial the number. 10 Button In standby mode In conversation mode In programming / viewing mode In standby mode, a short push on this button will show you the phone book list. The display shows the first alphabetical entry in the phone book. Use and to scroll through the entries and display the entry you want. Or search alphabetically for the entry by entering the first letter of the name you want using the keypad. In conversation mode, this button functions as ”volume down” for the handset, the speaker phone and the headset volume. In programming & memory review mode, this button functions as ”scroll down” when a short push is given. Use to scroll through the phone book, menu, redial list, or caller ID log. Press to exit the menu mode and return to standby. Press to get a new line or press to answer a waiting call if your telephone company offers this service. Press to transfer a call to another extension on a PABX. This key (flash) is a brief interruption of the line. In programming mode, this button functions as Cancel or Delete. Press it to delete incorrect digits or letters. Press this to go back to previous menu. While the phone rings, press and hold this button for three seconds to turn off the ringer temporarily. Press and hold for 5 sec to enable registration mode. Press this button once to switch on the headset function. Press to end a call. Press this button once to switch on the speaker phone function. Press to end a call. Push this button to make a page ring to all registered cordless handsets. Press this button to insert a pause when pre-dialling a number. Press this button to put the call on hold / mute the call. Press again to retrieve the call / unmute the call. 11 D.Preparation before use Attention Your DECT phone is protected by PINs (personal identification numbers). Never change the PINs of your base unit unless you are familiar with electronics products and you have a real need to protect your phone by special PINs. A forgotten PIN could stop operation of your DECT phone and may result in expensive technical support services. For details please refer to section I. ADVANCED OPERATION. as the date/time information will be received automatically from the caller ID signal. For use in countries with DTMF caller ID system (or countries with FSK system where date/ time is not sent from the telephone operator), go through the following procedures to set date/time information: Key Map: Time & Alarm Date/Time Set Date & Time D.1.The OK/MENU button This DECT phone is built with a user-friendly MENU function. All essential functions of this phone can be programmed via the MENU button by a question & answer (Q&A) approach. 24 Hours mode Use the numeric buttons to enter DATE information (DD/ MM/YY format), e.g. 030609 for 3rd June 2009, push again to enter TIME information (24:00 hours format). When finished, push again to confirm. Press to return to standby mode. By pushing on the base unit, it leads you to browse through the following function menus in a circular manner. You may push to browse upward and to browse downward. D.4.Telephone name Key Map: Display enter the handset name Call Log List > Internal Call> Audio Setting >Display > Time & Alarm > Add. Settings > Setting Base > Baby Monitor > You can change the name your phone displays on the screen. 1.Press to access the main menu. 2.Press / to select ”Display”. Press 3.Press / to select ”Handset Name”. Press 4.”Handset Name” appears. Enter the name using the number keypad. Press 5.Press to exit and return to standby mode. Throughout the remaining part of this Instruction manual, a quick Key Map will lead you to different programming areas where you will be asked to make your selections. D.2. Changing language English is the factory-programmed display language. To change the language setting: Key Map: Display Select Lang. your desired language and press Select 1.Use / to browse through the available languages. 2.When your desired language is shown, push to confirm. D.3. Setting date/time Depending on country and telephone operator, usually every caller ID memory will be stored with its incoming date and time information. It is not necessary to set the date/time for use of this DECT phone in countries with FSK caller ID system 12 Handset Name D.5.Tones Key Map: Audio Setting Tones your option select On/Off select You can switch on or off the tones for key touch, confirmation, and call waiting. For example, when the key tone is set to ”On”, you will hear a tone each time you press a keypad button. 1.Press to access the main menu. 2.Press / to select ”Audio Setting”. Press 3.Press / to select ”Tones”. Press 4.Press / to select the option (i.e. ”Warning”, ”Call waiting”) and to confirm. 5.Press / to display either ”On” or ”Off” and press to confirm. For ”Key”, select from ”Pattern 1-3” or ”Off” and press 6.Press to exit and return to standby mode. D.6.DIAL mode You can set your phone to use either ”Tone” or ”Pulse” dialing. The pre-set setting is ”Tone” dialling, where you will hear a tone beep each time you dial a number. Most modern exchanges and switchboards use ”Tone” dialling, so you should not need to change this setting. Only change it if your service provider or switchboard uses ”Pulse” dialling. 4.Press / to select ”Prefix Dial”.Press The current setting is displayed. 5. Enter the number using the number keypad or press to clear. Press to confirm. 6.Press to exit and return to standby mode. . D.9. Call barring When switched on, Call Barring prevents calls from being made to a specific number, area code or international code. Key Map: Setting Base enter the number Call Barring select On/Off Key Map: Mode Setting Base Additional select Tone/Pulse Dial 1.Press to access the main menu. 2.Press / to select ”Setting Base”. Press 3.Press / to select ”Additional”. Press 4.Press / to select ”Dial Mode”.Press . The current setting is displayed. 5.Press / to select either ”Tone” or ”Pulse”. Press to confirm. 6.Press to exit and return to standby mode. D.7.Tone dialling Switch-Over If you have set your phone to use ”Pulse” dialling, you can switch temporarily to ”Tone” dialling for the duration of a call: During off-hook state, press and hold ”D” will be displayed. Any digits entered after the ”D” will be dialled using tone dialling. 1.Press to access the main menu. 2.Press / to select ”Setting Base”. Press 3.Press / to select ”Call Barring”. Press 4.Enter the number using the number keypad or clear. Press to confirm. 5.Press / to select ”On” or ”Off”. Press to confirm. 6.Press to exit and return to standby mode. to E.NORMAL OPERATION E.1. Using an optional headset An optional headset can be used as an alternative method to make a call and this is especially useful for long calls. Connect the headset cord to the headset jack on the back of the base unit. When the headset is not in use, simply press the button to toggle the headset mode and return to normal handset or speaker phone mode. D.8.Prefix dialling If you need to add a prefix to the number for a long distance call, or if you need to add your saved area code to the number, do the following: Caution The headset jack type is 2.5 mm pin. Please contact your local supplier for compatible headset. Using other headsets may damage the unit. Key Map: E.2.To make a call Using the handset: 1.Pick up the handset. The display will show the handset icon . 2.Use the keypad to enter the number you wish to dial. 3.Hang up the handset when finished. Setting Base Additional Prefix Dial enter the number 1.Press 2.Press 3.Press to access the main menu. / to select ”Setting Base”. Press / to select ”Additional”. Press 13 Using the speaker phone: 1.Press . The display will show the speaker icon . 2.Use the keypad to enter the number you wish to dial. 3.Press to end the call. Using the headset: 1.Press . The display will show the headset icon . 2.Use the keypad to enter the number you wish to dial. 3.Press to end the call. E.3.To answer a call When there is an incoming call, the phone will ring as long as the ringing volume is not set to “Off”. If you have subscribed to caller ID service with your telephone operator, the caller’s number will show on the base station’s display while the phone is ringing. If the caller’s number is already stored in the Phone Book (refer to F. Phone Book), the matched name will be shown on the base station display when the phone receives a call. The call can be answered in three ways: 1.Simply pick up the handset. 2 Press to answer the call by hands-free speaker phone function. 3 Press to answer the call by the headset function. E.4.To end a call Put the handset on the cradle or press to end the call. or once E.5. Switching between the handset, the headset and the speaker phone The handset is always top priority among other operation modes. Once the handset is picked up, the unit should switch to handset mode. 1.To switch to the headset, press once. The headset indicator will come on. Put the handset on the cradle to activate the headset mode. 2.To switch to the speaker phone, press once. The speaker phone indicator will come on. Put the handset on the cradle to activate the speaker phone mode. 3.To switch to the handset, pick up the handset. The speaker phone or headset will turn off. 14 E.6. Volume The speaker, handset and headset volume are set independently using or in the related operation mode. Your telephone comes with default settings which can be adjusted to individual preference. There are six possible volume settings per mode. The volume indicator scale is displayed during volume adjustment. E.7. Sound enhancer The telephone is equipped with a unique audio tool offering you four sound options in the earpiece. This enables you to personalise the sound quality to your preferences. Choose between: Normal, Bass, Alto, or Treble. Key Map: Off-hook options SoundEnhancer select the tone 1.During off-hook, press to access the main menu. 2.Press / to select ”SoundEnhancer”. Press 3.Press / or Treble. Press to select one from Normal, Bass, Alto, to confirm. E.8. Mute/Unmute Key Map: Off-hook Mute/Unmute 1.During off-hook, press to access the main menu. 2.Press / to select “Mute”. Press 3.The mute icon will show on the screen. 4.To unmute the phone, follow the above procedure and select ”Unmute”. Press . The mute icon will disappear from the screen. E.9.Pause With some PABX systems, there is a short pause between the code for the external line (usually 0 or 9) and the obtaining dial tone. A pause needs to be entered manually and stored in the phone book so that the numbers are not dialled too quickly. When storing numbers in the memory, you can include the external line access digit (e.g. 9 or 0) with each phone number. LNR function (Redial) or memory dial may not work when using your telephone on a PABX. Insert a pause between the EXTERNAL LINE DIGIT and the TELEPHONE NUMBER. E.10.Hold To place a call on hold: 1.Press to hold/mute the call. 2.Press again to retrieve the call. E.14.To make an internal call between the base unit and a cordless handset You may make intercom from the base unit to a specific handset extension. 1.Press and select the ”Internal Call” . 2.Use or to select the name, number, or the handset you want to call. Press . The handset will ring. The icon is displayed and you will hear the internal call dialling tone. 3.When the called handset answers, pick up the handset to start conversion. E.11.Last number redial (Redial) There are 10 outgoing call logs stored. To redial a call, press at standby mode and then select the number by or . Pick up the handset or press or to dial the phone number. E.15.To answer an internal call When the telephone is called from a cordless handset, the name of the cordless handset will show on the display and the internal ringing tone will be heard. Pick up the handset to start intercom conversion. You can also redial the call log number during off-hook: Pick up the handset, or press or . Wait for a dial tone then press and select “Redial”. Use or to select the name, number, or the handset you want to call. Press to confirm. E.16.To end an internal call Put the handset on the cradle or press end the call. 1.Press the numeric keys to enter the EXTERNAL LINE DIGIT. 2.Press to insert a pause. The display shows “P”. 3.Press the numeric keys to enter the TELEPHONE NUMBER. E.12.Recall (Flash) Use the button to activate custom calling services such as call waiting or call forwarding, which are available through your local phone company. E.13.To make & receive internal calls (Intercom) • Make intercom calls between the cordless handset and the base unit telephone. • Transfer an outside call between the cordless handset and the base unit telephone. Internal communication (INTERCOM) can be made between the phone and an attached wireless handset or between two attached wireless handsets – like intercom, call transfer & conference conversation. Your phone and the handsets are given an individual extension number. This individual extension number will be used when making intercom, call transfer & conference conversation. Extension number for handset(s) starts from 1 to 6. The extension name for the phone is T50. or to E.17.To page all handsets from the base You can only page all registered handsets at the same time by pushing the PAGE button on the base unit. If you have misplaced your handset, you may also use the PAGE function from the base unit to make a page ring at the handset. E.18. Call Transfer & Conference Conversation Transferring a call You can transfer an external caller from the base unit to a cordless handset or vice versa: During an external call: 1.Press and select the ”Internal Call”. 2.Press or to select name, number or the handset you want to transfer the call to and press . The external caller is put ”on hold” and the called handset will ring. 3.When the called handset answers, put the handset on the cradle or press or once to transfer the call. If the called handset does not answer within 30 seconds, the external caller will return to you again. If you have got extra cordless handsets registered to your base unit, refer to the section E.19. 15 Conference call You can hold a three-part conversation (conference call) between the base unit, an external caller and another internal handset user. During an external call: 1.Press and select ”Internal Call”. 2.Press or to select name, number or the handset you want to have a conference call with and press . The external caller is put ”on hold” and the called handset will ring. 3.When the called handset answers, press scroll down to “Conference” and press to start your conference call. 4.You can put the handset on the cradle or press or any time to leave the conference. E.19. Multi-handset call transfer & conference conversation You can register up to six handsets per base unit. With two or more cordless handsets registered, you can: 1.Make intercom calls from one handset to another handset. 2.Transfer an outside call from one handset to another handset. 3.Activate the baby monitor function. Note: Only one handset can be connected to the outside line at once. If you try to make a call while another handset is already on the line, you will barge-in the call . E.20. Call Transfer/Switching via a switchboard (PABX) to a new extension If your phone is connected to a switchboard, an external call can be put through to a local extension by doing so: 1.Press . The display will now show a capital R. 2.Dial the requested extension. You will now be able to talk with the chosen extension and transfer the call. To transfer the call put the handset on the cradle or press or once. E.21.Baby Monitor To set your phone to the baby monitor function, the first step is to register one cordless handset to the base unit. Once the handset is registered to the base, you can turn on the baby monitor function as follows: 16 Key Map: Baby Monitor select handset On the base unit: 1.Press to access the main menu. 2.Press / to select ”Baby Monitor”. Press 3.Press / to select the handset. Press to confirm. 4.To deactivate the baby monitor, press on the base or on the handset to exit and return to standby mode. E.22.Data port This phone is equipped with a data port (DC jack) for you to connect an auxiliary phone device, such as a fax machine, a computer modem or an answering machine. F.PHONE BOOK and memory keys There are 100 phone book memory banks built inside this DECT phone (13 characters & 24 digits). You may store frequently used numbers into these memory banks. If more than one handset comes with your product package (refer to information on the package), the phone book memories are independent among the handsets. The phone book memory will not be automatically transferred from one handset to the others. You can manually select phone book transfer between the base and the cordless handsets. F.1.To make a new entry Key Map (when the phone book is empty): phone book <Enter Name> Key Map (when the phone book already has records): phone book New Entry <Enter Name> 1.Use the alphanumeric buttons (2 to 9) to enter a name for the record in the same manner as you manage alphabet input from your mobile phone. Push again to confirm. Press to delete an incorrect letter. If you enter a letter and the next letter is on the same button, press to move the cursor to the right or wait two seconds for the cursor to move. To switch between upper and lower case, press . 2.Use the numeric buttons to enter the phone number (timed pause is often inserted inside the telephone number when the phone is connected to a PABX. Press and hold until the display shows P), push to save the record. Press to delete an incorrect letter. 3.Press to select a distinctive ring and press confirm. 4.Press to select ”Store” or ”Back” and press to confirm. 5.The phone book entry is now stored. Press to return to standby model. F.4.To delete the Phone Book Memory Key Map: phone book / to select number Erase Entry Yes to F.2.To make a new entry from the Caller ID Memory and Redial List You may copy a number stored in the Caller ID memory and the Redial list to the phone book. (Please refer to G. CALLER IDENTIFICATION MEMORY and E.11. Last number redial for more details) 1.When a desired number is shown while you are reviewing caller ID memory or redial list, push once. ”Save to Phb.” is displayed. Press . Enter a name using the keypad and press to confirm. If you enter a name that is already stored in the phone book, you will be prompted to enter another name. 2.The number is displayed. To confirm and save the entry to the phone book, press to confirm. 3.If necessary, you can edit the number using to delete any incorrect digits and enter new ones using the keypad. 4.Press / to select a distinctive ring. 5.When finished, push again to complete. 6.Press to exit and return to standby mode. F.3.To make a call from the Phone Book Memory Key Map: phone book / to select a number. Pick up the handset. 1.Use the alphanumeric keypad to enter the first letter of a desired name inside the phone book. First record starting with the entered letter will be shown on the screen. 2.Use / to start browsing until the desired name is shown. 3.Pick up the handset or press or to make the call. 1.Use / to scroll until the desired name is shown on the screen. 2.Push to confirm or press to go back to the menu screen without deleting. You will be asked to confirm permanent deletion of phone book record. To confirm, push again and the selected phone book record is deleted and a long beep will be heard. F.5.To edit the Phone Book Memory Key Map: phone book / to select number Edit . Use and the numeric keypad to enter the correct letters 1.Use / to scroll until the desired name is shown on the screen. 2.Push to confirm. 3.You may use to delete letters of the name entry and make a correction. 4.When the name entry is finished, push . You may use to delete numbers of the phone number entry and make a correction. 5.Push again to save the record. 6.Select a distinctive ring and press F.6.One touch memory There are eight memory keys on the base unit which allow you to quick access the phone book memories and dial them directly. The speed dial key nos. 1 - 4 are placed on the upper row and speed dial key nos. 5 - 8 are placed on the lower row. F.7.To make and change an entry of the memory keys Phone book / to select number choose Speed dial select speed dial key number 1.Press from idle and press / to select the desirable phone numbers. 2.Press and choose “Speed dial”. 3.Press to select speed dial key number and press to confirm. 17 4.The desirable phone number is saved to the selected speed dial key. F.8.To dial out an entry of the memory keys 1.Lift the handset and press the speed dial key or just press the speed dial key from idle. 2.The phone number and name will show on the display. 3.The unit will enter speaker phone mode and dial the number. G. CALLER IDENTIFICATION MEMORY (CALLER ID) If Caller ID service is available from your service operator and you have subscribed to this service, the telephone number of the caller will be shown on the screens of handset when there is an incoming call. In FSK caller ID system, name of the caller and date time stamp will also be displayed and stored if they are available. Only the first 13 letters of the caller’s name are displayed. This DECT phone stores the last 30 Caller ID records into the Caller ID memory. It can store up to 24 digits long and names up to 13 characters long. The oldest record will be replaced by the newest record. If the caller has withheld their listing, ”Unavailable” or ”Private” will be displayed or, if the number is unavailable the display will show ”Unavailable”. You will not be able to dial back an entry with one of these messages. Call waiting tone This model has a special call waiting tone in addition to the one you typically hear from your local service provider. This tone will be heard after the standard tone when you receive a call waiting notification. The tone is provided as an extra feature and will have to be turned on in order to activate as the default setting is set to ”Off”. To turn this feature on, go to the menu, select ”Audio Setting”, ”Tones”, and ”Call Waiting” – then set the feature to ”On”. When the call waiting tone is turned on, you will be alerted by the call waiting tone when receiving a second external call. If the call waiting tone is disabled, you do not get a call waiting tone signal. When activated you can toggle between the calls by pressing . Please note that this function is dependent on your service provider. 18 G.1.To review Caller ID records To review Caller ID records, press and select the ”Call Log List”. Use / to scroll among records, or press to exit and return to standby. G.2.To make a call from Caller ID records You may make a call from the Caller ID records. Press and select the ”Call Log List”. Use / to scroll and select the desired number/name. Pick up the handset or press or to dial the desired caller’s number/name when reviewing the caller ID records. G.3.To delete Caller ID memory You may delete either a single or all records in the Caller ID memory. 1.Press and select the “Call Log List”. Use / to scroll and select the desired entry you intend to delete. If you want to delete all entries, skip this step. 2.Press to select “Erase Entry” or “Erase List”. 3.Press to select “Yes” or “No”. Then press to confirm. G.4. Message Waiting Indicator (MWI) If Voice Message service is available from your service operator and you have subscribed to this service, the symbol of Message Waiting will be shown on the screen when a voice message is left in your message box registered with the telephone operator. This is also supported by the LED light blinking on the base. Depending on your service operator’s service, Message Waiting Indicator should turn off automatically when you have checked your left message in the operator’s server. H.PERSONALIZING YOUR PHONE This DECT phone is built with features to offer you personalized settings such as ringer type, ringing volume and key click. Referring to the description of the MENU buttons in previous section, all these personalized settings can be programmed via Menu Programming mode. H.1. Setting Ringer Volume & Ringer Type Ringer Volume Key Map: Audio Setting Ringer Volume select the volume 1.To arrive at this menu, push in standby mode, and use / to start browsing until ”Audio Setting” is shown on the screen. Press 2.Press / to select ”Ringer Volume” and press 3.Press Ringer Type Key Map: Audio Setting select the option Ringer Type select the ringer type 1.To arrive at this menu, push in standby mode, and use / to start browsing until ”Audio Setting” is shown on the screen. Press 2.Press / to select ”Ringer Type” and press 3.Press / to select the ”External”, ”Internal”, ”Paging”, ”Alarm”, or ”Appointment” and press to confirm. 4.Press / to select the melody you want. (you will hear a sample of each as you scroll through), then press to confirm your selection. 5.Press to exit and return to standby. H.2. Appointment Key Map: Time & Alarm your appointment Set Appointm. – Select The date and time must be set before you can access the Calendar menu option. To set date and time, see section D.3. Setting date/time. Your phone allows you to set five personalized date and time appointments. 1.Press to access the main menu. 2.Press / to select ”Time & Alarm”. Press to select ”Set Appointm.”. Press 4.Press / to select one from ”Appointment 1” to ”Appointment 5”. Press 5.Press / to select ”On”. Press 6.Enter date and time for the appointment. Refer to D.3. Setting date/time. Press 7.Enter the appointment name using the keypad (up to 13 characters). Press I. 3.Press / to select the volume you want. (you will hear a sample of each as you scroll through), then press to confirm. 4.Press to exit and return to standby. If you select Volume ”Off”, will be displayed. / ADVANCED OPERATION Special Attention!! The following sections are only for users who are familiar with electronics products. Failure in following steps correctly may stop your DECT phone from normal operation. I.1.To register a cordless handset When you register a cordless handset to your base, you will be asked to enter your base PIN code. To enable registration mode on the base unit, press and hold the PAGE button for five seconds. The LED on the base will flash one time when registration mode is enabled. Before registration, make sure the new handset is fully charged and that you have the base and the handset in front of you. Also, make sure that all handsets and the base are in standby. On the handset you want to register: Key Map: Add. Settings Register the base number 1.Press 2.Press select to access the main menu. / to select ”Add. Settings” and press 3.Press / to confirm. 4.Press / to confirm. to display ”Register” and press to select your base number and press If the base already has the maximum number of six handsets registered, you will need to deregister one of the existing handsets before you can register the new handset. See section I.2. Deregister a handset or a base. 19 On the handset: Enter the base PIN code. Preset base PIN code is 0000. When in standby, the new handset number will be displayed. The handset will automatically be allocated with the next available handset number. If the registration is unsuccessful, the display will show ”Not registered” and you will need to follow the registration procedure again. I.2.Deregister a handset or a base If you have more than one handset registered to your base or more than one base registered to your handset(s), you can deregister both the handset from the base or the base from the handset. Before deregistration, make sure that all handsets and the base are in standby. Key Map: Add. Settings select the handset or base Deregister select Yes 1.Press 2.Press to access the main menu. / to select ”Add. Settings” and press 3.Press to confirm. 4.Press press 5.Press 6.Press / For the base Key Map: Setting Base select Yes 1.Press 2.Press Base Reset to access the main menu. / to select ”Setting Base” and press 3.Press / to display ”Base Reset” press to confirm. 4.Press / to select ”Yes” and press confirm. 5.Press to exit and return to standby. For the cordless handset Key Map: Add. Settings select Yes to Handset Reset to display ”Deregister” press / to select ”Handset” or ”Base” and to confirm. / to select ”Yes” and press . to exit and return to standby. I.3. Changing the PIN code Key Map: Setting Base a new PIN code Base PIN enter The default Base Pin code is 0000. If you want to change to a new PIN code, follow the above procedures while you enter a new 4 digits base PIN code. 20 I.4.Resetting your phone If you reset your phone, the base will return to the default settings. The time, date, handset name, phone book, call log list and redial list will not return to default. If you have more than one handset registered to your base and you complete the following procedure, only the handset you reset and the base will go back to the default settings. 1.Press 2.Press to access the main menu. / to select ”Add. Settings” and press 3.Press / to display ”Handset Reset” press to confirm. 4.Press / to select ”Yes” and press to confirm. 5.The display shows “Cleared” and returns to factory default. I.5. Switchboard and FLASH time If the telephone is connected to a switchboard (PABX) and not ringing correctly, then the FLASH time should be adjusted to match the time of the switchboard. To change the time, press Setting Base Additional Recall Time choose between 80 - 800 ms and confirm with . J.REVERTING TO FACTORY DEFAULT SETTING You may change all settings in your DECT phone back to the factory default setting. The only way to reset the handset or the base is to go into the menu and choose ”Handset Reset” or ”Base Reset”. Please refer to the above section I.4. Resetting your phone. All programming and settings you have made to the phone will be lost automatically. It could be useful if you have programmed too many things at the same time, making conflicts between your settings and affecting normal operation. The following memory banks will remain unchanged after resetting to factory default: - Caller ID memory - Last Number Redial List - Base unit and handsets registration - Phone book A1. A1. A1. A1. A1. To change all settings back to factory default, go to section I.4. Resetting your phone. A1. K. MAINTENANCE • Do not expose this product to dust, strong sunlight, humidity, high temperature, or mechanical shock. Do not use corrosive or abrasive cleansers on this product. Keep the unit dust free by wiping it with a soft, dry cloth. Do not disassemble this product, it contains no userserviceable parts. In case of a thunderstorm, it is advised to disconnect the power adapter, as the product warranty does not cover damage caused by lightning/surge. Use only the adapter included with this package. • • • • Q2. A2. A2. A2. L.TROUBLESHOOTING – for both the base and the optional handset A2. Q1. A1. A2. A1. A1. A1. My phone does not work! Make sure that you have NOT locked the keypad of your handset. When the keypad lock is turned on, a symbol will show on the screen. To remove the keypad lock, push and hold on your handset for approximately two seconds and release the button. Make sure that all connections of the adapter and the line cord are connected securely to the jacks. Make sure that you have inserted the battery pack into the handset battery compartment, and that it is charged and inserted with the correct polarity. If you have connected more than one phone to the same telephone line, make sure that all other telephones connected are put on hook. In some telephone systems, when the first phone on the same telephone line is used, all other telephones are electrically disconnected. Try to connect another telephone to the telephone socket, if the problem persists and it appears that there is a problem with your telephone line system, consult your network provider. If the person on the other end of the conversation does not hear your voice, make sure you have not activated the MUTE function. To test, activate the MUTE function once more and your phone should resume to normal operation. on the screen is Check if the receiving symbol bar flashing. If it is at a weak level, it indicates your handset is too far away from the base unit and the radio signal is too weak. You should get nearer to the base unit and try again. If you fail to dial a number, check if that number is barred (Refer to D.9. Call Barring). Occasionally, if the handset is without normal battery charging for a prolonged period of time, it may lock itself when the battery level becomes too low. Try to disconnect the battery and put it back on again and put the handset on the charger for six hours to resume. If a wrong number is dialled, please check that a Prefix number is not configured by mistake. For checking, please go to the menu, select ”Setting Base”, then select ”Additional” and select ”Prefix Dial”. Clear or edit the saved prefix number. My phone does not ring! Check if the ringing volume is set to ”Off” (Refer to H.1. Setting Ringer Volume & Ringer Type). Your phone will not ring if the ringing volume is set to ”Off”. Change the ringing volume to higher setting ranges. Make sure that your handset is not switched off. Make sure that the connection of the line cord is connected securely to the jacks. Check the country setting. Please select ”Setting Base” and press ”Country”, then select your country from the list. If the telephone is connected to a switchboard, check if the FLASH time is correct. (Refer to I.5. Switchboard and FLASH time). Q3.The phone book memories do not work as expected! A3. Make sure that you do not enter a telephone number longer than the limits mentioned in the phone book section. A3. If your phone is connected behind a PABX system, consult your system provider for information of timed pause delay required to make an external call. 21 Q4. A4. A4. A4. Q5. A5. A5. Caller’s number does not show on my phone! Make sure your phone line is provided with caller ID function from the phone service provider. In most countries, caller ID function must be paid and subscribed separately from normal phone function. For details, please consult the phone service provider. Callers may suppress their caller’s number when making their phone call. Caller’s number does not necessarily display when a call is received. For details, please consult the phone service provider. If a call is made from abroad, caller’s number cannot be transmitted. My handset does not work after I have registered my handset to a base unit from different maker! According to DECT standard (GAP compatible), handsets can be registered to any DECT system base unit. However, maker specific functions may not be compatible between the products. It may happen that only basic function can be operated if handset and base unit from two makers are registered together. Check if the other base unit is GAP compatible according to DECT standard. Only GAP compatible products can be compatible to each other. M.safety instructions Important note – Emergency calls The phone is not designed for making emergency calls when the main power is failed. But, if there is a power failure, you can dial an Emergency Call if the optional backup battery is installed. The unit only works under constant power supply to the base station or when the backup battery is installed. It is advisable that another corded phone (works without main power supply) is connected to your phone system for emergency call purpose in case of power failure. When using your telephone equipment, basic safety precautions should always be followed to reduce the risk of fire, electric shock and injury to persons: • • • 22 Do not allow the handset to come into contact with liquids or moisture. Avoid using a telephone (other than a cordless type) during an electrical storm. There may be a remote risk of electric shock from lightning. Do not use the telephone to report a gas leak in the vicinity of the leak. • • • • • • • • • Use only the power cord and battery(ies) indicated in this manual. Do not dispose of batteries in a fire. They may explode. Check with local codes for possible special disposal instructions. Do not open or mutilate the battery(ies). Released electrolyte is corrosive and may cause damage to the eyes or skin. It may be toxic if swallowed. Connect the adaptor to a socket-outlet near the equipment which is easily accessible. Do not open the handset or the base station. This could expose you to high voltage. There is a slight chance that the telephone could be damaged by an electrical storm. It is recommended that users unplug the phone from the phone line from the phone wall socket during a storm. Young children should be supervised to ensure that they do not play with the telephone. Since the phone works by sending radio signals between the base unit and the cordless handset, wearers of hearing aids may experience interference in the form of a humming noise. We advise that this phone should not be used near intensive care medical equipment or by persons with pacemakers. Your phone can interfere with electrical equipment such as answering machines, TV and radio sets if placed too close. It is recommended that you position the base unit at least one meter form such appliances. N. Environmental concerns and disposal Electric and electronic appliances contain materials, components and substances that can be damaging to people’s health and to the environment, if the waste is not disposed of correctly. Electric and electronic appliances are marked with a crossed-out wheelie bin symbol as illustrated below. It indicates that electric and electronic appliances are banned from being disposed of as general household waste, and have to be collected separately. Please ask you dealer about current means of disposal. O. EC declaration of conformity Hereby Bell Xpress A/S declares that this equipment (Telephone 50, type JJ T50 DECT / RTX3073) is in compliance with the essential requirements and other relevant provisions of Directive 1999/5/EC R&TTE. - - The contents of this manual are subject to change without notice. The manufacturer and its suppliers accept no liability whatsoever for any damage, expense, loss of profits or any other damage incurred as a result of using this product. 23 DE A. Installation UND INBETRIEBNAHME . . . . . . . . . . . . . 25 B.Display SYMBOLE und IHRE Bedeutung . . . . . . . . . . 27 C.Tasten und ihre Funktionen . . . . . . . . . . . . . . . . . . 28 D. EinstellungEN des Telefons . . . . . . . . . . . . . . . . . . . 30 E.Normalbetrieb . . . . . . . . . . . . . . . . . . . . . . . . . . . . . . . 31 F.Telefonbuch UND Speichertasten . . . . . . . . . . . . . . 35 G. ANRUFLISTE (CLIP) . . . . . . . . . . . . . . . . . . . . . . . . . . . . . . 36 H.Personalisierung des Telefons . . . . . . . . . . . . . . . . 37 I. Anmeldung von weiteren Mobilteilen und Basisstationen . . . . . . . . . . . . . . . . . . . . . . . . . . . . . . . 38 J. Zurücksetzen auf die Werkseinstellung . . . . . . . 39 K.Pflegehinweis . . . . . . . . . . . . . . . . . . . . . . . . . . . . . . . . 39 L. Störungssuche . . . . . . . . . . . . . . . . . . . . . . . . . . . . . . 39 M. Sicherheitsbestimmungen . . . . . . . . . . . . . . . . . . . . 40 N.Garantie . . . . . . . . . . . . . . . . . . . . . . . . . . . . . . . . . . . . . 41 O. Ökologische Bedenken und Entsorgung . . . . . . 41 P.DECLARATION OF CONFORMITY / zulassung . . . . . . 41 Herzlichen Glückwunsch zum Kauf ihres neuen JACOB JENSENTM Telefons. Das Telefon 50 wurde in Dänemark von Jacob Jensen entwickelt, dessen Produkte durch ihr einfaches, originelles und klassisches Design internationale Anerkennung gewannen. Auf dem neuesten Stand der technischen Entwicklung wurden auch die klassischen Designwerte Form und Funktion beachtet. Es kann auf den Tisch oder an der Wand installiert werden. Eine Wandhalterung ist in der Geschenkbox enthalten. Das JACOB JENSENTM Telefon 50 wurde mit der neuesten Digitaltechnologie ausgestattet: DECT System (Digital Enhanced Cordless Telecommunication/Digital unterstützt die drahtlose Telekommunikation). Dies ermöglicht die digitale Tonübertragung, Reichweite mit Klangschärfe und menügesteuerte Funktion. Gemäß dem DECT Systemstandard (GAP kompatibel), können bis zu 6 Mobilteile über eine Basisstation gesteuert werden. Mit ihren Funktionen der Rufweiterleitung und Interkom stellen sie so eine Minitelefonanlage dar. Zusätzlich bietet es größten Komfort durch eine Anruf-Erkennung (CLIP), Anrufspeicher Telefonbuch, Wahlwiederholung, Wahlwiederholungsliste und insbesondere die Interkomfunktion zwischen der Basisstation und den angeschlossenen Hand-Sets. Das JACOB JENSENTM Telefon 50 ist mit der Funktion “low radiation“ ausgestattet. Low Radiation arbeitet intelligent und ermittelt und justiert automatisch die längen der Radiofrequenzen (RF), in Abhängigkeit von der Entfernung des drahtlosen Mobilteils und der Basisstation. Diese Anpassung funktioniert automatisch, so dass die Stärke des Basissignals immer auf dem niedrigst möglichen Level gehalten wird. Hinweis: Sie können Ihre Telephone 50 Anlage mit zusätzlichen Telephone 10 Mobilteilen mit Ladestationen erweitern. Bis zu sechs Mobilteilen können angemeldet werden. Diese können separat bei Ihrem Vertragshändler bezogen werden. 24 A.Installation und Inbetriebnahme Wichtig: Die Reihenfolge dieser Schritte sind obligatorisch für eine korrekte Installation Ihres Telefons und beachten Sie folgendes: Das Telefon funktioniert nur, wenn Strom auf der Basisstation liegt. Bei event. Stromausfall ist es daher ratsam, ein weiteres schnurgebundenes stromunabhängiges Telefon (Telefon 5, Telefon 3, Telefon 1 von Jacob Jensen) an ihre Telefonanlage anzuschließen. Optional: Das Telefon kann mit einem SANIK 2.4 V 650 mAh Ni-MH Batterie, Modell 2SN-AAA65H-S-J1, als Netzausfallsicherung ausgestattet werden. Diese Netzausfallssicherungsbatterie ist optional und nicht im Lieferumfang enthalten. Achtung • Gefahr einer Explosion, falls die Batterie durch einen falschen Batterietypen ersetzt wird. Benutzen Sie nur den SANIK 2.4 V 650 mAh Ni-MH wiederaufladbaren Batteriepack, Modell 2SN-AAA65H-S-J1. Fragen Sie Ihren Händler nach diesem Sicherheitsbatteriepack. • Ziehen Sie den Netzstecker und das Telekomkabel bevor Sie das Sicherheitsbatteriepack einsetzen. • Entsorgen Sie keine Batterien im Feuer, da sie explodieren könnten. Achten Sie auf geeignete Entsorgung gemäß ihren regionalen Abfallbestimmungen. • Benutzen Sie ausschließlich den mitgelieferten Stromadapter Ktec Modell KSLFB0750035W1EU mit dem roten RJ11 Stecker. Die Benutzung eines anderen Adapters könnte das Gerät beschädigen und führt zum Erlöschen des Garantieanspruches. • Verbinden Sie den Adapter mit einer nahegelegenen und leicht erreichbaren Steckdose. 1.Installieren sie die Netzausfallssicherungsbatterie (optional) gemäß der Schritte unter A.4. 2.Verbinden Sie das eine Ende des Spiralkabels mit dem Hörer und das andere mit dem RJ9 Anschluss der Basis. Hinweis: Wenn sie den Tischaufbau bevorzugen, müssen Sie zuerst den Tischfuß ansetzen. 3.Verbinden Sie das aus der Basisstation kommende Kombinationskabel mit der Seite der Seite der Kombinationsweiche, auf der sich nur eine Buchse befindet. Verbinden Sie den RJ11 Stecker (16) und den Bananenstecker (17) mit den dafür vorgesehenen Buchsen an der Basis. 4.Stecken Sie den mitgelieferten Netzstecker in eine 220 V Steckdose und verbinden Sie das Kabelende mit der roten Buchse in der Kombinationsweiche. 5.Verbinden Sie ein Ende des Telefonkabels mit der schwarzen Buchse der Kombinationsweiche, verbinden Sie das andere Ende des Kabels mit dem länderspezifischen Steckeradapter. 6.Verbinden Sie den länderspezifischen Steckeradapter mit der Telefonbuchse in der Wand. A.1. Wandmontage 1.Ziehen Sie das Kombinationskabel durch die Kabelführung nach unten (wie oben gezeigt) zum Kabelauslass und verbinden sie es mit der Buchse/Weiche. 2.Befestigen Sie die Basisstation mit den beigelegten Schrauben und Dübeln (6 mm Bohrung). 25 A.2. Schreibtischmontage – Tischfuß Schieben Sie die beiden Rasten des Tischfußes in die dafür vorgesehenen Nuten auf der Rückseite der Basisstation. Der Tischfuß ist arretiert, wenn Sie ein „klick“ hören. 2.Entfernen Sie den Tischfuß, das Netz- und Telekomkabel von der Basis. 3.Öffnen Sie das Batteriefach mit einem passenden Schraubenzieher und heben Sie es ab. Der Tischfuß kann auch leicht wieder demontiert werden: - Drücken Sie mit dem Finger oder einem Stift die Entriegelungstaste im Inneren des quadratischen Loches am Grund der Basisstation und ziehen Sie dabei den Tischfuß von der Basisstation ab. 4.Setzen Sie eine neues Batteriepack ein wie auf dem Diagramm unten beschrieben 5. Verschließen Sie das Batteriefach wieder. A.3. Einstellen der Sprache Falls Sie eine andere Sprache benötigen, dann befolgen Sie bitte folgende Reihenfolge: Drücken Sie die Taste und drücken Sie die Taste 3 mal um zum Display zu kommen, drücken Sie drücken Sie zweimal zur Select Lang. Drücken Sie drücken Sie und wählen Sie zwischen den Sprachen: English, Deutsch, Français, Italiano, Nederlands, Español, Dansk, Svenska, Türkçe, Norwegian und drücken Sie . zum Bestätigen. A.4.Installation und Ersetzen der optionalen Batterie Achtung: Trennen Sie alle Leitungen von den Wandsteckdosen bevor Sie Batterien ersetzen. Befolgen Sie dabei folgende Schritte: 1.Bereiten Sie eine wiederaufladbare Batterie SANIK 2,4 V 650mAh Ni-MH, Modell 2SN-AAA65H-S-J, vor. 26 Wichtige Mitteilung • Optimalen Ladezustand der Batterie erreichen Sie, indem der erste Ladevorgang mindestens 10 Stunden dauert. • Entnehmen Sie die Batterie, falls das Mobilteil 30 Tage nicht genutzt wird. A.5. Speichertasten Sie können Ihre eigenen Speichertasten kreieren und auf das beigefügte Silberpapier drucken. Damit Sie unter die Tastenabdeckung passen, benutzen Sie bitte folgendes Druckschema. 66 mm 10 mm Text Text Text Text Texte oder Zeichen sollten innerhalb des gepunkteten Rahmens eingefügt werden (14x8 mm). Machen Sie evt. zuvor einen Drucktest auf normalem Papier. B.Display Symbole und ihre Bedeutung Um die Tastenabdeckung zu entfernen, befolgen Sie bitte folgende Schritte: In Stand-by Modus 1.Vorsichtig die linke Seite der Tastenabdeckung an der Aussparung anheben und die Abdeckung abheben. 2.Bedrucken sie das Silberpapier mit den dafür vorgesehene Beschriftungen. Symbol Bedeutung 14:05 Zeitanzeige im 24-Stunden Format. 20/01 3.Schneiden Sie die Papierstreifen mit einer Schere entlang der durchgezogenen Linien ab (66 x 10 mm) Anzeige für Sprachnachrichten: Hängt vom Netzdienstleister ab. Dieses Symbol erscheint, wenn Sie eine wartende Nachricht auf einer netzbetreiberseitig registrierten Mailbox erhalten haben. Hinweis: Abhänigig von Ihrem Netzservice, sollte das Sprachnachrichtssymbol ausgeblendet werden, sobald Sie Ihre Nachricht abgehört haben. Wenn nicht, müssen Sie den Indikator manuell ausblenden, siehe dazu die menügesteuerten Funktionen in der Anleitung. Das Telefon ist im Status automatische Rufannahme. Es leuchtet, während es Anrufe sendet oder empfängt. Das Mikrofon ist stummgeschaltet. Interkom (oder Babyüberwachung) ist aktiv, interner Anruf. 4.Setzen Sie die Papierstreifen ein und schließen die Tastenabdeckung wieder. 123 123 123 123 123 123 123 123 Telefonbuch anzeigen. Freisprechanlage ist aktiviert. 123 123 123 123 123 123 123 123 Zeigt das Tagesdatum im Datum/Monat Format Zeigt den Headset Modus an Das Telefon läutet bei einem eingehenden Anruf nicht. 27 C.Tasten und ihre Funktionen Bevor alle Tasten und Funktionen erklärt werden, ist es notwendig die Mehrfachtastatur zu erklären. Dies geschieht durch langes oder kurzes Drücken einer Taste. Unter kurzem Drücken versteht man, die Tastatur nach dem Drücken sofort wieder loszulassen, beim langen Drücken hingegen wird die jeweilige Tastatur 2 Sekunden gedrückt gehalten. Tastatur Stand-by Betrieb Sprachbetrieb Programmanzeige/ Displayanzeige Nur auf dem Mobilteil Drücken und halten Sie diese Taste zur Stummschaltung. Lassen Sie die Taste zur Aufhebung der Stummschaltung wieder los. Auf der Basisstation 28 Drücken Sie diese Taste um zum Menü zu gelangen. Eintrag: Stumm, Internal call, Klang, Flash, Wahlwiederhlg. Im Programmiermodus drücken Sie diese Taste zum Bestätigen. Eintrag der Zahlen 0 -9. Eintrag der Zahlen 0 -9. Eintrag der Nummern oder des Alphabets. Wenn die von Ihnen gewählte Nummer besetzt ist oder wenn Sie ihren Anruf wiederholen möchten, drücken Sie die Wahlwieder holungstaste. DabWahlwiederholu ngstaste. Dabei werden die letzten 10 Rufnummern angezeigt mit max. 24 Stellen. Benutzen Sie und für die gewünschte Nummer. Nehmen Sie den Hörer auf oder drücken Sie oder , um die Nummer zuwählen. Im Sprachbetrieb erhöht diese Taste die Lautstärke für Lautstärke für den Hörer, den Lautsprecher oder das Headset. Im Programmierungs und Speichermodus wird diese Taste zum blättern verwendet, wenn Sie kurz gedrückt wird. Blättern Sie so durch das Telefonbuch, Menü, Wahlwieder holungsliste oder Anruferliste. Tastatur Stand-by Betrieb Sprachbetrieb Programmanzeige/ Displayanzeige Im Stand-by: ein kurzes drücken dieser Taste zeigt die Liste des Telefonbuchs. Das Display zeigt die ersten alphabetischen Einträge. Durch drücken und kann man durch die Einträge blättern. Bei der alphabetischen Suche müssen Sie den gewünschten Anfangsbuchstaben eingeben. Im Sprachbetrieb verringert diese die Lautstärke für den Hörer, den Lautsprecher oder das Headset. Im Programmier- und SpeicherÜbersichtsmodus dient dieser Knopf zum zurück blättern, sobald die Taste kurz gedrückt wird. Benutzen Sie diese Taste um zum Telefonbuch, zum Menü, zur Wahl wiederholungsliste oder zur Anrufer identifikation zu gelangen. Drücken, um das Menü zu Verlassen und zum Standby Modus zurückzukehren. Drücken Sie die Taste, um eine neue Verbindung herzustellen oder einen wartenden Anruf anzunehmen, wenn Ihr Telekom Provider diesen Service anbietet. Drücken Sie diese Taste, um einen Anruf innerhalb einer Telefonanlage zu einer anderen Nebenstelle durchzustellen. Durch Drücken der Taste (flash) wird die Verbindung kurzzeitig unterbrochen. Im Programmiermodus hat diese Taste eine Lösch- oder Stornierfunktion. Drücken Sie diese Taste um falsche Zahlen oder Buchstaben zu löschen. Drücken Sie ihn um in das letzte Menü zu gelangen. Während das Telefon klingelt, drücken Sie die Taste für drei Sekunden und der Klingelton ist zeitweilig ausgeschaltet. Sammelruf (Paging) Drücken und halten (mind. 5 Sekunden): Auslösung eines Sammelanrufs an alle angemeldeten Mobilteile. Drücken Sie diese Taste einmal, um die Headsetfunktion zu aktivieren. Drücken, um den Anruf zu beenden. Drücken Sie diese Taste , um die Lautsprecherfunktion zu aktivieren. Drücken, um den Anruf zu beenden. Drücken Sie diese Taste , um den Sammelruf auszulösen, der alle angemeldeten Mobilteile signalisiert. Drücken Sie diese Taste, um eine Pause bei der Vorwahl einzufügen. Drücken und halten Sie diese Taste, um einen Anruf zu halten/stummzuschalten. Drücken Sie noch einmal , um den Anruf zurückzuholen/ lautzuschalten. 29 D. Einstellungen des Telefons Achtung Ihr DECT Telefon ist durch einen PIN (Sicherungscode) geschützt. Ändern Sie niemals den PIN Ihrer Basis, wenn Sie nicht unbedingt einen persönlichen PIN benötigen und nur wenn Sie sich mit elektronischen Geräten ausreichend auskennen. Falls sie Ihren PIN vergessen sollten, kann dies zur Nichtfunktion und zu teuren Servicereparaturen führen. Weitere Hinweise unter I. Anmeldung von weiteren Mobilteilen und Basisstationen. D.1.OK/ Menü Taste Das DECT Telefon 50 ist mit einer benutzerfreundlichen Menütaste ausgestattet. Alle Basisstations-Funktionen des Telefons können über eine Menütaste durch eine Frage/Antwort-Funktion (Q/A) erreicht werden. Durch Drücken der Taste auf der Basisstation, wird in kreisförmiger Weise durch die Funktionen im Menü geblättert. Sie können die Taste drücken um nach oben zu blättern und nach unten zu blättern. Call Log List > Internal Call> Ton Einstllng > Display > Zeit u Alarm > Weitere Einst > Basis Einst > Babyfon. > Im folgenden Teil der Anleitung wird jeweils eine Kurzdiagramm der Tastenfolge vorangestellt, um einen Überblick über die Programmierungsschritte zu geben. D.2. Spracheinstellungen Grundeinstellung des Telefon 50 ist englisch. Wechseln der Spracheinstellung: Display Ihre gewünschte Sprache Sprachwahl wählen Sie 1.Blättere mit den Tasten / durch die verfügbaren Sprachen 2.Haben Sie ihre gewünschte Sprache , drücken Sie um diese zu bestätigen. D.3. Eingabe von Datum/Zeit Unabhängig vom Land und vom Netzdienstleister wird über den Caller ID-Speicher üblicherweise über Anrufzeit und Datum informiert. In Ländern , in denen dieser Service per 30 FSK Caller ID unterstützt wird, braucht man Uhrzeit und Datum nicht einzustellen, da diese Daten dem Caller IDSpeicher automatisch gesendet werden. In Ländern mit DTMF Caller ID-System (oder in Ländern mit FSK System aber ohne die Mitsendung von Zeit/Datum) müssen Sie Datum/Uhrzeit folgendermaßen einstellen. Zeit u Alarm ZeitDat Einst Dat./Zeit 24 Stunden-Modus Benutzen Sie die Zahlentasten um Datum (TT/MM/JJ) einzugeben, drücken Sie dann noch einmal, um die Uhrzeit (24:00 Stundenformat) einzugeben. Nach der Eingabe drücken Sie zur Bestätigung. Drücken Sie , um zurück in den Stand-by Betrieb zugelangen. D.4.Telefonname Display Mobiltl Name Eingabe des Namens vom Mobilteil Sie können den Namen ihres Telefondisplays auf dem Bildschirm wechseln. 1.Drücken Sie um zum Hauptmenü zu gelangen. 2.Drücken Sie / und wählen Sie “Display“. Drücken Sie 3.Drücken Sie / und wählen Sie “Mobiltl Name“. Drücken Sie 4.“Mobiltl Name“ erscheint. Die Eingabe des Namens erfolgt durch die Nummern auf der Tastatur. Drücken Sie 5.Drücken Sie zugelangen. , um zurück in den Stand-by Betrieb D.5.Töne Ton Einstllng deine Option Töne wähle An/Aus wähle Sie können die Töne für die “Taste“, “Bestätigung“ und “Anruf Wartet“ “An“- oder “Aus“-schalten. 1.Drücken Sie um das Hauptmenü zu erreichen. 2.Drücken Sie / um “Ton Einstllng“ zu erreichen. Drücken Sie 3.Drücken Sie / um “Töne“ zu wählen. Drücken Sie 4.Drücken Sie / um die Option zu wählen (z.B. “Warnung”, “Anruf Wartet”,) und drücken Sie die zur Bestätigung. 5.Drücken Sie / um “An“ oder “Aus“ anzuzeigen und drücken Sie zur Bestätigung. Für den Tastenton wählen Sie zwischen Ton 1-3 oder “Aus“ und drücken Sie 6.Drücken Sie um das Programm zu verlassen und in den Stand-by modus zurückzukehren. D.6. Wahlverfahren Sie können bei Ihrem Telefon zwischen “Tonwahl“ und “Impulswahl“ wählen. Die Voreinstellung ist “Tonwahl“. Sie hören permanent einen Piepton. Verändern Sie diese Einstellung nur, wenn Ihr Telekom Provider oder Ihre Anlage mit „ Impulswahl“ funktioniert. Basis Einst Wählverf Weitere select Tonwahl/Impulswahl 1.Drücken Sie um zum Hauptmenü zu gelangen 2.Drücken Sie / und wählen Sie “Basis Einst“ und drücken Sie 3.Drücken Sie / und wählen Sie “Weitere“. Drücken Sie 4.Drücken Sie / und wählen Sie “Wählverf“. Danach drücken Sie Die Stromeinstellung wird angezeigt. 5.Drücken Sie / und wählen Sie zwischen “Tonwahl“ und “Impulswahl“. Drücken Sie 6.Drücken Sie um zurück in den Stand-by Betrieb zu gelangen. D.7.Umschalten auf Tonwahl Wenn Sie Ihr Telefon auf “Impulswahl“ voreingestellt haben, können Sie auch kurzfristig auf “Tonwahl“ umstellen: Bei aufgenommenem Hörer, drücken und halten Sie bis “D“ angezeigt wird. Alle Zahlen, die nach dem Erscheinen von “D“ eingegeben werden werden dann im Tonwählverfahren gewählt. D. 8. Vorwahl Falls Sie eine Vorwahl für ein Fern- oder Auslandsgespräch hinzufügen wollen oder Sie möchten für eine gespeicherte Nummer eine Vorwahl anfügen, müssen Sie folgendes tun: Basis Einst Weitere und bestätigen Sie die Nummer Vorwahl 1.Drücken Sie um zum Hauptmenü zu gelangen 2.Drücken Sie / und wählen Sie “Basis Einst“ und drücken Sie 3.Drücken Sie / und wählen Sie “Weitere“. Drücken Sie 4.Drücken Sie / und wählen Sie “Vorwahl“ und drücken Sie . Stromeinstellung wird angezeigt. 5.Bestätigen Sie die Nummer mit der Nummerntastatur oder drücken Sie die zum Löschen. 6.Drücken Sie um zurück in den Stand-by Betrieb zu gelangen. D.9. Anrufsperre Wenn die Anrufsperre eingeschaltet ist, können Telefonate mit speziellen Nummern sowie Fern- oder Auslandsgespräche nicht getätigt werden. Basis Einst bestätigen Sie die Nummer Anrufsperre und wählen Sie An/Aus 1.Drücken Sie um zum Hauptmenue zu gelangen 2.Drücken sie / und wählen Sie “Basis Einst“. Drücken Sie 3.Drücken sie / und wählen sie “Anrufsperre“. Drücken Sie 4.Geben Sie die zu sperrende Nummer ein oder nutzen Sie um eine slche zu löschen. Drücken Sie zur Bestätigung 5.Drücken Sie / um “An“ oder “Aus“ zu wählen. Bestätigen Sie mit 6.Drücken Sie um zum Stand-by Modus zurückzukehren. E.Normalbetrieb E.1.Benutzung eines optionalen Headsets Ein optionales Headset kann als Alternative benutzt werden, um Anrufe insbesondere lang andauernde Anrufe zu tätigen. Verbinden Sie das Headsetkabel mit der Headsetbuchse auf der Rückseite der Basis. Wenn das Headset nicht gebraucht wird, dann drücken sie einfach die Taste, um zum normalen Hörer oder Lautsprecherbetrieb zu wechseln. 31 Achtung: Der Headsetstecker ist eine Type mit 2,5 mm pin. Kontaktieren Sie Ihen Vertragshändler, damit Sie nur kompatible Stecker benutzen. Unpassende Stecker können die Buchse und das Gerät beschädigen. E.2. Einen Anruf tätigen Mit dem Hörer: 1.Hörer aufnehmen. Das Display zeigt das Hörer Symbol 2.Mit den Nummerntasten die gewünschte Nummer eingeben. 3.Hörer auflegen, um das Gespräch zu beenden. Mit dem Lautsprecher: 1.Drücken Sie . Das Display zeigt das Lautsprecher Symbol . 2.Mit den Nummerntasten die gewünschte Nummer eingeben. 3.Drücken Sie um das Gespräch zu beenden. Mit dem Headset: 1.Drücken Sie . Das Display zeigt das Headset Symbol . 2.Mit den Nummerntasten die gewünschte Nummer eingeben. 3.Drücken Sie um das Gespräch zu beenden. E.3. Einen Anruf annehmen Wenn ein Anruf ankommt klingelt das Telefon solange der Klingelton nicht auf “Aus” gestellt ist. Wenn Sie eine Anruferkennung (Caller ID) mit Ihrem Telekomprovider abgeschlossen haben, wird die eingehende Rufnummer im Basisstationsdisplay erscheinen. Wenn diese Nummer bereits in Ihrem Telefonbuch gespeichert wurde (siehe F. Telefonbuch), wird der gespeicherte Name sichtbar. Der Anruf kann auf drei Arten angenommen werden. 1.Einfach Hörer aufnehmen und sprechen. 2.Drücken Sie um den Anruf mit der Lautsprecher/ Freisprechfunktion anzunehmen. 3.Drücken Sie um den Anruf mit dem Headset anzunehmen. E.4. Einen Anruf beenden Legen Sie den Hörer auf oder drücken Sie einmal, um den Anruf zu beenden. 32 . E.5.Umschalten zwischen Hörer, Headset und Lautsprecher Der Hörer hat die oberste Priorität in den verschiedenen Modi. Wenn der Hörer aufgenommen wird, wird auch immer auf Hörerfunktion geschaltet. 1.Um auf die Headset Funktion umzuschalten drücken sie einmal . Der Headset Indikator wird eingeblendet. Legen Sie dann den Hörer auf, um den Headset Modus zu aktivieren. 2.Um auf den Lautsprecher zu schalten, drücken sie einmal. Das Lautsprecher Symbol wird eingeblendet. Legen Sie den Hörer auf, um den Lautsprecher zu aktivieren. 3.Um auf den Hörer zuschalten, nehmen sie einfach den Hörer auf. Lautsprecher oder Headset werden dadurch deaktiviert. E.6.Lautstärke Die Lautsprecher-, Hörer- und die Headsetlautstärke können unabhängig mit den Tasten oder in den jeweiligen Operationsmodi reguliert werden. Das Telefon wird mit der Werkseinstellungslautstärke geliefert. Sie können diese nach Belieben in jeweils 6 Stufen ändern. Der Lautstärkeindikator wird bei der Lautstärkenregulierung eingeblendet. E.7.Klangeinstellung Das Telephone 50 ist mit einem einzigartigen AudioEqualizer ausgestattet, der Ihnen 4 Soundoptionen anbietet. Dies ermöglicht Ihnen den Klang Ihren persönlichen Wünschen anzupassen. Wählbar sind: Normal, Bass, Alt, Sopran. Bei aufgenommenem Hörer, drücken Sie wähle den optionalen Ton Klang 1.Bei aufgenommenem Hörer, drücken Sie , um zum Hauptmenü zu gelangen. 2.Drücken Sie / wählen Sie “Klang“, drücken Sie 3.Drücken Sie / wählen Sie eine der Optionen: Normal, Bass, Alt, Sopran. Drücken Sie zum Bestätigen. oder E.8. Stummschaltung(Mute) Bei aufgenommenem Hörer, drücken Sie ein/Stumm aus Stumm 1.Bei aufgenommenem Hörer, drücken Sie , um zum Hauptmenü zu gelangen. 2.Wählen Sie “Stumm ein“ und drücken Sie 3.Das Stummschaltungs Symbol zeigt sich im Display. 4.Die Ausschaltung der Stummschaltung erfolgt in umgekehrter Reihenfolge. E.9.Pause Bei einigen PABX Anlagen wird eine kleine Pause für einen externen Anruf benötigt (üblicherweise 0 oder 9) , damit das Freizeichen ertönen kann. Diese Pause muss mit in das Telfonbuch eingegeben werden, damit die gespeicherten Nummern u.U. nicht zu schnell gewählt werden. Wenn Sie Nummern im Telefonbuch speichern können Sie die Anlagenvorwahlziffer (im allg. die 0) zu jeder Rufnummerhinzufügen. Bei manchen PABX Anlagen kann die Wahlwiederholung bei Nichtbeachtung der Pausenanforderung nicht funktionieren. Befragen Sie dazu Ihren Telefonanlagenkundendienst. So können Sie, wenn es Ihre Telefonanlage benötigt, eine Pause in der Telefonnummer eingeben: 1.Drücken Sie die geforderte externe Anruf Ziffer (für Freizeichen im allg. eine 0) 2.Drücken Sie um eine Pause einzugeben. Das Display zeigt „P“ 3.Drücken sie die gewünschten Nummerntasten für die Telefonnummer. E.10.Halten Um einen Anruf zu halten: 1.Drücken Sie um einen Anruf zu halten/ stummzuschalten. 2.Drücken Sie um den Anruf wiederaufzunehmen. E.11. Wahlwiederholung Die Nummern der letzten 10 abgehenden Anrufe werden gespeichert. Um eine Nummer erneut zu wählen drücken Sie im Standby Modus und wählen dann die Nummer mit den Tasten oder . Nehmen Sie den Hörer auf oder drücken Sie oder um die Rufnummer zu wählen. Sie können die Wahlwiederholung auch bei aufgelegtem Hörer nutzen: Nehmen Sie den Hörer auf, oder drücken sie oder . Warten Sie auf ein Freizeichen und drücken Sie und wählen Sie “Wahlwiederhlg.” Drücken Sie oder um einen Namen, Nummer oder ein Mobilteil anzuwählen. Drücken Sie zur Bestätigung. E.12.Recall (Flash) Drücken Sie die Taste, um spezielle Ruffunktionen Ihrer Telefonanlage oder Netzwerkbetreibers auszuführen, wie Rufweiterleitung und Anrufe auf Wartestellung. E.13.Interne Anrufe tätigen und annehmen (Interkom) • Tätigen Sie interne Anrufe zwischen den Mobilteilen und der Basis. • Leiten Sie einen externen Anruf von der Basis oder von einem Mobilteil weiter Interne Kommunikation (Intercom) ist möglich zwischen Basis und Mobilteilen oder zwischen den angemeldeten Mobilteilen als Intercom, Rufweiterleitung und Konferenzschaltung. Ihrem Telefon 50 und den daran angemeldeten Mobilteilen werden für die Intercomschaltungen Nebenstellennummern zugeordnet. Die Nummern 1 bis 6 sind den Mobilteilen zugeordnet und der Anschlussname für das Basistelefon ist T50. Wenn Sie zusätzliche Mobilteile angemeldet haben lesen Sie dazu auch Abschnitt E.19. E.14. Einen internen Anruf zwischen Basis und Mobilteil durchführen 1.Drücken Sie und wählen Sie “Internal Call“ . 2.Nutzen Sie oder und wählen Sie den Namen, die Nummer oder das Mobilteil. Drücken Sie . Das Mobilteil klingelt. Das Symbol wird angezeigt und Sie hören den Wahlton. 3.Wenn das angewählte Mobilteil antwortet, nehmen sie den Hörer auf, um das Gespräch zu beginnen. E.15. Einen internen Anruf beantworten Wenn das Telefon von einem Mobilteil angerufen wird, wird die Nummer des anrufendes Gerätes eingeblendet und der interne Klingelton ertönt. Nehmen Sie den Hörer auf und beginnen Sie das Gespräch. E.16. Einen internen Anruf beenden Legen Sie den Hörer auf die Gabel oder drücken Sie oder um den Anruf zu beenden. 33 E.17. Sammelruf (Paging) aller Mobilteile von der Basisstation Um alle Mobilteile gleichzeitig anzurufen benutzen Sie die PAGE Taste an der Basis. Wenn Sie Ihr Mobilteil einmal verlegt haben, können sie die PAGE Taste auch zum Wiederauffinden des Gerätes benutzen. E.18.Rufweiterleitung und Konferenzschaltung Sie können einen externen Anruf von der Basis auch zu einem Mobilteil durchstellen und umgekehrt: Während eines externen Anrufes: 1.Drücken Sie und wählen Sie “Internal Call“. 2.Drücken Sie oder , wählen Sie den Namen oder die Nummer des Mobilteiles welches Sie anwählen möchten für die Rufweiterleitung und drücke . Der Anrufer ist nun in der Warteschleife und das angewählte Mobilteil klingelt. 3.Wenn das angerufene Mobilteil antwortet, legen Sie den Hörer auf oder drücken Sie oder einmal, um den externen Anruf durchzustellen. Wenn der Angerufene das Gespräch nicht innerhalb 30 Sekunden annimmt, kehrt der externe Anruf an das Basistelefon zurück. Konferenzschaltung Sie können eine 3er Konferenzschaltung zwischen Basis Telefon, einem externen Anrufer und einem weiteren Mobilteilnutzer abhalten. Während eines externen Anrufes: 1.Drücke Sie und wählen Sie “Internal Call“. 2.Drücken Sie oder und wählen Sie die Name, Nummer oder das Mobilteil, das angewählt werden soll für eine Konferenzschaltung und drücken Sie . Der Anrufer ist nun in der Warteschleife und das angewählte Mobilteil klingelt. 3.Wenn das angerufene Mobilteil antwortet, drücken Sie , blättern Sie herunter bis “Konferenz“ und drücke um das Konferenzgespräch zu starten. 4.Sie können den Hörer jederzeit auflegen oder oder drücken, um das Konferenzgespräch zu verlassen. E.19. Mobilteil- Ruftransfer und Konferenzschaltungen Sie können bis zu 6 Mobilteilen an der Basis anmelden. Mit zwei zusätzlichen Mobilteilen können Sie: 1.Intercom Anrufe von einem Mobilteil zum anderen führen. 34 2.Einen externen Anruf weiterleiten von einem zum anderen Mobilteil. 3.Die Baby Monitorfunktion aktivieren Hinweis: Es kann jeweils nur ein Mobilteil mit einer externen Leitung verbunden sein. Wenn ein anderes Mobilteil während eines externen Anrufes einen weiteren externen Anruf tätigen will, so wird das bereits geführte Gespräch gestört. E.20.Umschalten eines Anrufes auf eine andere Nebenstelle in einer PABX Telefonanlage Ist das Telefon 50 in einer PABX Telefonanlage als Nebenstelle aufgeschaltet, so können Sie interne oder externe Anrufe innerhalb der Anlage wie folgt auf eine andere Nebenstelle umschalten: 1.Drücken Sie . Das Display zeigt nun ein großes „R“. 2.Wählen Sie die gewünschte Nebenstellennummer. Sie können nun mit der Nebenstellesprechen und den Anruf durchstellen, indem Sie nun Ihren Hörer auflegen bzw. oder einmal drücken. E.21.Babyfon Sie benötigen mindestens ein zusätzliches Mobilteil, das an dem Telefon 50 angemeldet ist, um die Babyphone Funktion zu nutzen. Wenn ein zusätzliches Mobilteil erfolgreichangemeldet wurde verfahren Sie wie folgt: Babyfon. Mobilteil wählen 1.Drücken Sie um ins Hauptmenue zu gelangen. 2.Drücken Sie / um “Babyfon” zu wählen. Drücken Sie 3.Drücken Sie / um das Mobilteil zu wählen. Drücken Sie zur Bestätigung. 4.Um die Babyphone Funktion zu deaktivieren, drücken Sie an der Basis oder am Mobilteil, um zum Standby Modus zurückzukehren. E.22.Datenanschluss Dieses Telefon ist mit einem Datenanschluss (aux) ausgestattet, an den Sie Zubehör wie Faxe, Anrufbeantworter oder Computermodems anschließen können. F.Telefonbuch und Speichertasten Sie können ihr persönliches Telefonbuch mit bis zu 100 Telefoneinträgen aufbauen. Wenn Sie mehr als ein Mobilteil im Einsatz haben, können Sie das Telefonbuch auf die anderen Mobilteile übertragen. F.1.Neuer Eintrag Wenn das Telefonbuch leer ist Telefonbuch <Eing Name> Wenn das Telefonbuch bereits Einträge besitzt Telefonbuch Neuer Eintr Name> <Eing 1.Benutzen Sie zur Eingabe die alphanumerischen Tasten (2 bis 9) zur Eintragung Ihres persönlichen Telefonbuches. Drücken Sie zum Bestätigen oder drücken Sie zum Löschen des Buchstabens bei einer fehlerhaften Eingabe. Liegt der zweite Buchstabe auf der gleichen Taste wie der erste, den Sie eingegeben haben, drücken Sie , um den Cursor auf den richtigen Buchstaben zu bewegen oder warten Sie drei Sekunden, bis sich der Cursor autimatisch weiterbewegt. Drücken Sie , um nach unten oder oben zu navigieren. 2.Benutzen Sie die Nummerntaste zur Eingabe der Telefonummern. (anlagenbedingt kann es PABX Anlagen sein , dass eine Pause in die Telefonnummern eingefügt werden muss. Drücken und halten Sie bis im Display „P“ erscheint), drücken Sie um die Eingabe zu speichern. Drücken Sie , um die falsche Eingabe zu korrigieren. 3.Drücken Sie und wählen Sie den Tontyp. Drücken Sie zum Bestätigen. 4.Drücken Sie und wählen Sie “Speichern“ oder “Zurück“ und drücken Sie zum Bestätigen. 5.Der Telefoneintrag ist nun gespeichert. Drücken Sie um in den Stand-by Betrieb zurück zu kommen. F.2. Ein neuer Eintrag von der Anruferliste und von der Wahlwiederholungsliste Sie können eine Nummer kopieren und speichern aus der Anruferliste und der Wahlwiederholungsliste. ( Lesen Sie auch dazu G. Anruferliste und E.11. Wahlwiederholung). 1.Wenn eine gewünschte Nummer aus der Anrufer- oder Wahlwiederholungsliste im Display ist, drücken Sie . “In Tlfb Spch“ wird angezeigt. Drücken Sie und geben Sie den Namen mit der Tastatur ein, um dann durch drücken . den Vorgang zu bestätigen. Falls Sie schon einen Eintrag mit diesem Namen im Telefonbuch haben, benutzen Sie einen anderen Namen. 2.Die Nummer wird angezeigt. Bestätigen Sie diese und speichern Sie den Eintrag im Telefonbuch. Drücken Sie zum Bestätigen. 3. Wenn nötig, können Sie inkorrekte Eingaben mit der Taste ändern. 4. Drücken Sie / um eine bestimmte Nummer auszuwählen 5. Nach der Eigabe, schließen Sie mit ab. 6. Drücken Sie , um in den Stand-by Modus zurückzukehren F.3. Einen Anruf aus dem Telefonbuch ausführen Telefonbuch / wählen Sie die Nummer. Nehmen Sie den Hörer auf. 1.Benutzen Sie die alphanumerische Tastatur um den 1. Buchstaben des gewünschten Namens einzugeben. Der erste Name mit dem Anfangsbuchstaben erscheint im Display. 2.Benutzen Sie / , um bis zum gewünschten Namen durchzublättern. 3.Nehmen Sie den Hörer auf oder drücken Sie oder , um einen Anruf zu tätigen. F.4.Löschen eines Telefonbucheintrages Telefonbuch / wählen der Nummer Eintr Löschen Ja 1.Nutzen Sie / und suchen Sie den gewünschten Namen. 2.Drücken Sie zum Bestätigen oder um in das Menü zurück zu kommen ohne gelöscht zu haben. Sie werden gebeten, die Telefoneintragungen zu bestätigen, dazu drücken Sie erneut und der Telefoneintrag ist gelöscht . Dabei hören Sie einen langen Piepton. F.5.Telefonbucheintragung ändern Telefonbuch / wählen Sie die Nummer Eintr ändern Verwenden Sie und die Nummerntasten, um die korrekten Buchstaben einzugeben . 35 1.Nutzen Sie / und suchen Sie den gewünschten Namen 2.Drücken Sie zum Bestätigen 3.Benutzen Sie um Buchstaben zu löschen und um die Änderung vorzunehmen. 4.Wenn der Eintrag beendet ist, drücken Sie . Sie können zum Löschen des Telefonbucheintrages und zur Änderung verwenden. 5.Drücken Sie erneut um die Änderung zu speichern. 6.Wählen sie einen speziellen Klingelton und drücken Sie G. F.6.Direktwahltasten Es gibt 8 Speichertasten an der Basis, um Telefonbucheinträge direkt aufzurufen und zu wählen. Diese Direktwahltasten sind mit den Zahlen 1-4 in der oberen Tastenreihe und mit den Nummern 5-8 in der unteren Reihe. Das Telefon 50 speichert die letzten 30 Anrufer. Bei voller Anruferliste wird die älteste Rufnummer überschrieben. Es erfolgt keine Synchronisation der Anruferliste zwischen den zugeordneten Mobilteilen. Bei ausgeschalteten Mobilteilen werden ankommende nicht in der Anruferliste gespeichert. Bei Anrufen mit einer unterdrückten Telefonnummer erscheint der Hinweis “Nicht verfügb“ oder “Privat“ im Display. Sie können in diesem Fall den Anruf nicht zurück verfolgen. F.7. Einen Eintrag machen oder ändern für die Direktwahltasten Telefonbuch / Nummer auswählen wählen Kurzwahl Nr. der Direktwahltaste auswählen 1.Drücken Sie im Ruhezustand und drücken Sie / , um die gewünschte Telefonnummer auszuwählen 2.Drücken Sie und wählen Sie “Kurzwahl”. 3.Drücken Sie und wählen Sie die Nummer der Direktwahltaste aus, drücken Sie zur Bestätigung. 4.Die gewünschte Rufnummer ist nun auf der Direktwahltaste hinterlegt. F.8. Einen Anruf mit den Direktwahltasten auslösen 1.Nehmen Sie den Hörer ab und drücken Sie die gewünschte Direktwahltaste oder drücken Sie die Direktwahltaste bei aufgelegtem Hörer. 2. Die Telefonnummer und der Name erscheinen auf dem Display 3.Das Telefon schaltet in die Lautsprecherfunktion und wählt die Nummer. 36 Anrufliste (CLIP) Sofern Ihr Netzbetreiber den Service der Anruferkennung unterstützt, wird die eingehende Rufnummer auf dem Display des Mobilteiles und der Basisstation angezeigt. Ist die Nummer außerdem im Telefonbuch gespeichert, erscheint der Anrufer auch mit Namen im Display. Ist ein FSK Caller ID System Grundlage Ihres Netzbetreibers, so werden auch Anrufzeit und Datum des eingehenden Anrufes angezeigt und gespeichert. Nur die ersten 13 Buchstaben von dem Anrufer werden angezeigt. Ton für wartenden Anruf (Anklopfen) Dieses Modell hat einen speziellen Warteton der zusätzlich zu dem typischen Zeichen Ihres Netzbetreibers aktiviert werden kann. Ab Werk ist dieser Ton deaktiviert. Im Menue “Ton Einstllng“, “Töne“, “Anruf wartet“, setzen Sie die Eingabe auf “An“. Wenn der Ton für wartenden Anruf aktiviert ist (Anklopfen), werden Sie diesen Anklopfton hören, wenn ein 2. externer Anrufer versucht, Sie zu erreichen. Ist der Anklopfton deaktiviert so hören Sie dieses Zeichen nicht. Nach der Aktivierung können Sie zwischen den Anrufen hin- und herschalten in dem Sie die Taste . Bitte beachten Sie, dass diese Funktion auch von den Einstellungen Ihres Telekomproviders abhängt. G.1. Ansehen der Anruferliste Drücken Sie und wählen Sie “Call Log List“. Benutzen Sie / um durch die Einträge zu blättern oder drücken Sie um in den Stand-by Betrieb zurück zu kommen. G.2. Anruf aus der Anruferliste Sie tätigen einen Anruf aus der Anruferliste. Drücken Sie und wählen Sie ”Call Log List”. Drücken Sie / um die gewünschte Nummer zu finden. Nehmen Sie den Hörer auf oder drücken Sie oder um die gewünschte Rufnummer aus der Liste anzuwählen. G.3.Löschen eines Anrufes aus der Anruferliste Sie können einzelne oder alle Einträge aus der Anruferliste löschen. 1.Drücken Sie und wählen Sie “Call Log List“. Benutzen Sie / und blättern Sie auf den Eintrag, der aus der Liste gelöscht werden soll. 2.Falls Sie alle Eintragungen löschen möchten, drücken Sie und wählen Sie “Eintr Löschen“ oder “Liste Löschen“. 3.Drücken Sie und wählen Sie “Ja“ oder “Nein“ um dann durch die Taste die Veränderung zu bestätigen. G.4. Wartende Nachricht (Message Waiting Indicator) Wenn Ihr Netzbetreiber einen Anrufbeantworter für Sie unterhält, dann wird dieses Symbol im Display angezeigt, falls sich eine wartende Nachricht auf ihrem Anrufbeantworter befindet. Bei den meisten Netzbetreiber erlischt das Symbol, wenn Sie die Nachricht abgehört haben. Abhängig von Ihre Netzbetreiber wird das zeichen für wartende Nachricht erlöschen, sobald Sie diese eingesehen bzw. bearbeitet haben. Die blaue LED Anzeige auf der Basisstation blinkt auch, falls Sie eine wartende Nachricht haben. Abhängig von Ihrem Telekomprovider, sollte sich der wartende Nachrichtenindikator ausblenden, wenn Sie Ihre Nachrichten auf dem Server des Operators abgerufen haben. H.Personalisierung des Telefons Das JACOB JENSENTM Telefon 50 ist mit einigen besonderen Funktionen (Klingelton und Lautstärke) ausgestattet, die der Nutzer individuell einstellen kann. H.1. Einstellung von Klingelton und Klingellautstärke Klingellautstärke Ton Einstllng L.st. Anruft. wählen Sie die Lautstärke 1.Drücken Sie im Stand-by Modus und nutzen Sie die / . Blättern Sie bis “Ton Einstllng“ im Display erscheint. Drücken Sie 2.Drücken Sie / und wählen Sie “L.st. Anruft.“ Anschließend drücken. 3.Drücken Sie / und bestimmen Sie Ihre individuelle Lautstärke. Zum Bestätigen drücken Sie erneut . 4.Drücken Sie , um in den Stand-by Modus zurück zu kommen. Falls Sie die Lautstärke ganz ausgeschaltet haben, erscheint das Zeichen im Display. Klingelton Ton Einstllng wähle Option Art d.Anruft. und wähle die Melodie 1.Drücken Sie im Stand-by Modus und nutzen Sie / . Blättern Sie bis “Ton Einstllng“ im Display erscheint. Drücken Sie 2.Drücken Sie / und wählen Sie “Art d.Anruft.“ Anschließend drücken 3.Drücke Sie / und wählen Sie zwischen “Anruf Extern“, “Anruf Intern“, “Paging“, “Wecker“ oder “Termin Ton“. Zum Bestätigen drücken Sie erneut . 4.Drücken Sie / und wählen Sie die gewünschte Melodie, drücken Sie , um die Eingabe zu bestätigen. 5.Drücken Sie , um wieder in den Stand-by Modus zu gelangen. H.2.Termine Zeit u Alarm ihre Termine Termin einst – wählen Sie Als erstes müssen Datum und Zeit eingegeben werden, danach kann die Kalender-Option genutzt werden. Wie die Eingabe von Datum und Zeit erfolgt, können Sie unter D.3. Eingabe von Datum/Zeit nachlesen. Sie können in Ihr Telefon fünf individuelle Termine eingeben. 1.Drücken Sie um zum Hauptmenü zu gelangen 2.Drücken Sie / und wählen Sie “Zeit u Alarm“. Drücken Sie 3.Drücken Sie / und wählen Sie “Termin einst“. Drücken Sie 4.Drücken Sie / und wählen Sie einen der fünf Termine. Drücken Sie 5.Drücken sie / und wählen Sie “An“. Drücken Sie 6.Eingabe Datum und Zeit für den Termin. Siehe Abschnitt D.3. Eingabe von Datum/Zeit. Drücken Sie 7.Eingabe des Terminnames mit der Tastatur. Drücken Sie 37 I. Anmeldung von weiteren Mobilteilen und Basisstatione Achtung!! Die folgenden Schritte sollten nur von Personen durchgeführt werden, die versiert im Umgang mit elektronischen Geräten sind, da inkorrekte Handhabung Ihr Telefon unbenutzbar machen könnte. I.1. Anmeldung eines drahtlosen Mobilteils Falls Sie ein drahtloses Mobilteil an der Basis anmelden möchten, werden Sie von der Basis nach einem PIN Code gefragt. Um das Mobilteil an der Basis anzumelden, müssen Sie die Sammelruftaste 5 Sekunden gedrückt halten. Der LED Spot an der Basis blinkt, wenn der Registrierungsmodus erfolgreich eingeleitet wurde. Stellen Sie sicher, dass Mobilteil und Basis im Stand-by Modus sind. Auf dem Mobilteil müssen Sie wie folgt vorgehen Weitere Einst Anmelden wählen Sie die Basisnummer 1.Drücken Sie , um das Menüprogramm zu kommen 2.Drücken Sie / und wählen Sie “Weitere Einst“. Anschließend drücken Sie 3.Durch drücken / erscheint “Anmelden“ und durch ein weiteres drücken wird dieser Vorgang bestätigt. 4.Drücken Sie / , um die Nummer der Basis zu wählen. Mit der Taste bestätigen. Falls an der Basis bereits 6 Mobilteile angeschlossen sind und sie ein weiteres neues anschließen möchten, müssen Sie ein unbenutztes Mobilteil abmelden (siehe I.2 Abmeldung des Mobilteiles oder Basisstation). Auf dem Mobilteil müssen Sie nun den Basis Pin Code eingeben. Der werkseitig eingestellte Basis Pin Code ist 0000. Dem Mobilteil wird automatisch eine frei verfügbare Nummer zugeordnet. Wenn die Registrierung fehlschlägt, zeigt das Display “Nicht angemeld” und Sie müssen die Anmeldeprozedur wiederholen. 38 I.2. Abmeldung des Mobilteiles oder Basisstation Falls Sie mehr als ein Mobilteil an der Basisstation oder eine Basisstation an dem Mobilteil angemeldet haben können Sie das Mobilteil von der Basisstation oder die Basisstation vom Mobilteil abmelden. Vor dem Abmelden überprüfen Sie, ob sich Mobilteil und Basisstation im Stand-by Modus befinden. Weitere Einst wählen Sie Mobilteil oder Basis Abmelden wähle Ja 1.Drücken Sie , um in das Menüprogramm zu kommen 2.Drücken Sie / und wählen Sie “Weitere Einst“. Drücken Sie 3.Drücken Sie / und es erscheint “Abmelden“. Bestätigung durch drücken . 4.Drücken Sie / zum Wählen “Basis“ oder “Mobilteil“. Drücken Sie zum Bestätigen. 5.Drücken Sie / um “Ja“ oder “Nein“ auszuwählen. 6.Drücken Sie , um in den Stand-by Modus zu gelangen. I.3.PIN Code verändern Basis Einst Eingabe des neuen PIN Basis PIN Der werkseitig eingestellte PIN Code ist 0000. Wenn Sie diesen ändern möchten , folgen sie den angegebenen Schritten (Bitte unbedingt den geänderten PIN Code sicher merken bzw. verwahren !!). I.4. Zurücksetzten ihres Telefons (Reset) Wenn Sie die Resetfunktion auslösen wird Ihr Telefon auf die Werkseinstellung zurückgesetzt. Zeit und Datum, Mobilteilname, Telefonbuch, Anruferliste und Wahlwiederholungsliste werden nicht zurückgesetzt. Es werden nur die Mobilteile und Basisstationen zurückgesetzt, die Sie bestimmen und nicht alle angeschlossenen Geräte. Für die Basisstation Basis Einst wähle Ja 1.Drücken Sie kommen. 2.Drücken Sie drücken Sie 3.Drücken Sie drücken Sie 4.Drücken Sie bestätigen Sie mit 5.Drücken Sie kommen. Basis Reset um in das Menüprogramm zu K.Pflegehinweis / zum Wählen “Basis Einst“ und • / . “Basis Reset“ wird angezeigt, zum Bestätigen. / zum Wählen “Ja“ und • , um in den Stand-by Modus zurück zu Für das drahtlose Mobilteil: Weitere Einst wähle Ja • • Mobiltl Reset 1.Drücken Sie , um in das Menüprogramm zu kommen. 2.Drücken Sie / zum Wählen “Weitere Einst“ und drücken Sie 3.Drücken Sie / “Mobiltl Reset“ wird angezeigt, drücken Sie zum Bestätigen. 4.Drücken Sie / um “Ja“ auszuwählen und bestätigen Sie mit der Taste. 5.Im Display erscheint “Cleared“ und das Gerät wird auf die Werkseinstellung zurückgesetzt. I.5.Telefonanlage und Flashzeit Wenn das Telfon an einer übergeordneten Telefonanlage angeschlossen ist (PABX) und nicht korrekt klingelt, kann die Flashzeit der Telefonanlage angepasst werden. Um die Flashzeit zu korrigieren, drücken Sie Basis Einst Weitere Flashzeit wählen Sie zwischen 80 - 800 ms und bestätigen Sie mit . J. Um das Telefon 50 zurück zu setzen gibt es nur eine Möglichkeit. Sie gehen in das Menü und wählen “Mobiltl Reset“ oder “Basis Reset“. Die weiteren Schritte sind I.4 Zurücksetzten ihres Telefons (Reset) beschrieben. Zurücksetzten auf die Werkseinstellung • L. Störungssuche – for both the base and the optional handset F1. A1. Mein Telefon funktioniert nicht Prüfen Sie, ob Sie die Tastensperre aktiviert haben. Wenn ja muss ein Symbol auf dem Display erscheinen. Um die Tastensperre aufzuheben, drücken und halten Sie die Taste an ihrem Mobilteil ca.2 Sekunden lang, bis ein Piepton ertönt. Dann lassen Sie die Taste wieder los. Vergewissern Sie sich, dass alle Stecker am Adapter und dem Telefonkabel richtig in die entsprechende Buchse eingesetzt sind. Prüfen Sie, ob die Batterie gemäß der Polaritätssymbole richtig eingesetzt und genügend geladen sind. Wenn Sie mehr als ein Telefon einer Telefonleitung zugeordnet haben, prüfen Sie, ob die anderen Geräte wirklich aufgelegt sind. In manchen Systemen werden bei gemeinsamer Leitung durch ein aktives Gerät alle anderen elektrisch abgeschaltet. Versuchen Sie probeweise ein anderes Telefongerät am entsprechenden Anschluss. Falls dieses auch nicht funktioniert, sollten Sie ihren Netzbetreiber benachrichtigen., da die Leitung offenbar die Ursache für diese Störung ist. Wenn der Gesprächspartner ihre Stimme nicht hört, prüfen Sie, ob Sie nicht die Stummschaltung aktiviert haben. Zum Test aktivieren Sie die Stummschaltung einfach noch einmal und ihr Telefon müsste wieder normal funktionieren. A1. A1. A1. A1. Es ist möglich alle vorgenommenen Programmierungen auf die Werkseinstellung zurückzusetzen. Folgende Speicher sind von dieser Zurücksetzung nicht betroffen. - Anruferliste (Caller ID) - Wahlwiederholungsliste - Einbuchung der Basisstation und des Mobilteiles - Telefonbuch Achten Sie darauf, dass Sie Ihr JACOB JENSENTM Telefon 50 weder Staub, starkem Sonnenlicht, Feuchtigkeit, hoher Temperatur noch mechanischen Stößen aussetzen. Vermeiden Sie bitte den Einsatz von Putz- oder Scheuermitteln. Halten Sie die Telefoneinheit frei von Staub, indem sie es mit einem trockenen, weichen Tuch abwischen. Demontieren Sie nie dieses Gerät, da es Teile enthält, die nicht vom Anwender gewartet werden können. Bei Gewitter sollte das Telefon von der Stromversorgung getrennt werden. Schäden durch Blitzeinschlag werden nicht von der Garantie abgedeckt. Benutzen Sie ausschließlich den beigefügten Netzadapter. Die Garantie erlischt automatisch bei Nichtbeachtung einer der obigen Punkte. A1. 39 A1. A1. A1. A1. F2. A2. A2. A2. A2. A2. Prüfen Sie, ob das Antennensignal im Display blinkt. Wenn ja, ist ihr Mobilteil zu weit von der Basis entfernt, keine Basis registriert ist oder das Funksignal ist zu schwach. Prüfen Sie die Basisanmeldung ihrer Stromversorgung. Nähern Sie sich wieder mit dem Mobilteil zur Basis und starten Sie einen neuen Versuch. Wenn ihr Mobilteil eine Nummer nicht wählt prüfen bitte ob diese Nummer nicht gesperrt ist. (siehe unter D.9. Anrufsperre) In manchen Situationen kommt es vor, dass sich das Mobilteil selbst blockiert, vor allem wenn es lange nicht geladen wurde. Versuchen Sie dann die Batterie zu entnehmen und wieder neu einzusetzen und dann das Mobilteil ca. 6 Stunden wieder aufzuladen. Wenn eine falsche Nummer angewählt wird, prüfen Sie, ob eine voreingestellte Vorwahlnummer nicht richtig konfiguriert wurde. Zur Überprüfung wählen sie im Menue “Basis Einst”, dann wählen sie “Weitere” und wählen dann “Vorwahl”. Ändern oder löschen sie diese falls nötig. Mein Telefon klingelt nicht ? Prüfen Sie , ob der Rufton auf “Aus“ steht oder die Lautstärke auf sehr niedrigem Niveau eingestellt ist (siehe H.1 Einstellung von Klingelton und Klingellautstärke). Versichern Sie sich, dass das Mobilteil nicht ausgeschaltet ist. Prüfen Sie die Kabelverbindungen und Stecker. Prüfen sie die Ländereinstellung. Wählen sie “Basis Einst” und drücken Sie “Country”, dann wählen Sie das gewünschte Land aus der Liste. Wenn das Telefon an einer übergeordneten Telefonanlage angeschlossen ist, überprüfen Sie bitte, ob die Flashzeit korrekt eingestellt ist (siehe Punkt I.5. Telefonanlage und Flashzeit). F3.Die Telefonbuchspeicher funktionieren nicht A3. Prüfen Sie, ob Nummern eingegeben sind, die länger als das Stellenlimit sind, wie unter Punkt Telefonbuchfunktion angegeben wurde. A3. Wenn Ihr Telefon mit einer PABX Anlage benutzt wird, befragen Sie Ihren Betreiber, ob eine Pauseneinstellung für einen externen Anruf voreingestellt werden muss. F5. A5. A5. M. A4. A4. 40 Anrufernummer erscheint nicht im Display Vergewissern Sie sich, dass Ihr Netzwerkbetreiber die Anruferkennungsfunktion (Caller ID) unterstützt. In den meisten Ländern ist dies kostenpflichtig. Anrufer können die anzeige Ihrer Rufnummer unterdrücken lassen, wenn Sie einen Anruf tätigen. Ausländische Anrufernummern können normalerweise nicht angezeigt werden. Sicherheitsbestimmungen Wichtiger Hinweis- Notrufe Dieses Telefon ist für Notrufe entwickelt, wenn die Stromversorgung ausgefallen ist. Wenn es einen Stromausfall gibt, und Sie den optionalen Batteriepack für die Netzausfallsicherung installiert haben, können Sie noch eine gewisse Zeit Notrufe tätigen. Das Telefon arbeitet nur unter konstanter Stromversorgung oder aktivierter Netzausfallsicherung. Es ist stets ratsam, zur Sicherheit ein vom Stromnetz unabhängiges Telefon in greifbarer Nähe zu haben. Wenn Sie das Telefonzubehör nutzen, sollten Sie die Basis Sicherheitsregeln zur Vermeidung von Feuer, Stromschlag oder anderen Verletzungen befolgen: • • • • • • • F4. A4. Mein Mobilteil funktioniert nicht, nachdem ich es an einer Basis eines anderen Herstellers angemeldet habe Gemäß dem DECT Standard (GAP kompatibel) können Mobilteile an jedweder DECT Basis angemeldet werden. Spezifische Herstellereigenen Funktionen können dabei allerdings verloren gehen, so dass zuweilen nur die Basisfunktionen erhalten bleiben. Prüfen Sie ob die Basis eines anderen Herstellers GAP kompatibel ist, denn nur dann können Mobilteil und Basis zumindest in den Grundfunktionen zusammenarbeiten. • • Halten Sie den Hörer oder das Mobilteil von Flüssigkeiten und Feuchtigkeit fern Telefonieren Sie nicht mit einem kabelgebundenen Telefon bei Gewitter Benutzen Sie nie das Telefon in der Nähe eines Gasaustrittes Stromkabel und Batterien nur wie in der Bedienungsanleitung vorgesehen verwenden. Batterien nicht in den Abfall und niemals ins Feuer werfen (Explosionsgefahr !). Fragen Sie nach den lokalen Entsorgungsvorschriften. Öffnen oder deformieren Sie niemals Batterien. Diese enthalten giftige Säuren, die ätzend für Augen und Haut sind und bei Verschlucken ebenfalls als Gift wirken. Verbinden Sie den Netzadapter mit einer nahegelegenen Steckdose, die leicht zu erreichen ist. Öffnen sie nicht den Hörer oder die Basisstation, dies könnte zu einem Stromschlag führen. Bei Gewitterstürmen besteht eine geringe Chance für die Beschädigung des Telefons. Bei Gewitter sollte das Telefon zur Sicherheit die Telekom- und Stromnetzleitung unterbrochen werden. Kleine Kinder sollten vom Spielen mit dem Telefon abgehalten werden. • • • Da die Telefonbasis mit angemeldeten Mobilteilen in Funkkontakt stehen, können Personen mit Hörhilfen unter Umständen ein Brummen durch ihre Hörhilfe wahrnehmen. Wir raten dieses Telefon nicht in der Nähe von medizintechnischem Gerät oder von Personen mit Schrittmachern zur verwenden. Dieses Telefon kann unter Umständen Interferenzen zwischen , Fernsehern, Radios oder Anrufbeantwortern erzeugen. Probieren Sie die optimalen Standorte bei der Installation aus und halten sie einen geeigneten Abstand ein. n.Garantie Auf ihr Telefon wird Garantie ab Kaufdatum im Rahmen der gesetzlichen Bestimmungen des Landes, in dem Sie ihr Gerät gekauft haben. Zum Nachweis des Kaufdatums bewahren Sie bitte den Kaufbeleg auf. Innerhalb der Garantiezeit werden unentgeltlich alle Mängel die auf Material-und Herstellungsfehler beruhen beseitigt. Die Garantieleistung erfolgt durch Reparaturen oder Austausch des Gerätes nach Wahl ihres Lieferanten. Von der Garantie ausgenommen sind Verbrauchmaterialen ,Mängel die den Wert oder Gebrauch des Gerätes nur unerheblich beeinträchtigen, sowie Schäden, die auf unsachgemässen Gebrauch, auf Verschleiß oder auf Eingriffe durch Dritte zurückzuführen sind. Eventuelle Folgeschäden hervorgerufen durch die Nutzung ,den Ausfall oder Mängel des Produktes, insbesondere jede Haftung für Vermögensschäden sind von dieser Garantie ausgeschlossen. Im Garantiefall wenden Sie sich bitte an die Verkaufsstelle, bei der Sie das Telefon gekauft haben. O.Ökologische Bedenken und Entsorgung Elektrische und elektronische Geräte enthalten Materialien, Komponenten und Substanzen, die Ihrer Umwelt und Gesundheit schaden können, wenn der Abfall nicht richtig entsorgt wird. Elektrische und elektronische Geräte sind mit einem wie unten dargestellten durchgestrichenen Mülltonnensymbol gekennzeichnet. Es zeigt an, dass elektrische und elektronische Geräte nicht mit dem normalen Haushaltsabfall entsorgt werden dürfen und separat gesammelt werden müssen. Bitte fragen Sie Ihren Händler nach den aktuellen Entsorgungsbestimmungen. P.DECLARATION OF CONFORMITY / zulassung Hiermit erklärt Bell Xpress A/S: Dieses Gerät (Telefon 50, Typ JJ T50 DECT / RTX3073) erfüllt die Anforderungen der EC Richtlinie 1999/5/EC R&TTE. Service Center (Nur Deutchland) Filius & Haake GmbH & Co. KG Kuckucksweg 55 DE-33607 Bielefeld Tel: 0521 / 9 28 25 11 Fax: 0521 / 9 28 25 33 e-mail: [email protected] - - Beim Inhalt dieser Bedienungsanleitung sind Änderungen vorbehalten. Der Hersteller und seine Zulieferer haften nicht für Schäden, Kosten, Erlösschmälerungen oder irgendwelche weiteren Schäden, die aus dem Gebrauch dieses Produktes resultieren. 41 FR A.INSTALLATION ET MISE EN SERVICE . . . . . . . . . . . . . . . . 43 B. SYMBOLE D’AFFICHAGE ET SIGNIFICATIONS . . . . . . . . . 45 C.TOUCHES ET SES FONCTIONS . . . . . . . . . . . . . . . . . . . . . 46 D.configuratioins DU TÉLÉPHONE . . . . . . . . . . . . . . . . 48 E. SERVICE NORMAL . . . . . . . . . . . . . . . . . . . . . . . . . . . . . . 50 F. Répertoire et touches mémoire . . . . . . . . . . . . . . . 53 G.LISTE D’APPELS (CLIP) . . . . . . . . . . . . . . . . . . . . . . . . . . . 54 H.PERSONALISATION DU TÉLÉPHONE . . . . . . . . . . . . . . . . 55 I. ENREGISTREMENT D’AUTRES COMBINÉS OU STATIONS DE BASE . . . . . . . . . . . . . . . . . . . . . . . . . . 56 J.RÉTABLIR LA CONFIGURATION D’ORIGINE . . . . . . . . . . . 57 K.INDICATION DE MAINTENANCE . . . . . . . . . . . . . . . . . . . 57 L.RECHERCHE D’ERREURS . . . . . . . . . . . . . . . . . . . . . . . . . 57 M. CONSEILS DE SÉCURITÉ . . . . . . . . . . . . . . . . . . . . . . . . . . 59 N. Considération écologique et traitement des déchets . . . . . . . . . . . . . . . . . . . . . . . . . . . . . . . . . . . . . . 59 O.UE Déclaration de conformité . . . . . . . . . . . . . . . . 59 Félicitations pour avoir achété un nouveau Téléphone 50 JACOB JENSENTM. Ce téléphone a été conçu par Jacob Jensen au Danemark. Ses produits ont gagné une reconnaissance internationale grâce à leur design simple, original et classique. Jacob Jensen a reçu plus de 100 prix de design dans le monde entier et 19 de ses oeuvres ont été exposées dans la collection Design Study et dans la Collection Design du Musée d´Art Moderne de New York. Le Téléphone 50 JACOB JENSENTM est conçu pour le raccordement au réseau téléphonique public. Il sera livré avec une fixation murale et l’equipment nécessaire pour le montage. Le Téléphone 50 JACOB JENSENTM est équipé avec la plus nouvelle technologie digitale: le système DECT (Digital Enhanced Cordless Telecommunication / télécommunication supportée digitalement). Cela permet le transfert digital du son, réception avec acuité du son, et des fonctions guidées par le menu. Selon le standard du système DECT (compatible avec GAP), on peut contrôler jusqu’à 6 combinés avec une seule station de base. Avec la fonction de transfert d’appels et d’Intercom, on reçoit une petite installation téléphonique. En plus, il offre un maximum en confort avec la fonction de réconnaissance de numéro (CLIP), un répertoire qui garde les numéros des appels reçus, une fonction de répétition de la numérotation, une liste de répétition de la numérotation, et notamment la fonction Intercom entre la station de base et les combinés connectés. Le Téléphone 50 JACOB JENSENTM est équipé avec la fonction «low radiation». Le mode à faibles radiations travaille d’une façon intelligente et détermine et ajuste automatiquement la longuer des fréquences radios (RF) en dépendance de la distance du combiné et de la station de base. La station de base émet des radiations seulement si le combiné a été enlevé de la base. En remettant le combiné à la base, l’émetteur s’éteint. Par conséquent, l’utilisateur n’est pas exposé à des ondes micros poulés. Etendez votre réseau téléphonique en raccordant des Téléphone 10 sans fil à votre Téléphone 50. Jusqu’à six combinés peuvent être connectés. Ces Téléphone 10 JACOB JENSENTM peuvent être achetés séparément chez votre revendeur Jacob Jensen. 42 A.INSTALLATION ET MISE EN SERVICE Important: Merci de suivre scrupuleusement les différentes étapes d’installation dans l’ordre afin d’avoir une installation propre et parfaitement opérationnelle. 3.Connectez le câble à deux têtes à la prise RJ45 du relais multiprise. Connectez la ligne téléphonique à la prise RJ11(16) et la prise d’alimentation (17) sur la station d’accueil du téléphone. Le téléphone sans fil est seulement opérationnel si la station de base est connectée au courant. Dans le cas d’une panne de courant il vous est conseillé de connecter à votre ligne téléphonique un autre téléphone sans fil qui ne dépend pas de l’électricité (par exemple le téléphone 1, 3, ou 5 de Jacob Jensen). Option : Le téléphone peut être équipé d’une batterie SANIK 2.4V 650mAh Ni-Mh, modèle 2SN-AAA65H-S-J1 qui permettra à votre téléphone d’être opérationnel pour une courte période en cas de panne de courant. Cette batterie est optionnelle et non incluse. Attention • Danger d’explosion si les piles sont remplacées par les mauvaises. Merci de n’utiliser que les batteries rechargeables SANIK 2.4V 650mAh Ni-Mh, modèle 2SN-AAA65H-S-J1. Contactez votre revendeur Jacob Jensen pour plus de renseignements. • Il est impératif de déconnecter la prise secteur ainsi que la ligne téléphonique avant d’installer la batterie rechargeable. • Ne jetez pas les piles au feu pour éviter le risque d’explosion. Respectez les traitements des déchets conforme à vos directives régionales. • Utilisez exclusivement l’adapteur Ktec Modèle KSLFB0750035W1EU avec le câble rouge RJ11 agréé dans l’emballage. L’utilisation d’un autre adapteur pourrait endommager l’appareil et mettra fin à la garantie. • Branchez l’adaptateur sur une prise proche de l’appareil et facilement accessible. 4.Branchez le connecteur réseau sur la prise murale principale et branchez l’autre bout sur la douille rouge de la prise/du duplexeur. 5.Connectez un bout du câble réseau avec la douille noire de la prise/du duplexeur et connectez l’autre bout du câble avec l’adaptateur de prise spécifique de votre pays. 6.Connectez l’adaptateur de prise spécifique de votre pays avec la douille du téléphone dans le mur. A.1.Fixation murale 1.Faîtes passer le câble à deux têtes dans l’interstice prévue sous le téléphone (comme montré sur le schéma). 2.Montez la base avec les vis et les boulons fournis avec une perceuse (trous de 6 mm pour les chevilles) 1.Installez la batterie de secours (vendue séparément) en suivant la procédure de la section A.4. 2.Connectez l’une des extrémités du câble torsadé au combiné et l’autre dans la prise RJ9 de la station d’accueil. Note: Si vous préférez installer le téléphone horizontalement (table, bureau etc…), installez le support prévu à cet effet en premier. 43 A.2.Positionné sur la table Faites glisser le portant dans les rainures de la base. Ce portant sera fixé dès lors que vous entendrez un click. Le portant peut être facilement démonté : - Pressez sur le bouton en dessous de la base avec un stylo ou votre doigt, et enlevez en même temps le portant de la base en le faisant glisser. A.3. Configuration de la langue Si vous souhaitez une autre langue, procédez comme suit: Appuyez sur la touche et appuyez la touche 3 fois pour arriver au Display, puis appuyez sur et appuyez deux fois sur pour arriver à Select Lang. Appuyez sur , puis appuyez sur pour sélectionner entre les langues: English, Deutsch, Français, Italiano, Nederlands, Español, Dansk, Svenska, Türkçe, Norwegian et appuyez pour confirmer. A.4. Installation et remplacement de la batterie de secours (vendue séparément) ATTENTION: Toujours débrancher toutes les prises murales reliées au téléphone avant d’installer ou de remplacer la batterie. Pour installer la batterie, merci de scrupuleusement suivre les instructions suivantes: 1.Vérifiez que la batterie que vous souhaitez installer est bien une batterie rechargeable SANIK 2.4V 650mAh NiMh, modèle 2SN-AAA65H-S-J1. 2.Ôtez le support pour bureau, l’alimentation et la ligne téléphonique de la station d’accueil du Téléphone 50. 44 3.Dévissez le compartiment batterie avec un tournevis et soulevez le couvercle. 4.Installez une nouvelle batterie ou remplacez l’ancienne comme indiqué sur le schéma. 5.Remettez en place le couvercle et revissez. Avis important • L’état de chargement des piles est optimal si le premier cycle de chargement est d’au moins 10 heures. • Extrayez les piles si le combiné ne sera pas utilisé pendant 30 jours. A.5.Touches raccourcis mémoires Préparez et imprimez vous-même les noms souhaités sur le papier argenté fourni. Afin que les écritures tiennent dans les espaces prévus, référez vous au schéma suivant: 66 mm 10 mm Texte Texte Texte Texte Les textes et/ou symboles doivent être placés dans les fenêtres (en pointillés sur le schéma) mesurant 14 x 8 mm. Nous vous conseillons de faire un essai sur un brouillon. Pour ôter les fenêtres transparentes et insérer le les noms sur papier argenté, merci de lire ce qui suit : B. SYMBOLE D’AFFICHAGE ET SIGNIFICATIONS Dans le mode Veille: 1.Soulevez délicatement la partie gauche du bloc des touches raccourcis mémoire et enlevez-le de la station d’accueil. 2.Préparez et imprimez les textes et/ou symboles désirés sur le papier argenté. 3.Découpez soigneusement le long des lignes les plus larges (66 x 10 mm). Symbole Signification 14:05 Affichage de l’heure dans le format 24 hrs. 20/01 Affichage des jours et du mois. Affichage des messages de voix: Fonction dépendante de l’opérateur de réseau. Ce symbole apparaît si vous avez reçu un message enregistré sur le répondeur de votre opérateur de réseau. Indication: En dépendance de votre service de réseau, le symbol de message de voix devrait s´éteindre dès que vous ayez écouté vos messages. Si ce n’est pas le cas, vous devez l’éteindre manuellement. Voir les fonctions guidées par le menu d’instruction. Il brille en recevant ou en émettant des appels. Le microphone est dans l’état muet.. 4.Insérez les bandes argentées à l’endroit désiré et remettez en place le bloc touches raccourcis mémoire. 123 123 123 123 123 123 123 Appel interne ou baby interphone est activé. 123 123 123 123 Fonction “mains libres” est activée. 123 123 123 Ouvrir le répertoire. 123 123 Indique que votre téléphone est en mode casque de communication. Indique que la sonnerie du téléphone est désactivée. Le téléphone ne sonnera pas en recevant un appel. 45 C.LES TOUCHES ET SES FONCTIONS Avant d’expliquer toutes les touches et ses fonctions, il faut expliquer le clavier multiple. La pression sur la touche doit être prolongée ou brève. Une pression brève signifie lâcher la touche juste après avoir appuyé. Une pression prolongée signifie appuyer la touche pendant 2 secondes. Clavier Mode Veille Mode Conversation Affichage de programmation / Affichage Display Seulement sur le combiné Appuyez et maintenez ce bouton pour activez la fonction silence. Appuyez de nouveau pour la désactiver. Sur la station de base Appuyez cette touche pour arriver au menu. Entrée: Silencieux, Internal Call, Amplif.Son, Recomposer, Flash Dans le mode de programmation, appuyez sur cette touche pour confirmer. Entrée des numéros 0-9. Entrée des numéros 0-9. Entrée des numéros ou de l’alphabet. Si le numéro que vous appelez est occupé ou si vous voulez répéter votre appel, appuyez la touche de répétition de la numérotation. Les derniers 10 numéros avec un max. de 24 chiffres seront affichés. En mode Conversation, ce bouton vous permet d’augmenter le volume du combiné, du haut-parleur en mode main-libre ou du casque de communication. Dans le mode de la programmation et de l’index de la mémorisation cette touche sert à défiler en haut si on l’appuye brièvement. Utilisez cette touche pour feuilleter dans le répertoire, le menu, la liste de répétition de la numérotation, ou dans la liste d’identification des appels. Utilisez et pour sélectionner le numéro désiré. Décrochez le combiné, appuyez sur ou pour appeler le numéro. 46 Clavier Mode Veille Mode Conversation Affichage de programmation / Affichage Display Dans le mode Veille: Si vous appuyez cette touche brièvement, la liste du répertoire sera affichée. L’affichage montre les premières entrées alphabetiques. En appuyant et on peut défiler les entrées. Si vous utilisez la recherche alphabétique, il faut entrer l’initiale. En mode Conversation, ce bouton vous permet de baisser le volume du combine, du haut-parleur en mode main-libre ou du casque de communication. Dans le mode de la programmation et de l’index de la mémorisation cette touche sert à défiler en bas si on l’appuye brièvement. Utilisez cette touche pour feuilleter dans le répertoire, le menu, la liste de répétition de la numérotation, ou dans la liste d’identification des appels. Appuyez sur ce bouton pour quitter le menu et remettre le téléphone en veille. Appuyez pour ouvrir une nouvelle ligne ou pour répondre à un appel en attente si votre serveur téléphonique vous le permet. Appuyez pour transférer un appel à une autre extension dans une installation PABX. Cette touche (flash) entraînera une brève interruption de la ligne. Dans le mode de la programmation, cette touche a la fonction d’effacement ou annulation. Appuyez cette touche pour effacer des numéros ou des lettres fausses. Appuyez-la pour arriver au dernier menu. Si vous voulez éteindre la sonnerie du téléphone en recevant un appel, appuyez cette touche pendant trois secondes. Appel collectif (Paging) Appuyez et maintenez (au moins pendant 5 sec.): lancement d’un appel collectif à tous les combinés activés. Appuyez sur ce bouton pour activer la fonction casque de communication. Appuyez sur le bouton pour terminer l’appel. Appuyez sur ce bouton pour activer la fonction main libre. Appuyez sur le bouton pour terminer l’appel. Appuyez sur ce bouton pour effectuer un appel collectif vers tous les combinés sans fil reliés à votre Téléphone 50. Appuyez sur ce bouton pour insérer une pause lors de la composition du numéro de téléphone. Appuyez sur ce bouton pour mettre l’appel en attente ou activer le mode silence. Appuyez de nouveau pour enlever ce mode. 47 D. CONFIGURATIONS DU TÉLÉPHONE Attention Le téléphone DECT est sécurisé avec un numéro PIN (personal identification number). Ne changez jamais le numéro du PIN de la station de base si vous n’êtes pas familiarisé avec des produits éléctroniques et il n’y a pas une bonne raison pour changer le PIN donné. Le téléphone ne peut plus être utilisé si vous oubliez votre PIN. Dans ce cas, contactez l’assistance technique de votre service clientèle. D.1.OK / Touche Menu Le téléphone DECT est équipé avec une touche menu d’utilisation facile. Toutes les fonctions de la station de base peuvent être accedées à partir d’une fonction Question/ Réponse (Q/R) de la touche Menu . En appuyant la touche sur la station d’accueil, les fonctions du menu se feuillettent de manière circulaire. Vous pouvez appuyer la touche pour défiler vers le haut ou appuyer la touche pour défiler vers le bas. Call Log List > Internal Call > Régl. audio > Affichage > Heure&Alarme > Régl avancés > Config base > Surv.Bébé Dans cette partie du manuel, on commence avec une petite table de succession des touches pour donner une orientation brève des pas de programmation. D.2. Configuration de la langue La configuration de base est en anglais. Pour changer la configuration de la langue: Affichage SélecLangue Sélectionnez la langue désirée 1.Défilez avec les touches / dans les langues disponibles. 2.Si vous avez trouvé la langue désirée, appuyez pour la confirmer. D.3.Insertion de la date / de l’heure La mémoire du Caller ID vous informe de l’heure et de la date de l’appel reçu indépendamment du pays et de l’opérateur du réseau. Dans ces pays qui supportent le service à travers le FSK Caller ID il n’est pas nécessaire d’ajuster la date et l’heure car elles sont envoyées automatiquement à la mémoire du Caller ID. 48 Dans ces pays qui supportent le système DTMF Caller ID (ou pays avec le système FSK mais sans l’envoi parallèle de date/ heure), il est nécessaire de les ajuster de la manière suivante: Heure&Alarme Date/Heure RéglDateHeure Mode 24 hrs. Utilisez les touches numériques pour insérer la date (Jour/ Mois/Année), appuyez la touche de nouveau pour insérer le temps (format 24:00 heures). Après l’insertion appuyez sur pour confirmer. Appuyez sur pour retourner en arrière et remettre le combiné en veille. D.4.Nom du téléphone Affichage Insértion Nom Combiné Nom combiné Vous pouvez changer le nom affiché sur l’écran de votre téléphone. 1.Appuyez sur la touche pour arriver au menu principal. 2.Appuyez sur la touche / et sélectionnez “Affichage”. Appuyez sur 3.Appuyez sur la touche / et sélectionnez “Nom combiné”. Appuyez sur 4.“Nom combiné” apparaît. Il faut insérer le nom avec les touches numériques du clavier. Appuyez sur 5.Appuyez sur la touche pour retourner au mode Veille. D.5. Sonnerie Régl. audio Sélectionnez votre option Arrêt Tonalités Sélectionnez Marche/ Vous pouvez activer ou désactiver la sonnerie pour “Touche”, “Confirmation” et “Appel en att”. Par exemple, lorsque le son des touches est paramétré sur ”Marche”, vous entendrez un son à chaque fois qu’une touche sera pressée. 1.Appuyez sur la touche principal. 2.Appuyez sur la touche audio”. Appuyez sur pour arriver au menu / pour arriver à “Régl. 3.Appuyez sur la touche / pour sélectionner “Tonalités”. Appuyez sur 4.Appuyez sur la touche / pour choisir une option (par exemple “Attention”, “Appel en att”) et appuyez sur pour confirmer. 5.Appuyez sur la touche / pour afficher “Marche” ou “Arrêt” et appuyez sur pour confirmer. Pour le son du clavier, sélectionnez entre 1-3 ou “Arrêt” et appuyez sur 6.Appuyez sur la touche pour sortir du programme et retourner au mode Veille. D.6.Procédure de numérotation Vous pouvez choisir entre “Tonalité” et “Impulsions”. Le préréglage est sur “Tonalité”. Vous écoutez un bip permanent. Les opérateurs téléphoniques et les standards les plus modernes utilisent la fonction «Tonalité», donc ce réglage ne devrait pas avoir besoin d’être changé. Il est à changer seulement si votre fournisseur ou standard utilise la fonction “Pulse”. Config base Mode composer Impulsions Supplémentaire Sélectionnez Tonalité/ 1.Appuyez sur la touche pour arriver au menu principal. 2.Appuyez sur la touche / et sélectionnez “Config base” et appuyez sur 3.Appuyez sur la touche / et sélectionnez “Supplémentaire”. Appuyez sur 4.Appuyez sur la touche / et sélectionnez “Mode composer”. Ensuite, appuyez . L’intensité du courant électrique sera affiché. 5.Appuyez sur la touche / et sélectionnez entre “Tonalité” et “Impulsions”. Appuyez sur 6.Appuyez sur la touche pour retourner au mode Veille. D.7. Changer la signalisation de fréquence au mode tonalité Si vous avez prédéterminé la fonction “Impulsions” sur votre téléphone, vous pouvez la changer à “Tonalité” à court terme. Lorsque le téléphone est décroché, appuyez et maintenez jusqu’à ce que “D” apparaisse. Tous les numéros qui ont été insérés après “D” seront composés d’après la méthode de signalisation de fréquence. D.8.Indicatif Si vous voulez ajouter un indicatif pour des appels à l’étranger ou vous voulez ajouter un indicatif pour un numéro enregistré, il faut procéder ainsi: Config base ComposPréfix Supplémentaire et confirmez le numéro 1.Appuyez sur la touche pour arriver au menu principal. 2.Appuyez sur la touche / et sélectionnez “Config base” et appuyez 3.Appuyez sur la touche / et sélectionnez “Supplémentaire”. Appuyez 4.Appuyez sur la touche / et sélectionnez “ComposPréfix” et appuyez . L’intensité du courant électrique est affiché. 5.Confirmez le numéro avec le clavier de numéros ou appuyez pour l’effacer. 6.Appuyez sur la touche pour retourner dans le mode Veille. D.9.Blocage d’appel Si le blocage d’appel est activé, on ne peut pas lancer des appels avec des numéros spéciaux ainsi que des appels à distance ou à l’étranger. Config base et confirmez le numéro Arrêt Blocage appel Sélectionnez Marche/ 1.Appuyez sur la touche pour arriver au menu principal. 2.Appuyez sur la touche / et sélectionnez “Basis Einst”. Appuyez 3.Appuyez sur la touche / et sélectionnez “Anrufsperre”. Appuyez 4.Insérez le numéro à bloquer ou utilisez pour effacer un numéro. Appuyez pour confirmer. 5.Appuyez sur la touche / pour sélectionner “Marche” ou “Arrêt”. Confirmez avec 6.Appuyez sur la touche pour retourner au mode Veille. para confirmar. 49 E. SERVICE NORMAL E.1.Utiliser un casque de communication (vendu séparément) Utiliser un casque de communication peut être une méthode alternative pour effectuer un appel, particulièrement utile lors de longs appels. Connectez le câble du casque à la prise casque située derrière la station d’accueil du Téléphone 50. Lorsque vous ne souhaitez pas utiliser le casque, appuyez simplement sur la touche pour passer du mode casque au mode communication via le combiné ou main libre. Si le contact vous appelant est déjà enregistré dans votre répertoire (se référer à F. Répertoire), le nom enregistré s’affichera lors de l’appel entrant. Cet appel peut être pris de trois manières différentes : 1.Décrochez simplement le combiné 2.Appuyez sur pour répondre en utilisant la fonction main-libre. 3.Appuyez sur to answer the call by the headset function. E.4.Pour terminer un appel. Reposez le combiné à son emplacement ou appuyez sur ou pour raccrocher. ATTENTION La prise jack du casque est une prise 2.5 mm. Merci de contacter votre revendeur afin de trouver un casque compatible. Utiliser un autre casque pourrait endommager le téléphone. E.5. Switcher entre le combiné, le main libre et le casque de communication. Le combiné est toujours prioritaire par rapport au main-libre ou au casque. Dès que le combiné est décroché, la station d’accueil passera en mode combiné décroché. E.2. Emettre un appel. En utilisant le combiné: 1.Décrochez le combiné. L’écran affichera l’icône . 2.Utilisez le pavé numérique pour composer le numéro souhaité. 3.Raccrochez le combiné une fois la communication finie. 1.Pour passer en mode casque de communication, appuyez une fois sur la touche . L’icône du casque d’affichera. Reposez le combiné sur son socle pour activer le casque. 2.Pour passer en mode communication main-libre, appuyez une fois sur la touche . L’icône du haut-parleur s’affichera. Reposez le combiné sur son socle pour activer la communication main-libre. 3.Pour repasser en communication via le combiné, décrochez le combiné. Le casque ou le main-libre se couperont automatiquement. En utilisant le mode main libre: 1.Appuyez sur la touche . L’écran affichera l’icône 2. Utilisez le pavé numérique pour composer le numéro souhaité. 3.Appuyez sur la touche pour raccrocher. . En utilisant un casque de communication: 1.Appuyez sur . L’écran affichera l’icône . 2.Utilisez le pavé numérique pour composer le numéro souhaité. 3.Appuyez sur la touche pour raccrocher. E.3.Répondre à un appel. Lors d’un appel entrant, le téléphone sonnera si le volume de sonnerie n’est pas paramétré sur “Arrêt”. Si vous avez souscrit à l’identification des appels entrant auprès de votre opérateur téléphonique, le numéro de votre correspondant s’affichera sur l’écran du téléphone en même temps que celui-ci sonnera. 50 E.6. Volume Le volume du combiné, du casque de communication ou du main-libre se paramètrent indépendamment en utilisant les touches et lorsque vous utilisez le mode souhaité. Votre téléphone est livré en configuration par défaut, configuration qui peut être personnalisée facilement. Il y a six paliers volumes différents par mode. L’indicateur de niveau du volume s’affiche lorsque vous réglez le volume. E.7. Configuration Son Le téléphone est équipé d’un outil audio vous offrant 4 options. Cela vous permet de personnaliser la qualité du son selon vos préférences. Vous pouvez choisir entre: Normal, Basses, Moyen, Aigus. Décrochez le combiné Sélectionnez le son optionnel Amplif.Son 1. Lorsque le combiné est décroché, appuyez pour arriver au menu principal. 2. Appuyez sur la touche / et sélectionnez “Amplif.Son”. Appuyez 3. Appuyez sur la touche / et sélectionnez une des options: Normal, Basses, Moyen, Aigus. Appuyez sur la touche pour confirmer. E.8. Commande de silencieux (Mute) Combiné décroché Silencieux/Silenc.Annulé 1.Lorsque le combiné est décroché, appuyez sur la touche pour arriver au menu principal. 2.Appuyez sur / pour sélectionner “Silencieux”. Appuyez sur pour valider. 3.Lorsque le téléphone est en mode silencieux, l’icône s’affiche sur l’écran. 4.Pour désactiver la fonction silence, suivez la procédure cidessus et sélectionnez ”SilencAnnulé”. Appuyez sur pour valider. L’icône mute disparaitra de l’écran. E.9.Pause Avec certains systèmes PABX, il y a une courte pause entre le code pour un appel vers l’extérieur (habituellement 0 ou 9) et la tonalité. Une pause doit être entrée manuellement et enregistrée dans le répertoire pour que les numéros ne soient pas composés trop rapidement. E.10. Attente Pour mettre un appel en attente : 1.Appuyez sur la touche pour mettre en attente un appel 2.Appuyez de nouveau sur la touche pour reprendre le correspondant en ligne. E.11.Dernier numéro composé (rappel) Seuls les 10 derniers appels sortant sont gardés en mémoire. Pour rappeler un numéro, appuyez sur la touche lorsque le combiné est en veille et sélectionnez le numéro souhaité en utilisant les touches et . Appuyez alors sur la touche d’appel, sur la touche ou pour passer l’appel. Vous pouvez aussi rappeler un correspondant lorsque le combiné est déjà décroché: Appuyez sur la touche ou . Attendez la tonalité, appuyez sur la touche et choisissez “Recomposer”. Utilisez alors les touches et pour choisir le nom, le numéro ou le combiné que vous souhaitez appeler. Validez avec la touche . E.12.Rappel (flash) Utilisez la touche pour activer le service d’appel personnalisé (double appel, redirection d’appel). Contactez votre compagnie téléphonique pour plus d’informations. E.13.Lancer et répondre à des appels internes (Intercom) • • Lorsque vous enregistrez un numéro en mémoire dans le répertoire, vous pouvez inclure le code d’accès vers l’extérieur (0 ou 9). La fonction LNR (rappeler le précédent numéro) ou appel d’un numéro du répertoire peut ne pas fonctionner si vous utilisez votre téléphone avec un système PABX. Insérez une Pause entre le préfixe d’appel vers l’extérieur et le numéro du correspondant. 1.Appuyez sur la touche correspondante à l’appel vers l’extérieur. 2.Appuyez sur la touches pour insérer la pause. L’écran affichera alors “P”. 3.Composez le numéro de votre correspondant. Faire des appels internes entre la station d’accueil et les téléphones sans fil reliés. Transférer un appel externe à un autre poste. Les communications internes (INTERCOM) peuvent être faites entre votre téléphone et un autre téléphone relié, ou entre eux téléphones sans fil reliés – intercom, transfert d’appel et conférence téléphonique. Votre téléphone ainsi que les téléphones sans fil reliés ont un numéro attribué. Ce numéro doit être utilisé pour contacter cet autre combiné si vous souhaitez faire un appel interne, un transfert d’appel ou une conférence téléphonique. Les numéros des autres combinés vont de 1 à 6. Le nom du téléphone que vous avez est T50. Si vous possédez un téléphone sans fil supplémentaire relié à votre T50, merci de vous référer à la section E.19. 51 E.14.Pour effectuer un appel entre la station d’accueil T50 et un téléphone sans fil. Vous pouvez effectuer un appel intercom entre votre T50 et un téléphone sans fil relié. 1.Appuyez sur la touche et sélectionnez “Internal Call”. 2.Utilisez ou et sélectionnez le nom, le numéro, ou le combiné. Appuyez sur . Le combiné sonne. Le symbole sera affiché et vous écouterez un son de numérotation. 3.Lorsque le téléphone contacté sonne, décrochez-le pour accepter la communication. E.15.Pour répondre à un appel interne. Lorsque le T50 est appelé depuis un autre téléphone sans fil relié, le nom de ce téléphone s’affiche sur votre écran, et la sonnerie d’appel interne retentis. Décrochez simplement le téléphone pour lancer la communication intercom. E.16.Pour finir une conversation intercom Raccrochez, ou appuyez ànouveau sur la touche . ou E.17. Appel collectif (Paging) à tous les combinés de la station de base Vous ne pouvez qu’appeler les combinés activés sur la station de base avec l’appel collectif. Cela s’applique aussi en cas de combiné à combiné. E.18.Transfert d’appel et téléconférence Transférer un appel Vous pouvez transférer un appel depuis votre téléphone filaire vers un téléphone sans fil, ou inversement : 1.Appuyez sur la touche et sélectionnez “Internal Call”. 2.Appuyez sur la touche ou , sélectionnez le nom ou le numéro du combiné que vous voulez appeler pour le transfert de l’appel et appuyez . L’appel venant de l’extérieur est mis en attente et le téléphone contacté sonne. 3.Lorsque le téléphone contacté répond, raccrochez votre téléphone, ou appuyez sur ou sur . Si le téléphone contacté n’est pas décroché dans les 30 secondes, l’appel sera redirigé vers votre téléphone. 52 Téléconférence Vous pouvez participer à une conférence téléphonique à trois entre la station T50, un téléphone sans fil relié et un appel extérieur. 1.Appuyez sur la touche et sélectionnez “Internal Call”. 2.Appuyez sur la touche ou et sélectionnez le nom, le numéro, ou le combiné que vous voulez appelez pour une téléconférence et appuyez . L’appelant externe est mis en attente et le téléphone relié contacté sonne. 3.Lorsque ce téléphone contacté est décroché, appuyez sur la touche descendez dans l’arborescence jusqu’à “Conférence” et appuyez à nouveau sur pour commencer la conférence. 4.Vous pouvez raccrocher, appuyer sur ou sur pour raccrocher et mettre fin à la conférence. E.19.Transférer un appel vers plusieurs postes sans fil & conférence téléphonique Vous pouvez enregistrer jusqu’à six combinés sans fil par station T50. Avec deux téléphones sans fil ou plus, vous pouvez: 1.Lancer une conversation Intercom 2.Transférer un appel externe d’un sans fil à un autre. 3.Activer la fonction Surveillance Bébé. Note: Seulement un seul combiné sans fil à la fois peut être connecté à un appel venant de l’extérieur. Si vous essayer d’appeler avec un autre téléphone alors que quelqu’un est déjà en ligne, vous vous joindrez à la conversation. E.20.Transférer un appel à un point auxiliaire dans une installation téléphonique PABX Si votre téléphone est activé comme point auxiliare dans une installation PABX, vous pouvez transférer des appels internes ou externes au point auxiliaire de l’installation comme suit: 1.Appuyez sur la touche et sur le display apparaît maintenant un “R” pour le transfert de l’appel. 2.Composez l’extension requise. Vous serez ainsi en mesure de converser avec l’extension choisie et de transférer un appel. Pour transférer l’appel, raccrochez, appuyez sur ou sur . E.21.Baby Interphones Pour activer le mode Surveillance bébé, la première étape est d’enregistrer un téléphone sans fil à votre station T50. Une fois cela fait, voici la marche à suivre : Surv.Bébé sélectionnez le combiné Sur la station d’accueil T50: 1.Appuyez sur pour accéder au menu principal 2.Appuyez sur / pour sélectionner “Surv.Bébé” puis appuyez sur 3.Appuyez sur / pour sélectionner le combiné. Appuyez sur pour confirmer. 4.Pour désactiver la fonction Surveillance Bébé, appuyez sur sur la station T50 ou sur pour un téléphone sans fil. Ceci désactivera la Surveillance Bébé et remettra votre téléphone en veille. E.22.Port Auxiliaire Votre téléphone T50 est équipé d’une prise auxiliaire vous permettant de relier un modem, un fax ou un répondeur. F.Répertoire et raccourcis mémoire. Vous pouvez créer votre répertoire personnel contenant jusqu’à 100 entrées téléphoniques. Si vous utilisez plus d’un combiné vous pouvez transférer le répertoire aux autres combinés.. F.1.Nouvelle Entrée Lorsque le répertoire est vide: répertoire <Écrivez le nom> Lorsque le répertoire possède déjà des contacts : répertoire Nouv. entrée <Écrivez le nom> 1.Utilisez pour l’insertion des entrées dans votre répertoire personnel les touches alphanumériques (2-9). Appuyez sur la touche pour confirmer ou appuyez sur pour effacer des lettres fausses. Si la deuxième lettre se trouve sur la même touche que la première précédente, appuyez sur la touche pour bouger le curseur sur la lettre juste ou attendez 3 sec. jusqu’à ce que le curseur continue à bouger automatiquement. Appuyez sur la touche pour naviguer vers le haut ou vers le bas. 2.Utilisez le clavier numérique pour entrer des numéros de téléphone. (Si vous utilisez une installation PABX, appuyez et retenez jusqu’à ce que P apparaît sur le display), appuyez de nouveau sur et gardez l’entrée. Appuyez sur la touche pour corriger l’entrée fausse. 3.Appuyez sur la touche et sélectionnez le mode du son. Appuyez pour confirmer. 4.Appuyez sur la touche et sélectionnez “Sauvegarder” ou “Retour” et appuyez pour confirmer. 5.L’entrée est maintenant gardée. Appuyez sur la touche pour retourner dans le mode Veille. F.2.Une nouvelle entrée de la liste d’appels et de la liste de répétition de la numérotation Vous pouvez copier et mémoriser un nom de la liste d’appels et de la liste de répétition de la numérotation. (Merci de vous référer à la section Identification d’un appel entré dans le répertoire et E.11. Dernier numéro composé pour de plus amples détails.) 1.Si un certain numéro de la liste d’appels ou de la liste de répétition de la numérotation est affiché sur le display, appuyez sur la touche . “SauvedsRépert” sera affiché. Appuyez sur la touche et insérer le nom avec le clavier et ensuite confirmez l’entrée en appuyant sur la touche . Si vous avez déjà une entrée avec le même nom dans votre répertoire, utilisez un autre. 2.Le numéro sera affiché. Confirmez-le et gardez l’entrée dans le répertoire. Appuyez sur la touche pour confirmer. 3.Si nécessaire, vous pouvez changer des entrées fausses avec la touche . 4.Appuyez sur la touche / pour sélectionner un certain numéro. 5.Après l’entrée, finissez avec . 6.Appuyez sur la touche pour retourner au mode Veille. F.3.Lancer un appel à partir du répertoire répertoire / sélectionnez le numéro. Décrochez le combiné. 1.Utilisez le clavier alphanumérique pour insérer la première lettre du nom désiré. Le premier nom avec cette initiale sera affiché sur le display. 2.Appuyez sur la touche / pour arriver au nom désiré. 53 3.Raccrochez le combiné, appuyez sur ou sur F.4. Effacer une entrée dans le répertoire répertoire / sélectionnez le numéro Effacer ent. Oui 2.Appuyez sur et choisissez “Numéro abrégé”. 3.Appuyez sur , sélectionnez la touche raccourcis désirée, et validez avec . 4.Le numéro du contact choisi est enregistré et associé à la touche raccourcis choisie. 1.Appuyez sur la touche / et cherchez le nom désiré. 2.Appuyez sur la touche pour confirmer ou pour retourner au menu sans rien effacer. On vous priera de confirmer les entrées. Pour le faire, appuyez de nouveau et l’entrée sera effacée. Vous écouterez un long bip. F.8.Pour appeler un contact via les touches raccourcis. 1.Décrochez le combiné et pressez la touche correspondante à la personne à appeler. 2.Le numéro et le nom de la personne appelée s’affiche sur l’écran. 3.Le téléphone passera en mode main libre et composera le numéro automatiquement. F.5. G.LISTE D’APPELS (CLIP) Changer une entrée dans le répertoire répertoire / sélectionnez le numéro Modifier . Utilisez la touche et le pavé numérique pour entrer les lettres correctes . 1.Appuyez sur la touche / et cherchez le nom désiré. 2.Appuyez sur la touche pour confirmer. 3.Appuyez sur la touche pour effacer des lettres et procéder avec le changement. 4.Si l’entrée est terminée, appuyez sur la touche . Vous pouvez utiliser pour effacer une entrée ou pour la changer. 5.Appuyez de nouveau sur la touche pour garder le changement. 6.Sélectionnez Configuration Sonnerie et appuyez F.6.Touches raccourcis Il y a huit touches raccourcis sur le T50 qui correspondent à des contacts entrés dans le répertoire. Une simple pression sur l’un de ces boutons vous permet d’appeler le contact rapidement. Les touches 1 à 4 sont situées en haut, les touches 5 à 8 sont en dessous. F.7.Pour changer un contact sur les touches raccourcis. Répertoire / pour sélectionner le contact appuyez sur Numéro abrégé sélectionnez l’une des touches raccourcis . 1.Appuyez sur / 54 depuis la veille et naviguez avec pour sélectionner le contact voulu. . Dans la mesure où votre opérateur de réseau supporte le service de reconnaissance de numéro, le numéro de l’appel sera affiché sur le display du combiné et de la station de base. Si le numéro ajouté est mémorisé dans le répertoire, le nom du correspondant téléphonique apparaît sur le display. Si la base de votre opérateur de réseau est un système FSK Caller ID, l’heure et la date de l’appel seront aussi affichées et mémorisées. Seulement les premières 13 lettres seront affichées. Le téléphone mémorise les derniers 30 appels. Si la liste d’appels est pleine, le numéro plus vieux sera effacé. Il n’y a pas de synchronisation entre les combinés. Si les combinés sont éteints, les appels arrivants ne seront pas mémorisés dans la liste d’appels. Si vous recevez un appel d’un numéro supprimé, l’indication “Indisponible” ou “Privé” apparaît sur le display. Dans ce cas, vous ne pouvez pas remonter l’appel. Sonnerie pour un appel différé Ce modèle a un son d’attente spécial. Il peut être activé additionellement aux signes typiques de votre opérateur de réseau. Ce son se fera entendre après la tonalité standard lorsque vous recevez une notification d’appel. Ex usine, il n’est pas activé. Dans le menu “Régl.audio”, “Tonalité”, “Appel en att”, mettez l’entrée sur “Marche”. Lorsque la sonnerie d’un appel en attente est activée, vous serez alerté par cette sonnerie que vous recevez un second appel entrant. Si la sonnerie est désactivée, aucune alerte ne retentira. Après l’activation vous pouvez commuter entre les appels en appuyant la touche . Il est à savoir que ce service est dépendant de votre fournisseur. G.1. Voir la liste d’appels Appuyez sur la touche et sélectionnez ”Call Log List”. Utilisez / pour défiler dans les entrées ou appuyez pour retourner au mode Veille. G.2. Appel de la liste d’appels Vous pouvez téléphoner en cherchant directement votre numéro dans la liste d’appels. Appuyez sur et sélectionnez “Call Log List”. Utilisez les boutons / pour faire défiler et choisir le numéro ou le nom que vous désirez. Décrochez le combiné, appuyez sur ou sur pour appeler le numéro souhaité lorsque vous parcourez la liste des appels. G.3. Effacement d’un appel de la liste d’appels Vous pouvez effacer un seul appel ou toute la liste d’appels. 1.Appuyez sur la touche et sélectionnez “Call Log List”. Utilisez / et allez à l’entrée que vous voulez effacer de la liste. 2.Si vous voulez effacer toutes les entrées, appuyez sur la touche et sélectionnez “Effacer ent.” ou “Effacer liste” 3.Appuyez sur la touche et sélectionnez “Oui” ou “Non” pour confirmer le changement. G.4. Appel différé (Message Waiting Indicator) Si votre opérateur de réseau vous offre un répondeur téléphonique, le symbole sera affiché sur le display s’il y a un nouveau message pour vous. Une lumière s’allumera sur votre stationT50. Chez la majorité des opérateurs de réseau, le symbole s’éteint après avoir écouté le message. 1.Appuyez sur la touche dans le mode Veille et utilisez / . Défilez jusqu’à ce que “Régl. audio” apparaît sur le display. Appuyez 2.Appuyez sur la touche / et sélectionnez “Volume sonn.”. Ensuite appuyez 3.Appuyez sur la touche / et déterminez votre volume individuel. Pour confirmer, appuyez de nouveau sur 4.Appuyez sur la touche pour retourner au mode Veille. Si vous avez diminué le volume complètement, le signe apparaît sur le display. Sonnerie Régl. audio Sélectionnez option Type sonn. et sélectionnez la mélodie 1.Appuyez sur la touche dans le mode Veille et utilisez / . Défilez jusqu’à ce que “Régl. audio” apparaît sur le display. Appuyez . 2.Appuyez sur la touche / et sélectionnez “Type sonn.”. Ensuite appuyez 3.Appuyez sur la touche / et sélectionnez entre “Externe”, “Interne”, “Recherche”, “Alarme” ou “Rendez-vous”. Pour confirmer, appuyez de nouveau sur 4.Appuyez sur la touche / et sélectionnez la mélodie désirée, appuyez pour confirmer la sélection. 5.Appuyez sur la touche pour retourner au mode Veille. H.2.Rendez-vous Heure&Alarme – Sélectionnez rendez-vous FixRendezVous H.PERSONALISATION DU TÉLÉPHONE Le téléphone 50 JACOB JENSENTM est équipé avec quelques fonctions très spéciales (sonnerie et volume) que l’utilisateur peut configurer individuellement. H.1. Configuration de la sonnerie et du volume Volume sonnerie Régl. audio Volume sonn. Sélectionnez le volume D’abord il faut ajuster la date et l’heure, ensuite on peut utiliser l’option calendrier. Le point D.3. Insertion de la date / de l’heure explique comment ajuster la date et l’heure. Vous pouvez insérer cinq rendez-vous individuels dans votre téléphone. 1.Appuyez sur la touche pour arriver au menu principal. 2.Appuyez sur la touche / et sélectionnez “Heure&Alarme”. Appuyez sur 55 3.Appuyez sur la touche / et sélectionnez “FixRendezVous”. Appuyez sur 4.Appuyez sur la touche / et sélectionnez un des cinq rendez-vous. Appuyez sur 5.Appuyez sur la touche / et sélectionnez “Marche”. Appuyez sur 6.Insertion de la date et de l’heure du rendez-vous. Voir paragraphe D.3. Insertion de la date / de l’heure. Appuyez sur 7.Insertion du nom du rendez-vous avec le clavier. Appuyez sur S’il y a déjà 6 combinés activés à la base et vous voulez connecter un autre, il faut désactiver un combiné inutilisé (voir I.2 Désactivation du combiné ou de la station de base). I. ENREGISTREMENT D’AUTRES COMBINÉS OU STATIONS DE BASE I.2.Désactivation du combiné ou de la station de base Si vous avez activé plus d’un combiné à une station de base ou une base au combiné, vous pouvez désactiver le combiné de la station de base ou la station de base du combiné. Avant la désactivation, contrôlez si le combiné et la station de base se trouvent en mode Veille. Attention!! Les démarches suivantes devront être exécutées seulement par des personnes habituées aux appareils électroniques: le maniement incorrect du téléphone pourrait le rendre inutilisable. I.1. Activation d’un combiné sans fil. Si vous voulez activer un combiné sans fil à la station de base, la base vous demandera le code PIN. Pour activer le combiné, il faut appuyez sur la touche d’appel collectif pour 5 sec. La LED sur la station d’accueil T50 clignotera une fois pour annoncer que le mode d’enregistrement de nouveau combinés sans fil est activé. Avant d’enregistrer un nouveau téléphone, assurez-vous que celui-ci est chargé convenablement. Le téléphone sans fil et la station T50 doivent être devant vous. Assurez-vous également que les deux sont en veille. Sur le combiné il faut procéder ainsi: Régl avancés Enregistrer Sélectionnez numéro de la base 1.Appuyez sur la touche pour arriver au programme Menu. 2.Appuyez sur la touche / et sélectionnez “Régl avancés”. Ensuite appuyez 3.En appuyant / “Enregistrer” apparaît. En appuyant de nouveau, le processus sera confirmé. 4.Appuyez sur la touche / pour sélectionner le numéro de la base. Confirmez avec la touche 56 Il faut insérer le code PIN de la station de base dans le combiné. Le PIN fourni du producteur est 0000. Le combiné recevra automatiquement un numéro disponible. Si la connexion n’est pas possible, “Non enregistré” apparaît sur le display et il faut répéter la procédure. Régl avancés Sélectionnez Combiné ou Base Résilier Sélectionnez Oui 1.Appuyez sur la touche pour arriver au programme Menu. 2.Appuyez sur la touche / et sélectionnez “Régl avancés”. Appuyez 3.Appuyez sur la touche / et “Résilier” apparaît. Pour confirmer, appuyez 4.Appuyez sur la touche / pour sélectionner “Base” ou “Combiné”. Appuyez sur la touche pour confirmer. 5.Appuyez sur la touche / pour sélectionner “Oui” ou “Non”. 6.Appuyez sur la touche pour retourner au mode Veille. I.3. Changer le code PIN Config base Insertion PIN nouveau PIN base Le PIN fourni du producteur est 0000. Si vous voulez le changer, suivez les pas indiqués (s’il vous plaît, souvenezvous de votre PIN ou gardez-le dans un lieu sûr !!). I.4.Réinitialisation (Reset) Si vous réinitialisez votre téléphone, la station d’accueil retournera en configuration par défaut. L’heure, la date, le nom du combiné, le carnet d’adresses, le journal d’appels et la liste de rappel ne changeront pas. La remise s’effectue exclusivement pour la station de base et le combiné que vous avez désignés et non pas pour tous les appareils connectés. Pour la station de base Config base Sélectionnez Oui Il est possible de rétablir la configuration d’origine. Les mémoires suivantes ne sont pas affectées de cette réinitialisation. - Liste d’appels (Caller ID) - Liste de répétition de la numérotation - Activation du combiné et de la station de base - Annuaire téléphonique. Réinit base 1.Appuyez sur la touche pour arriver au programme Menu. 2.Appuyez sur la touche / pour sélectionner “Config base” et appuyez 3.Appuyez sur la touche / “Réinit base” apparaît. Appuyez pour confirmer. 4.Appuyez sur la touche / pour sélectionner “Oui” et confirmez avec 5.Appuyez sur la touche pour retourner au mode Veille. Pour le combiné sans fil Régl avancés Sélectionnez Oui J.RÉTABLIR LA CONFIGURATION D’ORIGINE Il y a seulement une possibilité pour rétablir la configuration d’origine du téléphone. Il faut aller au menu et sélectionner “RéinitCombiné” ou “Réinit base”. Les autres démarches sont décrites dans le point I.4 Réinitialisation (Reset). K.INDICATION DE MAINTENANCE • • • • RéinitCombiné 1.Appuyez sur la touche pour arriver au programme Menu. 2.Appuyez sur la touche / pour sélectionner “Régl avancés” et appuyez 3.Appuyez sur la touche / “RéinitCombiné” apparaît, appuyez pour confirmer. 4.Appuyez sur la touche / pour sélectionner “Oui” et confirmez avec la touche 5.Le display montre “Cleared” et retourne à la configuration d’origine de l’usine. I.5. Standard et temps de réponse (FLASH time) Si votre téléphone est connecté à un standard (PABX) et qu’il ne sonne pas correctement, le temps de réponse (FLASH time) devra être ajusté pour être de la même longueur que celui du standard. Pour ce faire, appuyez sur Config base Supplémentair Temps rappel choisissez entre 80 - 800 ms et confirmez avec . • Ne pas exposer ce produit à la poussière, aux rayons du Soleil, à l’humidité, à des températures chaudes ou à des chocs. Ne pas utiliser de produits d’entretien corrosifs ou abrasifs. Nettoyez-le avec un chiffon doux légèrement humide. Ne pas démonter l’appareil. En cas d’orage, il est conseillé de débrancher l’adaptateur secteur. La garantie ne couvre pas les dommages causés par une surcharge électrique. Utilisez seulement l’adaptateur secteur fourni avec l’appareil. L.RECHERCHE D’ERREURS – Pour la station d’accueil et/ou les combinés sans fil Q1. R1. R1. R1. R1. Mon téléphone ne fonctionne pas Contrôlez si vous avez activé le verrouillage du clavier. Si c’est le cas, le symbole doit apparaître sur le display. Pour désactiver le verrouillage du clavier, appuyez et retenez la touche de votre combiné pendant environ 2 sec. jusqu’à ce qu’un bip retentisse. Ensuite, lâchez la touche. Assurez-vous que tous les connecteurs de l’adaptateur et du câble téléphonique ont été connectés correctement à leur douille respective. Contrôlez si les piles ont été installées correctement et si elles sont assez chargées. Si vous n’avez pas chargé votre combiné depuis longtemps il peut se bloquer soi-même à partir d’un niveau de chargement critique. Vous devriez extraire les piles et les réinstaller pour les charger après pendant 15 heures environ. 57 R1. R1. R1. R1. R1. R1. R1. R1. Si le display n’est pas illuminé, il est possible que la pile soit trop faible. Il est possible de faire un appel court mais le téléphone éteindra les autres segments du display pour épargner les piles. Chargez les piles pendant 15 heures environ. Si vous avez connecté plus d’un téléphone à la même ligne, contrôlez si les autres appareils sont vraiment raccrochés. Dans des systèmes qui utilisent la même ligne il est possible qu’un appareil actif puisse éteindre tous les autres. Essayez la connection d’un autre téléphone au raccordement respectif. Si cela ne marche pas non plus, vous devriez contacter l’opérateur de votre réseau puisqu’ apparemment la ligne semble être la cause du problème. Si votre interlocuteur ne vous écoute pas, contrôlez si vous n’avez pas activé la commande de silencieux. Pour le tester, activez la commande de silencieux encore une fois et votre téléphone devrait fonctionner normalement. clignote sur le Contrôlez si le signal de l’antenne display. Si c’est le cas, vous êtes trop loin de la base, il n’y a pas de base enregistrée ou le signal radioélectrique est trop faible. Contrôlez votre abonnement basique à l’alimentation au courant. Rapprochez-vous de nouveau à la base avec votre combiné et essayez encore une fois. Si votre téléphone ne compose pas un numéro, contrôlez si c’est un numéro bloqué (merci de vous référer à la section D.9. Blocage d’appel). Il est possible que dans certaines situations le combiné se bloque soi-même surtout s’il n’a pas été chargé depuis longtemps. Essayez d’extraire les piles et de les remettre et puis recharger le combiné pendant 6 heures environ. Si un faux numéro est composé, vérifiez que le préfix du numéro n’est pas mal configuré. Pour le vérifier, entrez dans le menu et sélectionnez “Config base”, puis “Supplémentaire” et enfin “ComposPréfix”. Effacez ou confirmez le préfix des numéros à garder. Q2. R2. R2. R2. R2. R2. Q3.Le répertoire ne fonctionne pas R3. Contrôlez l’insertion de numéros qui soient plus longs que la limite acceptée. La limite de numéros est spécifiée dans le paragraphe qui parle des fonctions du repertoire. R3. Si votre téléphone fait parti d’une installation PABX demandez à votre opérateur s’il faut régler avant le calibrage de pause. Q4.Le numéro du correspondant téléphonique n’apparaît pas sur le display R4. Assurez-vous que votre opérateur de réseau soutient la fonction de réconnaissance du numéro du correspondant téléphonique (Caller ID). Dans la plupart des pays, ce service est payé. R4. Les correspondants téléphoniques peuvent supprimer l’affichage de leurs numéros de téléphone sur votre téléphone. R4. Les numéros de téléphone de l’étranger normalement ne peuvent pas être reconnus. Q5. R5. R5. 58 Mon téléphone ne sonne pas Contrôlez si la sonnerie n’est pas “Arrét” ou si le volume est sur un niveau trop bas (voir H.1. Configuration de la sonnerie et du volume de la sonnerie) Assurez-vous que le combiné n’est pas éteint. Contrôlez les raccordements de câbles et les prises. Vérifiez votre pays d’origine. Sélectionnez “Config base” et appuyez sur “Country”, puis sélectionnez votre pays dans la liste. Si votre téléphone est connecté à un standard, vérifiez si votre temps de réponse (FLASH time) est correctement ajusté (merci de vous référer à I.5. Standard et temps de réponse (FLASH Time) ). Mon combiné ne fonctionne plus après l’avoir connecté à la base d’un autre producteur. D’après le standard DECT (compatible avec GAP) les combinés peuvent être connectés à n’importe quelle base DECT. Néanmoins c’est possible que des fonctions spécifiques du producteur se perdent de sorte qu’uniquement les fonctions de base se gardent. Contrôlez que la station de base de l’autre producteur soit compatible avec GAP. Seulement dans ce cas-là, le combiné et la base peuvent collaborer au moins dans les fonctions de base. M. CONSEILS DE SÉCURITÉ Note importante – Appels d’urgence. Ce téléphone n’a pas été conçu pour émettre des appels d’urgence en cas de coupure de courant. Cependant, si une batterie de secours a été installée, un appel d’urgence peux être émis en cas de panne de courant. Cet appareil ne fonctionne que s’il est branché sur secteur ou si une batterie de secours est installée. Lorsque vous utilisez votre téléphone T50, certaines règles de sécurité simple doivent être suivies pour éviter tout risque d’incendie, de choc électrique ou toute blessure : • Assurez vous que le combiné n’est pas en contact avec de l’eau, ou laissé à l’humidité. Evitez d’utiliser votre téléphone durant un orage. Ne jamais téléphoner à proximité d’une fuite de gaz. N’utilisez que l’adaptateur secteur ou la (les) batterie(s) indiqué(es) dans ce manuel. Ne pas jeter les batteries dans le feu, risque d’explosion. Ne pas essayer d’ouvrir les batteries. Elles contiennent une substance corrosive au contact de la peau. Risque de toxicité en cas d’inhalation. Connectez l’adaptateur secteur dans un endroit accessible. Ne pas essayer d’ouvrir la station d’accueil ou un combiné sans fil. Risque d’explosion. En cas d’orage, débranchez votre téléphone. Les enfants ne doivent pas se servir de cet appareil sans la présence d’un adulte. Ne pas utiliser à proximité d’appareils médicaux ou de personnes portant un pacemaker. Ce téléphone peut créer des interférences avec les équipements ménagers comme un téléviseur, un répondeur ou une radio. Assurez-vous d’éloigner ce téléphone d’au moins un mètre. • • • • • • • • • • N. Considération écologique et traitement des déchets Les appareils électriques et électroniques contiennent des matériaux, composants et substances nocives voir toxiques qui peuvent endommager votre santé et l’environnement si celles-ci ne sont pas correctement traitées. Les appareils électriques et électroniques sont marqués par le symbole d’une poubelle à roulettes barrée, comme illustré ci-dessous. Cela indique que les appareils électriques et électroniques ne doivent pas être jetés avec les déchets du ménage et qu’ils doivent être ramassés séparément. Merci de vous adresser à votre revendeur sur les précautions à prendre pour traitement ces déchets. O.UE Déclaration de conformité Par la présente, Bell Xpress A/S déclare que ce produit (Téléphone 50, Type JJ T50 DECT / RTX3073) correspond aux exigences générales de la directive 1999/5/EC R&TTE. - On se réserve des changements concernant le contenu de ce manuel d’instruction. - Le producteur et ses fournisseurs ne sont pas responsables pour les dommages, les coûts, les réductions de la recette, ou n’importe quels autres dommages qui résultent de l’utilisation de ce produit. 59 IT A.INSTALLAZIONE ED AVVIAMENTO . . . . . . . . . . . . . . . . . 60 B. SIMBOLI DEL DISPLAY E LORO SIGNIFICATO . . . . . . . . . 63 C.TASTI E LORO FUNZIONI . . . . . . . . . . . . . . . . . . . . . . . . . 64 D.INDICAZIONI PRIMA DELL’USO . . . . . . . . . . . . . . . . . . . 66 E.UTILIZZO STANDARD . . . . . . . . . . . . . . . . . . . . . . . . . . . . 68 F.RUBRICA e tasti di memoria . . . . . . . . . . . . . . . . . . . . 71 G.RICONOSCIMENTO ID . . . . . . . . . . . . . . . . . . . . . . . . . . . 72 H.PERSONALIZZAZIONE DEL TELEFONO . . . . . . . . . . . . . . 73 I.UTILIZZO AVANZATO . . . . . . . . . . . . . . . . . . . . . . . . . . . . 74 J.RIPRISTINO DELLE IMPOSTAZIONI INIZIALI . . . . . . . . . . 75 K. MANTENIMENTO DEL PRODOTTO . . . . . . . . . . . . . . . . . 75 L.RISOLUZIONE PROBLEMI . . . . . . . . . . . . . . . . . . . . . . . . . 75 M.NORME DI SICUREZZA . . . . . . . . . . . . . . . . . . . . . . . . . . . 76 N. SMALTIMENTO ECOLOGICO E TUTELA AMBIENTALE . . 77 Congratulazioni per aver acquistato il nuovo Telefono 50 JACOB JENSENTM. Il Telefono 50 JACOB JENSENTM è stato progettato in Danimarca da Jacob Jensen, la cui linea di prodotti ha ottenuto enorme successo grazie al design originale, semplice e lineare. Considerando la sua forma e le sue funzioni, il Telefono 50 è una vera e propria opera d’arte che può essere posizionata sia su un ripiano orizzontale che a muro, utilizzando l’apposito kit di fissaggio a parete incluso nella confezione. Il Telefono 50 JACOB JENSENTM sfrutta le più avanzate tecnologie, come ad esempio il sistema DECT (Digital Enhanced Cordless Telecommunication), fornendo suoni digitali ed un’ampia gamma di funzioni facilmente selezionabili dal menu. Grazie al sistema DECT (compatibile con GAP), sei diversi portatili possono essere connessi ad una singola base per riprodurre la funzionalità di un mini sistema PABX che offre la possibilità di trasferimento chiamate e chiamate interne fra portatili. Inoltre, il decoder interno per il riconoscimento ID, la rubrica, la lista di ricomposizione e la memorizzazione degli ID rendono la gestione delle chiamate molto più facile e veloce. O.DICHIARAZIONE EUROPEA DI CONFORMITA’ . . . . . . . . 77 Il Telefono 50 JACOB JENSENTM è dotato di un dispositivo per la riduzione delle radiazioni. A seconda della distanza tra base e portatile, e del numero dei portatili connessi, il segnale di radio-frequenze viene diligentemente rintracciato e regolato. Grazie a questo meccanismo automatico, il sistema riduce continuamente l’intensità del segnale RF fino al livello minimo possibile. Nota: Potreste aggiungere al Telefono 50 un Telefono 10 con il relativo caricatore, fino a 6 telefoni supplementari. Essi possono essere acquistati separatamente presso il vostro rivenditore di fiducia. A.INSTALLAZIONE ED AVVIAMENTO Importante: E’ imperativo seguire questi passaggi per una corretta installazione del telefono. Il telefono funziona solo se l’unità base è costantemente alimentata. E’ consigliabile connettere un telefono fisso alla linea telefonica, nel caso in cui si verificasse un guasto nell’alimentazione. 60 Opzionale: Il telefono può essere collegato alla batteria SANIK 2.4v 650mAh Ni-MH, modello 2SN-AAA65H-S-J1, la quale permette al telefono di operare per breve periodo anche in caso di assenza di corrente. La batteria è opzionale e non è inclusa. Precauzioni • Rischio di esplosione in caso di utilizzo di batterie inadeguate. Utilizzare la batteria SANIK 2.4v 650mAh Ni-MH, modello 2SN-AAA65H-S-J1 con il relativo caricatore. Contattare il vostro rivenditore di fiducia per fare un back up delle vostre batterie ricaricabili. • Dovete sconnettere la corrente e il cavo telefonico prima di installare la batteria di back up • Non gettare le batterie nel fuoco. Potrebbero esplodere. Controllare la normativa di smaltimento con l’ente locale preposto. • Utilizzare esclusivamente adattatori del modello Ktec KSLFB0750035W1EU con presa rossa RJ11 inclusa nel sistema. L’utilizzo di altri adattatori potrebbe danneggiare l’unità ed annullare la garanzia. • Connettere l’adattatore ad una presa vicina al sistema e facilmente accessibile. 1.Installare la batteria di back up (opzionale) seguendo la procedura illustrata nella sezione A.4. 2.Collegare un estremo del cavo elicoidale alla cornetta e un estremo all’ingresso RJ9 della tastiera. Nota: se viene scelta l’installazione su un ripiano, installare prima lo stand da tavolo. 6.Collegare l’adattatore telefonico della nazione alla presa principale. A.1.Fissaggio a muro 1.Tirare il cavo modulare verso il basso e connetterlo alla presa/duplex. 2.Montare l’unità base utilizzando le viti ed i tasselli inclusi (6 mm). A.2.Posizionamento orizzontale – supporto da tavolo Far scorrere le barre del supporto da tavolo nelle guide riportate nella parte posteriore dell’unità base. Il supporto è fissato solo quando emette un clic. 3.Connettere il cavo modulare all’ingresso RJ45 della presa Duplex. Collegare il cavo telefonico alla presa RJ11 della tastiera (16) e collegare il cavo d’alimentazione DC alla tastiera. 4.Collegare l’unità di alimentazione alla presa principale e connettere l’altro estremo all’ingresso ROSSO della presa/ duplex. 5.Collegare un estremo del cavo telefonico all’ingresso NERO della presa/duplex; connettere l’altro estremo del cavo telefonico all’adattatore telefonico della nazione (opzionale). 61 Il supporto da tavolo può essere anche facilmente rimosso: - Premere il tasto all’interno della sezione quadrata nella parte inferiore dell’unità base, utilizzando una penna o un dito, e contemporaneamente estrarre le barre dalle guide dell’unità base. A.3.Impostazione della lingua Se si desidera selezionare una lingua diversa dall’inglese, seguire le istruzioni: Premere e poi tre volte per selezionare Display, premere premere due volte per selezionare Select lang. Premere premere per selezionare la lingua desiderata: English, Deutsch, Français, Italiano, Nederlands, Español, Dansk, Svenska, Türkçe, Norwegian e premere per confermare. Nota bene • Per ottenere le migliori prestazioni dalle batterie, tenere in carica il portatile per dieci ore dopo l’installazione. • Togliere le batterie dal prodotto se non viene utilizzato per più di 30 giorni. A.5.Tasti di memoria Potete scegliere i vostri personali tasti di memoria e stamparli sul foglio di carta incluso. Per inserirli all’interno dei tasti, configurare la casella di testo nel seguente modo. 66 mm A.4.Installazione e sostituzione della batteria opzionale Attenzione: scollegare sempre tutti i cavi prima di maneggiare le batterie. Per installare le batterie, seguire le seguenti indicazioni: 1.Preparare la batteria SANIK 2.4v 650mAh Ni-MH, modello 2SN-AAA65H-S-J 2.Rimuovere lo stand da tavolo e tutti i cavi collegati. 3.Aprire il vano batteria con un cacciavite. 10 mm Testo Testo Testo Testo Testo e simboli devono essere inseriti nelle finestre tratteggiate che misurano 14x8mm. Raccomandiamo di stampare di fogli bianchi o silver. Per inserire il nuovo foglio silver, seguire le seguenti istruzioni: 1.Tirare dolcemente la parte sinistra della cover dei tasti di memoria, rimuovendo la cover stessa dalla tastiera. 2.Preparare il foglio argentato e stampare le nuove etichette per i tasti di memoria 4.Installare una nuova batteria o sostituire la vecchia come indicato nel diagramma sottostante. 5.Rimontare lo sportello del vano batteria. 62 3.Preparare, utilizzando una forbice, i nuovi fogli da inserire, tagliando lungo le linee spesse (66x10mm). B. SIMBOLI DEL DISPLAY E LORO SIGNIFICATO In standby / In pausa 4.Inserire l’etichetta argentata sulla tastiera e richiudere la cover dei tasti di memoria. SimboloDescrizione 14:05 Mostra l’ora attuale nel formato 24 ore. 20/01 123 123 123 123 123 123 123 123 Mostra la data nel formato giorno/mese. 123 123 123 123 123 123 123 123 Indica messaggi vocali in attesa. A seconda dell’operatore telefonico, questo simbolo compare quando un messaggio viene lasciato nella casella vocale dell’operatore. Lampeggia con chiamate in uscita o in entrata. Compare quando il microfono è disattivato. Chiamata intercom/interna. Compare quando una chiamata intercom o il controllo per bambini è attivato. Modalità scorrimento rubrica. Compare quando la rubrica viene consultata. Vivavoce attivato. Visualizzato quando il telefono è nella modalità cuffia. Compare quando il volume è disattivato. 63 C.TAST E LORO FUNZIONI Prima di analizzare le funzioni della tastiera, è necessario chiarire che ai singoli tasti possono esser state attribuite più funzioni, al fine di ridurre l’ingombro della tastiera. Per alcuni tasti, esercitare una pressione breve o prolungata può attivare funzioni diverse. E’ importante considerare attentamente la descrizione delle modalità di pressione breve o prolungata dei tasti. Per pressione breve s’intende premere e rilasciare immediatamente. Per pressione prolungata s’intende premere e rilasciare dopo alcuni secondi. Tasto In modalità standby Durante una conversazione In modalità programmazione / visualizzazione Sul ricevitore Premere per qualche secondo il tasto per attivare la funzione MUTE. Rilasciare il tasto per disattivare. Sulla stazione base 64 Premere questo tasto per accedere al menu. Per inserire: Escl. micr., Internal Call, Volume, Flash, Ricomporre. Nella modalità programmazione, premere questo tasto per confermare un’impostazione. Per inserire caratteri da 0-9. Per inserire caratteri da 0-9. Per inserire caratteri da 0-9 o alfabetici. In modalità standby, una pressione breve attiva la funzione di riselezione della chiamata. Vengono memorizzati gli ultimi 10 numeri composti. I numeri memorizzati possono avere fino a 24 caratteri. Utilizzare e per inserire il numero desiderato. Alzare il ricevitore o premere o per digitare il numero. Durante la conversazione, questo tasto funziona come “Alzare il volume” per il ricevitore, per l’altoparlante del telefono e per il volume del ricevitore In modalità programmazione e consultazione memoria, questo tasto premuto brevemente funziona da scorrimento verso l’alto. Può essere utilizzato per visualizzare la rubrica, il menu, la lista di riselezione oppure gli ID. Tasto In modalità standby Durante una conversazione In modalità programmazione / visualizzazione In modalità standby, la pressione breve di questo tasto attiva la rubrica. Il display mostra la prima voce in ordine alfabetico. Utilizzare e per scorrere le voci fino al numero desiderato. Oppure, effettuare la ricerca alfabetica selezionando dalla tastiera la prima lettera della voce desiderata. Durante la conversazione, questo tasto funziona come “Abbassare il volume” per il ricevitore, per l’altoparlante del telefono e per il volume del ricevitore In modalità programmazione e consultazione memoria, questo tasto premuto brevemente funziona da scorrimento verso il basso. Può essere utilizzato per visualizzare la rubrica, il menu, la lista di riselezione oppure gli ID. Premere per uscire dal menu mode e ritornare in standby. Premere per avere una nuova linea o per rispondere ad una chiamata in attesa, se l’operatore te-lefonico offre questa possibilità. Premere per trasferire una chiamata ad un’altra estensione del PABX. Questo tasto interrompe brevemente la linea. Nella modalità programmazione, questo tasto funziona da Cancella o Annulla. Premere per eliminare digitazioni errate. Premere per tornare al menu precedente. Quando il telefono squilla, premere e rilasciare dopo 3 se-condi per disattivare la suoneria. Premere questo tasto una volta per passare alla funzione cuffia. Premere per chiudere la chiamata. Premere questo tasto una volta per passare alla funzione vivavoce. Premere per chiudere la chiamata. Premere questo tasto per far squillare tutti i ricevitori registrati. Press and hold for 5 sec to enable registration mode. Premere questo tasto per inserire una pausa durante un numero preselezionato. Premere questo tasto per mettere in attesa / mute la chiamata. Premere nuovamente per ripristinare la chiamata. . 65 D.INDICAZIONI PRIMA DELL’USO Attenzione Il telefono DECT è protetto da codici PIN (personal identification number). Non modificare mai il PIN dell’unità base a meno che ci sia familiarità con prodotti elettronici e ci sia la reale necessità di proteggere il telefono con PIN speciali. Dimenticare il PIN potrebbe bloccare le funzionalità del sistema e portare a spese onerose per assistenza tecnica. Per ulteriori informazioni fare riferimento alla sezione I. UTILIZZO AVANZATO. D.1.Il tasto OK/MENU Questo telefono DECT dispone di un menu facile ed intuitivo. Tutte le funzioni essenziali possono essere impostate tramite il tasto MENU secondo il metodo Q&A (domanda e risposta). Premendo sulla base, si può navigare nelle funzioni del menu in modo circolare. E’ possibile premere , per scorrere il menu verso l’alto oppure per scorrerlo verso il basso. Call Log List > Internal Call> Imp. audio > Display > Ora e sveglia > Impost avanz. > Impost. base > Monitor bimbo. Nella restante parte di questo manuale, una rapida mappa dei simboli illustrerà le diverse aree di programmazione dove sarà possibile selezionare le impostazioni personali. D.2. Cambiare lingua L’inglese è la lingua preimpostata. Per modificare le impostazioni di lingua: Mappa dei simboli: Display Sel. Lingua la lingua desiderata e premere Selezionare / per scorrere tra le diverse lingue 1.Utilizzare disponibili. 2.Quando la lingua desiderata è visualizzata, premere ancora per confermare. D.3.Impostare data e ora A seconda del Paese e dell’operatore telefonico, la memoria ID riceve le informazioni locali di data e ora. Non è necessario impostare data e ora in Paesi che utilizzano il sistema FSK per gli ID in quanto queste informazioni vengono automaticamente recepite dal segnale ID. Per i Paesi che utilizzano un sistema DTMF per gli ID (oppure per Paesi con sistema FSK in cui data e ora non vengono trasmesse dall’operatore telefonico), seguire le seguenti istruzioni: Mappa dei simboli: Ora e sveglia Data/Ora Imp. Data/ora Modalità 24 ore Utilizzare i tasti numerici per inserire le informazioni di DATA (formato GG/MM/AA), ad es. 030609 per il 3 Giugno 2009, premere ancora per inserire l’ora (formato 24 ore). Ad operazione terminata, premere per confermare. Premere per tornare alla modalità standby. D.4.Nome del telefono Mappa dei simboli: Display inserire il nome Nome ricevit. E’ possibile modificare il nome del telefono visualizzato sul display. 1.Premere per accedere al menu principale. 2.Premere / per selezionare “Display”. Premere 3.Premere / per selezionare “Nome ricevit.”. Premere 4.Sul display compare “Nome ricevit.”. Inserire il nome utilizzando la tastiera. Premere 5.Premere per uscire e tornare in modalità standby. D.5.Toni Mappa dei simboli Imp. audio Toni Selezionare l’opzione selezionare Acceso/Spento Si può attivare o disattivare l’audio della tastiera, del comando conferma, della chiamata in attesa e dei segnali di allarme. Ad esempio, se la funzione audio è attiva, verrà 66 emesso un suono ogni volta che un tasto della tastiera viene premuto. 1.Premere 2.Premere Premere 3.Premere per accedere al menu principale. / per selezionare “Imp. audio”. / per selezionare “Toni”. Premere 4.Premere / per selezionare l’opzione (ad es. avviso “Attenzione”, chiamata in attesa “Chiam. in att”) e confermare con . 5.Premere / per visualizzare “Acceso” o “Spento” e premere per confermare. Per “Tasto” selezionare una voce da “Pattern 1-3” o “Spento” e premere 6.Premere Per uscire e tornare alla modalità standby. D.6. Modalità di composizione E’ possibile impostare la composizione in modalità “Tono” oppure “Impulsi”. L’opzione preimpostata è “Tono” in cui un beep viene emesso ogni volta che si preme un numero. La maggior parte dei centralini telefonici utilizzano la modalità “Tono”, perciò non c’è necessità di modificare questa impostazione, a meno che il gestore telefonico utilizzi la composizione in modalità “Impulsi”. Mappa dei simboli: Impost. base Modal. Chiam. Supplementare selezionare Tono/Impulsi 1.Premere per accedere al menu principale. 2.Premere / per selezionare “Impost. base”. Premere 3.Premere / per selezionare “Supplementare”. Premere 4.Premere / per selezionare “Modal. Chiam.”. Premere . L’impostazione corrente è visualizzata. 5.Premere / per selezionare fra “Tono” o “Impulsi”. Premere per confermare. 6.Premere per uscire e tornare alla modalità standby. D.7. Cambio di modalità di composizione Se il telefono è impostato sulla modalità di composizione “Impulsi” è possibile passare temporaneamente alla modalità “Tono” per la durata della chiamata: Durante lo stato di attesa, premere e rilasciare dopo alcuni secondi , una “D” verrà visualizzata. Qualsiasi inserimento dopo “D” avverrà in modalità “Tono” D.7.Tone dialling Switch-Over If you have set your phone to use ”Pulse” dialling, you can switch temporarily to ”Tone” dialling for the duration of a call: Durante lo stato di attesa, press and hold ”D” will be displayed. Any digits entered after the ”D” will be dialled using tone dialling. D.8. Comporre un prefisso Se è necessario aggiungere il prefisso per una chiamata a lungo raggio oppure se si vuole salvare il proprio prefisso al numero, seguire le istruzioni: Mappa dei simboli: Impost. base Pref. chiam. Supplementare selezionare il numero 1.Premere per accedere al menu principale. 2.Premere / per selezionare “Impost. base”. Premere 3.Premere / per selezionare “Supplementare”. Premere 4.Premere / per selezionare“Pref. chiam.”. Premere . L’impostazione corrente è visualizzata. 5.Inserire il numero utilizzando la tastiera o premere per cancellare. Premere per confermare. 6.Premere per uscire e tornare alla modalità standby. D.9.Blocco chiamate Se attivato, il blocco chiamate impedisce di effettuare chiamate ad uno specifico numero, ad un prefisso nazionale oppure ad uno internazionale. Mappa dei simboli Impost. base selezionare il numero Spento 1.Premere 2.Premere Premere 3.Premere Premere Blocco chiam. selezionare Acceso/ per accedere al menu principale. / per selezionare “Impost. base”. / per selezionare “Blocco chiam.”. 67 4.Inserire il numero utilizzando la tastiera o premere per cancellare. Premere per confermare. 5.Premere / per selezionare “Acceso” o “Spento”. Premere per confermare. 6.Premere per uscire e tornare alla modalità standby. E.UTILIZZO STANDARD il numero verrà visualizzato sul display della base. Se il numero è memorizzato in Rubrica (vedi F. Rubrica), il nome corrispondente sarà visualizzato sul display. Si può rispondere alla chiamata in tre modi: 1.Sollevando il ricevitore; 2.Premendo per rispondere in vivavoce; 3.Premendo per rispondere attraverso la cuffia. E.1.Utilizzo di un ricevitore supplementare Una cuffia supplementare può essere utilizzato durante le conversazioni estremamente lunghe. E.4.Terminare una chiamata Riporre il ricevitore sulla base oppure premere i tasti oppure una volta per chiudere la conversazione. Collegare il cavo della cuffia alla presa sul retro della base. Quando la cuffia non è in uso, premere semplicemente il tasto per passare dalla cuffia al ricevitore o al vivavoce. E.5.Passare la chiamata tra il ricevitore, il vivavoce e la cuffia. Il ricevitore ha sempre la priorità rispetto alle altre funzioni. Una volta sollevato il ricevitore, la funzione sarà attivata. Attenzione La presa della cuffia è tipo 2,5 mm pin. Contattare il vostro rivenditore di fiducia per una cuffia compatibile. Utilizzare altre cuffie possono danneggiare l’unità. 1.Per passare alla funzione cuffia, premere una volta L’icona della cuffia comparirà sul display. Riporre il ricevitore per attivare la cuffia. 2.Per passare a viviavoce, premere una volta L’icona dell’altoparlante comparirà sul display. Riporre il ricevitore per attivare il vivavoce. 3.Per passare al ricevitore, sollevare il ricevitore. Il vivavoce o la cuffia di disattiveranno automaticamente. E.2.Per effettuare una chiamata Utilizzando il ricevitore: 1.Sollevare il ricevitore. Il display visualizzarà l’icona della cornetta . 2.Utilizzare la tastiera per digitare il numero desiderato. 3.Riagganciare la cornetta terminata la conversazione. Utilizzare il vivavoce: 1.Premere . Il display visualizzarà l’icona dell’altoparlante . 2.Utilizzare la tastiera per digitare il numero desiderato. 3.Premere terminata la conversazione. Utilizzando la cuffia 1.Premere . Il display visualizzarà l’icona della cuffia . 2.Utilizzare la tastiera per digitare il numero desiderato. 3.Premere terminata la conversazione. E.3.Per rispondere a una chiamata Quando arriva una chiamata, il telefono squillerà fino a che il volume dello squillo verrà impostato su “Spento”. Se avete sottoscritto un contratto con il vostro operatore telefonico per il riconoscimento dell’ID chiamante, 68 E.6. Volume Il volume del vivavoce, del ricevitore e dellla cuffia sono impostati indipentemente con i tasti oppure nelle relative funzionalità. Il telefono viene fornito con un settaggio di default e può essere modificato a proprio piacimento. E’ possibile scegliere tra 6 livelli per ogni funzionalità. L’indicatore del volume è visualizzato durante la fase di impostazione. E.7. Sound Enhancer Il telefono è dotato di un dispositivo audio unico che offre quattro modalità di regolazione del suono nell’auricolare, per personalizzare la qualità dell’audio a seconda delle proprie preferenze. Le opzioni sono: Normale, Gravi, Contralti, Acuti. Attesa Volume 1.Durante l’attesa, premere principale. selezionare le opzioni di tono per accedere al menu 2.Premere / per selezionare “Volume”. Premere 3.Premere / per selezionare un’opzione tra: Normale, Gravi, Contralti, Acuti. Premere per confermare. E.8.Funzione Mute/Unmute Mappa dei simboli: Attesa Escl. micr./No escl. 1.During off-hook, premere per accedere al menu principale. 2.Premere / per selezionare “Escl. micr.”. Premere 3.L’icona corrispondente comparirà sul display. 4.Per riattivare il microfono, seguire la procedura sopra indicata selezionando “No escl”. Premere . L’icona verrà rimossa dal display. E.9.Pausa Con alcuni sistemi PABX, c’è una breve pausa tra il codice per la linea esterna (solitamente 0 oppure 9) e il tono di chiamata. La pausa necessita di essere inserito manualmente e salvata nella rubrica così i numeri non vengono composti troppo velocemente. Quando si memorizza un numero, potete inserire un accesso alla linea esterna (esempio, 9 oppure 0) per ogni numero telefonico. La funzione LNR (redial) o la memorizzazione dei numeri composti possono non funzionare quando sono collegati a un centralino PABX. Per inserire una pausa tra LA DIGITAZIONE PER LA LINEA ESTERNA e IL NUMERO DI TELEFONO 1.Premere il tasto per entrare nella linea esterna. 2.Premere per inserire una pausa. Il display visualizza “P”. 3.Premere il numero telefonico. E.10.Hold Per mettere in attea una chiamata: 1.Premere per mettere in attesa la chiamata. 2.Premere nuvamente per ripristinare la chiamata. E.11. Memoria ultima chiamata (Redial) Vi è una memoria delle ultime 10 chiamate in uscita. Per richiamare un numero, premere durante la modalità standby e selezionare il numero premendo oppure . Sollevare il ricevitore o premere oppure per comporre il numero. Si può richiamare anche durante l’attesa: sollevare il ricevitore, oppure premere o . Attendere il tono di chiamata e premere e selezionare “Ricomporre”. Usare o per selezionare il nome, il numero o il ricevitore che si vuole chiamare. Premere per confermare. E.12.Richiamare (flash) Usare il tasto per attivare la funzione di chiamata per i servizi come un’attesa di chiamata o un trasferimento di chiamata, se previsto della compagnia telefonica. E.13.Per effettuare o ricevere chiamate interne (intercom) • Si possono effettuare chiamate tra i ricevitori registrati e la base telefonica. • Si può trasferire la chiamata esterna tra i ricevitori e la base telefonica. Comunicazioni interne (INTERCOM) possono essere fatte tra i ricevitori wirelesse e ricevitori wireless e base. Il vostro telefono e i singoli ricevitori sono dotati di un individuale numero. Questa numero di estensione viene utilizzato per l’Intercom, per trasferire le chiamate e per le chiamate in conferenza. Il numero di estensione parte da 1 fino a 6. Il numeri d’estensione per il telefono è T50. Se avete un cordless extra registrato sulla base, vedete la sezione E.19. E.14. Chiamata intercom tra la base e un ricevitore cordless Se dovete fare una chiamata intercom tra la base e uno specifico ricevitore cordless. 1.Premere e selezionare “Internal Call” . 2.Utilizzare o per selezionare nome, numero o il ricevitore desiderato. Il portatile selezionato squillerà. L’icona viene visualizzata ed il suono della chiamata interna viene riprodotto. 3.Quando il ricevitore chiamato risponde, sollevare il vostro ricevitore e iniziare la conversazione. 69 E.15.Rispondere a una chimata interna Quando ricevete una chiamata interna da un cordless, il nome del cordless stesso verrò mostrato sul display e suonerà la melodia preimpostata per le chiamate interne. Sollevare la cornetta e iniziare la conversazione. E.16.Terminare una chiamata interna Riporre il ricevitore o premere oppure chiudere la chiamata. per E.17. Selezionare tutti i portatili dalla base E’ possibile selezionare tutti i portatili registrati premendo il tasto PAGE dalla base. Se il proprio portatile è stato smarrito, si può utilizzare la funzione PAGE per farlo squillare. E.18.Trasferimento di chiamata & conversazione in conferenza E’ possibile trasferire una chiamata esterna from the base unit to a cordless handset or vice versa: Durante una chiamata esterna: 1.Premere e selezionare “Internal Call”. 2.Premere o , per selezionare nome, numero o il portatile a cui si desidera trasferire la chiamata e premere . La chiamata in entrata viene messa in attesa. Il portatile selezionato squillerà. 3.Quando il ricevitore chiamato risponde, riporre il ricevitore oppure premere o per traferire la chiamata. Se il ricevitore chiamato non risponde, dopo 30 secondi la chiamata esterna ritorna nuovamente. Chiamata in conferenza E’ possibile effettuare una conversazione a tre parti (chiamata in conferenza) tra la base, una chiamata esterna e un altro ricevitore interno. Durante una chiamata esterna: 1.Premere e selezionare “Internal Call”. 2.Premere o per selezionare nome, numero o il portatile con cui si desidera instaurare la chiamata in conferenza e premere . La chiamata in entrata viene messa in attesa. Il portatile selezionato squillerà. 3.Quando l’altro ricevitore viene sollevato, premere scendere fino alla voce “Conferenza” e premere per iniziare la chiamata in conferenza. 4.Puoi riporre il ricevitore oppure premere o per lasciare la conferenza in qualsiasi momento. 70 E.19.Trasferimento di chiamata Multi-Handset & conversazione in conferenza Potete registrare fino a sei ricevitori extra per ogni unità base. Con due o più ricevitori potete: 1.Fare una conversazione interna (intercom); 2.Trasferire una chiamata esterna ad un altro ricevitore; 3.Attivare la funzione baby monitor. Nota: può essere collegato un solo ricevitore alla volta alla linea esterna. Non si può dunque effettuare una chiamata esterna mentre la linea è occupata. E.20.Trasferimento di chiamata/passaggio via centralino (PABX) ad una nuova estensione Se il telefono è collegato ad un centralino, la chiamata esterna può essere inoltrata ad un’estensione locale seguendo le istruzioni: 1.Premere Il display visualizza una “R” maiuscola. 2.Digitare l’estensione desiderata per essere abilitati a parlare con l’utente selezionato e trasferirgli la chiamata. Per trasferire la chiamata riporre il ricevitore o premere una volta oppure . E.21. Monitor bimbo Per impostare la funzione baby monitor sul telefono, il primo passo è quello di collegare un altro ricevitore alla base. Una volta fatto, potete accedere al menu baby monitor come segue: Mappa dei simboli: Monitor bimbo selezionare il portatile Sulla unità base: 1.Premere per accedere al menu principale. 2.Premere / per selezionare “Monitor bimbo”. Premere 3.Premere / per selezionare il portatile. Premere per confermare. 4.Premere sul ricevitore per disattivare il monitor bimbo e tornare alla modalità standby. 4.Per disattivare il baby monitor, premere sulla base oppure sul ricevitore per uscire e ritornare alla modalità standby. E.22.Data Port Il telefono è equipaggiato con la Data Port (connettore DC) per collegare un apparecchio ausiliario come il FAX, un modem o una segreteria telefonica. F.RUBRICA e tasti di memoria Il telefono DECT dispone di 100 voci per la memorizzazione in rubrica (13 caratteri alfabetici e 24 numerici). Se sono disponibili più portatili con una base, ogni ricevitore possiede una rubrica indipendente. Non è possibile trasferire automaticamente la memoria della rubrica da un portatile all’altro. F.1.Inserire una nuova voce Mappa dei simboli (quando la rubrica è vuota): rubrica <Inserire il nome> Mappa dei simboli (quando la rubrica ha già dei contatti): rubrica Nuova voce nome> <Inserire il 1.Utilizzare i tasti numerici (da 2 a 9) per inserire il nome del record, così come si inseriscono i caratteri alfabetici dal telefono cellulare. Premere per confermare. Premere per cancellare una digitazione errata. Per inserire una lettera uguale alla precedente, premere per muovere il cursore avanti o aspettare 3 secondi. Per passare da lettere maiuscole a minuscole e viceversa, premere . 2.Utilizzare i tasti numerici per inserire il numero telefonico (se il numero è collegato ad un centralino, può essere inserita una pausa premendo e rilasciando solo quando sul display viene visualizzata una “P”). Premere ancora per memorizzare il record. Premere per cancellare una digitazione errata. 3.Premere per selezionare un tipo di tono e premere per confermare. 4.Premere per selezionare “Memorizza” o “Indietro” e premere per confermare. 5.La voce della rubrica ora è registrata. Premere per tornare alla modalità standby. F.2.Inserire una voce dalla memoria ID chiamanti e dalla lista di riselezione E’ possibile copiare in rubrica un numero registrato nella memoria ID chiamanti o nella lista di riselezione (consultare la sezione G. ID chiamanti e E.11. Memoria ultima chiamata per maggiori dettagli). 1.Se dalla memoria ID chiamanti o dalla lista di riselezione viene visualizzato un numero non memorizzato in rubrica, premere ancora . La scritta “Salva in Rubr” viene visualizzata. Premere . Inserire un nome utilizzando la tastiera e premere per confermare. Se si inserisce un nome già memorizzato in rubrica, il sistema richiede automaticamente una digitazione differente. 2.Il numero viene visualizzato. Per confermare e salvare il record nella rubrica, premere . 3.Se necessario, si può modificare il numero premendo per cancellare le digitazioni errate ed inserire i caratteri corretti utilizzando la tastiera. 4.Premere / per selezionare una suoneria personalizzata. 5.A operazione terminata, premere ancora per confermare. 6.Premere per uscire e tornare alla modalità standby. F.3. Effettuare una chiamata dalla rubrica Mappa dei simboli: rubrica / per selezionare il numero. Sollevare il ricevitore 1.Utilizzare la tastiera alfanumerica per inserire la prima lettera del nome in rubrica da selezionare. Il primo record che inizia con la lettera selezionata viene visualizzato. 2.Premere / per iniziare a scorrere le voci fino a quella desiderata. 3.Sollevare il ricevitore oppure premere o per effettuare una chiamata. F.4. Eliminare la memoria della rubrica Mappa dei simboli rubrica / per selezionare un numero Cancella voce Si 1.Utilizzare desiderato. / per scorrere le voci fino al nome 71 2.Premere per confermare o premere per tornare al menu senza cancellare. Il sistema richiede la conferma per la cancellazione definitiva del record della rubrica. Per confermare l’eliminazione, premere ancora . Un lungo beep verrà emesso. F.5. Modificare la memoria della rubrica Mappa dei simboli: rubrica / per selezionare il numero Modifica . Utilizzare e la tastiera numerica per comporre le lettere corrette 1.Utilizzare / per scorrere la rubrica fino alla voce desiderata. 2.Premere per confermare. 3.E’ possibile utilizzare per cancellare i caratteri alfabetici errati ed apportare le correzioni. 4.Ad operazione terminata, premere . E’ possibile utilizzare per cancellare i caratteri numerici errati ed apportare le correzioni. 5.Premere ancora per salvare il record. 6.Selezionare un tipo di tono e premere . F.6. Memoria One Touch Ci sono 8 tasti di memoria sulla base che permettono un accesso veloce nella rubrica e la composizione diretta del numero. Questi tasti veloci sono numerati, 1-4 nella fila superiore e 5-8 nella fila inferiore. F.7.Per inserire e modificare i tasti di memoria Rubrica / per selezionare il numero scegliere Selezione rapida Selezionare il tasto breve G. MEMORIA DI RICONOSCIMENTO DEL CHIAMANTE (ID CHIAMANTE) Se l’operatore telefonico fornisce il servizio di riconoscimento dell’ID chiamante, sul display del portatile viene visualizzato il numero da cui viene effettuata la chiamata in entrata. Nei sistemi FSK, il nome del chiamante e la data vengono visualizzati e memorizzati, se disponibili. Vengono visualizzati solo i primi 13 caratteri del nome del chiamante. Questo telefono DECT memorizza gli ultimi 30 record degli ID chiamanti. Può memorizzare fino a 24 caratteri numerici e 13 caratteri alfabetici. Il record più datato viene sostituito da quello più recente. Se il chiamante ha nascosto il proprio ID o il numero non è disponibile, viene visualizzata la voce “Non disp.” o “Privato”. Non è possibile richiamare una voce il cui ID non è disponibile. Tono per chiamate in attesa Oltre al tipico suono riprodotto dal gestore telefonico, questo telefono dispone di un tono speciale per le chiamate in attesa che viene emesso appena dopo la segnalazione del gestore per la notifica di una chiamata in entrata. Poiché questo tono è una caratteristica aggiuntiva, è necessario attivare la funzione che è preimpostata in modalità “Spento”. Per attivarla, andare al menu, selezionare “Imp. audio”, “Toni” e “Chiam. in att”, ed impostare la modalità “Acceso”. Quando il tono per una chiamata in attesa è attivato, verrete avvisati da tale tono quando riceverete una seconda chiamata esterna. Se la funzione è disabilitata, non sentirete nessun segnale. Quando questa funzione è attiva, si può passare da una chiamata all’altra premendo , previa attivazione di questo servizio da parte del gestore. 1.Premere in pausa e premere / per selezionare il numero telefonico desiderato. 2.Premere e selezionare “Selezione rapida”. 3.Premere per selezionare il tasto breve e premere per confermare. 4.Il numero telefonico desiderato ora è salvato sul tasto brece selezionato. G.1.Rivedere gli ID chiamanti Per rivedere gli ID chiamanti, premere e selezionare “Call Log List”. Utilizzare / per scorrere tra i record o premere per uscire e tornare alla modalità standby. F.8.Per comporre una chiamata attrverso i tasti brevi 1.Sollevare il ricevitore e premere il tasto breve desiderato. 2.Il numero telefonico e il nome verrà visualizzato sul display. 3.L’unità entrerà in funzione vivavoce e comporrà il numero. G.2. Effettuare una chiamata dal record dell’ID chiamante E’ possibile effettuare una chiamata dal record dell’ID chiamante. Premere e selezionare “Call Log List”. Utilizzare / per scorrere le voci e selezionare il nome/numero desiderato. Sollevare il ricevitore oppure premere o per comporre il numero del chiamante mentre si scorrono i record dell’ID chiamante. 72 G.3. Eliminare un ID chiamante E’ possibile eliminare sia una singola voce che l’intera memoria degli ID chiamanti. 1.Premere e selezionare “Call Log List”. Utilizzare / per scorrere e selezionare la voce che si desidera eliminare. Se si desidera cancellare l’intera memoria, saltare questo punto. 2.Premere per selezionare “Cancella voce” o “CancellaElen”. 3.Premere per selezionare “Si” o “No”. Premere per confermare. 1.Per entrare in questo menu, premere in modalità standby ed utilizzare / per scorrere fino alla voce “Imp. audio”. Premere 2.Premere / per selezionare “Vol. suon.”e premere 3.Premere / per selezionare il volume desiderato (mentre si scorrono le opzioni, vengono riprodotti i diversi livelli). Premere per confermare. 4.Premere per uscire e tornare alla modalità standby. Se è stata selezionata l’opzione “Spento”, sul display viene visualizzato il simbolo . G.4.Indicatore di messaggi in attesa (MWI) Se il servizio di messaggeria vocale è attivato dal gestore telefonico, ogni volta che viene lasciato un messaggio nella casella vocale sul display appare il simbolo . A seconda del servizio fornito dal gestore, l’indicatore di messaggi in attesa dovrebbe scomparire non appena il messaggio viene consultato dal server dell’operatore. Questo è altresì supportato dal lampeggiamento del LED sulla base. Tipologia della suoneria Mappa dei simboli: Imp. audio selezionare l’opzione suoneria A seconda del vostro operatore telefonico, l’indicatore dei messaggi in attesa dovrebbe spegnersi automaticamente quando il messaggio è stato controllato nel server dell’operatore. H.PERSONALIZZAZIONE DEL TELEFONO Questo telefono DECT offre la possibilità di personalizzare le impostazioni di alcune caratteristiche quali suoneria, volume e pressione tastiera. Tutte queste impostazioni possono essere modificate tramite la modalità di programmazione del menu illustrata nella descrizione dei tasti nella precedente sezione. In riferimento alla descrizione del tasto menu nella sezione precedente, tutte le impostazioni personalizzate devono essere programmate attravero la modalità Menu Programming H.1.Impostare il volume ed il tipo di suoneria Volume della suoneria Mappa dei simboli: Imp. audio Vol. suon. selezionare il volume Tipo suon. selezionare il tipo di 1.Per entrare in questo menu, premere in modalità standby ed utilizzare / per scorrere fino alla voce “Imp. audio”. Premere 2.Premere / per selezionare “Tipo suon.” e premere 3. Premere / per selezionare “Esterno”, “Interno”, “Ricerca”, “Sveglia” o “Termin” e premere per confermare. 4.Premere / per selezionare la melodia desiderata (mentre si scorrono le opzioni, vengono riprodotte le diverse suonerie). Premere per confermare la selezione. 5.Premere per uscire e tornare alla modalità standby. H.2. Appuntamenti Mappa dei simboli Ora e sveglia l’appuntamento Reg. appunt. – Selezionare La data e l’ora devono essere impostate prima di accedere all’opzione del menu Calendario. Per impostare data e ora, vedere la sezione D.3. Impostare data e ora. Il telefono permette di impostare fino a 5 appuntamenti personali con data e ora. 1.Premere 2.Premere Premere per accedere al menu principale. / per selezionare “Ora e sveglia”. 73 3.Premere / per selezionare “Reg. appunt.”. Premere 4.Premere / per selezionare uno tra gli appuntamenti 1-5. Premere 5.Premere / per selezionare “Acceso”. Premere 6.Inserire data e ora dell’appuntamento. Vedere la sezione D.3. Impostare data e ora. Premere 7.Inserire il nome dell’appuntamento utilizzando la tastiera (fino a 13 caratteri). Premere I.UTILIZZO AVANZATO Attenzione! Le seguenti sezioni sono dedicate esclusivamente a coloro che hanno familiarità con questo genere di prodotti elettronici. Qualsiasi errore nell’esecuzione di operazioni avanzate può compromettere il normale funzionamento del telefono. I.1.Registrare un nuovo portatile Quando si registra un nuovo portatile sull’unità base, viene richiesto il codice PIN. Per attivare la modalità di registrazione, premere il tasto PAGE e rilasciarlo dopo 5 secondi. Il LED sulla base lampeggierà una volta quando la registrazione sarà attiva. Prima della registrazione, assicurarsi che il nuovo portatile sia completamente carico e che l’unità base sia facilmente raggiungibile. Tutti i dispositivi devono essere in standby. Sul portatile che si desidera registrare Mappa dei simboli Impost avanz. Registro selezionare il numero della base 1.Premere per accedere al menu principale. 2.Premere / per selezionare “Impost avanz.”e premere 3.Premendo / per visualizzare “Registro”e premere per confermare. 4.Premere / per selezionare il numero della base e premere per confermare. Se sulla base è già stato registrato il numero massimo di 6 portatili, è necessario eliminare una registrazione prima di effettuarne una nuova. A tal proposito fare riferimento alla sezione I.2. Cancellare la registrazione di un portatile o di una base. 74 Sul portatile: Inserire il codice PIN. Il codice PIN preimpostato è 0000. Se la registrazione non avviene correttamente, sul display viene visualizzata la scritta “Non registrato” ed è necessario eseguire la procedura di registrazione nuovamente. I.2. Cancellare la registrazione di un portatile o di una base Se si ha più di un portatile registrato su una base oppure più di una base collegata ad un portatile, è possibile cancellare la registrazione del portatile e/o della base. Prima di tutto, è necessario assicurarsi che tutti gli apparecchi siano in standby. Mappa dei simboli: Impost avanz. selezionare il portatile o la base Elim. regist selezionare Si 1.Premere per accedere al menu principale. 2.Premere / per selezionare “Impost avanz.” e premere 3.Premere / per visualizzare “Elim. regist” e premere per confermare. 4.Premere / per selezionare “Base” o “Ricevitore” e premere per confermare. 5.Premere / per selezionare“Si” e premere 6.Premere per uscire e tornare alla modalità standby. I.3. Cambiare il codice PIN Mappa dei simboli: Impost. base inserire il nuovo PIN PIN base Il codice PIN preimpostato è 0000. Se si desidera modificarlo, seguire la procedura sopra illustrata inserendo 4 nuovo cifre per il codice PIN. I.4.Resettare il telefono Se resettate il telefono, la base ripristinerà i dati iniziali. L’ora, la data, il nome del portatile, la rubrica, la lista degli ID chiamanti e la lista di riselezione non vengono reimpostati. Se si hanno più portatili registrati all’unità base e si applica la procedura di seguito descritta, solo il portatile e la base resettati torneranno alle impostazioni iniziali. Per la base: Mappa dei simboli: Impost. base selezionare Si Reset base 1.Premere per accedere al menu principale. 2.Premere / per selezionare “Impost. base” e premere 3.Premere / per visualizzare “Reset base”. Premere per confermare. 4.Premere / per selezionare “Si” e premere per confermare. 5.Premere per uscire e tornare alla modalità standby. Per il portatile Mappa dei simboli: Impost avanz. selezionare Si causando così l’insorgere di conflitti nella normale operatività del sistema. Anche dopo aver ripristinato le impostazioni iniziali, le seguenti memorie di dati non andranno perse: - Memoria degli ID chiamanti - Lista di riselezione - Registrazione dell’unità base e del portatile - Rubrica K. MANTENIMENTO DEL PRODOTTO • Non esporre il telefono alla polvere, alla luce del sole, all’umidità, alle alte temperature ed a shock meccanici. Non utilizzare prodotti abrasivi o corrosivi per la pulizia del telefono. Tenere l’unità pulita passando uno straccio morbido ed asciutto sulla superficie. Non smontare l’apparecchio: contiene parti non riutilizzabili dall’utente. In caso di temporali violenti, è consigliabile disconnettere l’adattatore di alimentazione poiché la garanzia non risponde in caso di danni causati da sovraccarichi elettrici. Utilizzare esclusivamente l’adattatore all’interno della confezione. • • Reset ricev. 1.Premere per accedere al menu principale. 2.Premere / per selezionare “Impost avanz.” e premere 3.Premere / per visualizzare “Reset ricev.”. Premere per confermare. 4.Premere / per selezionare “Si” e premere per confermare. 5.Il display visualizza la scritta “Cleared” ed il sistema torna alle impostazioni iniziali. I.5. Centralino e FLASH time Se il telefono è connesso ad un centralino (PABX) e non squilla correttamente, allora il FLASH time può essere settato per corrispondere al time del centralino stesso. Per cambiarlo, premere Impost. base Supplementare Ora richiam. scegliendo tra 80 - 800 msec e confermare con . J.RIPRISTINO DELLE IMPOSTAZIONI INIZIALI E’ possibile ripristinare le impostazioni iniziali del telefono. L’unico modo per resettare sia l’unità base che il portatile è scorrere il menu fino alla voce “Reset ricev.” o “Reset base”. Per maggiori dettagli vedere la sezione precedente I.4. Resettare il telefono. Tutte le impostazioni e le programmazioni registrate sul telefono verranno automaticamente eliminate. Questa operazione potrebbe essere utile nel caso in cui siano state effettuate troppe programmazioni contemporaneamente, • • L.RISOLUZIONE PROBLEMI – sia per la base che per i ricevitori opzionali D1.Il telefono non funziona! R1. Assicurarsi che la tastiera del portatile non sia bloccata. Quando è bloccata, il simbolo appare sul display. Per rimuovere il blocco tastiera, premere il tasto e rilasciarlo dopo due secondi. R1. Assicurarsi che tutte le connessioni dell’adattatore e dei cavi siano collegati correttamente ai jack. R1. Assicurarsi che le batterie siano state inserite nell’apposito spazio, che siano cariche e che siano posizionate con la corretta polarità. R1. Se alla linea telefonica sono connessi più telefoni, assicurarsi che tutti gli apparecchi siano agganciati correttamente. In alcuni sistemi, infatti, quando il primo telefono della linea non è agganciato, tutti gli altri apparecchi non sono connessi elettricamente. R1. Provare a collegare un altro telefono alla presa telefonica. Se il problema persiste e suggerisce un malfunzionamento della linea telefonica, consultare il gestore telefonico. R1. Se il problema consiste nell’impossibilità di far sentire la propria voce all’interlocutore, assicurarsi che la funzione MUTE non sia attivata. Per accertarlo, premere il tasto MUTE ancora una volta così che il telefono torni alla normale operatività. 75 R1. R1. R1. R1. D2. R2. R2. R2. R2. R2. Controllare che il simbolo sul display non lampeggi. Se il livello delle barre è basso, significa che il portatile è troppo distante dalla base ed il segnale radio è troppo debole. E’ consigliabile avvicinare la base al portatile e riprovare. Se risulta impossibile comporre un numero, controllare che quel numero non sia bloccato (fare riferimento alla sezione D.9. Blocco chiamate). Se il livello di carica è basso poiché le batterie non vengono ricaricate da molto tempo, il portatile potrebbe bloccarsi automaticamente. Provare a disconnettere le batterie e reinserirle. Per tornare al normale funzionamento, mettere in carica il portatile per almeno sei ore. Se viene composto un numero errato, controllare che il prefisso sia stato registrato correttamente. Per verificare, entrare nel menu, selezionare “Impost. base”, poi “Supplementare” ed infine “Pref. chiam.”. Cancellare o modificare il prefisso salvato. Il telefono non squilla! Controllare che il volume non sia impostato su “Spento” (Fare riferimento alla sezione H.1. Impostare il volume ed il tipo di suoneria). Se il volume è inattivo, impostare un livello più alto. Assicurarsi che il portatile non sia spento. Assicurarsi che tutte le connessioni dell’adattatore e dei cavi siano collegati correttamente ai jack. Controllare la selezione del Paese. Selezionare dal menu “Impost. base” e premere “Country”. Selezionare il Paese desiderato dalla lista. Se il telefono è connesso al centralino, assicurarsi che il FLASH time sia corretto. (Vedi I.5. Centralino e FLASH time). Q3.La rubrica non funziona come previsto! R3. Assicurarsi che il numero inserito non superi la lunghezza massima di caratteri consentita. R3. Se il telefono è collegato ad un sistema PABX, consultare il gestore telefonico per informazioni circa i ritardi della pause inserite nella composizione di chiamate esterne. Q4.Il numero del chiamante non viene visualizzato! R4. Assicurarsi che il gestore telefonico fornisca il servizio di riconoscimento degli ID chiamanti. In molti Paesi, questo servizio è a pagamento e deve essere richiesto separatamente dall’utente. Per maggiori dettagli, contattare il gestore telefonico. R4. Il chiamante potrebbe aver nascosto il proprio numero prima della chiamata. Il numero del chiamante non necessariamente deve essere visualizzato. Per maggiori dettagli, contattare il gestore telefonico. 76 R4. Se la chiamata è effettuata dall’estero, il numero non può essere trasmesso. Q5.Il portatile non funzione dopo che è stato registrato ad un’unità base di un costruttore differente! A5. Secondo gli standard DECT (compatibili con GAP), i portatili possono essere registrati a qualsiasi sistema DECT. Tuttavia, le funzioni di uno specifico costruttore potrebbero non essere compatibili con altri prodotti. Nel caso in cui un portatile ed una base di costruttori diversi vengano registrati fra loro, potrebbero essere funzionanti solo le operazioni essenziali. A5. Controllare che la base sia compatibile con GAP secondo gli standard DECT. Solo i prodotti compatibili GAP possono essere registrati fra loro. M.NORME DI SICUREZZA Nota importante – Chiamate di emergenza Il telefono non è stato concepito per effettuare chiamate di emergenza quando non c’è corrente. La soluzione può essere la batteria opzionale di back up. Il telefono funziona solo se costantemente collegato alla corrente o alla batteria di back up. E’ consigliato avere un ulteriore telefono analogico (che funzioni senza corrente) per emergenze in caso di assenza di corrente. • • • • • • • • Quando si utilizza un apparecchio telefonico, è necessario che vengano osservate le normali precauzioni di sicurezza per ridurre al minimo il rischio di incendio, shock elettrico e danni alle persone: Evitare che l’apparecchio entri in contatto con liquidi o miscele. Non utilizzare il telefono durante temporali violenti. Potrebbe verificarsi il rischio remoto di shock elettrici. Non utilizzare il telefono per comunicare perdite di gas vicino alla fuoriuscita. Utilizzare solo i cavi e le batterie specificati in questo manuale. Non gettare le batterie nel fuoco. Potrebbero esplodere. Controllare le modalità di smaltimento con l’ente locale preposto. Connettere l’adattatore ad una presa vicino all’apparecchio e facilmente raggiungibile. Non aprire il portatile, l’unità base o il caricatore. Potrebbero provocare shock elettrici. C’è una piccola possibilità che il telefono possa essere danneggiato durante un temporale. E’ raccomandato scollegare il telefono dalla linea telefonica e dalla corrente durante il temporale. Evitare che i bambini possano giocare con l’apparecchio. • • • N. Poiché il funzionamento del telefono si basa su segnali radio tra unità base e portatili, la presenza di apparecchi auricolari potrebbe causare delle interferenze sotto forma di ronzio. E’ consigliabile non utilizzare questo telefono vicino ad apparecchi medici per trattamenti intensivi o con persone provviste di pacemaker. Il telefono potrebbe interferire con altri apparecchi elettrici quali segreterie, TV o radio se posizionati troppo vicini. E’ consigliabile collocare l’unità base ad almeno un metro di distanza da tali apparecchi. SMALTIMENTO ECOLOGICO E TUTELA AMBIENTALE Gli apparecchi elettrici ed elettronici contengono materiali, componenti e sostanze che, se non smaltiti correttamente, possono arrecare danni alla salute dell’uomo e dell’ambiente. Come illustrato qui sotto, il simbolo di un portarifiuti sbarrato contraddistingue gli apparecchi elettrici ed elettronici che non possono essere smaltiti come rifiuti domestici generici, ma devono essere raccolti separatamente. Per conoscere le modalità di smaltimento, contattare il proprio rivenditore. O.DICHIARAZIONE EUROPEA DI CONFORMITA’ - - I contenuti di questo manuale possono subire variazioni senza preavviso. Il costruttore ed i suoi fornitori non riconoscono nessuna responsabilità in caso di guasti, spese, perdite di guadagno o qualsiasi altro danno risultante dall’utilizzo del prodotto. IMJT50UK/DE/FR/IT.09072010 Bell Xpress A/S dichiara che questo dispositivo (Telefono 50 di tipo JJ T50 DECT / RTX3073) è conforme ai principali requisiti ed alle altre condizioni della direttiva europea 1999/5/EC R&TTE. 77 JACOB JENSEN™ Hygrometer II Silver Version JACOB JENSEN™ Multi Sensor JACOB JENSEN™ Thermometer II Silver Version JACOB JENSEN™ Barometer II Silver Version JACOB JENSEN™ Doorbell JACOB JENSEN™ Timer Product by: Bell Xpress A/S, Denmark · www.bellxpress.dk www.jacobjensen.com Generation to generation... 80