1
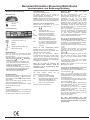
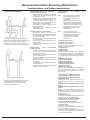
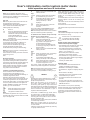
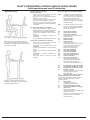
Motortische /Motordriven desks
Inbetriebnahme- und Bedienungsanleitung
Setup and user instructions
Benutzerinformation Steuerung Motortische
Inbetriebnahme- und Bedienungsanleitung
Bedienung der Steuerung
Basis-Steuerung
Aufwärts
Abwärts)
Programmierung
(gilt nur für Comfort-Steuerung)
Mit dieser Funktion ist es möglich 4
Tischplattenhöhen auszuwählen und für den
jeweiligen Benutzer/in abzuspeichern.
Hinweis: Wenn die Motorsteuerung zum ersten
Mal eingeschaltet wird, sind alle gespeicherten
Positionen gleich der untersten Tischplattenhöhe.
Speichern einer Tischplattenposition
Bewegen Sie die Tischplatte zur von Ihnen
gewünschten Tischplattenposition.
Comfort-Steuerung
072
S
S1,2,3,4
S1
Displayanzeige, Höhe in cm
Aufwärts
Abwärts
Speicherposition (M1, M2, M3)
Memoryspeicher (M)
Inbetriebnahme
Nach dem Transport und Aufstellen der Tische
muss der Tisch bzw. die Tischkonfiguration
initialisiert werden.
Bitte führen Sie dazu folgende Schritte durch:
• Die Tasten AUF
und AB
gleichzeitig
drücken und halten.
Tisch fährt mit halber Geschwindigkeit nach
unten. Nach Erreichen der untersten Position
schalten sich die Antriebe automatisch ab.
• Lassen Sie die Tasten los.
Die Steuerung bestätigt die erfolgte Initialisierung mit einem 3-fachen akustischen Signal.
• Die Steuerung ist jetzt betriebsbereit.
Der Tisch kann eingestellt werden.
Normaler Betrieb
Bei Betätigung der Pfeiltaste
fährt der Tisch
fährt er nach oben.
abwärts. Mit der Pfeiltaste
Tisch fährt mit normaler Geschwindigkeit abwärts
oder aufwärts.
Halten Sie die Taste solange gedrückt, bis die
gewünschte Tischhöhe erreicht ist.
Bei der Comfort-Steuerung wird auf dem Display
die aktuelle Höhe angezeigt.
Achtung:
Der Tisch bleibt stehen, wenn eine weitere Taste
zusätzlich gedrückt wird.
Erst bei nochmaligem Drücken der Pfeiltaste fährt
der Tisch auf die unterste bzw. oberste Position.
072
Im Display wird die
Tischplattenposition angezeigt.
Drücken Sie die Memorytaste.
Im Display wird S- angezeigt
Drücken Sie die entsprechende
Memorypositionstaste.
Memorytaste wird mit der ausgewählten Tischplattenhöhe belegt.
Es erfolgt ein hörbarer Doppelklick
und nach ca. 2 Sekunden wird die
gespeicherte Tischplattenposition
angezeigt.
Fahren zu einer gespeicherten HöhenPosition (gilt nur für Comfort-Steuerung)
Mit dieser Funktion können gespeicherte Tischhöhen wieder eingestellt werden.
Drücken Sie die gewünschte Memorypositionstaste und halten Sie die Taste solange
gedrückt, bis die gespeicherte Höhenposition
erreicht wird und die Motoren sich abschalten. Im
Bildschirm wird die erreichte und eingespeicherte
Tischplattenhöhe angezeigt.
Wenn Sie die Taste vor Erreichen der
gespeicherten Höhe loslassen, stoppt die
Tischplatte und die eingespeicherte Höhe
wird nicht erreicht.
Eingespeicherte Höhe der Tischplatte ändern
Mit
dieser
Funktion
können
Sie
die
eingespeicherte Höhe ändern.
S
Drücken Sie die Memorytaste.
SIm Display wird S - angezeigt.
072
Die Displayanzeige beginnt zu blinken.
Stellen Sie mit der Pfeiltaste die
gewünschte Tischplattenhöhe ein.
S
Drücken Sie die Memorytaste.
Die neue Höhe ist eingespeichert.
Manueller Reset – erste und zweite
Motorengruppe
Mit der Comfort-Steuerung können zwei
Motorengruppen angesteuert werden.
Diese Funktion benötigt man z.B. bei einem
Tischgestell, das mit den ersten beiden
Motorkanälen verfahren wird, und einem
Monitorlift, dessen Ansteuerung über den dritten
Motorkanal erfolgt. Im Standard wird die erste
Motorgruppe über die beiden rechten Auf- und
Abwärtstasten verstellt, die zweite Motorgruppe
über die beiden linken Auf- und Abwärtstasten
des LUD Handschalters.
Wenn die wirkliche Tischplattenposition nicht
mehr mit der angezeigten Tischplattenposition
oder eine bereits konfigurierte Motorsteuerung
an einem anderen baugleichen elektrisch
höhenverstellbaren Arbeitsplatz verwendet wird,
muss ein Reset durchgeführt werden.
Um für die erste Motorgruppe einen Reset
durchzuführen, gehen Sie wie folgt vor:
1. Da die Steuerung nach wenigen Sekunden
automatisch in den Energiesparmodus schaltet,
muss dieser zuerst deaktiviert werden.
Drücken Sie dazu kurz die Auf- oder die Abtaste.
2. Drücken Sie unmittelbar nach dem zuvor
genannten Schritt die Auf- und die Abtaste
gleichzeitig und halten Sie diese gedrückt.
und
Nach 2 Sekunden beginnt der Reset, der Tisch
fährt nach unten und muss so lange verfahren
werden, bis er seine unterste Position erreicht
hat.
3. Lassen Sie die Tasten los. Der elektrisch
höhenverstellbare Arbeitsplatz kann wieder
normal verwendet werden.
Hinweis: Diese Funktion ist nur für die erste
Motorgruppe verfügbar.
Um für die zweite Motorgruppe einen Reset
durchzuführen, gehen Sie wie folgt vor:
1. Drücken Sie die Taste Tischplatte nach unten
der 2. Motorgruppe.
Halten Sie die Taste Tischplatte nach unten
solange gedrückt, bis die Tischplatte die unterste
Tischplattenposition erreicht hat (programmierte
Tischplattenposition).
2. Drücken Sie die Taste Tischplatte nach unten
der 2. Motorgruppe nochmals und halten Sie die
Taste weiter gedrückt.
Nach ca. 5 Sekunden wird die Tischplatte weiter
nach unten verstellt, bis die absolut unterste
Tischplattenposition erreicht wird.
3. Lassen Sie die Taste los. Der elektrisch
höhenverstellbare Arbeitsplatz kann wieder
normal verwendet werden.
Hinweis: Der Reset der zweiten Motorgruppe
kann erst dann durchgeführt werden, wenn der
Reset der ersten Motorgruppe
abgeschlossen wurde.
Bei allen Resetvorgängen und beim
Endlagenabgleich ist der Auffahrschutz (ISP)
nicht aktiv. Beachten Sie dabei eine mögliche
Quetschgefahr!
Benutzerinformation Steuerung Motortische
Inbetriebnahme- und Bedienungsanleitung
Software-abhängige Funktionen
S
Hinweis: Die Motorsteuerung liECO wird vor
Auslieferung mittels Software parametriert. Die
folgenden Funktionen sind nur dann
verwendbar, wenn die Motorsteuerung
entsprechend parametriert ist.
Tastensperre
Über die Tastensperre lässt sich die
Motorsteuerung vor versehentlichen Eingaben
über den Handschalter schützen. Das Sperren
sowie auch das Entsperren erfolgt mit
folgender Tastenkombination:
S
Drücken Sie S.
Drücken Sie kurz danach die Taste
Tischposition nach unten der 2.
Motorgruppe.
- Wenn die Tastensperre aktiviert war,
wird sie dadurch deaktiviert.
- Wenn die Tastensperre deaktiviert
war, wird sie dadurch aktiviert.
Hinweis: Die Tastensperre ist nur mit der
Comfort-Steuerung möglich.
Wird bei einem gesperrten System eine
Bewegungstaste (Auf/Ab oder Memory)
gedrückt, so gibt die Steuerung ein akustisches
Signal mittels Relaisklicken aus (langsamer
Doppelklick nach Betätigen einer Taste).
Hinweis: Wenn die Tastensperre aktiviert
ist, bleibt sie auch dann aktiviert, wenn das
Stromversorgungskabel der Steuerung vom
Netz getrennt und zu einem beliebigen späteren
Zeitpunkt wieder verbunden wird.
Sicherheitsbereich
Diese Funktion (safety area) bewirkt, dass das
System vor dem Erreichen der
untersten Position stoppt und erst nach
erneutem Betätigen der Ab-Taste mit
reduzierter Geschwindigkeit (low speed) die
Bewegung bis zum Ende fortsetzt.
Dieser Sicherheitsbereich ist auch bei einem
gesetzten Container-Stop aktiv.
Container-Stop und Shelf-Stop-Positionen
Diese beiden Features können eingesetzt
werden, um den Fahrbereich des Tisches
einzuschränken (wenn z.B. ein Container unter
dem Tisch steht). Eine Container- Stop-Position
kann in der unteren Hälfte des Fahrbereiches
eingestellt werden, eine Shelf-Stop-Position in
der oberen Hälfte. Wenn eine Container-StopPosition gesetzt ist, wird diese als neue untere
Endlage verwendet, eine Shelf-Stop-Position
entspricht einer neuen oberen Endlage des
Fahrbereichs. Um eine Container-Stop/
Shelf-Stop-Position zu speichern, gehen Sie
wie folgt vor:
oder Bringen Sie die Tischplatte in jene
Position, die Sie als neue ContainerStop/ Shelf-Stop-Position nutzen
möchten.
Hinweis:
Eine Container-Stop-Position kann nur in der
unteren Hälfte des Fahrbereiches und eine
Shelf-Stop-Position nur in der oberen
Hälfte des Fahrbereichs gespeichert werden.
Drücken Sie S, bei einen
Handschalter mit Memoryfunktion
Bzw.
und
S-
Drücken Sie die Tischposition nach
unten und Tischposition nach
oben gleichzeitig wenn Sie einen
Handschalter ohne Memoryfunktion
haben.
Am Display (Handschalter mit
Memoryfunktion) wird S – angezeigt.
Drücken Sie innerhalb von 5
Sekunden die Taste Tischposition
nach oben und halten Sie sie für mind.
5 Sekunden gedrückt.
Ein Doppelklick der Motorsteuerung zeigt das
erfolgreiche Speichern der Container-Stop/ShelfStop Position an.
Hinweis: Diese Schritte müssen für eine
Container-Stop-Position und eine Shelf-StopPosition separat durchgeführt werden!
Um die Container-Stop/ Shelf-Stop-Position
zu deaktivieren, gehen Sie wie folgt vor:
oder Bringen Sie die Tischplatte in
beliebige Position in der unteren
Hälfte des Fahrbereiches, um den
Container-Stop zu deaktivieren. /
Bringen Sie die Tischplatte in eine
beliebige Position in der oberen
Hälfte des Fahrbereiches, um den
Shelf-Stop zu deaktivieren.
S
Drücken Sie S wenn Sie einen
Handschalter mit Memoryfunktion
haben.
Bzw.
und
Drücken Sie die Tischposition nach
unten und Tischposition nach
oben gleichzeitig bei Nutzung der
Basis-Steuerung
SAm Display (Handschalter mit
Memoryfunktion) wird S - angezeigt.
Drücken Sie innerhalb von 5
Sekunden die Taste Tischposition nach
unten und halten Sie diese für mind. 5
Sekunden gedrückt und lassen
diese danach los. Die Taste darf nicht
länger als 10s gedrückt gehalten
werden.
Ein leises Klick der Motorsteuerung
zeigt das erfolgreiche Löschen der
Container-Stop/Shelf-Stop Position an.
Hinweis: Diese Schritte müssen für eine
Container-Stop-Position und eine Shelf-StopPosition separat durchgeführt werden!
Diese Funktion ist nur für Motorgruppe 1
verfügbar!
SICHERHEITSHINWEISE
Wird das System unsachgemäß betrieben,
können Gefahren für Personen und Sachgegenstände entstehen. Öffnen Sie nie das Gehäuse
der Steuerung oder des Netzteils!
Durch unbefugtes Öffnen des Gehäuses
und unsachgemäße Reparaturen können
Gefahren für die Benutzer entstehen und der
Garantieanspruch erlischt. Das Öffnen oder
Reparieren der elektrischen Einrichtungen darf
nur vom Personal des Herstellers durchgeführt
werden!
Bei Funktionsstörungen wie zum Beispiel Rauch
oder Geruchentwicklung oder ungewöhnlichen
Geräuschen oder bei sichtbaren äußerlichen
Beschädigungen, darf das Gerät nicht weiter
betrieben werden. Ziehen Sie den Netzstecker!
Die Einschaltdauer beträgt 2 Minuten „ON“ und
18 Minuten „OFF“.
Elektrische
Zuleitungen
dürfen
keiner
Quetschgefahr, Biege- und Zugbeanspruchung
ausgesetzt werden!
Lassen Sie keine Flüssigkeit in das Innere der
Steuerung oder des Netzteils eindringen, da
sonst elektrische Schläge oder Kurzschlüsse die
Folge sein könnten!
Die Steuerung und das Handset dürfen nur mit
einem trockenen oder leicht befeuchteten Tuch
gereinigt werden.
Beim Fahren des Antriebs ist darauf zu
achten, dass keine Gegenstände (z. B. Möbel)
oder Körperteile eingeklemmt werden! Bei
der Höhenverstellung der Tischplatte kann
die Gefährdung Dritter durch Quetsch- und
Klemmstellen entstehen.
Zu nebenstehenden Gegenständen ist ein
Mindestabstand von mind. 25 mm einzuhalten
um Quetsch- und Scherstellen zu vermeiden!
Die Steuerung darf ausschließlich nur mit K+B
Führungssäulen eingesetzt werden!
Belastungswerte dürfen nicht überschritten
werden.
Der Sitz-Steharbeitsplatz ist für den Einsatz im
gewerblichen Bürobereich konzipiert.
Max. Belastung:
Die maximale verteilte Last bei Tischen mit 2
Säulen beträgt 100 kg.
Garantie kann nur für bestimmungsgemäßen Gebrauch gewährt werden.
Montage
Beachten Sie bei der Montage der Steuerung
und Netzteil folgendes:
• Der Montageort sollte trocken, staubfrei und
ohne direkte Sonneneinstrahlung sein.
• Die Umgebungstemperatur zum Betrieb der
Steuerung, sowie des Netzteils darf 5°C nicht
unterschreiten und 40°C nicht überschreiten.
• Achten Sie darauf, daß die Anschlußkabel nicht
geknickt, gezogen oder mechanisch belastet
werden.
• Zum Schutz gegen Überspannungen, wie sie
bei Gewittern auftreten können, empfiehlt sich
die Installation eines Überspannungsschutzes.
Lassen Sie sich von Ihrem Elektroinstallateur
beraten.
Allgemeine Hinweise
• Informationen über Produzent und Lieferant
siehe Kennzeichnung unter der Tischplatte.
• Hersteller-/Konformitätserklärung liegt vor.
• Maße, Gewicht und Leistungsdaten siehe
Preisliste.
• Geräuschentwicklung < 52 dBA
• Optionale Module und Zubehör finden Sie in
der Preisliste.
• Zur Benutzung der Arbeitsfläche und Anordnung der Geräte beachten Sie bitte die
DIN 527-1 und DIN EN ISO 9241-5.
Dieses Gerät ist nicht dafür bestimmt, durch
Personen (einschließlich Kinder) mit eingeschränkten physischen, sensorischen oder
geistigen Fähigkeiten oder mangels Erfahrung
und/oder mangels Wissen benutzt zu werden,
es sei denn, sie werden durch ein für ihre
Sicherheit zuständige Person beaufsichtigt oder
erhielten von ihr Anweisungen, wie das Gerät zu
benutzen ist. Kind sind zu beaufsichtigen, damit
sie nicht mit dem Gerät spielen.
Benutzerinformation Steuerung Motortische
Inbetriebnahme- und Bedienungsanleitung
Ergonomische Hinweise
Mögliche Störungen und deren Behebung
Antriebe funktionieren nicht:
•
Stromversorgungskabel ist nicht angesteckt:
Stecken Sie das Stromversorgungskabel
der Motorsteuerung an.
•
Antriebe sind nicht angesteckt: Stecken Sie
die Motorkabel an der Motorsteuerung an.
•
Schlechter Steckerkontakt: Stecken Sie
Motorkabel, Stromversorgungskabel und
Handschalter ordnungsgemäß an.
•
Motorsteuerung defekt: Kontaktieren Sie
den Kundendienst.
•
Handschalter defekt: Wechseln Sie den
Handschalter aus.
Antriebe laufen nur in eine Richtung:
•
Stromausfall während der Fahrt oder
Stromversorgungskabel während der Fahrt
abgesteckt: Manueller Reset, wenn Antriebe
nur nach unten fahren.
•
Motorsteuerung ist defekt: Kontaktieren Sie
den Kundendienst.
Beim Arbeiten im Sitzen sollten die Beine einen
•
Handschalter ist defekt: Wechseln Sie den
Winkel von 90° ergeben. Dann erfolgt die
Handschalter aus.
Anpassung des Tisches an die Sitzposition, so
•
Antrieb defekt: Kontaktieren Sie den
dass auch die Arme einen Winkel von 90° bilden.
Kundendienst.
Motorsteuerung
oder
Handschalter
funktioniert nicht
•
Stromversorgungskabel ist nicht angesteckt:
Stecken Sie das Stromversorgungskabel
der Motorsteuerung an.
•
Handschalter ist nicht angesteckt: Stecken
Sie den Handschalter an.
•
Motorsteuerung ist defekt: Kontaktieren Sie
den Kundendienst.
•
Netzkabel ist defekt: Kontaktieren Sie den
Kundendienst
•
Handschalter ist defekt: Wechseln Sie den
Handschalter aus.
•
Schlechter Steckerkontakt: Stecken Sie die
Stecker ordnungsgemäß an.
Auch bei einer arbeitenden Position im Stehen
sollte idealerweise ein Armwinkel von 90°
erzielt werden, so dass ein ergonomisches
Arbeiten gewährleistet wird.
Fehlermeldungen
Handschalter
am
Display
der
HOT
Am Display wird HOT angezeigt.
Die Motorsteuerung liECO ist
mit einem Überhitzungsschutz
ausgestattet.
Aufgrund von Überhitzung wurde
dieser Überhitzungsschutz aktiviert.
Warten Sie bis die Motorsteuerung
abgekühlt ist und die Meldung HOT
am Display erlischt. Dann ist die
Motorsteuerung liECO wieder
betriebsbereit.
E00
Am Display wird E + eine
Fehlernummer angezeigt. An der
Motorsteuerung liECO liegt ein
interner Fehler an. Gehen Sie
entsprechend der folgenden
Fehlerliste vor.
00 Interner Fehler Kanal 1
01 Interner Fehler Kanal 2
02 Interner Fehler Kanal 3.
Schalten Sie die Motorsteuerung aus. Wenden
Sie sich an den Kundendienst
12 Defekt Kanal 1
13 Defekt Kanal 2
14 Defekt Kanal 3
Stecken Sie die Motorsteuerung ab. Beheben
Sie den externen Kurzschluss. Oder stecken Sie
an der betroffenen Buchse den korrekten Motor
an. Nehmen Sie die Motorsteuerung wieder in
Betrieb.
24 Überstrom Motor M1
25 Überstrom Motor M2
26 Überstrom Motor M3
48 Überstrom Motorgruppe 1
49 Überstrom Motorgruppe 2
60 Kollisionsschutz
62 Überstrom Steuerung
Entfernen Sie die eingeklemmten Objekte aus
dem Fahrbereich. Tisch überladen Entfernen
Sie Last vom Tisch. Wenden Sie sich an den
Kundendienst.
36 Plug detection an Motorbuchse M1
37 Plug detection an Motorbuchse M2
38 Plug detection an Motorbuchse M3
61 Motor getauscht
Stecken Sie an der betroffenen Buchse den
korrekten Motor an. Führen Sie einen Reset
durch.
55 Synchronisierung der Motorgruppe 1 nicht
möglich
56 Synchronisierung der Motorgruppe 2 nicht
möglich
Entfernen Sie Last vom Tisch. Führen Sie einen
Reset durch; wenn der Fehler nach dem Reset
weiterhin angezeigt wird, wenden Sie sich an den
Kundendienst.
67 Zu hohe Spannung
Stecken Sie das Stromversorgungskabel ab und
wenden Sie sich an den Kundendienst.
70 Änderung der Antriebskonfiguration
Wenden Sie sich an den Kundendienst.
71 Sensorkonfiguration geändert
Überprüfen Sie, ob sich ein Sensor gelöst hat.
81 Interner Fehler
Führen Sie einen Reset durch.
Stecken Sie das Stromversorgungskabel ab und
nach einigen Sekunden wieder an.
Tritt dieser Fehler regelmäßig auf, stecken Sie
das Stromversorgungskabel ab und wenden Sie
sich an den Kundendienst.
User‘s information control system motor desks
Initial operation and user‘s instruction
Operating the positioning system
Programming
(only valid for comfort control)
Basic control system
With this function, it is possible to select 4 different
heights of desk heights and store them for the
respective.
Note: if you are switching on the liECO control unit
for the first time, all saved positions are set to the
lowest desktop height (minimum desktop position).
Parallel operating up
Parallel operating down
Comfort control system
Saving a desktop position
Adjust the desktop to the position you want to
save.
072
S
S1,2,3,4
S1
Display, height in cm
Parallel operating up (UP 1)
Parallellauf operating down (DN 1)
Storage position (M1, M2, M3)
Store (M)
Initial Operating
After transport and mounting of the table, the table
or the table configuration needs to be initialized.
Please follow the below-mentioned steps:
• Press and hold the buttons UP
and
DOWN
simultaneously.
The drivers travel downwards with half speed
until they come up against the mechanical stop
and then switch off.
When achieving the lowest position, the table
will stop automatically.
• Let go of the button now.
The control unit beeps three times to signal that
initialization has completed.
• The system is now operational.
The table can (again) be adjusted as usual.
Normal Operating
When pressing the arrow-shaped button
the
table moves downwards. When pressing the
arrow-shaped button
, it moves up again.
Table moves up or down with normal speed. It
automatically stops before reaching the final
mechanical position.
Keep the button pressed until the table has
reached the requested height.
In case of the comfortable control system, the
current height is shown on the display.
Attention:
The table stops if another button is pressed at the
same time.
When moving downwards, the table stops
automatically when reaching a height of 72 cm in
order to point to possible shearing or squeezing
spots.
Only when pressing the arrow-shaped button
again, the table moves to the lowest position.
072
The display will show the desktop
height.
Press the memory key.
The display will notify S -.
Press the required memory position
key.
The set desktop position will now be
saved to the selected memory
position key.
You will hear an audible double click
and after about 2 seconds the
saved desktop position will be
displayed.
Adjusting the desktop to a saved position
(only applies to comfort control system)
You can use this function to adjust the desktop
to a saved height. To change to a saved position,
proceed as follows:
•
Press the required memory position key and
hold it down. The desktop will move until it
reaches the saved position. The desktop has
reached the saved position. Now release the
memory position key. The display will read
the current (saved) desktop position.
If you release the key before the saved position
is reached, the desktop will stop and the saved
desktop position will not be reached.
Changing the desktop height displayed
This function enables you to change the
stored height shown on the display.
S
Press the memory key.
SThe display will read S -.
072
Press the Down key (down arrow) for
approx. 5 seconds. The display
will start flashing. Adjust the height
displayed by pressing the Down (down
arrow) or Up key (up arrow).
S
Press the memory key.
The height display is now set to the
new desktop position
Manual reset – first and second motor group
The Comfort switch is designed to control two
motor groups. This function is required for
controlling, for example, a table base, the
movement of which is being done via the
first two motor channels, and a screen lift, that is
controlled via the third motor
channel. In standard configuration the first motor
group is moved via the Up and
Down keys to the right, while the second motor
group is controlled via the left Up and
Down keys on the Comfort switch.
When the actual desktop position no longer
corresponds to the height displayed or
you wish to use a configured control unit on
another identical electric heightadjustable
desk, you have to reset the lowest desktop
position to the minimum
height.
To reset the first motor group, proceed as
follows.
1. As the control automatically shifts into energysaving mode after a
few seconds, this mode must be deactivated first.
To do this, briefly
press the Up or Down key.
2.
und
Press and hold the Up and Down keys at the
same time
immediately after the previous step.
After 2 seconds the reset begins, the table moves
downward and
needs to be kept moving until it reaches its
bottom position.
3. Release the button(s). The electric heightadjustable desk can now
be used again normally.
Note: this function is available for the first
motor group only.
To reset the second motor group, proceed as
follows.
1. Press the desktop down button of the second
motor group.
Keep pressing it until the desktop has reached
the lowest position
(programmed desktop position).
2. Press the desktop down button of the second
motor group
again and keep pressing it.
After about 5 seconds, the desktop will slowly
move further down
until it reaches the absolutely lowest desktop
position possible.
3. Release the desktop down key. The electric
height-adjustable
desk can now be used again normally.
Note: you can reset the first motor group too as
shown above.
Therefore, use the desktop down button of the
first motor group.
Please read the manual of the used handswitch
to see which buttons are
linked to which motor group!
intelligent system protection (ISP) is not enabled
during all
resets and limit position calibration.
Please note that there is a potential
risk of pinching in this case.
User‘s information control system motor desks
Initial operation and user‘s instruction
Software-dependent functions
S
Note: prior to shipping, the control unit is
parameterized with the software. The following
functions are only available if the control unit has
been configured accordingly:
resp.
Key lock
With the key lock function, the control unit can
be protected from inputs by the
handswitch which were done accidentally. To
lock or unlock the handswitch keys, the
following steps are necessary:
S
Press S.
Press the Taste desktop down button
of the second motor group shortly
afterwards. If the key lock was active,
it will be deactivated now.
If the key lock was inactive, it will be
activated now.
Note: The key lock function is only possible with
the comfort control system.
If a movement key (Up/Down or Memory) is
pressed when the key lock is active, the
control unit shows the active key lock by an
acoustic signal with the relays (slow
double click after pressing a movement key)
Note: If the key lock is active, it will stay active
even if the control unit is
disconnected from mains power and connected
again at any point in
time.
Slow speed ranges
The safety area function causes the system to
stop before reaching the bottom position and
resume the movement with reduced speed only
after pressing the Down key again until the
bottom position has been reached. The safety
area function is also active when a container
stop position has been defined.
Container- and Shelf-Stop positions
These 2 features can be used to limit the
movement area of the desktop (e.g. if a
container is placed underneath the desktop). A
container stop position can be
defined in the lower half of the movement
area, a shelf stop position in the upper half. If a
container stop position is set, this position will
be the lower limit position. If a shelf stop position
is set, this position will be the new upper limit
position. To store a container stop / shelf stop
position, go on as shown below:
or
Move the desktop to the position
where the container stop/ shelf
stop position shall be stored.
Note:
A container stop position can only be stored in
the lower half of the movement area and a shelf
stop in the upper half.
Press S if you have a handswitch with
memory function.
and
S-
Press the desktop down and desktop
up simultaneously if you have a
handswitch without memory function.
On the display (handswitch with
memory function) S – will be
displayed.
Press desktop up within 5 seconds
and keep it pressed for 5
seconds.
The control system will click twice when the
container stop/ shelf stop position is stored.
Note: These steps have to be done for a container
stop and a shelf stop position separately!
To deactivate the container stop/ shelf stop
position go on as shown below:
or
S
Move the desktop to any position in the
lower half to deactivate the
container stop. / Move the desktop to
any position in the upper half
to deactivate the shelf stop.
Do so by pressing the desktop down
or desktop up key until you reach the
desired position
Press S if you have a handswitch with
memory function.
resp.
and
S-
Press the desktop down and desktop
up simultaneously if you have a
base control system.
On the display (handswitch with
memory function) S - will be displayed.
Press desktop up within 5 seconds
and keep it pressed for 5 seconds. Do
not press it longer than 10 sec.
The control system will click once when the
container stop/ shelf stopposition is deactivated.
Note: These steps have to be done for a container
stop and a shelf stop position separately!
This function is only available for motor group 1!
When operating the drives make sure that no
obstructions (eg, furniture) or parts of the body
can be crushed! When moving the top, other
parties can be endangered by crushing and
shearing.
A minimum distance of 25 mm must be kept from
adjacent objects to avoid risk of crushing and
shearing!
The control unit is to be used exclusively for K+B
guide columns!
Load limits must not be exceeded.
This sit-stand desk is produced for the commercial
sector.
Load capacity:
The maximum averaged load capacity for desks
with 2 columns is 100 kg.
Incorrect use or use otherwise than
in compliance with this operating
manual invali-dates the warranty.
Points to note when installing the
control unit and power supply:
• The installation site should be dry, free of dust
and not be exposed to direct sunlight.
• The ambient temperature for operating the
control unit and power supply must not drop
below 5 °C or exceed 40 °C.
• Ensure that power cables are not bent,
stretched or mechanically stressed
• The installation of a surge arrester is recommended as protection against surge voltages,
eg. during thunderstorms.
Consult your electric fitter.
General notes
• For informations about manufacturer and
supplier see labelling under the top.
• Declaration of conformity is available.
• For dimensions, weight and capacity see price
list.
• Noise emission <52 dB(A)
SAFETY
Operating the system otherwise than in compliance with the instructions in this manual, can put
people and objects at risk!
Never open the housing of the control unit or
the power supply! Unauthorized opening of
the housing and repairs by anyone other than
authorized technicians invalidate the warranty and
can create risks for users. Only the manufacturer‘s
service technicians are authorized to open or
repair the electrical equipment!
In the event of a malfunction (eg, smoke, odours,
an unusual noise, or visible external damage)
switch the system off. Disconnect at the mains!
The duty cycle of the system is set to 2 minutes
ON and 18 minutes OFF.
Power cables must not be pinched, bent, stretched
or mechanically stressed!
Make sure no liquid enters the control unit or
power supply as this could cause electrical shocks
or short circuits!
Clean the control unit and handset only with a dry
or slightly moistened cloth.
• A summary of this user‘s information is fixed
underneath the top for pullout.
• For optional modules and accessories see
price list.
• For use of the work space and positioning of
the appliances please consider DIN 527-1 and
DIN EN ISO 9241-5.
This machine is not for persons (including
children) appointed, who have limited physical,
sensoric or mental abilities unless they are
supervised or have received instructions on
how to use the machine. Children have to be
supervised.
User‘s information control system motor desks
Initial operation and user‘s instruction
Ergonomic advice
Possible faults and remedies
Drives not working:
•
Power cord is not connected: Plug the
power cord into the control unit.
•
Drives are not connected: Plug the motor
cables into the control unit.
•
Poor plug contact: Plug the motor cables,
power cord and handswitch in properly.
•
Control unit is defective: Contact customer
service Handswitch is defective Replace the
handswitch.
Drives only operating in one direction:
•
Mains power breakdown or mains power is
plugged off during movement: Manual Reset
if movement is only possible downwards.
•
Control unit is defective: Contact customer
service.
•
Handswitch is defective: Replace the
handswitch.
•
Drive is defective: Contact customer service.
Control unit or handswitch not working:
When working in a seated position, the legs
•
Power cord is not connected: Plug the
should form a 90° angle. Then, the table has to
power cord into the control unit.
be adjusted to the seating hight so that the arms
•
Handswitch is not connected: Plug in the
also follow a 90° angle.
handswitch.
•
Control unit is defective: Contact customer
service.
•
Power cord is defective Contact customer
service.
•
Handswitch is defective: Replace the
handswitch.
•
Poor plug contact: Connect the plugs
properly.
Error messages on the handswitch display
HOT
The liECO control unit is fitted with
overheating protection. Overheating
has caused it to stop the control unit.
Wait until the control unit has
cooled down and HOT is no longer
displayed. The liEC control unit is then
operational again.
E00
The display reads E + an error code.
There is an internal fault in the liECO
control unit. Proceed as indicated in
the following error list.
00
01
02
Internal Error Channel 1
Internal Error Channel 2
Internal Error Channel 3
Unplug power cord and contact the
customer service.
Defect Channel 1
Defect Channel 2
Defect Channel 3
Unplug the control unit.
Fix the external short circuit. Or Plug
in the correct motor to the motor
socket that shows the error.
Start the control unit again.
Overcurrent motor M1
Overcurrent motor M2
Overcurrent motor M3
Overcurrent motor group 1
Overcurrent motor group 2
Collision protection
Overcurrent control unit
Remove jammed objects from
the driving area. Desk might be
overloaded remove load from
desktop. Contact customer service.
12
13
14
24
25
26
48
49
60
62
36
37
38
61
Working in a standing position, the arms
should form a 90° angle in order to ensure an
ergonomic working position.
Plug detection in M1 motor socket
Plug detection in M2 motor socket
Plug detection in M3 motor socket
Actuator changed
Plug in the correct motor to the motor
socket that shows the error.
Reset all motors.
55
Synchronization lost motor group 1
56 Synchronization lost motor group 2
Remove load from desktop. Reset all motors;
If error occurs after reset again, contact
customer service
67
High voltage
Unplug power cord and
contact thecustomer service.
70
Motor configuration changed
71
Anti-Pinch configuration changed
81
Internal error
Make a manual reset.
Unplug power cord and plug it in again
after a few seconds.
If this error occurs frequently, unplug
the power cord and contact the
customer service.
www.haworth-europe.com | www.haworth.com | www.haworth-asia.com
DHSC403 302XX • 07/2012
Benelux · Haworth Benelux B.V. · Tel. +31 88 287 70 60
Czech Republic · Haworth Czech s.r.o. · Tel. +420 272 657 240
France · Haworth S.A.S. · Tel. +33 1 45 64 45 00
Germany · Haworth GmbH · Living Office · Tel. +49 5042 501 0
Hungary · Haworth Hungary Kft. · Tel. +36 1 201 40 10
Ireland · Haworth Ireland Ltd. · Tel. +353 1855 8840
Portugal · Haworth Portugal SA · Tel. +351 214 345 000
Spain · Haworth Spain Ltd. · Tel. +34 91 3980 480
Switzerland · Haworth Schweiz AG · Tel. +41 62 765 51 51
United Kingdom · Haworth UK Ltd. · Tel. +44 207 324 1360
USA · Haworth Inc. · One Haworth Center · Tel. +1 616 393 3000