1
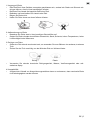
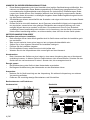
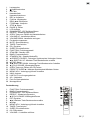
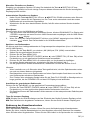
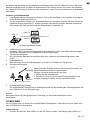
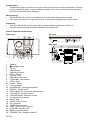
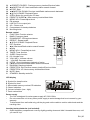
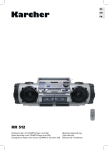
DE
EN
MC 6550
Musik-Center mit CD/MP3-Player, PLL-Radio & Kassettendeck
Music Center with CD/MP3 Player, PLL Radio & Cassette Deck
| Bedienungsanleitung
| User Manual
Vorwort
Vielen Dank, dass Sie sich für dieses Produkt entschieden haben. Bitte lesen Sie diese
Bedienungsanleitung sorgfältig, damit Sie in der Lage sind, die maximale Leistungsfähigkeit dessen
auszuschöpfen und die Sicherheit bei Installation, Verwendung und Wartung gewährleistet wird.
Bewahren Sie diese Bedienungsanleitung so auf, dass Sie sie immer griffbereit haben.
Unsere Hotline für technische Fragen:
0900/1000036
(Mo. – Do.: 8.00 – 16.30 Uhr | Fr.: 8.00 – 15.00 Uhr | 0,99 €/Min. aus dem deutschen Festnetz)
Bitte machen Sie von dieser Hotline Gebrauch, da technische Probleme meist hier schon behoben werden können, ohne dass Sie Ihr Gerät einsenden müssen.
Internet:www.karcher-products.de
E-Mail:[email protected]
2 | DE
DE
Sicherheitshinweise
1.
2.
3.
4.
5.
6.
7.
8.
9.
10.
11.
12.
13.
14.
15.
16.
17.
18.
19.
Bedienungsanleitung lesen – Lesen Sie die Bedienungsanleitung aufmerksam, um sich mit der
Bedienung des Gerätes vertraut zu machen.
Bedienungsanleitung aufbewahren – Bewahren Sie die Bedienungsanleitung sorgfältig auf.
Hinweise beachten – Beachten Sie alle Hinweise und Anweisungen in der Bedienungsanleitung.
Wasser und Feuchtigkeit – Das Gerät darf nicht in der Nähe von Wasser (z. B. einer Badewanne, einem Waschbecken, einem Schwimmbecken, etc.) oder an feuchten Orten, bzw. in
tropischem Klima verwendet werden. Stellen Sie keine mit Flüssigkeiten befüllten Objekte oder
Gefäße (z. B. Vasen) auf das Gerät. Setzen Sie das Gerät weder Tropf- noch Spritzwasser aus.
Aufstellung – Das Gerät darf nur auf einer stabilen, ebenen Oberfläche aufgestellt werden. Platzieren Sie das Gerät so, dass es keinen Erschütterungen ausgesetzt werden kann.
Wandmontage – Eine Wand- oder Deckenmontage darf nur dann erfolgen, wenn das Gerät
dafür vorgesehen ist.
Belüftung – Stellen Sie das Gerät immer so auf, dass die Lüftungsöffnungen nicht blockiert oder
verdeckt (z. B. von einem Vorhang, einer Decke, einer Zeitung, etc.) werden. Das Gerät darf z.
B. nicht auf einem Bett, Sofa, Teppich, etc. aufgestellt werden. Für eine ausreichende Belüftung
sollte ein Freiraum von mindestens 5 cm um das Gerät herum eingehalten werden.
Hitze – Das Gerät darf nicht in die Nähe von Hitzequellen, wie z. B. einer Heizung, einem Herd
oder anderen Geräten gelangen.
Stromversorgung – Das Gerät darf nur mit der auf der Geräterückseite angegebenen Spannung betrieben werden.
Kabel & Stecker – Das Netzkabel und der Netzstecker müssen immer in einwandfreiem Zustand
sein. Der Netzstecker muss jederzeit erreichbar sein, um das Gerät vom Netz trennen zu können.
Sämtliche Kabel sollten immer so ausgelegt werden, dass diese keine Stolperfalle darstellen und
nicht beschädigt werden können. Stellen Sie keine Objekte auf Kabel. Wandsteckdosen, Verlängerungskabel und Mehrfachsteckerleisten dürfen niemals überbelegt werden.
Reinigung – Reinigen Sie das Gerät ausschließlich mit einem trockenen, weichen und sauberen
Tuch. Verwenden Sie niemals chemische Reinigungsmittel. Ziehen Sie vor dem Reinigen den
Netzstecker.
Nichtverwendung – Wenn Sie das Gerät für längere Zeit nicht verwenden, ziehen Sie den
Netzstecker.
Eintritt von Objekten oder Flüssigkeiten – Es dürfen keine Objekte in das Gehäuse des Gerätes gelangen. Das Gerät darf niemals in Kontakt mit irgendwelchen Flüssigkeiten gelangen.
Wann Sie eine Servicestelle aufsuchen sollten – Ziehen Sie umgehend den Netzstecker und
suchen Sie eine qualifizierte Servicestelle auf, wenn einer der folgenden Ereignisse eintritt:
a) Wenn der Netzstecker oder das Netzkabel beschädigt ist.
b) Wenn Objekte in das Gehäuse eingedrungen sind oder das Gerät in Kontakt mit einer Flüssigkeit war.
c) Wenn das Gerät nicht ordnungsgemäß funktioniert. Nehmen Sie selbst nur solche Einstellungen vor, die in dieser Bedienungsanleitung erklärt werden.
d) Wenn das Gerät heruntergefallen ist oder in sonstiger Weise einer Erschütterung ausgesetzt war.
Reparaturen – Reparaturen und Wartungsarbeiten dürfen nur von qualifiziertem Fachpersonal
durchgeführt werden. Versuchen Sie niemals, das Gerät selbst zu reparieren. Öffnen Sie niemals
das Gehäuse.
Offenes Feuer – Halten Sie das Gerät fern von offenem Feuer. Stellen Sie keine brennenden
Kerzen oder ähnliches auf das Gerät.
Gewitter – Während eines Gewitters sollten Sie den Netzstecker ziehen.
Sicherheitscheck – Nach einer Reparatur sollte der durchführende Techniker einen Sicherheitscheck des Gerätes vornehmen, um zu versichern, dass das Gerät einwandfrei funktioniert.
Batterien – Setzen Sie Batterien immer richtig gepolt in elektrische Geräte ein. Explosionsgefahr wenn Batterien falsch eingesetzt werden. Ersetzen Sie alte Batterien stets mit neuen des
gleichen Typs. Verwenden Sie alte und neue Batterien nie gleichzeitig. Alte Batterien gehören
nicht in den Hausmüll, sondern müssen separat in den dafür vorgesehenen Behältern entsorgt
DE | 3
20.
werden. Batterien dürfen nicht übermäßiger Hitze, wie z. B. durch Sonnenschein, Feuer o. ä.
ausgesetzt werden.
Kopfhörer – Eine zu hohe Lautstärke bei Verwendung von Ohr- oder Kopfhörern kann zu Hörschäden führen.
VORSICHT
GEFAHR EINES ELEKTROSCHOCKS
WARNUNG: Um das Risiko eines Feuers oder
elektrischen Schlags zu verringern, setzen Sie dieses
Gerät niemals Wasser, Regen oder Feuchtigkeit aus.
WARNUNG: Um die Gefahr eines
elektrischen Schlags zu verringern, öffnen
Sie niemals das Gehäuse dieses Gerätes.
Versuchen Sie niemals, das Gerät selbst
zu reparieren. Wartungsarbeiten und
Reparaturen dürfen ausschließlich von
qualifiziertem Fachpersonal durchgeführt
werden.
Dieses Symbol weist den Benutzer auf gefährliche Spannung innerhalb des
Gerätes hin. Es besteht die Gefahr eines elektrischen Schlags.
Dieses Symbol weist den Benutzer auf Teile hin, deren Funktion und Wartung
genauestens beschrieben sind.
SEHEN SIE NIEMALS DIREKT IN
DEN LASERSTRAHL!
Batterien und Akkus
Batterien und Akkus dürfen nicht mit dem normalen Hausmüll entsorgt werden. Jeder Verbraucher ist verpflichtet, alte Batterien und Akkus bei einer Sammelstelle seiner Gemeinde,
seines Stadtteils oder im Handel abzugeben, so dass sie einer umweltschonenden Entsorgung zugeführt werden können.
Entsorgung von Elektro- und Elektronikaltgeräten
Dieses Symbol auf dem Produkt weist darauf hin, dass dieses nicht zusammen mit
dem normalen Hausmüll entsorgt werden darf. Für zu entsorgende Elektro- und
Elektronikaltgeräte gibt es ein besonderes, kostenfreies Entsorgungssystem. Weitere
Informationen erhalten Sie von Ihrem lokalen Entsorgungsunternehmen oder von dem
Händler, bei dem Sie dieses Produkt erworben haben. Mit der getrennten Entsorgung
helfen Sie, die Umwelt und Gesundheit Ihrer Mitmenschen zu schützen.
4 | DE
DE
1. Umgang mit Disks
•
Das Disk-Fach Ihres Gerätes muss stets geschlossen sein, sodass kein Staub und Schmutz eindringen können, die die Linse beschädigen würden.
•
Berühren Sie niemals die bespielte Seite einer Disk.
Bekleben und beschreiben Sie niemals eine Disk.
•
•
Biegen Sie Disks nicht.
•
Halten Sie Disks immer an deren äußeren Kanten.
2. Aufbewahrung von Disks
•
Bewahren Sie Disks stets in ihren jeweiligen Schutzhüllen auf.
•
Setzen Sie Disks niemals dem direkten Sonnenlicht, Staub, Schmutz, hohen Temperaturen, hoher
Luftfeuchtigkeit oder Nässe aus.
3. Reinigen von Disks
•
Sollte eine Disk einmal verschmutzt sein, so verwenden Sie zum Säubern ein sauberes, trockenes
Tuch.
•
Ziehen Sie das Tuch vorsichtig von der Mitte der Disk zur äußeren Kante:
Richtig
•
Falsch
Verwenden Sie niemals chemische Reinigungsmittel, Wasser, Verdünnungsmittel oder antistatisches Spray.
4. Kompatibilität
Aufgrund der Vielzahl von Komprimierungsverfahren kann es vorkommen, dass vereinzelte Disks
•
nicht wiedergegeben werden können.
DE | 5
HINWEISE ZU DIESER BEDIENUNGSANLEITUNG:
1. Diese Bedienungsanleitung wird vom Hersteller ohne jegliche Gewährleistung veröffentlicht. Korrekturen und Änderungen dieser Bedienungsanleitung zur Beseitigung typographischer Fehler
und redaktioneller Ungenauigkeiten sowie aufgrund von (technischen) Verbesserungen (Änderungen) der Geräte können vom Hersteller jederzeit ohne Ankündigung vorgenommen werden.
Änderungen dieser Art werden in zukünftigen Ausgaben dieser Bedienungsanleitung berücksichtigt. Alle Rechte vorbehalten.
2. Alle Abbildungen dienen ausschließlich der Illustration und zeigen nicht immer die exakte Darstellung des Artikels.
3. Dieses Gerät ist nicht dafür bestimmt, durch Personen (einschließlich Kinder) mit eingeschränkten physischen, sensorischen oder geistigen Fähigkeiten oder mangels Erfahrung und / oder
mangels Wissen benutzt zu werden, es sei denn, sie werden durch eine für ihre Sicherheit
zuständige Person beaufsichtigt oder erhielten von ihr Anweisung, wie das Gerät zu benutzen ist.
Kinder sollten beaufsichtigt werden, um sicherzustellen, dass sie nicht mit dem Gerät spielen.
WEITERE HINWEISE ZUM GERÄT
Einstellen einer sicheren Lautstärke
•
Beim ständigen Hören lauter Musik gewöhnt sich Ihr Gehör daran und lässt die Lautstärke geringer erscheinen.
•
Was normal erscheint, kann schon lange zu laut und gesundheitsschädlich sein.
•
Stellen Sie zu Ihrer eigenen Sicherheit die Lautstärke niedrig ein.
•
Erhöhen Sie die Lautstärke langsam.
•
Die Hörschäden können weitreichend und nicht heilbar sein.
Wenden Sie sich bei Hörproblemen bitte unverzüglich an Ihren Hausarzt.
•
Kondensation:
•
Beim Umsetzen des Geräts von einer kalten in eine warme Umgebung kann es zu Kondensationsbildung kommen. In diesem Fall sind Fehlfunktionen nicht auszuschließen. Schalten Sie das
Gerät nicht ein und benutzen es für etwa 1 Stunde nicht, bis es ausgetrocknet ist.
Energie sparen
•
Bei Nichtbenutzung das Gerät mit dem Netzschalter ausschalten.
•
Bei längerer Nichtbenutzung den Netzstecker aus der Steckdose ziehen.
Auspacken:
•
Nehmen Sie Ihr Gerät vorsichtig aus der Verpackung. Sie sollten die Verpackung zur weiteren
Verwendung aufheben.
•
Entfernen Sie vorsichtig etwaige Schutzkartons und Schutzfolien.
Bedienelemente und Funktionen
Vorderansicht
Draufsicht
Rückansicht
6 | DE
DE
1.
2.
3.
4.
5.
6.
7.
8.
9.
10.
11.
12.
13.
14.
15.
16.
17.
18.
19.
20.
21.
22.
23.
24.
25.
26.
27.
28.
29.
30.
31.
32.
33.
34.
35.
36.
37.
38.
Lautsprecher
Kopfhörerbuchse
CD-Fach
Kassettenfach
Kassettenfunktionen:
REC ●: Aufnahme
PLAY ►: Wiedergabe
REW ◄◄: Rückspulen
F.FWD ►►: Vorspulen
STOP ■: Stopp
PAUSE ||: Pause
LCD-Anzeige
ID3/MONO/ST.: ID3-Tag/Mono/Stereo
REPEAT : Wiederholungsmodus
OPEN: Taste zum Öffnen des Kassettenfaches
VOLUME UP: Lautstärke erhöhen
VOLUME DOWN: Lautstärke verringern
Fernbedienungssensor
MUTE: Stummschaltung
TIMER: Timerfunktion
EQ : Equalizer
SLEEP: Einschlaffunktion
FUNCTION: Funktionsauswahl
STAN DBY: Standby-LED
BAND: Frequenzbereich
STANDBY/ ON : Standby-Modus/Ein
◄ PRESET /FOLDER : Vorheriger Speicherplatz/ Vorheriger Ordner
►► SKIP/TUN. UP: Nächster Track/Sendersuche vorwärts
■ STOP: Stopp
◄◄ SKIP/TUN. DOWN: Vorheriger Track/Sendersuche rückwärts
►/|| PLAY /PAUSE: Wiedergabe/Pause
OPEN: Taste zum Öffnen des CD-Faches
PRESET /FOLDER ►: Nächster Speicherplatz/Nächster Ordner
MEM/C-ADJ.: Vorbelegung/Uhrzeit einstellen
UKW -Antenne
LINE OUT: Line-Ausgangsbuchse
AC~: Netzkabel
Fach für Backupbatterien
Montagelöcher
Fernbedienung
1.
2.
3.
4.
5.
6.
7.
8.
9.
10.
11.
12.
13.
FUNCTION: Funktionsauswahl
BAND: Frequenzbereich
ID3/MONO/ST.: ID3-Tag/Mono/Stereo
REPEAT : Wiederholungsmodus
►/|| PLAY /PAUSE: Wiedergabe/Pause
EQ : Equalizer
►►| Nächster Track/Sendersuchevorwärts
■ Stopp
MEM/C-ADJ.: Vorbelegung/Uhrzeit einstellen
TIMER: Timerfunktion
SLEEP: Einschlaffunktion
0-9: Zifferntasten
VOLUME +: Lautstärke erhöhen
DE | 7
14.
15.
16.
17.
18.
19.
20.
21.
- VOLUME: Lautstärke verringern
INTRO : Anspielen
|◄◄ Vorheriger Track/Sendersucherückwärts
RANDOM: Zufällige Wiedergabe
PRESET/FOL DN: Vorheriger Speicherplatz/Vorheriger Ordner
PRESET/FOL UP: Nächster Speicherplatz/Nächster Ordner
MUTE: Stummschaltung
STAN DBY: Standby-Modus/Ein
Aufbau des LCD-Displays
A. Symbol Einschlaffunktion
B. Symbol Timer
C. Album/Radio-Speicheplatznummer/CD-Anzeige
D. Stereoanzeige
E. Lautstärkeanzeige (niedrig - hoch)
F. Tracknummer/Zeit
Stromversorgung
Das Gerät ist für eine Netzspannung von AC 230V~50Hz ausgelegt.
•
•
Schließen Sie das Gerät an keine andere Spannungsversorgung an, dies kann zu Beschädigungen am Gerät führen, die nicht durch die Garantie abgedeckt sind.
•
Beim Ziehen des Netzsteckers fassen Sie bitte am Gehäuse an und nicht am Kabel um Kabelbruch und daraus resultierende Risiken zu vermeiden.
Einsetzen der Backup-Batterien (Batterien nicht mitgeliefert):
1. Entfernen Sie den Batteriefachdeckel durch leichtes Herunterdrücken und schieben ihn in Pfeilrichtung, bis Sie ihn herausheben können.
2. Setzen Sie drei Batterien des Typs UM-3, 1.5V (wir empfehlen die Verwendung von AlkaliBatterien) zur Gangreserve der Uhr und zur Sicherung der im Prozessor gespeicherten Daten
bei Netzausfall ein. Achten Sie beim Einsetzen der Batterien auf die im Batteriefach dargestellte
Polarität (“+” und “-”).
3. Setzen Sie den Deckel wieder auf das Batteriefach und schieben ihn gegen die Pfeilrichtung, bis
die Verschlussklammer einrastet.
Einsetzen der Batterien in die Fernbedienung
Schieben Sie die Abdeckung des Batteriefachs nach unten. Nehmen Sie die Abdeckung
vom Batteriefach ab. Setzen Sie zwei Batterien des Typs UM-4, 1.5V ein. Achten Sie
beim Einsetzen der Batterien auf die im Batteriefach und auf den Batterien dargestellte
Polarität („+“ und „-“). Setzen Sie den Batteriefachdeckel wieder auf das Batteriefach auf.
Drücken Sie den Deckel leicht herunter und schieben Sie ihn bis zum Einrasten nach
oben.
Batterien nicht
mitgeliefert
Vorsicht mit Batterien
•
Folgen Sie bitte diesen Sicherheitshinweisen im Umgang mit Batterien für dieses Gerät:
•
Benutzen Sie nur Batterien des gleichen Typs und der Größe wie beschrieben.
•
Achten Sie auf die Polarität wie im Batteriefach beschrieben. Falsch eingesetzte Batterien können zu Beschädigungen führen.
•
Mischen Sie nicht unterschiedliche Batterietypen (z.B. Alkali und Zink/Kohle) oder alte und neue
Batterien.
•
Laden Sie Batterien nicht auf, das führt zu Überhitzung und kann zu einer Explosion führen.
•
Verwenden Sie Alkali-Batterien für eine möglichst lange Batterielebensdauer.
•
Bei längerer Nichtbenutzung entnehmen Sie bitte die Batterien, um ein Auslaufen zu vermeiden.
8 | DE
DE
Allgemeine Bedienungshinweise
Die unten beschriebenen Einstellungen beziehen sich auf die Bedienelemente am Gerät. Die
Einstellungen sind, wenn nicht anders angegeben, auch mit der Fernbedienung möglich.
Wenn Sie den Stecker zum ersten Mal mit einer Netzsteckdose verbinden, geht das Gerät in den
Standby-Modus und die STANDBY-LED leuchtet auf. Statt der Uhrzeit blinkt „-- --:-- --“ auf dem Display. Das ist ein Hinweis, dass die Uhrzeit neu eingestellt werden muss.
Drücken Sie die Taste STANDBY/ ON , um das Gerät ein oder in den Standby-Modus zu schalten.
Ziehen Sie den Stecker aus der Steckdose, falls Sie das Gerät ganz ausschalten möchten.
Ein- und Ausschalten
•
Sie können das Gerät jederzeit im Standby-Modus mit STANDBY/ ON einschalten. Das Gerät
befindet sich im Standby-Modus, wenn die Uhrzeit angezeigt wird und die blaue Hintergrundbeleuchtung schwach leuchtet. Die STANDBY-LED leuchtet ebenfalls.
•
Bei eingeschaltetem Gerät leuchtet die blaue Hintergrundbeleuchtung des Displays kräftig auf
und die STANDBY-LED erlischt. Das Gerät ist nun betriebsbereit. Beim Einschalten aus dem
Standby-Modus startet das Gerät mit der zuletzt eingestellten Betriebsart.
Wählen Sie die Audioquelle durch wiederholtes Drücken der Funktionsauswahl FUNCTION. Die
•
entsprechende Anzeige „CD“, „TA PE“ oder „TUNER“ leuchtet auf.
•
Mit VOLUME (UP bzw. DOWN) (oder VOLUME + bzw. – VOLUME auf der Fernbedienung) stellen Sie die Lautstärke ein.
•
Wählen Sie mit der Taste EQ die gewünschte Voreinstellung des Equalizers („PASS“, „CLASSIC“,
„ROCK“, „POP“ oder „JAZZ“).
•
Schalten Sie das Gerät bei Nichtbenutzung mit STANDBY/ ON zurück in den Standby-Modus. Im
Standby-Modus wird die Uhrzeit im Display angezeigt.
•
Das Gerät ist auf Dauerbetrieb ausgelegt, es ist entweder eingeschaltet oder in Betriebsbereitschaft (Standby).
•
Aus Energiespargründen versetzen Sie das Gerät bitte in Standby-Modus wenn Sie es nicht
benutzen oder ziehen den Netzstecker aus der Steckdose.
Hinweis:
Wenn im CD-Modus kein Signal vorhanden ist, schaltet sich das Gerät innerhalb von 15 Minuten
automatisch aus.
Uhrzeiteinstellungen
Das Gerät muss sich im Standby-Modus befinden.
1. Halten Sie die Taste MEM/C-ADJ. gedrückt, bis die Zeit im 12-Stunden-Modus oder im 24- Stunden-Modus angezeigt wird.
2. Drücken Sie ►►SKIP/TUN. UP bzw. ◄◄SKIP/TUN. DOWN, um zwischen 12-Stunden-Anzeige
und 24- Stunden-Anzeige umzuschalten.
3. Drücken Sie die Taste MEM/C-ADJ. ein weiteres Mal. Die Stundenanzeige „00“ blinkt. Stellen Sie
mit ►►SKIP/TUN. UP bzw. ◄◄SKIP/TUN. DOWN die Stunden ein.
4. Drücken Sie die Taste MEM/C-ADJ. ein weiteres Mal. Die Minutenanzeige „00“ blinkt. Stellen Sie
mit ►►SKIP/TUN. UP bzw. ◄◄SKIP/TUN. DOWN die Minuten ein.
5. Drücken Sie die Taste MEM/C-ADJ. ein weiteres Mal, um die Zeiteingabe zu bestätigen.
Hinweis:
Wenn innerhalb von ca. 10 Sekunden keine Taste gedrückt wird, wird der Einstellmodus verlassen
und zum letzten Modus zurückgekehrt.
Timereinstellungen
Das Gerät muss sich im Standby-Modus befinden und die Uhrzeit muss eingestellt sein.
1. Drücken Sie einmal die Taste TIMER. Auf dem Display werden „ ON“ und „00:00“ angezeigt,
wobei die Stundenanzeige blinkt (siehe Abbildung F1).
2. Stellen Sie die Stunden mit ►►SKIP/TUN. UP bzw. ◄◄SKIP/TUN. DOWN ein.
3. Drücken Sie die Taste TIMER ein weiteres Mal. Die Minutenanzeige blinkt. Stellen Sie mit
DE | 9
►►SKIP/TUN. UP bzw. SKIP/TUN. DOWN die Minuten ein.
Drücken Sie die Taste TIMER ein weiteres Mal, um die Einschaltzeit des Timers zu bestätigen.
Auf dem Display werden „ OFF“ und „00:00“ angezeigt und die Stundenanzeige blinkt (siehe
Abbildung F2).
6. Wiederholen Sie die Schritte 2 bis 3 und bestätigen Sie mit einem erneuten Tastendruck auf
TIMER die Ausschaltzeit des Timers.
7. Wählen Sie mit ►►SKIP/TUN. UP bzw. ◄◄SKIP/TUN. DOWN die Betriebsart „TUNER“ oder
„CD“ für den eingestellten Zeitpunkt aus.
8. Drücken Sie die Taste TIMER ein weiteres Mal. Die Anzeige „VOL“ blinkt auf dem Display. Stellen
Sie mit ►►SKIP/TUN. UP bzw. ◄◄SKIP/TUN. DOWN die gewünschte Musiklautstärke ein.
9. Bestätigen Sie die erneut mit TIMER. Die Einstellungen werden der Reihe nach auf dem Display
angezeigt.
10. Das Gerät schaltet sich automatisch zur eingestellten Einschaltzeit ein, geht in die voreingestellte
Betriebsart und schaltet sich automatisch zur eingestellten Ausschaltzeit aus.
4.
5.
Hinweise:
•
Wenn innerhalb von ca. 10 Sekunden keine Taste gedrückt wird, wird der Einstellmodus verlassen und zum letzten Modus zurückgekehrt.
Wenn während dem Einstellen der Einschaltzeit des Timers das Display „ERROR“ anzeigt, sind
•
Einschalt- und Ausschaltzeit identisch. In diesem Fall stellen Sie bitte zuerst die Ausschaltzeit ein.
Deaktivierung oder Ändern des Timers:
Deaktivieren: Tippen Sie kurz auf die Taste TIMER. Das Symbol „ “ auf dem Display erlischt.
Ändern: Halten Sie die Taste TIMER länger als 1 Sek. gedrückt. Nun können ab Schritt 2 unter Timereinstellungen die Einstellungen ändern.
Einschlaffunktion einstellen
1. Falls Sie mit Musik einschlafen möchten, drücken Sie die Taste SLEEP.
2. Sie können den Zeitraum bis zum automatischen Ausschalten auswählen: 90, 80, 70 usw. bis 10
Minuten. Sie können die Einschlaffunktion im Radio-, CD-Player oder Kassettenrekorder-Betrieb
einstellen.
Equalizer
Drücken von EQ zeigt den aktuell eingestellten Klangeffekt an.
Wählen Sie den gewünschten Klangeffekt durch wiederholtes Drücken auf EQ aus:
Bei „PASS“ ist der Equalizer ausgeschaltet.
Funktionsauswahl
Mit jedem Tastendruck auf FUNCTION können Sie eine andere Betriebsart wählen, siehe unten:
Radio
1.
2.
Schalten Sie das Gerät mit der Taste STANDBY/ ON ein und drücken wiederholt die Taste FUNCTION, bis „TUNER“ auf dem Display angezeigt wird.
Wählen Sie mit der Taste BAND das Frequenzband „AM“ (Mittelwelle) oder „FM“ (UKW). Auf dem
Display wird entweder „AM“ (Mittelwelle) oder „FM“ (UKW) angezeigt.
10 | DE
DE
Manuelles Einstellen von Sendern
Einstellen von schwachen Sendern: Drücken Sie wiederholt die Taste ►►SKIP/TUN. UP bzw.
◄◄SKIP/TUN. DOWN, bis Sie die richtige Frequenz ablesen können oder bis Sie die bestmögliche
Empfangsqualität erzielen.
Automatisches Einstellen von Sendern
1. Halten Sie die Taste ►►SKIP/TUN. UP bzw. ◄◄SKIP/TUN. DOWN mindestens eine Sekunde
lang gedrückt. Lassen Sie die Taste dann los. Der Tuner sucht automatisch nach dem ersten
Radiosender mit ausreichender Signalstärke.
2. Wiederholen Sie die oben beschriebenen Schritte, falls Sie einen anderen Sender einstellen
möchten.
Mono/Stereo
Diese Funktion ist nur im UKW-Modus verfügbar.
1. Falls Sie keinen UKW-Stereosender auswählen können, drücken ID3/MONO/ST. Im Display wird
„STEREO“ angezeigt und wenn Sie einen UKW-Stereosender empfangen, wird die UKW-Stereobetriebsart „
“ anzeigt.
2. Wenn Sie erneut die Taste ID3/MONO/ST. drücken, wird „MONO“ angezeigt und der UKW-Stereostatus „
” erlischt. Das Gerät schaltet in die UKW-Monobetriebsart.
Speichern von Radiosendern
Sie können auch Ihre Lieblingsradiosender im Programmspeicher abspeichern (bis zu 10 MW-Sender
und 30 UKW-Sender).
1. Drücken Sie die Taste BAND, um zwischen „AM“ (MW)und „FM“ (UKW) umzuschalten.
2. Stellen Sie den gewünschten Sender ein.
3. Drücken Sie die Taste MEM/C-ADJ.
4. Drücken Sie die Taste PRESET /FOLDER (◄ bzw. ►) oder PRESET FOL (UP bzw. DN) auf der
Fernbedienung, um die gewünschte Speichernummer anzuwählen.
5. Drücken Sie die Taste MEM/C-ADJ. ein weiteres Mal, um Ihre Auswahl zu bestätigen.
6. Um weitere Sender abzuspeichern, wiederholen Sie bitte die Schritte 2 bis 5.
7. Um die gespeicherten Sender auszutauschen, wiederholen Sie bitte die Schritte 2 bis 5.
Hinweise:
•
Wenn innerhalb von ca. 8 Sekunden keine Taste gedrückt wird, wird der Speichermodus verlassen und zum letzten Modus zurückgekehrt.
•
Das Abspeichern eines neuen Radiosenders auf einem Speicherplatz löscht den zuvor auf diesem Speicherplatz enthaltenen Radiosender.
•
Zum Löschen aller vorbelegten Sender halten Sie die Taste PLAY /PAUSE im Standbymodus so
lange gedrückt, bis die STANDBY-LED und das LCD-Display einmal aufblinken.
Auswählen der gespeicherten Radiosender
Drücken Sie die Taste BAND, um das gewünschte Frequenzband auszuwählen.
•
Drücken Sie Taste PRESET /FOLDER (◄ bzw. ►) oder PRESET FOL (UP bzw. DN) auf der
Fernbedienung, um den gewünschten gespeicherten Radiosender aufzurufen.
•
Die Speichernummer des Radiosenders wird zusammen mit der entsprechenden Radiofrequenz
angezeigt.
Tipps für besseren Empfang
UKW: Wickeln Sie die UKW-Wurfantenne auf der Rückseite des Geräts für besten Empfang voll ab.
MW: Das Gerät hat eine eingebaute Ferritantenne, richten Sie das Gerät für besten Empfang aus.
Bedienung des Kassettenrekorders
Wiedergabe einer Kassette
Wenn Sie Kassetten abspielen möchten, öffnen Sie zuerst die Abdeckung der Kassettentasten.
Stellen Sie sicher, lockeres Kassettenband vor dem Abspielen aufzurollen. Benutzen Sie entweder
einen Stift oder einen Kugelschreiber. Führen Sie den Stift einfach in die Spulenmitte ein und drehen
DE | 11
Sie ihn, um das lockere Band aufzurollen.
Drücken Sie die rechte Taste OPEN, um das Kassettenfach zu öffnen.
Legen Sie die Kassette mit der offenen Seite nach unten und der vollen Spule auf der linken Seite
ausgerichtet in das Kassettenfach ein. Schieben Sie die Kassette ganz herein und schließen Sie das
Fach.
Berühren Sie dabei nicht die Oberfläche des Kassettenbandes.
Wählen Sie mit der Taste FUNCTION die Option „TAPE“ und drücken Sie die Kassettentaste PLAY ►.
Drücken Sie einmal die Kassettentaste STOP ■, um die Wiedergabe zu beenden. Nehmen Sie die
Kassette vorsichtig aus dem Kassettenfach.
Hinweis:
Bitte drücken Sie schnell die Kassettentaste STOP ■, bevor Sie das Ende des Bandes erreicht, um
mögliche Auswirkungen auf das Band zu verhindern.
Vom Radio aufnehmen
1. Wählen Sie mit der Taste FUNCTION die Option „TUNER“ und mit der Taste BAND das Frequenzband AM (MW) oder FM (UKW) aus.
2. Stellen Sie den gewünschten Sender ein (siehe Abschnitt „Radio“).
3. Legen Sie eine Kassette in das Kassettendeck ein und drücken Sie gleichzeitig die Kassettentasten REC ● und PLAY ►.
4. Drücken Sie die Kassettentaste STOP ■, um die Aufnahme zu beenden.
5. Die Kassettentaste PAUSE kann benutzt werden, um die Aufnahme kurzzeitig zu unterbrechen.
6. Drücken Sie die Kassettentaste F.FWD zum schnellen Vorspulen der Kassette. Drücken Sie die
Kassettentaste REW zum schnellen Rückspulen der Kassette.
Von CDs aufnehmen
1. Wählen Sie mit der Taste FUNCTION die Option „CD“.
2. Wählen Sie die aufzunehmenden Track aus.
3. Legen Sie eine Kassette in das Kassettendeck ein und drücken Sie gleichzeitig die Kassettentasten REC ● und PLAY ►.
4. Drücken Sie die Kassettentaste STOP ■, um die Aufnahme zu beenden.
Auto-Stopp
Sobald die Kassette im Wiedergabe- bzw. im Aufnahme-Modus ihr Ende erreicht, löst das eingebaute
Auto-Stopp-System die eingedrückten Kassettentasten PLAY ► und REC ●. Das Auto-Stopp-System
ist während der Aufnahme vom Radio und vom CD-Player aktiviert Es wird nur der Kassettenbetrieb
beendet. Radio und CD-Player fahren mit der Wiedergabe fort.
Schützen von Aufnahmen
Im Normalfall werden alle auf einer Kassette enthaltenen Daten automatisch gelöscht, wenn neue
Aufnahmen vorgenommen werden.
Es ist möglich, Ihre Aufnahmen durch Entfernen der Schutzlaschen (an der Oberkante der Kassette)
vor versehentlichem Löschen zu schützen. Wenn die Kassette mit der aufgenommenen Seite nach
links und dem ungeschützten Band nach unten ausgerichtet werden, befindet sich die Schutzlasche
auf der oberen linken Seite der Kassette.
Alle bespielten Kassetten werden auf diesem Wege vor versehentlichem Löschen der Aufnahmen
geschützt.
„Geschützte“ Kassetten verhindern das Eindrücken der Aufnahmetaste REC ●. Falls sich diese Taste
nicht eindrücken lassen sollte, wenn Sie eine Aufnahme vornehmen möchte, so tun Sie dies niemals
12 | DE
DE
mit Gewalt, da ansonsten der Mechanismus beschädigt werden könnte. Stellen Sie sicher, dass eine
Kassette eingelegt wurde und dass die Schutzlasche nicht entfernt wurde. Sie können auf Kassetten,
von denen die Schutzlasche entfernt wurde, aufnehmen, indem Sie die Schutzlaschen mit Klebeband
überkleben.
Hinweise zu Audiokassetten
1. Lose Bänder können Probleme verursachen. Ziehen Sie das Band in der Kassette vorsichtig mit
einem Bleistift straff (siehe Abb. 1).
2. Um ein ungewolltes Löschen von Tonbandkassetten zu vermeiden, brechen Sie bitte die Aufnahmesperre heraus (siehe Abb. 2). Wollen Sie später doch wieder auf diese Kassette aufnehmen,
dann setzen Sie ein Klebeband über die Aussparungen (siehe Abb. 3).
Seite A
(Abb. 2)
(Abb.1)
Aufnahmesperre B Seite B
Aufnahmesperre A
(Abb.3)
Klebeband
Tonband mit Bleistift straffen
3.
4.
5.
6.
Aufbewahrung von Kassetten:
Kassetten nicht in direkter Sonneneinstrahlung aufbewahren oder in der Nähe wärmeerzeugender Geräte. Kassetten nicht mit Magneten in Berührung bringen.
120-Minuten-Kassetten:
Bei 120-Minuten-Kassetten ist das Band sehr dünn und kann leicht beschädigt werden oder
reißen.
Endloskassetten:
Bitte benutzen Sie keine Endloskassetten, dies kann zu Schäden am Gerät führen.
Reinigen der Tonköpfe:
Q-TIP
KOPF
7.
Halten Sie stets Tonköpfe, Antrieb und Andruckrolle sauber, um
ANTRIEB besten Betrieb des Geräts zu gewährleisten.
Reinigen Sie diese Komponenten wie folgt:
1. Öffnen Sie das Kassettenfach.
2. Tränken Sie einen Q-Tip mit etwas Reinigungsalkohol und
reinigen vorsichtig Tonköpfe, Antrieb und Andruckrolle.
ANDRUCKFÜHRUNG ROLLE
Entmagnetisierung Tonkopf:
Ein magnetisierter Tonkopf führt zu Nebengeräuschen bei der Wiedergabe. Entmagnetisieren Sie
den Tonkopf mit einem Tonkopfreiniger.
Hinweis:
Bitte seien Sie bei der Reinigung äußerst vorsichtig, um die Präzisionsbauteile nicht zu
beschädigen.
CD/MP3/WMA
Der CD-Player kann nur Audio-CDs und MP3/WMA-CDs abspielen. Versuchen Sie nicht, Daten-CDs
oder VCD/DVD Disks abzuspielen.
Laden einer CD
1. Drücken Sie die linke Taste OPEN, um das CD-Fach zu öffnen. Das Display zeigt „OPEN“ an
DE | 13
2.
3.
(siehe Abb. F3).
Legen Sie eine CD in das CD-Fach ein und drücken Sie auf die CD-Tür (CLOSE), bis diese
einrastet.
Wählen Sie mit der Taste FUNCTION die Option „CD“oder drücken Sie die Taste ►/|| PLAY /
PAUSE, um in den CD/MP3-Modus zu wechseln. Der Player liest die MP3-/WMA-/Audio-CD
automatisch.
Hinweise:
1. Dieser Player kann CD, CD-R, CD-RW und MP3/WMA-Disks wiedergeben.
2. Es können „8 cm“- und „Multisession“-MP3-CDs gelesen werden.
3. Die Wiedergabe-Transferrate liegt bei 8-320 kBps.
4. Eine CD kann max. 99 Verzeichnisse und 999 Tracks enthalten.
5. Falls eine CD oder der Inhalt nicht gelesen werden können, wird die Meldung „NO DISC“ angezeigt (siehe Abb. F4).
Entnehmen einer Disk
1. Drücken Sie die linke Taste OPEN, um das CD-Fach zu öffnen. Auf dem Display wird OPEN
angezeigt.
2. Entfernen Sie eine CD, indem Sie sie mit den Fingern am Rand anfassen und sie vorsichtig nach
oben herausnehmen.
3. Verstauen Sie die entnommene CD zum Schutz im entsprechenden Cover.
Wiedergabe einer Audio-CD
1. Die Wiedergabe wird durch Drücken von PLAY/PAUSE gestartet. Die Wiedergabe beginnt mit
dem ersten Track. In der Anzeige wird „Cd“, die laufende Tracknummer und die abgelaufene Zeit
angezeigt (siehe Abb. F5).
2. Drücken Sie PLAY /PAUSE, um die Wiedergabe zu unterbrechen. Die Anzeige der abgelaufenen
Zeit blinkt (siehe Abb. F6).
3. Drücken Sie erneut PLAY/PAUSE, um die Wiedergabe fortzusetzen.
4. Drücken Sie STOP ■, um die Wiedergabe zu beenden.
Wiedergabe einer MP3-/WMA-CD
1. Die Wiedergabe wird durch Drücken von PLAY /PAUSE gestartet. Die Wiedergabe beginnt mit
dem ersten Track. In der Anzeige werden „MP3“, die Albumnummer, die laufende Tracknummer
und die abgelaufene Zeit angezeigt (siehe Abb. F7).
2. Drücken Sie PLAY/PAUSE, um die Wiedergabe zu unterbrechen. Die Anzeige der abgelaufenen
Zeit blinkt (siehe Abb. F8).
3. Drücken Sie erneut PLAY/PAUSE, um die Wiedergabe fortzusetzen.
4. Drücken Sie STOP ■, um die Wiedergabe zu beenden.
Auswahl eines anderen Tracks (Audio- und MP3/WMA-CD)
1. Drücken Sie die Taste ►►SKIP/TUN. UP bzw. ◄◄SKIP/TUN. DOWN, bis die gewünschte
Tracknummer im Display angezeigt wird. (siehe Abb. F9 und F10).
2. Drücken Sie einmal die Taste ►►SKIP/TUN. UP bzw. ◄◄SKIP/TUN. DOWN . Die vorherige
oder nächste Tracknummer erscheint und die Wiedergabe wird gestartet.
3. Drücken Sie im Pausemodus einmal die Taste SKIP/TUN. UP. Die nächste Tracknummer wird
14 | DE
DE
4.
5.
angezeigt. Setzen Sie dann mit der Taste PLAY /PAUSE die Wiedergabe fort.
Drücken Sie im Pausemodus einmal die Taste ◄◄SKIP/TUN. DOWN. Sie kehren zum Anfang
des laufenden Tracks zurück, bleiben aber im Pausemodus. Auf dem Display blinkt „00:00“ (siehe
Abb. F11 und F12).
Durch Drücken der Zifferntasten auf der Fernbedienung kann direkt die gewünschte Tracknummer auswählt werden (Das Display zeigt eine Fehlermeldung an, wenn die Nummer größer als
die Trackanzahl auf der CD ist).
Suche nach einer bestimmten Stelle (nur während der Wiedergabe, Audio- und MP3/WMA-CD)
Halten Sie ►►SKIP/TUN. UP bzw. ◄◄SKIP/TUN. DOWN zur Suche nach der gewünschten Stelle
innerhalb
des Tracks gedrückt. Nach dem Loslassen der Taste wird die normale Wiedergabe fortgesetzt. Während der Suche wird die Lautstärke abgesenkt.
Auswahl eines der anderen Alben (nur MP3/WMA-CD)
Wechseln Sie mit PRESET/FOLDER (◄ bzw. ►) oder PRESET FOL (UP bzw. DN) auf der Fernbedienung zum nächsten oder vorherigen Album (falls die CD mehr als ein Album enthält). Die Album-Funktion kann nur bei MP3/WMA-CDs verwendet werden, die Albums enthalten. Die Wiedergabe beginnt
mit dem ersten Track im gewählten Album.
ID3-Tags
Nur im MP3/WMA-Modus.
1. Drücken Sie ID3/MONO/ST. zum Aufrufen der ID3-Funktion.
2. W enn die MP3-Datei ID3-Informationen enthält, werden automatisch „Title“, „Artist“ und „Album“
auf dem Display angezeigt.
3. Drücken Sie erneut ID3/MONO/ST. Die ID3-Funktion wird ausgeschaltet.
TITLE
ARTIST
ALBUM
AKTUELLE UHRZEIT
Wiederholungsmodus
Audio-CD:
1. Falls Sie während der Wiedergabe einer Audio-CD einen einzelnen Track wiederholen möchten,
drücken Sie einmal die Taste REPEAT . Die Anzeige „REPEAT “ leuchtet auf (siehe Abb. F13).
2. Falls Sie alle Tracks wiederholen möchten, drücken Sie zweimal die Taste REPEAT . Die Anzeige
„REPEAT ALL“ leuchtet auf (siehe Abb. F14).
3. Zum Beenden der Wiederholfunktion drücken Sie dreimal die Taste REPEAT .
MP3-/WMA-CD:
1. Falls Sie während der Wiedergabe einer MP3/WMA-CD einen einzelnen Track wiederholen
möchten, drücken Sie einmal die Taste REPEAT . Die Anzeige „REPEAT “ leuchtet auf (siehe
Abb. F15).
2. Falls Sie alle Tracks wiederholen möchten, drücken Sie zweimal die Taste REPEAT . Die Anzeige
„REPEAT ALL “ leuchtet auf (siehe Abb. F16).
3. Falls Sie das aktuelle Album wiederholen möchten, drücken Sie dreimal die Taste REPEAT . Die
Anzeige „REPEAT ALBUM “ leuchtet auf (siehe Abb. F17).
4. Zum Beenden der Wiederholfunktion drücken Sie viermal die Taste REPEAT .
DE | 15
Zufallswiedergabe (nur auf der Fernbedienung)
1. Drücken Sie einmal die Taste RANDOM. Die Anzeige „RANDOM“ leuchtet auf (siehe Abb. F18).
2. Drücken Sie PLAY /PAUSE, um die Wiedergabe zu starten. Die Tracks werden in zufälliger
Reihenfolge abgespielt.
3. Drücken Sie die Taste RANDOM ein weiteres Mal, um die Zufallswiedergabe zu beenden.
Anspielen (nur auf der Fernbedienung)
1. Drücken Sie einmal die Taste INTRO. Die Anzeige „INTRO“ leuchtet auf (siehe Abb. F19).
2. Das Gerät gibt die ersten 10 Sekunden jedes Tracks wieder.
3. Drücken Sie die Taste INTRO ein weiteres Mal, um das Anspielen zu beenden.
CD-Player programmieren
Sie können durch das Programmieren des CD-Players bis zu 32 Tracks im Audio-CD-Modus oder bis
zu 64 Tracks im MP3-/WMA-Modus in beliebiger Reihenfolge abspielen. Das Programmieren ist nur
im CD-Stoppmodus möglich.
Audio-CD:
1. Legen Sie die zu programmierende CD in das CD-Fach ein und rufen mit der Taste MEM/C-ADJ.
den Programmiermodus auf.
2. Im Display wird „MEMORY “ und „P-01“ angezeigt (siehe Abb. F20).
3. Benutzen Sie die Taste ►►SKIP/TUN. UP bzw. ◄◄SKIP/TUN. DOWN, um den ersten zu programmierenden Track auszuwählen.
4. Wenn der gewünschte Track im Display angezeigt wird, drücken Sie Taste MEM/C-ADJ. ein
weiteres Mal.
5. Im Display wird „MEMORY “ und „P-02“ angezeigt.
6. Wiederholen Sie diese Schritte, um andere CD-Tracks, die Sie programmieren möchten, im
Programmspeicher zu speichern.
7. Anschließend drücken Sie die Taste PLAY /PAUSE. Der Player startet die Wiedergabe des ersten
programmierten Tracks.
Hinweise:
•
Nach der Wiedergabe aller Tracks zeigt das Display die Anzahl und die gesamte Spielzeit der
Audio-/MP3-CD an.
•
Wenn innerhalb von ca. 8 Sekunden keine Taste gedrückt wird, wird der Speichermodus verlassen und zum letzten Modus zurückgekehrt.
MP3-/WMA-CD:
1. Legen Sie die zu programmierende CD in das CD-Fach ein und rufen mit der Taste MEM/C-ADJ.
den Programmiermodus auf.
2. Im Display wird „00“, „MEMORY “ und „P-01“ angezeigt, die Albumnummer „00“ blinkt (siehe Abb.
F21).
3. Die Albumnummer können Sie mit der Taste PRE SET /FOLDER (◄ bzw. ►) oder PRESET FOL
(UP bzw. DN) auf der Fernbedienung ändern.
16 | DE
DE
4.
5.
Drücken Sie erneut die Taste MEM/C-ADJ., die Tracknummer blinkt (siehe Abb. F22).
Benutzen Sie die Taste ►►SKIP/TUN. UP bzw. ◄◄SKIP/TUN. DOWN, um den ersten zu programmierenden Track auszuwählen.
6. Wenn der gewünschte Track im Display angezeigt wird, drücken Sie Taste MEM/C-ADJ. ein
weiteres Mal.
7. Im Display wird „00“, „MEMORY “ und „P-02“ angezeigt.
8. Wiederholen Sie diese Schritte, um andere CD-Tracks, die Sie programmieren möchten, im
Programmspeicher zu speichern.
9. Drücken Sie die Taste PLAY /PAUSE. Der Player startet die Wiedergabe des ersten programmierten Tracks.
Hinweise:
•
Nach der Wiedergabe aller Tracks zeigt das Display die Anzahl und die gesamte Spielzeit der
Audio-/MP3-CD an.
Wenn innerhalb von ca. 8 Sekunden keine Taste gedrückt wird, wird der Speichermodus verlas•
sen und zum letzten Modus zurückgekehrt.
Programm löschen
1. Das Programm wird gelöscht, wenn Sie die Taste MEM/C-ADJ. drücken und dann mit Taste
STOP in den Stopp-Modus wechseln oder die CD-Fach öffnen und wieder schließen.
2. Durch Erstellen eines neuen Programms wird das alte Programm überschrieben.
Hinweise:
•
Falls Sie im Programmmodus den aktuellen Track wiederholen möchten, drücken Sie einmal die
Taste REPEAT am Gerät oder auf der Fernbedienung. Die Anzeige „REPEAT “ leuchtet auf.
•
Falls Sie alle programmierten Track wiederholen möchten, drücken Sie zweimal die Taste REPEAT . Die Anzeige „REPEAT ALL“ leuchtet auf.
•
Zum Beenden der Wiederholfunktion drücken Sie dreimal die Taste REPEAT .
Stummschaltung
1. Wenn Sie einmal die Taste MUTE drücken, blinkt die Lautstärkepegelanzeige und die Audio- Ausgabe wird kurzzeitig unterbrochen (siehe Abb. F23).
2. Drücken Sie die Taste MUTE ein weiteres Mal. Die Anzeige erlischt und die Audio-Ausgabe
erklingt wie gewohnt.
Musik mit Kopfhörern geniessen
Das Gerät ist mit einem Kopfhörerausgang ausgestattet. Um einen Kopfhörer (nicht mitgeliefert) anzuschließen, verbinden Sie den 3,5 mm Mini-Stereostecker des Kopfhörers mit der -Buchse an der
linken Seite des Geräts. Die Lautsprecher werden während der Benutzung der Kopfhörer automatisch
abgeschaltet.
LINE OUT-Buchse
An die LINE OUT-Buchse kann mittels eines Audiokabels mit 3,5 mm Mini-Stereostecker ein externer
Verstärker angeschlossen werden. Die Lautsprecher des Players bleiben weiterhin in Betrieb.
FEHLERBEHEBUNG
Überprüfen Sie bitte zunächst die Anschlüsse, bevor Sie die nachstehende Liste durchgehen. Sollten
Fehler und Störungen danach weiterhin bestehen, dann wenden Sie sich bitte an den Kundendienst.
DE | 17
Problem
Allgemein
Kein Ton
Mögliche Ursache
Lautstärke ist zu gering eingestellt.
Netzkabel ist nicht angeschlossen.
Keine Tastenfunktion
Elektrostatische Aufladung.
Radio
Schlechter Empfang
Der Radiosender (UKW oder MW)
wurde nicht richtig eingestellt.
UKW: Die Wurfantenne wurde nicht
richtig ausgerichtet.
MW: Das Gerät wurde nicht richtig
ausrichtet.
Störungen durch andere Elektrogeräte (Fernseher, Videorekorder,
Computer usw.).
Die CD wurde verkehrt geladen.
CD/MP3
Keine Wiedergabe
Die CD ist beschädigt oder verFehlerhafte Wiederschmutzt.
Die CD ist beschlagen.
gabe
Die CD ist beschädigt oder verschmutzt.
Kassetten-Rekorder Tonkopf, Antrieb oder Andruckrollen
Schlechte Tonqualität verschmutzt.
Aufnahme funktioniert Aufnahmesperre in Kassette herausnicht
gebrochen.
Fernbedienung
Batterien falsch eingesetzt.
Keine Funktion.
Die Batterien sind erschöpft.
Fernbedienung ist nicht auf Gerät
ausgerichtet.
Es befinden sich Hindernisse
zwischen Fernbedienung und dem
Sensor.
Reichweite überschritten.
Kopfhörer
Der Kopfhörerstecker wurde nicht
Kein Ton
richtig eingesteckt.
Lautstärke ist zu gering eingestellt.
Die CD ist beschädigt.
Backup-Batterien
Keine Backup-Batterien eingelegt.
Voreinstellung bei
Die Backup-Batterien sind erschöpft.
Stomausfall verschwunden
TECHNISCHE SPEZIFIKATIONEN
ALLGEMEIN
STROMVERSORGUNG:
LEISTUNGSAUFNAHME:
AC 230V~50Hz
23 W
RADIO
FREQUENZBEREICH:
UKW 87,5 - 108 MHz
MW 522 - 1620 kHz
KASSETTENPLAYER
BANDLAUFGESCHWINDIGKEIT:
4,75 CM/SEK.
18 | DE
Lösungsvorschlag
Regeln Sie die Lautstärke.
Schließen Sie das Netzkabel korrekt
an.
Ziehen Sie den Netzstecker für einige
Sekunden und schalten das Gerät
danach wieder ein.
Stellen Sie den Radiosender erneut
ein.
UKW: Die Wurfantenne ausrichten.
MW: Das Gerät ausrichten.
Halten Sie Abstand zu anderen Elektrogeräten.
Laden Sie die CD mit dem Aufdruck
nach oben.
Ersetzen oder reinigen Sie die CD.
Mit einem weichen Tuch abwischen.
Ersetzen oder reinigen Sie die CD.
Tonkopf, Antrieb und Andruckrollen
reinigen.
Decken Sie die Stelle mit etwas
Klebeband ab.
Überprüfen Sie die Polarität der
eingesetzten Batterien.
Tauschen Sie die Batterien aus.
Richten Sie die Fernbedienung auf
den Sensor vorn im Gerät aus.
Entfernen Sie die Hindernisse.
Die Fernbedienung hat eine Reichweite von ca. 6 m.
Stecken Sie den Kopfhörerstecker
richtig ein.
Erhöhen Sie die Lautstärke.
Wechseln Sie die CD.
Backup-Batterien eingelegen.
Tauschen Sie die Backup-Batterien
aus.
DE
FREQUENZGANG:
125 Hz – 8 kHz
CD-PLAYER
OPTISCHE AUFNAHME:
FREQUENZGANG:
3-STRAHL-LASER
100 Hz – 16 kHz
GERÄTEABMESSUNGEN:
48 (L) x 24 (B) x 10 (H) cm
NETTOGEWICHT:4,2 kg
Technische und optische Änderungen jederzeit vorbehalten.
DE | 19
20 | DE
EN
Safety Information
1.
2.
3.
4.
5.
6.
7.
8.
9.
10.
11.
12.
13.
14.
15.
16.
17.
18.
19.
Read Instructions - All the safety and operating instructions should be read before the appliance
is operated.
Retain Instructions - The safety and operating instructions should be retained for future reference.
Heed Warnings - All warnings on the appliance and in the operating instructions should be
adhered to.
Water and Moisture – Do not use the apparatus near water (e.g. bath tub, sink, swimming pool)
or in wet places or tropical climates. Do not place objects filled with liquids, such as vases, on top
of the apparatus. Do not expose the apparatus to dripping or splashing.
Setup – The apparatus should only be placed on a stable, flat surface. Do not let the apparatus fall
down or expose it to shock.
Wall or Ceiling Mounting - The appliance should be mounted to a wall or ceiling only as
recommended by the manufacturer.
Ventilation - The appliance should be situated so that its location or position does not interfere
with its proper ventilation. For example, the appliance should not be situated on a bed, sofa,
rug, or similar surface that may block the ventilation openings; or, placed in a built-in installation,
such as a bookcase or cabinet that may impede the flow of air through the ventilation openings.
Ensure a minimum distance of 5 cm around the apparatus for sufficient ventilation. Ensure that the
ventilation is not impeded by covering the ventilation openings with items such as newspapers,
table-cloths, curtains, etc.
Heat - The appliance should be situated away from heat sources such as radiators, heat registers,
stoves, or other appliances (including amplifiers) that produce heat.
Power Sources - The appliance should be connected to a power supply only of the type described
in the operating instructions or as marked on the appliance.
Cables and Plugs – The mains plug shall remain readily operable. All cables should be routed so
that they are not likely to be walked on or pinched by items placed upon or against them, paying
particular attention to cords at plugs, convenience receptacles, and the point where they exit from
the appliance.
Cleaning - The appliance should be cleaned only as recommended by the manufacturer. Clean
by wiping with a dry and clean cloth. Do not use chemical cleaners or detergents. Always pull the
mains plug before cleaning the unit.
Non-use Periods - The power cord of the appliance should be unplugged from the outlet when left
unused for a long period of time.
Object and Liquid Entry - Care should be taken so that objects do not fall and liquids are not
spilled into the enclosure through openings.
Damage Requiring Service - The appliance should be serviced by qualified service personnel
when:
a) The power-supply cord or the plug has been damaged; or
b) Objects have fallen, or liquid has been spilled into the appliance; or
c) The appliance has been exposed to rain; or
d) The appliance does not appear to operate normally or exhibits a marked change in
performance; or
e) The appliance has been dropped, or the enclosure damaged.
Servicing - The user should not attempt to service the appliance beyond that described in the
operating instructions. All other servicing should be referred to qualified service personnel.
Open Fire – Keep the apparatus away from open fires. Do not place naked flame sources, such
as lighted candles on the apparatus.
Thunderstorms – During a thunderstorm the mains plug should be unplugged.
Safety Check – After servicing the technician should conduct a safety check in order to ensure that
the apparatus is working properly and safely.
Batteries – Always place batteries in the correct polarization into electrical components. Danger of
explosion if battery is incorrectly replaced. Replace only with the same or equivalent type. Do not
mix old and new batteries. Take attention to the environmental aspects of battery disposal. Batteries
shall not be exposed to excessive heat such as sunshine, fire or the like. Remove batteries before
disposing of the product.
EN | 21
20. Headphones – Excessive sound pressure from earphones and headphones can cause hearing
loss.
CAUTION
RISK OF ELECTRO SHOCK
WARNING: To reduce the risk of electric
shock, do not remove cover (or back).
No user serviceable parts inside. Refer
servicing to qualified service personnel.
DO NOT OPEN
WARNING: To reduce the risk of fire or electric shock, do
not expose this appliance to dripping or splashing.
The lightning flash with arrowhead symbol within an equilateral triangle is
intended to alert the user to the presence of uninsulated dangerous voltage
within the product’s enclosure that may be of sufficient magnitude to constitute
a risk of electric shock to persons.
The exclamation point within an equilateral triangle is intended to alert the user
to the presence of important operating and maintenance (servicing) instructions
in the literature accompanying the appliance.
DO NOT STARE INTO BEAM –
INVISIBLE LASER RADIATION
Batteries
Batteries may not be disposed of in regular house hold trash. Every consumer has the
obligation to return batteries to special disposal locations.
Disposal of Used Electrical & Electronic Equipment
The meaning of the symbol on the product, its accessory or packaging indicates that this
product shall not be treated as household waste. Please, dispose of this equipment at your
applicable collection point for the recycling of electrical & electronic equipments waste. By
ensuring the correct disposal of this product, you will help prevent potential hazards to the
environment and to human health, which could otherwise be caused by unsuitable waste
handling of this product. The recycling of materials will help conserve natural resources.
For more detailed information about recycling of this product, please contact your local
city office, your household waste disposal service or the shop where you purchased the
product.
22 | EN
1. Handling discs
Always keep the CD compartment shut to prevent dust or dirt from getting into the CD mechanism.
•
•
Do not touch the recorded surface.
•
Do not stick paper or write on either side of the CD.
Do not bend the CD.
•
•
Only handle a disc on its outer edges.
2. Storing discs
•
To avoid scratches/damages always put CDs back into their cases after use.
Do not expose CDs to direct sunlight, dust, dirt, high temperatures, high humidity or water.
•
3. Cleaning discs
•
Use a soft cloth to wipe fingerprints and dust from the disc surface.
•
Carefully move the cloth from the center of the disc to its edge:
Correct
•
False
Never use benzene, thinners, record cleaner fluid or antistatic spray to clean CDs.
4. Compatibility
Due to the numerous compression methods, some discs may not play.
•
NOTES ABOUT THIS INSTRUCTION MANUAL:
1. This instruction manual is published by the manufacturer without any warranty. Corrections and
changes of this instruction manual for the removal of typographic mistakes and editorial inaccuracies as well as due to (technical) improvements (changes) of the devices can be done by the
manufacturer at any time without announcement. Changes of this kind are considered in future
versions of this user manual. All rights reserved.
2. All figures are only for illustration and do not always show the exact representation of the product.
3. This unit is not intended for use by persons (including children) with reduced physical, sensory, or
mental capacities, or lack of experience and knowledge, unless they have been given supervision
or instruction concerning use of the appliance by a person responsible for their safety. Children
should be supervised to ensure that they do not play with the unit.
FURTHER NOTES ON THE DEVICE
Setting a safe volume level
•
If you continually listen to loud music, your hearing gradually adapts to it and gives you the impression that the volume is lower.
•
What seems normal to you can be already for long time too loud and unhealthy.
•
To protect yourself from this, set the volume to a low level.
•
Increase the volume slowly.
Damage to your hearing can be extensive and cannot be reversed.
•
•
If you notice a hearing problem, please consult a doctor.
EN | 23
EN
Condensation:
•
Condensation may occur when moving the device from a cold to a warm environment. If there is
moisture inside the player, it may not operate properly. Don’t turn on the device and wait about
one hour for the moisture to evaporate.
Saving energy
During nonuse of the unit it is advisable to turn off the player with the power switch.
•
•
If the unit is not used for a long period of time, it should be unplugged from the AC socket
Unpacking:
•
Take out carefully the unit from the packing. Please keep the packing for further use.
•
Carefully remove possible protection cardboards and slipcovers.
Control elements and functions
Front view
Top view
Rear view
1.
2.
3.
4.
5.
6.
7.
8.
9.
10.
11.
12.
13.
14.
15.
16.
17.
18.
19.
20.
21.
22.
23.
24.
25.
Speaker
Headphone jack
CD tray
Cassette tray
Cassette functions:
REC ●: Record
PLAY ►: Play
REW ◄◄: Fast rewind
F.FWD ►►: Fast forward
STOP : Stop
PAUSE : Pause
LCD indications
ID3/MONO/ST.: ID3 tag/mono/stereo
REPEAT : Repeat mode
OPEN: Button for opening the cassette door
VOLUME UP: Increase volume
VOLUME DOWN: Decrease volume
IR -remote control sensor
MUTE: Mute
TIMER: Timer function
EQ : Equalizer
SLEEP: Sleep function
FUNCTION: Function selector
STAN DBY: Standby LED
BAND: Frequency band
STANDBY/ ON : Standby mode/On
24 | EN
26.
27.
28.
29.
30.
31.
32.
33.
34.
35.
36.
37.
38.
◄ PRESET /FOLDER : Previous memory location/Previous folder
►►SKIP/TUN. UP: Next track/Radio station search forward
■ STOP: Stop
◄◄SKIP/TUN. DOWN: Previous track/Radio station search backward
►/|| PLAY /PAUSE: Playback/Pause
OPEN: Button for opening the CD door
PRESET /FOLDER ►: Next memory location/Next folder
MEM/C-ADJ: Preset/Adjust clock
FM antenna
LINE OUT: Line output jack
AC~: Power cord
Compartment for backup batteries
Mounting holes
EN
Remote control
1. FUNCTION: Function selector
2. BAND: Frequency band
3. ID3/MONO/ST.: ID3 tag/mono/stereo
4. REPEAT : Repeat mode
5. ►/|| PLAY /PAUSE: Playback/Pause
6. EQ : Equalizer
7. ►►| Next track/Radio station search forward
8. ■ Stop
9. MEM/C-ADJ.: Preset/Adjust clock
10. TIMER: Timer function
11. SLEEP: Sleep function
12. 0-9: Number keys
13. VOLU ME +: Increase volume
14. - VOLUME: Decrease volume
15. INTRO : Short introductory playback of tracks
16. |◄◄ Previous track/Radio station search backward
17. RANDOM: Random playback
18. PRESET/FOL DN: Previous memory location/Previous folder
19. PRESET/FOL UP: Next memory location/Next folder
20. MUTE: Mute
21. STANDBY: Standby mode/On
LCD display
A. Symbol for sleep function
B. Symbol for timer
C. Album/radio memory number/CD indication
D. Stereo indication
E. Volume indication (low – high)
F. Track number/time
Power supply
The unit is designed for mains power supply AC 230V~50Hz.
•
Do not connect the unit to any other power supply to avoid damage that is not covered by your
•
warranty.
To disconnect from wall outlet only pull the plug and not the cable to avoid a cable break and the
•
resulting risks.
Inserting backup batteries (not included):
1. Open the battery compartment cover by slightly pushing down and slide it towards the arrow, until
you can lift it up.
EN | 25
2.
3.
Insert 3 batteries type UM-3, 1.5 V into the battery compartment (preferably Alkaline). These
three batteries keep at short power outages the real-time clock and the data stored in the processor. Please observe the correct polarity marked inside the battery compartment (“+” and “-”).
Place the cover again onto the battery compartment and slide it opposite to the direction of the
arrow until it snaps in.
Inserting batteries into the remote control
Remove the battery compartment cover by pressing it down and sliding it outwards. Take
the cover of the battery compartment away. Insert two batteries type UM-4, 1.5V. Please
observe the correct polarity marked inside the battery compartment and on the batteries (“+” and “-”). Place the cover over the compartment, press down lightly, and push it
upward until it snaps in.
Batteries not
supplied
Battery Safety Precautions
Please follow these safety instructions if handling batteries for this device:
•
Only use batteries of the same type and size.
•
•
Observe the polarity as marked in the battery compartment. Failure to properly align the battery
polarity can cause damages.
•
Do not mix different battery types (e.g. alkaline and zinc/carbon batteries) or exhausted and new
batteries.
Do not recharge normal batteries to avoid overheating and explosion.
•
•
Use alkaline batteries for extending the operating time of the batteries as much as possible.
•
During longer periods of non-use, please remove the batteries to avoid leaking.
General operating instructions
The settings described below refer to the control elements at the device. The settings are, if not
differently indicated, also possible with the remote control.
When connecting the plug with a power outlet for the first time, the appliance will be in the standby
mode and the STANDBY LED lights up. Instead of the time the indication flashes “-- --:-- --” on the
display. This is an indication that the time must be set.
Press the STANDBY/ ON button to turn the appliance on or to set it into standby mode. Pull the power
plug out of the wall socket if you want to switch off completely.
On/Off
•
By pressing STANDBY/ ON you can set the device at any time into the standby mode. The
device is in standby mode if the current time is indicated and the blue background illumination is
dimmed. The STANDBY LED also lights up.
•
At the activated device, the blue background of the display lights up intensely and the STAN DBY
LED extinguishes. The device is now ready for use. When turning on from standby mode to the
activated mode, the device continues with the last adjusted mode.
•
Select the audio source by repeated pressing of the FUNCTION key. The corresponding indication “CD”, “TAPE” or “TUNER” will light up.
•
Adjust the volume with VOLUME (UP or DOWN) (VOLUME + or. – VOLUME on the remote
control).
•
Set the equalizer with the EQ button (“PASS”, “CLASSIC”, “ROCK”, “POP” or “JAZZ”).
•
During nonuse switch the device with STAN DBY/ ON back to the standby mode. In the standby
mode the current time is shown on the display.
•
The device is construed for continuous operation; it is either turned on or in standby mode.
•
If you don’t use the unit, please switch the device for power savings reasons into the standby
mode and pull the power plug.
Note:
If in the CD mode no signal is present, the device turns off automatically within 15 minutes.
26 | EN
Clock setting
The device must be in the standby mode.
1. Press and hold MEM /C-AD J. until the time will display 12-hour or 24-hour digit flashing.
2. Press ►►SKIP/TUN. UP or ◄◄SKIP/TUN. DOWN to adjust the 12-hour or 24-hour digit.
3. Press the MEM /C-AD J. button again. The hour indication “00” flashes. Press ►►SKIP/TUN.
UP or ◄◄SKIP/TUN. DOWN to adjust the hours.
4. Press the MEM /C-AD J. button again. The minute indication “00” flashes. Press ►►SKIP/TUN.
UP or ◄◄SKIP/TUN. DOWN to adjust the minutes.
5. Press the MEM /C-AD J. button again to confirm the clock settings.
Note:
If within approx. 10 seconds no key is pressed, the setting mode will be canceled and the appliance
returns to the last mode.
Timer setting
The device must be in the standby mode and the clock must be set.
1. Press once the TIMER button. The symbol “ ON” and “00:00” are shown on the display and the
hour digits will flash (see figure F1).
2. Press ►►SKIP/TUN. UP or ◄◄SKIP/TUN. DOWN to adjust the hours.
3. Press the TIMER button again. The minute indication flashes. Press ►►SKIP/TUN. UP or
◄◄SKIP/ TUN. DOWN to adjust the minutes.
4. Press the TIMER button again to confirm the turning on time of the timer.
5. The symbol “ OFF” and “00:00” is shown on the display and the hour digits will flash (see figure
F2).
6. Repeat steps 2 to 3 and then confirm the turning off time of the time by pressing the TIMER button.
7. Press ►►SKIP/TUN. UP or ◄◄SKIP/TUN. DOWN to select the operation mode “TUNER” or
“CD” for the adjusted turning on time.
8. Press the TIMER button again. The indication “VOL ” flashes on the display. Press ►►SKIP/
TUN. UP or ◄◄SKIP/TUN. DOWN to adjust the desired volume of the sound.
9. Confirm again with the TIMER button. The timer settings will be shown on the display one after
the other.
10. The appliance will be turned on automatically at the adjusted turning on time, switches to the
preset operation mode and will automatically shut off at the adjusted off time.
Notes:
•
If within approx. 10 seconds no key is pressed, the setting mode will be canceled and the appliance returns to the last mode.
•
If the display shows “ERROR” while setting the turning on time of the timer, then the time for turning on and off is identical. In this case, please set the off time first.
Disabling or modifying of the timer settings:
Disable: Press briefly the TIMER button. The symbol “ ” disappears on the display.
Modify: Press and hold the TIMER button for more than 1 second. Now you can modify the timer settings beginning at step 2 at the “Timer settings” section.
Sleep function
1. If you want to fall asleep to music, press the SLEEP button.
2. You can select the period until turning off automatically: 90, 80, 70 etc. up to 10 minutes. The
sleep function can be adjusted during the radio, CD or cassette operation.
EN | 27
EN
Equalizer
Pressing EQ shows the current adjusted sound effect.
Select the desired sound effect by repeated pressing of EQ:
“PASS” means that the equalizer function is deactivated.
Function selector
Each time you press FUNCTION, you can select a different operating mode, see below:
Radio
1.
2.
Turn on the appliance by pressing the STANDBY/ON button and press repeatedly the FUNCTION button until “TUNER” is shown on the display.
Select with the BAND button the frequency band “AM” or “FM”. On the display either “AM” or
“FM” is indicated.
Manual tuning
To tune for weak stations: Press ►►SKIP/TUN. UP or ◄◄SKIP/TUN. DOWN, until the correct
frequency
is shown, or until you achieve the best reception quality.
Automatic tuning
1. Press and hold ►►SKIP/TUN. UP or ◄◄SKIP/TUN. DOWN at least one second. Then release
the button. The tuner scans automatically for the first radio station with sufficient signal strength.
2. To select another radio station, repeat the procedure above.
Mono/Stereo
This function can only be used in FM mode.
1. If you cannot select a FM stereo station, press the ID3/MONO/ST. button. On the Display the
indication “STEREO” is shown. When you receive a FM stereo station the symbol “
” will appear on the display.
2. If you press the ID3/MONO/ST. button again, the display will show “MONO” and the FM stereo
” will disappear. The appliance will switches to the FM mono operation mode.
indication “
Programming of preset radio stations
You can also store your favorite stations in the program memory (up to 10 AM and 30 FM stations).
1. Toggle with BAND between “AM” and “FM”.
2. Tune the desired radio station.
3. Press the MEM/C-ADJ. button.
4. Press the PRESET /FOLDER (◄ or ►) or PRESET FOL (UP or DN) on the remote control to
select the desired memory number.
5. Press the MEM /C-ADJ. button again to confirm the selection.
6. For storing additional radio stations, please repeat the steps 2 to 5.
7. For replacing the stored radio stations, please repeat the steps 2 to 5.
Notes:
•
If within approx. 8 seconds no button is pressed, the storing mode will be canceled and the appliance returns to the last mode.
Storing a new station into a preset location will erase the previously stored radio station in that
•
location.
•
To delete all the preset station press and hold the ►/|| PLAY /PAUSE button in standby mode
until the STA NDBY LED and the LCD will flash once.
28 | EN
Selecting a preset radio station
Select with BAND the desired frequency band.
•
Press the PRESET /FOLDER (◄ or. ►) or PRESET FOL (UP or. DN) on the remote control, to
select the desired preset radio station.
The number of the radio station will be shown on the display together with its corresponding
•
frequency.
Recommendations for better reception
FM: For best reception fully unwind the FM wire antenna at the rear of the unit.
AM: The unit comes with a built-in ferrite antenna. For best reception change the direction of the unit.
Cassette operation
Cassette playback
To play a cassette first open the cover of the cassette recorder controls.
Be sure to tighten any slack tape in the cassette before use. Using either a pencil or a ball-point pen,
simply insert the pen or pencil into the centre of the spool and rotate to remove slackness.
Depress the OPEN button to open the cassette door.
Insert the cassette into the compartment with the open end facing downwards and full reel on the left
hand side, push the cassette well down and close the door.
Be sure not to touch the tape surface.
Select “TAPE” with the FUNCTION button and press the cassette PLAY ►. button. To stop playback,
press the cassette STOP ■, button once. Remove the cassette carefully from the cassette tray.
Note:
Please press the cassette STOP , button quickly before it reaches the end of the tape, in order to
prevent potential effects of tape.
Recording from radio
1. Select with the FUNCTION button the option “TUNER” and select with BAND the frequency band
“AM” or “FM”.
2. Tune the desired radio station (see section “Radio”).
3. Insert a cassette into the deck and press the cassette PLAY ► and cassette REC ● buttons at
the same time.
4. To stop recording, press the cassette STOP button.
5. The cassette PAUSE button can be used to stop recording for a short time.
6. Press the cassette F.FWD to fast forward the tape. Press the cassette REW button to fast rewind
the tape.
Recording from CD
1. Select with the FUNCTION button the option “CD”.
2. Select the required tracks to be recorded.
3. Insert a cassette into the deck and press the cassette PLAY ► and cassette REC ● buttons at
the same time.
4. To stop recording, press the cassette ■ STOP button.
Auto Stop
When the tape reaches in the playback or recording mode its end, the built-in Auto Stop system
releases the depressed PLAY ► and REC ● buttons.The Auto Stop system is active while recording
from the Radio or CD player. Only the cassette function is stopped automatically. The Radio or CD
player will continue the playback.
Protection of recordings
Usually the tape will be erased automatically if a new recording is made.
EN | 29
EN
To prevent recordings from being accidentally erased, remove the tabs on the rear of the cassette
(see Fig. below). Hold the cassette with the pre-recorded tape side horizontally upward, the recording
protection is located on the back right side of the cassette.
All standard commercial pre-recorded cassettes are protected in this way to prevent from being accidentally erased.
“Protected” cassettes prevent the activation of the record button REC ●. If the record button cannot be
pressed, never try to press the button forcefully, the mechanism of the tape drive can be damaged.
Check if the tabs of an inserted cassette are removed. If you want to record a tape whose tabs have
been broken out, stick some adhesive tape over the holes.
Notes on tapes
1. Loose tapes may cause trouble. With a pencil etc. gently tighten the tape as shown in Figure 1.
2. To prevent recordings from being accidentally erased, remove the tabs with a screwdriver (see
Figure 2). If you want to record a tape whose tabs have been broken out, stick some cello tape
over the holes (see Figure 3).
Side A
(Fig.1)
(Fig. 2)
Recording Interlock B Side B
Recording Interlock A
(Fig.3)
Adhesive Tape
Tighten the tape band with a pencil
3.
4.
5.
6.
Storage of tapes:
Do not store tapes in places which are subject to direct sunlight or near equipment that generates
heat; keep cassette tapes away from magnetic fields.
120-minute tapes:
Since 120-minute tapes are very thin, the tape could be easily damaged or cut.
Endless tape:
Do not use endless tapes, as this could damage the mechanism of the unit.
Cleaning tape heads:
Q-TIP
SOUND HEAD TRACK
7.
For maintaining the best condition of the deck and for a longer
Drive
lifespan always keep the head (recording/playback/erase), capMechanism stan and pinch rollers clean.
Clean as follows:
1. Open the cassette compartment.
2. Use a cotton swab dipped in alcohol to clean the head (recordPIN ROLLER
ing/ playback/erase), capstan and pinch roller carefully.
Demagnetizing the head:
When the recording/playback head is magnetized, noise may increase during playback. In this
case demagnetize the head using a commercially available demagnetizer (head eraser).
Note: When cleaning, pay special attention not to damage any components.
30 | EN
EN
CD/MP3/WMA
The CD-player can only play Audio CDs and MP3/WMA CDs. Do not attempt to play data CD or VCD /
DVD discs.
Loading a CD
1. Depress the OPEN button to open the CD door. The display shows “OPE N” (see figure F3).
2. Insert a CD into the CD drive and press onto the CD door (CLOSE), until it snaps in.
3. Select with the FUNCTION button the option “CD”, to change to the CD/MP3 mode or press the
►/|| PLAY /PAUSE button. The player reads the MP3/WMA/Audio CD automatically.
Notes:
1. The player can play CD, CD-R, CD-RW and MP3/WMA discs.
2. It can read “8 cm” and “Multisession” MP3 discs.
3. The transfer rate during playback is at 8 - 320 kbps.
4. A CD can contain max. 99 folders and 999 tracks.
5. If no CD is inserted or the table of content (TOC) cannot be read, “NO DISC” is shown on the
display (see figure F4).
Removing a disc
1. Depress the OPEN button to open the CD door. On the display “OPEN” is shown.
2. Remove the CD by grasping with the fingers at the edge and pull it carefully upwards.
3. To protect the removed CD store it in its cover.
Normal playback (Audio CD)
1. Playback will start by pressing ►/|| PLAY /PAUSE. Playback start with the first track. The display
will show “Cd”, the current track number and its elapsed time (see figure F5).
2. To pause playback, press ►/|| PLAY /PAUSE. The time elapse indicator will flash (see figure F6).
3. To resume playback, press ►/|| PLAY /PAUSE again.
4. Press ■ STOP to stop the playback.
Normal playback (MP3 or WMA CD)
1. Playback will start by pressing ►/|| PLAY /PAUSE. Playback start with the first track. The display
will show “MP 3”, the album number and its elapsed time (see figure F7).
2. To pause playback, press ►/|| PLAY /PAUSE. The time elapse indicator will flash (see figure F8).
3. To resume playback, press ►/|| PLAY /PAUSE again.
4. Press ■ STOP to stop the playback.
Selection of a different track (Audio and MP3/WMA CD)
1. Press ►►SKIP/TUN. UP or ◄◄SKIP/TUN. DOWN, until the desired track number is shown on
the display (see figures F9 and F10).
2. Press ►►SKIP/TUN. UP or ◄◄SKIP/TUN. DOWN once. The next or previous track number will
be shown and the playback will start.
3. Press during the pause mode the ►►SKIP/TUN. UP button once. The next track number will be
displayed. Resume the playback by pressing the PLAY /PAUSE button.
4. Press during the pause mode the ◄◄SKIP/TUN. DOWN button once. The player skips to the
beginning of the current track, but remains in the pause mode. On the display flashes “00:00”
EN | 31
5.
(see figures F11 and F12).
By pressing the number keys on the remote control you can select the desired track number (The
display shows an error message if the number is bigger than the number of tracks on the CD).
Search for a certain position (only during playback, Audio and MP3/WMA CD)
Press ►►SKIP/TUN. UP or ◄◄SKIP/TUN. DOWN to search for the desired position within the track.
Normal playback continues when the button is released. In search mode the volume is reduced.
Selection of one of the other albums (only MP3/WMA CD)
Skip with PRESET/FOLDER (◄ or ►) or PRESET FOL (UP or DN) on the remote control to the next
or previous album (if the CD contains more than one album). The album function can only be used
with MP 3/WMA -CD s which include albums. Playback starts with the first track in the selected album.
ID3 tags
Only in MP3/WMA mode.
1. Press ID3/MONO/ST. to invoke the ID3 function.
2. If the MP3 file is contains ID 3 information, it will show “Title”, “Artist” and “Album” on the display.
3. Press the ID3/MONO/ST. button again. The ID3 function will be disabled.
TITLE
ARTIST
CURRENT TIME
ALBUM
Repeat mode
Audio CD:
1. If you want to repeat a single track while playing an Audio CD, press the REPEAT button once.
The “REPEAT ” indication will light up (see figure F13).
2. If you want to repeat all tracks, press the REPEAT button twice. The “REPEAT ALL” indication will
light up (see figure F14).
3. Press REPEAT three times to terminate the repeat mode.
MP3/WMA CD:
1. If you want to repeat a single track while playing a MP3/WMA CD, press the REPEAT button
once. The “REPEAT ” indication will light up (see figure F15).
2. If you want to repeat all tracks, press the REPEAT button twice. The “REPEAT ALL” indication will
light up (see figure F16).
3. If you want to repeat the current album, press the REPEAT button three times. The “REPEAT
ALBUM ” indication will light up (see figure F17).
4. Press REPEAT four times to terminate the repeat mode.
Random playback (only on the remote control)
1. Press once the RA NDOM button. The “RA NDOM ” indication will light up (see figure F18).
2. Press PLAY /PAUSE button to start playback. The tracks on the CD will be played in a random
32 | EN
3.
EN
order.
Press the RANDOM button again to terminate the random playback.
Intro (only on the remote control)
1. Press once the INTRO button. The “INTRO ” indication will light up (see figure F19).
2. The device will play the first 10 seconds of each track.
3. Press the INTRO button again to terminate the Intro playback.
Programming the CD player
Up to 32 tracks at an Audio CD or up to 64 tracks at a MP3/WMA CD can be programmed in a specific
sequence. The CD player must be in the stop mode.
Audio CD:
1. Insert the CD to be programmed into the CD tray and invoke the programming mode with the
MEM/C-ADJ. button.
2. On the display “MEMORY ” and “P-01” will be shown (see figure F20).
3. Press SKIP/TUN. UP or SKIP /TUN. DO WN to select the first track to be programmed.
4. When the desired track is shown on the display, press the MEM/C-ADJ. button again.
5. On the display “MEMORY ” and “P-02” will be shown.
6. Repeat these steps to store additional CD tracks into the program memory.
7. Afterwards press the PLAY /PAUSE button.The player plays the first programmed track.
Notes:
•
When all tracks are played, the total number and total playback time of the Audio/MP3 CD titles
will be shown on the display.
If within approx. 8 seconds no key is pressed, the storing mode will be canceled and the appli•
ance returns to the last mode.
MP3/WMA CD:
1. Insert the CD to be programmed into the CD tray and invoke with the MEM/C-ADJ. button the
programming mode.
2. On the display “00”, “MEMORY ” and “P-01” will be shown, the album number “00” flashes (see
figure F21).
3. The album number can be changed by pressing PRE SET /FOLDER (◄ or ►) or PRESET FOL
(UP or DN) on the remote control.
4. Press the MEM /C-AD J. button again, the track number flashes (see figure F22).
5. Press SKIP/TUN. UP or SKIP /TUN. DO WN to select the first track to be programmed.
6. When the desired track is shown on the display, press the MEM/C-ADJ. button again.
7. On the display “00”, “MEMORY ” and “P-02” will be shown.
8. Repeat these steps to store additional CD tracks into the program memory.
9. Afterwards press the PLAY /PAUSE button. The player plays the first programmed track.
Notes:
When all tracks are played, the total number and total playback time of the Audio/MP3 CD titles
•
will be shown on the display.
If within approx. 8 seconds no button is pressed, the storing mode will be canceled and the appli•
ance returns to the last mode.
EN | 33
Cancel the programmed playback
1. T he program will be deleted by pressing the MEM/C-ADJ. button and then change with STOP to
the stop mode, or by opening the disc tray and closing it again.
2. By entering a new program an existing program will be deleted.
Notes:
•
If you want to repeat the current track in the program mode, press the REPEAT button on the appliance or on the remote control once. The indication “REPEAT” turns on.
•
If you want to repeat all programmed tracks, press the REPEAT button twice. The indication
“REPEAT ALL” turns on.
•
Press REPEAT three times to terminate the repeat mode.
Mute
1. When you press MUTE once, the volume level indicator flashes and the sound output is muted
temporarily (see figure F23).
2. Press the MUTE button again. The indication disappears and the audio output sounds as usual.
Listen to the music by using headphone
A stereo headphone jack is provided for private listening. To connect the headphones (not included to
the player), insert the 3.5mm mini-stereo plug from the headphones into the jack on the left of the
appliance. When connecting the earphones the speakers are automatically muted.
LINE OUT jack
You can connect an external amplifier to the LINE OUT jack using an audio cable with 3.5 mm mini
stereo plug. The speakers of the player will remain in operation.
TROUBLESHOOTING
To solve the common problems, read and follow the troubleshooting list. If you still cannot solve the
problem, consult your nearest service dealer.
Problem
General
No sound
No key function
Radio
Poor reception
CD/MP3
No playback
Faulty playback
34 | EN
Possible Cause
Volume is set too low.
Mains cable not connected.
Electrostatic discharge.
Solution
Adjust the volume.
Connect mains cable correctly.
Disconnect mains cable for some
seconds
und reconnect.
The (AM or FM) radio station is not
Tune to the radio station again.
tuned properly.
FM: Adjust wire antenna.
FM: The wire antenna is not directed AM: Adjust the unit.
Keep distance to other appliances.
properly.
AM: The device is not directed
properly.
Interferences by other appliances
(TV sets, VCRs, computers, etc.).
The CD is inserted upside down.
Reinsert CD with label side facing
The CD is dirty or damaged.
up.
Replace or clean the CD.
The CD is steamy.
Wipe with a soft cloth.
The CD is dirty or damaged.
Replace or clean the CD.
Tape Recorder
Poor sound quality
Recording does
not work
Remote control
No function.
Headphones
No sound
Backup batteries
Preset is lost after
power outage
Head, capstan or pinch rollers dirty.
Tab in cassette broken out.
Clean head, capstan and pinch
rollers.
Cover with cello tape.
The batteries are inserted in the
wrong direction.
The batteries are exhausted.
The remote control is not directed
towards the device.
There are obstacles between remote
control and the remote control sensor.
The operation range is exceeded.
The headphones jack is not plugged
in correctly.
Volume is set too low.
The CD is damaged.
No backup batteries inserted.
The backup batteries are exhausted.
Check the polarity of the inserted
batteries.
Replace the batteries.
Direct the remote control directly
towards the remote control sensor
on the front of the device.
Remove the obstacles.
The remote control has an operation
range of 6 meters.
Plug in the headphones jack correctly.
Adjust the volume.
Replace the CD.
Insert backup batteries.
Replace the backup batteries.
TECHNICAL SPECIFICATIONS
GENERAL
POWER SUPPLY:
AC 230V~50Hz
POWER CONSUMPTION: 23 W
RADIO
FREQUENCY RANGE:
FM 87.5 - 108 MHz
A M 522 – 1620 kHz
CASSETTE RECORDER
4.75 CM/SEC.
TAPE SPEED:
FREQUENCY RESPONSE: 125 Hz – 8 kHz
CD PLAYER
3 - BEAM LASER
OPTICAL PICKUP:
FREQUENCY RESPONSE: 100 Hz – 16 kHz
DIMENSIONS:
NET WEIGHT:
48 (L) x 24 (W) x 10 (H) cm
4.2 kg
Technical specifications and design may change without notice.
EN | 35
EN
www.karcher-products.de