1
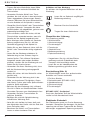
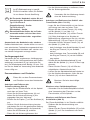
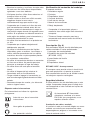
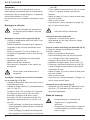
2.12.2003
13:05
StrÆnka 1
BTI Spanien
WKS115.qxd
BTI Zentrale
BTI Técnicas de la fijación, S.L.
Pol. Ind. Nirsa,
C/. Partida de la grasa,
Nave B-4
E-43206 Reus (Tarragona)
Telefon 977 - 77.51.84
Telefax 977 - 77.12.56
Nürnberg
Schniegling
Brettergartenstraße 16
90427 Nürnberg
Telefon 0911/32389-0
Telefax 0911/32389-10
München
Hochbrück
Schleißheimer Straße 92
85748 Garching
Telefon 089/327080-0
Telefax 089/327080-10
Leipzig
Wahren
Pittlerstraße 33
04159 Leipzig
Telefon 0341/4612324
Telefax 0341/4612326
BTI Befestigungstechnik
GmbH & Co. KG
Postfach 40
74665 Ingelfingen
Telefon 07940/141-0
Telefax 07940/141-64
[email protected] · www.bti.de
BTI Handwerker-Center
Berlin
Lilienthalstraße 6
15732 Waltersdorf
Telefon 033762/60380
Telefax 033762/60445
Essen
Altenessen
Krablerstraße 127
45326 Essen
Telefon 0201/333162
Telefax 0201/367659
Frankfurt am Main
Sprendlingen
Otto-Hahn-Straße 35
63303 Dreieich
Telefon 06103/311501
Telefax 06103/311235
Hamburg
Willinghusener Weg 5C
22113 Oststeinbek
Telefon 040/7135031
Telefax 040/7138380
Stuttgart
Endersbach
Dammstraße 19
71384 Weinstadt
Telefon 07151/98669-3
Telefax 07151/98669-40
Bedienungsanleitung
Instrucciones de servicio
Manual de instruções
Operating instructions
Winkelschleifer
Amoladoras angulares
Rebarbadora
Angle Grinder
BTI-WKS 115
BTI-WKS 125 E
Deutsch
5
Español
12
Português
18
English
24
Copyright BTI
1
2
3
1
4
A
2
5
B
C1
C2
D
3
17
17
E
4
5
DEUTSCH
WINKELSCHLEIFER BTI-WKS 115/
BTI-WKS 125 E
Herzlichen Glückwunsch!
Sie haben sich für ein Werkzeug von BTI entschieden, das die lange BTI-Tradition fortsetzt,
nur ausgereifte und in zahlreichen Tests bewährte Qualitätsprodukte für den Fachmann anzubieten.
Lange Jahre der Erfahrung und kontinuierliche Weiterentwicklung machen BTI zu Recht zu einem verläßlichen Partner aller professionellen Anwender.
Technische Daten
Spannung
Leistungsaufnahme
Leerlaufdrehzahl
Scheibendurchmesser
Spindeldurchmesser
Gewicht
BTI-WKS 115
230
800
10.000
115
M14
(kg) 1,7
BTI-WKS 125 E
230
1.400
2.800-10.000
125
M14
1,8
(Volt)
(Watt)
(min-1)
(mm)
Mindestabsicherung des Stromkreises:
230-V-Elektrowerkzeuge
10 A
Folgende Symbole werden in dieser Anleitung
verwendet:
EG-Konformitätserklärung
Achtung: Verletzungsgefahr,
Lebensgefahr oder mögliche
Beschädigung des Elektrowerkzeuges
infolge der Nichtbeachtung der
Anweisungen dieser Anleitung!
BTI-WKS 115 / BTI-WKS 125 E
BTI erklärt hiermit, daß diese Elektrowerkzeuge
entsprechend den Richtlinien und Normen
98/37/EWG, 89/336/EWG, 73/23/EWG,
EN 50144, EN 55014-2, EN 55014-1, EN 61000-32 und EN 61000-3-3 konzipiert wurden.
Elektrische Spannung
Für weitere Informationen wenden Sie sich bitte an
die Adresse weiter unten oder an eine der auf der
Rückseite dieser Anleitung genannten Niederlassungen.
Feuergefahr
Die Höhe des Schalldrucks entspricht den Richtlinien der Europäischen Gemeinschaft 86/188/EWG
und 98/37/EWG gemessen nach EN 50144:
LpA
(Schalldruck)
LWA (Schalleistung)
dB(A)*
89,9
dB(A)
97,9
* Arbeitsplatzbezogener Emissionswert
Tragen Sie einen geeigneten Gehörschutz.
5
DEUTSCH
Gewichteter Effektivwert der Beschleunigung nach
EN 50144:
< 2,5 m/s2
ppa. U. Delz
i.V. G. Hub
BTI Befestigungstechnik GmbH & Co. KG
D-74653 Ingelfingen
Sicherheitshinweise
Beim Gebrauch von Elektrowerkzeugen sind
zum Schutz gegen elektrischen Schlag,
Verletzungs- und Feuergefahr die nationalen
Sicherheitsvorschriften zu beachten.
Lesen Sie diese Anleitung gründlich durch,
bevor Sie das Elektrowerkzeug verwenden.
Bewahren Sie diese Anleitung auf.
Allgemeines
1 Halten Sie Ihren Arbeitsbereich in Ordnung
Unordnung im Arbeitsbereich führt zu Unfallgefahren.
2 Berücksichtigen Sie Umgebungseinflüsse
Setzen Sie das Werkzeug keinem Regen aus.
Verwenden Sie das Werkzeug nicht in einer
feuchten oder nassen Umgebung. Sorgen Sie
für eine gute Beleuchtung des Arbeitsbereiches
(250 - 300 Lux).
Benutzen Sie das Werkzeug nicht an Orten, wo
Feuergefahr oder Explosionsgefahr besteht,
z.B. in der Nähe von brennbaren Flüssigkeiten
oder Gasen.
3 Halten Sie Kinder fern!
Halten Sie Kinder, Besucher und Tiere vom
Arbeitsbereich fern und sorgen Sie dafür, daß
Sie das Werkzeug und das Netzkabel nicht
berühren.
4 Tragen Sie geeignete Arbeitskleidung
Tragen Sie keine weite Kleidung oder
Schmuck, da diese von sich bewegenden
6
Teilen erfaßt werden können. Tragen Sie bei
langen Haaren ein Haarnetz. Beim Arbeiten im
Freien sind Arbeitshandschuhe und rutschfestes Schuhwerk empfehlenswert.
5 Schutzmaßnahmen
Verwenden Sie immer eine Schutzbrille. Tragen Sie eine Atemschutzmaske, falls die Arbeiten Staub oder Späne erzeugen können. Falls
diese Teilchen heiß sind, so müssen Sie auch
eine hitzebeständige Schürze tragen. Tragen
Sie stets einen Gehörschutz.
6 Schutz vor elektrischem Schlag
Vermeiden Sie Körperberührung mit geerdeten
Teilen, z.B. Rohren, Heizkörpern, Herden und
Kühlschränken. Bei extremen Einsatzbedingungen (z.B. hohe Feuchtigkeit, Entwicklung von Metallstaub usw.) kann die elektrische
Sicherheit durch Vorschalten eines Trenntransformators oder eines Fehlerstrom-(FI-)
Schutzschalters erhöht werden.
7 Achten Sie auf einen sicheren Stand
Achten Sie auf einen sicheren Stand, um in
jeder Arbeitsposition das Gleichgewicht zu
halten.
8 Seien Sie stets aufmerksam
Konzentrieren Sie sich auf Ihre Arbeit. Gehen
Sie vernünftig vor. Verwenden Sie das Werkzeug nicht, wenn Sie müde sind.
9 Sichern Sie das Werkstück
Benutzen Sie Spannvorrichtungen oder einen
Schraubstock, um das Werkstück festzuhalten.
Es wird damit sicherer gehalten und ermöglicht
die Bedienung des Werkzeuges mit beiden
Händen.
10 Schließen Sie Vorrichtungen zur Staubabsaugung an!
Falls Vorrichtungen zur Absaugung oder zum
Sammeln von Staub an das Werkzeug angeschlossen werden können, vergewissern Sie
sich, daß diese angeschlossen sind und ordnungsgemäß verwendet werden.
11 Lassen Sie keine Werkzeugschlüssel
stecken.
Überprüfen Sie vor dem Einschalten, ob die
Schlüssel und Einstellwerkzeuge entfernt sind.
12 Verlängerungskabel
Prüfen Sie vor dem Gebrauch das
Verlängerungskabel und tauschen Sie es aus,
falls es beschädigt ist. Wenn Sie das Gerät im
DEUTSCH
13
14
15
16
Freien verwenden, verwenden Sie nur
Verlängerungskabel, die sich für den Einsatz
im Freien eignen und entsprechend gekennzeichnet sind.
Benutzen Sie das richtige Werkzeug
Die bestimmungsgemäße Verwendung ist in
dieser Betriebsanleitung beschrieben. Verwenden Sie keine zu schwachen Werkzeuge oder
Zubehörteile für schwere Arbeiten. Mit dem
richtigen Werkzeug erzielen Sie eine optimale
Qualität und gewährleisten Ihre persönliche
Sicherheit. Überlasten Sie das Werkzeug nicht.
Warnung! Das Verwenden anderer als der in
dieser Anleitung empfohlenen Anbaugeräte
und Zubehörteile oder die Ausführung von
Arbeiten mit diesem Werkzeug, die nicht der
bestimmungsgemäßen Verwendung entsprechen, kann zu Unfallgefahren führen.
Kontrollieren Sie Ihr Werkzeug
auf Beschädigungen
Überprüfen Sie das Werkzeug und das Netzkabel vor der Arbeit auf Beschädigungen.
Überprüfen Sie, ob alle beweglichen Teile
richtig montiert sind, ob keine Teile gebrochen
sind, ob keine Schutzvorrichtungen und Schalter beschädigt sind, und ob irgendwelche andere Schäden den einwandfreien Betrieb des
Werkzeuges beeinträchtigen könnten. Vergewissern Sie sich, daß das Werkzeug ordnungsgemäß funktionieren wird. Benutzen Sie das
Werkzeug nicht, wenn irgendein Teil defekt ist.
Verwenden Sie das Werkzeug nicht, wenn der
Ein-/Aus-Schalter nicht funktioniert. Lassen Sie
defekte Teile immer von einer unserer autorisieren BTI-Kundendienstwerkstätten austauschen. Versuchen Sie nie, das Werkzeug
selber zu reparieren.
Ziehen Sie den Netzstecker.
Schalten Sie das Werkzeug ab und warten Sie,
bis das Werkzeug vollkommen zum Stillstand
gekommen ist, bevor Sie es unbeaufsichtigt
lassen.
Ziehen Sie den Netzstecker, wenn Sie das
Gerät nicht benutzen, bevor Sie irgendwelche
Werkzeuge, Zubehörteile oder Geräteteile
auswechseln und bevor Sie irgendwelche
Wartungsarbeiten vornehmen.
Vermeiden Sie ein unbeabsichtigtes
Einschalten!
Tragen Sie das Werkzeug nicht mit dem Finger
am Schalter. Vergewissern Sie sich, daß das
Gerät ausgeschaltet ist, bevor Sie es an die
Stromversorgung anschließen.
17 Behandeln Sie das Kabel sorgfältig!
Tragen Sie das Werkzeug niemals an seiner
Leitung. Benutzen Sie das Kabel nicht, um den
Stecker aus der Steckdose zu ziehen Schützen
Sie das Kabel vor Hitze, Öl und scharfen Kanten.
18 Bewahren Sie Ihre Werkzeuge sicher auf
Unbenutzte Werkzeuge sollten in trockenen,
verschlossenen Räumen und für Kinder nicht
erreichbar aufbewahrt werden.
19 Pflegen Sie Ihre Werkzeuge mit Sorgfalt
Halten Sie Ihre Werkzeuge scharf und sauber,
um gut und sicher arbeiten zu können.
Befolgen Sie die Wartungsvorschriften und die
Hinweise für den Werkzeugwechsel. Halten Sie
sämtliche Handgriffe und Schalter trocken,
sauber und frei von Öl und Fett.
20 Reparaturen:
Dieses Werkzeug entspricht den einschlägigen
Sicherheitsbestimmungen. Lassen Sie Reparaturen nur von einer autorisierten BTIKundendienstwerkstatt ausführen. Reparaturen
sind nur von autorisierten Fachkräften und mit
Original-Ersatzteilen vorzunehmen; andernfalls
kann Unfallgefahr für den Betreiber entstehen.
Zusätzliche Sicherheitshinweise für Schleifer
• Ihr Schleifer wurde zum Schleifen und Trennen
von Mauerwerk und Stahl entworfen.
Trennen bzw. schleifen Sie keine
Leichtmetalle mit einem Magnesiumgehalt größer als 80%, da solche
Metalle brennbar sind.
• Verwenden Sie keine anderen Einsatzwerkzeuge als glasfiberverstärkte Schleif- und
Trennscheiben.
• Verwenden Sie nur die empfohlenen Schleifund Trennscheiben.
• Die maximal zulässige Drehzahl der Schleifoder Trennscheibe muß der auf dem Typenschild des Schleifers angegebenen Leerlaufdrehzahl entsprechen oder diese überschreiten.
7
DEUTSCH
• Trennen Sie keine Werkstücke, deren Stärke
größer ist als die maximale Schnittiefe der
Trennscheibe.
• Verwenden Sie keine Schleif- bzw. Trennscheiben, die nicht mit den in den technischen
Daten angegebenen Abmessungen übereinstimmen. Benutzen Sie keine Abstandsstücke,
um eine Scheibe auf die Spindel zu setzen.
• Überprüfen Sie die Schleif- oder Trennscheiben
vor jedem Gebrauch. Verwenden Sie keine
Schleifscheiben, die abgeblättert, gerissen oder
anderweitig beschädigt sind.
• Falls vorhanden, stellen Sie sicher, daß die
Flanschstücke verwendet werden, wenn die
Scheibe auf der Spindel angebracht wird.
• Beim Anbringen einer Scheibe mit Gewindebohrung vergewissern Sie sich, daß das
Gewinde lang genug für die Spindel ist.
• Stellen Sie vor dem Gebrauch sicher, daß die
Schleif- oder Trennscheibe richtig angebracht
ist.
• Lassen Sie das Werkzeug mindestens 30
Sekunden lang in einer sicheren Lage im
Leerlauf laufen. Falls stärkere Vibrationen
festgestellt werden oder andere Schäden
eintreten, schalten Sie das Werkzeug ab und
finden Sie die Ursache heraus.
• Verwenden Sie dieses Werkzeug nicht, ohne
daß die Schutzvorrichtung ordnungsgemäß
montiert ist.
• Stellen Sie sicher, daß das Werkstück sicher
gestützt wird.
• Verwenden Sie das Werkzeug nicht in der
Nähe von brennbaren Flüssigkeiten, Gasen
oder Staub. Funken oder heiße Späne könnten
explosive Stoffe entzünden.
• Benutzen Sie das Werkzeug nicht, während
Sie sich in Reihe zur Scheibe befinden. Halten
Sie andere Personen vom Arbeitsbereich fern.
• Verwenden Sie keine Trennscheiben für
seitliches Schleifen.
• Betätigen Sie nicht die Spindelsicherung,
während das Werkzeug läuft.
• Seien Sie sich darüber im klaren, daß nach
dem Abschalten des Geräts sich das Rad eine
kurze Zeit weiter dreht.
• Bewahren Sie Schleif- und Trennscheiben
immer an einem trockenen Platz auf.
8
Aufkleber auf dem Werkzeug
Es befinden sich folgende Bildzeichen auf dem
Werkzeug:
Lesen Sie vor Gebrauch sorgfältig die
Bedienungsanleitung
Benutzen Sie eine Schutzbrille
Tragen Sie einen Gehörschutz.
Überprüfen der Lieferung
Die Verpackung enthält:
1 Winkelschleifer
1 Schutzvorrichtung
1 Zusatzhandgriff
1 Flanschsatz
1 Gabelschlüssel
1 Bedienungsanleitung
1 Explosionszeichnung
• Vergewissern Sie sich, daß das Elektrowerkzeug sowie die Zubehörteile beim
Transport nicht beschädigt wurden.
• Lesen Sie vor der Inbetriebnahme die
Bedienungsanleitung gründlich durch.
Beschreibung (Abb. A)
Ihr Winkelschleifer wurde zum professionellen
Schleifen und Trennen entwickelt.
1 Ein-/Aus-Schalter
2 Drehzahlvorwahl (BTI-WKS 125 E)
3 Spindelarretierung
4 Schutzvorrichtung
5 Zusatzhandgriff
BTI-WKS 125 E - Sanftanlauf
Durch den Sanftanlauf läuft der Winkelschleifer
ruckfrei auf die Nenndrehzahl hoch.
Elektrische Sicherheit
Der Elektromotor wurde nur für eine Spannung
konzipiert. Überprüfen Sie deswegen, ob die Netzspannung der auf dem Typenschild des Elektrowerkzeuges angegebenen Spannung entspricht.
DEUTSCH
Ihr BTI-Elektrowerkzeug ist gemäß
EN 50144 zweifach isoliert; ein Erdleiter
ist aus diesem Grunde überflüssig.
CH
CH
Bei Ersatz des Netzkabels achten Sie auf
Verwendung des Schweizer Netzsteckers.
Typ 11 für Klasse II
(Doppelisolierung) - Geräte
Typ 12 für Klasse I
(Schutzleiter) - Geräte
Ortsveränderliche Geräte, die im Freien
verwendet werden, müssen über einen
Fehlerstromschutzschalter angeschlossen werden.
Auswechseln des Netzkabels oder -steckers
Defekte Netzkabel oder -stecker dürfen nur von einem autorisierten Fachbetrieb ausgewechselt werden. Ausgetauschte Netzkabel oder -stecker müssen danach fachgerecht entsorgt werden.
Verlängerungskabel
Verwenden Sie ein zugelassenes Verlängerungskabel, das für die Leistungsaufnahme des Elektrowerkzeugs ausreichend ist (vgl. technische Daten). Der Mindestquerschnitt beträgt 1,5 mm2. Rollen Sie das Kabel bei Verwendung einer Kabelrolle
immer völlig aus.
Zusammenbauen und Einstellen
Ziehen Sie vor dem Zusammenbauen
und Einstellen immer den Netzstecker.
Anbringen und Entfernen der
Schutzvorrichtung (Abb. B)
• Legen Sie den Winkelschleifer mit der Spindel
nach oben auf einen Tisch.
• Lösen Sie die Sicherungsklammer (6) und
halten Sie die Schutzvorrichtung (4) wie
angegeben über das Werkzeug.
• Richten Sie die Zapfen (7) mit den Schlitzen (8)
aus.
• Drücken Sie die Schutzvorrichtung herunter
und drehen Sie sie in die gewünschte Stellung.
• Erhöhen Sie gegebenenfalls die Spannkraft,
indem Sie die Schraube (9) anziehen.
• Ziehen Sie die Sicherungsklammer fest.
• Um die Schutzvorrichtung zu entfernen, lösen
Sie die Sicherungsklammer.
Verwenden Sie das Werkzeug niemals
ohne die Schutzvorrichtung.
Anbringen und Entfernen einer Schleif- oder
Trennscheibe (Abb. C1 & C2)
• Legen Sie den Winkelschleifer mit der Schutzvorrichtung nach oben auf einen Tisch.
• Bringen Sie den inneren Flansch (10) richtig
auf der Spindel (11) an (Abb. C1).
• Setzen Sie die Scheibe (12) auf den Flansch
(10). Beim Anbringen einer Scheibe mit
Mittenerhöhung vergewissern Sie sich, daß die
Mittenerhöhung (13) zum Flansch (10) weist.
• Schrauben Sie den äußeren Flansch (14) auf
der Spindel (11) (Abb. C2):
- beim Anbringen einer Schleifscheibe (A) muß
der Ring am Flansch (14) zur Scheibe
weisen;
- beim Anbringen einer Trennscheibe (B) muß
der Ring am Flansch (14) von der Scheibe
weg weisen.
• Drücken Sie den Spindelarretierknopf (3) und
drehen Sie die Spindel (11), bis sie in ihrer Lage
einrastet.
• Ziehen Sie den Flansch (14) mit Hilfe des
mitgelieferten Gabelschlüssels fest.
• Lassen Sie den Spindelarretierknopf wieder los.
• Um die Scheibe abzunehmen, lösen Sie den
Flansch (14) mit dem Gabelschlüssel.
Benutzen Sie keine beschädigte
Scheibe.
Montieren einer Stahldrahttopfbürste
• Schrauben Sie die Stahldrahttopfbürste direkt,
ohne Verwendung des Flansches und der
Flanschmutter, auf die Spindel.
Montieren und Entfernen des FlexonSchleiftellers (Abb. D)
Der Flexon-Schleifteller ist als Zubehör erhältlich.
• Entfernen Sie die Schutzvorrichtung vom
Werkzeug.
• Setzen Sie den Flexon-Schleifteller (15) auf die
Spindel (11) auf. Der Innenflansch wird nicht
gebraucht.
9
DEUTSCH
• Legen Sie die Schleifscheibe (16) auf den
Teller.
• Schrauben Sie den Außenflansch (14) auf die
Spindel (11).
• Drücken Sie den Spindelarretierknopf und
drehen Sie den Teller (15), bis er in seiner
Lage einrastet.
• Ziehen Sie den Flansch (14) mit Hilfe des
mitgelieferten Gabelschlüssels fest.
• Lassen Sie den Spindelarretierknopf wieder
los.
• Um die Scheibe abzunehmen, lösen Sie den
Flansch (14) mit dem Gabelschlüssel.
Montieren des Seitenhandgriffes (Abb. E)
• Schrauben Sie den Seitenhandgriff (5) fest in
eines der Löcher (17) an den Seiten des
Getriebegehäuses.
Gebrauchsanweisung
• Beachten Sie immer die Sicherheitshinweise und die gültigen Vorschriften.
• Stellen Sie sicher, daß sämtliche zu
schleifende bzw. zu schneidende
Materialien in ihrer Lage gesichert sind.
• Üben Sie nur einen leichten Druck auf
das Elektrowerkzeug aus. Üben Sie
keinen seitlichen Druck auf die Scheibe
aus.
• Vermeiden Sie Überlastungen. Sollte
sich das Elektrowerkzeug überhitzen, so
lassen Sie es einige Minuten lang im
Leerlauf laufen.
Vor dem Betrieb:
• Installieren Sie die richtige Schutzhaube und
die Schleif- oder Trennscheibe. Verwenden Sie
keine übermäßig abgenutzten Scheiben.
• Vergewissern Sie sich, das der innere und
äußere Flansch richtig montiert sind.
• Überzeugen Sie sich, daß sich die Schleif- oder
Trennscheibe in Pfeilrichtung (siehe Zubehörteil und Werkzeug) dreht.
Ein- und Ausschalten (Abb. A)
• Drücken Sie zum Einschalten den Ein-/AusSchalter.
10
• Für Dauerbetrieb drücken Sie den Ein-/
Ausschalter ganz nach vorne.
• Lassen Sie zum Stoppen des Werkzeuges den
Schalter los. Zum Stoppen des Werkzeuges
bei Dauerbetrieb drücken Sie hinten auf den
Schalter.
Schalten Sie das Elektrowerkzeug nicht
unter Belastung ein oder aus.
Wenden Sie sich für nähere Informationen über
das richtige Zubehör an Ihren Händler.
Wartung
Ihr BTI-Elektrowerkzeug wurde für eine lange Lebensdauer und einen möglichst geringen
Wartungsaufwand entwickelt. Ein dauerhafter,
einwandfreier Betrieb setzt eine regelmäßige
Reinigung voraus.
Schmieren
Ihr Elektrowerkzeug erfordert keine zusätzliche
Schmierung.
Reinigung
Sorgen Sie dafür, daß die Lüftungsschlitze offen
bleiben, und reinigen Sie das Gehäuse regelmäßig
mit einem weichen Tuch.
Recycling (nicht zutreffend für Österreich
und die Schweiz)
Elektrowerkzeuge enthalten Roh- und Kunststoffe,
die recycelt werden können und Stoffe, die fachgerecht entsorgt werden müssen. BTI und andere
namhafte Hersteller von Elektrowerkzeugen haben
ein Recycling-Konzept entwickelt, das dem Handel
und dem Anwender eine problemlose Rückgabe
von Elektrowerkzeugen ermöglicht. Ausgediente
netz- und akkubetriebene BTI-Werkzeuge können
beim Handel abgegeben oder direkt an BTI eingeschickt werden. Beim Recycling werden sortenreine Rohstoffe (Kupfer, Aluminium, etc.) und
DEUTSCH
Kunststoffe gewonnen und nicht verwertbare Reststoffe verantwortungsvoll entsorgt.
Voraussetzung für den Erfolg ist das Engagement
von Anwendern, Handel und Markenherstellern.
GARANTIE UND KUNDENDIENST
Jedes Produkt wird vor Verlassen der Fabrik
sorgfältig geprüft. Sollten trotzdem irgendwelche
Defekte am Produkt auftreten, so senden Sie es
bitte direkt an den Zentralkundendienst oder an
die nächste BTI-Kundendienstwerkstatt.
Die Garantiezeit von 12 Monaten beginnt mit
dem Kaufdatum, das durch den OriginalKaufbeleg nachgewiesen werden muß. In dieser
Zeit garantieren wir:
• Kostenlose Beseitigung eventueller Störungen
• Kostenlosen Ersatz aller schadhaften Teile
• Kostenlosen und fachmännischen Reparaturservice
Voraussetzung ist, daß der Fehler nicht auf
unsachgemäße Behandlung zurückzuführen ist,
und daß nur Original-Zubehörteile verwendet
wurden, die ausdrücklich von BTI als zum
Betrieb mit BTI-Maschinen geeignet bezeichnet
worden sind.
11
ESPAÑOL
AMOLADORA ANGULAR BTI-WKS 115/
BTI-WKS 125 E
¡Enhorabuena!
Usted ha optado por una herramienta BTI. Muchos años de experiencia y una gran asiduidad en el
desarrollo y la innovación de sus productos han convertido BTI en un socio muy fiable para el usuario
profesional.
Características técnicas
Voltaje
Potencia absorbida
Velocidad en vacío
Diámetro del disco
Diámetro del eje
Peso
BTI-WKS 115
230
800
10.000
115
M14
kg 1,7
BTI-WKS 125 E
230
1.400
2.800-10.000
125
M14
1,8
V
W
min-1
mm
Fusibles
Herramientas 230 V:
10 A
En el presente manual figuran los pictogramas
siguientes:
Indica peligro de lesiones, de
accidentes mortales o de averías en la
herramienta en caso de no respeto de
las instrucciones en este manual.
Declaración CE de conformidad
BTI-WKS 115 / BTI-WKS 125 E
BTI certifica que estas herramientas eléctricas
han sido construidas de acuerdo a las normas
siguientes: 98/37/CEE, 89/336/CEE, 73/23/CEE,
EN 50144, EN 55014-2, EN 55014-1, EN 61000-3-2
& EN 61000-3-3.
Indica tensión eléctrica.
Para información más detallada, contacte a BTI,
véase abajo o consulte el dorso de este manual.
Peligro de incendio.
El nivel de la presión acústica de acuerdo con las
normas 86/188/CEE & 98/37/CEE, medida de
acuerdo con EN 50144:
LpA
(presión acústica)
LWA (potencia acústica)
dB(A)*
89,9
dB(A)
97,9
* al oído del usuario
Tome medidas adecuadas para la
protección de los oídos.
12
ESPAÑOL
Valor cuadrático medio ponderado en frecuencia
de la aceleración según EN 50144:
< 2,5 m/s2
U. Delz
G. Hub
BTI Befestigungstechnik GmbH & Co. KG
D-74653 Ingelfingen
Instrucciones de seguridad
Al utilizar herramientas eléctricas, observe las
reglas de seguridad en vigor en su país, a fin
de reducir el riesgo de descarga eléctrica,
de lesiones y de incendio.
Lea completamente este manual antes de
utilizar la herramienta.
Mantenga a mano este manual para consultas
posteriores.
Generalidades
1 Mantenga limpia el área de trabajo.
Un área o un banco de trabajo en desorden
aumentan el riesgo de accidentes.
2 Tenga en cuenta el entorno del área de
trabajo.
No exponga herramientas a la lluvia. No utilice
la herramienta en ambientes húmedos o
mojados. Procure que el área de trabajo esté
bien iluminada (250 - 300 Lux). No utilice la
herramienta donde exista riesgo de incendio o
explosión, p. ej. en la proximidad de líquidos o
gases inflamables.
3 Mantenga alejados a los niños.
No permita que niños, otras personas o
animales se acerquen al área de trabajo ni
toquen la herramienta o el cable de corriente.
4 Vista ropa de trabajo apropiada.
No lleve vestidos anchos ni joyas. Estos
podrían ser atrapados por piezas en
movimiento. Si tiene el pelo largo, manténgalo
recogido y cubierto. Cuando trabaje en
ambientes externos utilice preferentemente
guantes y calzado antideslizante apropiados.
5 Protección personal
Utilice siempre gafas de protección. Utilice una
mascarilla si el trabajo ejecutado produce polvo
u otro tipo de partículas que puedan ser
inhaladas. Si esas partículas están a
unatemperatura considerablemetne caliente
utilice también un delantal de trabajo. Lleve
puesta siempre la protección auditiva.
6 Protéjase contra las descargas eléctricas.
Evite el contacto del cuerpo con las superficies
conectadas a tierra (p. ej. tuberías, radiadores,
cocinas eléctricas y refrigeradores).
Para aplicaciones de uso extremas (p. ej.
humedad elevada, formación de polvo
metálico, etc.), se puede mejorar la seguridad
eléctrica intercalando un transformador de
separación o un disyuntor con derivación a
tierra (FI).
7 No intente realizar demasiadas cosas al
mismo tiempo
Mantenga un apoyo firme sobre el suelo y
conserve el equilibrio en todo momento.
8 Esté siempre alerta
Concéntrese en lo que esté haciendo. Use el
sentido común. No maneje la herramienta
cuando esté cansado.
9 Sujete bien la pieza de trabajo
Utilice abrazaderas o un torno para sujetar la
pieza de trabajo. Es más seguro que sujetarla
con la mano y le permite utilizar ambas manos
para manejar la herramienta.
10 Conecte los accesorios para la extracción
de polvo.
Si se suministran adaptadores para la conexión
de accesorios extractores y para el
almacenamiento del polvo, asegúrese de que
conectarlos y utilizarlos adecuadamente.
11 Retire las llaves de maniobra
Antes de poner la herramienta en marcha,
asegúrese de que las llaves y utensilios de
reglaje hayan sido retirados.
12 Cables alargadores
Compruebe que el cable alargador no presente
despecfectos antes de utilizarlo. Al utilizar las
herramientas en exteriores, utilice
exclusivamente aquellos cables prolongadores
diseñados para estas condiciones.
13
ESPAÑOL
13 Utilice la herramienta adecuada.
En este manual, se indica para qué uso está
destinada cada herramienta. No utilice
herramientas o dispositivos acoplables de baja
potencia para ejecutar trabajos pesados. La
herramienta funcionará mejor y con mayor
seguridad si se utiliza de acuerdo con sus
características técnicas. No fuerce la
herramienta.
Atención! El uso de otros accesorios,
adaptadores, o la propia utilización de la
herramienta en cualquier forma que no sea la
recomendada en este manual de instrucciones
puede presentar riesgo de lesiones a los
usuarios.
14 Compruebe que no haya piezas averiadas.
Antes de utilizarla, compruebe cuidadosamente
que la herramienta y el cable de corriente no
presenten desperfectos. Compruebe que no
existan piezas móviles mal alineadas o
atascadas, piezas quebradas, protectores o
interruptores dañados e interruptores o
cualquier otro condicionante que pueda afectar
al funcionamiento correcto de la herramienta.
Asegúrese de que la herramienta puede
funcionar adecuadamente y cumplir con el
cometido para el que ha sido diseñada. No use
la herramienta si hay alguna pieza defectuosa
o averiada. No utilice la herramienta si no es
posible apagar y encender el interruptor.
Encargue al servicio técnico autorizado que
repare o sustituya las piezas defectuosas o
averiadas. Jamás intente repararla usted
mismo.
15 Desconecte la herramienta.
Desconecte la herramienta y no la pierda de
vista hasta que haya dejado de funcionar
completamente. Desenchufe la herramienta
cuando no la esté utilizando, antes de sustituir
piezas, accesorios o acoplamientos, y antes de
efectuar revisiones.
16 Evite ponerla en funcionamiento
involuntariamente.
No sostenga la herramienta con un dedo en el
interruptor. Asegúrese de que la herramienta
esté apagada cuando la enchufe.
17 No someta el cable de alimentación a
presión innecesaria.
No sostenga nunca la herramienta por el cable.
14
Nunca tire del cable para desconectarlo del
enchufe. Proteja el cable de las fuentes de
calor, del aceite y de las aristas vivas.
18 Guarde las herramientas que no utilice.
Las herramientas eléctricas que no se utilizen
deben estar guardadas en un lugar seco,
cerrado y fuera del alcance de los niños.
19 Tenga cuidado al realizar labores de
mantenimiento.
Mantenga sus herramientas afiladas y limpias
para trabajar mejor y de forma más segura.
Siga las instrucciones de mantenimiento y
sustitución de accesorios. Mantenga los mandos
y conmutadores secos, limpios y libres de
aceite y grasa.
20 Reparaciones
Esta herramienta eléctrica cumple con las
reglas de seguridad en vigor. Haga reparar su
herramienta en Centros de Servicio BTI. Las
reparaciones deben llevarse a cabo por
personal cualificado, utilizando piezas de
recambio originales.
Caso contrario podría provocar situaciones de
riesgo considerable para el usuario.
Normas de seguridad adicionales para
amoladoras
• La amoladora se ha diseñado para el amolado
y corte de mampostería y acero.
•
•
•
•
•
No corte ni amole metales de poca
densidad con un contenido en
magnesio superior al 80%, ya que este
tipo de metales son inflamables.
No utilice accesorios distintos de las muelas y
discos de corte reforzados con fibra.
Utilice exclusivamente muelas y discos de
corte recomendados por el fabricante.
La velocidad máxima de la muela o del disco
de corte debe ser siempre igual o superior a la
velocidad en vacío impresa en la placa de
características de la herramienta.
No corte piezas que requieran una profundidad
máxima de corte superior a la del disco de
corte.
No utilice muelas o discos de corte que no se
ajusten a las dimensiones indicadas en la
documentación técnica. No utilice
espaciadores para encajar el disco en el eje.
ESPAÑOL
• Examine las muelas y los discos de corte antes
de cada uso. No utilice discos desportillados,
agrietados o con otros defectos.
• Si dispone de ellos, utilice discos abrasivos al
encajar el disco en el eje.
• Cuando instale un disco con orificio roscado,
asegúrese de que la rosca sea lo
suficientemente larga para recibir el eje.
• Compruebe que la muela o el disco de corte
esté correctamente instalado antes del uso.
• Ponga en marcha la herramienta sin carga en
una posición segura durante 30 segundos como
mínimo. Si se produce una vibración excesiva o
existe algún otro defecto, pare la herramienta y
examínela para descubrir la causa.
• No utilice esta herramienta sin el protector en
su sitio.
• Compruebe que la pieza trabajada esté
debidamente apoyada.
• No utilice la herramienta cerca de líquidos
inflamables, gases o residuos. Las chispas o
astillas calientes procedentes de los cepillos
mecánicos de corte o ruptura pueden prender
los materiales combustibles.
• No utilice la herramienta mientras se encuentre
en línea con el disco. No permita que otras
personas se acerquen el lugar de trabajo.
• No utilice discos de corte para el amolado
lateral.
• No utilice el bloqueo del eje mientras la
herramienta está en funcionamiento.
• Tenga cuidado al apagar la herramienta, ya
que la muela seguirá girando durante un breve
periodo.
• Almacene siempre las muelas y los discos de
corte en lugares secos.
Etiquetas sobre la herramienta
En la herramienta se indican los siguientes
pictogramas:
Antes de usar, leer el manual de
instrucciones
Lleve gafas de protección
Use protección acústica
Verificación del contenido del embalaje
El paquete contiene:
1 Amoladora angular
1 Protector
1 Empuñadura lateral
1 Conjunto de bridas
1 Llave de dos clavijas
1 Manual de instrucciones
1 Dibujo despiezado
• Compruebe si la herramienta, piezas o
accesorios han sufrido algún daño durante el
transporte.
• Tómese el tiempo necesario para leer y
comprender este manual antes de utilizar la
herramienta.
Descripción (fig. A)
Esta amoladora angular ha sido diseñada para
realizar amolados o cortes profesionales.
1 Interruptor de marcha/parada
2 Ruedecilla de control de velocidad
(BTI-WKS 125 E)
3 Inmovilizador del husillo
4 Protector
5 Empuñadura lateral
BTI-WKS 125 E - Arranque suave
El arranque suave permite evitar el shock inicial
que suele producirse a la puesta en marcha.
Esta característica resulta ser de útilidad cuando
se trabaja en espacios restringidos.
Seguridad eléctrica
El motor eléctrico ha sido diseñado para un solo
voltaje. Compruebe siempre que el voltaje de la
red corresponde al valor indicado en la placa de
características.
Su herramienta BTI tiene doble
aislamiento, conforme a la norma
EN 50144; por consiguiente, no se
requiere conexión a tierra.
Sustitución de cable o enchufe
Al sustituir el cable o el enchufe hágalo con sumo
cuidado: un enchufe con conectores de cobre
desprotegidos es peligroso si se conecta a una
toma de corriente activa.
15
ESPAÑOL
Utilización de un cable de prolongación
En caso de que sea necesario utilizar un cable de
prolongación, deberá ser un cable de prolongación
aprobado, adecuado para la potencia de esta
herramienta (véanse las características técnicas).
La sección mínima de conductor es de 1,5 mm2.
Si utiliza un carrete de cable, desenrolle siempre
el cable completamente.
Montaje y ajustes
Desenchufe la herramienta antes de
proceder con el montaje y los ajustes.
Montaje y desmontaje del protector (fig. B)
• Coloque la amoladora angular en una mesa,
con el eje portamuelas hacia arriba.
• Suelte el cierre (6) y sostenga el protector (4)
sobre la herramienta como se muestra en la
ilustración.
• Haga coincidir las orejetas (7) con las ranuras
(8).
• Presione el protector y gírelo hasta la posición
deseada.
• Si es necesario, aumente la fuerza de cierre
apretando el tornillo (9).
• Apriete el cierre.
• Para retirar el protector, suelte el cierre.
Nunca utilice la herramienta sin el
protector colocado en su lugar.
Montaje y desmontaje de una muela o un disco
de corte (fig. C1 & C2)
• Coloque la herramienta en una mesa, con el
protector hacia arriba.
• Encaje la brida interior (10) correctamente en
el eje (11) (fig. C1).
• Coloque el disco (12) sobre la brida (10).
Cuando instale un disco con el centro elevado,
asegúrese de que el centro elevado (13) quede
hacia la brida (10).
• Enrosque la brida exterior (14) en el eje (11) (fig.
C2):
- el aro de la brida (14) debe quedar hacia el
disco cuando se instala una muela (A);
- el aro de la brida (14) debe quedar hacia el
lado contrario al disco cuando se instala un
disco de corte (B);
16
• Presione el bloqueo del eje (3) y haga girar el
eje (11) hasta que encaje en su posición.
• Apriete la brida (14) con la llave doble para
tuercas suministrada.
• Suelte el bloqueo del eje.
• Para retirar el disco, afloje la brida (14) con la
llave doble para tuercas.
No utilice el disco si está dañado.
Montaje de un cepillo de alambre esférico
• Enrosque el cepillo de alambre esférico
directamente sobre el eje portamuelas sin
utilizar ni el separador ni la brida conducida.
Montaje y extracción de la almohadilla de
soporte de goma (fig. D)
La almohadilla de soporte de goma puede
solicitarse como accesorio opcional.
• Retire el protector de la herramienta.
• Presione la almohadilla de soporte (15) sobre
el eje (11). No necesitará la brida interior.
• Coloque el disco abrasivo (16) sobre la
almohadilla.
• Atornille la brida roscada (14) en el eje
portamuelas (11).
• Presione el bloqueo del eje (4) y haga girar la
almohadilla hasta que encaje en su posición.
• Apriete la brida (14) con la llave doble para
tuercas suministrada.
• Suelte el bloqueo del eje.
• Para retirar el disco, afloje la brida (14) con la
llave doble para tuercas.
Montaje de la empuñadura lateral (fig. E)
• Atornille con fuerza la empuñadura lateral (5)
en uno de los orificios (17) de cualquiera de los
lados de la caja de engranajes.
Instrucciones para el uso
• Respete siempre las instrucciones de
seguridad y las normas de aplicación.
• Asegúrese de que todos los materiales
que se vayan a amolar o cortar estén
sujetos en su posición.
• Sólo se debe ejercer una ligera presión
sobre la herramienta. No ejerza presión
ESPAÑOL
lateral sobre el disco.
• Evite la sobrecarga. En caso de
calentamiento de la herramienta,
hágala funcionar unos minutos sin
carga.
Antes de trabajar:
• Montar el protector adecuado y un disco o una
muela. No use discos o muelas excesivamente
desgastados.
• Asegúrese de que las bridas interior y exterior
estén correctamente instaladas.
• Asegúrese de que el disco o la muela gira en
el sentido indicado por las flechas en el
accesorio y la herramienta.
Encendido y apagado (fig. A)
• Para poner en marcha la herramienta, presione
el interruptor on/off (1).
• Para trabajar de manera continua, presione el
interruptor on/off hacia adelante.
• Para parar la herramienta, suelte el
conmutador. Para parar la herramienta en
modo de funcionamiento continuo, presione la
parte trasera del interruptor.
No encienda o apague la herramienta
mientras esté en posición de carga.
Consulte a su proveedor si desea información
más detallada sobre los accesorios apropiados.
limpie el exterior con regularidad utilizando un
paño suave.
Herramientas desechadas y el medio
ambiente
Lleve la herramienta vieja a un Centro de Servicio
BTI, donde será eliminada sin efectos
perjudiciales para el medio ambiente.
GARANTÍA Y SERVICIO
Todas los productos de BTI han sido sometidos
a extensas pruebas antes de salir de la fábrica.
Sin embargo, en el caso de que el producto
necesitase ser reparado, llévalo a un centro de
servicio BTI.
Si su producto BTI presenta algún defecto
debido a fallos de materiales o mano de obra en
los 12 meses siguientes a la fecha de compra,
le garantizamos la sustitución gratuita de todas
las piezas defectuosas siempre y cuando:
• El producto no haya sido utilizado
inadecuadamente.
• No se haya intentado su reparación por parte
de una persona no autorizada.
• Se presente la prueba de compra.
Mantenimiento
Su herramienta eléctrica BTI ha sido diseñada
para funcionar mucho tiempo con un mínimo de
mantenimiento. El funcionamiento satisfactorio
depende del buen cuidado de la herramienta y de
una limpieza frecuente.
Lubricación
Su herramienta eléctrica no requiere lubricación
adicional.
Limpieza
Evite que se obturen las ranuras de ventilación y
17
PORTUGUÊS
REBARBADORA BTI-WKS 115/
BTI-WKS 125 E
Parabéns!
Escolheu uma ferramenta BTI. Muitos anos de experiência, um desenvolvimento contínuo de produtos e
o espírito de inovação fizeram da BTI um dos parceiros mais fiáveis para os utilizadores profissionais.
Dados técnicos
Voltagem
Potência absorvida
Velocidade em vazio
Diâmetro do disco
Diâmetro do veio
Peso
BTI-WKS 115
230
800
10.000
115
M14
kg 1,7
BTI-WKS 125 E
230
1.400
2.800-10.000
125
M14
1,8
V
W
min-1
mm
Fusíveis
Ferramentas de 230 V 10 Ampéres
Os seguintes símbolos são usados neste manual:
Indica risco de ferimentos, perda de
vida ou danos à ferramenta no caso do
não-cumprimento das instruções deste
manual.
Declaração CE de conformidade
BTI-WKS 115 / BTI-WKS 125 E
A BTI declara que estas ferramentas eléctricas
foram concebidas em conformidade com 98/37/
CEE, 89/336/CEE, 73/23/CEE, EN 50144,
EN 55014-2, EN 55014-1, EN 61000-3-2 &
EN 61000-3-3.
Indica tensão eléctrica.
Perigo de incêndio.
Para mais informações, quieira consultar a BTI no
endereço abaixo ou a parte de trás do presente
manual.
De acordo com as Directivas 86/188/CEE &
98/37/CEE da Comunidade Europeia, o nível de
potência sonora, medido de acordo com a
EN 50144, é:
LpA
(pressão sonora)
LWA (potência sonora)
dB(A)*
89,9
dB(A)
97,9
* junto ao ouvido do operador
Use protectores auditivos.
18
PORTUGUÊS
Valor médio quadrático ponderado em frequência
de aceleração conforme à EN 50144:
< 2,5 m/s2
U. Delz
G. Hub
BTI Befestigungstechnik GmbH & Co. KG
D-74653 Ingelfingen
Instruções de segurança
Quando usar ferramentas eléctricas, cumpra
sempre os regulamentos de segurança
aplicáveis no seu país para reduzir o risco de
incêndio, de choque eléctrico e de ferimentos.
Leia todo o manual atentamente antes de
utilizar a ferramenta.
Guarde este manual para futura referência.
Instruções gerais
1 Mantenha a área de trabalho arrumada.
Mesas e áreas de trabalho desarrumadas
podem provocar acidentes.
2 Cuide do ambiente da área de trabalho
Não exponha a ferramenta à chuva Não utilize
a ferramenta em situações em que haja
humidade ou água. Mantenha a área de
trabalho bem iluminada (250 - 300 Lux). Não
utilize a ferramenta onde haja risco de fogo ou
explosão, como por exemplo na presença de
líquidos ou gases inflamáveis.
3 Mantenha as crianças afastadas.
Não permita que crianças, visitantes ou
animais aproximem-se da área de trabalho ou
que toquem a ferramenta ou o cabo de força.
4 Vista-se de maneira apropriada
Não use vestuário largo nem jóias, pois podem
prender-se numa peça móvel. Cubra o cabelo
se tiver cabelo comprido. Ao trabalhar ao ar
livre, de preferência use luvas adequadas e
calçados anti-derrapantes.
5 Protecção pessoal
Sempre use óculos de protecção. Utilize uma
máscara de protecção para o rosto ou antipoeira sempre que as operações possam
produzir poeira ou partículas que voem.
Caso tais partículas sejam consideravelmente
quentes, use também um avental resistente ao
calor. Use sempre protectores auriculares.
6 Cuidado com choques eléctricos
Evite o contacto directo com superfícies
ligadas à terra (p.ex. tubos, radiadores, fogões,
frigoríficos). Quando usar a ferramenta em
condições extremas tais como alto grau de
humidade ou ao trabalhar com soldaduras,
a segurança eléctrica pode ser melhorada com
a colocação de um transformador de
isolamento ou disjuntor de fuga de terra (FI).
7 Verifique a sua posição
Mantenha-se sempre bem posicionado e em
equilíbrio.
8 Esteja atento
Preste atenção no que faz. Use o bom senso.
Não utilize ferramentas quando estiver
cansado.
9 Segure firmemente a peça de trabalho
Use grampos ou um torno para segurar a peça.
É mais seguro e permite manter as duas mãos
livres para trabalhar.
10 Conecte o equipamento de extracção de pó
Caso sejam fornecidos dispositivos para a
extracção e colecta de pó, assegure-se de que
os mesmos sejam correctamente conectados e
utilizados.
11 Retire as chaves de ajuste
Verifique sempre se as chaves de ajuste e
chaves inglesas foram retiradas da ferramenta
antes de utilizá-la.
12 Cabos de extensão
Antes de iniciar o uso, verifique o estado do
cabo de extensão e substitua-o se estiver
danificado. Quando usar a ferramenta ao ar
livre, utilize somente cabos de extensão
apropriados para tal e correctamente rotulados.
13 Use a ferramenta apropriada.
Neste manual consta as aplicações da
ferramenta. Não force pequenas ferramentas
ou acessórios para que efectuem o trabalho
duma ferramenta forte. A ferramenta trabalhará
melhor e de uma maneira mais segura se for
19
PORTUGUÊS
utilizada para o fim indicado. Não force a
ferramenta.
Aviso! O uso de qualquer acessório ou da
própria ferramenta para realizar quaisquer
operações além das recomendadas neste
manual de instruções pode causar riscos de
ferimento.
14 Verifique se há peças danificadas
Antes do uso, verifique cuidadosamente se a
ferramenta e o cabo de força não estão
danificados. Verifique se as peças móveis
estão alinhadas e engatadas, se há alguma
peça partida, se as protecções e os
interruptores estão danificados, bem como
quaisquer outras condições que possam
afectar o funcionamento da ferramenta.
Assegure-se de que a ferramenta esteja a
funcionar correctamente e a desempenhar as
funções para as quais foi projectada.
Não utilize a ferramenta se houver alguma
peça defeituosa. Não utilize a ferramenta se o
interruptor não funcionar para ligá-la ou desligála. Providencie para que um técnico autorizado
BTI efectue a troca de quaisquer peças
danificadas ou defeituosas. Nunca tente
efectuar reparos por sua própria conta.
15 Desconecte a ferramenta
Desligue a ferramenta e aguarde até que
cesse todo movimento antes de afastar-se
dela. Desconecte a ferramenta quando não
estiver em uso, antes de trocar quaisquer
peças ou acessórios e antes de realizar a
manutenção.
16 Evite o accionamento involuntário
Não transporte a ferramenta com um dedo
sobre o interruptor. Certifique-se de que a
ferramenta esteja desligada antes de conectála.
17 Não force o cabo eléctrico
Nunca transporte a ferramenta pelo cabo.
Nunca puxe o cabo para retirar o conector da
tomada. Proteja o cabo contra o calor e evite o
contacto com óleo e objectos cortantes.
18 Guarde as ferramentas que não estiverem
em uso
Guarde as ferramentas que não estiverem em
uso em lugar seco. Feche-as com segurança,
fora do alcance das crianças.
20
19 Cuide das suas ferramentas com atenção
Para um desempenho melhor e mais seguro,
mantenha as ferramentas em boas condições
e limpas. Siga as instruções para manutenção
e troca de acessórios. Mantenha todas as
alavancas e interruptores secos, limpos e livres
de óleo e graxa.
20 Reparos
Esta ferramenta satisfaz as normas de
segurança relevantes. Providencie para que
um técnico autorizado BTI conserte sua
ferramenta. Os reparos devem ser realizados
somente por pessoas qualificadas e as peças
de reposição devem ser originais. A não
observância disso poderá resultar em perigos
consideráveis para os utilizadores.
Normas de segurança adicionais parar discos
de rebarbar
• O seu disco de rebarbar foi concebido para
rebarbar e cortar alvenaria e aço.
•
•
•
•
•
•
•
Não corte nem rebarbe metais leves
com conteúdo de magnésio superior a
80% pois este tipo de metais é
inflamável.
Não utilize outros acessórios que não sejam os
discos de rebarbar reforçados com fibra e os
discos de corte.
Utilize apenas os discos de rebarbar e os
discos de corte recomendados pelo fabricante.
A velocidade concedida do disco de rebarbar
ou disco de corte deve ser sempre igual ou
superior à velocidade em vazio impressa na
placa de identificação da ferramenta.
Não corte peças de trabalho que exijam uma
profundidade máxima de corte que exceda a
do disco de corte.
Não utilize discos de corte ou de rebarbar que
não contenham as dimensões estabelecidas
nos dados técnicos. Não utilize espaçadores
para ajustar o disco no fuso.
Inspeccione os discos de corte e de rebarbar
antes de cada utilização. Não utilize discos
lascados, rachados ou com outros danos.
Se necessário, assegure-se de que são
utilizados talões quando o disco é colocado no
fuso.
PORTUGUÊS
• Sempre que aplicar um disco com o orifício
roscado, assegure-se que a fenda é comprida
o suficiente para aceitar o fuso.
• Assegure-se de que o disco de rebarbar ou de
corte está correctamente instalado antes da
sua utilização.
• Deixe a ferramenta funcionar em vazio numa
posição segura pelo menos durante 30
segundos. Caso haja demasiada vibração ou
ocorra qualquer outra falha, pare a ferramenta
e procure a causa.
• Não opere esta ferramenta sem ter as
protecções no lugar.
• Verifique se a peça a trabalhar está
correctamente apoiada.
• Não opere a ferramenta perto de poeira,
gases ou líquidos inflamáveis. Faíscas ou
lascas quentes provenientes de corte ou de
descarga eléctrica de escovas motoras podem
incendiar materiais combustíveis.
• Não opere a ferramenta enquanto esta estiver
alinhada com o disco. Mantenha as outras
pessoas afastadas da área de trabalho.
• Não utilize os discos de corte para rebarbar
lados.
• Não opere o botão de travamento do fuso com
a ferramenta ligada.
• Não se esqueça que depois de desligar a
ferramenta a roda continua a rodar durante
alguns segundos.
• Guarde sempre os discos de rebarbar e de
corte em local seco.
Etiquetas da ferramenta
Aparece o seguinte na ferramenta:
Leia o manual de instruções antes
de usar
Utilize óculos de protecção
Utilize protecções auriculares
Verificação do conteúdo da embalagem
A embalagem contém:
1 Rebarbadora
1 Resguardo
1
1
1
1
1
Punho lateral
Flange
Chave de dois pinos
Manual de instruções
Vista dos componentes destacados
• Verifique se a ferramenta, as peças ou os
acessórios apresentam sinais de danos que
possam ter ocorrido durante o transporte.
• Antes de utilizar a ferramenta, dedique o
tempo necessário à leitura e compreensão
deste manual.
Descrição (fig. A)
A sua rebarbadora foi concebida para aplicações
profissionais de rebarbar e de corte.
1 Interruptor on/off
2 Indicador do controlo de velocidade
(BTI-WKS 125 E)
3 Dispositivo de bloqueio do veio
4 Resguardo
5 Punho lateral
BTI-WKS 125 E - Função de arranque suave
A função de arranque suave permite que a
velocidade aumente lentamente para evitar o
contragolpe quando é posta em funcionamento.
Esta função torna-se particularmente útil quando
se trabalha em espaços confinados.
Segurança eléctrica
O motor eléctrico foi concebido para uma única
tensão. Verifique sempre se a tensão da rede
corresponde à voltagem indicada na placa de
identificação.
A sua ferramenta BTI tem duplo
isolamento em conformidade com
o estipulado na norma EN 50144,
não sendo, por isso, necessária uma
ligação à terra.
Substituição do cabo ou ficha
Ao substituir o cabo ou ficha, elimine-os de forma
segura; uma ficha com condutores de cobre a
descoberto é perigosa quando entra em contacto
com uma tomada com corrente.
21
PORTUGUÊS
Extensões
Se fôr necessário um fio de extensão, use um
cabo especial, conveniente para a corrente desta
ferramenta (Veja os dados técnicos). A dimensão
mínima do condutor é 1,5 mm2.
No caso de se usar uma bobina, desenrole o cabo
todo.
Montagem e afinação
Antes da montagem de acessórios e
da afinação retire sempre a ficha da
tomada.
Montagem e remoção do resguardo (fig. B)
• Coloque a rebarbadora sobre uma mesa, com
o veio para cima.
• Liberte o botão de travamento (6) e segure no
resguardo (4) por cima da ferramenta como
mostrado.
• Alinhe as linguetas (7) com as fendas (8).
• Carregue no resguardo e rode-o até à posição
desejada.
• Se necessário, aumento a força de fixação
apertando o parafuso (9).
• Aperte o botão de travamento.
• Para remover o resguardo, solte o botão de
travamento.
Nunca utilize a ferramenta sem o
resguardo.
Instalação e remoção de um disco de rebarbar
ou de corte (fig. C1 & C2)
• Coloque a ferramenta sobre uma mesa, com o
resguardo para cima.
• Coloque a flange interna (10) correctamente no
veio (11) (fig. C1).
• Coloque o disco (12) na flange (10). Aquando
da colocação de um disco com um centro
levantado, certifique-se de que o centro
levantado (13) fica virado para a flange (10).
• Aparafuse a flange externa (14) no veio (11)
(fig. C2):
- o anel na flange (14) deve ficar virado para o
disco aquando da colocação de um disco de
rebarbar (A);
- o anel na flange (14) deve ficar afastado do
disco aquando da colocação de um disco de
22
corte (B).
• Prima o botão de travamento do veio (3) e rode
o veio (11) até que alcance a posição de
bloqueio.
• Aperte a flange (14) com a chave de dois pinos
que vem incluída.
• Solte a trava do veio.
• Para remover o disco, desaperte a flange (14)
com a chave de dois pinos.
Não utilize discos danificados.
Instalação de uma catrabucha
• Aparafuse a catrabucha de arame
directamente ao veio sem utilizar as flanges
interior e exterior.
Colocar e retirar uma flange em borracha (fig. D)
A flange em borracha está disponível como
acessório opcional.
• Retire o resguardo da ferramenta.
• Press the backing pad (15) onto the spindle
(11). A flange interior não é necessária.
• Coloque o disco abrasivo (16) na flange.
• Aparafuse a flange exterior (14) no veio (11).
• Pressione o botão de travamento do veio (15)
e rode a flange até que alcance a posição de
travamento do veio.
• Aperte a flange (14) com a chave de dois pinos
que vem incluída.
• Solte a trava do veio.
• Para remover a flange, desaperte a flange (14)
com a chave de dois pinos.
Instalação do punho lateral (fig. E)
• Aparafuse o punho lateral (5) apertando-o num
dos furos (17) colocados nos dois lados da
caixa de engrenagens.
Modo de emprego
• Cumpra sempre as instruções de
segurança e os regulamentos
aplicáveis.
• Assegure-se de que todos os materiais
a serem lixados ou cortados estejam
fixos no lugar.
PORTUGUÊS
• Aplique apenas uma leve pressão à
ferramenta. Não aplique pressão lateral
ao disco.
• Evite a sobrecarga. Caso a ferramenta
esquente, deixe-a funcionar por alguns
minutos sem carga.
Antes da operação:
• Instale o devido resguardo e disco. Não utilize
discos com um nível de desgaste excessivo.
• Certifique-se de que a flange interna e externa
estão correctamente montadas.
• Certifique-se que o disco roda na direcção das
setas indicadas no acessório ou na ferramenta.
Ligar e desligar (fig. A)
• Para ligar a máquina pressione o interruptor (1).
• Para a utilização em contínuo, avança o
interruptor.
• Para desligar a máquina, liberte o interruptor.
Para parar a ferramenta quando esta se
encontrar em operação contínua, pressione a
parte de trás do interruptor.
Não ligue ou desligue a ferramenta
quando estiver sob carga.
Para mais informações sobre os acessórios
apropriados, consulte o seu Revendedor
autorizado.
Ferramentas indesejadas e o ambiente
Leve a sua ferramenta velha a um Centro de
Assistência Técnica BTI onde ela será eliminada
de um modo seguro para o ambiente.
GARANTIA E SERVIÇO
Todos os produtos de BTI tem sido sometidos
à extensas provas antes de sair da fábrica.
Apesar disso, caso que o produto precisse ser
consertado, levem-o a um centro de serviço
BTI.
Caso que o seu produto BTI presenta algum
defeito por motivo de defeitos do material ou
mão de obra nos seguintes 12 meses da data
de compra, garantisamos-lhe a sustituição
grátis de todas as peças que têm o defeito
sempre e quando:
• O produto não tenha sido usado de maneira
não adecuada
• Não se tenha provado a sua reparação por
parte duma pessoa não autorizada
• Se presente à prova de compra
Manutenção
A sua Ferramenta Eléctrica BTI foi concebida para
funcionar durante muito tempo com um mínimo de
manutenção. O funcionamento satisfatório
contínuo depende de bons cuidados e limpeza
regular da ferramenta.
Lubrificação
A sua Ferramenta Eléctrica não precisa de
lubrificação suplementar.
Limpeza
Conserve livres as aberturas de ventilação e limpe
regularmente o corpo da máquina utilizando um
pano macio.
23
ENGLISH
ANGLE GRINDER BTI-WKS 115/
BTI-WKS 125 E
Congratulations!
You have chosen a BTI tool. Years of experience, thorough product development and innovation make
BTI one of the most reliable partners for professional power tool users.
Technical data
Voltage
(U.K. & Ireland only)
Power input
No-load speed
Wheel diameter
Spindle diameter
Weight
Fuses:
Europe
U.K. & Ireland
BTI-WKS 115
230
230/115
800
10,000
115
M14
kg 1.7
BTI-WKS 125 E
230
V
V
W
min-1
mm
230 V tools
230 V tools
1,400
2,800-10,000
125
M14
1.8
10 Amperes, mains
13 Amperes, in plugs
The following symbols are used throughout this
manual:
EC-Declaration of conformity
Denotes risk of personal injury, loss of
life or damage to the tool in case of
non-observance of the instructions in
this manual.
BTI-WKS 115 / BTI-WKS 125 E
BTI declares that these power tools have been
designed in compliance with: 98/37/EEC,
89/336/EEC, 73/23/EEC, EN 50144, EN 55014-2,
EN 55014-1, EN 61000-3-2 & EN 61000-3-3.
Denotes risk of electric shock.
For more information, please contact BTI at the
address below, or refer to the back of the manual.
Fire hazard.
Level of sound pressure according to 86/188/EEC
& 98/37/EEC, measured according to EN 50144:
LpA
(sound pressure)
LWA (acoustic power)
dB(A)*
89.9
dB(A)
97.9
* at the operator’s ear
Take appropriate measures for the
protection of hearing.
24
ENGLISH
Weighted root mean square acceleration value
according to EN 50144:
< 2.5 m/s2
U. Delz
G. Hub
BTI Befestigungstechnik GmbH & Co. KG
D-74653 Ingelfingen
Safety instructions
When using power tools, always observe the
safety regulations applicable in your country to
reduce the risk of fire, electric shock and
personal injury.
Read all of this manual carefully before
operating the tool.
Save this manual for future reference.
General
1 Keep work area clean
Cluttered areas and benches can cause
accidents.
2 Consider work area environment
Do not expose the tool to rain. Do not use the
tool in damp or wet conditions. Keep the work
area well lit (250 - 300 Lux). Do not use the tool
where there is a risk of causing fire or
explosion, e.g. in the presence of flammable
liquids and gases.
3 Keep children away
Do not allow children, visitors or animals to
come near the work area or to touch the tool or
the mains cable.
4 Dress properly
Do not wear loose clothing or jewellery, as
these can be caught in moving parts. Wear
protective hair covering to keep long hair out of
the way. When working outdoors, preferably
wear suitable gloves and non-slip footwear.
5 Personal protection
Always use safety glasses. Use a face or dust
mask whenever the operations may produce
dust or flying particles. If these particles might
be considerably hot, also wear a heat-resistant
apron. Wear ear protection at all times.
6 Guard against electric shock
Prevent body contact with earthed surfaces
(e.g. pipes, radiators, cookers and
refrigerators). When using the tool under
extreme conditions (e.g. high humidity, when
metal swarf is being produced, etc.), electric
safety can be improved by inserting an isolating
transformer or a (FI) earth-leakage circuitbreaker.
7 Do not overreach
Keep proper footing and balance at all times.
8 Stay alert
Watch what you are doing. Use common
sense. Do not operate the tool when you are
tired.
9 Secure workpiece
Use clamps or a vice to hold the workpiece. It
is safer and it frees both hands to operate the
tool.
10 Connect dust extraction equipment
If devices are provided for the connection of
dust extraction and collection facilities, ensure
that these are connected and properly used.
11 Remove adjusting keys and wrenches
Always check that adjusting keys and
wrenches are removed from the tool before
operating the tool.
12 Extension cables
Before use, inspect the extension cable and
replace if damaged. When using the tool
outdoors, only use extension cables intended
for outdoor use and marked accordingly.
13 Use appropriate tool
The intended use is described in this
instruction manual. Do not force small tools or
attachments to do the job of a heavy-duty tool.
The tool will do the job better and safer at the
rate for which it was intended. Do not force the
tool.
Warning! The use of any accessory or
attachment or performance of any operation
with this tool other than those recommended in
this instruction manual may present a risk of
personalinjury.
25
ENGLISH
14 Check for damaged parts
Before use, carefully check the tool and mains
cable for damage. Check for misalignment and
seizure of moving parts, breakage of parts,
damage to guards and switches and any other
conditions that may affect its operation.
Ensure that the tool will operate properly and
perform its intended function. Do not use the
tool if any part is damaged or defective. Do not
use the tool if the switch does not turn it on and
off. Have any damaged or defective parts
replaced by an authorised BTI repair agent.
Never attempt any repairs yourself.
15 Unplug tool
Switch off and wait for the tool to come to a
complete standstill before leaving it
unattended. Unplug the tool when not in use,
before changing any parts of the tools,
accessories or attachments and before
servicing.
16 Avoid unintentional starting
Do not carry the tool with a finger on the switch.
Be sure that the tool is switched off before
plugging in.
17 Do not abuse cord
Never carry the tool by its cord. Never pull the
cord to disconnect from the socket. Keep the
cord away from heat, oil and sharp edges.
18 Store idle tools
When not in use, tools must be stored in a dry
place and locked up securely, out of reach of
children.
19 Maintain tools with care
Keep the tools in good condition and clean for
better and safer performance. Follow the
instructions for maintenance and changing
accessories. Keep all handles and switches
dry, clean and free from oil and grease.
20 Repairs
This tool is in accordance with the relevant
safety regulations. Have your tool repaired by
an authorised BTI repair agent. Repairs should
only be carried out by qualified persons using
original spare parts; otherwise this may result
in considerable danger to the user.
•
•
•
•
•
•
•
•
•
•
•
•
•
•
•
•
•
Additional safety rules for grinders
• Your grinder has been designed for grinding
and cutting masonry and steel.
26
•
Do not cut or grind light metal with a
magnesium content exceeding 80%
since this type of metal is flammable.
Do not use any accessories other than fibre
reinforced grinding and cutting discs.
Use the grinding and cutting discs
recommended by the manufacturer only.
The max. allowable speed of the grinding wheel
or cutting disc must always be equal to or
greater than the no-load speed of the tool
specified on the nameplate.
Do not cut workpieces requiring a maximum
depth of cut exceeding that of the cutting disc.
Do not use grinding and cutting discs that do
not conform to the dimensions stated in the
technical data. Do not use any spacers to
make a disc fit onto the spindle.
Inspect grinding and cutting discs before each
use. Do not use chipped, cracked or otherwise
defective discs.
If provided, ensure that blotters are used when
the disc is fitted onto the spindle.
When applying a threaded hole disc, ensure that
the thread is long enough to accept the spindle.
Ensure that the grinding or cutting disc is
mounted correctly before use.
Let the tool run at no-load in a safe position for
at least 30 seconds. If there is a considerable
vibration or if any other defect occurs, stop the
tool and check it to determine the cause.
Do not operate this tool without the guard in
place.
Check that the workpiece is properly
supported.
Do not operate the tool near flammable liquids,
gases or dust. Sparks or hot chips from cutting
or arcing motor brushes may ignite combustible
materials.
Do not operate the tool while standing in line
with the disc. Keep other persons away from
the work area.
Do not use cutting discs for side grinding.
Do not operate the spindle lock while the tool is
running.
Beware that after switching off the tool the
wheel continues to rotate for a short period.
Always store grinding and cutting discs in a dry
place.
ENGLISH
Labels on tool
The following pictographs are shown on the tool:
Your BTI tool is double insulated in
accordance with EN 50144; therefore
no earth wire is required.
Read the instruction manual before use
Mains plug replacement
(U.K. & Ireland only)
Wear safety glasses
Wear ear protection
Package contents
The package contains:
1 Angle grinder
1 Guard
1 Side handle
1 Flange set
1 Two-pin spanner
1 Instruction manual
1 Exploded drawing
• Check for damage to the tool, parts or
accessories which may have occurred during
transport.
• Take the time to thoroughly read and
understand this manual prior to operation.
Description (fig. A)
• Should your mains plug need replacing and you
are competent to do this, proceed as instructed
below. If you are in doubt, contact an
authorized BTI repair agent or a qualified
electrician.
• Disconnect the plug from the supply.
• Cut off the plug and dispose of it safely; a plug
with bared copper conductors is dangerous if
engaged in a live socket outlet.
• Only fit 13 Amperes BS1363A approved plugs
fitted with the correctly rated fuse (1).
• The cable wire colours, or a letter, will be
marked at the connection points of most good
quality plugs. Attach the wires to their
respective points in the plug (see below).
Brown is for Live (L) (2) and Blue is for Neutral
(N) (4).
• Before replacing the top cover of the mains
plug ensure that the cable restraint (3) is
holding the outer sheath of the cable firmly and
that the two leads are correctly fixed at the
terminal screws.
Your angle grinder has been designed for
professional grinding and cutting applications.
1 On/off switch
2 Speed control dial (BTI-WKS 125 E)
3 Spindle lock
4 Guard
5 Side handle
BTI-WKS 125 E - Soft start feature
The soft start feature allows a slow speed build-up
to avoid an initial jerk when starting. This feature is
particularly useful when working in confined
spaces.
Electrical safety
The electric motor has been designed for one
voltage only. Always check that the power supply
corresponds to the voltage on the rating plate.
Never use a light socket.
Never connect the live (L) or neutral (N)
wires to the earth pin marked E or
.
For 115 V units with a power rating exceeding
1500 W, we recommend to fit a plug to BS4343
standard.
Using an extension cable
If an extension cable is required, use an approved
extension cable suitable for the power input of this
27
ENGLISH
tool (see technical data). The minimum conductor
size is 1.5 mm2.
When using a cable reel, always unwind the cable
completely.
Also refer to the table below.
Conductor size (mm2)
0.75
1.00
1.50
2.50
4.00
Cable rating (Amperes)
6
10
15
20
25
7.5
Voltage
115
230
Amperes
0 - 2.0
2.1 - 3.4
3.5 - 5.0
5.1 - 7.0
7.1 - 12.0
12.1 - 20.0
0 - 2.0
2.1 - 3.4
3.5 - 5.0
5.1 - 7.0
7.1 - 12.0
12.1 - 20.0
15
Cable length (m)
25 30
45
60
Cable rating (Amperes)
6
6
6
6
6
6
6
6
6
15
6
6
10 15
20
10 10
15 20
20
15 15
20 25
25
20 20
25
6
6
6
6
6
6
6
6
6
6
6
6
6
6
10
10 10
10 10
15
15 15
15 15
20
20 20
20 20
25
10
15
20
25
6
6
15
15
20
-
Assembly and adjustment
Prior to assembly and adjustment
always unplug the tool.
Mounting and removing the guard (fig. B)
• Place the angle grinder on a table, spindle up.
• Release the clamping lock (6) and hold the
guard (4) over the tool as shown.
• Align the lugs (7) with the notches (8).
• Press the guard down and rotate it to the
required position.
• If required, increase the clamping force by
tightening the screw (9).
• Tighten the clamping lock.
• To remove the guard, release the clamping
lock.
Never use the tool without the guard in
place.
28
Fitting and removing a grinding or cutting disc
(fig. C1 & C2)
• Place the tool on a table, guard up.
• Fit the inner flange (10) correctly onto the
spindle (11) (fig. C1).
• Place the disc (12) on the flange (10). When
fitting a disc with a raised center, make sure that
the raised centre (13) is facing the flange (10).
• Screw the outer flange (14) onto the spindle
(11) (fig. C2):
- the ring on the flange (14) must face towards
the disc when fitting a grinding disc (A);
- the ring on the flange (14) must face away
from the disc when fitting a cutting disc (B).
• Press the spindle lock (3) and rotate the
spindle (11) until it locks in position.
• Tighten the flange (14) with the two-pin
spanner supplied.
• Release the spindle lock.
• To remove the disc, loosen the flange (14) with
the two-pin spanner.
Do not use a damaged disc.
Fitting a wire cup brush
• Screw the wire cup brush directly onto the
spindle without using the spacer and threaded
flange.
Mounting and removing the rubber backing
pad (fig. D)
The rubber backing pad is available as an option.
• Remove the guard from the tool.
• Press the backing pad (15) onto the spindle
(11). The inner flange is not needed.
• Position the abrasive disc (16) on the pad.
• Screw the outer flange (14) onto the spindle
(11).
• Press the spindle lock and rotate the pad (15)
until it locks in position.
• Tighten the flange (14) using the two-pin
spanner supplied.
• Release the spindle lock.
• To remove the pad, loosen the flange (14) with
the two-pin spanner.
Mounting the side handle (fig. E)
• Screw the side handle (5) tightly into one of the
holes (17) on either side of the gear case.
ENGLISH
Instructions for use
• Always observe the safety instructions
and applicable regulations.
• Ensure all materials to be ground or cut
are secured in place.
• Apply only a gentle pressure to the tool.
Do not exert side pressure on the disc.
• Avoid overloading. Should the tool
become hot, let it run a few minutes
under no load condition.
Prior to operation:
• Install the guard and appropriate disc or wheel.
Do not use excessively worn discs or wheels.
• Be sure the inner and outer flange are mounted
correctly.
• Make sure the disc or wheel rotates in the
direction of the arrows on the accessory and
the tool.
Switching on and off (fig. A)
• To run the tool, press the on/off switch (1).
• For continuous operation, press the switch
completely forward.
• To stop the tool, release the switch. To stop the
tool in continuous operation, press on the back
part of the switch.
Do not switch the tool on or off when
under load.
Consult your dealer for further information on the
appropriate accessories.
Maintenance
Cleaning
Keep the ventilation slots clear and regularly clean
the housing with a soft cloth.
Unwanted tools and the environment
Take your tool to an authorized BTI repair agent
where it will be disposed of in an environmentally
safe way.
GUARANTEE AND SERVICE
All BTI products are thoroughly tested before
leaving the factory. However, in case the
product becomes defective, please take it to
your nearest BTI service station.
If your BTI product becomes defective due to
faulty material or workmanship within 12 months
from the date of purchase, we guarantee to
replace all defective parts free of charge, or, at
our discretion, replace the unit free of charge,
provided that:
• The product has not been misused.
• Repairs have not been attempted by persons
other than our own service staff or the staff
of authorized repairers.
• Proof of purchase date is provided.
This guarantee is offered as an extra benefit
and is additional to consumers statutory rights.
Your BTI Power Tool has been designed to
operate over a long period of time with a minimum
of maintenance. Continuous satisfactory operation
depends upon proper tool care and regular
cleaning.
Lubrication
Your power tool requires no additional lubrication.
29
30
31
32
622331-00